
Среди частых вопросов пользователей, особенно после того, как они сталкиваются с тем, что какая-то из библиотек DLL отсутствует в Windows 10, Windows 11 или других версиях системы — как зарегистрировать DLL в соответствующей версии ОС.
В этой инструкции подробно о способах регистрации библиотек DLL в Windows x64 и x86 (32-бит) с помощью regsvr32.exe (и кратко о regasm.exe), о возможных нюансах и проблемах, которые могут возникнуть в процессе.
Регистрация библиотеки DLL в Windows 10, Windows 11 и предыдущих версий системы
Дальнейшие шаги описаны в предположении, что DLL, которую нужно зарегистрировать, уже находится в нужном расположении: папке C:\Windows\System32, C:\Windows\SysWOW64 или, в некоторых случаях — отдельных папках программ, к которой относится соответствующая библиотека, например, для 1С — C:\Program Files\1cv8\номер_версии\bin (или Program Files x86 в случае 32-битной версии).
Прежде чем приступить к регистрации библиотеки, учитывайте следующие моменты:
- В x64 версиях Windows 64-битные DLL хранятся в System32, а 32-битные — в SysWOW64 (у некоторых начинающих пользователей бывает обратное предположение исходя из имён папок).
- Файлы DLL x64 и x86 (32-бит) — это разные файлы. И если прямого указания на разрядность в месте загрузки файла нет, то чаще это 32-битный файл (что не мешает ему работать в x64 системе), но это не всегда так.
- Для регистрации библиотеки DLL используется системный инструмент regsvr32.exe, который также доступен в двух версиях, которые лежат в папках System32 и SysWOW64 (в случае 64-битных систем). По умолчанию при описываемых далее действиях запускается x64 версия.
- 32-битным программам и играм (по умолчанию устанавливаются в Program Files x86 в 32-битных системах) для работы нужны 32-битные DLL, не зависимо от разрядности Windows.
Сам процесс регистрации в общем случае состоит из следующих шагов:
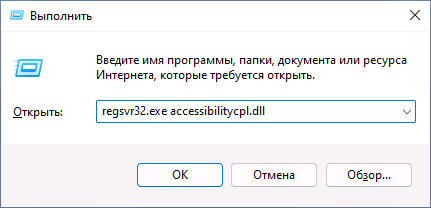
- Нажмите клавиши Win+R на клавиатуре (Win — клавиша с эмблемой Windows). Также можно нажать правой кнопкой мыши по кнопке «Пуск» в Windows 11 или Windows 10 и выбрать пункт контекстного меню «Выполнить».
- Введите команду regsvr32.exe путь_к_файлу (если путь к файлу содержит пробелы, возьмите весь путь в кавычки), например, для регистрации библиотеки DLL COMCNTR.DLL в 1С (для 64-бит) команда может иметь вид:
regsvr32.exe "C:\Program Files\1cv8\8.3.19.1150\bin\comcntr.dll"
Если DLL находится в System32, полный путь указывать не обязательно, достаточно простого имени файла, как на изображении ниже.

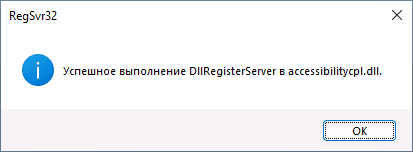
- Нажмите Ок или Enter.
- При успехе вы получите сообщение вида «Успешное выполнение DllRegisterServer в имя_файла.dll» или «Успешное выполнение DllRegisterServer и DllInstall в имя_файла.dll».

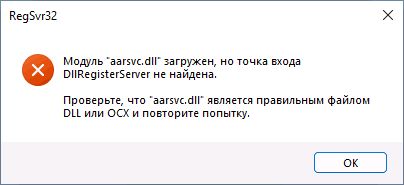
Возможна и неудача — сообщение об ошибке «Модуль dll загружен, но точка входа DllRegisterServer не найдена. Проверьте, что файл является правильным файлом DLL или OCX и повторите попытку». Подробнее об ошибке — в следующем разделе статьи.
Дополнительно: для регистрации классов из библиотек DLL .NET Framework в COM с созданием необходимых записей в реестре используется regasm.exe из .NET SDK, причем базовая команда регистрации DLL выглядит тем же образом, что и в случае с regsvr32.exe. Подробнее по использованию regasm — https://docs.microsoft.com/ru-ru/dotnet/framework/tools/regasm-exe-assembly-registration-tool.
Почему не удается зарегистрировать DLL
Ошибка при регистрации с помощью regsvr32 вида «Точка входа DllRegisterServer не найдена» говорит о том, что эта библиотека DLL не поддерживает регистрацию описанным методом. Можно попробовать использовать вариант команды:
regsvr32 /i /n путь_к_файлу.dll
но с большой вероятностью и это не поможет.
У большинства домашних пользователей такая проблема возникает при регистрации файлов DLL для игр и программ, часто не вполне лицензионных, которые сообщили, что нужный файл DLL не обнаружен или отсутствует. Причем сами библиотеки DLL обычно скачаны со сторонних сайтов (и чаще всего имеют имена начинающиеся с «vc», «msvc» или «d3d»). А решение, как правило, простое — выяснить, частью какого набора компонентов является эта DLL и установить эти компоненты с помощью их собственного установщика. Более подробно проблема и подходы к решению описаны в инструкции Точка входа DllRegisterServer не найдена — причины и возможные решения.
Видео
Надеюсь, цель достигнута, а количество вопросов, связанных с регистрацией DLL в Windows, уменьшилось.
Все способы:
- Варианты установки
- Способ 1: DLL-Files.com Client
- Способ 2: Средства системы
- Вопросы и ответы: 0
Часто можно столкнуться с ситуацией, когда программа или игра требует установки различных дополнительных DLL файлов. Эту проблему можно решить довольно легко, для этого не понадобятся особые знания или навыки.
Варианты установки
Установить библиотеку в систему можно различными способами. Есть специальные программы для выполнения данной операции, а также можно сделать это вручную. Проще говоря, в этой статье будет дан ответ на вопрос — «Куда кидать dll файлы?» после их скачивания. Рассмотрим каждый вариант по отдельности.
Способ 1: DLL-Files.com Client
Скачать DLL-Files.com Client
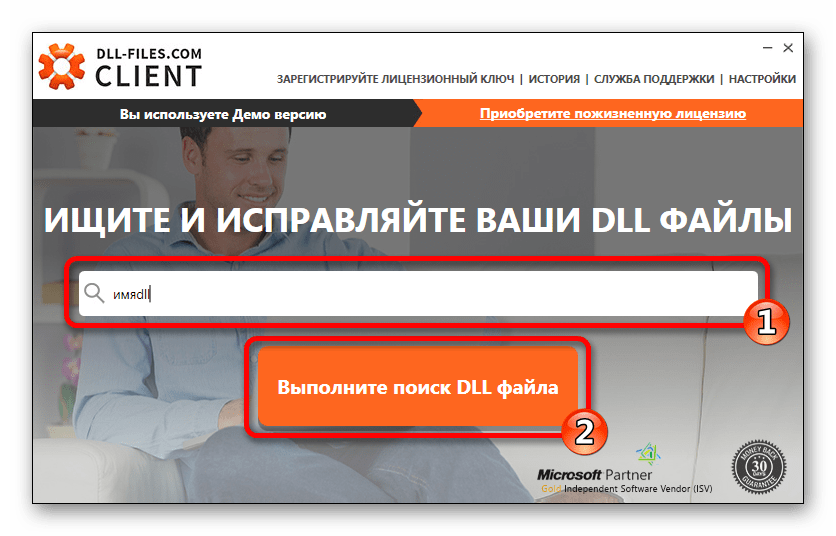
Для установки библиотеки здесь нужно произвести следующие действия:
- Ввести имя искомого файла.
- Нажать на кнопку «Выполните поиск DLL файла».
- Нажать на имя найденной библиотеки в результатах поиска.
- В открывшемся новом окне нажать на кнопку «Установить».
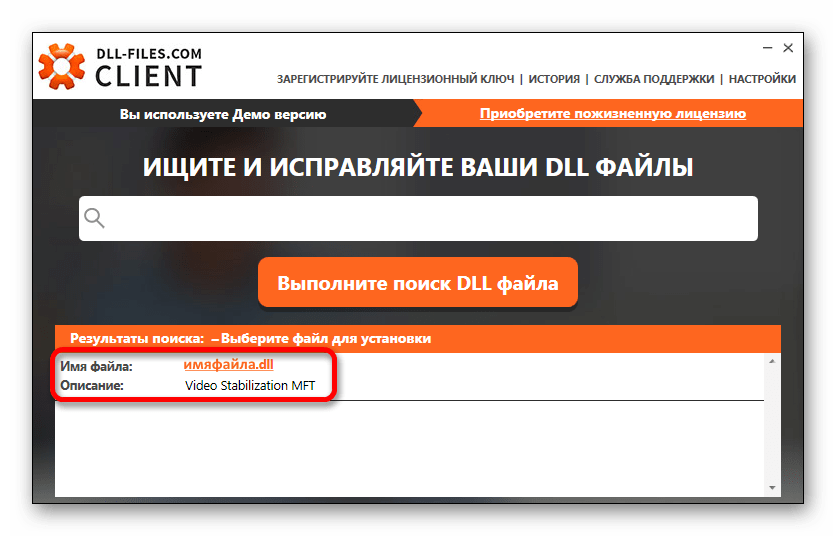

Все, ваша DLL библиотека скопирована в систему.
У программы имеется дополнительный продвинутый вид – это режим, в котором вы сможете выбрать различные версии DLL для установки. Если игра или программа требует конкретную версию файла, то можно найти её, включив этот вид в DLL-Files.com Client.
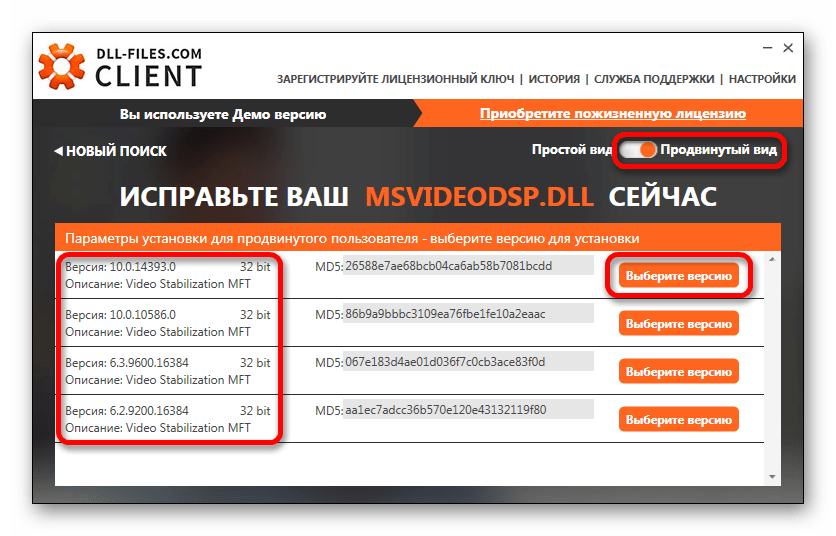
В случае, если нужно скопировать файл не в папку по умолчанию, вы нажимаете на кнопку «Выберите версию» и попадаете в окно параметров установки для продвинутого пользователя. Здесь вы производите следующие действия:
- Задаете путь, по которому будет выполнена установка.
- Нажимаете на кнопку «Установить сейчас».

Программа скопирует файл в указанную папку.
Способ 2: Средства системы
Можно установить библиотеку вручную. Для этого нужно будет скачать сам файл DLL и впоследствии просто скопировать или переместить его в папку по адресу:
C:\Windows\System32

В завершении надо сказать, что в большинстве случаев DLL файлы устанавливаются по пути:
C:\Windows\System32
64-разрядные системы могут потребовать свой путь для установки:
C:\Windows\SysWOW64
Но если вы имеете дело с операционными системами Windows 95/98/Me, то путь для установки будет таким:
C:\Windows\System
В случае Windows NT/2000:
C:\WINNT\System32
Читайте также: Регистрируем файл DLL в ОС Windows
Наша группа в TelegramПолезные советы и помощь
When it comes to installing DLL files in Windows 10, there are several recommended locations depending on the purpose and usage of the DLL file. Here are the steps to determine the appropriate location for installing DLL files:
1. System32 folder: If the DLL file is intended to be used by the operating system or critical system components, it should be installed in the System32 folder. The path to this folder is typically «C:\Windows\System32\«. However, be cautious and ensure that the DLL file is from a trusted source to avoid any security risks.
2. Program folder: For DLL files used by specific programs or applications, it is generally recommended to place them in the program’s installation folder. This helps ensure that the program can easily locate and access the DLL when needed. The program installation folder’s path usually varies depending on the software and can be found in the «Program Files» or «Program Files (x86)» directory.
3. SysWOW64 folder: If you have a 64-bit version of Windows 10, you might encounter 32-bit DLL files. In such cases, these DLL files should be installed in the SysWOW64 folder, which can be found at «C:\Windows\SysWOW64\«. This enables compatibility with 32-bit applications running on a 64-bit system.
4. Shared DLLs folder: Windows offers a shared DLL folder known as the WinSxS (Windows Side-by-Side) folder. It is primarily used for system libraries and shared components, ensuring multiple applications can utilize the same DLL without conflicts. It is not recommended to manually place DLL files in this folder unless specifically instructed by software developers.
Remember to exercise caution while installing DLL files and ensure they originate from trustworthy sources. Improper installation or utilization of DLL files can cause system instability or security vulnerabilities.
Video Tutorial: Where is DLL folder in Windows 10?
How do I install a missing DLL in Windows 10?
To install a missing DLL file in Windows 10, you can follow these steps:
1. Identify the missing DLL: Firstly, determine the specific DLL file that is missing. It is important to have the correct information to perform the installation accurately. You can typically identify the missing DLL by the error message displayed when you try to run a particular program or application.
2. Check the Recycle Bin: Sometimes, DLL files may be accidentally deleted and end up in the Recycle Bin. If that is the case, simply restore the DLL file from the Recycle Bin to its original location on your computer.
3. Use the System File Checker (SFC) tool: Windows has a built-in utility called the System File Checker that scans the system for corrupted or missing system files, including DLL files.
a. Open the Command Prompt as an administrator: Press the Windows key, type «cmd,» right-click on «Command Prompt,» and select «Run as administrator.«
b. In the Command Prompt window, type the following command and press Enter: `sfc /scannow`
c. Wait for the scan to complete: The System File Checker will automatically scan your system for missing or corrupted DLL files and other system files. It may take some time to finish the scan and repair any issues it finds.
4. Update Windows: Keeping your Windows operating system up to date is vital as updates often fix known issues and provide necessary DLL files. Make sure your Windows 10 is updated with the latest patches and updates by following these steps:
a. Press the Windows key, type «Settings,» and open the «Settings» app.
b. Click on «Update & Security.«
c. In the Windows Update section, click on «Check for updates» and allow Windows to install any available updates.
5. Download the missing DLL file from trusted sources: If the above methods didn’t resolve the issue, you can download the specific DLL file from reliable sources. Be cautious and ensure you only download DLL files from trustworthy websites to avoid malware or other security risks.
a. Search for the specific DLL file: Use a search engine to find a trusted website that offers the DLL file you need.
b. Download the DLL file: Locate the appropriate DLL file, download it, and save it to a specific folder on your computer.
c. Place the DLL file in the correct system directory: Once downloaded, locate the folder where the missing DLL should be stored (often the System32 folder), and copy the downloaded DLL file into that directory.
6. Register the DLL file: Finally, you may need to register the DLL file with Windows using the regsvr32 command. To do this:
a. Open the Command Prompt as an administrator.
b. In the Command Prompt window, type the following command and press Enter: `regsvr32 `
c. Replace « with the actual file path of the DLL file you downloaded, including the file extension.
After performing these steps, restart your computer and check if the program or application that previously displayed the missing DLL error is now working correctly. Remember to exercise caution when dealing with DLL files and only download them from reputable sources.
How do I run a DLL file in Windows 10?
To run a DLL (Dynamic Link Library) file in Windows 10, follow these steps:
1. Identify the DLL file: Confirm that you have the specific DLL file you want to run. DLL files contain functions and resources that multiple programs can use. Check if the DLL file is compatible with your version of Windows. Ensure that you have obtained the DLL file from a reputable source.
2. Place the DLL file in the appropriate location: DLL files usually need to be placed in specific folders for applications or the operating system to access them. The most common locations for DLL files are the application folder (where the program is installed) and the Windows system folder (typically C:\Windows\System32 or C:\Windows\SysWOW64 for 64-bit systems).
3. Register the DLL file (if necessary): Some DLL files require registration to work properly. To register a DLL file, you can use the regsvr32 command in the Command Prompt. Open the Command Prompt as an administrator, navigate to the folder containing the DLL file using the «cd» command, and then use the following command: regsvr32 .dll
4. Run an application that uses the DLL file: Once the DLL file is in place and registered (if needed), you can run an application that relies on it. Launch the application as you normally would, and it should automatically access and utilize the DLL file.
Note: Be cautious when working with DLL files, as incorrect handling can potentially cause system errors or compromise your computer’s security. It’s advisable to back up your system and exercise caution when obtaining and using DLL files from external sources.
Remember, running DLL files should be done cautiously and preferably with guidance from an experienced professional or trusted sources.
How do I put DLL files on my computer?
To put DLL files on your computer, you can follow these steps:
1. Identify the DLL file: First, ensure you have the DLL file you want to install on your computer. DLL files are dynamic link library files that contain code and data that multiple programs can utilize.
2. Check compatibility: Make sure the DLL file is compatible with your operating system. DLL files are specific to the version of the operating system and the software they are designed for.
3. Determine the appropriate directory: Identify the appropriate directory on your computer where the DLL file needs to be placed. Typically, DLL files are stored in the System32 or SysWOW64 folders within the Windows directory.
4. Copy the DLL file: Copy the DLL file from its current location. You can either use Windows File Explorer or the command prompt to perform this action. Ensure you have the necessary permissions to copy files in the destination folder.
5. Paste the DLL file: Navigate to the appropriate directory where you want to put the DLL file. Right-click on an empty space within the folder and select «Paste» to place the DLL file.
6. Register the DLL file (optional): In some cases, you may need to register the DLL file to make it usable by programs. To register a DLL file, open the command prompt with administrative privileges, navigate to the directory where the DLL file is located, and use the «regsvr32» command followed by the DLL file name.
7. Restart your computer: After placing the DLL file, it is recommended to restart your computer. This ensures that any changes related to the DLL file can take effect properly.
Note: It is essential to be cautious when dealing with DLL files. Ensure you download DLL files from trusted sources and always keep an updated backup of your files in case any unexpected issues arise.
How do I manually install a DLL in Windows 10?
Manually installing a DLL file in Windows 10 involves a few steps. Here’s a guide to help you through the process:
1. Identify the DLL file: Ensure you have the correct DLL file that you want to install. It’s crucial to obtain it from a reliable source or from the software’s official distribution.
2. Place the DLL file in the appropriate directory: The DLL file needs to be placed in the correct location for it to work properly. The typical directory for system DLL files is the System32 folder, located in the Windows installation folder (usually C:\Windows\System32). If it’s a user-specific DLL, you may need to put it in the corresponding application folder or in the Program Files directory.
3. Open the File Explorer: Press the Windows key + E or navigate to it via the taskbar.
4. Locate the DLL file: Use the File Explorer to navigate to the folder where you placed the DLL file.
5. Copy the DLL file: Right-click on the DLL file and select «Copy» from the context menu.
6. Navigate to the target directory: Open another File Explorer window and go to the folder where you want to install the DLL file. For system DLLs, navigate to C:\Windows\System32.
7. Paste the DLL file: Right-click inside the target directory and choose «Paste» from the context menu.
8. Administrator privileges: If prompted, grant administrative privileges to confirm the file transfer.
9. Register the DLL (optional): Certain DLL files require registration to function properly. To register a DLL, open the Command Prompt with administrative rights (press Windows key, type «Command Prompt,» right-click on it, and choose «Run as administrator«) and enter the command «regsvr32 filename.dll» (replace «filename» with the actual name of the file).
10. Confirm registration (optional): A dialog box should appear confirming that the DLL was successfully registered.
Remember that manual installation of DLL files can carry risks. It’s essential to exercise caution and ensure the file is obtained from a trusted source. If you’re unsure or want to be on the safer side, it’s advisable to consult professional assistance or use software provided by trusted developers to handle DLL installations.
How do I know if a DLL is loaded in Windows?
To determine if a DLL (Dynamic Link Library) is loaded in Windows, you can follow these steps:
1. Open the Task Manager: You can do this by right-clicking on the taskbar and selecting «Task Manager» from the menu that appears.
2. Navigate to the «Processes» or «Details» tab: This section will display a list of all the processes currently running on your system.
3. Locate the process of the application you suspect is using the DLL: Scroll through the list or use the search function to find the specific process associated with the application.
4. Check the «Modules» or «DLLs» column: In the Task Manager, you will usually find a column labeled «Modules» or «DLLs» that shows the modules loaded by each process. It displays the filenames of the DLLs that are currently loaded by the process.
5. Look for the DLL you are interested in: Scan through the DLL names in the Modules or DLLs column to find the DLL you want to check. If the DLL is present in the list, it means it is loaded by the corresponding process.
Please note that if a DLL is being dynamically loaded and unloaded by an application during its execution, it may not appear in the list of loaded modules at all times. In such cases, you might need to resort to additional tools or techniques to investigate the dynamic loading behavior of the application.
Remember, the steps provided here are based on general knowledge of Windows systems and the Task Manager interface. Depending on your specific Windows version or configuration, there could be slight variations in the steps or the names of the options presented.
How do I run a DLL directly?
Running a DLL (Dynamic Link Library) directly involves a few steps. Here’s a guide on how to do it:
1. Identify the purpose of the DLL: DLLs contain reusable code and resources that can be utilized by multiple applications. Before running a DLL, you need to determine its purpose and ensure it matches your requirements.
2. Check if the DLL is compatible: DLLs are designed to work with specific operating systems and applications. Verify if the DLL is compatible with the operating system you are using and the program you intend to use it with. Ensure you have the necessary software dependencies installed.
3. Place the DLL in the appropriate directory: Most DLLs need to be placed in specific directories for them to be detected and used by applications. These directories include the application’s working directory, system directories, or the directory where the specific application expects the DLL to be located. Consult the DLL’s documentation or the application’s documentation to determine the correct directory.
4. Register the DLL: In some cases, DLLs need to be registered before they can be used. This process involves adding the DLL’s information to the system registry. To register a DLL, open a command prompt with administrative privileges, navigate to the DLL’s location, and use the regsvr32 command followed by the DLL’s name. For example: regsvr32 mydll.dll.
5. Load the DLL in an application: Once you have ensured compatibility and placed the DLL in the correct directory, you can load and use it in an application that supports DLL integration. This typically involves writing code to import and access the functions or resources provided by the DLL. The process for loading a DLL varies depending on the programming language and framework being used.
It’s important to note that running DLLs directly should be done with caution. Ensure you obtain DLLs from trusted sources to avoid potential security risks or conflicts with your system. Additionally, be aware of any licensing restrictions or terms of use associated with the DLL you are using.
Remember to consult official documentation, relevant forums, or seek professional advice specific to the DLL you are working with for a more detailed and accurate procedure.
ВАЖНО мы настоятельно рекомендуем перед внесением любых изменений в системные файлы и настройки, в том числе при установке сторонних программ, создавать дополнительную точку восстановления, а не опытным пользователям во избежание неполадок лучше отказаться от любых изменений..
Установка DLL библиотек
DLL или dynamic-link library это файл с дополнительными ресурсами, которые могут использоваться программами и операционной системой. В DLL файлы помещают исполняемый код и другие данные нужные различным программам при их выполнении.
В разных системах местоположение этих файлов разное, поэтому я начну с ранних ОС:
— Windows 95/98 – помещаем файл в папку C:\Windows\System;
— Windows NT или 2000 – помещаем файл в папку C:\WINNT\System32;
— Windows XP, 7, 8, 10 – помещаем файл в папку для 32-х битных систем в C:\Windows\System32, а для 64-х битных в C:\Window\SysWOW64.
Иногда при попытке поместить файл в нужную папку может появится сообщение, что файл там уже есть. Возможно, что файл поврежден, либо представляет угрозу для системы, поэтому лучше заменить его другим файлом.
Как только библиотеки находятся на своих местах необходимо перезагрузить компьютер, чтобы изменения вступили в силу, а потом запустить те приложения для которых они были установлены.
Что делать, если все нужные файлы загружены, но по-прежнему не запускается, тогда можно попробовать зарегистрировать библиотеку в системе.
Регистрация библиотек DLL в Windows процесс простой и одинаков для Windows 7, 8 или 10 но делать это нужно ОБЯЗАТЕЛЬНО с правами администратора.
Первый способ
Открываем окно «Выполнить», с помощью клавиш Win+R и вводим туда команду regsvr32.exe название_файла.dll
Для примера возьмем regsvr32.exe d3dx9_27.dll у Вас название_файла будет своё
Если способ не сработал, укажите полный путь к этому файлу, то есть путь до папки, куда вы поместили DLL.
Например:
regsvr32.exe C:/Windows/system32/d3dx9_27.dll
Второй способ
Воспользуемся командной строкой, открывать её нужно обязательно от имени администратора.
Ввести похожую команду:
regsvr32.exe путь_к_файлу_dll
То есть мы выполняем все тоже самое, только в командной строке.
Третий способ
Редко используемый, но тоже рабочий, выбираете нужный dll-файл и нажимаете на нем правой кнопкой мыши, в появившемся контекстном меню выбираете пункт «Открыть с помощью» и идете в папку Windows/System32, и ищете там программу regsvr32.exe, через которую и будем открывать библиотеку.
Ошибка при регистрации DLL-файлов
Когда вы пытаетесь зарегистрировать DLL, причем, не важно каким способом, то вы можете получить ошибку, что модуль такого-то DLL несовместим с версией Windows, либо загружен.
Такие ошибки могут возникать по следующим причинам:
— Библиотеку не нужно регистрировать, потому что она не поддерживает эту функцию, либо она уже зарегистрирована в системе
— Скачанный вами файл битый, либо совершенно не относящийся к библиотекам
Решение:
— Опытные пользователи могут использовать regasm.exe
— Попробуйте скачать этот же файл, ещё раз, либо посмотрите, что это за файл и воспользуйтесь специальными установщиками DLL-файлов. Некоторые библиотеки поставляются с каким-либо программным обеспечением, например, DirectX.
— При скачивании архива антивирус мог удалить в процессе важные файлы, которые были там изначально, поэтому нужно скачать архив заново временно отключить антивирус.
Как заменить DLL-файл
Заходим в папку C:\Windows\System 32 с правами администратора, получаем полный доступ над файлом имя_файла.dll, переименовываем файл имя_файла.dll в имя_файла.dll.backup и копируем на его место измененный имя_файла.dll
Установка звука и звуковых схем на Windows
По умолчанию стандартные звуки windows находятся в папке C:\Windows\Media
Меняя тему windows, звуки применяются на те которые прописаны в теме (.theme), то есть каждый раз нужно заходить и применять звуковую схему самому в панели звука.
1. Если вы скачали архив звуков и среди них есть файл *.inf, тогда нам нужно кликнуть по нему и выбрать пункт Установить. Звуковая схема установится автоматически.
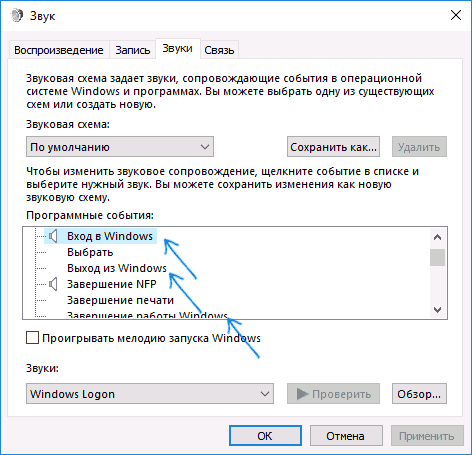
2. Вы скачали архив и в нем только звуковые файлы *.wav, в данном случаи нам нужно скопировать все звуки (можно папкой) в директорию C:\Windows\Media. Переходим в Панель управления -> Звук -> вкладка «Звуки» , кликаем по интересующему нас звуком для замены, потом «Обзор«, указываем нужный звук, «Сохранить«. Так с каждым звуком.
После того как настроите все звуки, можно сохранить звуковую схему. Для этого кликаем по кнопке «Сохранить как…«, пишем название и «ОК.»
3. Если в скачанном архиве один файл *.soundpack извлекаем его в удобное место. Тогда скачиваем программу SoundPackager, устанавливаем и запускаем. После кликаем по кнопке «Import Package«, указываем файл звуковой схемы и «Открыть«. Схема отобразится в списке программы, указываем на нее, кликаем по кнопке «Apply Package«, в открывшемся окне выбираем один из двух вариантов применения: Apply Enhanced Package (применение всех звуков которые входят в схему) или Apply Normal Package (применение упрощенной звуковой схемы, без звуков сворачивания/разворачивания окон и т.д).
Звук входа в систему можно изменить с помощью программы — Startup Sound Changer.
Установка шрифтов для windows
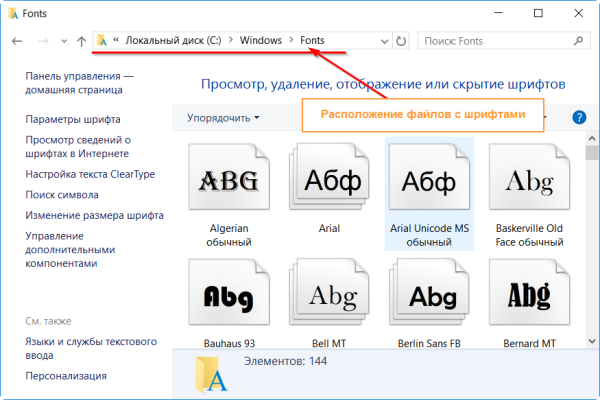
Шрифты представляют собой обычные файлы с определенным расширением. Для шрифтов, которые поддерживает Windows, расширение .ttf соответствует типу шрифта TrueType, а расширение .otf соответственно OpenType, по умолчанию папка со шрифтами windows находится C:\ Windows\ Fonts.
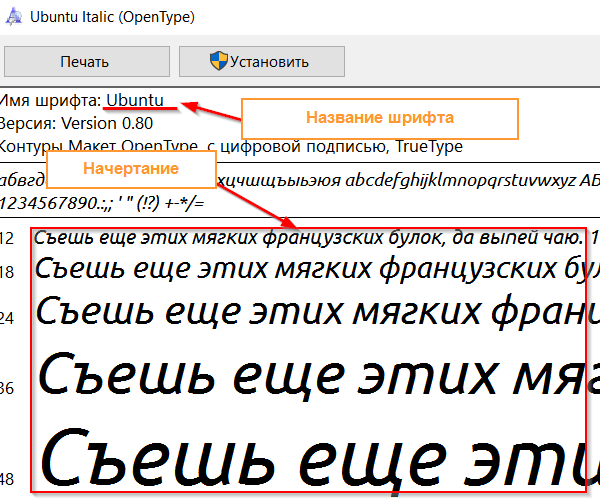
Некоторые архивы могут содержать несколько вариантов шрифта, поэтому прежде чем установить шрифт можно посмотреть как выглядит его начертание, откройте файл запустив его двойным нажатием и увидите как выглядит шрифт.
Способы установки шрифтов:
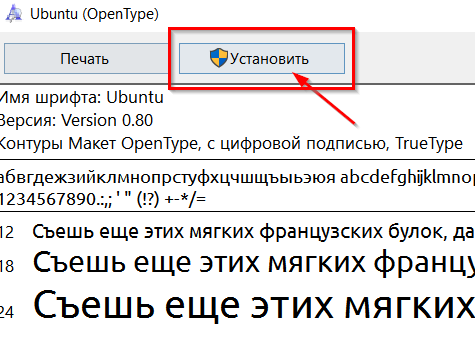
1. Прямо из окна предварительного просмотра шрифта. Для этого запустите файл как делалось ранее для просмотра и если вас устраивает шрифт, нажмите на кнопку «Установить».
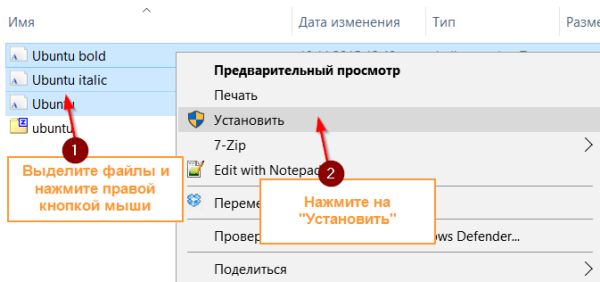
2. Установка одного или нескольких шрифтов Windows. Сначала необходимо разархивировать все файлы в одну из папок, выделите группу или конкретный шрифт, нажмите
правой
кнопкой мыши и выберите во всплывшем контекстном меню «Установить», не забывайте, что подобные манипуляции следует производить с правами администратора.
3. Просто скопировать все файлы папку: C:\ Windows\ Fonts.
Для удаления или скрытия шрифта выделите один или несколько необходимых шрифтов. В верхней части появиться список команд.
Для настройки шрифтов в windows 10 рекомендуем использовать бесплатную программу
Настройка системного шрифта
1. Для замены основного системного шрифта (Segoe UI) нужно в главном окне программы перейти в раздел Advanced Appearance Settings → System font и кликнуть по кнопке Change system font…

2. В открывшемся окне Installed fonts останется только выбрать один из установленных шрифтов и нажать на кнопку ОК. Если требуется установить уникальный шрифт, его нужно предварительно установить способом указанным выше.

3. Для применения изменений потребуется перезагрузить компьютер. Сделать это можно немедленно, прямо из окна Winaero Tweaker, кликом по кнопке Sign out now.

Для возврата к настройкам по-умолчанию необходимо снова запустить программу, перейти в раздел Advanced Appearance Settings → System font, кликнуть по ссылке Reset this page to defaults и применить изменения повторным входом в систему.
Настройка шрифта под иконками
Для изменения шрифта текста подписей иконок (значков) нужно перейти в раздел Advanced Appearance Settings → Icons и в блоке Change icons font воспользоваться кнопкой Change font... для выбора нужного шрифта. Изменения применяются кликом по кнопке Apply changes.

Настройка шрифта контекстного меню
Настройки текста контекстного меню изменяются в блоке Advanced Appearance Settings → Menus → Change menus font, принцип действий тот же.

Настройка шрифта окон сообщений
Изменить шрифт некоторых окон сообщений, всё ещё используемых в некоторых классических (Win32) программах, позволит опция Advanced Appearance Settings → Message Font.

Настройка шрифта панели состояния
Опция Advanced Appearance Settings → Status Bar Font позволит заменить шрифт панели состояния некоторых программ, таких как Блокнот, который обычно отображается в нижней части окна.

Настройка шрифта заголовков окон
Для замены шрифта в заголовках окон служит опция Advanced Appearance Settings → Windows Title Bars → Change title bar font.

ВАЖНО мы настоятельно рекомендуем перед внесением любых изменений в системные файлы и настройки, в том числе при установке сторонних программ, создавать дополнительную точку восстановления, а не опытным пользователям во избежание неполадок лучше отказаться от любых изменений..