
Содержание статьи
- Как установить Volatility на Windows
- Установка Python 3
- Установка Volatility 3 на Windows
- Таблицы символов Windows Volatility 3
- Использование Volatility 3 на Windows
- Заключение
Мы уже рассказывали про использование Volatility и рассматривали популярные плагины Volatility 2. Сегодня покажу, как установить Volatility на Windows. В сети нет хорошей инструкции, а то, что я нашел не работает.
Еще по теме: Как установить Volatility на Kali Linux
Как установить Volatility на Windows
Волатилити 3 — отличный инструмент для анализа дампа памяти или образов ОЗУ Windows 10 и 11. Я не буду рассказывать, с чем его едят, лучше сразу перейдем к установке.
Итак, для работы Volatility на Windows понадобиться:
- Volatility 3
- Python 3
- Таблицы символов Windows Volatility 3
Установка Python 3
Для работы Волатилити 3 требуется Python 3
Перейдите на официальный сайт Python и скачайте файл установки для Windows.

После скачивания, следуя инструкции, установите Python 3.
Установка Volatility 3 на Windows
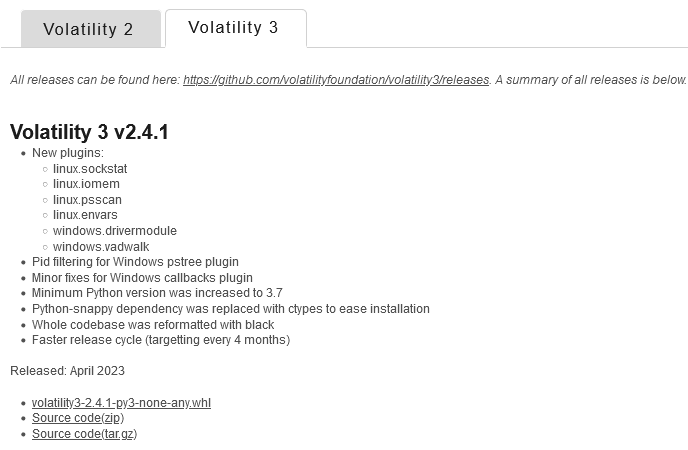
Зайдите на официальный сайт Volatility. Перейдите на вкладку Volatility 3 и скачайте последнюю версию файла Source code(zip).
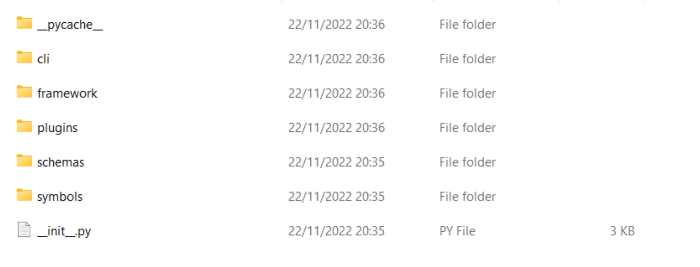
После скачивания, извлеките содержимое архива куда-нибудь на диск C:.
Таблицы символов Windows Volatility 3
Для работы модулей Windows требуются настройки таблиц символов.
Скачиваем большой архив (800мб) windows.zip и закидываем его в папку volitality3 —> symbols.
Использование Volatility 3 на Windows
Все готово к использованию.
Запустите FTK Imager или выберите другой способ создания дампа оперативной памяти Windows.
Закиньте файл дампа в туже папку.
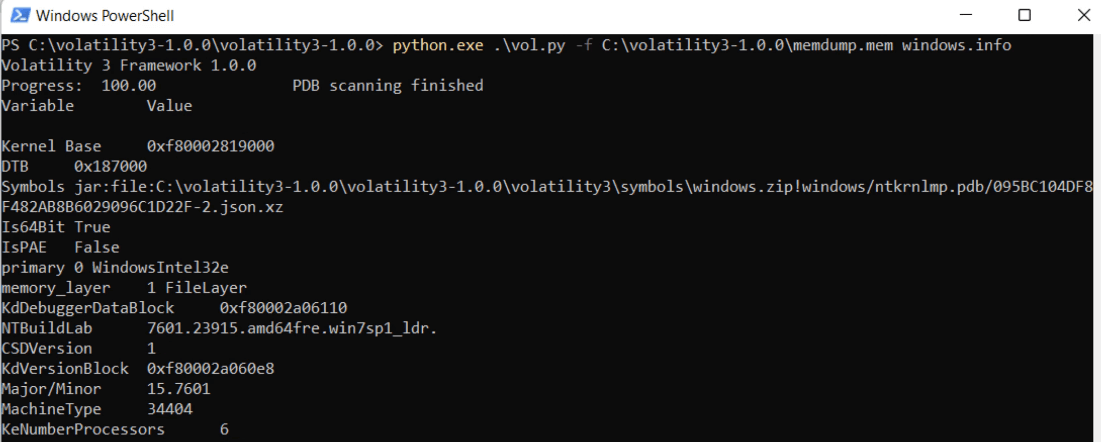
Используя PowerShell, запустите Волатилити указывая файл дампа (в моем случае, под рукой был уже готовый дамп ОЗУ Windows 7).
Пробуем модуль Windows.info:
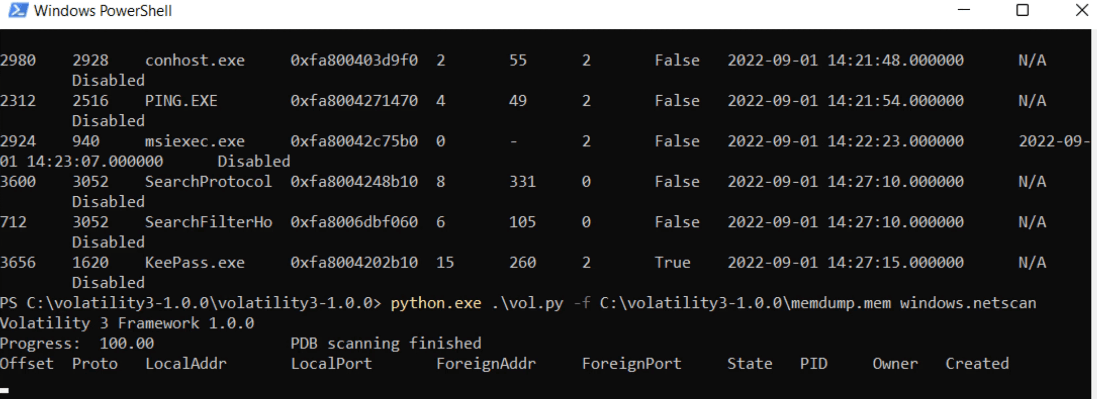
Пробуем модуль Windows.netscan:
Заключение
У меня получилось установить Волатилити 3 на Windows 11, и, как видите, все конфликтующие плагины (Windows.info, Windows.pslist, Windows.netscan и другие) прекрасно работали.
ПОЛЕЗНЫЕ ССЫЛКИ:
- Популярные плагины Volatility 3
- Использование Autopsy Forensic Browser
О фреймворке Volatility на Windows
В этой статье расскажем, как установить и запустить Volatility на Windows, а ещё немного расскажем о самом фреймворке.
Открытый набор инструментов, который реализован на Python под лицензией GNU General Public License. Он нужен для извлечение цифровых артефактов из оперативной памяти. Фреймворк поддерживает огромное количество профилей: Windows, Linux, MacOS, списанных dd-дампы и дампы виртуальных машин ( QEMU, VirtualBox).
Как установить Volatility на Windows
Для работы Volatility на Windows понадобиться:
-
Таблицы символов Windows Volatility 3
1. Переходим на и качем файл установки для Windows.
2. После скачивания, следуя инструкции, устанавливаем Python 3.
Установка Volatility 3 на Windows
-
Переходим на вкладку Volatility 3 → качаем последнюю версию файла Source code(zip).
3. Извлекаем содержимое архива на диск C.
Таблицы символов Windows Volatility 3
Используем Volatility 3 на Windows
2. Кидаем файл дампа в туже папку.
3. Используя PowerShell, запускаем Volatility. Нужно указать файл дампа (в нашем случае готовый дамп ОЗУ Windows 7).
4. Пробуем модуль Windows.info:
5. Пробуем модуль Windows.netscan:
Скачиваем архив → кидаем его в папку volitality3 → symbols.


I recently had the need to run Volatility from a Windows operating system and ran into a couple issues when trying to analyze memory dumps from the more recent versions of Windows 10.
Volatility uses profiles to handle differences in data structures between Operating Systems. There are changes in these data structures between some builds of Windows 10 that are significant enough to cause certain plugins to fail or return incomplete and unreadable results.
Compiled versions of Volatility are available on https://www.volatilityfoundation.org/releases. These releases contain all the required dependencies and don’t require any installation but they don’t contain the latest profiles. We can verify this if we download and run the compiled Windows release with the –info switch to display the available profiles. Those of you that are familiar with Windows build numbers will note that we are missing the following builds: 15063, 16299, 17134, and 17763.

Installation
To get the latest profiles, we need to install Volatility using the source code files. These utilize Python and will also require some dependencies to be installed for all plugins to work. Also, I’d like to point out that while these instructions are for Windows, the same principle applies to installing on other Operating Systems. For additional details, I highly recommend you take a look at the Installation page on the Volatility Github. This provides links for all the dependencies and explains what functionality they provide.
- Download and install Python 2.7. (The Volatility setup script doesn’t currently support Python 3). **Make sure to enable the option to add Python to Path during the installation as shown below.**

- Download the Volatility source code archive and extract files
- Open a command prompt, navigate to the location you extracted the Volatility source to and run “setup.py install”
- If we run “vol.py -h” at this point, we will get an error indicating that several dependencies are not installed. Use the links and commands below to install the following dependencies.


There is one other dependency listed for Volatility which is the Python Imaging Library (PIL). This gives Python the ability to process images an graphics. I was unable to install this and it wasn’t a capability I needed in Volatility so I chose to leave it out.
So that’s it. Now if we run “vol.py –info” we can see the newer profiles are listed.

We can get started with Volatility by running “vol.py -h” from the command line to see the syntax.

The SANS Memory Forensics Cheat Sheet is also a great resource if you need help getting started on Memory Forensics commands.
https://digital-forensics.sans.org/media/volatility-memory-forensics-cheat-sheet.pdf
Finally – I need to say thanks here to Richard Davis and his 13Cubed YouTube channel. Richard has a ton of great videos, one of which covers this profile issue on SIFT Workstation and Kali Linux. I watched this several months ago and when I ran into the Windows issue, I knew the cause right away thanks to him. Here’s the video if you are interested.
I hope this is helpful and if you have any questions or comments feel free to reach out.
Published
Table of Contents
- Getting Volatility
-
Installing Volatility
-
Dependencies
- Recommended packages
- Optional packages
-
Dependencies
- Upgrade Volatility
Getting Volatility
You can get the source code by either downloading a stable release or cloning from github. To do the latter, type:
$ git clone https://github.com/volatilityfoundation/volatility.git
This will create a volatility folder that contains the source code and you can run Volatility directory from there.
Installing Volatility
If you’re using the standalone Windows, Linux, or Mac executable, no installation is necessary — just run it from a command prompt. No dependencies are required, because they’re already packaged inside the exe.
If you’re using the Pyinstaller (Windows-only) executable, double click and follow through with the installation instructions (which basically consists of clicking Next a few times and then Finish). You must already have a working Python 2.7. Also see below for the dependency libraries.
If you downloaded the zip or tar source code archive (Windows, Linux, OSX) there are two ways to «install» the code:
-
Extract the archive and run
setup.py. This will take care of copying files to the right locations on your disk. Runningsetup.pyis only necessary if you want to have access to the Volatility namespace from other Python scripts, for example if you plan on importing Volatility as a library. Pros: easy use as a library. Cons: more difficult to upgrade or uninstall. -
Extract the archive to a directory of your choice. When you want to use Volatility just do python
/path/to/directory/vol.py. This is a cleaner method since no files are ever moved outside of your chosen directory, which makes it easier to upgrade to new versions when they’re released. Also, you can easily have multiple versions of Volatility installed at the same time, by just keeping them in separate directories (like/home/me/vol2.0and/home/me/vol2.1). Pros: clean, easy to run multiple versions, easy to upgrade or uninstall. Cons: more difficult to use as a library.
Dependencies
This section does not apply to the standalone Windows executable, because the dependent libraries are already included in the exe. Also please note the majority of core Volatility functionality will work without any additional dependencies as well. You will only need to install packages if you plan on using specific plugins that leverage those packages (see recommended dependencies), or if you want to enhance your experience (see optional dependencies). Note: for Linux you may have to install a few other packages/libraries as prerequisites for the following recommended packages (Example: apt-get install pcregrep libpcre++-dev python-dev -y)
Recommended packages
For the most comprehensive plugin support, you should install the following libraries. If you do not install these libraries, you may see a warning message to raise your awareness, but all plugins that do not rely on the missing libraries will still work properly.
-
Distorm3 — Powerful Disassembler Library For x86/AMD64
- Dependent plugins
- apihooks
- callbacks
- impscan
- kdbgscan, pslist, modules etc for Windows 8/2012 machines
- the disassemble command in volshell, linux_volshell, and mac_volshell
- Dependent plugins
-
Yara — A malware identification and classification tool
- Dependent plugins
- yarascan, linux_yarascan, mac_yarascan
- Note: get yara from the project’s main website, do not install it with pip.
- Note: if you are on Linux, you may have to issue the following command:
echo "/usr/local/lib" >> /etc/ld.so.conf && ldconfig
- Dependent plugins
-
PyCrypto — The Python Cryptography Toolkit
- Dependent plugins
- lsadump
- hashdump
- Note: this requires
python-devto build (unless you get pre-built binaries)
- Dependent plugins
-
PIL — Python Imaging Library
- Dependent plugins
- screenshots
- Dependent plugins
-
OpenPyxl — Python library to read/write Excel 2007 xlsx/xlsm files
- Dependent plugins
- Any plugin that has been converted to unified format (with
--output=xlsxoption)
- Any plugin that has been converted to unified format (with
- Dependent plugins
-
ujson — Ultra fast JSON parsing library
- Dependent plugins: anything using
--output=html
- Dependent plugins: anything using
Optional packages
The following libraries are optional. If they’re installed, Volatility will find and use them; otherwise an appropriate alternative method will be chosen.
- pytz for timezone conversion. Alternative: tzset (standard with Python)
- IPython for enhancing the volshell experience. Alternative: code (standard with Python)
- libforensic1394 for live analysis over firewire. Alternative: libraw1394
Upgrade Volatility
If you used setup.py to install Volatility, the files will be placed in a few standard locations. For example:
$ sudo python setup.py install
....
byte-compiling /usr/local/lib/python2.6/dist-packages/volatility/fmtspec.py to fmtspec.pyc
byte-compiling /usr/local/lib/python2.6/dist-packages/volatility/utils.py to utils.pyc
running install_scripts
copying build/scripts-2.6/vol.py -> /usr/local/bin
changing mode of /usr/local/bin/vol.py to 755
running install_data
creating /usr/local/contrib/plugins
copying contrib/plugins/example.py -> /usr/local/contrib/plugins
copying contrib/plugins/psdispscan.py -> /usr/local/contrib/plugins
....
creating /usr/local/contrib/plugins/addrspaces
copying contrib/plugins/addrspaces/ewf.py -> /usr/local/contrib/plugins/addrspaces
copying contrib/plugins/addrspaces/ewf-python.py -> /usr/local/contrib/plugins/addrspaces
running install_egg_info
Writing /usr/local/lib/python2.6/dist-packages/volatility-2.1.egg-info
Unfortunately there is no uninstaller, and if you simply try to run setup.py for a new version of Volatility, you may end up with some mixed source files which will surely lead to trouble. So before you install a new version of Volatility, remove everything the previous setup.py created:
$ sudo rm -rf /usr/local/lib/python2.6/dist-packages/volatility
$ sudo rm `which vol.py`
$ sudo rm -rf /usr/local/contrib/plugins
Now you can run the setup.py for your new Volatility version. As stated above, please remember setup.py is only necessary if you plan on importing Volatility as a library from other Python scripts. If you just want to use Volatility, no installation is necessary (just extract the archive and run vol.py inside).
Today, let’s dive into the fascinating world of digital forensics by exploring Volatility 3—a powerful framework used for extracting crucial digital artifacts from volatile memory (RAM). Volatility enables investigators to analyze a system’s runtime state, providing deep insights into what was happening at the time of memory capture.
While some forensic suites like OS Forensics offer integrated Volatility functionality, this guide will show you how to install and run Volatility 3 on Windows and WSL (Windows Subsystem for Linux). Given the popularity of Windows, it’s a practical starting point for many investigators. Moreover, WSL allows you to leverage Linux-based forensic tools, which can often be more efficient.
Installing Volatility 3 on Windows:
Before diving in, ensure you have three essential tools installed:
-
Python 3: Download Python 3 from the Microsoft Store.
-
Git for Windows: Click here
-
Microsoft C++ Build Tool: Download it
Once these tools are installed, follow these steps to set up Volatility 3:
-
Head to the Volatility GitHub repository here.
-
Copy the repository link.
-
Open PowerShell and run: git clone <copied link>
-
Check the Python version using: python -V
-
Navigate to the Volatility folder in PowerShell and run DIR (for Windows) or ls (for Linux).
-
Run the command: pip install -r .\requirements.txt
-
Verify the Volatility version: python vol.py -v
Extracting Digital Artifacts:
Now that Volatility is set up, you’ll need a memory image to analyze. You can obtain this image using tools like FTK Imager or other image capture tools.
———————————————————————————————————
Here are a few basic commands to get you started:
-
python vol.py -v (Displays tool information).
-
python vol.py -f D:\memdump.mem windows.info
Provides information about the Windows system from which the memory was collected.
Modify windows.info for different functionalities.
D:\memdump.mem (Path of memory image)
3. python vol.py -f D:\memdump.mem windows.handles — Lists handles in the memory image. Use -h for the help menu.
Significance of -pid Parameter in Memory Forensics is used as a parameter.
Now you guys will think what’s point using python in volatility 3.
-
python vol.py -f D:\memdump.mem windows.pslist | Select-String chrome
This command showcases the use of a search string (Select-String) to filter the pslist output for specific processes like ‘chrome.’ While Select-String isn’t a part of Volatility 3 itself, integrating it with Python offers a similar functionality to ‘grep’ in Linux, facilitating data extraction based on defined criteria.
Few Important commands:
windows.pstree (Will give hierarchy view)
windows.psscan (find unlinked hidden processes)
windows.netstat
windows.cmdline (what haven been run from where it have been run any special arguments he
used)
windows.malfind (in case of legit you will not get anything for legit processes)
windows.hashdump (showed hash password on windows)
windows.netscan
Windows.ldrmodules
A «True» within a column means the DLL was present, and a «False» means the DLL was not present in the list. By comparing the results, we can visually determine which DLLs might have been unlinked or suspiciously loaded, and hence malicious.
More commands with details you will found in this link click here
————————————————————————————————————-
Why Switch to WSL for Forensics?
As forensic analysis evolves, using Windows Subsystem for Linux (WSL) has become a more efficient option for running tools like Volatility 3. With WSL, you can run Linux-based tools natively on your Windows machine, giving you the flexibility and compatibility benefits of a Linux environment without the need for dual-booting or virtual machines.
Install WSL by running:
To install Volatility 3 on WSL:
1. Install Dependencies
Before installing Volatility 3, you need to install the required dependencies:
sudo apt update
sudo apt install -y python3-pip python3-pefile python3-yara
2. Installing PyCrypto (Optional)
While PyCrypto was a common requirement, it is now considered outdated. If installing it works, great! If not, you can move on:
If PyCrypto doesn’t install correctly, don’t worry—Volatility 3 can still function effectively without it in most cases.
3. Clone the Volatility 3 Repository
Next, clone the official Volatility 3 repository from GitHub:
4. Verify the Installation
To confirm that Volatility 3 is installed successfully, run the following command to display the help menu:
If you see the help options, your installation was successful, and you’re ready to begin memory analysis.
————————————————————————————————————
Why WSL is Essential for Forensic Analysis
Forensic tools like Volatility 3 often run more smoothly in a Linux environment due to Linux’s lightweight nature and better compatibility with certain dependencies and libraries. WSL allows you to run a full Linux distribution natively on your Windows machine without the need for a virtual machine or dual-booting. This means you can enjoy the power and flexibility of Linux while still working within your familiar Windows environment.
—————————————————————————————————-
Conclusion
Forensic analysis, especially with tools like Volatility 3, becomes far more efficient when leveraging WSL. It offers better performance, compatibility with Linux-based tools, and ease of maintenance compared to traditional Windows installations. I hope this guide has provided a clear pathway for setting up and running Volatility 3 on both Windows and WSL, empowering you to optimize your forensic workflows.
Now, you might wonder: «I’ve given the commands for running Volatility 3 on Windows—what about WSL?» The good news is that the commands remain the same for WSL, as the underlying process is the same; only the environment differs. In upcoming articles, I’ll cover tools like MemProcFS, Strings, and how to perform comprehensive memory analysis using all three.
Until then, happy hunting and keep learning! 👋
Akash Patel