
Все способы:
- Способ 1: Инструменты системы
- «Проводник»
- Windows PowerShell
- Способ 2: Daemon Tools Lite
- Выбор стандартного приложения для ISO-файлов
- Вопросы и ответы: 2
Способ 1: Инструменты системы
В Windows 10 можно монтировать ISO-образы без дополнительного ПО, одним из двух способов.
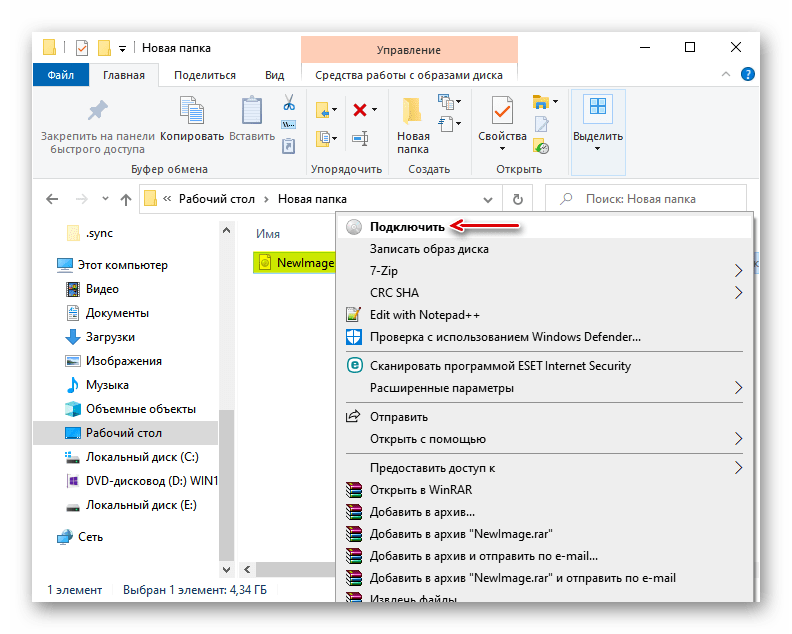
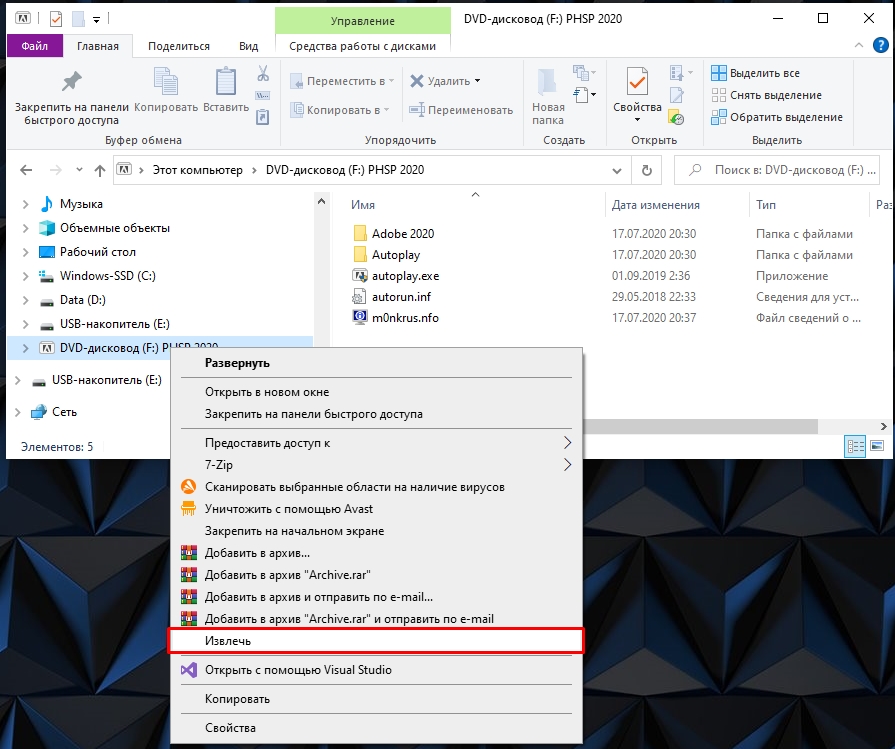
«Проводник»
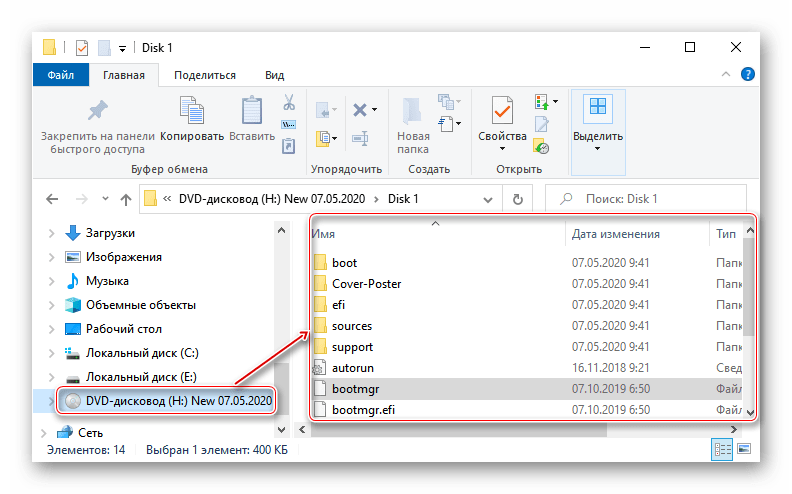
- Сочетанием клавиш Win+E открываем «Проводник» Виндовс, находим нужный файл, щелкаем по нему правой кнопкой мышки и в контекстном меню выбираем «Подключить». Эта команда назначена по умолчанию, поэтому смонтировать ISO-файл также можно двойным нажатием левой кнопки мышки.

Будет создан виртуальный оптический диск, на котором можно ознакомиться с файлами, входящими в ISO-образ.

Читайте также: Запуск «Проводника» в ОС Windows 10
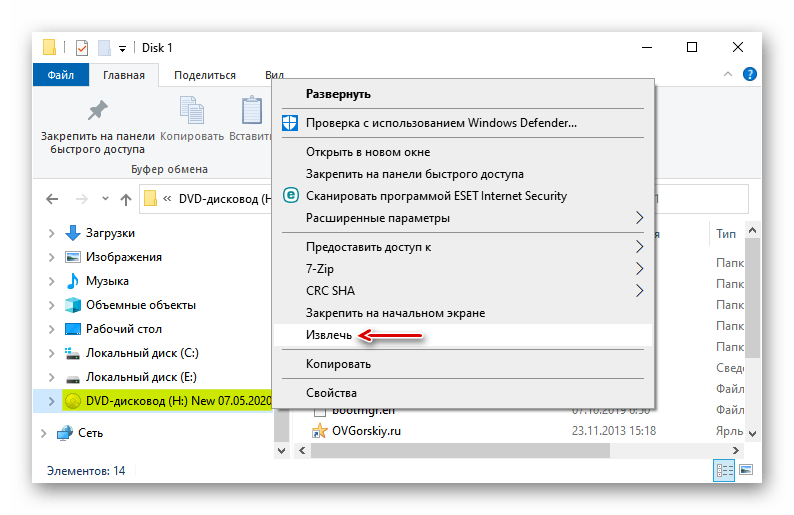
- Чтобы размонтировать образ, когда работа с ним будет закончена, щелкаем по нему правой кнопкой мышки и жмем «Извлечь».
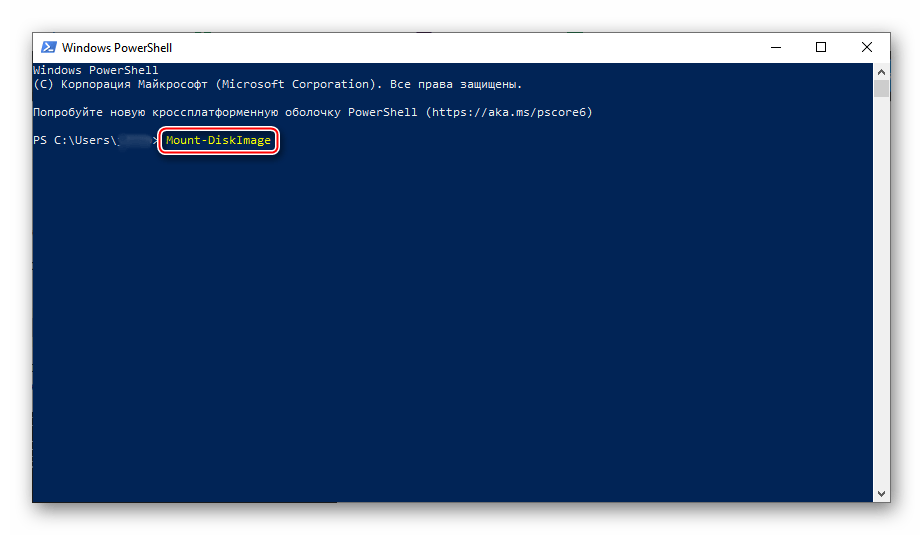
Windows PowerShell
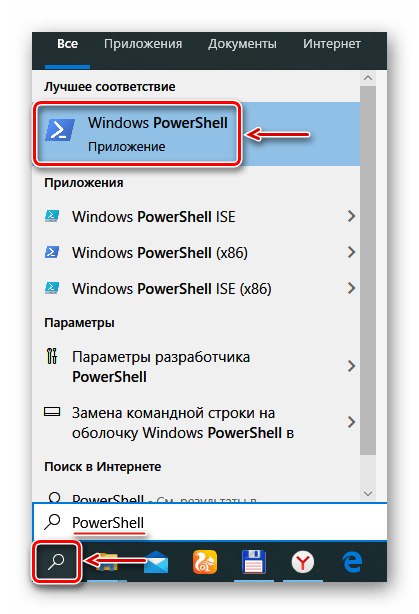
- С помощью системного поиска открываем приложение PowerShell.
- В поле консоли вводим команду:
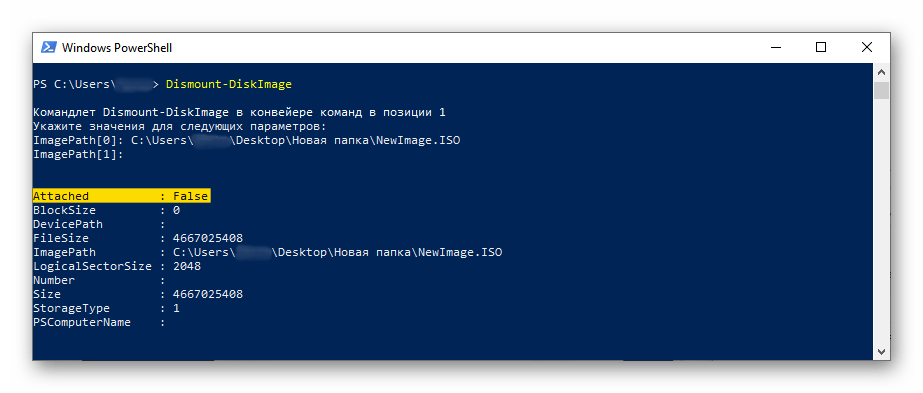
Mount-DiskImageи нажимаем «Enter».
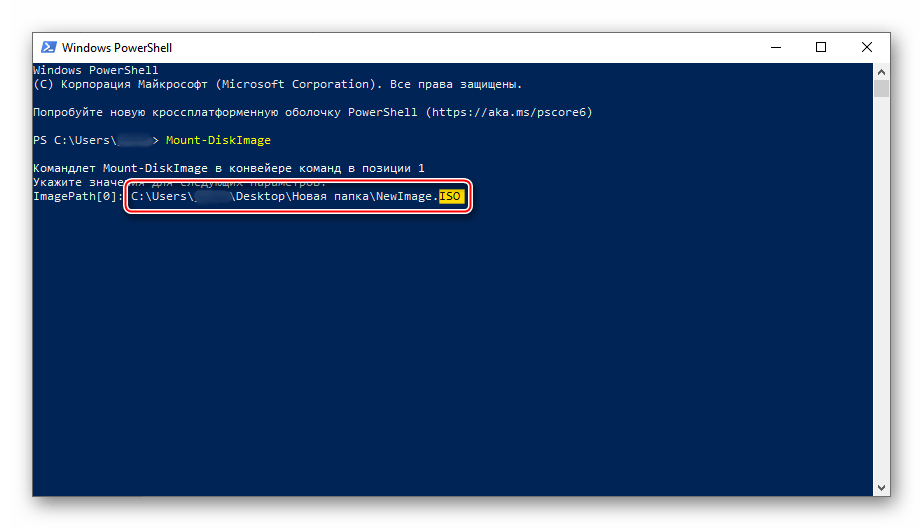
- Указываем путь к файлу. В конце обязательно должно стоять расширение .ISO.
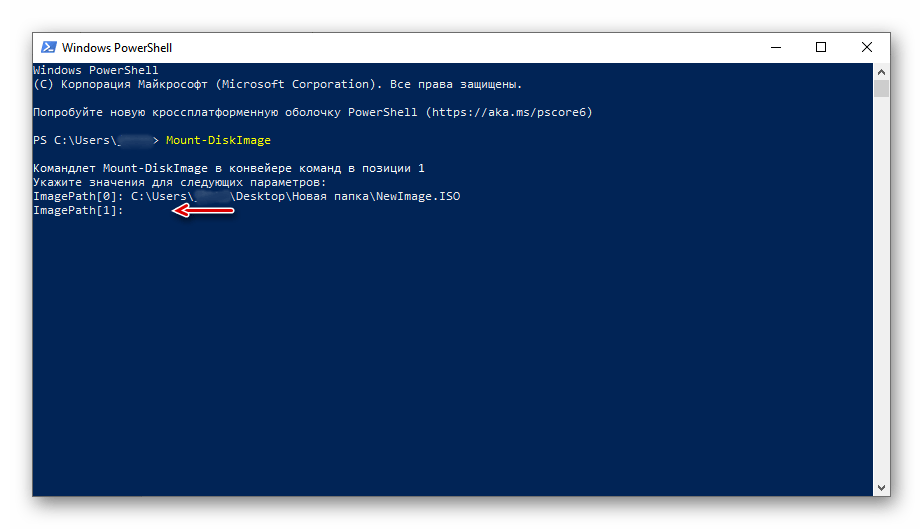
- Нас интересует только один ISO-файл, поэтому следующую строку оставляем пустой и жмем «Enter». Но при необходимости можно добавить другие пути, чтобы смонтировать сразу несколько ISO-образов.
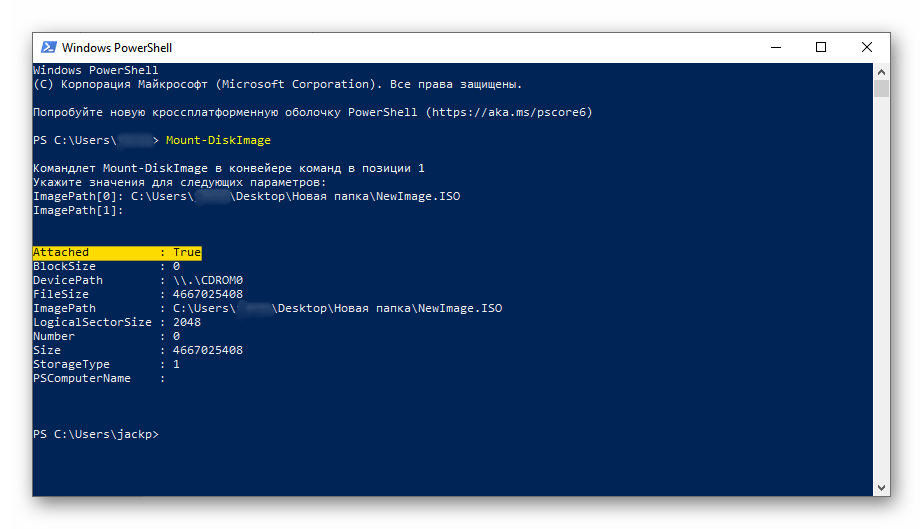
- Значение «True» в графе «Attached» указывает на то, что оптический диск создан.
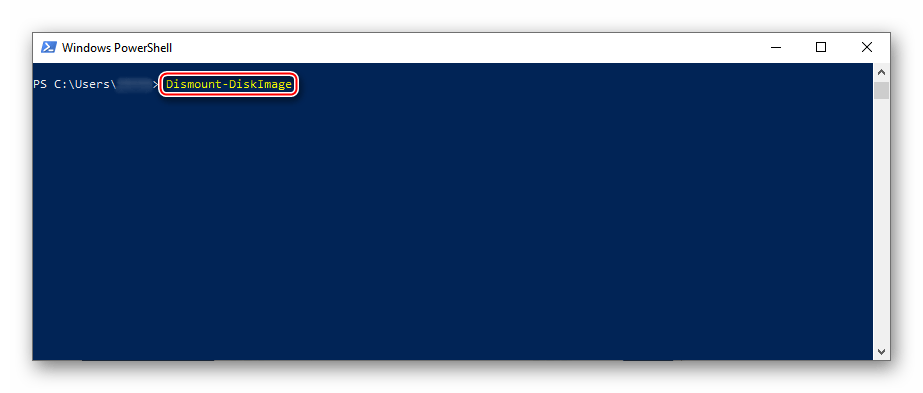
- Чтобы его размонтировать, вводим код:
Dismount-DiskImage
Снова указываем путь к месту расположения файла и нажимаем «Enter».
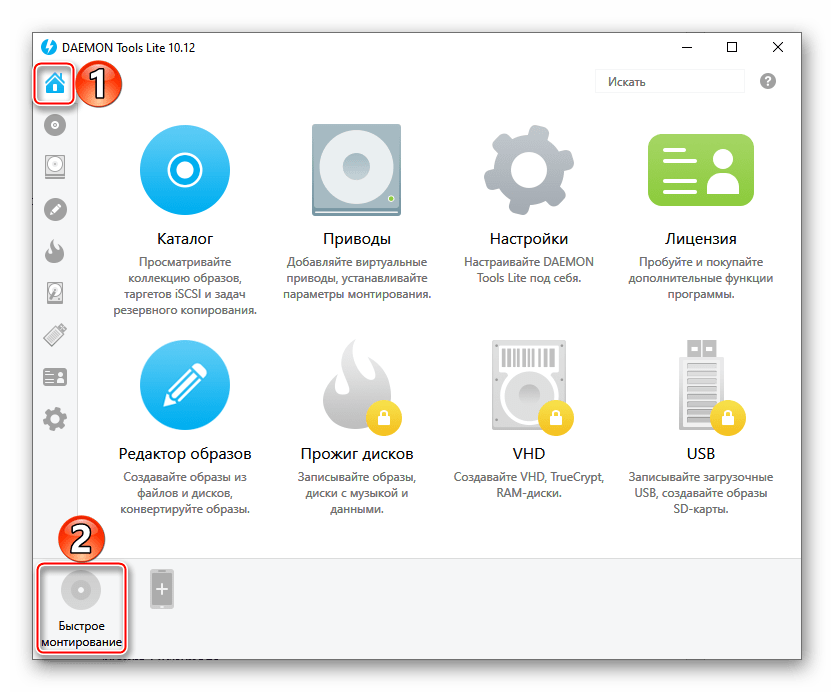
Способ 2: Daemon Tools Lite
Демон Тулс Лайт 10 – бесплатное ПО, с помощью которого можно не только монтировать популярные форматы образов и эмулировать до четырех виртуальных приводов, но и создавать собственные образы из файлов и дисков.
Скачать DAEMON Tools Lite
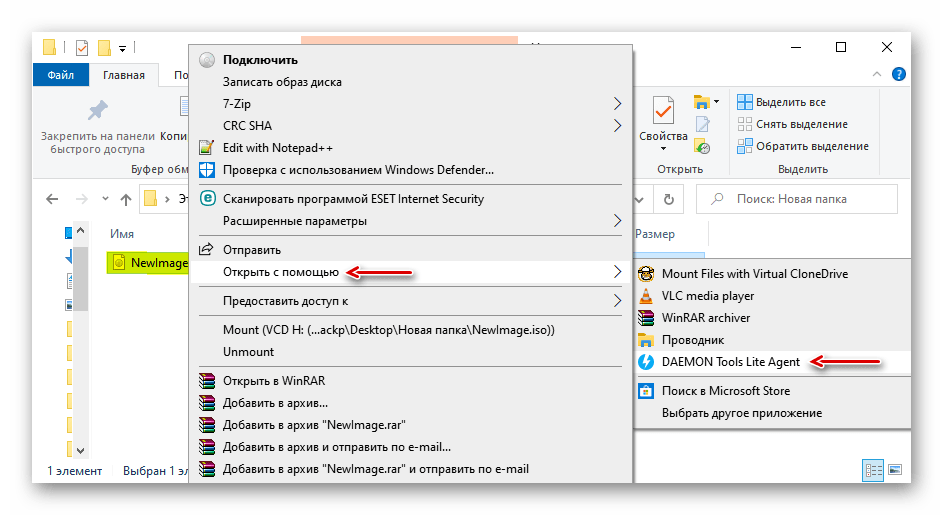
- Устанавливаем программу, находим ISO-файл, щелкаем по нему правой кнопкой мышки, нажимаем «Открыть с помощью» и выбираем Daemon Tools Lite.
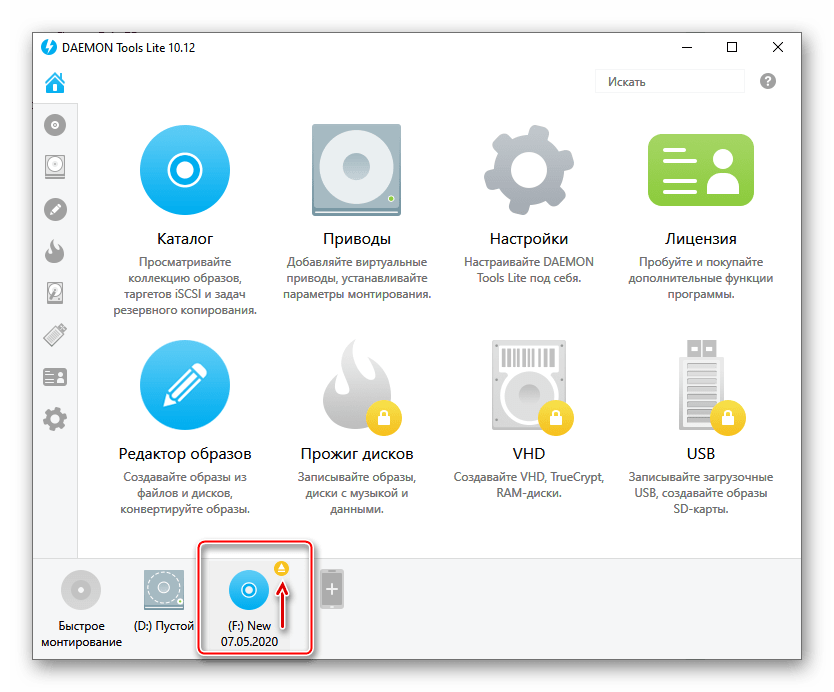
- Проверяем, что образ смонтирован.
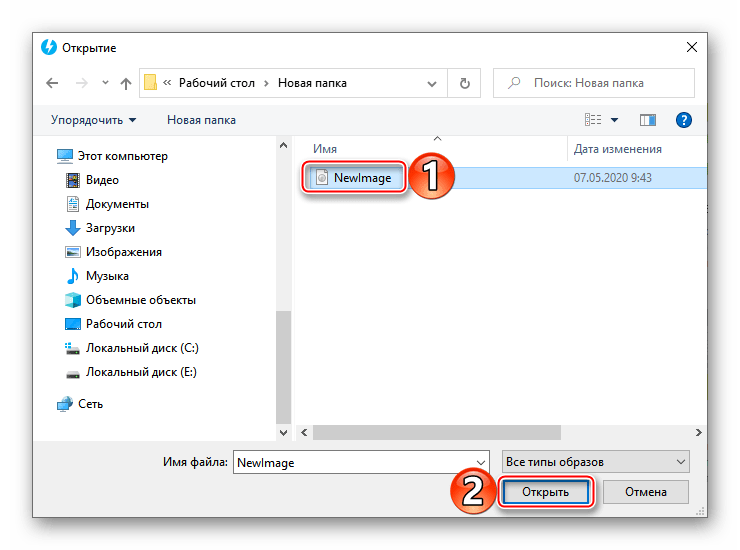
Чтобы создать виртуальный оптический диск через интерфейс DTL 10:
- Запускаем программу и в нижней части окна жмем иконку «Быстрое монтирование».
- Находим и открываем ISO-файл.
- Чтобы размонтировать его, жмем значок «Извлечь» рядом с иконкой виртуального диска.
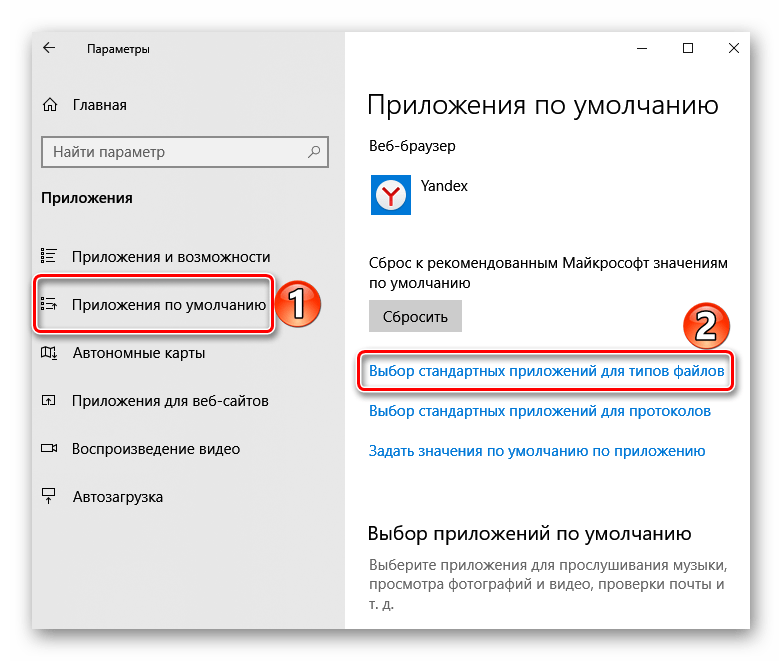
Выбор стандартного приложения для ISO-файлов
Ассоциация файлов – это механизм, с помощью которого система задает соответствие между типами файлов и программами, которые их могут открыть. Если нужно, чтобы файлы с расширением .ISO по умолчанию открывались каким-то определенным софтом, например, сторонним ПО, необходимо сделать следующее:
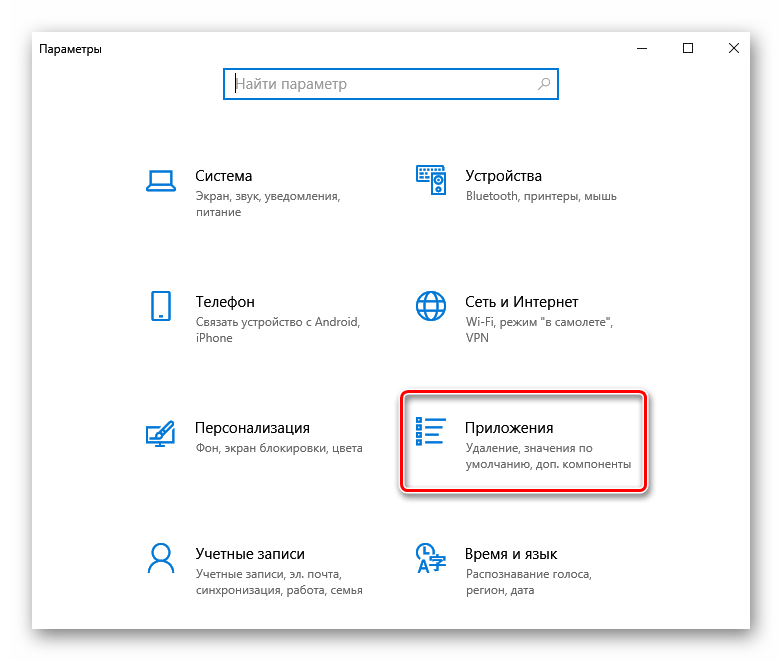
- Сочетанием клавиш Win+I вызываем «Параметры» Виндовс 10 и открываем раздел «Приложения».
- Во вкладке «Приложения по умолчанию» прокручиваем страницу вниз и жмем «Выбор стандартных приложений для типов файлов».
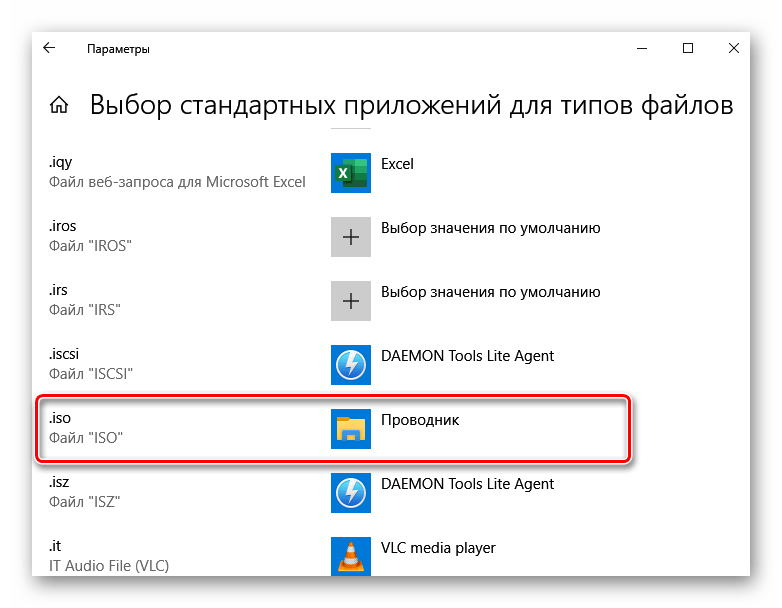
- В данном случае файлы ISO по умолчанию открывает «Проводник».

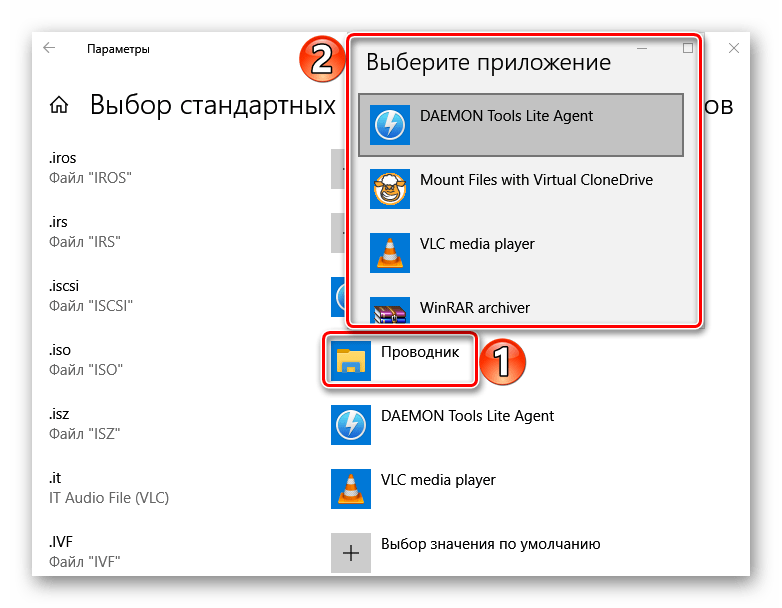
Чтобы изменить способ запуска, щелкаем по нему и из всплывающего списка выбираем другую программу, например, Daemon Tools Lite.
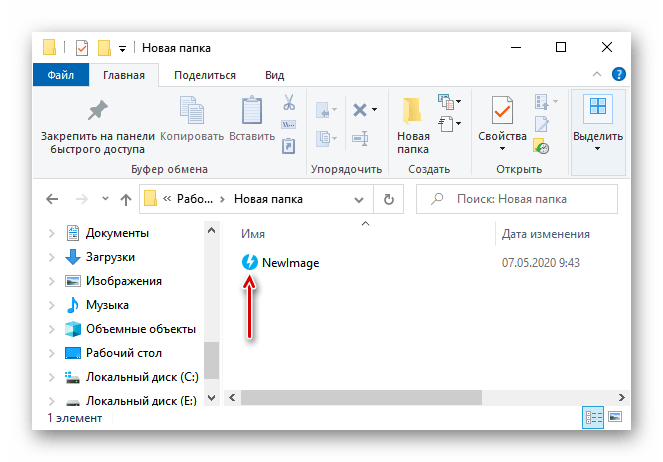
- Теперь рядом с ISO-файлами будет значок того ПО, которое вы назначили по умолчанию.
Наша группа в TelegramПолезные советы и помощь
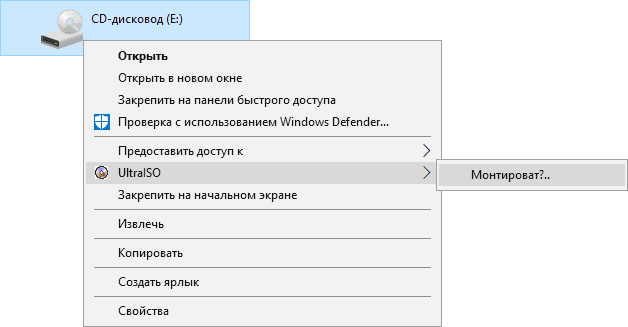
Обычно, вопросом о том, как создать виртуальный привод в UltraISO задаются при появлении ошибки «Виртуальный CD/DVD привод не найден» в программе, но возможны и другие варианты: например, просто требуется создать виртуальный CD/DVD привод UltraISO для монтирования различных образов дисков.
В этой инструкции подробно о том, как создать виртуальный привод UltraISO и кратко о возможностях его использования. См. также: Создание загрузочной флешки в UltraISO.
Примечание: обычно при установке UltraISO виртуальный привод устанавливается создается автоматически (выбор предоставляется на этапе установки, как на скриншоте ниже).
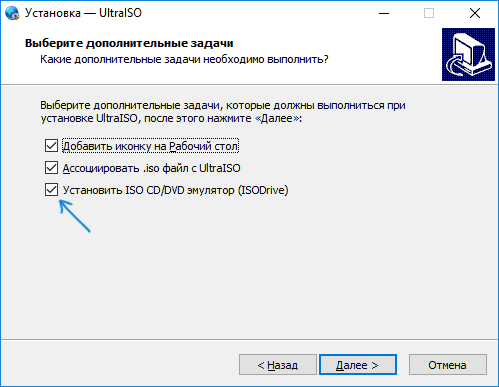
Однако, при использовании portable версии программы, а иногда — при работе Unchecky (программа, которая автоматически снимает ненужные отметки в установщиках) установка виртуального привода не происходит, в результате пользователь получает ошибку Виртуальный CD/DVD привод не найден, а создание привода способом, описанным ниже невозможна, так как нужные опции в параметрах не активны. В этом случае переустановите UltraISO и убедитесь, что пункт «Установить ISO CD/DVD эмулятор ISODrive» выбран.
Создание виртуального привода CD/DVD в UltraISO
Для того, чтобы создать виртуальный привод UltraISO выполните следующие простые шаги
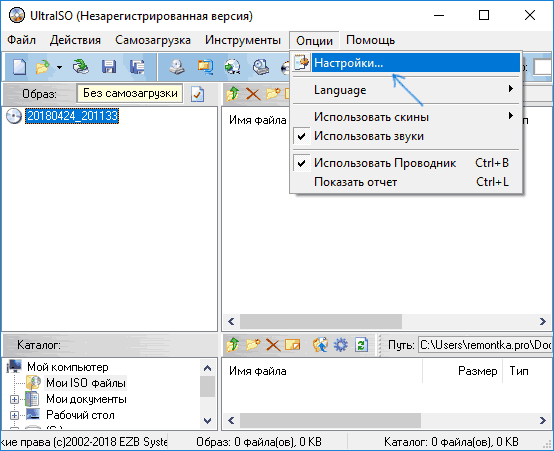
- Запустите программу от имени администратора. Для этого можно нажать по ярлыку UltraISO правой кнопкой мыши и выбрать пункт «Запуск от имени администратора».

- В программе откройте в меню «Опции» — «Настройки».

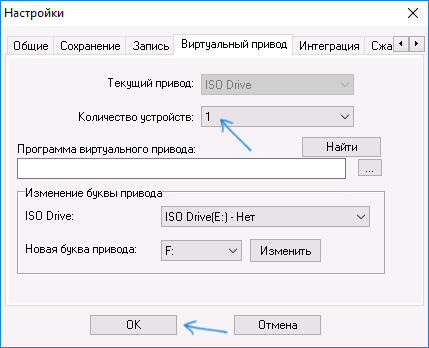
- Перейдите на вкладку «Виртуальный привод».
- В поле «Количество устройств» укажите нужное количество виртуальных приводов (обычно, не требуется более 1).

- Нажмите «Ок».
- В результате в проводнике появится новый привод «CD-дисковод», являющийся виртуальным приводом UltraISO.
- Если вам требуется изменить букву виртуального привода, снова зайдите в раздел из 3-го шага, выберите нужную букву в поле «Новая буква привода» и нажмите «Изменить».
Готово, виртуальный привод UltraISO создан и готов к использованию.
Использование виртуального привода UltraISO
Виртуальный привод CD/DVD в UltraISO можно использовать для монтирования образов дисков в разных форматах (iso, bin, cue, mdf, mds, nrg, img и других) и работы с ними в Windows 10, 8 и Windows 7 как с обычными компакт-дисками.
Смонтировать образ диска можно как в интерфейсе самой программы UltraISO (открываем образ диска, нажимаем по кнопке «Монтировать в виртуальный привод» в верхней строке меню), так и с помощью контекстного меню виртуального привода. Во втором случае нажимаем правой кнопкой мыши по виртуальному приводу, выбираем пункт «UltraISO» — «Монтировать» и указываем путь к образу диска.
Размонтирование (извлечение) производится тем же самым образом, с помощью контекстного меню.
При необходимости удалить виртуальный привод UltraISO, не удаляя саму программу, аналогично способу с созданием, зайдите в параметры (запустив программу от имени администратора) и в поле «Количество устройств» укажите «Нет». Затем нажмите «Ок».
Добро пожаловать на WiFiGid.ru! В этой статье мы покажем вам, как можно быстро сделать виртуальный дисковод в Windows 10 или Windows 11, чтобы к нему примонтировать нужный вам образ. За последний год лично я уже и не припомню случая, когда мне это могло потребоваться, но старинное знание живет и еще периодически всплывает. Все будет просто, повторяем за мной и радуемся
Содержание
- Способ 1 – Стандартные средства Windows
- Способ 2 – Командная строка
- Способ 3 – Daemon Tools
- Способ 4 – Alcohol 120%
- Про другие варианты
- Видео по теме
- Задать вопрос автору статьи

«Старпёры» вроде меня помнят, что для подключения дисков нужно было использовать эмуляторы вроде DAEMON Tools или Alcohol 120%, но сейчас все немного переменилось. В Windows 10, 11 (и даже на «восьмерке») есть встроенное средство для работы с виртуальными приводами. Показываю, как активировать этот эмулятор.
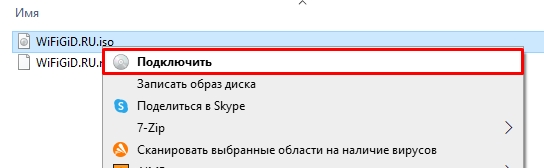
- Ничего не устанавливаем, а сразу переходим к нашему образу, который мы хотели запихать в этот виртуальный CD-ROM. Нажимаем по нему правой кнопкой мыши и выбираем «Подключить».
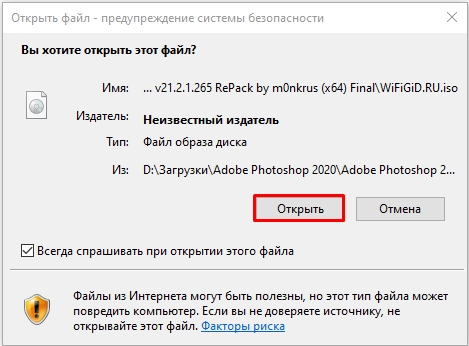
- Подтверждаем открытие:
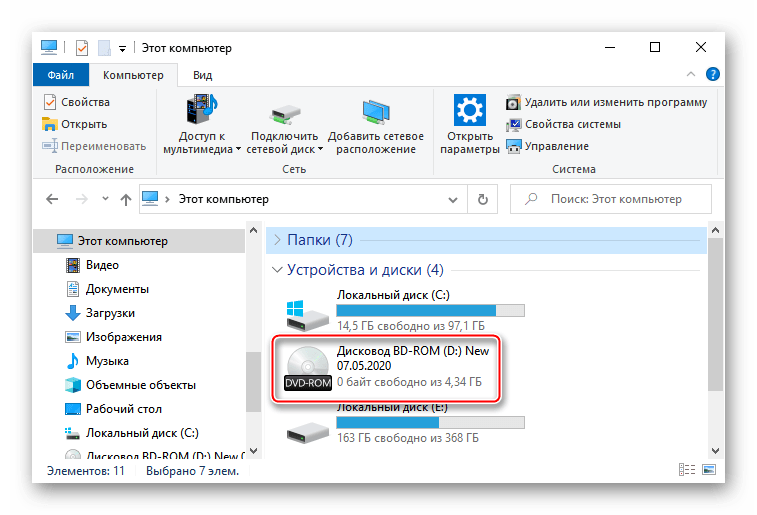
- И должен сразу же открыться уже примонтированный образ:
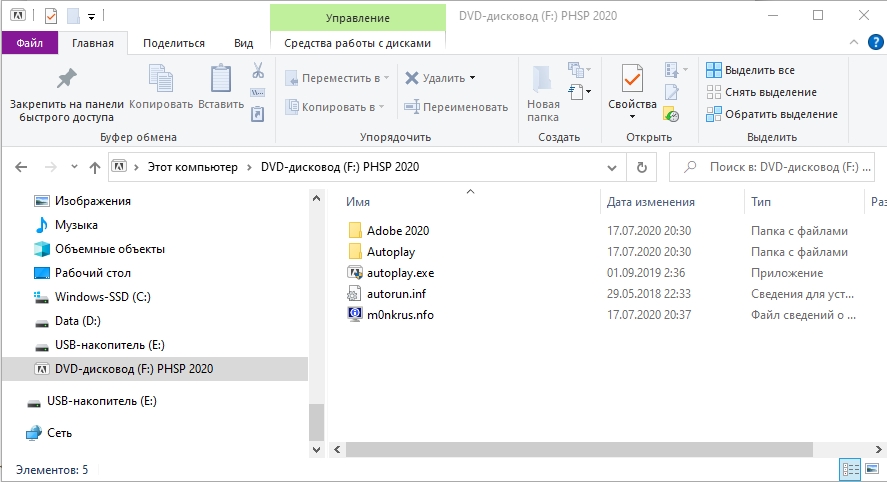
Образом можно пользоваться. А чтобы потом избавиться от мозолящего глаза диска в «Моем компьютере», просто нажимаем по нему правой кнопкой мыши и выбираем «Извлечь». Диск сразу же пропадает.
По мне это как раз то что нужно – не заморачиваемся с установкой левых программ, а если однажды эта функция понадобится, все уже есть под рукой. Правда, не знаю, как у них там с поддержкой разных аппаратных защит, но в крайнем случаем можно будет воспользоваться любой другой привычной программой.
Способ 2 – Командная строка
Все то же самое можно провернуть через командную строку. Т.е. снова используем стандартный эмулятор дисков от Windows. Любителям олдскульной консоли посвящается. Но лучше для этого использовать Windows PowerShell (ну или Терминал на «одиннадцатой»).
- Открываем Windows PowerShell любым удобным для вас способом. Я для этого нажимаю правой кнопкой по кнопке Пуск и из меню выбираю соответствующий пункт.
- Вводим следующую команду:
Mount-DiskImage
- В появившейся утилите указываем путь до нашего образа. Все вместе на скриншоте:

- Если нужно примонтировать что-то еще – прописываем следующие адреса. Если нет – нажимаем клавишу Enter и наслаждаемся проделанной работой.
- Для отключения диска используем вот эту команду:
Dismount-DiskImage
Как по мне, если уж и ставить какую-то программу для работы с виртуальными образами, так это Daemon Tools. Легкая, быстрая, бесплатная, поддерживает много всякой всячины (не помню, можно ли через нее создавать образы, но это сейчас нам и не нужно).
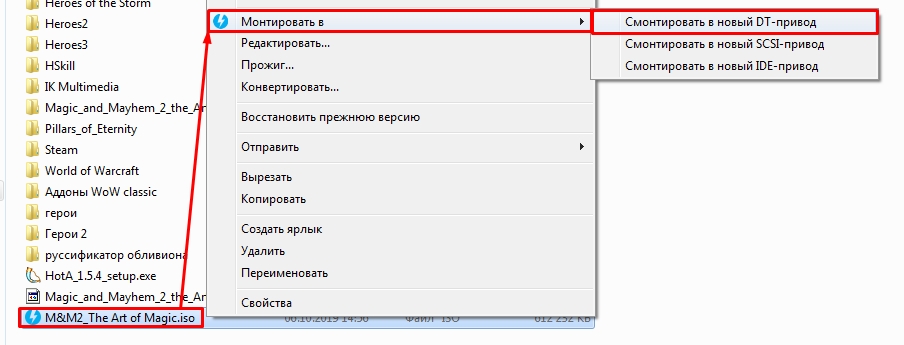
- Идем на официальный сайт Daemon Tools, скачиваем и устанавливаем бесплатную версию (они ее иногда прячут за другими, но вы уж потрудитесь, она есть).
- После этого спокойно нажимаем правой кнопкой мыши по нашему образу, выбираем «Монтировать в – Смонтировать в новый DT-привод». После чего появится новый диск.
То же самое можно провернуть и через главное меню программы (там как раз есть пункт по созданию приводов), но я туда вроде бы лазил пару раз за всю жизнь.
Способ 4 – Alcohol 120%
Очень давно его не использовал, но это легенда, с которой начинал в очень далекие времена, когда еще нужно было работать с виртуальными приводами чуть ли не каждый день. Может оно уже и не очень, но работало замечательно.
- Скачиваем и устанавливаем его к себе на компьютер.
- В главном меню программы выбираем «Файл – Открыть».
- Выбираем нужный нам образ.
- Готово.
Про другие варианты
- Из классных программ сразу вспоминается UltraISO. Там тоже можно работать с виртуальными приводами. Но его специфика изначально была заточена под ISO образы и под их создание. А здесь в статье мы рассматриваем какой-то общий вариант работы со всеми типами образов.
- Помним, что все образы ISO являются обычными архивами, который может открыть архиватор вроде RAR или ZIP. Да, это не очевидно, но, если скормить ему образ силой, все открывается замечательно. Возможно, вам и вовсе не нужны приводы.
Наверняка есть и другие хорошие уникальные программы. Но мы на нашем портале пишем лишь о том, что действительно применяли сами и что реально полезно. А свои решения можете показать в комментариях под этой статьей, только не забудьте рассказать, чем они действительно выделяются на фоне описанного выше
Видео по теме
Creating a virtual CD drive on Windows 10 can be useful when you want to access disc images or run programs that require physical media. Here’s how you can create a virtual CD drive:
1. Start by downloading and installing a virtual CD/DVD drive software. There are several options available, but a popular choice is Virtual CloneDrive, which is free and user-friendly.
2. Once installed, open the virtual CD/DVD drive software. Typically, you can find its icon in the system tray or start menu.
3. Right-click on the software’s icon and select «Virtual CloneDrive» from the context menu.
4. In the Virtual CloneDrive window, you’ll find an option to mount an image. Click on it.
5. Browse and select the disc image file (e.g., ISO, BIN, or IMG) that you want to mount as a virtual CD drive. Click «Open» or «Mount» to start the mounting process.
6. The disc image will be mounted to a virtual CD drive, and you can now access its contents as if it were a physical CD inserted into your computer.
7. To unmount the virtual CD drive, open the virtual CD/DVD drive software again, right-click on the virtual drive, and select «Unmount» or «Eject.«
By creating a virtual CD drive using software like Virtual CloneDrive, you can conveniently access disc images without needing physical media. It’s a handy tool for running installation files, viewing content, or performing other tasks that would require a CD or DVD. Remember to always download disc images from trusted sources to ensure their integrity and protect your computer from potentially harmful files.
Video Tutorial:Does Windows 10 have virtual drive?
Can I mount a virtual disk in Windows 10?
Yes, you can mount a virtual disk in Windows 10. Windows 10 provides built-in functionality for mounting virtual disks in various formats, such as VHD (Virtual Hard Disk) and ISO (disc image). Mounting a virtual disk allows you to access its contents as if it were a physical disk connected to your computer.
To mount a virtual disk in Windows 10, you can follow these steps:
1. Locate the virtual disk file (VHD or ISO) on your computer.
2. Right-click on the file and select «Mount» from the context menu.
3. Windows will assign a drive letter to the virtual disk, and it will appear in File Explorer as a separate storage device.
4. You can then browse and access the files and folders inside the mounted virtual disk just like you would with any other drive on your computer.
It’s important to note that the ability to mount virtual disks may differ based on the edition of Windows 10 you have installed. The Pro, Enterprise, and Education editions offer more advanced features compared to the Home edition.
How do I mount a DVD to a virtual DVD drive?
To mount a DVD to a virtual DVD drive, you’ll need to follow these steps:
1. Ensure you have a virtual DVD drive software installed on your computer. There are various options available, such as Daemon Tools, Virtual CloneDrive, or Alcohol 120%.
2. Insert the DVD into the physical DVD drive of your computer.
3. Open the virtual DVD drive software and locate the option to mount a new image or virtual drive. This option is usually found in the software’s interface or in the system tray.
4. Choose the option to mount an image or virtual drive and browse to the location where the DVD is inserted.
5. Select the DVD from the list of available drives or navigate to the physical DVD drive and choose the appropriate file format, such as ISO or IMG.
6. Click on the «Mount» or «Open» button to start the process of mounting the DVD to the virtual drive. The software may take a few moments to create a virtual drive and load the DVD contents.
7. Once the DVD is successfully mounted, you can access its contents through the virtual DVD drive. The mounted DVD will appear as a new drive letter in your operating system’s file explorer.
Remember to unmount the virtual DVD drive or eject the DVD image when you’re done using it, to free up system resources and avoid any conflicts with other applications.
Please note that the process may vary slightly depending on the virtual DVD drive software you are using, so it’s recommended to refer to the software’s documentation or online tutorials for specific instructions.
What is virtual CD ROM?
Virtual CD-ROM refers to the emulation of a CD-ROM drive on a computer system. It allows users to access and use CD or DVD images without requiring physical media. Essentially, it creates a virtual drive on the computer that behaves as if it were a physical CD-ROM or DVD-ROM drive. Users can mount these virtual images, which are typically in ISO or other image file formats, and access their contents as if they were using a physical disc.
Virtual CD-ROMs have various applications. One common use case is software installation, where an ISO image of the installation disc can be mounted and accessed without the need for physical media. This provides convenience and efficiency, especially for devices such as laptops that may not have an optical drive.
Another use case is for gaming, where users can mount virtual disc images to play games that require the original CD or DVD. Virtual CD-ROMs also find utility in data recovery, as they allow users to access and restore data from damaged physical discs by creating virtual copies.
Virtual CD-ROM software is available for different operating systems, and some operating systems already have built-in support for mounting virtual disc images. It is important to note that virtual CD-ROMs are not limited to just CDs and DVDs but can also extend to Blu-rays and other disc formats.
Overall, virtual CD-ROM technology provides a convenient and flexible way to access CD or DVD content without relying on physical media, making it a valuable tool for various purposes.
What is the virtual disk size for Windows 10?
The virtual disk size for Windows 10 can vary depending on the specific requirements and usage patterns of the user. However, as a standard recommendation, Microsoft suggests allocating a minimum of 32GB for the 64-bit version and 16GB for the 32-bit version of Windows 10. This size should allow for the operating system to function properly and accommodate essential system files and updates. However, it’s important to note that users with specific needs, such as running multiple applications or storing large amounts of data, may require more disk space. In such cases, it is advised to allocate a larger virtual disk size accordingly to ensure smooth performance and avoid running out of storage space.
How do I install a free virtual machine on Windows 10?
To install a free virtual machine on Windows 10, you can follow these steps:
1. Research and select a virtual machine software: There are several free virtual machine software options available, such as Oracle VM VirtualBox, VMware Workstation Player, and Microsoft Hyper-V. Evaluate their features and suitability for your needs.
2. Download the virtual machine software: Visit the official website of the chosen software and download the installer compatible with Windows 10.
3. Run the installer: Locate the downloaded installer file and double-click on it to run the installation process. Follow the on-screen instructions to complete the installation. Make sure you read and understand any prompts or options presented during the installation.
4. Launch the virtual machine software: Once the installation is complete, launch the virtual machine software from the Start menu or desktop shortcut.
5. Create a new virtual machine: Within the virtual machine software, you will typically find an option to create a new virtual machine. Click on this option and provide the necessary details such as the operating system you intend to install in the virtual machine.
6. Allocate system resources: During the virtual machine creation process, you will be prompted to allocate resources to the virtual machine, such as CPU cores, RAM, and disk space. Adjust these settings based on the requirements of the operating system and applications you plan to use within the virtual machine.
7. Install the guest operating system: After creating the virtual machine, proceed to install the guest operating system, which is the operating system that will run within the virtual machine. This is similar to installing an operating system on a physical computer. Insert the installation media (such as a bootable DVD or an ISO image) and follow the instructions provided by the guest operating system installer.
8. Configure virtual machine settings: Once the guest operating system is installed, you may want to customize the virtual machine settings according to your needs. These settings can include network configuration, shared folders, clipboard integration, and more. Refer to the virtual machine software’s documentation or preferences to adjust these settings.
9. Install necessary software and applications: Within the guest operating system, install the necessary software and applications you require within the virtual machine environment.
That’s it! You have successfully installed a free virtual machine on Windows 10 and set up a guest operating system within it. Remember to regularly update the virtual machine software and the guest operating system to ensure security and performance improvements.
How do I Create a virtual disk from a USB?
To create a virtual disk from a USB, you can follow these steps:
1. Connect the USB drive to your computer and ensure that it is recognized and accessible.
2. Download virtualization software that supports creating virtual disks, such as VirtualBox or VMware Workstation. Choose the software that best suits your needs and operating system.
3. Install the virtualization software on your computer following the instructions provided by the software vendor.
4. Open the virtualization software and create a new virtual machine. This process may vary depending on the software you are using, but generally, you will need to specify the operating system and configuration for the virtual machine.
5. During the virtual machine creation process, you will encounter a step where you can choose the virtual disk type. Select the option to create a new virtual hard disk or use an existing one.
6. Choose the option to create a new virtual hard disk and provide a name and location for the disk’s file.
7. Set the desired size for the virtual disk. Ensure that it is large enough to accommodate the USB drive’s data.
8. Complete the virtual machine creation process and start the virtual machine.
9. Once the virtual machine is running, locate the USB drive option in the virtualization software’s menu or settings. Attach the USB drive to the virtual machine.
10. In the virtual machine, you may need to initialize and format the USB drive to make it accessible. Follow the standard procedures for your operating system to accomplish this.
11. After initializing and formatting the USB drive within the virtual machine, you can access and use it as if it were a physical disk connected directly to your computer.
Keep in mind that the steps mentioned above are general guidelines and may vary slightly depending on the virtualization software you are using. It’s always recommended to consult the documentation or support resources provided by the software vendor for detailed instructions specific to the software you choose.