
When working with C++, we’re not restricted to just working with the standard library. There is a huge and diverse ecosystem of other libraries we can use, covering a large range of uses.
Rather than reinventing the wheel in every project, we can import libraries created by other developers that can meet our needs.
In upcoming lessons, we’re going to begin relying more and more on these external libraries.
However, manually downloading and managing packages is a cumbersome process. A range of options have been created that help us manage our dependencies more effectively.
The most popular options are currently vcpkg and Conan.
For this course, we’ll use vcpkg, and in this lesson, we’ll walk through the installation process and some common issues that can occur in Windows. but feel free to use any option
Installing vcpkg
We need to compile vcpkg from the source code, but a simple script is provided that will do this for us with a single command.
A common installation and setup for vcpkg involves four steps:
- Downloading the Source Code
- Building the Source Code
- Integrating vcpkg with MSBuild
- Setting our default target
We walk through these four steps below.
Installing vcpkg in Visual Studio
Recent versions of Visual Studio allow vcpkg to be installed as an individual component, alongside Visual Studio. This approach can cause issues, so we should use the manual installation process instead.
The version of vcpkg that is integrated with Visual Studio only supports «manifest mode», which is a more complex form of dependency management. We cover manifest mode in a later chapter when we introduce build automation.
1. Download from GitHub
A zip containing the source code we need is available from the releases page on GitHub.
We should download the source code from the Assets section of the latest release:

Once acquired, we should unzip this folder to a location on our hard drive. We will be accessing it frequently, so ensure it is in a location we’ll easily be able to find later.
Downloading vcpkg with git
Git users can quickly clone the latest code, rather than downloading a zip file:
git clone https://github.com/Microsoft/vcpkg.git2. Run bootstrap-vcpkg.bat
To compile vcpkg and generate the executable file, we can run the bootstrap-vcpkg.bat in the folder where we unzipped everything.
Once complete, the script should have created an executable file — vcpkg.exe — in the same directory.
3. Integrate vcpkg with MSBuild / Visual Studio
To easily use the packages we download, we need to integrate vcpkg with our C++ build tools. By default, this is MSBuild on Windows.
vcpkg also has a script for this, as part of the executable we generated in the previous step
vcpkg.exe is a command line tool. To use it, we need to execute it from a terminal, which allows us to pass additional arguments.
On Windows, we can open a Power Shell terminal window in our vcpkg directory using Shift + Right Click > Open PowerShell Window here
From PowerShell, we can run the following command to integrate vcpkg with MSBuild:
.\vcpkg integrate installThis should generate a success message, indicating C++ projects can now #include installed libraries.
If this script generates an error stating vcpkg is not recognized, we need to ensure we ran the bootstrap-vcpkg.bat file from step 2, and that we’re opening our PowerShell window in the same location as the vcpkg.exe file that was generated.
4. Set Default Triplet
There are many possible environments we can build C++ applications for. For example, these can include PCs running Windows, phones running iOS, smartwatches, etc. A triplet is a simple string that specifies what the target environment is. For example, x64-windows specifies our target is 64-bit Windows devices.
When we download a package through vcpkg, we need to specify which target we want. We can do that every time we install a package, but it’s usually easier to specify a default.
We do that by creating a VCPKG_DEFAULT_TRIPLET as an environment variable.
We can do that through Control Panel > System Properties > Advanced > Environment Variables, and click «New» within the User Variables section.
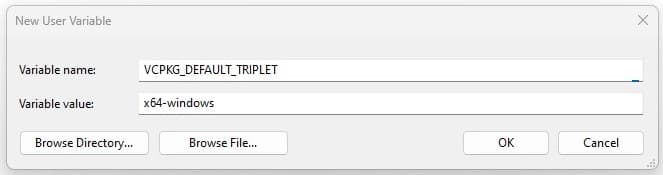
Alternatively, we can run this PowerShell command:
[System.Environment]::SetEnvironmentVariable(
  'VCPKG_DEFAULT_TRIPLET','x64-windows', 'User'
)
Installing Packages with vcpkg
We can install packages through vcpkg by using the vcpkg install command, followed by the names of the packages we want to install.
For example, let’s install spdlog, a popular third-party library for logging. As before, open a PowerShell terminal in our vcpkg installation directory, and run this command:
If successful, we should now be able to immediately #include this library in our Visual Studio projects:
#include <spdlog/spdlog.h>

int main() {
  spdlog::info("hello world");
  spdlog::error("oh no!");
}[2023-06-21 14:12:33.945] [info] hello world
[2023-06-21 14:12:33.946] [error] oh no!Troubleshooting
If the #include directive isn’t working following the above steps, the problem is likely to be one of two possibilities:
1. The integrate script didn’t run
Ensure step 2 from the installation instructions above is completed successfully.
2. Target/Triplet Mismatch
We need to ensure the platform we’re building for in Visual Studio matches the target of the package we downloaded. We can see our Visual Studio target (eg x64) from the dropdown near the Run button, or Build Menu > Configuration Manager
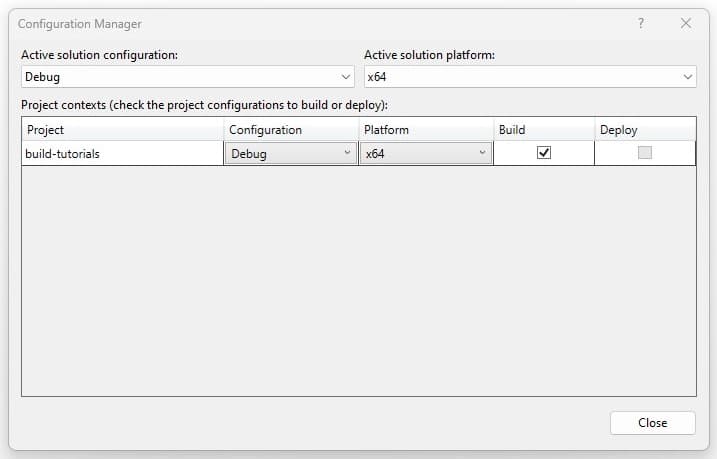
In the above example, we’re building for x64, or the x64-windows triplet.
We can see what vcpkg packages we have downloaded by running .\vcpkg.exe list from the vcpkg directory. For example, if our Visual Studio build configuration is targeting x64, we should ensure that the list includes the x64-windows version of our package:
If it’s missing, we can specify the desired triplet as an additional argument to the vcpkg install command:
.\vcpkg install spdlog --triplet x64-windowsAlternatively, we can set the default triplet by following step 4 of the installation instructions above. The default triplet will be used when we do not explicitly specify one as part of the install command.
Summary
In this lesson, we’ve navigated through the steps of installing vcpkg on Windows, allowing us to manage external C++ libraries. The key takeaways include:
- Package managers and their role in simplifying library management.
- An introduction to vcpkg, a C++ package manager created and maintained by Microsoft.
- Installing and integrating vcpkg with MSBuild and Visual Studio.
- Understood how to set a default target environment using triplets to tailor library installations for specific platforms.
- Explored the process of installing packages with vcpkg and troubleshooting common issues.
Free and Unlimited Access
Professional C++
Unlock the true power of C++ by mastering complex features, optimizing performance, and learning expert workflows used in professional development


New: AI-Powered AssistanceAI Assistance
Questions and HelpNeed Help?
Get instant help using our free AI assistant, powered by state-of-the-art language models.
Provide feedback
Saved searches
Use saved searches to filter your results more quickly
Sign up
C++ по прежнему используется не только для написания ОС, игр и драйверов, но и для неприхотливых к ресурсам утилит командной строки. Между тем конкуренты на этом поприще, например Rust, предлагают систему сборки c менеджером зависимостей по умолчанию. Для C++ де-факто тоже есть стандартная система сборки CMake, но как подключать внешние библиотеки без боли? Вспомним, что для многих развитых технологий есть нечто вроде странички https://start.yourtechnology.io, создающих базовый стандартный проект, чтобы не тратить время на boilerplate конфигурацию. В этой статье рассматривается именно такой шаблон для создания C++ проектов с менеджером зависимостей vcpkg.
Почему vcpkg?
Во первых, из желания предельно упростить базовый проект и уменьшить количество файлов конфигурации в нем. Для C++ есть и другой развитый пакетный менджер Conan, но он требует добавления файла conanfile.txt, а vcpkg обходится одним стадартным CMakeLists.txt. Во вторых, vcpkg хорошо зарекомендовал себя и имеет стабильную поддержку в лице Microsoft.
1. Установка тулчейна для работы
Прежде всего нам понадобится CMake и сам менеджер зависимостей vcpkg, его можно установить через ваш любимый пакетный менеджер (например brew install vcpkg), или собрать вручную отсюда.
2. Установка зависимостей
Проверить есть ли нужная библиотекаvcpkg search yourdepname
Установитьvcpkg install yourdepname
Обратите внимание, что на машине осуществляющей сборку, библиотеки не кладутся в директории рядом с проектом, а устанавливаются в систему глобально, чтобы vcpkg мог их потом переиспользовать в других проектах. Например, для работы нашего шаблона требуется библиотека тестирования, парсер аргументов командой строки и форматированный вывод:vcpkg install catch2
vcpkg install cli11
vcpkg install fmt
Приятным бонусом, после установки зависимости, vcpkg сам подскажет что дописать в CMakeLists.txt
Промежуточный итог
Как выглядит CMakeLists.txt после первичных манипуляций? Вовсе не страшно как можно было подумать, что на мой взгляд явно говорит в пользу vcpkg:
cmake_minimum_required(VERSION 3.17)
set(CMAKE_CXX_STANDARD 20)
set(CMAKE_CXX_STANDARD_REQUIRED ON)

project(proj)
file(GLOB proj_sources src/*.cpp)
add_executable(proj ${proj_sources})
find_package(fmt CONFIG REQUIRED)
target_link_libraries(proj PRIVATE fmt::fmt fmt::fmt-header-only)
find_package(CLI11 CONFIG REQUIRED)
target_link_libraries(proj PRIVATE CLI11::CLI11)

project(test)
#[[Changing the entry point for tests]]
list(FILTER proj_sources EXCLUDE REGEX ".*Main.cpp$")
file(GLOB test_sources test/*.cpp)
add_executable(test ${proj_sources} ${test_sources})
find_package(Catch2 CONFIG REQUIRED)
target_link_libraries(test PRIVATE Catch2::Catch2)
target_link_libraries(test PRIVATE CLI11::CLI11)
target_link_libraries(test PRIVATE fmt::fmt fmt::fmt-header-only)
3. Сборка в один бинарник
Итак, у нас есть простой CMake проект использующий вышеуказанные вещи, как собрать один исполняемый файл? Если вы используете IDE, то весь третий шаг можно сократить просто установив для параметра CMake options результат выполнения команды vcpkg integrate install
Без IDE чуть сложнее, сначала подготовим CMake в директории вашего проекта:
cmake `vcpkg integrate install | tail -1 | cut -d \"` -f2 -DCMAKE_BUILD_TYPE=Release -G "Unix Makefiles" -B cmake-build-releaseЕсли вы используете Windows, то вместо кода в « кавычках, подставьте сюда вручную результат выполнения все той же команды vcpkg integrate install
Затем, сборка будет осуществляться командой:cmake --build cmake-build-release --target all
Расширять такой проект по прежнему просто вызывая vcpkg install [...].
С++ в 21ом году совсем не страшный. Прилагаю GitHub шаблон, где все это уже реализовано включая точку входа. Чтобы использовать его для создания нового проекта, нажмите кнопку «Use this template» справа вверху.
Интересно услышать критику подхода и альтернативные решения для кроcплатформенных C++ проектов с зависимостями. Всем удачного дня!
Только зарегистрированные пользователи могут участвовать в опросе. Войдите, пожалуйста.
Я использую в своих проектах
13.04% пишу на Go, зашел посмотреть как вы страдаете18
18.84% пишу на Rust, зашел посмотреть как вы страдаете26
Проголосовали 138 пользователей. Воздержались 85 пользователей.
Краткая инструкция по установке всех нужных для курса библиотек для Visual Studio
Содержание
На Windows рекомендуется использовать
- Visual Studio Community Edition последней версии для разработки
- vcpkg для установки пакетов
- CMake для сборки некоторых библиотек
Без vcpkg каждую библиотеку придётся ставить по отдельности. Пакетный менеджер vcpkg автоматизирует скачивание и сборку библиотек на машине разработчика.
Установка CMake
Для сборки примеров потребуется CMake. Свои работы можно делать без CMake.
- Скачайте Cmake с официального сайта
- При установке не забудьте поменять опцию, чтобы путь к CMake был добавлен в переменную PATH
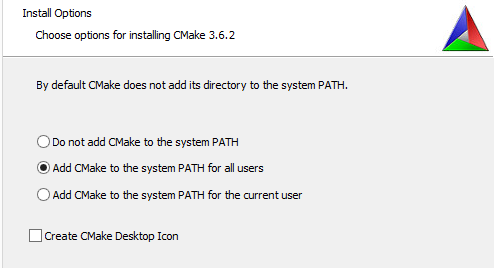
- Переменные окружения, такие как PATH, передаются приложению при старте. Если вы поменяли переменную PATH, изменения вступят в силу после перезапуска программ.
Установка и использование vcpkg
Источник: blogs.msdn.microsoft.com/vcblog/2016/09/19/vcpkg-a-tool-to-acquire-and-build-c-open-source-libraries-on-windows
Пакетный менеджер vcpkg распространяется в исходниках и собирается на машине разработчика. Для сборки потребуется установленная Visual Studio с инструментами C++ разработчика.
Порядок установки описан в консольных командах:
:: Клонируем репозиторий vcpkg (ветка master)
git clone https://github.com/Microsoft/vcpkg

:: Переходим в каталог клона репозитория
cd vcpkg

:: Выполняем скрипт для сборки vcpkg
powershell -exec bypass scripts\bootstrap.ps1
:: Теперь в корне репозитория лежит vcpkg.exe, который можно вызывать
::  из каталога либо добавить в переменную окружения PATH.

:: Установка библиотеки выполняется командой install
vcpkg install sdl2:x86-windows-static sdl2:x64-windows-static
Из команды выше легко понять, что имена пакетов перечисляются по порядку, а в качестве суффикса используется так называемый “триплет”: имя_пакета:триплет.
- Имя пакета задаёт одно из множества имён доступных библиотек.
- Триплет задаёт архитектуру и режим сборки
Доступные триплеты:
arm-uwp.cmake
x64-uwp.cmake
x64-windows-static.cmake
x64-windows.cmake
x86-uwp.cmake
x86-windows-static.cmake
x86-windows.cmake
Для данного курса рекомендуются триплеты x86-windows-static для сборки 32-битной версии программы и x64-windows-static для сборки 64-битной версии. Суффикс static означает, что библиотеки будут собираться статически и вам не потребуется распространять DLL.
Вместо явного указания триплета для каждой библиотеки можно разом указать триплет для всех:
vcpkg --triplet x86-windows-static sdl2 sdl2-image
Последняя, но крайне важная деталь: включите автоматическую интеграцию пакетов vcpkg во все проекты Visual C++:
:: Включаем интеграцию во все проекты Visual C++ в системе.
:: При первом запуске нужны права администратора.
vcpkg integrate install

:: Удаляем интеграцию - если она вам помешала.
vcpkg integrate remove
Установка пакетов для курса
Мы используем следующие библиотеки:
- sdl2, sdl2-image, sdl2-mixer, sdl2-ttf в целях абстрагирования от операционной системы для создания окон, растеризации текстовых надписей, загрузки изображений с диска, загрузки и проигрывания звуковых файлов
- glbinding для прозрачного подключения нужной версии API OpenGL без необходимости вручную работать с механизмом расширений OpenGL
- assimp3 для загрузки 3D моделей из множества форматов файлов
- anax для построения архитектуры программы на принципах Component-Entity-System
- bullet3 для расчёта столкновений в 3D пространстве
- glm для работы с линейной алгеброй в рамках задач 3D графики
- nlohmann-json для загрузки JSON
- tinyxml2 для загрузки XML
Команда для установки 32-битных версий библиотек из исходников может выполняться долго, т.к. сборка занимает длительное время:
vcpkg --triplet x86-windows-static sdl2 sdl2-image sdl2-mixer sdl2-ttf glbinding assimp anax bullet3 glm nlohmann-json tinyxml2
Настройка gitignore для своих проектов
В Visual Studio управление настройками сборки производится в графическом режиме в окне настроек проекта, хотя сами настройки сохраняются в XML определённой схемы в файле *.vcxproj. Виртуальные папки (фильтры), по которым разложены файлы проекта, сохраняются в файле *.vcxproj.filters. Настройки проекта из раздела Debugging, а также некоторые неявные пользовательские настройки сохраняются в *.vcxproj.user. Есть общепринятые правила:
- Файлы
*.vcxprojнеобходимы и достаточны для сборки проекта, их следует держать под контролем версий Git, а настройки проекта изменять аккуратно - Файлы
*.vcxproj.filtersне нужны для сборки, но хранят фильтры файлов, их тоже следует держать под контролем версий Git - Файлы
*.vcxproj.userхранят специфичные для компьютера настройки, их не следует держать в Git - Файлы
*.slnхранят списки проектов и информацию о сборке всего списка проектов в разных конфигурациях. Их следует держать в Git.
Вы можете взять готовый шаблон файла .gitignore из репозитория github.com/github/gitignore. После добавления файла .gitignore в корень своего репозитория достаточно сделать commit, добавляющий этот файл.
Microsoft vcpkg is a C++ library managers for Windows, macOS and Linux. For .NET, nuget is the commonly used package manager; for Java, Maven central and many other repositories are used by Maven or other build tools; for JavaScript, npm is a commonly used package manager and it is also the default package manager for JavaScript runtime environment Node.js. Microsoft vcpkg serves as similar purpose for C++ developers.
Install vcpkg on Windows
Before we can install vcpkg, make sure the following criteria are met:
- Git — for cloning repository from GitHub
- Windows 7 or newer
- Visual Studio 2015 Update 3 or greater with the English language pack
Follow these steps to install vcpkg.
- Create installation folder. I recommend creating the folder in C drive to avoid path related issues.
C:\>mkdir dev
C:\> cd dev
- Clone the repository using the following command:
git clone https://github.com/microsoft/vcpkg
- Run the following command to install vcpkg:
.\vcpkg\bootstrap-vcpkg.bat
- Wait until the command is completed successfully.
Now we can use vcpkg to install C++ libraries.
Find libraries
Subcommand search is used to search libraries. The syntax looks like the following:
.\vcpkg\vcpkg search [search term]
For example, the following command searches for library openssl:
.\vcpkg\vcpkg search openssl
...
openssl              1.1.1i           OpenSSL is an open source project that provides a robust, commercial-grade, an...
openssl-unix         1.1.1h#1         Deprecated OpenSSL port
openssl-uwp          1.1.1h#1         Deprecated OpenSSL port
openssl-windows      1.1.1h#1         Deprecated OpenSSL port
...
The results include a number of openssl related libraries.
Integrate vcpkg with Visual Studio
Run the following command to integrate vcpkg with Visual Studio:
.\vcpkg\vcpkg integrate install
The output looks like the following:
C:\dev>.\vcpkg\vcpkg integrate install
Applied user-wide integration for this vcpkg root.

All MSBuild C++ projects can now #include any installed libraries.
Linking will be handled automatically.
Installing new libraries will make them instantly available.

CMake projects should use: "-DCMAKE_TOOLCHAIN_FILE=C:/dev/vcpkg/scripts/buildsystems/vcpkg.cmake"
As mentioned in the output, you can include any installed libraries in your MSBuild C++ projects.
Use vcpkg in CMake
To use vcpkg with CMake outside of an IDE, you can use the toolchain file for CMake:
cmake -B [build directory] -S . -DCMAKE_TOOLCHAIN_FILE=[path to vcpkg]/scripts/buildsystems/vcpkg.cmake
For this article, the path is:
cmake -B [build directory] -S . -DCMAKE_TOOLCHAIN_FILE=C:/dev/vcpkg/scripts/buildsystems/vcpkg.cmake
Use CMake with Visual Studio
Open the CMake Settings Editor, and under CMake toolchain file, add the path to the vcpkg toolchain file:
C:/dev/vcpkg/scripts/buildsystems/vcpkg.cmake
Example — openssl
Now let’s implement this example that installs openssl: CMake Build Error — Could not Find OpenSSL on Windows 10.
Follow these steps:
- Run the following command to install package openssl:
C:\dev>.\vcpkg\vcpkg install openssl:x64-windows
Alternatively, you can also use the following command:
C:\dev>.\vcpkg\vcpkg install openssl --triplet x64-windows
I am using triplet x64-windows to match my project requirements. By default x86 triplet will be used.
The following text will be printed out if in your system CMake version is lower than 3.19.2. I would recommending upgrade CMake versions.
A suitable version of cmake was not found (required v3.19.2). Downloading portable cmake v3.19.2...
Downloading cmake...
  https://github.com/Kitware/CMake/releases/download/v3.19.2/cmake-3.19.2-win32-x86.zip -> C:\dev\vcpkg\downloads\cmake-3.19.2-win32-x86.zip
For the first time, many other dependencies will also be downloaded. It will takes a while to download for the first time.

- Test openssl by running the following command:
C:\dev>openssl version
OpenSSL 1.1.1g  21 Apr 2020
- Create a project folder named C:\hdp\cmaketest.
- Create file CMakeLists.txt in the project folder with the following content:
cmake_minimum_required(VERSION 3.10)

# set the project name
project(Test)

# Find package
find_package(OpenSSL REQUIRED)
- Change directory to C:\hdp\cmaketest.
cd /D C:\hdp\cmaketest
- Run CMake command:
cmake . -DOPENSSL_ROOT_DIR="C:/dev/vcpkg/installed/x64-windows"
The output looks like the following:
- Congratulations, openssl dependency is met.