
Running Valorant on Windows 11 is a fairly straightforward task, but there are a few important steps you don’t want to miss. First, make sure your system meets the minimum requirements for the game. Next, you’ll need to download and install the game client from the official Riot Games website. Lastly, ensure your Windows 11 settings are configured properly to avoid any compatibility issues. Following these steps will get you into the action-packed world of Valorant in no time.
Setting up Valorant on your Windows 11 device involves a few key steps. Each step is important to ensure the game runs smoothly and gives you the best experience possible.
Step 1: Check System Requirements
Make sure your PC meets the minimum system requirements for Valorant.
Before diving into downloads, verify that your computer has at least 4GB of RAM and an Intel i3-370M CPU or better. Confirm your graphics card is compatible and that your system is running Windows 10 or 11, with a 64-bit processor. Meeting these basic requirements ensures smooth gameplay without lag or crashes.
Step 2: Download the Valorant Installer
Visit the official Riot Games website to download the Valorant installer.
Navigate to the Riot Games website and find the Valorant page. Click on the download button to get the installer file. Keep an eye on rogue sites—always download from official sources to protect your device from malware.
Step 3: Install Valorant
Run the installer and follow the on-screen instructions to install Valorant.
After downloading, locate the installer file in your downloads folder and double-click to run it. Follow the on-screen prompts to install the game. This step usually takes a few minutes, depending on your internet speed and system performance.
Step 4: Update Graphics Drivers
Update your graphics drivers to ensure optimal performance.
Having up-to-date drivers is crucial for a seamless gaming experience. Visit your graphics card manufacturer’s website, whether it’s NVIDIA or AMD, to download the latest drivers. This step helps prevent any graphical glitches or errors during the game.
Step 5: Adjust Windows 11 Settings
Configure Windows 11 settings to avoid compatibility issues with Valorant.
Open the settings on your Windows 11 PC and navigate to the gaming section. Here, enable the Game Mode and ensure your PC’s performance is optimized for gaming. Also, ensure any system updates are applied to avoid compatibility hiccups.
Once you’ve completed these steps, your system should be ready to run Valorant. You’ll see the game icon on your desktop or in your start menu. Double-click it, log in with your Riot account, and you’re good to go! Enjoy exploring the thrilling maps and mastering the unique abilities of each character.
Tips for Running Valorant on Windows 11
- Keep your system updated: Regular Windows updates can improve game performance and fix bugs.
- Manage background apps: Close unnecessary programs running in the background to free up system resources.
- Optimize in-game settings: Adjust the in-game video settings for better frame rates, especially if you experience lag.
- Use a wired connection: A wired internet connection is more stable and can reduce latency compared to Wi-Fi.
- Check firewall settings: Make sure your firewall isn’t blocking Valorant or its anti-cheat program, Vanguard.
Frequently Asked Questions
Will Valorant run on my Windows 11 PC?
Yes, as long as your system meets the minimum requirements outlined by Riot Games.
How can I fix lag issues in Valorant on Windows 11?
Try updating your graphics drivers and closing unnecessary background applications.
Can I use a controller to play Valorant on Windows 11?
Currently, Valorant is optimized for keyboard and mouse use only.
Why isn’t Valorant opening after installation?
Check if your firewall or antivirus is blocking the game or its components.
Is Game Mode necessary for running Valorant?
While not necessary, enabling Game Mode can optimize system performance for gaming.
Summary
- Check system requirements.
- Download the Valorant installer.
- Install Valorant.
- Update graphics drivers.
- Adjust Windows 11 settings.
Conclusion
Running Valorant on Windows 11 is like preparing a recipe; it’s all about having the right ingredients and following each step carefully. By ensuring your system meets the game’s requirements, downloading from legitimate sources, and optimizing your settings, you’re setting yourself up for a top-notch gaming experience. Remember, keeping your drivers and system updated is like regularly servicing a car—it keeps everything running smoothly.
Valorant is not just another game; it’s a competitive world that invites you to strategize and collaborate with players globally. Now that you’re all set to play, why not explore different agents and find the one that matches your play style? The diversity and skill involved in mastering each character will keep you engaged and challenged.
So, are you ready to dive into the dynamic world of Valorant on Windows 11? Get your gear ready, gather your teammates, and step into the arena where every move counts. Have fun, and happy gaming!
Matthew Burleigh has been writing tech tutorials since 2008. His writing has appeared on dozens of different websites and been read over 50 million times.
After receiving his Bachelor’s and Master’s degrees in Computer Science he spent several years working in IT management for small businesses. However, he now works full time writing content online and creating websites.
His main writing topics include iPhones, Microsoft Office, Google Apps, Android, and Photoshop, but he has also written about many other tech topics as well.
Read his full bio here.
For the past few months, some Windows users have been able to download Windows 11 and participate in beta testing. These are about to end and the update will soon be available to everyone. Good news, some would think. Well, it’s not! Indeed, if you install this new version of Windows, it may prevent you from playing Valorant. But don’t panic, we’ll explain how to fix the problem.
Why doesn’t Valorant work on Windows 11?
Theoretically, although most players should be able to run Valorant on Windows 11, some have probably encountered error messages. Chances are, that’s precisely why you’re on this article. So what is going on and why is the world so unfair?
In most cases, the thing responsible is TPM 2.0 (for Trusted Platform Module).
It is a technology built into Windows 11 that is used to secure your computer and verify a user’s authentication and credentials. In short, it is basically an encrypted ID card for your computer, similar to a smart card like your credit card. When an action is performed by your computer, TPM 2.0 verifies that you are the originator, rather than an unknown outside source.
Until now, TPM 2.0 technology was integrated into certain motherboards, but was only used in professional environments. With Windows 11, it is directly integrated into the operating system and is therefore widely democratised.
However, there can be conflicts between Vanguard, Valorant’s anti-cheat software, and TPM 2.0, especially if the latter is not activated (which can happen when you fiddle with the registry keys). It is from these conflicts that the various errors arise. Let’s see some possible solutions.
Reinstall VALORANT and Vanguard
If you installed Valorant on Windows 10 before upgrading to Windows 11, it is likely that this installation did not support TPM 2.0.
In order to bring Vanguard back up to date properly, we advise you to uninstall Valorant and its security software and delete all files. Then restart your computer before installing the game again, this time on Windows 11.
Once this relatively simple process has been completed, you should not encounter any problems. If not, please try another solution.
Activate Trusted Platform Module 2.0 on Windows 11
Depending on how you installed Windows 11, TPM 2.0 may simply not be enabled on your motherboard or operating system.
To check that you have TPM 2.0 and activate it, we advise you to follow the steps described on the Microsoft support page. Windows 11 is still in beta and the procedure may change depending on your hardware. The official Microsoft website offers all the up-to-date methods for activating TPM 2.0.

Activate TPM 2.0 from your motherboard
For your own reasons, you may not want to enable TPM 2.0 on Windows 11. In this case, you can try to activate it directly from your motherboard, if it is compatible. To do this, you will have to go through your computer’s BIOS, which can be risky if you don’t know what you are doing.
We advise you to visit your manufacturer’s website to find out if your motherboard is compatible and how to activate TPM 2.0.
Reinstalling Windows 10
If your machine is not compatible with TPM 2.0 or you still can’t connect to the game after reinstalling it, you may have no choice but to switch back to Windows 10.
Fortunately, if you have just installed Windows 11, you have 10 days to decide whether to stay on the operating system or revert to its previous version.
To do this, use the following method:
- Open your computer’s Settings
- Go to the System menu
- Click on «Go Back»
- Microsoft may ask you why you are going backwards. You will be able to reinstall Windows 10 regardless of your answer.
- Microsoft may also offer you updates to Windows 11 before you make your choice. Refuse them.
- Windows 11 will ask you what you want to keep and what you don’t want to keep in the transition to Windows 10. Choose the items that are right for you.
- Let Windows restart your computer and make the transition.
If you’ve had Windows 11 for more than ten days, it can get complicated. You can use the Windows Recovery Tool to attempt a reinstall of Windows 10.
If none of these options are available, chances are you will need to format your system. The first thing to do is to back up all your data to an external hard drive or to a cloud. Don’t forget anything, otherwise it will be lost.
Next, get a bootable USB stick with the Windows 10 installation files. Plug it into your computer and restart it. Follow the steps that appear on your screen when you plug in your USB stick.
Contact support and wait for an update from Valorant
Finally, if none of these solutions are possible, you can always wait for Riot Games to update Valorant to improve compatibility between the game and Windows 11. But you won’t be able to play until then.
If you have tried all of the above solutions and still want to upgrade to Windows 11, you can contact the support of the game. Make a ticket including all the solutions that have already been tried. Do not hesitate to describe at length what you have done and why not include photos. This will greatly help the person who answers you and tries to find a final solution to your problem.

At the moment, the easiest solution is still to stay on Windows 10. So if we suggest that you upgrade now, feel free to postpone it a little to give the Valorant teams time to optimise the game for this new version of the operating system.
After a record-breaking beta testing period, Riot Games released its 5-v-5 tactical FPS title Valorant in 2020. Since then, the online multiplayer shooter has garnered a ton of traction from players around the globe and has become one of the most popular online PvP titles of all time.
However, we have seen many users report that they are facing the Valorant not working/ opening issue on their PCs and laptops after upgrading to Windows 11. So, if you are an avid Valorant player who is facing the Valorant not working in Windows 11 issue on your device, you have clicked the right article.
Fix Valorant Not Working in Windows 11
We understand how frustrating it can be to be not able to play your favorite game. So, in this in-depth fix guide, you can find some of the best fixes for the Valorant not working in Windows 11 issue. Be sure to try them all out on your PC or laptop to get Valorant up and running once again.
1. Check Your Internet Network
Now, oftentimes, users try to run Valorant without an active internet connection without knowing about it. So, as Valorant is an online game and requires an active internet network with decent speeds, they might experience the Valorant not working in Windows 11 error on their PCs and laptops.
Hence, if you are facing the same issue that is preventing Valorant to run on your Windows 11 PC or laptop, contact your internet provider and let them know about it. When your internet network becomes active, try running Valorant on your Windows 11 device. It should work fine.
2. Check Valorant Server Status
Another factor that can cause the Valorant not working issue in Windows 11 is issues with Riot’s cloud servers for Valorant. You see Valorant depends on cloud-based servers spread all across the world. There are servers for Valorant in India, Malaysia, Singapore, and various other regions to deliver uninterrupted gaming to players all around the world.
However, at times, these servers can be down due to heavy traffic or internal maintenance. For instance, when there is a major patch update for Valorant, the game servers often remain down for hours before going live again. During the downtime, most players cannot run Valorant and get various errors.
In this case, all you can do is wait for Riot to fix their servers and get them back online again. You can keep an eye on the Valorant’s official social handles to remain updated about server status. Otherwise, you can go to Riot’s official server status page to check for ongoing issues.
3. Repair Valorant in Windows 11
Now, if there is no issue with the game’s servers and your internet is also working fine yet you are facing the Valorant not working issue on your Windows 11 PC or laptop, you can try repairing the game.
Although you cannot repair Valorant like other system applications in Windows 11, you can do so via the Riot client. Follow the steps right below to repair Valorant in Windows 11:
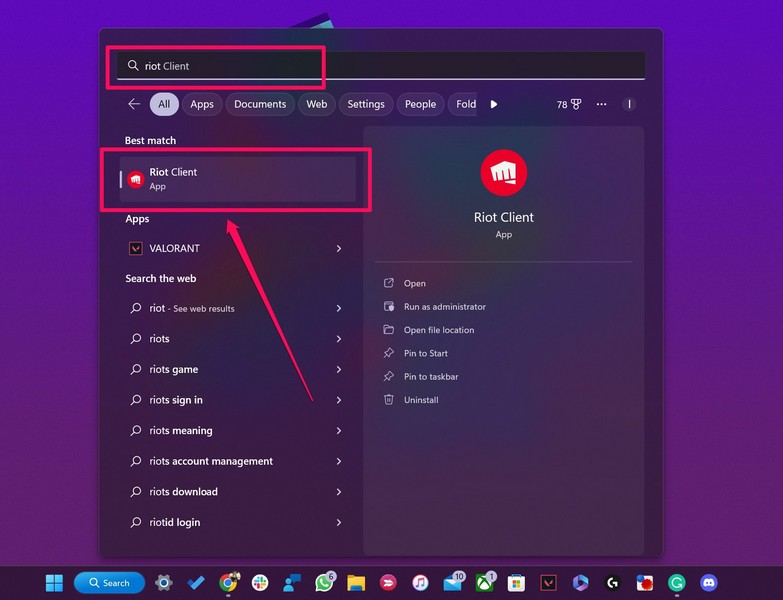
1. Use Windows + S to open Windows search and search for Riot.
2. Click on Riot Client on the search results page.
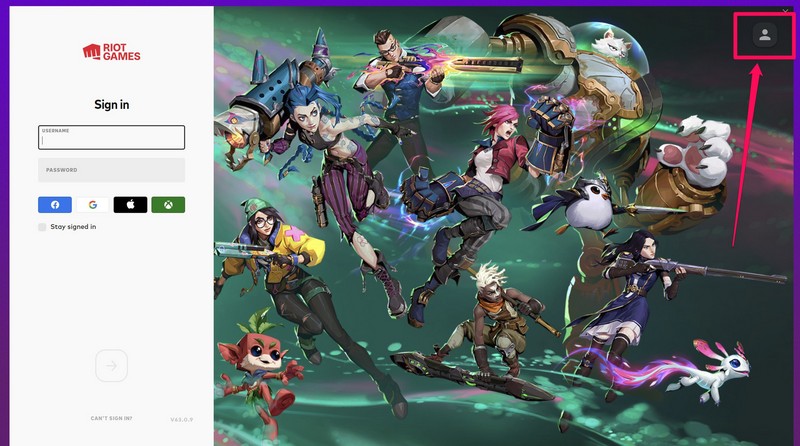
3. Once the Riot Client launches in Windows 11, click your profile icon at the top right.
4. Next, click on the Settings option.
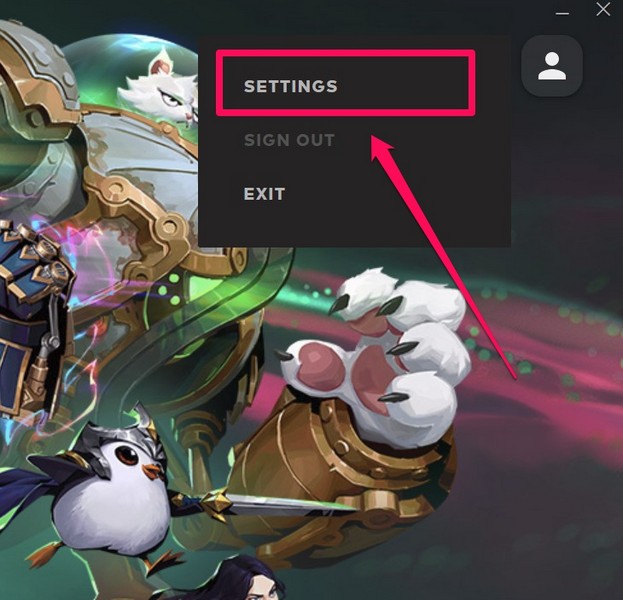
5. In the Settings window, go to the Valorant tab on the left nav bar and click the Repair button.

6. Wait for the repair process to complete.
7. Restart your Windows 11 PC after completion.
Following the restart, launch Valorant on your Windows 11 device and check if the issue has been fixed or not.
4. Update the Graphics Driver in Windows 11
Other than server and internet issues, outdated graphics drivers can also cause the Valorant not working/ opening issue in Windows 11. In this case, all you need to do is update the graphics driver on your PC and laptop. Follow the steps right below to do that:
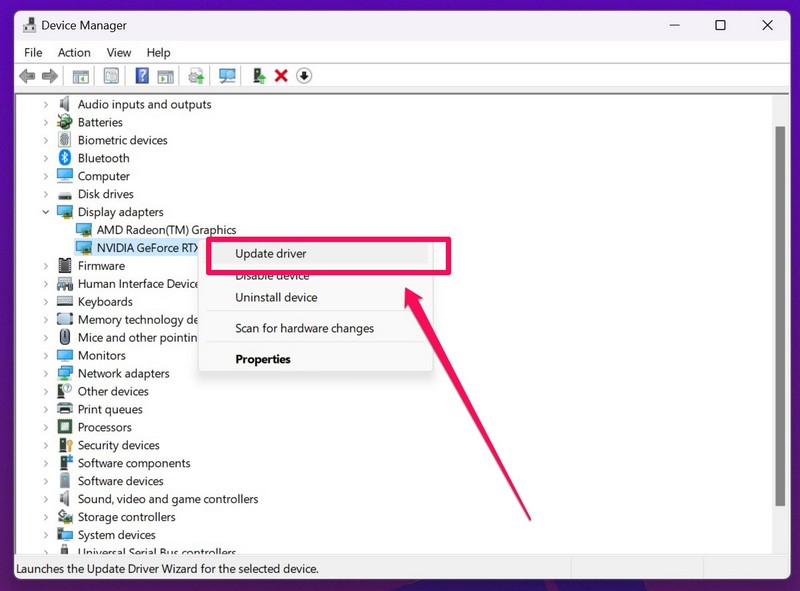
1. Right-click on the Start icon on the Taskbar to open the Quick Links menu.
2. Click on Device Manager on the list.

3. Find the Display adapters option and click the tiny arrow beside it to expand.

4. Right-click on your primary graphics card driver and select the Update driver option on the context menu.
5. Select the Search automatically for drivers option on the following prompt.
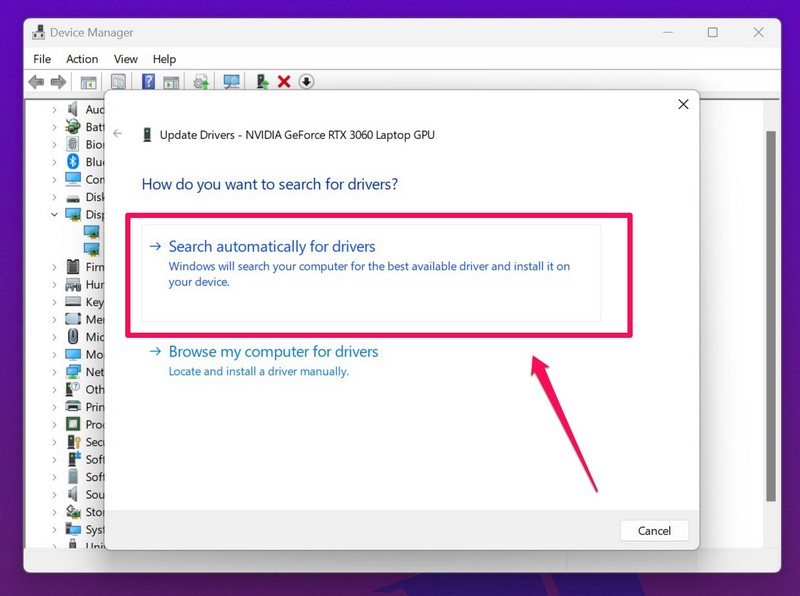
6. Wait for the update process to complete.
7. Restart your Windows 11 PC or laptop.
5. Run Valorant in Compatibility Mode in Windows 11
Now, another thing you can do when you experience the Valorant not working in Windows 11 issue on your PC or laptop is run the game in Compatibility Mode. The Compatibility Mode in Windows 11 is essentially a way to emulate an older version of an application for it to properly run on a potentially incompatible device.
So, if there is an issue in the current version of Valorant on your device, running the game in Compatibility Mode could fix it. Follow the steps right below to enable Compatibility Mode for Valorant on your Windows 11 PC or laptop:
1. Use Windows + S to open Windows search and search for Valorant.
2. When Valorant shows up in the search results, select the Open file location option from the right pane.
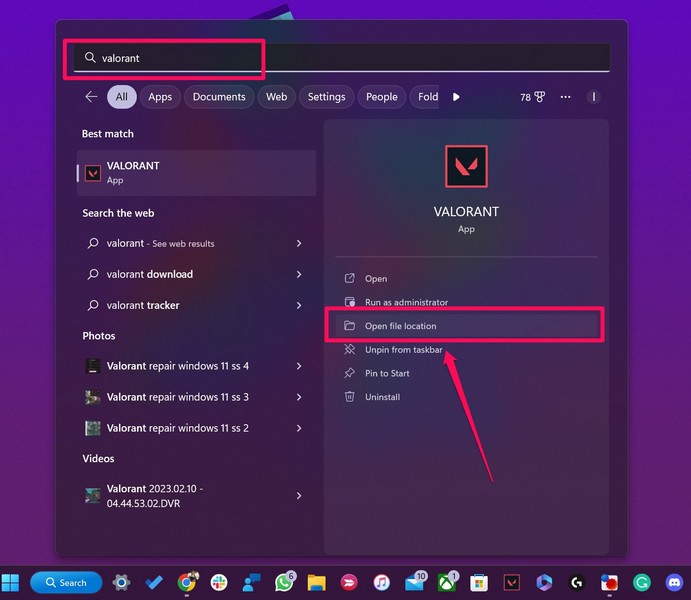
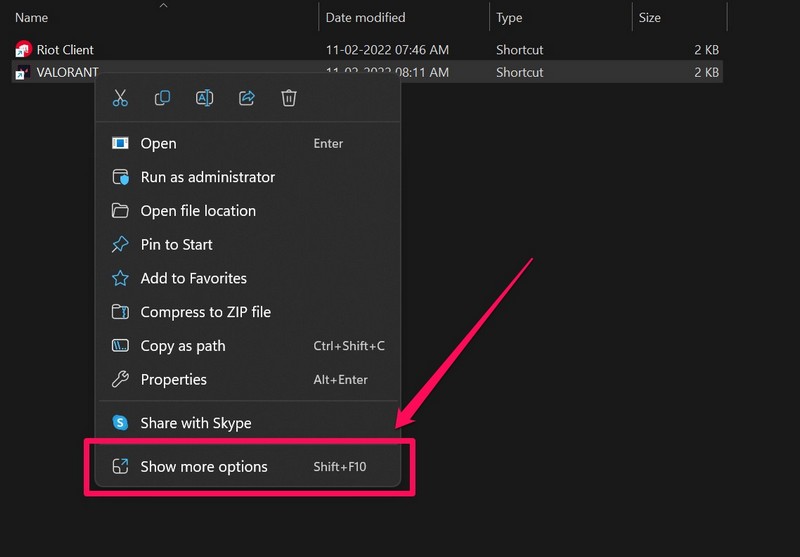
3. Once the file location opens in File Explorer, right-click on the executable file for Valorant and click the Properties button.
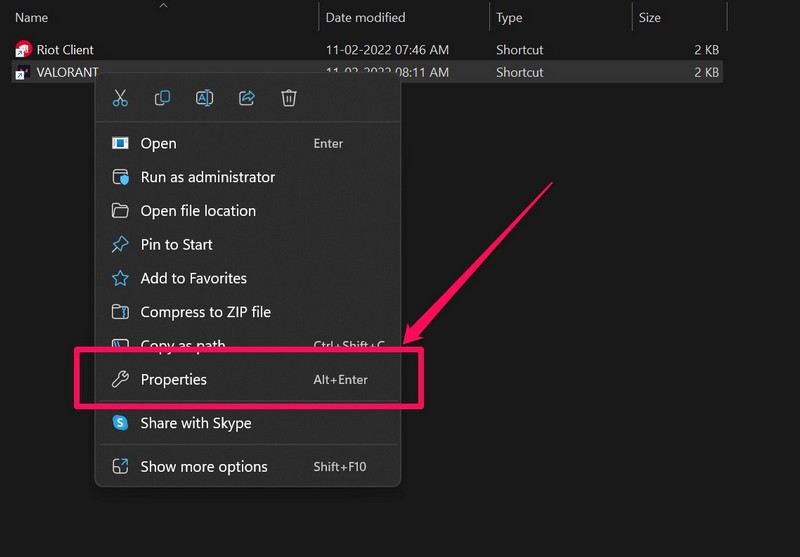
Note: If you do not see the Properties option, click the Show more options to access it.
4. In the Properties window, go to the Compatibility tab from the top nav bar.
5. Now, click the checkbox for the Run this program in compatibility mode for: option to enable it. Keep it as Windows 8.
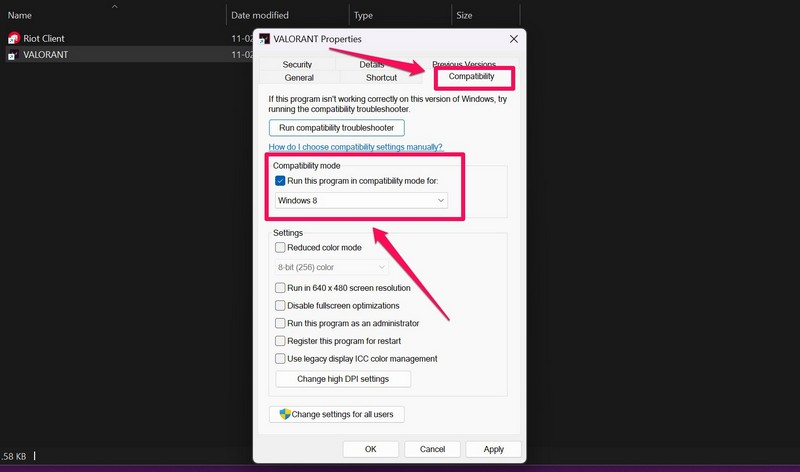
6. Finally, click the Apply button to save the changes.
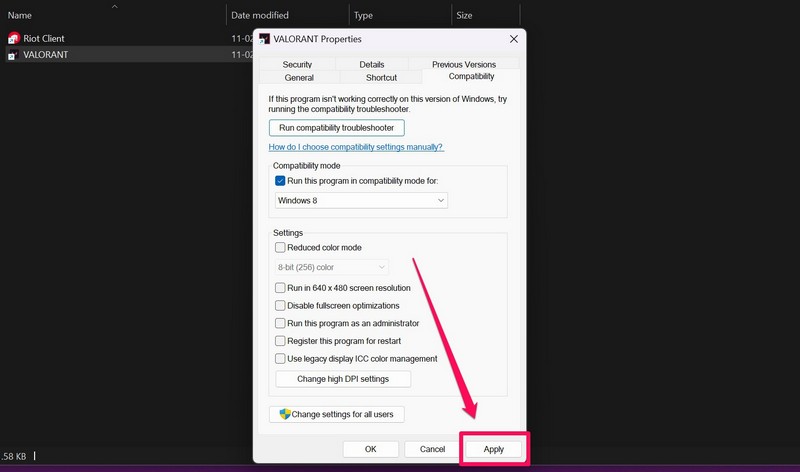
7. Restart your Windows 11 PC or laptop.
Following the restart, launch Valorant on your Windows 11 device. The game should now run properly on Windows 11.
6. Check for Windows Updates in Windows 11
Much like how outdated graphics drivers can cause the Valorant not working issue, outdated Windows 11 versions can also cause the same on your PC or laptop. Hence, it is always best to keep your PC or laptop up to date to avoid such issues due to possible bugs and glitches in the system.
So, follow the steps right below to check for Windows updates and install them on your PC or laptop right away:
1. Use Windows + I to launch the Settings app in Windows 11.
2. Go to the Windows Update tab on the left nav bar and click the Check for updates button.

Note: Be sure to keep your PC or laptop connected to an active internet network during this process.
3. Once the latest updates show up on the screen, click the Download and install button to get them right away.
4. Wait for the update to complete.
5. Restart your Windows 11 device after.
7. Re-Install Valorant in Windows 11
Now, if all the above solutions fail to fix the Valorant not working issue on your Windows 11 PC or laptop, try reinstalling the game. For this, you first need to uninstall Valorant from your Windows 11 PC or laptop. Follow the steps below to do that:
1. Use Windows + S to open Windows search and search for Valorant.
2. Once the program shows up in the search results, click the Uninstall option on the right pane.
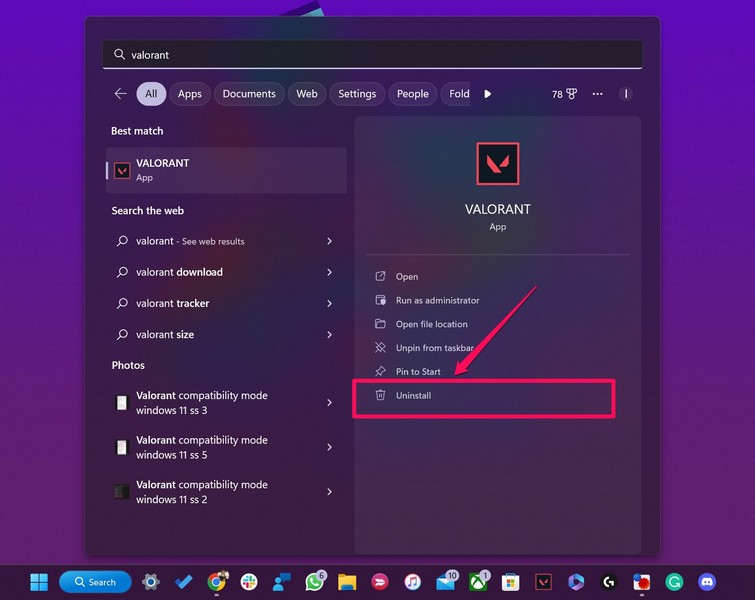
3. Follow the on-screen instructions to completely remove Valorant from your PC or laptop.
Now that you have uninstalled Valorant from your device, go to the official download page for Valorant and download the game on your Windows 11 device. Follow the on-screen instructions to install the title on your PC or laptop and launch the game once the installation is complete.
FAQs
Why is Valorant not opening in Windows 11?
There can be various reasons why Valorant is not opening or working in Windows 11. These include issues in the system, server issues, misconfigured settings, issues in the game files, and others.
Is Valorant compatible with Windows 11?
Yes, Valorant is compatible with Windows 11 as long as your PC or laptop has TPM 2.0 and UEFI Secure Boot enabled. If the said BIOS settings, which are the standard security protocols recommended by Microsoft to verify bootloaders, are disabled on your device, Valorant might not run in Windows 11.
Wrapping Up
So, these were some of the best fixes that you can try when you experience the Valorant not working issue on your Windows 11 PC or laptop. We hope one of the above solutions works for you and that you are able to get Valorant up and running on your device once again.
And if one of these methods helped you get back your favorite online game up and running, do let us know in the comments below. Meanwhile, you can check out our in-depth fix guides on various other Windows 11-related issues and bugs from right here!
Are you one of those unfortunate Windows 11 users facing an issue that impedes Valorant from opening? It’s because the tactical shooter needs its launch client and anti-cheat system to operate simultaneously. Moreover, the game developers have established particular system requirements for the game to operate efficiently on your PC. You might encounter the «Valorant won’t open Windows 11» issue being the topic of discussion, which is real trouble since the Riot client demonstrates no error texts when it fails to launch.
Valorant not launching!! HELP
byu/kalamardoboha inValorantTechSupport
Check the following guide and we’ll help you solve this Valorant game issue quickly.
| Workable Solutions | Step-by-step Troubleshooting |
|---|---|
| Method 1. Fix Valorant Not Opening by Running It in Compatible Mode | Right-click on the Valorant game and opt for «Properties.» Underneath the «compatibility…Full steps |
| Method 2. Check Valorant Server Status to Resolve | Server difficulties are the usual basis for Valorant not opening on Windows 11. Due to…Full steps |
| Method 3. Solve Valorant Issue by Running as Administrator | Hit the «Windows + E» key to launch «File Explorer.» Hit the address bar at the top and paste this location…Full steps |
| Method 4. Updating Graphics Card Driver to Solve | Launch your browser, move to the official Nvidia website, and hit «drivers» in the top menu. Type…Full steps |
| Extra Tip: Recover Missing DirectX Files | While fixing the «Valorant not opening Windows 11» error is crucial for gamers, there’s another…Full steps |
Method 1. Fix Valorant Not Opening in Windows 11 by Running It in Compatible Mode
If a Windows update messes with Valorant or any such client compatibility issues leading to «Valorent not opening Windows 11,» you may try to run this game in compatibility mode to eliminate this error. The steps are the following:
Step 1. Right-click on the Valorant game and opt for «Properties.»
Step 2. Underneath the «compatibility» tab, select an earlier version of Windows by marking the box labeled «Run this program in compatibility mode for.»
Step 3. Save the changes you have made and run the installer now.
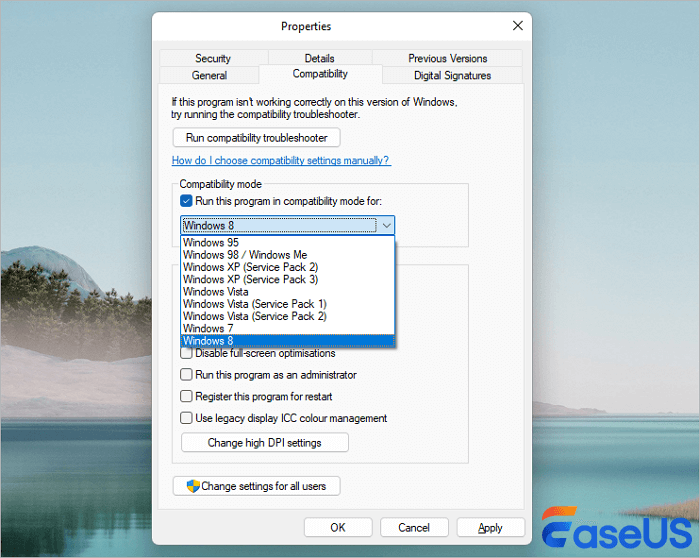
Remember to share the information with your mates on social media if it is valuable.
Method 2. Check Valorant Server Status to Resolve Valorant Launch Issues
Server difficulties are the usual basis for Valorant not opening on Windows 11. Due to its enormous traffic, Valorant is a highly regarded collaborative game that depends on multiple network servers, which can have difficulties or congestion. Therefore, you can do nothing other than wait. To evaluate the server condition, you must visit the official Valorant website or wait for the game developers to address the issue before launching the game.
Method 3. Solve Valorant Won’t Open Windows 11 by Running as Administrator
Operating the game as a daily user may lead you to face permission-oriented troubles that impede the game from opening. In that case, you must try running the game with administrator rights. Go through the steps below to solve «Valorant won’t open Windows 11» by running as administrator:
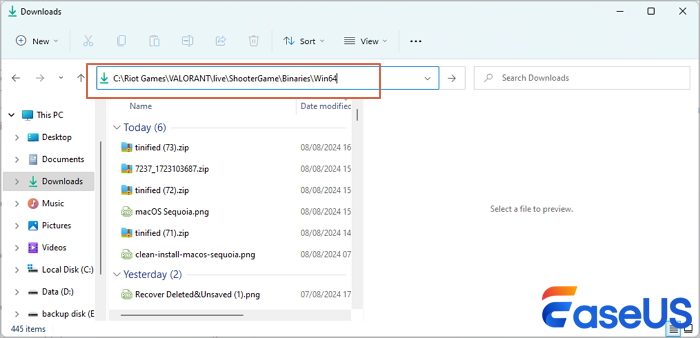
Step 1. Hit the «Windows + E» key to launch «File Explorer.»
Step 2. Hit the address bar at the top and paste this location: C:\Riot Games\VALORANT\live\ShooterGame\Binaries\Win64.
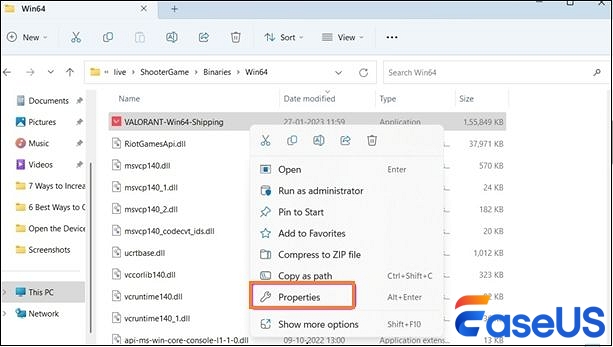
Step 3. Opt for «Properties» after right-clicking on the Valorant-Win64-Shipping file.
Step 4. Move to the compatibility mode and tick the box «Run this program as an administrator box.»
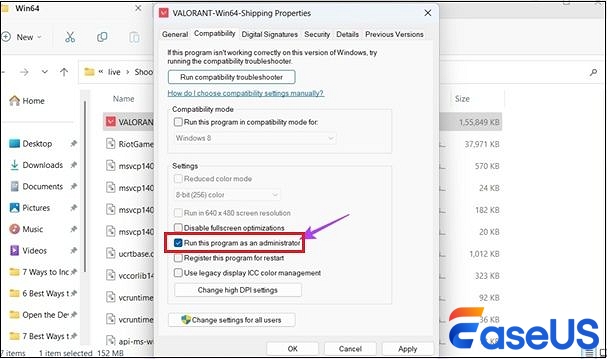
Step 5. Hit «Apply» and «OK» to confirm the changes.
Last but not least, open Valorant and investigate whether the problem persists. If you like the steps mentioned here, kindly share them with your friends on social media.
Method 4. Fix Valorant Not Launching Windows 11 by Updating Graphics Card Driver
Graphics drivers are essential for an uninterrupted gaming session. Sadly, several players disregard upgrading their graphics drivers, which can cause the «Valorant not opening Windows 11» problem. Are you among them? If so, manually installing the newest graphics card drivers is recommended. Let’s consider the steps below with Nvidia graphics drivers:
Step 1. Launch your browser, move to the official Nvidia website, and hit «drivers» in the top menu.
Step 2. Type your graphics card information in the «manually search for drivers» area. Finally, hit the «search» button to move further.
Step 3. Hit the «download» button to commence installing the driver’s installation file.
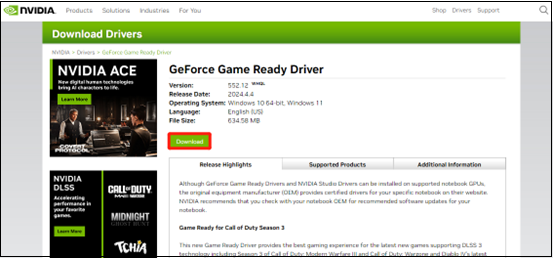
Step 4. Go through the on-screen prompts to install the newest graphics driver.
Extra Tip: Recover Missing DirectX Files to Fix Valorant Windows 11 Open Issues
While fixing the «Valorant not opening Windows 11» error is crucial for gamers, there’s another issue you might face during the troubleshooting procedure. This is none other than data loss. You might have lost crucial games or other essential files if you reset your Windows 11 PC, reinstall Windows, or follow other massive steps to resolve this issue. EaseUS Data Recovery Wizard is a robust tool catered to restore your system’s lost or deleted files efficiently.
Whether you have vital documents, misplaced in-game progress, or any precious images, EaseUS can assist you in restoring them. However, DirectX files are vital to run Valorant on Windows 11 PC. In case they get damaged or misplaced, your game won’t launch appropriately. In order to protect yourself from manually installing the DirectX files to solve the problem of «Valorant not opening Windows 11,» it’s recommended that you use EaseUS.
Whether it’s a free data recovery software, with this tool, you can recover deleted files on Windows 11 from HDD, SSD, recycle bin, and others. Check the following guide to restore missing game files in Windows 11.
Step 1. Run EaseUS Data Recovery Wizard on your computer. Choose the drive where you lost files and click «Search for Lost Data». If your lost files were on an external storage device, connect it to your computer firstly.

Step 2. The software will quickly scan the deleted files immediately, and then automatically perform a deep scan to find more lost files. After the scan is completed, you can use «Filter» or «Search box» to quickly locate specific file types.

Step 3. Click the «Preview» button or double-click on a file for a full preview. Finally, select the desired files, click «Recover» and choose another safe location or Cloud drive to save all the files at once.

Remember to share the tool’s features with your friends on social media if you prefer the information given here.
Summary
So, why does the «Valorent not opening Windows 11» issue happen? Before proceeding with the fixes, it’s necessary to understand the reasons:
- ❌Software conflicts: Some software running in the background may restrict Valorant from opening. The software includes overlays, antivirus programs, or other apps. They might restrict the game’s launch.
- ⚠️Older graphics drivers: Incompatible or older graphics drivers may lead to significant trouble when launching Valorant.
- 💻System specifications: The game may only start if Valorant’s PC prerequisites are matched. You need an AMD Ryzen 3 1200 CPU or an Intel i3-4150, 4GB of RAM, an AMD Radeon R7 240, or a GeForce FT 730 GPU to play Valorant on a Windows 11 computer.
- 🚫Damaged game files: If Valorant’s game files get corrupted, it may impede the game from launching. This might happen because of interrupted updates or unforeseen system crashes.
Hopefully, you have gone through the steps that the article has demonstrated in the best ways to fix the «Valorant Windows 11 not opening» issue. It has meticulously shown the instances of Valorant not working on a Windows 11 PC without TPM 2.0 and the top 4 solutions to resolve Riot clients not launching Valorant. All you need to do is follow the steps above, and your Windows 11 PC will end up functioning Valorant efficiently. Also, if you misplaced some crucial files, videos, or other data types while grappling with the «Valorent not opening issue,» you may use EaseUS Data Recovery Wizard to retrieve anything. This is one of the best data recovery software to restore anything in a jiffy!
Valorant Won’t Launch in Windows 11 FAQs
These are the best FAQs to comprehend the topic better:
1. Can I run Valorant on a Windows PC?
A PC workstation running at least Windows 7 64-bit or further can run Valorant.
2. Why is Valorant not working in Windows 11?
Network issues are one of the common reasons for Valorant not functioning on Windows 11 PC. It depends significantly on a stable internet connection. If you deal with network issues or have an unstable internet connection, it can severely impact the game’s launch.
3. How do I turn on TPM 2.0 for Valorant in Windows 11 OS?
TPM 2.0 can be activated in Windows 11 using «Windows + R,» typing tpm.msc, then tapping «Enter.» Finally, while looking at the status, if you find it’s disabled, you must type «msinfor32» and hit «enter» to detect your motherboard brand and CPU.
If you’re an FPS fan then you probably know about Valorant. Valorant is a first-person shooter from Riot games that has innovative mechanics and unique characters with different abilities to lend you a tactical advantage in the game. Valorant is quite popular and has anti-cheat measures that are some of the best in the industry.
So if you’re looking for an FPS shooter that has the least number of cheaters, then look no further. Use the guide below to get Valorant on your Windows 11 system.
What do you need?
You need to meet these system requirements to get Valorant working on your Windows 11 PC. Check out the list below.
- TPM 2.0 enabled
- Secure Boot enabled
- Minimum System requirements for Valorant
- CPU: Intel Core 2 Duo E8400 or AMD equivalent
- GPU: Intel HD 4000
- VRAM: 1GB
- RAM: 4GB
If your PC meets these requirements then you can use the guide below to get Valorant working on your PC. However, in case you fail to meet the requirements then you will need to provide support for them first.
You can use this guide for TPM and Secure Boot requirements, however, if you bypassed these requirements when installing Windows 11 then you can not get Valorant on your PC. You will have to upgrade your hardware with TPM and Secure Boot if you wish to continue using Windows 11 or roll back to Windows 10 to run Valorant on the same system.
Riot Games are the developers of Valorant and hence, the recommended source to get Valorant on your PC. However, if you have been already using the Epic Games store for other titles, then there is no point in installing the new Riot Client as well. In such cases, you can use the Epic Games store itself to get Valorant on your PC. Additionally, Prime Gaming is another platform where you can get Valorant. This is the recommended way if you’re
Follow the relevant section below to get you started.
Method #01: Install from Riot Games
If you already have a Riot Games account then you can skip the first section below and continue with the game download and installation.
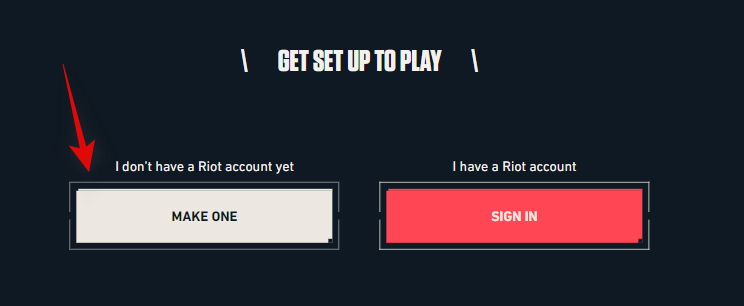
Step 1: Sign up for Riot Games
Visit this link in your favorite browser and click on PLAY NOW.

Now click on MAKE ONE.
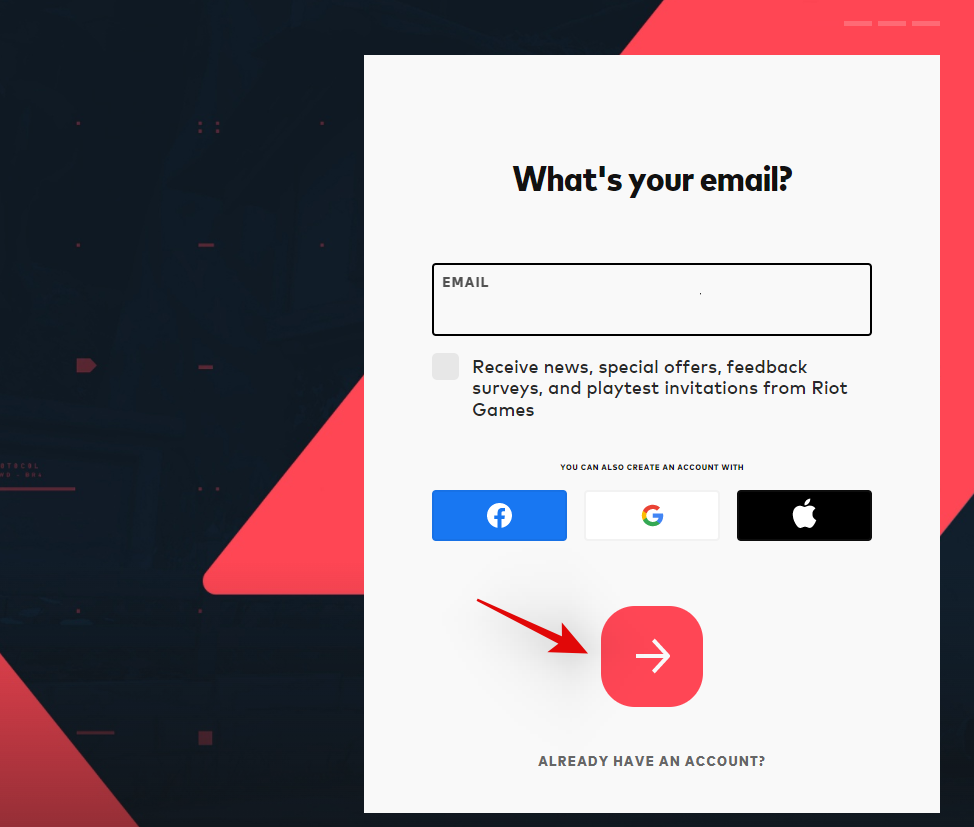
Enter your email ID on your right. You can also use your Apple, Google, or Facebook account to sign up for Riot Games. Click on their respective icons and follow the on-screen instructions to complete the process.
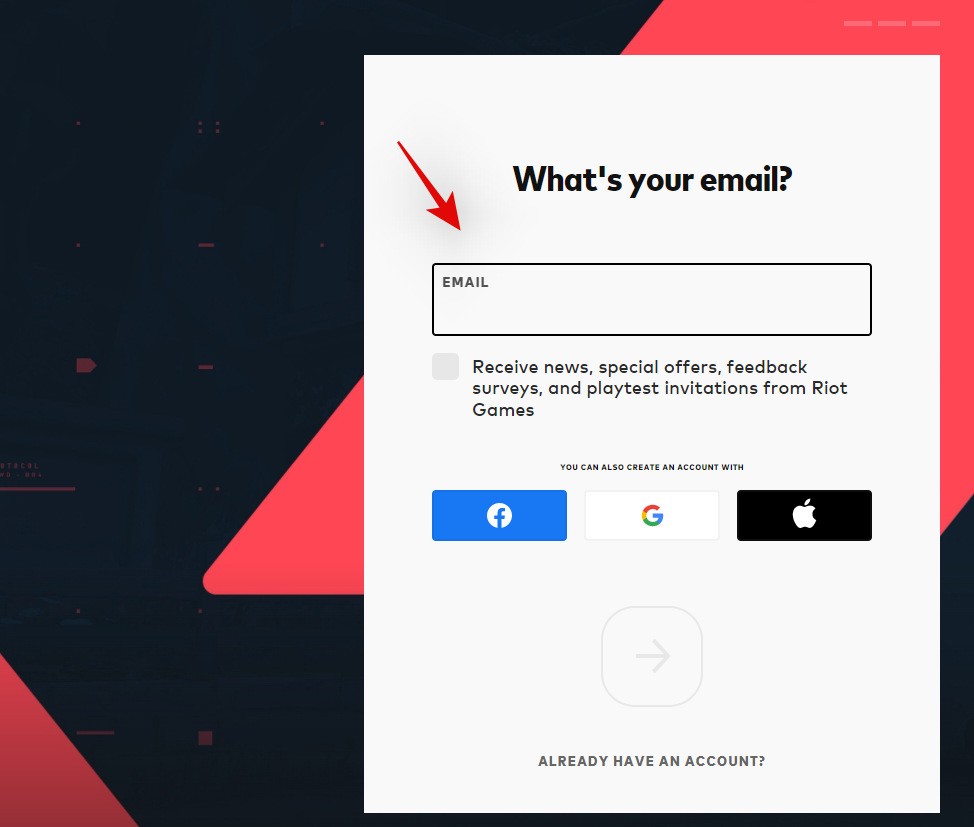
If you manually entered your email ID, then click on the arrow at the bottom pointing to your right.
Enter your age on the next step.

Now click on the arrow at the bottom.

Choose a username for your Riot Games account. Click on the arrow once you are done. Do not worry, you get to choose your Display Name in Valorant once the game has been downloaded to your PC.

Choose a password for your account.
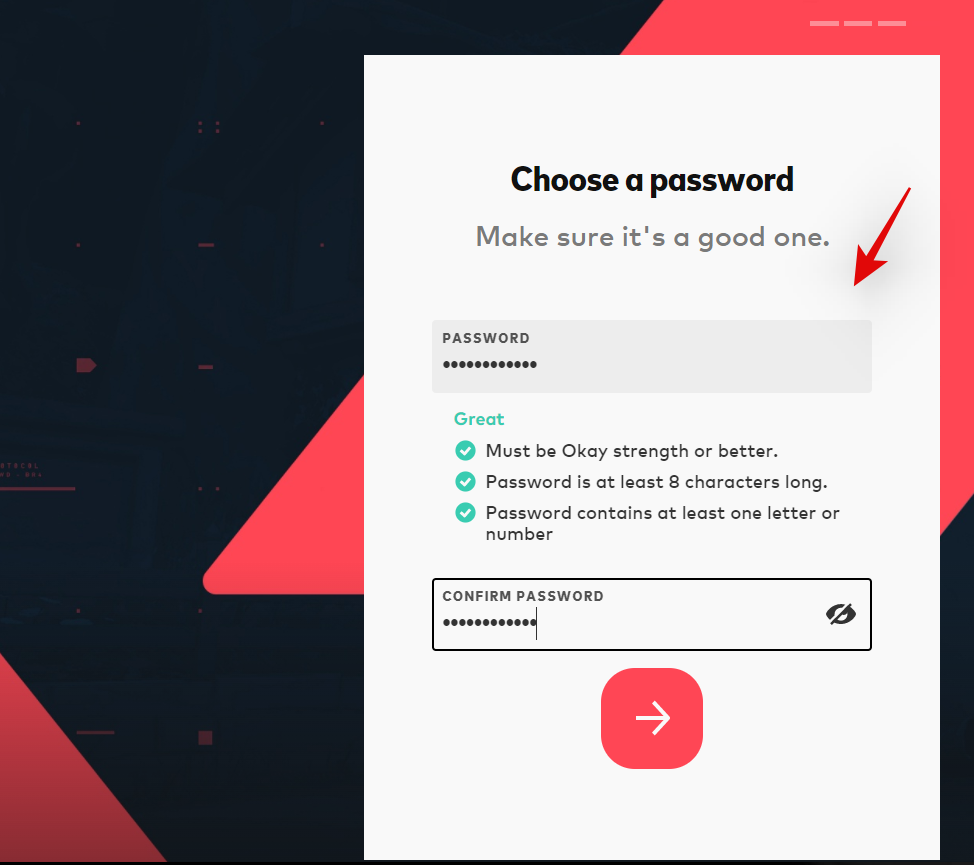
Re-enter your password to confirm the same and click on the arrow at the bottom once you are done.

Your information will now be processed and your Riot Games account should now be created. You can now use the next section to download and install Valorant on your PC.
Step 2: Download and Install Valorant
Visit this link and sign in to your Riot Games account. Once done visit this link to open the Download page for Valorant. If you just created your account using the guide above then you can skip this step. Click on DOWNLOAD.
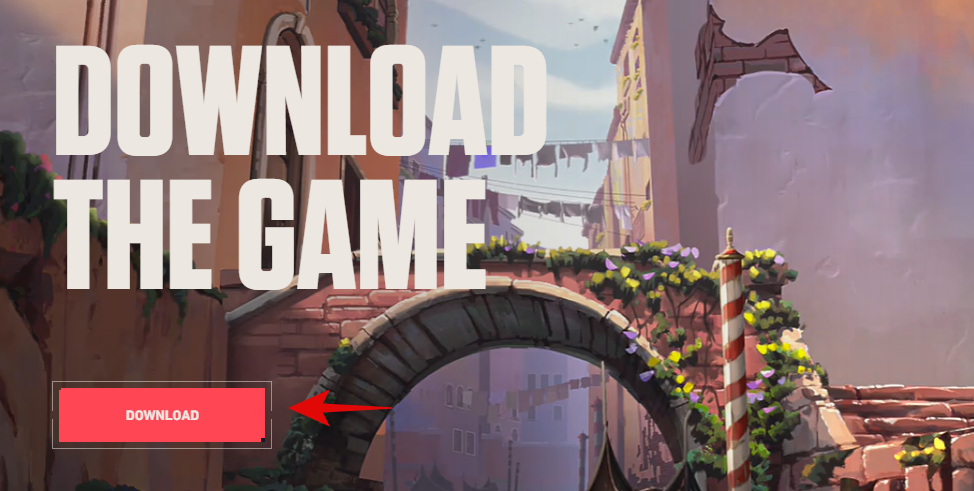
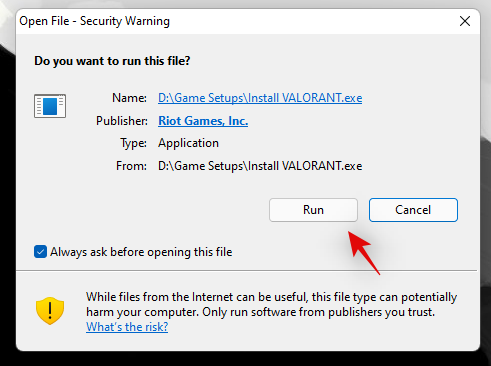
An install package for Valorant will now be downloaded to your PC. Wait for the download to complete and then double click to launch the package once done. Click on Run if prompted by Microsoft Defender.
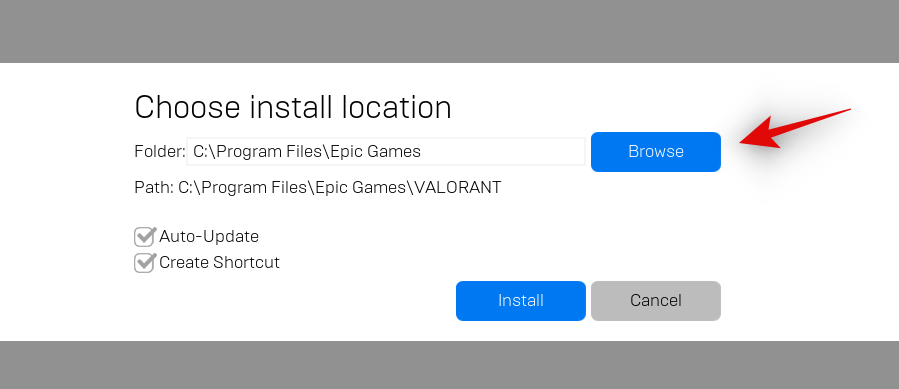
Click on ADVANCED OPTIONS.
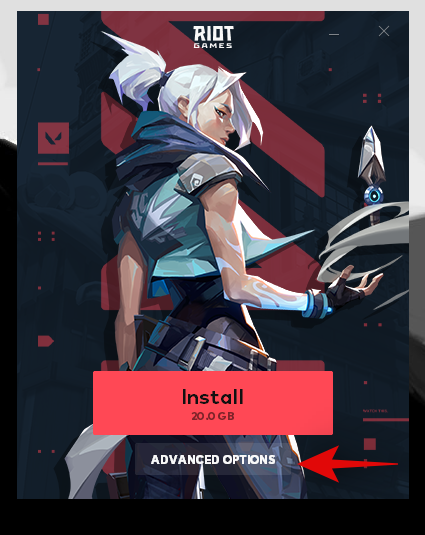
Click on the Folder icon and select a custom path for your game installation if needed.
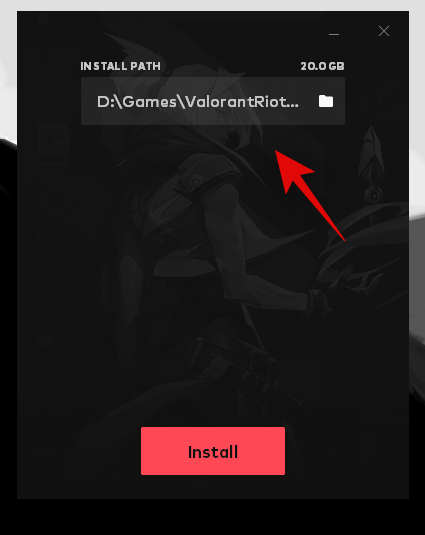
Click on Install.

The installer will now install the Riot Client on your PC. This can take some time depending on your network and system capabilities.
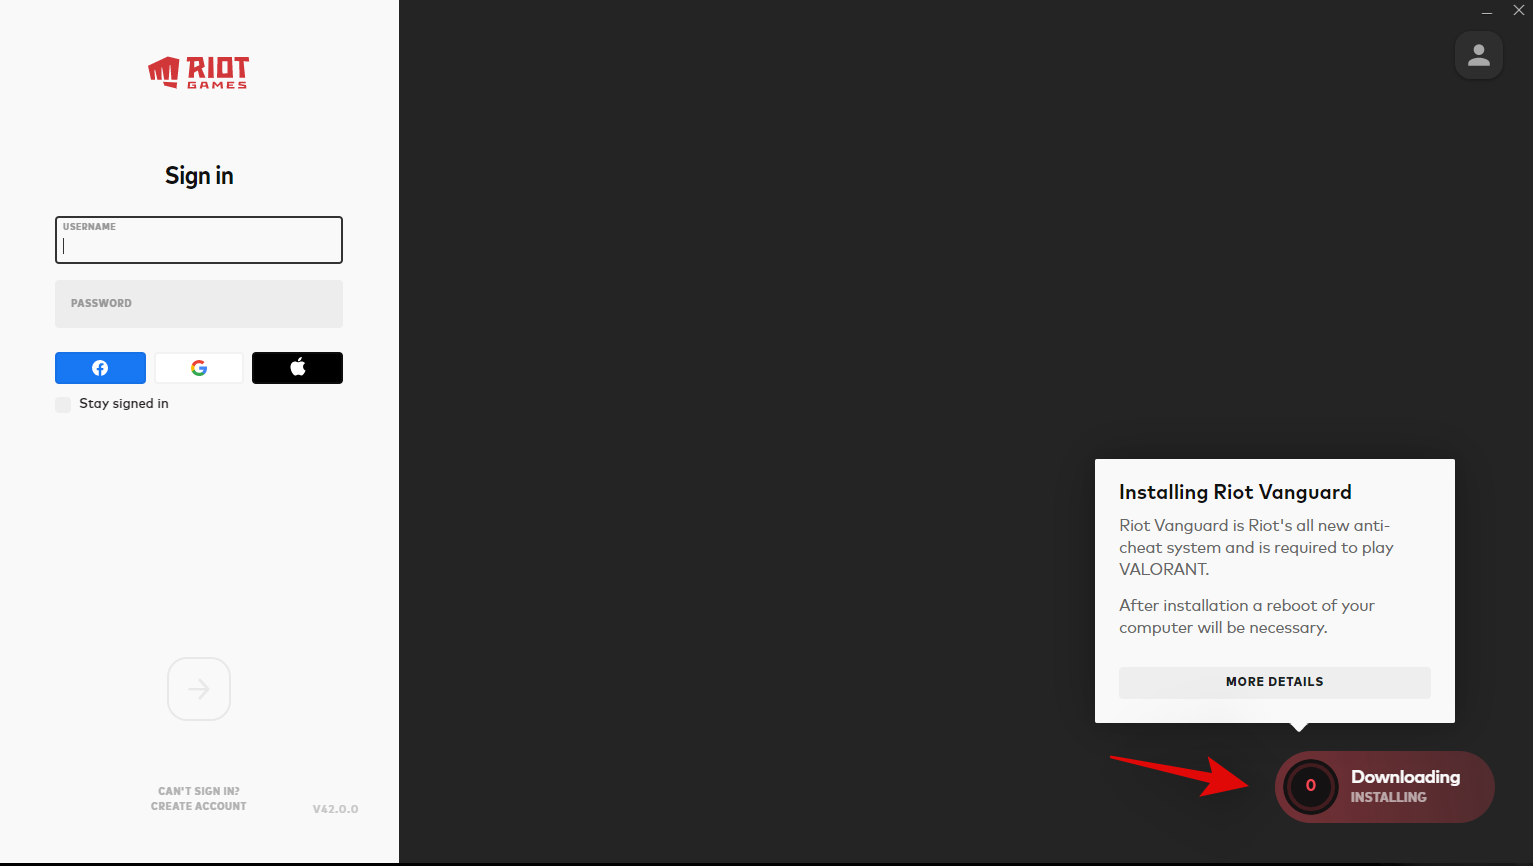
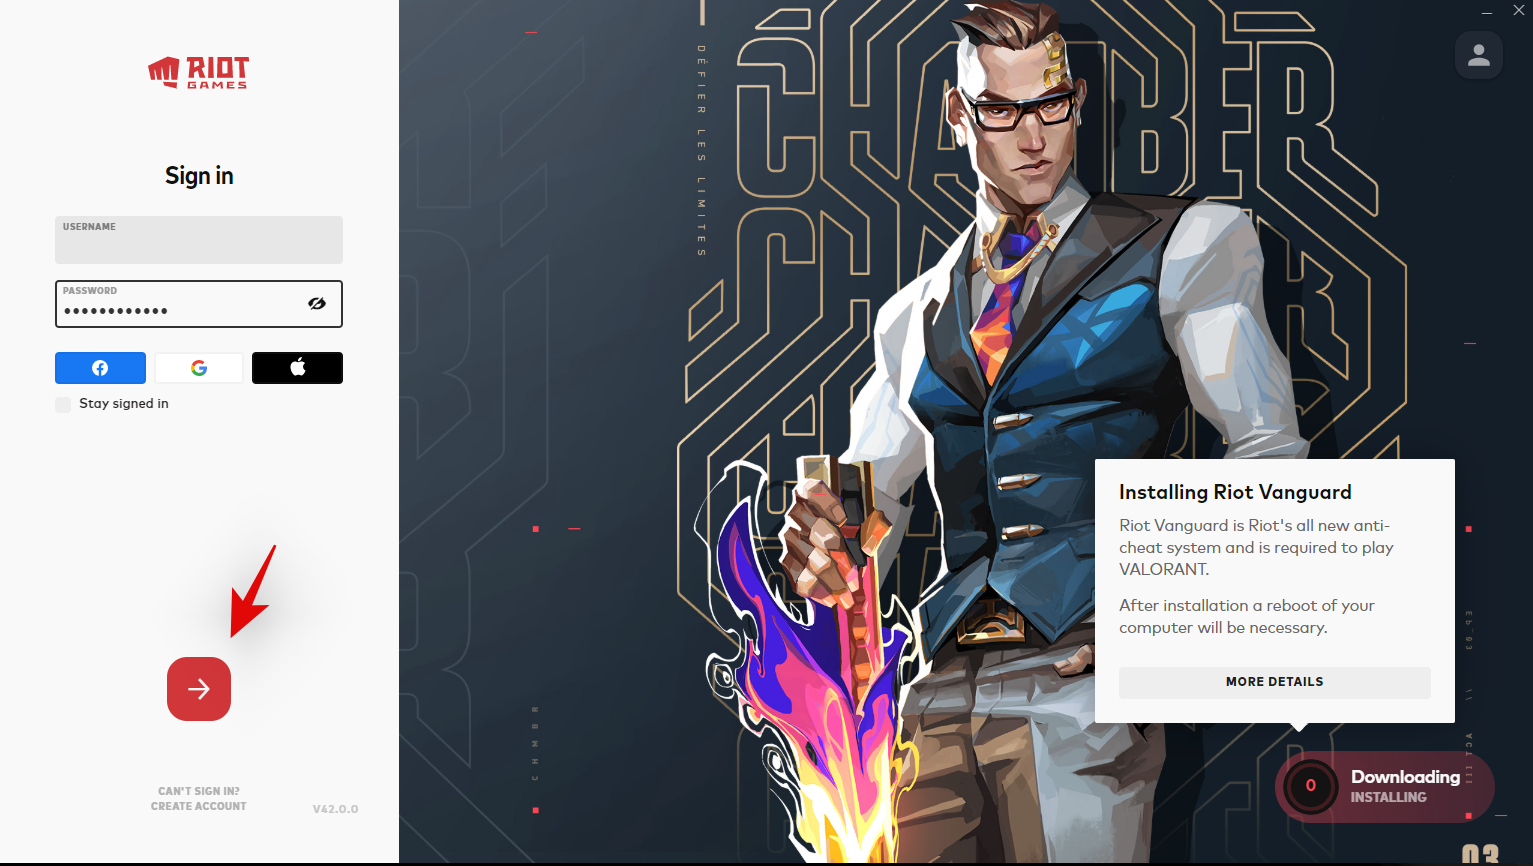
Once done, sign in to your Riot Games account using the respective fields on your left.
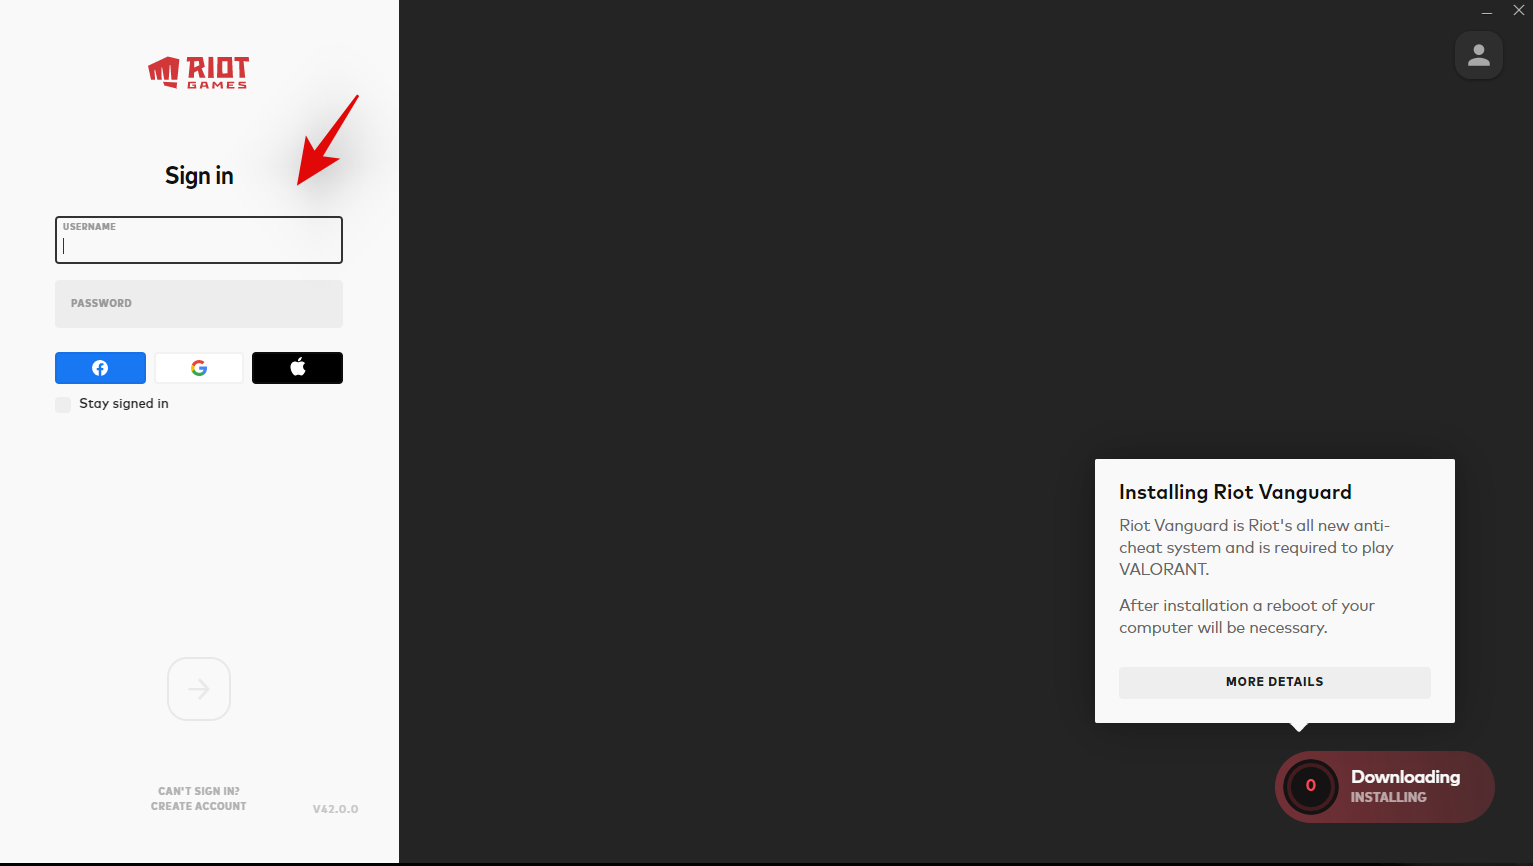
You can monitor your download progress in the bottom right corner of the window. The Riot Client should be installing Vanguard and components in the initial stages of the process.
Click on the arrow at the bottom once you are done.
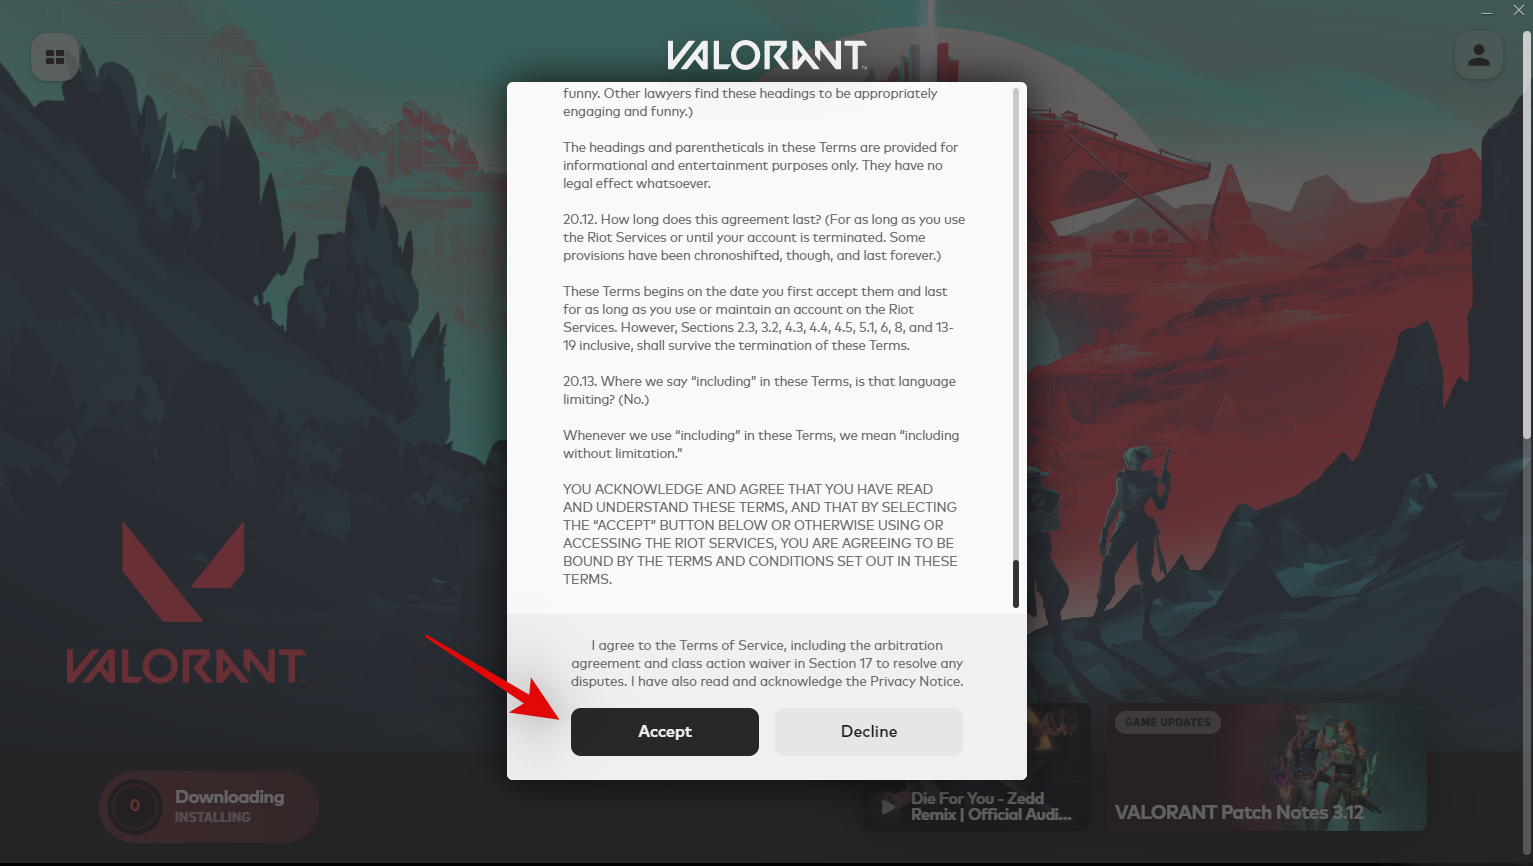
You will now be shown a user agreement. Scroll to the bottom of the user agreement and click on Accept once available.
Leave the launcher open in the background now while the game is downloaded. We have now done all we could until the download finishes.
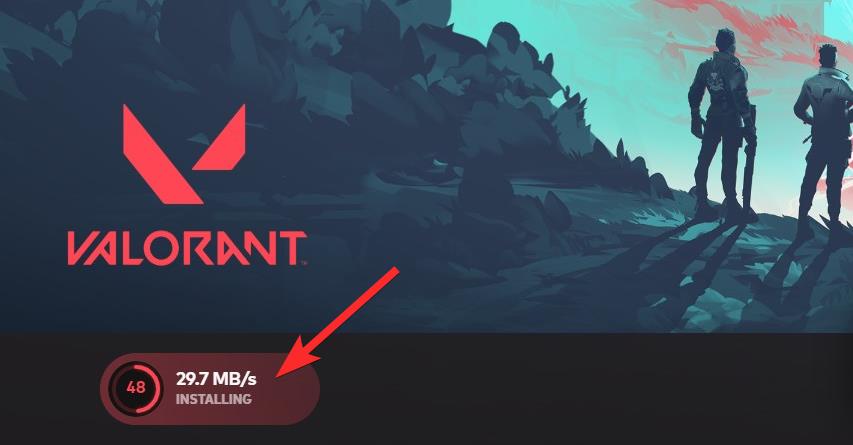
Once finished, click on Play in the bottom right corner to launch the game. Now select a Display Name that will be used for you in Valorant. Click on Confirm once you are done.
And that’s it! The game should now be running on your PC and we wish you luck on your first match.
Method #02: Install from Epic Games
We’re hoping that you have the Epic Games store already installed and ready to go on your PC. If not, use the link below to download and install it on your PC. Once you are done, Sign-in with your Epic Games account and you should be taken to the homepage. If you already have the store, simply launch it and you should be taken to the homepage.
- Epic Games Store
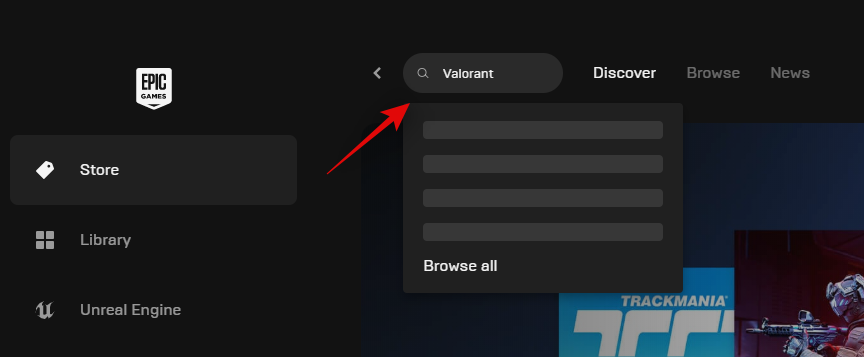
Click on the search bar and search for Valorant. Hit Enter on your keyboard once you are done.
Click and select Valorant.
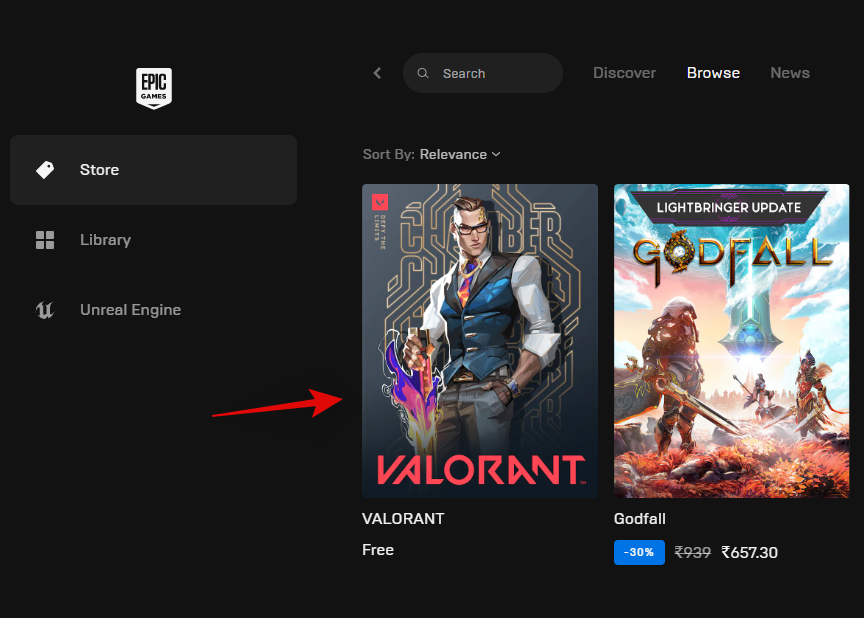
Click GET.
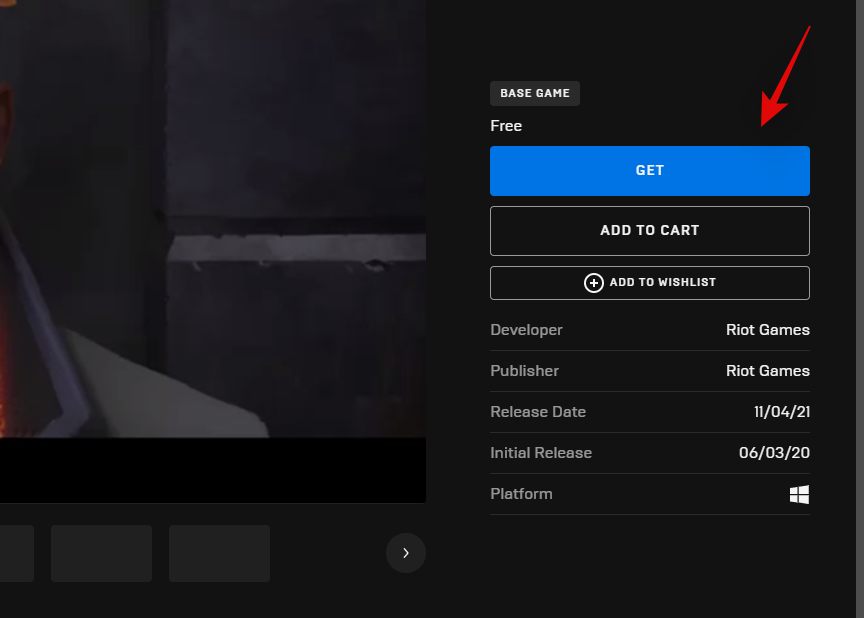
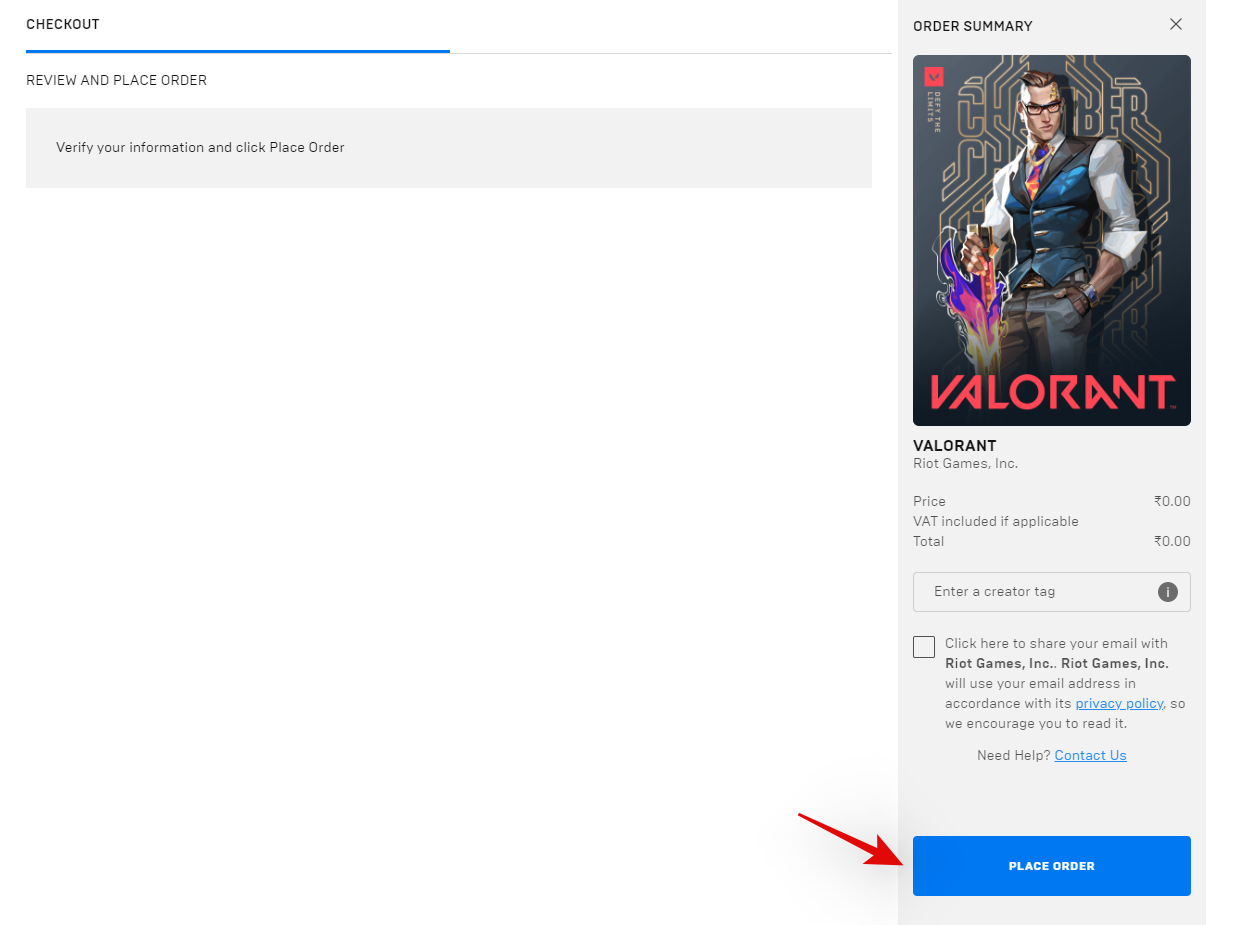
You will now be taken to the checkout screen. Click PLACE ORDER.
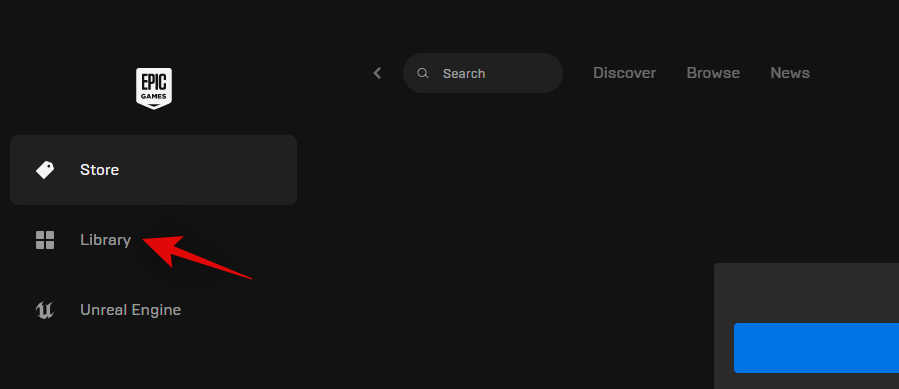
Click Library on your left.
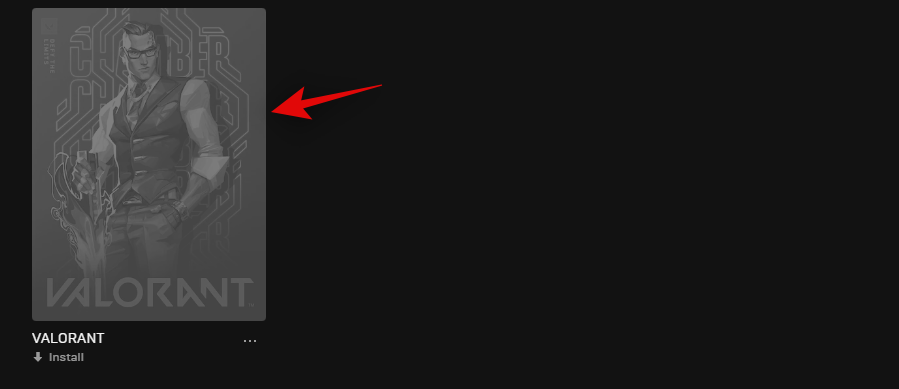
Find Valorant in your library and click on its thumbnail to initiate the download.
Now select a custom download location if needed.
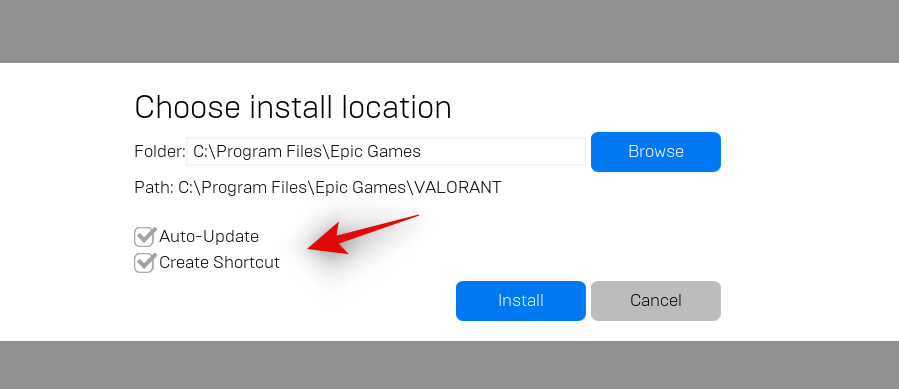
You can also uncheck or check the box for Auto-Update and Create shortcuts depending on your preference.
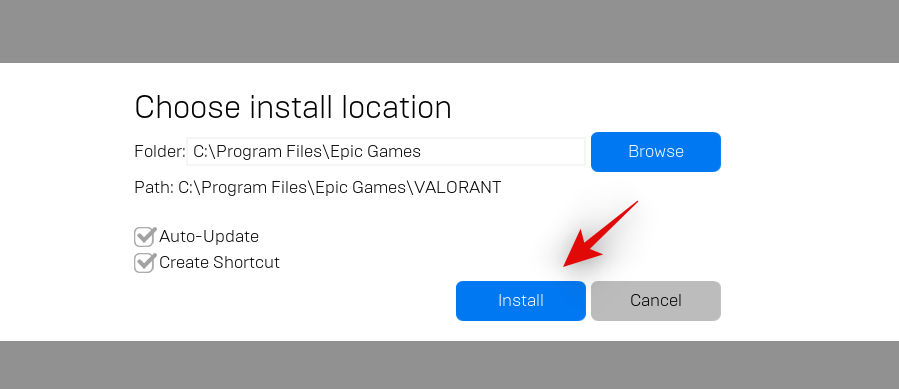
Click Install once you are done.
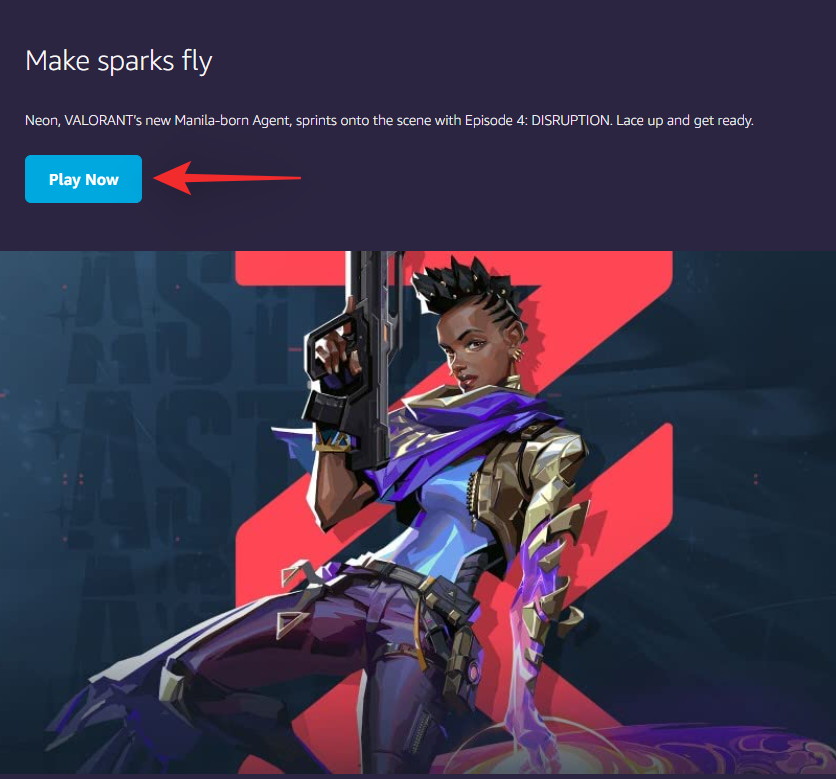
Valorant should now be downloading via the Epic Games store. Wait for the process to finish, and once it does simply click on the thumbnail in your Library to launch the game. Choose your display name for the game and click Confirm once you are done.
And that’s it! You can now enjoy Valorant on your PC! Good luck with your first match.
Method 3: Using Prime Gaming
Prime Gaming is the new gaming service in town that offers attractive features and incentives for almost every gamer. You can claim free PC games, get in-game loot and keep up with your latest TV shows, all using the same subscription. Prime Gaming also offers a 30-day trial so that you can make an educated decision on whether you wish to subscribe to the service or not.
You can get Valorant using Prime Gaming as well. Simply search for the game and click Play Now. You will be redirected to download the Riot Client and subsequently install Valorant on your PC.
If you’re unsure of the process, you can use our guide at the top to help you along with the process once you’ve downloaded the Riot Client.
And that’s it! You will now have installed Valorant on your PC. You can now use Prime Gaming to your advantage and claim in-game loot drops for Valorant as they are released every few weeks.
FAQs
Here are a few commonly asked questions that should help you get up to speed with Valorant and its latest update.
Why does Vanguard need TPM 2.0 and Secure Boot?
Valorant is a highly competitive FPS title with roots in the modern eSports industry. Thus, the game needs to maintain competitive integrity and have every measure in place to ensure fair gameplay. Hence Vanguard now requires TPM 2.0 and Secure Boot to ensure and verify that your Windows installation is a trusted platform.
Furthermore, Vanguard uses TPM and its secure keys and encryption to further ensure that none of the players can cheat when playing the game.
Can I circumvent Vanguard TPM & Secure Boot requirements?
Unfortunately no, Vanguard and Valorant now have baked in requirements for these features and if you could bypass them, then their purpose is already defeated. Your best choice at this point is to go back to Windows 10 and install a new instance of Valorant to run the game.
How to report players in Valorant?
You should use the link below whenever reporting malicious users in Valorant.
- Report Players | Valorant
We hope you were able to easily get and run Valorant on your system using the guide above. If you face any issues or have any more questions, feel free to reach out to us using the comments section below.
RELATED:
- How to Fix the ‘Invalid Access to Memory Location” Error in Valorant
- VAN 1067 Windows 11 Error: How to Fix the Valorant Issue