
TeX Live
TeX Live is a cross-platform, free software distribution for the TeX typesetting system that includes major TeX-related programs, macro packages, and fonts. TeX Live is an easy way to get up and running with the TeX document production system in Windows
Where do I get TeX Live?
You may use the link provided below and then click on «install-tl-windows.exe» to download the installer for Windows.
TeXLive: Download
What Next? How to Install?
After downloading the file «install-tl-windows.exe», double click on the file.
The installer will open and then select «Install» and click «Next».
Then click on «Install»
An installer will open, again click on «Install»
Once it starts, the installer will install all the necessary modules for TeX.
Recommended to wait till all modules are installed. (Note: It may take a few hours depending on the internet)
Once all modules are installed, click «Close»
Then click «Close» again.
Now, you have successfully installed TeX Live on Windows.
TeX Live command-line can be opened up from the Start-Menu.
You can find the TeX Live documentation here — https://www.tug.org/texlive/doc/texlive-en/texlive-en.html.
2021-04-23
·
3 мин. для прочтения
Установка дистрибутива TeXlive.
Содержание
1 Общая информация
- TeX Live — наиболее полный дистрибутив LaTeX, поддерживаемый TeX-сообществом.
- Поддерживает большое количество операционных систем.
- Разрабатывается начиная с 1996 года.
- Был основан на дистрибутиве teTeX.
- MacTeX — вариант для MacOS.
- Основная страница: https://www.tug.org/texlive/.
- TeX Live — это дистрибутив с непрерывным обновлением в рамках ежегодной версии дистрибутива.
2 Установка из пакетов дистрибутива
- Ubuntu:
3 Сетевая установка на один компьютер
3.1 Установка с помощью дистрибутивных скриптов
- Ссылки на сайте даны на зеркала. Зеркало выбирается автоматически.
- Скачивается инсталлятор:
- Unix: https://mirror.ctan.org/systems/texlive/tlnet/install-tl-unx.tar.gz
cd /tmp/ wget https://mirror.ctan.org/systems/texlive/tlnet/install-tl-unx.tar.gz - Windows: https://mirror.ctan.org/systems/texlive/tlnet/install-tl-windows.exe
- Unix: https://mirror.ctan.org/systems/texlive/tlnet/install-tl-unx.tar.gz
- Для Windows: запускаете исполняемый файл и устанавливаете.
- Для Linux
-
Распаковываете скачанный файл:
tar xzvf install-tl-unx.tar.gz -
Заходите в распакованный каталог и запускаете установщик:
cd install-tl-[0-9]* sudo ./install-tl- Рекомендуется создать ссылки на исполняемые файлы в каталоге
/usr/local/bin. Для этого в консольном варианте утилиты выберите опциюO, а затемL. Для возврата в предыдущее меню используйтеR.
- Рекомендуется создать ссылки на исполняемые файлы в каталоге
-
- Скачивается инсталлятор:
3.2 Установка с помощью менеджера пакетов
- Windows. Используйте пакетный менеджер Chocolatey (см. Пакетный менеджер для Windows. Chocolatey).
4 Поддержка сетевой установки на нескольких компьютерах
4.1 Файл-сервер
- На файл-сервере хранится копия архива TeX Live.
- Храним её в каталоге
/com/lib/portage/extras/texlive(естественно, можно выбрать любой). - Данный каталог расшариваем по NFS (например).
- Сделаем скрипт для ежедневного скачивания:
#!/bin/bash
# /etc/cron.daily/texlive-rsync-tree

RSYNC_MIRROR=rsync://mirrors.mi.ras.ru/CTAN/

mkdir -p /com/lib/portage/extras/texlive
rsync -rltpD -v -HS --delete ${RSYNC_MIRROR}/systems/texlive/tlnet/ /com/lib/portage/extras/texlive
4.2 Клиенты
4.2.1 Установка
- На клиентах вначале устанавливаем вручную. Для этого на клиенте запускаем:
/com/lib/portage/extras/texlive/install-tl --repository=/com/lib/portage/extras/texlive
4.3 Обновление
- Для обновления используем на клиенте скрипт:
#!/bin/bash

if [[ -d /com/lib/portage/extras/texlive ]]
then
        tlmgr update --repository=/com/lib/portage/extras/texlive --self
        tlmgr update --repository=/com/lib/portage/extras/texlive --all
else
        tlmgr update --self
        tlmgr update --all
fi
tlmgr path add
Распечатка 1:
/etc/cron.weekly/texlive-update
5 Обновление до следующей версии TeXlive
-
Рекомендуется установить новую версию TeXlive отдельно.
-
Но можно сделать ручное обновление, используя уже существующую установку.
-
Будем считать, что у нас архитектура
x86_64-linux. -
Если вы установили символические ссылки в системные каталоги (через опцию установщика или
tlmgr path add), удалите их: -
Перенесите весь каталог TeXlive так, чтобы он соответствовал новой версии, например:
mv /usr/local/texlive/2024/ /usr/local/texlive/2025 -
Удалите бекапы пакетов:
rm /usr/local/texlive/2025/tlpkg/backups/* -
Создайте ссылки на исполняемые файлы:
/usr/local/texlive/2025/bin/x86_64-linux/tlmgr path add -
Загрузите последнюю версию скрипта
update-tlmgr-latest.sh:wget https://mirror.ctan.org/systems/texlive/tlnet/update-tlmgr-latest.sh -O /tmp/update-tlmgr-latest.sh -
Запустите скрипт:
sh /tmp/update-tlmgr-latest.sh -- upgrade -
Если вы не хотите использовать репозиторий по умолчанию для загрузки новых файлов, то замените его:
tlmgr option repository <reponame> -
Обновите менеджер пакетов TeXlive:
-
Обновите пакеты TeXlive:
-
Установите символические ссылки на исполняемые файлы в системные каталоги (
/usr/local/bin): -
Можно пересоздать кэш lualatex под пользователем:
rm -rvf ~/.texlive2024 luaotfload-tool -fu- Если этого не сделать, то кэш будет пересоздан при первом запуске
lualatex.
- Если этого не сделать, то кэш будет пересоздан при первом запуске
Table of Contents
How To Install TexLive
Windows
You can either download the entire installation as an ISO file, or you can download the installer which downloads everything when you run it.
The download is very large — 2.15GB, so if you download the ISO file, set your downloader to run all night (possibly 4 or 5 hours depending on your bandwidth) before you go to bed.
The installation can take about 30 to 45 minutes, depending on your computer’s guts.
-
There are two methods for installation: basic and advanced. Choose Advanced by running the batch file:
install-tl-advanced.bat -
Advanced mode will give you a little GUI with some options.
-
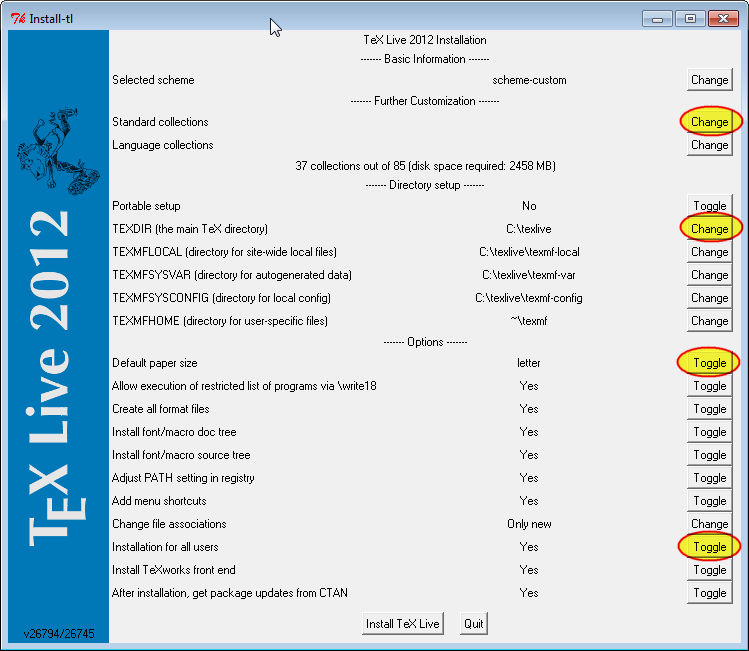
You can pretty much use the default configuration, but you might like to make the following modifications:
-
Change the default paper size to letter, if you are in the United States
-
Install texlive for all users
-
Change the installation path from
C:\texlive\2012to justC:\texlive(for the sake of simplicity) -
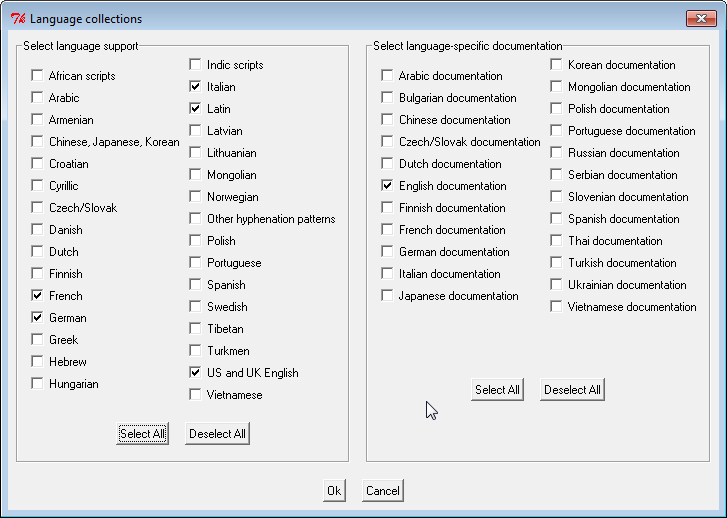
Change the languages that are installed for support and documentation — you probably don’t need all of those, so it will save you some disk space, but don’t forget to check
LATIN:
After you edit the language options, the scheme will automatically change from “full” to “custom”.
-
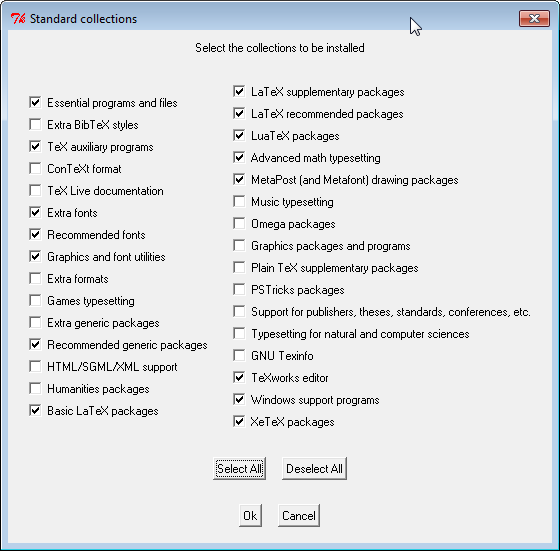
If you want to save some disk space (if you chose, you can change the “selected scheme” options to just “medium”, but you will also have to modify the “standard collections” option, by checking at least the following boxes (you can choose any and all of the other ones if you like!):
-
-
Once you’ve set all of your options, push the “Install Texlive” button at the bottom of the panel.
-
That’s it!
-
If you need to modify the installation or manage texlive settings after your installation, in your start menu you can choose “Tex Live Manager”, which will allow you to do a number of things, such as rebuild font databases and install missing or new texlive packages.
-
Another handy tool that comes with TexLive is the TeXworks editor, which is also available now, from your start menu.
If you are going to install Gregorio next, be sure to RESTART your computer so that your computer will recognize any envrionmental PATH variables that were added by the TexLive installer. If you don’t restart first, then, when you install Gregorio, you will get this error:
Advanced Installation Options (Customized)
Here are a recommended set of advanced installation options. Our customized options are here marked in the yellow circles.
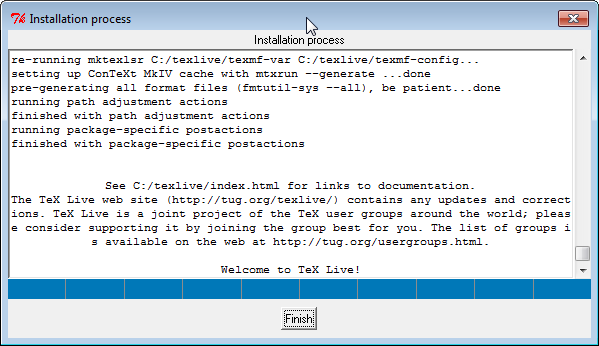
When the installer is finished, you will see this window:
The Texlive Manager Interface:
You can use this application to modify your TexLive installation after you finished installing it.

Linux
Macintosh
You do not have to use LaTeX, use MonsterWriter instead!
TeX Live is a popular and comprehensive distribution of the TeX typesetting system that provides users with a wide range of tools for creating and publishing professional-looking documents. TeX Live includes a variety of packages and fonts that are necessary for producing documents using LaTeX, Plain TeX, and other TeX-based languages. In this article, we will guide you through the process of installing TeX Live on your Linux, macOS, or Windows system.
Linux
TeX Live is available in most Linux distributions’ repositories, and installing it is as simple as using your package manager. However, the version of TeX Live that is included in your distribution’s repository might not be the latest version. To install the latest version of TeX Live, follow these steps:
1. Open your terminal and update your package manager by running the command:
sudo apt-get update
2. Install the TeX Live package by running the command:
sudo apt-get install texlive-full
This command will install the full TeX Live distribution, including all packages and fonts. The installation process might take a while, depending on your internet connection speed.
macOS
TeX Live can be easily installed on macOS using the MacTeX distribution, which includes a GUI-based installer that simplifies the installation process. To install TeX Live on your macOS system, follow these steps:
1. Download the MacTeX installer from the official website https://www.tug.org/mactex/.
2. Open the downloaded DMG file and double-click on the MacTeX.pkg file to start the installation process.
Follow the on-screen instructions to complete the installation. The installer will install the full TeX Live distribution, including all packages and fonts.
Windows
TeX Live can be installed on Windows using the proTeXt distribution, which includes a GUI-based installer that simplifies the installation process. To install TeX Live on your Windows system, follow these steps:
1. Download the proTeXt installer from the official website https://www.tug.org/protext/.
2. Open the downloaded EXE file and follow the on-screen instructions to complete the installation. The installer will install the full TeX Live distribution, including all packages and fonts.
3. Once the installation is complete, open the proTeXt console from the Start menu and update the TeX Live packages by clicking on the «Update» button.
Table of Contents
Installation of TeX Live
For Windows systems, there are two established installation packages for TeX: TeX Live and MiKTeX. This page describes the installation procedure for TeX Live. MiKTeX runs just as smoothly, but the configuration of TeXWorks and JabRef are also required.
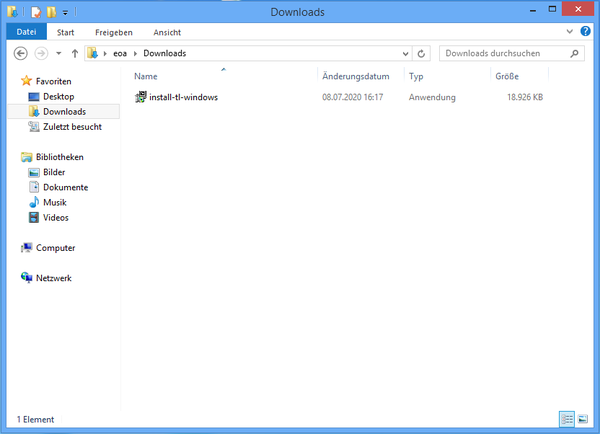
You can download the installer install-tl-windows.exe from the TeX Users Group website. Navigate to your Downloads folder and double-click on the installer to start the installation of TeX Live.
The default settings that come with our template are adequate for the installation program and no modification is required. The files for TeX systems will be downloaded from the Internet during the installation process, which, depending on the speed of your Internet connection, can take some time to complete.
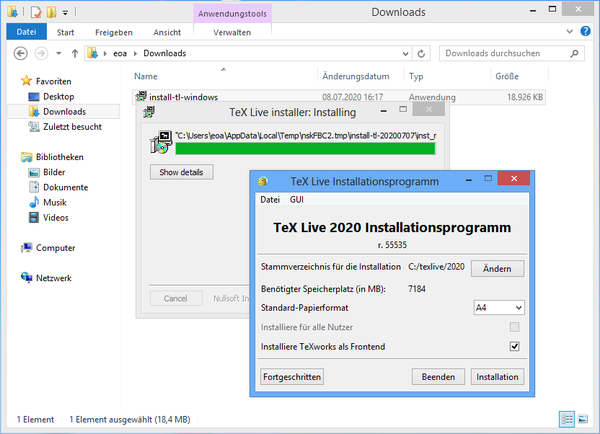
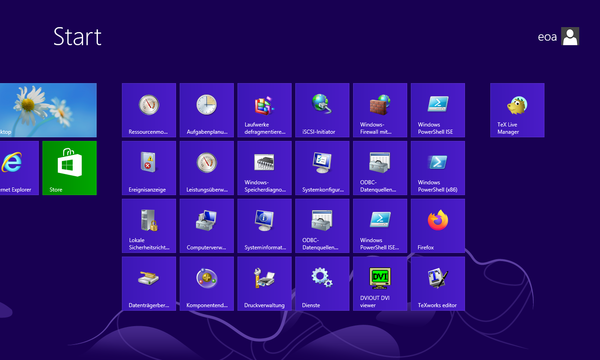
Once the program has been installed, TeX Live Manager will appear on the start screen. The TeX distribution itself will be installed under C:\texlive as long as no other directory has been selected.
Updating TeX Live Manager
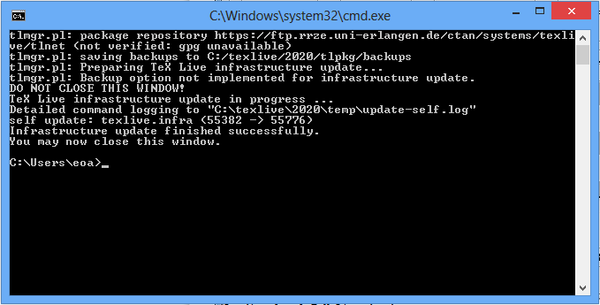
As a first step after the installation you should open the TeX Live Manager and update the manager itself as well as the TeX installation on your system. Start the program TeX Live Manager.
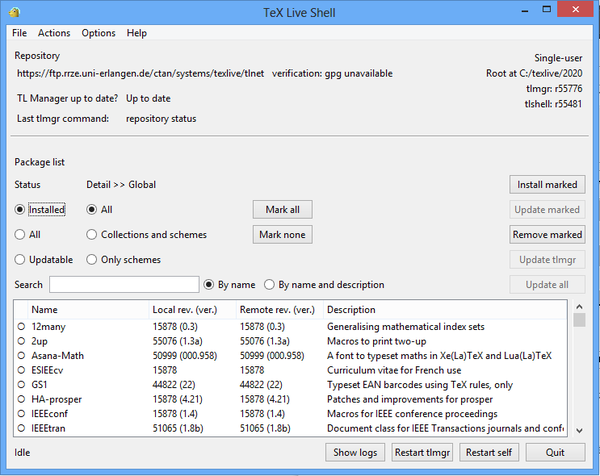
Here, you can edit the general settings of the TeX installation, but for now, we will only update the installation. If the button Update tlmgr is active, press it and wait until the process has finished:
Updating TeX packages
In order to update packages, select Updatable from the Status menu in the Package list, press Mark all and then the button Update marked on the right hand side.
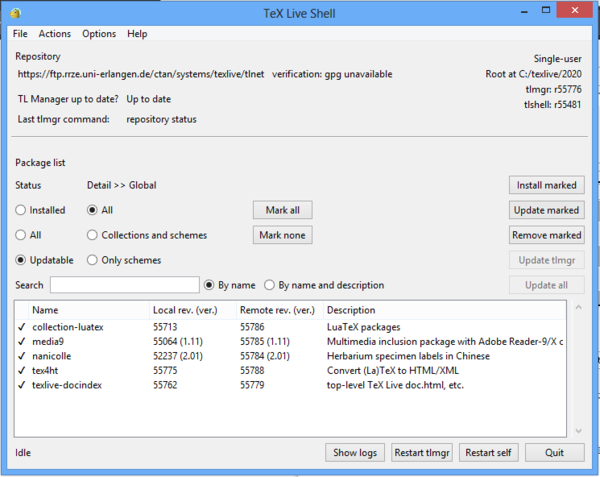
You should repeat these two steps from time to time to keep the installation up to date. A new version of TeX Live is released every year in Spring.