
In this tutorial I will help you how to use and install tcpdump in Windows machine. Tcpdump is a type of packet analyzer software utility that monitors and logs TCP/IP traffic passing between a network and the computer on which it is executed.
You can also use TCPDUMP on WINDOWS machine. This is command line sniffer tool for packet capturing in Windows machine.
It is clone of TCPDUMP which is most used to network sniffer in Unix machine. It is compiled with the original tcpdump community.
Follow my this tutorial to install tcpdump on Linux machine:
- How to install tcpdump on Linux machine?
Support Windows OS Lists by Microolap TCPDUMP for Windows:
- Windows XP
- Windows Vista
- Windows Server 2003
- Windows Server 2008
- Windows Server 2012
- Windows 8
- Windows 10
- Windows Server 2016
- Windows Server 2019
Follow this below link to Download Microolap TCPDUMP for Windows machine.
- Download Microolap TCPDUMP for Windows
Disclaimer
The above product developed by Microolap Technologies Ltd. and this site is not directly affiliated with Microolap Technologies Ltd.
All the above trademarks, product name and registered trademark and company name or logos mentioned on this page are the property of the their respective owners.
Technical Information
Name : tcpdump for Windows
File Size : 512.70KB
Requires : Windows Vista, Windows 7, Windows 8 and Windows 10.
Developer : Microolap Technologies Ltd.
Thank you! for visiting LookLinux.
If you find this tutorial helpful please share with your friends to keep it alive.
For more helpful topic browse my website www.looklinux.com.
To become an author at LookLinux Submit Article.
Stay connected to Facebook.
You may also like
About the author
Hi! I’m Santosh and I’m here to post some cool article for you. If you have any query and suggestion please comment in comment section.
Reading Time: 5 minutes
While TCPdump is primarily known as a network packet analyser for Unix-based systems like Linux and macOS, it is also possible to install and run TCPdump on Windows. TCPdump is widely used by network administrators, cybersecurity experts, and developers for troubleshooting network issues, monitoring network traffic, and performing network forensics. With its ability to capture and analyse network packets in real-time, TCPdump is an invaluable tool for anyone working with networks.
Unlike Linux, where TCPdump is readily available through package managers, the installation process on Windows involves a few additional steps. In this article, we will guide you through the process of installing TCPdump on a Windows machine, explaining the prerequisites, installation methods, and some configuration tips for using the tool effectively.
Prerequisites
Before proceeding with the installation, it is important to note that TCPdump on Windows requires additional software since Windows does not natively support the libpcap library (which is used by TCPdump for packet capture). The following prerequisites are necessary:
- Windows Operating System: TCPdump can run on Windows 7, 8, 10, and 11.
- Admin Privileges: You need administrator privileges to install the software.
- WinPcap or Npcap: TCPdump requires a packet capture driver, such as WinPcap or Npcap, to work on Windows. These drivers allow TCPdump to access network interfaces and capture traffic.
- Command Prompt or PowerShell: You’ll interact with TCPdump via the Windows command line (Command Prompt) or PowerShell.
Now, let’s dive into the steps for installing TCPdump on Windows.
Step 1: Install WinPcap or Npcap
TCPdump relies on WinPcap (or its modern counterpart, Npcap) for packet capture capabilities on Windows. Since WinPcap is no longer actively maintained, it is recommended to use Npcap, which is fully compatible with WinPcap and offers better performance and security.
Installing Npcap (Recommended)
- Download Npcap: Go to the official Npcap website and download the latest version: Npcap Official Download.
- Run the Npcap Installer: After downloading the installer, run the executable file to start the installation process.
- Choose Installation Options: During installation, you will be presented with various options. Ensure that you select the following:
- Install Npcap in WinPcap API-Compatible Mode: This ensures compatibility with legacy applications, including TCPdump.
- Install Npcap for All Users: This option allows you to capture packets as any user, not just the user who installed Npcap.
- Complete the Installation: After configuring the settings, click Install to complete the installation of Npcap.
Installing WinPcap (Older Option)
Although Npcap is recommended, WinPcap may still be required for some legacy systems or tools. To install WinPcap:
- Download WinPcap: Download the latest version from the official site: WinPcap Official Download.
- Run the Installer: Run the downloaded installer and follow the on-screen instructions to install WinPcap.
- Restart your computer: After installation, restart your machine to ensure the changes take effect.
Step 2: Download and Install TCPdump for Windows
TCPdump does not have a native Windows version, so we need to use a version compiled for Windows or run it via a compatibility layer. There are two main methods for running TCPdump on Windows:
- Using Precompiled TCPdump Binaries for Windows.
- Using Windows Subsystem for Linux (WSL).
Method 1: Using Precompiled TCPdump Binaries for Windows
Several websites provide precompiled TCPdump binaries for Windows. These binaries have been compiled to work with the WinPcap or Npcap drivers and are a simple way to get TCPdump running on Windows without needing to compile it yourself.
Steps:
- Download Precompiled TCPdump for Windows: A popular source for precompiled TCPdump binaries is eternallybored.org, where you can download a ready-to-use executable. Visit the following URL: TCPdump Windows Binaries.Choose the correct version based on your Windows architecture (32-bit or 64-bit). The file will typically be in a compressed format such as .zip.
- Extract the Files: After downloading the ZIP file, extract it to a directory of your choice (e.g.,
C:\tcpdump). - Add the Directory to System PATH: To make TCPdump easily accessible from any location in the command line, you can add its directory to your System PATH. This allows you to run
tcpdumpfrom any command prompt without needing to navigate to its directory.- Right-click on This PC (or Computer on older versions) and select Properties.
- Click on Advanced system settings and go to the Environment Variables section.
- Under System Variables, find Path and click Edit.
- Add the path where you extracted TCPdump (e.g.,
C:\tcpdump) to the Path variable. - Click OK to save the changes.
- Verify the Installation: Open Command Prompt (or PowerShell) and type the following command to verify that TCPdump is correctly installed:
tcpdump -version
If TCPdump is correctly installed, you should see the version information printed on the screen.
Method 2: Using Windows Subsystem for Linux (WSL)
For a more native Linux experience, you can install TCPdump via Windows Subsystem for Linux (WSL). WSL allows you to run a full Linux distribution on your Windows machine, providing access to all the familiar Linux tools, including TCPdump.
Steps:
- Enable Windows Subsystem for Linux (WSL): Follow these steps to enable WSL:
- Open PowerShell as Administrator and run the following command to enable WSL:
dism.exe /online /enable-feature /featurename:Microsoft-Windows-Subsystem-Linux /all /norestart - Enable the Virtual Machine Platform feature for WSL 2 by running this command:
dism.exe /online /enable-feature /featurename:VirtualMachinePlatform /all /norestart - Restart your computer to apply the changes.
- Open PowerShell as Administrator and run the following command to enable WSL:
- Install a Linux Distribution:
- Go to the Microsoft Store and search for a Linux distribution, such as Ubuntu.
- Select the distribution of your choice and click Install.
- Install TCPdump on WSL: Once you have WSL and your Linux distribution installed, open the Linux terminal (e.g., Ubuntu), and update the package list:
sudo apt update
Then, install TCPdump using the package manager:sudo apt install tcpdump - Verify the Installation: After installation, you can verify that TCPdump is installed by running:
tcpdump --version - Capture Network Traffic: To capture packets using TCPdump on WSL, you may need to configure your network settings or use a tool like Npcap to capture traffic from the Windows network stack.
Step 3: Using TCPdump on Windows
Once TCPdump is installed and configured on your Windows system, you can start using it to capture network traffic. Here are some basic commands to help you get started:
- Basic Packet Capture: To start capturing packets on a specific network interface (e.g.,
eth0), open Command Prompt or PowerShell and run:tcpdump -i eth0
Replaceeth0with the appropriate network interface on your system. On Windows, this could be a network adapter likeEthernet,Wi-Fi, orWi-Fi 2. - Save Captured Packets to a File: You can save the captured packets to a
.pcapfile for later analysis:tcpdump -i eth0 -w capture.pcap - Capture Specific Traffic: You can use filters to capture specific types of traffic. For example, to capture only TCP traffic, use:
tcpdump tcp
Or to capture traffic on a specific port (e.g., HTTP port 80):tcpdump port 80 - Stop the Capture: Press Ctrl+C to stop the capture.
Conclusion
Installing TCPdump on Windows may initially seem challenging due to the lack of native support, but by following the steps outlined in this guide, you can quickly get up and running. Whether you choose to install TCPdump via precompiled binaries or use Windows Subsystem for Linux (WSL), both methods offer an efficient way to capture and analyse network traffic on your Windows machine.
With TCPdump installed, you can use this powerful tool to troubleshoot network issues, monitor traffic, and gain valuable insights into the performance and security of your network. Whether you’re a network administrator, a cybersecurity professional, or just an enthusiast, mastering TCPdump will significantly enhance your ability to work with network protocols and data flows.
Disclaimer: This post may contain affiliate links. If you make a purchase through one of these links, Cyberly may earn a small commission at no extra cost to you. Your support helps us continue providing free tutorials and content. Thank you!
WinDump is a free command-line utility for network packet dump and traffic monitoring in Windows. It is often used in the analysis of network issues and help for troubleshooting as well as a security tool.
TcpDump is a powerful and versatile tool that contains many options and filters and is used in a variety of cases. Since it is a command-line tool, it is ideal to run it on virtual servers or devices that operate without a graphical user interface (GUI), or even to collect data that can be analyzed later.
TcpDump as WinDump on Windows
TcpDump for network packet monitoring is available as a BSD license and is pre-installed in the base system on most Unix operating systems such as FreeBSD and Linux. For Windows there is the port WinDump for network packet monitoring which is also freely available.
This tutorial shows how to install and use WinDump on Windows 11.
Network WinDump Windows Installation
WinPcap is required as a system requirement, the program library available as freeware consists of a driver that allows access to the network card. The WinPcap program library is based on the “libpcap” library known from Unix/Linux, in which the pcap interface was implemented. The network packets are intercepted and forwarded by the WinPcap modules bypassing the protocol stack.
Install WinPcap
First, the WinPcap driver is downloaded and installed here.
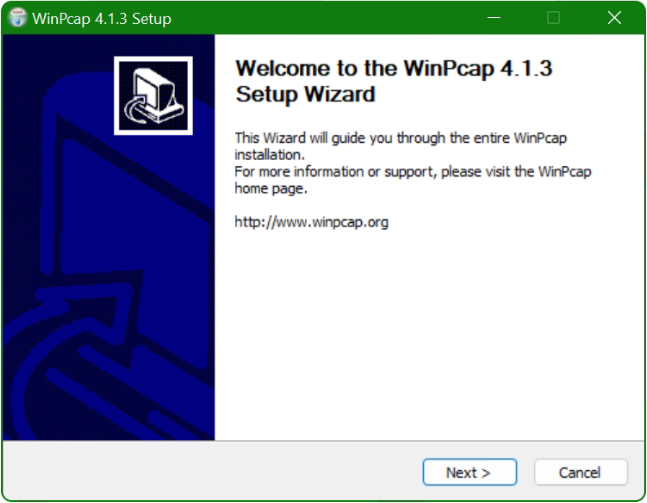
The WinPcap Setup Wizard guides you through the installation with three clicks, and you can accept the suggested settings. After installing WinPcap, the computer does not have to be restarted. The network interface is put into promiscuous mode by WinPcap, whereby all packets on this interface are “listened” and forwarded to the network stack, which enables evaluation as well decoding with WinDump.
Installing WinDump
After WinPcap is installed, then you are ready for WinDump they can be downloaded here. WinDump is a command-line tool that does not have to be installed. The file WinDump.exe can be copied for example under Program Files to a newly created folder WinDump. You can also copy WinDump.exe directly into the SystemRoot (C:\Windows), whereby the search path entry can be omitted.
WinDump can now be run by pressing the key and type in “command prompt” to open a command prompt as administrator with clicking on Run as administrator.
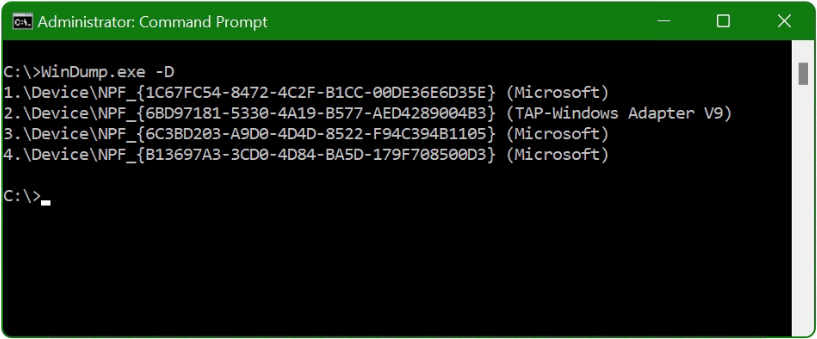
Find network interfaces
With the -D option, WinDump displays a list of the network interfaces available on the system on which WinDump can listen to packets. Windows assigns a GUID to each of these network interfaces.
Which GUID has which network interface? for my laptop I want to capture the packets from the WLAN adapter with WinDump.
This is where the command-line tool netsh helps to provide the information.
If you want to capture packets from the LAN Ethernet port (cable), the DOT3SVC service must be run, if it is not started, you can run the following command.
net start DOT3SVCFor Wi-Fi, the WLAN service must be started.
net start WLANSVCThus, the prerequisite is created for netsh to provide us with the desired information, with the following command for the LAN Ethernet port run in the command prompt.
netsh lan show interfacesHere on my laptop I use the WLAN network interface.
netsh wlan show interfacesThe command shows us the GUID of the WLAN network interface.
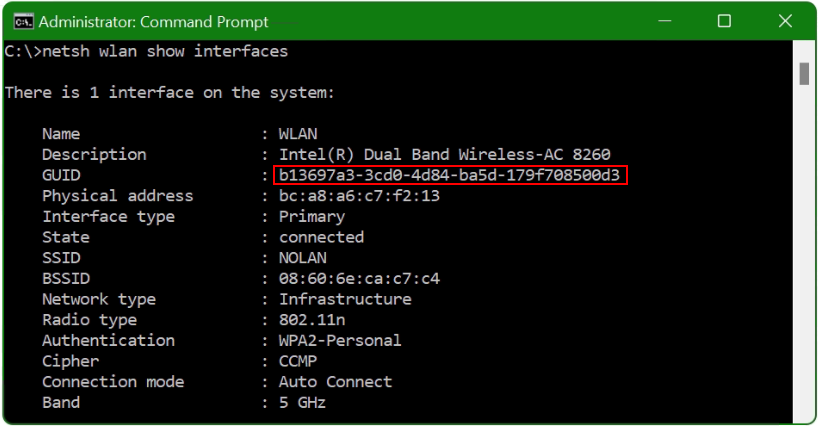
The GUID of my WLAN interface is marked in red here. As a reminder, with the command WinDump -D the interface appears here, i.e. in line 4.
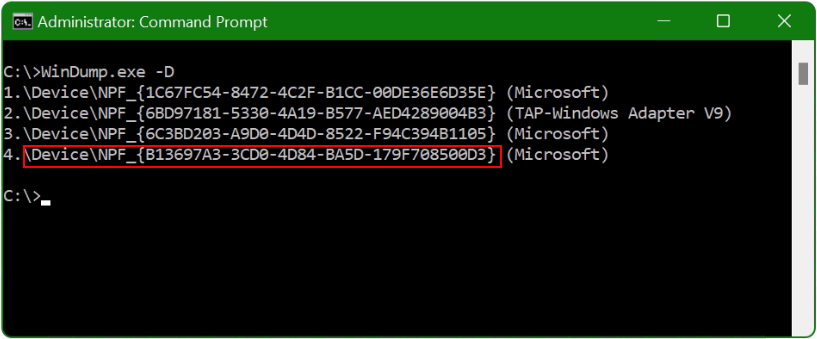
WinDump should listen to my laptop on Interface 4 (WinDump -D). With apply the -i option followed by \Device\NPF_{GUID}.
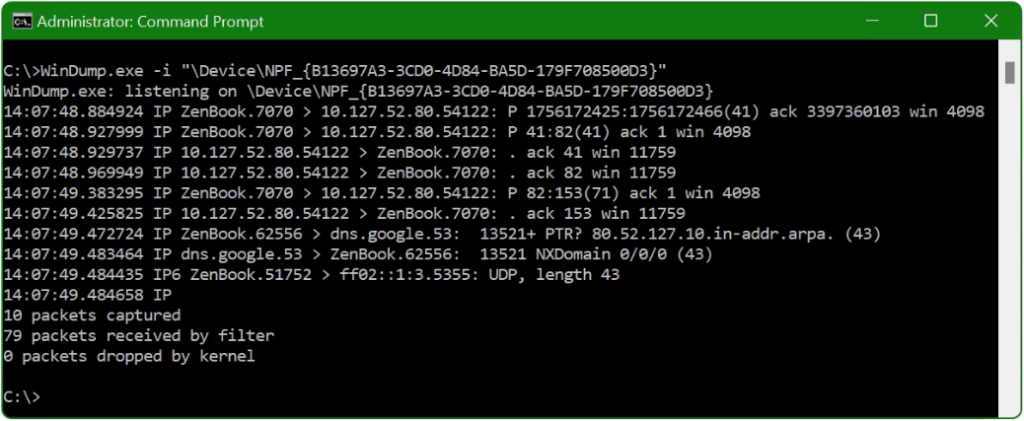
WinDump.exe -i "\Device\NPF_{B13697A3-3CD0-4D84-BA5D-179F708500D3}"TCP flags and filters
So far so good, the packets are displayed, then now comes the moment when flags and filters are used, so the chances increase that an issue can be found at all.
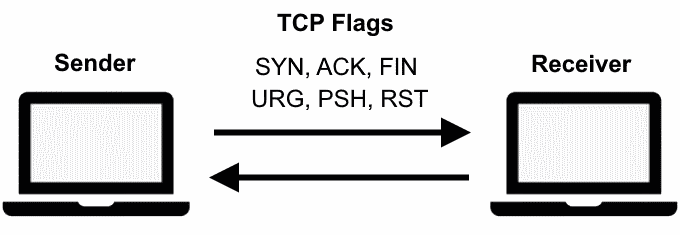
TCP flags are used within TCP packet transfer to announce a connection status or provide additional information in the context of the three-way handshake. They can be used to troubleshoot or control the connection. The TCP flags that are most commonly used are SYN, ACK, and FIN.
Analyze and display packets that contain one of the TCP flags, such as the TCP ACK flag here.
windump -i "\Device\NPF_{B13697A3-3CD0-4D84-BA5D-179F708500D3}" "tcp[13] & 16 != 0"A TCP flag is 1 bit in size. The following list describes each flag in more detail.
SYN = "tcp[13] & 2 != 0"
FIN = "tcp[13] & 1 != 0"
URG = "tcp[13] & 32 != 0"
PSH = "tcp[13] & 8 != 0"
RST = "tcp[13] & 4 != 0"
Network tcpdump on Windows
In the following example, only outbound connections are to be captured. In order to capture TCP packets that are initiated on our computer, we instruct WinDump to capture only those packets for which the SYN flag is set. However, we also have to exclude packages where the ACK flag is set, otherwise we will also receive the responses of the external host.
windump -i "\Device\NPF_{B13697A3-3CD0-4D84-BA5D-179F708500D3}" "tcp[tcpflags] & (tcp-syn) != 0" and "tcp[tcpflags] & (tcp-ack) == 0"The standard behavior of WinDump uses Unix timestamps. With the option -tttt, the packages appear with a human-readable timestamp.
windump -i "\Device\NPF_{B13697A3-3CD0-4D84-BA5D-179F708500D3}" -tttt -c 4 -vvThe -c 4 option limits the output to 4 packets (4 lines).
The -v option for verbose dump, -vv increased verbose dump.
By default, WinDump resolves IP addresses to host names and also uses service names instead of port numbers. If no DNS is available, or you simply want to see the port number, the -n option can be applied.
WinDump Filter Expressions
Use filter to select which packet headers capture. If no filters are applied, all packet headers are getting. Commonly used filters are port, host, src, dst, tcp, udp, icmp.
windump -i "\Device\NPF_{B13697A3-3CD0-4D84-BA5D-179F708500D3}" -n "udp port 53 or tcp port 53"The filter is applied to udp port 53 and tcp port 53, so only DNS packets are shown.
Filter expressions can be combined with the AND, OR, and NOT operators. In this way, packets can be isolated more precisely.
windump -i "\Device\NPF_{B13697A3-3CD0-4D84-BA5D-179F708500D3}" "src 10.10.10.11 and dst port 22"In the next example, capturing all packets except tcp packets.
windump -i "\Device\NPF_{B13697A3-3CD0-4D84-BA5D-179F708500D3}" "not tcp"The output of WinDump can scroll very quickly across the screen, but the package headers can be saved to a file with the -w option. The files are saved in pcap format and have a .pcap extension. pcap files stored in this way can e.g. in Wireshark to decoding again later.
windump -i "\Device\NPF_{B13697A3-3CD0-4D84-BA5D-179F708500D3}" -n -c 20 -w dump.pcapThis command saves 20 output lines to the icmp.pcap file.
Help and version information is available with run -help.
C:\>windump -help
windump version 3.9.5, based on tcpdump version 3.9.5
WinPcap version 4.1.3 (packet.dll version 4.1.0.2980), based on libpcap version 1.0 branch 1_0_rel0b (20091008)
Usage: windump [-aAdDeflLnNOpqRStuUvxX] [ -B size ] [-c count] [ -C file_size ]
                [ -E algo:secret ] [ -F file ] [ -i interface ] [ -M secret ]
                [ -r file ] [ -s snaplen ] [ -T type ] [ -w file ]
                [ -W filecount ] [ -y datalinktype ] [ -Z user ]
                [ expression ]
Conclusion
WinDump for network packet monitoring is easy to set up, once you are familiar with the various flags and filters after a few attempts, network issues can be solved quickly, as well the security in the network can be checked and optimized, that in the same effective way as is possible with a linux system.
Provide feedback
Saved searches
Use saved searches to filter your results more quickly
Sign up
Лицензирование и цена
Microolap TCPDUMP for Windows поставляется с лицензией, допускающей бесплатное использование только в личных некоммерческих целях. Для коммерческого использования необходимо приобрести лицензию.
Стоимость коммерческой лицензии по безналичному расчёту для организаций составляет 14 900 ₽.
Лицензирование происходит по принципу “одна лицензия — один специалист”, количество машин не ограничивается.
Стоимость лицензии окупается за 10-15 сэкономленных человеко-часов специалиста, который получит возможность использовать привычный tcpdump не только в *nix среде, но и в Windows.
Другие способы оплаты доступны через сервис MyCommerce/Share-It.