
Все способы:
- Шаг 1: Скачивание и распаковка файлов
- Шаг 2: Добавление исполняемого файла в переменную среду
- Шаг 3: Проверка работоспособности
- Вопросы и ответы: 4
Обратите внимание! Все описываемые далее действия выполняются на примере базы данных SQLite 3.40.1 (2022-12-28), актуальной на момент написания настоящей статьи. Это важно учитывать, так как в будущем разработчиками могут быть внесены серьезные изменения в работу продукта, вследствие чего некоторые инструкции могут потерять свою актуальность.
Шаг 1: Скачивание и распаковка файлов
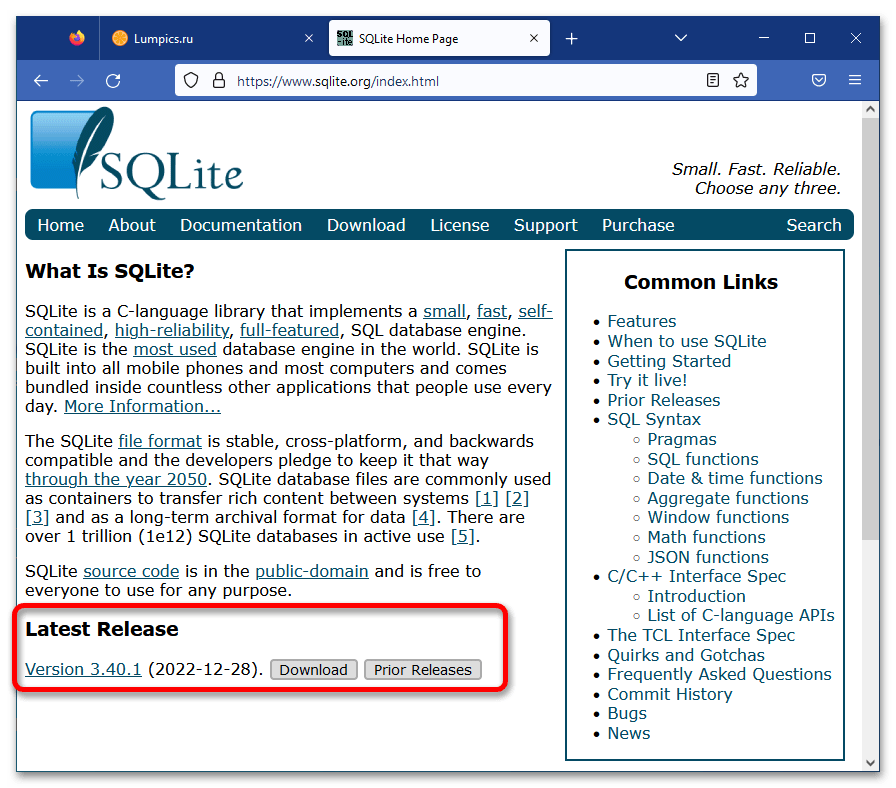
Первостепенно необходимо скачать файлы SQLite, чтобы в дальнейшем настроить их работу для использования в операционной системе Windows 10. Загружать базу данных рекомендуется с официального сайта разработчиков, это исключит вероятность заражения компьютера вирусными программами.
Скачать SQLite с официального сайта
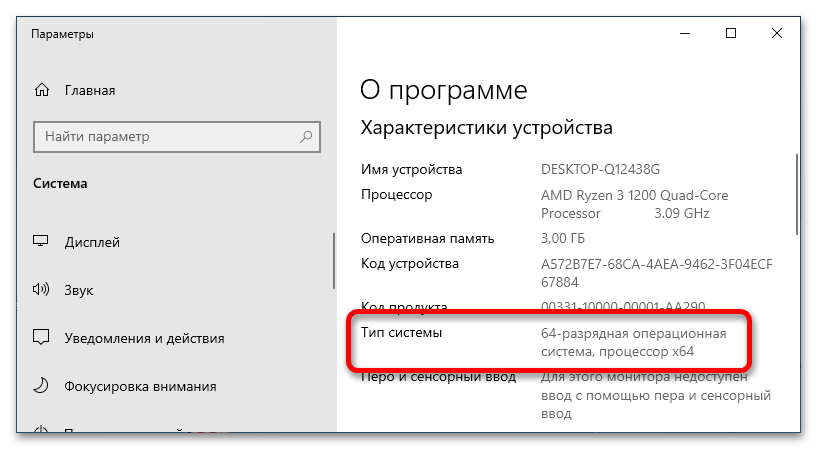
Примечание! При выборе файлов для загрузки следует отталкиваться от разрядности установленной операционной системы. Если этой информацией вы не обладаете, обратитесь за помощью к другой статье на нашем сайте, после чего вернитесь и продолжите выполнять описываемые ниже действия.
Подробнее: Как посмотреть разрядность системы Windows 10
Чтобы установить SQLite в Windows 10, достаточно скачать архивы базы данных нужной версии и распаковать их в удобную для вас директорию:
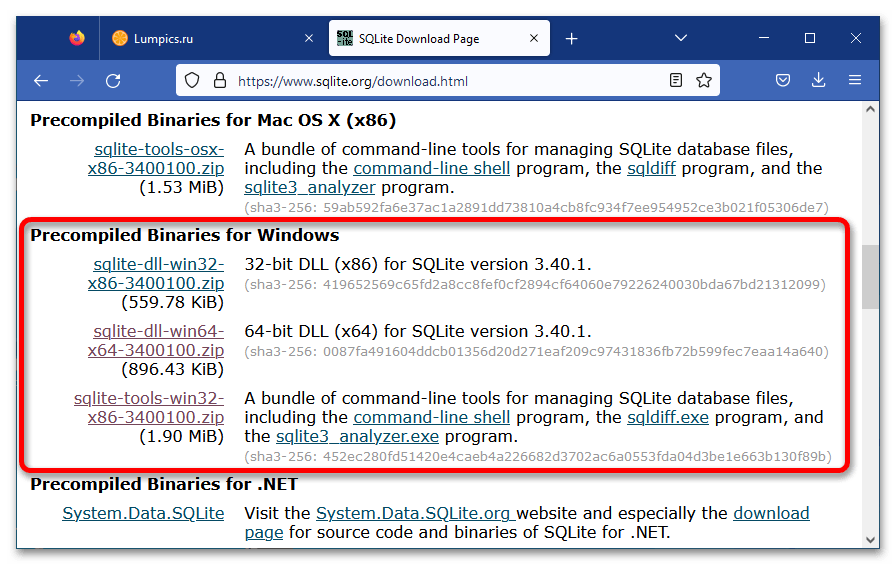
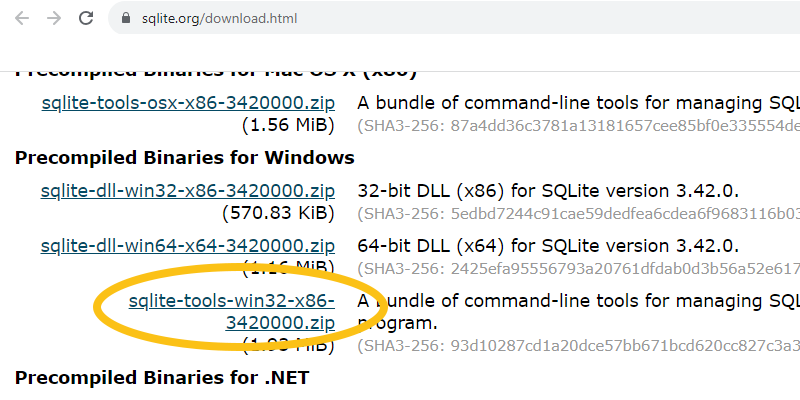
- Находясь на странице загрузки, переместитесь ниже до блока «Precompiled Binaries for Windows». Затем скачайте архив под названием «sqlite-tools-win32-x86-3400100.zip», после чего кликните по ссылке «sqlite-dll-win32-x86-3400100.zip» (для 32-разрядной операционной системы) или «sqlite-dll-win64-x64-3400100.zip» (для 64-разрядной операционной системы).
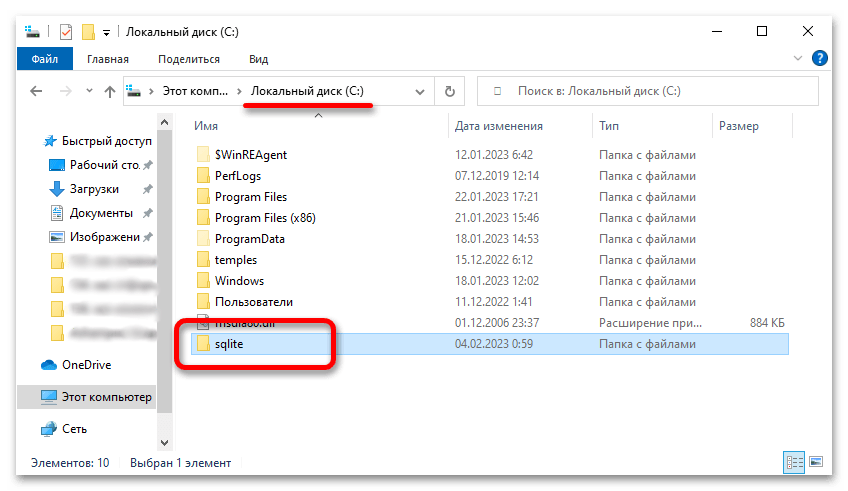
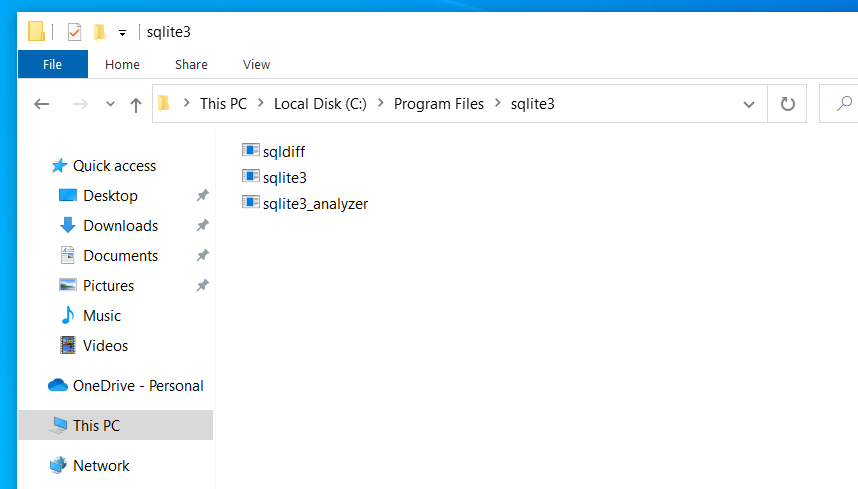
- В любом удобном месте на диске создайте папку, в которую будут помещены файлы SQLite. На скриншоте ниже видно, что была создана директория «sqlite» в корневом разделе диска C.
-
Распакуйте ранее загруженные архивы в созданный каталог, воспользовавшись специальной программой. В качестве примера приведен WinRAR, но для этих целей можно воспользоваться и штатным инструментом операционной системы.

Обратите внимание! Если с распаковкой архивов возникли трудности, обратитесь за помощью к другой статье на нашем сайте, в которой представлено три способа выполнения поставленной задачи.
Подробнее: Распаковка ZIP-архивов в операционной системе Windows 10


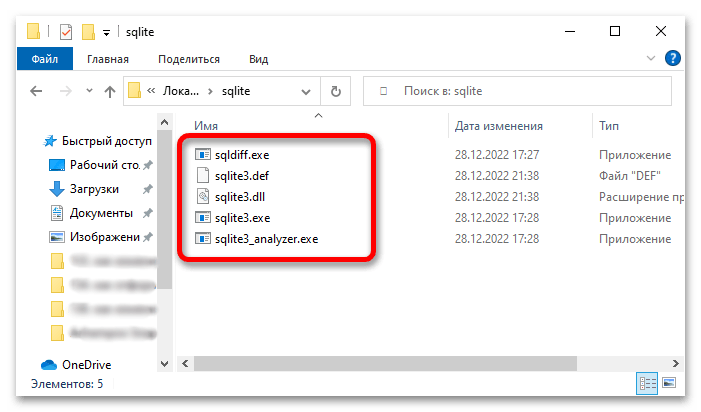
По итогу выполнения этого шага у вас на диске должен появиться каталог, в котором будут находиться пять файлов базы данных SQLite.
Шаг 2: Добавление исполняемого файла в переменную среду
Базой данных SQLite можно начинать пользоваться уже сейчас, запустив приложение «sqlite3.exe». Но для удобства вызова рабочей среды из «Командной строки» рекомендуется добавить в переменную PATH каталог, в котором размещен исполняемый файл программы. Это избавит от необходимости каждый раз открывать файловый менеджер и переходить в папку с базой данных.
-
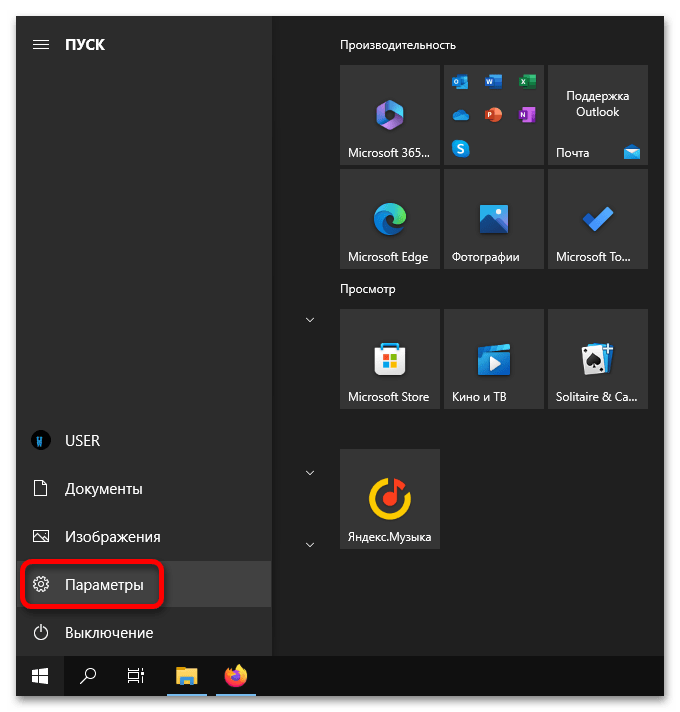
Откройте окно параметров любым доступным способом. Проще всего для этого сделать через меню «Пуск», кликнув по соответствующей кнопке в левом нижнем углу экрана.

Читайте также: Все способы запуска «Параметров» в Windows 10
- Перейдите в раздел «Система», щелкнув левой кнопкой мыши по одноименному блоку в окне параметров.
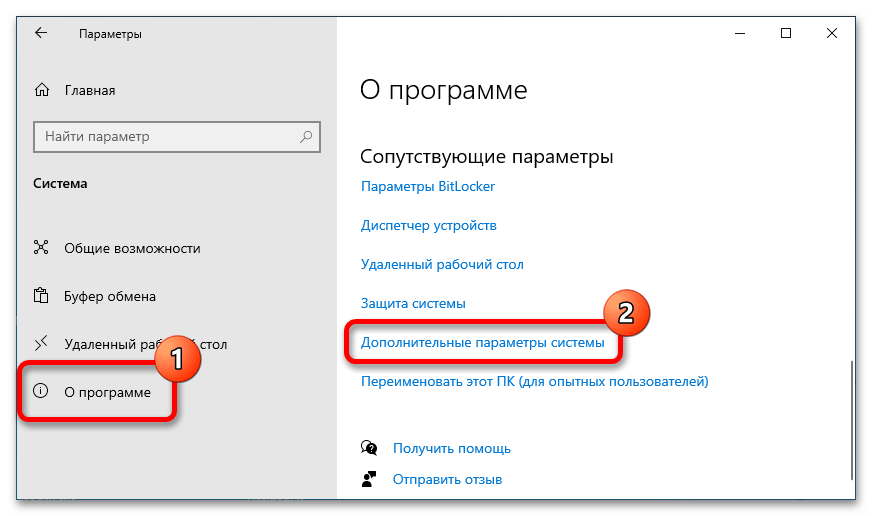
- Воспользовавшись панелью слева, перейдите во вкладку «О программе», после чего в основной части окна пролистайте страницу в самый низ и щелкните по ссылке «Дополнительные параметры системы».
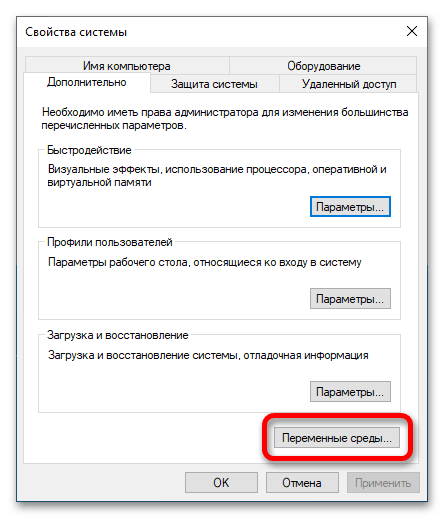
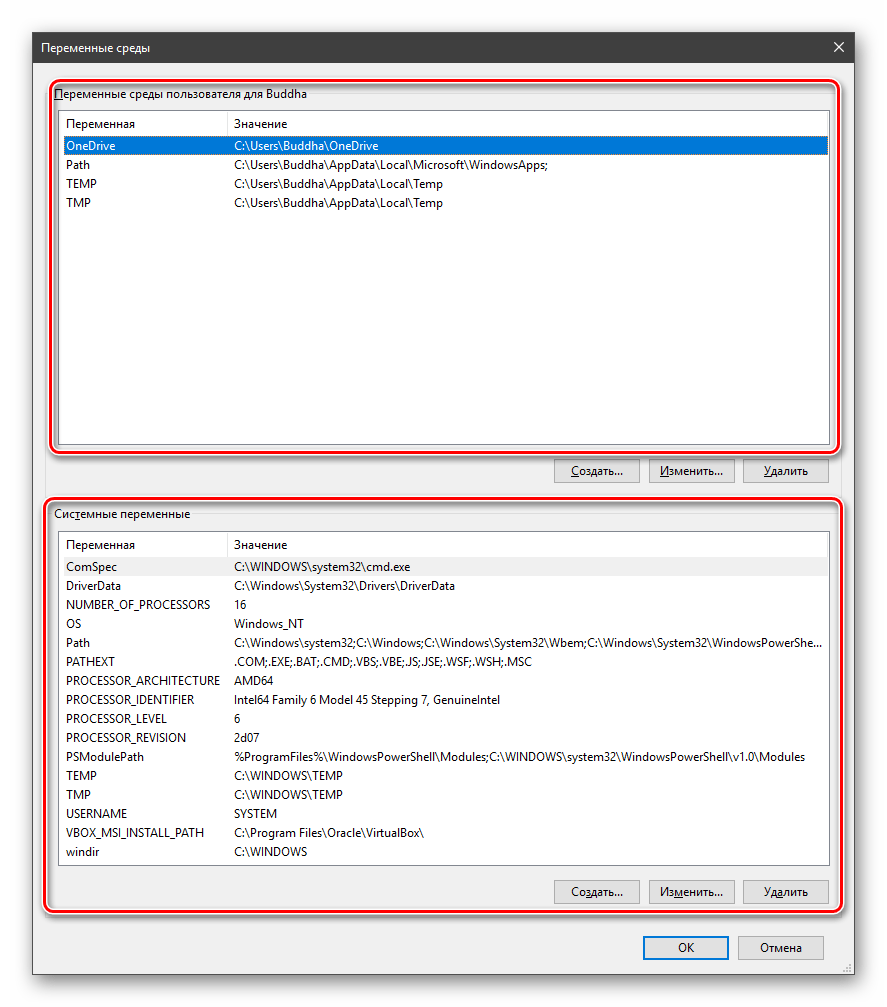
- В новом появившемся окне «Свойства системы», находясь на вкладке «Дополнительно», кликните по кнопке «Переменные среды».
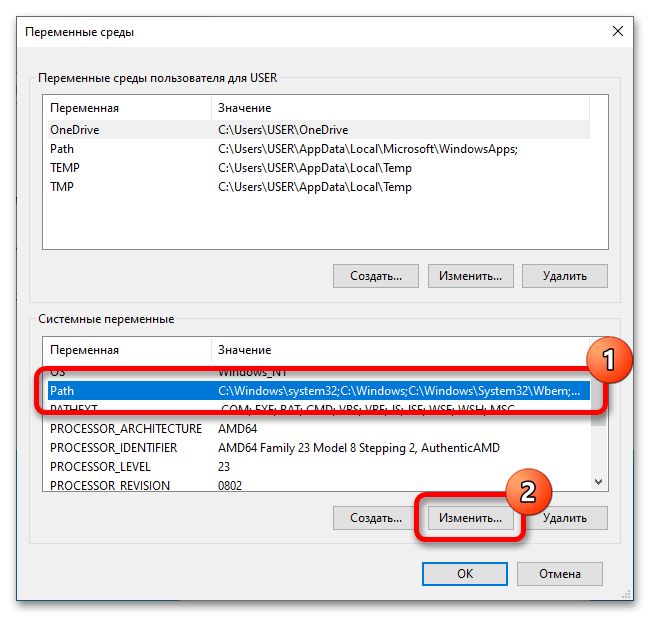
- В меню переменных сред в списке «Системные переменные» выделите строку «Path» и нажмите по кнопке «Изменить».
-
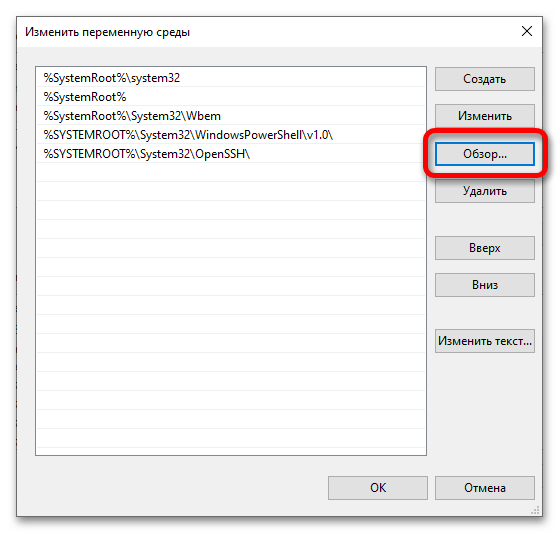
Добавьте в список путь к папке, созданной на первом шаге и содержащей все файлы SQLite. Проще всего это сделать через окно файлового менеджера, поэтому нажмите по кнопке «Обзор».

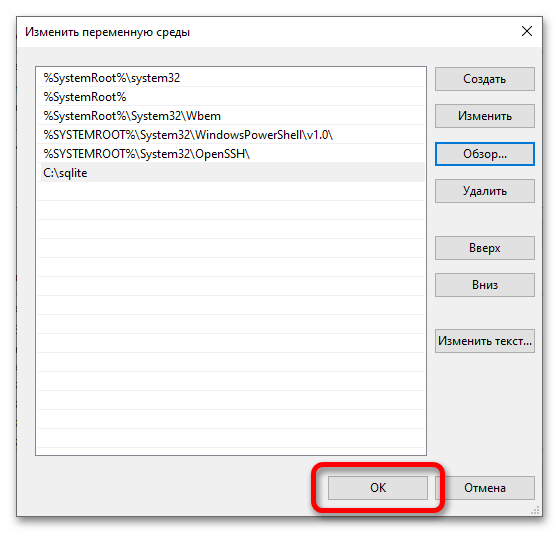
В «Проводнике» перейдите к целевой директории и выделите ее, после этого нажмите «ОК». Обратите внимание, что у вас месторасположение и название папки может отличаться.

Сохраните внесенные изменения в параметры среды, щелкнув по кнопке «ОК». После можете закрыть все оставшиеся окна и приступать к проверке работы базы данных.


Обратите внимание! Если в ходе работы с переменной средой Windows 10 вы столкнулись с проблемами или появилось желание более глубже изучить эту тему, рекомендуем перейти по ссылке ниже к статье, в которой подробно рассказывается о переменных PATH и PATHEXT, а также приводятся практические примеры использования этих компонентов операционной среды.
Подробнее: Изучаем переменные среды в Windows 10
Шаг 3: Проверка работоспособности
Все готово к запуску базы данных SQLite. Рабочая среда инициализируется в «Командной строке», поэтому предварительно необходимо ее открыть. Для этого проще всего вызвать окно «Выполнить» сочетанием клавиш Win + R, после чего ввести команду cmd и нажать по кнопке «ОК».

Читайте также: Все способы запуска «Командной строки» в Windows 10
В открывшемся окне консоли пропишите команду sqlite3 или sqlite3.exe и нажмите Enter. После этого должно появиться приглашение к вводу команд SQL, выраженное надписью «sqlite>» (без кавычек) в начале строки.
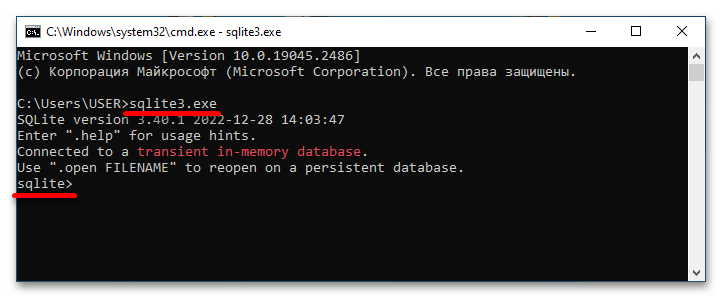
Если у вас все так, как описывается выше, то базу данных SQLite можно считать установленной и готовой к использованию. В противном случае вернитесь к шагу 2 и повторите выполнение всех перечисленных там действие.
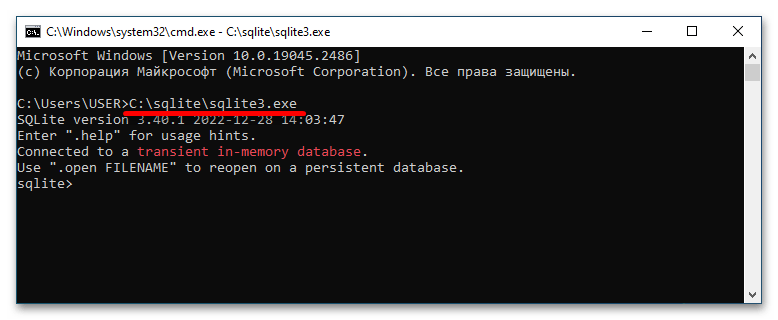
Важно! В качестве альтернативы можно запускать оболочку SQLite через исполняемый файл в корневом каталоге, который создавался на первом шаге. Сделать это можно и через «Командную строку», прописав полный путь к программе, как это показано на скриншоте ниже.
Наша группа в TelegramПолезные советы и помощь
To install SQLite on Windows 10, follow these steps:
- Visit the official SQLite website (https://www.sqlite.org/) on your web browser.
- Navigate to the «Download» section.
- Scroll down to the «Precompiled Binaries for Windows» section and find the precompiled binary for your version of Windows (32-bit or 64-bit). Select the appropriate link to download the binary.
- Once the download is complete, open the downloaded file.
- Extract the contents of the downloaded file to a directory on your computer, such as C:\sqlite.
- Open the extracted directory and locate the sqlite3.exe file.
- Right-click on the sqlite3.exe file and select «Copy».
- Navigate to the directory where you want to store the executable file, such as C:\Program Files\SQLite.
- Right-click inside the directory and select «Paste» to copy the sqlite3.exe file into the folder.
- Now, you have successfully installed SQLite on your Windows 10 computer.
To use SQLite, you can open a command prompt window and navigate to the directory where you stored the sqlite3.exe file. Then, you can type «sqlite3» followed by the name of the database file you want to create or work with (e.g., «sqlite3 mydatabase.db»). This will open the SQLite command-line interface where you can execute SQL commands and interact with the database.
Note: Make sure to add the directory where you stored the sqlite3.exe file to your system’s PATH variable to use SQLite from any command prompt window easily.
Best SQLite Books to Read in 2025
1
Rating is 5 out of 5
The Definitive Guide to SQLite (Expert’s Voice in Open Source)
2
Rating is 4.9 out of 5
The Definitive Guide to SQLite
3
Rating is 4.8 out of 5
Using SQLite: Small. Fast. Reliable. Choose Any Three.
4
Rating is 4.7 out of 5
Creating SQL Queries Using SQLite Made Easy (SQL Series)
5
Rating is 4.6 out of 5
SQLite For Beginners: Learn Fundamentals of Queries and Implement PyQt-Based Projects Easily
6
Rating is 4.5 out of 5
SQL Pocket Guide: A Guide to SQL Usage
Can I install SQLite on Windows 10 without administrative privileges?
No, you typically need administrative privileges to install SQLite on Windows 10. Administrative privileges are required to make changes to system files and directories, which is necessary for installation.
Can I install SQLite on Windows 10 for commercial or enterprise use?
Yes, you can install SQLite on Windows 10 for commercial or enterprise use. SQLite is an open-source, lightweight, and self-contained database engine that is widely used in commercial and enterprise applications. It can be freely used, modified, and distributed under the terms of the Public Domain license. SQLite is compatible with Windows 10, and you can download and install it from the official SQLite website without any restrictions on its usage for commercial purposes.
How long does it usually take to install SQLite on Windows 10?
The installation of SQLite on Windows 10 usually takes less than a minute. The process involves downloading and running the installation file, selecting the desired options, and confirming the installation location. Once the installation is complete, SQLite is ready to be used.
Are there any known issues or common errors encountered during SQLite installation on Windows 10?
There are a few potential issues or errors that can be encountered during SQLite installation on Windows 10. Some of the common ones include:
- «SQLite is not recognized as an internal or external command»: This error occurs when the SQLite executable file is not added to the system’s PATH environment variable. To fix this, you need to manually add the directory containing the SQLite executable to the PATH variable.
- «Failed to open database file»: This error can occur if the specified path for the SQLite database file is incorrect or if there are insufficient permissions to access/write to the file. Make sure the path is correct and that you have the necessary permissions to access the file.
- «Unable to open database file»: This error can occur if the path specified during SQLite connection is incorrect or if the database file is locked by another application. Ensure that the path is correct and that no other application is using the file.
- «SQL logic error or missing database»: This error can occur when trying to execute SQL statements on a non-existing database or if the database file is corrupt. Double-check the database path and ensure that the database file is valid and not corrupt.
- «Could not find the database driver»: This error can occur when trying to connect to SQLite using a programming language or library that does not have the necessary SQLite driver installed. Make sure you have the appropriate SQLite driver installed for your programming environment.
It is important to note that these issues are not specific to Windows 10 alone and can occur in other Windows versions as well.
What are the system requirements to install SQLite on Windows 10?
The system requirements to install SQLite on Windows 10 are as follows:
- Operating System: Windows 10 (32-bit or 64-bit)
- Processor: 1.0 GHz or faster processor
- Memory: 1 GB RAM (recommended minimum)
- Storage: Around 500 MB of free disk space
- Graphics: DirectX 9-capable video card with a minimum display resolution of 800×600 pixels
It’s worth noting that these are the basic requirements for running SQLite. However, if you plan to use SQLite in conjunction with other software or frameworks, the specific requirements imposed by those tools should also be considered.
SQLite is a self-contained, file-based relational database management system that allows users to store and manage data in a structured and efficient manner. Unlike traditional client-server databases, SQLite is serverless, meaning it doesn’t require a separate server process to operate. This makes it an ideal choice for embedded and standalone applications, as well as for developers who need a lightweight and easy-to-use database solution.
For Windows 10 users, SQLite offers a wide range of benefits. With SQLite, users can easily store and manage data for various applications, including web browsers, email clients, and games. SQLite’s compact size and low resource requirements also make it an excellent choice for devices with limited storage and processing power. Additionally, SQLite is highly customizable, allowing users to easily create and manage their own databases using a variety of programming languages, including C, C++, Java, and Python.
In this article, we will guide you through the process of SQLite Windows installation, highlighting the steps and best practices to ensure a successful installation. Whether you’re a developer, a power user, or just looking to try out SQLite, this article will provide you with the necessary information to get started with this powerful and versatile database management system.
Installing SQLite on Windows 10
Step 1: Downloading SQLite
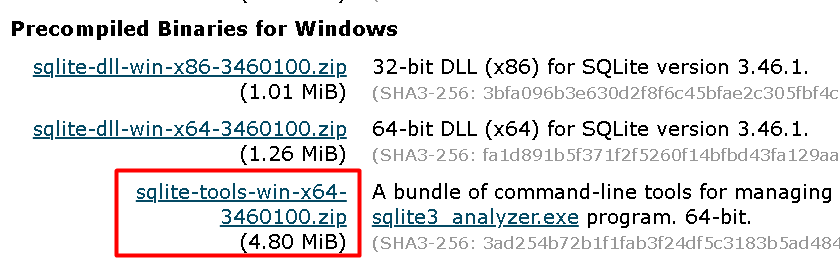
To install SQLite on Windows 10, you’ll need to download the precompiled binaries from the official SQLite website. Open a web browser navigate to the SQLite download page and then scroll down to the Precompiled Binaries for Windows section.
Here, you’ll find links to download the SQLite tools for 32-bit and 64-bit systems. Click on the sqlite-tools-win32-x86-<version>.zip** link for 32-bit systems or sqlite-tools-win64-x86-<version>.zip** for 64-bit systems.
The `<version>` will be the latest available version of SQLite. Save the zip file to a location on your computer, such as the Downloads folder.
Once the download is complete, you’ll need to extract the contents of the zip file. Navigate to the location where you saved the zip file and right-click on it. Select Extract All or Extract Here and choose a location to extract the files. This will begin the extraction process, and the files will be extracted to the specified location.
After extracting the files, you should see three executable files in the directory.
- The
sqlite3_analyzer.exefile is a tool for analyzing and optimizing SQLite databases. - The
sqldiff.exefile is a tool for comparing two SQLite databases. - The
sqlite3.exefile is the SQLite command-line shell, which allows you to interact with SQLite database Windows 10 using SQL commands.
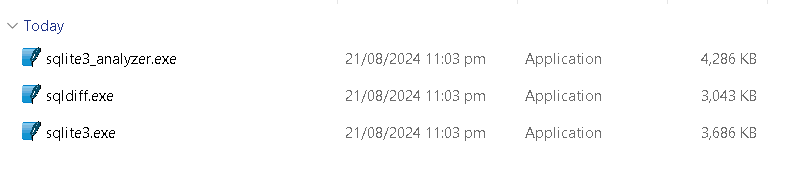
These executables are the core components of the SQLite installation on Windows 10.
Install SQLite on Our Windows 10 VPS!
With Ultahost, Hosting Windows VPS has never been easier or faster. Enjoy ultra-fast SSD NVME speeds with no dropouts and slowdowns.
Step 3: Running SQLite from the Command Prompt
Now that you have extracted the SQLite files, it’s time to run the SQLite command-line shell and start interacting with SQLite databases. To do this, you’ll need to navigate to the working directory where you extracted the SQLite files using the `cd` command.
- Open the Command Prompt on your Windows 10 system. You can do this by searching for “cmd” in the Start menu or by pressing the Windows key + R and typing “cmd” in the Run dialog box.
- Navigate to the directory where you extracted the SQLite files using the `cd` command. For example, if you extracted the files to a folder named “SQLite” on your desktop, you would type the following command and press Enter:
cd Desktop\SQLite
Replace “Desktop\SQLite” with the actual path to the directory where you extracted the SQLite files.
Once you are in the correct directory, type the following command and press Enter:
sqlite3
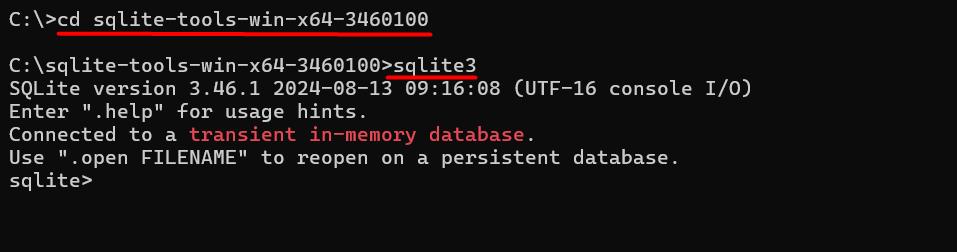
This will launch the SQLite command-line shell, and the output shows the version of SQLite that you are running, followed by a prompt that tells you that you are connected to a transient in-memory database. This means that any changes you make to the database will be lost when you exit the SQLite shell.
Using the SQLite Command-Line Shell
From the `sqlite>` prompt, you can execute SQL commands to create and manage databases, tables, and data. You can also use various SQLite commands to perform tasks such as:
- Creating a new database: .open database_name
- Creating a new table: CREATE TABLE table_name (column1, column2, …);
- Inserting data into a table: `INSERT INTO table_name (column1, column2, …) VALUES (‘value1’, ‘value2’, …);
- Querying data from a table: `SELECT * FROM table_name;
To see a list of all available commands in SQLite, you can type the following command and press Enter:
.help
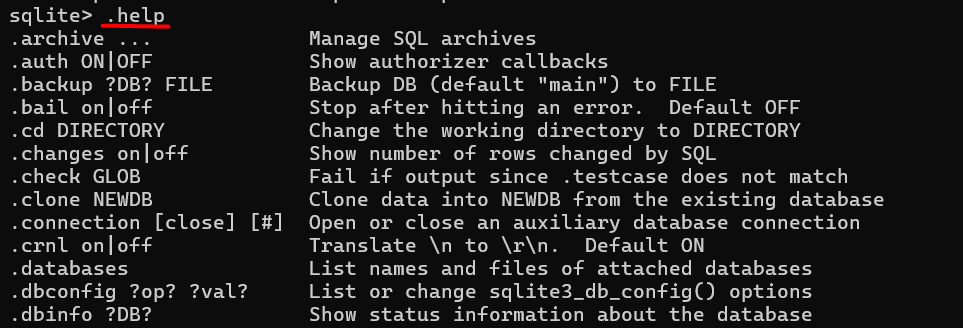
This will display a list of all available commands, including those for creating and managing databases, tables, and data.
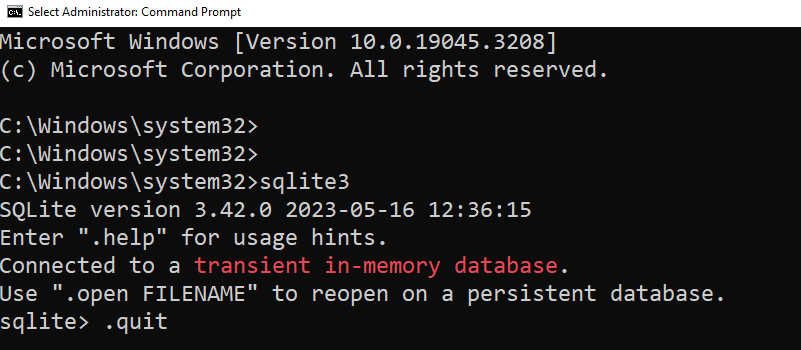
When you are finished using the SQLite shell, you can quit by typing the following command and pressing Enter:
.quit
This will exit the SQLite shell and return you to the Command Prompt.
With the SQLite shell up and running, you can now start exploring the features and capabilities of SQLite. In the next section, we will cover some common use cases for SQLite and provide examples of how to use SQLite in real-world applications.
Main Features of SQLite
SQLite is a robust and versatile database management system that offers a wide range of features that make it an ideal choice for various applications. Some of the key features of SQLite include:
- Serverless Architecture: SQLite does not require a separate server process to operate, making it a self-contained and lightweight solution.
- Zero-Configuration: SQLite does not require any configuration or setup, allowing users to start using it immediately.
- ACID Compliance: SQLite is fully ACID compliant, ensuring that database transactions are processed reliably and securely.
- SQL Support: SQLite supports most SQL features, including views, triggers, and stored procedures.
- Cross-Platform Compatibility: SQLite can run on multiple platforms, including Windows, macOS, and Linux.
- Small Footprint: SQLite has a small binary size, making it an excellent choice for embedded systems and mobile devices.
- High Performance: SQLite offers high performance and reliability, making it suitable for a wide range of applications.
Conclusion
In this article, we have walked you through the process of installing SQLite for Windows 10. From downloading the precompiled binaries to running the SQLite command-line shell, we have covered every step in detail. With its serverless architecture, zero-configuration setup, and support for SQL features, SQLite is an ideal choice for a wide range of applications.
By following the steps outlined in this article, you can easily download SQLite Windows on your system and start using it to create and manage databases. Whether you’re a developer, a power user, or just looking to try out SQLite, this article has provided you with the necessary information to get started with this powerful and versatile database management system.
Ultahost’s VPS hosting plan empowers you to elevate your development experience and offers superior processing power memory and storage on your system. Focus on running demanding applications or managing complex environments seamlessly, let Ultahost provide the power and resources you need to virtualize confidently.
FAQ
What is SQLite?
SQLite is a lightweight, disk-based database engine that doesn’t require a separate server process. It is widely used for local storage in applications and is known for its simplicity and efficiency.
How do I verify the installation?
Open Command Prompt and type sqlite3. If SQLite is installed correctly and added to your system path, you should see the SQLite command-line interface start, showing a prompt like sqlite>.
What if I get an error saying ‘sqlite3’ is not recognized as an internal or external command?
This usually means that the path to sqlite3.exe is not correctly added to the system PATH environment variable. Double-check the steps to ensure the directory containing sqlite3.exe is correctly added to the PATH.
Do I need to install any additional software to use SQLite?
No additional software is required for basic SQLite usage. However, for enhanced functionality or graphical interfaces, you might consider using SQLite management tools like SQLiteStudio or DB Browser for SQLite
Where can I find documentation for SQLite?
You can find comprehensive documentation and resources on the official SQLite website: SQLite Documentation.
Sqlite is a serverless relational database management system, what we call an embedded database. It is very lightweight and very easy to use.
In this article we are going to see how to install SQLite3 on Microsoft Windows 10 and 11. I will also show you how to install «DB Browser for SQLite», a graphical user interface for SQLite3.
There are a couple of ways to install SQLite3 on Windows. I will be using the Winget package manager, which is the official command-line package manager for Windows. It comes pre-installed on Windows 10 and Windows 11.
- Install SQLite3 using Winget.
- Install DB Browser for SQLite using Winget.
- Manually Install SQLite 3.
Install SQLite3 using Winget
To install SQLite3 on your Windows computer, Open command prompt as Administrator (CMD or PowreShell) and run the following command:
winget install sqlite.sqliteThat is all you need to do. Now, exit the command prompt and open a new one as Administrator. You will then have access to the sqlite3 command.
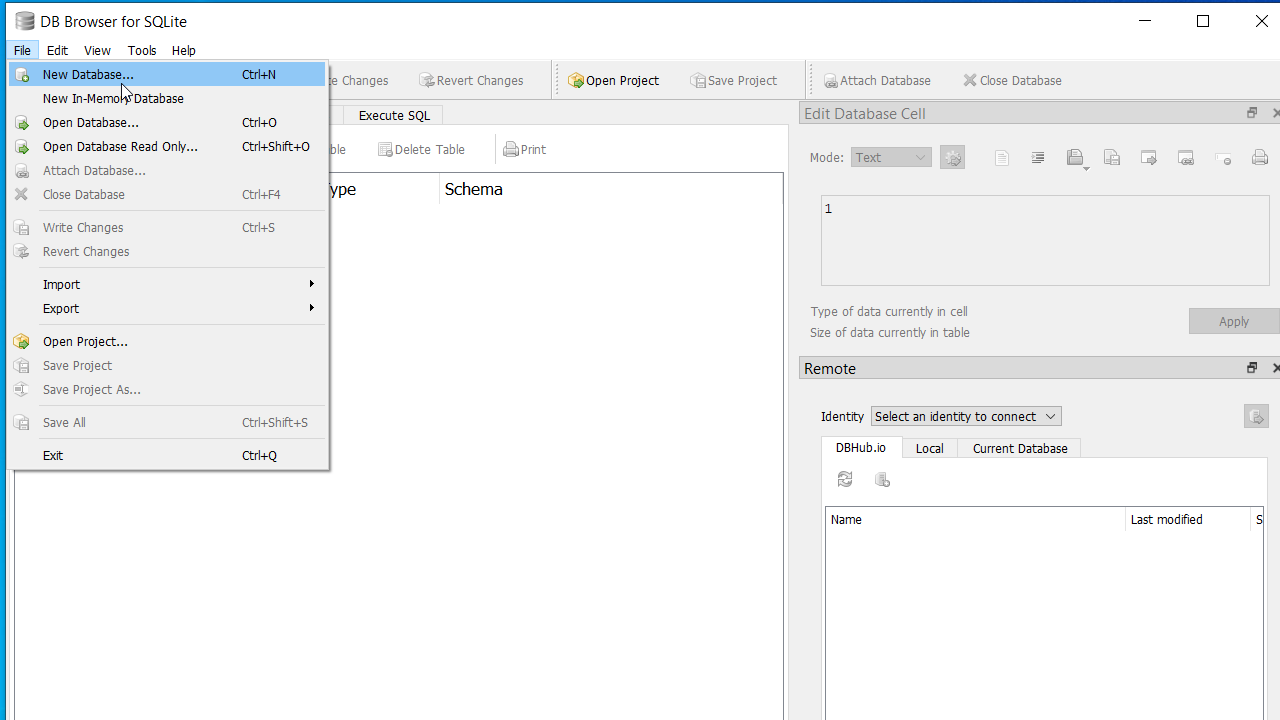
Install DB Browser for SQLite using Winget
If you prefer to use a graphical user interface, there is an open-source software package called ‘DB Browser for SQLite.’ You can install it on Windows with the following command:
winget install DBBrowserForSQLite.DBBrowserForSQLiteOnce the installation is complete. There will be a start menu shortcut to the DB Browser.
Manually Install SQLite 3
If you are on a computer that does not have a winget package manager, you can download the SQLite 3 from the following URL: https://www.sqlite.org/download.html.
In the website download the sqlite-tools package under the Precompiled Binaries for Windows.
After downloading the zip file, extract its contents to a location of your choice for installing SQLite 3. For example, you can extract the files to 'C:\Program Files\sqlite3'.
Then you need to add that location to the Windows PATH variable. To edit the path variable do the following steps:
- Press the
Windows key + Rto open the Run dialog box. - In the Run dialog box Type
sysdm.cpland press Enter to open the System Properties window. - In the System Properties window, select the Advanced tab, and then click the Environment Variables button.
- Under the ‘System variables,’ select the ‘Path’ variable and click Edit.
- Finally, click the New button and add the path to the SQLite directory (e.g.,
'C:\Program Files\SQLite').
Once you add the SQLite directory to the Path variable, you will have access to the sqlite3 command from both CMD and PowerShell.
A Sqlite database is a one single file, which you can move to anywhere in your computer. Also you can move a database from one operating system to another without any problem.
How to Install SQLite on Windows 10, 2016, 2019, 2022 (SQLite3 Command). SQLite is popular tool due to its great feature and zero configuration needed. It is small and self contained database engine that has a lot of APIs for a variety of programming languages. This article will take you through the process of setting up SQLite on Windows 10, 2016, 2019, 2022.
What is SQLite
SQLite itself is an RDBMS (relational database management system). In addition, it is in the public domain, which means you are free to use its code for commercial or noncommercial use. As a result, you will not be legally restricted in terms of utilizing, modifying, or even distributing the platform.
As opposed to server/client SQL systems, like MySQL, SQLite has been optimized for simplicity, economy and requires relatively little configuration. In the context of that, it does not compete with server/client solutions.
SQLite is a very popular database management system because of the fact that it is lightweight and easy to manage.
With SQLite all data and the data objects are stored in a single file that can be accessed directly by any application. The file is stored on the file system and no further admin required to run SQLite.
However, SQLite is only capable of handling low to moderate volume HTTP requests and also the database size is usually limited to 2GB. Even SQLite has its limitations, its advantages have gained the attention of more users. The tools in SQLite in particular the SQLite3 Command Line CLI we examine here, work the same from one environment to the next.
Sqlite3
The SQLite project has simple command line program named sqlite3 or sqlite3.exe on Windows, which allows the user to manually enter and execute SQL statements against an SQLite database or a ZIP archive. In this article we go through steps how to use the sqlite3 program in Windows server.
In the next part of our article How to Install SQLite on Windows 10, 2016, 2019, 2022 (SQLite3 Command) we will point out SQLite advantages:
Benefits of SQLite
Improves Performance
SQLite is extremely small and lightweight RDBMS, it is self contained in a small footprint. Also, it is serverless and file based. Any other RDBMS like MySQL needs a separate server for functionality, also called server/client architecture.
In fact, SQLite may take up as little as 600KB of space, depending on the system you install it on. You do not have to worry about installing any dependencies in order to make it work.
The SQLite database itself is modest by nature. Objects composing them – such as tables, indexes, and schema – are centralized within a single OS file. The combination of all these factors can lead to solid performance, in addition to high levels of dependability and stability. More specifically, SQLite runs between 10 to 20 times faster than PostgreSQL, and two times faster than MySQL. Low traffic websites will notice the difference the most.
Easy Setup and Administration
SQLite requires no configuration or requirements from the beginning. It is serverless and requires no configuration files. This means there isn’t any installation process involved. Downloading the requisite SQLite Libraries is all you need to get started with your database. Your computer is under no significant strain because it uses a small amount of memory.
SQLite is also transactional. This will allow you to roll back changes in case of a program crash or if an editing attempt does not succeed. SQLite’s rollback function allows you to return a database’s version that existed before the edits were applied. Therefore, you can rest assured that your changes won’t cause irreversible damage.
SQLite offers simplicity as well as easy administration. Ultimately, this means you may not need a DBA to keep everything running smoothly.
SQLite Is Versatile, Portable, and Flexible
A platform that provides versatility is one of the most beneficial things when it comes to software. SQLite is a cross platform database engine that is known for its robust portability and functionality.
You can copy and transfer data between 32 bit and 64 bit operating systems, as well as between big endian and little endian architectures. Basically, SQLite can be installed, compiled, and run on a number of different platforms, including Linux, Windows, and Mac OS X.
Furthermore, since the SQLite database consists of only one file and not a collection of separate files, it is far more portable when it comes to flexibility. As a result, SQLite is suitable for a wider variety of computing platforms.
SQLLite reduces cost and complexity
License free and serverless. No need for lengthy and error prone procedural queries. SQLite can be easily extended in in future releases just by adding new tables and/or columns. It also preserve the backwards compatibility.
Follow this post, we will show you how how to Install SQLite on Windows 10, 2016, 2019, 2022 (SQLite3 Command).
Install SQLite on Windows 10, 2016, 2019, 2022 (SQLite3 Command)
Install SQLite on Windows
First, go to SQLite’s official website download page and download precompiled binaries from Windows section. Once the download is completed, you should see the downloaded file in the Windows Downloads directory.
Next, right click on the downloaded file and extract it inside the C:\sqlite directory.

The window will look like this and you extract Compressed (Zipped) Folders and find a destination file as below

Next, open the Windows CMD and change the directory to C:\sqlite using the following command:
Next, verify the SQLite version with the following command:
You will get the SQLite version in the following output:
					SQLite version 3.38.5 2022-05-06 15:25:27
Enter ".help" for usage hints.
Connected to a transient in-memory database.
Use ".open FILENAME" to reopen on a persistent database.
sqlite>

Create a Database in SQLite
The basic syntax to create a database in SQLite is shown below:
sqlite3.exe database-name
Now, let’s create a database named employee.db using the following command:
You can also verify your created database with the following command:
You should see your created database in the following output:
main: C:\sqlite\employee.db r/w
To get a list of all SQLite options, run the following command:
You should see the list of all SQLite options in the following output:
					.archive ... Manage SQL archives
.auth ON|OFF Show authorizer callbacks
.backup ?DB? FILE Backup DB (default "main") to FILE
.bail on|off Stop after hitting an error. Default OFF
.binary on|off Turn binary output on or off. Default OFF
.cd DIRECTORY Change the working directory to DIRECTORY
.changes on|off Show number of rows changed by SQL
.check GLOB Fail if output since .testcase does not match
.clone NEWDB Clone data into NEWDB from the existing database
.connection [close] [#] Open or close an auxiliary database connection
.databases List names and files of attached databases
.dbconfig ?op? ?val? List or change sqlite3_db_config() options
.dbinfo ?DB? Show status information about the database
.dump ?OBJECTS? Render database content as SQL
.echo on|off Turn command echo on or off
.eqp on|off|full|... Enable or disable automatic EXPLAIN QUERY PLAN
.excel Display the output of next command in spreadsheet
.exit ?CODE? Exit this program with return-code CODE
.expert EXPERIMENTAL. Suggest indexes for queries
Create a Table in SQLite
CREATE TABLE engineer(id integer NOT NULL, name text NOT NULL, persontype text NOT NULL, length integer NOT NULL);
To verify the created table, run the following command:
You should see the following output:
Now, insert some data into the table using the following command:
					INSERT INTO engineer VALUES (1, "Ram", "Junagadh", 528);
INSERT INTO engineer VALUES (2, "Vikash", "Surat", 734);
INSERT INTO engineer VALUES (3, "Raj", "London", 1200);

Next, verify the inserted data using the following command:
You should see the content of a table in the following output:
					1|Ram|Junagadh|528
2|Vikash|Surat|734
3|Raj|London|1200
To view the data based on ID, use the following command:
SELECT * FROM engineer WHERE id IS 2;
You should see the following output:
Update a Table in SQLite
You can use the ALTER TABLE command to change the table. For example, to add a new column named age, run the following command:
ALTER TABLE engineer ADD COLUMN age integer;
Next, add the new age value for each rows using the following command:
					UPDATE engineer SET age = 80 WHERE id=1;
UPDATE engineer SET age = 50 WHERE id=2;
UPDATE engineer SET age = 90 WHERE id=3;
Next, verify the table data using the following command:
You should see the following output:
					1|Ram|Junagadh|528|80
2|Vikash|Surat|734|50
3|Raj|London|1200|90
To display the table data in a table format, you will need to enable the headers in SQLite. You can enable it using the following command:
You can now see the table data in the table format using the following command:
You should see the following output:
					id name persontype length age
-- ------ ---------- ------ ---
1 Ram Junagadh 528 80
2 Vikash Surat 734 50
3 Raj London 1200 90
To exit from the SQLite shell, run the following command:
Backup and Restore SQLite Database
To backup an SQLite database to a text file, run the following command:
sqlite3 employee.db .dump > employee.dump.sql
If you want to create a backup in sqlite format, run the following command:
sqlite3 employee.db ".backup employee.backup.sqlite"
To restore a backup from the text formated dump file, run the following command:
sqlite3 employee.db < employee.dump.sql
To restore a backup from the SQLite formatted dump file, run the following command:
sqlite3 employee.db ".restore employee.backup.sqlite"
Great! We have learned How to Install SQLite on Windows 10, 2016, 2019, 2022 (SQLite3 Command).
How to Install SQLite on Windows 10, 2016, 2019, 2022 (SQLite3) Conclusion
In this post, we explained how to install SQLite on a Windows server. We also explained how to interact with the SQLite shell to create and manage databases and tables in SQLite. I hope you can now easily use SQLite in the development environment.