
В этой статье мы пошагово рассмотрим установку Microsoft SQL Server 2019 с описанием всех опций, компонентов, актуальных рекомендаций и best practice.
MS SQL Server это лидирующая РСУБД (Реляционная система управления базами данных) а также главный конкурент Oracle Database в корпоративном сегменте. В СНГ MSSQL чаще всего применяется для собственных разработок прикладного ПО и для 1С.
Содержание:
- Редакции MS SQL Server 2019
- Особенности лицензирования SQL Server
- Начало установки SQL Server
- Параметры обновлений SQL Server при установке
- Тип инсталляции SQL Server
- Компоненты SQL Server 2019: для чего нужны, какие нужно установить
- Настройка именования экземпляра SQL Server
- Настройка параметров служб SQL Server, кодировка
- Настройка Database Engine в SQL Server
Редакции MS SQL Server 2019
Всего есть 6 выпусков (редакций) MSSQL 2019:
- Express является бесплатной для использования редакцией. Функционал довольно ограничен, самое ощутимое ограничение экспресс версии — максимальный размер базы 10 ГБ. Эта редакция подойдет для небольших проектов, например, студенческих работ или для обучения SQL/T-SQL.
- Standard это полноценная платная редакция, но многих функций всё еще нет. Максимальный объём оперативной памяти, который сможет использовать SQL Server – 128 ГБ, также отсутствуют группы доступности AlwaysOn и другие компоненты. Standard предназначен для приложений в небольших организациях.
- Enterprise включает в себя все возможные функции и компоненты, никаких ограничений нет. Корпоративная редакция обычно используется крупными корпорациями или компаниями, которым необходим функционал этой версии.
- Developer редакция так же как и Enterprise не имеет никаких ограничений и её можно использовать бесплатно, но она может использоваться только для разработки и тестирования приложений.
- Web редакция почти ничем не отличается от standard, кроме как более сильными ограничениями в функционале и соответственно более низкой стоимости лицензирования;
- Evaluation — ознакомительная редакция SQL Server, которая предоставляет полный функционал Enterprise и работает в течении 180 дней (может быть обновлена до полноценной версии).
Особенности лицензирования SQL Server
MS SQL Server лицензируется по 2 моделям:
- PER CORE — лицензирует MSSQL по ядрам сервера
- SERVER + CAL — лицензия целиком на сервер и на каждого пользователя, который будет работать с сервером
Enterprise редакция может быть лицензирована только по типу PER CORE
Также в MSSQL Server 2019 появилась новая возможность для лицензирования контейнеров, виртуальных машин и Big Data Clusters.
Более подробная информация по лицензирования SQL Server представлена в отдельной статье.
Начало установки SQL Server
В этой статье мы будем устанавливать MS SQL Server 2019 Enterprise Edition на Windows Server 2019.
Примечание. В SQL Server 2019 появилась полноценная поддержка Linux, а соответственно Docker и Kubernetes.
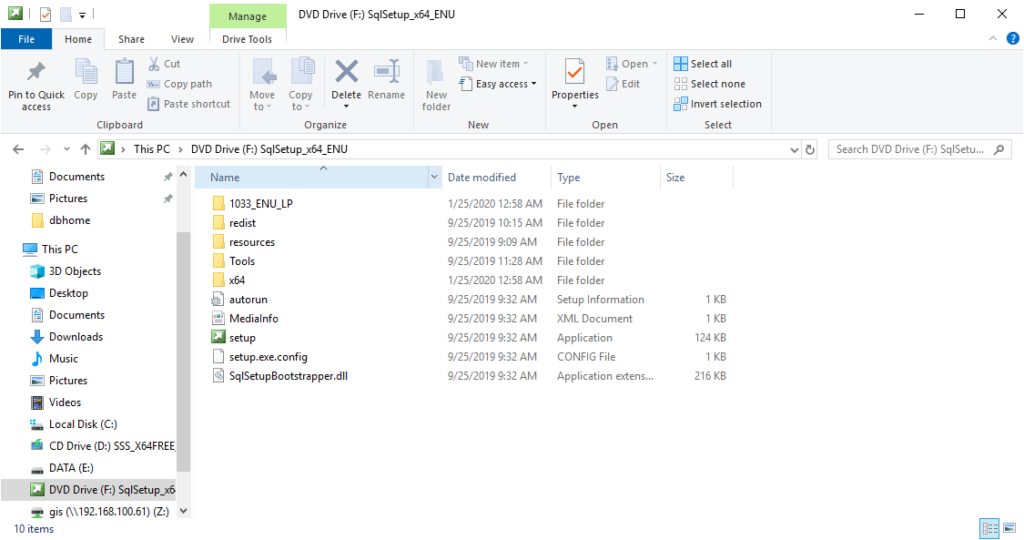
- Скачайте и распакуйте установочный образ SQL Server 2019. Запустите setup.exe;
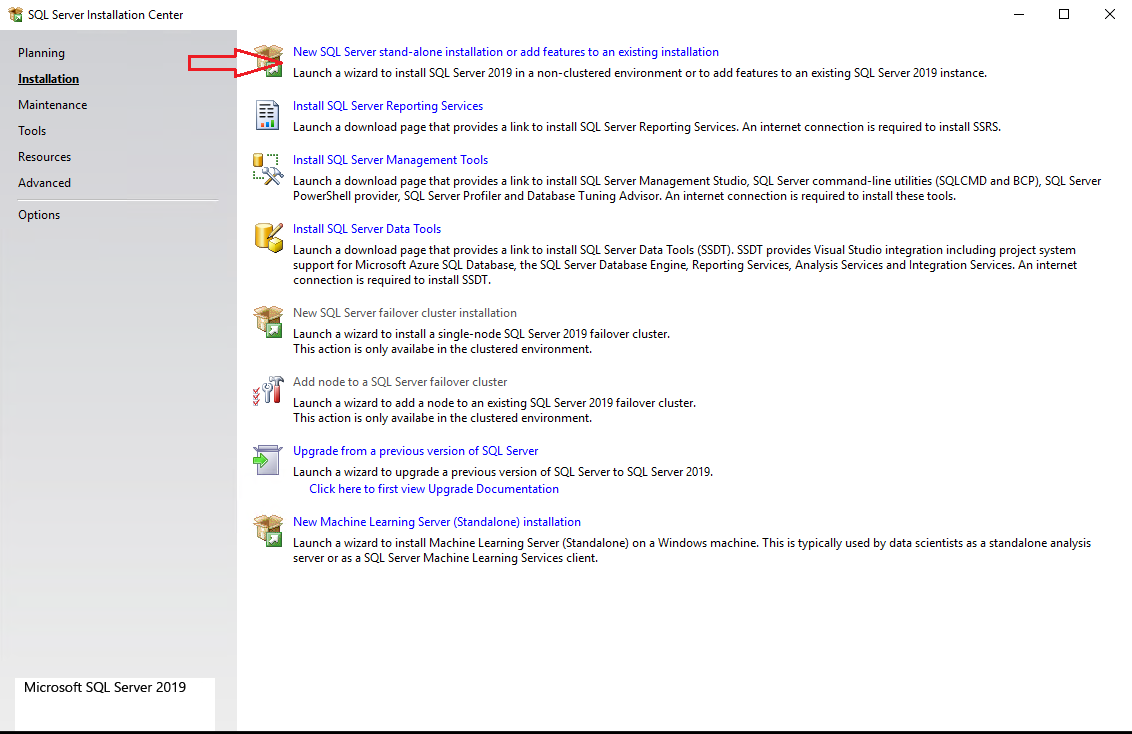
- Так как в этой статье мы будем устанавливать обычный изолированный экземпляр, во вкладке Installation выберите “New SQL Server stand-alone installation”.
В инсталляторе SQL Server можно выполнить много других действий: обновить старый экземпляр, починить сломанный и некоторые другие вещи.
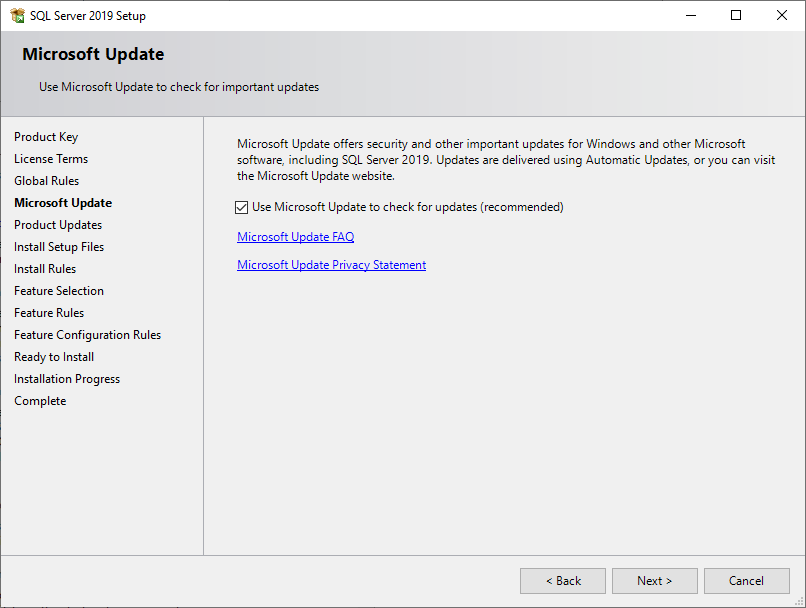
Параметры обновлений SQL Server при установке
На этом шаге вы можете включить поиск обновлений через Windows Update. Включать эту опцию или нет, решать вам. Всё зависит от вашей планировки обновлений и от требований к отказоустойчивости сервера. Если у вас нет четкого плана обновлений ваших серверов, лучше оставьте этот параметр включенным.
Нажмите Next.
Шаг Install Setup Files произойдет автоматически. Он подготовит файлы для установки.
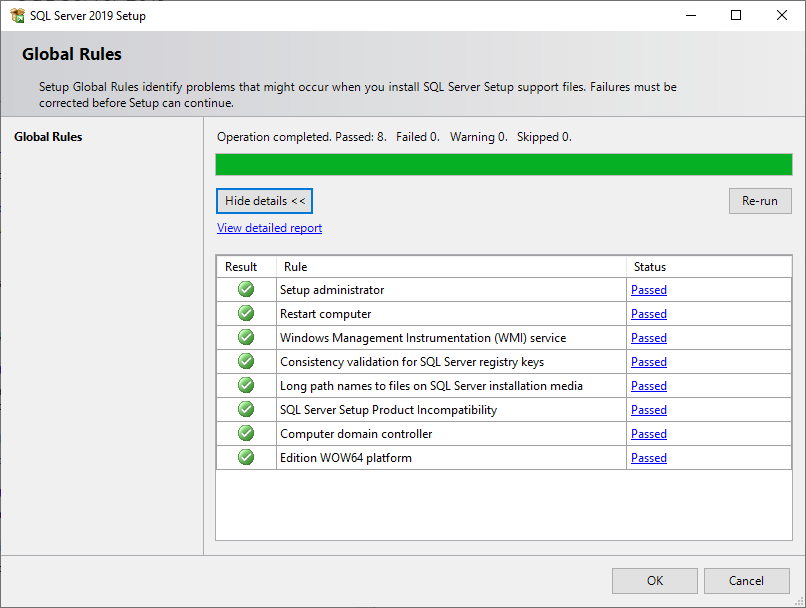
Install Rules так же пройдет автоматически, если установщик не обнаружит проблем, которые необходимо решить перед установкой MSSQL (например, перезагрузить компьютер или несовместимость вашей версии Windows с версией SQL Server).
Тип инсталляции SQL Server
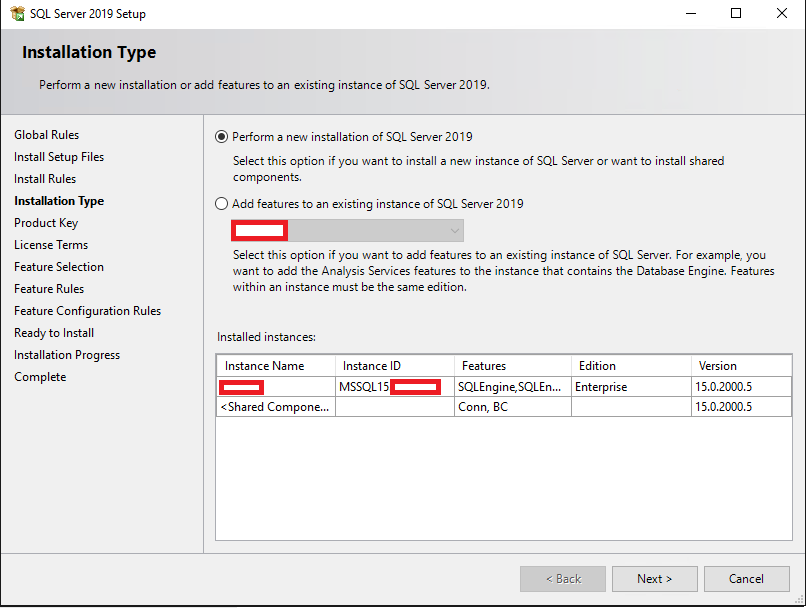
На этом шаге вы можете выбрать установку нового экземпляра или добавление функционала в уже установленный экземпляр. В нашем случае выбираем “Perform a new installation”.
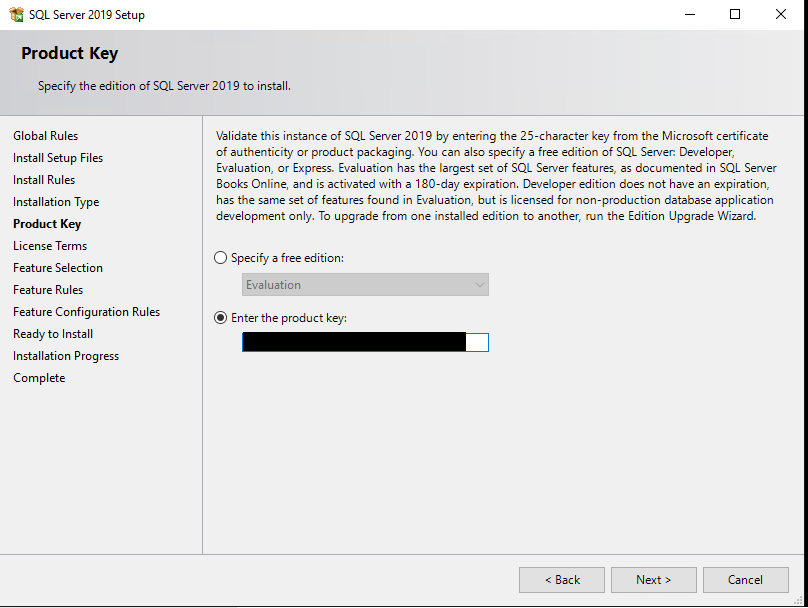
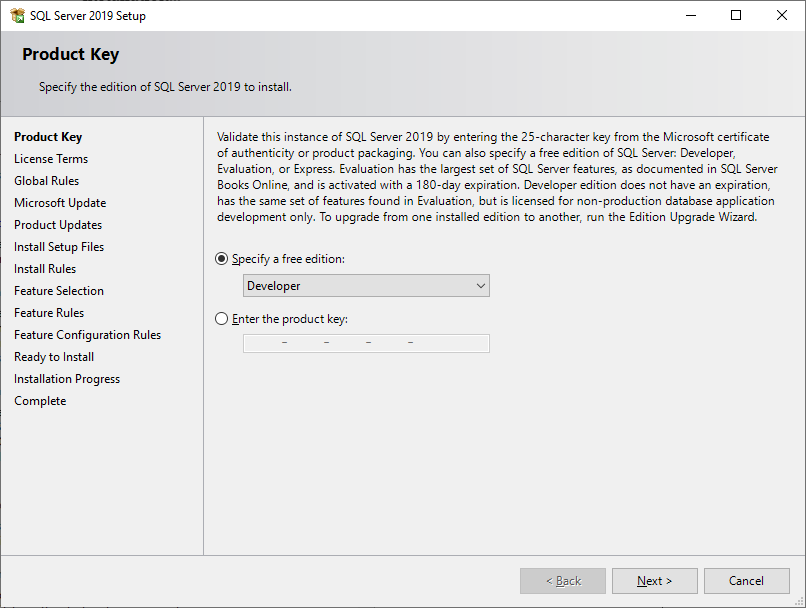
Теперь нужно ввести ключ продукта. Если нет ключа, выбирайте Free edition (например, Developer), но имейте в виду, что с редакцией Developer вы имеете право только разрабатывать и тестировать ПО, но не использовать сервер в продуктивной среде.
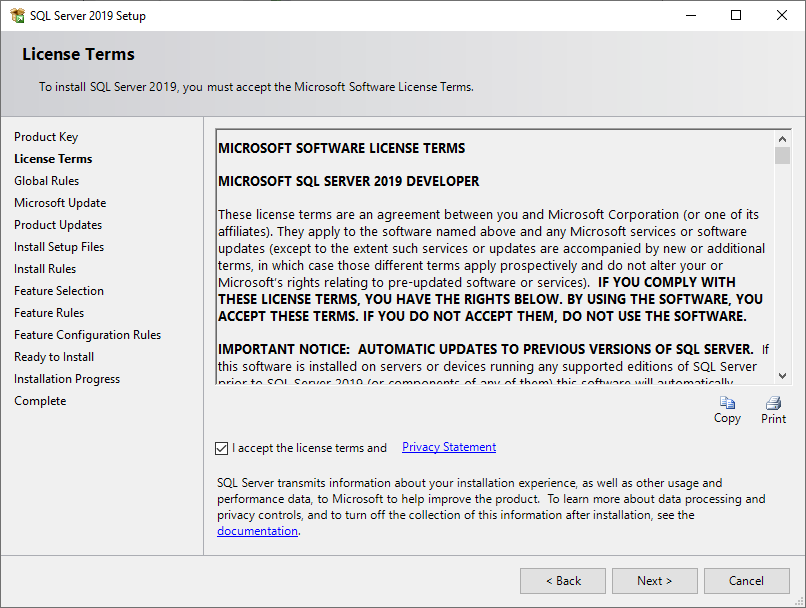
На шаге License Terms принимаем лицензионное соглашение.
Компоненты SQL Server 2019: для чего нужны, какие нужно установить
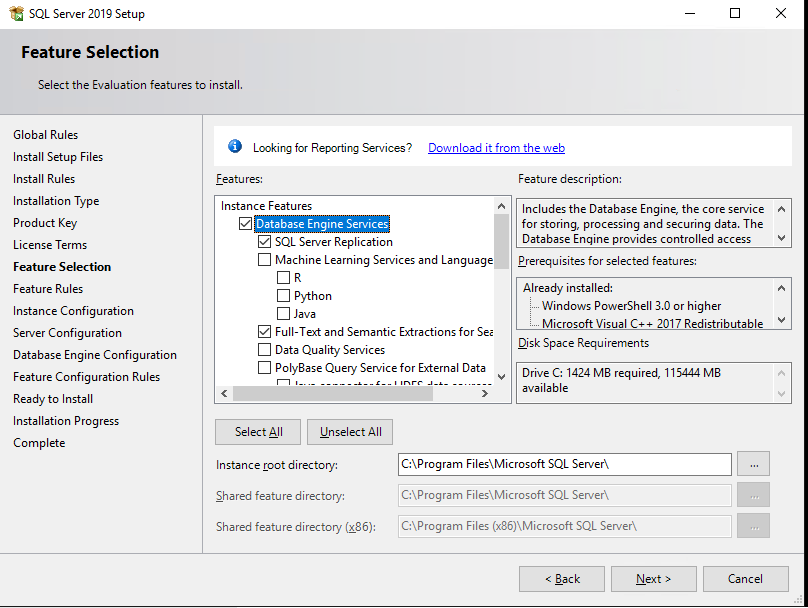
На этом этапе вам предлагают установить различные компоненты SQL Server. Пройдемся по ним подробнее, посмотрим какие нужно ставить в различных ситуациях:
- Database Engine Services – это основной движок SQL Server. Обязателен к установке.
- SQL Server Replication – службы репликации. Компонент довольно часто используются, поэтому если вы не уверены нужны ли они вам, то лучше отмечайте для установки.
- Machine Learning Services and Language Extensions – службы для выполнения R/Python/Java кода в контексте SQL Server. Необходимо, если вы собираетесь заниматься Machine Learning.
- Full-Text and Semantic Extractions for Search – компонент необходим, если вам нужна полнотекстовая технология поиска или семантический поиск в документах (например docx). В случае семантического поиска по документам, вам также понадобиться FILESTREAM, о нём ниже.
- Data Quality Services – службы для коррекции и валидации данных. Если вы не уверены нужен ли вам DQS, то лучше не устанавливайте его.
- PolyBase Query Service For External Data – технология для доступа к внешним данным, например на другом SQL Server или в Oracle Database. Java connector for HDFS data sources относиться к PolyBase технологии и нужен в случае если вы хотите работать с HDFS технологией.
- Analysis Services – также известен как SSAS. Технология для бизнес-отчетов (BI) и работы с OLAP. Используется в крупных компаниях для отчетности.
Дальше переходим к списку Shared Features (функций, распространяющихся на весь сервер, а не на конкретный экземпляр).
- Machine Learning Server (Standalone) – то же самое что и Machine Learning Services and Language Extensions, но с возможностью установки без самого движка SQL Server.
- Data Quality Client – то же самое что и DQS, только standalone.
- Client Tools Connectivity – библиотеки ODBC, OLE DB и некоторые другие. Рекомендем ставить обязательно.
- Integration Services – службы интеграции данных, известны также как SSIS. Технология для ETL (Extract, Transform, Load) данных. SSIS нужны, если вы хотите автоматизировать импорт данных и менять их в процессе импорта. Scale Out Master/Worker нужны для масштабирования работы SSIS. Если вы не уверены нужны ли они вам, то не отмечайте их.
- Client Tools Backwards Compatibility – устаревшие DMV и системные процедуры. Рекомендую ставить.
- Client Tools SDK – пакет с ресурсами для разработчиков. Можно не ставить, если не уверены, нужен ли он вам.
- Distributed Replay Controller/Client – повторяют и улучшают функционал SQL Server Profiler. Службы Distributed Replay нужны для моделирования нагрузки и для различного рода тестирования производительности.
- SQL Client Connectivity SDK – ODBC/OLE DB SDK для разработчиков.
- Master Data Services – компонент из Microsoft Power BI. Нужен для анализа, валидации, интеграции и коррекции данных.
Некоторые из этих компонентов (например, Java connector for HDFS data sources) могут отсутствовать в более старых версиях SQL Server.
Чуть ниже, на этом же шаге, вы можете указать директорию для файлов SQL Server’a. Если у вас нет весомых причин менять её, то оставьте стандартную (C:\Program Files\Microsoft SQL Server\).
После того как вы выбрали нужные вам компоненты MSSQL, инсталлятор проверяет совместимость компонентов с вашей системой, и, если проблем нет, этот шаг пройдет автоматически.
Настройка именования экземпляра SQL Server
Вы можете оставить параметр Default Instance, в таком случае имя вашего экземпляра будет MSSQLSERVER. При выборе Named Instance вы сами указываете имя экземпляра SQL Server. В моём случае я назову экземпляр DEV. Instance ID рекомендуется ставить такой же, как и имя экземпляра, во избежание путаницы.
В Installed instances отображаются установленные на сервере экземпляры MSSQL, у меня уже есть один.

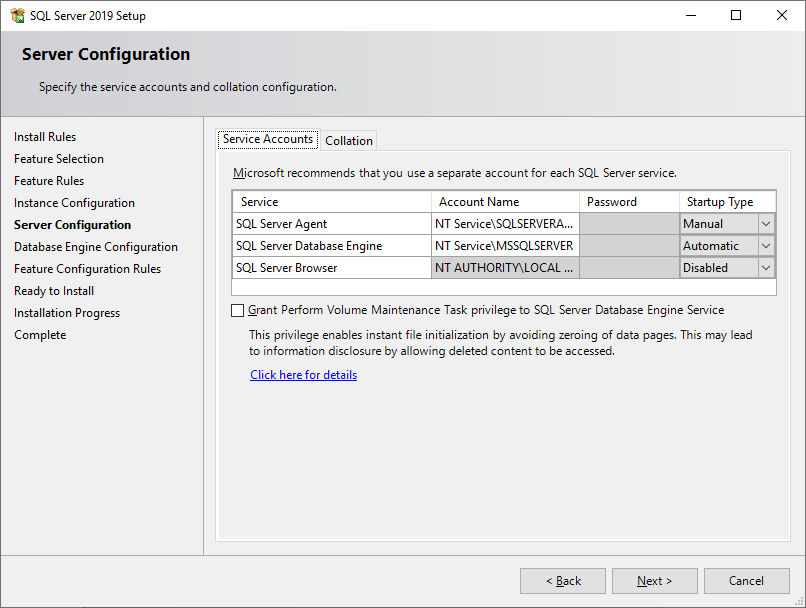
Настройка параметров служб SQL Server, кодировка
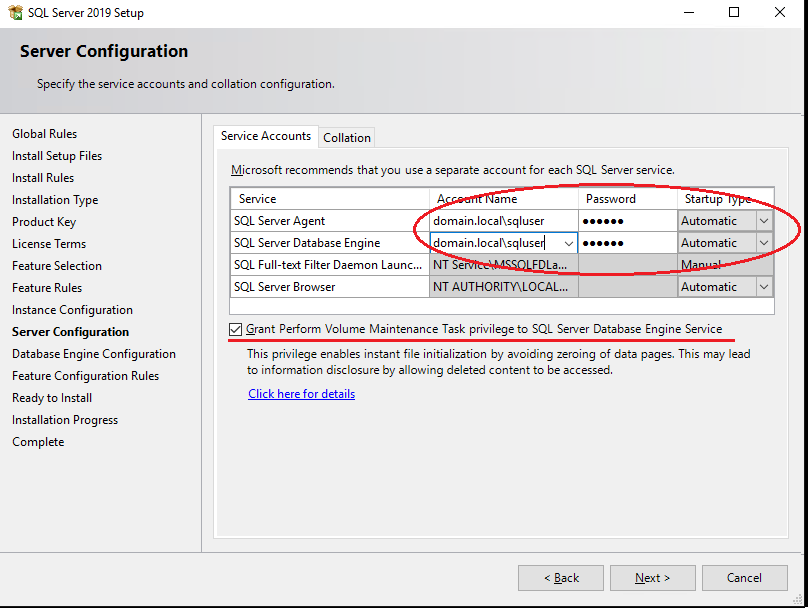
Во вкладке Service Accounts укажите аккаунты из-под которых будут работать службы SQL Server на хосте. Хорошей практикой считается использование MSA (Managed Service Accounts) и gMSA (Group Managed Service Accounts) технологий, как самых надежных в плане безопасности. Я буду использовать обычный доменный аккаунт.
Выставьте у SQL Server Agent поле Startup Type в Automatic, иначе агент придется запускать вручную.
Также начиная с SQL Server 2016 появилась возможность выставлять параметр IFI (Instant File Initialization) при установке сервера. В инсталляторе он называется “Grant Perform Volume Maintenance Task privilege to SQL Server Database Engine”. Его включение означает, что старые данные не будут перезаписываться нулями при:
- Создании базы данных;
- Добавлении данных в файлы данных или лог файлы;
- Увеличении размера существующих файлов (включая операции авто увеличения);
- Восстановлении базы данных/файловой группы.
Это ускоряет процесс инициализации файлов, но уменьшает безопасность, потом что старые данные не затираются нулями, поэтому старая информация, которая содержалась в этих файлах, может быть частична доступна.
Рекомендую включать этот параметр, если опасность утечки данных несущественна.
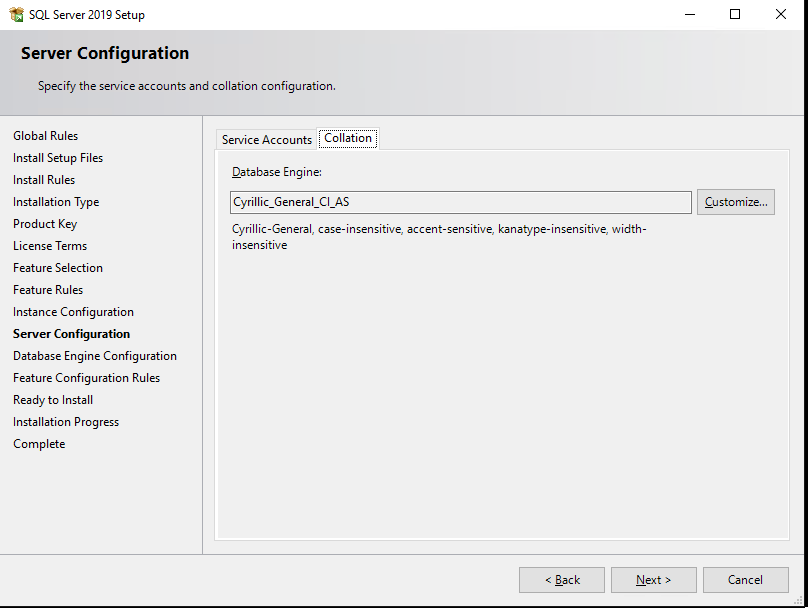
На следующем шаге вы должны выбрать Collation.
Грубо говоря, Collation это настройка кодировки SQL Server. Этот параметр устанавливает кодировку страниц, правила сортировки, кодировку для char/varchar и другие языковые настройки.
При установке сервера вы выбираете Collation для всего SQL Server. После установки можно будет поменять этот параметр, но сделать это будет непросто, поэтому нужно сразу выбрать подходящий для ваших задач Collation.
Для СНГ рекомендуется выбирать Cyrillic_General_CI_AS. Если данные будут только на английском, можно выбирать SQL_Latin1_General_CP1_CI_AS.
Если вы планируете использовать SQL Server в боевых условиях, ознакомьтесь с документацией по выбору Collation, так как это важный параметр, хоть он и может быть задан для конкретной базы данных.
Настройка Database Engine в SQL Server
На шаге Database Engine Configuration доступны 6 вкладок, начнем по порядку:
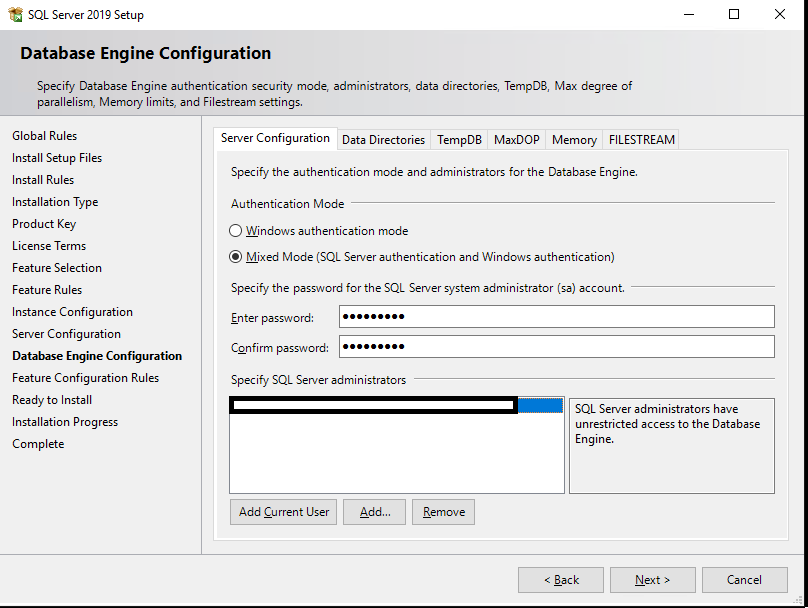
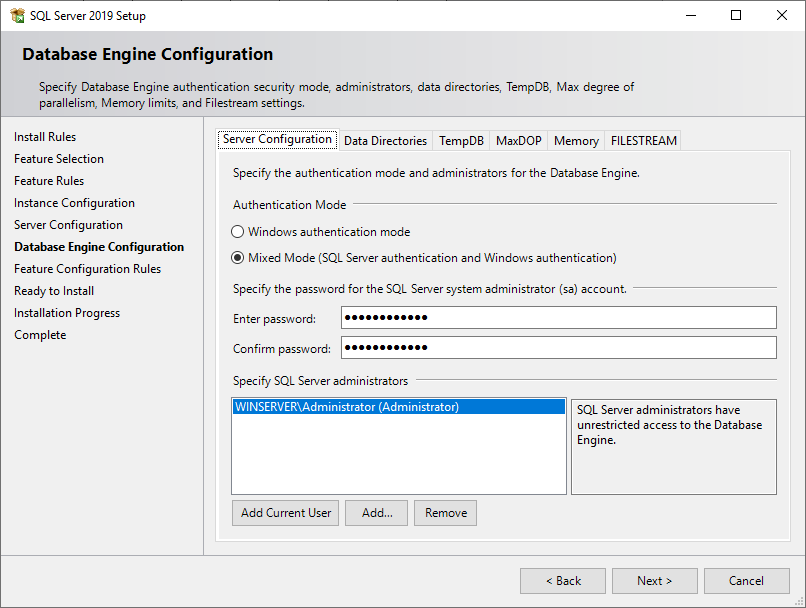
В Server Configuration вы должны выбрать Authentication Mode и указать аккаунт для администратора SQL Server’a.
У вас на выбор есть 2 режима: Windows authentication mode и Mixed mode.
- С Windows аутентификацией авторизоваться смогут только пользователи вашего домена или компьютера под управлением Windows.
- В Mixed mode помимо windows авторизации станет доступна авторизация по учетным данным самого SQL Server’a.
Майкрософт рекомендует использовать Windows Authentication как самый безопасный, но на практике скорее всего вам нужно будет логиниться на сервер из других приложений. Например, написанных на java, и в таком случае без аутентификации SQL сервера не обойтись.
Если вы уверены, что ваши пользователи будут логиниться только с Windows компьютеров и приложений, поддерживающих Windows аутентификацию, то выбирайте Windows authentication mode.
В моём случае я ставлю Mixed mode. В этом режиме вам нужно будет прописать пароль от пользователя sa и выбрать Windows аккаунт, который будет обладать административными правами.
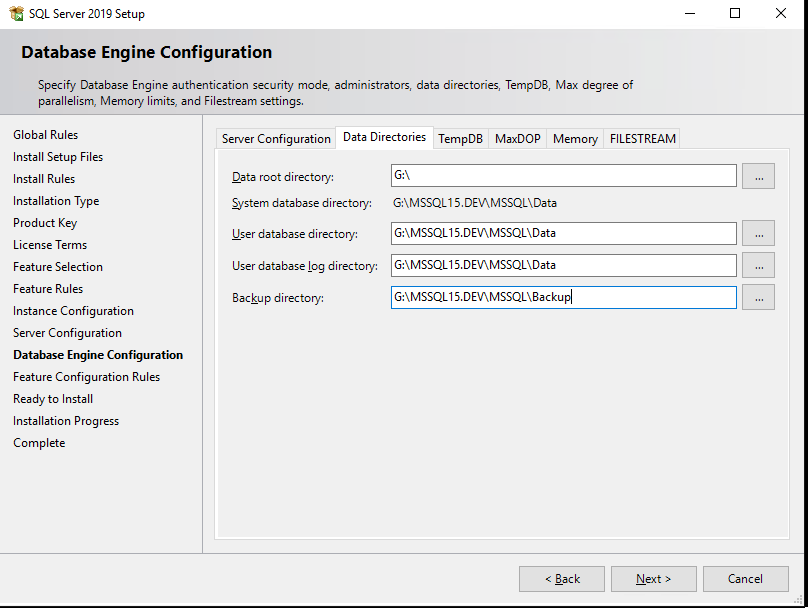
На вкладке Data Directories вы должны выбрать каталог, в которой SQL Server будет хранить базу данных и транзакционные логи.
Для данных лучше всего выделить отдельный RAID массив. Дисковая подсистема критически важна для производительности SQL Server’а, поэтому необходимо выбрать самый хороший из доступных вам вариант хранения данных, будь то NAS или локальный RAID из быстрых дисков.
Хорошей практикой считается разнесение всех директорий (системных баз данных, пользовательских баз данных, логов пользовательских баз данных, резервных копий) на разные хранилища. Таким образом вы добьетесь максимальной производительности от SQL Server’а на уровне работы с хранением данных.
В моём случае я укажу отдельный диск с RAID 1 для всех директорий.
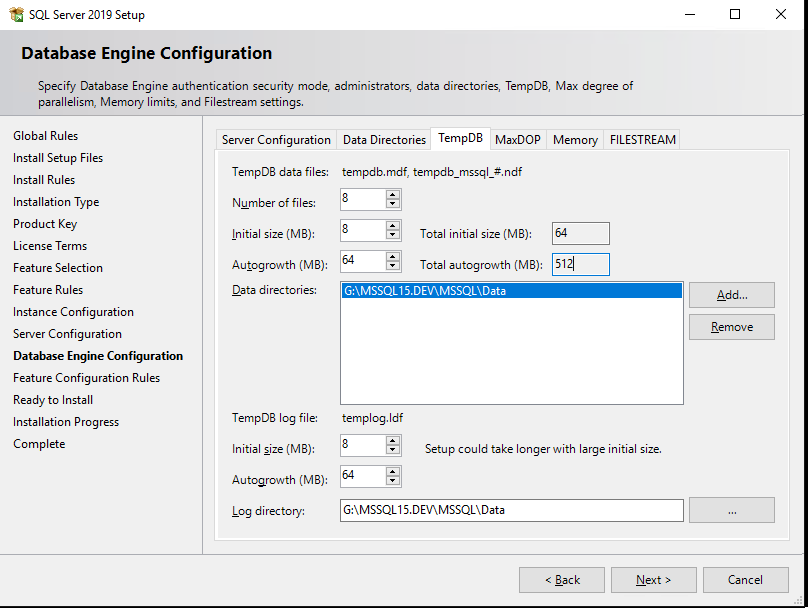
На вкладке TempDB настраиваются параметры для базы tempdb. Её правильная конфигурация важна для производительности сервера, так как эта база участвует практически во всех операциях с данными.
- Number of files – количество файлов данных для tempdb. Вам нужно указать количество файлов в зависимости от ядер процессора. Хорошей практикой считается выставлять количество файлов равным количеству ядер процессора поделенных на 2. То есть на 32 ядра вашего сервера рекомендуется 16 файлов. Также независимо от количества ядер не рекомендуется ставить меньше 8 файлов, это необходимо, чтобы избежать проблем, описанных здесь https://support.microsoft.com/en-us/kb/2154845 .
- Initial size – начальный размер файлов данных tempdb. При каждой перезагрузке сервера, размер tempdb будет сбрасываться до начального размера. Рекомендуется указывать размер файлов данных в зависимости от планируемой нагрузки. Если вы не можете спланировать будущую нагрузку, то оставьте 8 MB. Если вы выделите отдельный массив/диск под файлы tempdb (об этом ниже), то лучше всего будет указать такой размер файлов, который бы полностью заполнил диск, чтобы избежать постоянных операций увеличения файла.
- Autogrowth – шаг увеличения файлов tempdb. Размер нужно ставить в зависимости от начального размера. Оставьте 64 МB, если не можете спланировать нагрузку. Имейте в виду, если включен IFI (Instant File Initialization) то ожидание блокировок на расширение файла будет намного меньше. Не рекомендуется ставить размер шага слишком большим, так как это вызовет существенные задержки при увеличении размера файла.
- Data Directories – директории для размещения файлов данных tempdb. Если вы укажите несколько директорий, файлы будут размещаться по алгоритму Round-robin, то есть циклически. Грубо говоря при указании, например, 4 директорий, файлы данных распределятся по всем директориям в равной степени. Хорошей практикой будет добавить разные дисковые массивы для файлов данных.
- TempDb Log file: Initial size / Autogrowth – настройка начального размера и шага увеличения файла лога tempdb. Стоит придерживаться таких же правил, как и для файлов данных tempdb.
- Log Directory – директория для хранения лог файла tempdb. Лог файл всего 1, независимо от количества файлов данных, указывается всего 1 директория. Если есть возможность, лог файлу также выделите отдельный массив.
Вкладка MaxDOP.
MaxDOP это параметр SQL Server’а который отвечает за параллельное выполнение запросов и соответственно степень параллелизма. Для того чтобы SQL Server использовал все ядра процессора для обработки параллельных планов, установите 0 в качестве значения MaxDOP. Если по каким-то причинам вы хотите отключить параллельное выполнение запросов, установите 1 в качестве значения. Для максимальной производительности настройте MaxDOP согласно правилам в таблице (https://go.microsoft.com/fwlink/?linkid=2084761):
| Сервер с одним узлом NUMA | Не более 8 логических процессоров | Значение параметра MAXDOP не должно превышать количество логических процессоров |
| Сервер с одним узлом NUMA | Больше 8 логических процессоров | Значение параметра MAXDOP должно быть равно 8 |
| Сервер с несколькими узлами NUMA | Не более 16 логических процессоров на узел NUMA | Значение параметра MAXDOP не должно превышать количество логических процессоров на каждый узел NUMA |
| Сервер с несколькими узлами NUMA | Больше 16 логических процессоров на каждый узел NUMA | Значение MAXDOP должно быть равно половине количества логических процессоров на узел NUMA со значением MAX, равным 16 |
В моём случае я поставлю 0. Это даст наибольшую производительность для выполнения планов параллельных запросов, но это может вызвать задержки, так как другие запросы должны будут дождаться завершения выполнения текущего запроса, потому что все ядра процессора будут заняты выполнением текущего запроса.
Для “боевого” сервера я всё же рекомендую следовать правилам из таблицы, а также ознакомиться с документацией по ссылке выше.
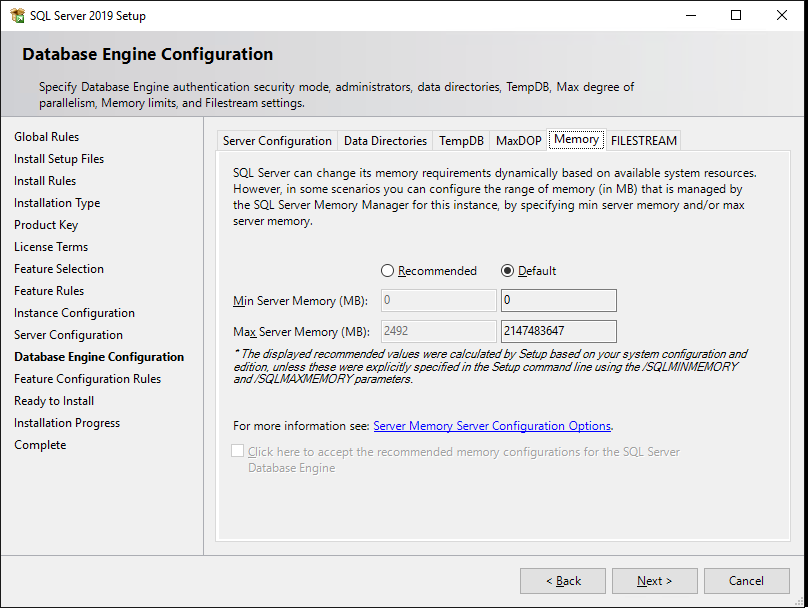
Вкладка Memory – нужно указать минимальный и максимальный объем оперативной памяти, который будет использовать SQL Server. Так как спрогнозировать нужный объём для сервера довольно сложно, рекомендуется выделить SQL Server’у 80-85% от всего объёма оперативной памяти сервера. Для того чтобы узнать реальный объём используемой оперативной памяти, нужно круглосуточно мониторить потребление оперативной памяти через специальные DMV (Dynamic Management View) и отслеживать пики потребления RAM. Только с наличием этой информации можно спрогнозировать реальный объем потребления оперативки.
Я оставлю Default значения (min 0 и max 2147483647 MB).
Вкладка FILESTREAM – включение технологии FILESTREAM. Она позволяет хранить бинарные файлы на файловой системе и обеспечивает доступ к ним через SQL. Если вы не уверены, что хотите работать с бинарными данными на уровне SQL, то тогда оставьте FILESTREAM выключенным.
Шаг Feature Configuration Rules пройдет автоматически. Ознакомьтесь со сводкой в Ready to Install и жмите Install.
На этом базовая установка SQL Server 2019 Enterprise завершена. В следующей статье мы посмотрим на основные способы анализа производительности и проблем в SQL Server.
Примечание. На более старых версиях ( SQL Server 2014, 2016) некоторых вкладок и параметров может не быть.

I am about to test the latest version of Microsoft SQL Server 2019 on my Windows Server 2019 platform. I was able to install MS SQL Server 2019 on other platform such as Ubuntu and CentOS Linux. But I have never tried to install Microsoft SQL Server 2019 on Windows Server 2019 machine. I like to test various software including the database system such as Oracle, SQL Server, PostgreSQL and MySQL Server.
Microsoft SQL Server 2019 brings a lot of improvements compared to any previous version. You can read the detailed information about this new version here. To try this new product, we can download the free trial that can be used for 180 days with all features unlocked. It’s a great deal if you want to try the SQL Server 2019 before deciding to purchase the license. I will show you every steps of the installation process.
My System Configuration
- Windows Server 2019 VM installed on Proxmox VE
- 8 GB of RAM
- 100 GB of disk space
- Remote Desktop enabled
Steps to Install Microsoft SQL Server 2019 on Windows Server 2019
Step 1. Download Installation file
Go to the following link to obtain the installation file for MS SQL Server 2019.
https://www.microsoft.com/en-us/evalcenter/evaluate-sql-server-2019?filetype=EXE
You will need to enter your details including email address to be able to download.
Step 2. Install the software
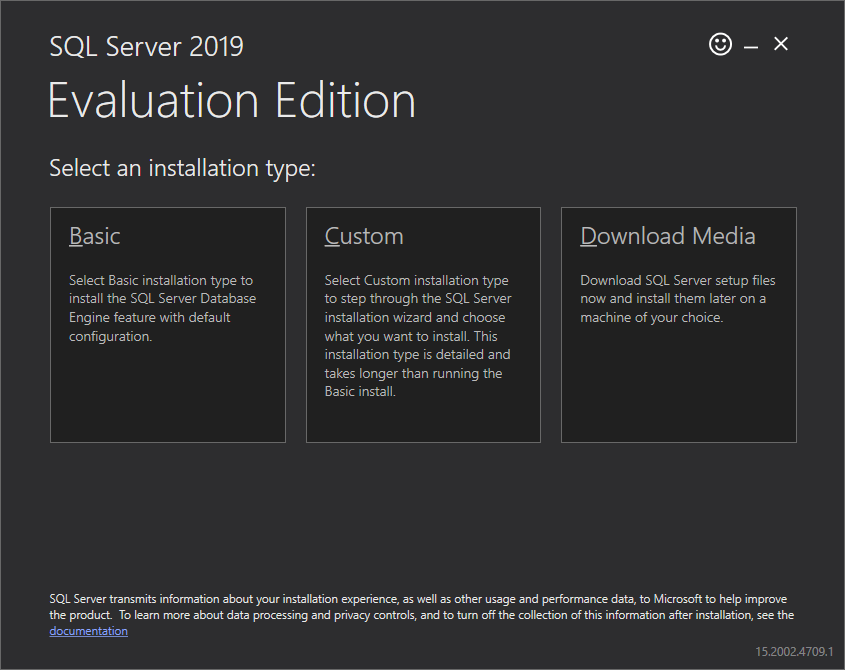
The installation is pretty straight-forward. On the first screen, we need to choose the installation type. Choose Download Media if you want to save the complete installation media for other computers/server.
Next. choose the language, format and the download location.
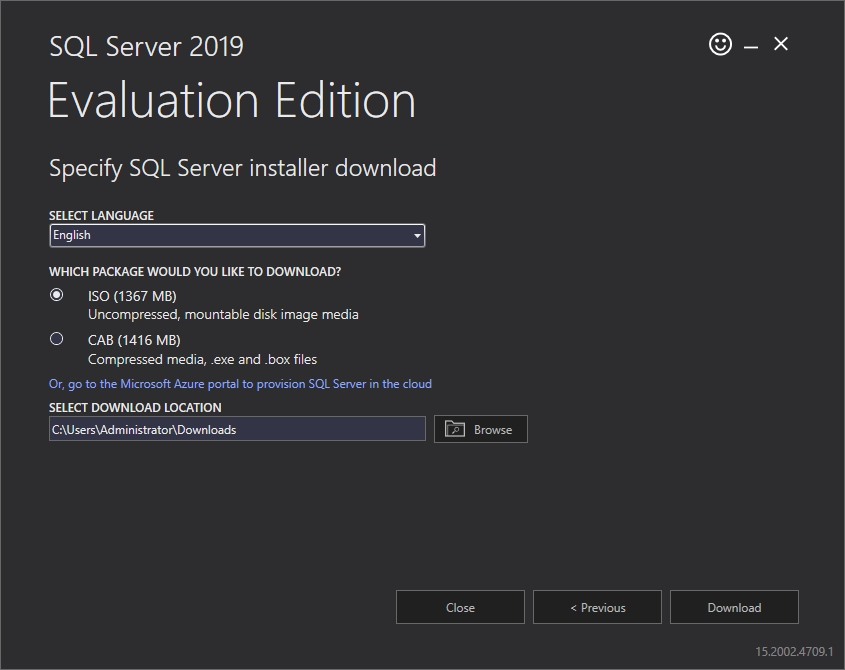
Click Download button to start the download process.

It will download 1.35 GB from the internet. Wait until the download process is completed.

Now it’s time to mount the ISO file we have just downloaded.
Double-click the setup file to start the installation. On the first screen, on the Planning step, click the System Configuration Checker to check our system before proceeding the installation.

Make sure everything is passed as follow.
Now go to the Installation and click New SQL Server stand-alone installation…

Next, select the edition or enter the license key. In this case, I choose the Developer edition which is free for personal use.
Accept the License Agreement
Next, choose to use Microsoft Update to check for any update.
The installer then will check for any potential problems.

Next, we need to specify the features we want to install. In this case, I will only install the Database Engine Service.

Instance configuration. I leave the default value for this instance. The default instance ID is MSSQLSERVER.

Server Configuration
Now we need to configure the database engine. Choose the Authentication Mode. I would recommend to use Mixed mode. You can add current user if you want to use it as server administrator. Or you can create a new one.
Switch to Data Directories tab to change the default location for database directories. You can leave the default value or change it as per you need.

Now lets do a final check before the installation take place.

Press Install to start the installation
Now the installation completes. Make sure there are no errors shown on this page.
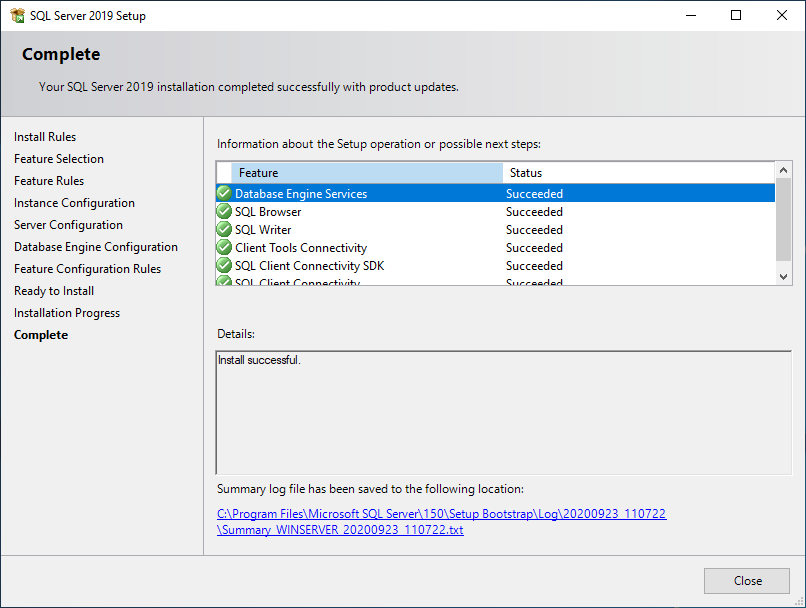
At this point, we have successfully install Microsoft SQL Server 2019 on Windows Server 2019. Optionally, you can install the SQL Server Management Tools from the SQL Server Installation Server. Or, download it from the link below
https://docs.microsoft.com/en-us/sql/ssms/download-sql-server-management-studio-ssms?redirectedfrom=MSDN&view=sql-server-ver15
Enable Network/Remote Access for SQL Server 2019
If you are planning to access the SQL Server across your network, we may need to configure few things.
A. Enable TCP/IP Protocol Service
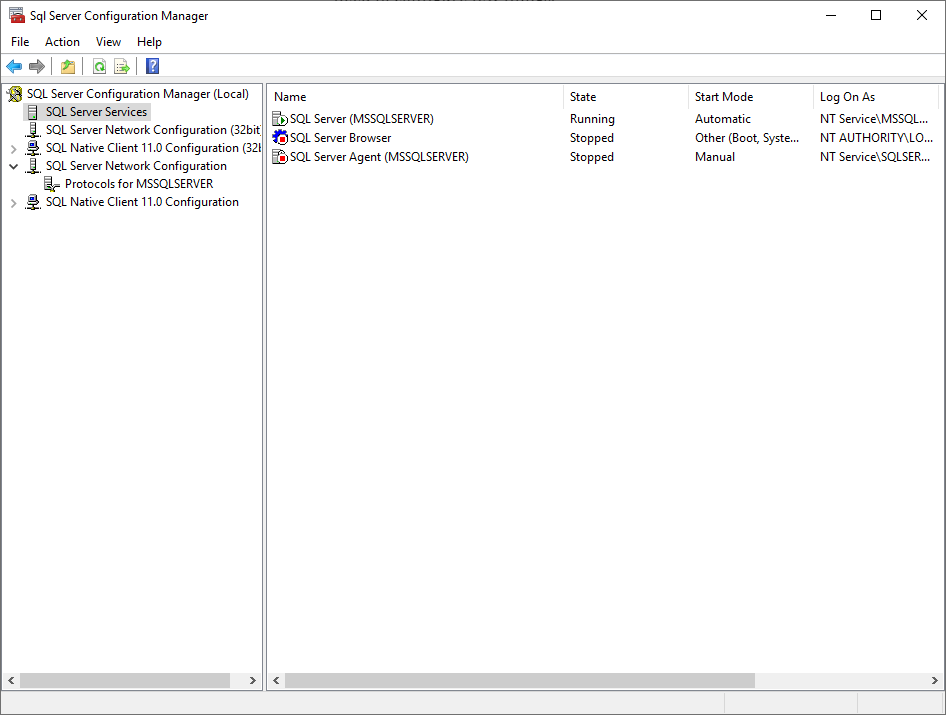
Open the SQL Server Configuration Manager and then go to SQL Server Network Configuration. Click the Protocols for MSSQLSERVER (this service name might be different with yours).

By default, the TCP/IP protocol is disabled. You need to enable it manually. And then we need to restart the SQL Server Service.
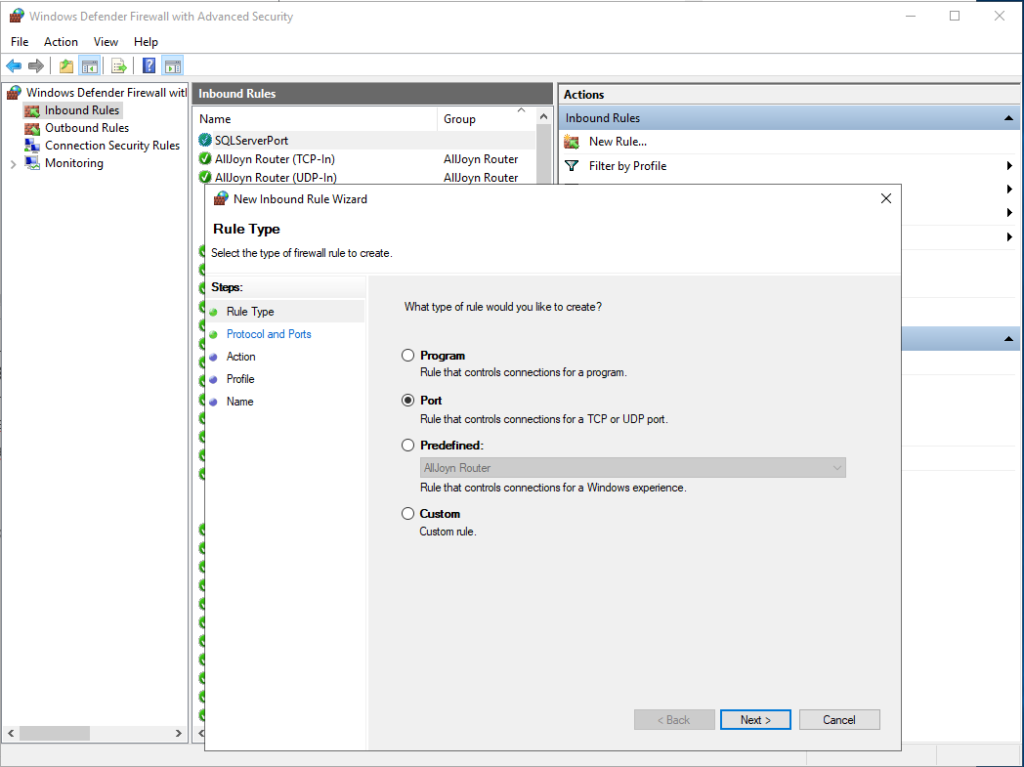
B. Configure Windows Firewall for SQL Server
In most cases, we need to configure the firewall to allow the network users access our SQL Server. So, we need to add a new rule to the Windows Firewall. Click Inbound Rules and then New Rule. Choose Port and click Next.
Now type the SQL Server TCP port. The default value is 1433.
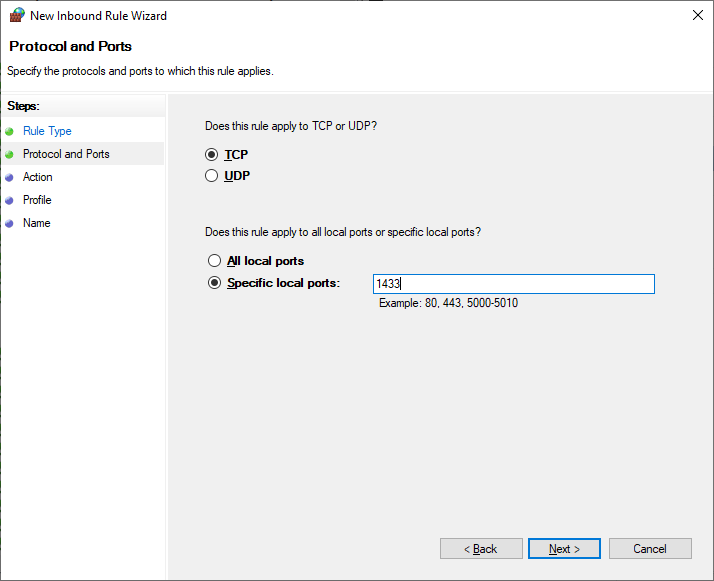
On the next page, select allow connection


Finally save it and you can now connect to the SQL Server from the network.
Dear readers of our blog, we’d like to recommend you to visit the main page of our website, where you can learn about our product SQLS*Plus and its advantages.
SQLS*Plus — best SQL Server command line reporting and automation tool! SQLS*Plus is several orders of magnitude better than SQL Server sqlcmd and osql command line tools.
Enteros UpBeat offers a patented database performance management SaaS platform. It proactively identifies root causes of complex revenue-impacting database performance issues across a growing number of RDBMS, NoSQL, and deep/machine learning database platforms. We support Oracle, SQL Server, IBM DB2, MongoDB, Casandra, MySQL, Amazon Aurora, and other database systems.
2 June 2020
In this article we will step by step cover the installation of Microsoft SQL Server 2019 with a description of all options, components, current recommendations and best practices.
MS SQL Server is the leading DBMS (Relational Database Management System) and also the main competitor of Oracle Database in the corporate segment. In CIS MSSQL is most often used for own application software development and for 1C.
MS SQL Server 2019 editions
There are 5 issues (editions) of MSSQL 2019 in total:
- Express is a free edition for use. The functionality is quite limited, the most tangible limitation of the Express version is the maximum base size of 10 GB. This edition is suitable for small projects such as student work or SQL/T-SQL learning.
- Standard is a full-fledged paid edition, but many functions still do not. The maximum amount of RAM that SQL Server can use is 128 GB, and there are no AlwaysOn accessibility groups or other components. Standard is designed for applications in small organizations.
- Enterprise includes all possible functions and components, there are no limitations. Enterprise edition is usually used by large corporations or companies that need the functionality of this version.
- Developer edition as well as Enterprise edition has no limitations and can be used for free, but it can be used only for application development and testing.
- Web edition is almost the same as standard, except for stronger limitations in functionality and correspondingly lower licensing costs.
Features of SQL Server licensing
MS SQL Server is licensed for 2 models:
- PER CORE – licenses MSSQL on server cores
- SERVER + CAL – a license for the entire server and for each user who will work with the server
Enterprise edition can only be licensed by PER CORE type
Also in MSSQL Server 2019 there is a new feature for licensing containers, virtual machines and Big Data Clusters.
For more information on SQL Server licensing, please see a separate article.
Getting started with SQL Server installation
In this article we will install MS SQL Server 2019 Enterprise Edition on Windows Server 2019.
Note. In SQL Server 2019 there is full support for Linux, and respectively Docker and Kubernetes.
- Download and unpack the SQL Server 2019 installation image. Run setup.exe;
- Since in this article we are going to install a normal isolated instance, on the Installation tab select “New SQL Server stand-alone installation”.

In SQL Server installer you can perform many other actions: update an old instance, fix a broken one and some other things.
SQL Server update options during installation
At this point, you can enable Windows Update to search for updates. It is up to you to enable this option or not. It all depends on your update scheduling and server resilience requirements. If you do not have a clear service plan for your servers, it is best to leave this option enabled.
At this step, you can see such a mistake:
Error 0x80244022: Exception from HRESULT: 0x80244022

This is due to problems with the Windows Update service.
Press Next.
The Install Setup Files step will happen automatically. It will prepare the files for installation.
Install Rules will also pass automatically if the installer does not find problems that need to be resolved before installing MSSQL (for example, reboot your computer or if your version of Windows is incompatible with the version of SQL Server).
Type of installation of SQL Server
At this step, you can choose to install a new instance or add functionality to an already installed instance. In our case, choose “Perform a new installation”. Choose the type of sql server installation – new installation

Now you have to enter the product key. If you do not have a key, select Free edition (e.g. Developer), but keep in mind that with the Developer edition you are only allowed to develop and test software, but not to use the server in a productive environment. enter the installation key of the sql server

At the step License Terms we accept the license agreement.
Components of SQL Server 2019: what you need, what you need to install
At this stage you are offered to install various SQL Server components. Let’s take a closer look at them, see what you need to install in different situations:
- Database Engine Services is the main engine of SQL Server. It is obligatory to install.
- SQL Server Replication – replication services. The component is used quite often, so if you are not sure if you need it, it is better to mark it for installation.
- Machine Learning Services and Language Extensions – services to execute R/Python/Java code in the SQL Server context. This is necessary if you are going to do Machine Learning.
- Full-Text and Semantic Extractions for Search – This component is necessary if you need a full-text search technology or a semantic search in documents (e.g. docx). In the case of semantic document searches, you will also need FILESTREAM, about it below.
- Data Quality Services – services for correcting and validating data. If you are not sure if you need DQS, it is better not to install it.
- PolyBase Query Service For External Data – technology to access external data, for example, on another SQL Server or in Oracle Database. Java connector for HDFS data sources refers to PolyBase technology and is needed in case you want to work with HDFS technology.
- Analysis Services – also known as SSAS. Technology for business reports (BI) and work with OLAP. Used in large companies for reporting.
Next, we move on to the list of Shared Features (features that apply to the entire server, not to a particular instance).
- Machine Learning Server (Standalone) – the same as the Machine Learning Services and Language Extensions, but with the ability to install without the SQL Server engine itself.
- Data Quality Client – the same as DQS, only standalone.
- Client Tools Connectivity – ODBC, OLE DB and some other libraries. We recommend to set necessarily.
- Integration Services – data integration services, also known as SSIS. Technology for ETL (Extract, Transform, Load) data. SSIS is needed if you want to automate data import and change it during the import process. Scale Out Master/Worker is needed to scale the operation of SSIS. If you are not sure if you need it, do not mark it.
- Client Tools Backwards Compatibility – Outdated DMV and system procedures. I recommend you put them in.
- Client Tools SDK – A resource pack for developers. You may not want to install it if you are not sure if you need it.
- Distributed Replay Controller/Client – Repeats and improves the functionality of SQL Server Profiler. Distributed Replay services are needed for load modeling and performance testing of all kinds.
- SQL Client Connectivity SDK – ODBC/OLE DB SDK for developers.
- Master Data Services – component from Microsoft Power BI. Needed for data analysis, validation, integration and correction.
Some of these components (such as Java connector for HDFS data sources) may not be available in older versions of SQL Server.
Just below, on the same step, you can specify a directory for SQL Server files. If you have no good reason to change it, then leave the default one (C:\Program Files\Microsoft SQL Server\).

Once you have selected the MSSQL components you need, the installer checks the compatibility of the components with your system, and if there are no problems, this step will go automatically.
Configure SQL Server instance naming
You can leave the Default Instance parameter, in which case your instance name will be MSSQLSERVER. When you select Named Instance, you specify the name of your SQL Server instance. In my case, I will name the DEV instance. It is recommended that you set the Instance ID to the same name as the instance name to avoid confusion.
The Installed instances displays the MSSQL instance installed on the server, I already have one.

Configuring SQL Server service parameters, encoding
On the Service Accounts tab, specify the accounts from under which the SQL Server services on the host will run. It is good practice to use MSA (Managed Service Accounts) and gMSA (Group Managed Service Accounts) technologies as the most secure. I will use a normal domain account.
Select the Startup Type field in Automatic from the SQL Server Agent, otherwise the agent will have to be run manually.
Also, starting with SQL Server 2016 it is now possible to set the IFI (Instant File Initialization) parameter when installing the server. In installer it is called “Grant Perform Volume Maintenance Task privilege to SQL Server Database Engine”. Enabling it means that old data will not be overwritten with zeros:
- Creating a database;
- Adding data to data files or log files;
- Increasing the size of existing files (including auto zoom operations);
- Restore database/file group.
This speeds up the process of initializing files, but reduces security by not overwriting old data with zeros, so the old information contained in these files may be partially available.
I recommend enabling this option if the risk of data leakage is not significant.

On the next step, you must select Collation.
Roughly speaking, Collation is a configuration of SQL Server encoding. This parameter sets page encoding, sorting rules, char/varchar encoding and other language settings.
When you install the server, you select Collation for the whole SQL Server. After installation, you can change this parameter, but it will not be easy to do, so you need to immediately select the right Collation for your tasks.
If you plan to use SQL Server in combat conditions, read the documentation on choosing Collation, as it is an important parameter, although it can be set for a specific database.
Configure Database Engine in SQL Server
On the Database Engine Configuration step 6 tabs are available, let’s start in order:
In Server Configuration you must select Authentication Mode and specify an account for the SQL Server administrator.
You have 2 modes to choose from: Windows authentication mode and Mixed mode.
- With Windows authentication, only users on your domain or Windows computer can authenticate.
In Mixed mode, in addition to windows authentication, you will be able to authenticate using the credentials of SQL Server itself. - Microsoft recommends that you use Windows Authentication as the most secure, but in practice you will most likely need to login to a server from other applications. For example, applications that are written in java, in which case you can’t do without SQL Server authentication.
If you are sure that your users will only login from Windows computers and applications that support Windows authentication, then choose Windows authentication mode.
In my case, I will set the Mixed mode. In this mode, you will need to prescribe a password from user sa and select a Windows account that has administrative privileges.

On the Data Directories tab, you must select the directory in which SQL Server will store the database and transaction logs.
For data, it is best to allocate a separate RAID array. The disk subsystem is critical to SQL Server performance, so you must choose the best storage option available to you, whether it is NAS or local RAID from fast disks.
It is good practice to separate all directories (system databases, user databases, user database logs, backups) into different storage. In this way you will get the maximum performance from SQL Server at the storage level.
In my case I will specify a separate drive with RAID 1 for all directories.

The TempDB tab is used to configure parameters for the tempdb base. Its correct configuration is important for server performance, as this database is involved in almost all data operations.
- Number of files is the number of data files for tempdb. You need to specify the number of files depending on the processor cores. It is good practice to set the number of files to the number of processor cores divided by 2. That is 16 files are recommended for 32 cores of your server. Also regardless of the number of cores it is not recommended to set less than 8 files, it is necessary to avoid the problems described here https://support.microsoft.com/en-us/kb/2154845 .
- Initial size is the initial size of tempdb data files. Each time you reboot your server, the tempdb size will be reset to its initial size. It is recommended to specify the size of the data files depending on the planned load. If you cannot plan your future load, then leave 8 MB. If you allocate a separate array/disk for the tempdb files (as discussed below), it is best to specify a file size that will fill the disk completely to avoid constant file enlargement operations.
- Autogrowth is the step to enlarge tempdb files. The size should be set according to the initial size. Leave 64MB if you cannot plan the load. Note that if IFI (Instant File Initialization) is enabled, the waiting time for locks on file extension will be much less. It is not recommended to set the step size too large, as this will cause significant delays when increasing the file size.
- Data Directories – directories for placing tempdb data files. If you specify several directories, the files will be placed according to the Round-robin algorithm, i.e. cyclically. Roughly speaking, if you specify, for example, 4 directories, the data files will be distributed equally across all directories. It is good practice to add different disk arrays for data files.
- TempDb Log file: Initial size / Autogrowth – setting the initial size and step of increasing the tempdb log file. You should follow the same rules as for tempdb data files.
- Log Directory – directory for storing the tempdb log file. Log file is only 1, regardless of the number of data files, you should specify only 1 directory. If possible, the log file should also have a separate array.

Tab MaxDOP
MaxDOP is a parameter of SQL Server that is responsible for parallel execution of queries and, accordingly, the degree of parallelism. For SQL Server to use all cores of the processor to process parallel plans, set 0 as the MaxDOP value. If for some reason you want to disable parallel execution of queries, set 1 as a value.
Tab Memory
Tab Memory – you must specify the minimum and maximum amount of RAM that will use SQL Server. Since it is difficult to predict the required amount for the server, it is recommended to allocate SQL Server 80-85% of the total amount of RAM. In order to know the real amount of RAM used, you need to monitor RAM consumption 24 hours a day through special DMV (Dynamic Management View) and monitor RAM consumption peaks. Only with this information can you predict the actual RAM consumption.

Tab FILESTREAM
Tab FILESTREAM – enabling FILESTREAM technology. It allows you to store binary files on the file system and provides access to them via SQL. If you are not sure that you want to work with binary data at the SQL level, then leave FILESTREAM off.
The Feature Configuration Rules step will go automatically. Read the summary in Ready to Install and click Install.
This completes the basic installation of SQL Server 2019 Enterprise.
Tags: Microsoft SQL Server, SQL, sql server, sqls, SQLS*Plus
Во многих web-проектах активно используются различные системы управления базами данных (СУБД). Применение их довольно обширно, при том, что создание, хранение баз данных, управление ими может осуществляться как через разнообразные приложения, так и посредством доступа к ним через web-сайт. В данном руководстве мы рассмотрим установку web-сервера из состава MS IIS и СУБД MS SQL Server на виртуальный сервер, работающий под управлением операционной системой Windows Server 2019.
IIS (Internet Information Services) – набор служб и серверов от Microsoft, входящий в состав операционных систем Windows Server. В данном мануале IIS будет интересовать нас прежде всего как web-сервер, на котором мы запустим собственный сайт.
MS SQL Server также разработан Microsoft и является одной из самых распространённых СУБД. Функционально, MS SQL Server использует реляционную модель организации структуры баз данных.
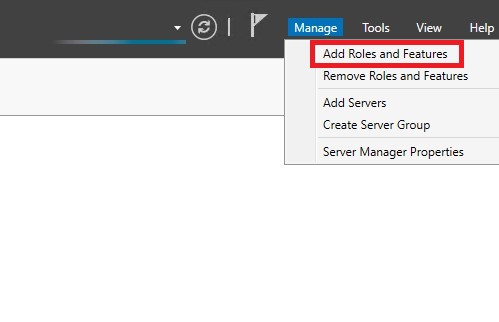
Установка IIS
Чтобы начать установку IIS запустите Диспетчер серверов (Server Manager). Далее, перейдите Manage 🠒 Add Roles and Features.
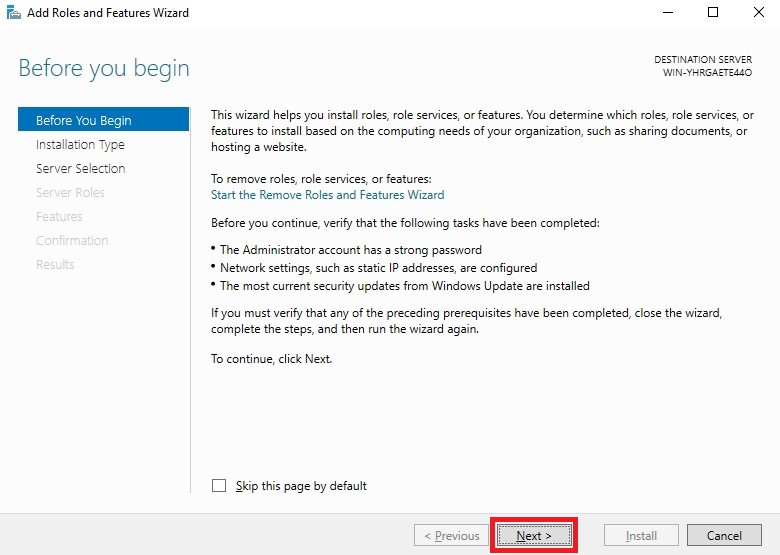
В стартовом окне открывшегося мастера нажмите Next >.
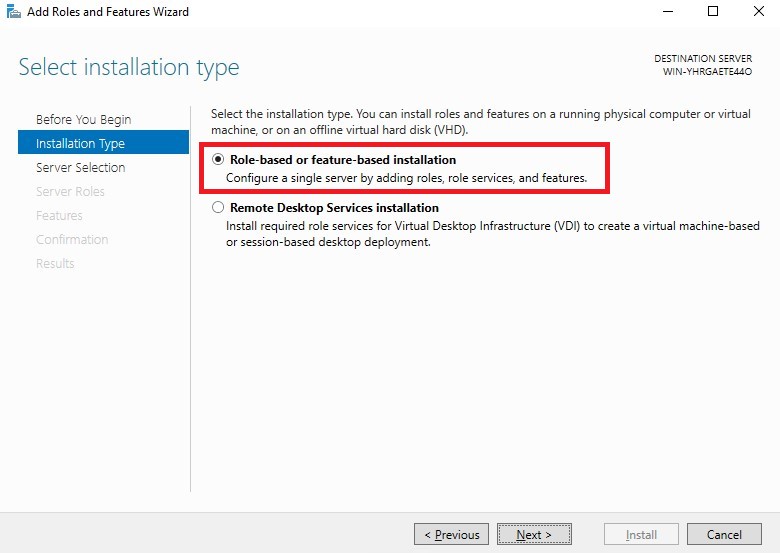
На следующем шаге отметьте тип установки как Role-based or feature-based installation и нажмите Next >.
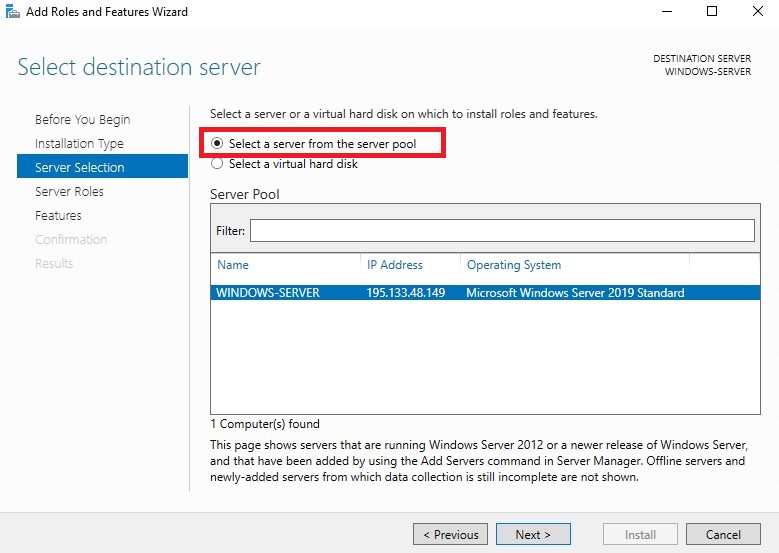
Далее, выберите опцию Select a server from the server pool и в списке доступных серверов укажите тот, на который планируете произвести установку. После чего нажмите Next > (в нашем примере доступен всего один сервер).
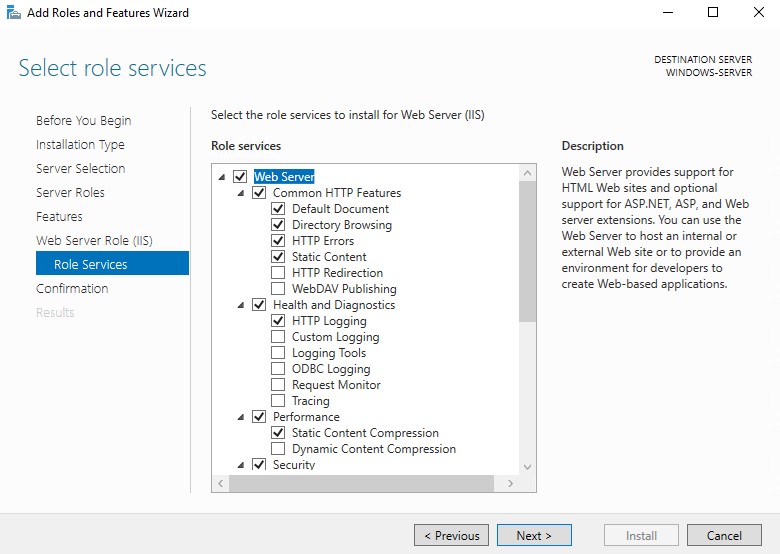
На следующей странице необходимо выбрать роль Web Server (IIS).
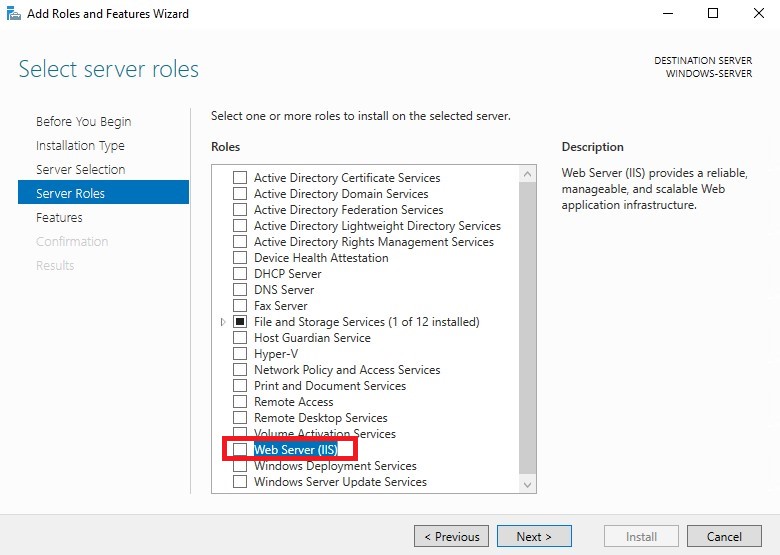
После чего откроется окно, в котором не внося никаких изменений нажмите Add Features.
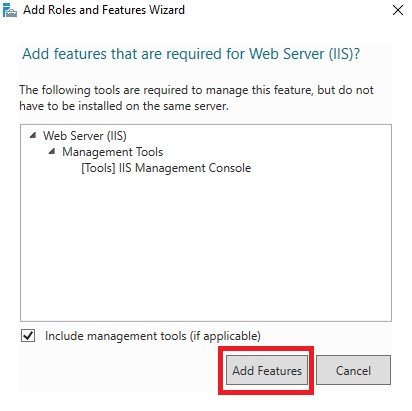
В результате роль Web Server (IIS) станет активной. Если это так, нажмите Next >.

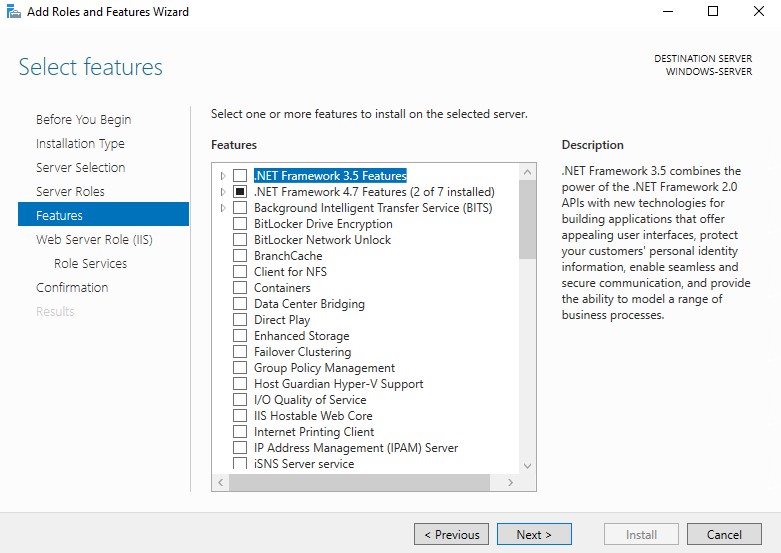
Если вы устанавливаете только IIS, то на следующих страницах можно всё оставить без изменений и так же нажимать Next >.
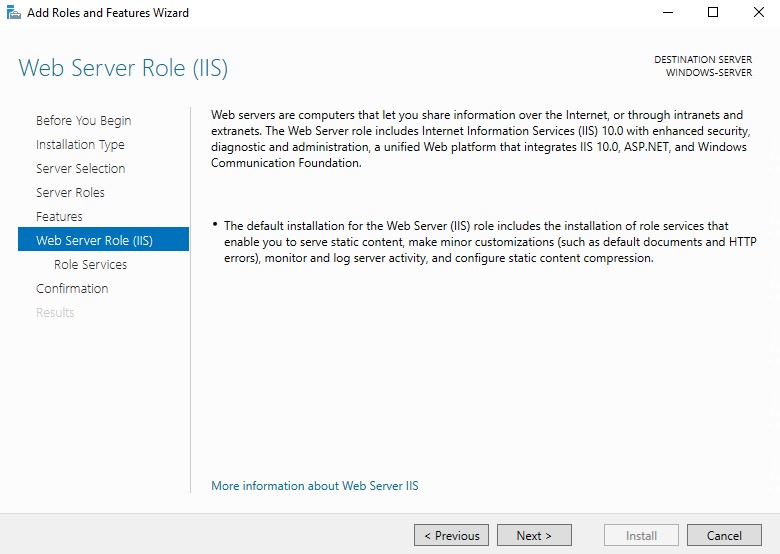
Наконец, в окне подтверждения запуска установки нажмите Install.
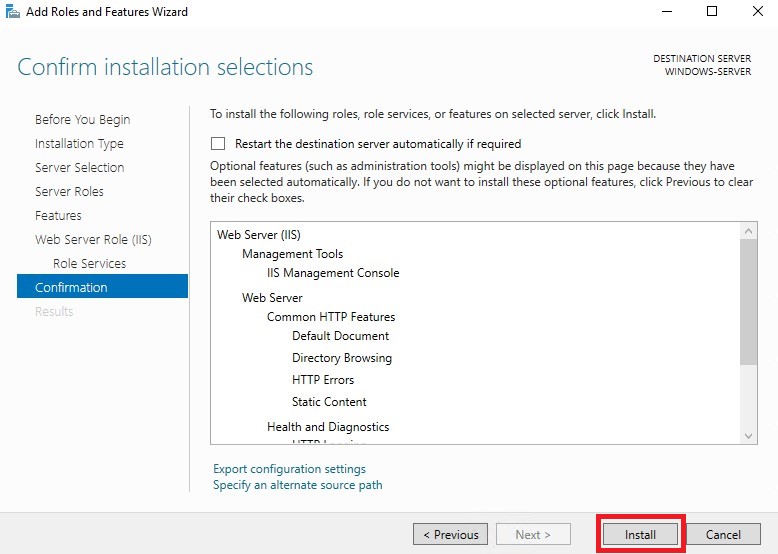
В результате запустится процесс инсталляции IIS.
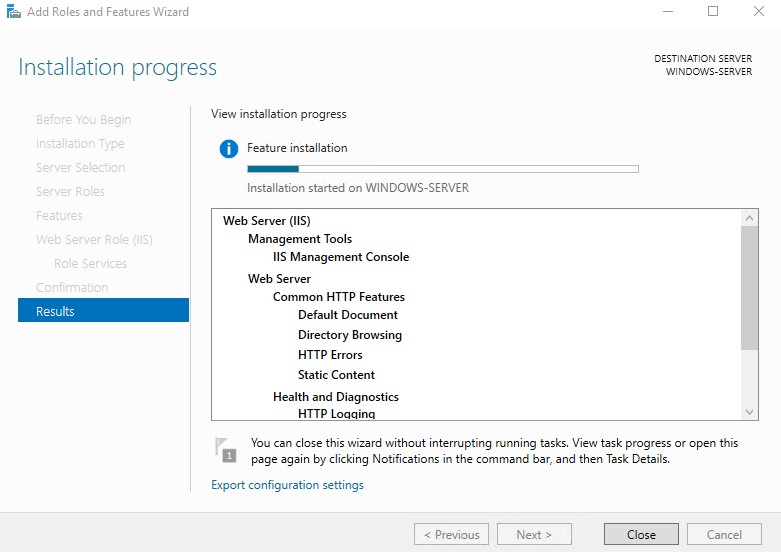
По окончании установки необходимо будет перезагрузить сервер.
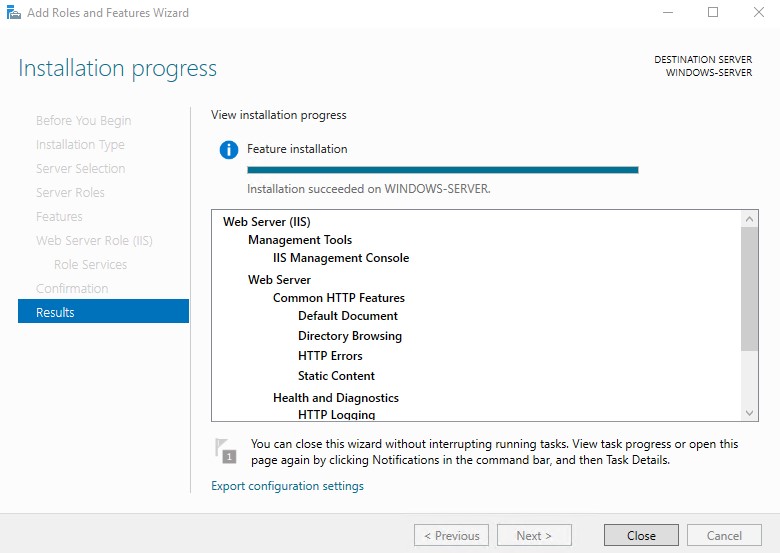
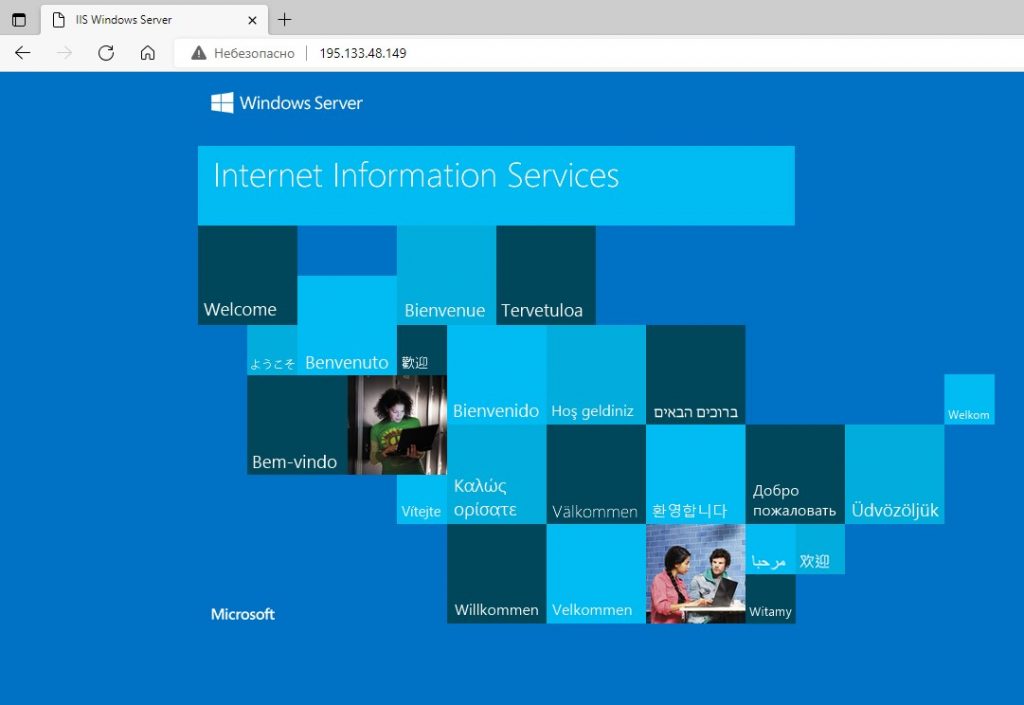
В результате, когда вы в браузере введёте IP-адрес вашего сервера, должна открыться дефолтная страница IIS.
Запуск сайта
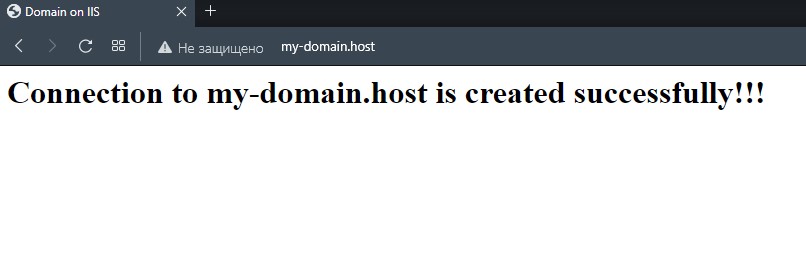
Теперь, когда IIS работает, можно запустить на нём свой домен. Для того, чтобы ваш сайт стал доступен по своему доменному имени, на имя вашего сайта должна указывать A-запись в настройках DNS-записей домена. Отредактировать DNS-записи можно в списке ваших доменов. В нашем примере мы будем использовать имя домена my-domain.host, которое связано с IP-адресом нашей виртуалки именно через A-запись.

По умолчанию файлы сайтов IIS расположены в каталоге C:\inetpub. В свою очередь, файлы дефолтной страницы IIS находятся в директории C:\inetpub\wwwroot. Мы же создадим отдельный каталог для нашего сайта. Таким каталогом будет C:\inetpub\my-domain. В него мы положим файл стартовой страницы сайта index.html со следующим содержимым:
<html>
<head>
<title>
Domain on IIS
</title>
</head>
<body>
<h1>
Connection to my-domain.host is created successfully!!!
</h1>
</body>
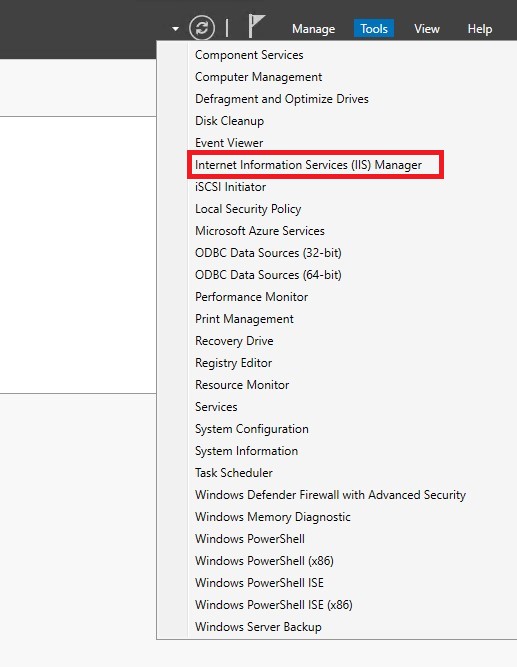
</html>Теперь, когда файл стартовой страницы сайта готов, в Диспетчере серверов перейдите в Tools 🠒 Internet Information Services (IIS) Manager.
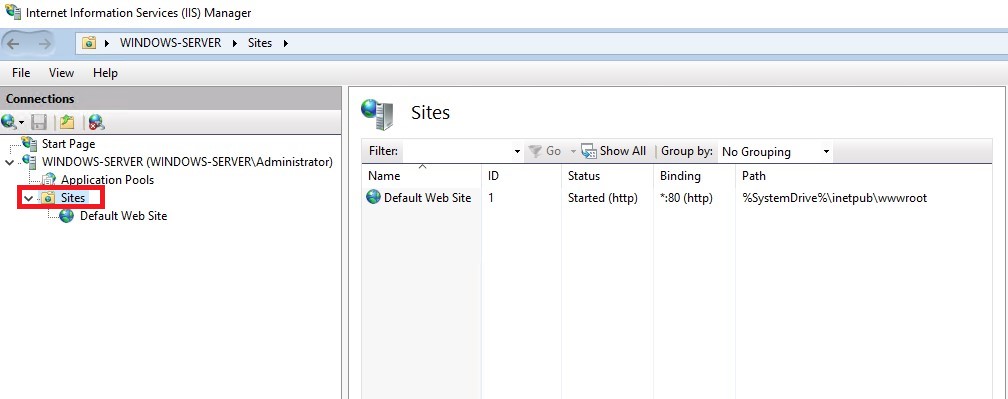
В открывшемся окне менеджера IIS раскройте ветку своего сервера и перейдите на ветку Sites.
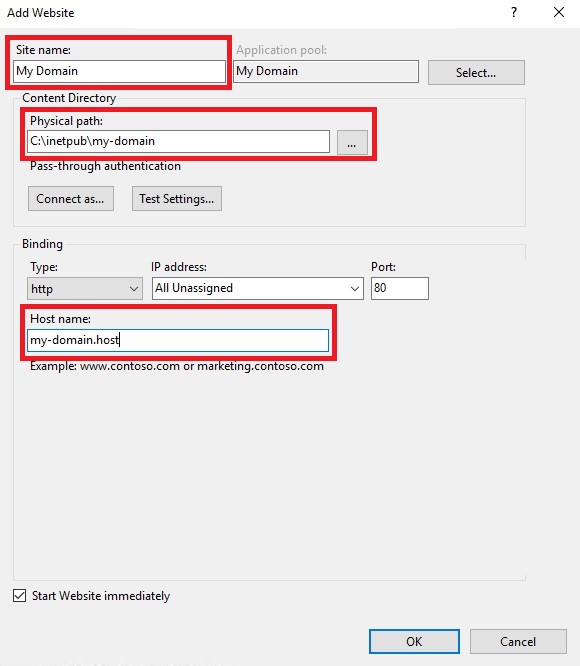
В эту ветку необходимо добавить новый сайт. Для чего на заголовке Sites нажмите правую кнопку мыши и выберите Add Website.... В открывшемся окне заполните поля Site name, Physical path и Host name. После чего нажмите ОК.
Теперь, если вы наберёте в браузере адрес вашего сайта, например, http://my-domain.host, браузер должен будет открыть его стартовую страницу.
Установка MS SQL Server
На нашем виртуальном сервере мы будем устанавливать MS SQL Server 2019. Данная СУБД была выпущена в следующих редакциях:
- Enterprise Edition – полноценная редакция MS SQL Server, предназначенная для использования в реальных проектах и не имеющая ограничений по вычислительным мощностям.
- Standard Edition – также полноценный выпуск, но имеющий определённые аппаратные ограничения.
- Express Edition – бесплатный выпуск для работы простых приложений. Может использоваться для решения реальных задач, но имеет некоторые аппаратные ограничения.
- Developer Edition – полнофункциональная бесплатная редакция, нацеленная на разработчиков. Данный выпуск не может использоваться для работы в качестве реального SQL-сервера, но может быть применён для изучения и тестирования механики MS SQL Server.
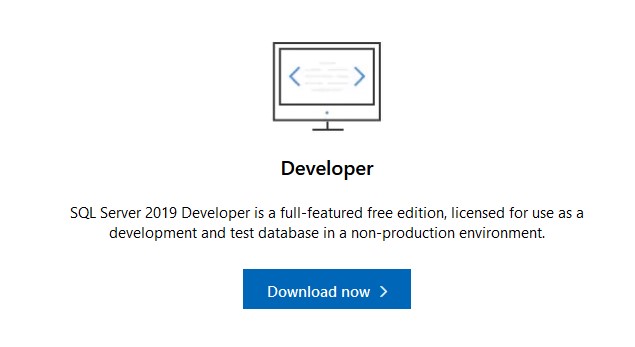
Запуск SQL-сервера рассмотрим на примере установки редакции Developer Edition.
Для загрузки инсталлятора перейдите на страницу MS SQL Server. Нажмите Download now > на версии Developer.
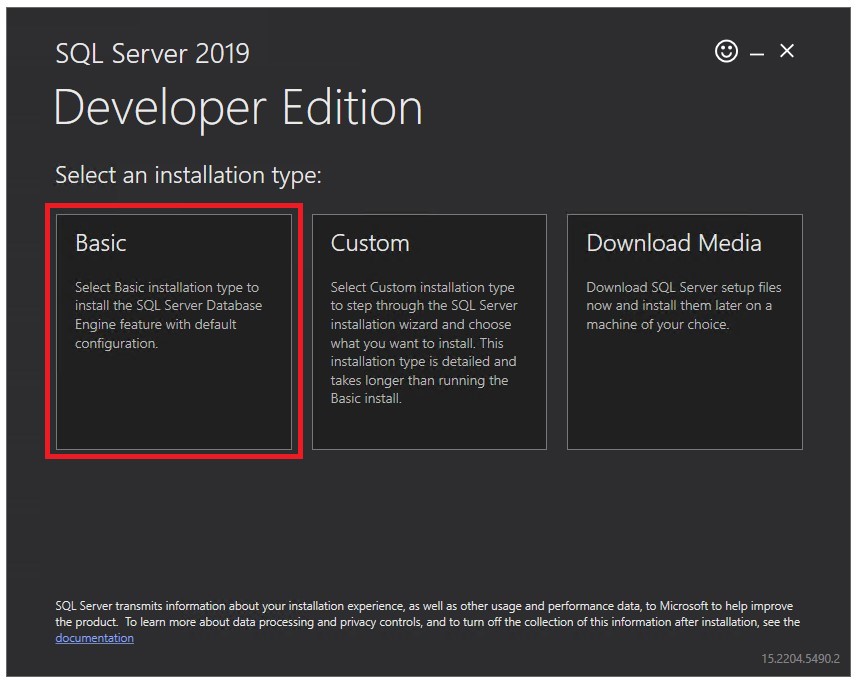
По окончании загрузки запустите установщик от имени администратора. Инсталляция MS SQL Server может производиться двумя вариантами: базовый (basic) и пользовательский (custom). Базовый вариант установки является более простым и не требует дополнительных настроек. Чтобы выбрать этот метод, необходимо выбрать соответствующий тип инсталляции.
В следующем окне нажмите Accept, чтобы принять условия лицензии.

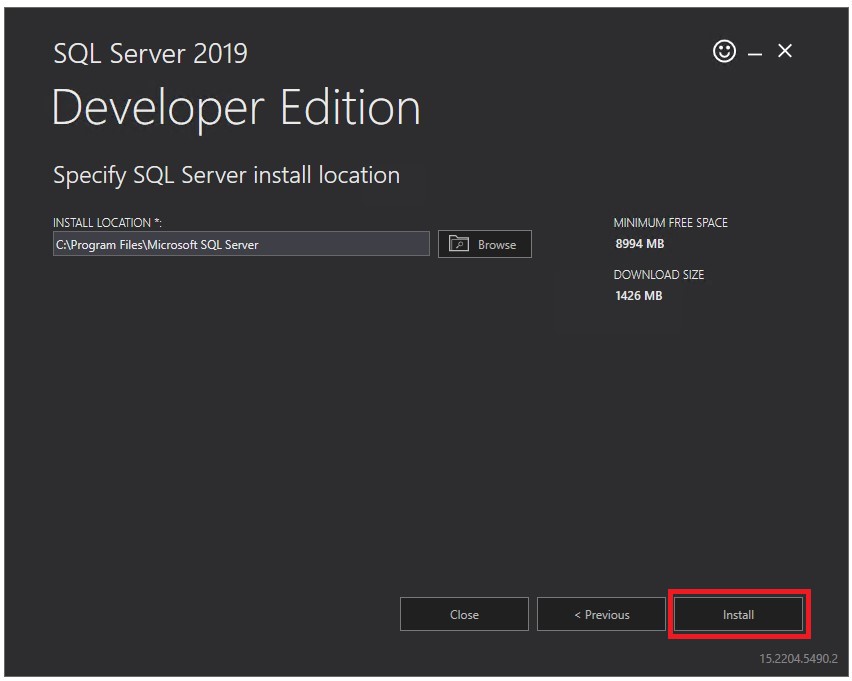
Далее, установщик укажет каталог, в который планирует инсталлировать SQL Server. Вы можете изменить его, если нужно. После чего нажмите Install.
Завершив установку мастер покажет итоговую информацию, которая будет необходима для дальнейшей эксплуатации SQL-сервера. В частности, в строке INSTANCE NAME указано имя экземпляра SQL Server. В одной операционной системе может работать до пятидесяти экземпляров, и каждый из них должен иметь своё собственное имя. Также, в этом окне прописана строка подключения CONNECTION STRING. С помощью содержимого этой строки вы сможете подключаться к SQL-серверу из других приложений, работающих на вашем VPS.
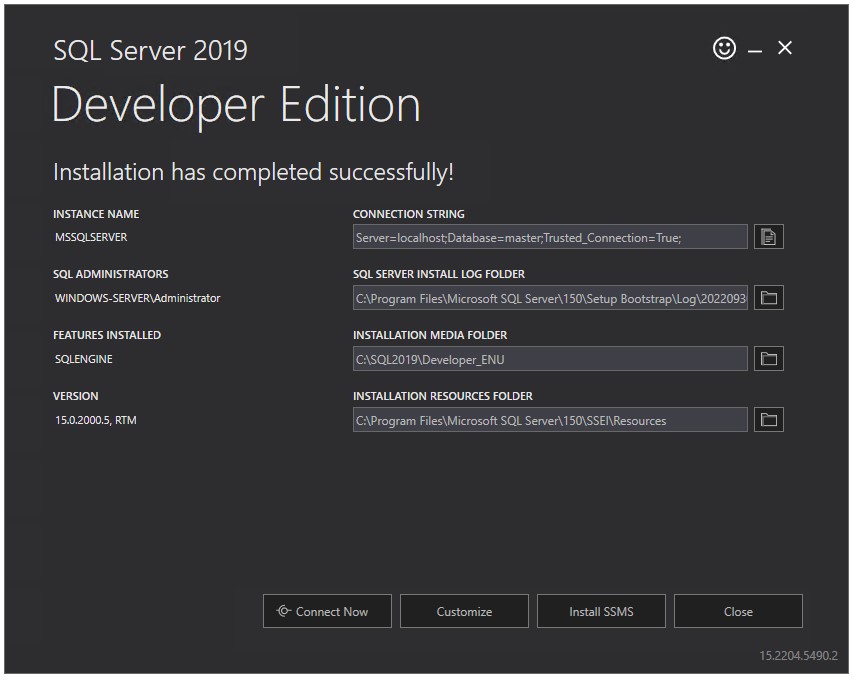
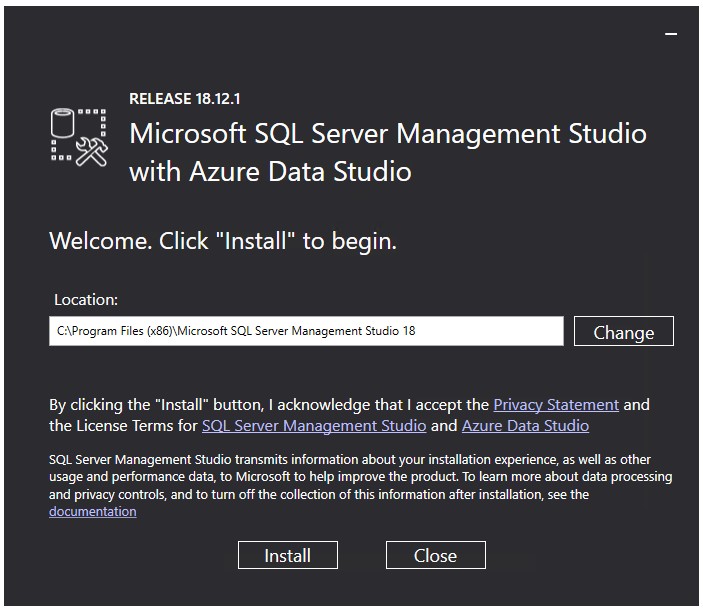
Здесь же есть кнопка Connect Now, с помощью которой вы можете проверить работоспособность данного экземпляра SQL-сервера, подключившись к нему через консольный терминал. В свою очередь, кнопка Install SSMS представляет собой ссылку на загрузку SQL Server Management Studio. Данное приложение является графической средой, содержащей инструментарий для управления инфраструктурой MS SQL Server. При переходе по ссылке загрузите инсталлятор SSMS, и запустите его от имени администратора. Установка начнётся по нажатию кнопки Install.
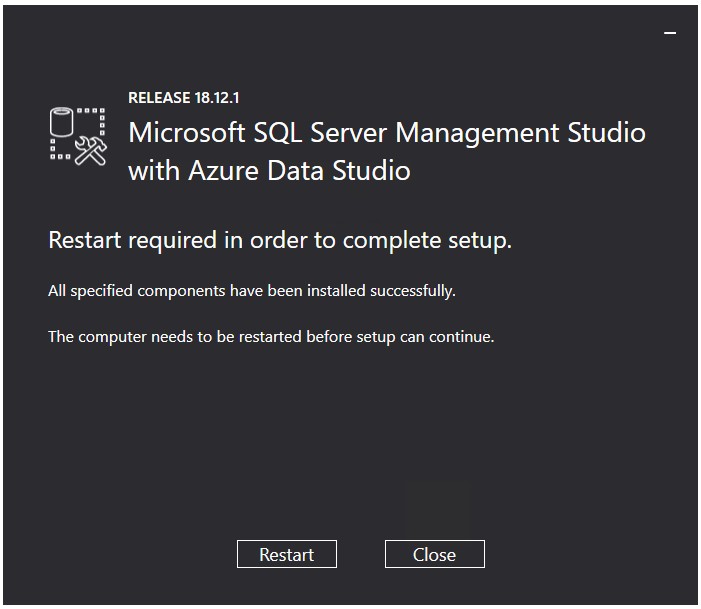
После завершения инсталляции необходимо будет перезагрузить сервер.
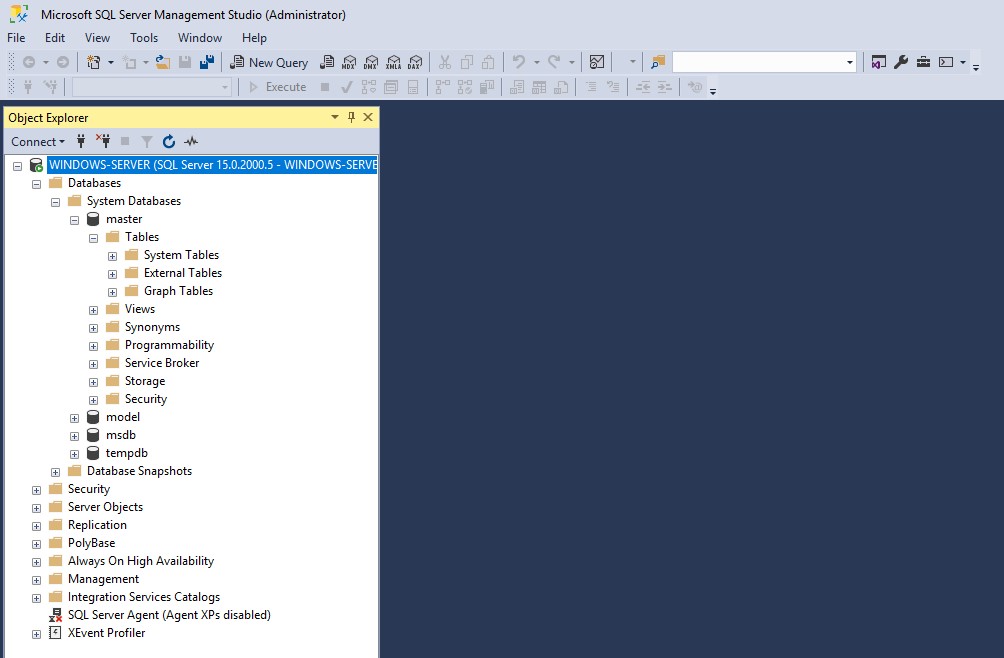
Перезапустив VPS уже можно будет подключиться к SQL-серверу при помощи графической оболочки и приступить к работе с ним.
Learn how to configure an SQL Server 2019 (15x) database server on a Windows server. Simply download and install SQL Server and configure SSMS.
Before you get started
To successfully complete this tutorial and install and configure SQL Server, you will need:
- To be registered with an organisation on the Jotelulu platform and have logged in to that organisation.
- To have registered for a Servers subscription
- To have a working Windows server associated with that subscription.
Part 1 – Download the SQL Server software
The first thing that you will need to do is download the desired version of SQL Server. To do this, visit Microsoft’s SQL download page and search for the option that best suits your needs.
In this tutorial, we will use Microsoft SQL 2019 Express, which you can find here, but the process is very similar for all other versions of SQL Server.
Part 1 – Download Microsoft SQL 2019 Express
In this first part, we will also download SSMS, which is the suite of tools used to connect and manage databases.
You can download SSMS here.
Part 1 – Download SSMS
Part 2 – Installing SQL Server
To install SQL Server, you will need to use an account with local administrator permissions.
When you initially launch the installation programme, it will take some time to download and decompress the necessary files. Once this is done, a window will appear like the one below. Here, you should choose ‘Custom’ installation (1).
Part 2 – Select ‘Custom’ installation
The next screen will ask you to select a download location on your local machine. You can leave the default location as it is without any problems.
Part 2 – Specify the SQL Server media download target location
At this point, the programme will begin downloading the install package. There is a lot to download and this could take some time. The progress bar will show you the different stages of the download, including the decompression of binary files, which has been a standard part of installations for a few years now as a way to speed up download times.
Once these files have been downloaded, the SQL Server Installation Center will appear, where you will see all of the possible testing, update, documentation and installation options.
At this point, you could take the opportunity to review each of the different options and check the installation requirements. But seeing as the programme itself runs a series of checks automatically, we think that it is best to just get straight into the installation and let the programme handle that.
Select «New SQL Server stand-alone installation or add features to an existing installation” (2) as we are going to install a new system from scratch.
Part 2 – SQL installation options
The next step will be to accept the License Terms, which we recommend reading in full. Once you have read them, click on «I accept the license terms and privacy statement» (3).
Click on «Next».
Part 2 – Accept the product license terms
At this point, the programme will perform a rule check. If any problems are encountered, you will be able to review them and take the necessary corrective actions. To perform the check again, click on «Re-run».
NOTE: A common source of problems is the firewall settings. To solve this, you will need to ensure that the relevant ports are open or disable your firewall, something that we do not recommend.
Once the checks have been passed successfully, you will be able to continue with the installation by clicking on «Next».
Part 2 – Checking installation requirements
At this point, you will see the option to «Use Microsoft Update to check for updates» and ensure that you download the most recent, secure and efficient version.
We recommend checking this box for a more stable system, but it is entirely up to you.
If you wish to check for updates, check the box next to «Use Microsoft Update to check for updates” (4).
Then, click on «Next» to continue.
Part 2 – Decide whether or not to use Microsoft Update
The programme will not download the install files and relevant updates. As you can see, this is divided into four different phases:
- Scan for product updates.
- Download Setup files.
- Extract Setup files.
- Install Setup files.
This step could take a while depending on your internet connection and system configuration.
Once finished, click on «Next».
Part 2 – Installing setup files
At this point, the installation window will close and a new installation window will appear.
After a few seconds, you will see the Install Rules window. Here, the programme will once again check that the system meets the necessary requirements and inform you of any problems encountered.
The programme will check the following:
- Consistency validation for SQL Server registry keys.
- Computer domain controller.
- Windows Firewall.
- SQL 2019 minimum CTP for Upgrade and Side by Side Support.
In principle, since the system already passed the previous check, you should not have any new problems here. However, these checks do include new items like the computer domain controller (if there is one).
Just like the previous checks, any problems will be flagged and you will have the opportunity to correct them. To run the checks again, simply click on «Re-run».
Once all checks have passed, click on «Next».
Part 2 – Checking the setup rules
We have finally reached the moment where you have to choose the features to install.
Here, you need to select the files that you want to install and those that you want to remove (5). You can remove features like R, Python or Java as they are not critical and tend to be used more for machine learning or language extensions. However, in this tutorial, we will leave them selected by default.
Next, you will see the directories where the different SQL Server components will be installed. By default, these are set as follows:
- Instance root directory: C:Program FilesMicrosoft SQL Server
- Shared feature directory: C:Program FilesMicrosoft SQL Server
- Shared feature directory (x86): C:Program Files (x86)Microsoft SQL Server
On this screen, you will also see the disk space requirements, which is a minimum of 3155 MB.
NOTE: The database should always be installed on a different disk to the one on which the operating is installed. This is because these applications tend to generate a lot of data and can end up overloading the disk. If it is installed on the same disk as the operating system, this could overload the system.
Once you have selected the files that you wish to install, click on «Next».
Part 2 – Select the features to install
Next, you need to set up the instance of SQL Server. Here, you have the choice between using a default instance or naming it yourself (7).
By default, the instance is named SQLExpress as this is the name of the SQL Server database that we have installed.
You can change this name if you want to use something more descriptive. For example, when I install Suite System Center, I tend to set up an instance for each of the most important products, naming them SCCM, SCOM, etc.
Once you have chosen a name, you can continue with the installation.
Next, you have to choose the Jave JRE installed location. The installation includes a version of Java, but if you wish, you can specify a version of Java that is already installed on your computer.
Once you have done this, we come to the server configuration, which has two very important parts:
- Service accounts.
- Collation.
In the Service Accounts tab, you need to specify the accounts that will be used to run the various SQL Server services and the Startup type (8). The default settings are as follows:
- SQL Server Database Engine: NT ServiceMSSQL$SQLEXPRESS
- SQL Server Launchpad: NT ServiceMSSQLLaunchpad$SQLEXPRESS
- SQL Full-text Filter Daemon Launcher: NT ServiceMSSQLFDLauncher$SQLEXPRESS
- SQL Server Browser: NT AUTHORITYLOCAL SERVICE
Once these have been configured, click on the Collation tab (9).
Part 2 – Configure the server
Collation is one of the most sensitive parts of the installation since it shows and determines the way that characters are interpreted.
If collation is not configured correctly, this could produce errors in the database.
This should be set to «SQL_Latin_General_CP1_CI_AS».
If this is not the case, to change it, click on «Customise…» (10).
Part 2 – Collation configuration
Next, tick the checkbox “SQL collation used for backwards compatibility” (11) and scroll down to find «SQL_Latin_General_CP1_CI_AS» (12).
Click on it and click on «OK» (13).
Part 2 – Select the appropriate collation
Check that the collation settings are now correct and click on «Next».
Part 2 – Check that the collation settings are correct
Next, you need to choose the SQL Authentication Mode (14). This can be chosen at the user’s discretion, but in this tutorial, we will use Mixed Mode (SQL Server authentication and Windows Server authentication).
Below, you will need to enter a password (15), twice as usual, and at the bottom of the window, will be able to add other users that will have administrator access. This is not necessary, and this tends to be both the SA and the administrator (that which is installed).
Once you have done this, click on the «Data Directory» tab (16).
Part 2 – Configure the database engine
In the «Data Directory» tab, you can configure all the data directories that are used by SQL Server (17).
By default, these directories are configured as follows:
- Data root directory: C:Program FilesMicrosoft SQL Server
- System database directory: C:Program FilesMicrosoft SQL ServerMSSQL15.SQLEXPRESSMSSQLData
- User database directory: C:Program FilesMicrosoft SQL ServerMSSQL15.SQLEXPRESSMSSQLData
- Backup directory: C:Program FilesMicrosoft SQL ServerMSSQL15.SQLEXPRESSMSSQLBackup
NOTE: The database should always be installed on a different disk to the one on which the operating is installed. This is because these applications tend to generate a lot of data and can end up overloading the disk. If it is installed on the same disk as the operating system, this could overload the system.
Once configured, click on the “TempDB” tab (18).
Part 2 – Configure the database directories
Next, you need to configure the temporary databases. Here, you will need to configure a number of parameters, such as the number of files used, their initial size and their outgrowth. You also need to specify the path where the data will be stored and the log directory (19).
As already mentioned, we do not recommend using the disk on which the operating system is installed in order to avoid reduced performance of the database or even the entire system.
This section can be more or less left as is. Next move on to the Memory tab (20).
Part 2 – Configure the temporary databases
In the Memory tab, you will need to choose how much memory to dedicate to the database. This is a very important parameter and you should take great care if the database coexists with another system. DBMSs use huge amounts of memory and will affect other applications if they are not set up correctly.
Here, you have two possible options. The first is to use the recommended option and the second is to use the default settings (21). If you use the recommended option you should review the settings and limit the memory a little.
Once configured, move on to the User Instances tab (22).
Part 2 – Configure the database memory
In the User Instances tab, you have the option to allow users to run a separate instance of the database engine (23) or only run the instance that has been configured. We recommend leaving this option checked.
Click on «Next».
Part 2 – Configure user instances
At this point, you will be asked to give consent to install the R programme and the Python libraries. This will only be shown if you selected these options during the installation configuration.
Once you click «Accept», the installation will begin and you will be able to see the progress bar. This could take quite some time and is probably a good moment to grab a coffee.
Part 2 – Continue with the installation process
Once installation is finished, you will see a summary showing the installation status of each feature (24). If the feature has been installed successfully, it will be marked with the word «Succeeded».
You will also be able to see the installation log (25). This is a plain text document detailing the different installation steps. We highly recommend reading this document so you can review the installation point by point, at least the first time you install an application of this type so that you can better understand the process.
Once reviewed, click on «Close» (26) to finish the installation process.
Part 2 – Final review of the installation
Once installed, «Microsoft SQL Server 2019» will now appear in the start menu, including all the associated tools. You will notice that SSMS (Microsoft Server Management Studio) has not been installed. For a few years now, SMSS has been kept separate from the SQL Server installation as many servers do not use it and many people choose to install it on a separate machine.
Part 2 – SQL Server will now appear in the start menu
Part 3 – Installing SQL Server Management Studio
Now we will look at how to install SSMS, using the install file that we downloaded in Part 1.
You will need administrator permissions to install SMSS as the installation will need to make changes to the system.
First, you simply need to choose an installation path (27) for Microsoft SQL Server Management Studio. By default, this is set to: C:Program Files (x86)Microsoft SQL Server Management Studio 18.
Once you have chosen an install path, click on «Install» (28) to begin the installation.
Part 3 – Select a folder path and begin installation
Next, you will see two consecutive windows showing the download and decompression of binaries and their subsequent installation. Once again, how long this takes will depend on your machine and internet connection.
Part 3 – SSMS installation process
Once the installation has finished, you will be asked to restart your machine and apply the changes.
Part 3 – Restart after installation
Once your machine has restarted, you will now see “Microsoft SQL Server 2018 tools” in the start menu, along with all the associated tools.
You are now able to connect to the database using SSMS (Microsoft SQL Server Management Studio).
Part 3 – SMSS will now appear in the start menu
Conclusions and next steps:
In this tutorial, you have learned how to install and configure SQL Server 2019, which will allow you to make use of a powerful yet simple database management system.
We hope that this tutorial helps you to set up your new service without any problems. However, if you do encounter any issues, please don’t hesitate to contact us so that we can help you.
Thanks for reading!