
В данной статье я подробно опишу процесс установки Microsoft SQL Server 2008 R2 в Windows Server 2008 R2 (для других ОС семейства Windows процесс аналогичен). Во время установки будут выбраны настройки, необходимые для работы с программами 1С:Предприятие 7.7 или 1С:Предприятие 8.х (если вы устанавливаете SQL Server для работы с другими программами, выбор параметров может отличаться).
0. Оглавление
- Что понадобится
- Установка SQL Server 2008 R2
- Настройка Брандмауэра Windows для MS SQL Server 2008 R2
- Администрирование SQL Server 2008 R2
1. Что понадобится
- Компьютер соответствующий минимальным системным требованиям для работы с SQL Server 2008 R2. Подробно о требовании к оборудованию и операционной системе читайте здесь.
- Права администратора на локальном компьютере.
- Установочный диск Microsoft SQL Server 2008 R2 (или образ диска).
- Действующий ключ продукта (не обязательно).
2. Установка SQL Server 2008 R2
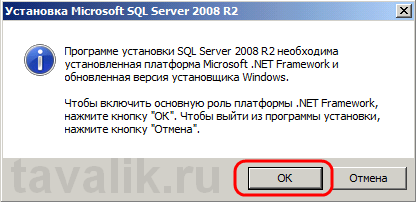
Запускаем файл setup.exe с установочного диска Microsoft SQL Server 2008 R2 и соглашаемся на включение основной роли платформы .NET Framework. О том, как установить компоненту .NET Framework 3.5 в Microsoft Windows Server 2008 R2 можно прочитать здесь.
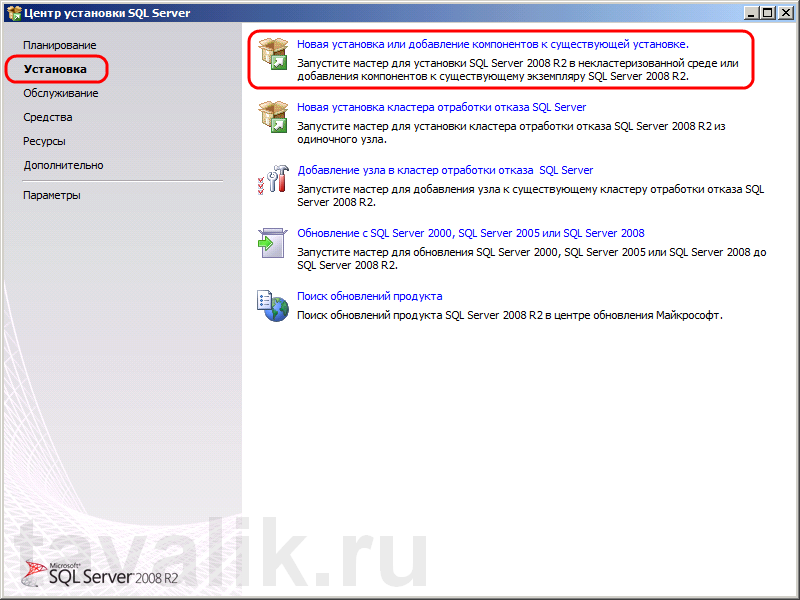
Откроется «Центр установки SQL Server» , переходим на вкладку «Установка» и нажимаем «Новая установка и добавление компонентов к существующей установке» .
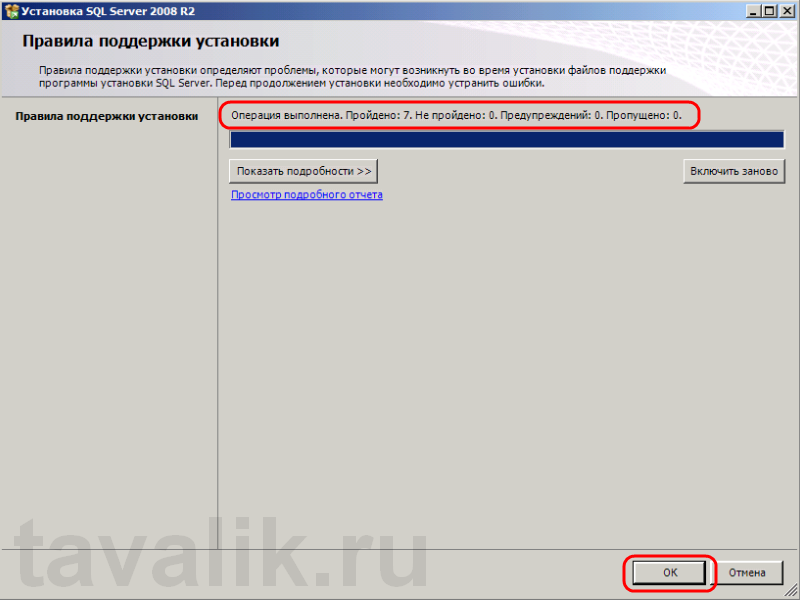
Запустится процедура проверки установки. Если тестирование выявит какие-либо ошибки, необходимо устранить их и повторить операцию. Если все в порядке нажимаем «ОК» .
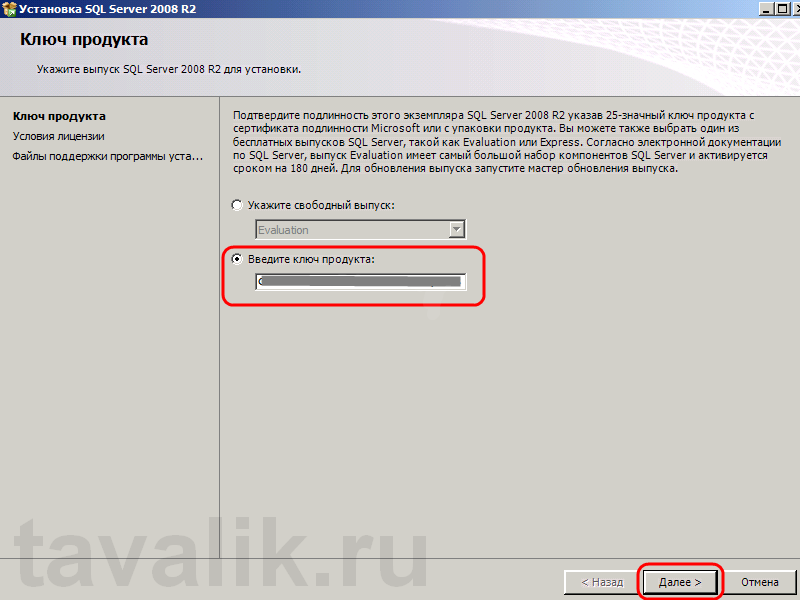
На следующей странице вводим ключ продукта, либо выбираем установку свободного выпуска «Evaluation». В последнем случае SQL Server будет без ограничений работать на протяжении 180 дней со дня установки, после чего потребуется ввести ключ продукта. Определившись с выпуском, нажимаем «Далее» .
Принимаем условия лицензионного соглашения и нажимаем «Далее» .

Нажимаем «Установить» для установки файлов поддержки программы установки.

Дожидаемся окончания процесса определения проблем, если таковые выявлены, их необходимо устранить и повторить тест. В противном случае нажимаем «Далее» .

На следующем шаге выбираем «Установка компонентов SQL Server» (если вы устанавливаете его не для SharePoint) и нажимаем «Далее» .

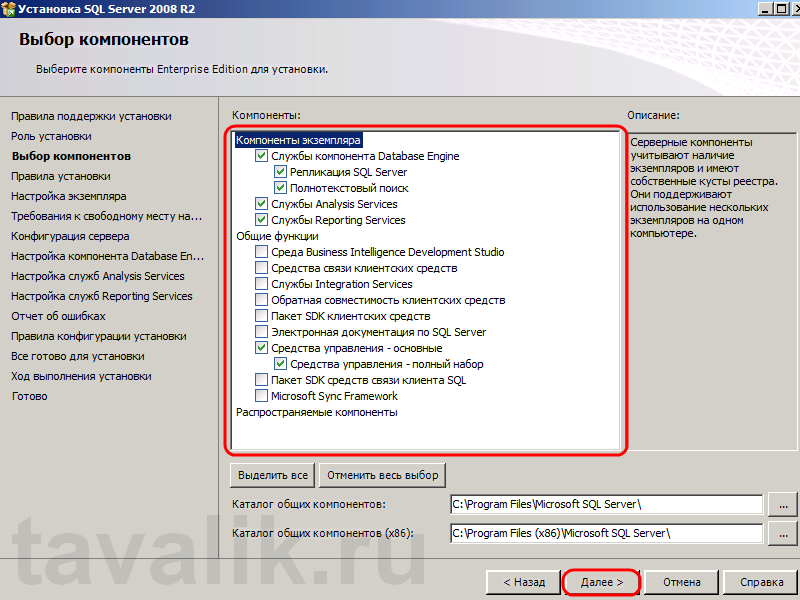
Теперь выбираем компоненты для установки. Например для работы программ 1С:Предприятие 7.7 и 1С:Предприятие 8.х (впрочем, как и для большинства других программ) достаточно выбрать лишь компоненты:
- Службы компонента Database Engine
- Средства управления — основные
- Средства управления — полный набор
Все необходимые компоненты можно установить позже, запустив заново установку MS SQL Server. Отмечаем необходимые компоненты и нажимаем «Далее» .
Опять дожидаемся окончания теста определения возможности установки и нажимаем «Далее» .

Теперь необходимо ввести имя именованного экземпляра SQL Server или оставить имя экземпляра по умолчанию (MSSQLSERVER). На одном изолированном сервере возможно устанавливать до 50 именованных экземпляров MS SQL Server 2012 и до 25 в отказоустойчивом кластере при использовании общего диска кластера. Экземпляр по умолчанию может быть только один. Выбрав тип установки, жмем «Далее» .

После проверки необходимого свободного места на диске, снова жмем «Далее» .

Теперь необходимо выбрать тип запуска служб. Для службы «Агент SQL Server» можно выбрать тип запуска «Вручную» , если вы не собираетесь использовать его постоянно. Остальные службы запускаются в автоматическом режиме. После ввода настроек переходим на вкладку «Параметры сортировки» .

Здесь требуется выбрать параметры сортировки, необходимые для того приложения, которое будет работать с SQL Server.
Будте внимательны, параметры сортировки устанавливаются один раз и поменять их уже нельзя!
Указав правильные значения жмем «Далее» .

На данной странице необходимо выбрать режим проверки подлинности для компоненты Database Engine (администрирование баз данных). Выбираем «Смешанный режим» , придумываем сложный пароль для встроенной учетной записи sa (system administrator) и обязательно записываем его (среди прочего) на бумажный носитель. Как говорится, тупой карандаш лучше острой памяти. Можно также использовать для этих целей специальные менеджеры паролей, например бесплатную программу KeePass. Затем определим пользователей Windows, которые смогут работать с Database Engine (как минимум текущего пользователя) и перейдем на вкладку «Каталог данных» .

Здесь выбираем корневой каталог, в котором будут храниться непосредственно файлы баз данных. Если в конфигурации компьютера присутствует RAID-массив из жестких дисков, разумно расположить файлы данных именно на нем. Указав необходимый путь, жмем «Далее» .

Если в процессе установки помимо основных были выбраны дополнительные компоненты, например служба Analysis Services, то также следует отдельно настроить и эти службы. В данном примере необходимо указать пользователей, имеющих разрешения администратора для служб Analysis Services, а также указать каталог хранения данных, перейдя на вкладку «Каталоги данных» .

Выбрав путь, жмем «Далее» .

Аналогично, для служб Reporting Services выбираем «Установить конфигурацию по умолчанию для работы в собственном режиме.» (если вы устанавливаете SQL Server не для SharePoint) и нажимаем «Далее» .

Вы можете помочь корпорации Microsoft установив флаг «Отправлять отчеты об ошибках…» . Жмем «Далее» .

Снова дожидаемся окончания проверки возможности установки, исправляем ошибки, если таковые имеются и жмем «Далее» .

Проверяем все введенные раннее настройки, и если все верно нажимаем «Установить» .

Дожидаемся окончания процесса установки. Если все прошло хорошо, то увидим сообщение, что Установка SQL Server 2008 R2 выполнена успешно. Нажимаем «Закрыть» .

На этом установка SQL Server 2008 R2 завершена.
3. Настройка Брандмауэра Windows для MS SQL Server 2008 (R2)
Если предполагается, что с SQL сервером будут работать программы, расположенные на других компьютерах в сети, то на самом сервере, где запущена служба SQL Server необходимо настроить Брандмауэр Windows для работы SQL Server. Подробно об этом можно прочитать здесь.
4. Администрирование SQL Server 2008 R2
Для администрирования SQL Server используется программа «Среда SQL Server Management Studio». Ярлык для запуска данной программы можно найти в меню «Пуск» — «Microsoft SQL Server 2008 R2» — «Среда SQL Server Management Studio».
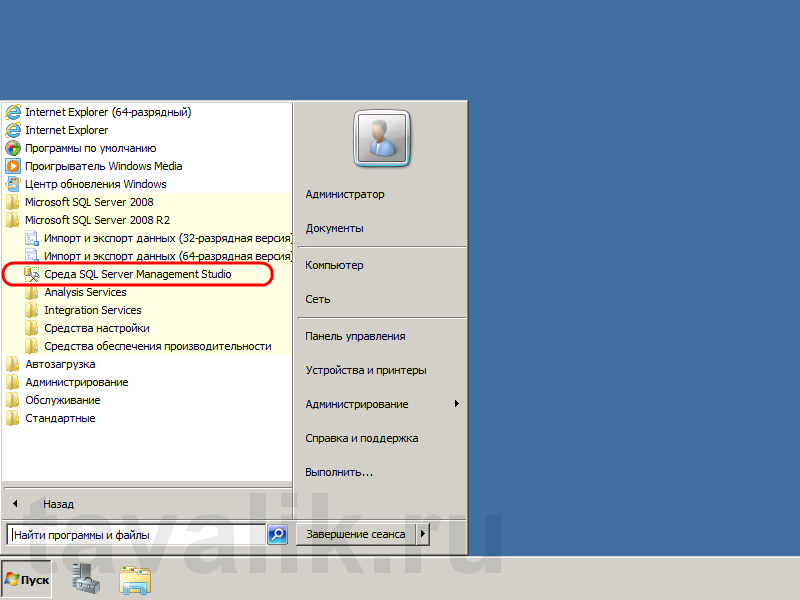
В открывшемся окне выбираем:
- Тип сервера: «Компонент Database Engine» .
- Имя сервера в формате «<Имя компьютера>\<Идентификатор экземпляра>» , где
<Имя компьютера> — имя или IP-адрес физического компьютера на котором установлен SQL Server.
<Идентификатор экземпляра> — задается только в случае подключения к именованному экземпляра SQL Server. - Проверка подлинности: «Проверка подлинности SQL Server» или «Проверка подлинности Windows»
- Имя входа: имя пользователя SQL Server.
- Пароль: в случае проверки подлинности SQL Server, пароль для выбранного пользователя.

После чего нажимаем «Соединить».
There is a recent post on the Microsoft SQL Server Support Blog about how to get SQL Server 2008 and 2008 R2 installed on Windows Server 2008 R2. The issue is how you get the .NET Framework 3.5 SP1 installed (which is a prerequisite for both SQL Server 2008 and 2008 R2) onto Windows Server 2008 R2.
With Windows Server 2008, you could either install .NET 3.5 SP1 yourself before you started the SQL Server 2008/2008 R2 installation, or you could let the SQL Server 2008/2008 R2 installer take care of it. I usually chose the former, just to make the SQL Server installation go smoother and quicker.
Now, with Windows Server 2008 R2, you need to add the .NET 3.5 SP1 Framework as a Feature inside of Windows Server 2008 R2 by going onto Server Manager. The Microsoft blog post goes into step by step detail on how to do this. This may cause some issues at some shops where the DBA is not allowed direct access to the server, so you should be aware of this. I know that this caused me a few minutes of delay the first time that I ran into it a few months ago, as I was installing SQL Server 2008 on Windows Server 2008 R2 for the first time.
We are running all of our Production database servers on x64 SQL Server 2008 SP1 CU5 on Windows Server 2008 R2, with very good results since mid-November 2009. Microsoft made a lot of low level performance improvements in the scheduler in Windows Server 2008 R2, that are designed to allow SQL Server 2008 R2 to scale beyond 64 logical processors on x64. Even though I am “only” on SQL Server 2008 SP1, with 16 logical processors, I think some of these improvements in Windows Server 2008 R2 are beneficial even on smaller boxes like mine.
Вы планируете установить SQL Server 2008 или 2008 R2 на Windows Server 2008 R2? Если да, то есть важное предварительное условие, о котором вам нужно знать – .NET Framework 3.5 SP1. В этой статье блога мы расскажем, как установить .NET Framework 3.5 SP1 на Windows Server 2008 R2 и обеспечить гладкий и быстрый процесс установки SQL Server.
В прошлом, с Windows Server 2008, у вас была возможность либо установить .NET 3.5 SP1 самостоятельно перед началом установки SQL Server, либо позволить установщику SQL Server справиться с этим за вас. Однако с Windows Server 2008 R2 вам нужно добавить .NET 3.5 SP1 Framework в качестве функции внутри Windows Server 2008 R2 с помощью Server Manager.
Это изменение может вызвать некоторые проблемы для администраторов баз данных, у которых нет прямого доступа к серверу. Если вы попадаете в эту категорию, важно знать об этом требовании и скоординироваться с соответствующей командой, чтобы обеспечить гладкий процесс установки.
Когда я столкнулся с этим требованием впервые, это вызвало несколько минут задержки, так как я устанавливал SQL Server 2008 на Windows Server 2008 R2. Однако, после того, как я следовал пошаговым инструкциям, предоставленным Microsoft, установка прошла без дополнительных проблем.
В нашей организации мы в настоящее время используем все наши серверы баз данных Production на x64 SQL Server 2008 SP1 CU5 на Windows Server 2008 R2. С середины ноября 2009 года мы имеем очень хорошие результаты. Одной из причин этого успеха являются улучшения производительности на низком уровне в планировщике в Windows Server 2008 R2. Эти улучшения предназначены для обеспечения масштабируемости SQL Server 2008 R2 свыше 64 логических процессоров на x64.
Несмотря на то, что я в настоящее время использую SQL Server 2008 SP1 с 16 логическими процессорами, я заметил, что некоторые из этих улучшений в Windows Server 2008 R2 оказали положительное влияние на более маленькие серверы, подобные моему.
В заключение, если вы планируете установить SQL Server 2008 или 2008 R2 на Windows Server 2008 R2, убедитесь, что добавили .NET Framework 3.5 SP1 в качестве функции с помощью Server Manager. Этот простой шаг обеспечит гладкий и эффективный процесс установки, позволяя вам воспользоваться улучшениями производительности, предлагаемыми Windows Server 2008 R2.
Microsoft SQL Server 2008 R2 (Standard Edition) Installation Guide
This document will guide you step by step installation of Microsoft SQL Server 2008 R2 Standard Edition on Window Server 2008 R2.
Running the Setup
Open the installation media, you will see the list of files. Run “Setup.exe” as show below.

Figure 1: Setup.exe
On running the “setup.exe” following screen will appear.

Click “Installation” from the top of left side of window. Select “New installation add features to an existing installation” at top of right side of window. See the figure below.

Following screen will appear for some time

Following screen will appear, press “OK” button.

Figure 2: Setup Support Rules
Product Registration
In this step you will enter registration key of MS SQL Server 2008 R2. After entering registration key successfully press “Next” button. See the figure below.

Figure 3: Product Registration Key
License Terms
This step will ask you to accept the license terms and condition. Check the both check boxes and press “Next” button. See the figure below.

Figure 4: License Terms
Setup Support Files
This step will install the setup support files. Press “Install” button. See the figure below.

Figure 5: Setup Support Files

Figure 6: Setup Support Rules Progress
Setup Support Rules
This step will check the potential problems that can occur during the installation. All test should be passed in-order to continue to next steps. Incase all the tests passed “Next” button will get activated, press “Next” button. See the screen below.
Figure 7: Setup Support Rules
Setup Role
Select first option “SQL Server Feature Installation” then press “Next” button. See the following screen.

Figure 8: Setup Role
Feature Selection
This step offers you to select features of SQL Server that you want to install. Select all the features by pressing “Select All” button and then press “Next” button. See the screen below.

Figure 9: Feature Selection
Installation Rules
If all the tests gets passed the press “Next” button. See the screen below.

Figure 10: Installation Rules
Instance Configuration
In this step we specify instance related configuration. Select “Default instance” option and press “Next” button. See the screen below.

Figure 11: Instance Configuration
Disk Space Requirement
This step checks space availability to install the SQL Server. In case of success press “Next” button.

Figure 12: Disk Space Requirement
Server Configuration
This step is important in the installation of SQL Server. Press “Use the same account for all SQL Server services”.

Figure 13: Server Configuration
A screen will appear, it will ask about Account Name and Password to be used for services. Browse
“NT AUTHORITY\NETWORK SERVICE” and press “OK” without entering any password. See the screen below.

Figure 14: Account Credentials
After above step press “Next” button. See the screen below.

Figure 15: Server Configuration Final Step
Database Engine Configuration
This is most important step during the installation of SQL Server. This steps asks about the accounts permissions and security mode of Database Engine.
a- Select “Account Provisioning” tab.
b- In “Authentication Mode”, select “Mixed Mode (SQL Server authentication and Windows authentication)”.
c- Specify the password for the SQL Server system administrator (sa) account. Enter password “Password?”
d- Specify SQL Server Administrators, press “Add Current User” button.
e- Press “Next” button after entering all the above information.
See the screen explaining all the above step below.

Figure 16: Database Engine Configuration
Analysis Services Configuration
Select “Account Provisioning” tab. Add the current user by pressing “Add Current User” button then press “Next” button. See the screen below.

Figure 17: Analysis Services Configuration
Reporting Services Configuration
This step specify the reporting services configuration. Select third option “Install, but do not configure the report server” and press “Next” button. See the screen below.

Figure 18: Reporting Services Configuration
Error Reporting
Select check box and press “Next” button. See the screen below.

Figure 19: Error Reporting
Installation Configuration Rules
If all the test gets passed then press “Next” button. See the screen below.

Figure 20: Installation Configuration Rules
Read to Install
At this step SQL Server setup is ready for final installation. It will show the summary of all the features going to be installed. Press “Install” button. See the screen below.

Figure 21: Ready to Install
Installation Progress
This step shows installation progress. Installation will take about half an hour. Installation times basically depends upon the speed of your system. See the screen below.

Figure 22: Installation Progress
Complete
On the completion of installation, it will prompt and show the following screen. Press “Close” button.

Figure 23: Installation Complete
Restarting the Computer
On pressing the “Close” button, setup will ask you to restart your computer in order to take changes. Press “OK” button. See the following screen.
Figure 24: Restart Computer
After restarting your system you can use your MS SQL Server successfully.
/*******************End of Document*******************/
Tags: Database-SqlServer, installation-step-by-step-MS-SQL-Server, microsoft, Microsoft SQL Server 2008 R2, mssqlserver, mssqlserver2008r2, mssqlserverinstallation, SQL Server 2008 R2, sql-server
To complete this post, we are going to install SQL Server 2008 R2 Enterprise Evaluation edition on a virtual machine running on Windows Server 2008 Service Pack 2. To see a complete list of Hardware and Software requirements for the installation of SQL Server 2008 R2, click here. You can download the SQL Server 2008 R2 Enterprise Evaluation Edition from here. Before starting the SQL Server installation, we are going to create the accounts, which will be used to run the SQL Server services. As we are going to deploy on a stand alone machine in a workgroup environment, we are going to use local windows accounts. In a domain environment, use domain accounts to run the SQL Server services.
Creating Service Accounts for SQL Server
In this part, we are going to create two service accounts for SQL Server 2008 R2 installation. For this demo, we are going to create two accounts; TestLab3_Data and TestLab3_Agent. From the screenshot we can find that Service Pack 2 of Windows Server 2008 has been installed. Follow the steps mentioned below to create the service accounts for SQL Server 2008 R2.
- After log on to the server, open Computer Management (Start –> Administrative Tools –> Computer Management).
- Expand System Tools, and click on Local Users and Groups. Expand Local Users and Groups, and click on Users.
- Right-click on the Users folder and select New Users. Enter the User name, Full Name, Descriptions, and Password for the user account and click on Create. The new user account will be created.
Verifying the Service Accounts
Once the accounts are created, make sure the passwords for the accounts are working properly. To test the accounts, we can execute the following commands from the command prompt:
runas /user:<machinename>\<username> cmd
Enter the password for the user account when prompted.
So when we verify the SQL Server database engine service account, we will get the following result:

Similarly, we can also verify the service account for SQL Server Agent service. Now, its time to start the SQL Server 2008 R2 installation.
SQL Server 2008 R2 Installation
After downloading the SQL Server 2008 R2 Enterprise Evaluation setup, we need to extract it. Once the extraction is completed, we are ready to start the SQL Server installation.
1. Inside the extraction folder, right-click on the Setup.exe, and click on the option Run as Administrator. Note, in Windows Vista / Windows Server 2008, always execute the setup program by right-click on it and choose Run as Administrator from the drop down menu. This setup is going to install .Net Framework 3.5 SP1, which is a pre-requisites for installation of SQL Server 2008 R2.
2. Accept the License Agreement to continue the .Net Framework setup, and click on Install.

3. Click on Exit, once the .Net Framework installation is completed. This will start the SQL Server installation. You will get the following screen once the .Net Framework installation is completed.

4. The above screen will opened the SQL Server 2008 R2 Installation Center.

5. Click on the Installation tab present on the Left side of SQL Server Installation Center. We will get the following screen. To install on a stand alone server, click on the first option.

6. After you clicked on New installation or add features to an existing installation, SQL Server will run a set of checks which need to be passed before the setup will continue further. There are 7 checks which must be passed, if failed, you need to take corrective actions before continuing further. Once all the tests passed, you will get the following screen. Click on Ok to continue.

7. Specify the version of SQL Server you are going to install. For completion of this blog post, I am going to install the Evaluation edition. Click on Next to continue the installation.

8. Accept the Licensing Agreement to continue further.

9. Click on Install to start the installation of the Support Files.

10. Once the support files are installed, you will get the following screen. Don’t worry about the following two warnings. The first warning says that the server is not connected to the internet and the second error says, the Windows Firewall is enabled. Its fine for my testing, however, in the production environment, we need to make sure that all the checks are passed. Click on Next to continue further.

11. Select the SQL Server features which you want to install. Since the objective of this post, is the installation of SQL Server 2008R2, we are going to choose the default option: SQL Server Feature Installation. Click on Next to continue.

12. Select the features of SQL Server we are going to install. If we take a close look at the available features, than we can see that SQL Server Integration Service is not listed in the above list. For the current deployment, we are not going to install Reporting Service & Analysis Service. Click on Next to continue.

13. SQL Server will run another set of checks which will validate whether the selected features can be installed on the server. Once the checks are done, we will get the following screen.

14. On continuing Next, we will get the Instance Configuration Page. Since this is the first instance to be installed on the server, we will make it as Default instance. Click on Next to continue.

15. On the Disk Space Requirements page, the setup will check whether the required disk space is available. It will give us the details about the required disk space for the installation along with the available disk space on the system hard drive.

16. The Server Configuration Page consists of two tabs; Service Accounts Page and Collation Page.

On the Service Account tab, we are going to provide the details of the service accounts, which will be used to run the various SQL Server services. On the Collation tab, we are going to choose the collation setting which will be used by SQL Server. Please find both the screenshots mentioned below. Click on Next to continue.


17. The Database Engine Configuration page consists of three tabs; Account Provisioning, Data Directories and FILESTREAM. The Account Provisioning tab is used to determine the Authentication Mode for the SQL Server. Also we can add a group/user to become a part of SQL Server Administrators. The Data Directories tab is used to specify the path for the root directory along with the path for System databases, User databases, TempDB and Backup locations. FILESTREAM is a new feature available with SQL Server 2008 and will not be part of this post. We will configure FILESTREAM on a later post. To continue further, we are going to add the current login account to the SQL Server Administrators group. Click on Next to continue further.

18. The Error Reporting page ask you whether or not you want to share the error messages with Microsoft. You can choose this option based on your requirement.

19. By executing certain rules, the setup will detect whether the installation process will be blocked due to some reasons. Click on Next to continue.

20. The SQL server 2008 R2 setup will prepare a list of selected features which are going to install. Click on the Install button to start the installation of the SQL Server.

21. Once you clicked on Install, you will get the following screen. It will take some times to complete the SQL Server 2008 R2 installation process.

22. Once the installation is completed, we will get the following screen: Click on Close to complete the installation process.

Thus, we have successfully installed SQL Server 2008 R2 on the test environment.