
How to enable and disable SMBv1, SMBv2, and SMBv3 in Windows Vista, Windows Server 2008, Windows 7, Windows Server 2008 R2, Windows 8, and Windows Server 2012
This article describes how to enable and disable Server Message Block (SMB) version 1 (SMBv1), SMB version 2 (SMBv2), and SMB version 3 (SMBv3) on the SMB client and server components.
Summary
In Windows 7 and Windows Server 2008 R2, disabling SMBv2 deactivates the following functionality:
- Request compounding — allows for sending multiple SMB 2 requests as a single network request
- Larger reads and writes — better use of faster networks
- Caching of folder and file properties — clients keep local copies of folders and files
- Durable handles — allow for connection to transparently reconnect to the server if there is a temporary disconnection
- Improved message signing — HMAC SHA-256 replaces MD5 as hashing algorithm
- Improved scalability for file sharing — number of users, shares, and open files per server greatly increased
- Support for symbolic links
- Client oplock leasing model — limits the data transferred between the client and server, improving performance on high-latency networks and increasing SMB server scalability
- Large MTU support — for full use of 10-gigabye (GB) Ethernet
- Improved energy efficiency — clients that have open files to a server can sleep
In Windows 8 and Windows Server 2012, disabling SMBv3 deactivates the following functionality (and also the SMBv2 functionality that is described in the previous list):
- Transparent Failover — clients reconnect without interruption to cluster nodes during maintenance or failover
- Scale Out concurrent access to shared data on all file cluster nodes
- Multichannel — aggregation of network bandwidth and fault tolerance if multiple paths are available between client and server
- SMB Direct adds RDMA networking support for very high performance, with low latency and low CPU utilization
- Encryption Provides end-to-end encryption and protects from eavesdropping on untrustworthy networks
- Directory Leasing — Improves application response times in branch offices through caching
- Performance Optimizations — optimizations for small random read/write I/O
More information
The SMBv2 protocol was introduced in Windows Vista and Windows Server 2008.
The SMBv3 protocol was introduced in Windows 8 and Windows Server 2012.
For more information about the capabilities of SMBv2 and SMBv3 capabilities, go to the following Microsoft TechNet websites:
Server Message Block overview
What’s New in SMB
-
How to enable or disable SMB protocols on the SMB server
Windows 8 and Windows Server 2012
Windows 8 and Windows Server 2012 introduce the new Set-SMBServerConfiguration Windows PowerShell cmdlet. The cmdlet enables you to enable or disable the SMBv1, SMBv2, and SMBv3 protocols on the server component.
Notes When you enable or disable SMBv2 in Windows 8 or in Windows Server 2012, SMBv3 is also enabled or disabled. This behavior occurs because these protocols share the same stack.
You do not have to restart the computer after you run the Set-SMBServerConfiguration cmdlet.
- To obtain the current state of the SMB server protocol configuration, run the following cmdlet:
Get-SmbServerConfiguration | Select EnableSMB1Protocol, EnableSMB2Protocol
- To disable SMBv1 on the SMB server, run the following cmdlet:
Set-SmbServerConfiguration -EnableSMB1Protocol $false
- To disable SMBv2 and SMBv3 on the SMB server, run the following cmdlet:
Set-SmbServerConfiguration -EnableSMB2Protocol $false
- To enable SMBv1 on the SMB server, run the following cmdlet:
Set-SmbServerConfiguration -EnableSMB1Protocol $true
- To enable SMBv2 and SMBv3 on the SMB server, run the following cmdlet:
Set-SmbServerConfiguration -EnableSMB2Protocol $true
Windows 7, Windows Server 2008 R2, Windows Vista, and Windows Server 2008
To enable or disable SMB protocols on an SMB Server that is runningWindows 7, Windows Server 2008 R2, Windows Vista, or Windows Server 2008, use Windows PowerShell or Registry Editor.
Windows PowerShell 2.0 or a later version of PowerShell
- To disable SMBv1 on the SMB server, run the following cmdlet:
Set-ItemProperty -Path «HKLM:\SYSTEM\CurrentControlSet\Services\LanmanServer\Parameters» SMB1 -Type DWORD -Value 0 -Force
- To disable SMBv2 and SMBv3 on the SMB server, run the following cmdlet:
Set-ItemProperty -Path «HKLM:\SYSTEM\CurrentControlSet\Services\LanmanServer\Parameters» SMB2 -Type DWORD -Value 0 -Force
- To enable SMBv1 on the SMB server, run the following cmdlet:
Set-ItemProperty -Path «HKLM:\SYSTEM\CurrentControlSet\Services\LanmanServer\Parameters» SMB1 -Type DWORD -Value 1 -Force
- To enable SMBv2 and SMBv3 on the SMB server, run the following cmdlet:
Set-ItemProperty -Path «HKLM:\SYSTEM\CurrentControlSet\Services\LanmanServer\Parameters» SMB2 -Type DWORD -Value 1 -Force
Note You must restart the computer after you make these changes.
Registry Editor
Important This article contains information about how to modify the registry. Make sure that you back up the registry before you modify it. Make sure that you know how to restore the registry if a problem occurs. For more information about how to back up, restore, and modify the registry, click the following article number to view the article in the Microsoft Knowledge Base:
322756 How to back up and restore the registry in Windows
To enable or disable SMBv1 on the SMB server, configure the following registry key:
Registry subkey:
HKEY_LOCAL_MACHINE\SYSTEM\CurrentControlSet\Services\LanmanServer\ParametersRegistry entry: SMB1
REG_DWORD: 0 = Disabled
REG_DWORD: 1 = Enabled
Default: 1 = Enabled To enable or disable SMBv2 on the SMB server, configure the following registry key:Registry subkey:HKEY_LOCAL_MACHINE\SYSTEM\CurrentControlSet\Services\LanmanServer\Parameters
Registry entry: SMB2
REG_DWORD: 0 = Disabled
REG_DWORD: 1 = Enabled
Default: 1 = EnabledHow to enable or disable SMB protocols on the SMB client
Windows Vista, Windows Server 2008, Windows 7, Windows Server 2008 R2, Windows 8, and Windows Server 2012
Note When you enable or disable SMBv2 in Windows 8 or in Windows Server 2012, SMBv3 is also enabled or disabled. This behavior occurs because these protocols share the same stack.
- To disable SMBv1 on the SMB client, run the following commands:
sc.exe config lanmanworkstation depend= bowser/mrxsmb20/nsisc.exe config mrxsmb10 start= disabled
- To enable SMBv1 on the SMB client, run the following commands:
sc.exe config lanmanworkstation depend= bowser/mrxsmb10/mrxsmb20/nsi sc.exe config mrxsmb10 start= auto
- To disable SMBv2 and SMBv3 on the SMB client, run the following commands:
sc.exe config lanmanworkstation depend= bowser/mrxsmb10/nsi sc.exe config mrxsmb20 start= disabled
- To enable SMBv2 and SMBv3 on the SMB client, run the following commands:
sc.exe config lanmanworkstation depend= bowser/mrxsmb10/mrxsmb20/nsi sc.exe config mrxsmb20 start= auto
Notes
- You must run these commands at an elevated command prompt.
- You must restart the computer after you make these changes.
- To obtain the current state of the SMB server protocol configuration, run the following cmdlet:
Published: 21/10/16 — 08:51:30 (Amanda Higgins)
Related Articles
Running DE8 on Windows Servers, do and dont’s (SMB1,SMB2,SMB3 and OpLocks)
With the release of DataEase 8.0, 8.1, 8.2 and Windows 7, 8 , 8.1 and Windows Server 2012 R2, we are frequently asked about how new versions of DataEase work when connecting to old versions of Windows servers and old versions of DataEase connecting to new…
Other sources of Network problems
This is a little old, but it is still useful. If you have switched off SMB2 and SMB3 on your networ as well as disabled OpLocks for SMB1 and still have problems with corruption, have a look below and see if some of these things might apply to your network…
Environment Variables in Windows XP, WIndows 7 and 8 (Complete List)
Environment variables is very useful to make general code. You can include them in paths directly to access files native to an active user/workstation/profile/session etc….
Сетевой протокол SMB (Server Message Block) используется для предоставления совместного удаленного доступа к файлам, принтерам и другим устройствам через порт TCP 445. В этой статье мы рассмотрим: какие версии (диалекты) протокола SMB доступны в различных версиях Windows (и как они соотносятся с версиями samba в Linux); как определить версию SMB на вашем компьютере; и как включить/отключить клиент и сервер SMBv1, SMBv2 и SMBv3.
Содержание:
- Версии протокола SMB в Windows
- Как проверить поддерживаемые версии SMB в Windows?
- Вывести используемые версии SMB с помощью Get-SMBConnection
- Об опасности использования SMBv1
- Включение и отключение SMBv1, SMBv2 и SMBv3 в Windows
Версии протокола SMB в Windows
Есть несколько версии протокола SMB (диалектов), которые последовательно появлялись в новых версиях Windows:
Для реализации протокола SMB в Linux/Unix системах используется samba. В скобках мы указали в каких версиях samba поддерживается каждый диалект SMB.
- CIFS — Windows NT 4.0;
- SMB 1.0 — Windows 2000;
- SMB 2.0 — Windows Server 2008 и Windows Vista SP1 (поддерживается в Samba 3.6);
- SMB 2.1 — Windows Server 2008 R2 и Windows 7 (поддерживается в Samba 4.0);
- SMB 3.0 — Windows Server 2012 и Windows 8 (поддерживается в Samba 4.2);
- SMB 3.02 — Windows Server 2012 R2 и Windows 8. 1 (не поддерживается в Samba);
- SMB 3.1.1 – Windows Server 2016 и Windows 10 (не поддерживается в Samba).
Начиная с версии Samba 4.14, по умолчанию используется SMB2.1.
При сетевом взаимодействии по протоколу SMB между клиентом и сервером используется максимальная версия протокола, поддерживаемая одновременно и клиентом, и сервером.
Ниже представлена сводная таблица, по которой можно определить версию протокола SMB, которая выбирается при взаимодействии разных версий Windows:
| Операционная система | Win 10, Server 2016 | Windows 8.1, Server 2012 R2 |
Windows 8, Server 2012 |
Windows 7, Server 2008 R2 |
Windows Vista, Server 2008 |
Windows XP, Server 2003 и ниже |
| Windows 10 ,
Windows Server 2016 |
SMB 3.1.1 | SMB 3.02 | SMB 3.0 | SMB 2.1 | SMB 2.0 | SMB 1.0 |
| Windows 8.1 , Server 2012 R2 |
SMB 3.02 | SMB 3.02 | SMB 3.0 | SMB 2.1 | SMB 2.0 | SMB 1.0 |
| Windows 8 , Server 2012 |
SMB 3.0 | SMB 3.0 | SMB 3.0 | SMB 2.1 | SMB 2.0 | SMB 1.0 |
| Windows 7, Server 2008 R2 |
SMB 2.1 | SMB 2.1 | SMB 2.1 | SMB 2.1 | SMB 2.0 | SMB 1.0 |
| Windows Vista, Server 2008 |
SMB 2.0 | SMB 2.0 | SMB 2.0 | SMB 2.0 | SMB 2.0 | SMB 1.0 |
| Windows XP, 2003 и ниже | SMB 1.0 | SMB 1.0 | SMB 1.0 | SMB 1.0 | SMB 1.0 | SMB 1.0 |
К примеру, при подключении клиентского компьютера с Windows 8.1 к файловому серверу с Windows Server 2016 будет использоваться протокол SMB 3.0.2.
Согласно таблице Windows XP, Windows Server 2003 для доступа к общим файлам и папкам на сервере могут использовать только SMB 1.0, который в новых версиях Windows Server (2012 R2 / 2016) может быть отключен. Таким образом, если в вашей инфраструктуре одновременно используются компьютеры с Windows XP (снятой с поддержки), Windows Server 2003/R2 и сервера с Windows Server 2012 R2/2016/2019, устаревшие клиенты не смогут получить доступ к файлам и папкам на файловом сервере с новой ОС.
Если Windows Server 2016/2012 R2 с отключенным SMB v1.0 используется в качестве контроллера домена, значить клиенты на Windows XP/Server 2003 не смогут получить доступ к каталогам SYSVOL и NETLOGON на контроллерах домена и авторизоваться в AD.
На старых клиентах при попытке подключиться к ресурсу на файловом сервере с отключенным SMB v1 появляется ошибка:
The specified network name is no longer available
Как проверить поддерживаемые версии SMB в Windows?
Рассмотрим, как определить, какие версии протокола SMB поддерживаются на вашем компьютере Windows.
В Windows 10, 8.1 и Windows Server 2019/2016/2012R2 вы можете проверить состояние различных диалектов SMB протокола с помощью PowerShell:
Get-SmbServerConfiguration | select EnableSMB1Protocol,EnableSMB2Protocol

Данная команда вернула, что протокол SMB1 отключен (
EnableSMB1Protocol=False
), а протоколы SMB2 и SMB3 включены (
EnableSMB1Protocol=True
).
Обратите внимание, что протоколы SMBv3 и SMBv2 тесно связаны между собой. Нельзя отключить или включить отдельно SMBv3 или SMBv2. Они всегда включаются/отключаются только совместно, т.к. используют один стек.
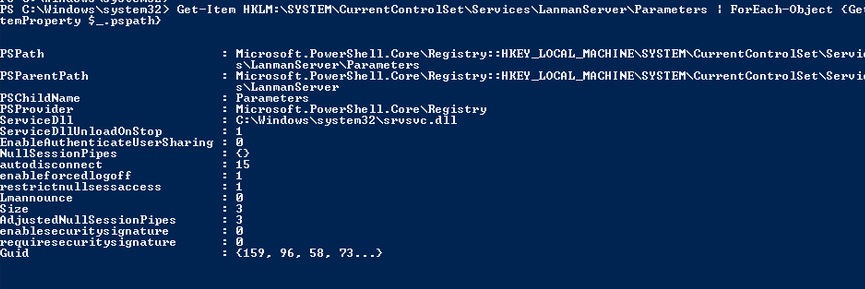
В Windows 7, Vista, Windows Server 2008 R2/2008:
Get-Item HKLM:\SYSTEM\CurrentControlSet\Services\LanmanServer\Parameters | ForEach-Object {Get-ItemProperty $_.pspath}
Если в данной ветке реестра нет параметров с именами SMB1 или SMB2, значить протоколы SMB1 и SMB2 по умолчанию включены.
Также в этих версиях Windows вы можете проверить, какие диалекты SMB разрешено использовать в качестве клиентов с помощью команд:
sc.exe query mrxsmb10
SERVICE_NAME: mrxsmb10
TYPE : 2 FILE_SYSTEM_DRIVER
STATE : 4 RUNNING
(STOPPABLE, NOT_PAUSABLE, IGNORES_SHUTDOWN)
WIN32_EXIT_CODE : 0 (0x0)
SERVICE_EXIT_CODE : 0 (0x0)
CHECKPOINT : 0x0
WAIT_HINT : 0x0
sc.exe query mrxsmb20
SERVICE_NAME: mrxsmb20
TYPE : 2 FILE_SYSTEM_DRIVER
STATE : 4 RUNNING
(STOPPABLE, NOT_PAUSABLE, IGNORES_SHUTDOWN)
WIN32_EXIT_CODE : 0 (0x0)
SERVICE_EXIT_CODE : 0 (0x0)
CHECKPOINT : 0x0
WAIT_HINT : 0x0
В обоих случаях службы запущены (
STATE=4 Running
). Значит Windows может подключаться как к SMBv1, так и к SMBv2 серверам.
Вывести используемые версии SMB с помощью Get-SMBConnection
Как мы говорили раньше, компьютеры при взаимодействии по протоколу SMB используют максимальную версию, поддерживаемую как клиентом, так и сервером. Для определения версии SMB, используемой для доступа к удаленному компьютеру можно использовать командлет PowerShell
Get-SMBConnection
:
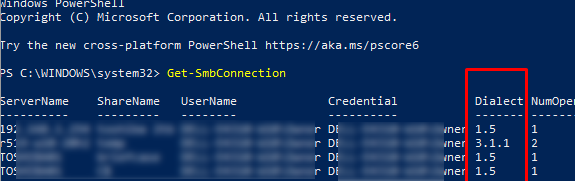
Версия SMB, используемая для подключения к удаленному серверу (ServerName) указана в столбце Dialect.
Можно вывести информацию о версиях SMB, используемых для доступа к конкретному серверу:
Get-SmbConnection -ServerName servername
Если нужно отобразить, используется ли SMB шифрование (появилось в SMB 3.0), выполните:
Get-SmbConnection | ft ServerName,ShareName,Dialect,Encrypted,UserName
В Linux вывести список SMB подключения и используемые диалекты в samba можно командой:
$ sudo smbstatus
Чтобы на стороне сервера вывести список используемых клиентами версий протокола SMB и количество клиентов, используемых ту или иную версию протокола SMB, выполните команду:
Get-SmbSession | Select-Object -ExpandProperty Dialect | Sort-Object -Unique

В нашем примере имеется 825 клиентов, подключенных к серверу с помощью SMB 2.1 (Windows 7/Windows Server 2008 R2) и 12 клиентов SMB 3.02.
С помощью PowerShell можно включить аудит версий SMB, используемых для подключения:
Set-SmbServerConfiguration –AuditSmb1Access $true
События подключения затем можно извлечь из журналов Event Viewer с помощью PowerShell:
Get-WinEvent -LogName Microsoft-Windows-SMBServer/Audit
Об опасности использования SMBv1
Последние несколько лет Microsoft из соображений безопасности планомерно отключает устаревший протокол SMB 1.0. Связано это с большим количеством критических уязвимостей в этом протоколе (вспомните историю с эпидемиями вирусов-шифровальщиков wannacrypt и petya, которые использовали уязвимость именно в протоколе SMBv1). Microsoft и другие IT компании настоятельно рекомендуют отказаться от его использования.
Однако отключение SMBv1 может вызвать проблемы с доступом к общий файлам и папкам на новых версиях Windows 10 (Windows Server 2016/2019) с устаревших версий клиентов (Windows XP, Server 2003), сторонних ОС (Mac OSX 10.8 Mountain Lion, Snow Leopard, Mavericks, старые версии Linux), различных старых NAS устройствах.
Если в вашей сети не осталось legacy устройств с поддержкой только SMBv1, обязательно отключайте эту версию диалекта в Windows.
В том случае, если в вашей сети остались клиенты с Windows XP, Windows Server 2003 или другие устройства, которые поддерживают только SMBv1, их нужно как можно скорее обновить или тщательно изолировать.
Включение и отключение SMBv1, SMBv2 и SMBv3 в Windows
Рассмотрим способы включения, отключения различных версий SMB в Windows. Мы рассматриваем отдельно включение клиента и сервера SMB (это разные компоненты).
Windows 10, 8.1, Windows Server 2019/2016/2012R2:
Отключить клиент и сервер SMBv1:
Disable-WindowsOptionalFeature -Online -FeatureName smb1protocol
Отключить только SMBv1 сервер:
Set-SmbServerConfiguration -EnableSMB1Protocol $false
Включить клиент и сервер SMBv1:
Enable-WindowsOptionalFeature -Online -FeatureName smb1protocol
Включить только SMBv1 сервер:
Set-SmbServerConfiguration -EnableSMB1Protocol $true
Отключить сервер SMBv2 и SMBv3:
Set-SmbServerConfiguration -EnableSMB2Protocol $false
Включить сервер SMBv2 и SMBv3:
Set-SmbServerConfiguration -EnableSMB2Protocol $true

Windows 7, Vista, Windows Server 2008 R2/2008:
Отключить SMBv1 сервер:
Set-ItemProperty -Path "HKLM:\SYSTEM\CurrentControlSet\Services\LanmanServer\Parameters" SMB1 -Type DWORD -Value 0 –Force

Включить SMBv1 сервер:
Set-ItemProperty -Path "HKLM:\SYSTEM\CurrentControlSet\Services\LanmanServer\Parameters" SMB1 -Type DWORD -Value 1 –Force
Отключить SMBv1 клиент:
sc.exe config lanmanworkstation depend= bowser/mrxsmb20/nsi
sc.exe config mrxsmb10 start= disabled
Включить SMBv1 клиент:
sc.exe config lanmanworkstation depend= bowser/mrxsmb10/mrxsmb20/nsi
sc.exe config mrxsmb10 start= auto
Отключить SMBv2 сервер:
Set-ItemProperty -Path "HKLM:\SYSTEM\CurrentControlSet\Services\LanmanServer\Parameters" SMB2 -Type DWORD -Value 0 -Force
Включить SMBv2 сервер
Set-ItemProperty -Path "HKLM:\SYSTEM\CurrentControlSet\Services\LanmanServer\Parameters" SMB2 -Type DWORD -Value 1 –Force
Отключить SMBv2 клиент:
sc.exe config lanmanworkstation depend= bowser/mrxsmb10/nsi
sc.exe config mrxsmb20 start= disabled
Включить SMBv2 клиент:
sc.exe config lanmanworkstation depend= bowser/mrxsmb10/mrxsmb20/nsi
sc.exe config mrxsmb20 start= auto
Для отключения сервера SMBv1 на всех компьютерах независимо от версии Windows можно распространить параметр реестра типа REG_DWORD с именем SMB1 и значением 0 (HKEY_LOCAL_MACHINE\SYSTEM\CurrentControlSet\Services\LanmanServer\Parameters)на через GPO.
Для отключения SMBv2 нужно в этой же ветке установить параметр SMB2=0.
Для отключения SMBv1 клиента нужно распространить такой параметр реестра:
- Key: HKEY_LOCAL_MACHINE\SYSTEM\CurrentControlSet\services\mrxsmb10
- Name: Start
- Type: REG_DWORD
- Value: 4
При отключении SMB 1.0/CIFS File Sharing Support в Windows вы можете столкнуться с ошибкой “0x80070035, не найден сетевой путь”, ошибкой при доступе к общим папкам, и проблемами обнаружения компьютеров в сетевом окружении. В этом случае вместо служба обозревателя компьютеров (Computer Browser) нужно использовать службы обнаружения (линк).
В этой публикации, друзья, рассмотрим, как включить SMB 1 в Windows 10 и 11. Протокол SMB (Server Message Block) – это сетевой протокол для удалённого доступа к файлам, принтерам и прочим ресурсам в локальной сети. Версия SMB 1 (SMBv1) – это самая ранняя версия этого протокола. Она древняя, имеет уязвимости и потенциальные проблемы безопасности. В Windows 10 и 11 используются современные версии протокола SMB, а его версия 1 отключена. В некоторых случаях её нужно включить. Как это сделать?
Версия протокола SMB 1 введена ещё в 1980-х годах. Нынче она заменена более современными и безопасными версиями протокола SMB 2 и SMB 3. Так, SMB 1 имеет серьёзные уязвимости, которые могут быть использованы злоумышленниками для атаки сетевых ресурсов. Включённый протокол SMB 1 повышает риск заражения вредоносным ПО, таким как WannaCry, NotPetya, Emotet и другим, использующим уязвимости этого протокола для распространения по сети.
Компания Microsoft не просто по умолчанию отключает SMB 1 в своих современных операционных системах, но рекомендует отключать использование SMB 1 в любой версии Windows и переходить на более безопасные версии протокола SMB 2 или SMB 3. Версия протокола SMB 2 присутствует в Windows начиная с Vista.
Однако следовать этим рекомендациям Microsoft не всегда возможно, поскольку есть древние сетевые устройства – принтеры, сетевые хранилища NAS и прочая техника, древние Windows XP и Windows Server 2003, древние дистрибутивы Linux и FreeBSD, древнее программное обеспечение. Этим всем ещё кое-кто пользуется, а оно не поддерживает современные версии протокола SMB и требует использования SMB 1. Если нет возможности использовать более современные устройства, установить более новую операционную систему или использовать более современное ПО, не остаётся ничего иного, как включить SMB 1.
SMB 1 необходимо включить и на компьютере-сервере, предоставляющем ресурсы (файлы, принтеры, другие сетевые ресурсы), и на компьютере-клиенте, запрашивающем доступ к ресурсам на сервере. Если один из компьютеров работает на базе современной или относительно таковой версии Windows, при включении протокола SMB 1 желательно предпринять меры для снижения его уязвимости:
- Установить все доступные обновления безопасности;
- Не отключать автоматические обновления Windows;
- Обновить Windows 10 до последней версии;
- Обновить Windows 11 до последней версии;
- Не отключать брандмауэр Windows;
- Использовать хорошее обновляемое антивирусное ПО.
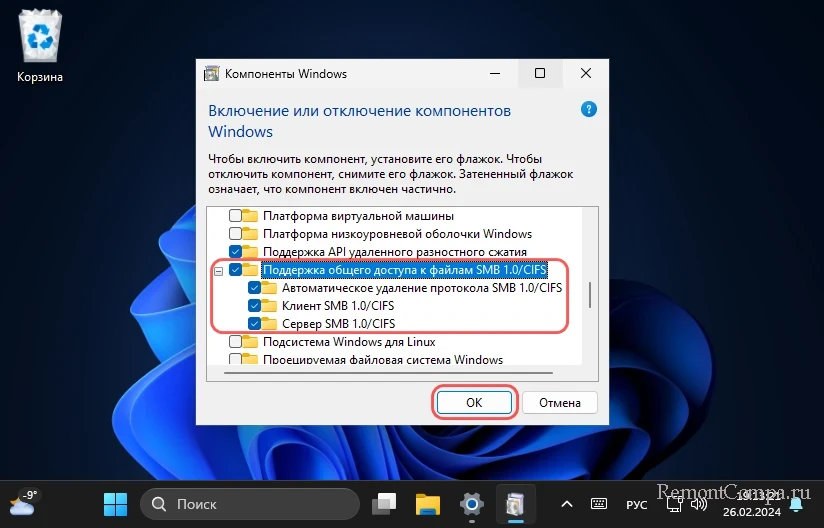
В Windows 10 и 11, где протокол SMB 1 отключён, включить его можно путём включения его компонентов. В системный поиск вписываем:
В окошке включения и отключения компонентов Windows ищем пункт «Поддержка общего доступа к файлам SMB 1.0/CIFS». Раскрываем его. Он содержит в себе 3 компонента:
- Автоматическое удаление протокола SMB 1.0/CIFS — автоматически отключает протокол SMB 1, если он не используется в течение 15-ти дней. Так продумано компанией Microsoft для повышения безопасности современных Windows. Windows 10 и 11 сами отключают уязвимый SMB 1, если он не используется. Обязательно устанавливаем галочку этого компонента;
- Клиент SMB 1.0/CIFS — позволяет компьютеру подключаться к сетевым ресурсам, используя SMB 1 в качестве клиента. Если нам нужен только доступ к сетевым ресурсам на других компьютерах локальной сети, при этом на нашем компьютере нет расшаренных ресурсов, можем установить галочку только этого компонента, но не следующего;
- Сервер SMB 1.0/CIFS — позволяет компьютеру предоставлять доступ к имеющимся ресурсам другим компьютерам локальной сети через протокол SMB 1. Если компьютер не будет выступать в роли клиента, т.е. будет только предоставлять сетевые ресурсы, но не пользоваться ресурсами других компьютеров, можем установить галочку только этого компонента, но не предыдущего.
Соответственно, если компьютер будет и сервером, и клиентом, устанавливаем все 3 галочки. Нажимаем «Ок»».
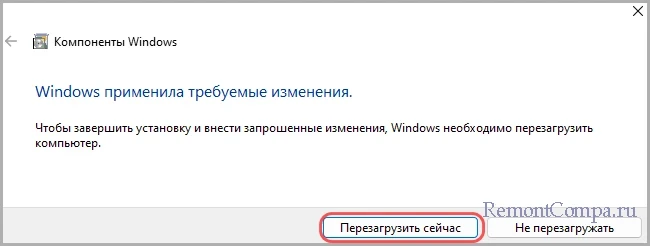
После применения изменений операционная система предложит перезагрузиться для завершения установки компонентов. Перезагружаемся.
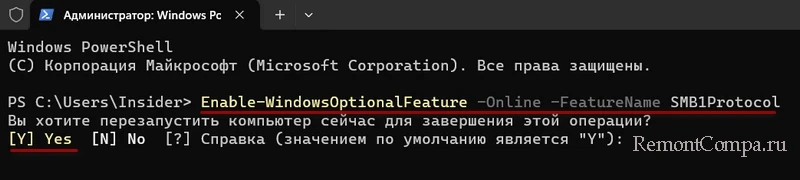
Альтернативный вариант, как включить SMB 1 — с помощью PowerShell. Этот Способ предусматривает включение всех 3-х рассмотренных выше компонентов протокола. Запускаем консоль с правами администратора. Вводим команду:
Enable-WindowsOptionalFeature -Online -FeatureName SMB1ProtocolНам будет предложена перезагрузка для завершения установки компонентов. Можем нажать букву Y для перезагрузки.
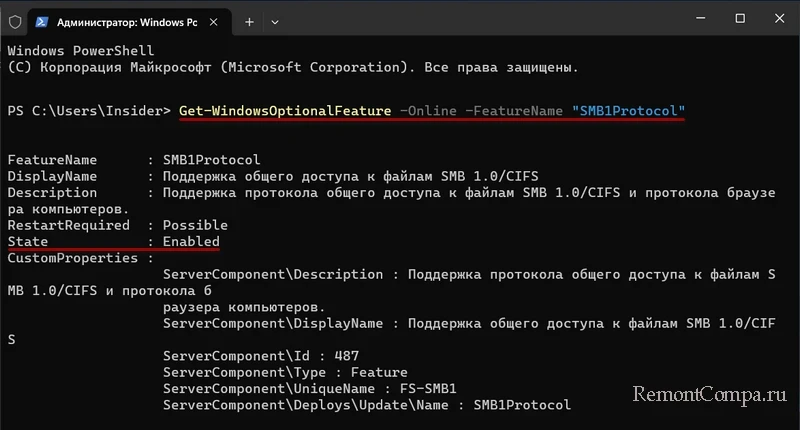
Включив протокол SMB 1 любым из рассмотренных способов, после перезагрузки компьютера можем проверить, используем ли мы этот протокол. Запускаем от имени администратора PowerShell. Вводим команду:
Get-WindowsOptionalFeature -Online -FeatureName "SMB1Protocol"В ответ получим детализацию по протоколу SMB 1, где, в частности, будет указан его статус – включён или отключён. Если включён, статус будет «Enabled».
Если отключён, статус будет «Disabled».
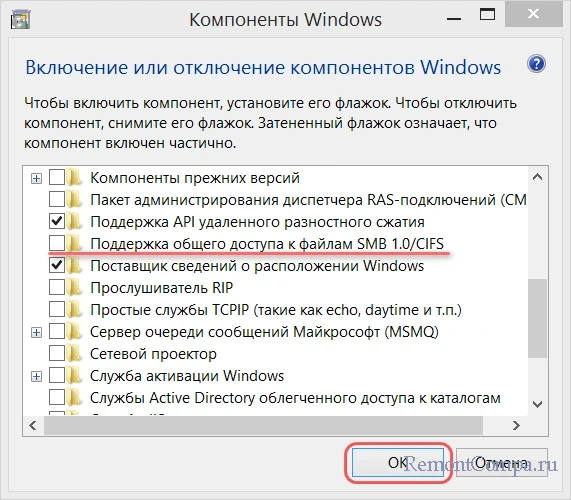
При ненадобности протокол SMB 1 необходимо отключить, чтобы не подвергать компьютер риску даже то число дней, что он будет активен до автоматического отключения протокола. Отключить можно с помощью функции включения компонентов Windows путём, обратным тому, как мы выше включали его.
Примечание: друзья, если вы используете версии Windows старше 10-й, т.е. Windows 8.1, 7 или Vista, из соображений безопасности можете отключить протокол SMB 1. Поскольку в этих версиях он включён по умолчанию. В окошке включения или отключения компонентов Windows снимите галочку пункта «Поддержка общего доступа к файлам SMB 1.0/CIFS», он будет один, без отдельных компонентов, как в Windows 10 или 11.
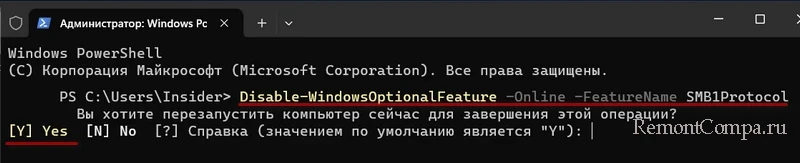
Также протокол SMB 1 можно отключить с помощью запущенной от имени администратора консоли PowerShell. Вводим команду:
Disable-WindowsOptionalFeature -Online -FeatureName SMB1ProtocolИ можем нажать букву Y для перезагрузки.
The SMB protocol is supported by Windows 7, Windows Server 2008, and Windows Vista. If you have an older computer, you can disable the SMB protocol by using the Windows PowerShell. The only way to enable SMB protocols in Windows 7 is by editing the registry. Luckily, Windows PowerShell also works with older versions of Windows. This article will walk you through the steps to enable SMB in Windows 7.
The SMB protocol works with shared folders. Windows-based SMB2 servers pass File System Control requests to the local object store. However, they do not support I/O Control requests. Windows clients use an OutputOffset field containing a number of bytes. Typically, the value of the OutputOffset is a multiple of eight bytes. SMB2 clients send a file to the destination if they do not have enough space in their local directory.
The SMB2 protocol uses GSS-API tokens and initializes them with AES-GMAC and CMAC. This method can fail if the Windows client does not have enough space in the buffer. Windows Server 2008 R2 and Vista SP1 support this. They also support a special format for SMB2 SET_INFO. By default, Windows clients append a byte to the SMB2 header.
What Version of SMB Does Windows 7 Use?
SMB, or Server Message Block, is the default file sharing protocol for Windows-based computers. SMB consists of two parts: an SMB client and a SMB server. File and printer sharing for Microsoft Windows is installed through the network connection properties. Earlier versions of SMB were called SMB 1.0, which was designed for early Windows-based network operating systems. The newer SMB 2.0 version adds support for opportunistic file locking.
Using SMB 2.0 is highly recommended. Both Windows 7 and Vista use SMB 2.0. SMB 2.0 features a variety of enhancements, such as allowing multiple SMB commands in one packet. The Windows device can connect to SMBv1 and SMBv2 hosts. SMB 1.0/CIFS File Sharing Support is also supported by Windows 7.
SMB was designed by Barry Feigenbaum at IBM in 1983 as a networked file system. Microsoft subsequently modified the original SMB specification, and implemented it in its LAN Manager operating system for OS/2 with 3Com in 1990. Then, in the mid-1990s, Microsoft continued to add SMB features, including file sharing and security. These enhancements were based on the IBM legacy SMB specification and the “LAN Manager” password.
Is SMB Enabled on Windows 7?
If you’re looking for the answer to the question “Is SMB enabled on Windows 7?” you’ve come to the right place. SMB is a popular protocol that allows computers to share files on a local network. While SMBv1 has a number of security flaws, the latest version is safer than the original. To ensure the safety of your files and your machine, you should disable SMBv1 when possible.
If you have a server system, you can disable SMBv1 via Group Policy. To do this, navigate to the Computer Configuration window. Then, expand the Preferences folder and Windows Settings folder. You will then need to navigate to the Registry node. Once you’re there, right-click on the SMBv1 value and choose New > DWORD (32-bit) Value.
After confirming that SMBv2 is enabled on your machine, you can go to the Control Panel. In the Control Panel, open the Control Panel and select the Programs and Features folder. Navigate to the SMB section. You’ll find SMB Windows 10 support under the Networking category. Under this option, you can also enable or disable the SMBv1 protocol. Activate the automatic deletion function and your SMBv1 network connection will be back to normal.
When your computer runs SMB, you might have wondered if Windows 7 supports this protocol. SMB2 is the new version of Windows’ old file sharing protocol, and is used on modern Windows hosts. To check if your computer supports SMB2, open a Command Prompt or PowerShell window, and type the following command: Get-SmbServerConfiguration. The answer should be True. To enable SMB2 on Windows, you need the latest build. To do so, simply press the Windows Key + S and type in the search box: Turn Windows features on or off.
SMB2 is supported by Windows 7, as well as Samba 4 clients. However, you will need to enable Windows domain authentication to use this protocol. The NTLM transparent mode is another option – it uses NTLM authentication end-to-end. Both modes will allow you to share files and folders between Windows 7 and other Windows computers. But be aware that Windows 7 does not support SMB3. SMB2 is broken and could be exploited by hackers to take over your PC.
How Do I Enable SMBv2?
If you want to share files with other computers, you need to enable SMBv2 on Windows 7. To do this, open Network and Sharing Center and look for the SMBv2 service. If it isn’t enabled by default, try disabling it and restarting your PC. Another option is to run the command “get-smbserverconfiguration” in powershell with administrative privileges.
The following steps will enable or disable SMBv2 on Windows 7. If the command returns a value of 1, then SMBv2 is enabled on that computer. Make sure to reboot the computer after changing the value. Make sure that you create a System Restore point before modifying the registry. Otherwise, you may accidentally remove the setting. Once you have completed the procedure, SMBv2 will be enabled by default on Windows 10.
The next step in enabling SMBv2 is to enable a Group Policy for the server. In this way, you can control which components are enabled and disabled on a machine. If the server uses MRxSMB10, disable it in the same way. You can also disable SMBv1 on a system that uses a legacy OS or third-party systems. You can also disable SMBv2 on the target system with a third-party system.
Does Windows 7 Support SMB3?
When it comes to network sharing, does Windows 7 support SMB3? Currently, Windows 7 only supports SMB 2.1, which is not the latest protocol available. But if you’re a business user, SMB 3.0 is the way to go. Windows Server 2012 and Windows 8 both support SMB 3.0. SMB versions are not important, but they do play a role in how certain features work.
If you’re not aware, SMB is a protocol used to share files and other services over a network. It’s a standard for file sharing and enables applications to access, write and request files on a server. It’s built on top of the TCP/IP protocol. While Windows 7 doesn’t support SMB3, it does support a number of different network protocols. If you’re a business user, you can use SMB to share files and services between a network and multiple PCs.
To check if Windows 7 supports SMB3, consult the SMB table. It can help you determine if you have an SMBv3 client or server. If Windows 7 supports SMBv2 or SMBv3, you should be able to use SMBv3 for sharing files. However, if you have a Windows Vista computer, you should disable SMB3. To do this, you should restart the computer.
What is the Difference Between SMB1 And SMB2?
SMB1 is the older version of the SMB protocol. It does not support encryption. As a result, any attacker can view the traffic stream and change the contents. However, SMB2 has many improvements. The latest version has the ability to increase throughput and take advantage of modern high-speed network connections. It also has improved security. For more information on the differences between SMB1 and SMB2, read the following sections.
SMB2 has a simplified signing process. Signing is configured via a registry key and Group Policy. The signing algorithm used in SMB1 was MD5; however, the new HMAC SHA-256 hashing algorithm improves security. SMB2’s settings also simplify configuration, increase interoperability, and improve performance. While SMB1 signing reduced performance, SMB2 plus signing has a limited impact on performance.
SMB1 and SMB2 were originally CIFS. They were based on the same concept of file sharing, and both have the ability to share files over a local area network. SMB1 was developed by IBM to make file sharing easier in networks. It supports larger file sizes, direct transport over TCP/IP, symbolic and hard links, and network browsing. The first version was introduced in Windows 95, but has since been replaced with SMB 2.0.
Is SMBv1 Still Vulnerable?
SMBv1 is a protocol that is insecure. This outdated protocol has been the subject of numerous attacks. A recent attack called WannaCry infected hundreds of thousands of computers in less than 24 hours. Its worm-like capabilities allow it to spread to other computers without human interaction. This vulnerability, found in SMBv1, leaves your organization’s server vulnerable to cyberattacks. Although the protocol was developed in the 1980s, it was never designed for today’s cyber environment, and many of its security flaws are still available.
Despite these flaws, Microsoft has issued patches for these vulnerabilities, which should be applied immediately. However, some security scanning engines still report SMBv1 as vulnerable, despite its security improvements. These vulnerabilities can result in information disclosure, denial of service, and even system crashes. Hence, administrators and users should immediately apply the patches. The US-CERT has released guidance on SMB security best practices.
Learn More Here:
1.) Windows Help Center
2.) Windows – Wikipedia
3.) Windows Blog
4.) Windows Central
The following post shows detailed steps to enable and disable the Server Message Block (SMB) versions SMBv1, SMBv2 & SMBv3 on the SMB server and SMB client. The SMBv2 protocol was introduced in Windows Vista & Windows Server 2008 and the SMBv3 was introduced in Windows 8 and Windows Server 2012.
The steps apply only to the following Windows versions:
• Windows Vista Enterprise
• Windows Vista Business
• Windows Vista Home Basic
• Windows Vista Home Premium
• Windows Vista Ultimate
• Windows 7 Enterprise
• Windows 7 Home Basic
• Windows 7 Home Premium
• Windows 7 Professional
• Windows 7 Ultimate
• Windows Server 2008 Datacenter
• Windows Server 2008 Enterprise
• Windows Server 2008 Standard
• Windows Server 2008 R2 Datacenter
• Windows Server 2008 R2 Enterprise
• Windows Server 2008 R2 Standard
• Windows 8
• Windows 8 Enterprise
• Windows 8 Pro
• Windows Server 2012 Datacenter
• Windows Server 2012 Essentials
• Windows Server 2012 Foundation
• Windows Server 2012 Standard
Important to Note:
It is recommended not to keep the SMBv2 or SMBv3 disabled. It should only be disabled for temporary troubleshooting. Keeping it disabled may deactivate various functions of the Windows server. The features which might get deactivated due to disabling SMBv2 & SMBv3 are mentioned below:
Disabling SMBv2 on Windows 7 & Windows Server 2008 R2 will deactivate the below functions:
• Request compounding – it enables users to send multiple SMB 2 requests as a single network request
• Larger reads and writes – better use of faster networks
• Caching of folder and file properties – clients keep local copies of folders and files
• Durable handles – when a temporary disconnection is there, it enables for connection to transparently rejoin to the server
• Improved message signing – HMAC SHA-256 replaces MD5 as hashing algorithm
• Improved scalability for file sharing – increases the no. of users, shares, and open files per server
• Support for symbolic links
• Client oplock leasing model – it automatically limits the volume of data transferred between the client and server, resulting in improved performance on high-latency networks and increasing the scalability of SMB server
• Large MTU support – for full use of 10-gigabyte (GB) Ethernet
• Enhanced energy efficiency – clients that have open files to a server can sleep
Disabling SMBv3 on Windows 8 & Windows Server 2012 will deactivate the below as well as above mentioned functions:
• Transparent Failover – it enables clients to rejoin the cluster nodes during the maintenance or failover without any interruption
• Scale Out – it allows concurrent access to shared data on all file cluster nodes
• Multichannel – aggregation of network bandwidth and fault tolerance if multiple paths are available between client and server
• SMB Direct – adds RDMA networking support for very high performance, with low latency and low CPU utilization
• Encryption – offers end-to-end encryption and completely defends from snooping on untrustworthy networks
• Directory Leasing – its caching functionality helps in improving the application response times in branch offices
• Performance Optimizations – optimizations for small random read/write I/O
Steps to Enable and Disable SMB Protocols on the SMB Server
Microsoft Windows 8 and Windows Server 2012 have introduced a new cmdlet [Set-SMBServerConfiguration] in the Windows PowerShell which allows you to enable and disable the SMBv1, SMBv2 & SMBv3 protocols on the server. When you enable or disable the Server Message Block version 2 (SMBv2) in Windows 8 or in Windows Server 2012, automatically the SMBv3 is enabled or disabled, as the same stack is shared by the SMB protocols. Also, there is no need to restart your system once you run the Set-SMBServerConfiguration cmdlet.
Get the current state of the configuration of the SMB server protocol by running the below command:
Get-SmbServerConfiguration | Select EnableSMB1Protocol, EnableSMB2Protocol
Disables the SMBv1 on the SMB server by running the below command:
Set-SmbServerConfiguration -EnableSMB1Protocol $false
Disables the SMBv2 and SMBv3 on the SMB server by running the below command:
Set-SmbServerConfiguration -EnableSMB2Protocol $false
Enables the SMBv1 on the SMB server by running the below command:
Set-SmbServerConfiguration -EnableSMB1Protocol $true
Enables the SMBv2 and SMBv3 on the SMB server by running the below command:
Set-SmbServerConfiguration -EnableSMB2Protocol $true
Steps to Enable and Disable the SMB protocols on SMB Server running Windows 7, Windows Server 2008 R2, Windows Vista, or Windows Server 2008.
Using the Windows PowerShell 2.0 or later version:
Disables the SMBv1 on the SMB server by running the below command:
Set-ItemProperty -Path “HKLM:\SYSTEM\CurrentControlSet\Services\LanmanServer\Parameters” SMB1 -Value 0 –Force
Disables the SMBv2 and SMBv3 on the SMB server by running the below command:
Set-ItemProperty –Path “HKLM:\SYSTEM\CurrentControlSet\Services\LanmanServer\Parameters” SMB2 –Value 0 –Force
Enables the SMBv1 on the SMB server by running the below command:
Set-ItemProperty –Path “HKLM:\SYSTEM\CurrentControlSet\Services\LanmanServer\Parameters” SMB1 –Value 1 –Force
Enables the SMBv2 and SMBv3 on the SMB server by running the below command:
Set-ItemProperty -Path “HKLM:\SYSTEM\CurrentControlSet\Services\LanmanServer\Parameters” SMB2 -Value 1 -Force
Note that you need to restart your system after making changes to the SMB server.
Using Registry Editor:
Important to Note:
• Before making any changes to the registry, make sure to back up it.
Steps to enable and disable the SMBv1 on the SMB server using the registry:
Registry subkey:
HKEY_LOCAL_MACHINE\SYSTEM\CurrentControlSet\Services\LanmanServer\Parameters
Registry entry: SMB1
REG_DWORD: 0 = Disabled
REG_DWORD: 1 = Enabled
Default: 1 = Enabled
Steps to enable and disable SMBv2 on the SMB server using the registry:
Registry subkey:
HKEY_LOCAL_MACHINE\SYSTEM\CurrentControlSet\Services\LanmanServer\Parameters
Registry entry: SMB2
REG_DWORD: 0 = Disabled
REG_DWORD: 1 = Enabled
Default: 1 = Enabled
Steps to Enable and Disable SMB protocols on the SMB client
The below steps apply to Windows Vista, Windows Server 2008, Windows 7, Windows Server 2008 R2, Windows 8, and Windows Server 2012.
Disables the SMBv1 on the SMB client by running the below commands:
sc.exe config lanmanworkstation depend= bowser/mrxsmb20/nsi
sc.exe config mrxsmb10 start= disabled
Enables the SMBv1 on the SMB client by running the below commands:
sc.exe config lanmanworkstation depend= bowser/mrxsmb10/mrxsmb20/nsi
sc.exe config mrxsmb10 start= auto
Disables the SMBv2 and SMBv3 on the SMB client by running the below commands:
sc.exe config lanmanworkstation depend= bowser/mrxsmb10/nsi
sc.exe config mrxsmb20 start= disabled
Enables the SMBv2 and SMBv3 on the SMB client by running the below commands:
sc.exe config lanmanworkstation depend= bowser/mrxsmb10/mrxsmb20/nsi
sc.exe config mrxsmb20 start= auto
Important to Note:
• The commands be run at a raised command prompt.
• The system must be restarted once you make these changes.