
Кастомизация отображения текстов позволит повысить уровень комфорта работы и сделать интерфейс операционной системы более привычным. Например, похожим на оформление предыдущих версий системы.
Использование стандартных функций системы
Проще всего научиться изменять системный шрифт в Windows 10 с помощью встроенной в систему утилиты. Она называется редактором реестра и требует для настройки отображения текста выполнения следующих действий:
- Перейти к самой утилите: используйте комбинацию клавиш Win+R, а потом введите ввести regedit.
- Выбрать раздел Fonts, который расположен в ветке HKEY_LOCAL_MACHINE/SOFTWARE/Microsoft/Windows NT/CurrentVersion.
- Удалить все значения для тех шрифтов, имена которых совпадают со стандартным Segoe UI — кроме Emoji.
- В этой же ветке реестра найти раздел FontSubstitutes.
- Создать строковый параметр под названием Segoe UI и ввести в строку значения название нового шрифта, который будет установлен по умолчанию.
- Для завершения изменений следует выйти из реестра и из системы вообще. Затем снова зайти.
Название подходящего шрифта можно посмотреть в каталоге Windows\Fonts, расположенном системном разделе. А узнать, как будут отображаться после изменения отдельные буквы, поможет встроенная функция «Таблица символов» или текстовый редактор MS Word.
Изменение для последних обновлений системы
В современных версиях Windows 10 есть возможность установки новых размеров шрифтов без изменения масштаба других элементов. Его преимущество — отсутствие необходимости скачивать и устанавливать стороннее ПО. Для увеличения размера шрифта Windows 10 выполняют такие действия:
- Перейти к приложению «Параметры» (можно просто нажать Win + I).
- Открыть раздел специальных возможностей.
- Перейти к «Дисплею» и указать значения новых размеров текста, которые задаются в процентах от установленных по умолчанию.
- Применить выбранные и настройки подождать, пока они начнут действовать.
Величину символов можно попробовать изменить и с помощью установки новых настроек масштабирования. Для этого снова придется открыть приложение «Параметры», перейти сначала к «Системе», затем к «Дисплею» и, наконец, к разделу масштаба и разметки. Здесь можно выбрать, как будут масштабироваться элементы системы, вместе с которыми изменятся и размеры шрифтов.
Настройки для старых версий
Если версия системы сравнительно старая, до 1703, есть возможность изменения размера ее шрифтов путем выполнения таких шагов:
- Перейти к разделу «Дисплей» в приложении «Параметры».
- Выбрать дополнительные параметры экрана.
- Выбрать дополнительные изменения для элементов.
- Найти раздел, где можно изменять параметры только для текста, и внести изменения для отдельных элементов системы.
При желании в этом же окне можно увеличить или уменьшить размеры всех элементов, которые изменятся вместе с параметрами текста. Изменения будут приняты после нажатия на «Применить». Не понадобится даже выход из Виндоус, как при использовании других способов.
Возврат к стандартному отображению
Разобравшись с возможностями установки новых параметров текста, стоит познакомиться с тем, как вернуть стандартный шрифт в Windows 10. Для этого достаточно сделать следующее:
- Перейти к вкладке шрифтов системы.
- Открыть раздел параметров шрифта.
- Нажать по кнопке восстановления всех параметров.
После этого характеристики текста вернутся к значениям, установленным в системе по умолчанию. Возврат срабатывает в большинстве случаев. Хотя перед использованием реестра стоит создать «Точку восстановления» — или сохранить копию файла с помощью стороннего ПО типа CCleaner.
Программы для изменения шрифта в Windows 10
Среди способов сменить шрифт в Windows 10 — применение специально разработанных для этой цели программ.
Утилита Winaero Tweaker
Здесь порядок действий следующий:
- Открыть утилиту и перейти к расширенным (Advanced) настройкам.
- Выбрать вариант из имеющегося списка — для изменения доступны и текст в строке состояния, и заголовки, и даже подписи к иконкам.
- Нажать на Change font, выбрав начертание, размеры и стиль.
- Сохранить изменения (Apply changes), выйти из Виндовс и зайти обратно.
Все, что было изменено в программе, так же легко восстановить. Для сброса настроек следует выбрать в ее главном меню соответствующую кнопку (Reset). При ее нажатии настройки отображения текста станут такими же, как до использования утилиты.
Advanced System Font Changer
Еще один метод, который поможет поменять шрифт на компьютере Windows 10, заключается в использовании Advanced System Font Changer. Работать с утилитой несложно — достаточно выполнить такие действия:
- Зайти в утилиту и выбрать из списка шрифты, которые будут изменяться.
- Установить параметры текста. При использовании утилиты доступны изменения шрифтов заголовков, пунктов меню и панели статуса в окне.
- При необходимости, внести изменения в характеристики других элементов.
Пользоваться программой Advanced System Font Changer можно бесплатно, скачав ее с официального сайта разработчика. При необходимости сброса настроек можно использовать расположенную в основном окне утилиты кнопку Default.
System Font Size Changer
Утилита System Font Size Changer помогает изменять настройки шрифта Windows 10, внося изменения в реестр. Причем перед запуском программа предлагает сохранить reg-файл с текущими параметрами. Его следует открыть, когда понадобится вернуть стандартные настройки.
В окне программы можно настраивать размеры шрифта или сделать его полужирным (Bold). Для изменения доступны стандартные элементы системы — заголовки, меню, окна сообщений, подписи и названия панелей. В отличие от большинства похожих утилит, с этой меняется даже шрифт подсказок.
Читайте также:
- Как сделать бесплатный Wi-Fi безопасным: главные правила =«content_internal_link»>
- Как установить таймер выключения Windows=«content_internal_link»>
Редактор направлений «Мобильные устройства» и «Техника для дома»
Applies ToWindows 11 Windows 10
Support for Windows 10 will end in October 2025
After October 14, 2025, Microsoft will no longer provide free software updates from Windows Update, technical assistance, or security fixes for Windows 10. Your PC will still work, but we recommend moving to Windows 11.
Learn more
Fonts play a crucial role in the overall aesthetics and readability of your documents and presentations. Whether you’re a designer looking to add a unique touch to your work or simply someone who wants to expand their creative toolkit, knowing how to manage fonts in Windows is essential.
This article guides you through the steps to view, install, and remove fonts on your Windows device. You’ll learn how to explore the fonts currently available on your computer, add new ones to enhance your projects, and remove those you no longer need to keep your system organized and efficient.
Check which fonts are available on your device
-
In the Settings app on your Windows device, select Personalization > Fonts or use the following shortcut:
Fonts
-
Fonts are listed under Available fonts
Note: Not all apps support custom fonts. If your font isn’t showing up in an app or program, try a different app to check and see if the font is installed and working properly.
The Available fonts section offers several options to help you manage your fonts effectively. Here are the key features available:
-
Search and filter: You can easily search for a specific font by typing its name in the search bar. This helps you quickly locate the font you need without scrolling through the entire list
-
View a preview: You can view a preview of each font, which includes different sizes and faces. This allows you to see how the font will look in various styles and sizes before you use it
-
Hide: If you have fonts that you don’t use frequently but don’t want to uninstall, you can hide them. This keeps your font list organized without permanently removing the fonts
-
Uninstall: You can uninstall fonts that you no longer need. This helps free up space and keeps your system tidy by removing unnecessary fonts
Common operations
Expand the following sections to learn more about common operations with fonts in Windows:
-
In the Settings app on your Windows device, select Personalization > Fonts or use the following shortcut:
Fonts
-
Select Get more fonts in Microsoft Store or use the following shortcut
Explore fonts in the Microsoft Store
-
Select the font you want to add, and then select Get or Buy. The font will download and install automatically
-
Obtain or download the font file, and make sure the file is a True Type (.ttf) or OpenType (.otf) file
-
If the file is compressed into a .zip file, right-click it and select Extract to extract the files
-
-
Right-click the font file, and then select Install. To install for all users on a computer, select Install for all users
-
If you’re asked to allow the program to make changes to your computer, make sure you trust the source of the downloaded file, and then select Yes
-
In the Settings app on your Windows device, select Personalization > Fonts or use the following shortcut:
Fonts
-
Select the font you want to remove
-
Select Uninstall
-
In the Settings app on your Windows device, select Personalization > Fonts or use the following shortcut:
Fonts
-
Under Related settings, select Download fornts for all languages and confirm by pressing OK
Need more help?
Want more options?
Explore subscription benefits, browse training courses, learn how to secure your device, and more.
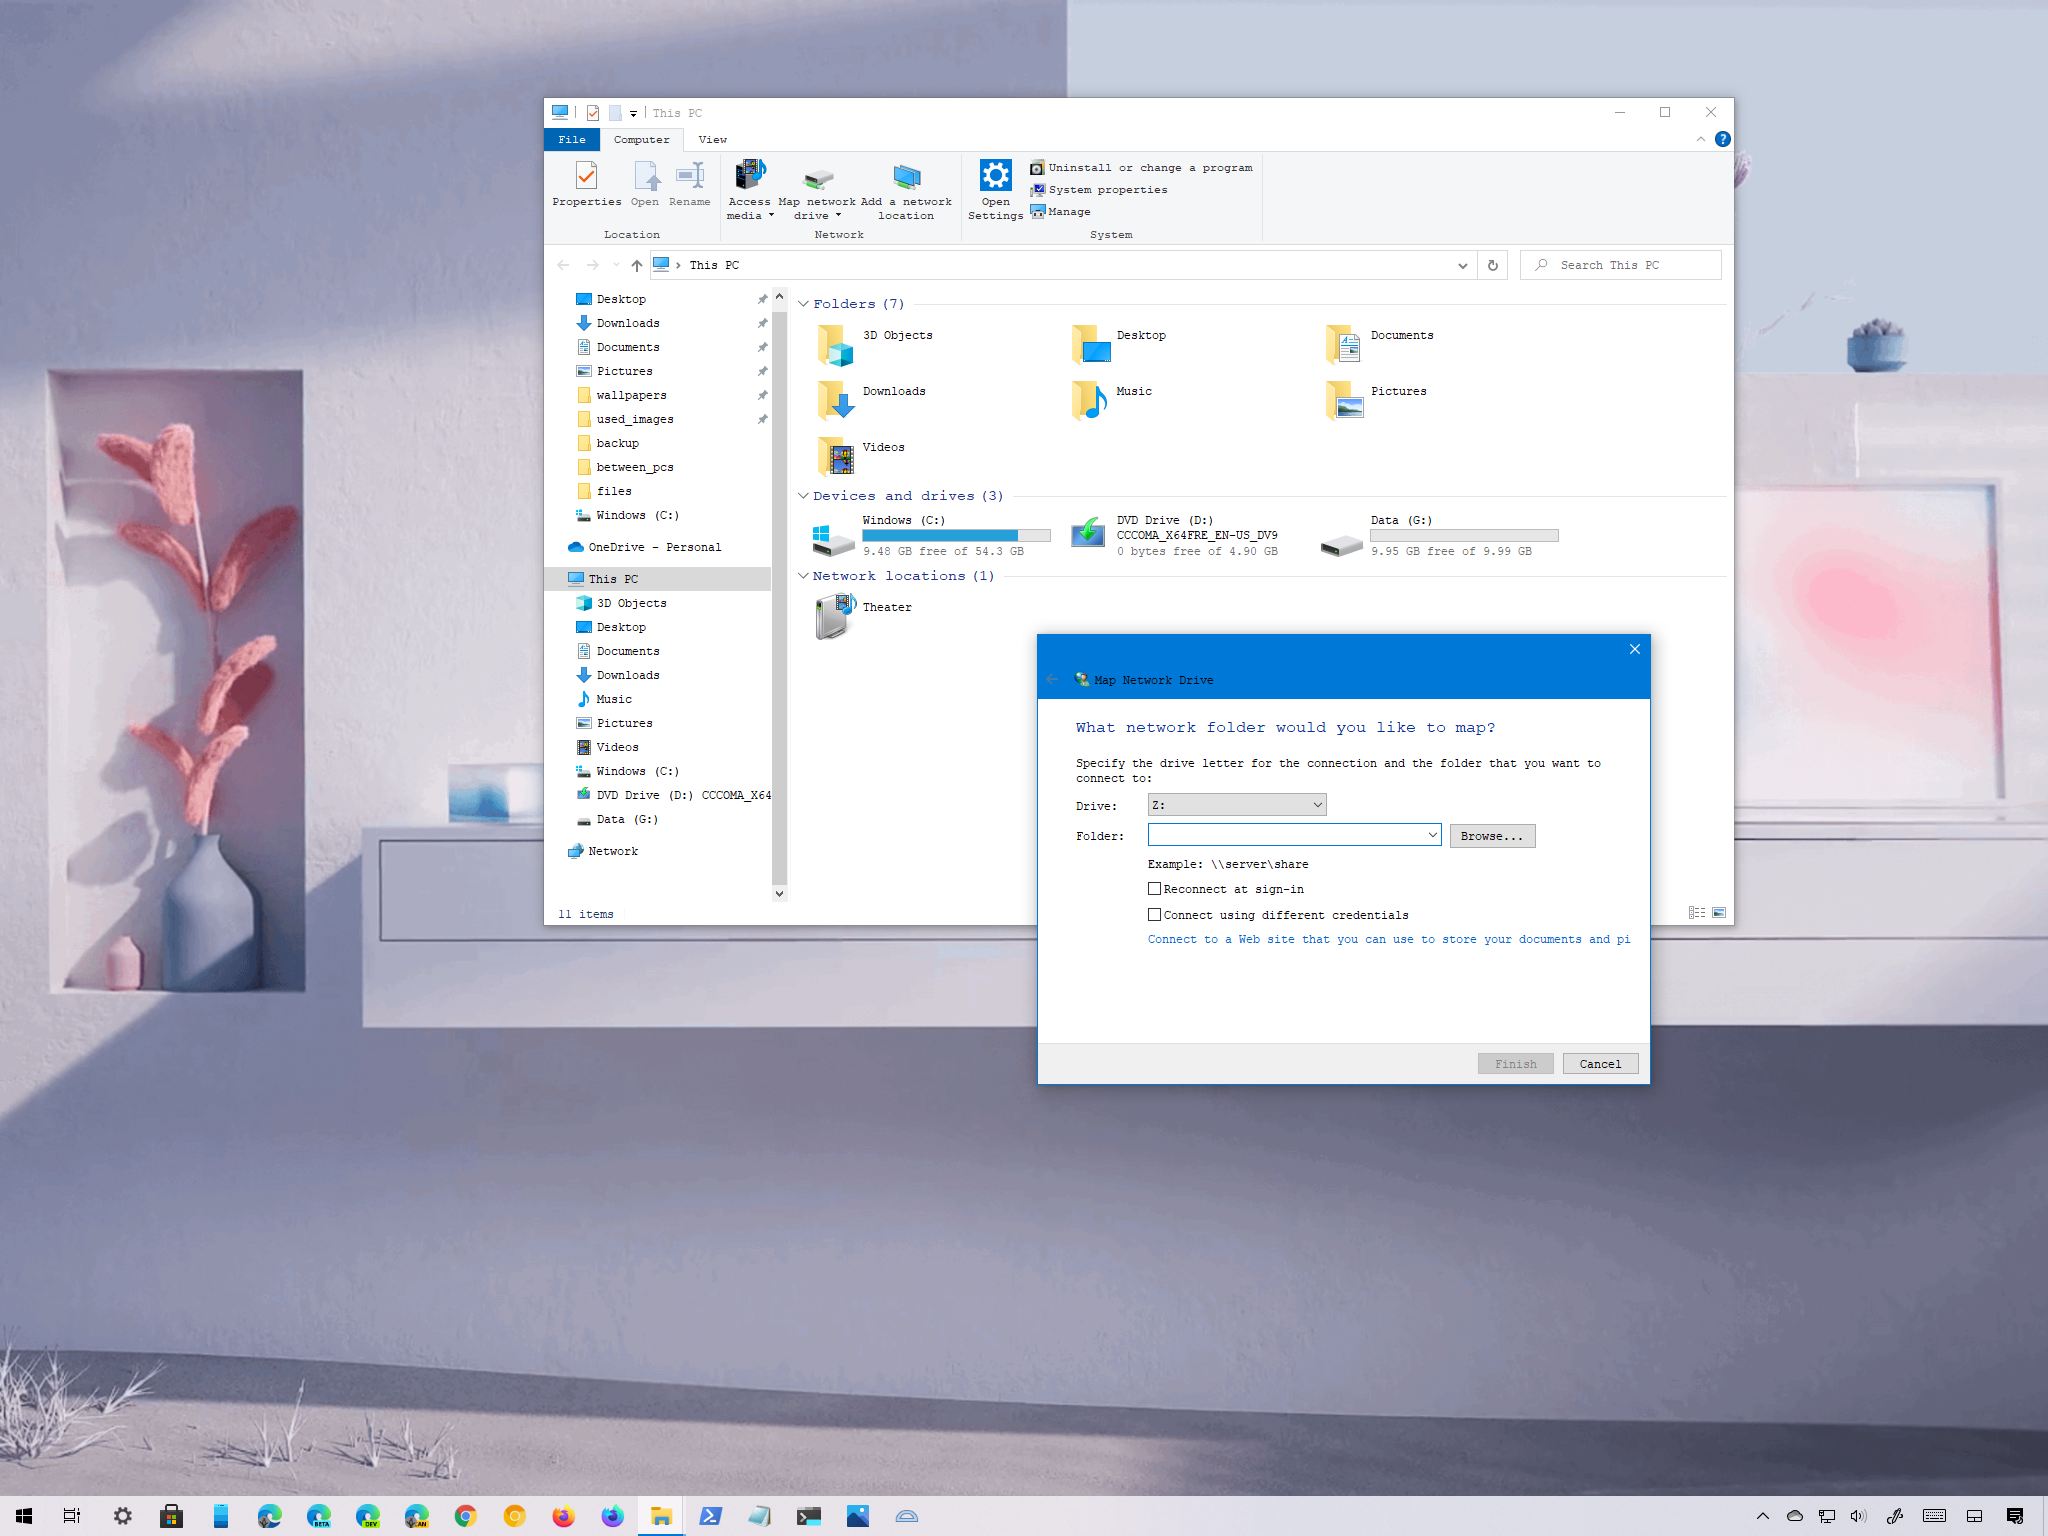
(Image credit: Windows Central)
On Windows 10, you can change the default system font, but you now have to make changes to the Registry to complete this task.
In older versions like Windows 7, the Control Panel included personalization settings to change the system font for many visual elements on the desktop, such as File Explorer, icons, title bars, menus, message boxes, and more. However, for some reason, Windows 10 removed these settings, and you are now stuck with the default system font.
However, it is possible to change the «Segoe UI» default font on Windows 10, if that is something you want to do. Now, it just takes a few more steps using the Registry.
In this Windows 10 guide, we will walk you through the steps to change the default system font for most desktop elements.
- How to change default font on Windows 10
- How to restore default system font on Windows 10
How to change default font on Windows 10
To change the system font on Windows 10, use these steps:
Warning: This is a friendly reminder that editing the Registry is risky and can cause irreversible damage to your installation if you don’t do it correctly. It’s recommended to make a full backup of your PC before proceeding. Alternatively, you can create a system restore point, which will also help you revert the changes.
- Open Start.
- Search for Notepad and click the top result to open the text editor.
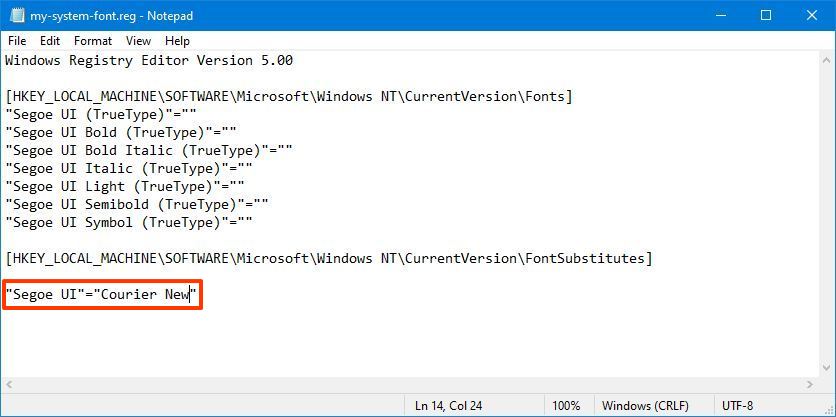
- Copy and paste the following Registry code onto the file:Windows Registry Editor Version 5.00[HKEY_LOCAL_MACHINE\SOFTWARE\Microsoft\Windows NT\CurrentVersion\Fonts]»Segoe UI (TrueType)»=»»»Segoe UI Bold (TrueType)»=»»»Segoe UI Bold Italic (TrueType)»=»»»Segoe UI Italic (TrueType)»=»»»Segoe UI Light (TrueType)»=»»»Segoe UI Semibold (TrueType)»=»»»Segoe UI Symbol (TrueType)»=»»[HKEY_LOCAL_MACHINE\SOFTWARE\Microsoft\Windows NT\CurrentVersion\FontSubstitutes]»Segoe UI»=»NEW-FONT-NAME»
- Open Settings.
- Click on Personalization.
- Click on Fonts.
- Select the font family you want to use.
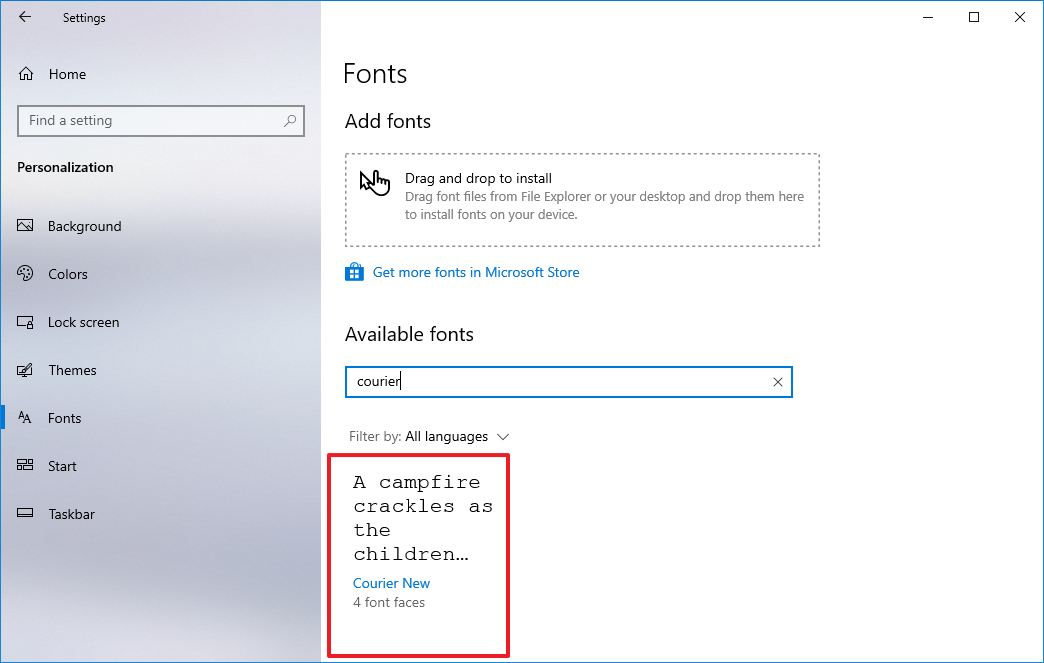
- Note the official name of the font family – for example, Courier New.
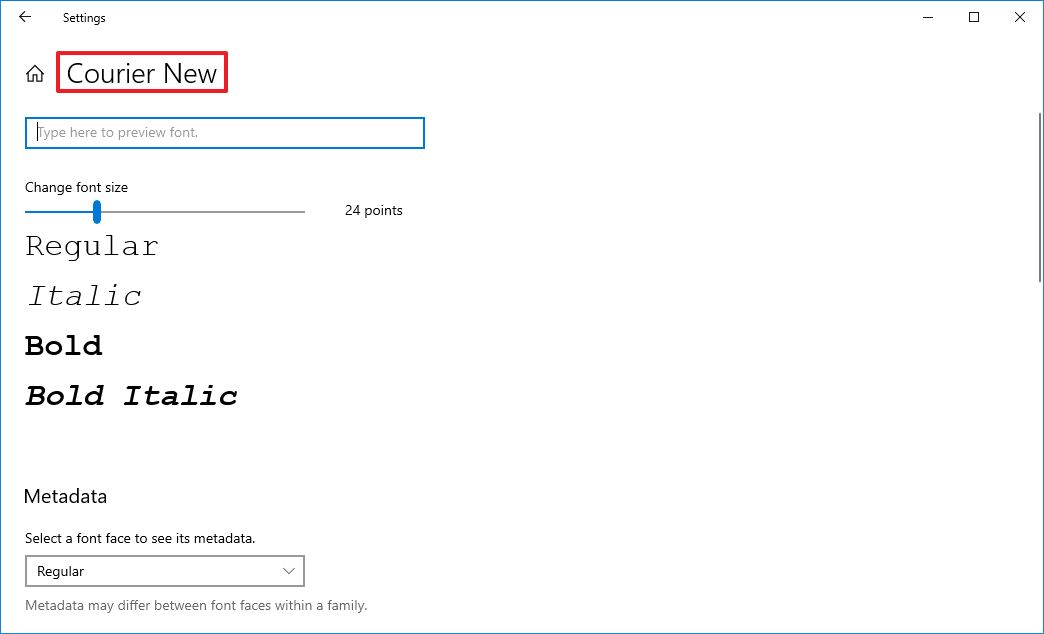
- In the Notepad text with the Registry code, replace «NEW-FONT-NAME» with the name of the font you want to use in the entire system – for example, Courier New.
- Click the File menu.
- Select the Save as option.
- Use the «Save as type» drop-down menu and select the All Files option.
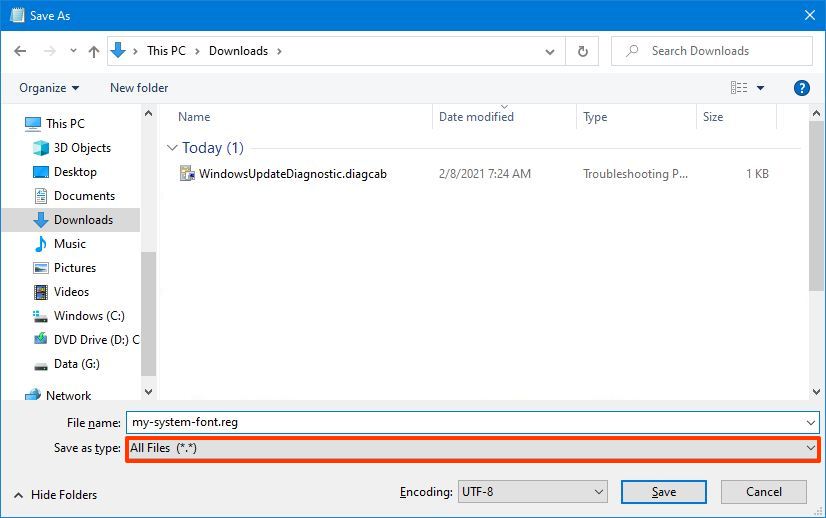
- Confirm a descriptive name for the file, such as «my-system-font,» and use the «.reg» as the extension – for example, my-system-font.reg.
- Click the Save button.
- Right-click the newly created «.reg» file and select the Merge option.
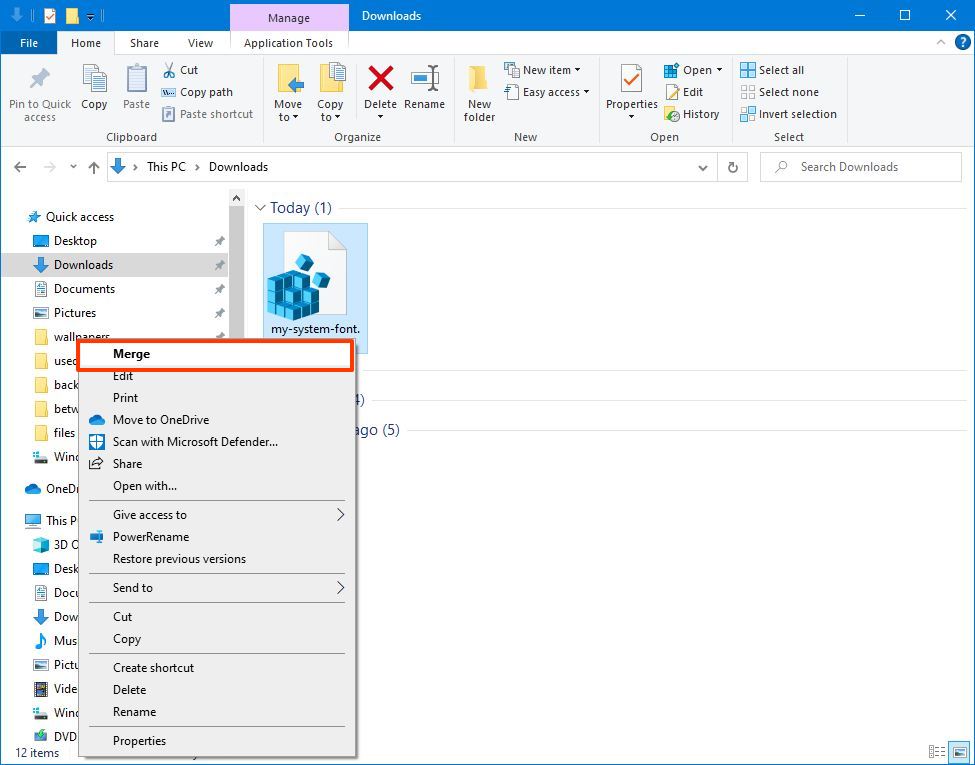
- Click the Yes button.
- Click the OK button.
- Restart the computer.
Once you complete the steps, the new font should be available throughout the desktop visual elements, including File Explorer, message box, taskbar, and apps that use the system default font settings.
All the latest news, reviews, and guides for Windows and Xbox diehards.
Although you can select from a lot of different fonts, it is recommended to choose a style that is easy to understand since fonts like Webdings or Wingdings use symbols, and they can cause issues to the installation.
How to restore default system font on Windows 10
If you change your mind, you can always restore the previous settings using the Registry or using a restore point.
Undo settings with Registry
To restore the default font settings on Windows 10, use these steps:
- Open Start.
- Search for Notepad and click the top result to open the text editor.
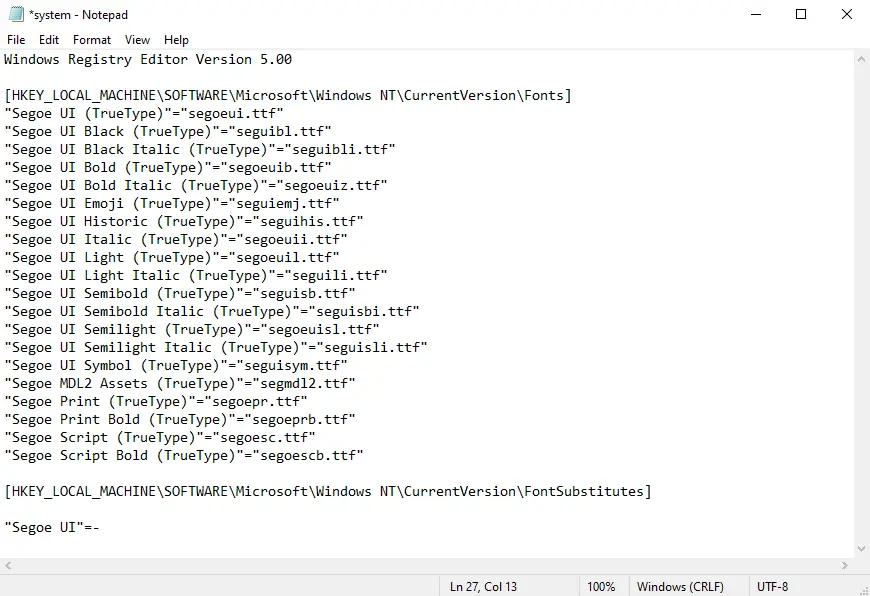
- Copy and paste the following Registry code onto the file:Windows Registry Editor Version 5.00[HKEY_LOCAL_MACHINE\SOFTWARE\Microsoft\Windows NT\CurrentVersion\Fonts]»Segoe UI (TrueType)»=»segoeui.ttf»»Segoe UI Black (TrueType)»=»seguibl.ttf»»Segoe UI Black Italic (TrueType)»=»seguibli.ttf»»Segoe UI Bold (TrueType)»=»segoeuib.ttf»»Segoe UI Bold Italic (TrueType)»=»segoeuiz.ttf»»Segoe UI Emoji (TrueType)»=»seguiemj.ttf»»Segoe UI Historic (TrueType)»=»seguihis.ttf»»Segoe UI Italic (TrueType)»=»segoeuii.ttf»»Segoe UI Light (TrueType)»=»segoeuil.ttf»»Segoe UI Light Italic (TrueType)»=»seguili.ttf»»Segoe UI Semibold (TrueType)»=»seguisb.ttf»»Segoe UI Semibold Italic (TrueType)»=»seguisbi.ttf»»Segoe UI Semilight (TrueType)»=»segoeuisl.ttf»»Segoe UI Semilight Italic (TrueType)»=»seguisli.ttf»»Segoe UI Symbol (TrueType)»=»seguisym.ttf»»Segoe MDL2 Assets (TrueType)»=»segmdl2.ttf»»Segoe Print (TrueType)»=»segoepr.ttf»»Segoe Print Bold (TrueType)»=»segoeprb.ttf»»Segoe Script (TrueType)»=»segoesc.ttf»»Segoe Script Bold (TrueType)»=»segoescb.ttf»[HKEY_LOCAL_MACHINE\SOFTWARE\Microsoft\Windows NT\CurrentVersion\FontSubstitutes]»Segoe UI»=-
- Click the File menu.
- Select the Save as option.
- Use the «Save as type» drop-down menu and select the All Files option.
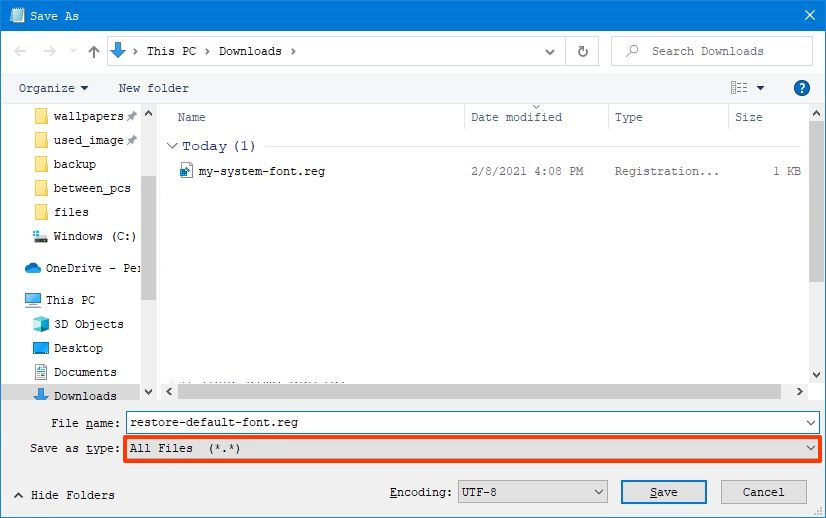
- Confirm a descriptive name for the file, such as «restore-default-font,» and use the «.reg» as the extension – for example, restore-default-font.reg.
- Click the Save button.
- Right-click the newly created «.reg» file and select the Merge option.
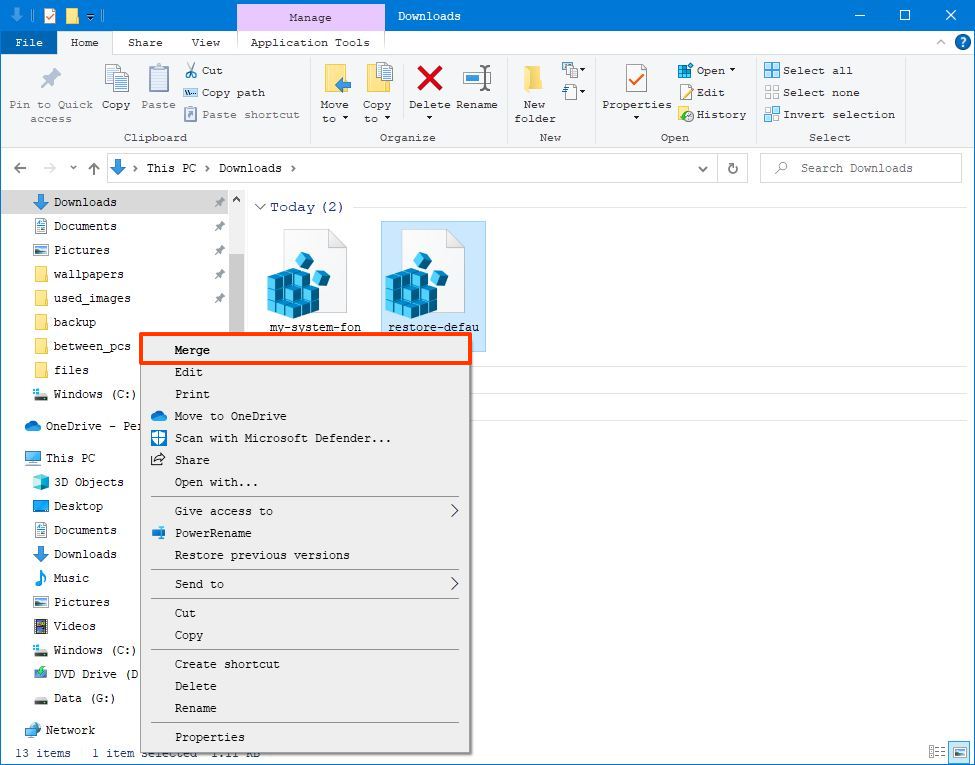
- Click the Yes button.
- Click the OK button.
After you complete the steps, the Windows 10 default font should rollback to the previous configuration.
Undo settings with Restore point
Alternatively, you could also use a previous restore point created before modifying the font settings to undo the changes. However, use this option as a last resort, since depending on when you are restoring the system, the feature may also undo other system changes you may have configured after the restore point was created.
To undo system changes, use these steps:
- Open Start.
- Search for Create a restore point and select the top result to open the app.
- Click the System Protection tab.
- Click the System Restore button.
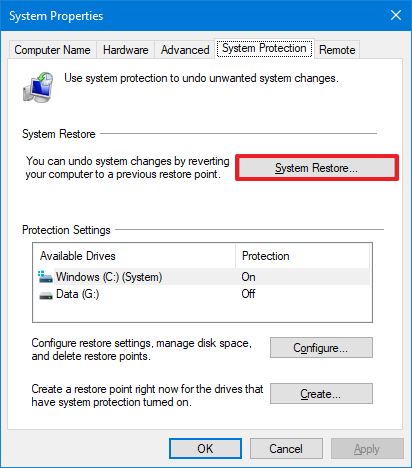
- Click the Next button.
- Select the restore point you created before applying the settings.
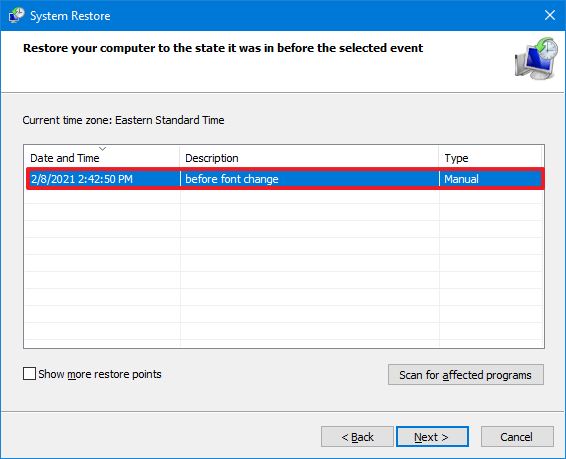
- Click the Next button.
- Click the Finish button.
Once you complete the steps, the system will need to be restarted to finish the process.
Mauro Huculak has been a Windows How-To Expert contributor for WindowsCentral.com for nearly a decade and has over 15 years of experience writing comprehensive guides. He also has an IT background and has achieved different professional certifications from Microsoft, Cisco, VMware, and CompTIA. He has been recognized as a Microsoft MVP for many years.
Learn how to change the default system font on Windows 10 with a simple registry tweak to give your desktop a new and exciting look. With this tweak, you can customize the default system font on your desktop icons, such as Recycle bin and This PC, as well as the title bar, message box, and more. To ensure a seamless process, we recommend backing up your registry and creating a system restore point before making any changes.
In the past, changing the default system font was easy on Windows 7 and earlier versions, using the personalization settings in the Control Panel. However, on Windows 10, these settings are no longer available, and you need to use registry tweaking or third-party software to make changes. In this post, we’ll guide you through the registry tweaking process to change the default system font in Windows 10, giving your desktop a fresh new look.
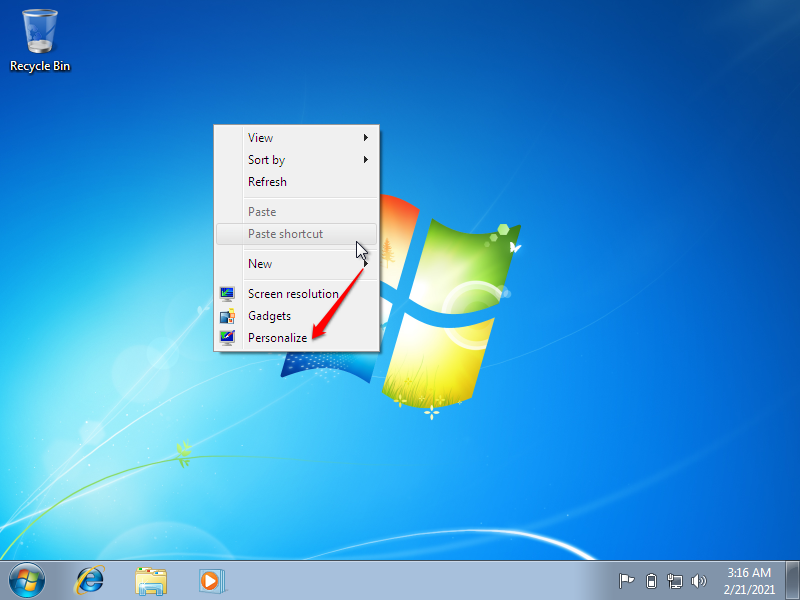
How to Change the Default System Font on Windows 7?
Follow these steps to change the default System Font on Windows 7:-
Step 1. Right-click on a blank area of the Desktop and choose Personalize from the available options.
Step 2. Select the theme you want to use, then click the Window Color option.
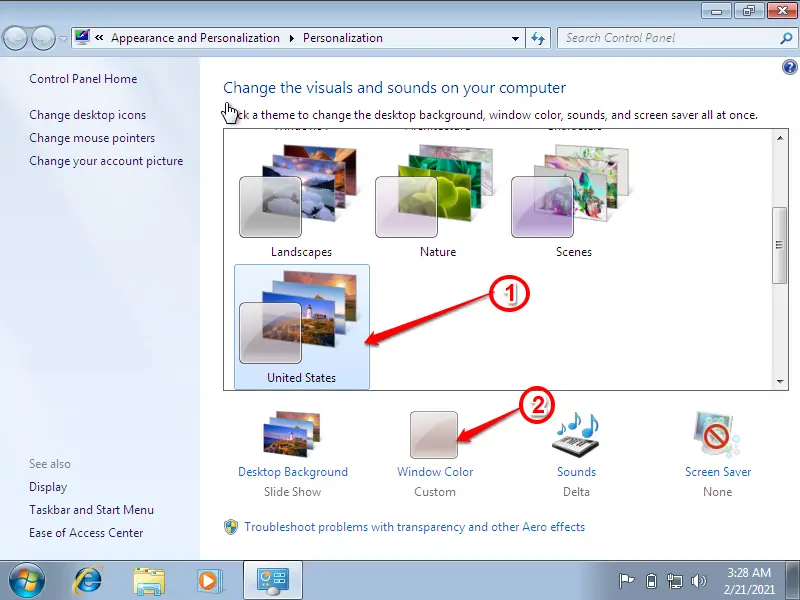
Step 3. Once you click on the “Window Color” option, the “Window Color and Appearance” window opens.
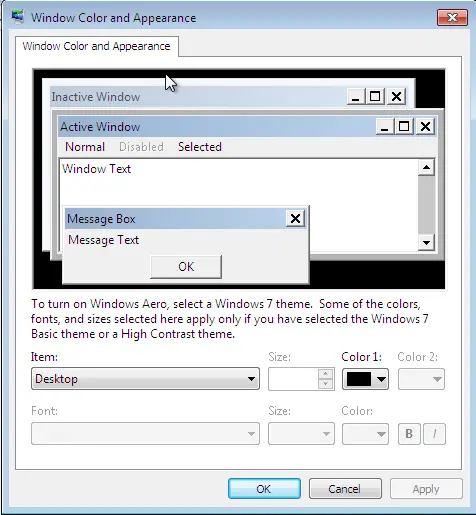
Step 4. Select the item, and change the Color, Size, and Font according to your choice. You have to make the changes one by one. Once the changes are made, click Apply and then OK.
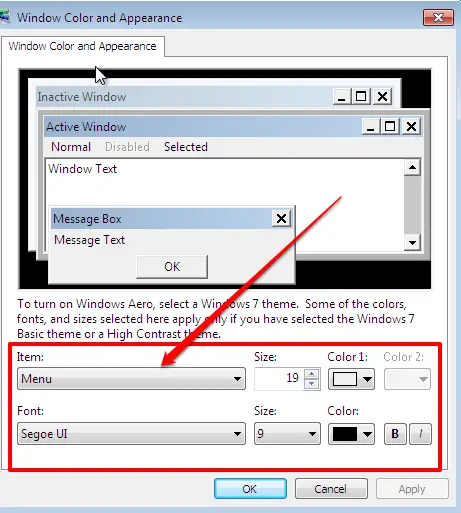
The change is immediate, which means that it will display font, color, or size immediately once you make the changes. There is no need to restart your computer.
How to Change the Default System Font on Windows 10?
Follow these steps to change the default System Font on Windows 10:-
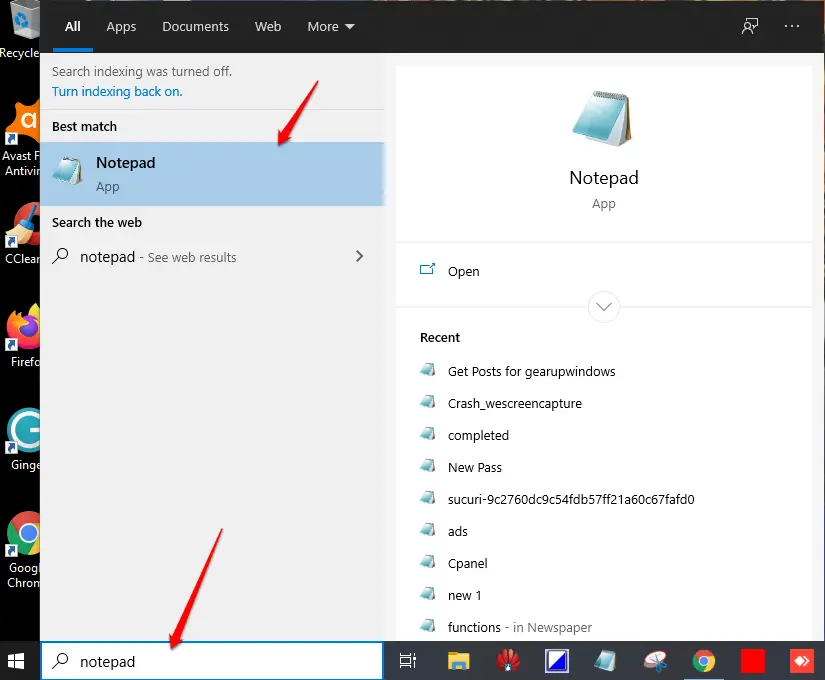
Step 1. Open a Notepad (To open the Notepad, click on the Start button and type Notepad. From the available options, click the Notepad).
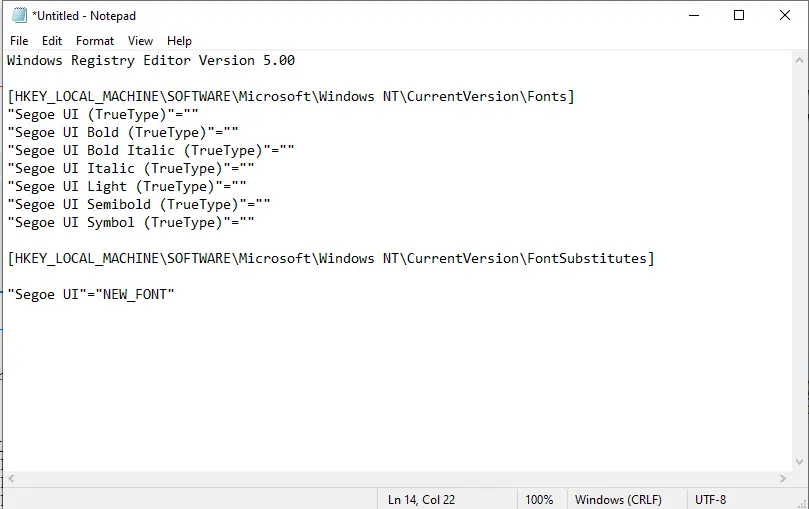
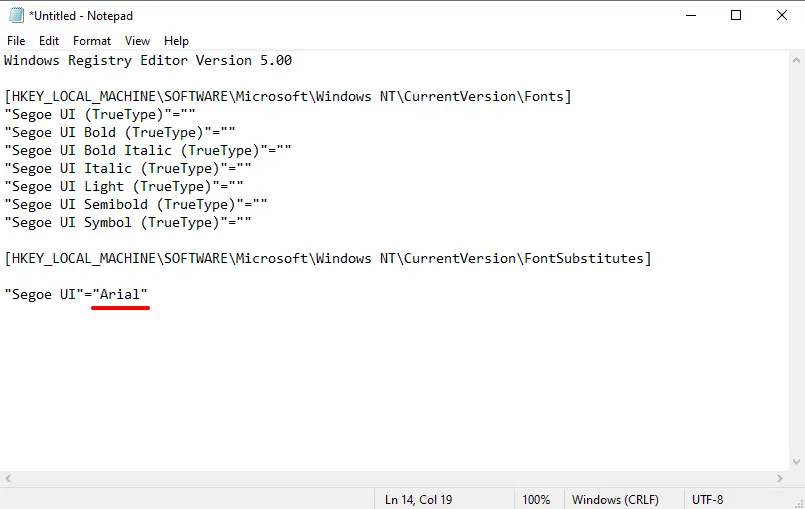
Step 2. Once the Notepad app opens, copy and paste the following text code:-
Windows Registry Editor Version 5.00

[HKEY_LOCAL_MACHINE\SOFTWARE\Microsoft\Windows NT\CurrentVersion\Fonts]
"Segoe UI (TrueType)"=""
"Segoe UI Bold (TrueType)"=""
"Segoe UI Bold Italic (TrueType)"=""
"Segoe UI Italic (TrueType)"=""
"Segoe UI Light (TrueType)"=""
"Segoe UI Semibold (TrueType)"=""
"Segoe UI Symbol (TrueType)"=""

[HKEY_LOCAL_MACHINE\SOFTWARE\Microsoft\Windows NT\CurrentVersion\FontSubstitutes]

"Segoe UI"="NEW-FONT"
Step 3. Now, press the Windows + I hotkey to open the Settings app and select the Personalization category.
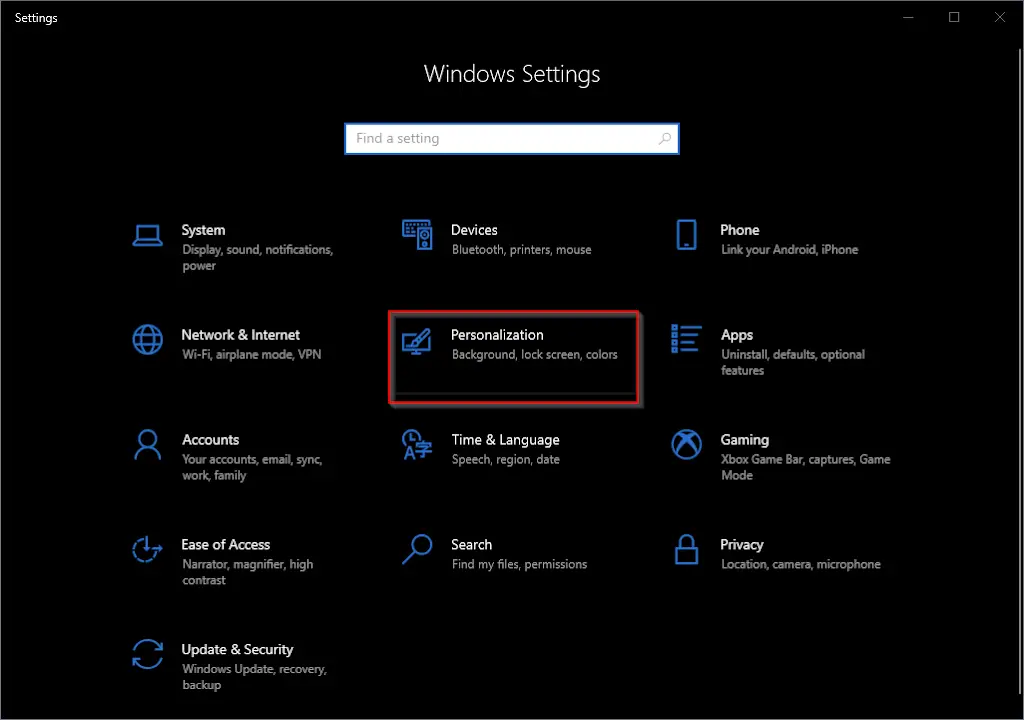
Step 4. On the Personalization category, click on the Fonts option from the left side.
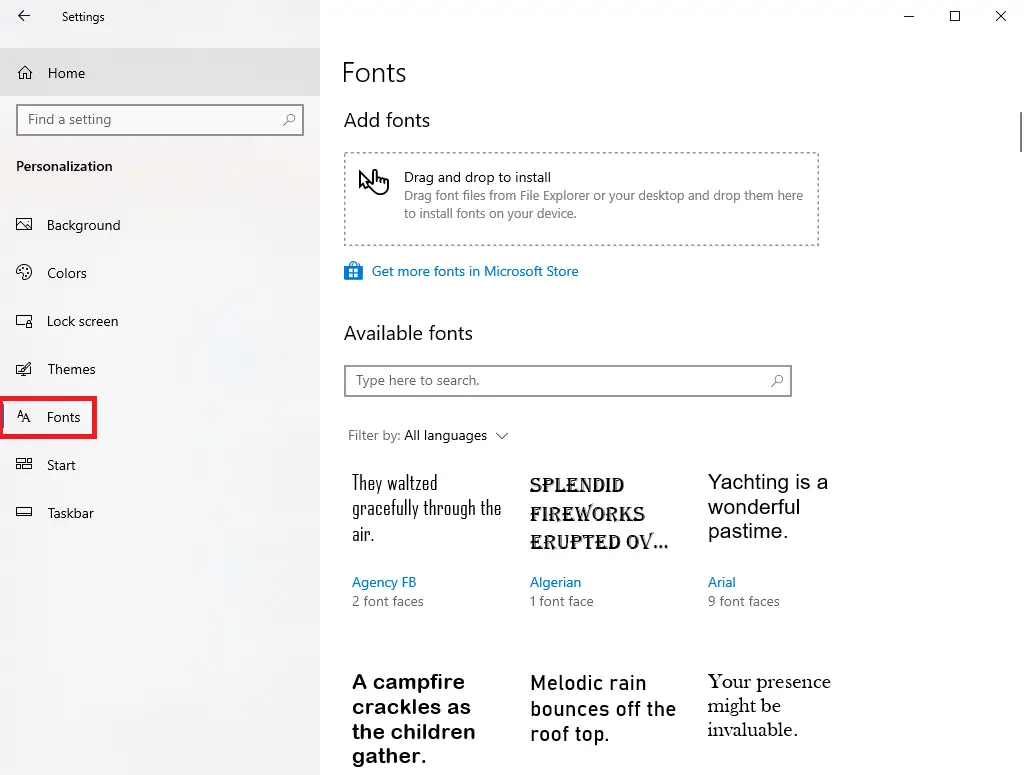
You will see a vast collection of font families installed on your PC.
Step 5. Select the font you want to use on your Windows 10 PC and note down its Official name—for example – Arial.

Step 6. Now, in the Notepad file you have already opened, replace the text NEW_FONT with the font name you have selected from the Settings page. Since we want to use the Arial font for the entire system, I have replaced the NEW_FONT with the Arial in the registry code.
Step 7. Once you have replaced the font name in the Notepad app, press Ctrl + S hotkey to save it. While saving, name it system.reg.
Step 8. Locate the file where you have saved the system.reg file. Right-click on it and select the Merge option from the context menu.
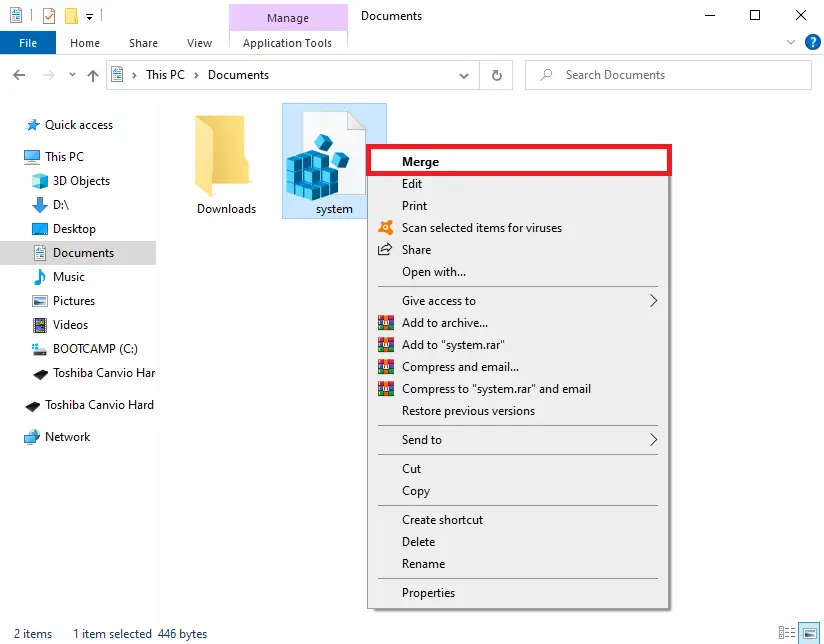
Step 9. When prompted, click on Yes and then OK to merge the registry file into your Windows 10 PC.
Once you have completed the above steps, restart your computer, and the new font will replace the entire system.
How to Restore Default System Font on Windows 10?
If you want the previous default fonts on your Windows 10 computer, you can revert the changes. To restore the system default font on Windows 10, perform the following steps:-
Step 1. Press Windows + R keys simultaneously to open the Run dialog box.
Step 2. Type notepad and hit Enter from the keyboard.
Step 3. Once the Notepad app opens, copy and paste the following code:-
Windows Registry Editor Version 5.00

[HKEY_LOCAL_MACHINE\SOFTWARE\Microsoft\Windows NT\CurrentVersion\Fonts]
"Segoe UI (TrueType)"="segoeui.ttf"
"Segoe UI Black (TrueType)"="seguibl.ttf"
"Segoe UI Black Italic (TrueType)"="seguibli.ttf"
"Segoe UI Bold (TrueType)"="segoeuib.ttf"
"Segoe UI Bold Italic (TrueType)"="segoeuiz.ttf"
"Segoe UI Emoji (TrueType)"="seguiemj.ttf"
"Segoe UI Historic (TrueType)"="seguihis.ttf"
"Segoe UI Italic (TrueType)"="segoeuii.ttf"
"Segoe UI Light (TrueType)"="segoeuil.ttf"
"Segoe UI Light Italic (TrueType)"="seguili.ttf"
"Segoe UI Semibold (TrueType)"="seguisb.ttf"
"Segoe UI Semibold Italic (TrueType)"="seguisbi.ttf"
"Segoe UI Semilight (TrueType)"="segoeuisl.ttf"
"Segoe UI Semilight Italic (TrueType)"="seguisli.ttf"
"Segoe UI Symbol (TrueType)"="seguisym.ttf"
"Segoe MDL2 Assets (TrueType)"="segmdl2.ttf"
"Segoe Print (TrueType)"="segoepr.ttf"
"Segoe Print Bold (TrueType)"="segoeprb.ttf"
"Segoe Script (TrueType)"="segoesc.ttf"
"Segoe Script Bold (TrueType)"="segoescb.ttf"

[HKEY_LOCAL_MACHINE\SOFTWARE\Microsoft\Windows NT\CurrentVersion\FontSubstitutes]

"Segoe UI"=-
Step 4. Save this file as Default-font.reg.
Step 5. Double-click on this .reg file, click Yes, and then OK to apply the changes.
Once you have completed the above steps, restart your PC to revert the system configuration to the default font.
Conclusion
In conclusion, changing the default system font can give your Windows 10 PC a fresh new look, and the process is simple with the help of registry tweaking. Unlike earlier versions of Windows, you cannot change the default system font on Windows 10 using personalization settings. However, by following the steps mentioned in this post, you can change the font of your desktop icons, message boxes, title bars, and more.
It is recommended that you back up your registry and create a system restore point before making any changes to avoid any unwanted issues. Also, if you want to revert to the previous default font, you can do so by following the steps mentioned in the post. With a few simple tweaks, you can customize the default system font on your Windows 10 PC and make it more exciting and fun to use.
In this article, we will show how to change the default system font on Windows 11/10, including the way to restore the default system font using the Registry Editor.
If you’re tired of using the default system font on Windows 11/10, you can change it to your desired font with a simple registry tinkering. This will change the default system fonts of the desktop icons like Recycle bin, including title bar, message box, and others.
In the older version (Windows 7 or lower version) changing the default system font was not a big deal. It was quite easy and straightforward through personalization settings in the Control Panel. But for some reason, these settings were removed and users remained stuck with the default system font. You had to do just this:
- Right-click the mouse on a blank area of the screen and choose Customize.
- Click Color and appearance of windows.
- Then, click Open classic appearance properties for additional color options.
- Next click the Advanced button.
- Pull down the list item and choose the element you want to change the font, icon, for example.
- Then pull down the Font list and choose the font to use. Then define its size and horns (bold or italic).
- Then repeat the operation for the other elements to customize. Finally, click on the OK button and then click Apply. The change is immediate and you don’t have to restart your computer. Before you proceed, one thing you must know is that without having proper skills, editing a registry is dangerous. It can damage your system permanently which might be irreversible. So, if you have a little knowledge of what you’re doing then you can skip it and ask a skilled person to complete the adjustment.
Before you go ahead and use the steps, do remember to create a system restore point first.
To get started, open Notepad first. You can open it using the Run command. Simply press Windows+R keys to launch the Run dialog box, type Notepad in the text field, then hit Enter to open the Notepad app.
In the Notepad app, copy and paste the following text code:
Windows Registry Editor Version 5.00

[HKEY_LOCAL_MACHINE\SOFTWARE\Microsoft\Windows NT\CurrentVersion\Fonts]
"Segoe UI (TrueType)"=""
"Segoe UI Bold (TrueType)"=""
"Segoe UI Bold Italic (TrueType)"=""
"Segoe UI Italic (TrueType)"=""
"Segoe UI Light (TrueType)"=""
"Segoe UI Semibold (TrueType)"=""
"Segoe UI Symbol (TrueType)"=""

[HKEY_LOCAL_MACHINE\SOFTWARE\Microsoft\Windows NT\CurrentVersion\FontSubstitutes]

"Segoe UI"="NEW_FONT"
Now, open the Settings app and click on the Personalization category.

In the left pane, select the Fonts tab. You will see a large collection of the font family on the right.
Select the font you want to use from the list and also note its Official name. For example – Book Antiqua.

Now replace “NEW_FONT” with the font name you have selected from the Settings page. Because I want the font name “Book Antiqua” to be used in the entire system, I have replaced the “NEW_FONT” with the Book Antiqua in the registry code.
After replacing the font name in the Notepad, click on the File menu and then select the “Save as” option. On the Save as page, switch “Save as type” to All Files.
Name the file, choose the preferred location of your file, and then click the Save button. The file name must have the .reg extension. For instance – I have named my file my_font. So, the name of my file with the .reg extension should be “my_font.reg”.

Now go to the location where the .reg file has been saved. Then right-click on it and select the Merge option from the context menu.
Click Yes and then hit the OK button to save the changes.
After performing the above steps, restart your computer and the new font will substitute in the entire system.
Read: How to change default font in Word, Excel, PowerPoint.
Restore default system font on Windows 11/10
If you want the previous configuration on your Windows device, you can revert the changes using the following instructions:
Open the Start menu, type Notepad, then select the top of the result to open the Notepad text editor.
In the Notepad app area, copy and paste the following text code:
Windows Registry Editor Version 5.00

[HKEY_LOCAL_MACHINE\SOFTWARE\Microsoft\Windows NT\CurrentVersion\Fonts]
"Segoe UI (TrueType)"="segoeui.ttf"
"Segoe UI Black (TrueType)"="seguibl.ttf"
"Segoe UI Black Italic (TrueType)"="seguibli.ttf"
"Segoe UI Bold (TrueType)"="segoeuib.ttf"
"Segoe UI Bold Italic (TrueType)"="segoeuiz.ttf"
"Segoe UI Emoji (TrueType)"="seguiemj.ttf"
"Segoe UI Historic (TrueType)"="seguihis.ttf"
"Segoe UI Italic (TrueType)"="segoeuii.ttf"
"Segoe UI Light (TrueType)"="segoeuil.ttf"
"Segoe UI Light Italic (TrueType)"="seguili.ttf"
"Segoe UI Semibold (TrueType)"="seguisb.ttf"
"Segoe UI Semibold Italic (TrueType)"="seguisbi.ttf"
"Segoe UI Semilight (TrueType)"="segoeuisl.ttf"
"Segoe UI Semilight Italic (TrueType)"="seguisli.ttf"
"Segoe UI Symbol (TrueType)"="seguisym.ttf"
"Segoe MDL2 Assets (TrueType)"="segmdl2.ttf"
"Segoe Print (TrueType)"="segoepr.ttf"
"Segoe Print Bold (TrueType)"="segoeprb.ttf"
"Segoe Script (TrueType)"="segoesc.ttf"
"Segoe Script Bold (TrueType)"="segoescb.ttf"

[HKEY_LOCAL_MACHINE\SOFTWARE\Microsoft\Windows NT\CurrentVersion\FontSubstitutes]

"Segoe UI"=-
Now click on the File menu and then select the “Save as” option. On the Save as page, use the drop-down menu to switch “Save as type” to All Files.
Thereafter you have to name the file, choose the preferred location to save the file, and then click the Save button. Save the file with the .reg extension. For example – I have named my file restore_my_font. So, the name of my file with the .reg extension should be “restore_my_font.reg”.
Now go to the location where you have saved the restore_my_font.reg file. Then right-click on it and select the Merge option from the context menu.
Click Yes then hit the OK button to save the changes.
Once you have done this, restart your computer, and it will revert your system configuration to the default font.
TIP: Advanced System Font Changer lets you change System Font in Windows.
Use Advanced System Font Changer software for Windows PC
Microsoft uses Segoe UI font, which looks pretty good. However, if you do not like this font and you want to try another font you have on your computer, you can change the default system font in Windows using Advanced System Font Changer. You can change the font size, adjust icon spacing, menu height, scroll height, caption height, scroll width and more! You can also restore the default system font.
The Advanced System Font Changer lets you change the font of-
- Title bar
- Menu
- Message box
- Palette title
- Icon
- Tooltip
You can also change the font size using this tool. Moreover, you can adjust icon spacing, menu height, scroll height, caption height, scroll width, etc. To start using this tool, you need to download and open the portable tool.

Click the option to change the font. For example, if you want to change the Title Bar font, click that option.
Next, you can choose a font family, font weight, and font size. After choosing, click the Apply button. Therefore, you need to log off your computer and sign in again to see the change.
If you want to change the icon spacing, or menu height/width, switch from Font tab to Advanced tab. Here you will get all the options you need.

The software is designed to fill the gap created by Microsoft’s decision to discontinue the option for setting the font sizes used by the system.
You can download this tool here. This tool creates a backup of the Windows Registry before changing the font. However, it is still recommended that you create a system restore point before using this tool.
What is the default font in Windows 11 or Windows 10?
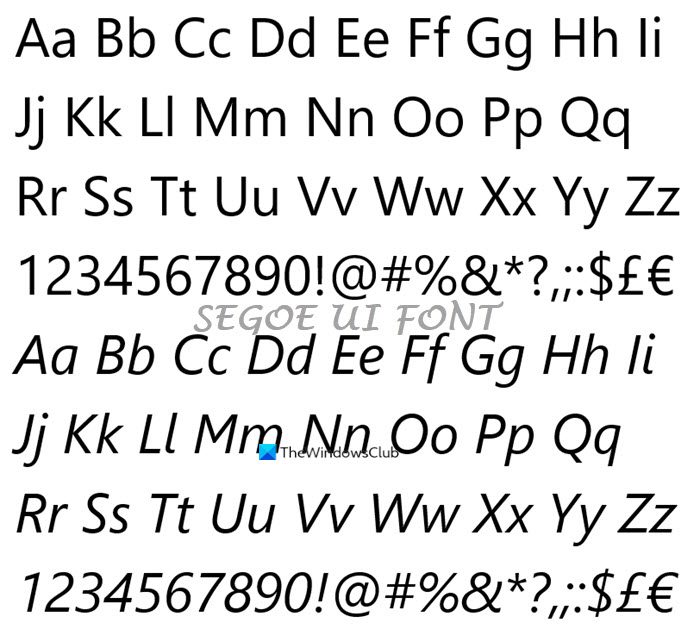
Segoe UI is the default font in Windows 11 and Windows 10 families of operating systems. Segoe UI (User Interface) is a member of the Segoe family and it is used in most Microsoft products for user interface text, as well as for many of its online services.