
Notice: this page is for server side. If you are looking for clients, visit clients.
Server deployment on Windows is discouraged, since the select API performs very poor. If you want to serve many users, you should always set up your server on Linux. Please visit README for more details.
- Download and install Python for Windows, you can download x86-64 MSI installer in 64bit Windows.
- During installation you should install
pip
- Install OpenSSL for Windows. If you installed 64bit Python, you should install 64bit OpenSSL.
- Install shadowsocks like Linux. In Command Prompt, type command line
- If you want to use
salsa20orchacha20encryption, download libsodium and put dll files (without path) intoC:\Windows\System32orC:\Windows\SysWOW64(32bit Python on 64bit Windows).

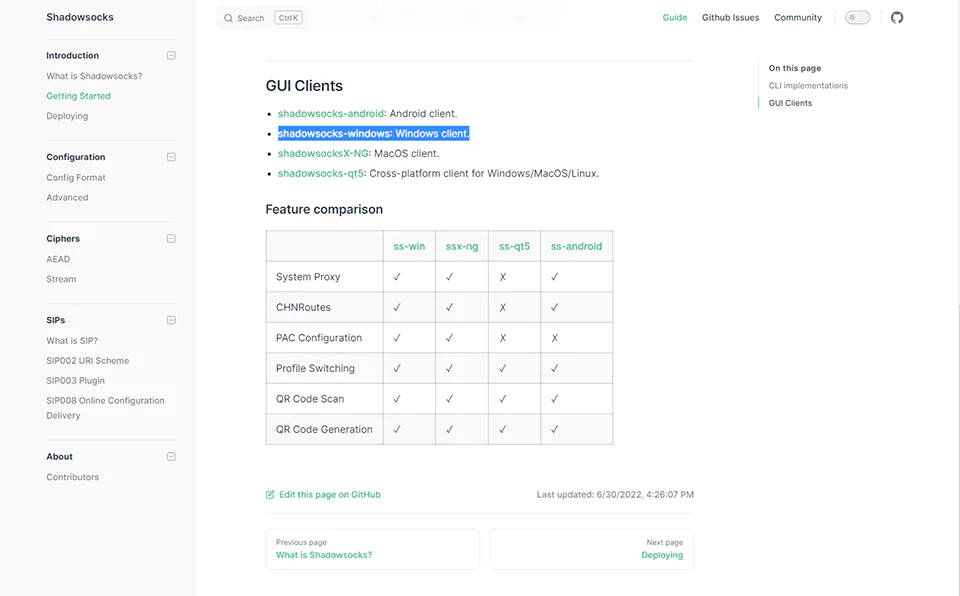
shadowsocks, a fast tunnel proxy that helps you bypass firewalls. A secure socks5 proxy, designed to protect your Internet traffic. shadowsocks-windows is one of shadowsocks clients for Windows.
Download
Windows
Download the lastest release of shadowsocks-windows from github release page.
macOS
Download the lastest release of ShadowsocksX-NG from github release page.
Requirements
Windows
Download and install Microsoft .NET Framework 4.6.2 or higher (e.g. Microsoft .NET Framework 4.7.2), Microsoft Visual C++ 2015 Redistributable (x86).
macOS
No requirement.
Run
Windows
Choose a path (e.g. D:\Portable\shadowsocks\), extract the exe file from the zip package and run without install.
macOS
Extract the app file from the zip package, drag it to Finder → Applications, and run without install.
Setup
Surfing when using system
Windows
- Double click shadowsocks.exe (e.g. D:\Portable\shadowsocks\shadowsocks.exe).
- Find shadowsocks tray icon in the notification area.
- Double click the shadowsocks icon.
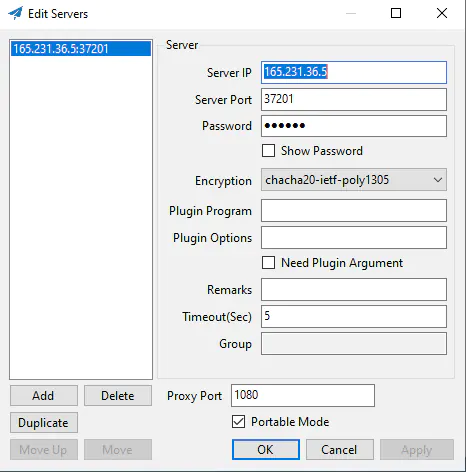
- Configure:
- Server Addr: server ip or host.
- Server Port & Password: server port and password.
- Encryption: choose a encryption.
- Remarks: fill something.
- Click OK.
- Right click the shadowsocks icon → System Proxy → PAC.
- Do somethine more:
- Right click the shadowsocks icon → Help → Verbose Logging.
- Right click the shadowsocks icon → PAC → Update Local PAC from GFWList.
- Right click the shadowsocks icon → PAC → uncheck Secure Local PAC.
- Visit Google and success. This means you can visit google through shadowsocks.
- Query ip in Baidu and show the same ip as before enabling shadowsocks. This means you can visit baidu directly.
- Now you could surf the Internet.
macOS
- Double click shadowsocks.
- Find shadowsocks icon in the menu bar.
- Click the shadowsocks icon → Proxy Auto Configure Mode.
- Click the shadowsocks icon → Servers → Server Preferences….
- Click the + icon and configure:
- Address: server ip or host in the left and server port in the right.
- Encryption: choose a encryption.
- Password: server port and password.
- Remarks: fill something.
- Click OK.
- Click the shadowsocks icon → Turn Shadowsocks On.
- Do somethine more:
- Click the shadowsocks icon → Update PAC from GFW List.
- Visit Google and success. This means you can visit google through shadowsocks.
- Query ip in Baidu and show the same ip as before enabling shadowsocks. This means you can visit baidu directly.
- Now you could surf the Internet.
Then only surfing when using browser (Windows)
Recommends: Firefox or Chrome.
You should do this step at first in Windows:
- Right click the shadowsocks icon → System Proxy → Disable.
Firefox
If you use Firefox, it is easy to configure.
- Due to technical limitations in the latest Firefox, it is not possible to enable PAC using add-ons. So you should delete or disable all add-ons about proxy in Firefox before the next steps.
- Find Open menu icon.
- Click the Open menu icon → Options.
- Find Network Settings.
- Click Settings….
- Choose Automatic proxy configuration URL: http://127.0.0.1:1080/pac.
- Click OK.
Chrome
If you use Chrome, it is easy to change your browser to Firefox.
Or if you have to use Chrome for some unreasonable reasons, follow this tons of steps.
- Install Proxy SwitchyOmega extension.
- Find SwitchyOmega icon.
- Click the SwitchyOmega icon → Options.
- Delete auto switch profile.
- Delete proxy profile.
- New profile… → Profile name: Shadowsocks All → check Proxy Profile → click Create.
- Configure:
- Protocol: SOCKS5.
- Server: 127.0.0.1.
- Port: 1080.
- Click Apply changes.
- New profile… → Profile name: Shadowsocks → check Switch Profile → click Create.
- Click Add a rule list and configure:
- Rule List Format: AutoProxy.
- Rule List URL: https://raw.githubusercontent.com/gfwlist/gfwlist/master/gfwlist.txt.
- Click Download Profile Now.
- Switch rules → Condition Type → Rule list rules → Shadowsocks All.
- Click Apply changes.
- Right click the shadowsocks icon → uncheck Enable System Proxy.
- Click the SwitchyOmega icon and check different profiles, test Google and query ip to see difference.
- Now you could only surf the Internet when using the browser.
Optional
Windows
- Right click the shadowsocks icon → Start on Boot.
- Right click the shadowsocks icon → Allow other Devices to connect.
macOS
- Click the shadowsocks icon → Preferences…. → General → Choose Launch At Login.
Debug
If you have any problem while using shadowsocks, try the following method:
Turn off shadowsocks, surf the Internet and check network connection…
Right click the shadowsocks icon → Help → Show Logs….
If there are many timeout s, it means bad network connection.
If there are many System.Net.Sockets.SocketException s, please contact shadowsocks administrator.
More
Read shadowsocks-windows README.md.
Find clients for other platforms.
Время на прочтение5 мин
Количество просмотров136K
Цель: открыть заблокированные провайдером сайты;
Примерное время: 30 минут;
Стоимость: бесплатно;
Что надо делать: нажимать кнопки, копировать и вставлять текст, читать простые слова на английском.
Project V — набор инструментов, которые помогут обойти замедление или полную блокировку сайтов. Он разработан азиатскими гениями для обхода великого китайского фаервола.
-
Обход замедлений и блокировок
-
Скрытие IP адреса
-
В сравнении с VPN:
-
Незаметен для провайдера
-
Меньше просадки по скорости
-
Меньше расход аккумулятора на мобильных устройствах\
-
Конечно, всё это не приходит так просто. При установке вручную нужно выполнить несколько действий:
-
Аренда сервера
-
Регистрация домена
-
Получение SSL сертификата
-
Настройка Nginx
-
Настройка Shadowsocks сервера
-
Настройка клиента
В этом руководстве я расскажу, как сократить этот список и упростить действия, чтобы они были доступны энтузиасту с минимальными знаниями в айти.
Мы будем разворачивать собственный сервер на бесплатных мощностях с использованием скрипта для автоматического деплоя.
Подготовка
Для деплоя на сервер вам понадобится установить python3.7 на свой компьютер. У маководов и линуксоидов питон установлен из коробки, и всё должно завестись сразу. Если нет, вот тут есть инструкция по установке.
Регистрируемся

Для примера воспользуемся сервером Microsoft Azure. Панель управления интуитивно понятна, регистрация проста, а при создании сервера мы сразу получаем доменное имя для него.
Сервис бесплатно предоставляет виртуальную машину под управлением Linux на год. 750 часов в месяц хватит для бесперебойной работы сервера. Учтите, что объем трафика на бесплатном лимите ограничен 15 гигабайтами в месяц. Бесплатные сервера устанавливают достаточно жесткие лимиты, и вы можете по аналогии с этим руководством завести еще пару серверов на других ресурсах: амазон, гугл и оракл.
Переходим по ссылке Жмем Continue to Azure portal, проходим регистрацию, заполняем поля. В процессе потребуется привязать карту, с неё спишут и сразу вернут 70 рублей. Используйте виртуальную карту qiwi или тинькофф, чтобы не нарваться на неожиданное списание.
Создаем сервер

После регистрации переходим по ссылке
И среди сервисов выбираем virtual machines
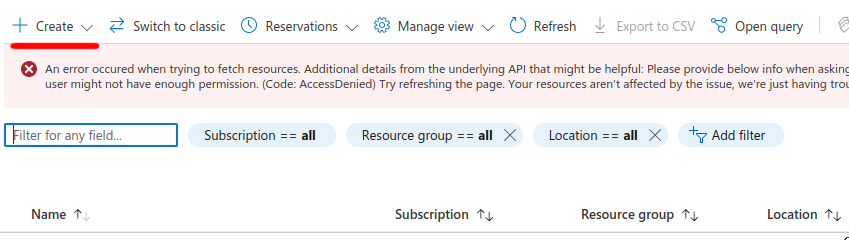
В углу списка нажимаем Create, нас переводят на страницу выбора параметров машины. Далее настроим её, чтобы пользоваться бесплатно. В окне настройки есть несколько вкладок, нас в первую очередь интересуют Basics, Disk и Networking

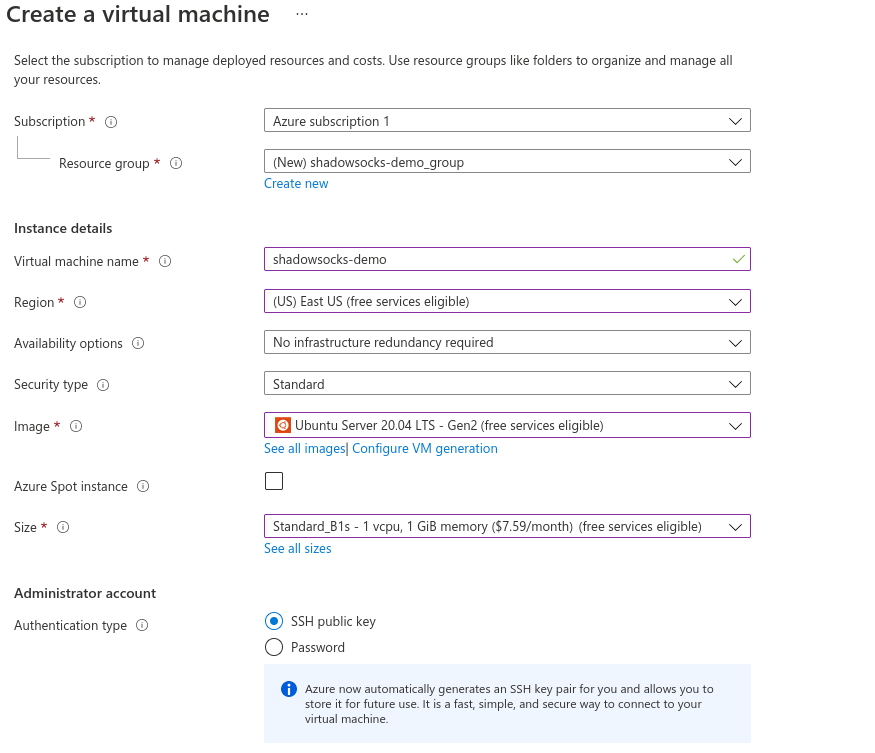
Basics
Примечание: здесь и далее пометка (free services eligible) означает доступность для бесплатного использования
-
Имя виртуальной машины — ставим любое
-
В качестве региона выберите один из доступных для бесплатного использования. Учтите, что в регионе может не быть бесплатных машин, и придется попробовать с другим.
-
Image — Ubuntu Server 20.04 LTS
-
Size — Standart_B1s
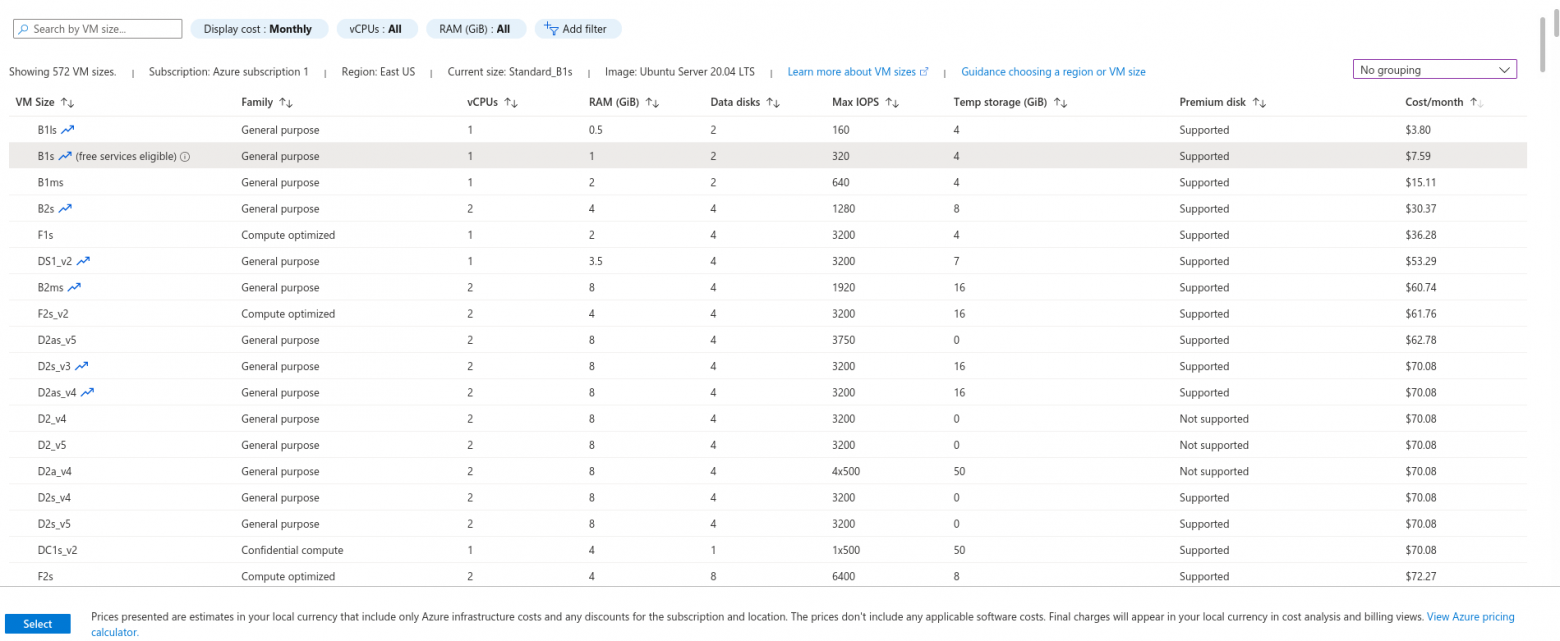
При выборе размера B1s может не быть в списке. Нажмите See all sizes , отключите группировку в правом верхнем углу и поставьте сортировку по стоимости. Он будет в самом начале с пометкой free services eligible
-
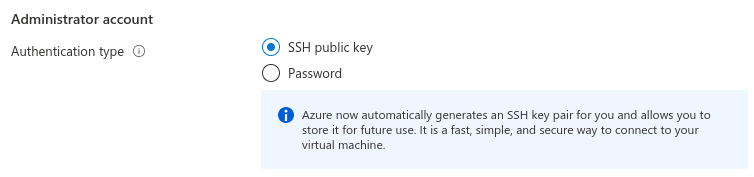
Способ аутентификации — SSH public key

-
Username — выставляем любой, запомните — пригодится вдальнейшем
-
SSH public key source — тут возможны два варианта:
-
Use existing public key если у вас уже есть сгенерированный ключ
-
Generate new key pair если вы не знаете, что это такое. Можете задать любое имя для ключа
-

Disk
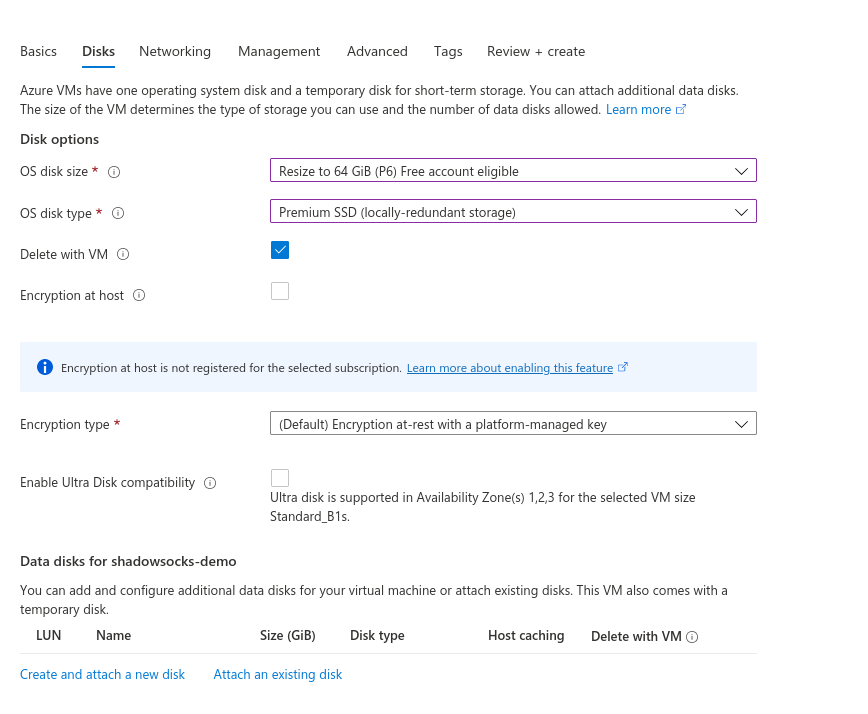
-
OS disk size — выставляем 64 гигабайта
Networking

-
Select inbound ports — включаем 80, 443 и 22 порты
Завершение настройки
После этого можете нажать review+create. Вас перекинет на страницу со статусом создания виртуальной машины. Если ранее вы выбрали генерацию ssh ключа, сайт предложит сохранить его. Сохраните на компьютер, он понадобится позже.
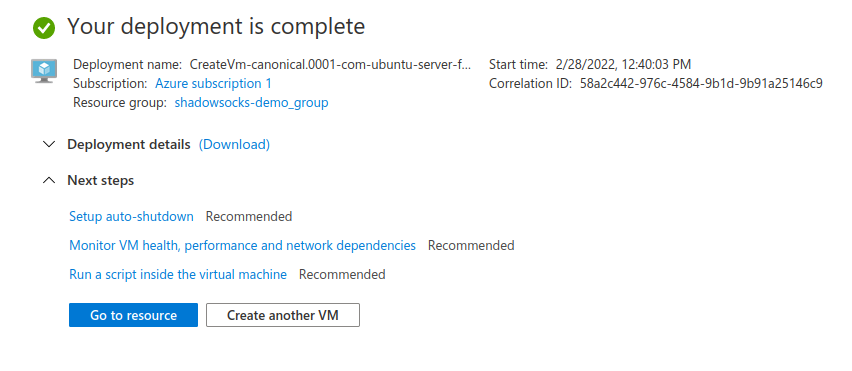
После появления надписи Your deployment is complete, можно перейти к странице со статусом созданной виртуальной машины. Жмём Go to resource

Здесь нас интересует строка DNS name в правой колонке, раздел networking. Жмём configure

-
Выставляем DNS name label. Пусть это будет не слишком подозрительное название — “мир рыбалки” или “кот сегодняшнего дня” вполне подойдет
-
IP address assignment — static
Настройка завершена. Вернитесь на предыдущий экран со статусом сервера и скопируйте DNS name, оно понадобится дальше.
Настройка проксирования
Скачиваем проект и задаем настройки для сервера
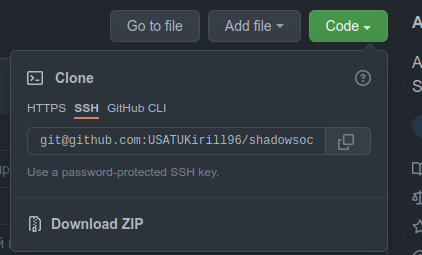
Качаем проект из репозитория на гитхабе.
Если у вас не установлен локально git, можете скачать архив и разархивировать в удобное место
Открываем папку с проектом shadowsocks-vray-playbooks. Все дальнейшие команды будут выполняться в терминале внутри неё.
-
Для windows: в папке shadowsocks-vray-playbooks зажмите шифт и нажмите правую кнопку мыши. Выберите пункт “Открыть окно PowerShell здесь”
-
Для linux: ПКМ → open in terminal
Введите в терминал следующие команды:
python3 -m pip install virtualenv
python3 -m virtualenv venv
source venv/bin/acvtivate
pip install -r requirements.txt
Если в будущем вы захотите поднять сервер на другой машине, нужно будет активировать виртуальное окружение через source venv/bin/activate
В папке deploy вы найдете файл hosts.example.ini скопируйте его и переименуйте в hosts.ini, замените в нем значения на следующие
server ansible_host=DNS name, которое вы задавали на последнем этапе настройки сервера

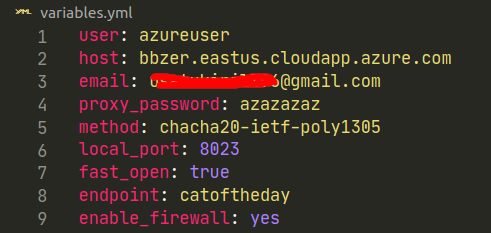
В папке с проектом вы найдете файл variables.example.yml скопируйте его и переименуйте в variables.yml, замените в нем значения на следующие:
user: Имя пользователя на сервере - то что вы писали в Username при настройке сервера
host: Домен,оформленный для сервера (DNS name)
email: Ваша электронная почта
proxy_password: Пароль для доступа к прокси, поставьте что-то сложное
method: Оставить как в примере
local_port: Порт, на котором будет работать ваш локальный сервер. Можно оставить как в примере
fast_open: Оставить как в примере
endpoint: эндпоинт для прокси. Можно поставить что-то наименее подозрительное для провайдера или оставить как в примере
enable_firewall: yes для включения фаервола после стартовой настройки. Если на сервере уже есть ваши проекты, и вы не знаете для чего это, включение может вызвать ошибки в их работе
Если при создании сервера вы выбрали Generate new key pair:
-
скопируйте скачанный ключ в текущую папку, а в variables.yml допишите строку
ansible_ssh_private_key_file: имя загруженного ключа (напр. key.pem)
-
Введите в терминале
ansible-playbook -i inventories/hosts.ini --extra-vars "@variables.yml" deploy/client.yml --tags prepare_ssh
Выгружаем прокси сервер
Введите в терминале последовательно следующие команды:
Настройка окружения виртуальной машины
ansible-playbook -i inventories/hosts.ini --extra-vars "@variables.yml" deploy/setup.yml
Если это новый сервер, и на нем нет ваших проектов, введите следующую команду чтобы очистить iptables
ansible-playbook -i inventories/hosts.ini --extra-vars "@variables.yml" deploy/setup.yml --tags disable-iptables
Выгрузка сервера. Если на этом этапе падают ошибки, проверьте, правильно ли вы заполнили variables.yml
ansible-playbook -i inventories/hosts.ini --extra-vars "@variables.yml" deploy/server.yml
Генерация конфигов для клиента
ansible-playbook -i inventories/hosts.ini --extra-vars "@variables.yml" deploy/client.yml
Пользуемся твиттором
В директории с проектом появилась папка client-config. В ней вы найдете shadowsocks-libev.json конфиги для десктопного клиента, а также qr код для мобильного телефона.
Для десктопных клиентов включите переадресацию трафика из браузера на локальный сервер
firefox: settings → general → network settings

iOS
Shadowrocket — стоит 3$. Открываем, нажимаем иконку скана, сканируем qr код, пользуемся
Android
Нужно установить shadowsocks client и v2ray плагин к нему
-
Клиент
-
Плагин
Открываем клиент, нажимаем иконку скана, сканируем qr код, пользуемся
Ubuntu linux
-
Выполните в терминале команды для установки клиентского приложения и плагина:
sudo apt update
sudo apt install shadowsocks-libev
sudo apt install shadowsocks-v2ray-plugin
-
Скопируйте клиентский конфиг в папку с конфигом ss-client:
cp client-config/shadowsocks-libev.json /etc/shadowsocks-libev/config.json -
Запустите сервер командой
ss-local
Windows
-
Скачайте последнюю версию shadowsocks и распакуйте архив
-
Скачайте последнюю версию v2ray, распакуйте архив, переименуйте файл внутри в v2ray.exe и сохраните в папку с shadowsocks
-
Запустите Shadowsocks.exe, заполните поля как в конфиге client-config/shadowsocks-libev.json или импортируйте из него настройки


How To Set Up Shadowsocks On Windows
2020-01-26
1. First thing you will need to download Shadowsocks client for windows, please go to the official Shadowsocks page here and download the Windows client.
2. After downloading and unzip the folder, open the Shadowsocks app.
3. Inside the Shadowsocks app fill the form with your details
- Server IP — the Shadowsocks IP you had purchased
- Server Port — the port of the Shadowsocks IP you had purchased
- Encryption — chacha20-ietf-poly1305
After that click Apply and OK.
4. To enable it, go in windows taskbar in tray icons and search for Shadowsocks icon, right click on it select System Proxy and set it to Global
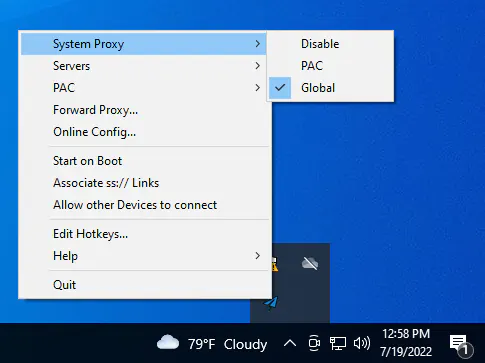
Now Shadowsocks is enabled and your IP is changed.

Buy Proxy, SOCKS5 & ShadowSocks Now
Buy Proxy now HTTP Proxies or SOCKS5, Dedicated or Shared, Residential or Datacenter. Fully Anonymous and Premium.
Buy Proxy


What Can We Offer You?
We offer a unique proxy infrastructure, monitored 24/7 with a 99% uptime. In the rare event of a failure, we take immediate action to resolve the issue.
Fast HTTP Proxies and SOCKS5
Our proxy servers are optimized for performance, powered by a 1Gb/s network. Whether you use our residential or datacenter proxies, you’ll experience seamless performance.
Proxies with Unlimited Bandwidth
Our Dedicated, Shared, Residential Proxy, SOCKS5, Shadowsocks, and VPNs offer unlimited bandwidth, allowing you to use them as much as you need without any concerns.
Instant Activation Proxies: Plug & Play
Purchase proxies with Instant Activation using a Card or PayPal. Transactions with cryptocurrencies require network confirmations.
Multiple Payment Methods: From Card to Crypto
Buy proxies with Card, PayPal, Bitcoin (BTC), Bitcoin Cash (BCH), Ethereum (ETH), Litecoin (LTC), Solana (SOL), Monero (XMR), Polygon(POL), Tron (TRX), AVAX, USDT, USDC, DAI, DASH, DOGE, TON.
Choose Your Proxy by Country, State, or City
Select proxies by city, state, or country. Our static IP proxies, VPNs, residential or datacenter, can be filtered by your desired location. Residential proxies can also be filtered by ISP.
Dual Authentication
Opt for username and password authentication, or authenticate by adding your IP address to our system. Access your proxy password or add your IP in your account.
Monthly IP Address Refresh
We offer monthly proxies, both residential and datacenter. For long-term purchases, we provide the option to change proxies directly in your account.
Proxies Focused on Top Privacy & Security
Our static proxies and VPNs (residential or datacenter) ensure 100% anonymity without any IP or DNS leaks. We maintain a no-logs policy.
Affordable Prices, High-Quality Proxies
Our Residential and Datacenter Proxies are competitively priced, ensuring affordability without compromising on quality.
Diverse Proxy Services and VPNs
As a leading proxy provider, we offer 13 services, including Residential and Datacenter Proxies, SOCKS5, Shadowsock, and VPNs, available in static or rotating options.
16/7/365 Technical Support
We understand the importance of support. If you have questions about our services, contact us via Live Chat. For any issues, open a support ticket in your account.
User-Friendly Settings
Our dashboard is easy to use and intuitive. We constantly seek ways to enhance user experience. If you need assistance, contact us and we’ll gladly help!
Our Services
We offer a big range of products, static or rotating IP’s, that you can choose from whatever location you need
High quality & private proxies
Dream no more! Get acquainted with our products today: protected proxy-servers, at incredible speed and minimum cost from you. Still not convinced? Check our proxies features out: — work with any sites/programs — supports HTTP/HTTPS, SOCKS5, ShadowSocks protocols — simple login: your proxy password or by your IP
With our proxies you get fast, stable and most important, an anonymous tool to get by on the internet. High quality proxies is our motto. Try our products today: spare 5 minutes from your time to gain continuos work-flow.
Buy Proxy

This is a tutorial on how to manually connect to Shadowsocks on Windows OS
1
Shadowsocks client download
For win xp , Make sure that your Windows system has .NET Framework 4.6.2 installed Download
Now let’s see how we can install the client on a Windows 10 VM. Open this Link to Shadosocks Clients. Download the package for your Windows VM, extract it and click on the package to execute it. Make sure that your Windows system has .NET Framework 4.6.2 installed other wise you will not be able to install the Shadowsocks client package.
2
Download Shadowsocks obfs-local download
Unzip the obfs folder
copy the files inside to the shadowsocks folder
Once installed, launch the client and configure the server parameters in it as shown below.
3
you can find QR Code or Proxy URI at Member area

please inpute below: you can check account information at member area above copy the SSLink
click import URL from Clipboard


Press 'OK' key to complete the Shadosocks client setup for Windows to connect to the the remote Shadosocks Proxy
Click Enable System proxy, and for Mode choose Global

The icon will become blue when connected
PAC
Connect to the site according to the file that describes the rule to go through the server when visiting a site. It is possible to use how to say that the Chinese site is connected directly, overseas go through the proxy server.
Global
All connections are connected to the Internet via the server. Basically please use Global.