
Last Updated :
21 Sep, 2022
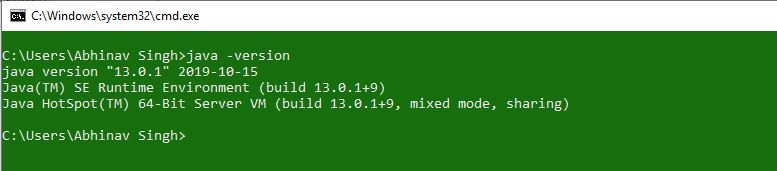
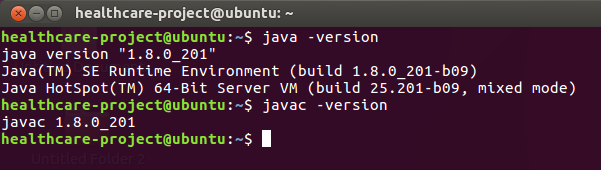
Prerequisite: Introduction to Scala Before, we start with the process of Installing Scala on our System, we must have first-hand knowledge of What the Scala Language is and what it actually does? Scala is a general-purpose, high-level, multi-paradigm programming language. It is a pure object-oriented programming language which also provides the support to the functional programming approach. There is no concept of primitive data as everything is an object in Scala. It is designed to express the general programming patterns in a refined, succinct, and type-safe way. Scala programs can convert to bytecodes and can run on the JVM(Java Virtual Machine). Scala stands for Scalable language. It also provides the JavaScript runtimes. Scala is highly influenced by Java and some other programming languages like Lisp, Haskell, Pizza etc. Scala is a very compatible language and thus can very easily be installed into the Windows. The most basic requirement is that we must have Java 1.8 or a greater version installed on our computer. Verifying Java Packages: The first thing we need to have is a Java Software Development Kit(SDK) installed on the computer. We need to verify this SDK packages and if not installed then install them. Just go to the Command line(For Windows, search for cmd in the Run dialog( + R). Now run the following command:
java -version
Once this command is executed the output will show the java version and the output will be as follows:
In case we are not having the SDK installed then download the latest version according to the computer requirements from oracle.com and just proceed with the installation.
Downloading and Installing Scala:
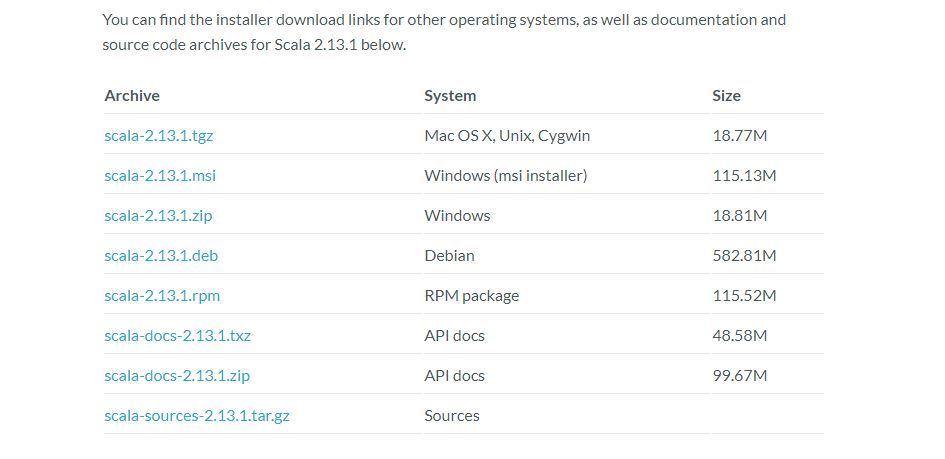
Downloading Scala: Before starting with the installation process, you need to download it. For that, all versions of Scala for Windows are available on scala-lang.org
Download the Scala and follow the further instructions for the installation of Scala. Beginning with the Installation:
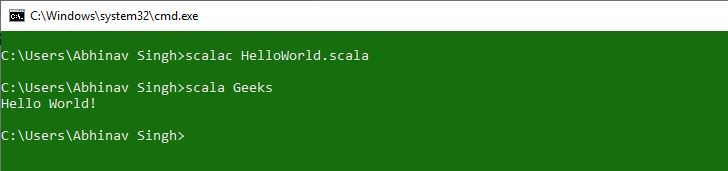
After completing the installation process, any IDE or text editor can be used to write Scala Codes and Run them on the IDE or the Command prompt with the use of command:
scalac file_name.Scala
scala class_name
Here’s a sample Program to begin with the use of Scala Programming: Let’s consider a simple Hello World Program.
scala
object Geeks
{
def main(args: Array[String])
{
println("Hello World!")
}
}
Output:
Scala, a high-level programming language that combines object-oriented and functional programming models has gained significant popularity due to its performance and ability to exchange make use of information with Java.
In this post, we will cover you through the step-by-step process of installing Scala on your Windows 10 machine.
Prerequisites
Before start download Scala Windows make sure you have the following:
- Windows 10 operating system installed.
- Java Development Kit (JDK) version 8 or later. Refer to our guide on how to install Java on Windows system.
Installing Scala on Windows 10
Following are the steps described below on how to install Scala Windows 10 operating system:
Step 1: Download Scala
Open your browser, navigate to the official website of Scala, and select the latest stable version of Scala.
Click on the “Windows” link and download the installer file. For example scala-x.x.x-windows.zip file.
Find the downloaded zip file usually located in the “Download” folder on your computer.
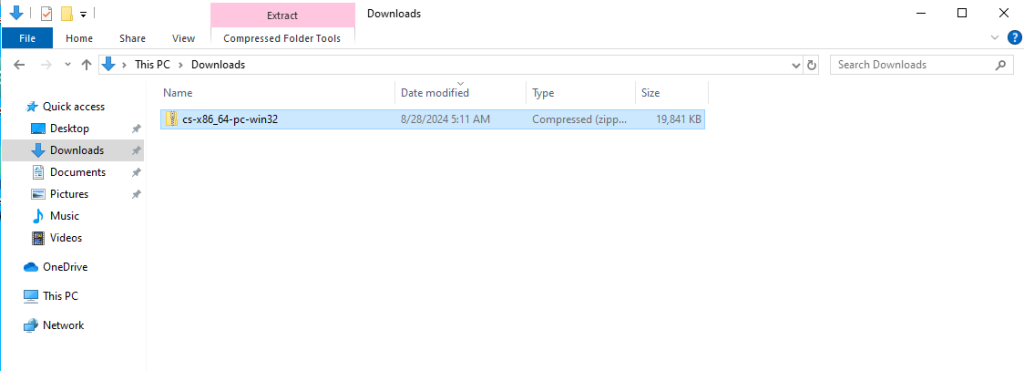
Right-click on the ZIP file and select “Extract All”. Choose a suitable destination folder, for example C:\scala.
Step 3: Set Environment Variables
Right-click on the “Start” button and select “System”. Click on “Advanced system settings” then click on the “Environment Variables” button.
Under “System variables” locate the “Path” variable and click “Edit”.
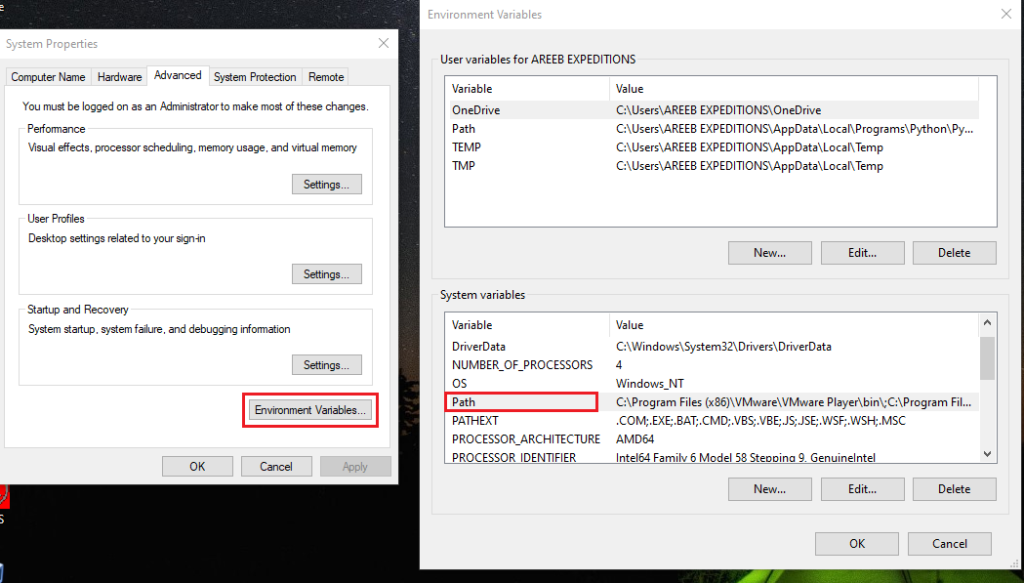
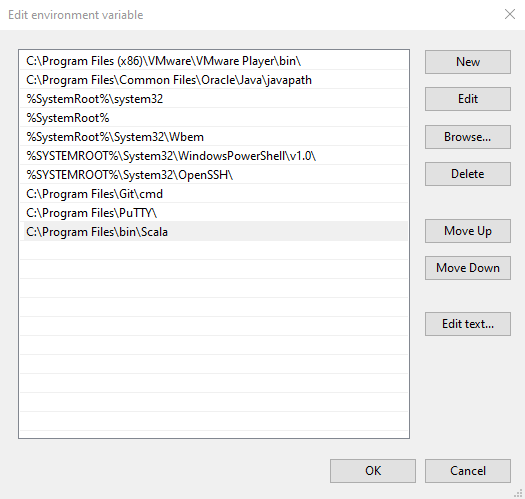
Add the path to the “bin” directory within your Scala installation like C:\scala\bin. Click “OK” to save changes.
Step 4: Verify Installation
Press Windows + R on your keyboard then type “cmd” and press “Enter”. You can also open Command Prompt by typing the cmd from the “Start Menu”.
In the command prompt, enter the following command:
scala
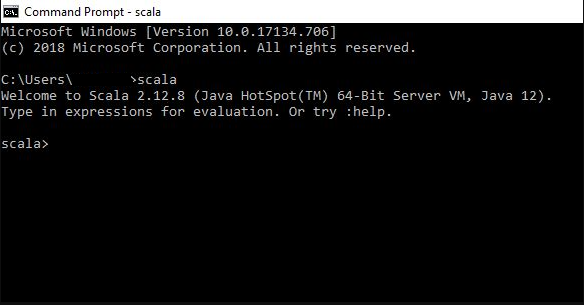
If the installation was successful you should see the Scala REPL (Read-Eval-Print Loop) prompt.
Install Scala on Our Windows 10 VPS!
With Ultahost, Hosting Windows 10 VPS easily installs Scala. Enjoy ultra-fast SSD NVME speeds with no dropouts and slowdowns.
Basic Usage of Scala
To run the simple program use the following code in the command prompt:
println("Hello, World!")
To use variables and data types write the following code:
val name = "Bob"
var age = 15
If you want to write the functions on Scala you can do this with the following:
def greet(name: String): String = {
  s"Hello, $name!"
}
Common Issues
The following are the common issues encountered while installing Scala on Windows 10 system:
- Java not found: Ensure you have the JDK installed and its path is set in the environment variables.
- Environment variable issues: Double-check if the Scala bin directory is added correctly to the PATH variable.
- Incompatible Scala version: If you encounter issues try using a different Scala version.
By addressing these common issues you can resolve most installation problems and start coding in Scala.
Important Considerations
The following are the important considerations after installing Scala on the Windows 10 operating system:
- Consider using a package manager like Chocolatey or Scoop to simplify the installation process.
- Scala can be integrated with popular IDEs like IntelliJ IDEA, Eclipse, or NetBeans. These IDEs provide features like code completion, debugging, and build automation.
- For managing Scala projects consider using tools like SBT (Simple Build Tool) or Maven.
Conclusion
By following these steps you should have successfully installed Scala on your Windows 10 machine. You can now start exploring the language’s features and building your Scala applications.
Installing Scala on Windows can be a simple process for beginners. Upgrading to an Ultahost cheap VPS hosting provides a more streamlined and efficient solution which is the ideal environment for Scala development. This eliminates compatibility issues and simplifies the installation process.
FAQ
What is Scala?
Scala is a programming language that combines object-oriented and functional programming.
Why should I install Scala on Windows 10?
Installing Scala allows you to develop software and run Scala programs on your Windows 10 computer.
What are the system requirements for installing Scala on Windows 10?
You will need Windows 10 Java installed and sufficient disk space to install Scala.
How do I download Scala for Windows 10?
Visit the official Scala website and download the Scala binaries for Windows.
Do I need Java to install Scala?
Yes, Java is required to run Scala on your system.
How do I check if Scala is installed correctly on Windows 10?
Open the Command Prompt and type scala to verify the installation.
Can I uninstall Scala from Windows 10 easily?
Yes, you can uninstall Scala from the Control Panel like any other program.
Scala, a powerful programming language known for its functional and object-oriented features, is widely used for building scalable and high-performance applications. If you’re new to Scala and eager to get started with programming in this language, you’ll first need to set up Scala on your system. In this comprehensive guide, we’ll walk you through the step-by-step process of installing Scala on different operating systems, ensuring you’re ready to embark on your Scala programming journey.
Before you begin the installation process, ensure that you have the following prerequisites:
- Access to a computer running Windows, macOS, or Linux.
- Internet connection to download the Scala distribution.
- Java Development Kit (JDK) installed on your system. Scala requires Java to be installed in order to run.
To install Scala, you’ll first need to download the Scala distribution. Follow these steps to download Scala:
- Visit the official Scala website at scala-lang.org .
- Navigate to the «Download» section of the website.
- Choose the appropriate distribution for your operating system (Windows, macOS, or Linux) and download the Scala installer package.
Follow these steps to install Scala on a Windows system:
- Double-click the downloaded Scala installer package to start the installation process.
- Follow the on-screen instructions in the installer wizard to proceed with the installation.
- Choose the installation directory and any additional configuration options as required.
- Once the installation is complete, Scala should be installed on your Windows system.
Follow these steps to install Scala on a macOS system:
- Open the downloaded Scala installer package (.dmg file).
- Drag the Scala icon into the «Applications» folder to install Scala on your system.
- Once the installation is complete, Scala should be available in the «Applications» folder on your macOS system.
Follow these steps to install Scala on a Linux system:
-
Open a terminal window.
-
Navigate to the directory where the downloaded Scala installer package is located.
-
Use the package manager appropriate for your Linux distribution to install Scala. For example, on Ubuntu, you can use the following command:
sudo apt-get install scala -
Once the installation is complete, Scala should be installed on your Linux system.
After installing Scala, you can verify that it has been installed correctly by opening a terminal or command prompt and typing the following command:
scala -version This command will display the version of Scala installed on your system. If Scala is installed successfully, you’re ready to start writing and executing Scala code!
Congratulations! You’ve successfully installed Scala on your system and are now ready to dive into Scala programming. Whether you’re building web applications, data processing pipelines, or distributed systems, Scala’s expressive syntax and powerful features make it an excellent choice for a wide range of applications. Happy coding!
Установка и настройка окружения
1. Предварительные требования
Перед установкой Scala необходимо убедиться, что на вашем компьютере установлена Java Virtual Machine (JVM), а именно JDK (Java Development Kit). Scala работает на JVM, поэтому корректная установка Java — первый шаг к успешной разработке.
- Рекомендуемая версия JDK:
Для большинства проектов подойдёт OpenJDK версии 11 или 17. - Проверка установки Java:
Откройте терминал или командную строку и выполните команду:java -versionЕсли команда возвращает версию Java, значит JDK установлен корректно.
2. Установка Scala
Есть несколько способов установки Scala, в зависимости от операционной системы и личных предпочтений:
a) Установка через пакетный менеджер
- На macOS (с использованием Homebrew):
brew update brew install scala - На Linux (используя SDKMAN):
curl -s "https://get.sdkman.io" | bash source "$HOME/.sdkman/bin/sdkman-init.sh" sdk install scala - На Windows:
Можно воспользоваться официальным установщиком Scala или использовать пакетный менеджер Scoop:scoop install scala
b) Ручная установка
Также можно скачать дистрибутив Scala с официального сайта и следовать инструкциям по распаковке и настройке переменных окружения.
После установки проверьте версию Scala:
scala -versionЭто поможет убедиться, что установка прошла успешно.
3. Установка и настройка SBT (Scala Build Tool)
SBT — это стандартный инструмент для сборки проектов на Scala, отвечающий за управление зависимостями, компиляцию и запуск приложений.
a) Установка SBT
- На macOS (с Homebrew):
brew install sbt - На Linux (с использованием SDKMAN):
sdk install sbt - На Windows:
Скачайте установщик с официального сайта SBT или установите через Scoop:scoop install sbt
После установки проверьте её корректность:
sbt sbtVersionКоманда должна вывести номер установленной версии SBT.
4. Выбор и настройка интегрированной среды разработки (IDE)
Чтобы упростить разработку, рекомендуется использовать IDE с поддержкой Scala. Наиболее популярные варианты:
a) IntelliJ IDEA
-
Установка IntelliJ IDEA Community Edition:
Скачайте IntelliJ IDEA и установите его согласно инструкциям для вашей операционной системы. -
Настройка Scala-плагина:
После установки запустите IntelliJ IDEA, перейдите в настройки (File → Settings на Windows/Linux или IntelliJ IDEA → Preferences на macOS), затем:- Выберите раздел Plugins.
- Воспользуйтесь поиском и найдите плагин Scala.
- Установите плагин и перезапустите IDE.
b) Другие IDE и редакторы
- Visual Studio Code:
Можно установить расширение Metals, которое обеспечивает поддержку Scala и интеграцию с SBT. - Eclipse с плагином Scala IDE:
Также доступен вариант использования Eclipse, однако IntelliJ IDEA считается более удобным и функциональным для Scala-разработки.
5. Создание первого проекта на Scala с использованием SBT
Чтобы проверить, что всё настроено правильно, создадим простой проект.
a) Создание структуры проекта
-
Создайте новую папку проекта, например,
MyScalaApp:mkdir MyScalaApp cd MyScalaApp -
Создайте файл
build.sbtв корневой директории проекта со следующим содержимым:name := "MyScalaApp" version := "0.1" scalaVersion := "2.13.10"Здесь вы можете указать нужную версию Scala (на момент написания многие проекты используют 2.13.x, но можно перейти и на 3.x, если проект этого требует).
-
Создайте структуру каталогов для исходного кода:
По умолчанию SBT ожидает, что исходный код будет располагаться по путиsrc/main/scala. Создайте необходимые директории:mkdir -p src/main/scala
b) Написание простого приложения
- Создайте файл
Hello.scalaв каталогеsrc/main/scala:object Hello extends App { println("Привет, Scala!") }Здесь объект
Helloнаследует трейтApp, что позволяет запускать код без явного объявления методаmain.
c) Сборка и запуск проекта
- Запустите SBT из корневой директории проекта:
sbt - В консоли SBT выполните команду для запуска приложения:
runВы должны увидеть вывод:
Привет, Scala!
Это подтверждает, что окружение настроено правильно и вы готовы к дальнейшей разработке.
6. Дополнительные настройки и инструменты
После первичной установки можно настроить дополнительные инструменты для повышения эффективности работы:
- Интеграция с системами контроля версий (Git):
Создайте локальный репозиторий и настройте удалённый для хранения и обмена кодом. - Настройка форматирования кода и линтинга:
Используйте такие инструменты, как Scalafmt для автоматического форматирования кода, что поможет поддерживать единый стиль в проекте. - Документация и тестирование:
Подключите библиотеки для тестирования (например, ScalaTest) и генерации документации (например, sbt-unidoc) для создания качественного, сопровождаемого кода.
Installation of Scala Programming Language, Welcome to the world of Scala Programming Language Tutorials. In these Tutorials, one can explore How to Download and install Scala on Linux, Unix, and Windows OS. Learn More advanced Tutorials on How to install Scala on Linux, Unix, and Windows OS by taking an example from India’s Leading Apache spark training institute which Provides advanced Apache spark course for those tech enthusiasts who wanted to explore the technology from scratch to advanced level like a Pro.
We Prwatech the Pioneers of Apache Spark training offering advanced certification course and Installation of Scala Programming Language to those who are keen to explore the technology under the World-class Training Environment.
Today we will learn how to download Scala and then install Scala on Linux, Unix, and Windows OS. Scala runs on top of JVM, so you should have JDK 1.8 or higher version installed all ready to proceed with Scala installation. Since you are here to learn Scala, I am assuming that you know how to install Java on your system.
Download and Install Scala on Linux systems
Scala installation on Linux, Ubuntu, Mac OS X or any Unix based system is the same, so the below steps should work for any *nix system.
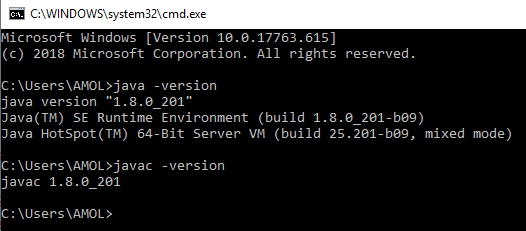
Verify the JDK installation on your machine. Open the shell/terminal and type java -version and javac -version.
Download Scala Binaries from http://www.scala-lang.org/download/. As of writing, this post-Scala version is 2.11.8, so you should be getting a downloaded file as scala-2.11.8.tgz. Unzip the scala-2.11.8.tgz file using the following command as shown below.
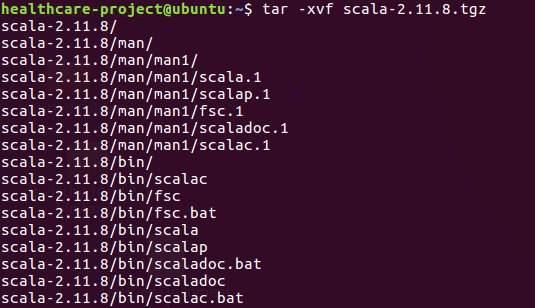
Now we are in the home directory where Scala binaries are present. Just go to the bin directory.

Now enter the scala shell as shown below.

This is the Scala REPL shell in which we can type programs and see the outcome right in the shell.
Prerequisite for Scala installation on windows
Verify the JDK installation on your windows machine by typing the following commands in the command prompt. JDK version should be 1.8 or above.
Scala download and installation can be done in the following ways:
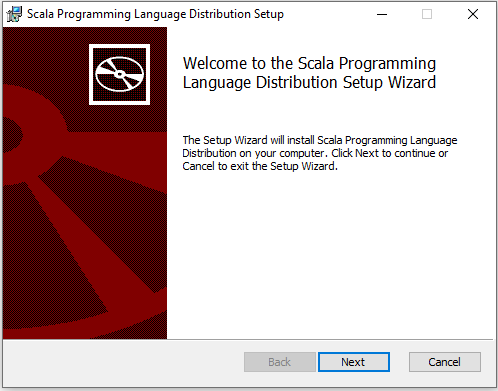
1. First, download the Scala setup from https://www.scala-lang.org/download/2.11.8.html and click on scala-2.11.8.msi extension
2.Double Click or Open scala-2.11.8.msi file and select Run. The Setup Wizard appears, click on Next and complete the installation process. Scala installer will set the Path environment variable too so that you can run it from anywhere.
Steps for Scala download and installation
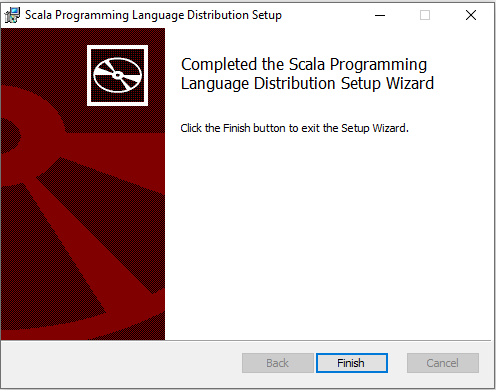
Click on next button
Accept the license and click on Next
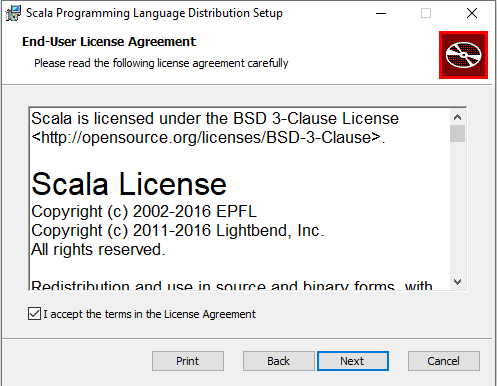
Click on Next

Click on Install

Wait a moment until status to complete
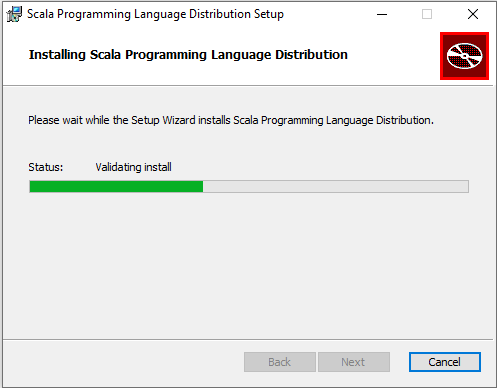
And finally, click on Finish
Open the command prompt and navigate to the bin directory of the installed scala by typing scala as shown below:

Scala sample program example:
Let us see how to write and execute a program in the shell. Below is a simple class student that we can define in the Scala shell.
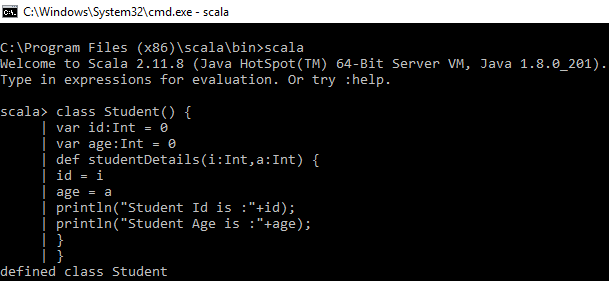
Output: defined class Student
Here we create a Student class and print the student details in the student details method by passing student id and age as a parameter. If there are no errors in the code, then a message “defined class Student” is displayed.
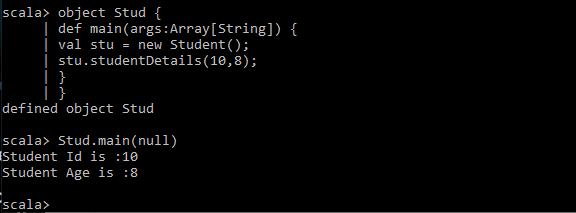
Create the student object and invoke the student details method bypassing the student id and age.
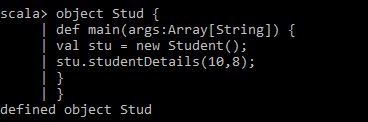
Returns: defined object Stud
Now run the code by typing Stud.main(null) and you will see below output as shown in the image.
That’s all for now for download and install scala on different operating systems, we will look into more Scala features in coming posts.
Intellij IDE:
For beginners in scala language, the most popular way to get Scala is either using Scala through sbt, the Scala build tool, or to use Scala through an IDE. By considering you have installed JDK 8 or above, you can install scala by installing an IDE such as IntelliJ, or sbt, Scala’s build tool
IntelliJ is an IDE for programmers who want to get started with scala in IntelliJ. You can build a scala project with IntelliJ and sbt. You can also test scala in IntelliJ.
To download IntelliJ click on the link and choose download Community Edition.
Once the download is complete install it and choose scala plugin available into IntelliJ software.
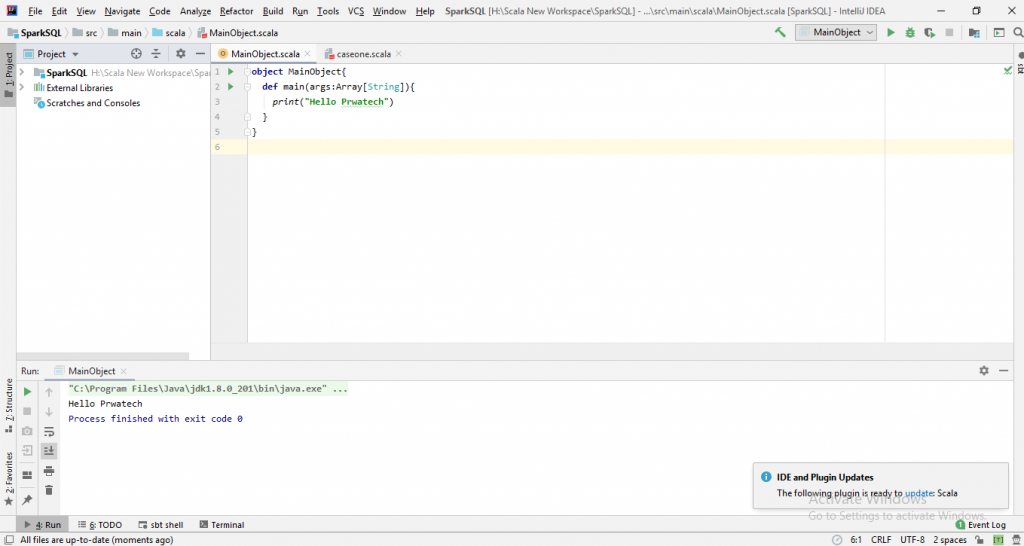
The “Hello Prwatech” output you can see after run MainObject.scala program given below:
Looking forward to learning more advanced tutorials on Apache Spark course then get it done from India’s leading Apache spark Training institute who can help you to learn the technology from 0 to advanced Level like a Pro.