
This guide will help you install rsync on Windows 10. It is assumed that you already have Git for Windows installed.
If you didn’t already know, Git for Windows and its Git Bash environment is built using msys2, but it doesn’t include all the binaries from that project. One of the binaries that exists, but that isn’t included, is rsync. So what we need to do is to download the msys2 rsync binary, and place it somewhere Git Bash can find it.
- Go to repo.msys2.org/msys/x86_64 and download the latest version of rsync (not rsync2). At the time of this writing that is rsync-3.1.3-1-x86_64.pkg.tar.xz
- Extract the downloaded archive. I’m using Total Commander with a .xz plugin, but 7-zip is also a great option. Download and install from 7-zip.org if you need to.
- Copy the contents of the extracted archive (sub-folders and all) to where you have Git for Windows installed. For me that’s
C:\Program Files\Git\. (The archive contains a\usrfolder, and so does the git installation directory. What you want is for everything inside of the\usrfolder in the archive to end up in the\usrfolder in the git installation directory, ultimately ending up with, among other files,C:\Program Files\Git\usr\bin\rsync.exe)
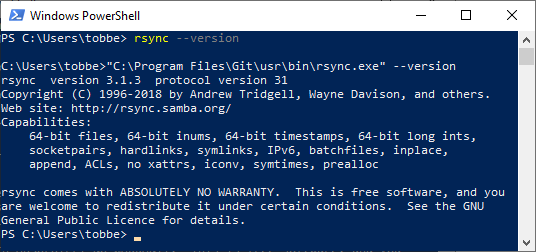
That’s it. You now have rsync installed. You can test your installation by opening up a Git Bash command line window and running rsync --version. You should see it print out version information.
Now, if you want to use rsync from the Windows Command Prompt, or from PowerShell, there is one more step.
Create a new .bat file with the following content (adjust the path to match your environment)
"C:\Program Files\Git\usr\bin\rsync.exe" %*
Name the file rsync.bat and place it somewhere in your %PATH%. I placed mine in C:\Windows\. Press Win + R and enter cmd. In the Command Prompt window that you just launched, enter rsync --version and it will find your .bat-file and run it, passing all arguments (that’s what %* does in the command above) off to your newly installed rsync.exe
The first three steps above are based on serverfault.com/questions/310337/using-rsyn.. where you can also find instructions for setting up Pageant for SSH, if that’s something you need.
I hope this short tutorial was useful to you. Happy rsyncing!
I recently needed to move several gigabytes of data from an old laptop running Windows 8.1 to another laptop running macOS and my options were to use an external disk or a network transfer. I wanted the whole process to be unattended so I naturally gravitated towards doing the transfer over my WiFi network.
For the network transfer, the easiest method I could think of was to use scp but it turns out that there’s no built-in support to «move» files with scp. My options were to write a script to delete each file after getting copied or use a different tool with file move semantics.
A couple of Google searches later, the most up-voted tool on Serverfault for the task is rsync. I’ved used rsync before but I have never used it on a Windows box so this was an interesting option to try out.
Some additional searches led me to this answer how to use rsync from Windows PC to remote Linux server? that I was hoping would be a drop-in solution to my situation.
Unfortunately, I couldn’t get rsync working on my first try because the instructions in the most-upvoted answer along with other answers on the question no longer work in 2021. Even this somewhat useful article on installing rsync on Windows from more than a year ago, which I found on Google, was almost completely out of date.
I had to figure out a few missing steps to get rsync working on Windows, so I decided to publish step-by-step instructions to help my future self and others in a similar situation. I tested the commands below on Windows 8.1, nonetheless they should work on Windows 10 or 11.
The macOS side of things are fairly straight forward so I wont go into that here.
Instructions
- Install Git for Windows to the path «C:\Program Files\Git».
In my case I already had it installed so installation merely updated my version to v2.33.0.2.
2. Visit https://repo.msys2.org/msys/x86_64/ and download the following three (3) file archives:
- rsync-3.2.3-1-x86_64.pkg.tar.zst — the
rsyncbinary for Windows; - libxxhash-0.8.0-1-x86_64.pkg.tar.zst — a (cryptographic) dll that
rsyncdepends on; - libzstd-1.5.0-1-x86_64.pkg.tar.zst — a (compression) dll that
rsyncdepends on.
3. The .zst extension indicates that the files were compressed using the fast Zstandard compression algorithm open sourced by Facebook so I had to download another (open source) tool to help me extract those files locally: PeaZip for Windows v8.2.0.
4. Create a temporary folder called «C:\tmp» then use PeaZip to extract the 3 files we downloaded earlier into this folder, in two (2) steps.
The 1st step is to use PeaZip to convert .tar.zst files to .tar files:
rsync-3.2.3-1-x86_64.pkg.tar.zst->rsync-3.2.3-1-x86_64.pkg.tarlibxxhash-0.8.0-1-x86_64.pkg.tar.zst->libxxhash-0.8.0-1-x86_64.pkg.tarlibzstd-1.5.0-1-x86_64.pkg.tar.zst->libzstd-1.5.0-1-x86_64.pkg.tar
The 2nd step is to use PeaZip to extract the contents of each .tar file. Note that all 3 archives contain a folder named \usr with different contents, so be sure to click «yes» when prompted to overwrite the contents of the C:\tmp\usr folder during the extraction process.
5. Now, you need to move the C:\tmp\usr folder to its final destination i.e. C:\Program Files\Git, or the location where you have Git for Windows installed.
Essentially, we need to merge the contents of C:\tmp\usr with C:\Program Files\Git\usr so that the rsync binary (and its dependencies) will end up at the following path C:\Program Files\Git\usr\bin\rsync.exe.
6. The final step is to confirm that you have a working installation of rsync from a command prompt by executing these 2 commands:
cd "C:\Program Files\Git\usr\bin" and rsync --version
rsync.exe --version
rsync  version 3.2.3  protocol version 31
Copyright (C) 1996-2020 by Andrew Tridgell, Wayne Davison, and others.
Web site: https://rsync.samba.org/
Capabilities:
    64-bit files, 64-bit inums, 64-bit timestamps, 64-bit long ints,
    socketpairs, hardlinks, no hardlink-specials, symlinks, IPv6, atimes,
    batchfiles, inplace, append, ACLs, xattrs, optional protect-args, iconv,
    symtimes, prealloc, stop-at, no crtimes
Optimizations:
    no SIMD, asm, openssl-crypto
Checksum list:
    xxh128 xxh3 xxh64 (xxhash) md5 md4 none
Compress list:
    zstd lz4 zlibx zlib none

rsync comes with ABSOLUTELY NO WARRANTY.  This is free software, and you
are welcome to redistribute it under certain conditions.  See the GNU
General Public Licence for details.
7. You are done. Enjoy!
Posted on October 20, 2013
10-21-2013 Update: Corrected a few errors in the write-up and fixed the template configuration files.
Introduction
I remotely manage the computers & networks for various family members (parents, siblings, and grandparents). To this end, I currently have router-to-router VPN links consistently established between home networks at five distinct geographic locations. (These links are maintained using OpenVPN running on my OpenWrt-based gateway routers.)
As administrator of this geographically-diverse home network, I need to consistently back up my family’s data in case disaster strikes. While there are many reputable cloud-backup solutions available, I prefer to trust my own skills to manage and protect my (and my family’s) data.
As we all know, a key backup strategy is to have off-site backups. Fortunately, because my VPN spans multiple geographic locations, the off-site backup problem is easy – provided I can periodically synchronize files between computers at different locations. Unfortunately, my VPN links are limited to approximately 300 KB/s due to the limited uplink bandwidth. For me, this is where rsync comes in.
What is Rsync?
Rsync is a tool for *NIX. From the rsync man page, “rsync … [is] … a fast, versatile, remote (and local) file-copying tool.” For me, attractive capabilities of rsync include:
- Delta-transfer algorithm – Only sends the differences between the “old” and “new” versions of the file when synchronizing over a network
- Supports compression of file data when sent via network
- Supports various modes for determining which files need to be transferred
- “Quick check” comparison (file size & timestamp)
- Checksum comparison (MD5)
- Transactional behavior (supports a mode where changes are not “committed” unless entire transfer was successful)
- Ability to resume partially-completed file synchronizations (without starting over)
Using “rsync”, the process of synchronizing files over slow VPN links can be made much less painful. The remainder of this entry documents installing and setting up rsync on Windows systems.
Installing Cygwin
I’m a Windows guy. Rsync is not (natively) a Windows tool. While there are many ways to get rsync for Windows, the easiest way (in my opinion) is to install Cygwin.
(Honestly, even if you don’t care about running rsync, if you don’t have Cygwin installed on your Windows box, you probably should rectify that situation immediately. Go do it now. And yes, for those who are diehard Windows fans, I checked whether rsync can run on Subsystem for UNIX-based applications, and it doesn’t sound like it…bummer.)
Tips for Installing Cygwin so that it’s “rsync-ready”:
- Download the Cygwin installer.
- Verify the integrity of the Cygwin installer using GPG or whatever PGP tool you use. For reference, Cygwin’s current public key’s is as follows:
- DSA key ID: 676041BA
- Fingerprint: 1169 DF9F 2273 4F74 3AA5 9232 A9A2 62FF 6760 41BA
- Run the installer. When you get to the point of selecting packages, be sure to install both the “rsync” and “cygrunsrv” packages. You may also want “nano” if you’re not a “vi” person.
- After installation, if your Windows user account contains spaces, eliminate those spaces from your Cygwin account and your home folder. Do this by:
- Editing /etc/passwd to change the home directory and user name
- Renaming your home directory in /home
- (Re-)starting the Cygwin shell
Perform the above steps on *both* the rsync client and the rsync server.
Understanding Rsync Modes of Operation
Rsync can access files on a remote host using two different methods. From the man pages, “There are two different ways for rsync to contact a remote system: using a remote-shell program as the transport (such as ssh or rsh) or contacting an rsync daemon directly via TCP.”
Of course, the advantages of using the remote-shell approach are obvious – no need to open additional ports and encryption of transmitted information. However, in my case, I had no need of encryption (due to my VPNs) and I would have to open up ports regardless (my Windows boxes were not running any remote-shell daemon). I therefore decided to get rsync working as a daemon on the server.
Installing Rsync as a Windows Service (Server-Side Only)
The equivalence to “daemons” in the Windows world are “services.” To install Rsync as a Windows service, a few steps are necessary and not exactly obvious. In researching the problem, I found an online tutorial that provided instructions; however, some steps didn’t seem quite right to me from a security standpoint. With some experimentation, I came up with a procedure that worked (on Windows 7, at least):
- Create a new Windows user account called “rsync” with a random password & remember it for later. This account will be used to run the rsync service. Use the following settings:
- User cannot change password
- Password never expires
- No group memberships (i.e. remove the default “users” group).
- Use secpol.msc –> Local Policies –> User Rights Assignment to configure the user privileges for the “rsync” user:
- Deny rsync “log on locally”
- Deny rsync “access computer from network”
- Deny rsync “log on through remote desktop services”
- Allow rsync “log on as a service”
- Note: Not all Windows editions support secpol.msc. There are ways to set these configuration settings using other mmc snap-ins, but doing so is outside the scope of this blog.
- Using Windows Explorer’s file permission editor, grant the Windows rsync account FULL CONTROL rights to any folder that will be synchronized remotely via rsync.
- From the Cygwin shell as root, run ‘mkpasswd > /etc/passwd’ to update the password file with the latest MS Windows user account list.
- Note: If you had to manually update the /etc/passwd file to remove spaces within your Cygwin username, execute ‘mkpasswd >> /etc/passwd’ instead and then manually edit the file to remove the duplicate information added. This way you won’t overwrite your previous changes.
- Generate the rsyncd.conf configuration file:
- Download the above template file.
- Edit the template configuration file to add the folders you wish to make available via the rsync daemon. Note that your “c:\” drive is mounted under the /cygdrive/c/ Cygwin path.
- Copy the file to the Cygwin path /etc/rsyncd.conf
- Use chmod to set the file permissions to 644 (rw- r– r–).
- Generate the rsyncd.secrets file:
- Download the above template file.
- Edit the file to set the rsync daemon password. Since we’re using plaintext communication (not counting any VPN) don’t use a password you use anywhere else.
- Copy the file to the Cygwin path /etc/rsyncd.secrets
- Use chown to change the owner of this file to “rsync”
- Use chgrp to change the group of this file to “root”
- Use chmod to set the permissions to 660 (rw- rw- —).
- Install the Windows service using the following command within an administrator command prompt:
C:\cygwin\bin\cygrunsrv.exe -I "rsync" -p /cygdrive/c/cygwin/bin/rsync.exe -a "--config=/cygdrive/c/cygwin/etc/rsyncd.conf --daemon --no-detach" -f "Rsync daemon service"- Note: This assumes you’ve installed Cygwin to C:\cygwin. You should adjust the paths above if you installed Cygwin somewhere else.
- Use services.msc to:
- Configure the now-installed rsync service to run under the “rsync” account. You’ll need the random password you typed in earlier.
- Configure service autostart settings as desired.
- Start the rsync service.
- Edit your firewall settings to allow inbound port TCP 873 for rsync.exe.
Rsync on the Client
At this point, we have Cygwin installed on both the client and the server machines. We also have rsync running as a daemon on the server machine as a Windows service. So, all we need to do now is run rsync on the client machine.
There are, however, some complications. First and foremost, there are a boatload of rsync options available, many of which we’d like to invoke during each and every rsync operation. Secondly, due to the /etc/rsyncd.secrets file, we will need to provide a password during every rsync connection, which may be undesirable. Finally, for lengthy transfers, a network glitch may interrupt rsync, and we may wish to have it automatically restarted for us after a brief period of waiting.
Fortunately, we can automate all of the above (and more) by writing a few simple shell scripts:
(IMPORTANT: Read the cautionary note below before attempting to use any of these scripts.)
- rsync.sh – Calls rsync with a set of default options (specified at the start of the script file). If run in “remote” mode, automatically loads the rsync password for the remote host from a file (named hostnamehere.rsyncpw) in the home directory. The script also implements a –loop option for auto-retrying failed synchronizations.
Usage: ./rsync.sh local|remote [--loop] [additional rsync options] source dest- Note: For the script to work, when specifying the remote host, use the format “username@remotehostname::FoldernameHere/”
Example:
./rsync.sh remote --dry-run /cygdrive/c/myfiles/ aaron@desktop::myfiles/ - rsync_local.sh – Provides a short cut for calling the above “rsync.sh” script; always provides the “local” option to the script. This allows for a syntax such as:
./rsync_local.sh --dry-run /cygdrive/c/myfiles/ /cygdrive/c/myfiles2/ - rsync_remote.sh – Provides a short cut for calling the above “rsync.sh” script; always provides the “remote” option to the script. This allows for a syntax such as:
./rsync_remote.sh --dry-run /cygdrive/c/myfiles/ aaron@desktop::myfiles/ - rsync_batch.sh – Automates the execution of multiple separate rsync operations using a separate file containing a list of synchronizations to perform.
Usage: ./rsync_batch.sh check|sync timestamp|checksum rules_file [additional rsync options]- check|sync – Option “check” runs the batch set of rsync commands with the –dry-run option to prevent any changes from being made. Option “sync” actually performs the synchronization.
- timestamp|checksum – Option “timestamp” uses timestamps and file sizes (the default mode) for file comparison. Option “checksum” uses the MD5 checksum for file comparison.
- rules_file – Specifies the rules file to use for the batch synchronization. See the example.
For ease of use, after downloading the scripts, drop them in your Cygwin home directory, and use chmod +x to mark them executable.
CAREFUL: Being a file synchronization program, if used incorrectly, rsync can easily damage/destroy large amounts of your data. So, be VERY careful when running rsync with or without the above scripts. I AM NOT RESPONSIBLE for any damage to your computer and/or files through the use of the scripts provided above!
I highly recommend that you always first invoke rsync with the –dry-run option to view the likely results of the synchronization without actually changing anything.
Conclusion
I hope this guide helps anyone setting up rsync on their Windows systems.
Provide feedback
Saved searches
Use saved searches to filter your results more quickly
Sign up
Appearance settings
Windows · September 28, 2024
Rsync is a powerful tool for data synchronization and backup, widely used in Unix-like systems. However, Windows users can also leverage its capabilities through various methods. This article will guide you through the installation and configuration of Rsync on Windows, enabling efficient data synchronization.
What is Rsync?
Rsync is a command-line utility that synchronizes files and directories between two locations over a network or locally. It is known for its speed and efficiency, as it only transfers the differences between the source and the destination, rather than copying all files. This makes it an ideal choice for backups and mirroring data.
Prerequisites
- A Windows operating system (Windows 10 or later is recommended).
- Administrator access to install software.
- Basic knowledge of command-line operations.
Installation of Rsync on Windows
To use Rsync on Windows, you can install it through several methods. The most common approaches include using Cygwin, WSL (Windows Subsystem for Linux), or a standalone version like DeltaCopy. Below are the steps for each method:
Method 1: Using Cygwin
- Download the Cygwin installer from the Cygwin website.
- Run the installer and follow the prompts.
- When prompted to select packages, search for “rsync” and select it for installation.
- Complete the installation process.
Method 2: Using Windows Subsystem for Linux (WSL)
- Enable WSL by running the following command in PowerShell as an administrator:
- Restart your computer if prompted.
- Open the Microsoft Store and install a Linux distribution (e.g., Ubuntu).
- Once installed, open the Linux terminal and update the package list:
- Install Rsync by running:
wsl --installsudo apt updatesudo apt install rsyncMethod 3: Using DeltaCopy
- Download DeltaCopy from the DeltaCopy website.
- Run the installer and follow the instructions to complete the installation.
- DeltaCopy provides a GUI for Rsync, making it easier for users unfamiliar with command-line interfaces.
Configuration of Rsync
Once Rsync is installed, you can configure it for data synchronization. Below are the steps to set up a basic Rsync command:
Basic Rsync Command Structure
rsync [options] source destinationCommon Options
-a: Archive mode; it preserves permissions, timestamps, and symbolic links.-v: Verbose output; it provides detailed information about the transfer process.-z: Compress file data during the transfer.-r: Recursively copy entire directories.
Example Command
To synchronize a local directory with a remote server, you can use the following command:
rsync -avz /path/to/local/dir user@remote_host:/path/to/remote/dirIn this command:
/path/to/local/diris the source directory on your local machine.user@remote_hostis the username and IP address or hostname of the remote server./path/to/remote/diris the destination directory on the remote server.
Scheduling Rsync Tasks
To automate Rsync tasks, you can use Windows Task Scheduler or cron jobs in WSL. Here’s how to set up a scheduled task in Windows:
- Open Task Scheduler and select “Create Basic Task.”
- Follow the wizard to set the task name and trigger (e.g., daily, weekly).
- In the “Action” step, select “Start a program” and enter the path to the Rsync executable along with your command.
- Finish the setup and ensure the task runs as expected.
Conclusion
Rsync is a versatile tool for data synchronization on Windows, whether you choose to install it via Cygwin, WSL, or DeltaCopy. By understanding its command structure and options, you can efficiently manage your data backups and transfers. For users looking for reliable hosting solutions, consider exploring USA VPS Hosting options that can complement your data management needs.