
Вернуться к общему содержанию «Инструментальные средства программиста».
Дата написания статьи: 2014-08-11
Дата последней правки: 2014-08-13
- Содержание
- Введение
- Системы сборки QMake и CMake
- Инструменты компиляции — MinGW и средства от Microsoft
- Добавление путей к системной переменной PATH
- Последовательность шагов
- Проверка установленных инструментов
- Сборка с использованием QMake
- Сборка с использованием CMake
Введение
Установка средств разработки Qt на Windows может сопровождаться рядом сложностей, которые могут оказаться непреодолимыми для новичков, не знающих некоторые особенности использования Qt и тех средств инсталляции, которые можно найти на различных ресурсах Интернет.
Прежде всего, следует знать, что, для разных платформ, Qt распространяется на основе разных лицензий. Под Windows, на текущий момент, предлагаются как платная, так и бесплатная лицензия. После того, как компания Nokia продала в компанию Digia права на разработку платформы Qt (компания Nokia занималась разработкой Qt с 2008 по 2012 годы), бесплатная ветка Qt существенно обособилась и стала выставляться с отдельного ресурса. Сейчас, с целью предоставления клиентам наиболее полной информации о различных вариантах использования продукта, планируется объединение ресурсов, предоставляющих платные и бесплатные средства Qt. Кроме того, планируется объединение средств инсталляции для пакетов с разными лицензиями. Выпуск первого такого инсталлятора планируется на сентябрь 2014 года.
Все нововведения будут относиться к версии Qt5, в то время как версия Qt4 уже давно не интересует производителей и именно с ней, для некомерческих предложений, и существует ряд проблем установки под Windows.
В традициях, для версии Qt4, библиотека поставлялась в виде наборов, которые могли содержать, в разных комбинациях, следующие средства.
- Qt SDK — заголовочные файлы, динамические библиотеки, утилиты — все, что необходимо для сборки традиционных Qt-проектов, исключая сам компилятор.
- Источники Qt SDK. Как правило, источники содержали более полный набор элементов Qt SDK, которые можно было опционально скомпилировать.
- Среда разработки QtCreator. На сегодняшний день, данная бесплатная среда разработки является, на мой взгляд, лучшим выбором при разработке проектов на языке C/C++.
- Средства MinGW (Minimalist GNU for Windows). Включают в себя GNU компилятор для C++, утилиту сборки GNU make и прочий набор инструментов, необходимых для компиляции проектов с некоторого набора языков, включающих в себя языки C/C++.
К сожалению, не всегда в обозначение инсталлятора входят содержащиеся в нем средства. Именно это может смутить новичков, особенно, при невнимательном использовании инсталлятора. Обозначенные в инсталляторе средства могут указывать на его зависимость от этих средств. Так, например, если у инсталлятора стоит пометка (VS 2010), то многим понятно, что в этом инсталляторе содержатся средства для разработки в связке с Microsoft Visual Studio 2010, которая должна быть предварительно установлена. Однако, если у инсталлятора стоит пометка (MinGW 4.8.2), то, так как инструментарий MinGW распространяется свободно, то не очевидно, содержится в этом инсталляторе MinGW или нет. И действительно, есть инсталляторы, которые содержат и которые не содержат внутри себя MinGW. В последних, на одной из страниц визарда, может стоять ссылка на скачивание и установку MinGW, которая может оказаться устаревшей. Так, если зайти на оригинальный ресурс, Qt-Project, где официально предлагается для скачивания Qt4 SDK с бесплатной лицензией, то мы столкнемся с отсутствием средств MinGW в соответствующем инстялляторе для версии Qt4. Фактически, с официального ресурса мы установим нерабочие средства разработки, если сами не доработаем их до требуемого состояния.
Системы сборки QMake и CMake
Традиционно, проекты Qt поддерживаются нативной системой сборки QMake, которая поставляется со всеми дистрибутивами, однако, из-за ряда проблем, связанных с использованием QMake, разработчики, работающие с Qt, все чаще используют систему сборки CMake, которая не содержит проблем QMake и формирует информативную сборку (с отображением процента исполнения), что очень удобно для больших проектов, сборка которых может занять значительное время (особенно при сборке на виртуальных компьютерах).
Инструменты компиляции — MinGW и средства от Microsoft
Система фреймворков и библиотек классов Qt поддерживает две системы компиляции:
- Инструменты из коллекции компиляторов GNU и GNU Binutils
- Инструменты компиляции для языка C++ от Microsoft
Средства разработки GNU для платформы Windows, можно получить в пакете, который называется MinGW (Minimalist GNU for Windows). Сегодня, согласно оригинальному ресурсу предоставляющему MinGW, в пакет входят следующие портированные компоненты.
- Коллекция компиляторов GNU Compiler Collection (GCC), включая компиляторы с языков C, C++, Objective-C, ADA и Fortran.
- Утилиты GNU Binutils для Windows (ассемблер, линковщик, менеджер архивов).
- Инструментальные утилиты, упрощающие работу с командной строкой — MSYS.
- Инсталлятор, в виде графического менеджера, управляющего составом установленных инструментов.
Использование средств разработки от Microsoft для проектов Qt, предполагает установленную среду разработки Microsoft Visual Studio со средствами компиляции с языка C++. Если нет специального требования на использование компиляторов Microsoft, то удобно будет воспользоваться бесплатными средствами разработки. При выборе инсталлятора средств разработки Qt, обратите внимание на тип компилятора, для которого они предназначены.
Добавление путей к системной переменной PATH
При выполнении установки требуемых средств разработки, указанных ниже, может понадобиться добавление путей на директории установки этих средств к значению системной переменной PATH. Это можно выполнить следующим образом.
- Нажмите комбинацию клавиш Windows+Pause. Откроется окно «Панель управления->Система и безопасность->Система».
- В панели слева выберите пункт «Дополнительные параметры системы». Откроется окно «Свойства системы». На вкладке «Дополнительно», внизу, щелкните кнопку «Переменные среды». В открывшемся окне, в группе «Системные переменные» выберите системную переменную PATH и щелкните по кнопке «Изменить».
- Значение системной переменной PATH состоит из списка путей разделенных знаком точка с запятой. Чтобы добавить нужный путь, вставьте в конец списка символ точки с запятой и запишите после него требуемый путь.
- Закройте все окна панели управления и перегрузите приложения, которые должны получить обновленные записи путей.
Последовательность шагов
- Устанавка Windows 7
- В моем случае, на виртуальном компьютере VirtualBox, была установлена Windows 7 Ultimate (x64). Кроме того, так как я не представляю себе работу с Windows без Firefox и Far Manager, то, сразу после установки Windows, мною были установлены эти два бесплатных продукта. Скорее всего, эти, приятные для меня программы, никак не должны повлиять на успех дальнейших мероприятий, однако, точности ради, я упоминаю об этих дополнительных инсталляциях, проведенных в моем случае. Конкретно, были установлены Firefox v. 31 и Far Manager v. 3.0 betta 4040 (x64).
- Установка CMake
- В моем случае, была установлена версия 3.0. Во время инсталляции была выбрана опция добавления CMake в пути Windows. В противном случае, это придется сделать самостоятельно. Вообще, путь на CMake можно не прописывать. В этом случае, при ручной работе, понадобится указывать полный путь до файла cmake.exe, а в случае работы из под какой-нибудь среды разработки, поддерживающей систему сборки CMake, понадобится из среды выполнить настройку запуска CMake.
- Установка MinGW
- Установим бесплатные средства компиляции, распространяемые под лицензице GNU. Как минимум, нам необходимо установить средства для компиляции с языка C++. Если необходимо использовать MinGW непосредственно из командной строки, не пользуясь возможностями сред разработки, типа QtCreator, то понадобиться указать путь на директорию bin установки MinWG. В моем случае, я указал путь C:\MinGW\bin. Использование в командной строке полного пути к утилитам MinGW не всегда приведет к успеху, так как из одной утилиты может понадобиться вызов другой. Так, например, утилита сборки mingw32-make вызывает при исполнении сценария сборки компилятор g++ при компиляции файлов с языка C++.
- Установка Qt SDK
- На странице http://qt-project.org/downloads по-умолчанию, предлагается скачивание последних версий Qt и среды разработки. Однако, внизу страницы, надо поискать средства для открытия информации по скачиванию более ранних версий Qt. На момент написания этих строк, я нашел внизу страницы кнопку «Show downloands» щелчок по которой открыл мне доступ к скачиванию «Qt libraries 4.8.6 for Windows (MinGW 4.8.2, 328MB)».
Использование данного инсталлятора отличается простотой, в том плане, что не требуется пользовательская установка со сложным выбором средств, которые требуются для конечной работы. К сожалению, устанавливая Qt для Windows я сталкивался с инсталляторами, которые содержат ошибки в зависимостях установки опций, и которые решаются установкой совершенно нелогичных флажков). В данной версии инсталлятора следует заметить только одну особенность. Он не содержит в себе MinGW в явном виде, и, вместо этого, на последней странице, перед запуском установки, сообщает о том, что для его работы нужен установленный MinGW и просит указать директорию его установки. Также, он предлагает ссылку, по которой можно попробовать установить MinGW, но, с учетом того, что инсталлятор Qt4 уже довольно старинный артефакт, а ссылки на ресурсы Интернет, могут меняться, то лучше подготовить установку MinGW предварительно, как мы и сделали на предыдущем шаге.
Если мы будем использовать сборку из командной строки, не используя средств разработки, то следует добавить путь на QtSDK в системную переменную PATH. Так же, это может потребоваться для работы CMake при наличии нескольких установленных версий Qt SDK. При наличии нескольких установленных версий Qt SDK в системных путях должен быть путь только на одну из версий — таким образом можно будет выполнять переключение используемых версий вне возможностей сред разработки, которые под каждую настроенную сборку автоматически формируют набор переменных окружения с требуемыми значениями.
Каждая из установок Qt SDK характеризуется &quuot;своим» экземпляром утилиты qmake.exe. Именно она знает где лежит все то, что необходимо для сборки проекта под данную версию Qt. Поэтому, путь на Qt SDK характеризуется путем на размещение ее экземпляра qmake.exe. В моем случае, это был путь C:\Qt\4.8.6\bin.
Проверка установленных инструментов
Создайте отдельную директорию. Например, директорию test. В этой директории создайте файл main.cpp со следующим содержимым.
#include <QApplication>
#include <QWidget>

int main(int argc, char* argv[])
{
    QApplication a(argc, argv);
    QWidget wgt;

    wgt.show();
    return a.exec();
}
Это код простейшей бесполезной оконной программы на Qt. После компиляции этого кода мы получим приложение, представляющееся на экране пустым окном с системными кнопками — свернуть, развернуть и закрыть.
Далее, продемонстрируем сборку данной программы средствами QMake и CMake. Пример является минимальным и совершенно корректным с точки зрения Qt4, поэтому любая ошибка в его сборке, фактически будет указывать на отсутствие того или иного инструмента. Чаще всего это будет означать отсутствие путей на инструмент или неправильную запись этого пути. Так же помните, что после редактирования системной переменной PATH требуется перезапустить приложение, в котором вы собираетесь использовать изменение значения системной переменной. Именно при запуске приложения формируется его окружение (environment) из текущих значений всех системных переменных операционной системы. Исключение из такого поведения я встречал только в Mac OS X.
Сборка с использованием QMake
Система сборки QMake является нативной для сборки Qt-проектов, поэтому пользоваться qmake очень просто. Она самостоятельно может создать файла проекта и сгенерировать по этому проектному файлу сценарий сборки под текущую конфигурацию вычислительно системы.
Откройте в директории нашего простейшего проекта консоль и выполните следующий набор команд. Знак ‘>’ является знаком приглашения к вводу команд в консоли Windows.
  > qmake -project
  > qmake
  > mingw32-make
Команда «qmake -project» выполненная в директории с файлами проекта выполняет анализ файлов источников и на их основе формирует проектный файл для системы сборки QMake. Файл проекта QMake имеет расширение «pro». Имя файла будет совпадать с именем директории проекта. В нашем случае, это будет файл test.pro.
Следующая команда «qmake» выполняет формирование сценария сборки для утилиты «make» на основе проектного файла, созданного предыдущей командой. После ее выполнения будет сформирован файл сценария «Makefile».
Далее, команда «mingw32-make», выполняет созданный на предыдущем шаге сценарий из файла «Makefile». Результатом выполнения созданного сценария будет исполняемый файл test.exe созданный в поддиректории debug. При запуске данного файла должно будет открыться пустое окно приложения.
Сборка с использованием CMake
Система сборки CMake, к сожалению, не является такой автоматизированной, как QMake, но обладает, тем не менее, рядом преимуществ.
Проектный файл системы CMake для любого проекта носит фиксированное название CMakeLists.txt. Для нашего простого проекта его придется писать самому. Создайте в директории с файлом main.cpp файл CMakeLists.txt и заполните его следующим содержимым. Строки, начинающиеся со знака решетки (комментарии) можно не писать.
cmake_minimum_required(VERSION 2.6)

set (PROJECT Test2)
project (${PROJECT})

# Тип сборки. Доступны следующие варианты значений:
# DEBUG | RELEASE | RELWITHDEBINFO | MINSIZEREL
set( CMAKE_BUILD_TYPE RELEASE )

# Подключение к сборке Qt4
find_package(Qt4 COMPONENTS QtCore QtGui REQUIRED)
include (${QT_USE_FILE})
ADD_DEFINITIONS(${QT_DEFINITIONS})

add_executable (${PROJECT} main.cpp )
target_link_libraries (${PROJECT} ${QT_LIBRARIES})
Чтобы не засорять текущую директорию множественными файлами с побочными продуктами компиляции, создадим отдельную директорию build для выполнения компиляции. Директория build должна содержаться в той же директории, что и файл проекта CMakeLists.txt. Зайдем в созданную директорию build и выполним в ней следующую команду cmake.
> cmake -G "MinGW Makefiles" ..
Ключ -G используется для указания генератора, который должен быть использован для создания сценария сборки. CMake поддерживает большое количество разных генераторов, которые могут быть использованы для создания сценариев сборки под различные известные среды разработки на разных платформах. В том числе, C++ Builder, MS Visual Studio, Eclipse и пр. По умолчанию, для разных платформ предлагаются разные генераторы. Если запустить cmake под *nix, то генератором по-умолчанию будет генератор с именем «Unix Makefiles», который формирует сценарий сборки для утилиты GNU make. Если запустить cmake.exe под Windows, то генератором по-умолчанию будет генератор «NMake Makefiles», формирующий сценарий сборки под утилиту nmake, входящей в состав инструментов сборки от Microsoft. Так как нам нужно создать сценарий сборки под средства, предоставляемые системой MinGW, то необходимо указать соответствующий генератор.
Следующим параметром запуска утилиты, является параметр, обозначаемый в виде двух точек. Этот значок является синонимом родительской директории, пришедшей в современный Windows из *nix через DOS. В утилиту cmake.exe следует передать директорию с файлом проекта, а в нашем случае, для сборки в директории build, такой директорией будет родительская директория.
В результате выполнения этой команды будет создан файл сценария Makefile, который, как и в случае с использованием QMake, можно будет выполнить командой mingw32-make.
Introduction
As a Qt developer, you may have encountered the challenge of setting up a Qt project on Windows, only to find that the process is not as straightforward as it is on Linux. In this article, we will explore the process of using Qmake on Windows, highlighting the key differences and providing a step-by-step guide to help you get started.
Understanding Qmake
Qmake is a build tool that comes with the Qt framework. It is used to generate project files for various build systems, including Makefiles, Visual Studio project files, and more. Qmake is a powerful tool that allows you to manage your project’s build process, making it easier to compile and deploy your application.
Installing Qt on Windows
Before you can use Qmake on Windows, you need to install the Qt framework. You can download the Qt installer from the official Qt website. Once you have downloaded the installer, follow these steps:
- Run the installer and select the components you want to install. Make sure to select the «Qt 5» or «Qt 6» component, depending on your project’s requirements.
- Choose the installation location and click «Next».
- Select the tools you want to install, including Qmake.
- Click «Next» to proceed with the installation.
Setting Up Qmake on Windows
Once you have installed Qt, you need to set up Qmake on your system. Here are the steps:
- Open a command prompt as an administrator. You can do this by right-clicking on the Start button and selecting «Command Prompt (Admin)».
- Navigate to the Qt installation directory. The default location is
C:\Qt\5.15.2\msvc2019_64. - Run the following command to set up Qmake:
qmake -install
This command will install Qmake and its dependencies on your system.
Compiling a Qt Project on Windows
Now that you have set up Qmake on your system, you can compile a Qt project using the following command:
qmake ../trunk/GSDTesting.pro
This command will generate a Makefile or a Visual Studio project file, depending on your project’s requirements.
Using Qmake with Visual Studio
If you prefer to use Visual Studio as your IDE, you can use Qmake to generate a Visual Studio project file. Here are the steps:
- Open Visual Studio and create a new project.
- Select the «Qt» project type and choose the «Qt 5» or «Qt 6» component.
- In the project properties, select the «Qt» build system.
- In the «Qt» build system settings, select the «Qmake» generator.
- Click «OK» to generate the project file.
Troubleshooting Qmake on Windows
If you encounter any issues while using Qmake on Windows, here are some common troubleshooting steps:
- Check that you have installed the correct version of Qt.
- Make sure that you have set up Qmake correctly.
- Check that your project file is correct and up-to-date.
- Try running Qmake with the
-voption to enable verbose output.
Conclusion
In this article, we have explored the process of using Qmake on Windows. We have covered the installation of Qt, setting up Qmake, compiling a Qt project, and using Qmake with Visual Studio. We have also provided some common troubleshooting steps to help you resolve any issues you may encounter.
Additional Resources
For more information on Qmake and Qt, you can refer to the following resources:
- Qt documentation: https://doc.qt.io/
- Qmake documentation: https://doc.qt.io/qt-5/qmake-manual.html
- Qt community forum: https://forum.qt.io/
Qmake on Windows: Frequently Asked Questions
Q: What is Qmake?
A: Qmake is a build tool that comes with the Qt framework. It is used to generate project files for various build systems, including Makefiles, Visual Studio project files, and more.
Q: How do I install Qt on Windows?
A: You can download the Qt installer from the official Qt website and follow the installation instructions.
Q: How do I set up Qmake on Windows?
A: You need to run the following command to set up Qmake:
qmake -install
Q: How do I compile a Qt project on Windows?
A: You can use the following command to compile a Qt project:
qmake ../trunk/GSDTesting.pro
Q: Can I use Qmake with Visual Studio?
Q: What is Qmake?
A: Qmake is a build tool that comes with the Qt framework. It is used to generate project files for various build systems, including Makefiles, Visual Studio project files, and more.
Q: How do I install Qt on Windows?
A: You can download the Qt installer from the official Qt website and follow the installation instructions. Make sure to select the correct version of Qt and the components you need for your project.
Q: How do I set up Qmake on Windows?
A: You need to run the following command to set up Qmake:
qmake -install
This command will install Qmake and its dependencies on your system.
Q: How do I compile a Qt project on Windows?
A: You can use the following command to compile a Qt project:
qmake ../trunk/GSDTesting.pro
This command will generate a Makefile or a Visual Studio project file, depending on your project’s requirements.
Q: Can I use Qmake with Visual Studio?
A: Yes, you can use Qmake to generate a Visual Studio project file. Here are the steps:
- Open Visual Studio and create a new project.
- Select the «Qt» project type and choose the «Qt 5» or «Qt 6» component.
- In the project properties, select the «Qt» build system.
- In the «Qt» build system settings, select the «Qmake» generator.
- Click «OK» to generate the project file.
Q: How do I troubleshoot Qmake issues on Windows?
A: Here are some common troubleshooting steps:
- Check that you have installed the correct version of Qt.
- Make sure that you have set up Qmake correctly.
- Check that your project file is correct and up-to-date.
- Try running Qmake with the
-voption to enable verbose output.
Q: Can I use Qmake with other build systems?
A: Yes, Qmake can generate project files for various build systems, including:
- Makefiles
- Visual Studio project files
- Xcode project files
- CMake project files
Q: How do I customize Qmake settings?
A: You can customize Qmake settings by editing the qmake.conf file. This file is located in the Qt installation directory and contains settings for the build process.
Q: Can I use Qmake with Qt Creator?
A: Yes, you can use Qmake with Qt Creator. Qt Creator is an integrated development environment (IDE) that comes with Qt. You can use Qmake to generate project files and then open them in Qt Creator.
Q: How do I migrate from Qmake to CMake?
A: Migrating from Qmake to CMake involves several steps:
- Install CMake on your system.
- Create a new CMakeLists.txt file for your project.
- Update your project files to use CMake.
- Run CMake to generate the build files.
Q: Can I use Qmake with other programming languages?
A: Yes, Qmake can be used with other programming languages, including:
- C++
- C#
- Java
- Python
However, Qmake is primarily designed for use with Qt and C++.
Q: How do I get help with Qmake?
A: You can get help with Qmake from the following resources:
- Qt documentation: https://doc.qt.io/
- Qmake documentation: https://doc.qt.io/qt-5/qmake-manual.html
- Qt community forum: https://forum.qt.io/
- Qt mailing list: https://lists.qt.io/group/qt-project
Conclusion
In this article, we have answered some of the most frequently asked questions about Qmake on Windows. We hope that this article has been helpful in resolving any issues you may have encountered while using Qmake. If you have any further questions, please don’t hesitate to ask.
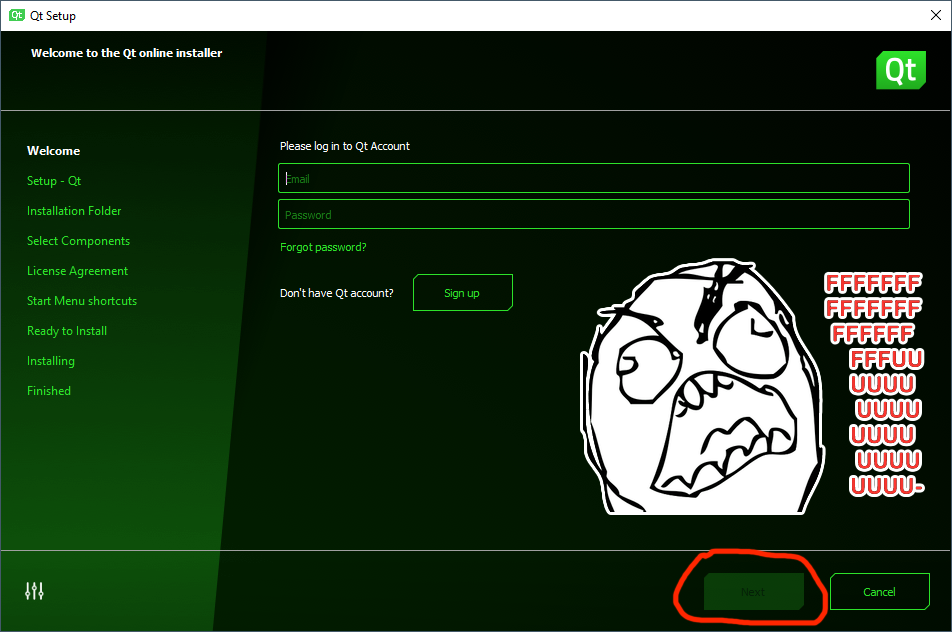
At some point (beginning of 2020 year) Qt installer started to require users to have Qt Account (again), otherwise you can’t proceed with the installation. More details in the Qt’s official blog post.
That’s something that already happened before, but back then community got really mad about it, so The Qt Company reverted that, and installer started to work without Qt Account. And now they fucking did it again, and apparently this time community wasn’t that mad (or there is nothing left of that community after all the stunts The Qt Company has been pulling over the past years).
Anyway, I won’t tolerate such anal-probing, so The Qt Company (or rather its management) can go fuck itself, and I’ll be just building Qt from sources — it’s not that scary as it sounds.
In the very same blog post The Qt Company stated that LTS releases will be only available to commercial users, so The Qt Company can go fuck itself twice at this point. But don’t even trip, dawg, as we’ll still be able to build LTS releases from sources without Qt Account and/or commercial license. Aw, geez!
Just to clarify and to TLDR the article: it’s not about pirating the binaries, it’s not about some hack or anything shady at all — everyone can get the Qt sources and build whatever version they want. And certainly, you’ll still need to comply with GPL/LGPL terms (depending on components that you’ll be using).
Getting the Qt sources
Clone Git repository
Go to the Qt’s Git repository. Find the latest (or whichever you need) release — it’s hard not to notice that branches match releases, so 5.15.2 branch is the latest release at the moment (03.12.2020).
$ cd /d/programs/
$ mkdir -p qt/src && cd $_
$ git clone --depth 1 -b 5.15.2 git://code.qt.io/qt/qt5.git 5.15.2
That’s not the entire source code just yet, as Qt is divided into modules and first you need to initialize/download them. This is done with init-repository Perl script, so you’ll need to have Perl installed and available in your PATH.
By default it will initialize a lot of modules (essential, addon, preview, deprecated), and it will take quite some disk space (and time) to initialize all of them. Here’s the full list of default modules (the script prints it out):
$ cd 5.15.2
$ git submodule init qt3d qtactiveqt qtandroidextras qtbase qtcharts qtconnectivity qtdatavis3d
qtdeclarative qtdoc qtgamepad qtgraphicaleffects qtimageformats qtlocation qtlottie qtmacextras
qtmultimedia qtnetworkauth qtpurchasing qtqa qtquick3d qtquickcontrols qtquickcontrols2
qtquicktimeline qtremoteobjects qtrepotools qtscript qtscxml qtsensors qtserialbus qtserialport
qtspeech qtsvg qttools qttranslations qtvirtualkeyboard qtwayland qtwebchannel qtwebengine
qtwebglplugin qtwebsockets qtwebview qtwinextras qtx11extras qtxmlpatterns
I don’t want preview, deprecated and obsolete groups, and also I don’t want quite a lot of some other stuff, so I ran it like this:
$ ./init-repository --module-subset=essential,addon,-qtwebengine,-qtactiveqt,-qt3d,\
-qtlottie,-qtdatavis3d,-qtgamepad,-qtpurchasing,-qtquick3d,-qtquickcontrols,\
-qtquicktimeline,-qtspeech,-qtvirtualkeyboard,-qtwayland,-qtsensors,-qtserialbus,\
-qtserialport,-qtscxml,-qtremoteobjects,-qtqa
It took 40 minutes (with my 3 MB/s connection) and 3 GB to initialize such a list. Be sure to check it in case you might actually need some modules which I excluded here.
Download source package
Or you can just get a source package ZIP archive from the download page. That will be actually much faster, and even though you can’t choose modules here, later you’ll be able to skip building unwanted modules with -skip option (-skip qtwebengine, -skip qtactiveqt, -skip qt3d and so on).
Building Qt from sources
Now when you have the sources, you can just build Qt and get the same binaries that are installed using installer.
I’ll describe the process for Windows 10 and Visual Studio 2019 / MSVC 142 (assuming that you have all that), but it will be almost the same with different toolchains and on other platforms too.
5.x with qmake
Let’s say you have downloaded/cloned sources to d:\programs\qt\src\5.15.2 and you would like to install Qt to d:\programs\qt\5.15.2. Open x64 Native Tools Command Prompt for VS 2019 and there:
> c:
> cd d:\programs\qt\src\5.15.2
> mkdir build
> cd build
> ..\configure.bat -release -no-pch -prefix "d:\programs\qt\5.15.2" -skip qtwebengine -nomake tools -nomake tests -nomake examples
Choose and accept Open Source license terms (if you do accept those) and wait for the configuration to finish. Note that this will give you release build, so don’t forget to set your projects to release configuration too. Also be aware that by default Qt is built for dynamic linking, and if you need static linking, then you need to add -static option too.
By the way, I have a more detailed article about building static Qt from sources, although the only difference there is basically just this -static option.
Anyway, once it’s configured, run the build and then install using jom (you do have jom, don’t you):
It took about 1 hour to build and 10 minutes to build and install the binaries. The resulting size of the installation folder (d:\programs\qt\5.15.2) is 143 MB.
Out of curiosity, I also built Qt with sources from source package ZIP archive and the same configuration options (so it built also all the stuff that I excluded with modules), and there it took a bit longer than 1 hour and resulted in 193 MB of installation folder. So actually simply downloading the source package and keeping all the modules can save you quite some time, and 50 MB of difference doesn’t seem to be significant enough to not to do so.
6.x with CMake
Starting with Qt 6, you can build it with CMake. The process is almost the same as with qmake. I tried it with Qt 6.0.1 (downloaded to d:\programs\qt\src\6.0.1).
At first I wanted to see if I can now run everything from Git BASH:
# where to install the binaries to
$ mkdir /d/programs/qt/6.0.1
# build folder
$ cd /d/programs/qt/src/6.0.1
$ mkdir build && cd $_
$ ../configure -cmake-generator "Visual Studio 16 2019" -release -no-pch -prefix "d:/programs/qt/6.0.1" -skip qtwebengine -nomake tools -nomake tests -nomake examples
and that failed:
ERROR: C++11 <random> is required and is missing or failed to compile.
ERROR: detected a std::atomic implementation that fails for function pointers.  Please apply the patch corresponding to your Standard Library vendor, found in qtbase/config.tests/atomicfptr

CMake Error at qtbase/cmake/QtBuildInformation.cmake:72 (message):
  Check the configuration messages for an error that has occurred.
Call Stack (most recent call first):
  qtbase/cmake/QtBuildInformation.cmake:10 (qt_configure_print_summary)
  CMakeLists.txt:87 (qt_print_feature_summary)
After a brief googling I found that Visual Studio 16 2019 generator is not supported. I’ve set it here because otherwise by default with Ninja it discovers Clang toolchain, which I also have in my environment, but I want to build Qt with MSVC toolchain.
And while I could’ve tried to set cl.exe for CMAKE_C_COMPILER and CMAKE_CXX_COMPILER explicitly, I decided not to and just switched back to x64 Native Tools Command Prompt for VS 2019. There MSVC toolchain is detected just fine:
**********************************************************************
** Visual Studio 2019 Developer Command Prompt v16.8.3
** Copyright (c) 2020 Microsoft Corporation
**********************************************************************
[vcvarsall.bat] Environment initialized for: 'x64'

D:\programs\qt\src>cd 6.0.1\build

D:\programs\qt\src\6.0.1\build>ninja --version
1.9.0

D:\programs\qt\src\6.0.1\build>cmake --version
cmake version 3.18.4

D:\programs\qt\src\6.0.1\build>..\configure.bat -release -no-pch -prefix "d:/programs/qt/6.0.1" -skip qtwebengine -nomake tools -nomake tests -nomake examples

+ cd qtbase
+ D:\programs\qt\src\6.0.1\qtbase\configure.bat -top-level -release -no-pch -prefix "d:/programs/qt/6.0.1" -skip qtwebengine -nomake tools -nomake tests -nomake examples
CMake Warning at D:/programs/qt/src/6.0.1/qtbase/cmake/QtProcessConfigureArgs.cmake:223 (message):
  '-nomake tools' is not implemented yet.
Call Stack (most recent call first):
  D:/programs/qt/src/6.0.1/qtbase/cmake/QtProcessConfigureArgs.cmake:625 (qtConfAddWarning)
  D:/programs/qt/src/6.0.1/qtbase/cmake/QtProcessConfigureArgs.cmake:689 (check_qt_build_parts)

'D:/programs/cmake/bin/cmake.exe' '-DBUILD_qtwebengine=OFF' '-DBUILD_WITH_PCH=OFF' '-DCMAKE_INSTALL_PREFIX=d:/programs/qt/6.0.1' '-DQT_BUILD_TESTS=FALSE' '-DQT_BUILD_EXAMPLES=FALSE' '-DCMAKE_BUILD_TYPE=Release' '-G' 'Ninja' 'D:/programs/qt/src/6.0.1'
-- The CXX compiler identification is MSVC 19.28.29335.0
-- The C compiler identification is MSVC 19.28.29335.0
-- The ASM compiler identification is MSVC
-- Found assembler: D:/programs/vs/2019/VC/Tools/MSVC/14.28.29333/bin/Hostx64/x64/cl.exe
-- Detecting CXX compiler ABI info
-- Detecting CXX compiler ABI info - done
-- Check for working CXX compiler: D:/programs/vs/2019/VC/Tools/MSVC/14.28.29333/bin/Hostx64/x64/cl.exe - skipped
-- Detecting CXX compile features
-- Detecting CXX compile features - done
-- Detecting C compiler ABI info
-- Detecting C compiler ABI info - done
-- Check for working C compiler: D:/programs/vs/2019/VC/Tools/MSVC/14.28.29333/bin/Hostx64/x64/cl.exe - skipped
-- Detecting C compile features
-- Detecting C compile features - done
Apparently, -nomake tools is not implemented yet (or was renamed), but that’s okay-ish. The configuration successfully completes, though with some more warnings:
# ...

OpenGL:
    Desktop OpenGL ....................... no
    Dynamic OpenGL ....................... yes
    OpenGL ES 2.0 ........................ no
    OpenGL ES 3.0 ........................ no
    OpenGL ES 3.1 ........................ no
    OpenGL ES 3.2 ........................ no
  Vulkan ................................. no

# ...

WARNING: QDoc will not be compiled, probably because libclang could not be located. This means that you cannot build the Qt documentation.
 Either set CMAKE_PREFIX_PATH or LLVM_INSTALL_DIR to the location of your llvm installation. On Linux systems, you may be able to install libclang by installing the libclang-dev or libclang-devel package, depending on your distribution. On macOS, you can use Homebrew's llvm package.
WARNING: Clang-based lupdate parser will not be available. LLVM and Clang C++ libraries have not been found.

Qt is now configured for building. Just run 'cmake --build . --parallel'

Once everything is built, you must run 'cmake --install .'
Qt will be installed into 'D:/programs/qt/6.0.1'

To configure and build other Qt modules, you can use the following convenience script:
        D:/programs/qt/6.0.1/bin/qt-configure-module.bat

If reconfiguration fails for some reason, try to remove 'CMakeCache.txt' from the build directory

-- Configuring done
-- Generating done
CMake Warning:
  Manually-specified variables were not used by the project:

    BUILD_qtwebengine

-- Build files have been written to: D:/programs/qt/src/6.0.1/build
So, first of all Desktop OpenGL is not detected, which is a bit concerning, as I seem to remember that it should be. However, having built and run a couple of Qt Quick application, I didn’t see any issues.
Then BUILD_qtwebengine is ignored, so does it mean that WebEngine will be also built? How does one disable it then?
And finally, QDoc and lupdate will not be compiled, but that’s also a minor issue.
Let’s run the build and install now:
$ cmake --build . --parallel
$ cmake --install .
For me that took 1 hour and resulted in 159 MB of installation folder (d:\programs\qt\6.0.1). So WebEngine wasn’t built after all.
Failed pcre2_jit_compile.c.obj, oaidl.h
If your build fails with something like this:
Building C object qtbase\src\3rdparty\pcre2\CMakeFiles\BundledPcre2.dir\src\pcre2_jit_compile.c.obj
FAILED: qtbase/src/3rdparty/pcre2/CMakeFiles/BundledPcre2.dir/src/pcre2_jit_compile.c.obj
D:\programs\vs\VC\Tools\MSVC\14.29.30133\bin\Hostx64\x64\cl.exe /nologo -DHAVE_CONFIG_H -DPCRE2_CODE_UNIT_WIDTH=16 -DPCRE2_STATIC -DQT_NO_DEBUG -DQT_NO_EXCEPTIONS -DUNICODE -DWIN32 -DWIN64 -D_CRT_SECURE_NO_WARNINGS -D_ENABLE_EXTENDED_ALIGNED_STORAGE -D_UNICODE -D_USE_MATH_DEFINES -D_WIN64 -ID:\programs\qt\src\6.2.0\build\qtbase\src\3rdparty\pcre2\BundledPcre2_autogen\include -ID:\programs\qt\src\6.2.0\qtbase\src\3rdparty\pcre2\src -ID:\programs\qt\src\6.2.0\qtbase\mkspecs\win32-msvc -ID:\programs\qt\src\6.2.0\build\qtbase\include /DWIN32 /D_WINDOWS /DNDEBUG -O2 -MD -W0 /wd4530 /wd4577 -FS -Zc:rvalueCast -Zc:inline -Zc:strictStrings -Zc:throwingNew -Zc:referenceBinding -Zc:externConstexpr -Zc:wchar_t -guard:cf -Zc:__cplusplus -permissive- -utf-8 -std:c11 /showIncludes /Foqtbase\src\3rdparty\pcre2\CMakeFiles\BundledPcre2.dir\src\pcre2_jit_compile.c.obj /Fdqtbase\lib\Qt6BundledPcre2.pdb /FS -c D:\programs\qt\src\6.2.0\qtbase\src\3rdparty\pcre2\src\pcre2_jit_compile.c
C:\Program Files (x86)\Windows Kits\10\include\10.0.17763.0\um\oaidl.h(487): error C2059: syntax error: '/'
C:\Program Files (x86)\Windows Kits\10\include\10.0.17763.0\um\oaidl.h(502): error C2059: syntax error: '/'
C:\Program Files (x86)\Windows Kits\10\include\10.0.17763.0\um\oaidl.h(530): error C2059: syntax error: '}'
C:\Program Files (x86)\Windows Kits\10\include\10.0.17763.0\um\oaidl.h(531): error C2059: syntax error: '}'
C:\Program Files (x86)\Windows Kits\10\include\10.0.17763.0\um\oaidl.h(533): error C2059: syntax error: '}'
C:\Program Files (x86)\Windows Kits\10\include\10.0.17763.0\um\oaidl.h(534): error C2059: syntax error: '}'
C:\Program Files (x86)\Windows Kits\10\include\10.0.17763.0\um\oaidl.h(665): error C2079: 'varDefaultValue' uses undefined struct 'tagVARIANT'
C:\Program Files (x86)\Windows Kits\10\include\10.0.17763.0\um\oaidl.h(950): error C2079: 'varValue' uses undefined struct 'tagVARIANT'
C:\Program Files (x86)\Windows Kits\10\include\10.0.17763.0\um\propidlbase.h(319): error C2059: syntax error: '/'
C:\Program Files (x86)\Windows Kits\10\include\10.0.17763.0\um\propidlbase.h(378): error C2371: 'pvarVal': redefinition; different basic types
C:\Program Files (x86)\Windows Kits\10\include\10.0.17763.0\um\oaidl.h(510): note: see declaration of 'pvarVal'
C:\Program Files (x86)\Windows Kits\10\include\10.0.17763.0\um\propidlbase.h(379): error C2059: syntax error: '}'
C:\Program Files (x86)\Windows Kits\10\include\10.0.17763.0\um\propidlbase.h(380): error C2059: syntax error: '}'
C:\Program Files (x86)\Windows Kits\10\include\10.0.17763.0\um\propidlbase.h(383): error C2059: syntax error: '}'
C:\Program Files (x86)\Windows Kits\10\include\10.0.17763.0\um\propidlbase.h(384): error C2059: syntax error: '}'
[19/8412] Building C object qtbase\src\3rdparty\pcre2\CMakeFiles\BundledPcre2.dir\src\pcre2_study.c.obj
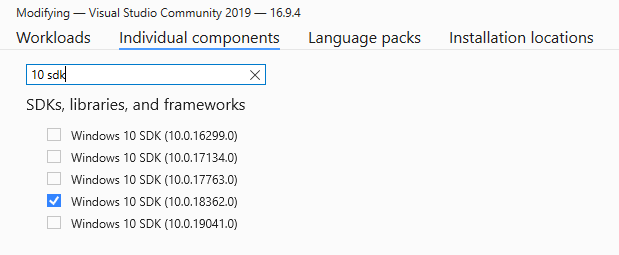
ninja: build stopped: subcommand failed.Then perhaps you have an “old” Windows 10 SDK installed. In my case it was 10.0.17763, so I deleted that one and installed 10.0.18362 instead (using Visual Studio Installer):
It might be a good idea to reboot the system just in case before starting a new build.
Alternatively, perhaps, you can get PCRE2, make it visible to Qt configuration and pass -system-pcre. Or maybe even configure Qt without PCRE (-no-pcre).
Using your own Qt build
This is it, you can already use this your very own Qt distribution to build your projects.
With CMake and bare CLI
I have an article about that already, but there it’s more about CMake and Visual Studio Code, so here will be a shorter CLI-only version.
Be aware that with Qt 6 you might need to explicitly set Ninja as your generator (and help it discover cl.exe), otherwise it might fail with the same error as on configuring/building the Qt itself.
Say, you have some Qt Quick project with CMake and the following CMakeLists.txt:
cmake_minimum_required(VERSION 3.15)

project("color-corners")

# that's all you need for your Qt installation to be discovered by CMake
set(CMAKE_PREFIX_PATH "d:/programs/qt/5.15.2")

set(CMAKE_INCLUDE_CURRENT_DIR ON)
set(CMAKE_AUTOMOC ON)

message("Looking for Qt...")

find_package(Qt5 REQUIRED Quick Qml)
if (${Qt5_FOUND})
    message("Found Qt " ${Qt5_VERSION})
else()
    message("Couldn't find Qt")
endif()

set(sources
    main.cpp
)

qt5_add_resources(qrc qml.qrc)

add_executable(${CMAKE_PROJECT_NAME} WIN32 ${sources} ${qrc})

target_link_libraries(
    ${CMAKE_PROJECT_NAME}
    Qt5::Quick
    Qt5::Qml
    )
Configure and build the project:
$ cd /d/code/qt/color-corners/
$ mkdir build && cd $_

$ cmake ..
-- Building for: Visual Studio 16 2019
-- Selecting Windows SDK version 10.0.18362.0 to target Windows 10.0.18363.
-- The C compiler identification is MSVC 19.27.29112.0
-- The CXX compiler identification is MSVC 19.27.29112.0
-- Detecting C compiler ABI info
-- Detecting C compiler ABI info - done
-- Check for working C compiler: D:/programs/vs/2019/VC/Tools/MSVC/14.27.29110/bin/Hostx64/x64/cl.exe - skipped
-- Detecting C compile features
-- Detecting C compile features - done
-- Detecting CXX compiler ABI info
-- Detecting CXX compiler ABI info - done
-- Check for working CXX compiler: D:/programs/vs/2019/VC/Tools/MSVC/14.27.29110/bin/Hostx64/x64/cl.exe - skipped
-- Detecting CXX compile features
-- Detecting CXX compile features - done
Looking for Qt...
Found Qt 5.15.2
-- Configuring done
-- Generating done
-- Build files have been written to: D:/code/qt/color-corners/build

$ cmake --build . --config Release
Microsoft (R) Build Engine version 16.7.0+b89cb5fde for .NET Framework
Copyright (C) Microsoft Corporation. All rights reserved.

  Checking Build System
  Automatic MOC for target color-corners
  Generating qrc_qml.cpp
  Building Custom Rule D:/code/qt/color-corners/src/CMakeLists.txt
  mocs_compilation.cpp
  main.cpp
  qrc_qml.cpp
  Generating Code...
  color-corners.vcxproj -> D:\code\qt\color-corners\build\Release\color-corners.exe
  Building Custom Rule D:/code/qt/color-corners/src/CMakeLists.txt
So it’s all good: CMake found your Qt installation and successfully built the project.
But you might, however, get the following error:
Qt5Gui.lib(Qt5Gui.dll) : fatal error LNK1112: module machine type 'x86' conflicts with target machine type 'x64' [D:\code\qt\color-corners\build\color-corners.vcxproj]Try to re-configure the project with explicitly set x32/x86 architecture:
$ rm -r ./* && cmake -G "Visual Studio 16 2019" -A Win32 ..
$ cmake --build . --config Release
If that works fine, then it means that you built Qt in x86 Native Tools Command Prompt, so your Qt build is x32/x86. If you need x64, then you’ll need to build Qt again, but this time in x64 Native Tools Command Prompt.
In Qt Creator
Most likely you’ll want to use your Qt build in Qt Creator.
Install Qt Creator
The Qt Creator installer is also available at the official download page. Good news that installer does not require Qt Account (yet?). Actually, it does, but only if it discovers internet connection — it that case the first installer view looks like this at the moment:
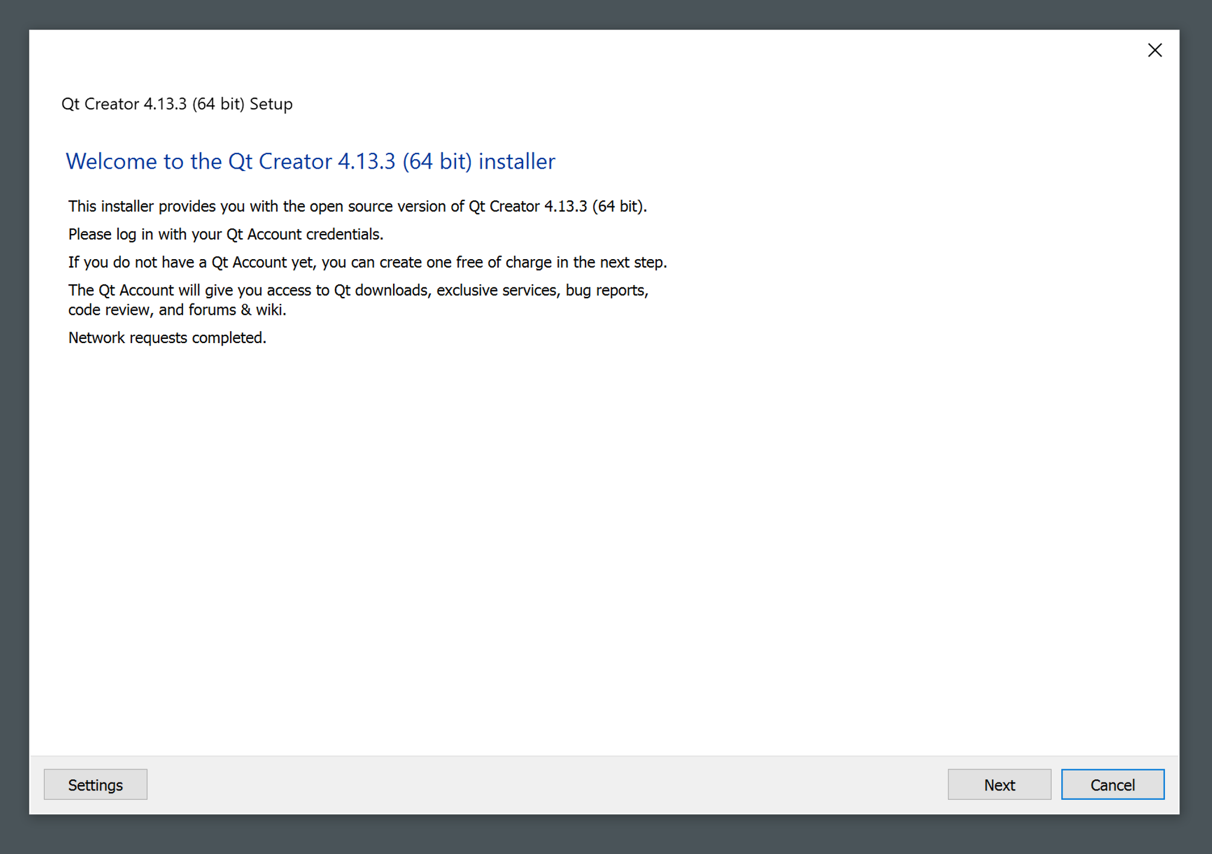
So you can just disconnect from the internet or block any network access for the installer before launching it, and then the first view will look like this:
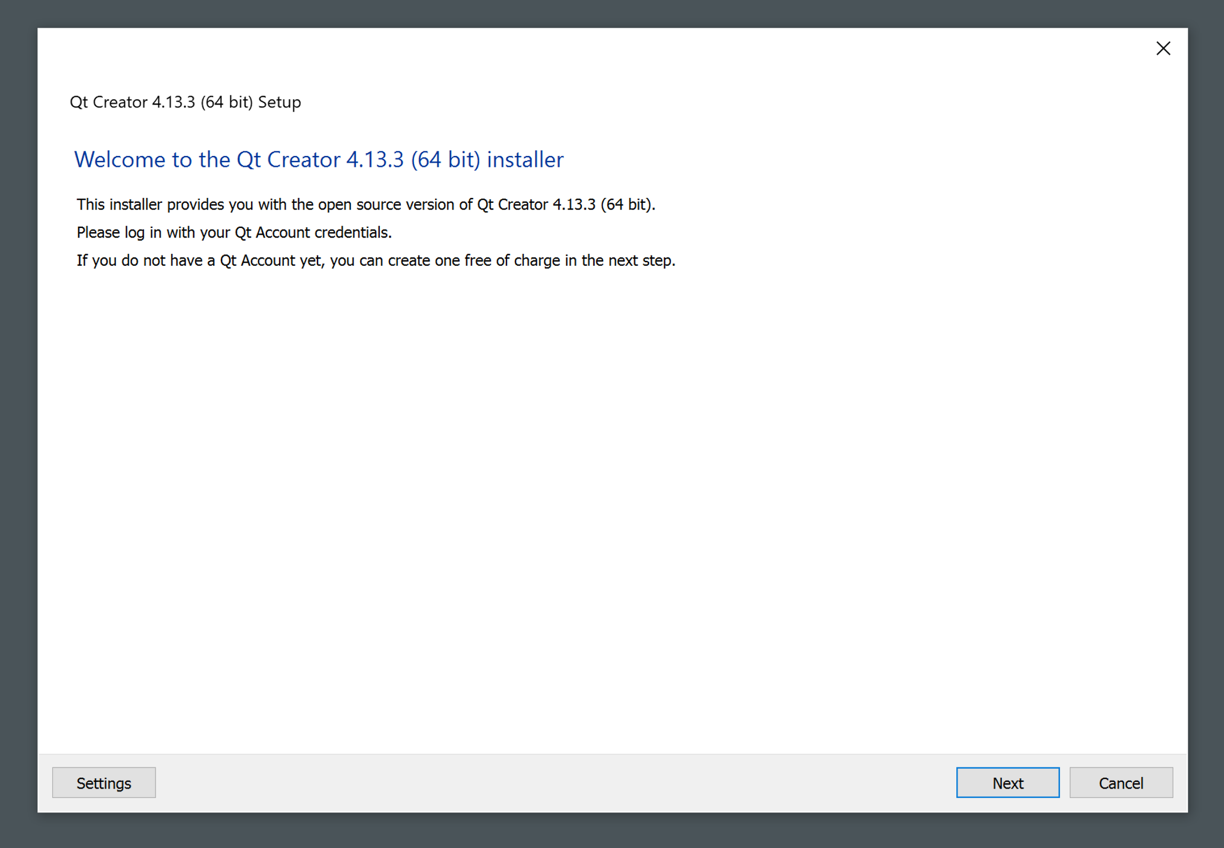
or this:
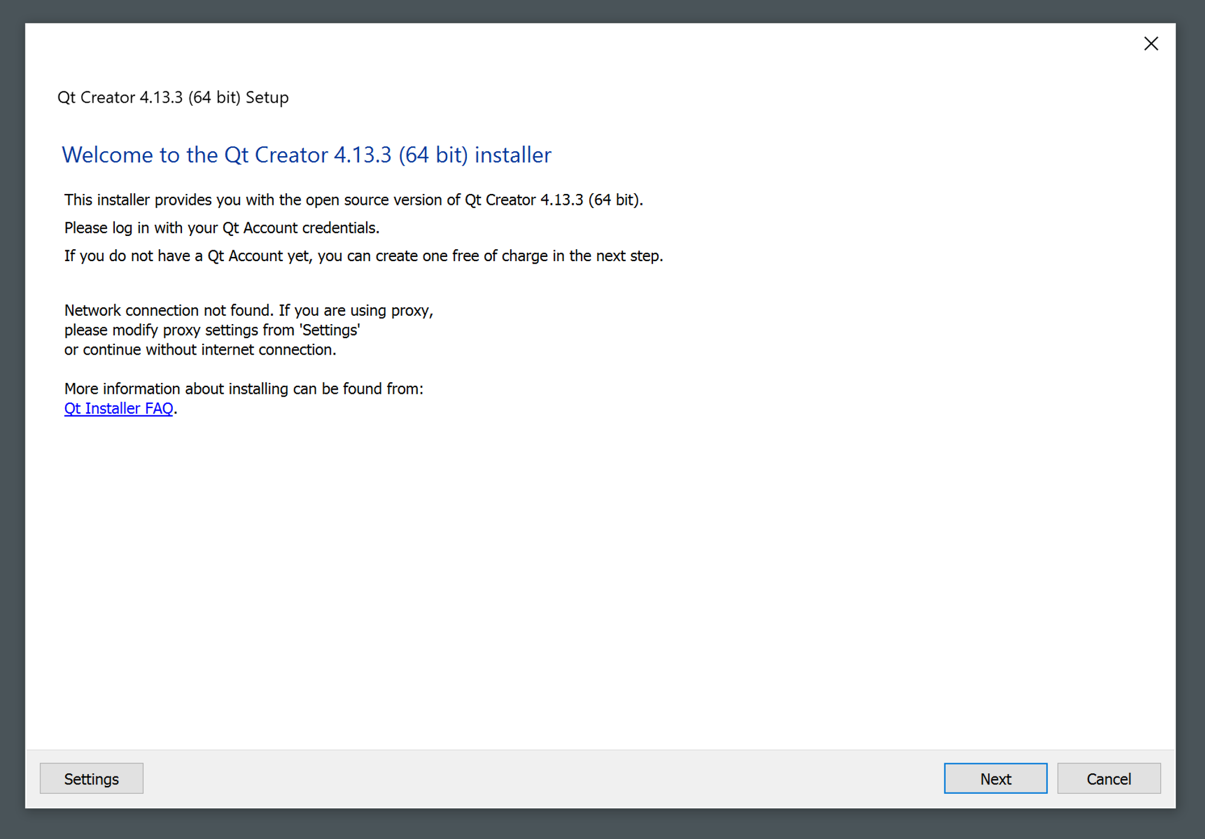
So you’ll be able to proceed without Qt Account.
And if you are brave enough, you can of course build it from sources as well.
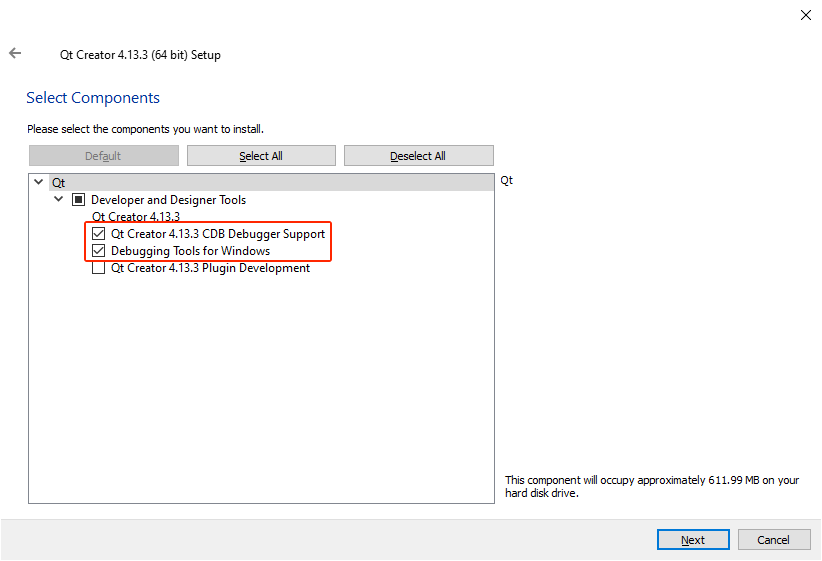
If you, like me, are using MSVC toolchain and CDB, then it is important to check CDB Debugger Support and Debugging Tools for Windows components:
Add a new kit
First time you launch Qt Creator, it will suggest you to “link” existing Qt installation, which is nice. But what does it actually want — I have no fucking idea, because when I pointed it to my Qt build, it didn’t enable Link with Qt button:
To hell with this thing then.
Just in case, note that I’ve updated the Qt paths in my system after adding a section about Qt 6, so now I have two Qt versions, but screenshots below still point to old paths. The screenshots also have 5.12.2 version, but that’s just a typo — it should be 5.15.2 there.
Open Qt Creator settings, go to Kits and there to Qt Versions. Add your Qt build here (you’ll need to provide path to d:\programs\qt\VERSION\bin\qmake.exe). Click on Apply button, otherwise versions list on the Kits tab won’t have it.
Now go to Kits tab and add a new kit. Select your Qt version, C and C++ compilers (in my case it’s amd64 variant) and debugger (CDB). If you haven’t installed CDB Debugger Support and Debugging Tools for Windows, then you won’t have CDB option available.
If you won’t set debugger, you’ll get a yellow warning. To get details about what’s wrong, hover your mouse over it and there will be a pop-up tooltip with some explanation:
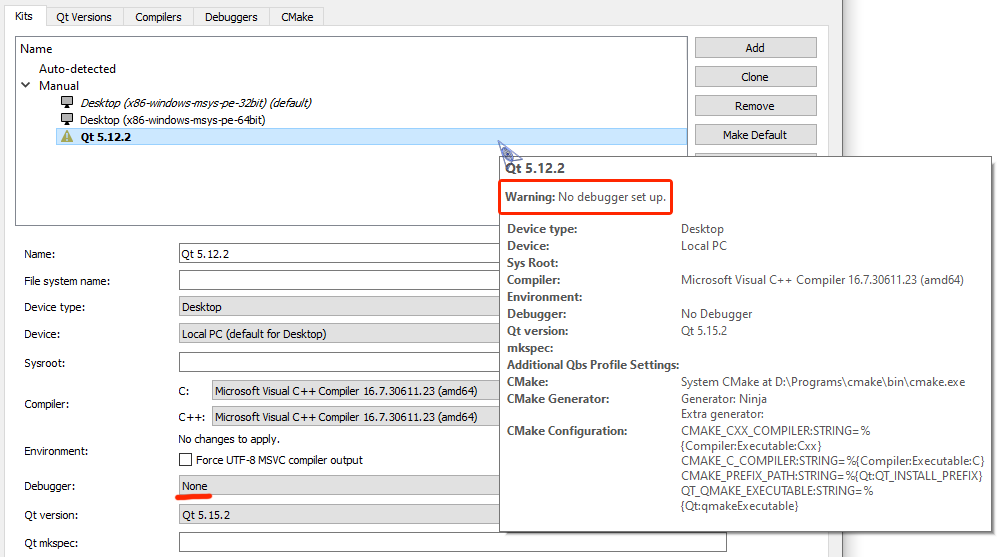
Despite it’s just a warning, you nevertheless won’t be able to select this kit in your projects.
If you’ll set a wrong compiler, then you’ll get a red error and the following explanation in the pop-up tooltip:
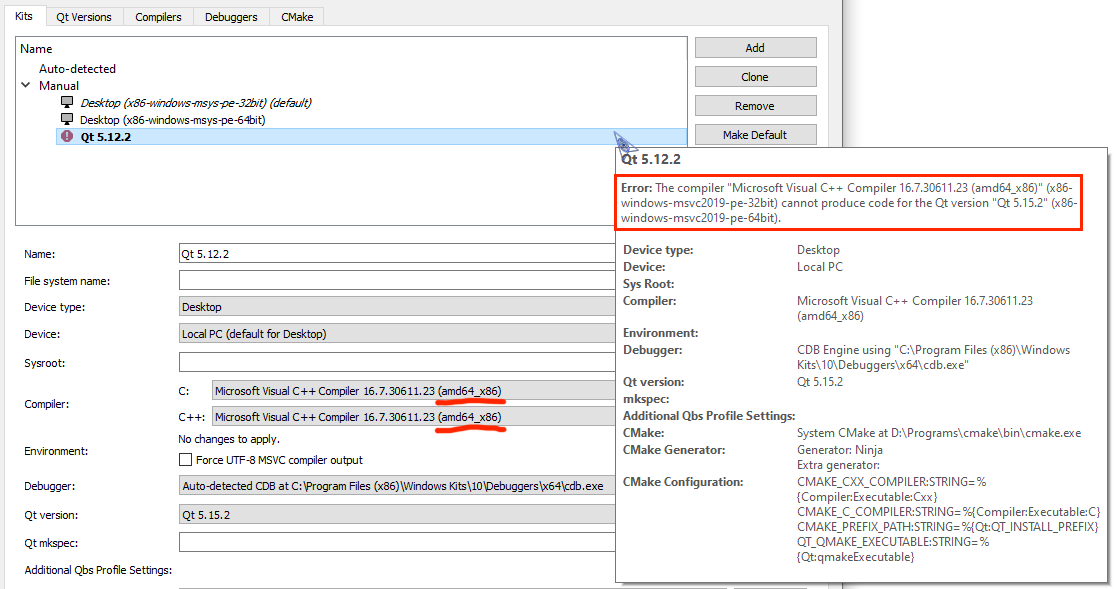
And if everything is good, then the kit won’t have any yellow/red warnings/errors:
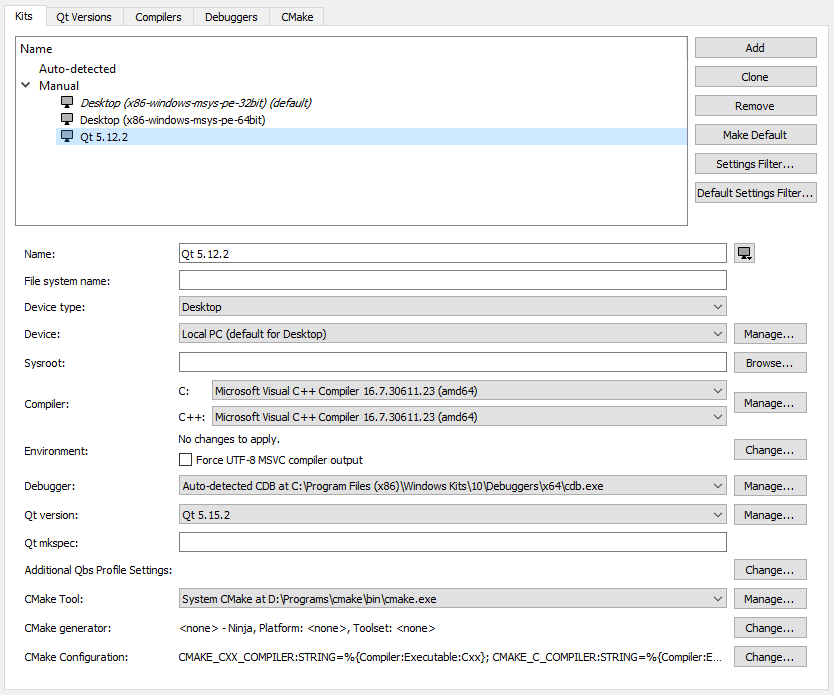
So here you’ve got a perfectly splendid Qt installation without using the installer and creating Qt Account. And The Qt Company’s management can go fuck itself for the third time now.
Updates
03.03.2022
The Qt Company has blocked installing Qt from installer and logging-in to Qt Account using russian IP addresses.
So far this has been mentioned only in this thread on Qt forum and also in comments under Qt Design Studio 3.1 Released blog post. Company representatives confirmed the blocking:
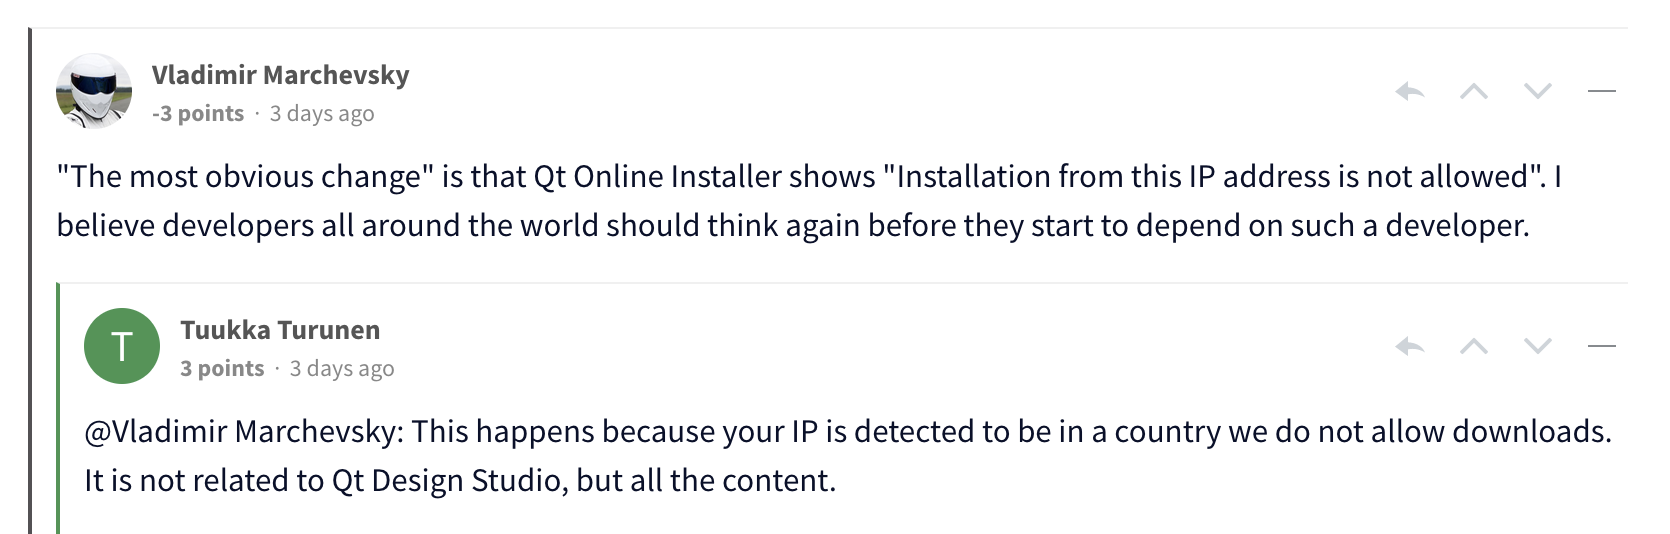
and

So reporting bugs and editing wiki will become unavailable too? It’s strange that posting on forum is still available, as it is also tied to Qt Account, but perhaps they used VPN.
What an unexpected way for this article to suddenly become more in demand.
These instructions are here for the sake of helping those who are still using older versions of the project. If possible, consider using the most current version built with CMake.
Get a Compiler
Make sure you have one of the following compilers installed:
Build from Source (Dynamic Linking)
Get Qt
Download the Qt installer
Qt is the only dependency you will need to install. Go to the Qt download section and download the Qt installer.
Install Qt 5
Please note that Qt 5.10.0 or higher is needed in order to have full Qt3D support. Qt 6 is not yet supported. Install the Qt version with the minimum of the following features (uncheck all other boxes) to a path without white spaces:
- Qt/5.15.1/MSVC 2019 64-bit (Make sure to select the correct version based on your compiler)
- Qt/5.15.1/QtCharts
After the installation is finished make sure to add the Qt bin folder (e.g. <QtFolder>\5.15.1\msvc2019_64\bin) to your PATH variable. On Linux and MacOS you might also need to add the Qt lib folder (e.g. <QtFolder>\5.15.1\msvc2019_64\lib) to the LD_LIBRARY_PATH and DYLD_LIBRARY_PATH, respectivley.
Get Project Source Code
Fork MNE-CPP’s main repository to your own GitHub account. For a detailed guide on how to fork a repository, we recommend checking out the guide on the official GitHub website.
Clone the fork to your local machine:
git clone https://github.com/<YourGitUserName>/mne-cpp.git
Setup a new remote pointing to MNE-CPP’s main repository:
git remote add upstream https://github.com/mne-tools/mne-cpp.git
Every time you want to update to the newest changes use:
git fetch --all
git rebase upstream/main
Compile the Source Code
Via QtCreator (recommended)
Please note: If you are working on an operating system on a “non-western” system, i.e. Japan, you might encounter problems with unicode interpretation. Please do the following: Go to Control Panel > Language and Region > Management tab > Language Settings for non-Unicode Programs > Set to English (U.S.) > Reboot your system.
- Go to your cloned repository folder and run the
mne-cpp.profile with QtCreator. - The first time you open the mne-cpp.pro file you will be prompted to configure the project with a pre-defined kit. Select the appropriate kit, e.g.,
Desktop Qt 5.15.1 MSVC2019 64bitand configure the project. - In QtCreator select the Release mode in the lower left corner.
- In the Qt Creator’s Projects window, right mouse click on the top level MNE-CPP tree item and select Run qmake. Wait until the progress bar in lower right corner turns green (this step may take some time).
- Right mouse click again and then hit Build (this step may take some time). Wait until progress bar in lower right corner turns green.
- After the build process is finished, go to the
mne-cpp/out/Releasefolder. All applications and libraries should have been created throughout the build process.
For building on CentOS and other linux distros with older gcc versions, check if RHEL Developer Toolsets are available with newer versions. In Qt Creator, under Tools > Options > Kits > Compilers, you can add a new compiler, and then add it to your build kit in Tools > Options > Kits > Kits.
Via Command Line
Create a shadow build folder, run qmake on mne-cpp.pro and build:
mkdir mne-cpp_shadow
cd mne-cpp_shadow
<QtFolder>/5.15.1/msvc2019_64/bin/qmake ../mne-cpp/mne-cpp.pro
<QtFolder>/5.15.1/msvc2019_64/bin/jom -j8 # On Windows
make -j8 # On Linux and MacOS
Running Applications
Once built, applications can be run from within QtCreator using the run button on the bottom left side. To instead run applications from the command line, first execute the deploy.bat script in tools/deployment. For more information about this script, see our Continuous Integration documentation. Once this is done, applications can be executed normally from the command line.
Test the Build
You might have to add the folders including the Qt libraries to your OS’s corresponding environment variables. In order to run the examples you must download the MNE-Sample-Data-Set from here and extract the files to mne-cpp/resources/data/MNE-sample-data. Once finished you can try to run one of the examples, e.g., ex_disp_3D. If the build was successful the example should start and display a window including a 3D brain as well as a source localization result.
Build from Source (Static Linking)
This tutorial will show you how to build a static version of MNE-CPP. In order to build statically we need to perform two steps:
- Build a static version of Qt
- Compile MNE-CPP with the
staticflag
This tutorial assumes the following folder structure:
Git/
├── qt5/
├── qt5_shadow/
├── qt5_wasm_binaries/
├── mne-cpp/
└── mne-cpp_shadow/
Build a Static Version of Qt
Get the Qt Source Code
Clone the current Qt 5 version. Qt 6 is currently not supported. Currently, MNE-CPP uses four Qt modules: QtBase, QtCharts, QtSvg and Qt3D. QtBase subdivides in other modules reflecting most of the Qt functionality (core, gui, widgets, etc). In order to setup the sources for Qt 5.15.1 type:
git clone https://code.qt.io/qt/qt5.git -b 5.15.1
cd qt5
Linux/MacOS
Install OpenGL dependencies (just to make sure). This is only needed on Linux:
sudo apt-get install build-essential libgl1-mesa-dev
Navigate to the qt5 folder and init the repository:
./init-repository -f --module-subset=qtbase,qtcharts,qtsvg,qt3d
Navigate to the parent directory, create a new shadow build folder and cd into it:
cd ..
mkdir qt5_shadow
cd qt5_shadow
Call configure from the new working directory in order to setup a shadow build:
../qt5/configure -static -release -skip webengine -nomake tools -nomake tests -nomake examples -no-dbus -no-ssl -no-pch -opensource -confirm-license -prefix "../qt5_wasm_binaries"
Build Qt and install to target (prefix) location afterwards. You can change the -j8 flag to the number of cores you want to use during compilation:
make module-qtbase module-qtsvg module-qtcharts module-qt3d -j8
make install -j8
A static Qt version should now be setup in the qt5_wasm_binaries folder.
Windows 10
Setup the following dependencies:
- Install Perl and add it to
PATH - Install Python and add it to
PATH - Install MSVC 2015 or higher (We recommend the MSVC 2019 Community Version)
- Install the Windows 10 SDK (can also be installed via the MSVC community edition installer)
- If you want to use multiple cores (MSVC’s
nmakedoes not support multicore usage), install the jom compiler and add it toPATH
Navigate to the qt5 folder and init the repository:
perl init-repository -f --module-subset=qtbase,qtcharts,qtsvg,qt3d
Navigate to the parent directory, create a new shadow build folder and cd into it:
cd ..
mkdir qt5_shadow
cd qt5_shadow
Setup the visual studio compiler by starting the VS2019 x64 Native Tools Command Prompt or by typing (assuming you are using MSVC 2017):
cmd.exe /c "call `"C:\Program Files (x86)\Microsoft Visual Studio\2019\Enterprise\VC\Auxiliary\Build\vcvars64.bat`" && set > %temp%\vcvars.txt"
Get-Content "$env:temp\vcvars.txt" | Foreach-Object { if ($_ -match "^(.*?)=(.*)$") { Set-Content "env:\$($matches[1])" $matches[2] } }
Call configure from the new working directory in order to setup a shadow build.
../qt5/configure.bat -release -static -no-pch -optimize-size -opengl desktop -platform win32-msvc -skip webengine -nomake tools -nomake tests -nomake examples -opensource -confirm-license -prefix "..\qt5_wasm_binaries"
Build Qt and install to target (prefix) location afterwards. You can change the -j8 flag to the number of cores you want to use during compilation:
A static Qt version should now be setup in the qt5_wasm_binaries folder.
Compile MNE-CPP with the static flag
Create a shadow build folder, run qmake and build MNE-CPP (on Windows use nmake or jom instead of make):
mkdir mne-cpp_shadow
cd mne-cpp_shadow
../qt5_wasm_binaries/bin/qmake ../mne-cpp/mne-cpp.pro MNECPP_CONFIG += static
make -j8
All MNE-CPP applications (MNE Scan, examples, tests, etc.) should now be in the mne-cpp/out/Release folder.
Загрузить PDF
Загрузить PDF
Qt Software Development Kit (SDK) — кроссплатформенный инструментарий разработки программного обеспечения с графическим пользовательским интерфейсом (GUI). Он поддерживает Windows, Linux и Mac OS X. Qt SDK позволяет создавать графические интерфейсы пользователя (GUI) в приложениях, которые будут работать в Windows, Linux и Mac OS X. Популярными приложениями, созданными при помощи Qt SDK, являются KDE, Google Earth, Skype, Linux Multimedia Studio и мультимедийный плеер VLC. Кроссплатформенный означает, что исходный код Qt приложения, созданного для Microsoft Windows, как правило, может быть перенесен в Linux и Mac OS X (и наоборот).
Примечания: данная статья рассматривает Qt SDK 4.8 и Qt SDK 5.0.
-

Подготовьте вашу операционную систему Windows для разработки Qt приложений.
- Скачайте Qt SDK, выбрав соответствующую версию Windows. Пользователям с медленным интернетом рекомендуется воспользоваться оффлайн установкой Qt SDK, так как его размер составляет 1,7 Гб и скачивание может занять более 6 часов.
-
После установки Qt SDK вы должны отредактировать системную переменную PATH, чтобы операционная система могла найти Qt команды из командной строки. Будьте осторожны при редактировании системной переменной PATH в Windows.
Реклама


-
- Нажмите Start
- Нажмите Control Panel
- Нажмите System and Maintenance
- Нажмите System
- Нажмите Advanced System Setting
- Нажмите Environmental Variables
- Нажмите PATH (чтобы отредактировать системную переменную)
- Нажмите OK

-
- Щелкните по значку в виде папки, расположенному на нижней панели задач рядом со значком Internet Explorer.
- Щелкните правой кнопкой мыши по Properties
- Нажмите Advanced System Setting
- Нажмите Environmental Variables
- Нажмите PATH (чтобы отредактировать системную переменную)
- Нажмите OK
-
- Введите/скопируйте/вставьте: ;C:\QtSDK\mingw\bin;C:\QtSDK\Desktop\Qt\4.8.1\mingw\bin;
- Это установит и уведомит операционную систему Windows о возможности компиляции приложений Qt SDK из командной строки. Число 4.8.1 обозначает версию Qt SDK (замените это число на вашу версию Qt SDK).
-
3
Важно: если вы хотите использовать MinGW (входит в состав Qt SDK) для создания Qt приложений, но в системной переменной PATH прописана другая версия компилятора MinGW (например, ;C://MinGW/bin), то вам необходимо поменять эту версию на Qt версию MinGW. Это очень важно, если у вас есть еще один вариант компилятора MinGW C/C ++, установленного в системе Windows; необходимо удалить другой MinGW из системной переменной PATH, чтобы избежать конфликтов с Qt версией MinGW и невозможности компиляции Qt приложений из командной строки. (По сути, если вы используете другую версию MinGW C/C ++, то при создании Qt приложений из командной строки вы будете получать сообщения об ошибках.) Вы должны использовать ту версию MinGW C/C ++, которая входит в состав Qt SDK.
-
Для проверки возможности компиляции приложений из командной строки Windows, откройте командную строку и введите следующую команду.
-
qmake -version
- На экране отобразится сообщение, аналогичное следующему:
- ‘QMake version 2.01a
- ‘Using Qt version 4.8.1 in C:\QtSDK\Desktop\Qt\4.8.1\mingw\lib
-
Для создания и редактирования исходного кода приложений пользуйтесь текстовым редактором, например, Блокнотом или WordPad, а затем компилируйте Qt приложения из командной строки.
-
После добавления Qt SDK в системную переменную PATH вы можете компилировать приложения из командной строки, используя следующий метод. Откройте командную строку и введите следующие команды.
- Введите/скопируйте/вставьте: mkdir Qt-Applications
- Введите/скопируйте/вставьте: cd Qt-Applications
- Введите/скопируйте/вставьте: mkdir QtHelloWorld
- Введите/скопируйте/вставьте: cd QtHelloWorld
-
Находясь в каталоге QtHelloWorld, используйте текстовый редактор, например, Блокнот или Wordpad, чтобы ввести исходный код.
- Введите/скопируйте/вставьте: notepad main.cpp
- Убедитесь, что вы сохраните файл с исходным кодом под именем main.cpp
- или
- Введите/скопируйте/вставьте: start wordpad
- Используя Wordpad в качестве текстового редактора вы должны вручную сохранить файл с исходным кодом под именем main.cpp
-
- Введите/скопируйте/вставьте:
Реклама


#include <QApplication>
#include <QLabel>
#include <QWidget>
#int main(int argc, char *argv[ ])
{
QApplication app(argc, argv);
QLabel hello("<center>Welcome to my first WikiHow Qt program</center>");
hello.setWindowTitle("My First WikiHow Qt Program on Windows");
hello.resize(400, 400);
hello.show();
return app.exec();
}
- Сохраните файл с исходным кодом под именем main.cpp
- Находясь в каталоге QtHelloWorld, введите следующие команды для компиляции исходного кода.
- Введите/скопируйте/вставьте: qmake -project
- это создаст файл проекта Qt
- Введите/скопируйте/вставьте: qmake
- это подготовит файл проекта Qt к компиляции
- Введите/скопируйте/вставьте: make
- это скомпилирует исходный Qt код в исполняемую программу.
- После того, как вы успешно выполнили вышеописанные действия, готовое Qt приложение будет помещено в папку Debug в виде исполняемого (.exe) файла. Перейдите в папку Debug и запустите Qt приложение, либо щелкнув по нему, либо введя следующие команды.
- Введите/скопируйте/вставьте: cd debug
- вы перейдете в папку Debug
- Введите/скопируйте/вставьте: QtHelloWorld.exe
- вы запустите созданное вами приложение
- Сделано! Вы скомпилировали Qt приложение из командной строки Windows.
-
Подготовьте вашу операционную систему Windows для разработки Qt приложений.
- Скачайте Qt SDK, выбрав соответствующую версию Windows. Пользователям с медленным интернетом рекомендуется воспользоваться оффлайн установкой Qt SDK, так как его размер составляет 1,7 Гб и скачивание может занять более 6 часов.
-
После установки Qt SDK вы должны отредактировать системную переменную PATH, чтобы операционная система могла найти Qt команды из командной строки. Будьте осторожны при редактировании системной переменной PATH в Windows.
Реклама


-
- Нажмите Start
- Нажмите Control Panel
- Нажмите System and Maintenance
- Нажмите System
- Нажмите Advanced System Setting
- Нажмите Environmental Variables
- Нажмите PATH (чтобы отредактировать системную переменную)
- Нажмите OK

-
- Щелкните по значку в виде папки, расположенному на нижней панели задач рядом со значком Internet Explorer.
- Щелкните правой кнопкой мыши по Properties
- Нажмите Advanced System Setting
- Нажмите Environmental Variables
- Нажмите PATH (чтобы отредактировать системную переменную)
- Нажмите OK
-
- Введите/скопируйте/вставьте:;C:\Qt\Qt5.0.2\5.0.2\mingw47_32\bin;C:\Qt\Qt5.0.2\Tools\MinGW\bin;
- Это установит и уведомит операционную систему Windows о возможности компиляции приложений Qt SDK из командной строки. Число 5.0.2 обозначает версию Qt SDK (замените это число на вашу версию Qt SDK).
-
3
Важно: если вы хотите использовать MinGW (входит в состав Qt SDK) для создания Qt приложений, но в системной переменной PATH прописана другая версия компилятора MinGW (например, ;C://MinGW/bin), то вам необходимо поменять эту версию на Qt версию MinGW. Это очень важно, если у вас есть еще один вариант компилятора MinGW C/C ++, установленного в системе Windows; необходимо удалить другой MinGW из системной переменной PATH, чтобы избежать конфликтов с Qt версией MinGW и невозможности компиляции Qt приложений из командной строки. (По сути, если вы используете другую версию MinGW C/C ++, то при создании Qt приложений из командной строки вы будете получать сообщения об ошибках.) Вы должны использовать ту версию MinGW C/C ++, которая входит в состав Qt SDK.
-
Для проверки возможности компиляции приложений из командной строки Windows, откройте командную строку и введите следующую команду.
-
qmake -version
- На экране отобразится сообщение, аналогичное следующему
- ‘QMake version 3.0
- ‘Using Qt version 5.0.2 in C:\Qt\Qt5.0.2\mingw\lib
-
Для создания и редактирования исходного кода приложений пользуйтесь текстовым редактором, например, Блокнотом или WordPad, а затем компилируйте Qt приложения из командной строки.
-
После добавления Qt SDK в системную переменную PATH вы можете компилировать приложения из командной строки, используя следующий метод. Откройте командную строку и введите следующие команды.
- Введите/скопируйте/вставьте: mkdir Qt-Applications
- Введите/скопируйте/вставьте: cd Qt-Applications
- Введите/скопируйте/вставьте: mkdir QtHelloWorld
- Введите/скопируйте/вставьте: cd QtHelloWorld
-
Находясь в каталоге QtHelloWorld, используйте текстовый редактор, например, Блокнот или Wordpad, чтобы ввести исходный код.
- Введите/скопируйте/вставьте: notepad main.cpp
- Убедитесь, что вы сохраните файл с исходным кодом под именем main.cpp
- или
- Введите/скопируйте/вставьте: start wordpad
- Используя Wordpad в качестве текстового редактора вы должны вручную сохранить файл с исходным кодом под именем main.cpp
-
- Введите/скопируйте/вставьте:
Реклама


#include <QApplication>
#include <QLabel>
#include <QWidget>
#int main(int argc, char *argv[ ])
{
QApplication app(argc, argv);
QLabel hello("<center>Welcome to my first WikiHow Qt program</center>");
hello.setWindowTitle("My First WikiHow Qt Program on Windows");
hello.resize(400, 400);
hello.show();
return app.exec();
}
- Сохраните файл с исходным кодом под именем main.cpp
- Находясь в каталоге QtHelloWorld, введите следующие команды для компиляции исходного кода.
- Введите/скопируйте/вставьте: qmake -project
- это создаст файл проекта Qt
- Тем не менее, в Qt 5.0 SDK необходимо использовать текстовый редактор и добавить следующие строки в создаваемый *.pro файл.
- Введите/скопируйте/вставьте: notepad QtHelloWorld.pro
- Созданный файл QtHelloWorld.pro должен содержать следующий код:
TEMPLATE = app
TARGET = QtHelloWorld
#INCLUDEPATH += .
# Input
SOURCES += main.cpp
- Отредактируйте код в файле QtHelloWorld.pro следующим образом:
TEMPLATE = app
TARGET = QtHelloWorld
QT += core gui
QT += widgets
#INCLUDEPATH += .
# Input
SOURCES += main.cpp
- Добавив в файл QtHelloWorld.pro описанные строки (после слова TARGET), запустите команду qmake.
- Введите/скопируйте/вставьте: QT += core gui
- Введите/скопируйте/вставьте: QT += widgets
- Сохраните файл и закройте текстовый редактор.
- Введите/скопируйте/вставьте: qmake
- это подготовит файл проекта Qt к компиляции
- Введите/скопируйте/вставьте: make
- это скомпилирует исходный Qt код в исполняемую программу.
- После того, как вы успешно выполнили вышеописанные действия, готовое Qt приложение будет помещено в папку Debug в виде исполняемого (.exe) файла. Перейдите в папку Debug и запустите Qt приложение, либо щелкнув по нему, либо введя следующие команды.
- Введите/скопируйте/вставьте: cd debug
- вы перейдете в папку Debug
- Введите/скопируйте/вставьте: QtHelloWorld.exe
- вы запустите созданное вами приложение
- Сделано! Вы скомпилировали Qt приложение из командной строки Windows.
Об этой статье
Эту страницу просматривали 16 878 раз.