
To install Python on Windows using the command prompt, download the installer and run it with the appropriate options to ensure Python is added to your PATH.
start /wait python-installer.exe /quiet InstallAllUsers=1 PrependPath=1
Why Use Command Prompt to Install Python?
Using Command Prompt to install Python has several advantages over the traditional graphical user interface (GUI) installation method. Here are the key reasons why you might choose to use cmd:
- Speed: The command line allows you to skip multiple windows and dialogs. You can execute commands quickly and reliably.
- Automation: Installing Python via cmd enables automation through scripting, allowing you to replicate setups or streamline installations across multiple systems.
- Troubleshooting: Errors and issues are usually more apparent in cmd, making it easier to identify and resolve problems.
Set Path Cmd Windows: A Quick Guide to Path Management
Prerequisites for Installing Python
Before diving into the installation process, it’s crucial to ensure your system is ready.
Check for Existing Python Installations
First, you need to verify if Python is already installed on your system, as having it can lead to conflicts or unnecessary reinstalls. To check, run the following command in Command Prompt:
python --version
If Python is installed, this command will display the installed version. If nothing appears or an error appears indicating that the command is not recognized, you will need to proceed with the installation.
Verify Command Prompt Access
Make sure you can access Command Prompt (cmd). It’s a straightforward application included with Windows, and you can access it by searching for «cmd» in the Start menu.
How to Install Python on Windows 11 Using Cmd
Downloading Python
Finding the Right Version
When downloading Python, it’s essential to choose the latest stable version that supports your applications. The official Python website is your best resource for this.
Using Command Prompt to Download Python
You can download Python directly through cmd, negating the need to use your browser. If you have `curl` or PowerShell available, you can execute the following command:
curl -O https://www.python.org/ftp/python/x.x.x/python-x.x.x-amd64.exe
Replace `x.x.x` with the desired version number. This command will download the Python installer directly to your current directory.
List Files Cmd Windows: A Simple Guide
Installing Python Using Command Prompt
Navigating to the Downloads Folder
Once you have downloaded the installer, you’ll need to navigate to the folder where it was saved. The Downloads folder is the default location for most browser downloads. Use the following command:
cd %USERPROFILE%\Downloads
This command changes the directory to your Downloads folder, where the Python installer should be located.
Running the Installer
Now, it’s time to run the installer from cmd. Below is the command to execute the downloaded installer:
python-x.x.x-amd64.exe /quiet InstallAllUsers=1 PrependPath=1
Breakdown of Command Flags
- `/quiet`: This flag ensures that the installation runs silently, without interruptions.
- `InstallAllUsers=1`: This flag installs Python for all users on the system, not just the current user.
- `PrependPath=1`: This automatically adds Python to the system PATH, allowing you to run Python commands from any directory.
List Disk Cmd Windows: Quick Guide to Disks Management
Verifying the Installation
Checking the Python Version
To verify that Python was successfully installed, you can run the following command:
python --version
If the installation was successful, this command will show the version of Python you installed. If you encounter an error stating that the command is not recognized, you may need to troubleshoot the installation process or check your system PATH settings.
Install Windows From Cmd: A Quick How-To Guide
Setting Up Your Environment
Installing pip: Python’s Package Installer
pip is the package installer for Python and is essential for managing additional Python libraries. To verify if pip was installed along with Python, run the following command:
pip --version
This command will confirm whether pip is available. If it’s not installed, you may need to reinstall Python and ensure that pip is included in the installation settings.
Creating a Virtual Environment
Creating a virtual environment is highly recommended for managing dependencies for different projects. Here’s how to create and activate a virtual environment using cmd:
- Create the virtual environment:
python -m venv myenv
- Activate the virtual environment:
myenv\Scripts\activate
Activating the virtual environment allows you to install packages in an isolated space which helps prevent conflicts between project dependencies.
Install Windows 10 Cmd: Quick and Easy Guide
Common Issues and Troubleshooting
Installation Errors
While installing Python via cmd, you may encounter various issues. Common errors include insufficient permissions or problems with the installation flags. If you run into problems, check if you’re running Command Prompt as an administrator.
Python Not Recognized
If you receive an error stating that Python is not recognized after installation, it is often due to the PATH variable not being set correctly. You may need to manually add the Python installation path to your system’s environment variables.

Install Windows Service Cmd: A Quick How-To Guide
Conclusion
Installing Python using Command Prompt on Windows is not only efficient but opens the door to greater control over your Python programming environment. With the steps provided, you should be able to successfully install Python and manage your projects seamlessly using cmd. As you practice and become more comfortable with these commands, you can unlock the full potential of your Python development experience.
Mastering Diskpart Cmd Windows 10: Your Quick Guide
Additional Resources
For more information, visit the official Python documentation at [python.org](https://docs.python.org). Additionally, various online tutorials can enhance your cmd skills and Python knowledge.
Mastering Python Cmd Input for Effective Command Line Use
Call-to-Action
If you found this guide helpful, consider subscribing to our service for more quick and concise cmd tutorials. Share your experiences or any questions you may have in the comments section below!
- Установка на Windows
- Установка на Linux (из репозитория)
-
Ubuntu
-
Debian
-
Cent OS
- Установка на Linux (из исходников)
- Установка на MacOS
В данной статье мы рассмотрим, как устанавливать Python на Windows 10, Linux или mac OS по шагам.
Установка на Windows
Шаг 1 Для начала, нам понадобится скачать дистрибутив. Он находится на официальном сайте www.python.org в разделе «Downloads«.
Если вам нужна более ранняя версия Python, выберите пункт «Windows» слева в разделе «Downloads«.
Использовать версию ниже 2.x не рекомендуется — поддержка 2-й версии Python прекратилась в 2020 году
В списке также присутствуют версии Python 64-bit. 64-разрядная версия позволит одному процессу использовать больше оперативной памяти, чем 32-разрядная. Однако есть одна особенность: для хранения некоторых данных (например целых чисел) может потребоваться больше оперативной памяти, чем в версии 32-bit.
Если в ближайшее время вы не планируете заниматься научными вычислениями и задачами, в которых требуется более 2 ГБ памяти, используйте рекомендованную 32-битную версию.
Шаг 2 Установка Python.
Поставьте галочку около «Add Python 3.x to PATH«. Она отвечает за добавление пути до Python в системную переменной PATH (для того, чтобы запускать интерпретатор командой python без указания полного пути до исполняемого файла).
Далее выбираем «Install Now«.
После установки, отобразится сообщение «Setup was successful». Python установлен! 🎉
Шаг 3 Проверим, правильно ли всё установилось. В меню «Пуск» появилась папка «Python 3.x«. В ней мы видим IDLE (редактор кода), интерпретатор Python и документация.
Зайдем в командную строку Windows «WIN + R«. Вводим в поле «cmd» и нажимаем «ok«.
Набрав в консоли команду python --version мы увидим установленную версию Python.
Установка на Linux (из репозитория)
Python входит в состав большинства современных дистрибутивов Linux. Чтобы проверить, какая версия установлена в вашей системе, попробуйте выполнить следующие команды:
python --versionpython3 --version
Команды две, потому что в вашей системе могут быть установлены одновременно 2 версии — Python 2.x и Python 3.x.
Если python 3 не установлен, или необходимо обновить старую версию, для разных дистрибутивов Linux это делается по-разному. Для начала необходимо выяснить, какая версия дистрибутива установлена на вашей системе. Команда lsb_release -a покажет нужную информацию.
Теперь вы знаете название и версию своего дистрибутива Linux и можете приступить к установке Python.
Ubuntu
Для установки Python 3.7 на Ubuntu, выполните следующие команды:
sudo apt-get update

sudo apt-get install python3.7
Если вы используете старую версию Ubuntu, то пакета python3.7 может не быть в репозитории Universe. Вам нужно получить его из архива PPA (Personal Package Archive). Выполните следующие команды:
sudo apt install software-properties-common

sudo add-apt-repository ppa:deadsnakes/ppa

sudo apt-get update

sudo apt-get install python3.7
Python 3.8 отсутствует в репозитории Ubuntu по умолчанию. Если выполнить команду sudo apt-get install python3.8 в консоли можно увидеть предупреждение Unable to locate package python3.8.
Для установки Python3.8 выполните следующие команды:
sudo apt install software-properties-common

sudo add-apt-repository ppa:deadsnakes/ppa

sudo apt-get update

sudo apt-get install python3.8
Debian
Первый способ, установка Python 3.7 с помощью команды:
apt install python3.7
Если данный способ не сработал, или отобразилась ошибка Unable to locate package python3.7, есть второй способ — установка Python из исходников. Этот способ описан ниже.
Cent OS
Установить Python 3.6 можно следующим командами:
sudo yum install centos-release-scl

sudo yum install rh-python36
Чтобы использовать установленную версию Питона, достаточно выполнить команду:
scl enable rh-python36 bash
Команда scl вызывает скрипт /opt/rh/rh-python36/enable, который меняет переменные окружения shell.
Обратите внимание — если вы выйдете из сеанса или откроете новый в терминале, версия по умолчанию будет 2.7.x., и команду scl нужно будет выполнять заново.
Для установки более свежей версии Python (например 3.8) воспользуйтесь установкой из исходников, описанной ниже.
Установка на Linux (из исходников)
Установка через исходники не так сложна, как кажется изначально. Она состоит из 4 шагов.
Шаг 1 Прежде чем начать устанавливать Python 3.8, необходимо установить необходимые библиотеки для компиляции Python следующими командами:
apt-get install build-essential checkinstall

apt-get install libreadline-gplv2-dev libncursesw5-dev libssl-dev \

    libsqlite3-dev tk-dev libgdbm-dev libc6-dev libbz2-dev libffi-dev zlib1g-dev
Шаг 2 Скачать архив Python 3.8 в любое место (например в /opt):
cd /opt

wget https://www.python.org/ftp/python/3.8.1/Python-3.8.1.tgz
Доступные версии можно выбрать тут.
Разархивируем скачанный архив:
tar xzf Python-3.8.1.tgz
Шаг 3 Осталось скомпилировать исходники. Для этого выполним команды:
cd Python-3.8.1

./configure --enable-optimizations

make altinstall
altinstall используется для предотвращения замены бинарного файла python в папке /usr/bin
Шаг 4 Проверить установку можно командой:
python3.8 -V
Чтобы скачанный архив Python-3.8.1.tgz не занимал лишнее место, его можно удалить:
cd /opt

rm -f Python-3.8.1.tgz
Установка на MacOS
Для установки на Mac OS X, просто скачайте Python 3 с официального сайта www.python.org. Далее кликните на скачанный файл два раза, пройдите процесс установки и проверьте в консоли версию Python запустив команду python3 --version
Альтернативный вариант — установка через Homebrew.
Шаг 1 Сначала необходимо установить сам Homebrew (если он отсутствует). Откройте приложение «Terminal» и выполните команду:
/bin/bash -c "$(curl -fsSL https://raw.githubusercontent.com/Homebrew/install/HEAD/install.sh)"
Проверим успешность установки командой brew doctor
Шаг 2 Установим Python 3.
brew install python3
И проверим результат установки:
python3 --version
Installing Python 3 on Windows 11 or 10 machines is not difficult, however, if you are a beginner then we have discussed the both Graphical and command prompt ways to install it. Especially, for those who are not much familiar with Python, it is an open-source high-level interpreted programming language.
Installing Python 3 on Windows 10 or 111. Download Python’s latest version2. Start Python Installation on Windows3. Check version4. Stop Python from opening the Microsoft store5. Open PowerShell, CMD, or Terminal (Admin)6. List Python versions7. Use Winget to install Python8. Run a simple program
It is known for its versatility because it has been used widely for programming applications, web development, data analysis, machine learning, artificial intelligence, data visualization, web scraping, and scientific computing. The reason behind’s Python popularity among the developer community is its clear syntax, readability, ease of use, and large number of libraries & frameworks. All this is possible because of a vast but active community.
Python also supports most of the popular IDEs or can be written using a simple text file created using Notepad.
Let’s go through the article, whether you are a beginner or experienced, in this tutorial we will find the necessary steps required to install and set up Python on Windows operating systems.
Installing Python 3 on Windows 10 or 11
Here we are discussing two ways to set up Python one is using the graphical installation wizard and the other with the help of a command in prompt or Powershell (Terminal).
Using GUI:
1. Download Python’s latest version
As we know Python is not included in Windows by default to compile our programs based on it. Therefore, visit the official website- python.org to download the latest version by clicking on the Download button.

2. Start Python Installation on Windows
After following the previous steps, you would already have the executable file of python on your Windows.
- Double-click python executable to start the installation wizard.
- Select the “Add Python.exe to PATH” box otherwise, we won’t be able to run PIP or Python using native Windows Powershell or command prompt.
- After that click on the Install Now option.

- The setup will start running, this will also install PIP and documentation on your system.

- Finish the installation by clicking on the Close button.

3. Check version
To confirm, the installation is successful without any error, let’s check the version of installed Python and PIP. For this, you can either use the Command prompt or Powershell. Alternatively, we can also run the Python terminal app to issue commands, for that in your Windows Search type – python as its app appears, and click to open it. You will have a Python interpreter with version details as well.
python --version
To check the PIP version
pip -V
Note: If typing python on on command terminal or Powershell, opens the Microsoft Store then go through the next step.

4. Stop Python from opening the Microsoft store
By default, if you type python on the command prompt or PowerShell in Windows, it will open Microsoft Store to download another version of Python instead of using the existing version of your Python. To stop that and tell the system to run the one you have installed, Follow the steps:
- Go to the Windows Search box
- Type- Manage App Execution Aliases
- As its icon appears click to open it.
- Search for Python3 and Python App Installers
- Turn off the toggle button given there for them.
- Close your CMD Terminal or Powershell and reopen it again.
- Now, type python in that to check your current version.

#Use the command line method
5. Open PowerShell, CMD, or Terminal (Admin)
Right-click on the Windows Start button and select Terminal (Admin). If you have PowerShell then you can go for that as well.
6. List Python versions
When you go for command line installation there are multiple versions available to install. We can use Winget to first check what are those and, later, to install them as well.
winget search Python.Python

7. Use Winget to install Python
Once you have decided which version is suitable for your project then set it up using the following syntax.
winget install Python.Python.version-number
For example, if you want to have 3.11 then the command will be like this:
winget install Python.Python.3.11
When you are done with it, close your CMD terminal or PowerShell and reopen it again to check, whether it is working or not.
For that either use:
pip -V

or

 python --version
8. Run a simple program
Open the Python command line and type:
print ('Hey I am here with Python')
The above code will print “Hey I am here with Python” on your screen.

Other Articles:
- How to install and use Python on Windows 7
- 8 Best ways to start Command Prompt in Windows 10
- Best 5 Books to Learn Python Programming?
- How to make Python 3 your default “Python Version” on Windows
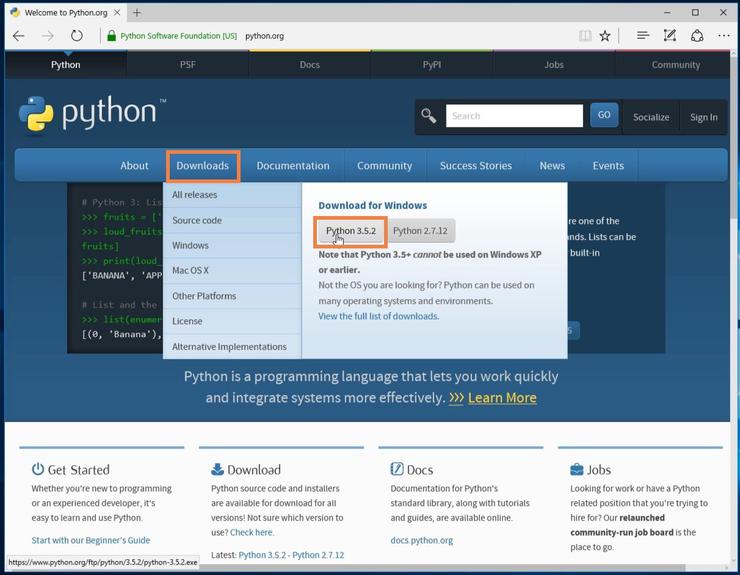
В данном разделе мы научимся устанавливать Python и менеджер пакетов pip на Windows 10 с нуля. Лучший способ установить Python на Windows — это скачать официальный установщик с сайта python.org. Чтобы сделать это, откройте браузер и перейдите по ссылке https://python.org/. После завершения загрузки установщика, откройте «Загрузки». Сайт обнаружит, что вы посетили его с Windows, и предложит скачать последнюю версию Python 3 или Python 2. Если вы не знаете, какую версию использовать, то я рекомендую Python 3. Если вам нужно работать с унаследованным кодом Python 2, тогда вам необходим Python 2. Под вкладками Downloads → Download for Windows нажмите кнопку “Python 3.X.X” (или “Python 2.X.X”), чтобы скачать установочный файл.

64-разрядный Python против 32-разрядного
Если вы гадаете, какую версию Python нужно использовать 64-разрядную или 32-разрядную, вам, скорее всего, понадобится 32-разрядная. Иногда достаточно тяжело найти бинарники для 64-разрядной версии, а это значит, что некоторые сторонние модули могут установиться неправильно на 64-разрядной версии Python. Мое мнение – использовать ту версию, которую конкретно рекомендуют на официальном сайте. Если вы кликните кнопку Python 3 или Python 2 под “Download for Windows”, вы получите именно ту версию, которую выбрали. Помните, Если вы в итоге сделаете неправильный выбор, и захотите перейти на другую версию Python, вы можете просто удалить существующую версию и переустановить его, скачав другой установщик с официального сайта.
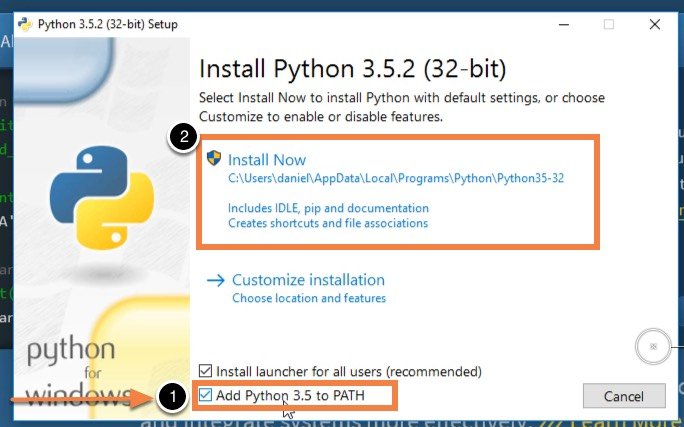
По окончанию загрузки установщика, запустите его двойным щелчком мыши, чтобы начать установку Python. Обязательно установите флажок на «Add Python X.Y to PATH» в мастере настройке. Убедитесь, что флажок “Add Python X.Y to PATH” поставлен в установщике, в противном случае у вас будут проблемы с доступом инсталлятора Python к командной стоке. Нажмите «Установить» для начала установки. Установка должна пройти быстро, после чего Python будет готов к запуску на вашей системе. К следующему шагу нужно убедиться, что все было выполнено надлежащим образом.
Подтверждаем, что Python был установлен правильно
По окончанию установки, Python должен быть установлен на вашем компьютере. Давайте убедимся в том, что все было выполнено правильно, протестировав, имеет ли Python доступ к командной строке (cmd) Windows:
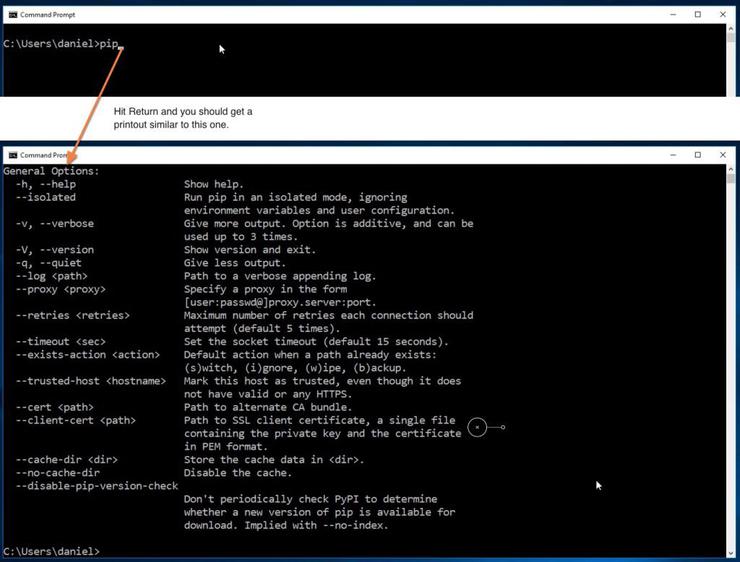
- Откройте командную строку Windows, запустив cmd.exe
- Введите pip и нажмите «Enter»
- Вы увидите справочный текст менеджера пакетов Python под названием “pip”. Если вы получите уведомление об ошибке, повторите этапы установки Python, и убедитесь в том, что вы обладаете рабочей версией Python. Большая часть проблем, с которыми вы можете столкнуться, будут иметь то или иное отношение к неправильной настройке PATH. Переустановка и подтверждение того, что опция “Add Python to PATH” была активирована, должны исправить эту проблему.
Есть вопросы по Python?
На нашем форуме вы можете задать любой вопрос и получить ответ от всего нашего сообщества!
Telegram Чат & Канал
Вступите в наш дружный чат по Python и начните общение с единомышленниками! Станьте частью большого сообщества!
Паблик VK
Одно из самых больших сообществ по Python в социальной сети ВК. Видео уроки и книги для вас!
Что теперь?
Убедившись в том, что все сделано правильно, и убедившись в правильной работе Pip в вашей командной строке, вы можете смело заявить, что установили Python на вашей системе.
Являюсь администратором нескольких порталов по обучению языков программирования Python, Golang и Kotlin. В составе небольшой команды единомышленников, мы занимаемся популяризацией языков программирования на русскоязычную аудиторию. Большая часть статей была адаптирована нами на русский язык и распространяется бесплатно.
E-mail: vasile.buldumac@ati.utm.md
Образование
Universitatea Tehnică a Moldovei (utm.md)
- 2014 — 2018 Технический Университет Молдовы, ИТ-Инженер. Тема дипломной работы «Автоматизация покупки и продажи криптовалюты используя технический анализ»
- 2018 — 2020 Технический Университет Молдовы, Магистр, Магистерская диссертация «Идентификация человека в киберпространстве по фотографии лица»
Let’s explore Python and Pip in this post and learn “How to install python on windows 10 properly“. We will discuss the latest version available today for Python (3.9.1) and pip (20.2.3). Also, I will explain how to modify and uninstall Python software. In case either additional feature needs to add/remove or you want to get rid of the old python version.
I am confident, even if you are new to Python, you will be able to install it easily, following this post step by step. So let’s deep dive in.
What are Python and pip
Python is a simple, Object-oriented, interpreted, high-level programming language with dynamic semantics. Due to its non-complicated syntax and fast edit-test-debug cycle, the Programmer community loves it. Python also reduces the cost of software management due to its simple nature.
Pip is a package manager for python, it allows you to install and manage additional libraries and dependencies that are not distributed or part of the standard library.
Linux users can check out my post on “How to install the latest Python in Linux“.
Pre-requisite to install python on Windows 10
- Windows 10 machine
- Internet connection
- Approx. 200MB of disk space (varies according to features and options selected).
Let’s find out the steps to install Latest Python and pip –
Step1- Python and pip download
You can download the latest python version 3.9.1 for windows or your respective operating system from python.org website.
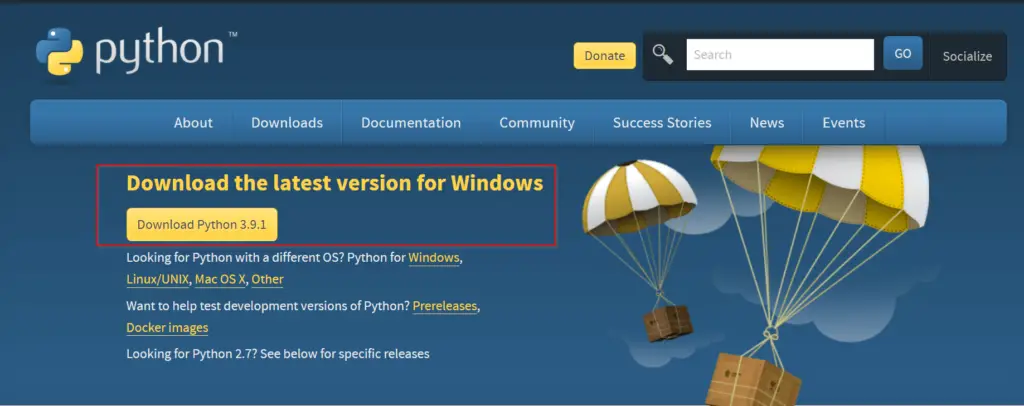
Otherwise, you can simply click on the below-mentioned button to download python for windows 10.
Click here to download an older release of Python like 3.8 or 2.7, for your project. Once you click on this link, scroll down and select your old python version as shown in the image.

You don’t need to download pip separately as it’s part of Python 3.9.1 software. You will know it while following this post further.
Step2- Run Python 3.9.1 (64-bit) installer
Once your download completes, visit your “download” directory. Then double click python-3.9.1-amd64 file to start the python setup wizard.

Step3- Choose “Install Now” or “Customize” installation
At this point, You will get two installation options –
- Install Now – This option is helpful if you are a newbie. Just select “Install now” and it will install Python 3.9 with default settings. Python default installation directory would be “C:\users\”your-username”\AppData\Programs\Python\Python39”. It will also install IDLE, pip, documentation and shortcuts.
- Customize installation – If you are a pro and need to know, what all features will be installed with python. Also, in case you already have python installed and want to test the latest version. Using the Customize installation option, you can choose a different installation folder and can keep both python versions.
Keep following this post, if you want to see options covered in Customize installation.
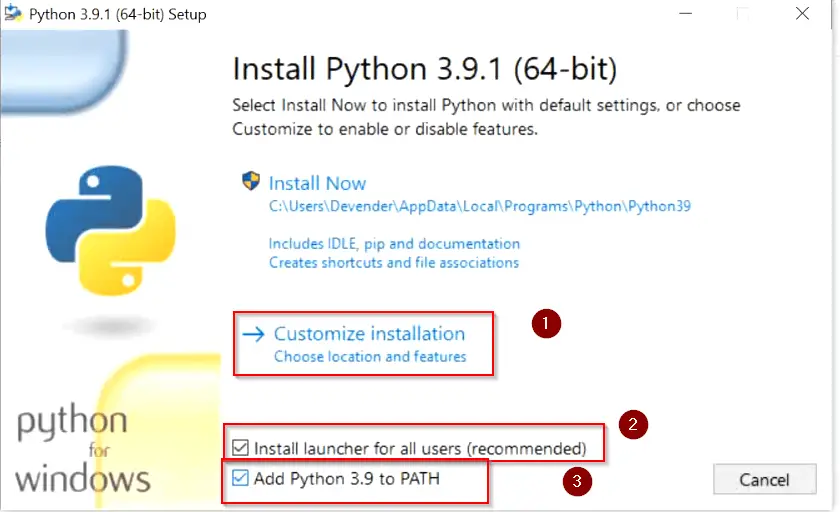
There are two more checkboxes to look into –
- “Install launcher for all users (recommended)” – Select this check box and it will make a python launcher shortcut for all user profiles exist in your machine. Whomsoever will login to your system will be able to use python 3.9.
- Add python 3.9 to path – Select this check box to add Python and pip “Path Variables” in the system environment automatically. If you will not select this option now, you need to add the path variable manually later after installation. My recommendation is to select it here itself.
So let’s click on “Customize installation” and check both the boxes as shown in the image.
Step4- Add or remove “Optional Features“
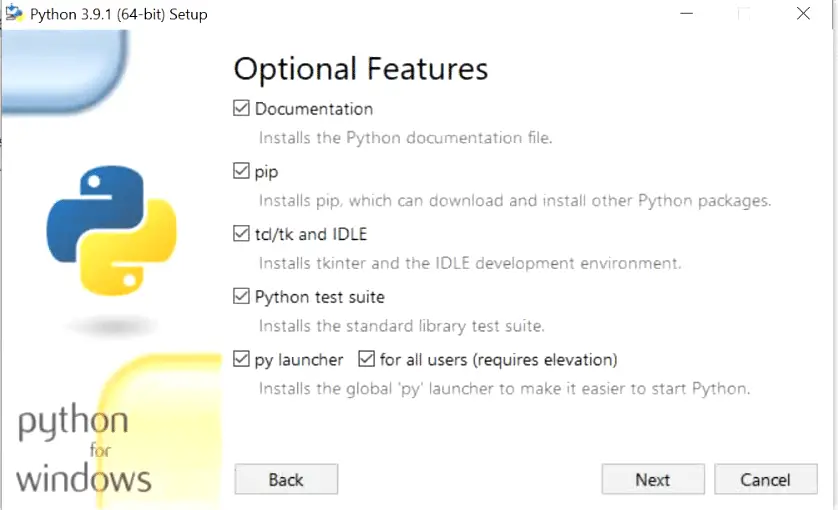
On this window, you can add or remove optional features, available with python 3.9. Let’s see few details of each optional feature available –
- Documentation:- Selecting this box will install all the Python documentation and manuals.
- pip:- As I informed you in Step 1 download section. Pip is already part of python 3.9. Select this check box, If you want to install pip automatically with Python 3.9 (which I strongly recommend).
- tcl/tk and IDLE:- Selecting this check box will install Tkinter and the IDLE development environment. You don’t need to install it separately then.
- Python test suite:- Installs the standard library suite.
- py launcher for all users (requires elevation):- Installs the global ‘py launcher‘ for all users. It requires admin rights (elevation) to perform it. Because it will allow all users to launch python easily from their user profiles.
Choose your required optional features and click Next. I will suggest you to keep all options checked.
Step5- Choose “Advanced Options” of python 3.9
These are the advanced options available, which are self-explanatory.
- Install for all users – Python 3.9 will install for all users in your machine. In my case, I am the only user. So this option really doesn’t matter much for me.
- Associate files with Python (requires the py launcher) – Link associated files to the py launcher
- Create shortcuts for installed applications – Create shortcuts icons for Python, pip and installed optional features.
- Add python to environment variables – Add environment variable for python and pip
- Precompile standard library – Adds precompiled libraries.
- Download debugging symbols – You can download and install the debugging symbol, which attaches additional information to the symbol table.
- Download debug binaries (requires VS 2017 or later) – To install required and dependent debugging binaries.
If you are a pro and know your required options. Select those options as per your need. In case you are a newbie, you can proceed with default selected options as shown in the image.
Click Install –

Step6 (optional)- Select custom install location folder
If you already have Python version installed and want to keep it safe. Also, you want to install a newer python version for testing. To make this happen, On Step 5, click Browse – Select your destination installation folder – click OK and click Install.

Step7- Allow Python 3.9.1 to make changes
Choose “Yes” to allow Python 3.9 to make changes to your system.

Step8- Let Python 3.9 and pip setup complete
Sit back and relax. Python and pip installation will take some time to complete.

Step9- Select “Disable path length limit”
At this point, Python and pip have been installed successfully in windows 10. But you need to select “Disable path length limit” here. Because it allows python to bypass the 260 characters “MAX_PATH” limitation. Basically, it means, if the number of characters exceeds 260 in your installation directory path. Python will not be able to add it to the path variable. It’s a limitation of Windows 10.
Select “Disable path length limit” – then Allow Python 3.9 in user access control and Select Close.

How to Check Python and Pip version on Windows 10
Follow below mentioned steps to check python and pip version. Additionally, it will also validate path variable is added properly in system environment.
Step10- Validate Python and pip versions
- Open elevated command prompt “as administrator” by typing “cmd” in search bar of windows 10.
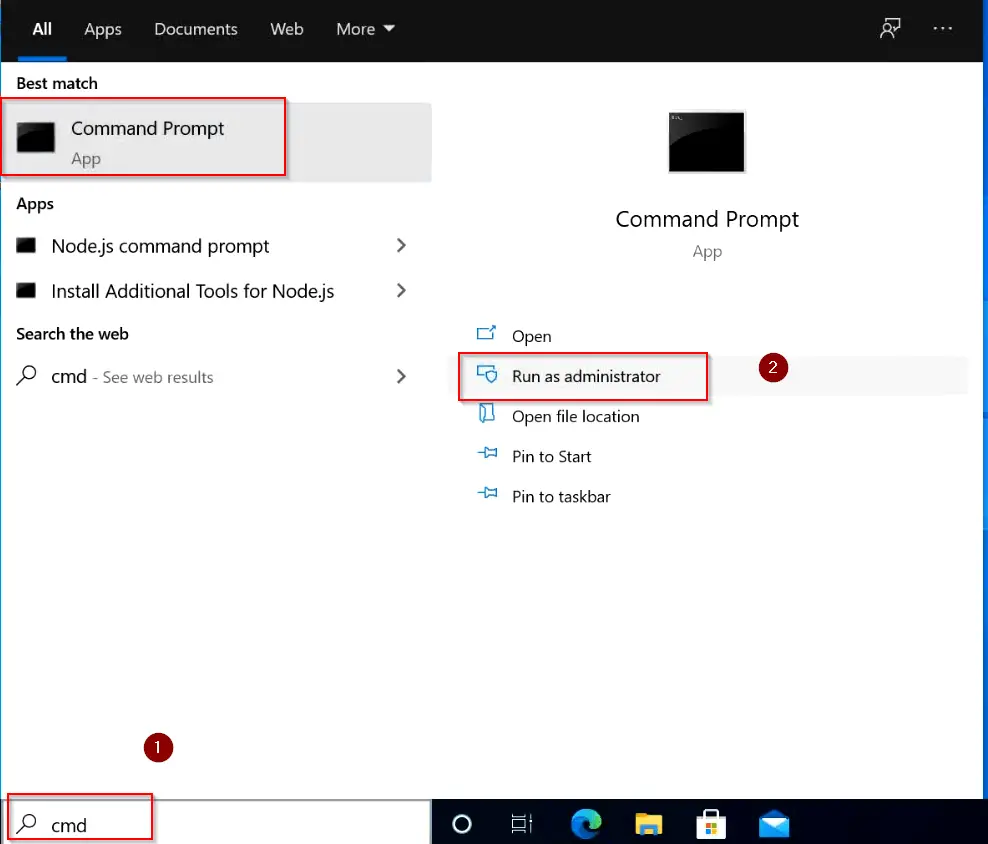
- Run python or py (short form) command to check Python version. You can see it’s version 3.9.1 installed in my case. You will see your installed version.
C:\> py
### OR ###
C:\> python
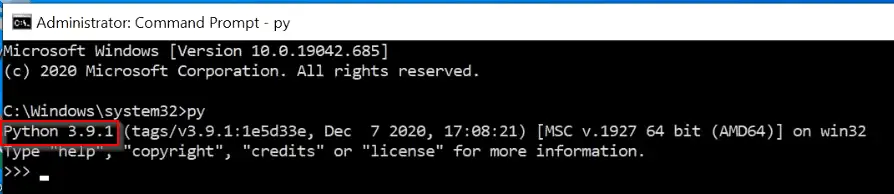
Type exit() or press “Ctrl + Z” on your keyboard to exit from python prompt.
- To check Python-pip version, type pip –version command. it will show you the pip version. it’s pip 20.2.3 in my case.
C:\> pip --version

Running pip and python version command successfully also validates, that your python and pip path variables are added successfully in Windows 10. Check out this post, if you are still getting ‘pip’ is not recognized as an internal or external command, operable program or batch file.
Step11- Launch Python alternative method
I showed you how to get python prompt and version from the command prompt. Let me show you an alternate way to launch the Python console.
- Type “Python” in the search bar of windows 10. Click “open“.
- (optional) If you will check bullet 3 in the image, I have shown you that if you need open or check Python manuals or documentation. You select one of them and open. Additionally, you can open IDLE from the search bar.

- After opening, it will take you to python 3.9 window. Enjoy and start your python projects.

How to install python on windows 10 (command line)
Although preferred and recommended option to install Python and pip in windows 10 is through GUI. But in case you want to learn python 3.9 version installation from the command line. Follow these simple steps –
Step1 –
- Open elevated command prompt by typing “cmd” in search bar.
Step2 –
- Go to your Downloads directory and Run “Python-3.x.x exe” as shown. In my case, it’s Python 3.9.1-amd64.exe. Below mentioned are the arguments and options used in the command –
- /quiet – means no interactive wizard.
- InstallAllUsers=1 – Install for all users
- PrependPath=1 – Install Python variable path
- Include_test=0 – Don’t include or install test suite
0 – means disable (don’t install)
1 – enable (install)
C:\> cd "path to your home directory"
C:\> python-3.x.xexe /quiet InstallAllUsers=1 PrependPath=1 Include_test=0
For example –
C:\> cd "users\devender\Downloads"
C:\> python-3.9.1-amd64.exe /quiet InstallAllUsers=1 PrependPath=1 Include_test=0

Just wait for a couple of minutes and latest python will install. Enjoy..
How to repair or modify Python in windows 10
There are some scenarios when you are not confident about additional features and options. Later you realize that you need that feature or advance option as shown in step4 and step5 in this post during installation. Then you don’t need to worry, it’s easy to add or remove features and advance options even after installation is done.
Follow these easy steps –
- You need to type “Control Panel” in the windows search bar. Click Open.

- Select “uninstall a program“

- Select “Python 3.9.1” or your version and click “Change“.

- Select “Modify” and press Next. You can also repair your installation using this wizard, in case installation issues.

Select Features and advanced option as per your need and complete installation. Refer Step4 and Step5 for further reference as shown in “How to install Python on Windows 10 using GUI” section.
How to uninstall Python in windows 10
If you have installed the latest Python and pip version by following this post. Now you want to get rid of your old Python version. Follow these simple steps to remove or uninstall Python in Windows 10.
Step1. Open Control panel from search bar
To start the uninstallation process of older Python and pip software from your windows 10. You need to type “Control Panel” in the windows search bar. Click Open.
Step2. Select “Uninstall a program“
Step3. Select Python and click “Uninstall or change a program”.
Step 3.1 – I have shown Python version 3.9.1, but you need to select your old Python version. Once you select, click “uninstall“.
- Wait for uninstallation progress bar to complete and click “Close“.

Step 3.2(optional) – Once python uninstallation completes and if you can see Python Launcher also.
- Then, Just select “Python launcher” and click “Uninstall“.
- Select “Yes” in “uninstall python launcher” dialogue box as shown in image.

- Permit in allow “User access control” box and uninstallation of Python will be done.
Hurray, You have got rid of old version of Python.
Video tutorial
If you don’t like reading, watch this tutorial to know “How to Install Python on Windows 10“. Also “Uninstallation of Python from windows 10“.
Conclusion
Congrats!! Now you know approximately everything on how to install, modify and uninstall Python in windows 10. Also, you must have a good idea of pip installation with Python3. Nowadays, Microsoft also recommends installing development software on WSL (windows subsystem for Linux).
If you like this post, you can share it on your social media wall to help others.
Frequently Asked Questions:-
Is Python EXE safe?
Yes, Python exe is completely safe. Make sure you download it from python.org website or from legitimate source only. Then you should be good with the installation. In case you have not installed it and still, you can see in your system. Go to control panel – click on “Uninstall a program” – Then check for Python software installation. If it is visible there and you don’t want, you can uninstall it. If you don’t found it in programs, then it may be a virus or malware. Scan your system and remove it.
Is Python free to download?
Yes, Python is free opensource software. You can download and install it in your system from https://www.python.org/downloads/ website.
How do I run Python on Windows 10 from the command line?
Open elevated command prompt – type py or python and hit enter.
Can I learn Python by myself?
Yes, it’s one of the easy languages with no complex syntax. There are many websites with free tutorials. Checkout free Python tutorials.
Why Python is not working?
May be either python is not installed or you have not set up Python path variable in the system environment.