
In this article, we’ll focus specifically on how to install PySpark on the Windows operating system. While Spark is primarily designed for Unix-based systems, setting it up on Windows can sometimes be a bit tricky due to differences in environment and dependencies. However, with the right steps and understanding, you can install PySpark into your Windows environment and run some examples.
I will also cover how to start a history server and monitor your jobs using Web UI.
Related:
- PySpark Install on Mac OS
- Install Apache Spark on Windows (Spark with Scala)
To Install PySpark on Windows follow the below step-by-step instructions.
Install Python or Anaconda distribution
Download and install either Python from Python.org or Anaconda distribution which includes Python, Spyder IDE, and Jupyter Notebook. I would recommend using Anaconda as it’s popular and used by the Machine Learning and Data science community.
To use Anaconda distribution, follow Install PySpark using Anaconda & run Jupyter notebook
Install Java 8
To run the PySpark application, you would need Java 8/11/17 or a later version. Download and install JDK from OpenJDK.
Once the installation completes, set JAVA_HOME and PATH variables as shown below. Change the JDK path according to your installation.
JAVA_HOME = C:\Program Files\Java\jdk1.8.0_201
PATH = %PATH%;C:\Program Files\Java\jdk1.8.0_201\bin
You can install PySpark either by downloading binaries from spark.apache.org or by using the Python pip command.
Install using Python PiP
Python pip, short for “Python Package Installer,” is a command-line tool used to install, manage, and uninstall Python packages from the Python Package Index (PyPI) or other package indexes. PyPI is a repository of software packages developed and shared by the Python community.
PySpark is available in PyPI hence, you can install it using the pip command.
# Install pyspark using pip command
pip install pyspark
Download & Install from spark.apache.org
If you install PySpark using PIP, then skip this section.
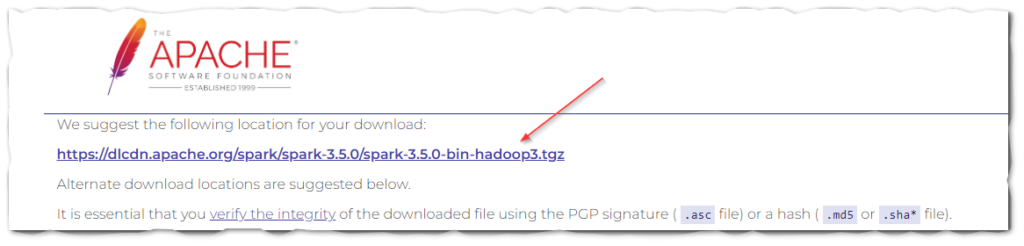
Access the Spark Download page, choose the Spark release version and package type; the link on point 3 updates to the selected options. select the link to download it.
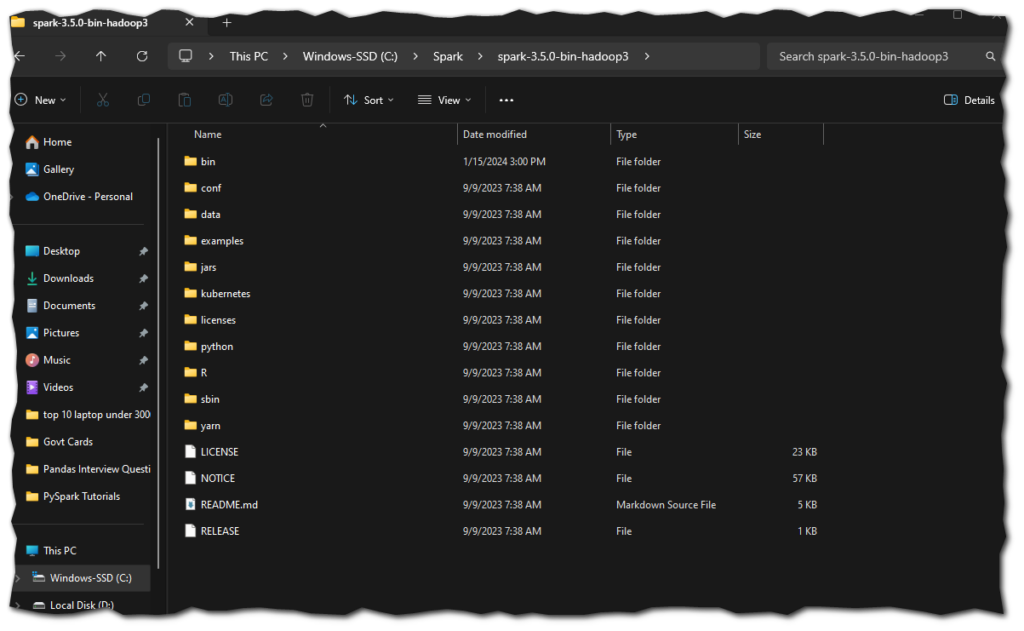
2. Unzip the binary using WinZip or 7zip and copy the underlying folder spark-3.5.1-bin-hadoop3 to c:\apps
3. Open the Windows environment setup screen and set the following environment variables.
SPARK_HOME  = C:\apps\spark-3.5.1-bin-hadoop3
HADOOP_HOME = C:\apps\spark-3.5.1-bin-hadoop3
PATH=%PATH%;C:\apps\spark-3.5.1-bin-hadoop3\bin
Install winutils.exe on Windows
<br>winutils.exe is a set of utilities for Windows used in Hadoop deployments. These utilities are primarily required for running Apache Hadoop applications on a Windows operating system. Copy winutils files to %SPARK_HOME%\bin folder.
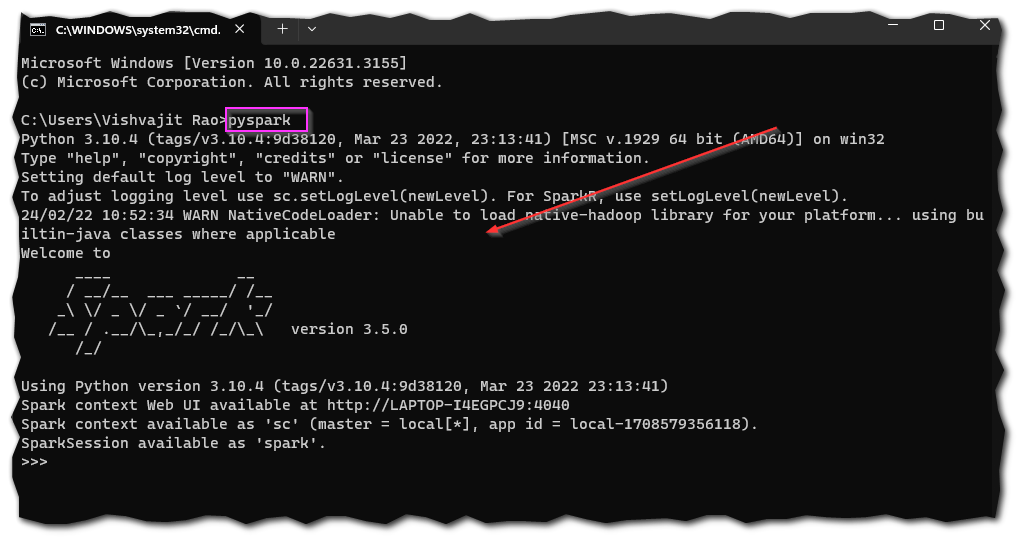
PySpark shell
The PySpark shell is an interactive Python shell that provides a convenient way to interact with Apache Spark. To launch the PySpark shell, you typically use the pyspark command in your terminal or command prompt. Once launched, you’ll see the Python interpreter prompt (>>>) indicating that you can start executing Python code. From there, you can import the pyspark module and start interacting with Spark.
Run the below statements in PySpark shell to create an RDD.
# RDD creation
rdd = spark.sparkContext.parallelize([1,2,3,4,5,6])
print(rdd.count)
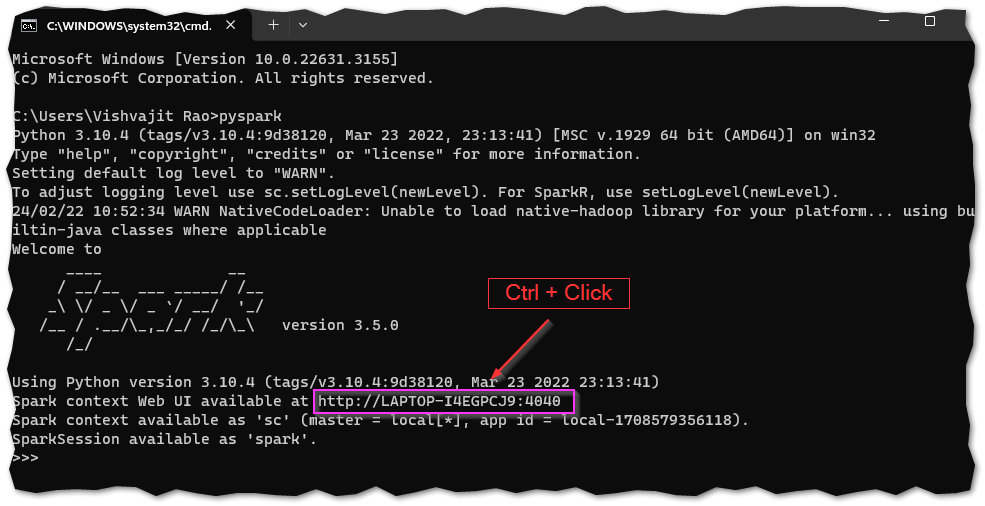
Spark-shell generates a Spark context web UI, which is accessible by default at http://localhost:4040.
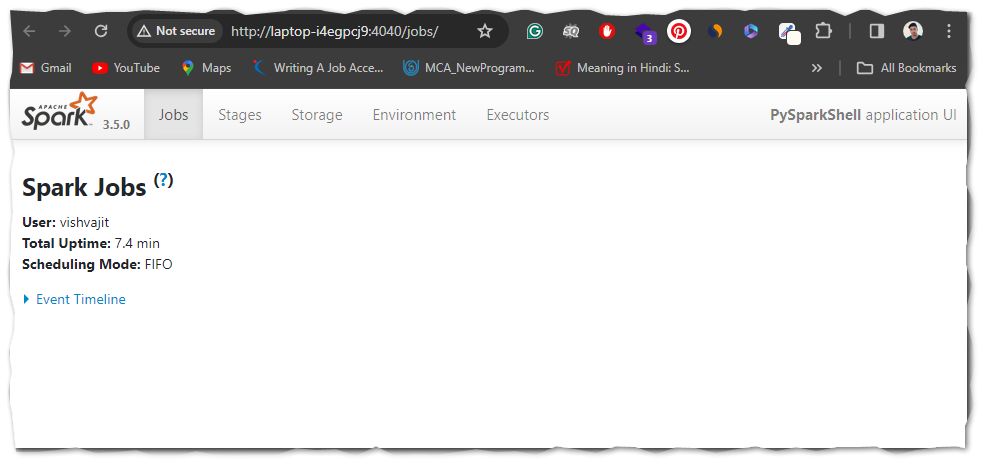
Web UI
The Spark Web UI or Spark UI, is a web-based interface provided by Apache Spark for monitoring and managing Spark applications. It offers real-time insights into the execution of Spark jobs, providing information about tasks, stages, executors, and more.
You can access Spark Web UI by accessing http://localhost:4040. You can find this URL on the PySpark shell console.
Conclusion
In summary, you have learned how to install PySpark on Windows and run sample statements in spark-shell. If you have any issues setting it up, please message me in the comments section, and I will try to respond with a solution.
Happy Learning !!
Related Articles
- Apache Spark Setup with Scala and IntelliJ
- Apache Spark Installation on Windows
- Spark Installation on Linux Ubuntu
- Spark Hello World Example in IntelliJ IDEA
- Spark Word Count Explained with Example
- Spark Setup on Hadoop Cluster with Yarn
- Spark Start History Server
- How to Check Spark Version
- Install PySpark on Ubuntu running on Linux
- Install PySpark in Anaconda & Jupyter Notebook
- Install PySpark in Jupyter on Mac using Homebrew
- How to Install PySpark on Mac
- Install Pyspark using pip or condo
- Dynamic way of doing ETL through Pyspark
How to Find PySpark Version?
PySpark Shell Command Usage with Examples
Install Anaconda & Run pandas on Jupyter Notebook - Pyspark: Exception: Java gateway process exited before sending the driver its port number
Introduction
Apache Spark is an open-source, distributed computing system that provides a fast and general-purpose cluster-computing framework for big data processing.
PySpark is the Python library for Spark, and it enables you to use Spark with the Python programming language.
This blog post will guide you through the process of installing PySpark on your Windows operating system and provide code examples to help you get started.
Prerequisites
1. Python 3.6 or later: Download and install Python from the official website (https://www.python.org/downloads/). Make sure to add Python to your PATH during installation.
2. Java 8: Download and install the Java Development Kit (JDK) 8 from Oracle’s website (https://www.oracle.com/java/technologies/javase/javase-jdk8-downloads.html). Set the JAVA_HOME environment variable to the installation directory.
1. Install Apache Spark
- Download the latest version of Apache Spark from the official website (https://spark.apache.org/downloads.html). Select the package type as “Pre-built for Apache Hadoop”.
-
Extract the downloaded .tgz file to a directory, e.g., C:\spark.
-
Set the SPARK_HOME environment variable to the extracted directory path, e.g., C:\spark.
2. Install Hadoop
-
Download the latest version of Hadoop from the official website (https://hadoop.apache.org/releases.html).
-
Extract the downloaded .tar.gz file to a directory, e.g., C:\hadoop.
-
Set the HADOOP_HOME environment variable to the extracted directory path, e.g., C:\hadoop.
3. Install PySpark using pip
Open a Command Prompt with administrative privileges and execute the following command to install PySpark using the Python package manager pip:
pip install findspark
pip install pyspark
4. Install winutils.exe
Since Hadoop is not natively supported on Windows, we need to use a utility called ‘winutils.exe’ to run Spark.
Download the appropriate version of winutils.exe for your Hadoop version from the following repository: https://github.com/steveloughran/winutils.
Create a new directory called ‘hadoop’ in your C: drive (C:\hadoop) and a subdirectory called ‘bin’ (C:\hadoop\bin). Place the downloaded ‘winutils.exe’ file in the ‘bin’ directory.

5. Set the Environment Variables
a) Open the System Properties dialog by right-clicking on ‘This PC’ or ‘Computer’, then selecting ‘Properties’.
b) Click on ‘Advanced system settings’ and then the ‘Environment Variables’ button.
c) Under ‘System variables’, click on the ‘New’ button and add the following environment
### variables:

    Variable Name: HADOOP_HOME

    Variable Value: C:\hadoop

    Variable Name: SPARK_HOME

    Variable Value: %USERPROFILE%\AppData\Local\Programs\Python\Python{your_python_version}\Lib\site-packages\pyspark

    Replace {your_python_version} with your installed Python version, e.g., Python39 for Python 3.9.
d) Edit the ‘Path’ variable under ‘System variables’ by adding the following entries:
    %HADOOP_HOME%\bin

    %SPARK_HOME%\bin
e) Click ‘OK’ to save the changes.
6. Test the PySpark Installation
To test the PySpark installation, open a new Command Prompt and enter the following command:
pyspark
If everything is set up correctly, you should see the PySpark shell starting up, and you can begin using PySpark for your big data processing tasks.
7. Example Code
Here’s a simple example of using PySpark to count the number of occurrences of each word in a text file:
import findspark
findspark.init()

from pyspark import SparkConf, SparkContext

# Configure Spark
conf = SparkConf().setAppName("WordCount")
sc = SparkContext(conf=conf)

# Read input file
text_file = sc.textFile("input.txt")

# Perform word count
word_counts = text_file.flatMap(lambda line: line.split(" ")) \
             .map(lambda word: (word, 1)) \
             .reduceByKey(lambda a, b: a + b)

# Save results to a file
word_counts.saveAsTextFile("output")

# Stop Spark context
sc.stop()
Create an input file named input.txt with some text content.
Run the Python script using the following command:
spark-submit word_count.py
After the script finishes executing, you should see an “output” folder containing the word count results.
Conclusion
Congratulations! You have successfully installed PySpark on your Windows operating system and executed a simple word count example.
You can now start exploring the powerful features of PySpark to process large datasets and build scalable data processing pipelines.

In this PySpark tutorial, we will see how to install PySpark in Windows Operating systems with the help of step by step guide. There are various steps involved in PySpark installation but don’t worry if you follow all the steps carefully then definitely you can install and run PySpark on your Windows machine.
Before going to deep dive into this article, let’s see a little about Spark and PySpark so you could’t have any confusion regarding PySpark and Spark.
Headings of Contents
- 0.1 What is Spark?
- 0.2 What is PySpark?
- 0.3 Who Can Learn PySpark?
- 1 How to install PySpark in Windows Operating System
- 1.1 1. Python Installation
- 1.2 2. Java Installation
- 1.3 3. PySpark Installation
- 1.4 4. Install Winutils in Windows
- 1.5 PySpark Shell
- 1.6 Spark Web UI
- 1.7 Conclusion
What is Spark?
Spark is a unified cluster computing big data processing framework or engine. Spark is mostly used for Data Engineering, Data Science, and Machine Learning on single or multiple clusters. Officially Spark is written in Scala programming language.
Features of Apache Spark:
- Batch/Streamming Data:- We can perform batch processing or streaming processing. The difference between batch processing and streamming processing is that In batch processing data comes to perform processing periodically but in streamming processing data comes continuously to perform processing. We can use our preferred language to process that data.
- SQL Analytics:- Apache Spark also allows to perform the SQL queries to get the reporting for dashboarding.
- Machine Learning:- Spark provides a module called MLlib to perform machine learning operations.
Let’s move on to the PySpark.
What is PySpark?
PySpark is nothing but it is an interface written in Python programming just like another package to interact with Apache Spark. Using PySpark APIs our application can use all the functionalities of Apache Spark to process large-scale datasets and perform operations on top of loaded datasets.
Who Can Learn PySpark?
If you come from a Python programming background then you can go with PySpark because it is just an interface which completely written in Python programming Language to access all the functionality of Apache Spark.
Now, Follow the below steps to install PySpark in Windows 11.
How to install PySpark in Windows Operating System
Now, Follow the below steps to install PySpark in Windows 11.
1. Python Installation
To work with PySpark, Python must be installed in your system. So to install Python go the python.org and download and install the latest version of Python. You can ignore this if you have already installed Python on your machine.
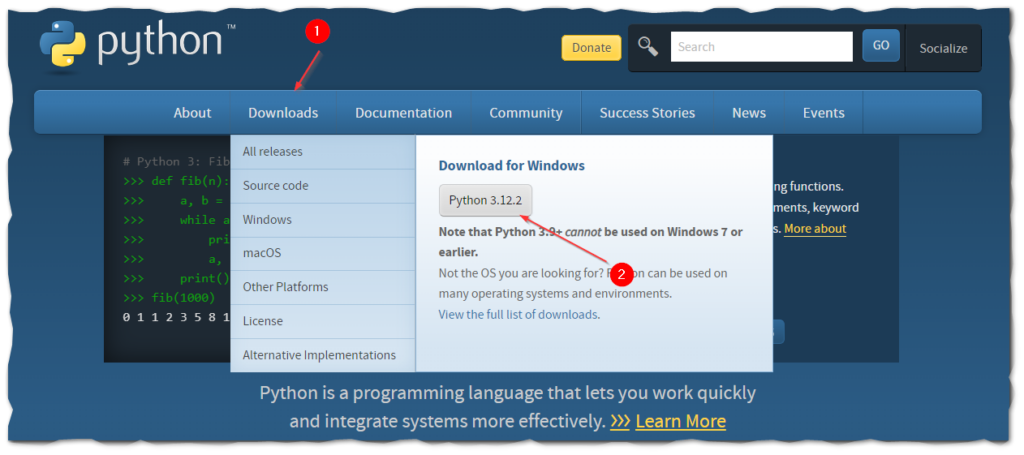
Note:- Your Python version version might be different.
After downloading, Install Python just like normal applications. After the installation of the Python open the command prompt and type python. If you see output like this that means Python has been successfully installed on your machine.

👉Install Python in Windows, Ububtu and Linux:- Click Here
2. Java Installation
To run the PySpark application, you will need Java on your Windows machine.
- Go to Java official Website to download and install Java.
- Click on “Windows Offline (64-bit)” to download Java.
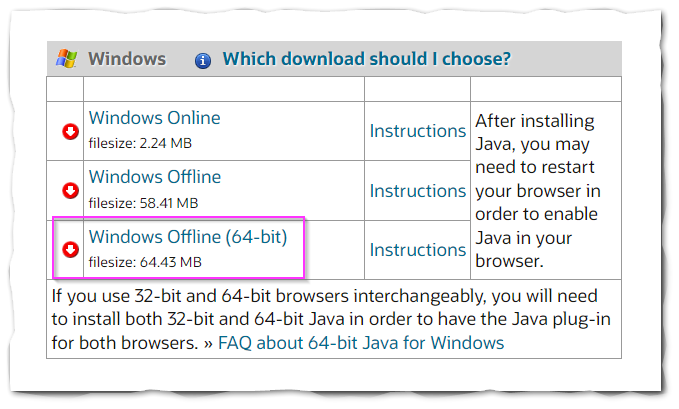
- Open the downloaded file and click on the Install button.
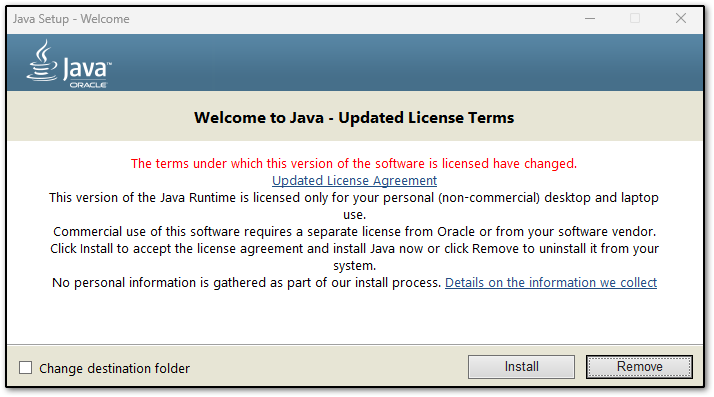
- Now the installation of Java will be started.
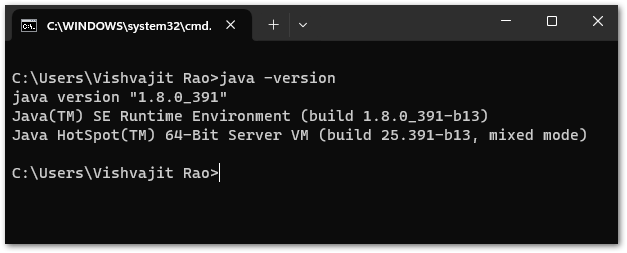
- After completing installation, Go to “Command Prompt” and type “java -version” to know the version of Java and to know whether it is installed or not.
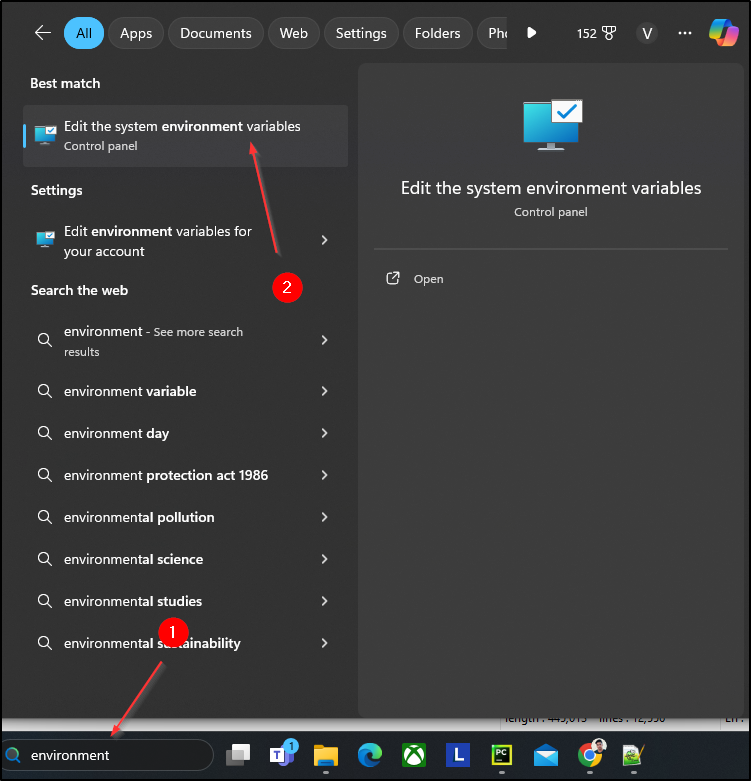
- Now, It’s time to set the Java installation path to Windows Environment variables. To set environment variables, type “environment” in the window search bar click on “edit the system environment variables” and set the below variables.
JAVA_HOME=C:\Program Files\Java\jre-1.8
PATH=C:\Program Files\Java\jre-1.8\bin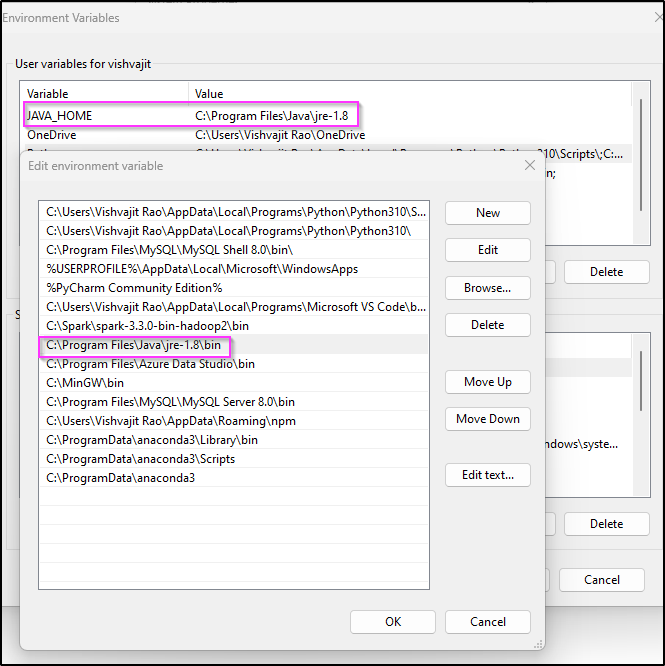
Note:- In your case path of environment variables might be different.
Now, you have successfully installed Java on your machine.
3. PySpark Installation
There is no separate PySpark Library to install, To work with PySpark we need to install Spark in your machine because PySpark is just an interface to interact with Spark or Apache Spark.
Follow the below steps to install PySpark in Windows operating system.
- Go to the Spark website to download and install Apache Spark.
- Choose the Spark release and click on the third link to download the Spark.
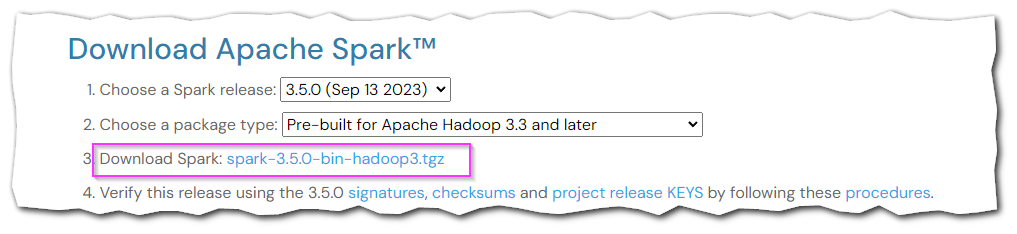
- Click on the first link to download the Spark.
- After completing the downloading of the spark, go to C drive create a folder called ‘spark‘, and extract the downloaded spark files inside the spark folder. As you can below in my case.
- Now, it’s time to set up some environment variables for Spark. Let’s set up the following environment variables for spark.
SPARK_HOME  = C:\Spark\spark-3.5.0-bin-hadoop3
HADOOP_HOME = C:\Spark\spark-3.5.0-bin-hadoop3
PATH=%PATH%;C:\Spark\spark-3.5.0-bin-hadoop3\bin
Now, You have successfully installed the Spark.
4. Install Winutils in Windows
winutils is a binary file that is required for Hadoop versions.
Go to Winutils choose the Hadoop version that you downloaded earlier and download the winutils.exe file.
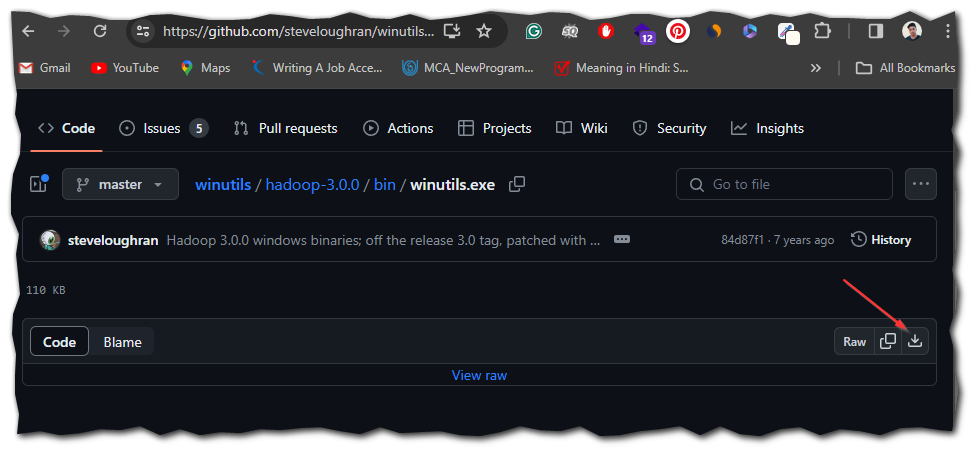
You can explore all the winutils files according to Hadoop versions from this https://github.com/steveloughran/winutils
Now, We have completed all the steps successfully, it’s time to check whether PySpark is installed or not.
PySpark Shell
To check, go to the Windows command prompt and type pyspark. If you see output like this it means PySpark has been downloaded and installed successfully in your Windows operating system.
Spark Web UI
Apache Spark provides a Web UI ( Jobs, Stages, Tasks, Storage, Environment, Executors, and SQL) to check the status of your Spark application. To access the Web UI follow the link mentioned in the below output.
After visiting the Web UI lik your web UI will look like this.
Conclusion
Congratulations!, You have made it. Now you are completely able to run PySpark applications on your machine.
Throughout this article, we have seen the installation of Python, Java, Spark, and Winutils which are necessary to work with PySpark and also we see a small PySpark program for wordcount.
If you found this article helpful, please visit our PySpark tutorial page and explore more interesting PySpark articles.
Thanks for visiting….
About the Author: Admin
Programming Funda aims to provide the best programming tutorials to all programmers. All tutorials are designed for beginners as well as professionals.
Programming Funda explains any programming article well with easy examples so that you programmer can easily understand what is really going on here.
View all posts by Admin | Website
Время прочтения: 9 мин.
Мы говорим Big Data, подразумеваем — Apache Spark. Сейчас это, пожалуй, самый мощный и модный фреймворк для распределённой обработки больших данных в задачах Data Science, поэтому для всех аналитиков как никогда важна задача изучения Spark и получения практических навыков работы с ним. Однако привычная среда обитания Spark — это, как правило, серверные кластеры промышленного масштаба под управлением Linux, что, несомненно, слегка усложняет работу с ним в уютных домашних условиях. Но нет ничего невозможного. В этой статье мы научимся ставить PySpark на локальную машину c ОС Windows и использовать его (на примере задачи векторизации и сравнения текстов алгоритмом Word2Vec, входящим в библиотеку mllib).
- Установка Spark на ОС Windows
Шаг 1. Установка Java JDK
Так как Spark в основе своей работает на Java-машине, то нужно иметь установленную в системе Java JDK. Для этого посмотрите в «Программах и компонентах», есть ли в списке установленных программ строка «Java(TM) SE Development Kit 8.x.x.», а на диске C папка «C:\Program Files\Java\jdk-8.x.x» (в обоих случаях версия должна быть 8 или больше). Если нет, переходите по адресу, нажимайте ссылку «JDK download». На странице скачивания загружайте исполняемый файл с описанием «Windows x64 Installer» и устанавливайте его.
Шаг 2. Установка Apache Spark
Для скачивания Spark перейдите по адресу:
По умолчанию в строке «1. Choose a Spark release» будет стоять последняя рабочая версия Spark (на сегодняшний день это 3.1.2, соответственно, дальше по тексту все названия папок и файлов будут с этим номером).
В строке «2. Choose a package type» выберите «Pre-built for Apache Hadoop 2.7». Затем в строке «3. Download Spark» щёлкните по ссылке «spark-3.1.2-bin-hadoop2.7.tgz» и скачайте файл с дистрибутивом Spark.
Внутри скачанного архива находится папка «spark-3.1.2-bin-hadoop2.7». Распакуйте её, например, WinRAR-ом (или любым другим архиватором, умеющим в zip). Создайте на диске C папку «С:\spark» и скопируйте в неё распакованную папку «spark-3.1.2-bin-hadoop2.7».
Шаг 3. Установка утилиты winutils.exe
Так как Spark разрабатывался для работы в среде Hadoop, то специально для Windows энтузиасты сделали его сборку, которая позволяет Spark-у работать на Windows-машине как на одиночном Hadoop-кластере. Для работы в среде Hadoop 2.7 скачайте файл «winutils.exe» по ссылке и положите его в папку «С:\spark\spark-3.1.2-bin-hadoop2.7\bin».
Шаг 4. Создание папки c:\tmp\hive
Создать папку «С:\tmp\hive» нужно для того, чтобы Spark не падал с ошибкой об отсутствии Hadoop Hive. То есть, у нас-то он отсутствует в любом случае, но ошибок об этом возникать не будет. Для корректной работы перейдите в папку «С:\spark\spark-3.1.2-bin-hadoop2.7\bin» и выполните в командной строке:
winutils.exe chmod -R 777 C:\tmp\hivewinutils.exe ls -F C:\tmp\hive
Шаг 5. Изменение переменных окружения
Далее нужно создать переменные окружения пользователя, необходимые для корректной работы Spark…
SPARK_HOME = C:\Spark\spark-3.1.2-bin-hadoop2.7
HADOOP_HOME = C:\Spark\spark-3.1.2-bin-hadoop2.7
JAVA_HOME = C:\Program files\Java\jdk-x.x.x
…и добавить в переменную PATH пути:
C:\Spark\spark-3.1.2-bin-hadoop2.7
C:\Program files\Java\jdk-x.x.x
Внимание! Имена путей нужно указывать точно такие же, как и у вас в системе!
После этого перезагрузите компьютер.
Шаг 6. Установка PySpark
Для работы со Spark в Python нужно установить PySpark:
pip install pyspark
Шаг 7. Устранение неочевидных подводных камней
Из линуксовой природы Python-а, Spark-а и PySpark-а вытекает одна особенность (которая, впрочем, может проявиться не у всех). При установке Python 3.x на Linux в системе создаётся так называемая «жёсткая ссылка» с именем «python3», указывающая на исполняемый модуль Python вне зависимости от того, куда он установлен. Таким образом, если выполнить в командной строке Linux команду «python3», то в любом случае запустится интерпретатор Python версии 3.xx.
Неожиданно выяснилось, что при работе в Windows PySpark пытается внутри себя запустить интерпретатор Python как раз по имени «python3», что вызывает ошибку выполнения скрипта, т.к. данный исполняемый модуль не может быть найден в системе. Для устранения этой проблемы необходимо скопировать исполняемый модуль python.exe, установленный в системе, в ту же самую папку установки, но только с именем python3.exe.
В случае, если вы работаете с Jupyter Notebook (или с другим инструментом) , запускаемым из пакета Anaconda нужно скопировать файл С:\ProgramData\Anaconda3\python.exe. Если вы работаете в PyCharm или другом отдельно стоящем инструменте, то скопируйте python.exe файл (или делайте это в той папке, куда была выполнена локальная установка Python)
Шаг 8. Запуск Spark в коде Python
Запустим Jupyter Notebook, создадим новый ноутбук и выполним следующий код:
from pyspark import SparkConf, SparkContext
from pyspark.sql import SparkSession
conf = SparkConf()
conf.setMaster("local").setAppName('My app')
sc = SparkContext.getOrCreate(conf=conf)
spark = SparkSession(sc)
print('Запущен Spark версии', spark.version)
Если всё было выполнено правильно, то создастся Spark-сессия и появится сообщение:
Запущен Spark версии 3.1.2
Также по адресу запустится web-сервер с панелью управления нашим свежеиспечённым Saprk-кластером, состоящим из одной ноды:
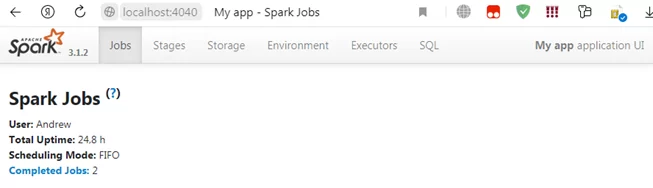
Поздравляю, у вас всё получилось, вы великолепны. А теперь попробуем на практическом примере обработать с помощью Spark данные, хранящиеся на диске Windows-машины.
- Работа с Word2Vec из пакета MlLib PySpark
Для примера возьмём случай из жизни.
В ходе проверки для установления того факта, что разные документы могут принадлежать одному клиенту, понадобилось сравнить адреса, указанные в этих документах. Разумеется, адреса могли быть записаны в произвольной форме, с ошибками, мусорными и незначащими словами и символами, и т.д., и т.п.
Например, если в разных документах указаны адреса «Город Подольск Московской области» и «Москва обл. г\подолск» — то, скорее всего, это один и тот же адрес, а если «Город Подольск Московской области» и «Город Пинск Брестской области» — то это явно разные адреса, несмотря на одинаковую форму записи. Кроме того, если адрес совпадал по нескольким компонентам (например, область и район, или город и улица), но не совпадал по другим компонентам, то это также было признаком того, что, возможно, это один и тот же адрес, просто некорректно указанный.
Для сравнения таких адресов было решено использовать очистку строк от мусора и незначащих фрагментов, токенизацию (разбиение на отдельные значащие компоненты, в нашем случае – на одиночные слова) и, самое главное — представление токенизированных строк в виде числовых векторов с последующим сравнением косинусного расстояния между ними.
Векторизацию строк выполняли старым добрым методом Word2Vec. Реализация этого метода, как и многих других, встроена в PySpark в библиотеку mllib, и, так же, как и у многих других, не представляет никаких трудностей для практического использования в коде Python.
Итак, just do it.
Сначала положим в рабочий каталог csv-файл, содержащий набор строк с адресами, подлежащими сравнению (для служебных целей добавим столбец, содержащий единицы).
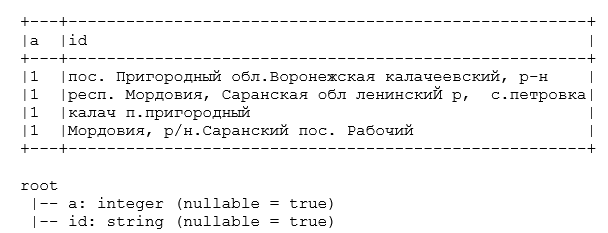
Файл «spark_test_data.csv»:
a;id
1;пос. Пригородный обл.Воронежская калачеевский, р-н
1;респ. Мордовия, Саранская обл ленинскиЙ р,  с.петровка
1;калач п.пригородный
1;Мордовия, р/н.Саранский пос. Рабочий
Далее напишем следующий код в Jupyter Notebook (в дополнение к коду инициализации spark-сессии, который был приведён выше).
from pyspark.sql.functions import udf
from pyspark.sql.types import ArrayType, StringType
from pyspark.ml.feature import Word2Vec
from scipy.spatial.distance import cosine
import pyspark.sql.functions as F
Загрузим данные, создадим датафрейм, покажем его состав и структуру.
data = spark.read.load('documents/spark_test_data.csv', format = 'csv', sep = ';', inferSchema = 'true', header = 'true')
data.show(truncate = False)
data.printSchema()
Далее объявим UDF-функцию токенизации строковых полей. Предварительно удаляем мусорные знаки препинания и сокращённые наименования типов населённых пунктов, разбиваем на слова по пробелам, оставляем элементы с длиной больше одного символа, на выходе получаем отсортированный по алфавиту список с элементами поля — отдельными словами.
def splitter(inStr):
    if inStr is None:
        inStr = 'пустой адрес'
    splt = sorted(inStr.lower()\
                   .replace('гор.', ' ')\
                   .replace('край', ' ')\
                   .replace('края', ' ')\
                   .replace('кв.', ' ')\
                   .replace('"', ' ')\
                   .replace('\\', ' ')\
                   .replace('/', ' ')\
                   .replace('*', ' ')\
                   .replace('_', ' ')\
                   .replace('.', ' ')\
                   .replace(',', ' ')\
                   .replace('-', ' ')\
                   .replace('?', ' ')\
                   .replace('пос', ' ')\
                   .replace('пгт', ' ')\
                   .replace('аул', ' ')\
                   .replace('район', ' ')\
                   .replace('село', ' ')\
                   .replace('област', ' ')\
                   .replace('обл', ' ')\
                   .replace('республик', ' ')\
                   .replace('респ', ' ')\
                   .split(' '))
    res = [x for x in splt if len(x) > 1]
    if len(res) == 0:
        return ['пустой адрес']
    return res

tokenizer_udf = udf(lambda x: splitter(x), ArrayType(StringType()))
Объявим UDF-функцию вычисления косинусного расстояния между векторами в полях датафрейма:
cosine_udf = udf(lambda x, y: abs(float(1 - cosine(x, y))))Преобразуем исходный датафрейм: токенизируем поле с адресами и свяжем каждую запись с каждой, чтобы показать, как будет меняться сходство между разными адресами.
df = data
df = df.select('a', 'id', tokenizer_udf('id').alias('tok_id'))
df = df.join(df.select('a', F.col('tok_id').alias('tok_id2')), on = 'a', how = 'fullouter')
df.select('tok_id', 'tok_id2').show(truncate = False)
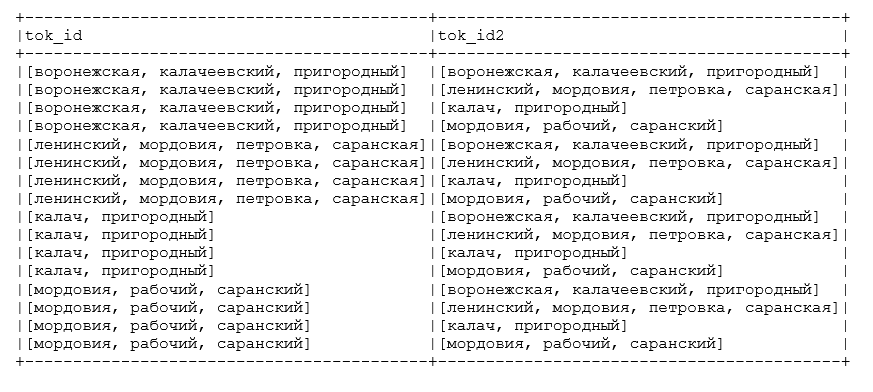
Как мы видим токенизатор очистил адреса от мусора и разбил на значащие элементы (названия элементов адреса – области, района, города и т.д.). Теперь векторизуем и сравним смежные поля с токенизированными адресами в преобразованном датафрейме и посмотрим, насколько Word2Vec справится с возложенной на него задачей.
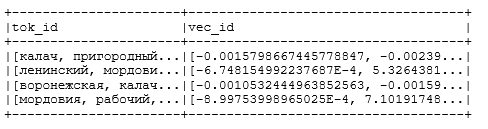
Выполняем векторизацию, устанавливаем число размерностей в пространстве векторизации vectorSize = 100, минимальное число включений токена в словарь модели minCoiunt = 5:
word2Vec = Word2Vec(vectorSize = 100, minCount = 5, inputCol = 'tok_id', outputCol = 'vec_id')
model = word2Vec.fit(df)
df = model.transform(df)
df.select('tok_id', 'vec_id').distinct().show()
word2Vec = Word2Vec(vectorSize = 100, minCount = 5, inputCol = 'tok_id2', outputCol = 'vec_id2')
model = word2Vec.fit(df)
df = model.transform(df)
Получаем на выходе следующую модель векторизации (вектора показаны не полностью, не все 100 элементов, т.к. тогда они бы просто не влезли в текст статьи):
Вычисляем косинусное расстояние между векторами и записываем результат сравнения в новый столбец:
df = df.withColumn('similarity', cosine_udf('vec_id', 'vec_id2'))
df.select('tok_id', 'tok_id2', 'similarity').orderBy(F.col('similarity').desc()).show(truncate = False)
Получаем на выходе следующий результат:
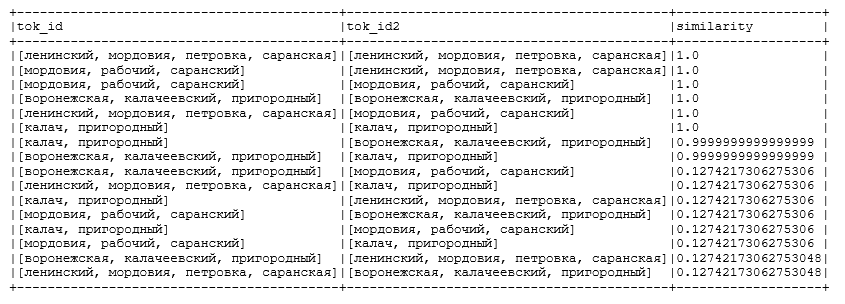
Как видим, модель прекрасно справилась со своей задачей — мало того, что сходство между одинаковыми адресами было рассчитано как 100% (что очевидно), но и адреса с элементами из одной области и района тоже были отнесены к весьма схожим. А вот сходство между адресами, которые вообще не содержат отдельных похожих элементов, упало ниже 13%.
В самом конце не забудем выключить нашу spark-сессию, чтобы освободить ресурсы кластера для других пользователей (на самом деле других пользователей на нашей машине, конечно же, нет, но правила хорошего тона диктуют выполнять данную процедуру каждый раз при завершении расчётов, что является весьма полезной привычкой при работе на кластерах общего пользования):
sc.stop()Итак, мы научились запускать Spark на Windows и использовать в практических целях модель Word2Vec, встроенную в Spark, что может весьма облегчить практику изучения этого инструмента и использования его для работы с текстами, содержащимися в хранилищах больших данных.
PYTHON
Introduction
PySpark is an essential tool for data processing and big data analytics. By providing a Python API for Apache Spark, PySpark allows Python developers to harness the power of Spark’s distributed computing capabilities. This guide will walk you through the detailed steps for installing and configuring PySpark on a Windows environment.
What is PySpark?
PySpark is the Python API for Apache Spark, an open-source distributed computing system. It allows you to write Spark applications using Python, leveraging the speed and efficiency of Spark’s in-memory computation capabilities. This makes it an ideal choice for big data analytics, machine learning, and stream processing.
Why Install PySpark on Windows?
-
Ease of Use: Python’s syntax is simpler and more readable compared to Scala and Java.
-
Rich Ecosystem: PySpark integrates well with Python libraries like NumPy, Pandas, and Matplotlib.
-
Data Processing: Efficiently manage large datasets and perform complex transformations and analytics.
Prerequisites for Installation
Before installing PySpark on Windows, ensure that you have the following prerequisites:
-
Python: Python 3.x installed on your system. You can download the latest version from the official Python website.
-
Java: Java Development Kit (JDK) installed. Spark requires Java 8 or higher. Download from Oracle’s official website or use OpenJDK.
-
Environment Variables: Ensure that
JAVA_HOMEandPYTHON_HOMEare set in your System Properties.
Step 1: Install Python
-
Download the Python installer from the official site.
-
Run the installer and check the box for “Add Python to PATH”.
-
Follow the prompts to complete the installation.
Verify Python Installation
Open Command Prompt and type:
You should see the installed Python version.
Step 2: Install Java
-
Download the JDK from the site mentioned in the prerequisites.
-
Install it by following the installation instructions.
-
Set up the
JAVA_HOMEenvironment variable:-
Right-click on “This PC” or “My Computer” and select “Properties”.
-
Click on “Advanced system settings”.
-
Click on the “Environment Variables” button.
-
Under “System Variables”, click “New” and add:
-
Variable name:
JAVA_HOME -
Variable value: Path to your JDK installation folder (e.g.,
C:\Program Files\Java\jdk-11.0.10)
-
-
Click OK to save.
-
Verify Java Installation
Open Command Prompt and type:
You should see the installed Java version.
Step 3: Install Spark
-
Download the latest version of Apache Spark from the Apache Spark download page. Choose a pre-built package for Hadoop.
-
Extract the downloaded Spark archive to a directory of your choice (e.g.,
C:\spark).
Set the SPARK_HOME Environment Variable
-
Follow the steps outlined in the Java installation to create a new environment variable:
-
Variable name:
SPARK_HOME -
Variable value: Path to your Spark installation folder (e.g.,
C:\spark)
-
-
Update the
PATHvariable to include thebindirectory of Spark:-
Locate the
PATHvariable under “System Variables” and click “Edit”. -
Add
;%SPARK_HOME%\binto the end of the variable value.
-
Step 4: Install Hadoop Winutils
PySpark requires Hadoop binaries to run on Windows. You will need to download Hadoop Winutils:
-
Download the binaries from the Winutils repository.
-
Create a folder on your system (e.g.,
C:\hadoop\bin) and extract the binaries into it.
Set the HADOOP_HOME Environment Variable
-
Create a new environment variable:
-
Variable name:
HADOOP_HOME -
Variable value: Path to the Hadoop bin directory (e.g.,
C:\hadoop)
-
Step 5: Install PySpark Using pip
With all the dependencies set up, you can now install PySpark using pip:
-
Open Terminal or Command Prompt.
-
Execute the following command:
Verify PySpark Installation
Open Python shell or Jupyter Notebook and run the following code to check if PySpark is working:
import pyspark
from pyspark.sql import SparkSession

spark = SparkSession.builder.appName("test").getOrCreate()
print(spark.version)
You should see the version of Spark displayed, indicating a successful installation.
Conclusion
You’ve successfully installed PySpark on your Windows machine! With this powerful tool, you can start processing large datasets, performing advanced analytics, and building machine learning models using your Python skills. Make sure to refer to the official PySpark documentation for guidance on using its features effectively.
Additional Resources
-
Apache Spark Documentation
-
PySpark API Documentation
-
Python Installation Quick Guide
By following this guide, you will be able to harness the transformative power of big data through PySpark on your Windows system. Happy analyzing!
Suggested Articles
PYTHON
PYTHON
PYTHON
PYTHON
PYTHON
PYTHON