В Windows 10 и 11 по умолчанию установлен виртуальный принтер Microsoft Print to PDF, который при отправке на него на печать позволяет преобразовать любой документ или веб страницу в PDF файл. В этой статье мы рассмотрим, как включить/отключить нативную поддержку печати в PDF в Windows и как исправить типовые проблемы с виртуальным PDF принтером, если он не работает.
Содержание:
- Как установить или удалить виртуальный PDF принтер в Windows 10/11
- Восстановление Print to PDF принтера в Windows
Как установить или удалить виртуальный PDF принтер в Windows 10/11
Откройте панель управления Settings -> Devices -> Printers and Scanners (или выполните URI команду быстрого доступа:
ms-settings:printers
) и проверьте, что виртуальный Microsoft Print to PDF принтер перечислен в списке устройств.

Установить виртуальный принтер Microsoft Print to PDF в Windows 10/11 можно через панель управления компонентами.
- Выполнитекоманду
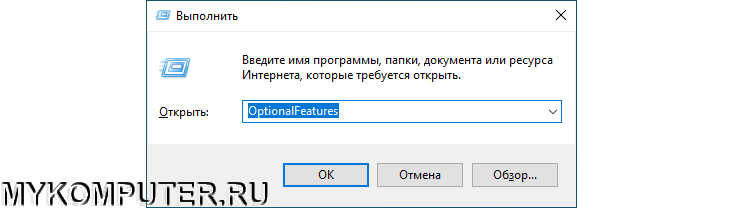
optionalfeatures
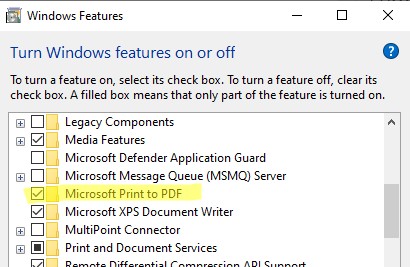
, чтобы открыть панель Turn Windows features on or off; - Здесь можно включить или отключить компонент Microsoft Print to PDF.

Также вы можете установить этот компонент из командной строки DISM:
dism /Online /Enable-Feature /FeatureName:"Printing-PrintToPDFServices-Features" /NoRestart
Или с помощью PowerShell:
Enable-WindowsOptionalFeature -online -FeatureName Printing-PrintToPDFServices-Features
Восстановление Print to PDF принтера в Windows
Если вы удалили виртуальный принтер Microsoft Print to PDF или его драйвер работает некорректно, его можно переустановить.
- Откройте панель управления драйверами печати (
printui.exe /s
), перейдите на вкладку Drivers. Проверьте что в списке драйверов есть драйвер Microsoft Print to PDF (откройте его свойства и проверьте); - Удалите драйвер принтера (выберите опцию Remove Driver and driver Package);
- Переустановитекомпонент Printing-PrintToPDFServices с помощью команд PowerShell:
Disable-WindowsOptionalFeature -online -FeatureName Printing-PrintToPDFServices-Features
Enable-WindowsOptionalFeature -online -FeatureName Printing-PrintToPDFServices-Features - Проверьте, что драйвер был переустановлен;
- Если компонент Printing-PrintToPDFServices включе, драйвер установлен, но виртуальный PDF принтер отсутствует в списке устройств, попробуйте пересоздать его вручную;
- Откройте мастер добавления нового принтера (
printui.exe /im
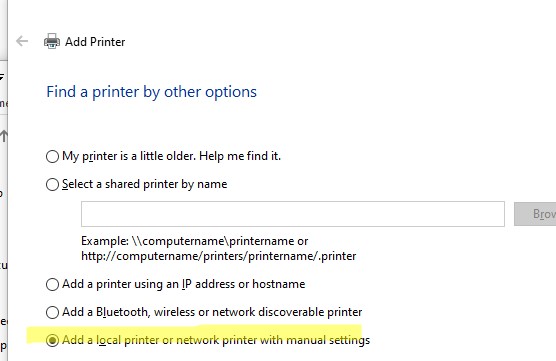
) - Укажите что вы хотите добавить локальный принтер вручную;

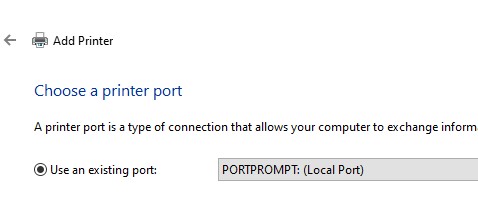
- Выберите тип порта
PORTPROMPT
;
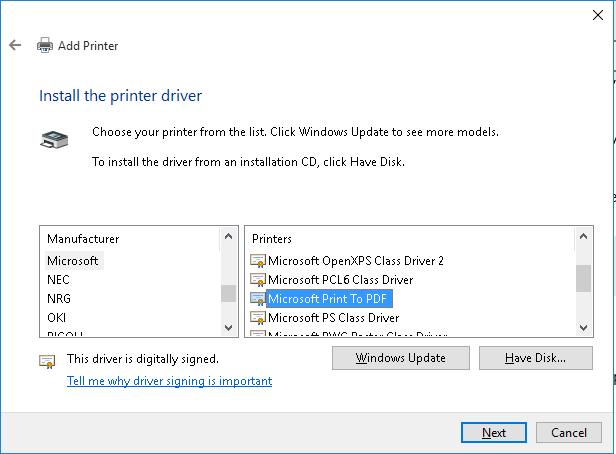
- Выберите драйвер Microsoft Print to PDF в разделе Microsoft;

- Задайте имя принтера
Microsoft Print to PDF
; - Попробуйте распечатать любой документ в PDF файл.
,
As you may know with Windows 10 you have the ability to create PDF files from any program, by using the virtual printer «Microsoft Print to PDF». If you have accidentally deleted the «Microsoft Print to PDF» printer, continue reading this article to learn how you can re-add the «Print to PDF» printer driver on your Windows 10 PC.
How to re-Install Microsoft Print to PDF after Deleting it.
1. Open Programs and features in Windows Control Panel. If you don’t know how to do that:
1. Press Windows + R keys to open the Run command box.
2. Type control & click OK.
3. Set the View by to Small icons and then click Programs and Features.

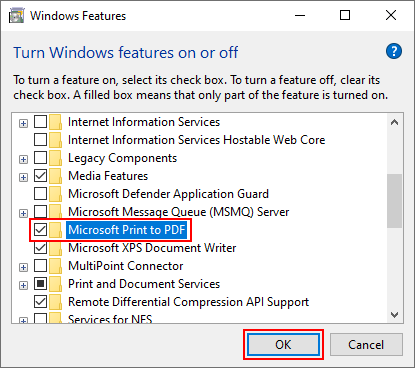
2. Click Turn Windows features on or off.

3. Uncheck the Microsoft Print to PDF feature and click OK.

4. When Windows completes the required changes, click Close.

5. Click Turn Windows features on or off again.
6. This time, check the Microsoft Print to PDF checkbox and click OK.

7. When Windows apply the change click Close and the then close the Programs and features window.
8. Navigate to Control Panel -> Device and Printers.

9. Normally, the Microsoft Print to PDF printer should be installed. *

* Note: To create a PDF file from any program, go to File > Print and select the Microsoft Print to PDF printer.

That’s all folks! Did it work for you?
Please leave a comment in the comment section below or even better: like and share this blog post in the social networks to help spread the word about this solution.
If this article was useful for you, please consider supporting us by making a donation. Even $1 can a make a huge difference for us.
- Author
- Recent Posts
Konstantinos is the founder and administrator of Repairwin.com. Since 1995 he works and provides IT support as a computer and network expert to individuals and large companies. He is specialized in solving problems related to Windows or other Microsoft products (Windows Server, Office, Microsoft 365, etc.).
Как установить принтер Microsoft Print to PDF.
Печать в PDF (Microsoft Print to PDF) это функция позволяет легко конвертировать любые документы, фото, страницы в формат PDF с помощью операции печати.
Бывают сборки Windows, где она отключена или же просто удален сам принтер Microsoft Print to PDF, как раз в данной статье расскажу как подключить данный принтер.
Шаг 1 Клавишами Win + R вызываем окно Выполнить. Вводим команду OptionalFeatures и жмем OK.
Шаг 2 В окне Компоненты Windows, находим компаненту параметр Печать в PDF (Майкрософт) и ставим флажок, чтобы ее активировать и нажмите кнопку OK.
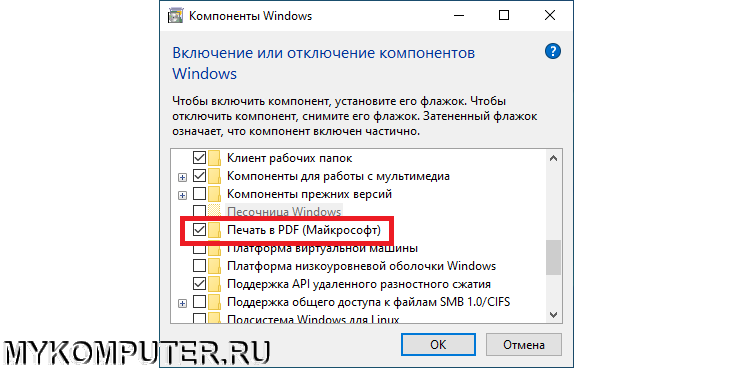
После того как Windows применит требуемые изменения, нажмите кнопку Закрыть, при этом перезагрузка компьютера не требуется.
Поддержать развитие блога
Отправить Донат
Installing Microsoft Print to PDF on Windows 10 can be a useful tool for converting documents, images, and webpages into PDF format. PDF files are easily shareable and can be opened on any device without the need for specific software. This blog post will guide you through the process of installing Microsoft Print to PDF on Windows 10 and provide some additional tips and troubleshooting for common issues.
Video Tutorial:
The Challenge of Installing Microsoft Print to PDF on Windows 10
Installing Microsoft Print to PDF on Windows 10 can be a bit challenging for some users, as it requires navigating through various settings and control panels. However, once installed, it becomes a convenient and powerful tool for creating PDF documents.
Things You Should Prepare for
Before starting the installation process, there are a few things you should prepare:
1. Windows 10 operating system: Ensure that your computer is running on Windows 10. This feature is not available on older versions of Windows.
2. Administrative privileges: Make sure you have administrative privileges on your computer. This will allow you to make changes to system settings during the installation process.
3. Stable internet connection: Although the installation does not require internet connectivity, it is always recommended to have a stable internet connection to avoid any interruptions during the process.
Method 1: Via Control Panel
Installing Microsoft Print to PDF through the Control Panel is one of the most straightforward methods. Follow the steps below:
1. Open the Start menu by clicking on the Windows icon in the bottom left corner of the screen.
2. Type «Control Panel» in the search bar and click on the Control Panel app to open it.
3. In the Control Panel window, navigate to «Hardware and Sound» and click on «Devices and Printers.«
4. On the Devices and Printers screen, click on «Add a printer» located at the top of the window.
5. In the Add Printer wizard, select «The printer that I want isn’t listed» and click on the «Next» button.
6. On the next screen, select «Add a local printer or network printer with manual settings» and click on the «Next» button.
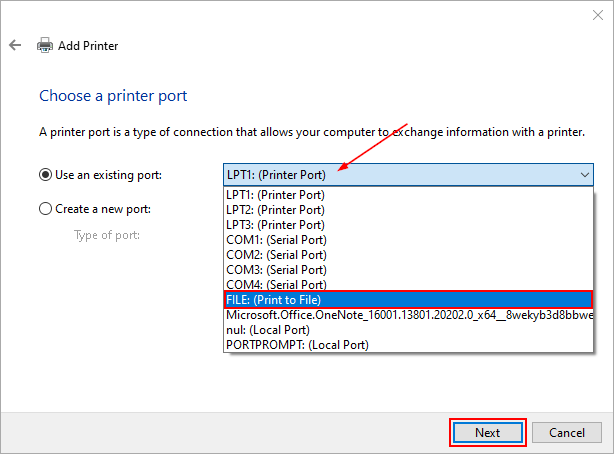
7. On the Choose a printer port screen, select «FILE: (Print to File)» and click on the «Next» button.
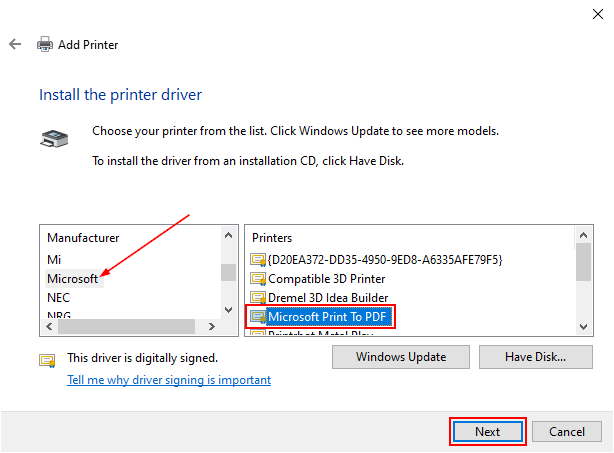
8. On the Install the printer driver screen, select «Generic» in the Manufacturer section and «Microsoft Print To PDF» in the Printers section, then click on the «Next» button.
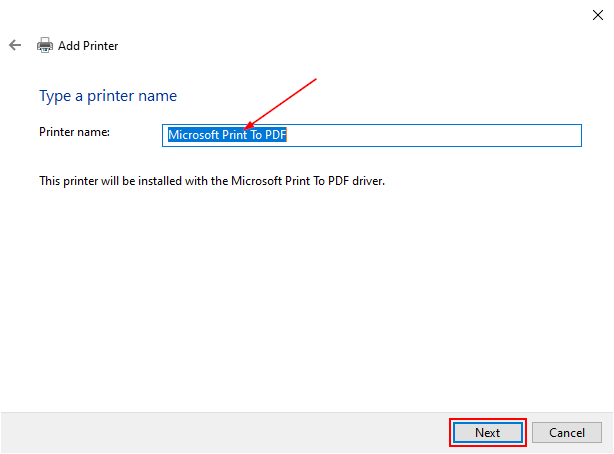
9. In the next window, you can choose to rename the printer if desired, and then click on the «Next» button.
10. Finally, click on the «Finish» button to complete the installation process.
Pros:
| Pros | Cons |
|---|---|
| Easy to follow | Requires administrative privileges |
| No additional software required | May not be available in all versions of Windows 10 |
Method 2: Using Settings
Another method to install Microsoft Print to PDF is through the Settings menu on Windows 10. Here’s how:
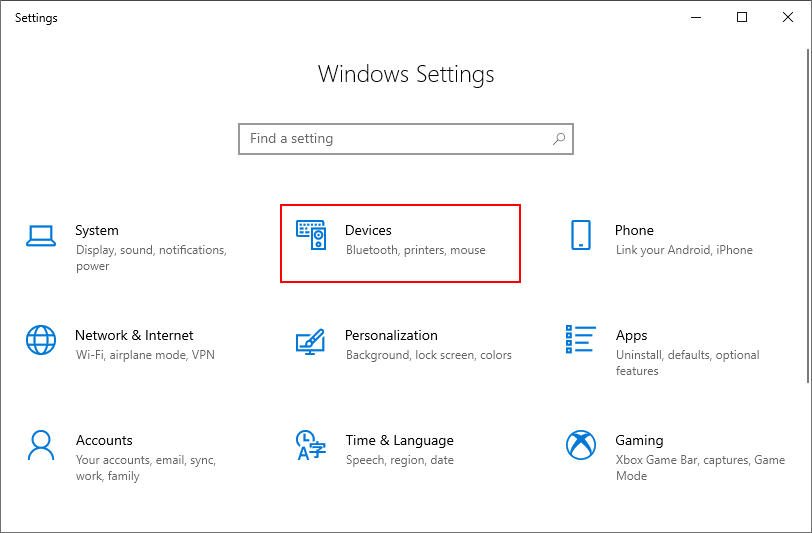
1. Open the Start menu and click on the «Settings» gear icon to open the Windows Settings menu.
2. In the Settings window, click on «Devices» to open the devices settings.
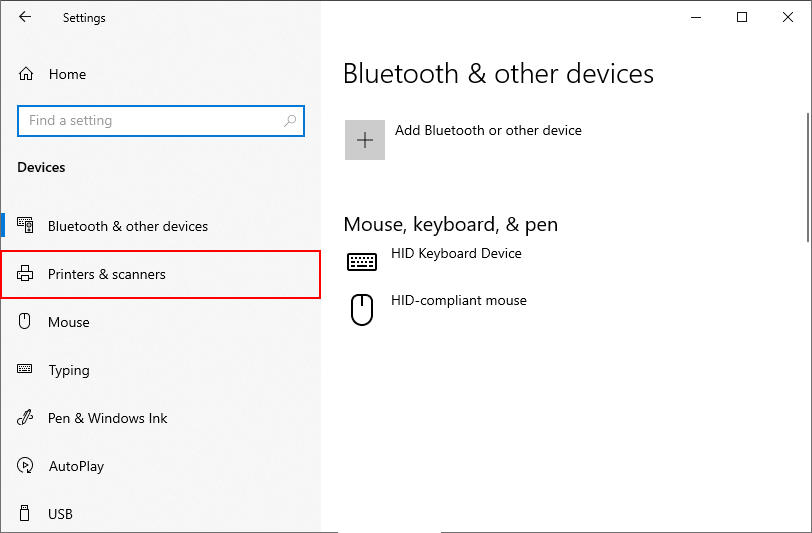
3. In the left sidebar, click on «Printers & scanners.«
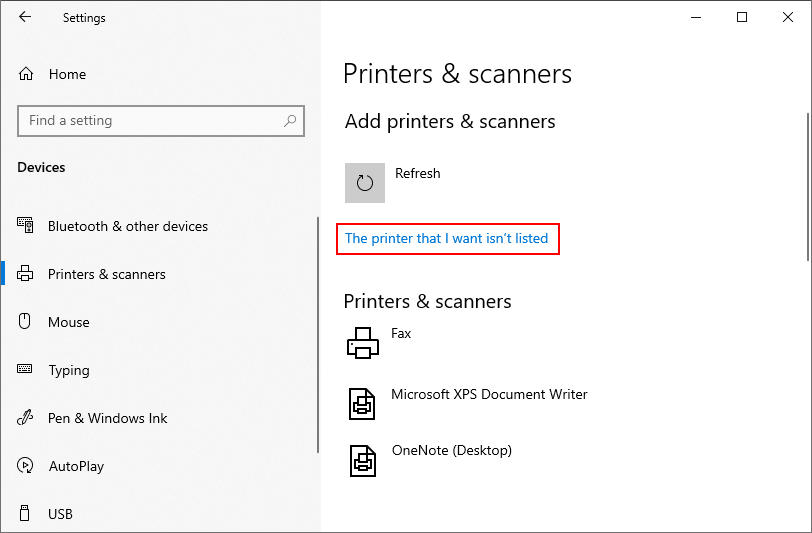
4. On the right side of the Printers & scanners window, click on the «Add a printer or scanner» button.
5. Windows will start searching for available printers and scanners. Once the search is finished, click on «The printer that I want isn’t listed» option.
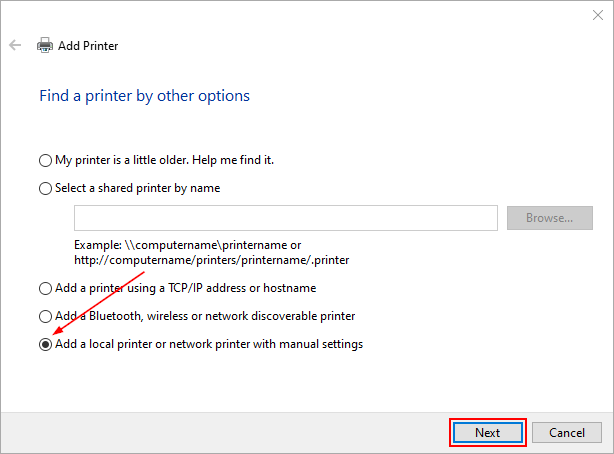
6. On the next screen, select «Add a local printer or network printer with manual settings» and click on the «Next» button.
7. On the Choose a printer port screen, select «FILE: (Print to File)» and click on the «Next» button.
8. On the Install the printer driver screen, select «Generic» in the Manufacturer section and «Microsoft Print To PDF» in the Printers section, then click on the «Next» button.
9. Rename the printer if desired and click on the «Next» button.
10. Finally, click on the «Finish» button to complete the installation.
Pros:
| Pros | Cons |
|---|---|
| Accessible through Windows Settings | Requires administrative privileges |
| No additional software required | May not be available in all versions of Windows 10 |
Method 3: Via Power User Menu
The Power User Menu provides a quick way to access various system settings, including the Printers and Scanners menu. Here’s how to install Microsoft Print to PDF via the Power User Menu:
1. Press the Windows key + X on your keyboard to open the Power User Menu.
2. From the menu, select «Settings» to open the Windows Settings menu.
3. In the Settings window, click on «Devices» to open the devices settings.
4. In the left sidebar, click on «Printers & scanners.«
5. On the right side of the Printers & scanners window, click on the «Add a printer or scanner» button.
6. Windows will start searching for available printers and scanners. Once the search is finished, click on «The printer that I want isn’t listed» option.
7. On the next screen, select «Add a local printer or network printer with manual settings» and click on the «Next» button.
8. On the Choose a printer port screen, select «FILE: (Print to File)» and click on the «Next» button.
9. On the Install the printer driver screen, select «Generic» in the Manufacturer section and «Microsoft Print To PDF» in the Printers section, then click on the «Next» button.
10. Rename the printer if desired and click on the «Next» button.
11. Finally, click on the «Finish» button to complete the installation.
Pros:
| Pros | Cons |
|---|---|
| Quick access through Power User Menu | Requires administrative privileges |
| No additional software required | May not be available in all versions of Windows 10 |
Method 4: Via Command Prompt
For tech-savvy users who prefer using command-line tools, installing Microsoft Print to PDF via Command Prompt is an option. Follow the steps below:
1. Open the Start menu and type «Command Prompt» in the search bar.
2. Right-click on «Command Prompt» and select «Run as administrator» to open Command Prompt with administrative privileges.
3. In the Command Prompt window, type the following command and press Enter: `printui.exe /il`
4. This will open the Add Printer wizard. Follow the same steps as explained in Method 1 or Method 2 to install Microsoft Print to PDF.
Pros:
| Pros | Cons |
|---|---|
| Advanced users can use command-line tools | Requires administrative privileges |
| No additional software required | May not be user-friendly for beginners |
Why Can’t I Install Microsoft Print to PDF?
There can be several reasons why you may encounter issues while installing Microsoft Print to PDF. Here are a few common reasons and their fixes:
1. Missing or outdated drivers: Ensure that you have the latest printer drivers installed on your computer. Visit the manufacturer’s website to download and install the appropriate drivers.
2. Compatibility issues: Microsoft Print to PDF is only available on Windows 10. If you are using an older version of Windows, consider upgrading to Windows 10.
3. Permission restrictions: Make sure you have administrative privileges on your computer. Right-click on the installer or the application and select «Run as administrator» to grant the necessary permissions.
Additional Tips
Here are some additional tips to enhance your experience with Microsoft Print to PDF:
1. Customizing PDF settings: After installing Microsoft Print to PDF, you can customize the PDF settings by going to Control Panel > Devices and Printers > right-clicking on Microsoft Print to PDF > Printer properties > Preferences. From here, you can set options such as paper size, orientation, and quality.
2. Using keyboard shortcuts: You can speed up the PDF creation process by using keyboard shortcuts. Press Ctrl + P to open the Print dialog, select Microsoft Print to PDF as the printer, and configure the settings before clicking on the Print button.
3. Print to PDF from any application: Microsoft Print to PDF is available as a printer option in most Windows applications. Simply open the document or file you want to convert to PDF, go to File > Print, select Microsoft Print to PDF as the printer, and click on the Print button.
5 FAQs about Installing Microsoft Print to PDF
Q1: Why is Microsoft Print to PDF not available for me?
A: Microsoft Print to PDF is only available in Windows 10. If you are using an older version of Windows, you will not have access to this feature.
Q2: Can I install Microsoft Print to PDF on multiple computers?
A: Yes, you can install Microsoft Print to PDF on multiple computers running Windows 10.
Q3: Can I convert multiple documents into PDF at once using Microsoft Print to PDF?
A: Yes, you can select multiple documents and print them using Microsoft Print to PDF. Each document will be converted into a separate PDF file.
Q4: Are there any limitations on the size of the documents I can convert to PDF?
A: The size limit for converting documents to PDF using Microsoft Print to PDF depends on your computer’s resources. However, it is recommended to convert large documents in smaller batches to avoid performance issues.
Q5: Is it possible to password-protect the PDF files created using Microsoft Print to PDF?
A: No, Microsoft Print to PDF does not offer built-in password protection for PDF files. You can use third-party software or online services to add password protection to your PDF files if needed.
In Conclusion
Installing Microsoft Print to PDF on Windows 10 can be a valuable addition to your digital toolkit. It allows you to easily convert documents, images, and webpages into PDF format, making them easily shareable across different devices and platforms. By following the methods mentioned in this blog post, you can quickly install Microsoft Print to PDF and start creating PDF files with ease. Remember to prepare your system, choose the method that suits you best, and enjoy the benefits of having a built-in PDF printer on your Windows 10 computer.
Microsoft Print to PDF is a handy feature in Windows 10 that makes printing documents to a PDF extremely easy. On some systems though, you might that Microsoft Print to PDF is missing when you go to use it.
That’s because it’s an optional feature in Windows 10 that’s usually on by default, but may need to be enabled and installed on some systems. In this article, we’ll take a look at how to enable and install Microsoft Print to PDF in Windows 10 for systems where it’s missing.
How to Enable Microsoft Print to PDF Optional Feature
Before you can install Microsoft Print to PDF, and its driver, you first need to enable it in Windows 10’s optional features.
- Hit
Windows key + Ron your keyboard to open the WindowsRundialog box. - Type in
optionalfeaturesand clickOK, or hitEnteron your keyboard. Alternatively, you can go to Windows Settings > Apps > Optional features > More Windows features (at the bottom). - in the
Windows Featureswindow that appears, locateMicrosoft Print to PDFand check the box to the left of it then clickOK.
Now you are ready to install Microsoft Print to PDF!
How to Install Microsoft Print to PDF / Driver in Windows 10
- Click the
Startbutton and then click theGearicon in the bottom left of theStart menu. - In the
Settingswindow that appears, clickDevices.
- Click
Printers & ScannersunderDevicesin the menu on the left.
- Click
Add a printer or scannerand then clickThe printer that I want isn't listedwhen it appears (this can take a few seconds).
- In the
Add Printerwindow that appears, selectAdd a local printer...with manual settingsand clickNext.
- On the next screen, select
FILE: (Print to File)from theUse an existing portdropdown menu, and then clickNext.
- In the following screen, select
Microsoftfrom the list on the left and thenMicrosoft Print to PDFin the list on the right. ClickNextafterwards.
Note: If the
Microsoft Print to PDFis missing from the list on the right, click theWindows Updatebutton, then look for it again.In some cases, the driver will still be missing from the list even after clicking the
Windows Updatebutton. To fix this issue, you’ll need to remove the old driver from the system first and then try the above again. Here’s how to remove the Microsoft Print to PDF driver from your system:- Open the Windows
Rundialog box (Windows key + R), type inprintui.exe /s, and hitOK. - In the
Print Server Propertieswindow, click theDriverstab. - Locate the
Microsoft Print to PDFdriver underInstalled printer driversand remove it. When asked whether to remove only the driver, or the driver and its packages, remove only the driver. ClickYeson any other confirmation boxes.
- Open the Windows
- Type a name for the printer, or leave it as the default
Microsoft Print to PDF(recommended), and clickNext.
- Finally, click
Finishin the Add Printer success window. You may also want to test the printer and make sure it’s working!