
Applies ToMicrosoft Defender для Android Microsoft Defender для iOS Microsoft Defender для Mac Microsoft Defender для Windows
Защитите устройства Android, iPhone, Mac и Windows от угроз, установив Microsoft Defender. Скачайте Microsoft Defender на устройства, выполнив следующие действия:
-
Сканирование следующего QR-кода
-
Поиск Microsoft Defender в магазине приложений
-
Совместное использование с устройствами, по следующей ссылке: Копировать ссылку
Мы рекомендуем установить Microsoft Defender по крайней мере на пять устройств на человека.
Готовы попробовать?
При установке приложений Microsoft 365 на устройстве с Windows приложение Microsoft Defender будет автоматически установлено вместе с другими приложениями. Если вы установили приложения Microsoft 365 до выпуска Defender и у вас по-прежнему есть активная Microsoft 365 для семьи или личная подписка, приложение Defender автоматически добавляется на устройство с Windows в рамках обновления.
Важно: Даже если он установлен, Microsoft Defender не активируется до входа в приложение.
Просто запустите его из меню Пуск (или нажмите кнопку ниже) и войдите с помощью личной учетной записи Майкрософт, используемой для Microsoft 365.
Если на устройстве с Windows настроен единый вход( SSO), приложение Microsoft Defender входит в систему без необходимости вводить имя пользователя и пароль при каждом использовании приложения. Приложение Microsoft Defender также входит в систему, не требуя запуска, если Microsoft Defender антивирусная программа является основным антивирусом. Дополнительные сведения о том, как учетную запись Майкрософт или рабочую или учебную учетную запись, которую вы используете для входа в Windows, можно использовать для входа в другие приложения на устройстве на aka.ms/sso-info. Чтобы предотвратить единый вход, выйдите или удалите приложение Microsoft Defender.
Открыть Defender
Если у вас нет активной подписки на Microsoft 365 прямо сейчас
-
Откройте https://aka.ms/WindowsDefender, чтобы перейти к Microsoft Defender в Microsoft Store, и нажмите кнопку Установить.
-
После установки войдите с помощью личной учетной записи Майкрософт (например, @outlook.com, @hotmail.com или @live.com).
Удаление Defender
Найдите Microsoft Defender в меню Пуск, щелкните его правой кнопкой мыши и выберите Удалить.
При удалении приложения оно не будет автоматически переустановлено. Его можно переустановить вручную, перейдя в https://aka.ms/WindowsDefender и выбрав Установить.
Предоставление общего доступа к состоянию безопасности с семейными организаторами
Если вы являетесь частью подписки на Microsoft 365 для семьи, последним шагом является решение о том, хотите ли вы поделиться своим состоянием безопасности с семейными организаторами. Организатор семьи — это лицо, создающее подписку на Microsoft 365 для семьи, а также любые другие члены семьи, выбранные этим лицом в роли организаторов семьи.
Предоставляя общий доступ к состоянию безопасности, вы упрощаете для семейных организаторов обеспечение безопасности устройств и удостоверений. Это предоставляет только сведения о мониторинге угроз безопасности и удостоверений из Defender, а не любые другие сведения о вашем устройстве или личных файлах. Дополнительные сведения см. в статье Защита всей семьи с помощью Microsoft Defender.
Когда этот процесс будет завершен, мы переведем вас на панель мониторингаMicrosoft Defender, а затем все готово.
Далее см. статью Начало работы с Microsoft Defender.
У вас есть другие вопросы об установке Defender?
Посетите сообщество ответов Microsoft Defender
Нужна дополнительная помощь?
Нужны дополнительные параметры?
Изучите преимущества подписки, просмотрите учебные курсы, узнайте, как защитить свое устройство и т. д.
Все способы:
- Способ 1: Восстановление системных файлов
- Способ 2: Откат к точке восстановления
- Способ 3: Копирование исполняемого файла
- Вопросы и ответы: 0
Важно! В этой статье будет рассказываться о том, как восстановить работу «Защитника Windows» после его полного удаления. Этот процесс подробно описывался в другой статье на нашем сайте, ссылка на которую дана ниже. Если вы ранее выполняли представленные там действия, значит, текущее руководство будет актуально.
Подробнее: Как удалить «Защитник Windows» в Windows 10
Примечание! Если штатный антивирус Windows 10 вы не удаляли, а просто отключали средствами операционной системы, для восстановления его работы обратитесь за помощью к другой статье на нашем сайте, перейдя по ссылке ниже.
Подробнее: Как включить «Защитник Windows» в Windows 10

Способ 1: Восстановление системных файлов
Удаленный исполняемый файл «Защитника Windows» является системным, поэтому его можно попытаться восстановить с помощью специальной предустановленной консольной утилиты SFC. Это несложная процедура, достаточно только открыть «Командную строку» и инициализировать запуск приложения путем ввода команд. Этот процесс детально описывается в другом материале на нашем сайте, при необходимости ознакомьтесь с изложенной там информацией, воспользовавшись ссылкой ниже.
Подробнее: Восстановление целостности системных файлов в Windows 10
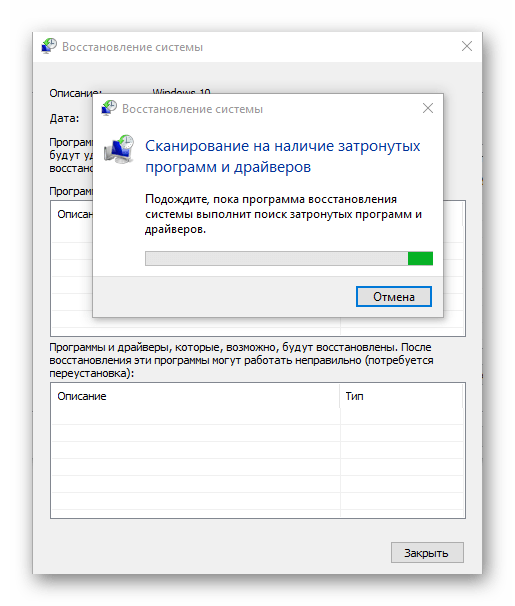
Способ 2: Откат к точке восстановления
Попробовать восстановить работу «Защитника Windows» можно путем отката операционной системы до контрольной точки. Только в этом случае важно, чтобы она была сделана до удаления штатного антивируса, иначе способ окажется неэффективным. При удовлетворении этого условия произведите откат через соответствующее приложение в Windows 10. Если вы не знаете, как это сделать, воспользуйтесь руководством, представленным в другой статье на нашем сайте.
Подробнее: Как откатить Windows 10 до точки восстановления
Обратите внимание! Создавать контрольные точки в Windows 10 рекомендуется систематически. Это позволит в любой момент при появлении неисправностей совершить откат до рабочей версии, не затрачивая время на устранение проблем вручную. Ознакомьтесь со статьей на нашем сайте, в которой подробно рассказывается об этой процедуре.
Подробнее: Как создать точку восстановления в Windows 10

Способ 3: Копирование исполняемого файла
Если ни один из приведенных выше способов не помог вам, установить «Защитник Windows» придется вручную. Эта процедура отличается от стандартной инсталляции программного обеспечения в операционной системе, поэтому далее она будет рассмотрена подробнее.
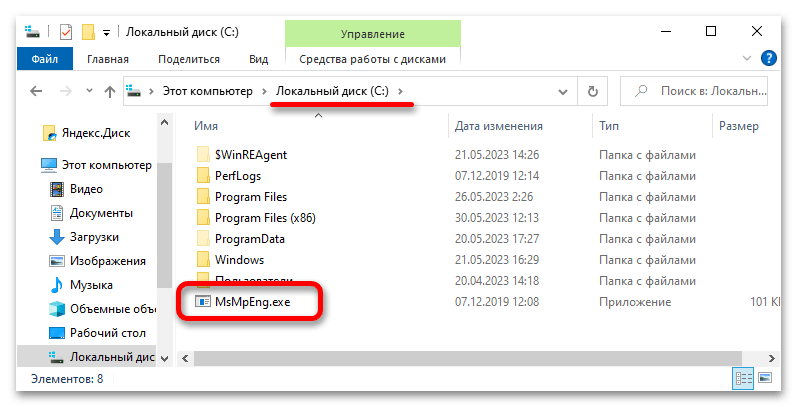
Компания Microsoft не предоставляет установочного файла «Защитника Windows», поэтому файлы антивируса придется поместить в корневую директорию на системном диске вручную. Но прежде их следует перенести на свой компьютер, предварительно скопировав с другого. Расположение исполняемого файла указано ниже:
C:\Program Files\Windows Defender\MsMpEng.exe
Примечание! Вы также можете скачать исполняемый файл «MsMpEng.exe» из интернета, но этого делать не рекомендуется, если вы не уверены в надежности источника. Есть немалая вероятность того, что вы занесете в свою операционную систему вирус.
Получив в свое распоряжение исполняемый файл «Защитника Windows», поместите его в корневой каталог диска C, чтобы к нему был быстрый доступ при выполнении действий, описанных далее в этой статье.
После этого необходимо будет запустить «Командную строку» в среде восстановления. Требуется это для того, чтобы у вас была возможность редактировать системные разделы.
- Перезапустите компьютер с зажатой клавишей Shift. Для этого откройте меню «Пуск», щелкните по кнопке выключения, зажмите указанную клавишу и кликните по пункту «Перезагрузка».
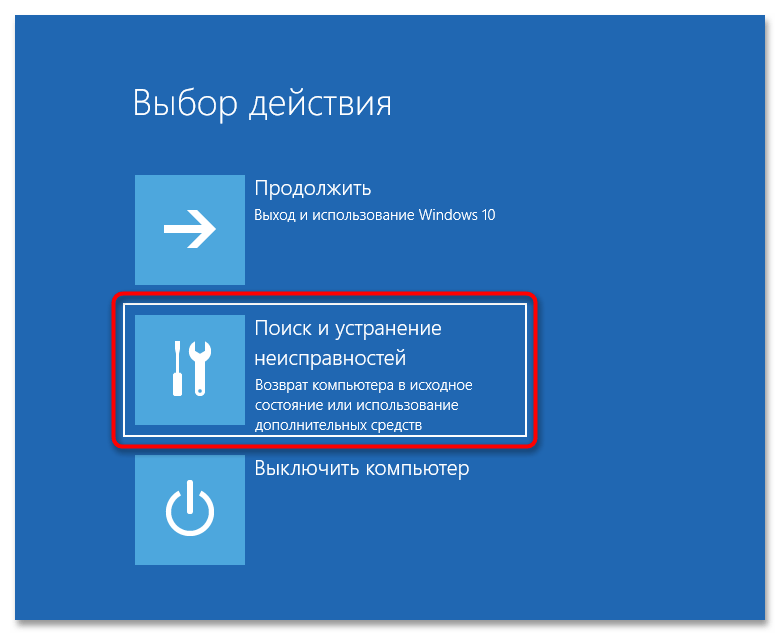
- Дождитесь, пока компьютер перезапустится и на экране появится главное меню среды восстановления. Затем перейдите в раздел «Поиск и устранение неисправностей».
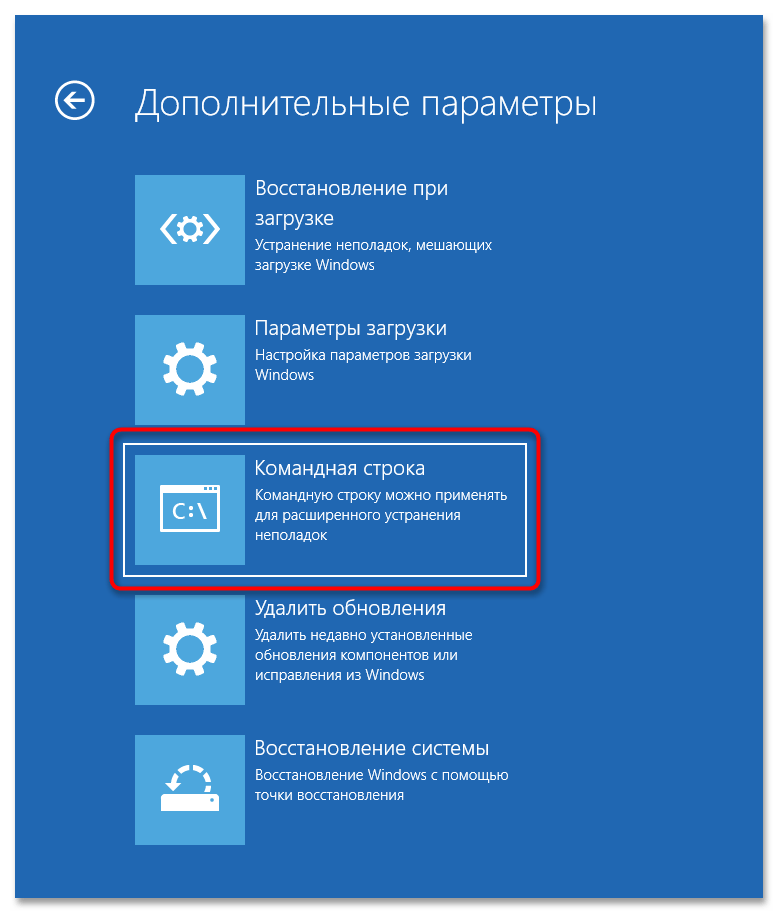
- Далее проследуйте в меню «Дополнительные параметры», щелкнув левой кнопкой мыши по одноименному элементу.
- Запустите «Командную строку», нажав по ней в списке дополнительных параметров среды восстановления.
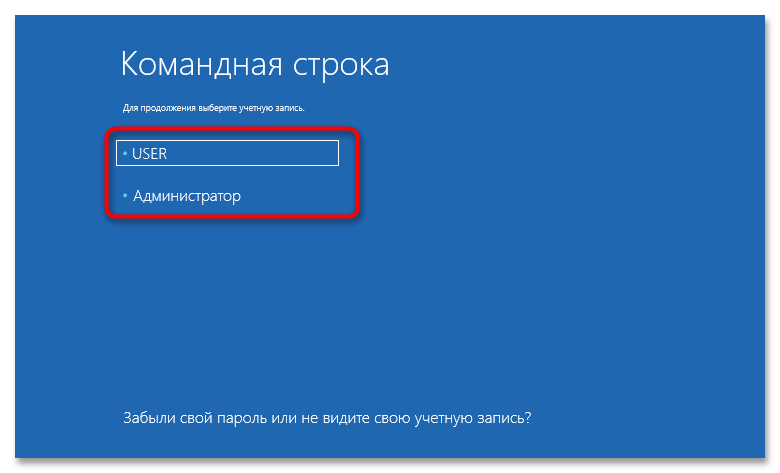
- На экране выбора учетных записей Windows 10 выберите любую, к которой у вас есть доступ. Для этого единожды кликните левой кнопкой мыши по ее названию.
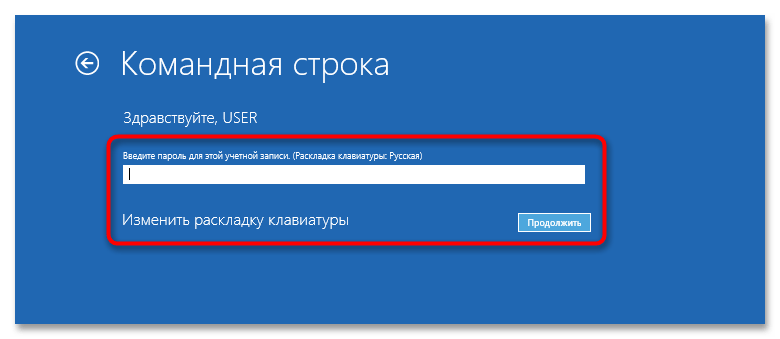
- При необходимости введите пароль и нажмите по кнопке «Продолжить». Если пароль не был задан, просто оставьте поле пустым.
- Дождитесь перезагрузки компьютера, пока на экране не отобразится «Командная строка», запущенная в среде восстановления.


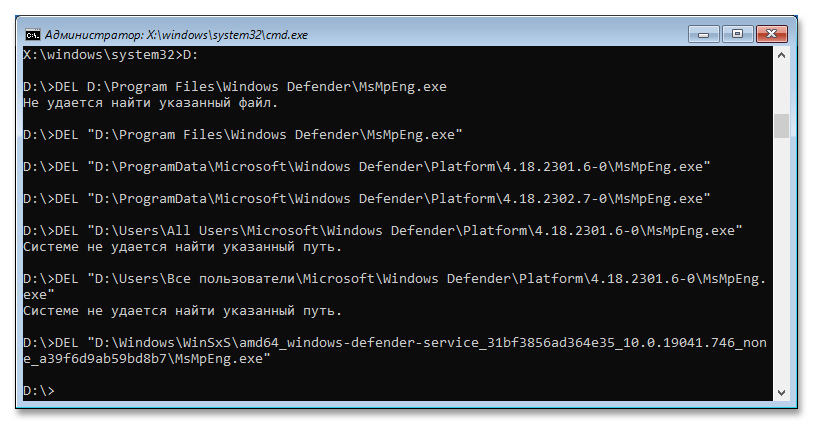
Теперь необходимо путем ввода специальных команд переместить файл с системного диска в корневую директорию «Защитника Windows». Важно четко следовать дальнейшим указаниям, чтобы процедура прошла успешно, поэтому внимательно следите за тем, какие команды вводите.
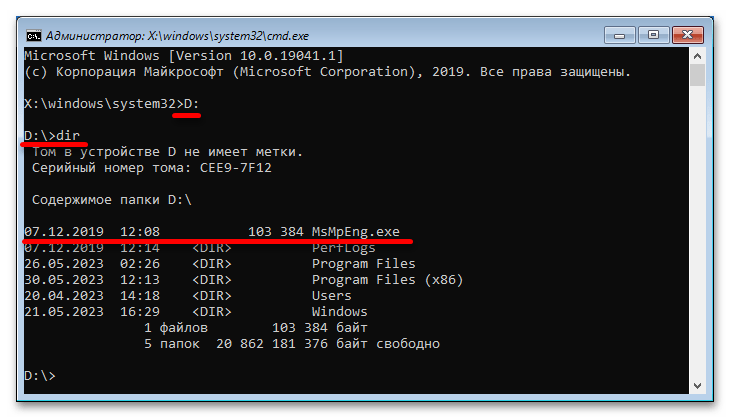
- По умолчанию «Командная строка» в среде восстановления открывается на диске X, поэтому необходимо перейти на системный раздел, обозначающийся в Windows 10 буквой C. Но здесь диски спутаны, зачастую системный раздел имеет букву D, это необходимо выяснить. Для этого перейдите на него и просмотрите содержащиеся в корневой директории папки. Чтобы это сделать, поочередно выполните приведенные ниже команды
D:
dirНа экране отобразится список всех файлов текущего каталога. Найдите ранее помещенный исполняемый файл «Защитника Windows» под названием «MsMpEng.exe». Если он здесь есть, значит, диск определен верно и вы можете продолжать следовать инструкции. Если его нет, перейдите на другой диск, введя его букву, следующую по алфавиту, и нажав Enter, например
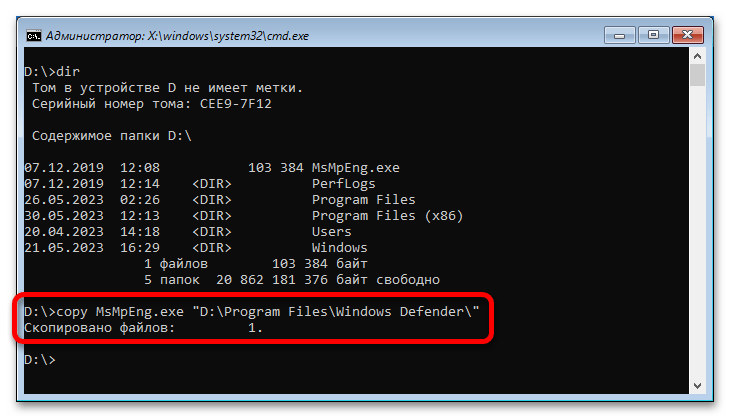
E:,F:, илиH:. - Переместите исполняемый файл антивируса в его корневую директорию. Для этого введите специальную команду, указанную ниже:
copy MsMpEng.exe "D:\Program Files\Windows Defender\"Обратите внимание! У вас начальная буква диска может отличаться. При необходимости смените ее на ту, которую вы определили на предыдущем шаге.
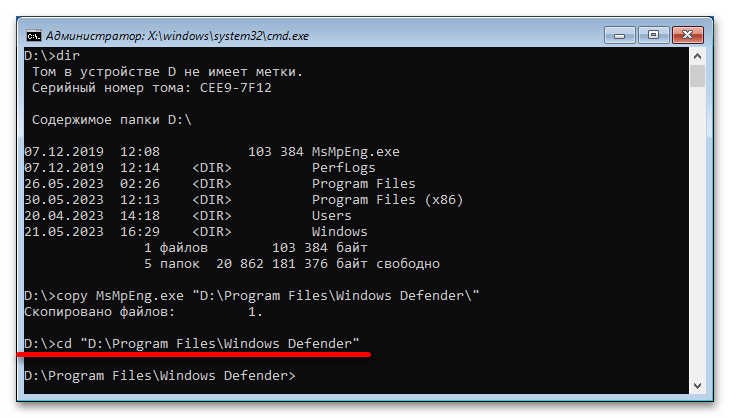
- Чтобы убедиться в успешном перемещении файла, перейдите в корневую директорию «Защитника Windows». Для этого нужно воспользоваться командой
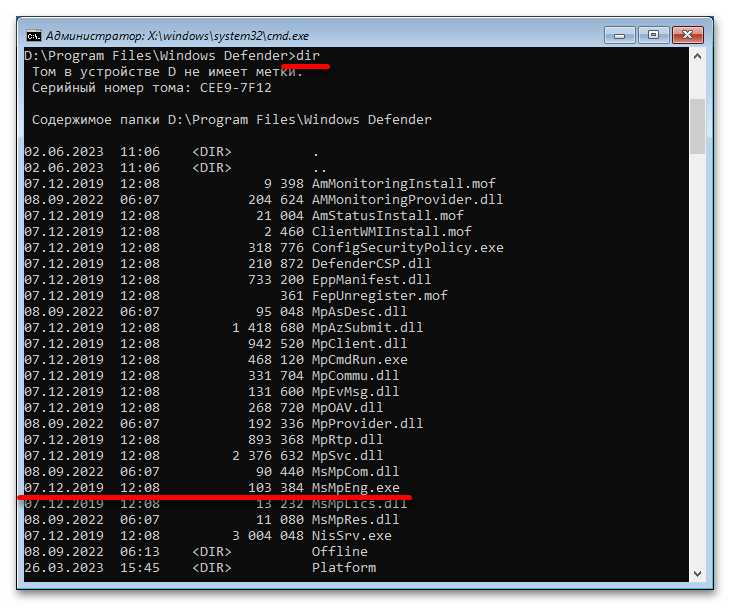
cd, указав целевой каталог.cd "D:\Program Files\Windows Defender\" - После перехода отобразите в окне консоли список всех содержащихся в этой папке файлов. Для этого воспользуйтесь уже знакомой командой
dir. Найдите в списке файл с названием «MsMpEng.exe». Если он есть, значит, все прошло успешно и можно перезагрузить компьютер, выполнив вход в операционную систему.
Если файла в директории нет, повторите выполнение этой инструкции с самого начала. Возможно, вы неверно определили букву системного диска или неправильно ее указали при выполнении команды копирования.
Важно! Если после выполнения всех действий, описанных в этом способе, работу «Защитника Windows» восстановить не получилось, попробуйте повторно воспользоваться первым методом из статьи, проведя восстановление системных файлов с помощью утилиты SFC.
Наша группа в TelegramПолезные советы и помощь
This PowerShell command reinstalls Windows Defender in seconds
Updated on September 22, 2022
What to Know
- You don’t need to download Windows Defender, because it’s integrated into Windows 11.
- Enter this in a PowerShell window: Get-AppxPackage Microsoft.SecHealthUI -AllUsers | Reset-AppxPackage.
- Or, go to Settings > Apps > Installed apps > Windows Security > three dots > Advanced options > Reset.
This article explains when and how to reinstall Windows Defender through the command line or Settings app in Windows 11.
How to Reinstall Windows Defender in Windows 11
Windows Defender (aka, Microsoft Defender) isn’t installed on your computer like a typical program, so you can’t reinstall it like you can regular software. Instead, follow these directions to use a PowerShell command to get the job done. It might take anywhere from 5 seconds to a few minutes to complete. If you can open Settings normally, there’s an easier method after these steps.
-
Right-click the Start button and select Terminal (Admin).
If that doesn’t work for whatever reason, use the search bar on the taskbar to search for PowerShell, and then right-click it to find the Run as administrator option.
-
Copy the command exactly as it’s shown here, and then right-click in the PowerShell window to paste it (Ctrl+V works, too):
Get-AppxPackage Microsoft.SecHealthUI -AllUsers | Reset-AppxPackage -
Press Enter to immediately start the process to reset Windows Defender to its original settings so that it performs as a freshly installed app.
-
You’ll know when it’s finished because you’ll see the blinking cursor again on a new line below the command you entered. In the meantime, you might briefly see a Deployment operation progress message.
If you see lots of red text, and an «Access is denied» message, return to step 1 and make sure you’re opening PowerShell as an administrator.
Another way to reset Windows Defender is through Settings. If Settings opens fine for you, you don’t need to bother with a PowerShell command. Instead, go to Settings > Apps > Installed apps > Windows Security > three dots > Advanced options > Reset.
When to Reinstall Windows Defender
Technically, you’re not really reinstalling the program because Windows doesn’t actually let you uninstall it. That said, you might run the above command to reset Windows Defender if it’s just not working correctly.
The most obvious sign you need to do this is if you see an error when you try to open it. If it’s not opening as it should, and you see this message, the above command should fix it right away:
You'll need a new app to open this windowsdefender linkLook for an app in the Microsoft Store
Or, maybe it does open, but some of its toggles won’t turn on or off, or you can’t even find a link to it on your computer. In these cases, the PowerShell command should refresh the tool back to working order.
Windows Defender Might Just Be Off
It’s possible that you’ve considered reinstalling Windows Defender because it isn’t catching malware, when in reality, it’s just not turned on. You might think it’s been uninstalled or is broken, but really it’s just disabled.
This is completely possible since Windows 11 lets you turn off its built-in antivirus program if you’d rather not use it.
Learn how to turn Windows Defender on and off for specific directions.
FAQ
-
Not really. While Windows Defender provides basic protection from threats, it’s no substitute for third-party antivirus software.
-
Go to Start > Settings > Privacy & Security > Windows Security > Virus & threat protection. Under Virus & Threat Protection Settings, select Manage settings, then under Exclusions, select Add or remove exclusions.
Thanks for letting us know!
Get the Latest Tech News Delivered Every Day
Subscribe
Here’s a guide for Microsoft/Windows Defender download, install, uninstall and reinstall on Windows 10/11. Utilize this best free antivirus software for Windows to protect your computer from threats. For more computer troubleshooting tips, you can visit MiniTool Software official website.
This post mainly introduces how to download Windows Defender on Windows 10/11 computer. 3 ways are offered to let you get the Microsoft Defender app. You can also learn how to uninstall and reinstall Windows Defender on Windows 10/11, how to fix Windows Defender can’t open/start issue, how to recover deleted or lost files from your PC, etc.
Also read: Learn the best tips and tricks for data recovery hard drive on Windows 11/10/8/7.
About Windows Defender
Windows Defender, also known as Microsoft Defender or Windows Security, is a 100% free antivirus program developed by Microsoft. It is included in Windows 11/10/8/8.1/7/Vista.
Windows Defender offers 4 scan modes: full scan, quick scan, custom scan, and offline scan.
Users can open Windows Defender on Windows 10/11 and turn on or off the real-time protection, enable or disable firewall & network protection, change the automatic scanning settings, adjust the advanced protection settings, and more.
Check for more information about how to stay protected with Windows Security.
How to Download and Install Windows Defender on Windows 10/11
Windows Defender is automatically installed for free on all PCs that run on Windows 11/10/8/7. If you can’t find Windows Defender on your computer, generally, you have 3 ways to get Windows Defender.
Way 1. Update Windows OS
You can try to update Windows 11/10 to the latest version to see if Windows Defender comes back.
To update your system, you can click Start -> Settings -> Update & Security (Privacy & Security) -> Windows Update -> Check for updates. You can also use this way to update Windows Defender to the latest version on Windows 10/11.
Way 2. Manually Download and Install Windows Defender on Windows 10/11
- Open Microsoft Store on your Windows computer. For Windows 11, you can click the Microsoft Store icon on the taskbar to open it. You can also press Windows + S, search for Microsoft Store in the search box, and click the Microsoft Store app to open it.
- In Microsoft Store, you can type Microsoft Defender Preview in the search box, and choose the Microsoft Defender Preview app.
- Click the Get button or Get in Store app button to download Microsoft Defender for Windows 10 or 11.
Way 3. Find Third-party Windows Defender Download Websites
You may also find some third-party reliable websites to get Microsoft Defender. Some websites are listed below for your reference, but you should identify by yourself if the Windows Defender download resource is reliable.
- https://windows-defender.en.softonic.com/download
- https://downloads.digitaltrends.com/windows-defender/windows
- https://www.filehorse.com/download-windows-defender-64/
- https://download.cnet.com/Microsoft-Windows-Defender/3000-8022_4-55082.html
Related: How to Enable or Disable Microsoft Defender in Windows 11
Download Microsoft Defender for Android from Google Play Store
If you want to download Microsoft Defender for Android, you can open the Play Store on your device, search for Microsoft Defender, and tap the Install button to download and install Microsoft Defender for your Android phone or tablet.
How to Uninstall and Reinstall Windows Defender on Windows 10/11
If you want to uninstall the built-in Windows Defender app on Windows 10/11, you may need to use Windows PowerShell to do it. You may refer to this post: How to Uninstall, Restore, Reinstall Windows 10 Built-in Apps.
If you download and install Microsoft Defender from Microsoft Store or other third-party websites, you can open Control Panel on Windows, right-click the Microsoft Defender app and select Uninstall to remove it from your computer.
After you uninstall Windows Defender, you can follow the instructions above to reinstall Windows Defender if you want.
Fix Windows Defender Can’t Open/Start on Windows 10/11
If you can’t open Windows Defender on your computer, you may try the 10 tips below to see if they can help bring this free antivirus app back to normal working.
Fix 1. Restart your computer and try to open Windows Defender again.
Fix 2. Update Windows system.
You can follow the guide above to update your Windows 10 or 11 OS to see if Windows Security can work normally again.
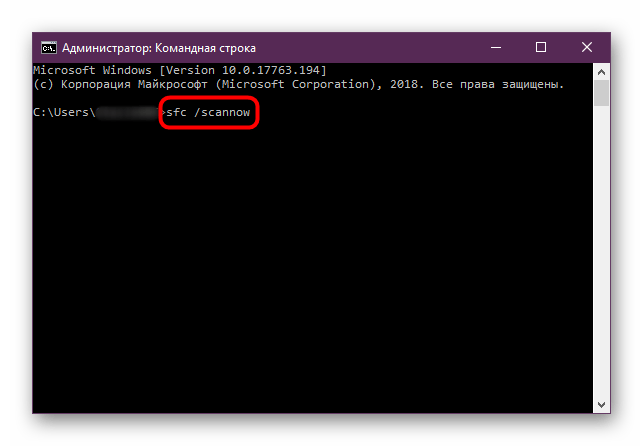
Fix 3. Run SFC scan.
You can perform a system scan to repair possible corrupted system files in your device.
- Press Windows + R, type cmd, and press Ctrl + Shift + Enter to open Windows Command Prompt.
- Type sfc /scannow command and press Enter to run the SFC tool to automatically check and fix corrupted system files. If this command doesn’t work, you can type DISM /Online /Cleanup-image /RestoreHealth command and press Enter to run this command first.
Fix 4. Reset Windows Defender app.
If Windows Defender is not working well on your computer, you can follow the operation below to reset the app settings to default to see if it helps.
- Press Windows + X and select Windows PowerShell (Admin). For Windows 11, select Windows Terminal (Admin).
- Type the command: Get-AppxPackage Microsoft.SecHealthUI -AllUsers | Reset-AppxPackage. Press Enter to execute the command.
Fix 5. Uninstall and reinstall Windows Defender. The instructions are introduced above.
Fix 6. Disable any third-party antivirus software on your computer since it may be conflicted with the Windows Defender antivirus program.
Fix 7. Use third-party antivirus software.
If Windows Defender has problems or can’t work on your computer, you can turn to some third-party top free antivirus software for Windows 10/11.
Fix 8. Start Windows in Safe Mode to see if Windows Defender can smoothly open and work.
Fix 9. Perform a System Restore. If you still favor Windows Defender and do not want to use other antivirus applications, you can try to restore your Windows system to a previous state to see if the Windows Security app can work properly.
Fix 10. If Windows Defender is not working and you have some other problems on your computer, you may reinstall your Windows OS.
Note: Before you perform the system restore or reinstall your computer, it’s highly advised you make a backup of your Windows system and important data.
How to Recover Deleted/Lost Files on Windows 10/11 for Free
If your computer has problems and you lost some important data, you can try a professional data recovery program to restore the lost data from your PC.
MiniTool Power Data Recovery is a top data recovery program that helps you recover data from various data loss situations. You can use it to recover permanently deleted files, recover data from a corrupted/formatted hard drive, recover data after malware/virus infection, recover data when the PC won’t boot, and more. Unless the hard drive is physically damaged and can’t be recognized by your computer, you can try this tool to restore data.
As for supported devices, you can use MiniTool Power Data Recovery to recover any deleted/lost files from a Windows PC or laptop, USB flash drive, memory card, external hard drive, SSD, etc.
Download and install MiniTool Power Data Recovery on your Windows PC or laptop, and check the guide below for how to use it to recover data.
MiniTool Power Data Recovery FreeClick to Download100%Clean & Safe
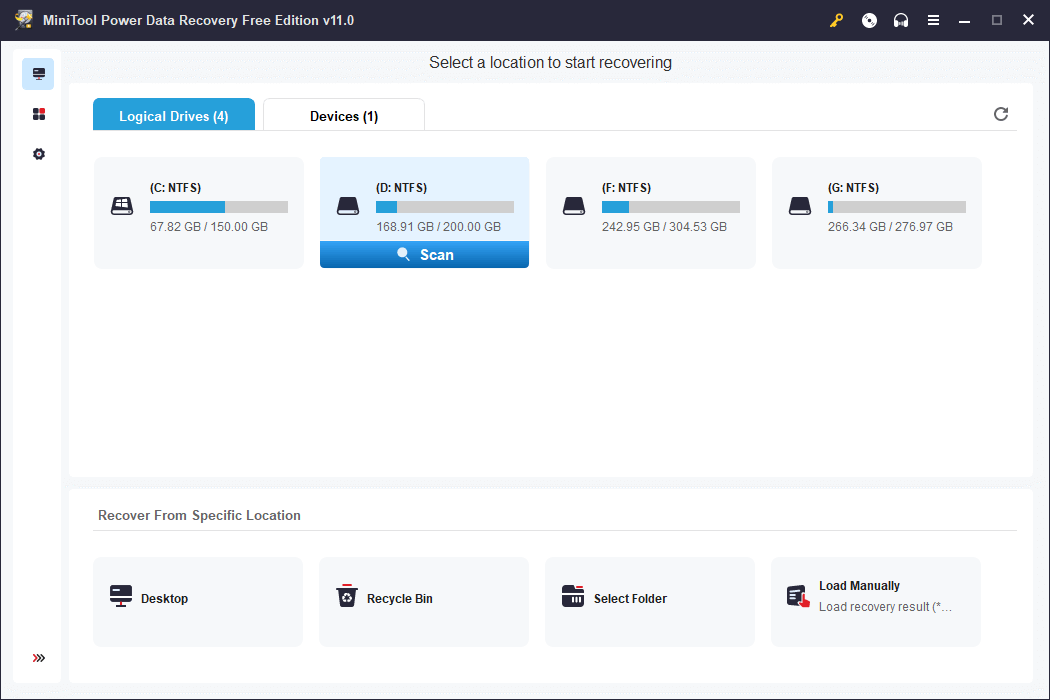
- Launch MiniTool Power Data Recovery to access its main interface.
- On the main UI, you can choose the drive or device you want to scan. If you know which drive contains your deleted/lost files, you can select the target drive under Logical Drives and click Scan. If you don’t know which drive to scan, you can click the Devices tab, select the whole disk or device and click Scan. For an external device, you need to connect it to your Windows computer beforehand.
- Let the software finish the scan. After that, you can check the scan result and find if the target files are listed, if so, check those files and click the Save Then you can choose a preferred new location to store the recovered files.
Tip: If you only want to scan a specific type of file, you can click the Scan Settings icon in the left panel of the main UI and choose the file types you want to scan.
Free Disk Partition Manager for Windows 11/10/8/7
If your computer has problems or you reinstalled your OS, you may need a professional disk partition manager to repartition the hard disk or manage the hard drives from other aspects.
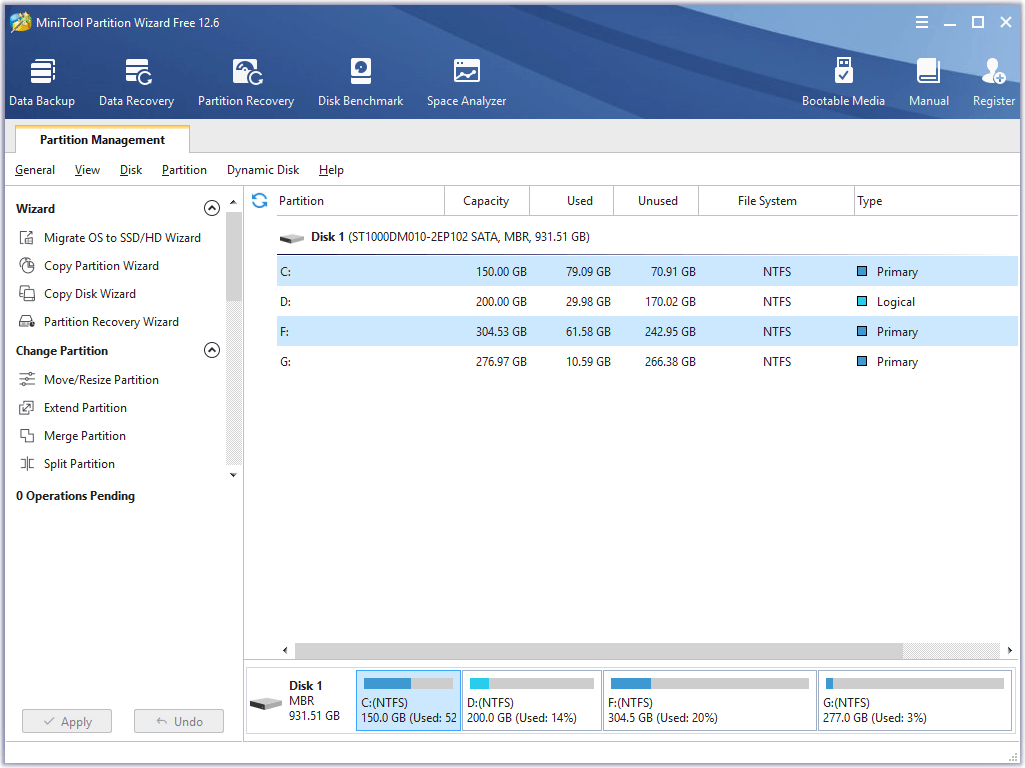
MiniTool Partition Wizard is a popular free hard drive partition manager for Windows. It lets you manage hard drives and partitions from all aspects.
For partition management, you can use it to create, delete, extend, resize, split, merge, format, wipe partitions, convert partition format, check file system errors, change the drive letter, and more.
For disk management, you can use MiniTool Partition Wizard to migrate OS to SSD/HD, copy disk, recover lost partitions, convert disk format, wipe disk, test hard drive speed, analyze hard drive space, and more.
This disk partition manager is extremely easy to use and fulfills all your hard disk management needs. It is free and clean. You can download and install MiniTool Partition Wizard on your Windows PC or laptop to test it now.
MiniTool Partition Wizard FreeClick to Download100%Clean & Safe
Free PC Backup Software for Windows 10/11
For system and data backup on a PC, you can utilize a professional free PC backup tool.
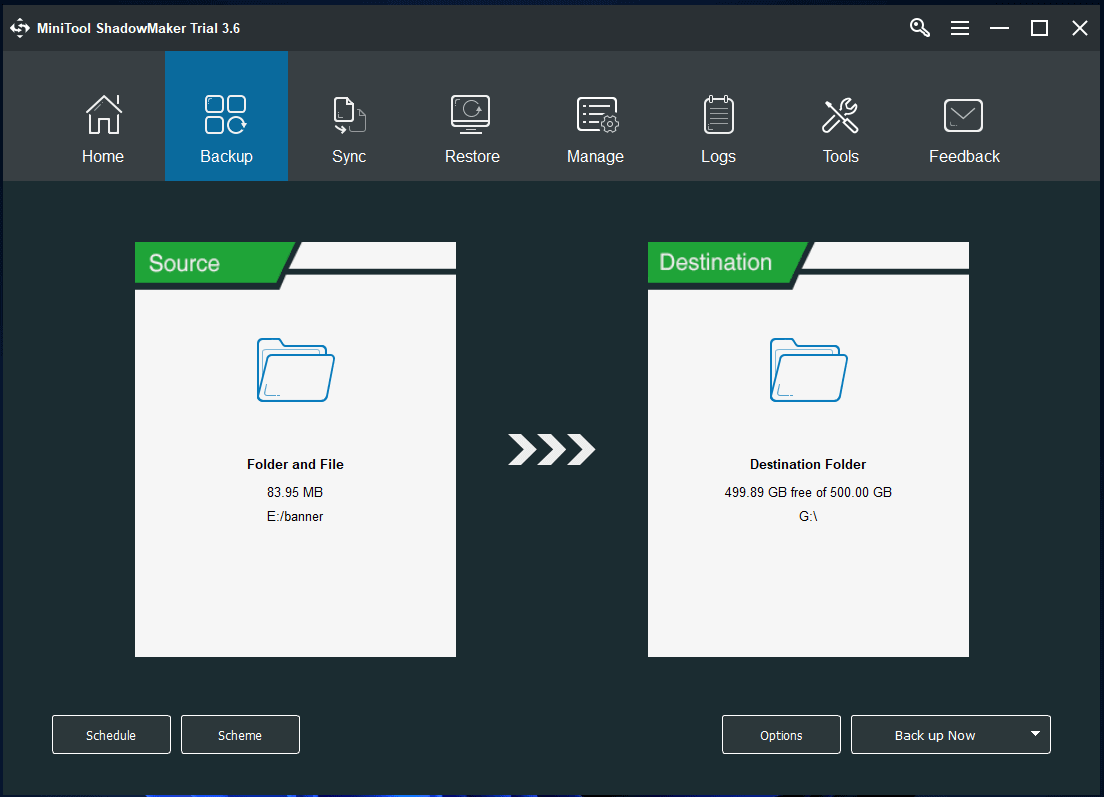
MiniTool ShadowMaker is one of the best free PC backup utilities that supports Windows system backup and file backup.
You can use it to easily create a system image backup of your Windows OS and restore your OS from the backups when needed.
As a professional PC backup application, you can also use it to back up any files on your computer at a fast speed. You can easily select files, folders, or partitions to back up to external hard drives or USB flash drives. You can even select the whole disk content to back up.
Besides, it also offers another backup module: File Sync. You can easily sync data to the target device to make a backup.
Many other backup features are provided, e.g. disk clone, automatic backup, incremental backup, etc.
Use this top free PC backup tool to keep your computer data safe.
MiniTool ShadowMaker TrialClick to Download100%Clean & Safe
Click to Tweet
Conclusion
This post offers a guide for Windows Defender download, install, uninstall, and reinstall on Windows 10/11. Some tips to help you fix Windows Defender not working or can’t open problem are also provided. Some useful free Windows tools are offered to help you with data recovery, system and data backup, and disk partition management. Hope it helps.
If you have any problems with using MiniTool Software products, you can contact [email protected].
Introduction
Are you looking for a way to protect your computer from viruses, malware, and other online threats? Windows Defender is a great tool to help you do just that. In this blog post, we’ll discuss the benefits of installing Windows Defender, provide a step-by-step guide to installing it, and offer additional tips for protecting your computer.
Overview of Windows Defender
Windows Defender is a security program developed by Microsoft. It is included in the Windows operating system and is designed to detect and remove malicious software from your computer. It can also help protect your computer from viruses, spyware, and other malicious programs.
Benefits of Installing Windows Defender
There are many benefits to installing Windows Defender, including:
- It’s free and easy to install.
- It can detect and remove malicious software.
- It can help protect your computer from viruses, spyware, and other malicious programs.
- It can help keep your computer running smoothly.
Step-by-Step Guide to Installing Windows Defender
Installing Windows Defender is easy. Here’s a step-by-step guide:
Download the Software
The first step is to download the software. You can do this by visiting the Microsoft website and downloading the latest version of Windows Defender.
Install the Software
Once you’ve downloaded the software, you can install it by following the on-screen instructions.
Activate Windows Defender
Once you’ve installed the software, you’ll need to activate it. You can do this by opening the Windows Defender program and clicking “Activate Now”.
In addition to installing Windows Defender, there are other steps you can take to protect your computer. Here are some tips:
Keep Your Operating System and Software Up to Date
It’s important to keep your operating system and software up to date. This will help ensure that your computer is protected from the latest threats.
Use Strong Passwords
You should also use strong passwords to protect your computer and your data. Strong passwords should be at least 8 characters long and include a combination of letters, numbers, and symbols.
Use Firewall Protection
You should also use firewall protection to help protect your computer from malicious software.
Use Secure Network Connections
When connecting to the internet, it’s important to use secure network connections. This will help protect your computer from hackers and other malicious actors.
Back Up Your Data Regularly
Finally, you should back up your data regularly. This will help ensure that your data is safe in the event of a system failure or other disaster.
Conclusion
Installing Windows Defender is an easy way to protect your computer from viruses, malware, and other online threats. We hope this guide has been helpful in showing you how to install Windows Defender and offering additional tips for protecting your computer.
Installing Windows Defender is an incredibly easy process that can help protect your computer from malicious attacks. With just a few simple steps, you can be up and running in no time. First, you’ll need to download and install the Windows Defender program from the Microsoft website. Once the program is installed, you’ll need to configure the settings to ensure that you are getting the best protection for your computer. Finally, you’ll need to keep your computer updated with the latest security patches and updates to ensure that your computer is protected from the latest threats. By following these incredibly easy steps, you can be sure that your computer is safe and secure from malicious attacks.
Frequently Asked Questions (FAQ) :
Q1: What is Windows Defender?
A1: Windows Defender is a free antivirus program from Microsoft that helps protect your computer against viruses, spyware, and other malicious software.
Q2: How do I install Windows Defender?
A2: To install Windows Defender, open the Windows Security app, select Virus & threat protection, and then select Install Windows Defender.
Q3: What other measures should I take to protect my computer?
A3: In addition to installing Windows Defender, you should also regularly update your computer’s software, use strong passwords, and avoid clicking on suspicious links or downloading unknown files.
Q4: Does Windows Defender protect against all types of threats?
A4: Windows Defender does a good job of protecting against most common threats, but it is not a complete security solution. It is important to also use other security measures such as a firewall and anti-spam software.
Q5: Is Windows Defender easy to use?
A5: Yes, Windows Defender is easy to use and it can be configured to run automatic scans on a regular basis.