
Все способы:
- Способ 1: Microsoft Store
- Способ 2: Включение приложения
- Установка приложения по умолчанию
- Альтернативные варианты
- Решение возможных проблем
- Вариант 1: Восстановление и сброс настроек
- Вариант 2: «Windows PowerShell»
- Вариант 3: Встроенное средство устранения неполадок
- Вопросы и ответы: 2
Фирменное приложение «Фотографии» обычно предустановлено в Windows 10. Если на компьютере его нет, то оно доступно в Microsoft Store, но, скорее всего, софт просто нужно активировать.
Способ 1: Microsoft Store
«Фотографии» — фирменное средство просмотра изображений и фотографий от Microsoft, которое может быть установлено через другое фирменное приложение — магазин. Если у вас его вдруг нет (оно также установлено по умолчанию), то в нашем отдельном материале вы найдете инструкцию по инсталляции официального маркета компании. Также в ней можно узнать о решении самых распространенных проблем при установке или работе.
Читайте также: Установка Microsoft Store в Windows 10
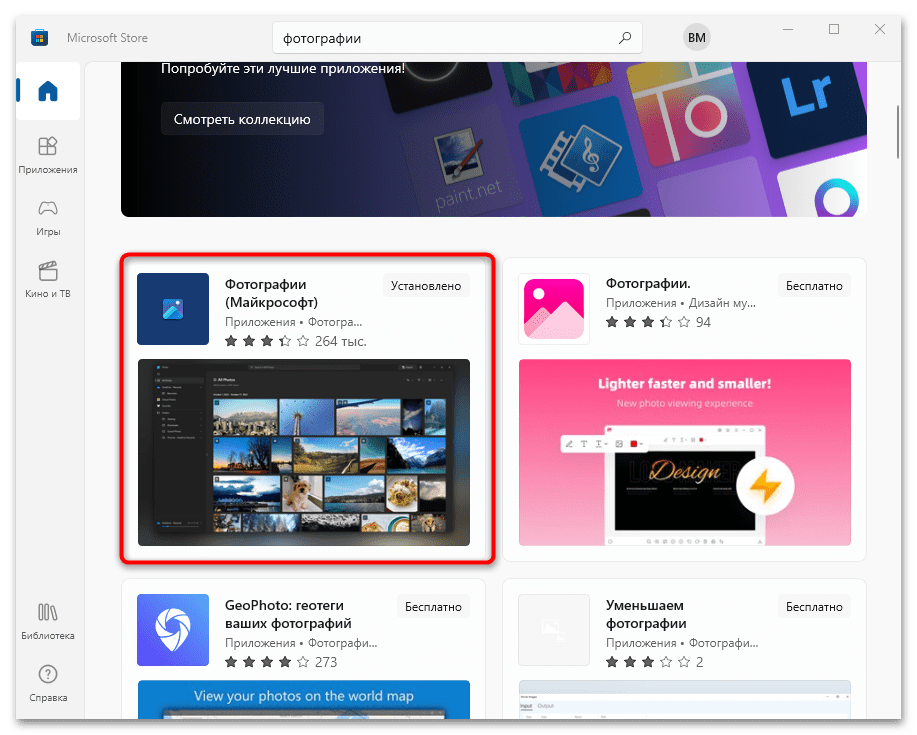
- Запустите Microsoft Store. В поисковой строке пропишите «Фотографии» и нажмите кнопку поиска или на клавишу «Enter».
- На новой странице отобразятся найденные совпадения, среди которых есть и нужное нам. Выберите его, чтобы перейти на страницу с описанием.
- Останется только кликнуть по кнопке установки «Получить» и дождаться, пока «Фотографии» будет инсталлировано на компьютер. Пожалуй, это единственный адекватный способ установить приложение для просмотра фотографий в Windows 10.

Читайте также: Решение проблем со скачиванием приложений из Microsoft Store в Windows 10
Способ 2: Включение приложения
В большинстве случаев «Фотографии» уже есть в системе, но если она не отображается в списке доступных для просмотра изображений программ, то, вероятнее всего, ее нужно просто включить. Для этого его сперва придется найти, используя «Редактор реестра». Более простой способ – использовать специализированный софт, предназначенный для расширения базовых возможностей операционной системы. Наш автор разбирал оба метода, позволяющих самостоятельно активировать приложение.
Подробнее: Включение стандартного приложения «Просмотр фотографий» в Windows 10

Установка приложения по умолчанию
Стандартный способ выбора приложения для открытия графического файла через контекстное меню и функции «Открыть с помощью» со стандартной программной может не сработать: его не будет в списке. Чтобы установить «Фотографии» в Виндовс 10 средством по умолчанию, потребуется перейти в «Параметры» системы:
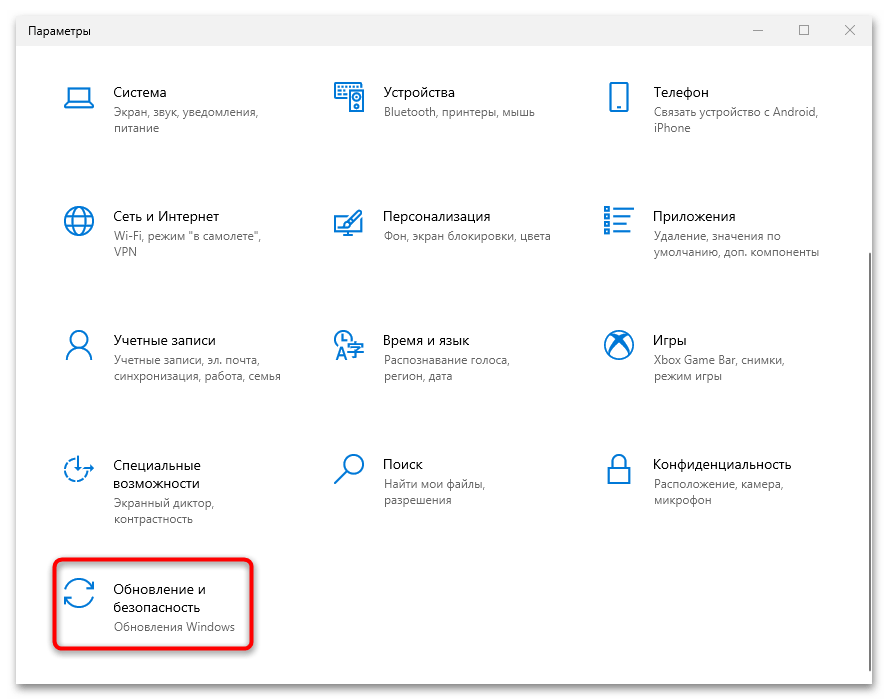
- Кликните по кнопке «Пуск» и выберите «Параметры», помеченное иконкой в виде шестерни.
- В новом окне нажмите на раздел «Приложения».
- На панели слева кликните по вкладке «Приложения по умолчанию». Останется отыскать строку «Просмотр фотографий» и нажать на название установленной по умолчанию программы, если это не «Фотографии». Из всплывающего меню выберите нужное — искомый софт помечен как рекомендуемый для Windows 10.

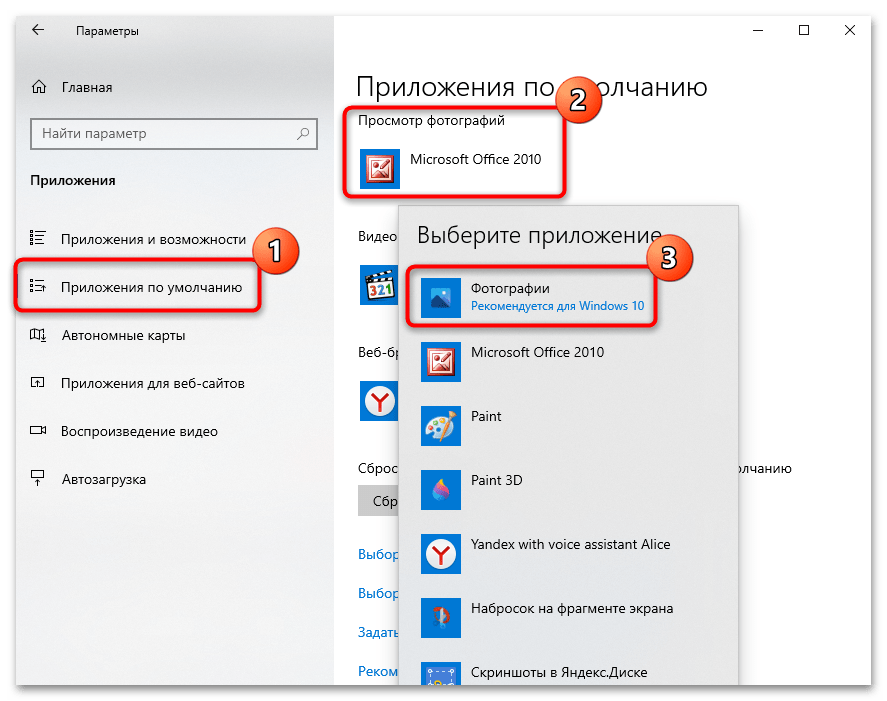
После выбора приложения по умолчанию закройте окно. Как только настройки будут выполнены, все графические файлы в наиболее распространенных форматах станут автоматически открываться в интерфейсе «Фотографий».
Альтернативные варианты
Можно воспользоваться аналогичным софтом, предназначенным для просмотра фото и других изображений. Но, в отличие от приложения «Фотографий», такие программы придется устанавливать отдельно. Некоторые из них предусматривают дополнительные возможности, например встроенный редактор с базовыми инструментами для простого изменения файлов. Другие интегрируются в системное меню, что позволяет быстро открывать доступ к просмотру и редактированию изображений.
Решение возможных проблем
Иногда ни включение, ни установка не доступны, и это означает, что в работе стандартного приложения возникла ошибка. Но встроенные средства Виндовс позволяют устранить ту или иную неполадку самостоятельно.
Вариант 1: Восстановление и сброс настроек
Попробуйте восстановить или сбросить настройки приложения через системные «Параметры»:
- Запустите «Параметры» через главное меню и перейдите в раздел «Приложения». На вкладке «Приложения и возможности» в списке установленного софта найдите «Фотографии». Кликните по названию левой кнопкой мыши, затем ей же по появившейся строке «Дополнительные параметры».
- В новом окне сначала нажмите на кнопку «Исправить», после чего система попытается вернуть состояние приложения, не затронув данные.
- Если это не сработало, то выберите «Сброс», при котором все настройки и данные «Фотографий» будут удалены.
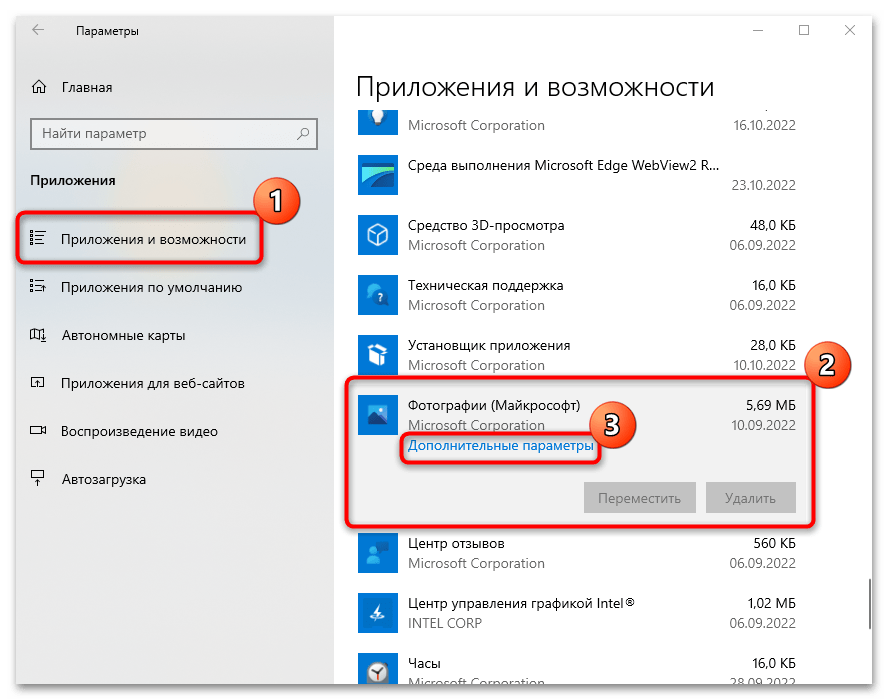
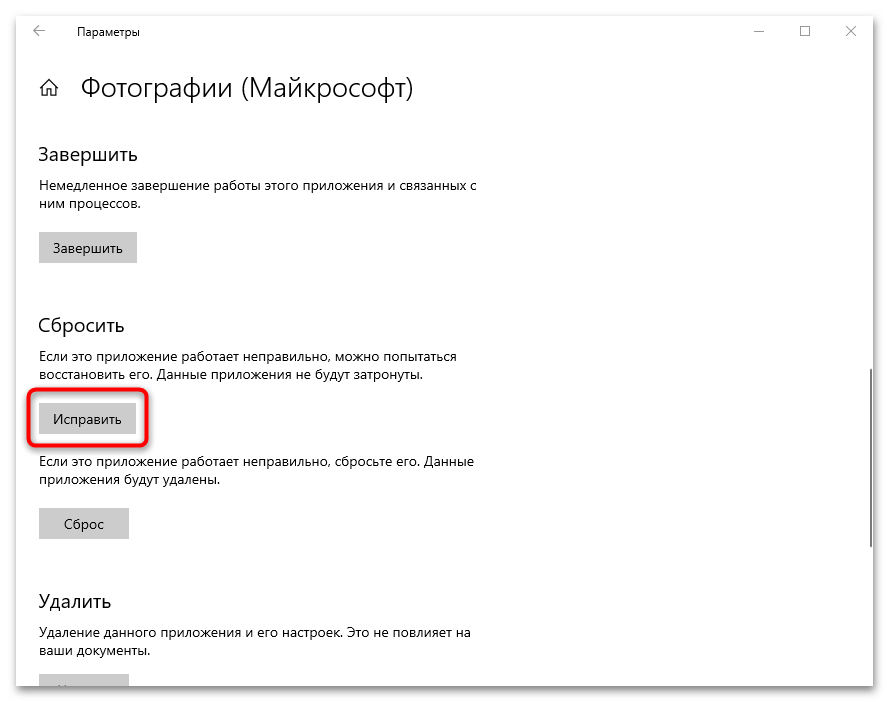
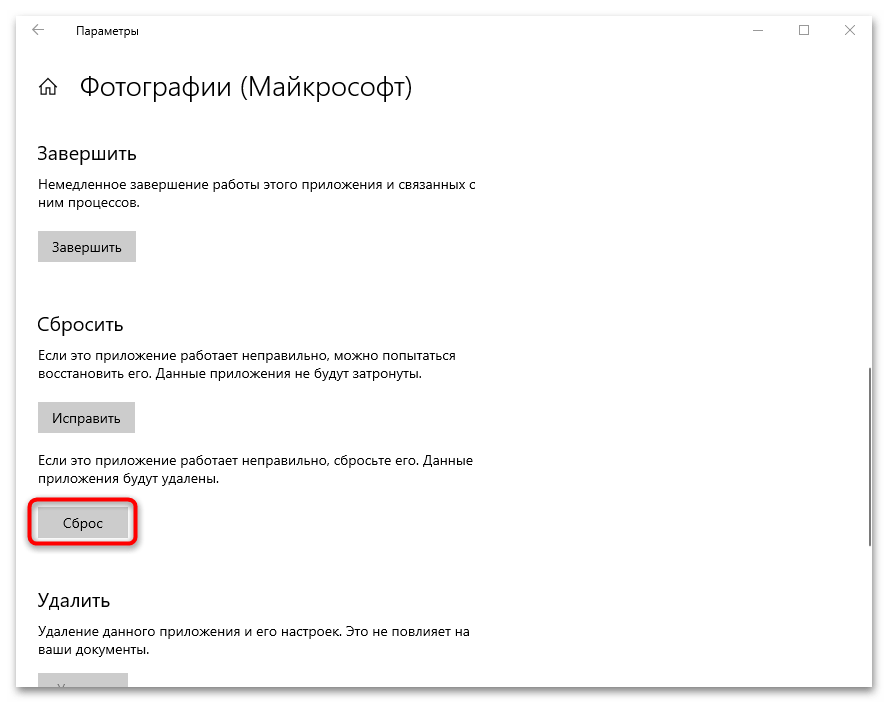
Такой вариант исправления неполадок подойдет, если фирменная программа работает некорректно.
Вариант 2: «Windows PowerShell»
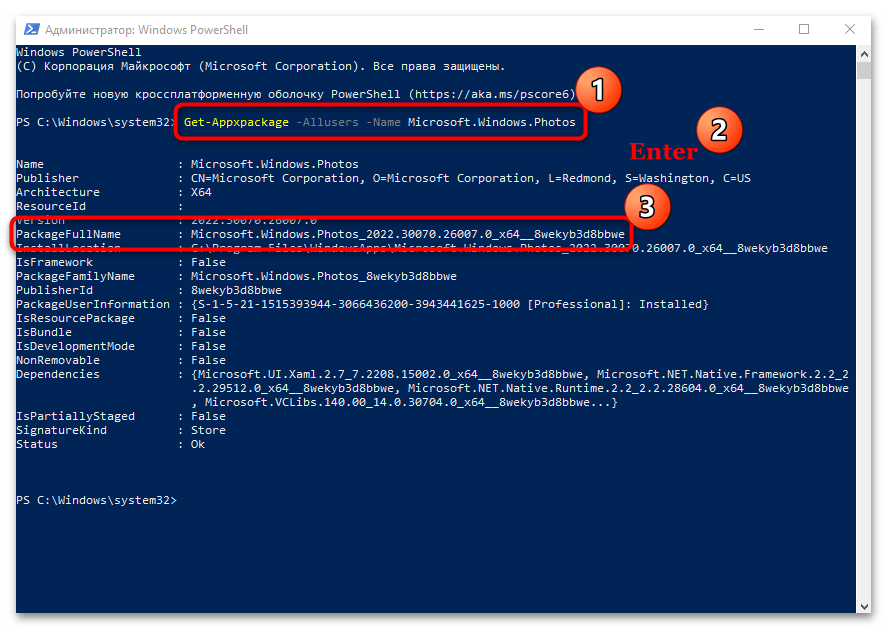
С помощью терминала PowerShell есть возможность перерегистрировать приложение, что может помочь восстановить его работоспособность. Оно должно начать нормально функционировать после ввода одной специальной команды:
- Запустите «Windows PowerShell» от имени администратора — для этого кликните по кнопке «Пуск» правой кнопкой мыши и выберите соответствующий пункт из меню.
- Выполните команду
Get-Appxpackage -Allusers -Name Microsoft.Windows.Photos, прописав ее и нажав на клавишу «Enter». Обратите внимание на строку «PackageFullName». Ее значение нужно скопировать с помощью сочетания клавиш «Ctrl + C». В нашем случае это «Microsoft.Windows.Photos_2022.30070.26007.0_x64_8wekyb3d8bbwe». - После этого вставьте команду
Add-AppxPackage -register «C:\Program Files\WindowsApps\***AppxManifest.xml» –DisableDevelopmentModeи перейдите с помощью стрелок на клавиатуре к месту, где звездочки. На их место вставьте полученное в прошлом шаге название приложения, используя сочетание «Ctrl + V». В нашем примере команда будет выглядеть так:Add-AppxPackage -register «C:\Program Files\WindowsApps\Microsoft.Windows.Photos_2022.30070.26007.0_x64_8wekyb3d8bbweAppxManifest.xml» –DisableDevelopmentMode. Нажмите на клавишу ввода.
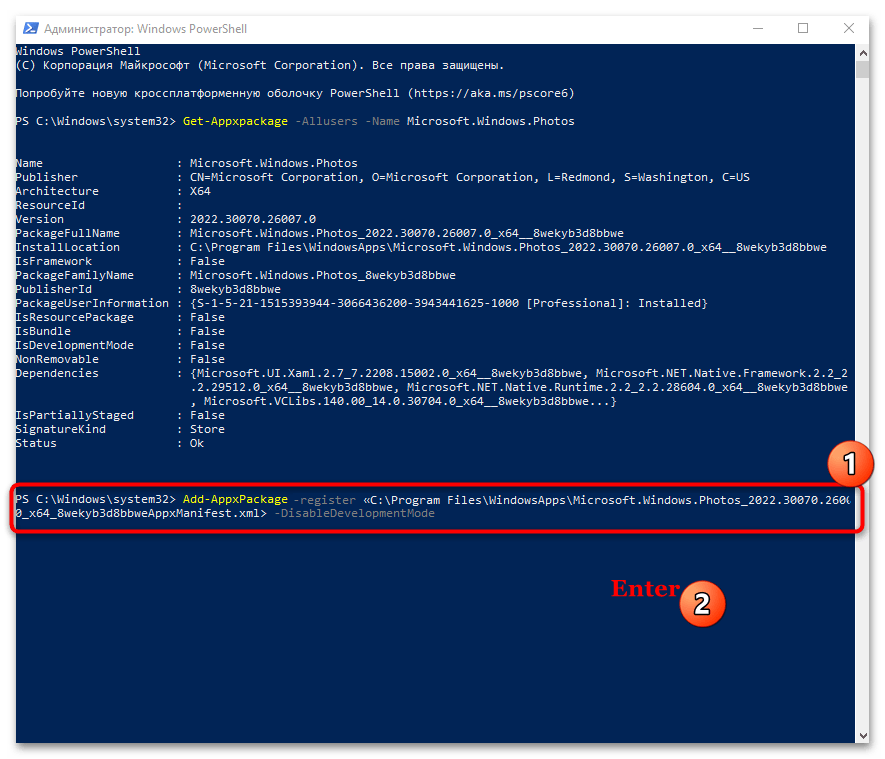
После этого приложение «Фотографии» будет перерегистрировано в системе, а его работоспособность может восстановиться.
Вариант 3: Встроенное средство устранения неполадок
В Виндовс 10 имеется встроенное средство устранения неполадок, которое находит самые распространенные проблемы и автоматически их устраняет или предлагает пользователю инструкции по самостоятельному решению. Запустить его можно при помощи «Параметров»:
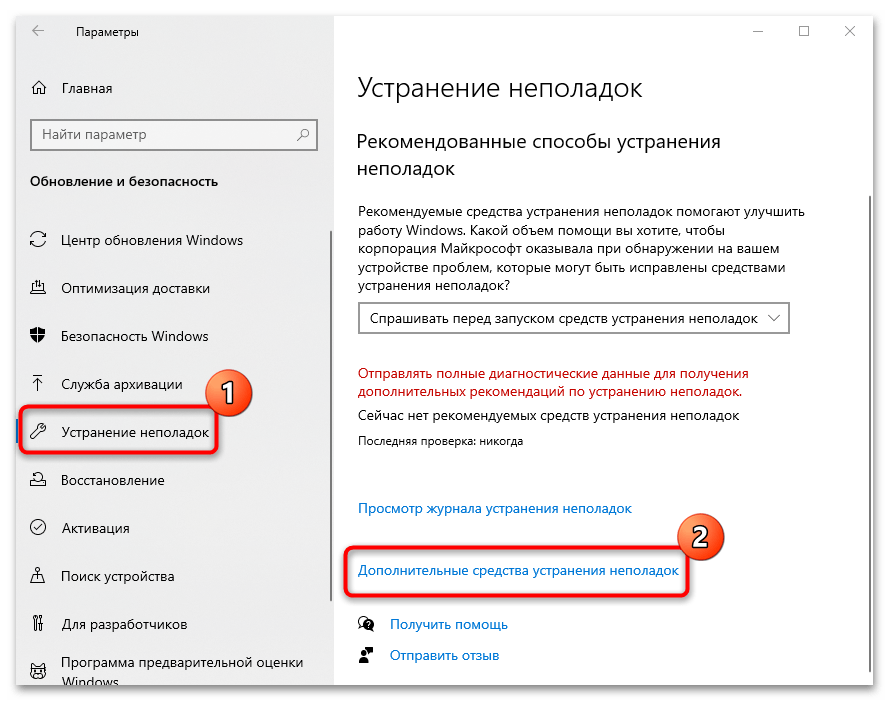
- Через «Параметры» перейдите в раздел «Обновление и безопасность».
- Нажмите на вкладку «Устранение неполадок» и кликните по строке «Дополнительные средства устранения неполадок».
- Поскольку «Фотографии» — приложение из Microsoft Store, проверять на наличие ошибок нужно именно фирменный магазин. Найдите соответствующий пункт в списке, кликните по нему левой кнопкой мыши. Появится дополнительная кнопка, запускающая проверку неполадок.
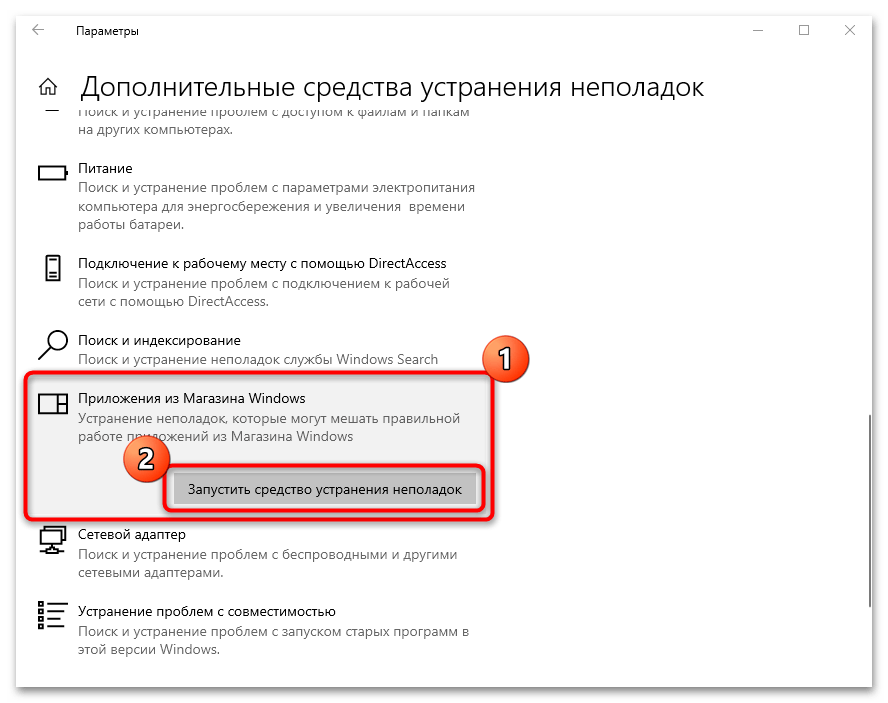
После этого запустится средство устранения неполадок. Если возможно, система обнаружит и самостоятельно исправит ошибку. Также могут отобразиться рекомендации и инструкции для пользователя, которые он должен выполнить, чтобы решить возникшую трудность.
Наша группа в TelegramПолезные советы и помощь
Microsoft Photos is a stock app on Windows 10. It is present on Windows 10 when you install the OS and it is the go-to app for viewing photos if you have nothing else installed. If you choose to install a different photo viewer, you will have to change the default one on Windows 10 i.e., change it to something other than Microsoft Photos.
Stock apps on Windows 10 are present out of a box but many of them can be uninstalled. If you want, you can remove the ones you do not need but Microsoft Photos is one of the core apps on the OS so uninstalling it isn’t that easy (though still possible). If you can’t find the Microsoft Photos app, try the fixes below.
1. Reinstall Photos App on Windows 10
It’s possible that you’ve uninstalled the Microsoft Photos app, or an app that you installed did it for you. In that case, you will have to install the app again. You can do this from the Microsoft Store or via PowerShell.
To install Microsoft Photos from the Microsoft Store;
- Visit this link to the Microsoft Photos app in your browser.
- Click Get.
- Open the Microsoft Store app when prompted by the browser.
- Click Get and then Install.
- Microsoft Photos will be installed.
If you’re unable to install Microsoft Photos from the Microsoft Store app, you can install it via PowerShell.
- Open PowerShell with admin rights.
- Run this command:
$manifest = (Get-AppxPackage Microsoft.WindowsStore).InstallLocation + ‘AppxManifest.xml’. - Microsoft Photos will be installed.
Note: Restart the system if the app doesn’t appear.
2. Reset Microsoft Store
The Microsoft Store app may cause problems with other apps. The Microsoft Photos app may very be present on your system but the Microsoft Store may prevent it from opening. Try resetting the app.
- Tap the Win +R keyboard shortcut to open the run box.
- In the run box, enter
wsreset.exeand tap the Enter key. - A Command Prompt window will open and close on its own.
- The store app will be reset. Try opening the Microsoft Photos app.
3. Run Windows Store app troubleshooter
The Microsoft Photos app is a Microsoft Store and Windows 10 has a troubleshooter that can help resolve problems with these types of apps.
- Open the Settings app with the Win+I keyboard shortcut.
- Go to Update & Security.
- Select the Troubleshoot tab.
- Click Additional troubleshooters.
- Run the Windows Store Apps troubleshooter.
- Apply all fixes that it recommends.
- Restart the system.
4. Try a different photo viewer
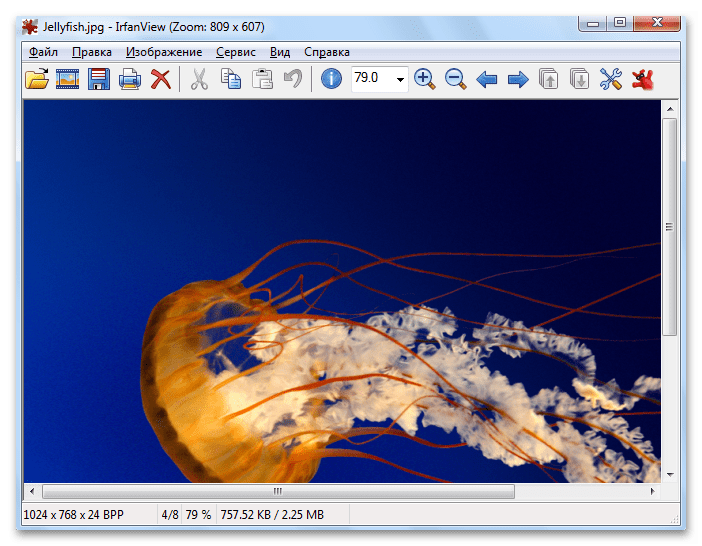
If you’re still unable to open and use the Microsoft Photos app, you can install a third-party photo viewer. There are plenty of great alternatives to the Microsoft Photos app. We recommend giving IrfanView a try.
Conclusion
The Microsoft Photos app is the best photo viewer that Microsoft has ever developed. In fact, many Windows 10 users often complain about it. That said, if you’re determined to use it and it doesn’t reappear with any of the fixes listed above, create a new user account and it will be present in it. You will have to switch to using the new account.

Fatima Wahab
Fatima has been writing for AddictiveTips for six years. She began as a junior writer and has been working as the Editor in Chief since 2014.
Fatima gets an adrenaline rush from figuring out how technology works, and how to manipulate it. A well-designed app, something that solves a common everyday problem and looks
You are here:
Home » Windows 10 » How To Reinstall The Photos App In Windows 10/11
The universal Photos app is the default photo or image viewer in Windows 10/11 operating system. The classic Windows Photo Viewer, although it has not been removed from Windows 10/11, is disabled by default, and one needs to enable Windows Photo Viewer to make it the default photo viewer program in Windows 10.
The new Photos app is not just an image viewer, but it also offers basic image editing and optimizing tools as well. It provides you with options to add various effects and filters to your photos. With the Photos app, you can crop, rotate, straighten, and retouch your images. The app also allows you to remove red-eye from images.

Probably the only problem with the Photos app is that it is not as quick as the classic Windows Photo Viewer or its competitors like ImageGlass to open photos. The other most common issue is reasonably high resource usage.
If the Windows 10/11 Photos app is not opening, crashing soon after the launch, or displaying an error, you can fix those issues by reinstalling the Photos app. However, like any other default Windows 10/11 apps, the Photos app can’t be uninstalled via the Settings app. In this guide, we will see how to easily uninstall and then install the Photos app in Windows 10/11.
Method 1 – uninstall the Photos app via PowerShell and then install it
Method 2 – uninstall Photos via PowerShell
Method 3 – uninstall the Photos app using CCleaner and then install the same
Method 1 of 3
Reinstall the Photos app in Windows 10/11 using PowerShell
Step 1: Open PowerShell as an administrator. To do this, type PowerShell in the Start menu or taskbar search box, right-click on the PowerShell entry in the search results, and then click the Run as administrator option.

Click the Yes button when you see the User Account Control prompt.
Step 2: In the elevated PowerShell, type the following command and press the Enter key to uninstall the Photos app.
get-appxpackage *Microsoft.Windows.Photos* | remove-appxpackage
This should remove the Photos app. If not, follow the next method.
Step 3: Once the app is removed, open the built-in Microsoft Store app, search for the Microsoft Photos app, and install the same to reinstall the Photos app.

Method 2 of 3
Another way to uninstall the Photos app via PowerShell
Step 1: Open the PowerShell with admin rights.
Step 2: Type the following command and press the Enter key to view all installed apps.
Get-AppxPackage –AllUsers

Step 3: Scroll down, and locate the entry named Microsoft.Windows.Photos and copy its PackageFullName to the Notepad program.
Tip: To quickly find the Photos app entry, right-click on the title bar of PowerShell, click Edit, click Find, type Photos, and then click the Find Next button.
To copy PackageFullName, select PackageFullName (refer to the picture below), and then use Ctrl + C hotkey to copy it.

Step 4: Execute the following command to uninstall the Photos app.
remove-AppxPackage PackageFullName
In the above command, replace PackageFullName with the PackageFullName of the Photos app that you copied to Notepad in Step 3.

Step 5: Now that we have uninstalled the Photos app from Windows 10, it’s time to install a fresh copy of the same from the Store. To do so, open the Store app by clicking the Store app tile on the Start menu or searching for it.
Step 6: Once the Store is launched, type Microsoft Photos in the search box, click on the Microsoft Photos entry, and then click the Install/Get button. If the Install or Get button is not active or you are setting the Open button instead, please close the app once, and then launch the Store app again.
Depending on the speed of your internet connection, the app should be installed and ready to use in 2 to 10 minutes.
Method 3 of 3
Reinstall the photos app using CCleaner
Those of you who are not familiar with PowerShell can use the popular CCleaner (free) software to uninstall the Photos app and then follow the directions mentioned above to install the Photos app from the Store.
Step 1: Download the CCleaner app and install the same on your Windows 10 PC, if not installed already.
Step 2: Launch CCleaner, click Tools and click Uninstall to view all installed apps.
Step 3: Locate the entry named Photos, right-click on it, and click the Uninstall button to uninstall it. Click the OK button when you see the confirmation dialog.


Step 4: Once the Photos app is uninstalled, open the Windows Store app, type Microsoft Photos in the search box, click on Photos app to open its page, and then click Free button to install the Photos app. Simple as that!


Our how to reinstall Solitaire Collection in Windows 10 guide might also interest you.
В данной статье мы рассмотрим, как вернуть стандартное «Средство просмотра фотографий Windows» в Windows 10.
С выходом Windows 8, в семействе Windows появились так называемые Metro-приложения. Одним из них стало приложение «Фотографии»:
")
Не смотря на широкую функциональность программы «Фотографии», в числе которых возможности редактирования фотографий с целью улучшения их качества, не всем «Фотографии» пришлись по вкусу. В основном пользователи жалуются на долгое открытие фото, вплоть до пары минут; для кого-то важна возможность открывать многостраничные TIF-файлы и иметь возможность перемещаться среди страниц внутри них (а на момент написания статьи, «Фотографии» этого делать не умеют); кому-то не нравится или непривычен внешний вид нового Metro-приложения; а кому-то просто напросто не нужна такая большая функциональность программы, а ведь весь этот функционал потребляет не малое количество ресурсов компьютера.
Если в Windows 8 и 8.1 можно было вернуть стандартное «Средство просмотра фотографий Windows» без «плясок с бубном» – через диалог «Открыть с помощью…», то в Windows 10 компания Microsoft решила насильно пересадить пользователей на своё Metro-приложение, убрав быстрые способы его открытия.
Однако, «Средство просмотра фотографий» пока что не было вырезано из Windows 10 (проверено на версии 20H2), и его ещё возможно использовать для просмотра фото. Однако, для этого нужно внести некоторые изменения в реестр Windows.
Чтобы не усложнять ни инструкцию, ни её выполнение манипуляциями с редактором реестра, предлагаем Вам сразу скачать готовый файл, который внесёт все изменения автоматически:
Windows_10_Photo_viewer.reg (2.09 Кб)
Запустите данный файл и разрешите ему внести изменения в реестр компьютера.
После того, как Вы выполнили предыдущий пункт, нажмите по любому изображению правой кнопкой мыши – «Открыть с помощью» – «Выбрать другое приложение». В открывшемся окне найдите и выберите «Просмотр фотографий Windows», установите галочку «Всегда использовать это приложение для открытия .*** файлов» и нажмите «ОК».
Готово. Теперь файлы определённого расширения будут открываться в приложении «Средство просмотра фотографий Windows».
Обратите внимание: так как форматов изображений много (jpg, jpeg, tif, tiff, png, gif и прочие), некоторые файлы могут по прежнему открываться в «Фотографиях». Для того, чтобы они тоже открывались в «Средстве просмотра фотографий», необходимо проделать манипуляции из предыдущего абзаца с каждом из типов файлов, которые вы хотите открывать в «Средстве просмотра фотографий».
-
Home
-
News
- Microsoft Photos App Download/Reinstall on Windows 10
By Alisa |
Last Updated
An introduction of Microsoft Photos app. Learn how to access Microsoft Windows Photos app, how to download and install, or reinstall Microsoft Photos app on your computer. FYI, MiniTool Software offers you free movie maker, free video editor, free video converter, free screen recorder, free video downloader, free photo and video recovery software, and more.
To manage & edit photos and videos on Windows 10, you can use Windows built-in free Microsoft Photos app. This post teaches you how to open Microsoft Photos app, how to download and install Microsoft Photos app, how to uninstall and reinstall Microsoft app on your Windows 10 computer.
What Is Microsoft Photos
Microsoft Photos is a photo and video editor designed by Microsoft. It was firstly introduced in Windows 8 and is also included in Windows 10. You can use this app to view, organize, edit, share your images and photos, play and edit video clips, create albums, etc. Microsoft Photos video editor lets you trim videos, change filters, text, motion, music, add 3D effects, and more.
App Type: Image viewer, image organizer, video editor, video player, raster graphics editor.
License: Is Microsoft Photos free? It is free to use for all users but with in-app purchase for more advanced features.
Availability: Windows 10/8/8.1, Windows 10 Mobile, Xbox One. Support 64 languages.
Predecessor: Windows Photo Viewer, Windows Photo Gallery, Windows Movie Maker.
How to Access Microsoft Photos
Microsoft Photos is a Windows 10 built-in app. You can easily access the Photos app by following the operation below.
- You can click Start menu, or the search box on the taskbar, or the Cortana icon.
- Type Photos or Microsoft Photos in the search box, and then select Photos app from the search results to quickly open it.
Microsoft Photos Download for Windows 10
If you can’t find Microsoft Photos app on your Windows 10 computer, you can also manually download and install it by following the steps below.
- Open Microsoft Store app or website.
- Click the Search box, type Microsoft Photos, click Microsoft Photos app to open its download page.
- Click Get button to download Microsoft Photos app on your Windows computer.
- After downloading, you can click its installation exe file to quickly install it on your computer.
How to Reinstall Microsoft Photos App on Windows 10
If the Microsoft Photos app is not working properly on your computer, you can try to reinstall it. Check how to do it below.
- Press Windows + X and select Windows PowerShell (Admin) to open PowerShell in Windows 10.
- Type the command: get-appxpackage *Microsoft.Windows.Photos* | remove-appxpackage, and press Enter to uninstall Microsoft Photos app.
- Then you can go to Microsoft Store to download and install Microsoft Photos app on your Windows 10 computer again.
Microsoft Photos App Main Functions
Photo Management: You can use this app to organize your photos. You can view photos by date, album, or folder.
Photo Editing: Microsoft Photos app is professional photo editing software. It allows you to edit photos, e.g. crop and rotate, correct exposure or colors, fix red eye, remove spots and blemishes, reduce image noise, etc.
Video Editing: It also includes a video editor intending to replace the older Windows Movie Maker. Microsoft Photos Video Editor lets you create videos from pictures and songs. It also lets you add 3D effects, soundtracks, 3D animations, and styles to your videos.
Sum Up
Now you should know how to access, download and install, uninstall and reinstall Microsoft Photos app on Windows 10. For more computer tutorials, you can go to MiniTool Software official website.
About The Author
Position: Columnist
Alisa is a professional English editor with 4-year experience. She loves writing and focuses on sharing detailed solutions and thoughts for computer problems, data recovery & backup, digital gadgets, tech news, etc. Through her articles, users can always easily get related problems solved and find what they want. In spare time, she likes basketball, badminton, tennis, cycling, running, and singing. She is very funny and energetic in life, and always brings friends lots of laughs.