
Postman API Platform — это популярный HTTP-клиент для создания, тестирования и документирования API. Он позволяет отправлять запросы различным сервисам и работать с их ответами. Настоящая палочка-выручалочка для тестирования бэкенда.
Давайте сразу договоримся: в комментариях вы можете предлагать любой аналогичный сервис и расписывать его плюсы. Но поскольку статья у нас о Постмане, то и дифирамбы будем петь ему.
Для начала держите ссылку на Postman, чтобы иметь возможность изучать его параллельно со статьёй. Дальше перекатываемся к преимуществам сервиса:
- Бесплатный.
- Он интуитивно-понятен, а потому предельно прост в использовании и подходит даже новичкам.
- Поддерживает REST, SOAP, GraphQL.
- Расширяемый с помощью Postman API.
- Интегрируемый в CI/CD с помощью консольной утилиты Newman.
- Большое комьюнити, что позволяет получить ответ практически на любой вопрос.
Загрузка и установка Postman
Поскольку теперь вы знаете о приложении и ознакомились с принципами его работы, пришло время установить приложение. В этой статье мы рассмотрим, как загрузить и установить Postman на ОС Windows.
Стоит отметить, что Postman доступен для Windows, Linux и MacOS в виде отдельного приложения. Вы можете установить приложение двумя способами:
- Как отдельное десктопное приложение
- Как расширение Google Chrome
Мы подробно рассмотрим оба способа.
Скачать Postman как отдельное приложение
Десктопный вариант — это стандартное ПО, которое вы устанавливаете на ПК. Такое приложение пользуется поддержкой только вашей операционной системы, а не другого приложения, потому что оно как раз и написано для конкретной ОС.
- Перейдите по ссылке https://www.postman.com/downloads/.
- Выберите операционную систему, на которую вы хотите установить Postman, и нажмите кнопку «Загрузить». Поскольку у меня машина с Windows 64-бит, то и устанавливать я буду версию для x64-Windows.
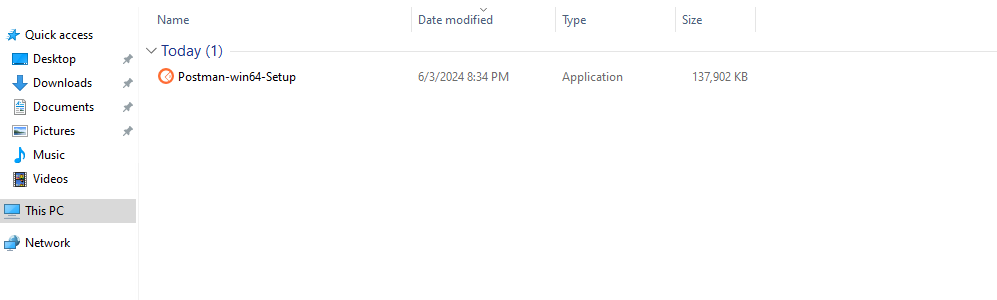
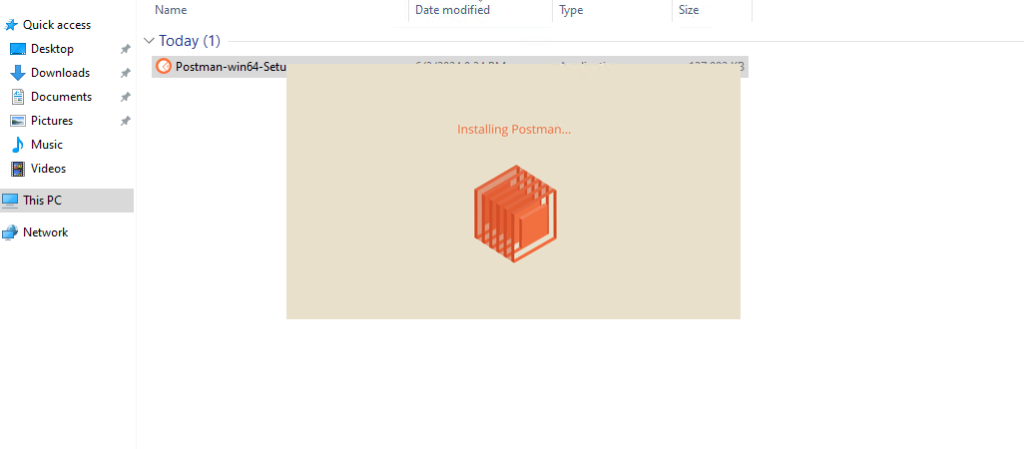
- Тыкаем на загруженный файл .exe и устанавливаем.
- Установка не требует никаких дополнительных действий. После завершения установки автоматически начнется открытие инструмента Postman.
- Создаёте учётную запись и пользуетесь инструмерегис
Скачать Postman как расширение Google Chrome
- Перейдите по ссылке на расширение в веб-магазине Chrome и добавьте Постман в список своих расширений.
- Тыкайте на свежеустановленный extension.
- После этого вы увидите страницу регистрации.
Но следует отметить, что в расширении доступны не все родные функции приложения. Например, расширение не позволяет нормально работать с прокси. В этом случае для прокси потребуется установить ещё одно расширение, которое называется Postman Interceptor.
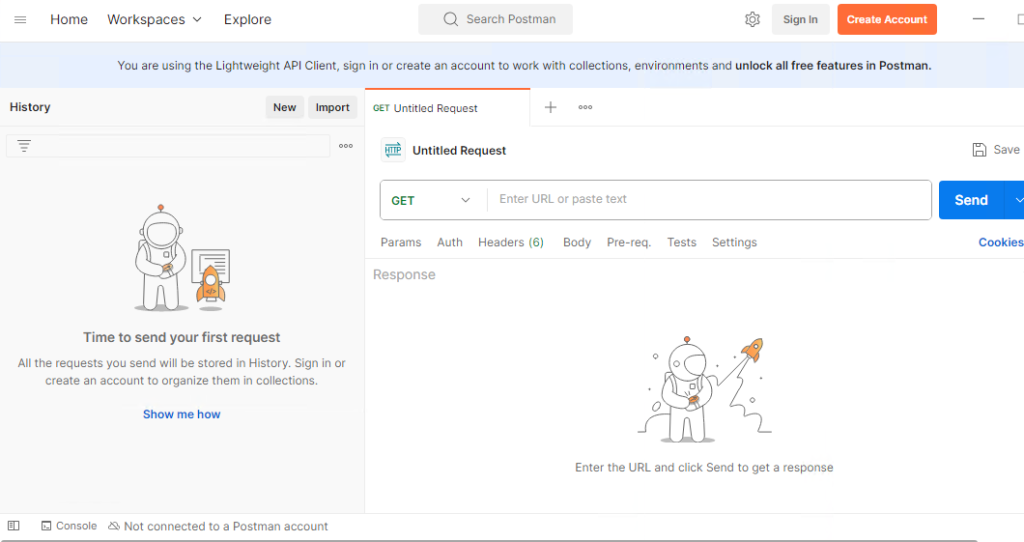
Навигация в Postman API Platform
Теперь, когда Postman установлен (а в моём случае установлен он как полноценное приложение), начинаем изучение пользовательского интерфейса.
Навигацию Postman можно разделить на четыре основных блока пользовательского интерфейса, как показано ниже:
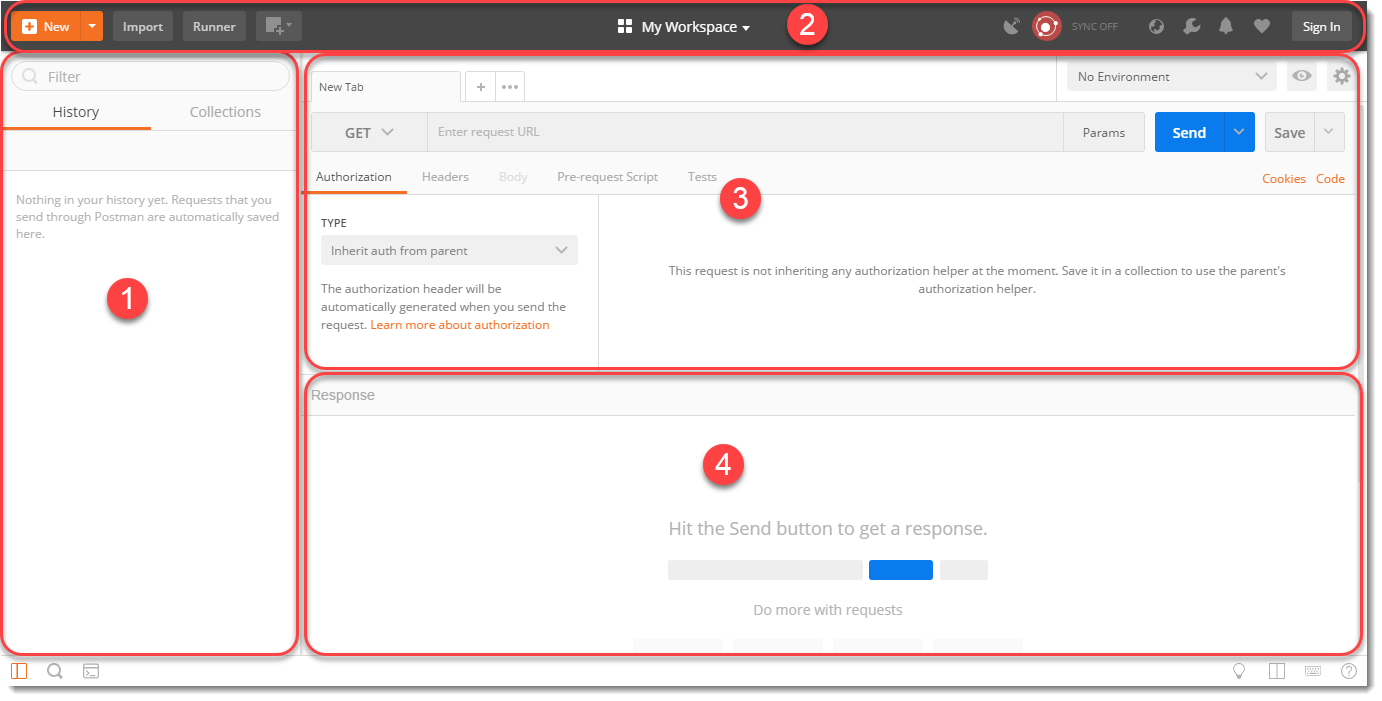
- Сайдбар → Фильтр, по которому можно найти запрос, который создавали; История запросов; Коллекции запросов.
- Хедер → Кнопка New, которая отвечает за создание нового запроса, коллекции и окружения; Импорт документов; Раннер, с помощью которого запускается тестирование запросов; Меню для работы со вкладками; Переключение рабочей области; Кнопки настроек, уведомлений, авторизации, etc.
- Билдер → Окружения и менеджер окружений; Вкладки; HTTP-метод; URL; Прочие Builder-элементы, которые позволяют работать с запросами.
- Ответы → Заполняется только при вызове REST-запроса. Этот раздел будет заполнен деталями полученного ответа.
Это краткое описание навигации, но и его достаточно, чтобы более-менее ориентироваться в интерфейсе данного инструмента.
Создание запроса в Postman
И вот, изучив назначение, преимущества и разобравшись в навигации, мы подобрались к самому главному, а именно созданию нашего первого реквеста. Разберём весь процесс поэтапно.
1. Кликаем по кнопке New, которая находится в хедере:

2. В появившемся меню выбираем Request:

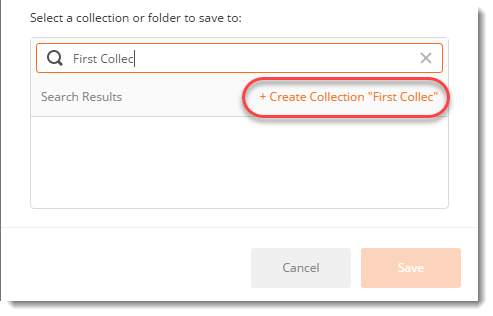
3. Вводим осмысленное имя запроса, например, First API, который мы используем. Вы также можете использовать описание API для более подробных сведений, но это поле не является обязательным.
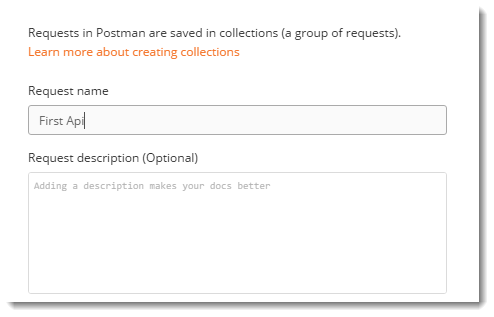
4. Теперь вводим имя коллекции, например, First Collec, и выберем +Create Collection, как показано на скрине. После нажимаем на Save.
5. В сайдбаре кликаем по табу Collections, выбираем только что созданную коллекцию и First API:
6. В поле URL вводим www.google.com и нажимаем Send:

7. В завершение либо нажимаем Save, если хотим перезаписать текущий запрос, либо выбираем Save As и сохраняем, как новый запрос:

Таким образом, мы создали запрос и сохранили его в нужной коллекции.
Отправка GET-запроса в Postman API Platform
Вспомним основы. Существует 4 основных метода НТТР, которые мы используем в запросах для взаимодействия с ресурсами в системе REST:
- GET — получение конкретного ресурса (по id) или коллекцию ресурсов;
- POST — создание нового ресурса;
- PUT — обновление конкретного ресурса (по id);
- DELETE — удаление конкретного ресурса по id.
Грубо говоря, на первом этапе мы ставим перед собой не самую сложную задачу, а именно запрос на получение данных.
Запрос GET содержит всю информацию внутри URL-адреса, и, поскольку URL-адрес виден всё время, рекомендуется не использовать этот тип запроса при отправке конфиденциальной информации, такой как пароли.
Например, когда вы нажимаете поиск после ввода чего-либо в поле поиска google.com, вы на самом деле выполняете GET-запрос, потому что там нет конфиденциальной информации, и вы просто запрашиваете страницу с нужными вам результатами поиска.
Теперь разберём отправку GET-запроса пошагово.
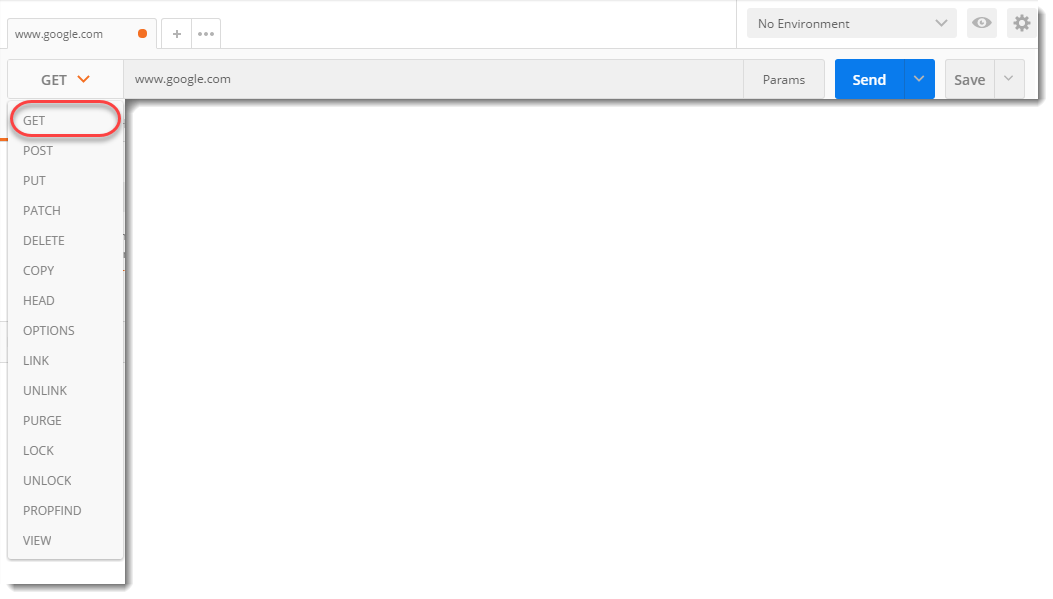
1. В выпадающем меню выбираем GET:
2. Как мы уже делали выше, в поле URL вводим www.google.com и нажимаем Send. Только в этот раз давайте посмотрим, что будет в статус-коде и теле ответа:
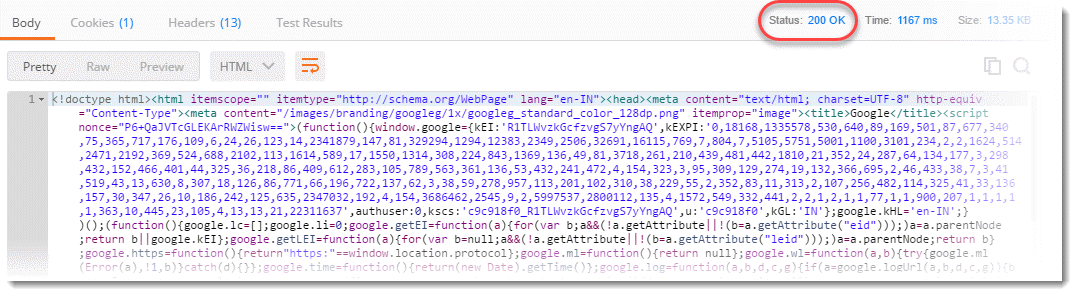
Подробнее о кодах ответа. Если кратко, то код 200 в нашем случае означает, что данные были успешно извлечены и переданы в теле ответа. Другими словами, мы достучались до EndPoint и получили желаемый результат. При этом тело ответа подаётся в трёх возможных вариантах:
- Pretty — понятная структура ответа с окрашенными символами и, в ряде случаев, отступами для удобства.
- Raw — то же самое, но без цветов, отступов и разбития на строки.
- Preview — показывает предварительный просмотр отправленной страницы.
Вот и всё, ничего сложного.
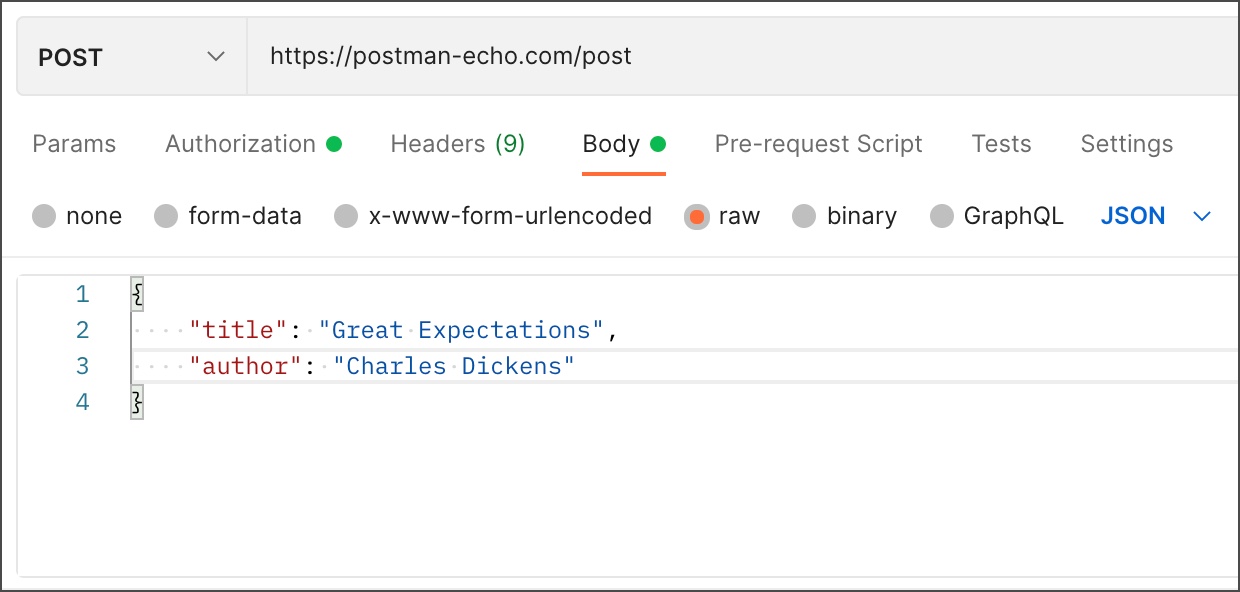
Построение POST-запроса в Postman API Platform
Итак, данный метод используется, когда нужно отправить на сервер дополнительную информацию внутри тела запроса. Как правило, когда мы отправляем запрос POST, мы ожидаем каких-либо изменений на сервере, таких как обновление, удаление или вставка.
Одним из лучших примеров использования POST-запроса является вход на сайт. При регистрации вы отправляете на сервер свою личную информацию, такую как пароль. Сервер создает новую учетную запись с той же информацией, что и у вашей учетной записи.
Запрос POST является основным методом, и этот метод в основном используется, когда пользователь хочет отправить на сервер конфиденциальные данные.
Важные моменты POST-запроса:
- Запросы POST не будут принимать файлы cookie.
- POST-запросы не добавляются в закладки и не отпечатываются в истории браузера.
- В запросах POST нет ограничений на длину данных.
В Postman каждая конечная точка REST API связана со своим HTTP-запросом. Когда конечная точка указывает, что ее следует вызывать с помощью HTTP-запроса POST, то для вызова конечной точки требуется только HTTP-запрос POST.
Вкладка Body в Postman позволяет указать данные, которые необходимо отправить с запросом. Вы можете отправлять различные типы данных тела в соответствии с вашим API.
Если вы отправляете данные тела, убедитесь, что выбраны правильные заголовки, чтобы указать тип контента, который может потребоваться вашему API для правильной обработки полученных данных.
- Для типов данных формы и URLencoded body Postman автоматически прикрепит правильный заголовок.
- Если вы используете raw для данных body, Postman установит заголовок на основе выбранного вами типа (например, текст или json).
- Если вы вручную выберете заголовок типа, он будет иметь приоритет над тем, что устанавливает Postman.
- Postman не устанавливает тип заголовка для типа binary.
- По умолчанию будет выбран тип none.
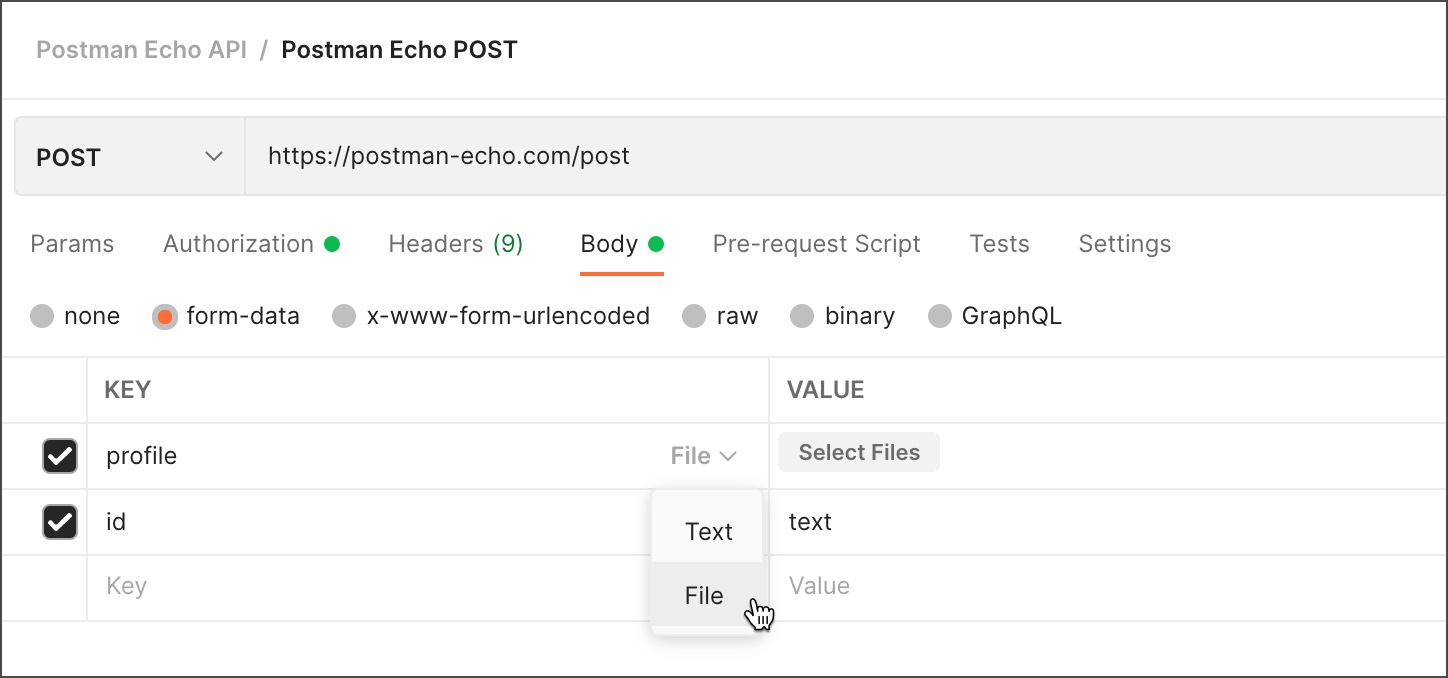
Form-data
Формы веб-сайтов часто отправляют данные в API как multipart/form-data. Вы можете воспроизвести это в Postman, используя вкладку Form-data Body. Данные формы позволяют отправлять пары ключ-значение и указывать тип содержимого.
URL-encoded
Данные в URL-encoded используют ту же кодировку, что и параметры URL. Если для вашего API требуются данные в кодировке URL, выберите x-www-form-urlencoded на вкладке Body вашего запроса. Введите пары ключ-значение для отправки вместе с запросом, и Postman закодирует их перед отправкой.
Raw
Используйте raw-данные для отправки всего, что вы можете ввести в виде текста. Используйте вкладку raw и раскрывающийся список типов, чтобы указать формат, например: текст, JavaScript, JSON, HTML или XML. Таким образом Postman включит подсветку синтаксиса, а также добавит соответствующие заголовки к вашему запросу.
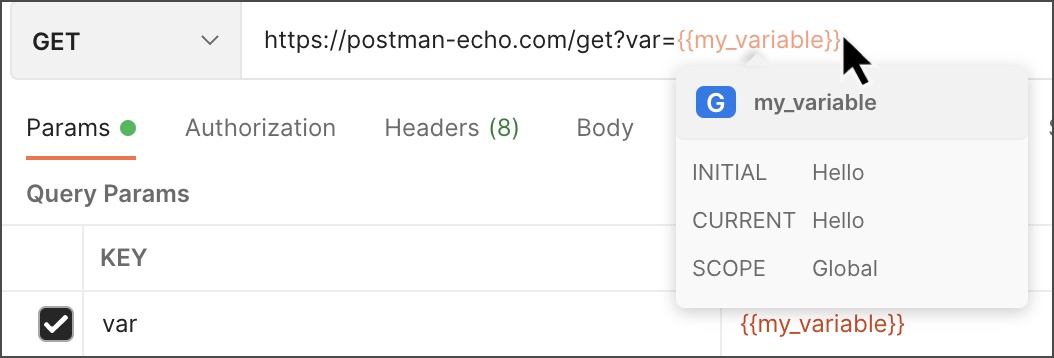
Используйте переменные в данных своего тела, и Postman будет заполнять их текущие значения при отправке вашего запроса.
Для удобства в raw JSON вы можете добавить комментарии: они будут удалены при отправке запроса. Однострочные комментарии с // и многострочные комментарии с /* */ не будут учтены в запросе.
Binary
Кажется, здесь всё понятно, но проговорим ещё раз. Вы можете использовать тип binary для отправки информации, которую нельзя ввести вручную в редакторе Postman вместе с телом запроса, например изображения, аудио- и видеофайлы. Вы также можете отправлять таким образом и текстовые файлы.
GraphQL
Вы можете отправлять запросы GraphQL, выбрав соответствующую вкладку. Введите свой код в области запросов и любые переменные в разделе GraphQL Variables.

Более подробно о работе с GraphQL в Postman вы можете ознакомиться здесь.
Работа с переменными в Postman
Не стоит забывать и о том, что в инструменте предусмотрены специальные переменные. Что это такое?
Переменная в Postman — это символическое представление данных, которое позволяет получить доступ к значению без необходимости вводить его вручную, где бы оно вам ни понадобилось. Это крайне полезно в тех случаях, когда вы используете одни и те же значения в нескольких местах. Переменные делают запросы более гибкими и читабельными, абстрагируя детали.
Предположим, у вас есть один и тот же URL-адрес в нескольких запросах, но URL-адрес может измениться позже. Чтобы не менять его руками во всех запросах, можно сохранить URL-адрес в переменной base_url и ссылаться на него в своих запросах, используя конструкцию {{base_url}}. Если URL-адрес изменится, вы можете изменить значение переменной, и оно будет отражено во всей вашей коллекции, где бы вы ни использовали имя переменной.
При этом рандомных переменных в Postman много. Если при написании кода начать вводить парные фигурные скобки, Postman сам подскажет, какие из них доступны.
Максимально подробно о переменных в документации к Postman API Platform.
Заключение
Если хотите узнать больше о других методах запросов, таких как POST, PUT, DELETE, обязательно прочитайте эту статью: она доступно ответит на все ваши вопросы.
А для желающих самостоятельно построить API, у нас также есть полезный материал:
Остались вопросы? Смело задавайте их в комментариях к данной статье.
Provide feedback
Saved searches
Use saved searches to filter your results more quickly
Sign up
Postman, a well-known name in the API development track enables you to easily create and test APIs. This user-friendly interface improves your workflow allowing you to send queries, review results, and easily manage API collections.
If you are using a Windows 10 machine and want to know how to install Postman in Windows then this comprehensive article will show you to easily install and configure it.
Understanding Postman
Postman provides numerous benefits for Windows 10 users making it an essential tool for anyone dealing with application programming interface development. Here’s a look at what it brings to the list:
- Postman provides a user-friendly interface for building and testing APIs. You can construct requests, add headers and parameters, and visualize responses in a clear organized manner.
- Postman supports teamwork by enabling you to share API collections with colleagues. This streamlines collaboration and ensures everyone is on the same page regarding API functionality.
- Postman boasts a comprehensive suite of testing tools. You can send various HTTP requests (GET, POST, PUT, etc) set up pre-request scripts, and assert responses, allowing for thorough API validation.
- By centralizing your API interactions within Postman you can significantly boost your productivity. Gone are the days of juggling multiple tools and manual testing procedures.
Downloading Postman
Downloading the Postman version that is compatible with your Windows 10 system is essential before starting the installation process. This is how you do it:
1. To download Postman for Windows navigate to the official Postman download page using a web browser.
2. On the download page, you’ll find options for various operating systems. Since you’re on Windows 10, select the Windows download button.
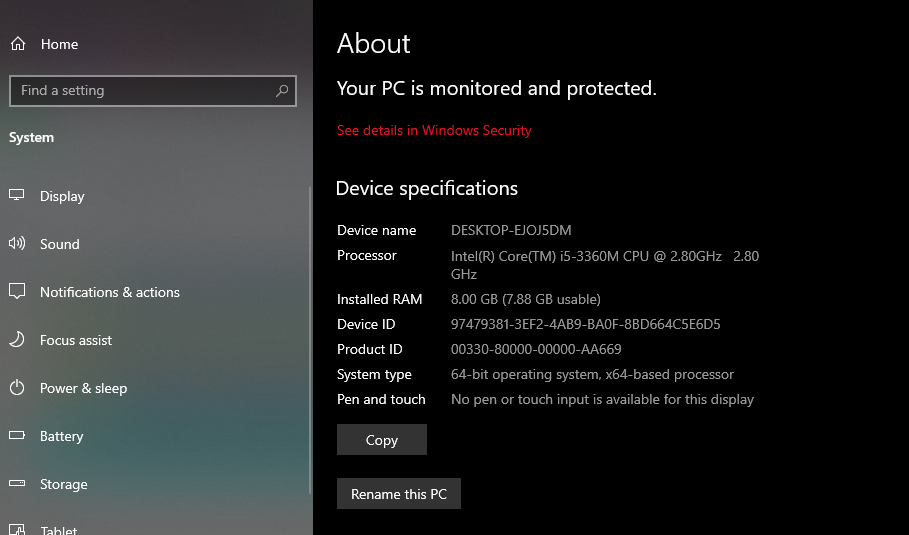
3. In most cases, you will want to download the Windows 64-bit version. However, if you are unsure about your system architecture, here’s a quick way to check:
Navigate to “This PC” properties it shows the “Device Specification” where you can find the x64-based processor option which means the operating system is based on 64-bit architecture.
Once you have chosen the appropriate version click the download button. The Postman Windows install should begin automatically.
Installing Postman
With the downloaded installer file it’s time to install latest Postman on Windows 10 machine. Follow these steps described below:
1. Navigate to your Downloads folder or wherever your browser downloaded the file. The installer file will typically have a name like Postman-win64.exe depending on your downloaded version.
2. Double-click on the downloaded installer file. This will initiate the Postman installation wizard.
3. The installation process will commence. Depending on your system’s specifications, it might take a few minutes to complete.
4. Once the installation is finished you will be presented with the option to launch Postman immediately.
Install Postman on Our Windows 10 VPS!
With Ultahost, Hosting Windows VPS has never been easier or faster. Enjoy ultra-fast SSD NVME speeds with no dropouts and slowdowns.
Configuring Postman
With Postman successfully installed you are just a few steps away from exploring its functionalities. Here’s a quick guide to configuring Postman for optimal use:
1. Upon launching Postman for the first time you will be presented with a welcome screen. This screen provides a brief overview of Postman’s core features and functionalities.
2. Postman offers both free and paid plans. While a free account grants you access to the most essential features, creating a free account unlocks additional benefits like collection history, team collaboration features, and enhanced security options.
3. Postman’s interface is designed for ease of use. Here’s a quick overview of the Postman features:
- Workspaces: This section on the left-hand side of the screen allows you to organize your API collections and environments.
- Collections: Collections serve as containers for grouping related API requests. You can create new collections, import existing ones, and organize them for better manageability.
- Requests: Within a collection, you will define individual API requests. Each request specifies the HTTP method GET, POST, and URL, headers, body if applicable, and more.
- Builder: This central workspace is where you construct your API requests. You can specify the request method, URL, headers, and body parameters.
- History: The history panel keeps track of your recently sent requests and responses, allowing you to revisit them for reference.
4. If you have existing API collections in another format, you can import them into Postman for seamless integration. Postman supports various collection formats, including OpenAPI Swagger and JSON.
5. Environments enable you to manage different API deployment environments for example development, staging, and production. You can define environment variables that store base URLs, API keys, or other environment-specific details. This allows you to easily switch between environments without manually modifying request details.
Conclusion
Postman simplifies and streamlines your process, especially for API developers. Postman makes it simple to create and maintain APIs with its accessible interface, strong testing features, and collaborative possibilities.
Postman on Windows is a handy tool for basic API testing and comes with features for complex scenarios or managing multiple environments. Upgrading to an Ultahost VPS hosting plan empowers you to elevate your API testing experience. These VPS plans come pre-configured with a full desktop environment allowing you to leverage the power of Postman extensions.
FAQ
What is Postman?
Postman is a tool for API development and testing.
How do I download Postman on Windows 10?
Go to the Postman website and click the “Download” button for Windows.
How do I install Postman after downloading?
Open the downloaded file and follow the installation steps on the screen.
Is Postman free to use?
Yes, Postman offers a free version with basic features.
Do I need an account to use Postman?
No, you can use Postman without an account but creating one gives you access to more features.
Installing Postman on Windows and Mac
Postman is a popular tool used for API development and testing. If you are a beginner looking to install Postman on your Windows computer or Mac, following these instructions will allow you to install Postman and get started quickly. Let us begin!
Table of contents
- Installation on Windows
- Installation on Mac
- Common errors
- Conclusion
Installing Postman on Windows
- Visit the Postman Website in your preferred web browser and navigate to the official Postman website.

- Click the Windows button to download from that page.

- Now click the Windows 64-bit button (or whatever matches your system configuration).

- The Postman file will start downloading automatically. Wait for the download to complete.
- Locate the downloaded file, usually located in the Downloads folder. Double-click on the installer file to run it.
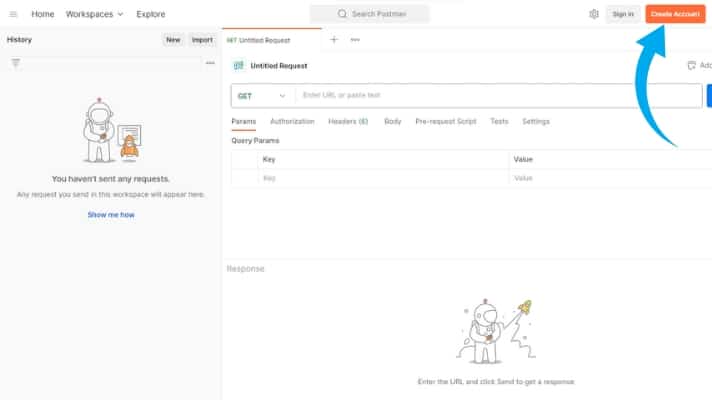
- After installing the program, the software opens automatically. Now, you can see the interface of the software. If you are a new user, click the Create an Account button and follow the instructions to sign up. If you already have an account, click the Log In button and enter your credentials.
- After that, you will be redirected to the Postman application, and an icon will be created on the desktop.
Congratulations! You have successfully installed Postman on your Windows computer. You can now use Postman to simplify your API development and testing tasks. Take some time to explore Postman’s various features and functionalities, and do not hesitate to refer to the official documentation and tutorials to enhance your learning experience.
Installing Postman on Mac
Step 1: Downloading Postman
- Open your preferred web browser and navigate to the official Postman website.
- Once on the website, locate the Download button marked below.

- Click on it. Then, you must select the appropriate download button depending on your chip configuration. If you have a Mac Apple chip, click on Mac Apple chip, and if you have a Mac Intel chip, you can click on Mac Intel chip.

Step 2: Installing Postman
- Once the download is complete, navigate to your Downloads folder and find the downloaded file, usually named Postman.app.zip
- Double-click on the downloaded file to extract its contents. That will create a new folder named Postman
- Open the Postman folder and locate the Postman.app application file
- To install Postman, drag and drop the Postman.app file into your Applications folder.

Step 3: Launching Postman
- Open the Applications folder on your Mac.
- Scroll through the list of applications until you find Postman
- Double-click on the Postman icon to launch the application.
Step 4: Setting up Postman
- After launching Postman, you will be prompted to sign in or create a new account. If you already have a Postman account, enter your credentials to sign in. Otherwise, click the Create Account button and follow the on-screen instructions to set up a new account.
- The Postman interface will be displayed once signed in or after creating a new account.

Congratulations! You have successfully installed Postman on your Mac and are ready to explore its functionalities.
Common errors while installing Postman on Windows or Mac
Download errors
- Slow or interrupted internet connection can cause incomplete downloads of the Postman installation file. Ensure you have a stable internet connection.
- Antivirus software or firewall settings may block the download or installation process. Temporarily disable them or add an exception for Postman.
Compatibility issues
- Older versions of Windows or Mac operating systems may not be compatible with the latest version of Postman. Ensure your system meets the minimum requirements for Postman.
- Incompatibility with 32-bit operating systems. Postman requires a 64-bit operating system to function correctly.
Extraction errors (Windows)
- Error messages related to the extraction process can occur if the downloaded ZIP file corrupts. Re-download the Postman installation file and attempt the extraction again.
Permission errors (Mac)
- Postman can’t be opened because Apple cannot check it for malicious software: This error typically occurs on macOS when trying to open an application that hasn’t been notarized by Apple. Notarization is a process where Apple checks the software for malicious content and approves it for use on macOS.
Follow these steps to resolve this issue:
1. Control-click (or right-click) on the “Postman” application icon: Locate the “Postman” application in your Applications folder or wherever you have it saved. Hold down the Control key and click on the application icon, then choose “Open” from the context menu.
2. Confirm the Opening: A dialog box will appear, warning you that the application is from an unidentified developer because it hasn’t been notarized. Click “Open” to proceed and launch the application.
3. Add to Security & Privacy Preferences: After you open the application, go to System Preferences > Security & Privacy. In the “General” tab, you may see a message saying, “Postman was blocked from use…” with an “Open Anyway” button. Click “Open Anyway” to add Postman to your approved application list.
4. Authenticate: You might need to authenticate using your administrator credentials to confirm this action. - Postman can’t be opened because it is from an unidentified developer: This error occurs due to security settings preventing the installation of applications from unidentified developers. To bypass this, right-click on the Postman.app file, select Open and confirm the action in the prompt.
- Postman.app can’t be opened because it was not downloaded from the App Store: This error can occur when the Gatekeeper security feature only allows applications downloaded from the App Store. Follow the same steps as above to open the application.
Installation errors
- Insufficient disk space can prevent the installation process from completing. Ensure you have the required free space on your computer or laptop.
- Lack of administrative privileges may cause installation errors on Windows. Ensure you have administrative rights or contact your system administrator.
Antivirus false positives
- Some antivirus software may mistakenly flag the Postman installation file as malicious. Temporarily turn off the antivirus or add an exception for Postman to proceed with the installation.
Final thoughts on installing Postman on Windows and Mac
By following this installation guide, you can easily install the latest version of Postman on your Mac and Windows. Postman’s user-friendly interface makes it a valuable tool for developers and testers and helps them efficiently design, test, and document APIs. Start utilizing Postman’s features and enjoy seamless API development on your Mac. Happy coding!
This post is part of our comprehensive Postman Mini-Course.
Follow our blog
Be the first to know when we publish new content.
- Author
- Recent Posts
Ashutosh has 4 years of experience in software testing. He has performed different types of testing such as load, API, and database as well as knows a wide range of testing tools. He has a bachelor’s degree in Electronics and Telecommunication Engineering.
Throughout his entire life, he always wanted to help others and now he’s helping a large number of groups by sharing knowledge through his writings.
Postman is a popular tool to test and develop API that simplifies sending requests, inspecting responses, and automating workflows. It is popularly used by developers, testers, and DevOps engineers to interact with APIs. Postman offers support for REST, GraphQL, SOAP, and other protocols, making it a versatile tool for API development and debugging.
Prerequisites for Installing Postman
Before you install Postman on your system, ensure that your environment meets the following requirements.
- System Requirements
- Operating System: Windows, macOS, or Linux (Debian-based, RPM-based, or Arch-based)
- Memory: At least 4GB RAM (8GB recommended for smooth performance)
- Storage: 200MB of free disk space
- Network: Active internet connection for installation and updates
- Installing Dependencies (For Linux Users)
- Ubuntu/Debian: Ensure snapd is installed for Snap package installation.
sudo apt update && sudo apt install snapd - Arch Linux: Ensure yay or pacman is set up for AUR installations.
Installing Postman on Linux
You can install Postman on Linux using multiple different methods, depending on your distribution and preference. Here are the step-by-step installation methods:
- Install Postman via Snap (Recommended for Ubuntu & Debian-based Distros)
Snap provides an easy way to install Postman with automatic updates.
- Ensure snapd is installed, using these commands:
sudo apt update && sudo apt install snapd
snap install postman
Tech Delivered to Your Inbox!
Get exclusive access to all things tech-savvy, and be the first to receive
the latest updates directly in your inbox.

- Install Postman by running the following command:
sudo snap install postman
- Verify the installation
snap list | grep postman

- Lastly, run Postman by:
postman
- Install Postman via APT (For Debian/Ubuntu without Snap)
If you prefer manual installation for Postman, use APT:
- Download the latest Postman tarball:
wget https://dl.pstmn.io/download/latest/linux64 -O postman.tar.gz
- Extract the file
sudo tar -xvf postman.tar.gz -C /opt/
- Create a symbolic link
sudo ln -s /opt/Postman/Postman /usr/local/bin/postman
- Run Postman
postman
- Install Postman via Flatpak (Alternative for Fedora, openSUSE, and Others)
Flatpak provides a universal method to install Postman on various distributions.
- Install Flatpak (if not already installed)
sudo dnf install flatpak
Enhance Your CyerPanel Experience Today!
Discover a world of enhanced features and show your support for our ongoing development with CyberPanel add-ons. Elevate your experience today!

- Add the Flathub repository
flatpak remote-add –if-not-exists flathub https://flathub.org/repo/flathub.flatpakrepo
- Install Postman
flatpak install flathub com.getpostman.Postman
- Run Postman
flatpak run com.getpostman.Postman
- Installing Postman Manually (Tar.gz) for Any Linux Distro
Lastly, you can install Postman using Tar.gz for any Linux Distro.
- Download the latest Postman package
wget https://dl.pstmn.io/download/latest/linux64 -O postman.tar.gz
- Extract it to /opt/
sudo tar -xvf postman.tar.gz -C /opt/
- Create a symlink for easier execution
sudo ln -s /opt/Postman/Postman /usr/local/bin/postman
- Run Postman
postman
Installing Postman on Windows
You can install Postman on Windows using the official installer, which provides a simple setup process. Following the steps below to install Postman on Windows.
- Downloading Postman for Windows
Visit the official Postman website, click on the Windows (64-bit) download option, and .exe installer will start downloading.
- Installing Postman Using the Installer
Locate the downloaded Postman-win64.exe file, double-click on the installer to start installation, and wait for it to start automatically. Once the installation is complete, Postman will launch itself.
- Verifying the Installation
Open Postman from the start menu or by searching for “Postman” in the Windows search bar. If Postman launches successfully, the installation is complete.
Installing Postman on macOS
To install Postman on macOS, you can either use Homebrew or manually download the application.
- Install Postman Using Homebrew (Recommended)
Homebrew is a package manager that simplifies the installation by ensuring automatic updates for Postman.
- Open the Terminal and run the following command to install Postman:
brew install –cask postman
- Once the package is installed, you can launch Postman from the Launchpad or by running.
open /Applications/Postman.app
- Download and Install Postman Manually
If you prefer to manually download, use the following steps:
- From the official Postman website, select the macOS version.
- Download the download .zip file, it will extract Postman.app.
- Drag and drop Postman.app into the /Applications folder.
- Open Postman from the Launchpad or the applications folder.
- Verifying the Installation
Open Postman from the Launchpad or run using this command:
open /Applications/Postman.app
Uninstalling Postman
If you are no longer using Postman, you can uninstall it from your system with different methods based on your operating system.
- Uninstalling Postman on Linux
Here is how you can uninstall Postman on the Linux system.
- Using Snap (For Ubuntu & Debian-based Systems)
sudo snap remove postman
- Using Flatpak (For Fedora & Other Flatpak Users)
flatpak uninstall com.getpostman.Postman
- Manual Uninstallation (Tar.gz Installation)
Remove the Postman directory, using the command:
sudo rm -rf /opt/Postman
- Delete the symlink (if created)
sudo rm /usr/local/bin/postman
- Uninstalling Postman on Windows
From the control panel, visit programs & features, find Postman, and click on uninstall. From the command prompt, run the command:
wmic product where name=”Postman” call uninstall
- Uninstalling Postman on macOS
Using Homebrew, run the command:
brew uninstall –cask postman
To remove manually, open the applications folder, and drag Postman.app to the trash. Later, remove the configuration files:
rm -rf ~/Library/Application\ Support/Postman
Troubleshooting Postman Installation Issues
| Issue | Possible Cause | Solution |
| Postman not launching | Corrupt installation or missing dependencies | Reinstall Postman and ensure dependencies are met |
| Snap/Flatpak installation fails | ‘/ | Install or update Snap/Flatpak (sudo apt install snapd or sudo dnf install flatpak) |
| Command not found (Linux) | Postman is not in the system’s PATH | Add Postman to PATH manually (export PATH=$PATH:/opt/Postman) |
| Permission denied (Linux/macOS) | Postman installed without proper permissions | Run Postman with sudo or change permissions (chmod +x /opt/Postman/Postman) |
| Windows installer stuck | Antivirus blocking installation | Temporarily disable antivirus and retry |
| Homebrew installation fails (macOS) | Homebrew is outdated or misconfigured | Run brew update before installing Postman |
| Postman crashes on launch | Corrupt cache or configuration files | Delete cache: rm -rf ~/.config/Postman (Linux/macOS) or %AppData%\Postman (Windows) |
| Postman version outdated | Old version installed manually | Download the latest version from Postman’s website |
Wrapping Up
You can easily install Postman on Linux, macOS, and Windows easily using these simple steps and package managers. Alternatively, you can opt for manual downloads. This troubleshooting cheat sheet will also help you solve any issues by yourself.
Frequently Asked Questions
1. What is Postman used for?
Postman is an API development and testing tool that allows users to send requests, automate workflows, and collaborate on API projects.
2. Why is Postman not launching after installation?
This could be due to corrupt installation files or missing dependencies. Try reinstalling Postman or deleting its cache and configuration files.
3. Can I update Postman automatically?
Yes, if you installed Postman via Snap (Linux), Homebrew (macOS), or the Windows installer, it updates automatically.