
Hi all. So you tried Pop OS! 20.04 (https://bln364.com/how-to-try-system-76s-pop-os-on-windows-10-laptop/) and now you want to install Pop OS! alongside Windows 10. This will show you how to dual boot Pop OS! and Windows 10.
Short overview:
- Download Pop!_OS 20.04
- Create Bootable USB stick
- Shrink Windows 10 partition
- Create Pop OS! partition
- Install Pop OS!
- Configure GRUB
And I must add. Please be careful with this process. Formatting the wrong partition can cause you to lose all your data. Please be careful, back up your data and do next steps on your own risk.
If you are maybe not ready to install Linux on you hard drive maybe you can try Linux inside Virtual Machine. If you are interested in something like that please check out my first online Udemy Course Virtualization with VirtualBox.

Also check out my other post on how easy it is to dual boot Ubuntu and Windows 10 in 2022 in next post https://blnlabs.com/dual-boot-ubuntu-and-windows-10-in-2022/
What is Dual Boot?
So, what is Dual boot Pop OS? What is good to know before we start. When we say dual boot we are saying that on our PC and/or laptop there are two Operating Systems installed. It can be Windows and Linux, Linux and Linux, Windows and Mac in some cases, and so on. Basically If you can install an OS on your machine, you can dual boot it with Another OS that can run on your machine.
To get more detailed with this we need to know a bit about the boot process, and how does our PC know to start our OS.
Check out my other post about the best 14-inch laptop with dual NVMe SSDs at link.
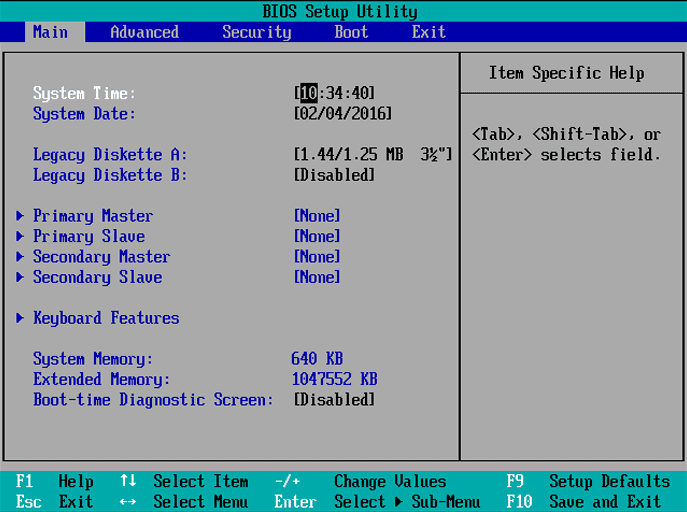
At the beginning PC doesn’t know anything about its hard drives, and the first thing is to perform something that is called Power On Self-Test or POST. Now, the firmware searches somewhere to find the entry point for your OS and that information can be found in Master Boot Record MBR for Legacy Boot or in GUID Partition Table (GPT) for UEFI boot. This is a bit too technical but don’t worry you only need to know that there is info where your OS is stored, and PC but need to have this info in order to boot your PC.
In these two places firmware will find the location of your installed OS and then give control to your OS.
But then how are we dual booting and as always there are a couple of ways (freedom :)).
If you are adding the second drive to your PC for the second OS, you can simply do the next thing. Power of your PC and unplug your first drive and then plug in the second drive and install a second OS on that drive. After install, simply plug back the first drive and you are done. Now, at the boot up of your PC you need to go inside the UEFI or BIOS and just choose the drive to boot from. This is not the optimal way, but if you don’t switch between the OSes frequently, maybe this solution can make your life easier because you don’t have to modify or change MBR or GPT.
The other way is to use GRUB, which is done in this post. Just to say there are a lot of ways to do dual boot, but in this post I will cover just those two. What is GRUB?
“GNU GRUB is a Multiboot boot loader. It was derived from GRUB, the GRand Unified Bootloader, which was originally designed and implemented by Erich Stefan Boleyn. Briefly, a boot loader is the first software program that runs when a computer starts. It is responsible for loading and transferring control to the operating system.” by WiKi.
So we can install GRUB in part of our hard drive and then point MBR or GPT to it. That instead of our OS grub will control, create GUI for us, scan drives for installed OSes and then give us a choice which OS we want to use. Below you can see a couple of GRUB examples that are themed by Linux distros Ubuntu and Manjaro.

The Grub way (or with programs like GRUB) is the only way if you are dual booting on the one hard drive. If you have only a hard drive you will need to install your second OS to separate the partition that your first OS and then install GRUB. In a lot of Linux distributions Grub is installed by default, but for some reason GRUB is not installed with Pop!_OS from the box. So, don’t worry if you don’t see windows after you installed Pop!_OS, maybe you just need to install GRUB in order to Dual boot Pop OS.
Intro to Pop!_OS
Pop!_Os is Linux distribution create and maintained by System76 and it’s based on other Linux distro Ubuntu. It’s very good for beginners because it’s easy to setup and start using it.
Download Pop!_OS 20.04
In order to download Pop!_Os go to system76 site and select download https://pop.system76.com/.

Now, we have couple of options in order to download Pop!_Os. There are two versions for Pop!_Os, normal release and something that is called LTS (Long Term Support). This follows the release cycle of Ubuntu, that is show below.

Basically, there should be new release of OS every 6 months, but every 2 years there is major release that is called LTS and that version will get much longer official support then normal release. Advantage for normal release is, if it’s after roiling release, that it might sooner have support for new hardware and/or some new feature, but because that it can be a bit unstable. If you are downloading Pop!_Os for the first time and trying Linux for the first time, maybe stick with LTS version at first.

When we have LTS selected now we can download Pop!_Os with NVidia or open source drivers. What this means. If you have NVidia graphics card download Pop!_Os LTS (NVIDIA) and this will download OS with NVidia drivers preinstalled. If you have AMD or Inter integrated graphics download Pop!_Os LTS.
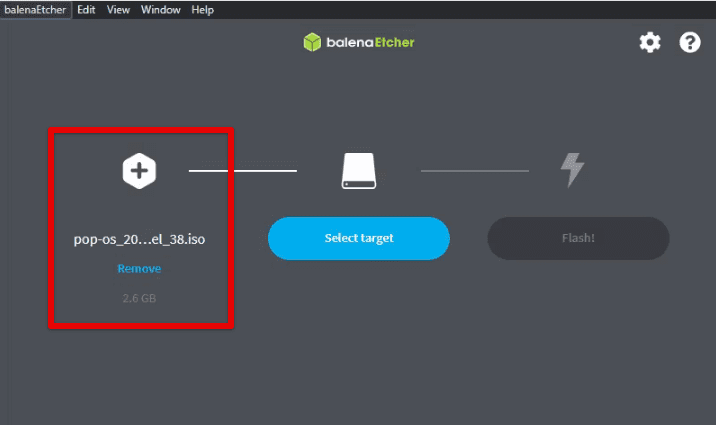
Now, we have .ISO file with our OS. We need to create bootable USB or CD/DVD form our .ISO file and for that there is good program called balenaEtcher.
Create Bootable USB stick (Live USB)
In this post I will create bootable USB flash drive (Live USB) using balenaEtcher, but first go to https://www.balena.io/etcher/, download and install balena.

In order to create Live USB with Pop!_Os (on Windows) we need:
- Installed BalenaEtcher (done)
- Downloaded Pop!_OS ISO file (done)
- USB flash drive with at least 8GB
Insert USB stick into your PC and start balenaEtcher. Again, be careful. Back up your data from USB flash drive before this. USB Drive will be formatted for new OS and your current data will be gone.
Select Pop!_Os ISO file in section Flash from file and your USB flash drive at Select Drive section. Then press Flash.

Shrink Windows 10 partition
Now, you have a bootable USB stick, and you need to boot from it. If you have a problem with booting from USB stick check out my blog for solution (https://bln364.com/how-to-try-system-76s-pop-os-on-windows-10-laptop/).


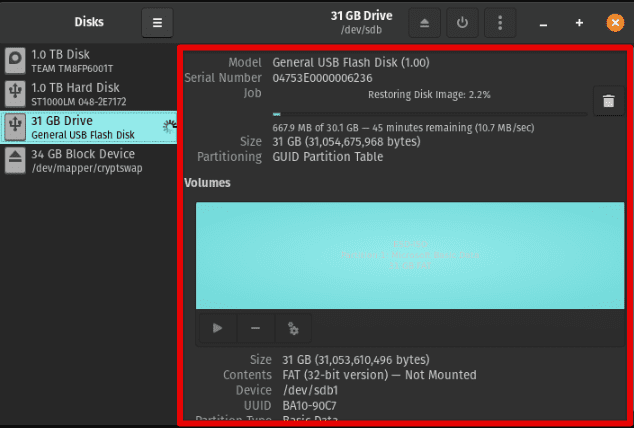
On windows shown above we select do we want to continue with Demo Mode, or do we want to install Pop OS! 20.04 on your hard disk. I’m using for this example 120GB internal SSD disk (Kingston 120GB A400). If we want to install Pop OS! on your hard disk in this case select Custom (Advanced) install and you will get next window.

Currently, we have only Windows 10 installed on our hard disk, so we have only two partitions, Windows Recovery and the main Windows NTFS partition. Next thing to do is to shrink our existing partition and create space for Linux partitions. Two do that we need to press Modify Partitions…
This will open Gparted Linux partition tool that will look something like this. In the top right corner important thing is to set your hard disk. In this example, I have selected /dev/sda.

When we have selected the right hard disk, we need to unmount our partitions. This will allow us to change existing partitions.

Then we need to resize our existing partition. Let us use half a space for Windows and half for Linux.


Create Pop OS! partition
Now, we can create 3 partitions for Pop OS!, and that are root, boot, and swap. We can do that in the next way.


For this blog, I’m installing Pop OS! on a very old HP Compaq nc6400 laptop, so I’m setting the size of my /swap partition to 2GB, and 512MB for /boot. Everything else will be /root partition.
After creating and formatting new 3 partitions, click Apply All Operations and when all is done close Gparted. Now you should see updated hard disk preview with new partitions like on the image below.

Now we need to use Pop OS! installer to define which partition will be allocated for Pop OS!.


Install Pop OS!
Now we can you press Erase and Install and wait for Pop OS! to be installed.


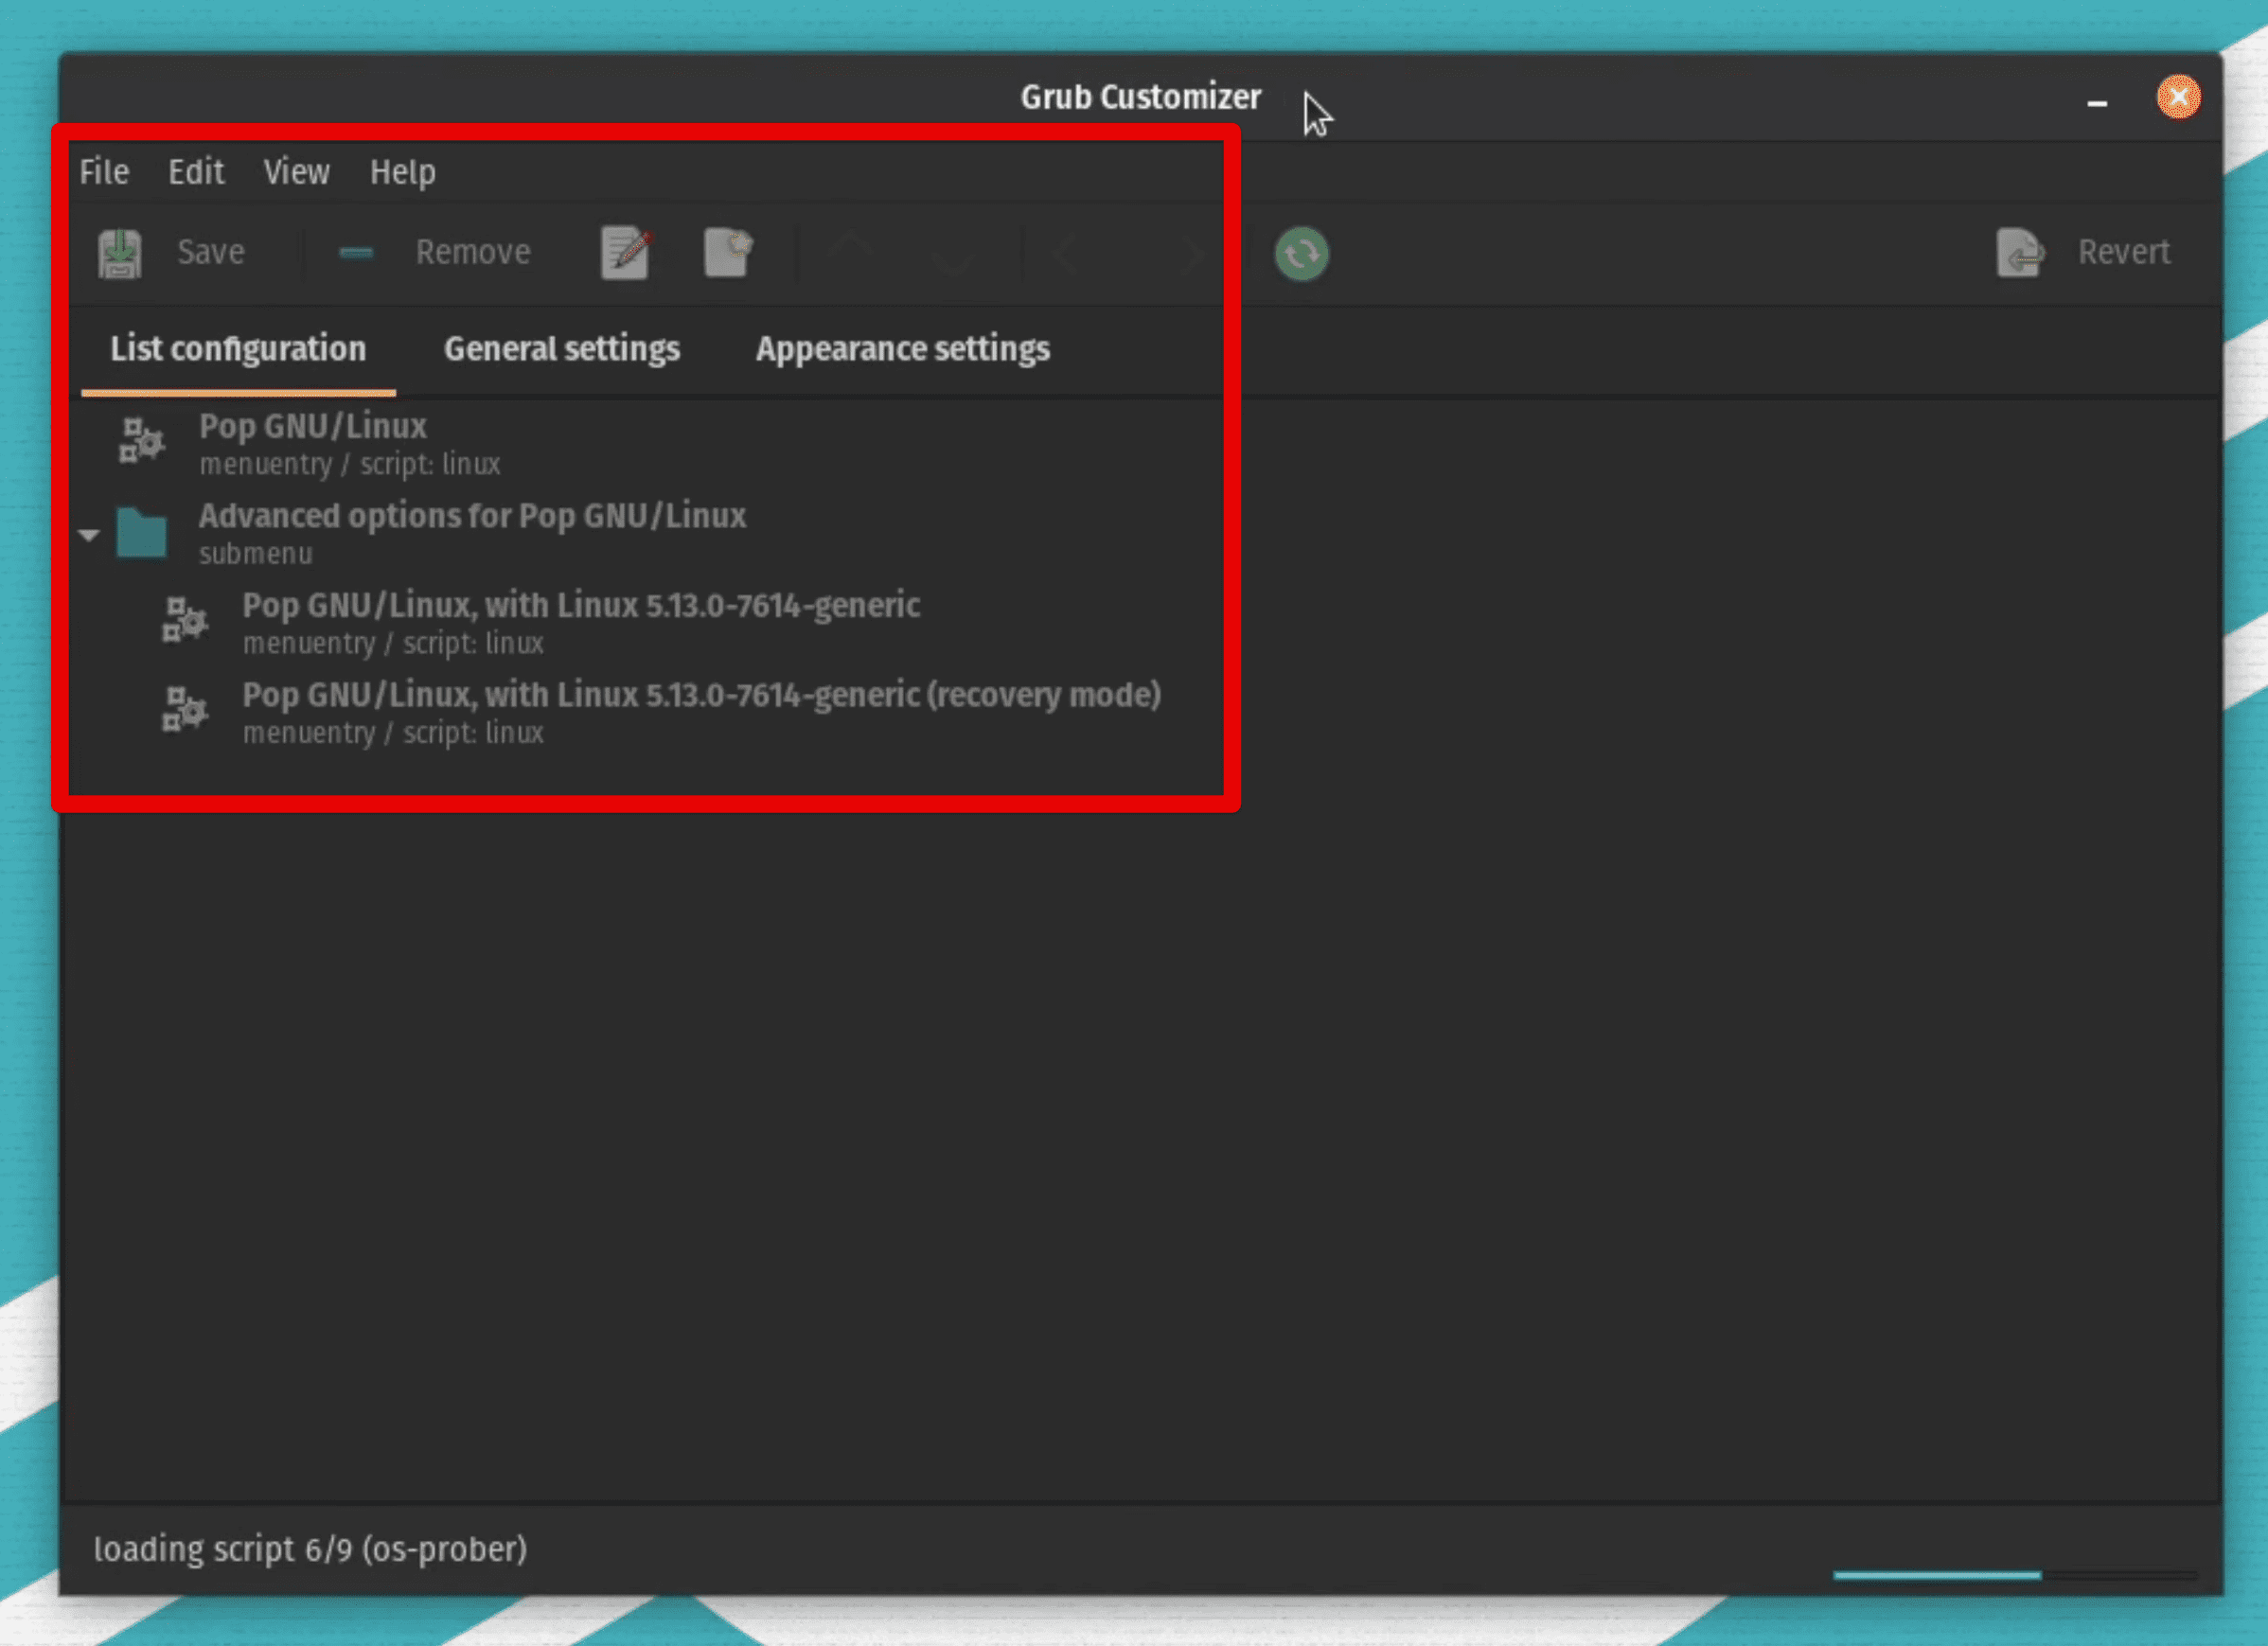
Configure GRUB
And we have Pop OS! installed beside our Windows 10. We can simply reboot and remove USB stick for PC and enjoy in two compliantly different Operating systems.
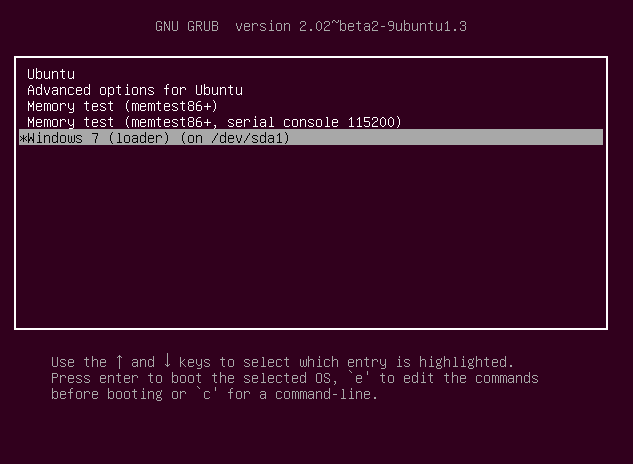
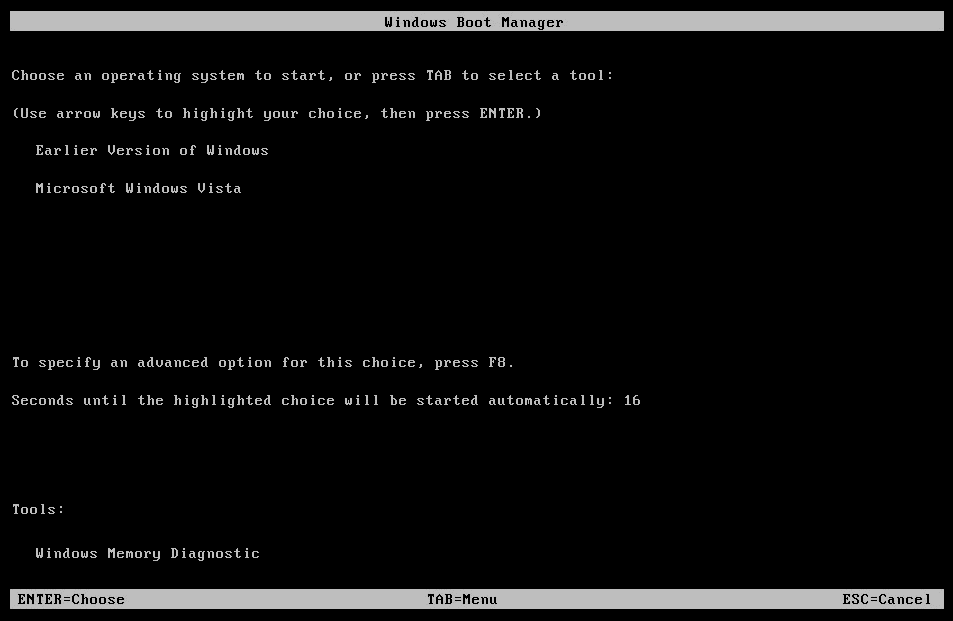
Now laptop boots directly to Pop OS!. This was very strange for me, because, usually, on other Linux distributions GRUB (Linux boot loader) will be automatically setup when installing and after powering on you will be greeted with something like this:

In this case, GRUB was nowhere to be seen so we can not say that we have Dual boot Pop OS! and Windows 10 system? We went straight to Pop OS!. Windows 10 is still installed but we need to configure GRUB to know where to find Pop OS! and where to find Windows 10.
To update and setup GRUB lets first update the hole system. That can be done with two simple commands from terminal:
sudo apt update
sudo apt upgrade
Now we need to install one packet, os-prober with:
sudo apt install os-prober
We need this packet because without it GRUB will not be able to find Windows 10 partition.
Result from running the os-prober should be something like this:
/dev/sda1:Windows 10:Windows:chain
Finally we can run:
to update and activate GRUB on Pop OS!.
And this is it. Now after powering on you will be greeted with GRUB screen in which you can select Pop OS! or Windows 10.

Final words
This was a fun project for me and it brings life in my old laptop. Pop OS! 20.04 isn’t maybe the best option for low-end hardware, or there are maybe better Linux Distribution for low-end hardware, but said that it runs better than Windows 10.
Process of installing Pop OS! alongside Windows 10 went pretty much smooth, if we don’t count GRUB part, what was very strange for me.
Let finish. Did you find something missing in this tutorial? How do you like Pop OS!? Did you manage to Dual boot Pop OS!? Please comment down below and check out my other post at https://bln364.com/
Check out my other Pop OS 20.04 related posts:

Configuring a dual boot system with Pop!_OS and Windows offers the flexibility to enjoy the best of both worlds. Whether you want to harness the power and versatility of Linux or rely on the familiarity of Windows for specific tasks, a dual boot setup allows you to switch between operating systems on a single machine seamlessly. This detailed guide will walk you through setting up a dual boot configuration with Pop!_OS, a popular Linux distribution, and Windows, the ubiquitous operating system.
Configuring a dual boot
This article will delve into the intricacies of dual booting, exploring the necessary steps to ensure a smooth and successful setup.
Configuring a dual boot with Pop!_OS and Windows
We will cover the installation procedures for both Pop!_OS and Windows and the configuration of a dual boot manager to switch between the two systems seamlessly. Additionally, we will discuss various optimization techniques, file-sharing methods, and maintenance practices to enhance the overall dual boot experience. If you are setting up a dual-boot system or installing Windows on another machine, you might need to create a bootable Windows USB stick using a Linux system. Learn how to do so in this detailed guide.
Preparing for dual boot
Dual booting allows you to have two or more operating systems installed on your computer, allowing you to choose between them when you start your machine. This concept is beneficial when you want to leverage the strengths of different operating systems for various tasks. By configuring a dual boot system with Pop!_OS and Windows, you can harness the power and versatility of Linux while still retaining the familiarity and compatibility of Windows. However, before diving into the installation process, it is crucial to prepare for dual booting adequately.
Dual booting and its benefits: Dual booting provides several benefits to users. It allows you to have multiple operating systems on a single machine, enabling you to access different software, tools, and applications based on your needs. For example, you can utilize Pop!_OS for development, programming, or system customization while relying on Windows for gaming, specific software, or compatibility with certain hardware devices. Dual booting offers the best of both worlds, providing a versatile computing environment.
Dual booting and its benefits
System requirements: Before proceeding with the dual boot configuration, ensuring that your system meets the necessary requirements is critical. Both Pop!_OS and Windows have specific hardware requirements, and checking if your computer meets these criteria is essential. Consider CPU, RAM, storage space, and graphics card compatibility for both operating systems. Ensure that your machine has sufficient resources to simultaneously handle the demands of both Pop!_OS and Windows. Refer to each operating system’s official documentation or websites for detailed system requirements.
System requirements
Backing up important data: Whenever you modify your system configuration or install new operating systems, it is crucial to back up your important data. Dual booting involves partitioning your hard drive or using separate drives for each operating system. While the installation process is designed to minimize risks, there is always a slight chance of data loss or unintended consequences. Therefore, creating a backup of your critical files, documents, and personal data is recommended for an external storage device, cloud storage, or another computer. This precautionary measure ensures you will still have a copy of your valuable data, even if something goes wrong during installation or configuration.
Backing up important data
Limitations and potential risks: Dual booting has limitations and potential risks. One of the primary challenges is managing disk space effectively. Partitioning your hard drive to accommodate multiple operating systems requires careful planning and consideration of storage needs for each OS. Another limitation is the possibility of compatibility issues between the two operating systems, particularly with hardware drivers or specific software applications. Additionally, dual booting may introduce complexities regarding system updates, as updates for one operating system might affect the other. It is essential to be aware of these limitations and plan accordingly.
Limitations and potential risks
Moreover, there are potential risks associated with dual booting, such as the accidental deletion or corruption of data during the installation or configuration process. The interaction between the two operating systems can lead to conflicts or booting issues if improperly managed. Understanding these risks allows you to approach the dual boot configuration process cautiously and take appropriate measures to mitigate them.
Installing Pop!_OS
Pop!_OS, developed by System76, is a popular Linux distribution known for its user-friendly interface, stability, and focus on productivity. This section will guide you through installing Pop!_OS as part of your dual boot configuration.
Introduction to Pop!_OS: Pop!_OS is based on Ubuntu and provides a polished desktop environment with various features and optimizations. It offers a clean and intuitive user interface to enhance productivity and workflow. Pop!_OS also includes powerful customization options, allowing users to tailor the system to their preferences. Additionally, it comes with a curated set of software applications and utilities that cater to different user needs, such as developers, gamers, and creative professionals.
Introduction to Pop!_OS
Downloading the Pop!_OS ISO file: To install Pop!_OS, you need to download the ISO file from the official System76 website. Visit the website and navigate to the download section. Select the appropriate version (e.g., 64-bit or 32-bit) based on your system architecture and requirements. It is recommended to download the latest stable release of Pop!_OS for optimal performance and compatibility with your hardware.
Downloading the Pop!_OS ISO file
Creating a bootable USB drive: Once the Pop!_OS ISO file is downloaded, you must create a bootable USB drive to install the operating system. This requires a separate USB flash drive with sufficient storage capacity. To create a bootable USB drive, you can use dedicated tools like BalenaEtcher, Rufus, or the built-in Startup Disk Creator (for Ubuntu-based systems). Launch the tool, select the downloaded Pop!_OS ISO file, choose the USB drive as the target, and follow the on-screen instructions to create the bootable USB drive. If you want to try out Pop!_OS on another computer, creating a bootable USB is an essential first step. Here is our ultimate guide on creating a Pop!_OS bootable USB drive.
Creating a bootable USB drive
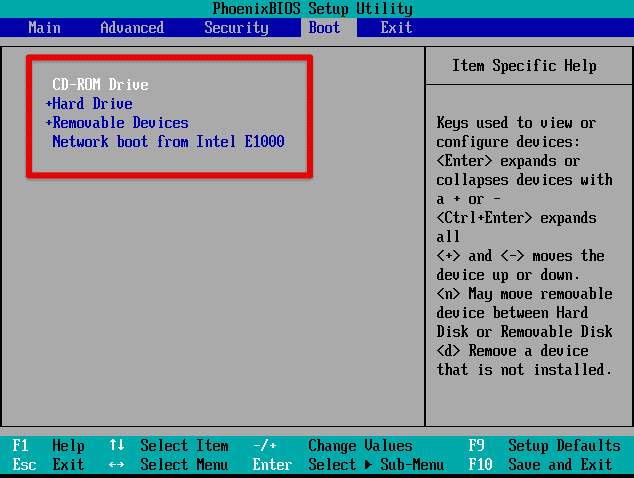
Configuring BIOS for Installation: Before installing Pop!_OS, it is essential to configure your computer’s BIOS/UEFI settings to prioritize the boot from the USB drive. Restart your computer and access the BIOS/UEFI settings by pressing the designated key during startup (usually Del, F2, or F12). Navigate to the Boot menu and change the boot order to ensure the USB drive is listed as the first boot option. Save the changes and exit the BIOS/UEFI settings.
Configuring BIOS for installation
Step-by-Step installation guide: Now that the bootable USB drive is prepared, and the BIOS/UEFI settings are configured, you are ready to install Pop!_OS. Insert the bootable USB drive into your computer. Restart the computer and allow it to boot from the USB drive. The Pop!_OS installation wizard should appear. Select your preferred language and click “Install.”

Installing Pop!_OS
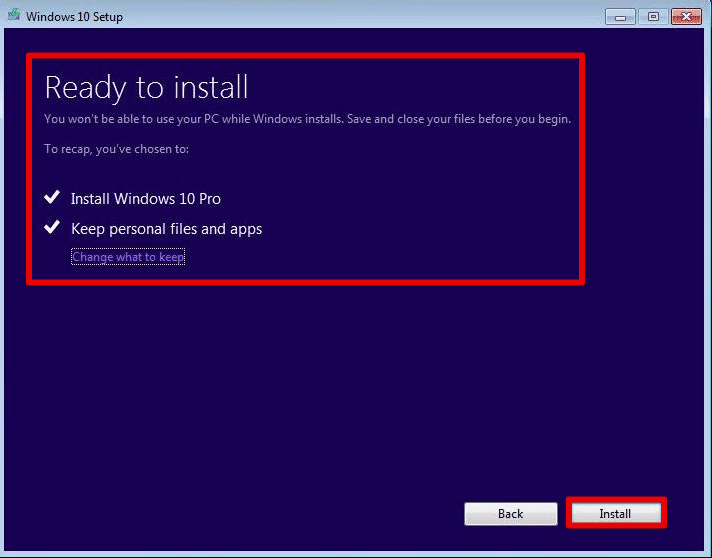
Choose whether to install proprietary software, such as drivers and codecs, during installation. Select the installation type. Select the “Install alongside” option to install Pop!_OS alongside Windows if configuring a dual boot. Customize the partitioning scheme if needed. Ensure you allocate sufficient space for Pop!_OS while leaving enough room for Windows. Select the target disk or partition for the installation.
Create a username and password for your Pop!_OS user account. Review the installation settings and click “Install” to proceed. The installation process will begin. Please wait for it to be complete. Once the installation is finished, you will be prompted to restart the system. Remove the USB drive and restart your computer.
Installing Windows
This section will guide you through installing Windows as part of your dual boot configuration with Pop!_OS.
Downloading Windows: To install Windows, you must download the appropriate ISO file from the official Microsoft website. Visit the Microsoft website and navigate to the download section. Select the desired version of Windows (e.g., Windows 10 Home, Windows 11 Pro) and choose the appropriate architecture (32-bit or 64-bit) based on your system requirements. Ensure that you download the ISO file for the version of Windows that you have a valid license.
Downloading Windows
Creating a bootable USB drive: Once the Windows ISO file is downloaded, you must create a bootable USB drive to install the operating system. This requires a separate USB flash drive with sufficient storage capacity. You can use tools like Rufus, Windows USB/DVD Download Tool, or the built-in Disk Utility (for macOS) to create a bootable USB drive. Launch the tool, select the downloaded Windows ISO file, select the USB drive as the target, and follow the on-screen instructions to create the bootable USB drive.
Creating a bootable USB drive for Windows
Configuring BIOS for installation: Before installing Windows, it is important to configure your computer’s BIOS/UEFI settings to prioritize booting from the USB drive. Restart your computer and access the BIOS/UEFI settings by pressing the designated key during startup (usually Del, F2, or F12). Navigate to the Boot menu and change the boot order to ensure the USB drive is listed as the first boot option. Save the changes and exit the BIOS/UEFI settings.
Configuring BIOS for installing Windows
Step-by-Step installation guide: Now that the bootable USB drive is prepared, and the BIOS/UEFI settings are configured, you are ready to install Windows. Insert the bootable USB drive into your computer. Restart the computer and allow it to boot from the USB drive. The Windows installation wizard should appear. Select your preferred language, time zone, and keyboard layout, then click “Next.” Click “Install now” to begin the installation process.
Installing Windows
Enter the Windows product key when prompted. If you have a digital license or product key, enter it accordingly. Accept the terms and conditions, and click “Next.” Select the installation type. If you are configuring a dual boot, choose the custom installation option. Next, select the disk or partition where you want to install Windows. If you have unallocated space, you can create a new partition for Windows.
Select the partition, click “Next,” and wait for the installation process to complete. Follow the on-screen prompts to personalize Windows settings, including account creation, privacy preferences, and network configuration. Once the setup is finished, Windows will finalize the installation and may restart your computer several times. After the final restart, Windows will complete the installation process, and you will be prompted to set up user preferences.
Configuring boot order and dual boot manager
Properly configuring the boot order and dual boot manager in a dual boot configuration is crucial for seamless switching between Pop!_OS and Windows. This section will provide a detailed guide on configuring these aspects to ensure a smooth and efficient dual boot setup.
Boot order: Boot order refers to the sequence in which the computer searches for an operating system to load during startup. When you power on your computer, it checks the boot order to determine which device or partition to boot from. In a dual boot setup, you must ensure that the boot order is correctly configured to prioritize the dual boot manager, allowing you to choose between Pop!_OS and Windows.
Boot order
Modifying boot order: To modify the boot order, you must access the BIOS/UEFI settings. The process may vary depending on your computer’s manufacturer and model. Restart your computer and look for the key to access the BIOS/UEFI settings. The key is typically displayed during startup (e.g., “Press Del to enter Setup”). Press the designated key repeatedly until the BIOS/UEFI settings menu appears. Navigate to the Boot menu or a similar section that controls the boot order.
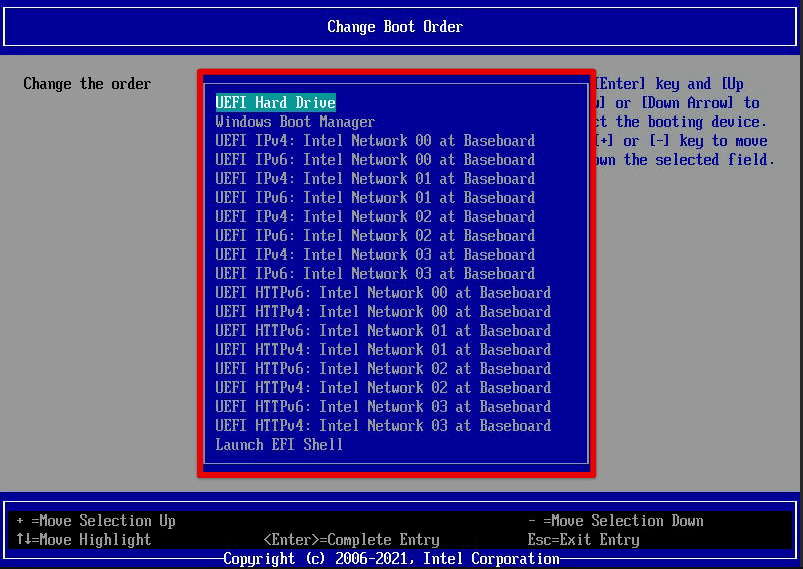
Modifying boot order
Configuring the dual boot manager: In a dual boot setup, a dual boot manager presents a menu allowing you to select between Pop!_OS and Windows during startup. Different dual boot managers are available, such as GRUB (Grand Unified Bootloader) and systemd-boot. The specific configuration steps may vary depending on the dual boot manager. If you use GRUB as your dual boot manager, open a terminal in Pop!_OS. Use the following command to edit the GRUB configuration file:
sudo nano /etc/default/grub
Locate the line starting with GRUB_DEFAULT and set the value to the desired operating system entry. The entries are usually numbered, with the first entry being 0. Save the changes and exit the text editor. Update the GRUB configuration afterward.
Configuring the dual boot manager
The GRand Unified Bootloader, or GRUB, is a crucial component that manages the boot process for Linux systems. Learn how to troubleshoot boot problems by reinstalling GRUB on Linux.
Managing boot entries: When configuring the dual boot manager, managing the boot entries for both Pop!_OS and Windows is essential. The dual boot manager should detect both operating systems and present them as options during startup. If any changes or updates are made to the boot configuration, such as installing system updates or adding/removing operating systems, it may be necessary to update the boot entries.
Optimizing Pop!_OS for dual boot
To ensure a seamless dual boot experience with Pop!_OS, optimizing the system for hardware compatibility, smooth operation, and synchronization with Windows is necessary. This section provides a detailed guide on optimizing Pop!_OS for your dual boot configuration.
Installing necessary drivers: Installing the required drivers for your specific hardware components is recommended to optimize hardware compatibility. Pop!_OS often includes a wide range of drivers out of the box, but some proprietary drivers or specific hardware drivers may need to be installed manually.
Installing necessary drivers
Pop!_OS provides an Additional Drivers utility that can be accessed through the system settings. Launch the utility, and it will scan for any additional drivers available for your hardware. Install any recommended drivers for optimal performance. Next, visit the manufacturer’s website for your hardware components (such as graphics cards or network adapters) and download the appropriate drivers. Follow the instructions provided by the manufacturer to install the drivers on Pop!_OS. Utilize package managers like apt or snap to install drivers from official repositories or third-party sources. Research the specific driver you need and use the appropriate command to install it.
Configuring system settings: To optimize Pop!_OS for smooth operation in a dual boot setup, consider the following configuration adjustments. First, adjust the power management settings to optimize battery life or performance according to your needs. You can access power management settings through the system settings or power management utilities.
Configuring system settings
Configure the software update settings to ensure regular system updates. Also, check the software sources and repositories to enable additional software and updates. To provide seamless connectivity, Configure network settings, including Wi-Fi, Ethernet, and VPN connections. Set up any required network protocols or proxy settings.
Setting up user accounts and permissions: Creating user accounts and managing permissions is essential to ensure safe and efficient usage of Pop!_OS. Create user accounts for each individual using Pop!_OS. Assign appropriate usernames and passwords during the account creation process.
Setting up user accounts and permissions
Configure user permissions and groups to control access to files, applications, and system settings. Assign users to appropriate groups based on their needs. Grant administrative privileges to specific user accounts using the sudo command. This allows authorized users to perform administrative tasks by entering their passwords.
Customizing the desktop environment: Pop!_OS offers a range of customization options to personalize the desktop environment and appearance. Install and apply custom themes and icons to change the look and feel of the desktop environment. You can find various themes and icons from the official Pop!_OS repositories or third-party sources.

Customizing the desktop environment
Use GNOME Shell extensions to add additional functionality to the desktop environment. Popular extensions include Dash to Panel, Workspace Grid, and Night Light. Customize the behavior and appearance of the dock and app indicators to suit your preferences. Adjust the dock’s position, size, and behavior, and enable or disable specific app indicators.
Optimizing Windows for dual boot
To optimize Windows for a smooth dual boot experience, it is crucial to update the operating system, install essential drivers, configure system settings, manage user accounts, adjust partition sizes, and address potential issues. This section provides a detailed guide on optimizing Windows for your dual boot configuration.
Updating Windows and installing essential drivers: To optimize Windows for dual boot, ensure the operating system is up-to-date. Go to Settings > Update & Security > Windows Update and check for updates. Install any available updates for your version of Windows. Visit the manufacturer’s website for your hardware components (e.g., graphics card, network adapter) and download the latest drivers. Install the drivers according to the manufacturer’s instructions.
Updating Windows and installing essential drivers
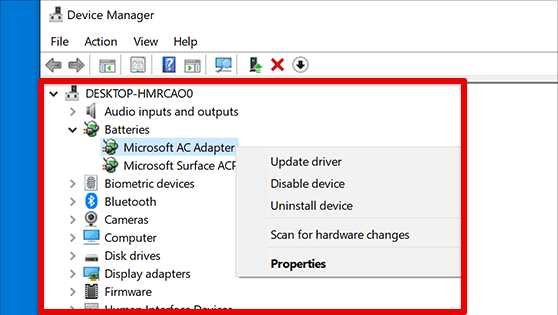
Open the Device Manager by right-clicking the Start button and selecting “Device Manager.” Check for any devices with missing or outdated drivers. Right-click on the device and select “Update driver” to install the latest drivers.
Configuring system settings: To configure system settings on Windows for dual boot compatibility, disable Fast Startup, as it may interfere with the dual boot process. Go to Control Panel > Power Options > Choose what the power buttons do. Click on “Change settings that are currently unavailable” and uncheck “Turn on fast startup.”
Configuring system settings in Windows
If your system has Secure Boot enabled in the BIOS/UEFI settings, ensure it is compatible with Windows and Pop!_OS. Some systems may require you to disable Secure Boot for successful dual booting. In the Windows Boot Manager, you can set the default operating system and adjust the timeout for selecting the default OS during startup. Use the “System Configuration” utility or a third-party boot manager tool to make these changes.
Managing user accounts and permissions: Windows allows you to create and manage user accounts with different levels of permissions. Create user accounts for each individual who will be using Windows. Assign appropriate usernames and passwords during the account creation process.
Managing user accounts and permissions in Windows
Configure user permissions and groups to control access to files, applications, and system settings. Assign users to appropriate groups based on their needs. Ensure you have an account with administrative privileges to perform system-level tasks. Use this account to install software, modify system settings, and manage other user accounts.
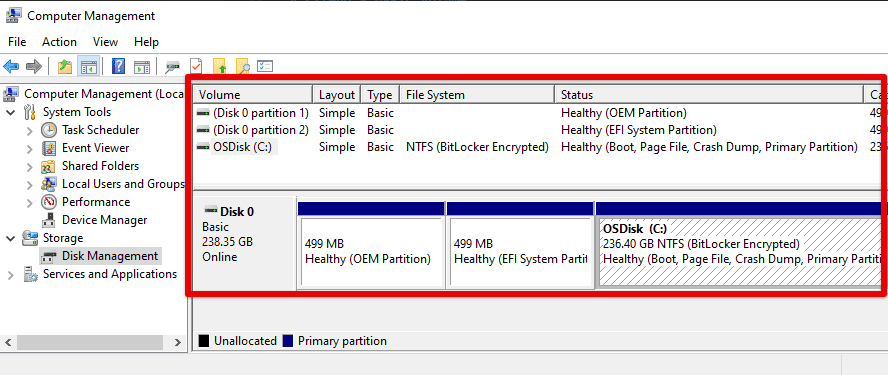
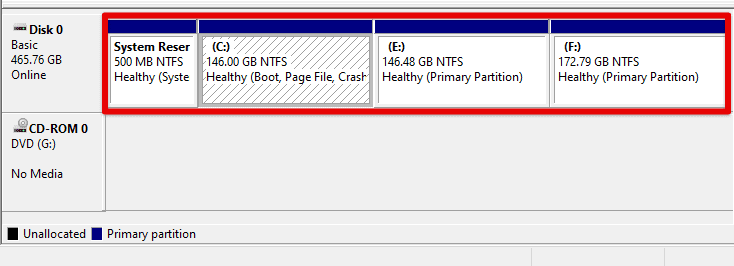
Adjusting partitions: To optimize the storage allocation for dual booting, consider changing partition sizes. Open the Disk Management tool by right-clicking the Start button and selecting “Disk Management.” Identify the partitions and their sizes.
Adjusting partitions
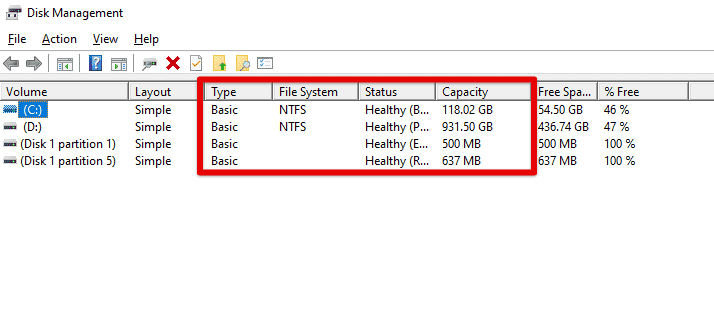
If necessary, right-click on a partition and select “Shrink Volume” to reduce size. Allocate the desired space for the dual boot partition. After shrinking a partition, right-click on the unallocated space and select “New Simple Volume.” Follow the on-screen prompts to create a new partition.
Sharing files and data
Sharing files and data between Pop!_OS and Windows is an important aspect of a dual boot setup. This section provides a detailed guide on understanding file system compatibility, accessing partitions, configuring shared folders or network file sharing, using cross-platform applications and file formats, and ensuring data integrity and backup practices.
Understanding file system compatibility: File systems like NTFS (used by Windows) and ext4 (used by Pop!_OS) have different compatibility levels. While Windows can read NTFS and FAT32 file systems, it cannot natively read or write to ext4 partitions. On the other hand, Pop!_OS can read and write to NTFS partitions, but it requires additional setup to access ext4 partitions.
Understanding file system compatibility
Accessing partitions: To access Pop!_OS partitions from Windows and vice versa, install a third-party driver or utility that provides ext4 file system support for Windows, such as Ext2Fsd or Paragon ExtFS. These tools allow Windows to read and write to ext4 partitions. After installation, restart your computer, and the ext4 partitions should be accessible from Windows Explorer.
Accessing partitions
NTFS partitions can be accessed natively in Pop!_OS without any additional setup. Open the file manager and navigate to the NTFS partitions to read and write files.
Configuring shared folders: To facilitate file sharing between Pop!_OS and Windows, you can configure shared folders or set up network file sharing. Identify a folder/directory on your Pop!_OS or Windows system that you want to share. Right-click on the folder and select “Properties” or “Sharing Options.”
Configuring shared folders
Enable folder sharing and configure the desired permissions (read-only or read-write) for other users or devices. Access the shared folder from the other operating system by entering the network address (e.g., \ip_address\shared_folder) in the file manager or Windows Explorer.
Conclusion
This comprehensive guide explored the intricacies of setting up and maintaining a dual boot system, specifically focusing on Pop!_OS and Windows. Following the detailed instructions provided in each section, you should now understand how to install both operating systems, configure boot order, optimize each OS for dual booting, and share files between them.
Dual booting offers the advantage of having two operating systems on a single machine, allowing you to enjoy the strengths of both Pop!_OS and Windows. It lets you enjoy the flexibility and customization of Linux and Windows’s familiarity and software compatibility. A dual boot-enabled machine allows you to switch seamlessly between these useful operating systems without a hitch.
This tutorial will illustrate how to set up a dual boot Pop!OS + Windows 10/11 system very easily, without losing much disk space or installing not officially supported alternative boot loaders like GRUB or rEFInd.
The main issue with dual booting Pop!OS and Windows is that unlike most other distributions, Pop!OS uses the systemd-boot bootloader, which in its default configuration does not support loading kernels from partitions other than the EFI partition. Thus, Pop!OS requires the EFI partition to be at least 500 MiB in size, whereas the size of the EFI partition created during the installation of Windows is just 100 MiB. This would suffice for GRUB or rEFInd, since these bootloaders are able to load the kernel from the root partition, but not for systemd-boot. In this guide, we will perform a customized Windows installation with an enlarged EFI partition, and use that for a 100% default Pop!OS installation.
WARNING : this will not work on already existing installations of Windows or Pop!OS, you will have to install both from scratch.
- Start a regular Windows install. Once you get to the screen where you choose between «Recommended» and «Custom» install, press Shift + F10 to enter command prompt. Start the
diskpartutility. WARNING: the usual Linux disk utilities don’t write any changes to disk until you’ve finished setting it up.diskpartwrites every command to disk immediately. Be very careful while usingdiskpart, you can very easily lose data:
diskpart
List the connected drives:
list disk
Find the drive you want to use as boot drive and select it:
select disk N
Create the enlarged EFI partition:
create partition efi size=500
Create a regular MSR partition:
create partition msr size=16
Finally, create a primary partition of desired size (in MiB, not MB):
create partition primary size=XXXXX
Exit the utility and the command prompt:
exit
exit
Continue the installation by selecting the «Custom» option, then select the primary partition you just created. The Windows installation will continue normally. Finish installing Windows.
- Boot into the Pop!OS installer. When you get to the choice between a «Recommended» and «Custom» installation, select «Custom».
Create an appropriately sized swap partition (same size as your system’s RAM) and a root partition with a filesystem of your choice.
After creating the partitions, select the Windows EFI partition and mount it at /boot. Select the swap partition. Then select the root partition and mount it at /. Continue the installation normally.
- After booting into Pop!OS, edit the
/boot/efi/loader/loader.conffile and make it look like this:
default Pop_OS-current
timeout 5
console-mode max
editor no
- Reboot. Now, at boot you will have 5 seconds to choose to boot into Windows instead of Pop!OS.
How Can We Help?
Created on
Updated
You are here:
Do you want to have both Windows and a Linux based OS on your PC? This article will explain how to install a Linux based OS (Pop!_OS) onto a PC with Windows 10.
Prerequisites
It is assumed that you have already installed Windows 10 on the system.
It is also assumed, that you have some space reserved on your hard drive for the Pop!_OS installation. If not, please shrink your Windows partition now!
Installation
Start by downloading Pop!_OS from pop.system76.com. Once downloaded install it on a USB stick using a tool like Rufus (rufus.ie). Now boot your PC from the USB stick (in case you have issues make sure that your BIOS settings are correct, i.e. secure boot and UEFI settings).
Once Pop!_OS is booted cancel the installer and test if everything works, i.e. internet, Bluetooth, etc. Once satisfied start the installer and follow the installation steps.
Once you arrive at the Install stage, select Custom (Advanced). The installation will now show your available drives, one of these drives should have free space available. Click on Modify partitions to setup the partitions for Pop!_OS, make sure to add the following partitions in the following order:
- boot partition: Give it 1GB and format it as fat32
- root partition: Give it the remaining GB and format it as ext4
- swap partition: Should be at the end with enough GB compared to your RAM* and format it as ext4
*Your swap partition should be double or equal to your RAM if you have <8GB RAM. When you have more than 8GB of RAM you can divide your RAM by 2 and use that as swap.
Once satisfied mark the partitions in the installation and follow the rest of the installation steps.
Once Pop!_OS is installed reboot your system. In case your system boots into Windows, you have to change the boot partition in your BIOS settings.
Add Windows to the Boot Menu
In case Pop!_OS boots, you will see that it skips a boot menu. We have to add this manually, start by adding timeout 10 to /boot/efi/loader/loader.conf.
Now install os-prober using sudo apt-get install os-prober and run it using os-prober. This will show you something like the example below.
/dev/sdb1@/efi/Microsoft/Boot/bootmgfw.efi:Windows Boot Manager:Windows:efiMount that partition to your system using sudo mount /dev/sdb1 /mnt and copy the files to the boot files using sudo cp -ax /mnt/EFI/Microsoft /boot/efi/EFI.
Finally, reboot your system and you will have an option to choose between Pop!_OS and Windows.
Sources
- How To Dual Boot Windows And Pop!_OS (ostechnix.com)
Do you want to install Pop OS on your PC? Here are 3 ways for you. This post from MiniTool offers you a step-by-step Pop OS install guide. You can select one accordingly. It also tells you how to get the Pop OS download.
How to Download Pop!_OS
Pop!_OS is a free and open-source Linux distribution, based upon Ubuntu, and featuring a customized GNOME desktop environment known as COSMIC. It is developed and maintained by System76, an American Linux computer manufacturer.
This distro is designed for fast navigation, easy workspace organization, and fluid and convenient workflow. It is also suitable for STEM and creative professionals who use their computers as a tool to discover and create.
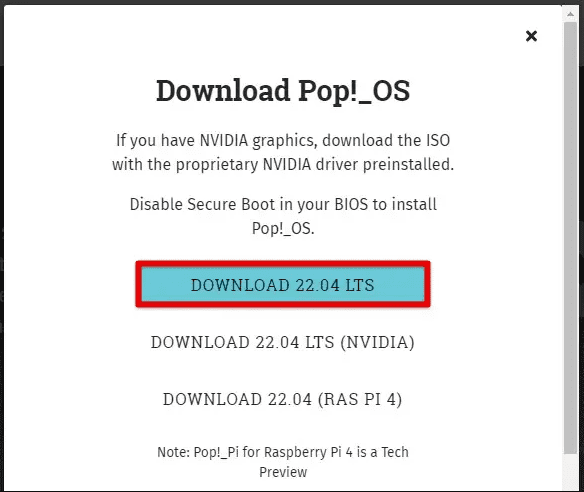
Pop!_OS is primarily bundled with the System76 laptops, but it can also be downloaded and installed on most computers for free. How to get the Pop OS download? This is very simple. Go to the Pop OS by System76 website. Click the Download button. Then, you can 3 versions: the pure version, the Nvidia version, and the Ras Pi 4 version.
If your PC has Nvidia graphics installed, download the Nvidia version. This version has been optimized for the Nvidia GPU. If you want to install Pop OS onto Raspberry Pi 4, download the Ras Pi 4 version. Note that Pop!_Pi for Raspberry Pi 4 is a Tech Preview. If you are not in the above cases, just download the pure version.
Then, verify your download using the checksum to ensure that you’ve received the full, complete download and that it is not corrupted. Open the Command Prompt and run the following command: CertUtil -hashfile folder-path\pop-os_22.04_amd64_intel_22.iso SHA256.
Tips:
You need to replace the folder-path accordingly. In addition, the .iso filenames will change over time, so please make sure you are using the correct .iso filename.
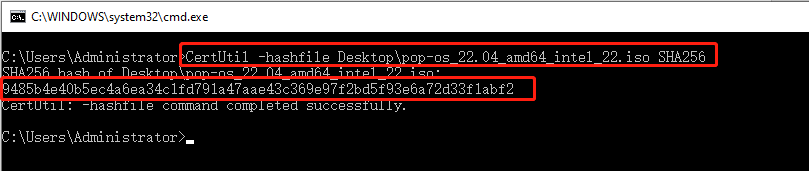
If the checksum does not match the one on the download page, you may need to re-download your copy of Pop!_OS.
7 Best Lightweight Linux Distros for Old PCs
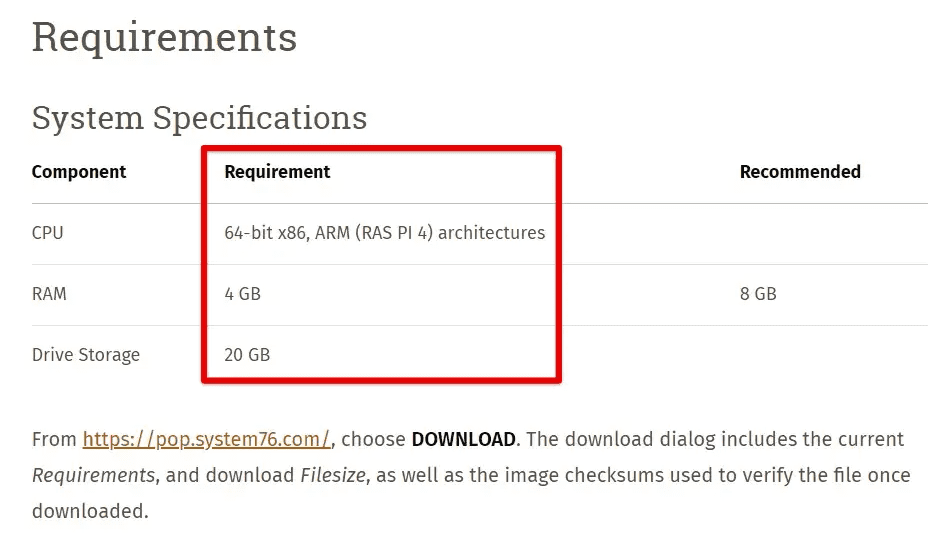
Pop OS System Requirements
To install Pop OS on a PC, the PC needs to meet the following requirements.
- CPU: 64-bit x86
- RAM: 4GB (8GB for the recommendation)
- Storage: 20GB
To check your PC whether meets the above requirements, you can follow the steps below:
- Press the Windows key + R keys to open the Run dialogue.
- In the text bar, type “msinfo32” and press Enter.
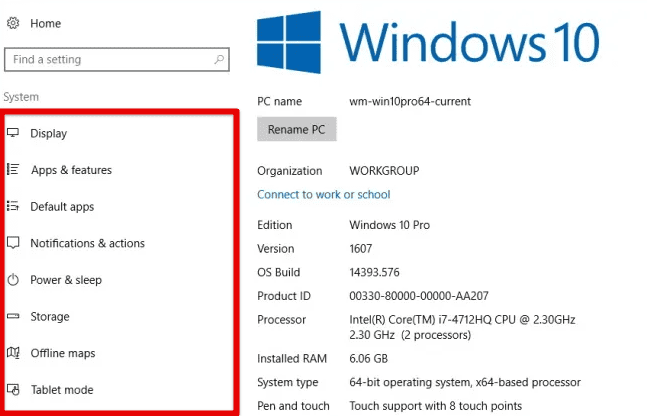
- In the System Information window, scroll down to find the Installed Physical Memory (RAM) item and check if it is 4GB or more.
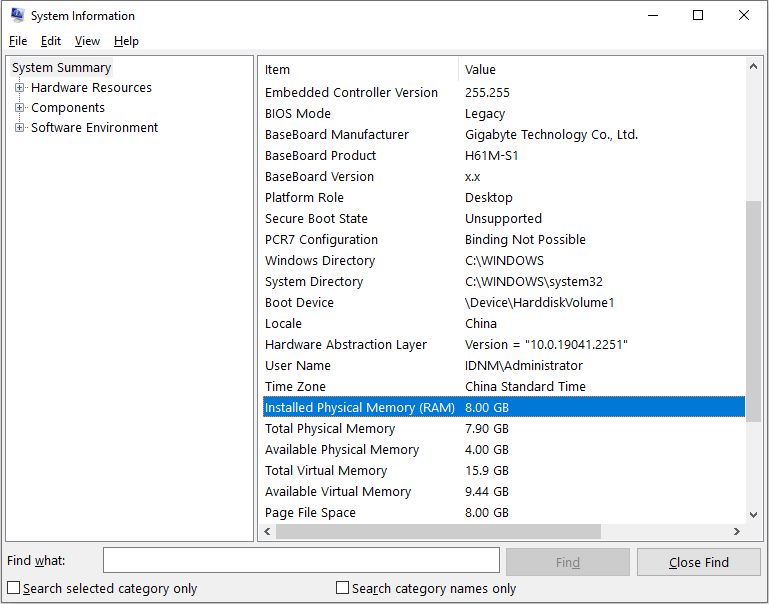
If the memory of the PC is less than 4GB, you may need to replace the old RAM or add a second RAM. You can refer to this post: How to Get More RAM on Laptop—Free up RAM or Upgrade RAM.
As for the storage requirement, any PC hard drive can meet it. Of course, you can also upgrade the hard drive to a larger or faster one.
How to Install Pop OS on a PC
If your PC can run Pop OS, you can then get the Pop OS download and install it. In general, you can use the following 3 ways to install Pop OS on a PC:
- Create a Pop OS VM. This option will help you learn Pop OS operation without any risk.
- Dual boot Pop OS and Windows.
- Replace Windows with Pop OS thoroughly.
In this part, I will show you the 3 Pop OS installation ways.
Dual Boot vs Virtual Machine: Which One Should You Choose?
How to Create a Pop OS VM
To manage the VM better, I recommend you create a separate VM partition. You can use MiniTool Partition Wizard, which is a professional disk and partition management tool. Here is the guide:
MiniTool Partition Wizard FreeClick to Download100%Clean & Safe
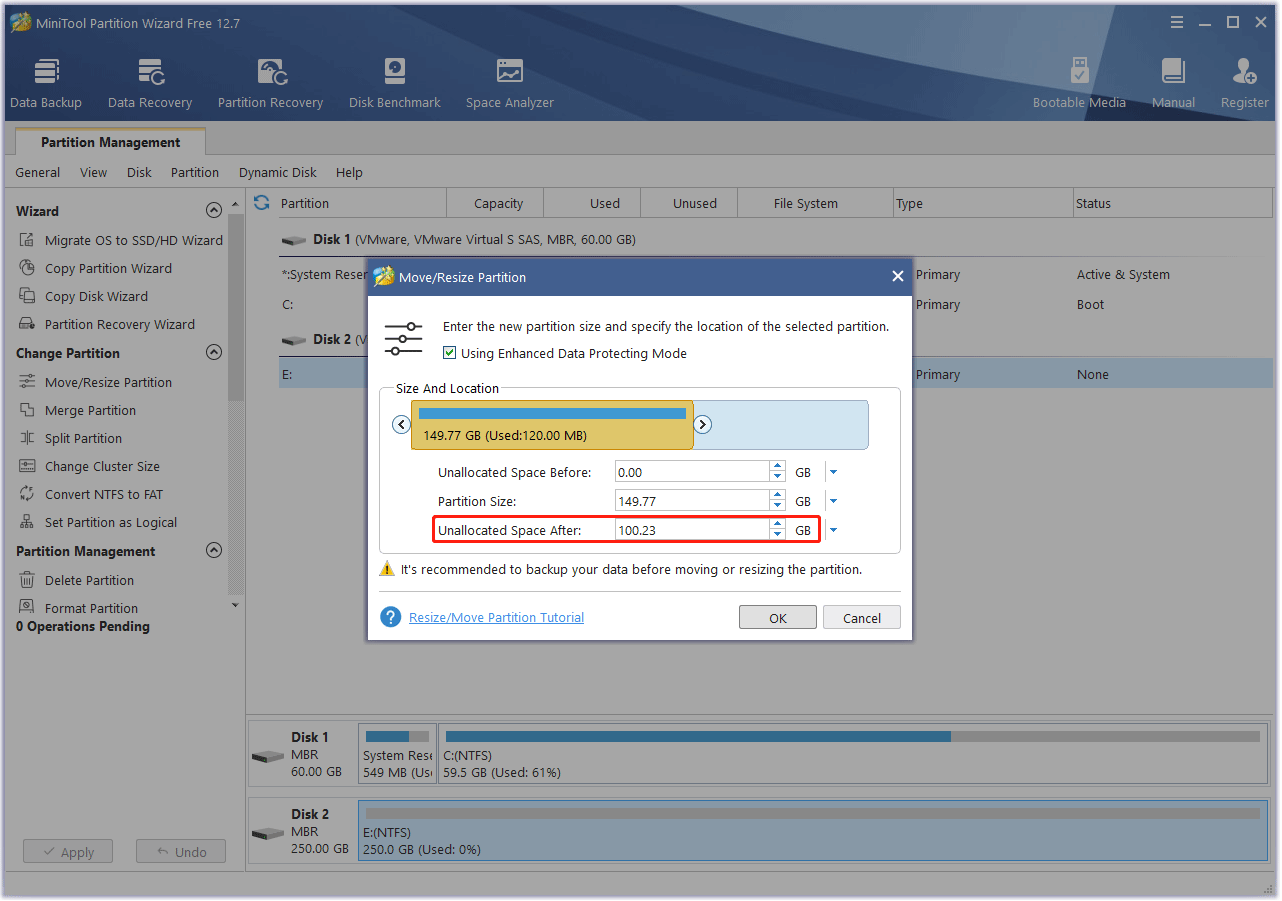
Step 1: Launch MiniTool Partition Wizard. Right-click a partition and choose Move/Resize.
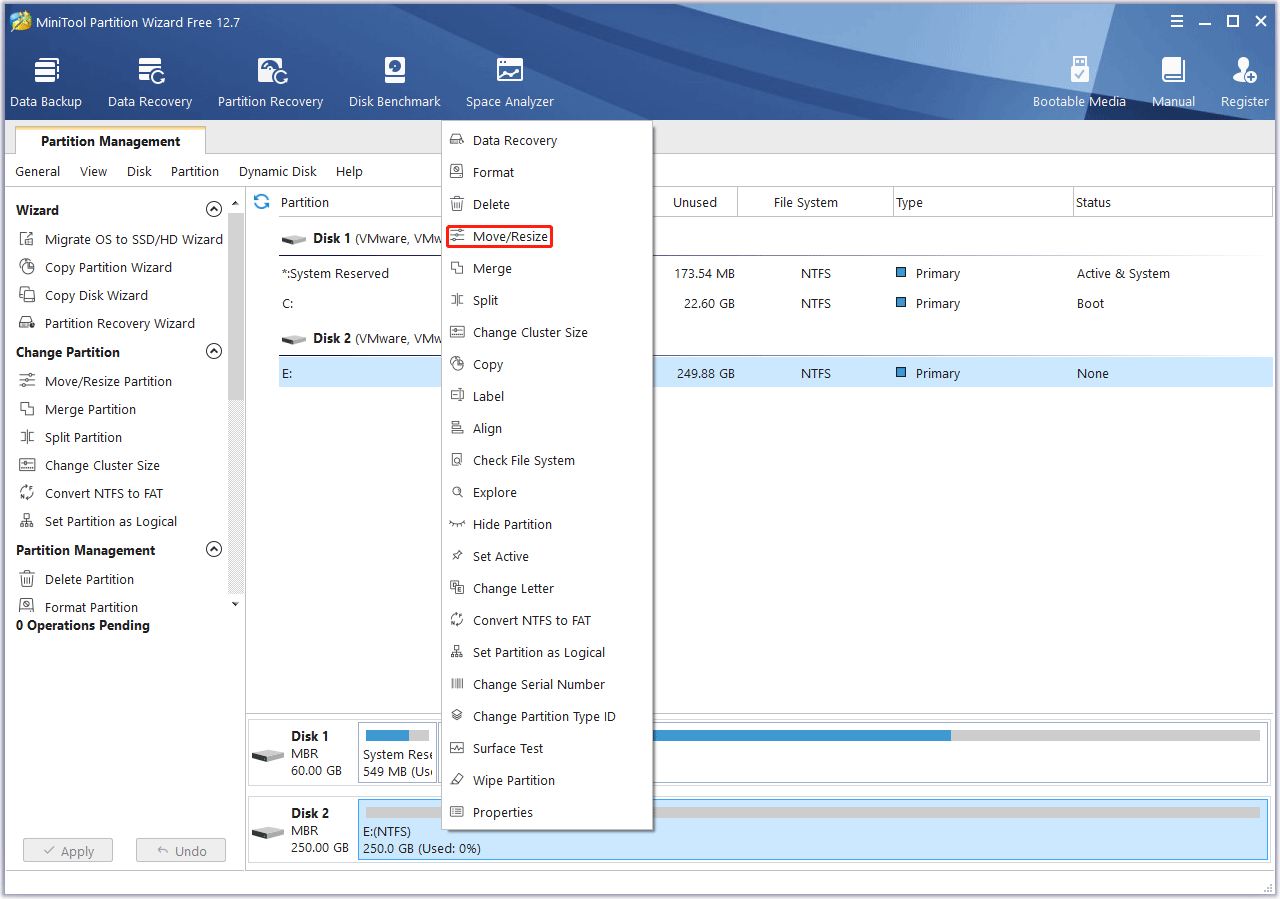
Step 2: Drag the arrow icon to decide how much space you want to shrink. Click the partition block and drag it to decide the location of the partition. Then, click the OK button.
Tips:
- In general, the VM file will increase as your VM usage frequency increases. Therefore, I recommend you create a partition of more than 40GB. Of course, you can decide according to your condition.
- You can check the unallocated space before and after to know how much space you have shrunk. You need to make sure the unallocated space is enough. If not, you need to move/resize multiple partitions.
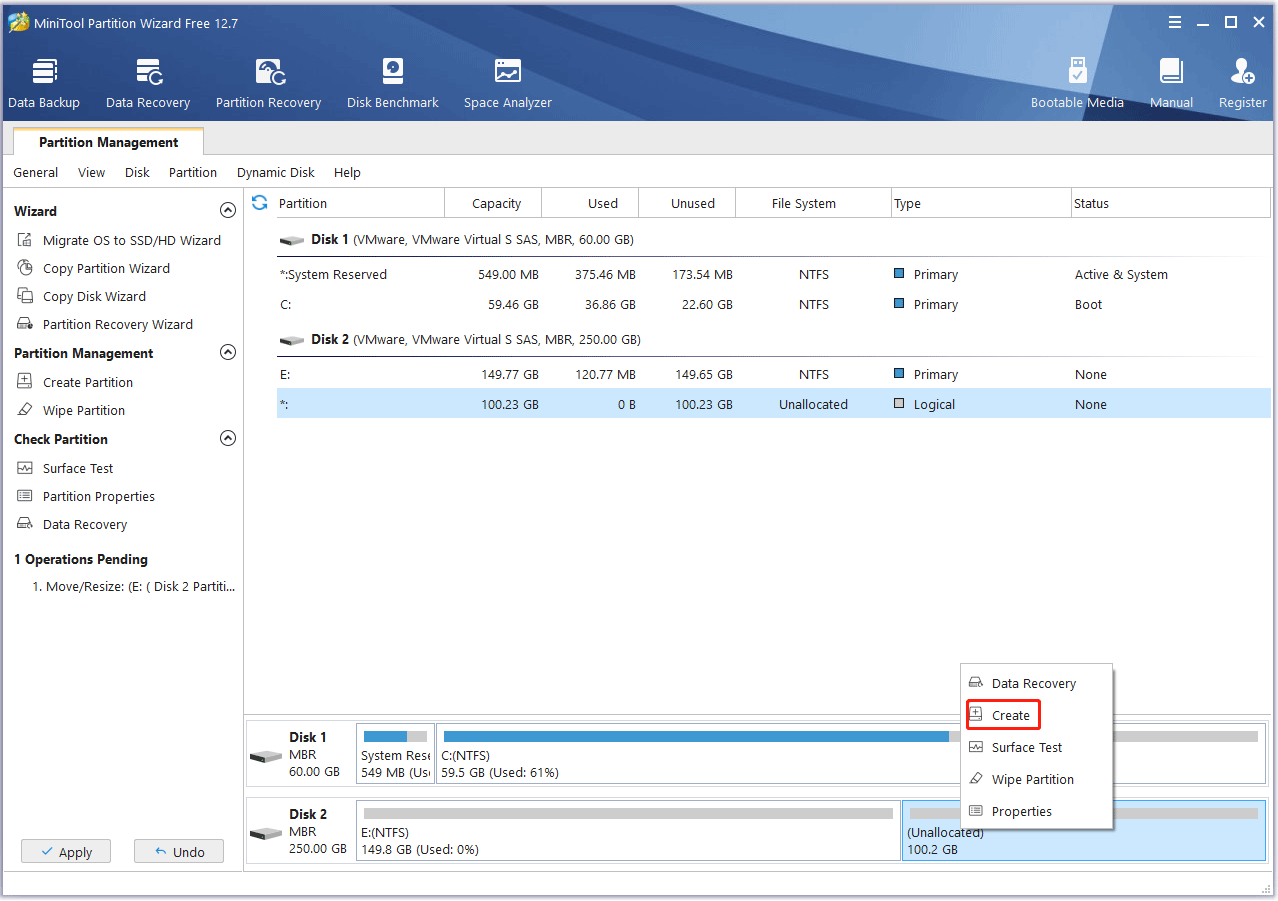
Step 3: Right-click the unallocated space and choose the Create button.
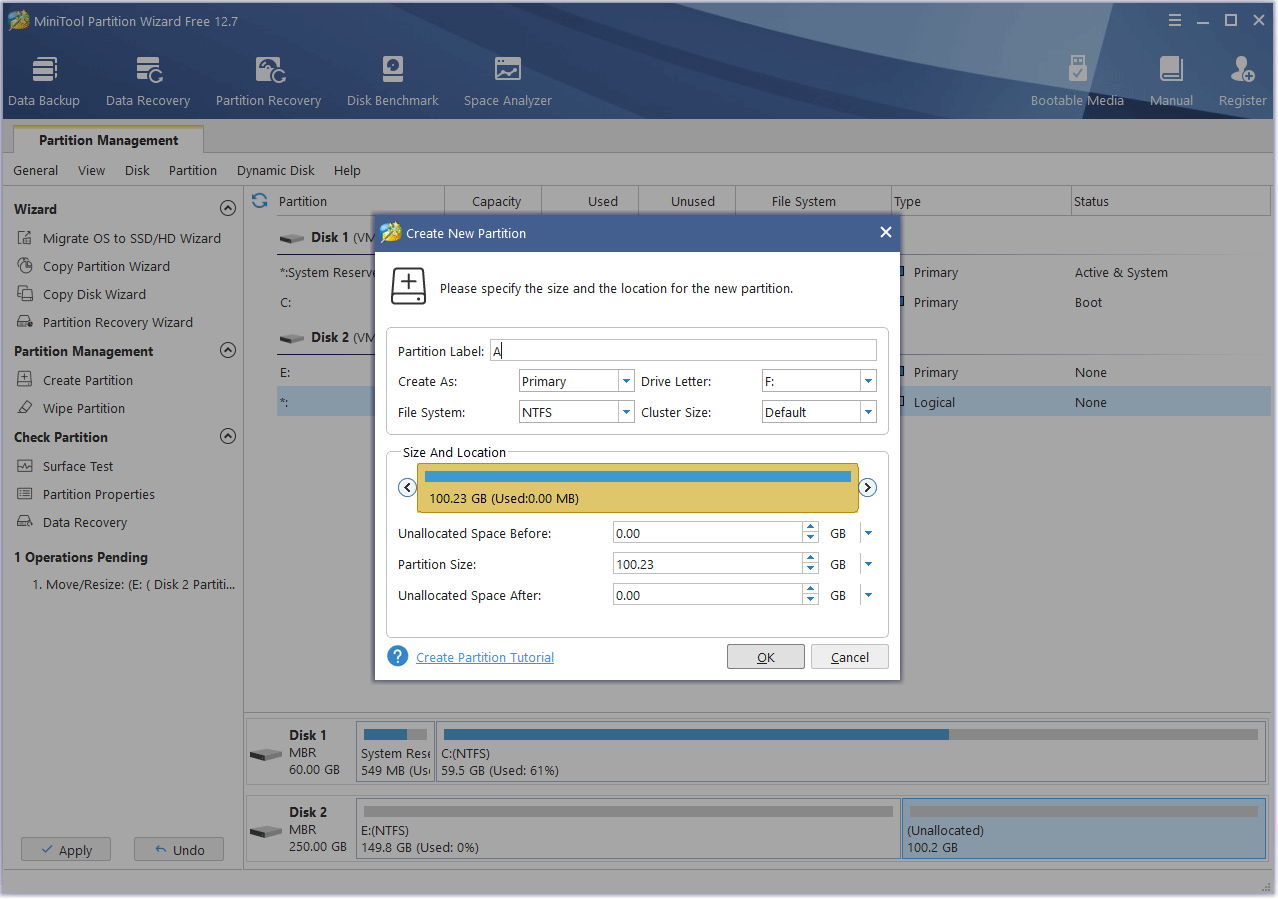
Step 4: Set parameters for the new partition. You can keep them to the default value if you don’t have specific demands. Then, click the OK button.
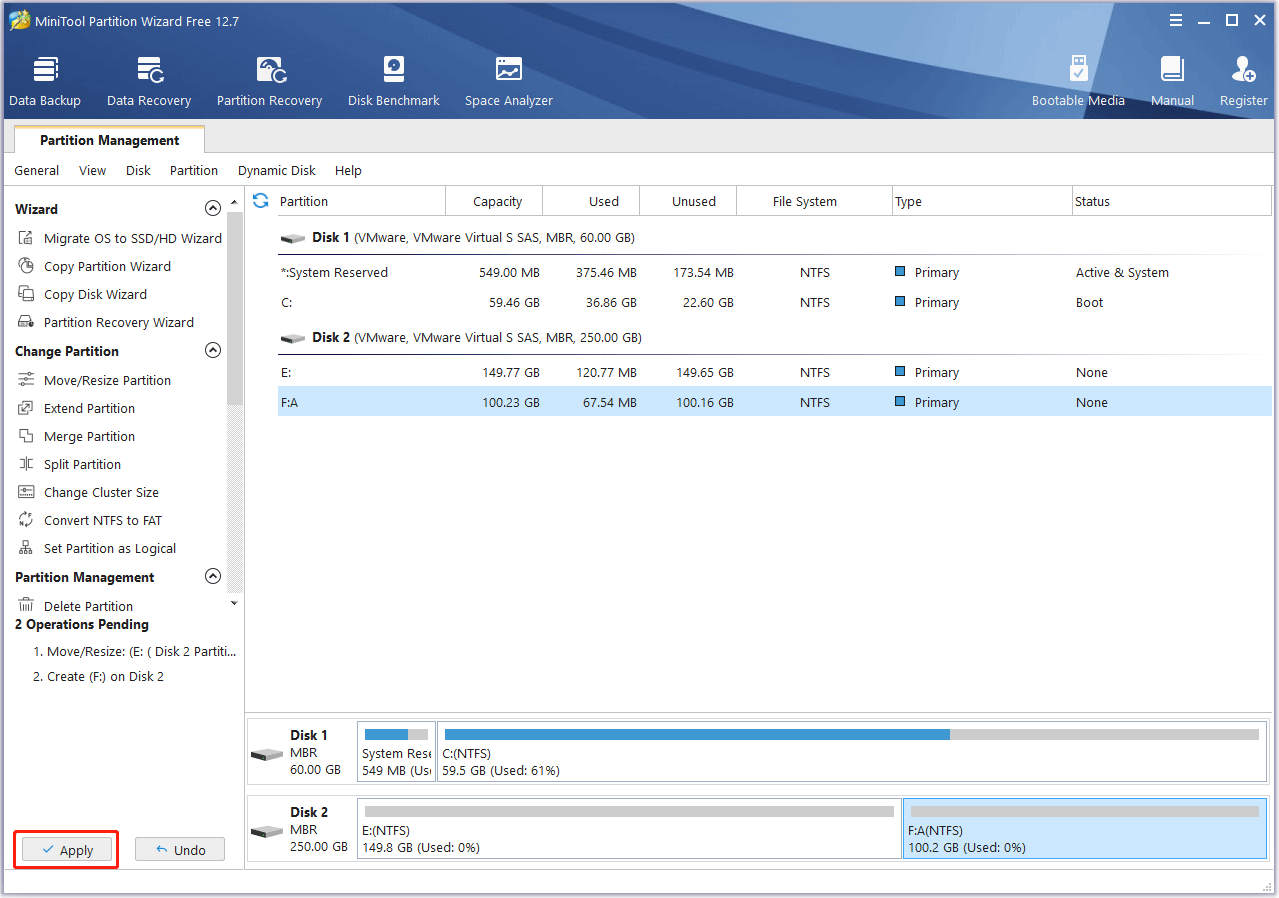
Step 5: Click the Apply button to execute pending operations.
Then, you need to install a VM program on this partition and use this software to create a Pop OS VM. You can use VMware or VirtualBox. Here, I will show you how to install Pop OS on VMware. The guide is as follows:
Step 1: Create a VM on VMware.
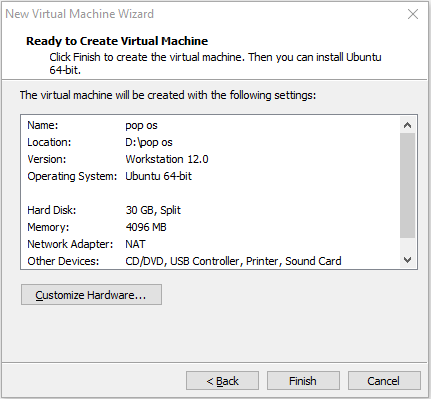
- Launch VMware and click File > New Virtual Machine.
- On the pop-up window, select Custom (advanced) and click Next.
- On the next window, click Next again.
- Select the Installer disc disk image file (iso) option and click the Browse button.
- On the Browse window, navigate to the Pop OS ISO file and click the Open Then, click Next.
- Select Linux and Ubuntu 64-bit. Then, click Next.
- Change the VM name to Pop OS and change the VM location to the partition you created just now. Then, click Next.
- Allocate the number of processors. Keep the default value and click Next.
- Specify the memory size. Change the memory size to 4GB or more and then click Next.
- Then, keep the default values and click Next all the way through until you are asked to specify the disk capacity. You can change the Maximum disk size to a larger number if you think 20GB is too small. Then, click Next.
- Click Next again. Then, review all the virtual machine settings. If they are OK, click Finish.
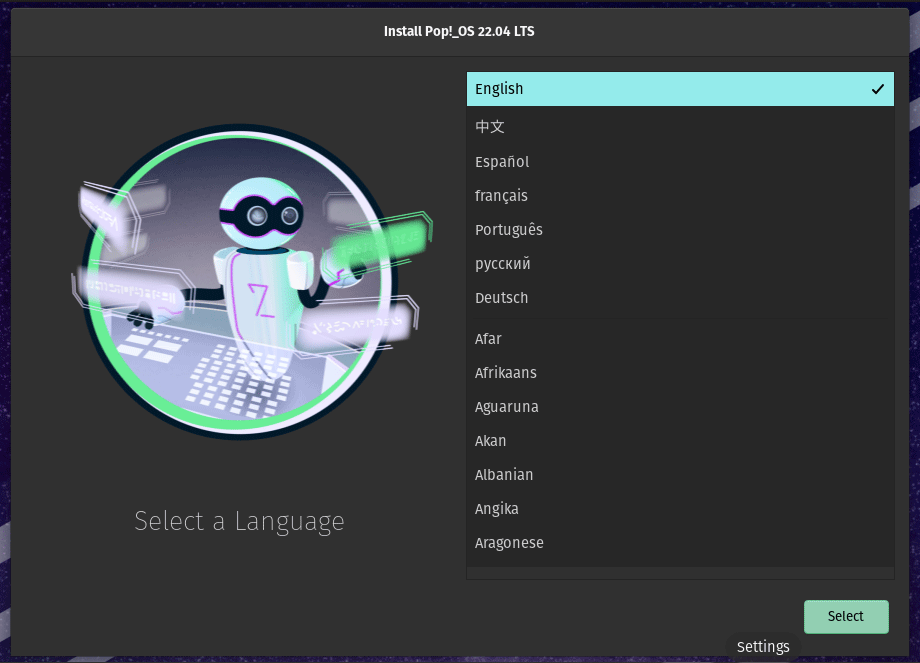
Step 2: Power on the Pop OS virtual machine. Wait until the Pop OS install wizard launches. Then, go through the Pop OS installation process.
Follow the wizard to select a language, a locale, a keyboard input language, and a keyboard layout.
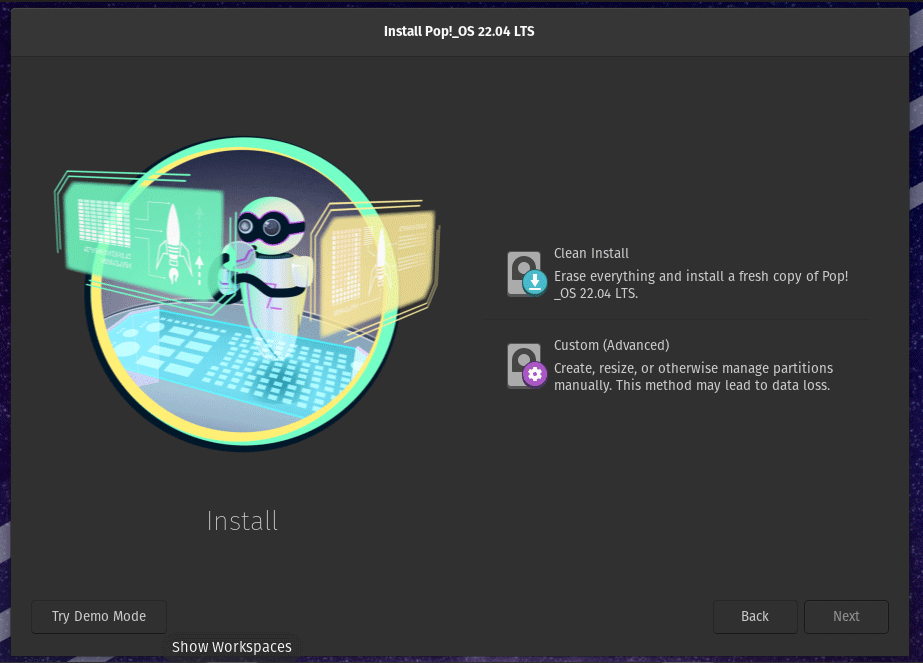
Choose the Clean Install option. This will erase all contents of the target drive. If you want to create a Pop OS VM or replace Windows with Pop OS thoroughly, this option is OK.
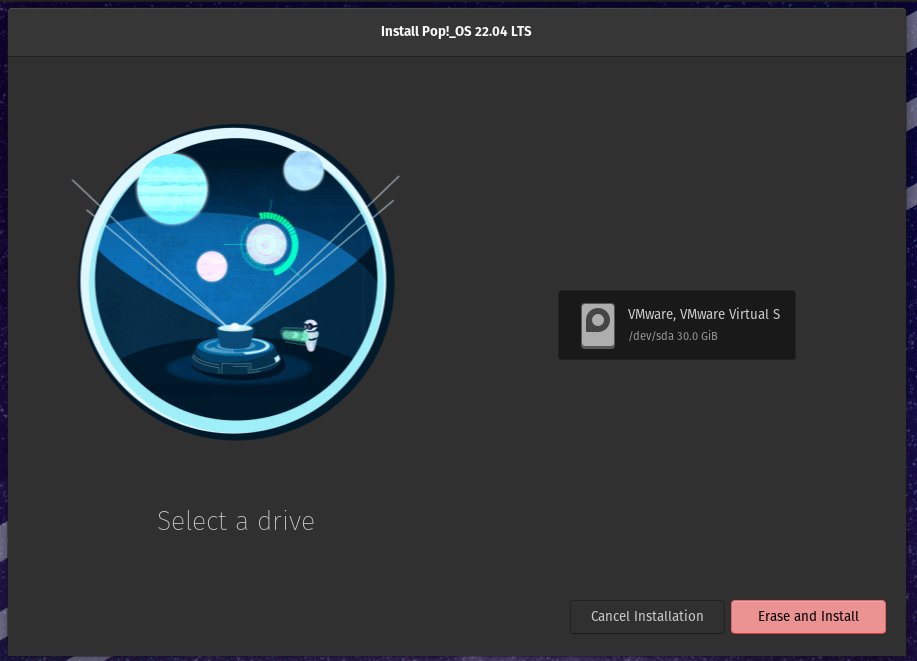
Select the VMware disk and click the Erase and Install button.
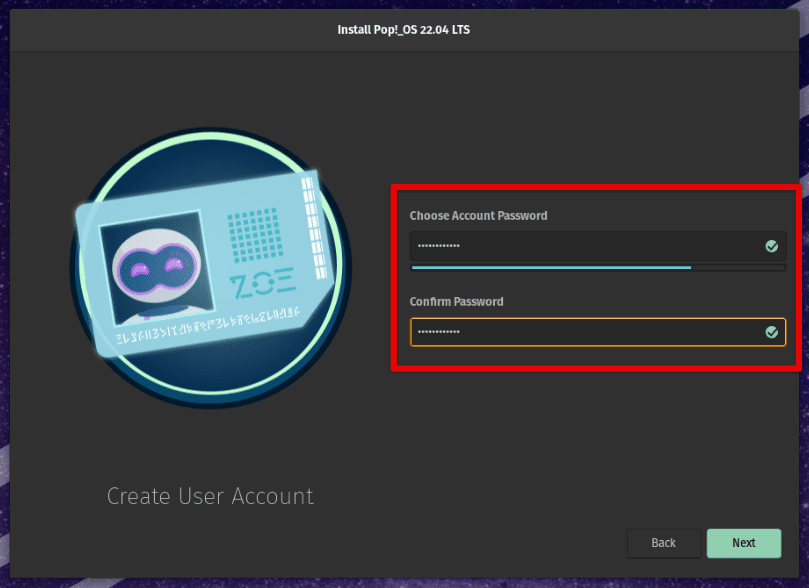
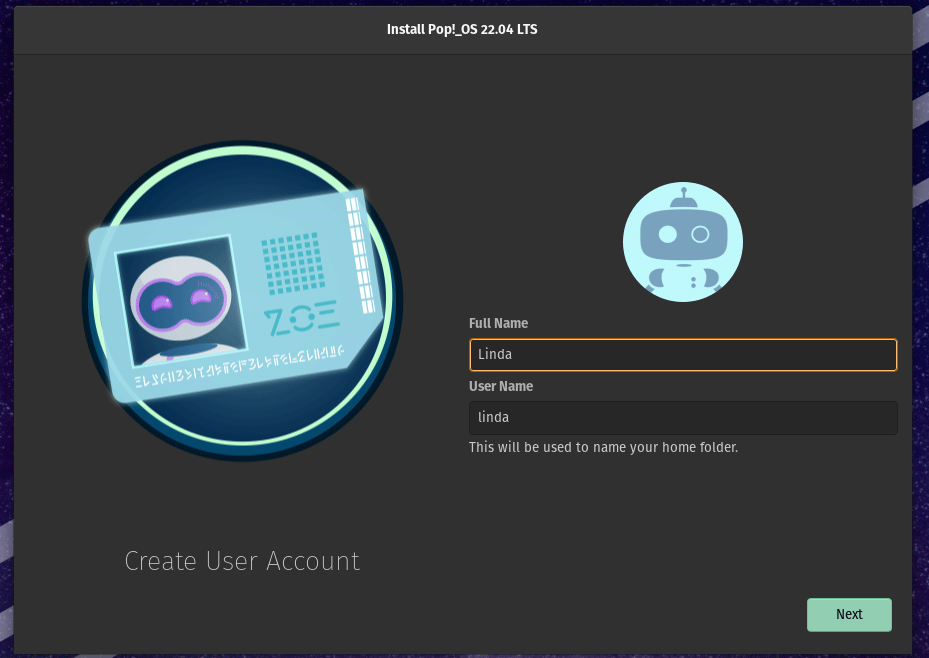
Create a user account and click Next. Then, you need to set the password.
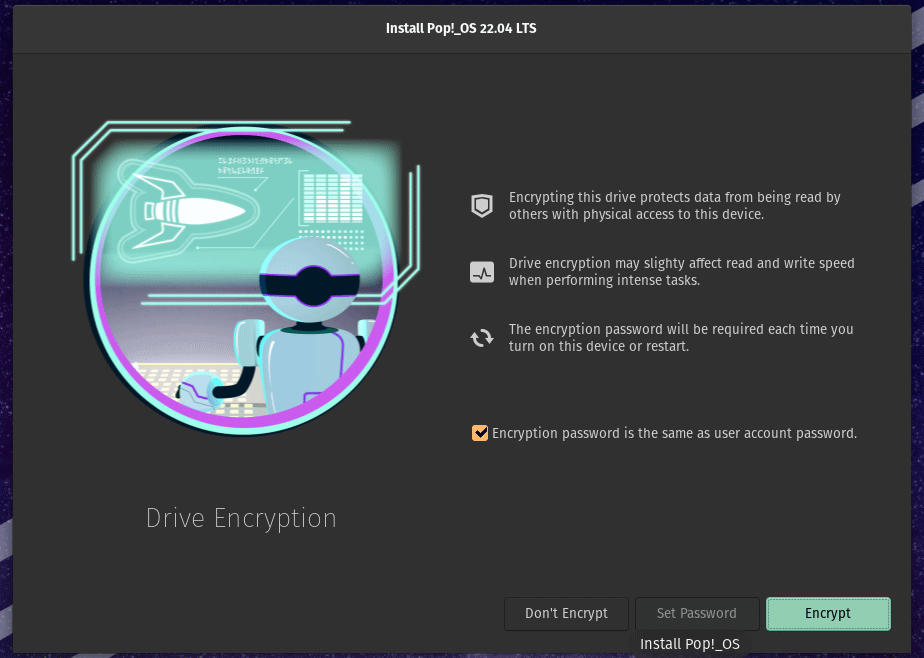
Decide whether to encrypt the system drive. The function of this feature is similar to BitLocker. You can decide according to your condition.
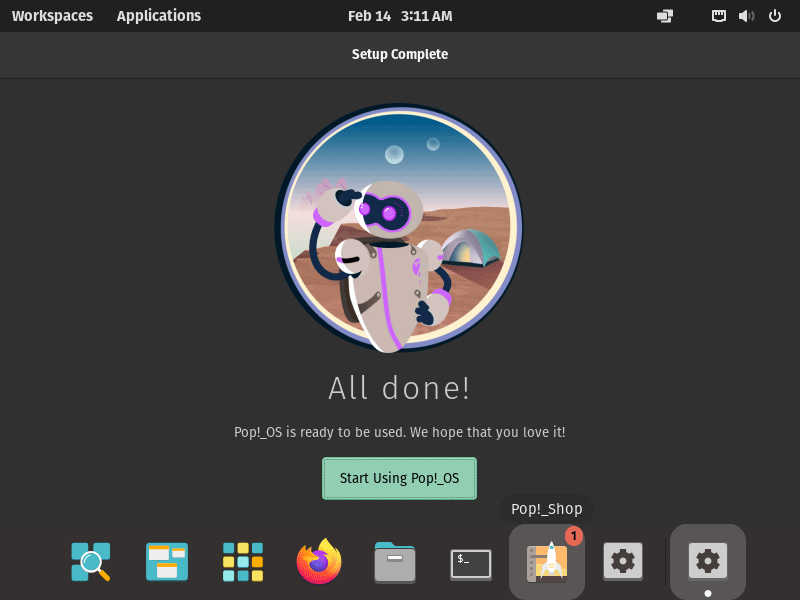
Then, the Pos OS install wizard starts to partition the drive, extract files, etc. This may take a long time. When the installation is completed, reboot your computer and log in to complete the user account setup process. Then, you can use Pop OS. If you think the screen is too small, right-click on the desktop and choose Display Settings to change it.
How to Replace Windows with Pop OS
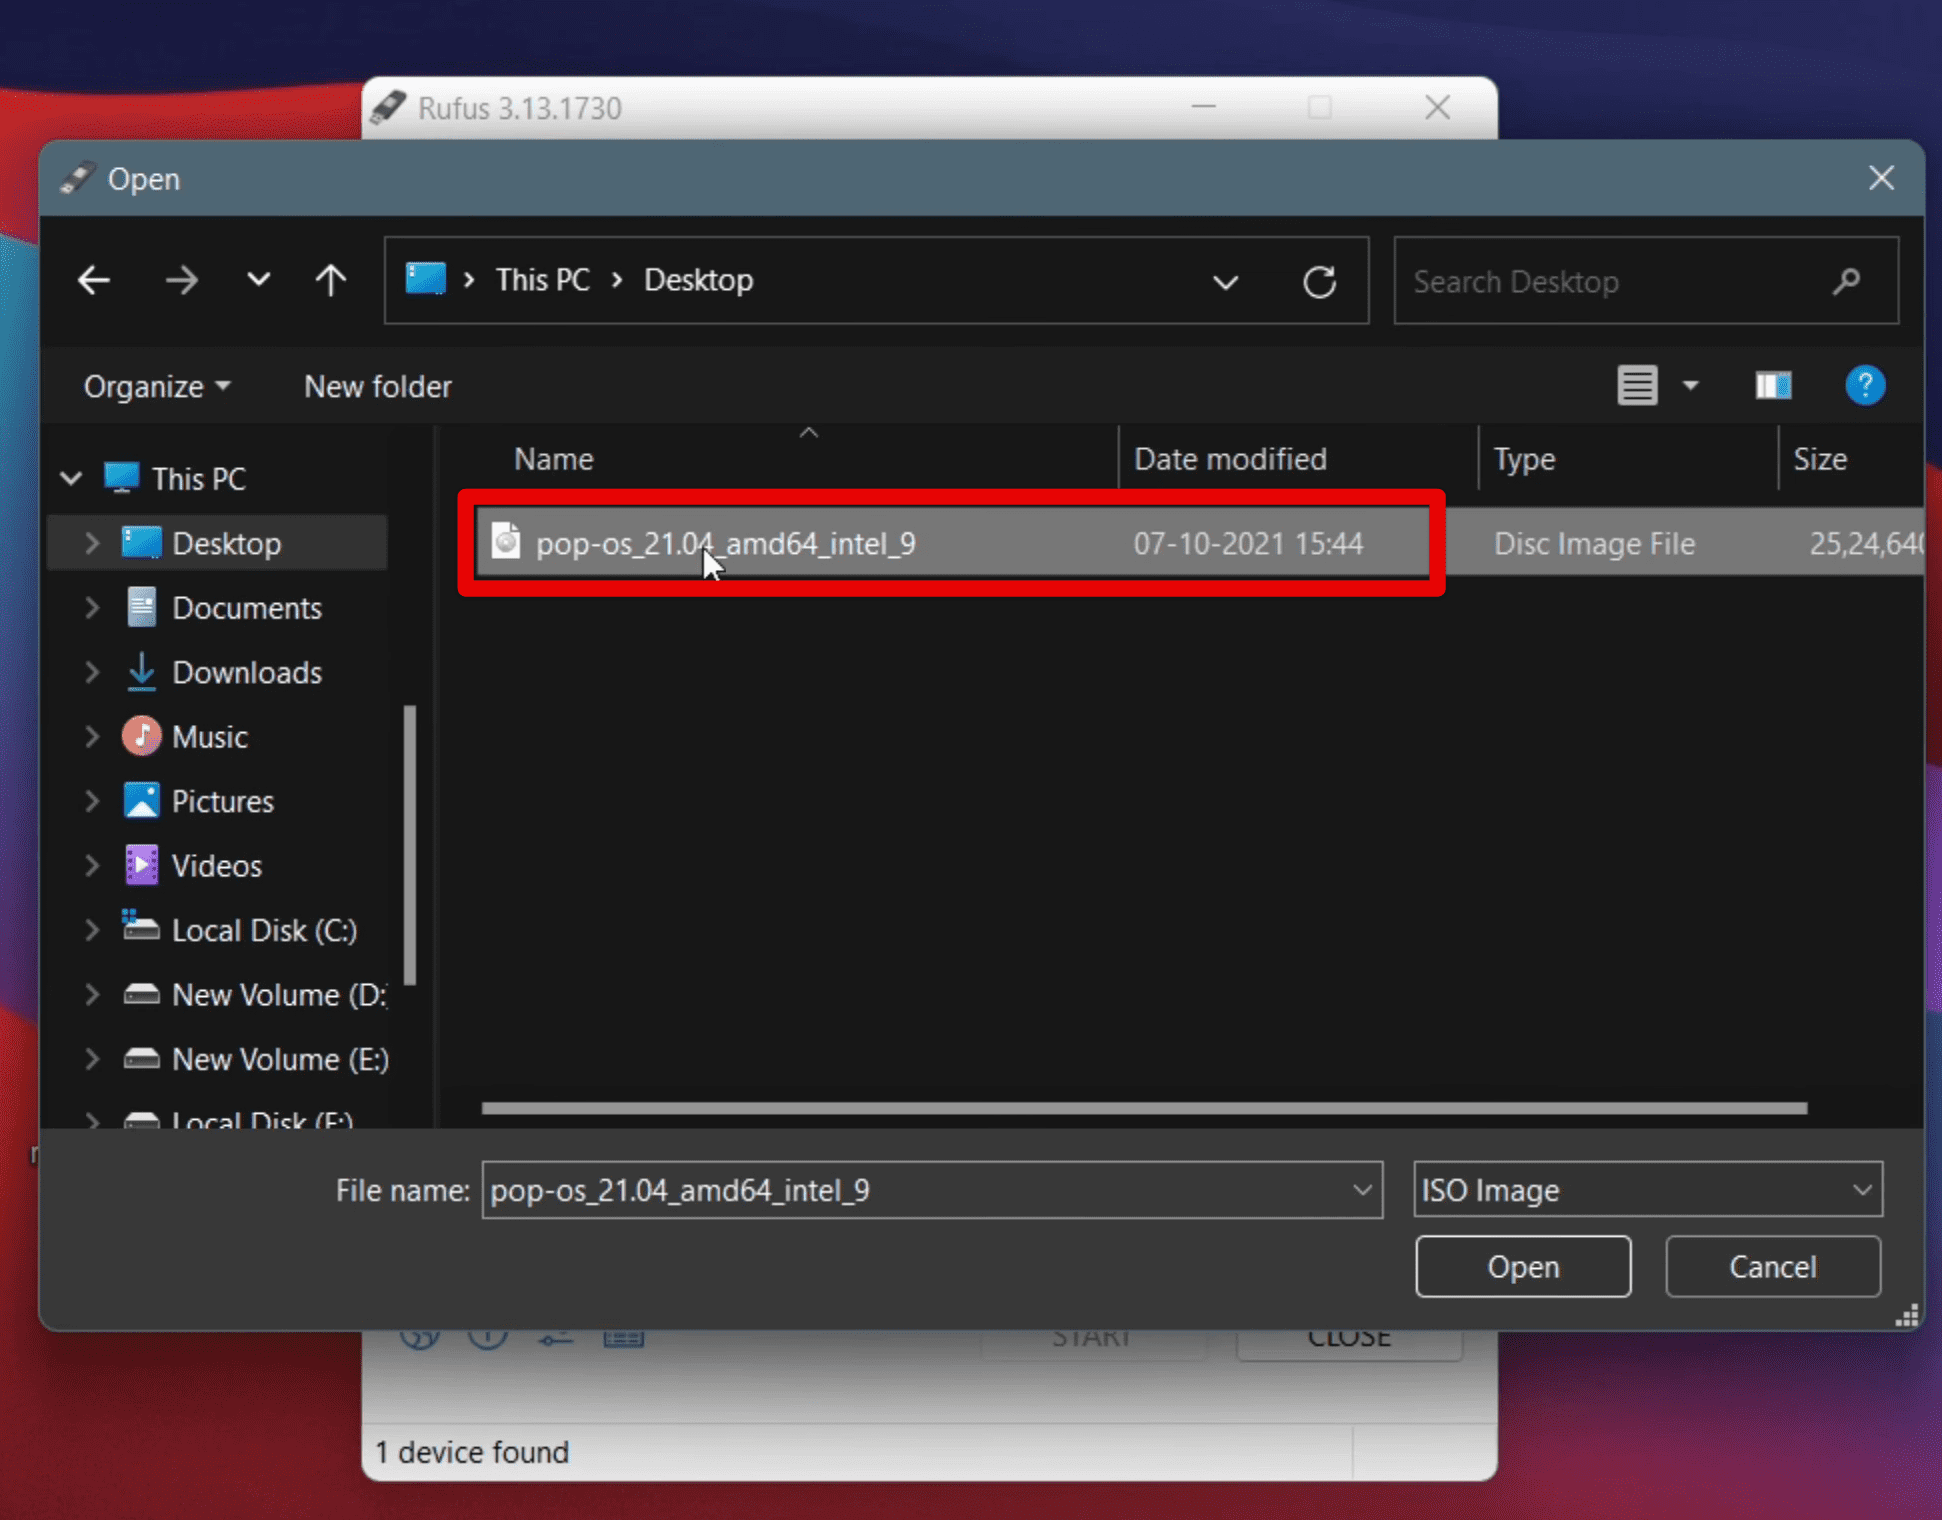
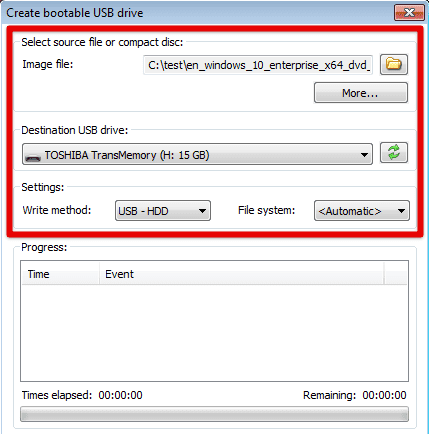
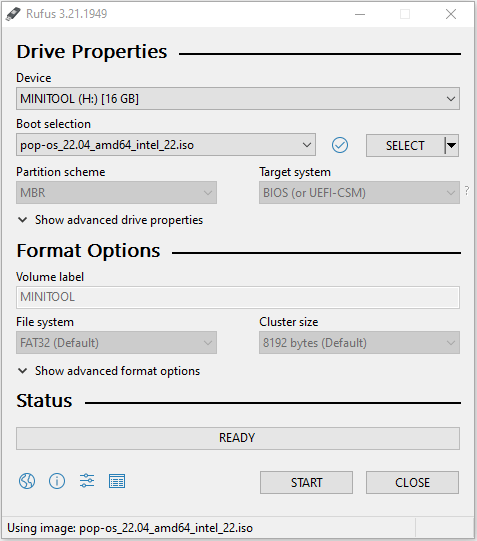
Step 1: Create a Pop OS installation media. You need to insert a USB larger than 8GB into the PC. Then, download an ISO burning program like Rufus and use it to burn the Pop OS ISO file into the USB drive.
- Launch Rufus. It will detect the USB drive automatically.
- Click the Select button and choose the Pop OS ISO file. Then, click OK.
- Click the Start Then, click OK. After the burning process completes, click Close.
Step 2: Insert the USB drive into the PC where you want to install Pop OS. Make sure the PC is powered down. Then, power on the PC and press the BIOS key to enter the firmware. Then, you need to do the following things in order:
- Disable the Secure Boot because this feature may prevent Pop OS from booting.
- Set the USB drive as the first boot device.
- Save changes and exit the firmware. The PC will boot from the USB drive, and then you just need to go through the complete Pop OS installation process.
- Enter the firmware again and make the PC boot from the internal storage. Now, if all is OK, your PC should enter Pop OS.
How to Dual Boot Pop OS and Windows
Step 1: Shrink partitions to get enough free space (unallocated space). You can also use the Move/Resize feature of the MiniTool Partition Wizard, especially if you need to shrink multiple partitions and get the unallocated space together.
Step 2: Create a Pop OS installation media, disable Secure Boot, and make the PC boot from the USB drive.
Step 3: Go through the Pop OS installation process, but this time you need to choose the Custom (Advanced) option. Click Modify Partitions. This will open the GParted tool. You need to use this tool to create 3 partitions (“/”, “/boot”, and “swap”).
Tips:
The “/boot” partition stores boot files. The «/» partition is used to store system files. You can also use it to store personal files. The «swap» partition is used as the virtual memory.
Right-click on the unallocated space and choose New from the menu.
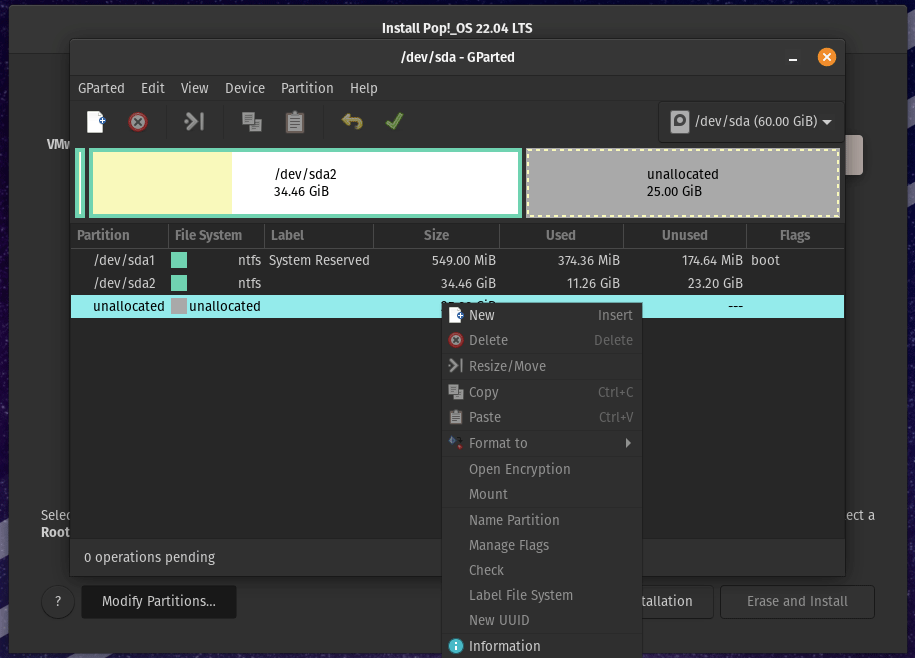
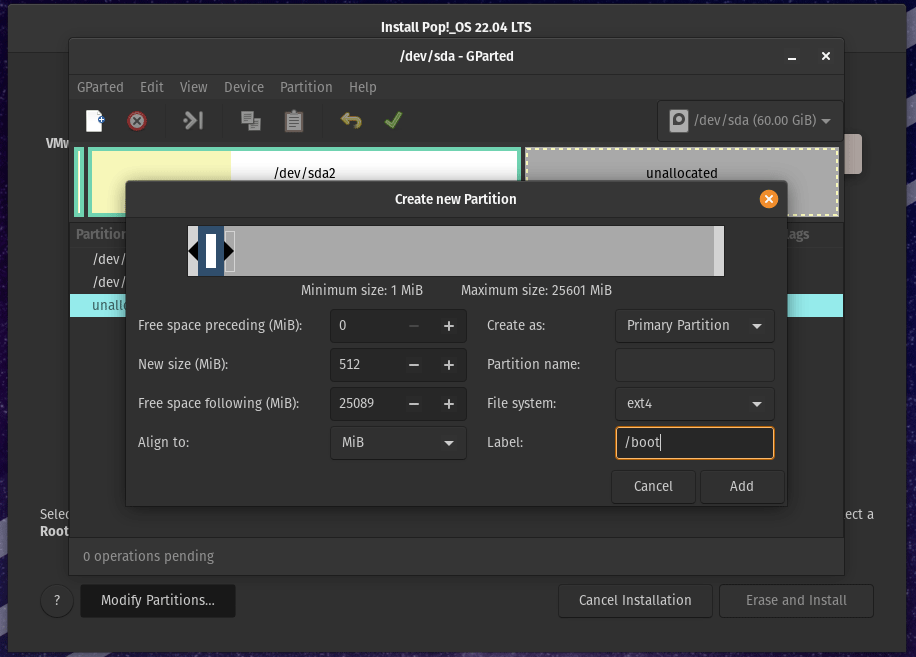
On the new window, change the New Size to 512 (MB), label the partition as “/boot”, and click Add. Please note that the boot partition must be a primary partition.
Then, add the “swap” partition and the “/” partition.
Tips:
The number of partitions on an MBR disk can’t exceed 4. So, if your disk is MBR style, you need to create an Extended Partition first. To do that, you just keep the default value and change the Create as parameter. If your disk is GPT style, skip this step.
The “swap” partition should be 2048 (MB) and its File System should be Linux-swap. Use the same way to create the “/” partition. This time, you don’t need to change anything. Just label the partition as “/” and click Add.
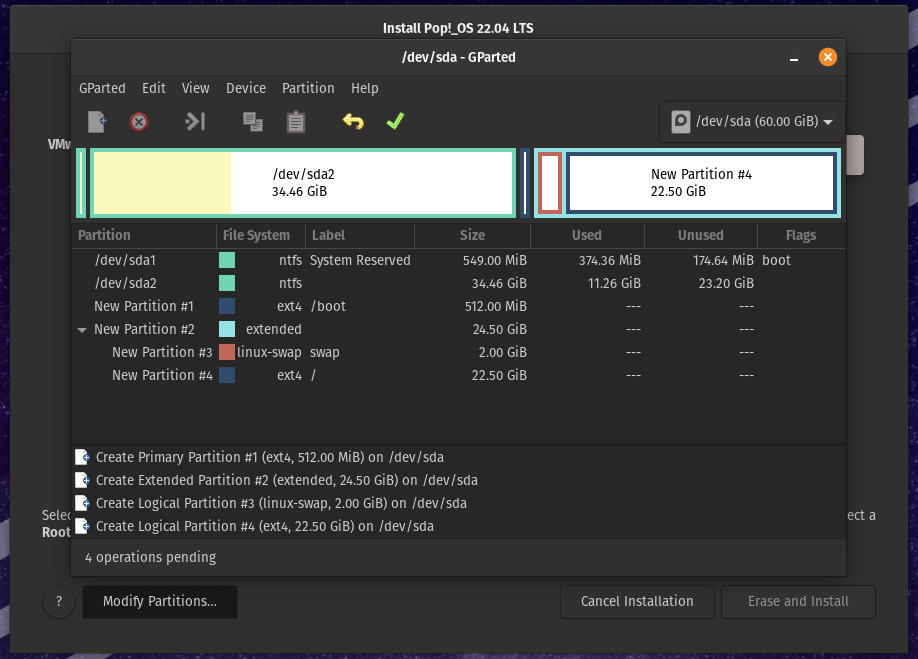
Click the green tick icon to execute all operations. Click Apply. After the operation is executed successfully, click Close. Then, close the GParted tool.
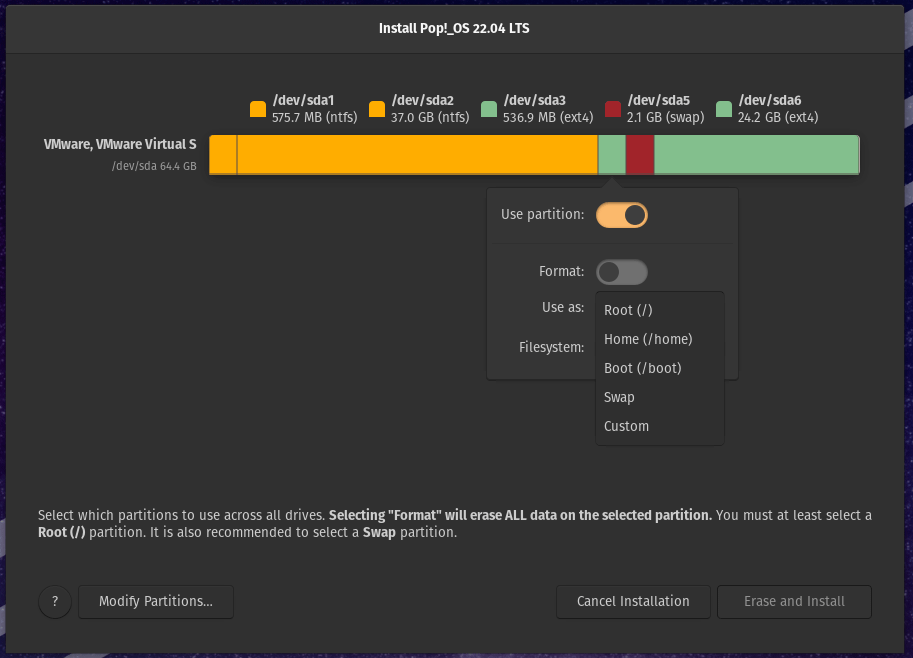
Click the /boot partition, toggle on Use Partition, and use it as Boot (/boot). Use the same way to set the Swap partition and the Root (/) partition. Then, click the Erase and Install button.
Step 4: Now, you can follow the steps described before to complete the Pop OS installation.
Here is a post showing you how to download and install Pop OS on a Windows PC in 3 ways. You can create a Pop OS VM, dual boot Pop OS and Windows, and replace Windows with Pop OS thoroughly.Click to Tweet
Bottom Line
Is this post useful to you? Have you encountered issues when downloading and installing Pop OS? Share them with us in the following comment zone. In addition, if you encounter problems when using MiniTool Partition Wizard, please feel free to contact us via [email protected]. We will get back to you as soon as possible.