
PlantUML README
Rich PlantUML support for Visual Studio Code.
Notice
The server render is now very recommended by this extension, since it’s much faster and much easier to setup, while the major weakness has been improved:
- Enables
POSTmethod, you can now render very-large diagrams - The extension comes with a new
include processor, you won’t encounter include problems again.
To make sure you can benifit from this update, make sure your plantuml server enables POST support.
If not, like the official https://www.plantuml.com/plantuml, the extension falls back to use GET, and you may still encounter 414 URI Too Long errors. Setup your own server is recommended.
See also: About Render
Features
- Preview Diagram, Press Alt + D to start PlantUML preview (option + D on MacOS).
- Auto update.
- Zoom & scroll support.
- Multi-Page Diagram support.
- Instant preview, if diagram’s been exported.
- From local or server.
- Snap to Border
- Export Diagrams
- At cursor, in current file, in whole workspace, in workspace selected.
- Concurrent export.
- Generate URLs.
- Multi-Page Diagram support.
- From local or server.
- Image map (cmapx) support.
- Editing Supports
- Format PlantUML code. (Deprecated)
- All type syntax highlight.
- All type snippets.
- Basic auto completion & macro signature support
- Symbol List support.
- Others
- Multi-root Workspace Support.
- MarkDown integrating support. View Demo
- Extracting source from images support.
Notice: If you use customize
plantuml.jar, please update to the latest version to enableMulti-Page Diagram support. (Later thanV1.2017.15)
Format PlantUML code is Deprecated. Don’t depend on it, use it only when it works right. I had force disable it in auto-format cases (format on save).
Supported Formats
*.wsd, *.pu, *.puml, *.plantuml, *.iuml
How to install
Launch VS Code Quick Open (Ctrl+P), paste the following command, and press enter.
ext install plantuml
Requirements
Depend on which render you choose, plugin has diffrerent requirements.
Requirements for PlantUMLServer render
A plantuml server. See Use PlantUML Server as render.
Requirements for Local render
It’s necessary to have following installed:
- Java : Platform for PlantUML running.
- Graphviz : PlantUML requires it to calculate positions in diagram.
Quick Install for Mac
brew install --cask temurin
brew install graphviz
Quick Install for Windows
The plugin has an integrated copy of plantuml.jar and GraphViz, so you are normally good to go.
But if you want to use your own jar or a different version of GraphViz (maybe a newer version, or with many dependent jars):
- download the latest
plantuml.jaror install it using chocolatey (see below). - specify the jar location with the extension setting
plantuml.jar. - specify the GraphViz installation by defining the Windows environment variable
GRAPHVIZ_DOT, e.g.,c:\program files\graphviz\bin\dot.exeif you installed plantuml with chocolatey, which automatically installs the latest GraphViz as a dependency.
Choco install
For windows users, majkinetor introduced a way to install plantuml and its dependencies easily.
Run cmd.exe as Administrator, and run two commands as follows (the first command is not needed and will fail if you already have chocolatey installed).
@"%SystemRoot%\System32\WindowsPowerShell\v1.0\powershell.exe" -NoProfile -ExecutionPolicy Bypass -Command "iex ((New-Object System.Net.WebClient).DownloadString('https://chocolatey.org/install.ps1'))" && SET "PATH=%PATH%;%ALLUSERSPROFILE%\chocolatey\bin"

choco install plantuml
If you’ve installed java, but still prompts «java not installed», please add java bin path to
PATHenvironment variable.
Typical Files Organization
- Default extension settings works for independent Plantuml projects.
- If Plantuml files are only part of your project (as documetation), use
plantuml.diagramsRootandplantuml.exportOutDirto setting up the organization, for example:
"plantuml.diagramsRoot": "docs/diagrams/src",
"plantuml.exportOutDir": "docs/diagrams/out"
You’ll get export results like:
Project Folder/
  docs/
    diagrams/
      src/
        architecture_overview.wsd
      out/
        architecture_overview/
          architecture_overview.png
  ...rest_of_your_project_folders/
  ...rest_of_your_project_files
Include Files Search Logic
Latest version has changed the include files search logic once again.
It is possible to configure includepaths now in settings.json.
The new search order is as follows:
- The folder of the rendered file
- The
includepathsas configured in settings.json
"plantuml.includepaths": ["docs/diagrams/style","docs/diagrams/src"],
- The
diagramsRoot
The setting includeSearch is not needed anymore, since the folder of the plantuml file and the diagramsRoot are always both in the include path.
To new projects, it’s recommended not to rely on diagramsRoot and configure all required includepaths explicitly.
Thanks anotherandi for the brilliant idea and implementation!
Preview Demos
Preview page provides various zoom/pan actions and snap feature:
- Zoom operations (since version 2.7.0):
- Zoom to select area
- Pinch to zoom (TouchPad)
- Click to zoom in, alt + click to zoom out
- Ctrl + mouse scroll to zoom in/out
- Middle mouse button click to toggle zoom
- Zoom in / zoom out / toggle buttons of the controls bar.
- Pan operations (since version 2.7.0):
- Right mouse button drag
- Two-finger move to pan (TouchPad)
- Mouse scroll
- Snap to border (since v2.8.0):
- Scroll to most bottom/right/top/left, preview will snap to that border.
e.g. Snap to Bottom is useful while writing long activity diagrams, which helps you keep focus in the latest part in the bottom.
Auto update:

zoom & scroll:

Multi-Page View:

Export Demos
Export diagram:

Generate URLs


About Format

PlantUML formatter is disabled (since v2.8.3) if
editor.formatOnSaveis on.
Because the formatter is not reliable enough according to user feedbacks.
About Snippets

This plugin integrates all type diagram snippets. They are splitted into 9 sections:
diagram: snippets for general diagrams elements.activity: snippets for activity diagrams.class: snippets for class diagrams.component: snippets for component diagrams.state: snippets for state diagrams.usecase: snippets for usecase diagrams.sequence: snippets for sequence diagrams.ui: snippets for salt diagrams.egg: snippets for some funny diagrams, like sudoku, earth.
For exsample, type acife (short version) to trigge following snippet (activity➤if・else):
if (cond1?) then (val1)

else (val2)

endif
About Symbol List (List diagrams of file)

Press Ctrl+Shift+O to list all diagrams in the file. You can name the diagram when diagram starts.
@startuml diagram name
sudoku
@enduml
About Render
Plugin supports two renders: Local and PlantUMLServer.
Local is the default and traditional way. If you care more about export speed, you should try PlantUMLServer.
Local: 6 documents, 9 digrams, 14 files exported in 24.149 seconds
PlantUMLServer: 6 documents, 9 digrams, 14 files exported in 1.564 seconds
Advantages and Disadvantages of PlantUMLServer Render
Advantages:
- 15X times faster export and much quicker preview response.
- Don’t have to set local enviroments if you have a server in your team.
- You don’t need
plantuml.exportConcurrency, because it’s unlimited in concurrency.
Disadvantages:
- ~~Cannot render very-large diagrams (414 URI Too Long).~~
- ~~Cannot render diagrams with
!includein it.~~ - Less format support: png, svg, txt.
- Some settings are not applicable:
plantuml.jar,plantuml.commandArgs,plantuml.jarArgs.
Use PlantUML Server as Render
To render very-large diagrams with include support, please make sure your plantuml server enables
POSTsupport.If not, like the official https://www.plantuml.com/plantuml, the extension falls back to use
GET, and you may still encounter414 URI Too Longerrors.Setup your own server is recommended.
-
You may already have a PlantUML server in your team, find the server address, like:
http://192.168.1.100:8080. -
If don’t have one, set up following the instructions, run with Docker is recommended. Find the server address, like:
http://localhost:8080, orhttp://192.168.1.100:8080which is ready for sharing to your team. -
Another option for running a PlantUML server on your local machine is to use the built in picowebserver, which can be as simple as running
java -jar plantuml.jar -picoweb, read more here: https://plantuml.com/picoweb -
Open user setting, and configure like:
"plantuml.server": "http://192.168.1.100:8080",
"plantuml.render": "PlantUMLServer",
Multiple languages support
Translations are welcome. lang.nls.json, package.nls.json
MarkDown integrating

@startuml / @enduml is still recommended, so that PlantUML code in Markdown can be managed by other function of this plugin.
Extension Settings
This extension contributes the following settings.
Render Select:
plantuml.render: Select diagram render for both export and preview.
PlantUMLServer Render Settings:
plantuml.server: PlantUML server to generate UML diagrams on-the-fly.
Local Render Settings:
plantuml.java: Java executable location.plantuml.commandArgs: commandArgs allows you add command arguments to java command, such as-DPLANTUML_LIMIT_SIZE=8192.plantuml.jar: Alternate plantuml.jar location. Leave it blank to use integrated jar.plantuml.jarArgs: jarArgs allows you add arguments to plantuml.jar, such as-config plantuml.config.plantuml.includepaths: Specifies the include paths besides source folder and thediagramsRoot.
Export Settings:
plantuml.diagramsRoot: Specifies where all diagram files located (relative to workspace folder).plantuml.exportOutDir: Exported workspace diagrams will be organized in this directory (relative path to workspace folder).plantuml.fileExtensions: File extensions that find to export. Especially in workspace settings, you may add your own extensions so as to export diagrams in source code files, like «.java».plantuml.exportFormat: format to export. default is not set, user may pick one format everytime exports. You can still set a format for it if you don’t want to pick.plantuml.exportSubFolder: export diagrams to a folder which has same name with host file.plantuml.exportIncludeFolderHeirarchy: include folder heiracrchy between the root and the source diagram in the exported file path.plantuml.exportConcurrency: decides concurrency count when export multiple diagrams.plantuml.exportMapFile: Determine whether export image map (.cmapx) file when export.
Preview Settings:
plantuml.previewAutoUpdate: Dedecides if automatically update the preview window.
Other Settings:
plantuml.urlFormat: URL format. Leave it blank to pick format everytime you generate a URL.plantuml.urlResult: URL result type. Simple URL or ready for MarkDown use.plantuml.lintDiagramNoName: Decides if it should lint when diagram is unmaned.
Known Issues
Please post and view issues on GitHub
Thanks
- Kohei Arao
- zhleonix
- Eward Song
- Martin Riedel
Translators
- Japanese: Kohei Arao, kannkyo
- Tranditional Chinese: Alan Tsai
- German: Fabian F.
- French: Zepmanbc, FlorianKempenich
- Danish: Mikkel O. Laursen
Donators
Thanks for your encouragements!
Claus Appel, 三島木一磨, 富吉佑季, 黒田悦成, Jared Birdsall, Suleyman Cabir Ciplak, Malcolm Learner, Сысоев Максим, Gokan Kenichi, anb0s, Lawrence Yarian, Ahmad Ragab, 山田暁通
Enjoy!
В Visual Studio 2017 с удивлением обнаружил отсутствие проектов для моделирования (UML). Нет, можно запустить 2015, но держать две студии как-то не комильфо, да и при параллельном изменении диаграмм появляется проблема с потерей изменений того, кто сохранил не последним.
Озадачившись вопросом, что можно использовать для построения UML диаграмм, наткнулся на PlanUML. Что это такое? Да много чего. Нотация, парсер и куча плагинов к наиболее распространенным средам разработки. Существенным достоинством данного подхода является хранение диаграмм в виде plan-text, т.е. файл с моделью – это просто текстовый файл. При изменении файла несколькими людьми в параллели, даже если в результате коммитов он разъедется, всегда можно будет посмотреть, кто и какие изменения внес, и смержить их руками. Не все, к сожалению, радужно. Применить PlantUML для хоть немного серьезной ArchiMate диаграммы (да, он и это умеет) не получилось. То ли я не владею дао, то ли в случаях, когда расположение элементов играет существенную роль, его применять не получится. Но не суть, мы сегодня про UML, поэтому, устанавливаем и начинаем работать с PlantUml. Поехали.
Установка
1. В Visual Studi Code переходим в расширения и поиском находим PlantUML от jebbs-а. Ставим его.
2. Устанавливаем Java.
3. Перезагружаем компьютер.
4. Устанавливаем Graphviz.
Использование
Начнем с самого простого примера. В Visual Studio Code создаем новый файл и сохраняем его как Diagram с расширением, например, wsd.
В файле пишем:
PlantUML is a nice tool to create UML diagrams in a markup style way.
In this guide I’ll show you how to set it up for Atom on Windows, whereas the steps are quite similar on Linux or Mac.
I think it’s a powerful tool that lets you draw your diagrams quickly.
Table of Contents
- What’s PlantUML?
- Requirements
- Atom Packages and Settings
- Resources
What’s PlantUML?
PlantUML helps to quickly and easily create UML diagrams using simple and intuitive language.
It is opensource and free.
A markup like description of the diagram can be converted to a graphical diagram as shown below

Requirements
To create and view your UML diagrams in Atom you first need to install a few things:
(for Linux and Mac just check how to install Graphviz and Java Runtime Enivronment, the plantUML jar is the same for every plattform)
plantUML jar
The jar file can be downloaded here.
Then you just have to save it to a place of your liking, I’ve saved it to my users folder.
Be sure to remember where you saved it.
Graphviz
The installation exe for Graphviz can be found here.
Just install it following the wizard, no need to add it to PATH, and again remember the install location.
Java Runtime Enivronment
To run plantUML we also need a Java Runtime Environment.
If not already installed we can get the latest version at https://www.java.com/en/download/
Atom Packages and Settings
Now in Atom we need to install these two packages:
- language-plantuml
- plantuml-preview
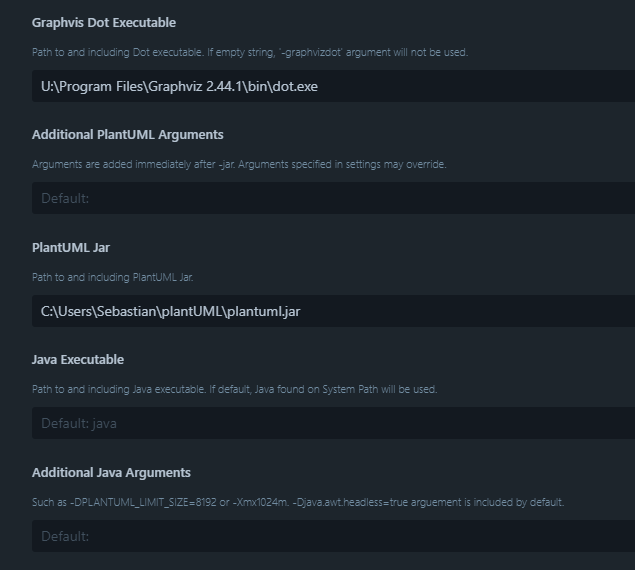
Then in the settings of plantuml-preview we need to set the location for the Graphviz dot executable and the plantUML.jar.
From the install locations we remembered from before we set the dot location to Graphviz_install_location/bin/dot.exe and the jar to jar_location/plantUML.jar.
Now we can toggle the preview with ctrl/cmd + alt + P.
To save the diagram as either png or svg just uncheck the use of the temp directory and reload the preview, then the image will be saved in the same directory.
Resources
- http://trevershick.github.io/atom/2015/12/04/plantuml-snippets.html
- https://plantuml.com
- https://graphviz.org
What is PlantUML?
PlantUML is a simple diagram creation tool that uses a simple plain text language to generate visual diagrams.
This tool is amazing because it allows you to store your diagrams as text in source control, allowing you to see changes in your diagrams over time.
Example PlantUML Diagram Components
A simple Plant UML Diagram will have a text component and an image component:
Example PlantUML Code
Bob->Alice : Hello!
Example PlantUML Visual Diagram
The code listed above gets outputted to this:
Adding PlantUML Support to Visual Studio Code
Now that we have a basic understanding of what PlantUML is, let’s add support for it in Visual Studio Code.
Install the PlantUML Extension in Visual Studio Code
Open up the extensions tab in VS Code and search for PlantUML, we want to install the PlantUML extension by jebbs.
Click the blue install button to install the extension.
Install PlantUML Dependencies — Java and GraphViz
In order to create the diagrams properly, you must have Java and GraphViz installed.
Installing Java on Windows 10
What is Java?
Java is a programming language and computing platform first released by Sun Microsystems in 1995. It has evolved from humble beginnings to power a large share of today’s digital world, by providing the reliable platform upon which many services and applications are built. New, innovative products and digital services designed for the future continue to rely on Java, as well.
Source: What is Java?
We can assume that you already have Java installed for Windows 10, but if you don’t, you will need to download Java for Windows.
Installing GraphViz on Windows 10
What is GraphViz?
Graphviz is open source graph visualization software. Graph visualization is a way of representing structural information as diagrams of abstract graphs and networks. It has important applications in networking, bioinformatics, software engineering, database and web design, machine learning, and in visual interfaces for other technical domains.
Source: What is GraphViz?
For windows, you can go here to download GraphViz for Windows.
For most users you will want to select the latest version of GraphViz, which is 3.0.0.
For 64-bit machines, click download graphviz-3.0.0 (64-bit) which is roughly in the middle of the download page.
When prompted in the GraphViz installer, you should select Add GraphViz to the system PATH for all users.
You can optionally select Create GraphViz Desktop Icon.
IMPORTANT: We recommend restarting your machine after you install Java and GraphViz, otherwise your PlantUML Preview will be empty or show an error!
Create a New PlantUML Diagram
Now that we have the extension installed along with Java and GraphViz, we want to create a test PlantUML diagram.
We can create the diagram in any folder within our current project.
WE created a PlantUML diagram file named test-diagram.puml:
The file has the following contents:
@startuml Test Diagram
User->World : Hello World!
Previewing PlantUML Diagrams in VS Code
Once we have created a plant uml diagram with the file extension of .puml, we can open the diagram and hit ALT + D to preview the PlantUML diagram.
Alternatively, you can also hit F1 to bring up the show all commands menu and then select PlantUML: Preview Current Diagram.
Once you kick off the preview process, you will see the processing animation in VS Code, and then the diagram will appear.
Exporting PlantUML Diagrams in VS Code
Once we have finalized our PlantUML diagram and the preview looks acceptable, we can now export the diagram to an exportable file type.
We will hit F1 to bring up the show all commands menu and then select PlantUML: Export Current Diagram.
We are then prompted to select the export file type.
The following file types are supported:
- png
- svg
- eps
- vdx
- xmi
- scxml
- html
- txt
- utxt
- latex
- latex:nopreamble
For demo purposes, we will just export to a png image file.
The exported diagrams are automatically saved to a newly added out folder in the root of your project.
By default diagrams are added to /out/public/plantuml/test-diagram.
In the next section we will see how we can customize the default export directory.
Customizing The Default PlantUML Export Directory
The default export directory is completely configurable.
To configure the default PlantUML export directory, open up the extensions tab, search for the installed PlantUML extension and click the gear icon, then click Extensions Settings.
In the very top of the extension settings page, click edit in settings.json.
Then at the bottom of the json you can add a custom plantuml.exportOutDir property.
For example, if we want to output all exported PlantUML diagrams to be saved to docs/plantuml/exports, we would add the following property to the settings.json file:
"plantuml.exportOutDir": "docs/plantuml/exports"
Now every time we export a diagram, the exported file will be saved to that directory.
Customizing The Default Diagram Root Folder
In addition to setting the default export directory, we can also set a default root directory where all of our .puml files will live.
This can help to keep things organized if your diagrams will also live alongside your actual code files in your code base.
To configure the default PlantUML diagram root directory, open up the extensions tab, search for the installed PlantUML extension and click the gear icon, then click Extensions Settings.
In the very top of the extension settings page, click edit in settings.json.
Then at the bottom of the json you can add a custom plantuml.diagramsRoot property.
For example, if we want to set the default PlantUML diagram root directory to docs/plantuml/diagrams, we would add the following property to the settings.json file:
"plantuml.diagramsRoot": "docs/plantuml/diagrams"
Additionally, we can set both of the PlantUML settings (exportOutDir and diagramsRoot).
Here is an example of both customized properties:
"plantuml.exportOutDir": "docs/plantuml/exports",
"plantuml.diagramsRoot": "docs/plantuml/diagrams"
Now all of our PlantUML diagrams will be neatly organized together!
Visual Studio Code Plantuml Preview Not Working
If your PlantUML diagram is empty or not working after running the command PlantUML: Preview Current Diagram, make sure you have Java and GraphViz properly installed. Then fully restart your computer and the issue will be resolved.
Wrapping Up Support for PlantUML in Visual Studio Code
We have fully integrated support for creating, previewing, and exporting PlantUML diagrams in Visual Studio Code.
Now you don’t have an excuse to not create sharable diagrams for your projects!
Happy Coding!
Пишу диаграммы последовательностей текстом (кодом). Вы тоже можете
Время на прочтение5 мин
Количество просмотров39K
Я работаю бизнес-аналитиком. Создание диаграмм последовательностей (sequence diagram) – часть регулярной рутины. Всё классно. Но процесс правок…
-
даже незначительные изменения – это долго потому, что нужно много всего подвинуть и состыковать;
-
исходников может не сохраниться и приходится создавать диаграмму заново;
-
иногда проще сделать новую диаграмму, чем править существующую.
Такая нерациональная трата времени и сил раздражает.
Как и многие, я использую визуальные инструменты для создания диаграмм последовательностей: Visio и Draw.io. С их помощью можно составлять схемы из различных готовых фигур. Именно при таком подходе процесс внесения правок может быть болезненным. Особенно для перфекционистов, которым важно чтобы все на схеме было ровненько до пикселя.

К счастью, я нашел для себя способ, при котором все элементы схемы стоят идеально ровно, а внесение исправлений занимает минимальное количество времени. Теперь я не рисую sequence diagram, а пишу кодом. Это легко, быстро и удобно.
-
Процессы взаимодействия систем описываются текстом, а аккуратная картинка (диаграмма) отрисовывается сама.
-
Правки вносятся также, как и в любой текст – посредством добавления нужного количества строк. На изображении всё само двигается, подставляется в нужных местах и опять аккуратно выглядит.
-
Исходники хранятся в виде текстовых файлов которые, по сравнению с картинками, почти ничего не весят. Вы можете подключить Git репозиторий к проекту и хранить там все обновления. Картинка нужной версии диаграммы формируется автоматически из кода за несколько секунд запуском одной команды.
Выглядит как магия. Жаль, что я раньше так не умел.
Недостатки описания диаграмм кодом
Есть свои сложности у этого подхода. Не напрасно визуальный способ создания диаграмм последовательностей так широко распространен. У него низкий порог входа. Просто берешь и делаешь. Проблемы начинаются позже – в процессе использования.
При описании диаграмм кодом все наоборот – сначала немного нужно потрудиться, чтобы потом полегче жилось.
Основные минусы:
-
Для того, чтобы писать диаграмму кодом необходимо выучить (или знать где подсмотреть) синтаксис описания схемы. Он простой и логичный. Запоминается быстро. Но поначалу может быть сложно.
-
Процесс локальной установки расширения PlantUML неочевиден. Мне пришлось “потанцевать с бубном” некоторое время. Инструкцию прилагаю.
Где писать диаграммы кодом?
В качестве инструмента для создания диаграмм последовательностей кодом я выбрал PlantUML.
Можно использовать онлайн версии данного ПО, представленные на разных площадках:
-
https://www.planttext.com/
-
https://plantuml-editor.kkeisuke.dev/
-
http://www.plantuml.com/plantuml/uml/SyfFKj2rKt3CoKnELR1Io4ZDoSa70000
Можно установить PlantUML локально на свой компьютер.
Как установить PlantUML локально на Mac OS
Я использую связку Visual Studio Code + расширение к нему PlantUML на операционной системе Mac OS (процессор intel).
Для достижения желаемого нужно:
-
Установить редактор Visual Studio Code.
Просто скачайте VS Code для своей операционной системы, запустите установку, следуйте инструкциям системы. -
Установить расширение PlantUML для VS Code.
-
Перейдите на вкладку “Расширения” в VS Code
-
В строке поиска найдите PlantUML (автор jebbs)
-
Выбрав расширение нажмите “Установить”
-
P.S. Пишут, что PlantUML можно установить прописав команду в терминале VS Code ”ext install plantuml”, но я не пробовал 

Также рекомендую установить языковой пакет для русского “Russian Language Pack for Visual Studio Code” от Microsoft.
-
Чтобы PlantUML корректно работал, дополнительно нужно установить:
-
Java
-
Graphviz
-
Переходим на официальный сайт и устанавливаем Java.
Проблем возникнуть не должно (скачиваете установщик и запускаете процесс).
Для установки Graphviz придется немного постараться.
На официальном сайте Graphviz написано, что для установки на Mac нужно запустить в терминале VS Code команду “sudo port install graphviz”, НО.. команда не сработает, потому что не установлен “пакет” для использования “port” для вашей ОС.
Погуглив “How to Install graphviz on Mac OS” нашел решение.
-
Чтобы решить проблему, возникшую на третьем шаге, необходимо перейти на сайт macports.org и скачать установщик для своей версии операционной системы. Запустить установку. После того, как процесс завершиться удачно можно вернуться к тому, что не удалось на предыдущем этапе. Для этого потребуется в терминале VS Code запустить команду “sudo port install graphviz” и дожидаемся окончания процесса. Он займет несколько минут.
Всё. Установка завершена. Как теперь этим пользоваться?
Как создавать, изменять и сохранять диаграммы в PlantUML
Создание диаграммы последовательностей
Создаем новую папку для проекта.
Создаем новый файл в одном из рекомендуемых расширений *.wsd, *.pu, *.puml, *.plantuml, *.iuml (я использую для наглядности *.plantuml).
Пишем свою первую схему в локальном редакторе:
@startuml test_name
    autonumber

    actor Client

    participant UI
    participant Back

    activate Client
        Client -> UI: Запрос 1

    activate UI
        UI -> Back: Запрос от клиента

    activate Back
        Back -> Back: Думает
        UI <-- Back: Ответ от Back

    deactivate Back
        Client <-- UI: Ответ от UI

    deactivate UI
    deactivate Client
@enduml
Запускаем render картинки схемы сочетанием клавиш “Option + D” (Alt + D)

Сохранение диаграммы
Чтобы экспортировать изображения из PlantUML в .png или другие форматы:
-
Нажимаем правой клавишей мыши в той области, где написан код
-
Выбираем из списка пункт «Палитра команд»

-
В строке для ввода пишем «PlantUML: Export Current Diagram» (доступны и другие похожие действия)

-
Выбираем в каком формате нужно сохранить файл, например, *.png
-
После сохранения, готовый файл будет создан и сохранен автоматически в папку проекта
Внесение изменений в диаграмму
Добавим на схему комментарий.
Для внесения правок в схему просто добавим одну строчку кода и запустим генерацию схемы:
@startuml test_name
    autonumber

    actor Client

    participant UI
    participant Back

    activate Client
      Client -> UI: Запрос 1

    activate UI
      UI -> Back: Запрос от клиента

    activate Back

      note right of UI: важное пояснение

      Back -> Back: Думает
      UI <-- Back: Ответ от Back

    deactivate Back
      Client <-- UI: Ответ от UI

    deactivate UI
    deactivate Client
@endumlОзнакомиться с используемым в Plantuml синтаксисом и другими видами диаграмм можно на страницах официального гайда: https://plantuml.com/ru/guide
Лично я очень доволен своим переходом к способу создания UML-диаграмм кодом. Ни разу не пожалел о том, что потратил время на процесс установки и отладки инструментов. Теперь они экономят мне нервные клетки. Хотя получилось всё не сразу. Надеюсь, что мой опыт поможет кому-нибудь разобраться в процессе быстрее.