
-
Computational Mechanics Software
3
-
1.1
CalculiX-to-Paraview Converter, R210726
-
1.2
CalculiX 2.17 Binary Executables on Ubuntu 21.04, R210725
-
1.3
OpenFOAM v2106 System Package on Ubuntu 21.04, R210724
-
-
Numerical Modelling Software
4
-
2.1
FreeCAD CFD Workbench with OpenFOAM v2106, R210808
-
2.3
FreeCAD FEM Workbench with CalculiX 2.17, R210727
-
2.4
Gmsh 4.8.x Binary Package on Ubuntu 21.04, R210726
-
2.5
FreeCAD 0.19.x installation on Ubuntu 21.04, R210721
-
-
Development Environment Tools
6
-
3.1
Ruby Installation on WSL/Ubuntu via RVM, R210830
-
3.2
Ruby installation on Ubuntu 21.04 via RVM, R210828
-
3.3
Conda environments on Ubuntu 21.04 using Miniconda3, R210723
-
3.4
Python and Virtual Environments on Ubuntu 21.04, R210723
-
3.5
Node.js Installation on Windows 10 (R210516)
-
3.6
Node.js Installation via NVM on Ubuntu 21.04 (R210516)
-
-
-
4.1
ParaView 5.9.x Binary Package on Windows 10, R210723
-
4.2
ParaView 5.9.x Binary Package on Ubuntu 21.04, R210723
-
-
-
5.1
Ubuntu 21.04 on Windows 10 using VirtualBox, R210926
-
5.2
VirtualBox 6.1.x Installation on Windows 10, R210830
-
5.4
Ubuntu Docker Workspace using Nvidia/Cudagl Image, R210722
-
5.5
Ubuntu 20.04 Subsystem on Windows 10 using WSL, R210719
-
Asked By
10 points
N/A
Posted on — 11/16/2014
Kindly help me with your expert advice on how to install Paraview on Windows. I have tried several times to install this visualization software on a Windows operating system and configure it to process 3D images but unfortunately it has proven to be an unsuccessful venture. Could you please help me with some guidelines on how I can install and configure Paraview for a Windows machine? How do I read in a 3D data? Which file formats are acceptable in Paraview and how do I import them?
Answered By
points
N/A
#190499
Hello,
ParaView is quite a good open-source data analyzing and visualization application. Windows, on the other hand, the most popular OS all over the world. In order to make this application available for Windows users, ParaView officially releases binary for Windows.
Download ParaView for Windows. It’s recommended to download the EXE installer file from their site.
It’s as normal as running other application on Windows. Just run the installer, it’ll create Start menu shortcut to run the application. Start the program and let your joy begin.
For documentation, you can contact their official documentation page.
Last Verified: 2025-01-27
Overview
ParaView is an open-source, multiplatform data analysis and visualization application found at ParaView.org. ParaView users can quickly build visualizations to analyze their data using qualitative and quantitative techniques. The data exploration can be done interactively in 3D or programmatically using ParaView’s batch processing capabilities.
ParaView was developed to analyze extremely large datasets using distributed memory computing resources. It can be run on supercomputers to analyze datasets of petascale as well as on laptops/desktops for smaller data.
Environment
Machines and Versions
See LC visualization software page.
Location
Links to the latest version exist in /usr/tce/bin
Multiple versions may be accessible via modules. Type module avail paraview to see the available options. You can specify a particular version in the module command, e.g., module load paraview/5.11.0
The actual installation directories are in /usr/tce/packages/paraview and /usr/gapps/paraview/ParaView
Settings
The module load paraview command will setup your PATH and any other needed environment variables.
X forwarding is not supported by the latest versions of ParaView! X forwarding cannot support newer versions of OpenGL and several required OpenGL extensions. Therefore, the ParaView client GUI should not be run remotely.
Instead, ParaView should be run in client-server mode, which connects a local workstation’s ParaView installation to an instance of ParaView running on an LC host. This allows access to the data and processing power that is available on the LC systems. It also runs far more efficiently than over X forwarding, and provides a more responsive interface. Please see the additional setup instructions for Running ParaView in Client-Server Mode.
If you still encounter OpenGL errors when trying to connect via client-server mode, try running module load opt mesa before starting the ParaView server.
Connecting from Windows
Unfortunately, even the older ParaView client is not compatible with X-Win32 on Windows. When connecting from a Windows system, ParaView must be installed locally and run in client-server mode (see Running ParaView in Client-Server Mode).
Usage
ParaView is not compatible with X11 forwarding. To use ParaView on an LC system, ParaView should be installed locally and run in client-server mode (see Running ParaView in Client-Server Mode).
Help
Several links to ParaView documentation, guides, tutorials, and other resources are provided in the «Help» menu within the ParaView application. They are also available directly from the ParaView Resources web page.
An excellent and wide-ranging set of tutorials is available via the ParaView Tutorials page.
Further LLNL specific help is available from the LC Hotline: lc-hotline@llnl.gov, (925) 422-4531.
Download
You can install ParaView on your local workstation; there is no license restriction. Downloads for Windows, Linux, and MacOS, as well as for building from source code are all available on the ParaView Download webpage.
Links
- ParaView Home Page
- ParaView Tutorials
- Running ParaView in Client-Server Mode
How do I install ParaView on Windows 10?
Download and install ParaView for Windows Click on the Resources -> Download link on the toolbar at the top of the page and then select v4. 1 (release candidates) from the Version of ParaView pull-down. Pick the one for release candidate 2 that matches your architecture and download it.
How install ParaView in Linux?
Prerequisites
- Download And Install CMake.
- Download And Install Qt.
- Download And Install ffmpeg (.avi) movie libraries.
- Download And Install MESA 3D libraries.
- Download ParaView Source Code.
- Configure ParaView With CMake.
- Build ParaView.
- Run ParaView from build.
How do I run ParaView on Windows?
Start ParaView
- On Windows, go to Start → All Programs → ParaView 5.x.x → and click ParaView.
- On Mac, in the finder, go to the ParaView directory (in the Application directory where you installed ParaView) and click on “paraview”.
- On Linux go into the ParaView directory (where you downloaded ParaView) and type “paraview”.
Why do we use ParaView?
ParaView users can quickly build visualizations to analyze their data using qualitative and quantitative techniques. The data exploration can be done interactively in 3D or programmatically using ParaView’s batch processing capabilities.
Is ParaView open source?
ParaView is an open-source, multi-platform data analysis and visualization application. ParaView is known and used in many different communities to analyze and visualize scientific data sets. It can be used to build visualizations to analyze data using qualitative and quantitative techniques.
How do you install OpenFOAM?
Install OpenFOAM
- Click on the link OpenFOAM-v2012-windows10.
- Start Bash on Ubuntu by typing bash in search toolbar, and click on the Desktop app Bash on Ubuntu on Windows.
- In the bash-terminal, copy OpenFOAM-v2012-windows10.tgz from the Download folder to the local bash-environment by typing command.
How install Paraview 5.8 Linux?
You probably have some link to system ParaView that you are finding….Install Paraview 5.8
- Download a new version of Paraview from the paraview.org website. Untar this.
- cd to the bin directory.
- Run as follows: ./paraview. This will run in the bin directory, rather than the first “paraview” that is found in your path.
How do you install open foam?
How do I open a ParaView file?
You can also use the keyboard shortcut CTRL + O (or ⌘ + O ) to open this dialog. The Open File dialog allows you to browse the file system on the data processing nodes. This will become clear when we look at using ParaView for remote visualization.
Who uses ParaView?
Is ParaView open-source?
ParaView is an open-source, multi-platform data analysis and visualization application. ParaView users can quickly build visualizations to analyze their data using qualitative and quantitative techniques.
Can we install OpenFOAM on Windows?
The packaged distributions of OpenFOAM for Ubuntu can now be installed directly on Microsoft Windows 10 using Windows Subsystem for Linux (WSL). WSL provides a full compatibility layer for running Linux applications on Windows by performing real-time translation of Linux system calls into Windows OS system calls.
How does ParaView work?
The underlying visualization pipeline that ParaView uses comes from VTK. The visualization pipeline is responsible for constructing a geometric representation of the data set that is then rendered by the graphics hardware. The visualization pipeline transforms informational data into graphical data.
What can ParaView do?
Does OpenFOAM work on Windows 10?
From OpenFOAM-v1706, users can now run OpenFOAM using Bash on Ubuntu on Windows. This utility, referred to as the Windows Subsystem for Linux (WSL) uses the genuine Ubuntu image provided by Canonical, the group behind Ubuntu Linux.
Introduction
ParaView is an open-source, multi-platform data analysis and visualization application. ParaView users can quickly build visualizations to analyze their data using both qualitative and quantitative techniques. The data exploration can be done interactively in 3D or programmatically using ParaView’s batch processing capabilities. ParaView was developed to analyze extremely large datasets using distributed memory computing resources and can be run on supercomputers to analyze terascale datasets, as well as on laptops for smaller data.
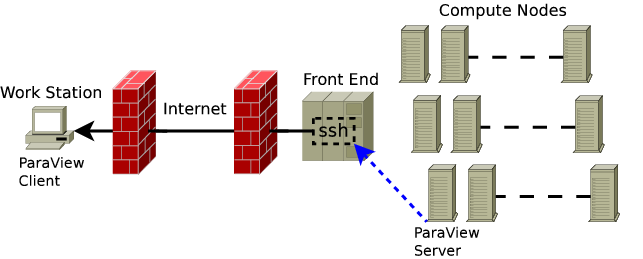
Remote Visualization with ParaView
ParaView is a client-server application. The ParaView client (or simply paraview) will run on your desktop while the server will run at the remote supercomputing site. The following describes the steps you will take to install ParaView on your desktop and configure it so that you can launch parallel jobs on remote systems from within the ParaView GUI. Running ParaView remotely in a client-server configuration involves establishing an ssh tunnel to the login node, launching the ParaView server, and connecting the server to the client over the tunnel via a socket.
Install the ParaView Client
The first step is to install ParaView on your local machine. It is recommended that you use the binaries provided by Kitware on your workstation matching the NERSC installed versions. This ensures client-server compatibility. The version number that you install must identically match the version you intend to connect to at NERSC.
| System | ParaView Version | Status |
|---|---|---|
| Perlmutter | 5.13.0 | Available |
| Perlmutter | 5.12.0 | Available |
| Perlmutter | <5.12.0 | Deprecated |
Use the following link to download the correct ParaView client binary version for your desktop environment: ParaView binaries.
Install Dependencies
In order to use ParaView remotely you will also need an ssh client and a terminal program.
- Linux. On Linux this functionality is provided by the ssh and xterm programs. These may need to be installed on Linux systems using your distribution’s package manager, e.g. apt or dnf.
- Windows. On Windows the ssh and terminal functions are provided by the programs plink.exe and cmd.exe, of which only cmd.exe will come pre-installed. The ssh client, plink.exe, needs to be installed before using ParaView. This program can be installed using the Windows installer from the PuTTY download site. The PuTTY install folder needs to be added to the system path after the install. This can be done in the Windows control panel, by opening Control Panel\System and Security\System , opening the Advanced System Settings page, and opening the Environment Variables dialog box.
- MacOS. On MacOS one may use the terminal provided by Apple and NERSC provided OSA script to connect to NERSC. The OSA script is provided in the following section. Alternatively on MacOS one may connect to NERSC servers via the Linux like configuration once XQuartz is installed. XQuartz may be installed on MacOS using brew.
Install the NERSC server configuration
NERSC provides an integrated server configuration that enables «point and click» ssh tunnel configuration, job configuration and submission, enabling users to quickly launch the ParaView server on NERSC systems.
- Close any instances of ParaView running on your desktop.
- Download the appropriate NERSC server configurations to your laptop or desktop. You can click to download or follow the link to copy the contents and save as the corresponding the pvsc filename.
- Open the ParaView client and click the Connect button or from the File menu choose connect. In the choose a server dialog box click the load servers button and select the NERSC server configuration.
The NERSC server configurations will now show up in ParaView’s connect menu.
Select The Appropriate Server Configuration From The Table
| ParaView Version | Operating System | ParaView Configuration | Launch Script |
|---|---|---|---|
| 5.13.0 | Linux | perlmutter-unix-v5-13.pvsc | none |
| 5.13.0 | Windows | perlmutter-win-v5-13.pvsc | none |
| 5.13.0 | MacOS | perlmutter-macos-v5-13.pvsc | perlmutter-macos.scpt |
| 5.12.0 | Linux | perlmutter-unix.pvsc | none |
| 5.12.0 | Windows | perlmutter-win.pvsc | none |
| 5.12.0 | MacOS | perlmutter-macos.pvsc | perlmutter-macos.scpt |
Note: The MacOS configuration requires an additional launch script which must downloaded and saved locally with execute permissions. When connecting to NERSC the first time through ParaView one must locate this file in the launch dialog. This should only be necessary on the first connection. Alternatively one may use the Linux configuration on MacOS if XQuartz (or some other X11 implementation) is installed.
Connecting to the Server on NERSC Systems
The steps are summarized below.
- Download the configuration script from the table above that corresponds to your operating system.
For MacOS: Download both the perlmutter-macos.pvsc and the launch script perlmutter-macos.scpt.
Make sure to give execute permissions to the script(s) by executing the chmod +x perlmutter-macos.pvsc and chmod +x perlmutter-macos.scpt (for MacOS) commands in the terminal.
- Open ParaView and select File->Connect from the menu.
- Select Load Servers in the window that pops up.
- Select the pvsc file in the pop-up window. Click OK.
- Click Connect on the window in Step 3. Configure the run by setting the username, account, architecture (cpu/gpu), number of processes, processes per socket, job wall time and QOS in the next pop-up window. Click OK.
For MacOS: specify the path and name of the launch script, perlmutter-macos.scpt in the last field.
One common issue for Mac users is that the ParaView client sometimes reports "The process failed to start. Either the invoked program is missing, or you may have insufficient permissions to invoke the program.". To resolve this, make sure to give the full path of the launch script — <path>/perlmutter-macos.scpt in the last field, and give execute permissions to the configuration and launch (for MacOS) scripts as given in Step 1.
- The Starting server dialog will be shown while the client waits for the server to start and connect back.
- The server configuration script will start an xterm allowing you to login to the selected system. Enter the Password+OTP and login. Click the Enter button. Then you can see the that job has been submitted to the queue. Press u to see the status of the job. The tunnel is established between the workstation and the remote system once the job is allocated. This window needs to stay open while you use ParaView. See the image immediately below for a similar example.
Running in Batch Mode
In batch mode the ParaView server runs on its own without a client executing a python script. Batch mode provides a way to automate common visualization tasks and alleviates the necessity of being present when the job executes. Log in to the desired system, and submit your job using the batch script pvbatch.
For more information execute pvbatch --help and an explanation of the required command line arguments will be printed.
Example ParaView Batch Python Script
The following ParaView batch script renders a sphere colored by MPI Rank. It can be used for basic testing.
from paraview.simple import *

s = Sphere()
s.ThetaResolution = 128
s.PhiResolution = 128

p = ProcessIdScalars()

rep = Show(p)
Render()

lr = p.PointData.GetArray("ProcessId").GetRange()
lut = GetLookupTableForArray("ProcessId",
          1,
          RGBPoints=[lr[0], 0.0, 0.0, 1.0, lr[1], 1.0, 0.0, 0.0],
          ColorSpace='Diverging',
          VectorMode='Magnitude',
          ScalarRangeInitialized=1.0)

rep.ColorArrayName = 'ProcessId'
rep.LookupTable = lut

Render()

WriteImage('pvbatch-test.png')
See Also
ParaView home page. http://www.ParaView.org