
OpenSSL is an open-source toolkit that implements the Secure Sockets Layer (SSL) and Transport Layer Security (TLS) protocols, widely used to secure communication between client-server applications and protect sensitive information over the internet.
In this tutorial, we will go through the steps of installing OpenSSL on Windows 10 operating system.
Prerequisites:
Before installing OpenSSL, make sure to have the following prerequisites in place:
- A Windows 10 machine with administrative access.
- A reliable internet connection to download the OpenSSL binary package.
- A text editor such as Notepad++ or Visual Studio Code to edit OpenSSL configuration files.
Step 1: Download OpenSSL Binary Package
The first step to install OpenSSL on Windows 10 is to download the binary package from the official website.
You can find the latest version of OpenSSL at https://slproweb.com/products/Win32OpenSSL.html
Once the download is complete, extract the contents of the ZIP file to a directory of your choice, for example, C:\OpenSSL-Win64.
Step 2: Set Environment Variables
The next step is to set the environment variables for OpenSSL.
To do this, follow these steps:
- Right-click on the Start button and select System.
- Click on Advanced system settings.
- Click on the Environment Variables button.
- In the System Variables section, scroll down and find the Path variable.
- Click on the Edit button.
- Click on the New button and add the following path: C:\OpenSSL-Win64\bin.
- Click OK to close all windows.
Step 3: Verify OpenSSL Installation
To verify that the OpenSSL installation was successful, open the Command Prompt and run the following command:
openssl versionThe output should display the version number of OpenSSL installed on your machine.
Step 4: Generate a Private Key and a Self-Signed Certificate
Once OpenSSL is installed, you can use it to generate a private key and a self-signed certificate.
A private key is a secret key that is used to encrypt and decrypt data, while a certificate is a public key that is used to verify the authenticity of the server.
To generate a private key and a self-signed certificate, follow these steps:
Open the Command Prompt and navigate to the OpenSSL bin directory by running the following command:
cd C:\OpenSSL-Win64\binRun the following command to generate a private key:
openssl genpkey -algorithm RSA -out private.pem -aes256
Run the following command to generate a self-signed certificate:
openssl req -new -x509 -key private.pem -out certificate.pemYou will be prompted to enter information about the certificate, such as the Common Name, Organization, and Country. Fill in the required information, and the certificate will be generated.
Conclusion
In this tutorial, we have gone through the steps of installing OpenSSL on Windows 10 operating system, setting the environment variables, verifying the installation, and generating a private key and a self-signed certificate.
OpenSSL is an essential tool for developers and technical writers who need to secure communication between client-server applications and protect sensitive information over the internet
What is OpenSSL?
OpenSSL is a single-system image clustering system that is open-source. It allows a group of computers to be viewed as a single colossal system, giving programs running on any one machine access to all of the cluster’s resources. [It is the culmination of a long development process that began with the development of LOCUS in the early 1980s.
OpenSSL allows a group of separate computers (nodes) to be regarded as one massive system. Processes running on any node have full access to all node resources.
Functionalities can be automatically transferred from node to node to balance system utilization. Alternatively, the cluster might be set up so that each node has direct access to the file system.
Step 1 Download OpenSSL Binaries
Link to Download OpenSSL binaries files: https://sourceforge.net/projects/openssl/files/
In our article, we are downloading
https://sourceforge.net/projects/openssl/files/openssl-1.0.2j-fips-x86_64/
Step 2 Unpack OpenSSL Zip files
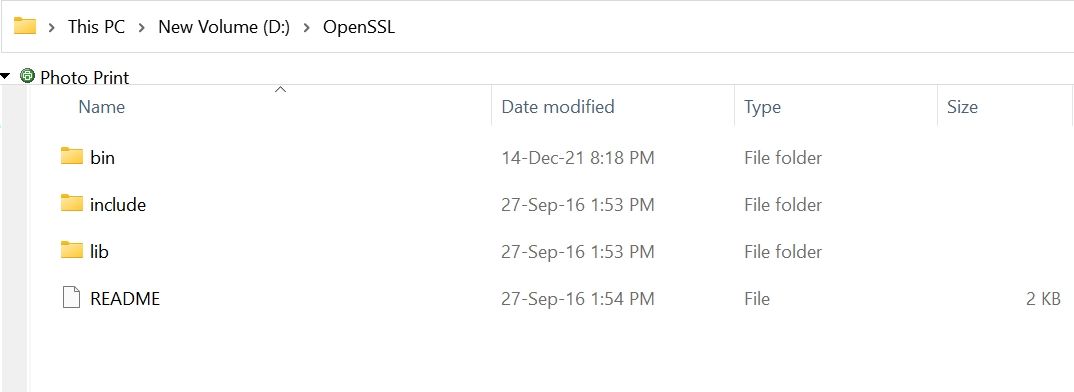
Unpack the content of (openssl-1.0.2j-fips-x86_64.zip) zip file into your desired location in our example we are using (D:\OpenSSL) folder
This comes with three folders (bin, include & lib) as shown in the image
Step 3: Set OpenSSL Path in Windows path
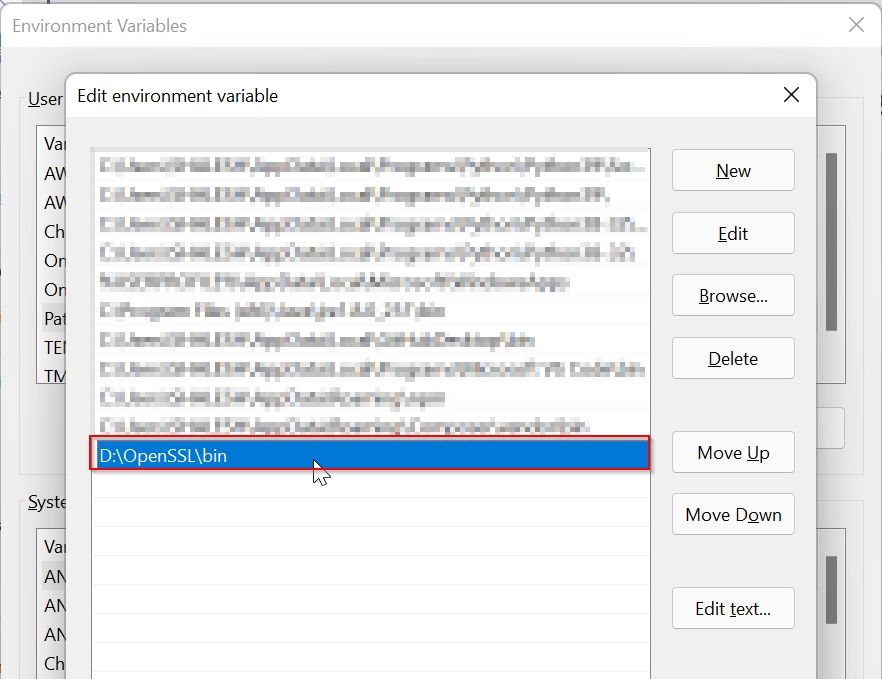
We have extracted OpenSSL files in directory D:\OpenSSL\bin
So our OpenSSL path is D:\OpenSSL\bin
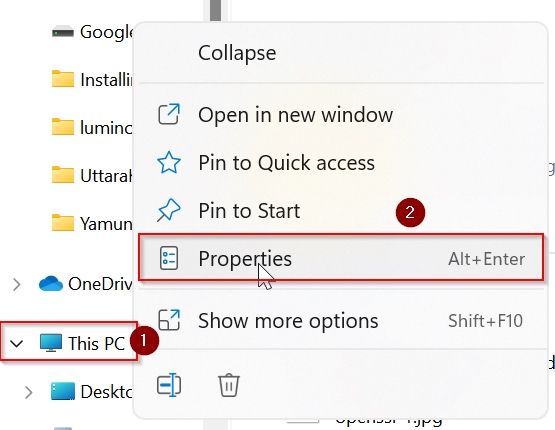
Open explorer and right-mouse click on This PC icon as shown in the image
Under System About window click on the Advanced system settings button

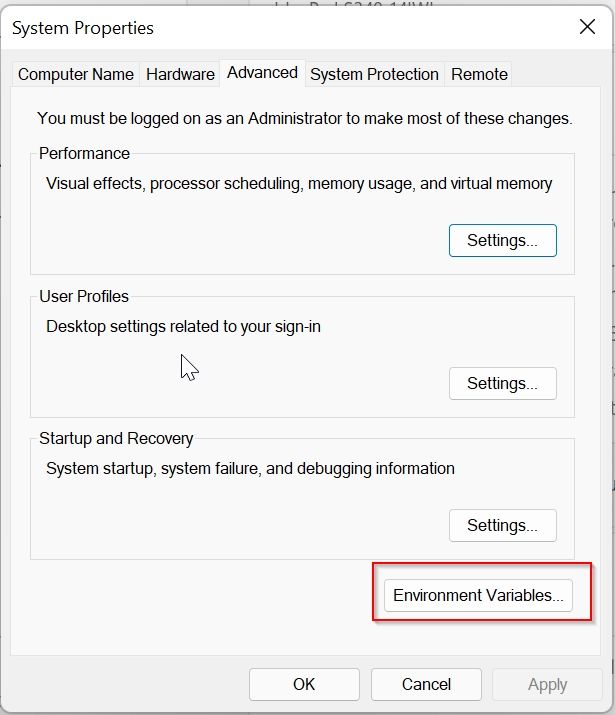
Under the System Property window click on the Environment Variables button
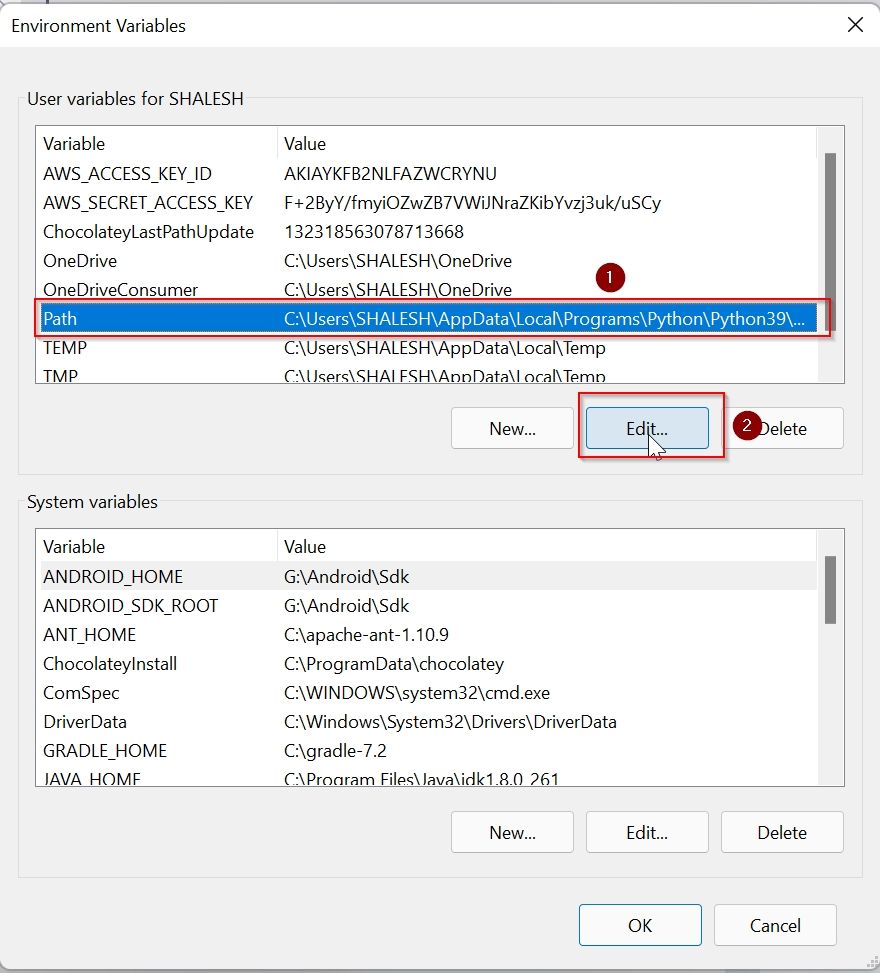
Under the Advanced Environment window select Path and then click on the Edit button
Under the Environment Variable window click on the New button
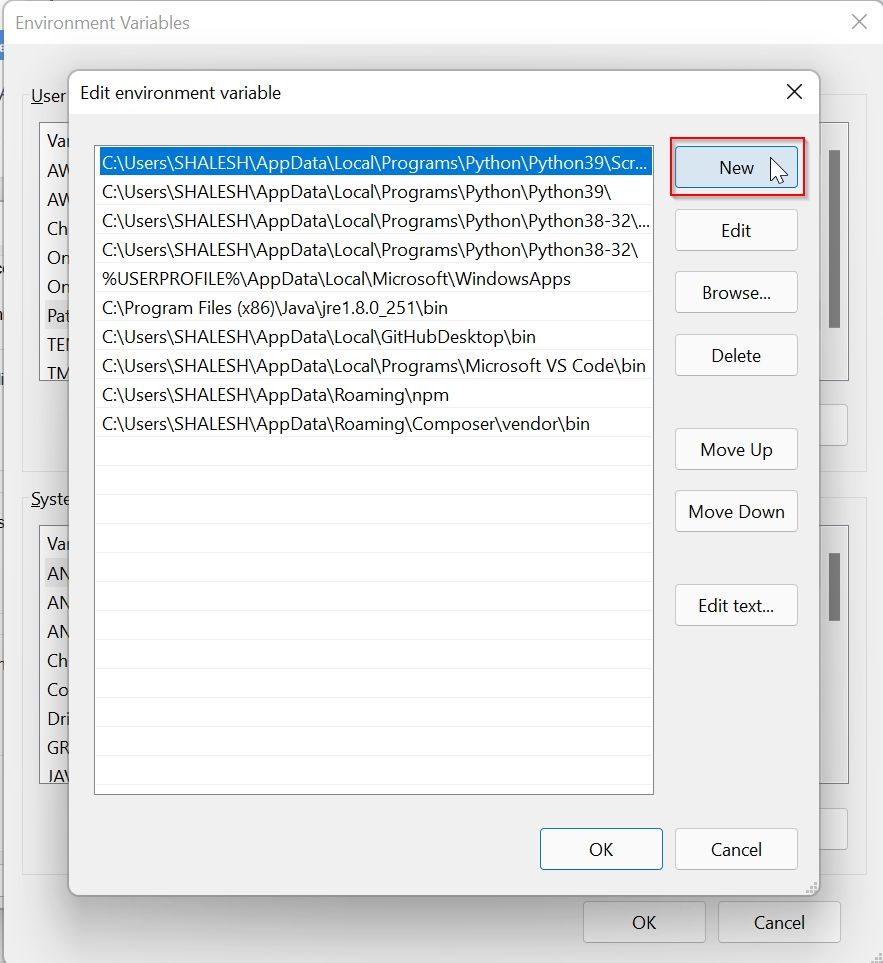
Paste the path of OpenSSL (D:\OpenSSL\bin) and click the OK button
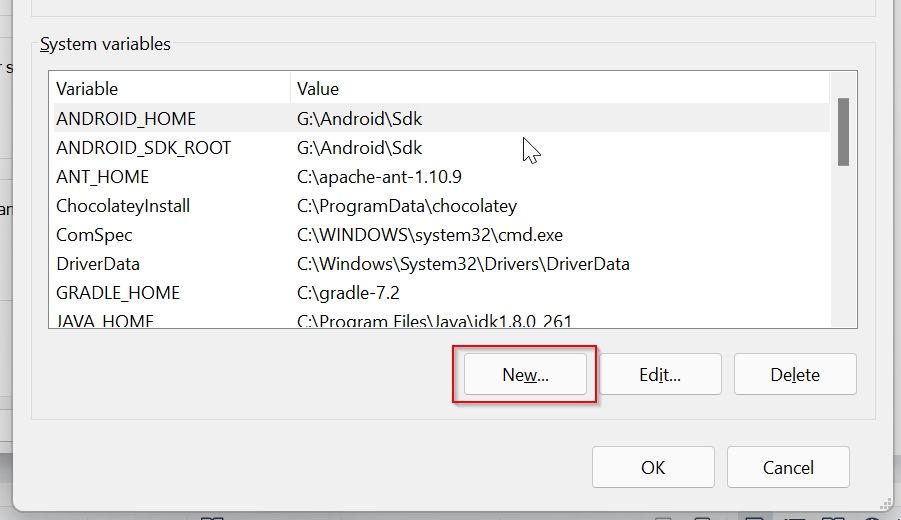
Step 4: Set System Variable for OPENSSL_CONF
Now to set system variable for OPENSSL_CONF
Click on the New button under the System Variable window
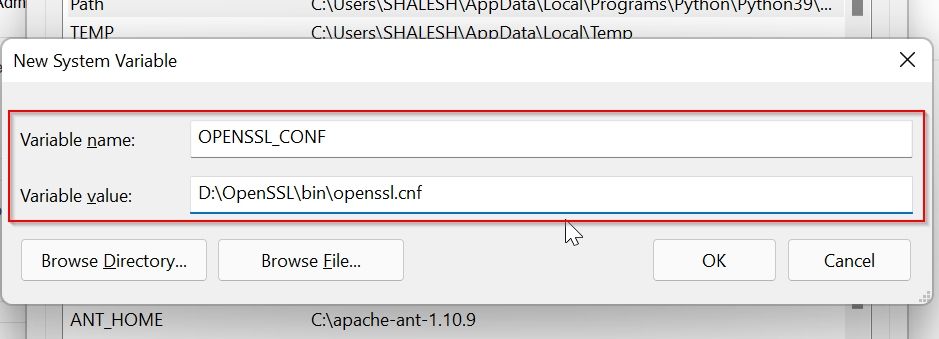
Now add system variable values as given, the path to your openssl.conf file location as shown below, and click on the OK button
Name: OPENSSL_CONF
Value: D:\OpenSSL\bin\openssl.cnf
Now you can see that the system variable is set

For window 10 and 11 you don’t have to restart your system to effect changes, else you need to restart the system
Step5: Test OpenSSL
To test OpenSSL installed properly open the terminal and check the OpenSSL version
cmd: openssl version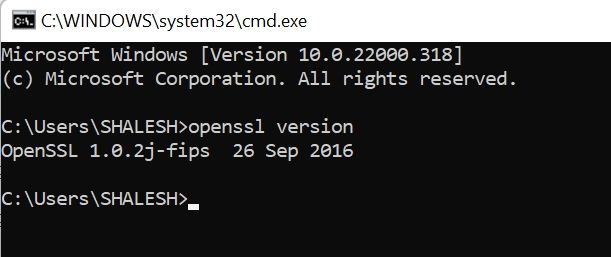
If it displays the OpenSSL version then OpenSSL is installed properly.
Important Commands for Open SSL
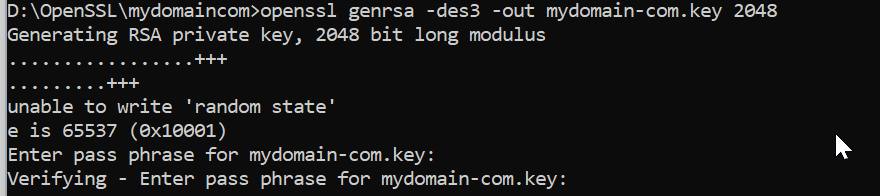
Creating a Private Key
Private Key is very important it is required for all operations in SSL, this Private key is required to create a CSR file.
openssl genrsa -des3 -out mydomain-com.key 2048It will ask for the password, please keep the password in a safe place because it is required in many places.
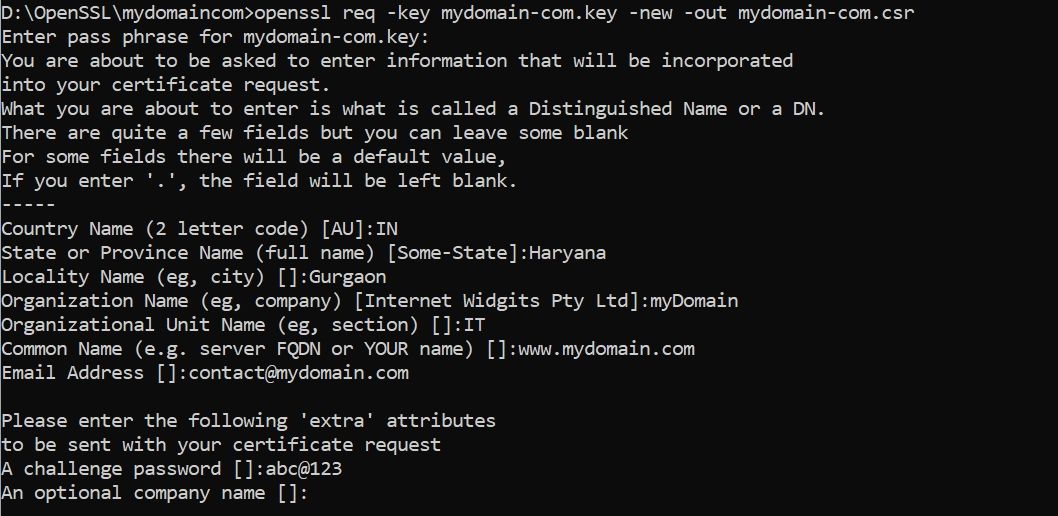
1. Create CSR Creating a Certificate Signing Request
CSR file is required to generate an SSL certificate.
This CSR file contains information about the certificate and private key
openssl req -key mydomain-com.key -new -out mydomain-com.csrInformation required by CSR:
Enter pass phrase for mydomain-com.key:
Country Name (2 letter code) [AU]:IN
State or Province Name (full name) [Some-State]:Haryana
Locality Name (eg, city) []:Gurgaon
Organization Name (eg, company) [Internet Widgits Pty Ltd]:myDomain
Organizational Unit Name (eg, section) []:IT
Common Name (e.g. server FQDN or YOUR name) []:www.mydomain.com
Email Address []:contact@mydomain.com
Please enter the following ‘extra’ attributes
to be sent with your certificate request
A challenge password []:
An optional company name []:
Important: Common Name is the Fully Qualified Domain Name for which you want an SSL certificate.
This CSR file is used by different SSL certificate companies to generate SSL Certificate
Generate Private key and CSR with Single command.
openssl req -newkey rsa:2048 -keyout mydomain-com.key -out mydomain-com.csrCreating a Self-Signed Certificate
A self-Signed Certificate is an SSL certificate is generated by using your own private key, it is not used for commercial purposes because it shows a warning that says the certificate is not trusted.
So self-signed certificate can be used for development and testing purposes.
openssl x509 -signkey mydomain-com.key -in mydomain-com.csr -req -days 365 -out mydomain-com.crt
Convert CRT file to PFX file
The .pfx file is required to install an SSL certificate in the windows system, this file contains Private Key and SSL certificate.
openssl pkcs12 -export -out mydomain-com.pfx -inkey mydomain-com.key -in mydomain-com.crtGenerate SHA265 Key from .crt file
openssl x509 -in mydomain.crt -pubkey -noout | openssl pkey -pubin -outform der | openssl dgst -sha256 -binary | openssl enc -base64Output:
XXXXXXxxXXXXXXXXXXXXXXXxXXXXxXXXX121XX=Generate PF12 file .crt file
openssl pkcs12 -export -out yourdomain.com.p12 -inkey yourdomain.com.key -in yourdomain.crt -certfile CACert.crtyourdomain.com.key: is the key file, it get generated when we create .CSR file
CACert.crt : root certificate, it comes with SSL certificate bundel file.
yourdomain.crt: is the main certificate file
Tutorial: OpenSSL provision on Windows 10 and Windows 11
OpenSSL was previously reserved for Linux operating systems or had to be compiled from the source code itself under Mac and Windows. With Win32/Win64 OpenSSL, the open source software library can also be run on 32-bit and 64-bit Windows OS (x86/i386) and can be integrated on Windows machines via installer.
OpenSSL is widely used and found by encryption in numerous application and secure connections, as well as for SSL/TLS connections HTTPS, including cryptography in SSH, OpenVPN and DNSSEC.
The Win32/Win64 OpenSSL installation project from Shining Light Productions (slproweb.com) carrying the ease of deployment of OpenSSL for Microsoft Windows. The installation consists of downloading and unpacking the binaries, which eliminates the need to compile source code.
Installation
This tutorial shows two methods to deploy OpenSSL on Windows 10 and Windows 11. The simple method right at the beginning, by running Windows Package Manager with hit the Windows-logo+R keys and enter cmd in the Run box then click OK, or press and hit cmd then click the command prompt icon.
Click Start
and hit cmd

In the now opened command prompt ran the following command, if you are not authorized as administrator with the logged in user, you can select “Run as administrator”.
C:\> winget install opensslThe Windows package manager “winget” allows you to install applications and other packages by using the command line. If winget is started for the first time, you will be prompted to confirm the source agreement terms, by hit the Y key.
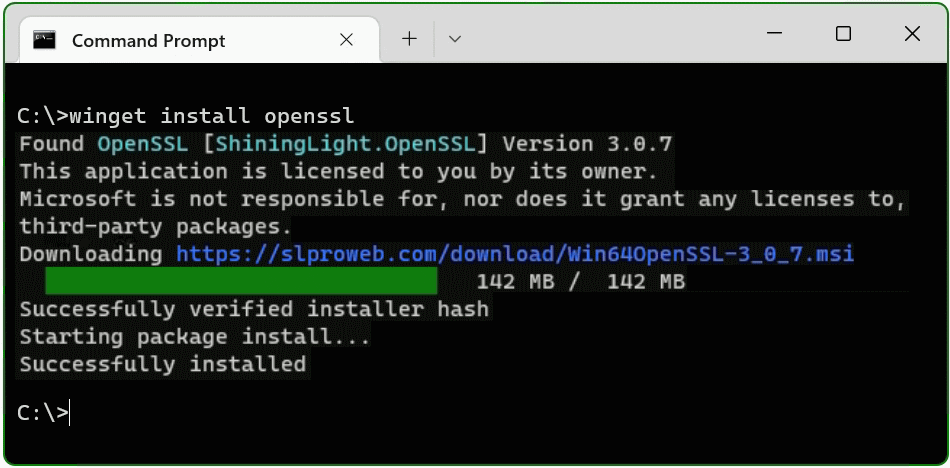
The OpenSSL package is now installed. The second method is to download and install the package.
Install Win64 OpenSSL package manually
The table (screenshot) on the slproweb.com website contains the versions for Win32 and Win64 OpenSSL as EXE and MSI installers.
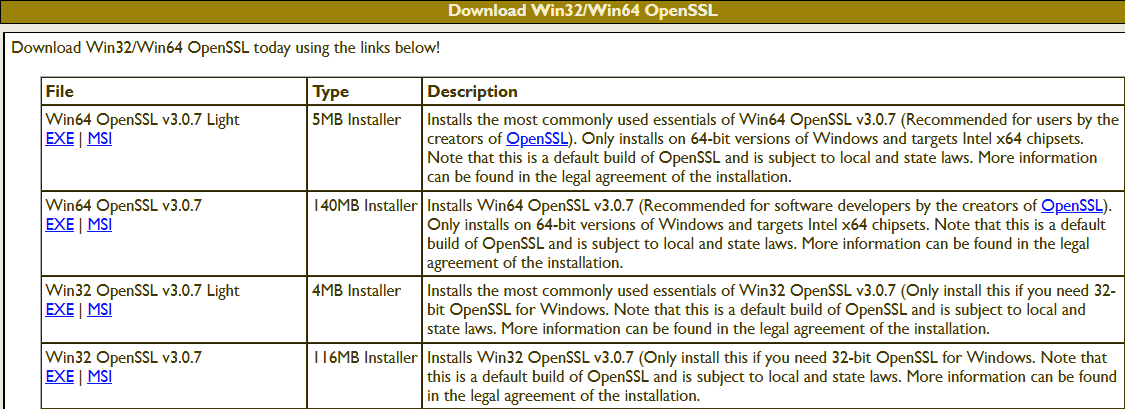
Recommended here is the latest version with the most commonly used essentials of Win64 OpenSSL v3.0.7, at the time of writing this article, it is Win64 OpenSSL v3.0.7 EXE Light, at the top of the first line.
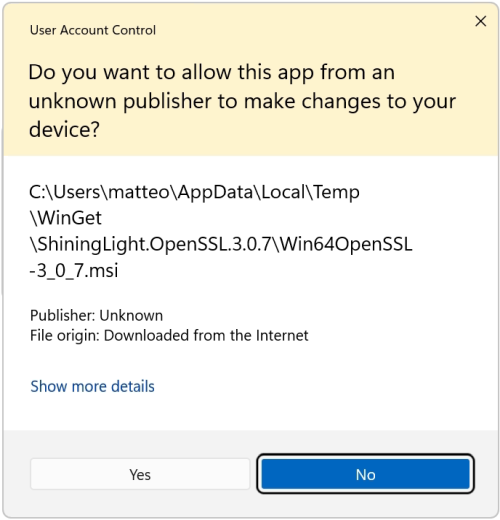
Double-click to execute the file Win64OpenSSL_Light-3_0_7.exe will the setup wizard appears. Confirm the Windows Account Control (UAC) with Yes to continue the installation.
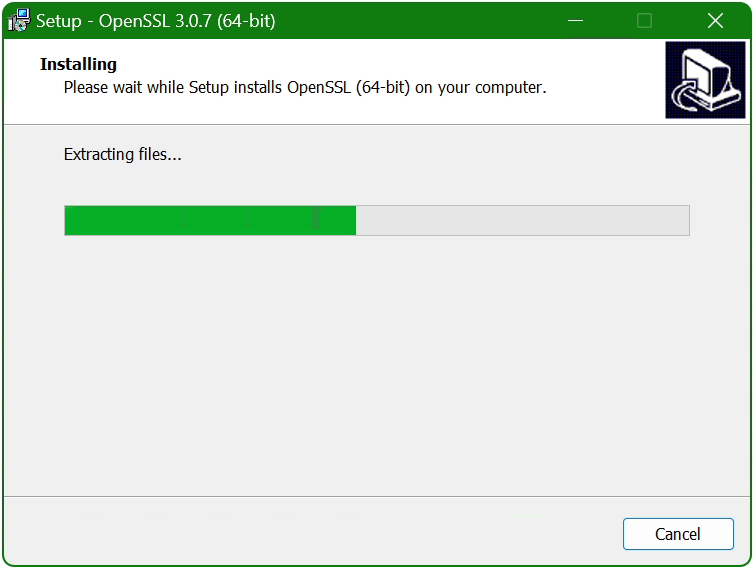
The setup wizard unpacks and copies the OpenSSL files.
Set up the OpenSSL environment
After the OpenSSL files are copied and installed, the search path and environment variable are now added to the operating system, with + R and paste SYSTEMPROPERTIESADVANCED and click OK.
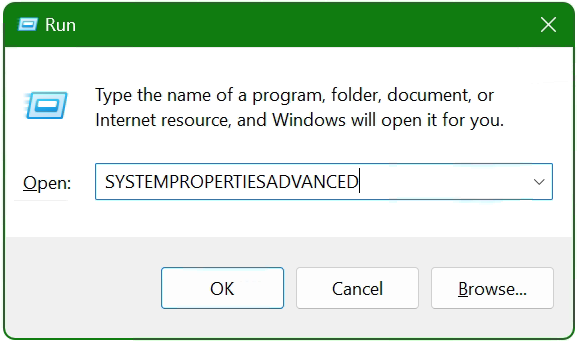
The System Properties window opens.
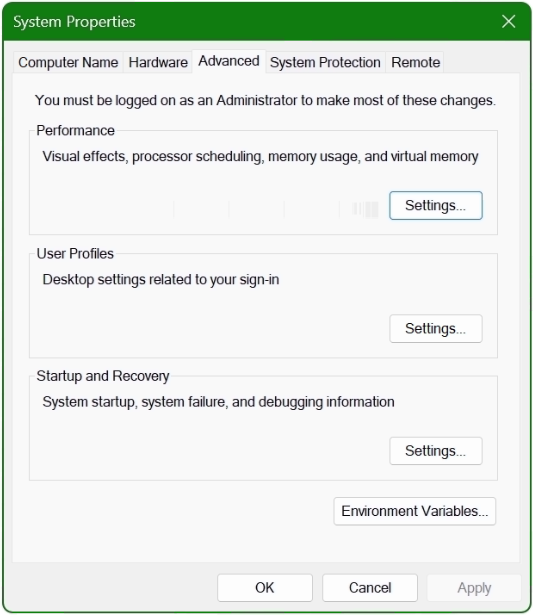
Click the Environment Variables button at the bottom.
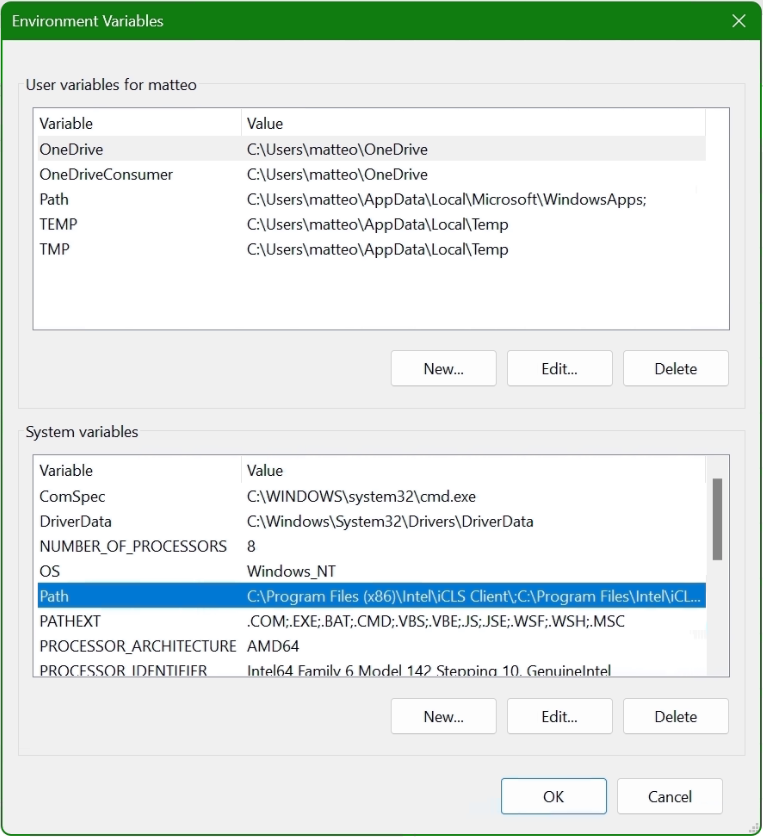
In the lower area System Variables, select the Path line with the mouse and click on the Edit button.
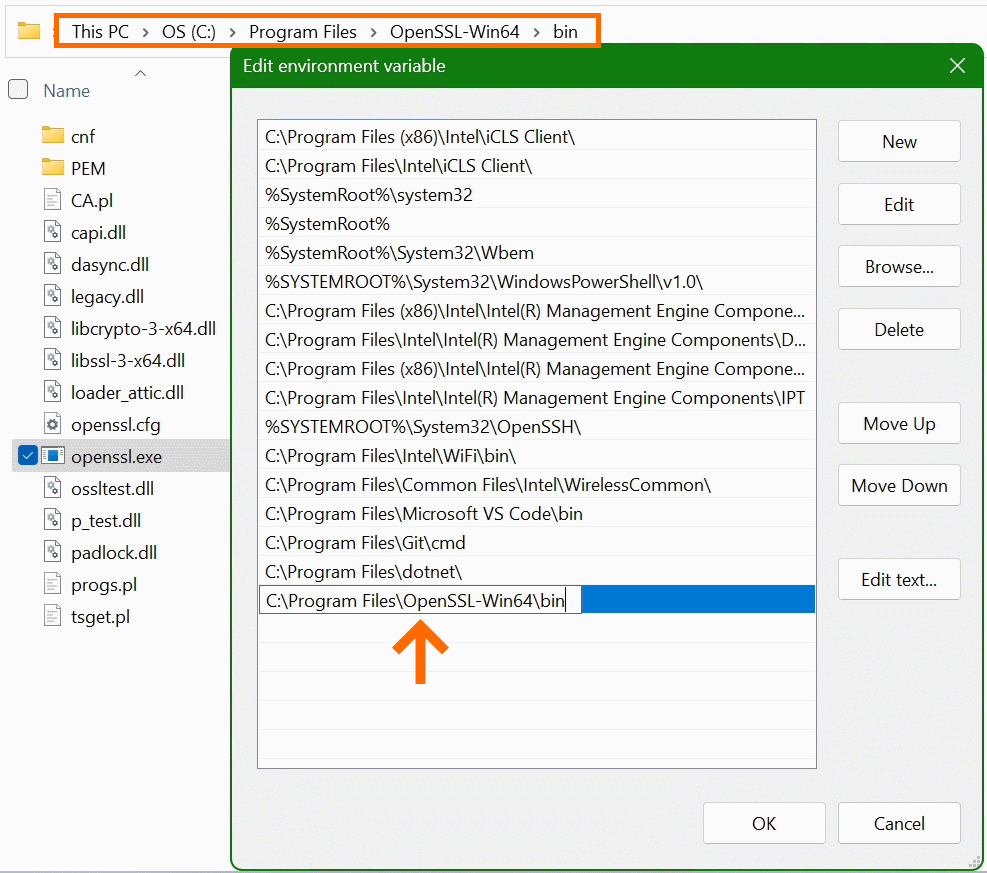
In the “Edit Environment Variables” window, click New to add the path to the OpenSSL-Win64\bin folder under Program files. The path in which the file openssl.exe is located can be found with Windows Explorer and copied to the clipboard, there is also the possibility to choose the path to the bin folder with the Browse button. Confirm the action with OK.
Now add another system variable with click New.
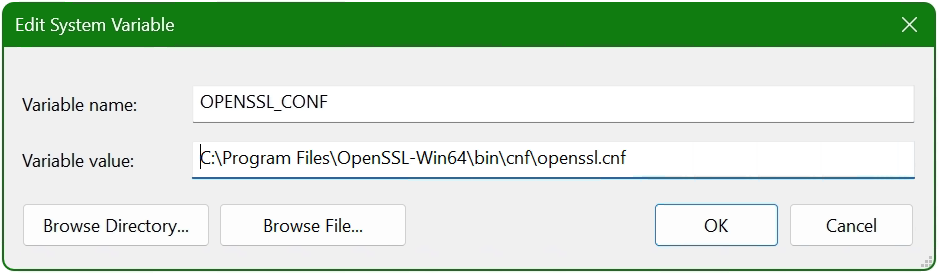
Enter OPENSSL_CONF in the Variable name field. In the next field insert the path to which the file openssl.cnf is located, here it is C:\Program Files\OpenSSL-Win64\bin\cnf\openssl.cnf
The installation is now complete and OpenSSL can be used. First of all, there is the opportunity to check the OpenSSL provisioned release.
C:\> openssl version -a
OpenSSL 3.0.7 1 Nov 2022 (Library: OpenSSL 3.0.7 1 Nov 2022)
built on: Tue Nov  1 16:04:12 2022 UTC
...
C:\> openssl version -d
OPENSSLDIR: "C:\Program Files\Common Files\SSL"
The OpenSSL Toolkit is a versatile utility with many options, but under Windows there is not the possibility of using the man page, as is known on Linux. However, the openssl help command provides context-sensitive help, such asopenssl help s_clientor useopenssl help x509oropenssl help reqto show just a few examples. Help is also offered on the documentation pages on the web, where manpages can also be found.
Useful OpenSSL Examples
A few of the most commonly used openssl command examples in the console are shown below, note that this is not a comprehensive collection of all possible applicable commands of this powerful open source toolkit.
openssl x509 -noout -text -in ca-cert.pemDisplaying and print the ca-cert.pem certificate file in plain text.
openssl req -text -noout -verify -in x509-check.csrView and verify the contents of CSR x509-check.csr in plain text.
openssl rsa -check -in rootCA.keyVerify key consistency of the rootCA.key file.
openssl x509 -noout -modulus -in ca-cert.pem | openssl md5Check md5 checksum of certificate ca-cert.pem file.
openssl crl2pkcs7 -nocrl -certfile servercert.pem -out c:\temp\servercert.p7bConvert certificate from pem to p7b format and write to temp folder.
openssl pkcs12 -export -in rootCA.pem -inkey rootCA.key -out c:\temp\rootCA.p12 -name "PKCS12 certificate"Convert certificate rootCA.pem to PKCS12 format as rootCA.p12 file.
openssl req -new -newkey rsa:2048 -sha256 -days 365 -nodes -x509 -keyout server.key -out server.crtGenerate SSL certificate and key on a single line, using SHA256 with RSA 2048 encryption, the certificate will be valid for 1 year.
openssl s_client -connect imap.gmail.com:993Check connection to imap.gmail.com service 993 to get more useful results like than as in telnet.
openssl s_client -crlf -connect smtp.gmail.com:587 -starttls smtpTry to connect service 587 on smtp.gmail.com using the starttls protocol, possibly to check a firewall policy for its effect.
openssl s_client -verify_quiet -brief www.ietf.org:443Check protocol version and ciphersuite, peer certificate and hash used.
openssl rand -base64 20Generate a random password in base64 using OpenSSL, can be used as a passphrase to hide private keys from spying eyes.
These were just a few examples, because openssl is a versatile toolkit that offers numerous application options.
Conclusion
The OpenSSL open-source library for cryptography is more important than ever and indispensable. Connections are encrypted and protected, so why shouldn’t the OpenSSL Toolkit be used on Windows? Creating and managing Digital X. 509 certificates, check algorithms for data encryption such as Chiper Suite, digital fingerprint, MD5 and SHA hash values can be checked, which was previously reserved only for Linux.
Sources Links:
slproweb.com Win32/Win64 OpenSSL Installation Project for Windows
openssl.org Cryptography and SSL/TLS Toolkit
Installing OpenSSL on Windows 10 is quite simple if you follow a few steps. First, you’ll need to download the installer, then install OpenSSL, and finally set up the environment variables. This guide will walk you through the entire process step-by-step.
In this section, we’ll cover the steps needed to install OpenSSL on your Windows 10 system. By the end of these steps, you’ll have OpenSSL up and running.
Step 1: Download the OpenSSL Installer
Head over to the official OpenSSL website to download the installer.
On the OpenSSL website, look for the most recent version suitable for Windows. Usually, it’s labeled something like «Win64 OpenSSL.» Click on the link to download the installer file.
Step 2: Run the Installer
Locate the downloaded installer file and double-click it to run.
After you start the installer, you’ll be prompted by a setup wizard. Follow the on-screen instructions. You’ll need to agree to the license agreement and select the location where you want OpenSSL to be installed.
Step 3: Select the Installation Directory
Choose the directory where you want to install OpenSSL.
By default, the installer will suggest a directory. You can leave it as is or choose a different location. Make sure you remember this path as you’ll need it later.
Step 4: Configure the Environment Variables
Go to the System Properties to set up the environment variables.
Open the Start menu, search for «Environment Variables,» and select «Edit the system environment variables.» In the System Properties window, click on the «Environment Variables» button. Here, you’ll add the OpenSSL bin directory to the system path.
Step 5: Verify the Installation
Open a Command Prompt and type openssl version to check if OpenSSL is installed correctly.
If everything was done correctly, you should see the version of OpenSSL displayed in the Command Prompt. This means OpenSSL is installed and ready to use.
After completing the steps above, you’ll be able to use OpenSSL on your Windows 10 system.
Tips for Installing OpenSSL on Windows 10
- Make sure to download the correct version for your system (32-bit vs 64-bit).
- Always run the installer as an administrator to avoid permission issues.
- Use an easily accessible directory to install OpenSSL for convenience.
- Back up your environment variables before making changes.
- Keep your OpenSSL updated to the latest version for security reasons.
Frequently Asked Questions
What is OpenSSL used for?
OpenSSL is a toolkit for implementing Secure Sockets Layer (SSL) and Transport Layer Security (TLS) protocols. It’s commonly used for secure communications over computer networks.
Do I need admin rights to install OpenSSL?
Yes, you need administrative rights to install OpenSSL and to modify system environment variables.
Can I install OpenSSL on Windows 10 Home?
Yes, you can install OpenSSL on any version of Windows 10, including Home, Professional, and Enterprise editions.
How do I update OpenSSL?
To update OpenSSL, simply download the latest installer from the official website and follow the same installation steps.
Is OpenSSL free to use?
Yes, OpenSSL is open-source and free to use under the Apache License 2.0.
Summary of Steps
- Download the OpenSSL Installer
- Run the Installer
- Select the Installation Directory
- Configure the Environment Variables
- Verify the Installation
Conclusion
Installing OpenSSL on Windows 10 is straightforward if you break it down into manageable steps. First, you download the installer, run it, select the installation directory, configure environment variables, and finally, verify the installation.
Having OpenSSL installed on your system is invaluable for securing your communications and handling cryptographic operations. Whether you’re a developer needing to test SSL/TLS connections, or just someone interested in enhancing your system’s security, OpenSSL is a powerful tool worth having.
For further reading, you might want to explore the extensive documentation available on the OpenSSL website. This will help you get the most out of this versatile toolkit. If you encounter any issues, the OpenSSL community forums are a great place to seek help.
So, what are you waiting for? Go ahead and install OpenSSL on your Windows 10 system today!
Matt Jacobs has been working as an IT consultant for small businesses since receiving his Master’s degree in 2003. While he still does some consulting work, his primary focus now is on creating technology support content for SupportYourTech.com.
His work can be found on many websites and focuses on topics such as Microsoft Office, Apple devices, Android devices, Photoshop, and more.
OpenSSL is generally a requirement for developers, sysadmins, and security professionals who work with applications that require SSL/TLS encryption. Whether you need OpenSSL for web development, certificate management, remote connections, or other cryptographic operations, getting it on Linux is quite easy; however, what about Windows 11 or 10? Although OpenSSL doesn’t come pre-installed, there is a simple way to get it on Windows 11, and in this article, we discuss that.
Method 1: Install OpenSSL on Windows 11 or 10 using WingetFor Command Prompt or PowerShell:Get OpenSSL using a Graphical user interface.Add or Configure OpenSSL to Windows 11 System PATHHow to Add OpenSSL to the System PATH:Verify OpenSSL InstallationMethod 2: Build OpenSSL from Source (For Developers & Advanced Users)Step 1: Install Required DependenciesStep 2: Download OpenSSL Source CodeStep 3: Build OpenSSL🔹 Frequently Asked Questions (FAQs)1. How do I check if OpenSSL is installed on Windows 11?2. How do I update OpenSSL on Windows 11?3. How do I use OpenSSL to generate SSL certificates?Conclusion
Methods we are going to discuss in this tutorial for Windows 11 OpenSSL setup:
✅ Using a Precompiled OpenSSL Installer (Recommended for Beginners)
✅ Building OpenSSL from Source (For Advanced Users & Developers)
Method 1: Install OpenSSL on Windows 11 or 10 using Winget
We can install OpenSSL using Command Prompt or PowerShell on Windows 11 or 10 apart from the graphical user interface. Let’s know how to use both:
For Command Prompt or PowerShell:
Users who want to use the command line to install the OpenSSL can use WIndow’s built-in package manager called “Winget.” Here are the steps to follow:
Step 1: Open the command terminal. Right-click the Start button and select “Terminal (Admin)” from the open Power Menu.
Step 2: Check whether Winget is available; for that, type the given command. If it will return with the version details or help section, confirming that the package manager is available on your Windows 11 or 10 system.
winget -vStep 3: Search for the OpenSSL using Winget to confirm the package name and its availability. Type:
winget search opensslYou will see the package name as shown in the screenshot from ShiningLight.OpenSSL.Light.

Step 4: Install OpenSSL using the given Winget command. This is the fastest way to get the pre-compiled binary for Windows OS.
winget install ShiningLight.OpenSSL.LightGet OpenSSL using a Graphical user interface.
For those who don’t want to use the command line, instead graphical user interface to get the OpenSSL on Windows:
Step 1: Download the graphical installer of OpenSSL for Windows 32-bit or 64-bit version by visiting the “slproweb. This website provides trusted, up-to-date OpenSSL binaries for Windows.
Step 2: Scroll down “Download Win32/Win64 OpenSSL” section and choose the Right Version:
- Win64 OpenSSL v3.x.x (EXE) → For 64-bit Windows 11
- Win32 OpenSSL v3.x.x (EXE) → For 32-bit Windows (rarely needed)
📌 Pro Tip: Most modern Windows 11 systems are 64-bit, so choose the Win64 version unless you’re running a legacy system.
Step 3: Once you have downloaded the installer, run the .exe file by double-clicking it. Then, accept the License Agreement and click Next.

Step 3: Choose an Installation Directory, if needed; otherwise, leave the default location as it is, which C:\Program Files\OpenSSL-Win64\

Step 4: The installation wizard will ask you to Select “Copy OpenSSL DLLs to the System Directory.” We are choosing this option because it makes access to OpenSSL easier.
Step 5: Finally, click the Next butt and complete the installation process.

Add or Configure OpenSSL to Windows 11 System PATH
Even after successful installation, you won’t be able to use the OpenSSL commands in your Prompt or PowerShell because the system doesn’t know where it was installed. Therefore, add an OpenSSL folder path to your system’s variable to use its commands.
How to Add OpenSSL to the System PATH:
Step 1: Open Environment Variables: for that press Win + R, type sysdm.cpl, and hit Enter.
Step 2: On the System Properties window, go to the Advanced tab and click Environment Variables.

Step 3: Find the “Path” Variable under the System Variables section, select the Path item, and click Edit.

Step 4: Add OpenSSL’s Installation Path, which is the directory where Windows has installed it. So, click New and enter the given OpenSSL’s bin folder path. Click OK to save changes. Note: If you have installed OpenSSL at some custom location, add that folder path instead of the given one.
C:\Program Files\OpenSSL-Win64\bin
Verify OpenSSL Installation
Open the Command Prompt or PowerShell (if already opened the first, close and reopen it). After that, type the given syntax; if everything works correctly, you will get the version details, as shown in the following screenshot.
openssl version
✅ Congratulations! OpenSSL is now installed on your Windows 11 system! 🎉
📌 Pro Tip: If CMD says “openssl is not recognized”, make sure you added it to the system PATH (Step 3).
Method 2: Build OpenSSL from Source (For Developers & Advanced Users)
This method is specifically for advanced users who want to make some custom configurations because the given steps will discuss how we can compile OpenSSL from a source using Microsoft Visual Studio and Perl.
Step 1: Install Required Dependencies
1️⃣ Install Visual Studio (with C++ build tools): Download from https://visualstudio.microsoft.com/. Select “Desktop development with C++” during installation.
2️⃣ Install Perl (Strawberry Perl Recommended): Download from http://strawberryperl.com/. or use the Winget command:
winget install StrawberryPerl.StrawberryPerl3️⃣ Install NASM (Netwide Assembler) by downloading the setup https://www.nasm.us/. from the official website or directly use the given command.
wignet install NASM.NASM4️⃣ Install git to clone the source code from the OpenSSL repository:
winget install Git.GitStep 2: Download OpenSSL Source Code
1️⃣ Open Command Prompt and navigate to your desired folder or to the root drive using:
cd\2️⃣ Clone the OpenSSL repository:
git clone https://github.com/openssl/openssl.git
cd openssl
Step 3: Build OpenSSL
1️⃣ Configure OpenSSL:
perl Configure VC-WIN64A2️⃣ Build OpenSSL:
nmake3️⃣ Install OpenSSL:
nmake install✅ Now, you have a custom-built OpenSSL on your Windows 11 system! For more details, check out the official GitHub page.
📌 Pro Tip: If you’re not a developer, stick to Method 1 (Precompiled Installer), as it’s much more manageable.
🔹 Frequently Asked Questions (FAQs)
1. How do I check if OpenSSL is installed on Windows 11?
Open Command Prompt on your Windows and type the given command. If OpenSSL is installed, you will see the details of the version number.
openssl version2. How do I update OpenSSL on Windows 11?
To update OpenSSL:
1️⃣ Uninstall the old version from Control Panel.
2️⃣ Download and install the latest OpenSSL version using Method 1.
3️⃣ Restart your PC to apply changes.
3. How do I use OpenSSL to generate SSL certificates?
You can generate an SSL certificate using:
openssl req -new -x509 -nodes -days 365 -out mycert.pem -keyout mykey.pemReplace mycert.pem and mykey.pem with your preferred filenames.
Conclusion
Everyone does not need to install OpenSSL on Windows 11 or 10; however, if you are in the development field, using Method 1 will be pretty easy for security, encryption, and development tasks. Nevertheless, whether you choose Method 1 (Precompiled Installer recommended to beginners and general users) because of convenience or Method 2 (Build from Source recommended for Developers and Power Users) for customization, you will have a working OpenSSL setup on Windows OS.