Время на прочтение7 мин
Количество просмотров41K
Введение
В данной статье речь пойдет о сборке и установке OpenCV 4 для C/C++, Python 2 и Python 3 из исходных файлов с дополнительными модулями CUDA 10 на ОС Windows.
Я постарался включить сюда все тонкости и нюансы, с которыми можно столкнуться в ходе установки, и про которые не написано в официальном мануале.

Сборка тестировалась для:
- Windows 8.1 + Visual Studio 2017 + Python 2/3 + CUDA 10.0 + GeForce 840m
- Windows 10 + Visual Studio 2019 + Python 2/3 + CUDA 10.0 + GeForce GTX 1060
Внимание! Сборка не подойдет для версии OpenCV 4.0.1 и/или CUDA ниже 10-й версии. CUDA 9 и ниже поддерживается OpenCV 3.
Что потребуется для установки
В моей сборке использовались следующие инструменты:
- CMake 3.15
- MS Visual Studio 2019 64-бит + средства CMake С++ для Windows
- Python 3.7.3 64-бит + NumPy 64-бит
- Python 2.7.16 64-бит + NumPy 64-бит
- CUDA 10.0
- CuDNN 7.6.2
- OpenCV 4.1.1 и OpenCV-contrib-4.1.1
Установка
Так как установка производится через консольные команды, то следует внимательно и аккуратно выполнять все шаги. Также, при необходимости, меняйте установочные пути на свои.
Для начала необходимо установить требуемое ПО, причем Visual Studio должна быть установлена до CUDA:
- CMake (версия >= 3.9.1)
- MS Visual Studio
- Python 3.7 (дистрибутив Anaconda3)
- CUDA 10.0
- CuDNN 7.6.2
После установки всех компонент убедитесь, что пути для CMake, Visual Studio, Python, CUDA, CuDNN прописаны в переменных PATH, PYTHONPATH, CUDA_PATH и cudnn соответственно.
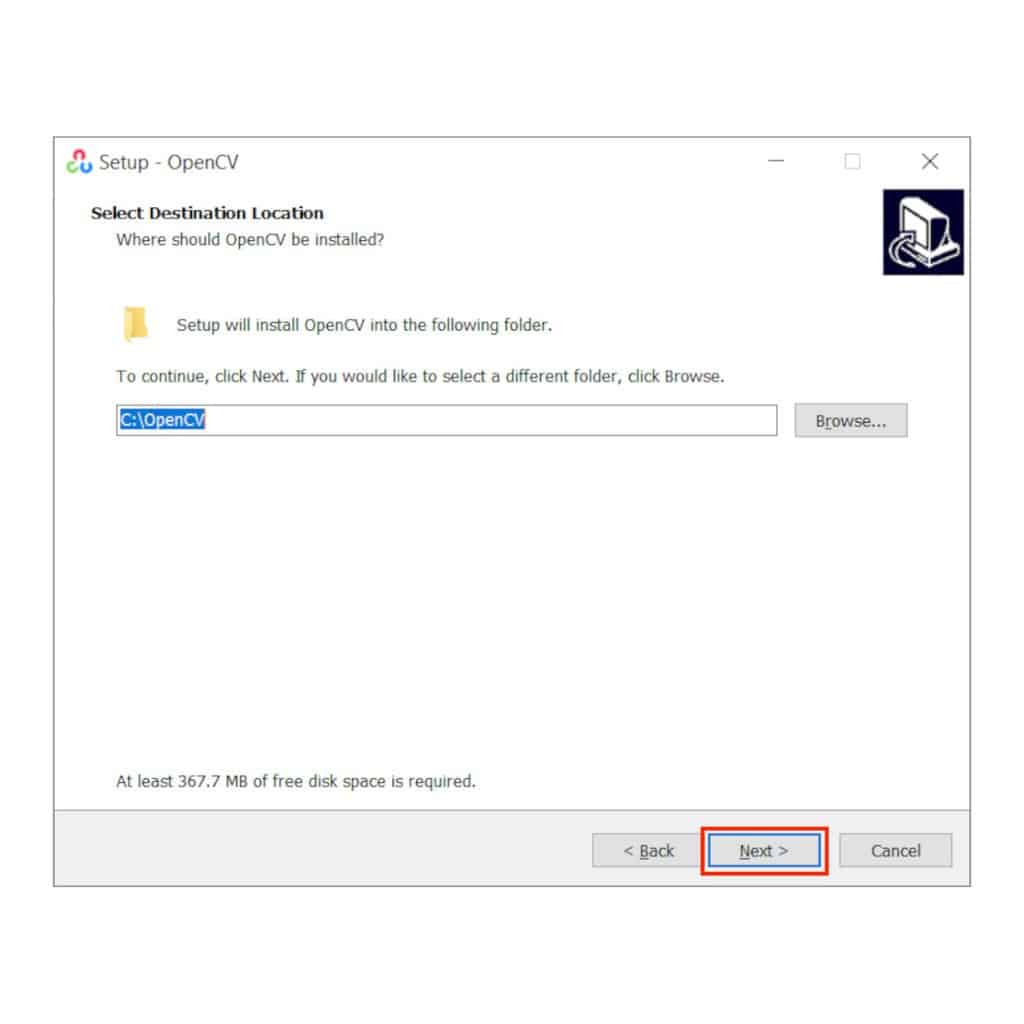
Далее загружаем архивы исходников opencv-4.1.1 и opencv-contrib-4.1.1 в желаемое место (в моем случае это C:\OpenCV\).
git clone https://github.com/opencv/opencv.git -b "4.1.1"
git clone https://github.com/opencv/opencv_contrib.git -b "4.1.1"
Создаем папку build/ внутри opencv-4.1.1.

Далее сгенерируем файлы сборки с помощью cmake. Мы будем использовать консольный вариант cmake, так как cmake-gui путает типы некоторых переменных (например, OPENCV_PYTHON3_VERSION) и, как следствие, неправильно генерирует файлы.
Открываем консоль по пути C:\OpenCV\ и прописываем переменные.
set "opencvSource=opencv-4.1.1"
set "opencvExtraModules=opencv_contrib-4.1.1/modules"
set "opencvBuild=%opencvSource%\build"
set "compiler=Visual Studio 16 2019"
set "buildType=Release"Примечание. Для Visual Studio 2017 генератор пишется как «Visual Studio 15 2017 Win64» и без флага -A.
Также можно явно указать питоновские библиотеки для python 2 и python 3 на случай, если сборщик не сможет найти их автоматически.
set "python2_executable=C:/Python27/python.exe"
set "python2_include_dir=C:/Python27/include"
set "python2_library=C:/Python27/libs/python27.lib"
set "python2_numpy_include_dirs=C:/Python27/Lib/site-packages/numpy/core/include"
set "python2_packages_path=C:/Python27/Lib/site-packages"

set "python3_executable=C:/Users/root/Anaconda3/python.exe"
set "python3_include_dir=C:/Users/root/Anaconda3/include"
set "python3_library=C:/Users/root/Anaconda3/libs/python37.lib"
set "python3_numpy_include_dirs=C:/Users/root/Anaconda3/lib/site-packages/numpy/core/include"
set "python3_packages_path=C:/Users/root/Anaconda3/Lib/site-packages"Примечание. Обратите внимание на то, что библиотека NumPy должна быть той же разрядности, что и OpenCV. Проверить это легко:
import numpy.distutils.system_info as sysinfo
print(sysinfo.platform_bits)
Выполняем генерацию файлов сборки с помощью длинной команды ниже. При неудачной генерации или наличии ошибок после выполнения команды, повторную генерацию следует производить вычистив все файлы в build/ и .cache/.
cmake ^
-B"%opencvBuild%/" ^
-H"%opencvSource%/" ^
-G"%compiler%" ^
-Ax64 ^
-DCMAKE_BUILD_TYPE=%buildType% ^
-DBUILD_opencv_world=ON ^
-DINSTALL_TESTS=OFF ^
-DINSTALL_C_EXAMPLES=OFF ^
-DBUILD_EXAMPLES=OFF ^
-DOPENCV_EXTRA_MODULES_PATH="%opencvExtraModules%/" ^
-DBUILD_PROTOBUF=ON ^
-DBUILD_opencv_python_bindings_generator=ON ^
-DWITH_CUDA=ON ^
-DCUDA_FAST_MATH=ON ^
-DWITH_CUBLAS=ON ^
-DCUDA_ARCH_PTX=7.5 ^
-DBUILD_opencv_python2=ON ^
-DPYTHON2_EXECUTABLE="%python2_executable%" ^
-DOPENCV_PYTHON2_VERSION=2.7.16 ^
-DPYTHON2_INCLUDE_DIR="%python2_include_dir%" ^
-DPYTHON2_LIBRARY="%python2_library%" ^
-DPYTHON2_NUMPY_INCLUDE_DIRS="%python2_numpy_include_dirs%" ^
-DPYTHON2_PACKAGES_PATH="%python2_packages_path%" ^
-DBUILD_opencv_python3=ON ^
-DPYTHON3_EXECUTABLE="%python3_executable%" ^
-DOPENCV_PYTHON3_VERSION=3.7.3 ^
-DPYTHON3_INCLUDE_DIR="%python3_include_dir%" ^
-DPYTHON3_LIBRARY="%python3_library%" ^
-DPYTHON3_NUMPY_INCLUDE_DIRS="%python3_numpy_include_dirs%" ^
-DPYTHON3_PACKAGES_PATH="%python3_packages_path%"
Значение некоторых флагов
- BUILD_opencv_world – необязательный модуль, содержащий копии всех выбранных в ходе установки библиотек. Удобен при разработке на C++, так как вместо подключения кучи зависимостей opencv можно подключить одну зависимость opencv_world411.lib в проект
- INSTALL_EXAMPLES/INSTALL_TESTS – установка примеров/тестов кода opencv
- CUDA_FAST_MATH, WITH_CUBLAS – дополнительные модули для CUDA, призванные ускорить вычисления
- CUDA_ARCH_PTX – версия PTX инструкций для улучшения производительности вычислений
- OPENCV_EXTRA_MODULES_PATH – путь до дополнительных модулей из opencv-contrib (обязательно для CUDA)
- BUILD_PROTOBUF – для работы некоторых модулей opencv необходим Protobuf (сборщик opencv в любом случае поставит BUILD_PROTOBUF=ON)
Спустя примерно 10 минут в консоле должна появиться информация о сборке и завершающие строки «Configuring done» и «Generating done». Проверяем всю информацию, особенно разделы NVIDIA CUDA, Python 2, Python 3.

Далее собираем решение. На сборку может уйти несколько часов в зависимости от вашего процессора и версии Visual Studio.
cmake --build %opencvBuild% --target ALL_BUILD --config ReleaseУстанавливаем решение.
cmake --build %opencvBuild% --target INSTALL --config ReleaseПосле успешной установки создаем системную переменную OPENCV_DIR со значением C:\OpenCV\opencv-4.1.1\build\install\x64\vc15\bin и также добавляем ее в PATH.
Тест
Проверим работоспособность OpenCV с модулем CUDA на простом примере умножения матриц.
Подключение OpenCV в проект Visual Studio
- Установить тип сборки Release/x64 (для Debug следует собрать OpenCV с флагом Debug)
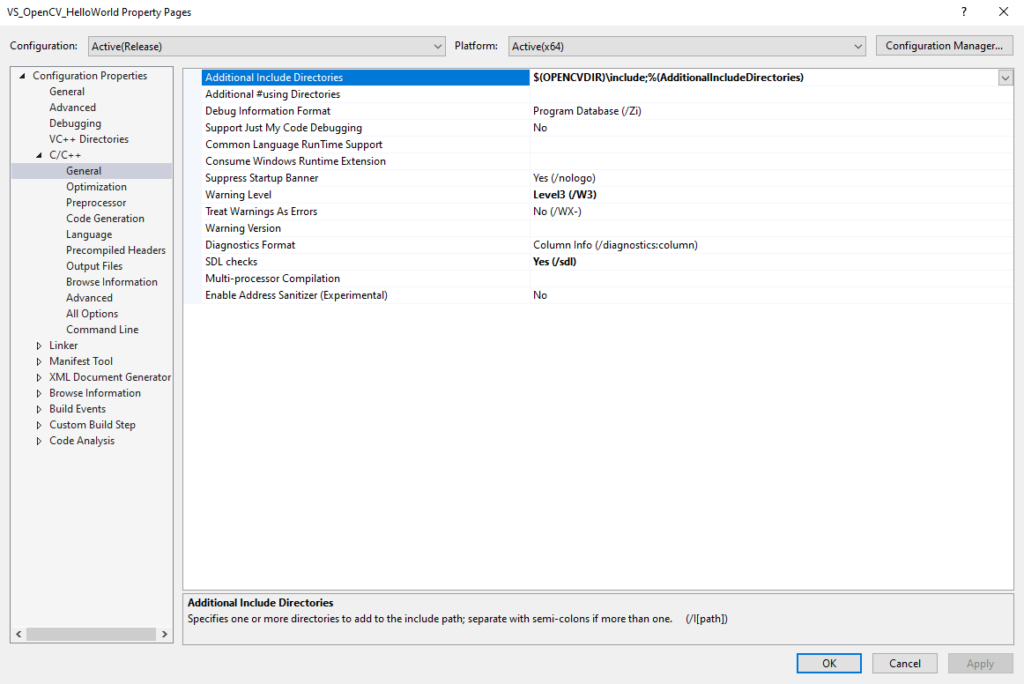
- Project Properties → C/C++ → General → Добавить строку «C:\OpenCV\opencv-4.1.1\build\install\include» в Additional Include Directories
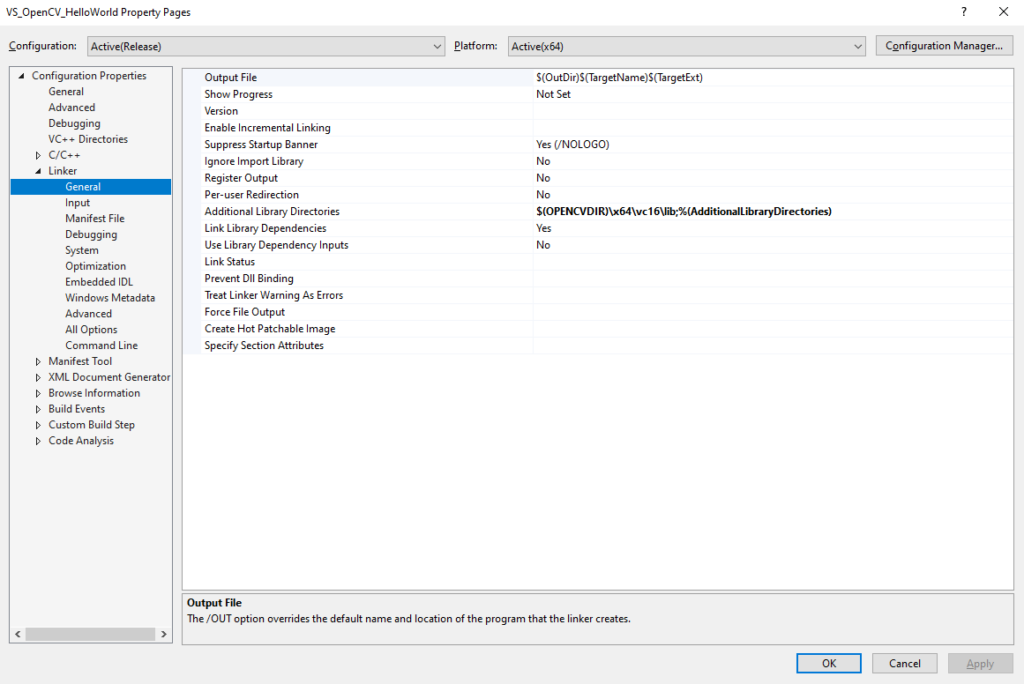
- Project Properties → Linker → General → Добавить строку « C:\OpenCV\opencv-4.1.1\build\install\x64\vc16\lib» в Additional Library Directories
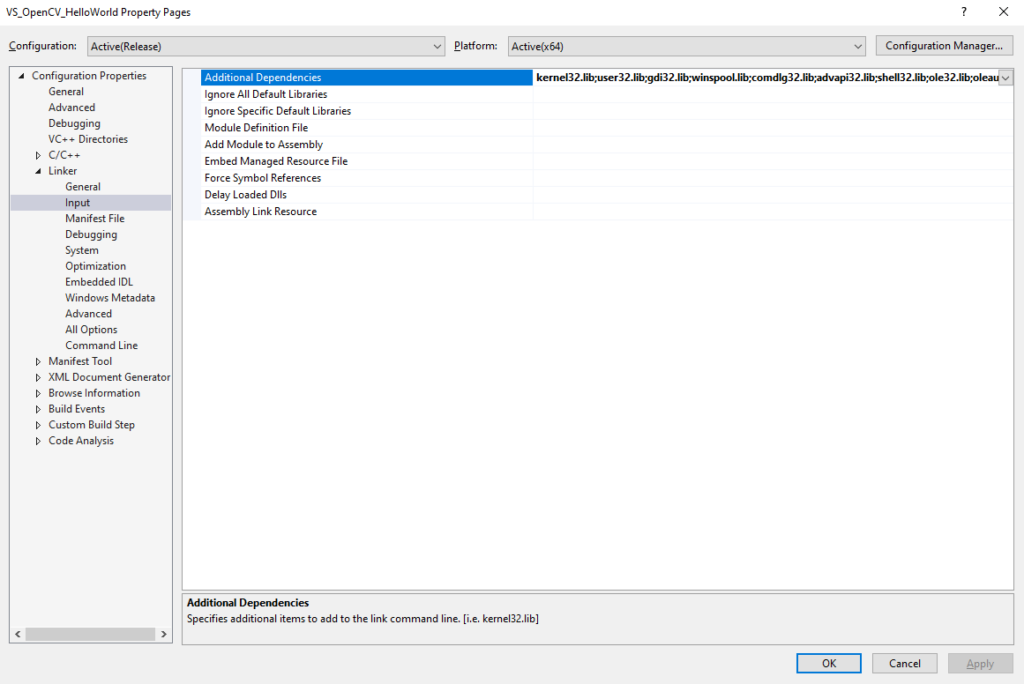
- Project Properties → Linker → General → Добавить «;opencv_world411.lib» («;opencv_world411d.lib» для Debug) в конец Additional Dependencies
Пример на Python 3
import numpy as np
import cv2 as cv
import time

rand = np.random.random((1024, 1024)).astype(np.float32)
h_array1 = np.stack([rand, rand],axis=2)
h_array2 = h_array1
d_array1 = cv.cuda_GpuMat()
d_array2 = cv.cuda_GpuMat()
d_array1.upload(h_array1)
d_array2.upload(h_array2)

start = time.time()
cv.cuda.gemm(d_array1, d_array2, 1, None, 0, None, 1)
end = time.time()
print("Time elapsed:", end - start, "sec")
Вывод в консоли
Time elapsed: 0.3130002021789551Пример на C++
#include <iostream>
#include <opencv2/opencv.hpp>
#include <opencv2/cudaarithm.hpp>

using namespace std;
using namespace cv;
using namespace cv::cuda;

int main() {

	Mat h_array1 = Mat::ones(1024, 1024, CV_32FC2);
	Mat h_array2 = Mat::ones(1024, 1024, CV_32FC2);
	Mat h_array3 = Mat::zeros(1024, 1024, CV_32FC2);
	Mat h_result;
	GpuMat d_array1, d_array2, d_array3, d_result;

	d_array1.upload(h_array1);
	d_array2.upload(h_array2);

	const clock_t begin_time = clock();
	cuda::gemm(d_array1, d_array2, 1.0, d_array3, 0.0, d_result);
	cout << "Time elapsed: " << (float(clock() - begin_time) / CLOCKS_PER_SEC) << " sec" << endl;

	d_result.download(h_result);

	return 0;
}
Вывод в консоли
Time elapsed: 0.354Удаление
Чтобы удалить OpenCV, нужно выполнить команду.
cmake --build %opencvBuild% --target uninstall --config Releaseи удалить системную переменную OPENCV_DIR и убрать путь до OpenCV из PATH.
Заключение
В статье мы рассмотрели установку OpenCV 4 для ОС Windows 10. Данный алгоритм тестировался на Windows 8.1 и Windows 10, но, в теории, может собираться и на Windows 7. За дополнительной информацией можно обратиться к списку источников ниже.
P.S. Напоследок сведем все установочные команды в один .bat файл для тех, кто хочет автоматизировать установку.
install_opencv411.bat
cd C:\OpenCV

git clone https://github.com/opencv/opencv_contrib.git -b "4.1.1"
git clone https://github.com/opencv/opencv.git -b "4.1.1"

ren opencv opencv-4.1.1
ren opencv_contrib-4.1.1

set "opencvSource=opencv-4.1.1"
set "opencvExtraModules=opencv_contrib-4.1.1/modules"
set "opencvBuild=%opencvSource%\build"
set "compiler=Visual Studio 16 2019"
set "buildType=Release"

set "python2_executable=C:/Python27/python.exe"
set "python2_include_dir=C:/Python27/include"
set "python2_library=C:/Python27/libs/python27.lib"
set "python2_numpy_include_dirs=C:/Python27/Lib/site-packages/numpy/core/include"
set "python2_packages_path=C:/Python27/Lib/site-packages"

set "python3_executable=C:/Users/root/Anaconda3/python.exe"
set "python3_include_dir=C:/Users/root/Anaconda3/include"
set "python3_library=C:/Users/root/Anaconda3/libs/python37.lib"
set "python3_numpy_include_dirs=C:/Users/root/Anaconda3/lib/site-packages/numpy/core/include"
set "python3_packages_path=C:/Users/root/Anaconda3/Lib/site-packages"

cmake ^
-B"%opencvBuild%/" ^
-H"%opencvSource%/" ^
-G"%compiler%" ^
-Ax64 ^
-DCMAKE_BUILD_TYPE=%buildType% ^
-DBUILD_opencv_world=ON ^
-DINSTALL_TESTS=OFF ^
-DINSTALL_C_EXAMPLES=OFF ^
-DBUILD_EXAMPLES=OFF ^
-DOPENCV_EXTRA_MODULES_PATH="%opencvExtraModules%/" ^
-DBUILD_PROTOBUF=ON ^
-DBUILD_opencv_python_bindings_generator=ON ^
-DWITH_CUDA=ON ^
-DCUDA_FAST_MATH=ON ^
-DWITH_CUBLAS=ON ^
-DCUDA_ARCH_PTX=7.5 ^
-DBUILD_opencv_python2=ON ^
-DPYTHON2_EXECUTABLE="%python2_executable%" ^
-DOPENCV_PYTHON2_VERSION=2.7.16 ^
-DPYTHON2_INCLUDE_DIR="%python2_include_dir%" ^
-DPYTHON2_LIBRARY="%python2_library%" ^
-DPYTHON2_NUMPY_INCLUDE_DIRS="%python2_numpy_include_dirs%" ^
-DPYTHON2_PACKAGES_PATH="%python2_packages_path%" ^
-DBUILD_opencv_python3=ON ^
-DPYTHON3_EXECUTABLE="%python3_executable%" ^
-DOPENCV_PYTHON3_VERSION=3.7.3 ^
-DPYTHON3_INCLUDE_DIR="%python3_include_dir%" ^
-DPYTHON3_LIBRARY="%python3_library%" ^
-DPYTHON3_NUMPY_INCLUDE_DIRS="%python3_numpy_include_dirs%" ^
-DPYTHON3_PACKAGES_PATH="%python3_packages_path%"

cmake --build %opencvBuild% --target ALL_BUILD --config Release
cmake --build %opencvBuild% --target INSTALL --config Release
Список источников
- docs.opencv.org/4.1.1/d3/d52/tutorial_windows_install.html
- www.learnopencv.com/install-opencv-4-on-windows
- jamesbowley.co.uk/build-opencv-4-0-0-with-cuda-10-0-and-intel-mkl-tbb-in-windows
- lightbuzz.com/opencv-cuda
- Глава «Building libraries from Source» книги Hands-on GPU-Accelerated Computer Vision with OpenCV and CUDA
-
Star
(19)
You must be signed in to star a gist -
Fork
(7)
You must be signed in to fork a gist
-
Clone this repository at <script src="https://gist.github.com/demid5111/6faa590e4fc5813550dd95cc1c538893.js"></script>
- Save demid5111/6faa590e4fc5813550dd95cc1c538893 to your computer and use it in GitHub Desktop.
Clone this repository at <script src="https://gist.github.com/demid5111/6faa590e4fc5813550dd95cc1c538893.js"></script>
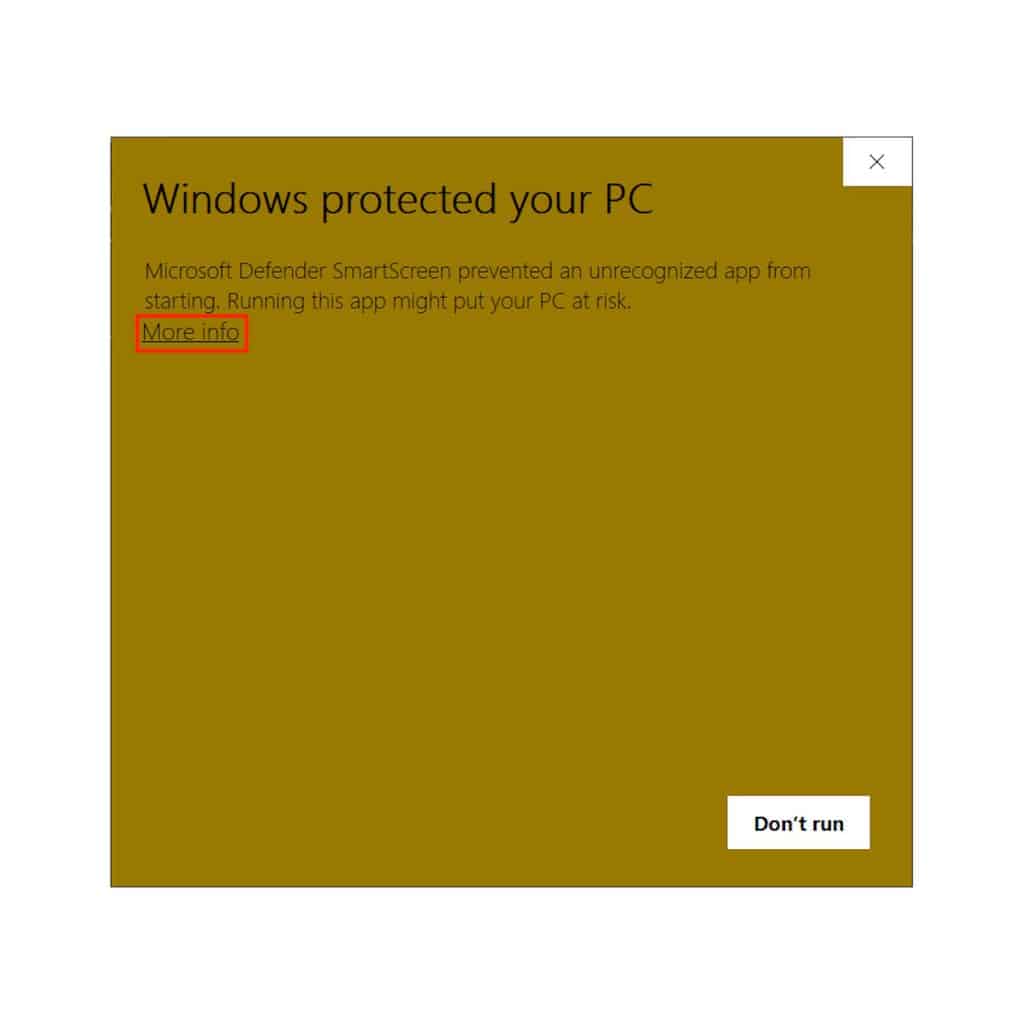
Instructions for installing opencv on Windows 10
Install OpenCV 4.5 on Windows 10
Pre-configured OpenCV for Python from PyPi
- open the terminal (Ctrl+R + cmd)
- check Python3 installation:
py --version - go to official website to learn details: https://pypi.org/project/opencv-python/
- choose the most complete package and run:
py -m pip install opencv-contrib-python - check installation by entering the Python REPL:
py - import tha library:
import cv2
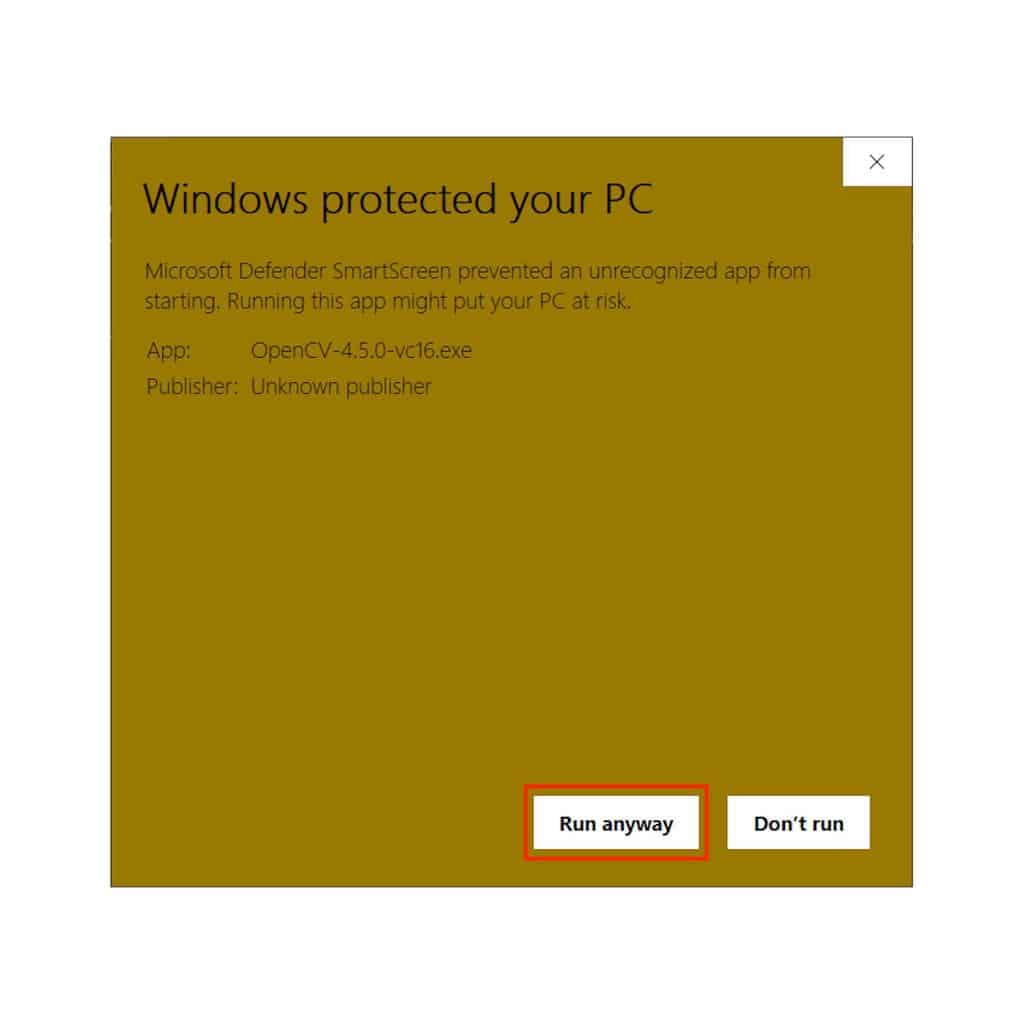
Pre-configured OpenCV for Python and C++ from GitHub releases
- Download opencv-4.5.1-vc14_vc15.exe from latest release:
https://github.com/opencv/opencv/releases/tag/4.5.1 - unpack to
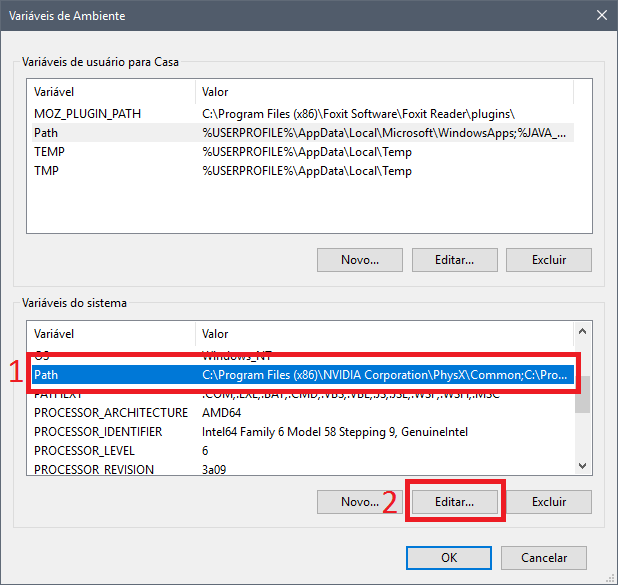
C:\opencv - edit environment variables. Win search «Environment variables»
- append to Path the path to opencv:
C:\opencv\bin - restart computer
- open cmd
echo %Path%output should contain new path
Build OpenCV for Python and C++ from sources
- Install cmake. To check:
cmake --version - Download Source code (zip) from latest release:
https://github.com/opencv/opencv/releases/tag/4.5.1 - Download Source code (zip) from latest release of opencv-contrib sources:
https://github.com/opencv/opencv_contrib/releases/tag/4.5.1 - Unzip both archives
Run cmake-gui - choose the directory with opencv sources
- specify the directory for storing building binaries and Visual Studio project.
it would better if you create a new one and specify it here - press ‘Configure’
- use standard settings and proceed with Finish button
- once project is prepared, review all the flags suggested
- check
BUILD_WITH_DEBUG_INFO - important to specify:
OPENCV_EXTRA_MODULES_PATH. We need to specify path to
contrib folder we extracted earlier - change
CMAKE_INSTALL_PREFIX
to a directory you want opencv to install to. for exampleC:/opencv-custom - when you are ready, press
Generate. - go to build directory
- double click on
OpenCV.sln - build
BUILD_ALLby right click on the corresponding project in Release configuration - Then build
INSTALLby right click on the corresponding project to finally install in Release configuration - edit environment variables. Win search «Environment variables»
- append to Path the path to opencv:
C:\opencv-custom\bin - restart computer
- open cmd
echo %Path%output should contain new path
Configure Visual Studio project to work with opencv
Go to the Visual Studio and create the new empty C++ project.
- We will call it «HelloOpenCV».
- Set the target to
Debugandx64. This is very important to configure it for x64. - Paste the
main.cppcode to themain.cpp
As we can see there is unknown include statement of the opencv package. We need to fix that.
-
For that we need to configure a project so that compiler could know where to take headers
and library from. Open the Project->HelloOpenCV Properties and go toVC++ Directories. -
Change the
Include Directoriesto contain corresponding include folder in the opencv
installation. Insert it to the beginning of the value:C:\opencv\opencv\build\include; -
Change the
Library directoriesto includeC:\opencv\opencv\build\x64\vc15\lib -
Change the
Linker->Input->Additional dependenciesto- include
opencv_world451d.libif we are talking about pre-configured package installation - include
opencv_core451d.lib;opencv_highgui451d.lib;opencv_videoio451d.lib;opencv_imgcodecs451d.lib;
if we are talking about building from sources. In future, this list might be bigger
containing all the libraries and extensions that you use from opencv and opencv-contrib.
- include
-
Apply and close the window
To name the few more available libraries that can be included with the following linker flags
(for Windows remove-land add451d.libto the end if the version of opencv is 4.5.1:-lopencv_gapi -lopencv_stitching -lopencv_alphamat \ -lopencv_aruco -lopencv_bgsegm -lopencv_bioinspired \ -lopencv_ccalib -lopencv_dnn_objdetect -lopencv_dnn_superres \ -lopencv_dpm -lopencv_face -lopencv_freetype \ -lopencv_fuzzy -lopencv_hfs -lopencv_img_hash \ -lopencv_intensity_transform -lopencv_line_descriptor -lopencv_mcc \ -lopencv_quality -lopencv_rapid -lopencv_reg \ -lopencv_rgbd -lopencv_saliency -lopencv_sfm \ -lopencv_stereo -lopencv_structured_light -lopencv_phase_unwrapping \ -lopencv_superres -lopencv_optflow -lopencv_surface_matching \ -lopencv_tracking -lopencv_highgui -lopencv_datasets \ -lopencv_text -lopencv_plot -lopencv_videostab \ -lopencv_videoio -lopencv_viz -lopencv_xfeatures2d \ -lopencv_shape -lopencv_ml -lopencv_ximgproc \ -lopencv_video -lopencv_dnn -lopencv_xobjdetect \ -lopencv_objdetect -lopencv_calib3d -lopencv_imgcodecs \ -lopencv_features2d -lopencv_flann -lopencv_xphoto \ -lopencv_photo -lopencv_imgproc -lopencv_core
This file contains hidden or bidirectional Unicode text that may be interpreted or compiled differently than what appears below. To review, open the file in an editor that reveals hidden Unicode characters.
Learn more about bidirectional Unicode characters
| #include «opencv2/opencv.hpp« | |
| #include <opencv2/highgui/highgui.hpp> | |
| #include «iostream« | |
| int showImage() { | |
| std::string path = «img/test.jpeg«; | |
| cv::Mat img = cv::imread(path); | |
| imshow(«Portrait«, img); | |
| cv::waitKey(0); | |
| return 0; | |
| } | |
| int showWebCameraContent() { | |
| // open the first webcam plugged in the computer | |
| cv::VideoCapture camera(0); | |
| if (!camera.isOpened()) { | |
| std::cerr << «ERROR: Could not open camera« << std::endl; | |
| return 1; | |
| } | |
| // create a window to display the images from the webcam | |
| cv::namedWindow(«Webcam«); | |
| // this will contain the image from the webcam | |
| cv::Mat frame; | |
| // display the frame until you press a key | |
| while (1) { | |
| // capture the next frame from the webcam | |
| camera >> frame; | |
| // show the image on the window | |
| cv::imshow(«Webcam«, frame); | |
| // wait (10ms) for a key to be pressed | |
| if (cv::waitKey(10) >= 0) { | |
| break; | |
| } | |
| } | |
| return 0; | |
| } | |
| int main(int, char**) { | |
| showImage(); | |
| // showWebCameraContent(); | |
| } |
For developers wishing to explore computer vision, OpenCV is the best place to start. Installing OpenCV however is notoriously tricky. In this article we’ll step through a full build-from-source installation on Windows 10, including setting up Python and C++ development environments.
Building from Source
When installing OpenCV on Windows, we have two options. We can install pre-built binaries or perform our own build from source. The easiest way to get up and running quickly is to install the pre-built binaries. There are however a number of reasons why you may want to build from source:
- You want to be able to debug OpenCV code and step into OpenCV functions. The pre-built Windows distribution contains binary libraries for release builds only therefore, if you want to debug, you need to build from source.
- You want more control over the installation, for example which libraries and wrappers are included and which platforms are targeted.
- You want to modify the OpenCV source code in your application.
- You want to contribute to OpenCV development.
Installing the pre-built binaries is a great way to get started quickly however you will probably want to customize the install eventually as you get more familiar with what OpenCV has to offer. This article assumes you want to build from source and explains the full process on Windows 10.
Preparation
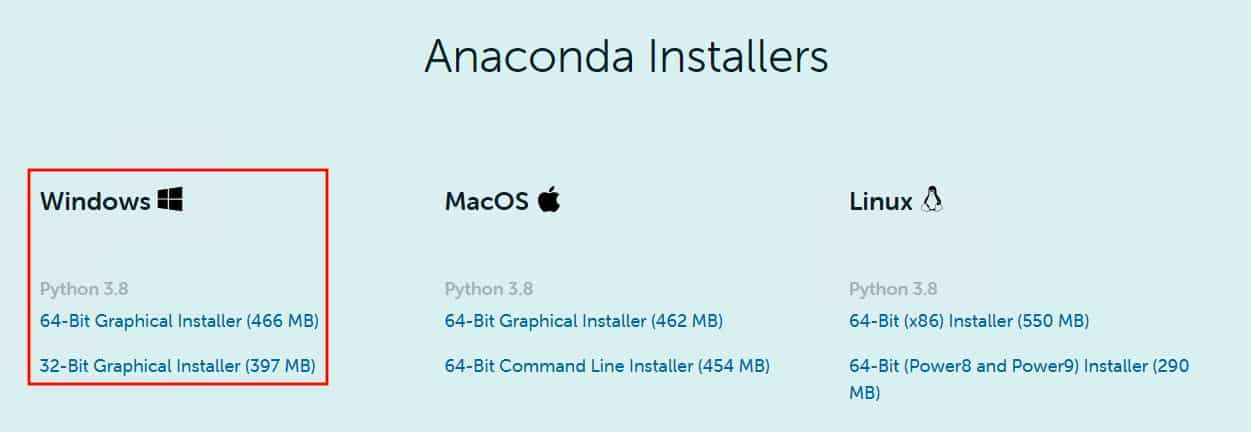
The first step is to download the source code. At the time of writing, the latest version of OpenCV is 4.2.0. The 4.2.0 source can be downloaded from OpenCV’s GitHub page. To have access to the latest OpenCV functionality, you will also want to download the contrib modules.
To build the OpenCV source code, a compiler is required. The suggested compiler for Windows is that provided by MSVC (Microsoft Visual C++). MSVC can either be installed as part of Microsoft Visual Studio or, if you don’t want the full Visual Studio install, you can just install the Visual Studio Build Tools. At the time of writing, the latest version of MSVC is version 16, which ships with Visual Studio 2019.
Unless you’re already familiar with C++, OpenCV’s Python interface is the best place to start. Regarding Python versions, the suggested version to use with OpenCV at the time of writing is Python 3.7. The more recent Python 3.8 has encountered issues with OpenCV bindings. Regarding target platforms, the default Python install available on www.python.org is x86 (32-bit). If you want to run x64 (64-bit) Python with OpenCV, the complication is that Numpy (a computational library which Python’s OpenCV bindings depend on) is only officially available in 32-bit format for Windows. The options therefore are as follows:
- Go with 32-bit Python and the official 32-bit Numpy package. This is the easiest option for getting started. Once 32-bit Python is installed, running the following command at the command prompt installs Numpy at the system level: pip3 install numpy.
- Use a 64-bit distribution of Python which includes 64-bit versions of supporting packages such as Numpy. Anaconda is the most common way of doing this. Distributions such as Anaconda are convenient as they have lots of tools readily available. The downside is you have less control over what is installed on your system and potentially many tools which you don’t need.
- Build your own 64-bit version of Numpy. This is only suggested if you’re familiar with building Python packages from source and you absolutely want to run with 64-bit Python and don’t want to work with a 3rd party distribution such as Anaconda.
To facilitate building from source, OpenCV uses CMake. The CMake tool is a free and open source utility which simplifies the build process with a graphical interface. CMake can be obtained from the downloads section of the CMake website. Be sure to add CMake to your Path during the installation process to allow it to be called from the command prompt.
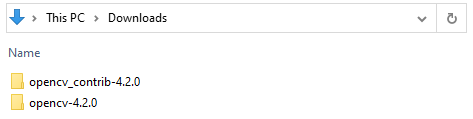
Building the Binaries
Now the preparation steps are complete, we can start the build process. Once the source files are downloaded and extracted, you should see two folders as per the image below.
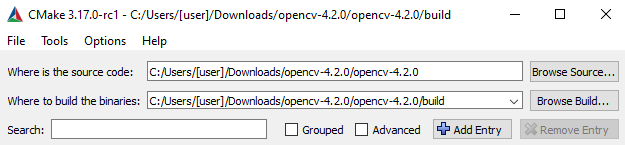
Launch the CMake utility and set the path of the source location. A build folder needs to be designated which CMake will create automatically. Be careful to use forward slashes instead of backslashes, which reflects CMake’s Linux origins.
Click the ‘Configure’ button and accept the creation of the build directory. CMake will then prompt you to specify the generator. Attention needs to be paid here to x64 vs x86. Depending which architecture you’re targeting (discussed earlier in this article regarding Python), the appropriate selection needs to be made. Note that MSVC version 16 (Visual Studio 2019) defaults to x64 whilst MSVC 15 (Visual Studio 2017) defaults to x86. You may therefore need to override the default setting using the ‘Optional toolset to use’ field.
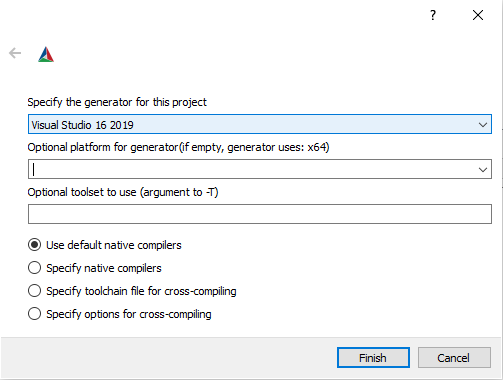
Upon clicking ‘Finish’, CMake will proceed to create the build configuration files in the designated build directory. Once the initial configuration step is complete, there are a number of build configuration changes to make in the red window of the CMake utility. The following changes are suggested:
- Set CMAKE_INSTALL_PREFIX to the folder in which you want the binaries to be installed e.g. C:/Program Files/OpenCV
- Check INSTALL_C_EXAMPLES and INSTALL_PYTHON_EXAMPLES
- To have access to the full OpenCV functionality, check OPENCV_ENABLE_NONFREE
- To include the contrib modules, set OPENCV_EXTRA_MODULES_PATH to the contrib modules source location e.g. C:\Users\[user]\Downloads\opencv_contrib-4.2.0\opencv_contrib-4.2.0\modules
- Set PYTHON3_PACKAGES_PATH to where you want the Python bindings installed – by default this will be C:/Users/[user]/AppData/Local/Programs/Python/Python37-32/Lib/site-packages
Once the above changes have been completed, click ‘Configure’ again to update the build configuration files then click ‘Generate’ to generate the build files.
Once the build files are generated, we can proceed with the build itself. Open a command prompt, navigate to the build directory which contains CMake’s output and run the following command: cmake.exe –build . –config Release –target INSTALL. The command prompt may need to be opened with administrator privileges, depending on where the binaries are being installed. This process will take approximately 15 minutes, depending on your system. When complete, the binaries will be installed in the folder indicated by the CMAKE_INSTALL_PREFIX field during CMake configuration. If you want to add debug functionality, also run the following command in the build directory: cmake.exe –build . –config Debug –target INSTALL. To complete the build process, add the location of the binaries to your Path e.g. C:\Program Files\OpenCV\x64\vc16\bin (this will depend on the location indicated by the CMAKE_INSTALL_PREFIX field during CMake configuration.
Testing the Python bindings
If the PYTHON3_PACKAGES_PATH field in CMake was set to the system site packages folder (see CMake configuration section earlier in this article), OpenCV’s Python bindings should work without any further configuration. Launch the Python interpreter, paying attention to x64 vs x86 if you have multiple versions installed, and enter ‘import cv2’. If successful, you will receive no error messages and be able to check the version.

If you have errors when trying to import cv2, the most likely causes are either x64 vs x86 compatibility or the cv2 bindings not being on Python’s path. The x64 vs x86 compatibility issues are discussed earlier in this article: Python, Numpy and the compiler need to be aligned on the same architecture. Regarding Python’s path, the cv2 module may need to be added to the PYTHONPATH environment variable if the cv2 module was installed in a location other that the system site packages folder.
Setting up a C++ development environment
On Windows, the most common C++ development environment is Microsoft Visual Studio therefore we’ll focus on Visual Studio for this article. Once the compiled binaries are correctly installed, a development environment such as Visual Studio requires the paths to the include files and library files in order to work with an external library such as OpenCV.
The first step is to create an environment variable pointing to the install directory of the compiled binaries. This simplifies the addition of paths to Visual Studio and avoids having to modify the Visual Studio project from one machine to another. For example, on my machine, I created an environment variable called OPENCVDIR, pointing to C:\Program Files\OpenCV.
Within your Visual Studio C++ project, open the Project Properties dialogue and navigate to C/C++ > General. Under ‘Additional Include Directories’, add the environment variable created earlier, followed by the path to the include files.
The next step is to add the path to the libraries for linking. Again within the Project Properties dialogue, navigate to Linker > General and add the path to the library files under ‘Additional Library Directories’.
The final step is to add the specific library files to be linked under the Linker > Input section. To start with, it is suggested to add opencv_core420.lib, opencv_highgui420.lib, opencv_imgcodecs420.lib and opencv_imgproc420.lib. You can add more libraries later as you explore more of the OpenCV functionality.
Depending on whether you want to link statically or dynamically, a final step is to set the Runtime Library property within Project Properties > Configuration Properties > C/C++ > Code Generation. Your OpenCV C++ development environment is now setup and ready for building OpenCV applications.
Published by Jean on
A new version of OpenCV has been released so… Time to update!
(This is an updated version of the article I wrote months ago: Installing and using OpenCV 3.2 with Eclipse and MinGW on Windows 10. )
Getting started
– You will need:
- OpenCV source code: version 3.4 or 3.3 (Link to Github repository (Latest release: 3.4.3));
- (Optional) If you want the extra modules, you will need opencv_contrib (Version 3.4.3 can be found here)
- Download MinGW-w64 and extract;
- Download and install CMake.
Configuring OpenCV
- Add MinGW to System Path
– Edit your System Environment variables (you can search for Environment in Windows’ Start Menu) ;
– Click on Path, and Edit;
– Then, hit New, and add the address of your MinGW bin folder.
- Extract OpenCV to a folder, rename it opencv_src— Inside it, create a folder named Mingw_build
Now, let’s compile OpenCV
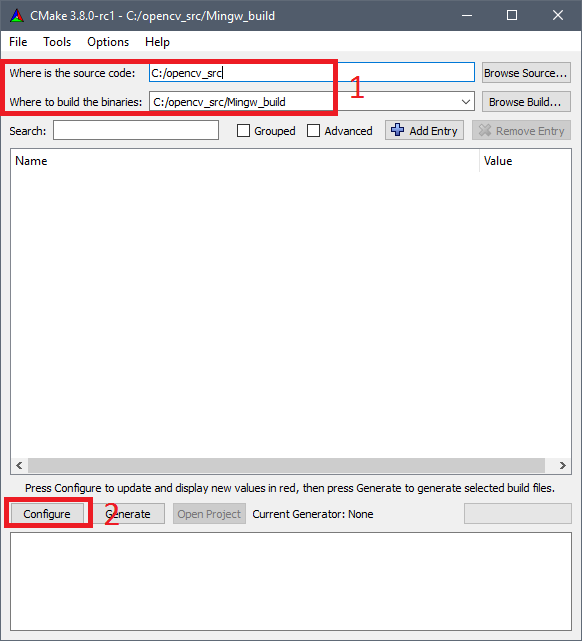
- Open CMake-gui;
- Set “Where is the source code:” to opencv_srcand “Where to build the binaries” to opencv_src/Mingw_build/
- Click on Configure, choosing Eclipse CDT4 – MinGW MakeFilein the next window, then next;
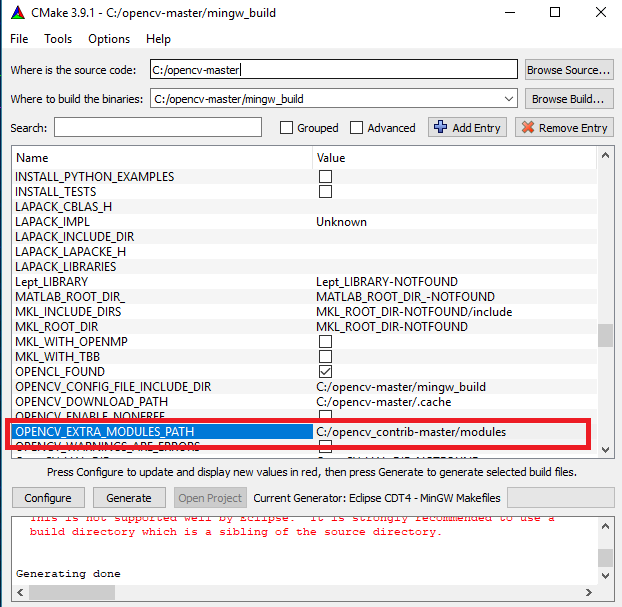
Optional Step: OpenCV_Contrib Extra modules
- If you want a simple and flawlessly working installation, just skip this step and go to the next, it’s not obligatory for you to have opencv_contrib.
- For additional info, access its Modules Github Page.
- After the “Configure” is finished, Set OPENCV_EXTRA_MODULES_PATH to opencv_contrib/modules folder
Building and Installing
- After the “Configure”, on my PC I had to deselect the options ENABLE_PRECOMPILED_HEADERS and BUILD_opencv_python3 to correctly compile.
- Hit “Generate”;
- Now, open the CMD/PowerShell, and navigate to opencv_src/Mingw_build/
- Inside opencv_src/Mingw_build type mingw32—make and hit enter;- This step probably will take a while, wait until it’s finished.
- Install using mingw32—make install
- Finally, add C:\opencv_src\Mingw_build\install\x64\mingw\binto your system path.
- I have seen errors related also to the following parameters: WITH_PTHREADS_PF , WITH_OPENCL and ENABLE_CXX11 options. Try unchecking then if something occurs.
Configuring Eclipse
- Open it and create a C++ program using the following OpenCV example:
|
1 2 3 4 5 6 7 8 9 10 11 12 13 14 15 16 17 18 19 20 21 22 23 24 25 26 27 28 29 30 |
#include <opencv2/core/core.hpp> #include <opencv2/highgui/highgui.hpp> #include <iostream> using namespace cv; using namespace std; int main( int argc, char** argv ) { if( argc != 2) { cout <<» Usage: thisprogramname.exe ImageToLoadAndDisplay» << endl; return —1; } Mat image; image = imread(argv[1], CV_LOAD_IMAGE_COLOR); // Read the file if(! image.data ) // Check for invalid input { cout << «Could not open or find the image» << std::endl ; return —1; } namedWindow( «Display window», WINDOW_AUTOSIZE );// Create a window for display. imshow( «Display window», image ); // Show our image inside it. waitKey(0); // Wait for a keystroke in the window return 0; } |
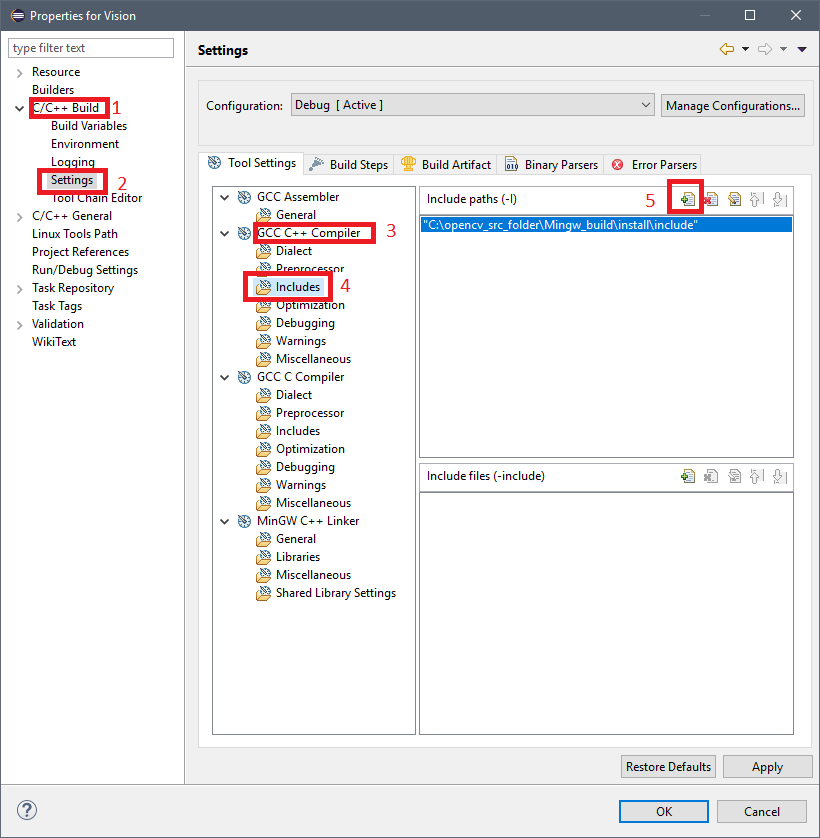
- Go to
Project > Properties > C/C++ Build > Settings > GCC C++ Compiler > Includes
and add the source OpenCV folderC:\opencv_src\Mingw_build\install\include
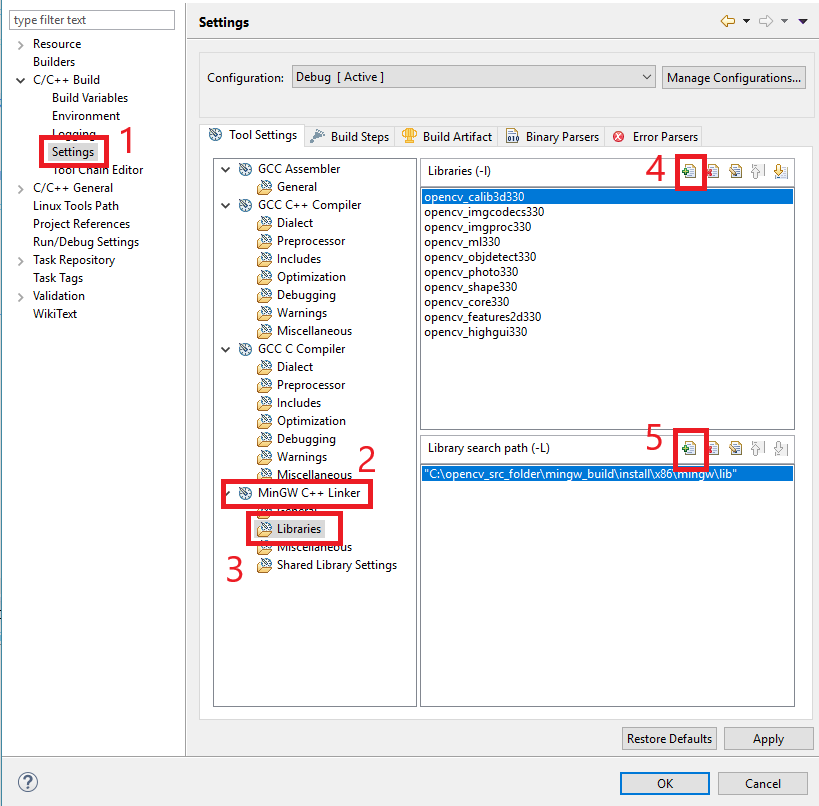
- Go to
Project > Properties > C/C++ Build > Settings > MinGW C++ Linker > Libraries
, and add this to the Libraries (-l), separately as shown in the image - For OpenCV 3.4:
|
opencv_calib3d340 opencv_core340 opencv_features2d340 opencv_flann340 opencv_highgui340 opencv_imgcodecs340 opencv_imgproc340 opencv_ml340 opencv_objdetect340 opencv_photo340 opencv_shape340 |
- For OpenCV 3.3:
|
opencv_calib3d330 opencv_core330 opencv_features2d330 opencv_flann330 opencv_highgui330 opencv_imgcodecs330 opencv_imgproc330 opencv_ml330 opencv_objdetect330 opencv_photo330 opencv_shape330 |
- If you are using a different OpenCV version, change the number at end of each lib to match your version
- You can add additional libraries from lib folder if you need, just follow the presented format;
- Add
C:\opencv_src\Mingw_build\install\x64\mingw\lib
to Library search path (-L); - Build the project. There are a lot of o ways of running it, e.g.:
- Open the Powershell or CMD, go to the executable folder and type:
yourprogramname.exe image.jpg - Or put the path of the image you want to show in the code, changing the following line:
- image = imread(argv[1], CV_LOAD_IMAGE_COLOR);
to - image = imread(«C://YOURIMAGEPATH.jpg», CV_LOAD_IMAGE_COLOR);
- image = imread(argv[1], CV_LOAD_IMAGE_COLOR);
- Open the Powershell or CMD, go to the executable folder and type:
- Updates
04/11/17 – Changed the order of some steps;
22/11/17 – Added MinGW-w64 instead of the conventional MinGW;
11/01/18 – Added support to OpenCV 3.4
12/04/18 – Added a better explanation for running the test code
12/09/18 – Added version 3.4.3 links and error correction sentences
Have fun with your projects!
If this post helped you, please consider buying me a coffee 🙂