
OctoPi (Raspberry Pi) · Octo4a (Android) · OctoPrint for Orange Pi · Docker install · octoprint_deploy (Linux) · Windows Installer · Manual install (Linux, Windows, Mac)
OctoPi
Guy Sheffer maintains “OctoPi”,
a Raspbian (and thus Debian) based SD card image for the Raspberry Pi
that already includes OctoPrint plus everything you need to run it:
- OctoPrint plus its dependencies
- MJPG-Streamer
for live viewing of prints and timelapse video creation, compatible with various
USB webcams and the Raspberry Pi camera
Recommended hardware: Raspberry Pi 3B, 3B+, 4B or Zero 2. Expect print artifacts and long loading times with other
options, especially when adding a webcam or installing third party plugins. Setups not using
recommended hardware are not officially supported.
Please note that the Raspberry Pi Zero and Zero W are not recommended explicitly since severe performance
issues were observed, caused by the WiFi interface when bandwidth is utilized (e.g. the webcam is streamed), negatively
impacting printing quality. See also here. The Zero 2
however is recommended.
Installing OctoPi
OctoPi is available through the Raspberry Pi Imager, which you can use to download and setup OctoPi. You can install it yourself, or alternatively simply buy one of the available
Installing OctoPi using the Raspberry Pi Imager
🤚 Before you begin
Read and follow these instructions precisely.
-
If you haven’t already, download and install Raspberry Pi Imager on your computer
-
Find the OctoPi image under “Choose OS”, by selecting “Other Specific Purpose OS” > “3D printing” > “OctoPi” and then the “stable” version.
-
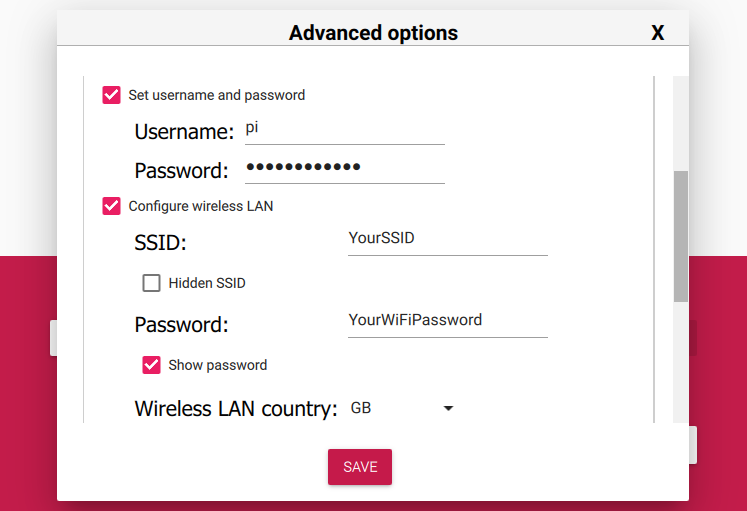
Open advanced options by clicking on the button with the gear, or by using the keyboard shortcut
ctrl+shift+xand then:-
Configure your wifi options: Set your SSID, password and WiFi country.
-
Change the system password in “Set username and password” by entering a new password to use for the system user “pi”. This is not the password you’ll use for logging into
OctoPrint but one that you’ll have to use to log into your Pi via SSH should you ever need to. -
Optionally: Change the configured timezone in “Set locale settings”
-
Optionally: Change the hostname in “Set hostname”

-
-
Install the image to your SD card, then plug everything in to your Raspberry Pi and boot it up. Do not format the SD card after installing, even if prompted to do so. This will break the installation and you will have to start over!
-
Access OctoPrint from your browser via
http://octopi.localor the hostname you
chose (if your computer supports bonjour)
orhttp://<your pi's ip address>.httpsis available too, with a self-signed certificate
(which means your browser will warn you about it being invalid — it isn’t, it’s just not recognized by your browser).
Please also refer to OctoPi’s README, especially the “How to use it” section.
Alternative Initial Setup
If you decide against using the Raspberry Pi Imager, here are some alternative steps to get started:
-
Flash the image to your SD card through whatever alternative means you’ve chosen.
-
With the SD card still attached to your computer, set up the Wifi connection using the
octopi-wpa-supplicant.txtfile
on the root of the installed card when using it like a thumb drive.
Important: Do not use WordPad (Windows) or TextEdit (MacOS X) for this, those editors are known to mangle
the file, making configuration fail. Use something like Notepad++, Atom or VSCode instead or at the very
least heed the warnings in the file. If your computer doesn’t see the card right away after flashing, try
ejecting and inserting it again. Do not format the SD card after installing, even if prompted to do so. This will break the installation and you will have to start over!Please also refer take a look at the full WiFi setup guide in the FAQ that also includes troubleshooting tips.
-
Plug everything into your Raspberry Pi and boot it up
-
Log into your Pi via SSH (it is located at
octopi.local
if your computer supports bonjour
or the IP address assigned by your router), default username ispi, default password israspberry.
Runsudo raspi-config. Once that is open:- Change the password via “Change User Password”
- Optionally: Change the configured timezone via “Localization Options” > “Timezone”.
- Optionally: Change the hostname via “Network Options” > “Hostname”. Your OctoPi instance will then no longer be reachable under
octopi.localbut rather the hostname you chose postfixed with.local, so keep that in mind.
You can navigate in the menus using the arrow keys and Enter. To switch to selecting the buttons at the bottom use Tab.
You do not need to expand the filesystem, current versions of OctoPi do this automatically.
You also do not need to manually enable the RaspiCam if you have one, that is already taken care of on the image as well.
-
Access OctoPrint through
http://octopi.local(if your computer supports bonjour)
orhttp://<your pi's ip address>.httpsis available too, with a self-signed certificate
(which means your browser will warn you about it being invalid — it isn’t, it’s just not recognized by your browser).
Please also refer to OctoPi’s README, especially the “How to use it” section.
Image Downloads
Raspberry Pi Imager will download the latest version of OctoPi for you, but if you want to download the images
yourself you can do so here.
Stable OctoPi
OctoPi 1.1.0 & OctoPrint 1.11.0
SHA256: 686bad3459d0f4c892c69814a9c29ebe93b71a72b513d81d517bd401c521da30
Raspberry Pi 3B, 3B+, 4B or Zero 2 strongly recommended, Raspberry Pi Zero/Zero W not officially supported, Raspberry Pi 5 currently unsupported!
Image compatible with Raspberry Pi 1A, 1A+, 1B, 1B+, 2B, 3A+, 3B, 3B+, 4B 1/2/4/8GB, 5B 4/8GB, Zero, Zero W, Zero 2 and 400.
Stable OctoPi with New Camera Stack
The same OctoPi image with the new camera stack can be found here:
OctoPi 1.0.0 & OctoPrint 1.11.0 (new camera stack)
SHA256: 9bd5f5b22ff50b03072abe70586a49884dae99ed4b05bb9b9e22f1e464099649
Raspberry Pi 3B, 3B+, 4B or Zero 2 strongly recommended, Raspberry Pi Zero/Zero W not officially supported, Raspberry Pi 5 currently unsupported!
Image compatible with Raspberry Pi 1A, 1A+, 1B, 1B+, 2B, 3A+, 3B, 3B+, 4B 1/2/4/8GB, 5B 4/8GB, Zero, Zero W, Zero 2 and 400.
OctoPi Nightlies
You can also get the 32bit nightlies here or the 64bit nightlies here.
Further resources
- For customizing OctoPi, take a look at CustoPiZer.
- Scripts to build the image yourself can be found in OctoPi’s Github repository.
Octo4a
Filip Grzywok maintains
“Octo4a”, an Android
app that allows you to use an Android based smart phone as an OctoPrint host. Root
is not required!
Check out the Octo4a README for information on
how to obtain the app, install and run it.
Video
There’s also a video guide on how to get Octo4a up and running by Thomas Sanladerer.
OctoPrint for Orange Pi
The people at Obico maintains an image suitable for use with the Orange Pi Zero 2 and the Orange Pi 3. You can find it here. Please report issues to Obico.
Docker
There’s also an official OctoPrint Docker image, octoprint/octoprint. It is maintained
by Brian Vanderbush and team on GitHub.
Please refer to its entry on dockerhub for
more details on usage and configuration.
octoprint_deploy (Linux)
octoprint_deploy is a guided script for installing OctoPrint and additional tools (video streamer, haproxy) on virtually any Linux system. It guides the user through creation of one or more OctoPrint instances. Creating multiple instances with the script allows control of multiple printers on a single piece of hardware. A variety of utilities improve the multi-instance experience, including automated creation of udev rules, syncing users between instances, and sharing file uploads between instances. It is compatible with OctoPi.
Maintained by Paul Paukstelis.
Windows Installer
OctoPrint-WindowsInstaller is a Windows installation wizard for OctoPrint. It
is maintained by jneilliii. Please report issues here.
Installing manually
The generic setup instructions boil down to
- Installing Python 3, including pip.
- Creating a virtual environment somewhere:
python -m venv OctoPrint - Installing OctoPrint into that virtual environment:
OctoPrint/bin/pip install OctoPrint - OctoPrint may then be started through
./OctoPrint/bin/octoprint serveor with an absolute path/path/to/OctoPrint/bin/octoprint serve
More specific setup instructions for the most common runtime environments can be found below.
Linux
For installing OctoPrint on Linux, please take a look at the setup instructions for Raspbian on the forum.
They should be pretty much identical on other Linux distributions. See octoprint_install & octoprint_deploy (Linux) above for simplified scripted options.
Windows
For installing the OctoPrint server on a Windows system, please take a look at the setup instructions for Windows on the forum.
Mac
For installing the OctoPrint server on a Mac, please take a look at the setup instructions for MacOS on the forum.
OctoPi (Raspberry Pi) · Octo4a (Android) · OctoPrint for Orange Pi · Docker install · octoprint_deploy (Linux) · Windows Installer · Manual install (Linux, Windows, Mac)
OctoPi
Guy Sheffer maintains “OctoPi”,
a Raspbian (and thus Debian) based SD card image for the Raspberry Pi
that already includes OctoPrint plus everything you need to run it:
- OctoPrint plus its dependencies
- MJPG-Streamer
for live viewing of prints and timelapse video creation, compatible with various
USB webcams and the Raspberry Pi camera
Recommended hardware: Raspberry Pi 3B, 3B+, 4B or Zero 2. Expect print artifacts and long loading times with other
options, especially when adding a webcam or installing third party plugins. Setups not using
recommended hardware are not officially supported.
Please note that the Raspberry Pi Zero and Zero W are not recommended explicitly since severe performance
issues were observed, caused by the WiFi interface when bandwidth is utilized (e.g. the webcam is streamed), negatively
impacting printing quality. See also here. The Zero 2
however is recommended.
Installing OctoPi
OctoPi is available through the Raspberry Pi Imager, which you can use to download and setup OctoPi. You can install it yourself, or alternatively simply buy one of the available
Installing OctoPi using the Raspberry Pi Imager
🤚 Before you begin
Read and follow these instructions precisely.
-
If you haven’t already, download and install Raspberry Pi Imager on your computer
-
Find the OctoPi image under “Choose OS”, by selecting “Other Specific Purpose OS” > “3D printing” > “OctoPi” and then the “stable” version.
-
Open advanced options by clicking on the button with the gear, or by using the keyboard shortcut
ctrl+shift+xand then:-
Configure your wifi options: Set your SSID, password and WiFi country.
-
Change the system password in “Set username and password” by entering a new password to use for the system user “pi”. This is not the password you’ll use for logging into
OctoPrint but one that you’ll have to use to log into your Pi via SSH should you ever need to. -
Optionally: Change the configured timezone in “Set locale settings”
-
Optionally: Change the hostname in “Set hostname”
-
-
Install the image to your SD card, then plug everything in to your Raspberry Pi and boot it up. Do not format the SD card after installing, even if prompted to do so. This will break the installation and you will have to start over!
-
Access OctoPrint from your browser via
http://octopi.localor the hostname you
chose (if your computer supports bonjour)
orhttp://<your pi's ip address>.httpsis available too, with a self-signed certificate
(which means your browser will warn you about it being invalid — it isn’t, it’s just not recognized by your browser).
Please also refer to OctoPi’s README, especially the “How to use it” section.
Alternative Initial Setup
If you decide against using the Raspberry Pi Imager, here are some alternative steps to get started:
-
Flash the image to your SD card through whatever alternative means you’ve chosen.
-
With the SD card still attached to your computer, set up the Wifi connection using the
octopi-wpa-supplicant.txtfile
on the root of the installed card when using it like a thumb drive.
Important: Do not use WordPad (Windows) or TextEdit (MacOS X) for this, those editors are known to mangle
the file, making configuration fail. Use something like Notepad++, Atom or VSCode instead or at the very
least heed the warnings in the file. If your computer doesn’t see the card right away after flashing, try
ejecting and inserting it again. Do not format the SD card after installing, even if prompted to do so. This will break the installation and you will have to start over!Please also refer take a look at the full WiFi setup guide in the FAQ that also includes troubleshooting tips.
-
Plug everything into your Raspberry Pi and boot it up
-
Log into your Pi via SSH (it is located at
octopi.local
if your computer supports bonjour
or the IP address assigned by your router), default username ispi, default password israspberry.
Runsudo raspi-config. Once that is open:- Change the password via “Change User Password”
- Optionally: Change the configured timezone via “Localization Options” > “Timezone”.
- Optionally: Change the hostname via “Network Options” > “Hostname”. Your OctoPi instance will then no longer be reachable under
octopi.localbut rather the hostname you chose postfixed with.local, so keep that in mind.
You can navigate in the menus using the arrow keys and Enter. To switch to selecting the buttons at the bottom use Tab.
You do not need to expand the filesystem, current versions of OctoPi do this automatically.
You also do not need to manually enable the RaspiCam if you have one, that is already taken care of on the image as well.
-
Access OctoPrint through
http://octopi.local(if your computer supports bonjour)
orhttp://<your pi's ip address>.httpsis available too, with a self-signed certificate
(which means your browser will warn you about it being invalid — it isn’t, it’s just not recognized by your browser).
Please also refer to OctoPi’s README, especially the “How to use it” section.
Image Downloads
Raspberry Pi Imager will download the latest version of OctoPi for you, but if you want to download the images
yourself you can do so here.
Stable OctoPi
OctoPi 1.1.0 & OctoPrint 1.11.0
SHA256: 686bad3459d0f4c892c69814a9c29ebe93b71a72b513d81d517bd401c521da30
Raspberry Pi 3B, 3B+, 4B or Zero 2 strongly recommended, Raspberry Pi Zero/Zero W not officially supported, Raspberry Pi 5 currently unsupported!
Image compatible with Raspberry Pi 1A, 1A+, 1B, 1B+, 2B, 3A+, 3B, 3B+, 4B 1/2/4/8GB, 5B 4/8GB, Zero, Zero W, Zero 2 and 400.
Stable OctoPi with New Camera Stack
The same OctoPi image with the new camera stack can be found here:
OctoPi 1.0.0 & OctoPrint 1.11.0 (new camera stack)
SHA256: 9bd5f5b22ff50b03072abe70586a49884dae99ed4b05bb9b9e22f1e464099649
Raspberry Pi 3B, 3B+, 4B or Zero 2 strongly recommended, Raspberry Pi Zero/Zero W not officially supported, Raspberry Pi 5 currently unsupported!
Image compatible with Raspberry Pi 1A, 1A+, 1B, 1B+, 2B, 3A+, 3B, 3B+, 4B 1/2/4/8GB, 5B 4/8GB, Zero, Zero W, Zero 2 and 400.
OctoPi Nightlies
You can also get the 32bit nightlies here or the 64bit nightlies here.
Further resources
- For customizing OctoPi, take a look at CustoPiZer.
- Scripts to build the image yourself can be found in OctoPi’s Github repository.
Octo4a
Filip Grzywok maintains
“Octo4a”, an Android
app that allows you to use an Android based smart phone as an OctoPrint host. Root
is not required!
Check out the Octo4a README for information on
how to obtain the app, install and run it.
Video
There’s also a video guide on how to get Octo4a up and running by Thomas Sanladerer.
OctoPrint for Orange Pi
The people at Obico maintains an image suitable for use with the Orange Pi Zero 2 and the Orange Pi 3. You can find it here. Please report issues to Obico.
Docker
There’s also an official OctoPrint Docker image, octoprint/octoprint. It is maintained
by Brian Vanderbush and team on GitHub.
Please refer to its entry on dockerhub for
more details on usage and configuration.
octoprint_deploy (Linux)
octoprint_deploy is a guided script for installing OctoPrint and additional tools (video streamer, haproxy) on virtually any Linux system. It guides the user through creation of one or more OctoPrint instances. Creating multiple instances with the script allows control of multiple printers on a single piece of hardware. A variety of utilities improve the multi-instance experience, including automated creation of udev rules, syncing users between instances, and sharing file uploads between instances. It is compatible with OctoPi.
Maintained by Paul Paukstelis.
Windows Installer
OctoPrint-WindowsInstaller is a Windows installation wizard for OctoPrint. It
is maintained by jneilliii. Please report issues here.
Installing manually
The generic setup instructions boil down to
- Installing Python 3, including pip.
- Creating a virtual environment somewhere:
python -m venv OctoPrint - Installing OctoPrint into that virtual environment:
OctoPrint/bin/pip install OctoPrint - OctoPrint may then be started through
./OctoPrint/bin/octoprint serveor with an absolute path/path/to/OctoPrint/bin/octoprint serve
More specific setup instructions for the most common runtime environments can be found below.
Linux
For installing OctoPrint on Linux, please take a look at the setup instructions for Raspbian on the forum.
They should be pretty much identical on other Linux distributions. See octoprint_install & octoprint_deploy (Linux) above for simplified scripted options.
Windows
For installing the OctoPrint server on a Windows system, please take a look at the setup instructions for Windows on the forum.
Mac
For installing the OctoPrint server on a Mac, please take a look at the setup instructions for MacOS on the forum.
Добрый день, в двух небольших видео я рассказываю как поставить OctoPrint на Raspberry Pi и компьютер. А так же добавление ключа API в слайсер CURA. Доступ к OctoPrint через строку в интернет браузере выдаваемый wifi роутером.
Наверное большинство испытывали трудности отправки файла на печать, я предлагаю немного облегчить процесс печати. Понадобится роутер wifi, raspberry pi (+ карта памяти от 16 до 128 Гб) или компьютер с wifi модулем, можно приобрести на торговых площадках или у знакомых.
Сразу оговорюсь, один компьютер на один принтер. Доступ к принтеру только в одной сети wifi, (можно в дальнейшем использовать ddns для удалённого доступа из сети, при выборе роутера рекомендую обратить на этот параметр). Для Raspberry Pi очень важен стабильный и качественный источник питания. А так же использование Raspberry Pi не ниже 3 версии (подходят 3B, 3B+, 4B).
Для raspberry pi намного легче подключить веб-камеру чем к ПК.
В маркете есть приложение OctoRemote для мобильных устройств, добавить путем сканирования QR кода из программы OctoPrint.
Для raspberry pi после подачи питания программа запускается автоматически, а для пк необходимо добавить файл запуска в автозагрузку.
Ниже описание только теоретический материал, и видео представлено не было.
В качестве дополнительных опций можно добавить монитор octoscreen для raspberry pi (требуется уровень владения пк — уверенный пользователь) с которого в дальнейшем можно выполнять ограниченный набор функций:
1. Выбор сохранённых файлов для печати.
2. Настройка стола по 4 точкам.
3. Управление по осям
4. Выбор wifi сети
и немного доп. функций.
Теперь немного информации из источников:
Для Raspberry Pi
1. Сайт программы OctoPrint https://octoprint.org/download/
2. Сайт программы для прошивки карты памяти для Raspberry pi https://www.raspberrypi.com/software/
Для компьютера
1. Сайт для настройки OctoPrint для Windows https://community.octoprint.org/t/setting-up-octoprint-on-windows/383
2.1 Сайт для скачивания питона https://www.python.org/downloads/
2.2 Сайт для скачивания Visual Studio https://visualstudio.microsoft.com/ru/downloads/
OctoPrint Windows Installer
This repository uses a GitHub action to make a bundled installer for OctoPrint on Windows. It uses WinPython, winsw, and automates the process of creating a venv, installing OctoPrint in it, and adding an OctoPrint service in Windows.
System Requirements
The minimum requirements to use the Windows Installer are:
- 64 bit OS
- Windows 10 or newer
Usage
Head to the latest release and download the built installer from the bottom of the release.
While downloading the installer exe your browser may prompt that the file is dangerous, accept any warnings as shown below in Chrome by selecting Keep.

During initial install you may get the SmartScreen warning because the installer is not signed by a MS trusted certificate. Unfortunately, I’m not investing the money to acquire one of those, feel free to download this repo and scan it if you are concerned with what’s included.

To continue with the installation press the More info link and then press the Run anyway button.

You may be presented with a UAC prompt for admin rights once the install starts. Press the Yes button and continue with the installation wizard.

Building the installer
To manually build you will need to pass /DMyAppVersion="x.x.x" to InnsoSetup compile command. This is automatically handled by the GitHub Action.
Добавлено в закладки: 6
Обычно для упрощённого удалённого управления 3D принтером используют TeamViewer, но он не заточен для управления принтером. С другой стороны зачем покупать Raspberry Pi если есть старенький ноутбук или нетбук, ведь можно настроить OctoPrint на Windows.
Изначально OctoPrint предназначался для маломощных устройств работающих на операционной системе Linux, но его можно установить и на компьютер с операционной системой Windows. Этим и займёмся.
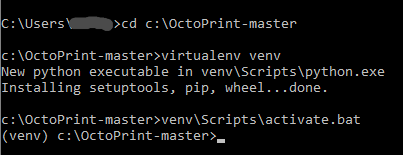
Установка принт-сервера
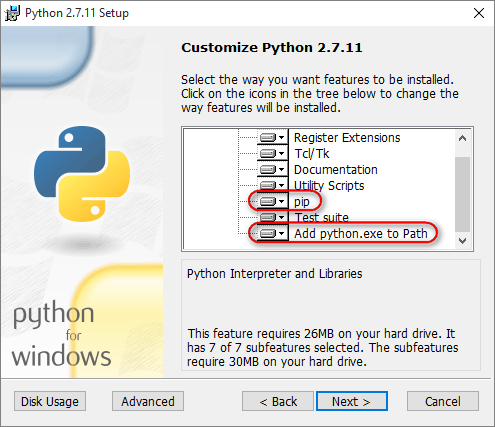
1. Начинать нужно с установки интерпретатора языка программирования высокого уровня Python 2.7. Устанавливать нужно версию 32bit – Windows x86 MSI installer. Во время установки поставить галочки (не должно быть крестиков, см. на скриншот) на pip и Add python.exe to PATH. Перезагружаем компьютер.

2. Открываем командную строку Windows. Win+R, пишем cmd и жмём Enter. Появляется чёрное окошко с курсором. Выполняем в командной строке
pip install virtualenv
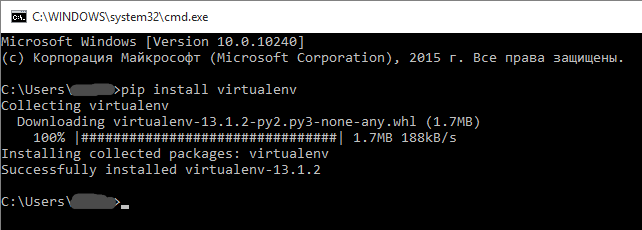
Если пишет, что pip не найден, значит Python не прописался в переменную PATH и это придётся сделать руками.
3. Скачиваем OctoPrint с ГитХаба. Ссылка. Распаковываем в корневую папку диска C:\
У меня получился путь C:\OctoPrint-master
4. Устанавливаем виртуальное окружение:
cd c:\OctoPrint-master
virtualenv venv
venv\Scripts\activate.bat
5. Мы установили виртуальное окружение venv. Теперь установим в нём принт-сервер
python setup.py install
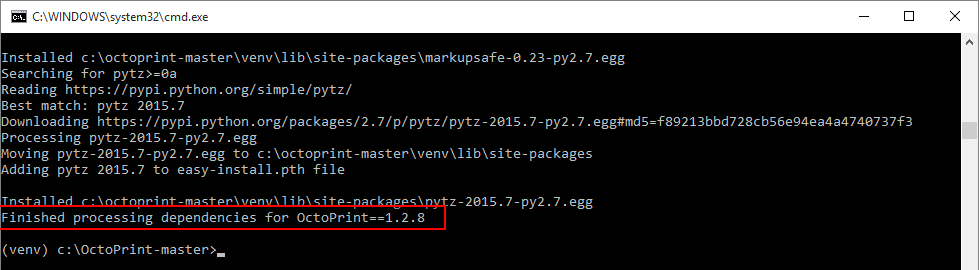
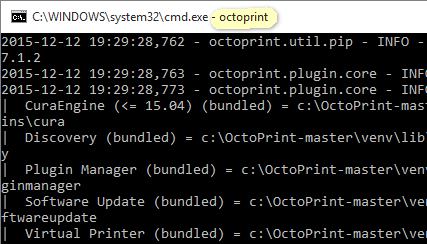
6. Готово. Теперь можно запускать Octoprint
octoprint

Всё OctoPrint запущен!
Ссылка на свежую версию инструкции.
Использование принт-сервера
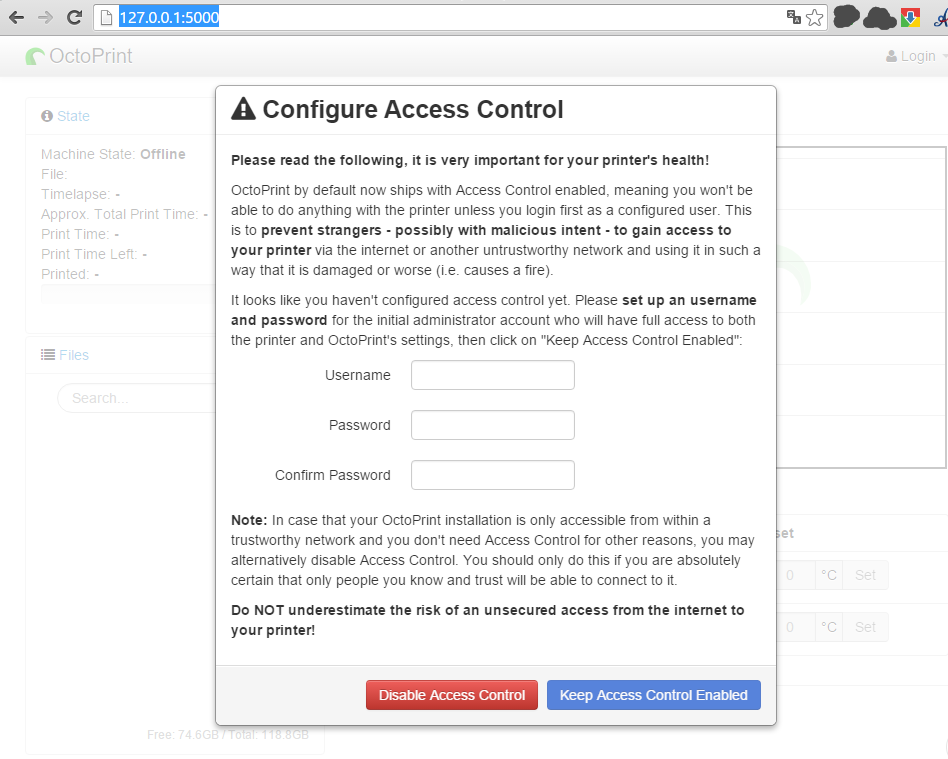
1. Переходим в веб интерфейс. Вводим в браузере http://127.0.0.1:5000. Задаём Имя пользователя и Пароль, и начинаем работать точно так же, как на Raspberry Pi.
Здесь не нужно делать проброс портов в маршрутизаторе, этот сервер уже работает через порт 5000. Но в маршрутизаторе нужно открыть этот порт для компьютера, на котором работает OctoPrint.
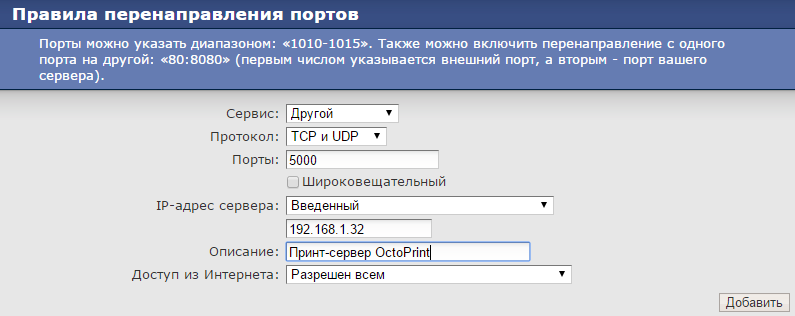
Возможно у вас порты и так открыты всему миру, а возможно их нужно дополнительно добавить в исключения файрвола.
Теперь идём по адресу http://myip.dnsdynamic.org/. Копируем цифры. Это наш внешний IP адрес. Вбиваем его в адресную строку браузера и добавляем :5000 – вот он наш принт-сервер на любом устройстве с браузером в Интернете. Добавляем в закладки браузера. Подробнее про статичный IP читайте в статье “Удалённое управление 3D принтером. OctoPrint“.
2. Останавливается и закрывается принт-сервер – закрывая чёрное окно командной строки
3. Как запускать уже установленный принт-сервер
Находим файл C:\OctoPrint-master\venv\Scripts\activate.bat и правим его в Блокноте. Добавляем строку octoprint перед строкой :END
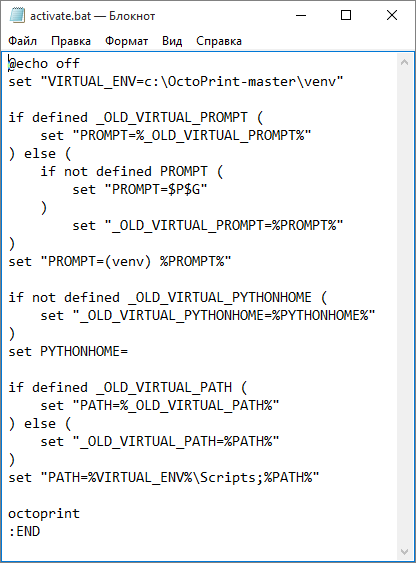
Добавляем ярлык этого файла на рабочий стол и переименовываем его в “OctoPrint“. Теперь запуская этот ярлык – запускаем на компьютере принт-сервер OctoPrint.
Подключение веб камеры
Здесь нет вкладки Timelapse, как на версии для Raspberry Pi
Так как работаем мы в Windows, нам не нужны дополнительные видео функции в принт-сервере, они отлично обеспечиваются сторонними приложениями. Рассмотрим одно из них – Yawcam.
Устанавливаем по порядку:
- Устанавливаем Java Runtime Environment (JRE). Ссылка.
- Перезагружаем компьютер.
- Устанавливаем Yawcam. Ссылка.
- Запускаем Yawcam.
Выбираем свою камеру через меню
После этого должна появиться картинка в Preview окне.
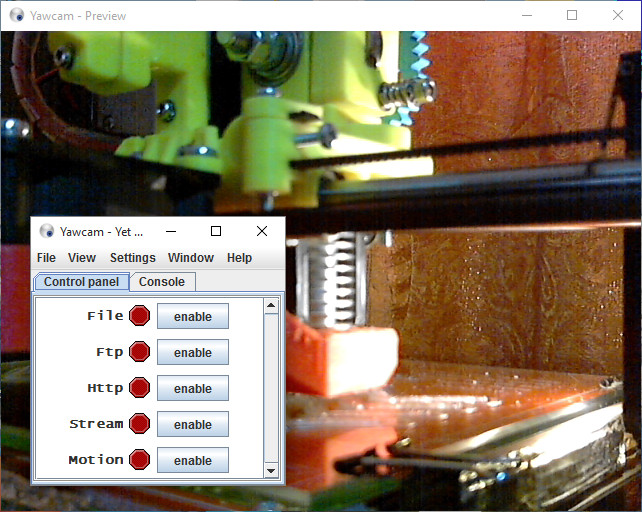
Включаем Http и Stream
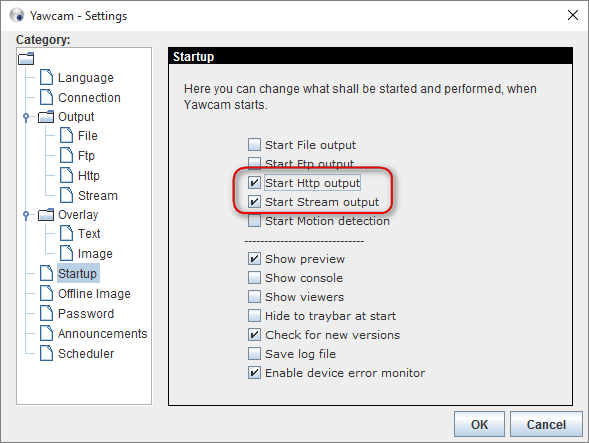
Открываем порты на маршрутизаторе для видеопотока (8081) и статичного кадра (8888).

Теперь видеопоток доступен по адресу http://ваш IP:8081/
Статичный кадр доступен по адресу http://ваш IP:8888/

В итоге
На ОС Windows обычному пользователю проще и понятнее работать. Приятно, что это возможно. Также на большом компьютере можно запустить несколько серверов печати без ущерба для производительности системы. Это значит можно подключать сразу несколько принтеров и управлять ими раздельно с разных адресов. Но во всём этом нужно дополнительно разбираться
После подключения камеры возникла масса вопросов:
- Какое место для камеры оптимально?
- Как организовать и где установить свет?
- Как улучшить качество картинки?
- Как настроить фокус камеры?
Возможно есть варианты интеграции видео в OctoPrint или управление параметрами через него, но я разобрался только в этом варианте.
Обсуждение на форуме
Summary
- Skip the Pi: Run OctoPrint on Windows for easy setup and better performance on higher-end hardware.
- Quick Install: Use the automated installer for a hassle-free process on Windows 10 or newer.
- Avoid Configuration Issues: Troubleshoot common problems like Python recognition and activation scripts in Windows.
OctoPrint is a powerful tool for remotely managing and monitoring your 3D printer. While it’s most often associated with running on a Raspberry Pi, it’s also entirely possible — and sometimes more convenient — to run it on a Windows PC. Whether you’re avoiding the cost or complexity of a Pi or prefer sticking with what you already have, this guide will walk you through the process.
There are a couple of ways to accomplish this, including an automated installer as well as a method outlined by the OctoPrint community itself. This manual method tailors the instructions specifically for Windows users, so there’s no need to hunt down outdated instructions or dig through forums.
Related
5 Octoprint alternatives you should be using
OctoPrint is not the only platform for remotely controlling a 3D printer. These alternatives are great and they even offer more functionalities.
Why run OctoPrint on Windows?
A more straightforward setup for some users
There are several good reasons to skip the Pi and set up OctoPrint on your Windows machine. It’s ideal for testing or development, especially if you’re working on OctoPrint plugins or UI tweaks. Also, since a Windows installation performs better on higher-end hardware, you can manage multiple printers or heavier plugins without slowdown.
Octoprint
It’s also just convenient. You don’t need to buy extra hardware if you already have a dedicated PC near your printer. And if you’re in an environment where Pi availability is limited or your Pi is required elsewhere, Windows makes a solid alternative.
What you’ll need before starting
Tools and software to prepare first
Before diving into the install process, ensure you’ve covered the basics. Here’s what you’ll need:
- A Windows 10 or 11 PC (64-bit preferred)
- Administrator access to install software
- A working 3D printer with a USB connection
- Python 3.8 to 3.11 installed (if you use the automated installer, this will happen automatically)
- Git for Windows (also installed automatically with the installer)
- Basic command-line familiarity (Command Prompt or PowerShell)
If Python isn’t already installed, make sure to add it to your system PATH during installation. This will be critical if you choose the manual installation method instead of the automated installer.
The quick and easy automatic OctoPrint installation
If you want to install OctoPrint and all of its dependencies quickly and automatically, the community maintains an installer to handle all of this for you. This installer requires 64-bit Windows 10 or newer. It won’t work if you have a 32-bit operating system, so keep that in mind. To follow this method, here’s what you need to do.
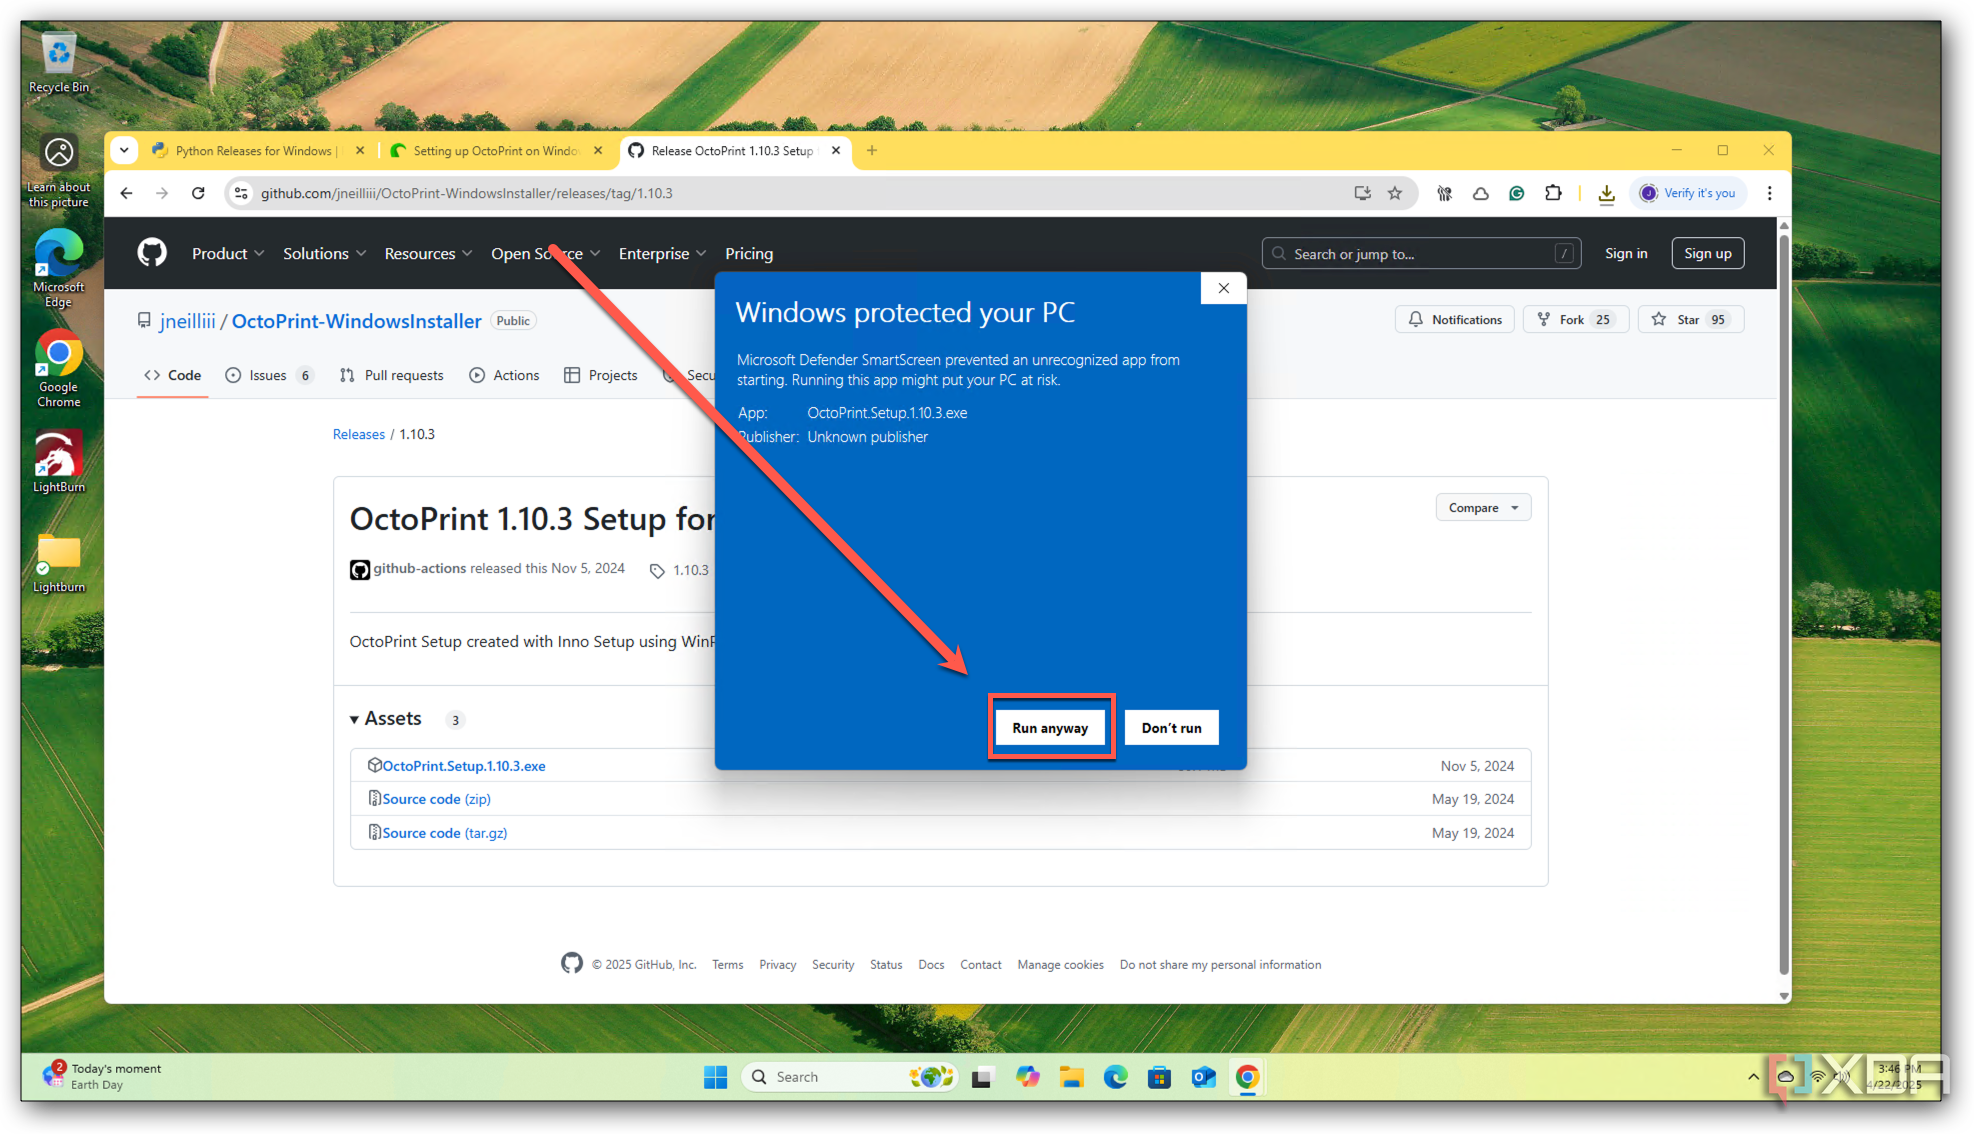
- Download the latest stable release from the OctoPrint-WindowsInstaller GitHub repository.
-
Once downloaded, run the installer. If you get an error that Microsoft Defender has blocked the app from running, click on Run anyway.

-
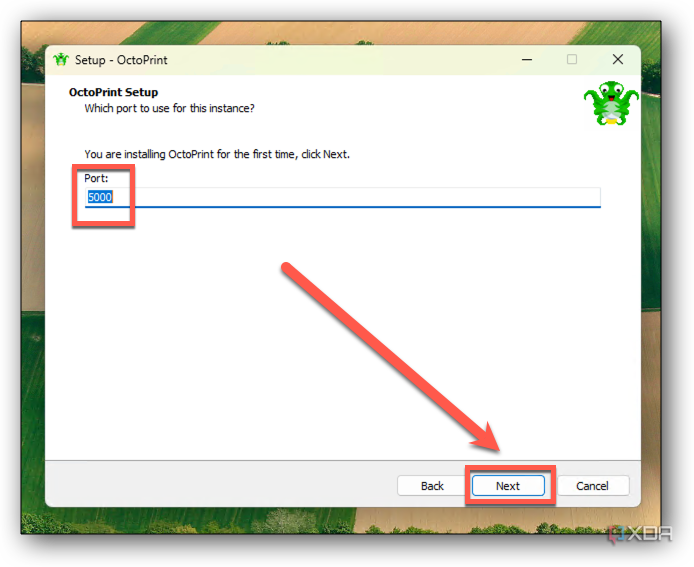
By default, the installer will configure OctoPrint to use port 5000. If you wish to change that, you can do so during the installation by entering the port number when prompted and clicking Next.

-
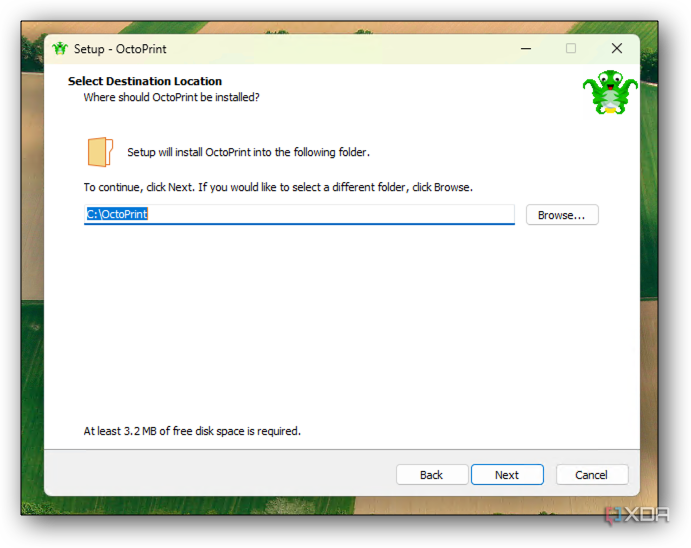
You can also change where OctoPrint is installed, but most folks should stick to the default settings.

- Choose any additional tasks you want the installer to complete, like including go2rtc or YawCam for webcam support.
-
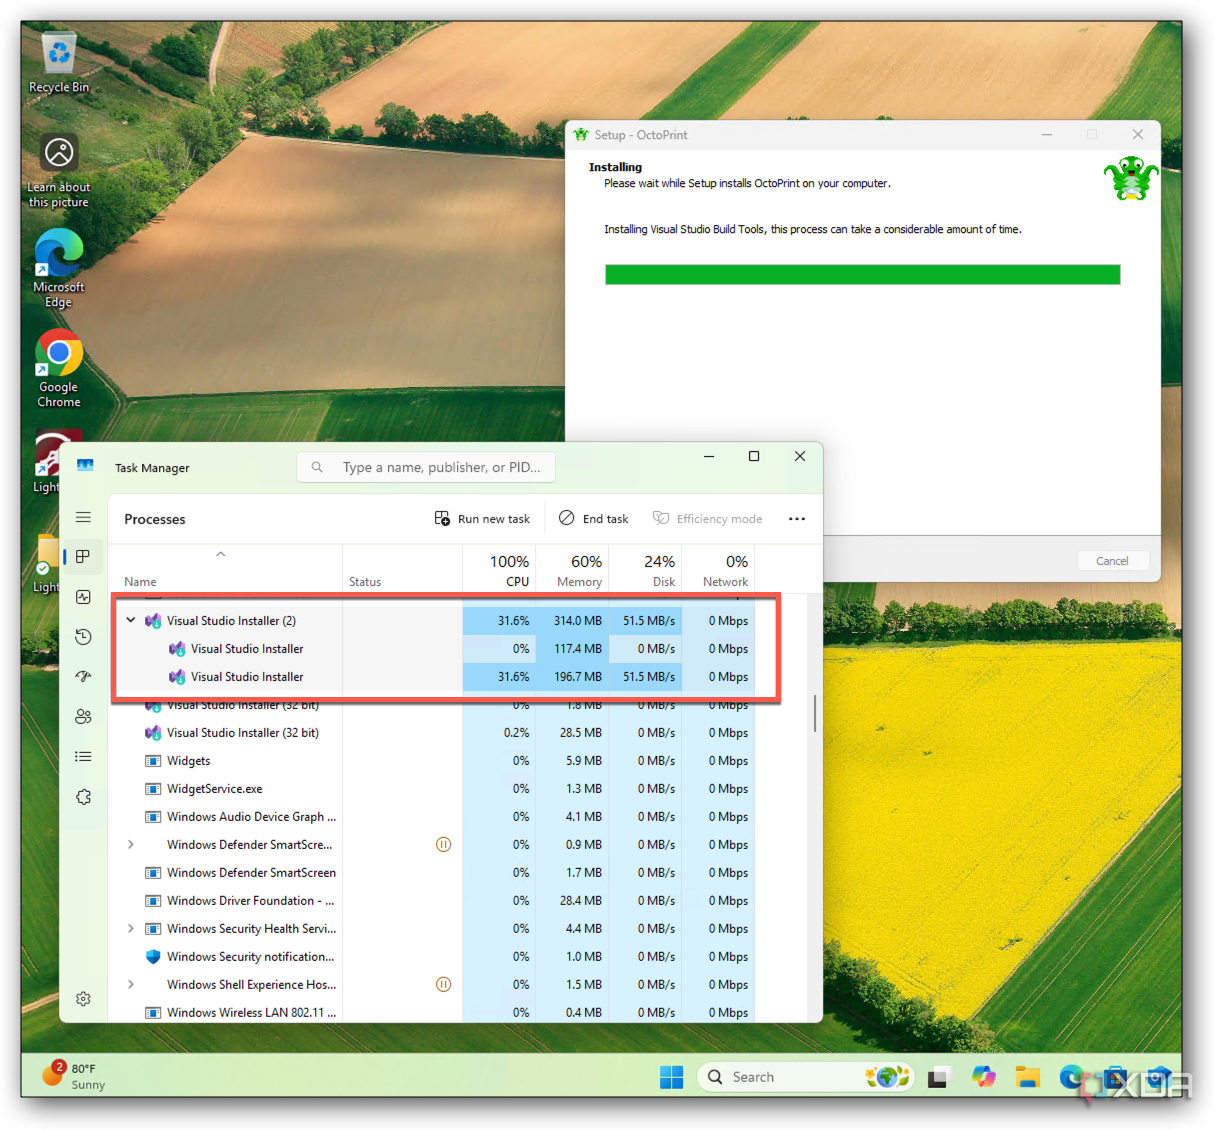
The installer will download the dependencies it needs to run, which could take a few minutes. It may seem to stall while installing Visual Studio Build Tools, but this is normal. You can look in Task Manager to see the Visual Studio Installer running.

-
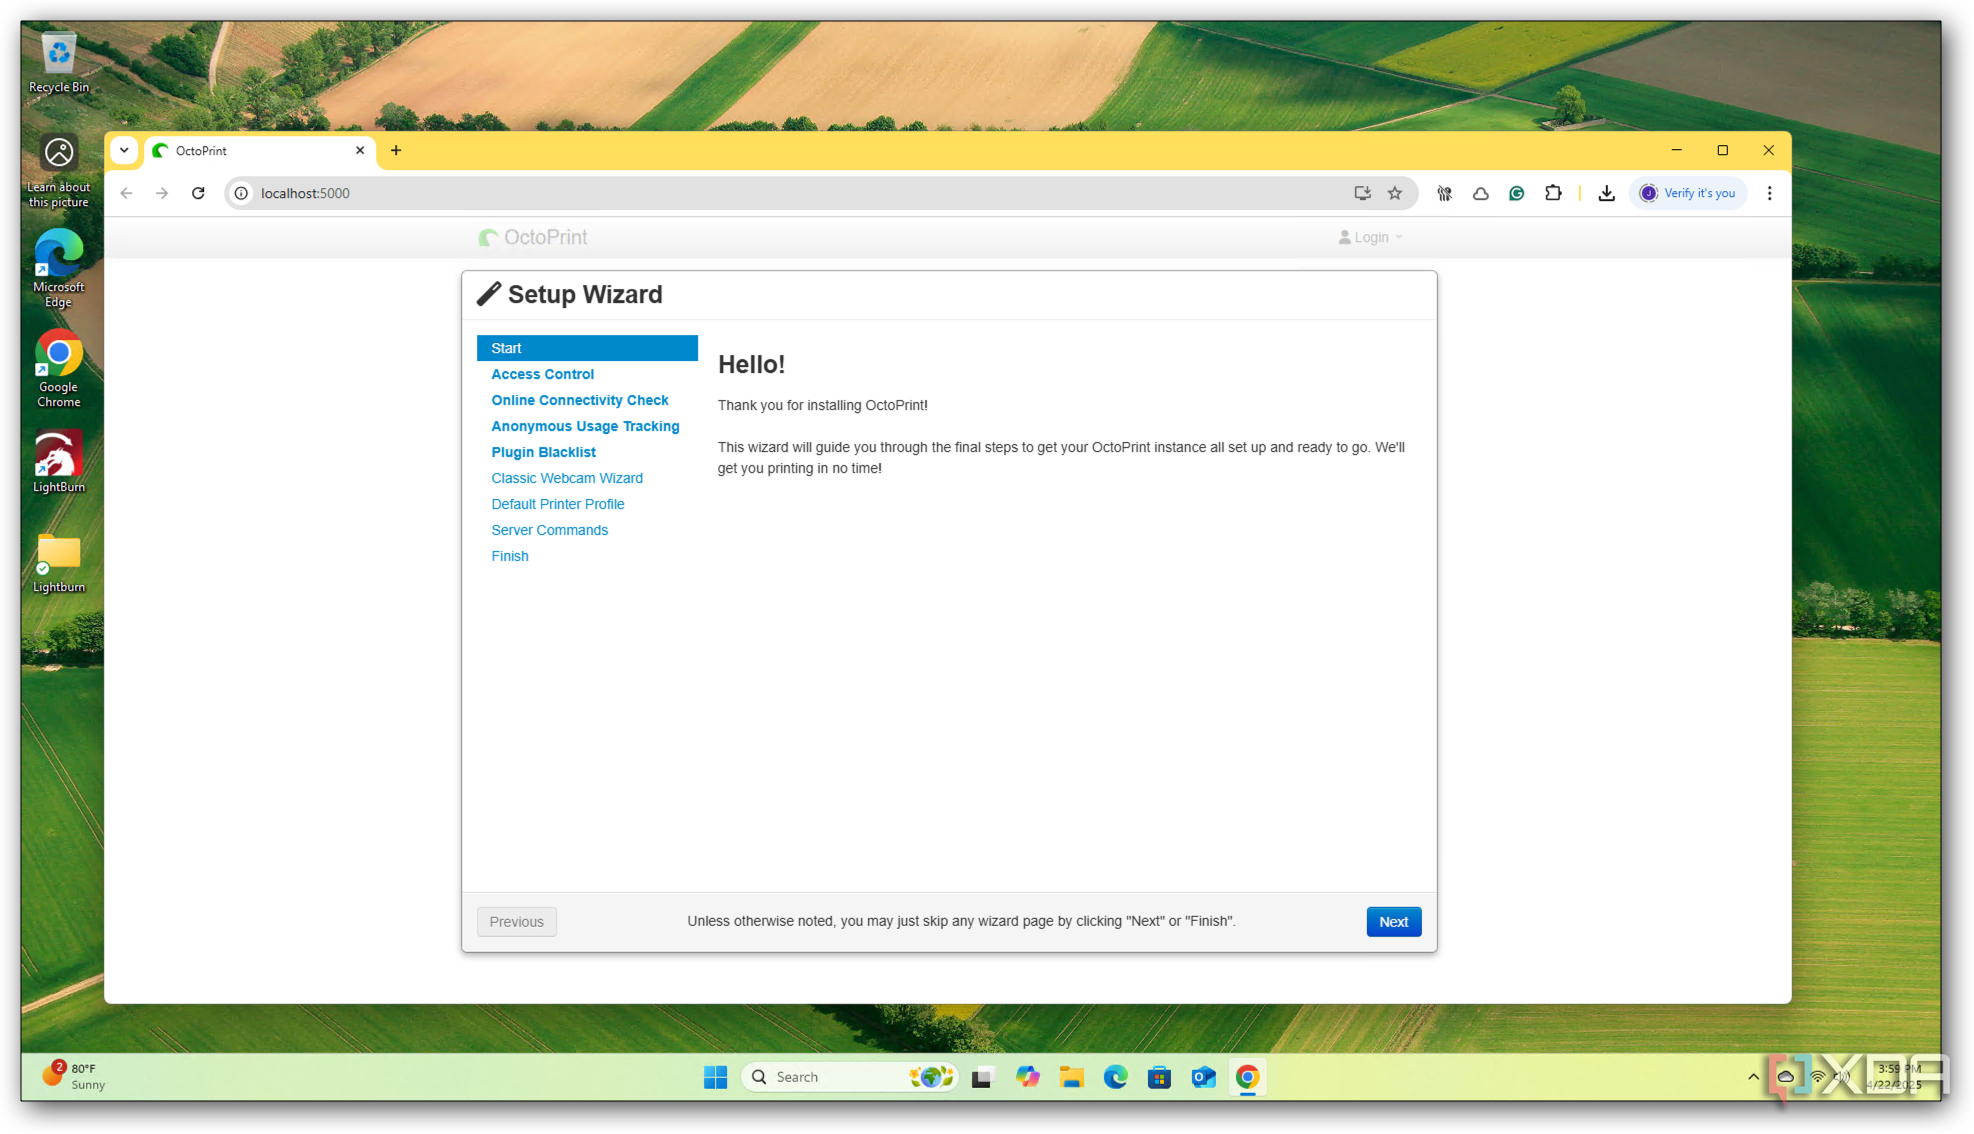
Once the installer finishes, ensure the box labeled Open OctoPrint to complete initial setup is checked, then click Finish.

-
Your default browser will open to the OctoPrint web interface, where you can complete the process of connecting OctoPrint to your 3D printer or printers.

Installing OctoPrint on Windows, the long way, manually
From virtual environment to first launch
Now that your environment is ready, let’s walk through setting up OctoPrint. You’ll install it in a virtual environment using Python, which keeps things clean and easy to manage.
- Create a working directory for your OctoPrint installation. In either the Command Prompt or a PowerShell window, run mkdir OctoPrint and then cd OctoPrint to create and move into a new folder.
- Set up a Python virtual environment by running python -m venv venv to create the virtual environment. Then activate it using one of the following options.
- If using PowerShell, run .\venv\Scripts\Activate.ps1
- If you’re using the normal Command Prompt, the command is .\venv\Scripts\activate.bat
- Upgrade pip using python -m pip install —upgrade pip to ensure pip is current.
- Next, install OctoPrint using pip install octoprint.
- To run OctoPrint for the first time, start the server with octoprint serve. If everything works, your browser should open to http://localhost:5000 where you’ll complete the first-time setup wizard.
- If you want OctoPrint to launch when Windows starts, you can create a scheduled task or batch file shortcut. This step isn’t required, but it’s handy for regular use.
- Plug in your printer via USB. In the OctoPrint interface, select the appropriate port from the dropdown menu to connect and start controlling your printer.
Common issues and how to fix them
Avoiding or working around some ‘gotchas’ unique to Windows users
Since OctoPrint was initially designed for Linux-based platforms, there are a few things to watch out for. These might seem ready to stop you in your tracks, but don’t worry—they’re easily remedied. Here are the biggest hurdles I faced when I was setting up OctoPrint on my mini PC with Windows 11 Pro.
If you’re using OctoPrint as a production environment under Windows, be sure to disable automatic reboots for Windows updates. Your prints could be interrupted unexpectedly if Windows reboots while your 3D printer is in the middle of a print job.
PowerShell won’t run the activation script
If you’re using PowerShell to activate your Python virtual environment, you might see an error message about script execution being disabled. This happens because Windows has a security policy that blocks unsigned scripts by default, including the ones generated by Python’s virtual environment setup. It’s not a sign that something is wrong — just a default setting.
You can temporarily lift the restriction for your current session to work around this. Run the following command in PowerShell before you try to activate the environment again:
Set-ExecutionPolicy -Scope Process -ExecutionPolicy Bypass
This change only affects the current PowerShell window, so your overall system security policy remains intact.
Python isn’t recognized in the terminal
If the terminal says ‘python’ is not recognized as an internal or external command, the issue is almost always that Python wasn’t added to your system’s PATH variable. This makes it so the terminal doesn’t know where to find the Python executable.
The easiest fix is reinstalling Python and ensuring the “Add Python to PATH” option is checked during installation. If you’d rather not reinstall, you can manually edit the PATH environment variable and add the folder where Python is installed — typically something like C:\Users\YourName\AppData\Local\Programs\Python\Python311.
OctoPrint launches, but nothing loads
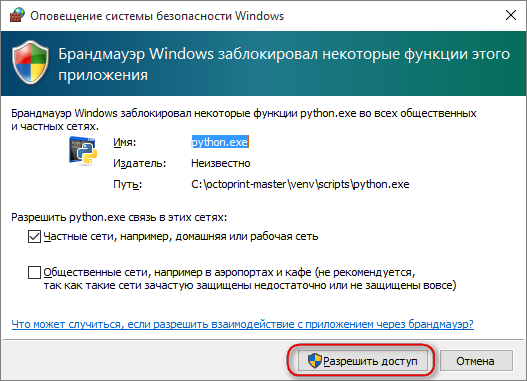
After running octoprint serve, if your browser doesn’t automatically open or shows a connection error, the issue may be caused by your firewall or antivirus software. These tools sometimes block local ports, including the one OctoPrint uses — port 5000.
You’ll want to check your firewall rules and ensure that Python and OctoPrint are allowed through. If necessary, open a browser manually and go to http://localhost:5000. If you’re using third-party antivirus software, you may need to create an exception or allow list rule for the OctoPrint process.
Wrapping up your OctoPrint setup
A reliable alternative to Raspberry Pi
Running OctoPrint on Windows can be a solid alternative when you don’t want to use a Raspberry Pi. You get access to the same features and plugin ecosystem; with the right prep, it’s not hard to set up. Whether you’re testing new features, working on plugin development, or just want a desktop-based print controller, this installation method is worth keeping in your toolkit.
Related
4 amazing self-hosted services I use for my 3D printer
Make 3D printing more convenient by hosting these neat apps on your home server