
Setting the default microphone in Windows 10 ensures seamless communication during video calls, voice recordings, and online meetings. Whether using a built-in microphone or an external device, configuring the correct input source ensures optimal audio quality.
Here we look at steps to change your default microphone, troubleshoot common issues, and optimize audio performance.
Why Change Your Default Microphone?
Changing your default microphone allows you to select the device that best suits your needs. While built-in microphones are convenient for casual use, they often lack the clarity and quality required for professional applications.
External microphones offer superior sound quality, enhanced noise reduction, and greater flexibility, making them ideal for podcasting, video conferencing, and content creation. Switching to an external microphone can achieve clearer audio capture, reduce background noise, and provide more precise control over your sound settings.
Methods to Change Your Default Microphone in Windows 10
Windows 10 provides multiple options for setting your default microphone. Whether you’re adjusting settings for general use, specific applications, or resolving audio conflicts, the steps below will guide you through each method.
1. Using Windows Settings
This is the quickest way to select and switch your default input device:
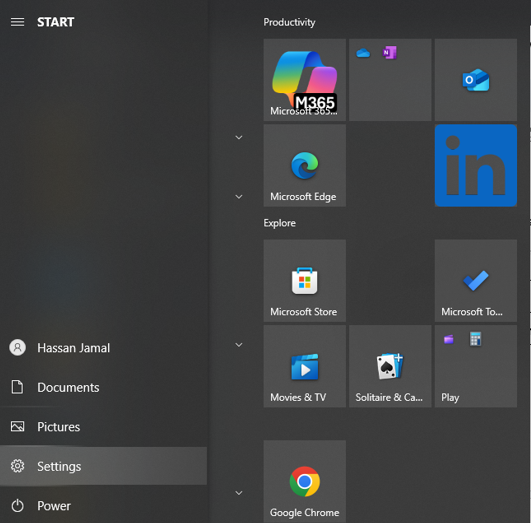
- Click the Start Menu, then select the Settings icon (represented by a gear).
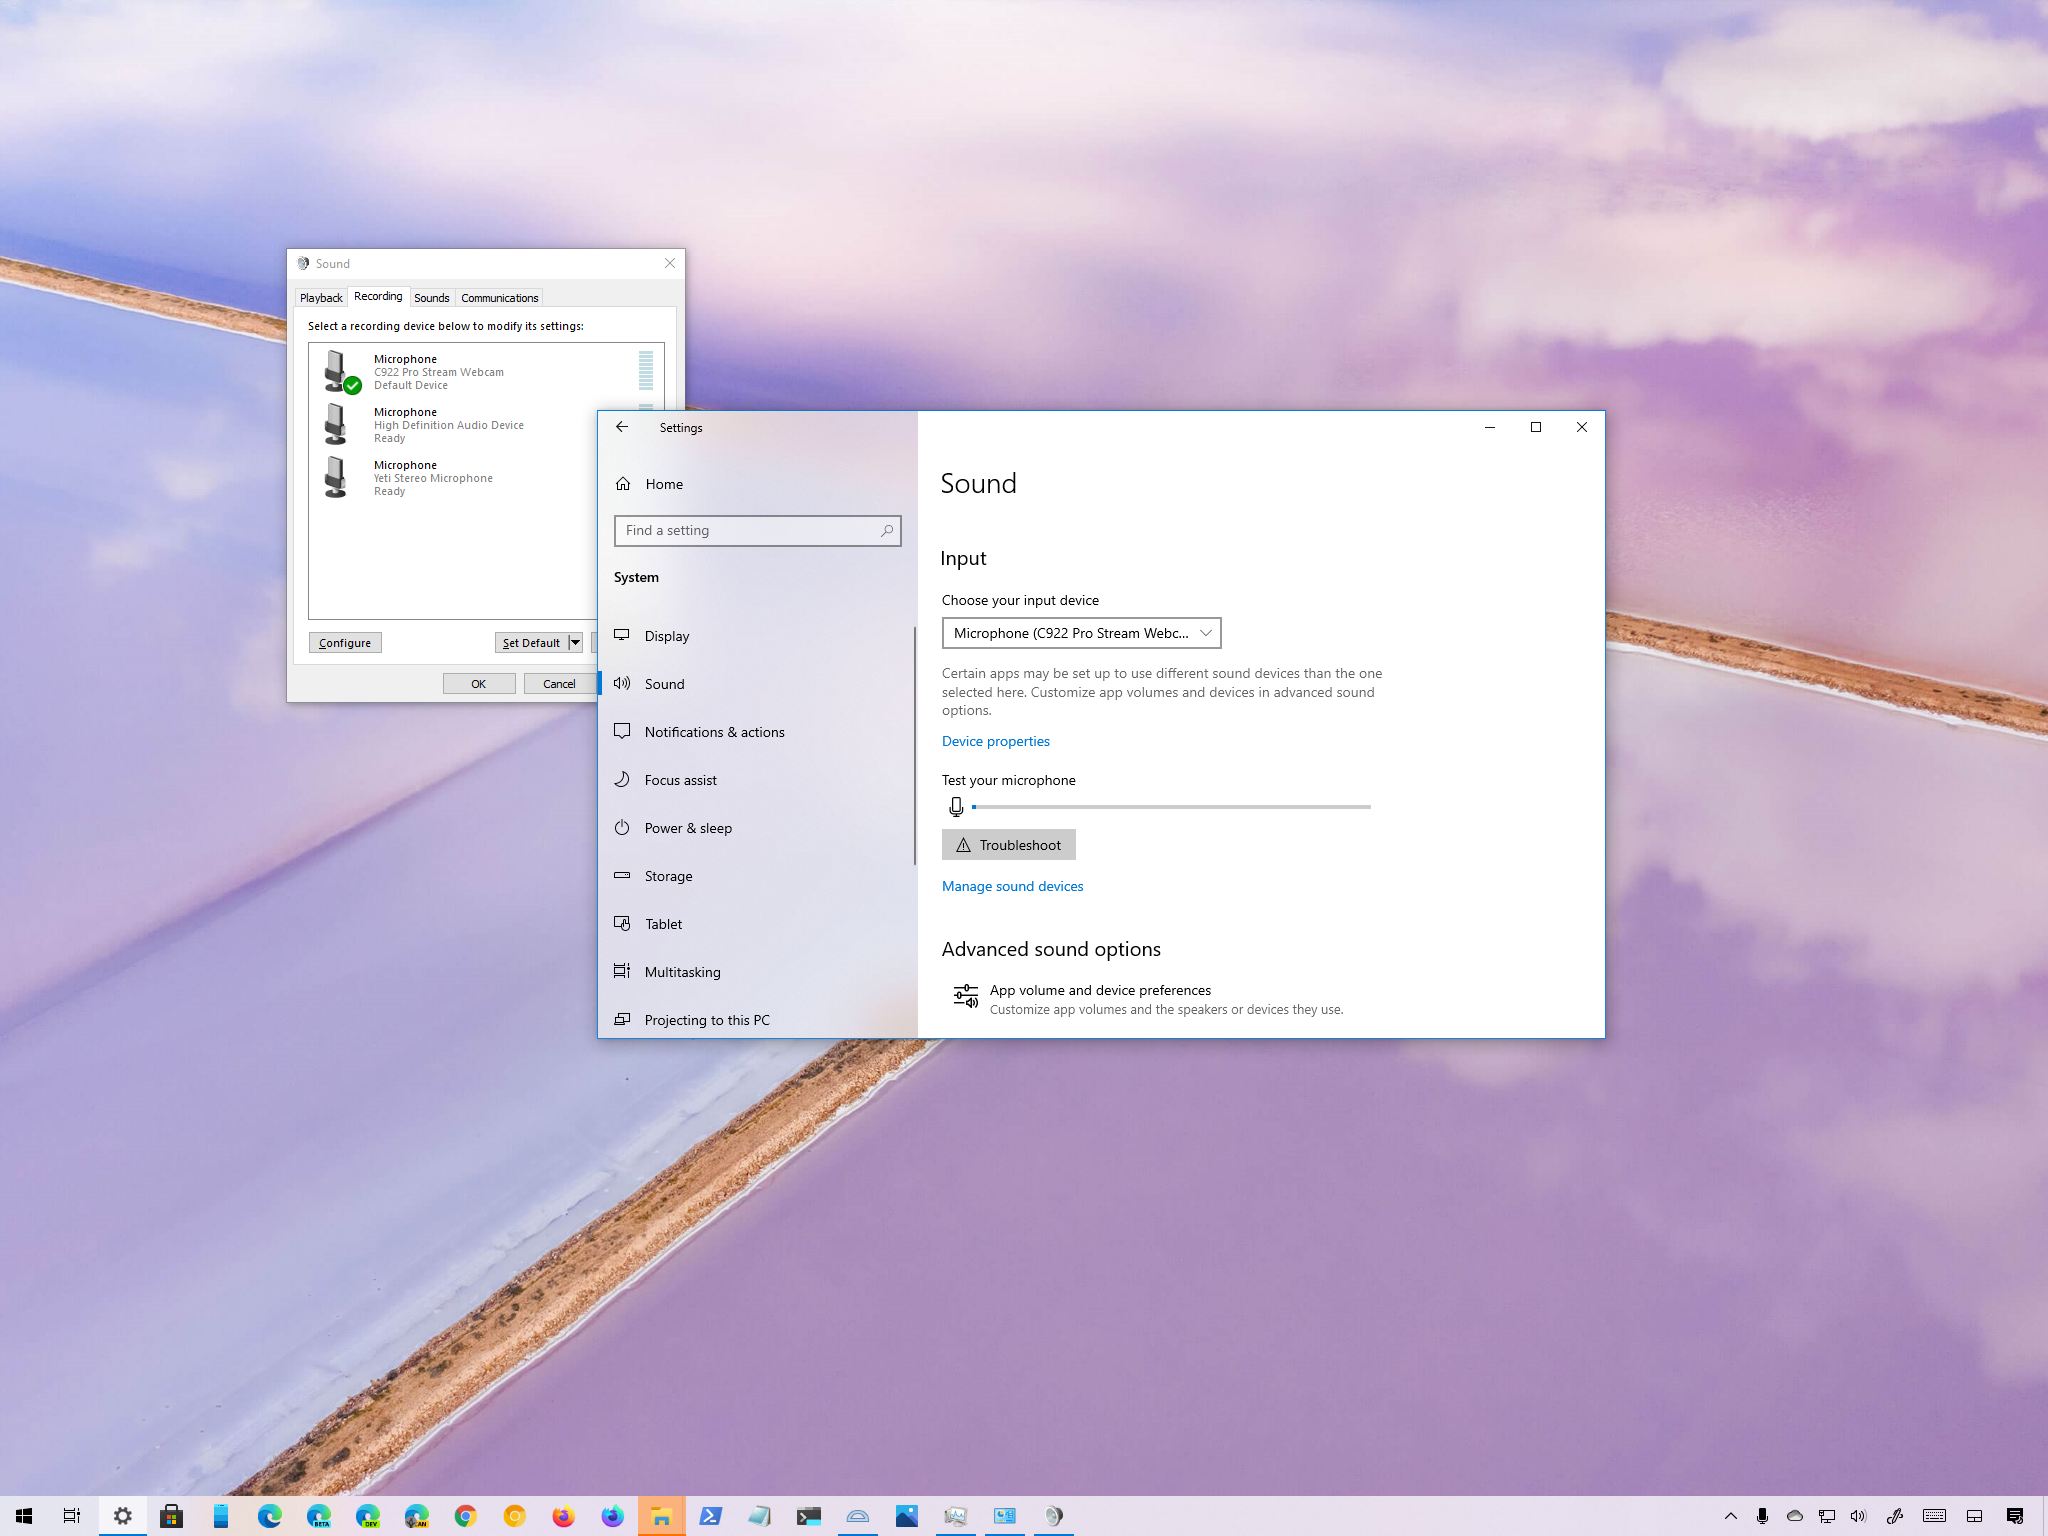
- Navigate to System > Sound.

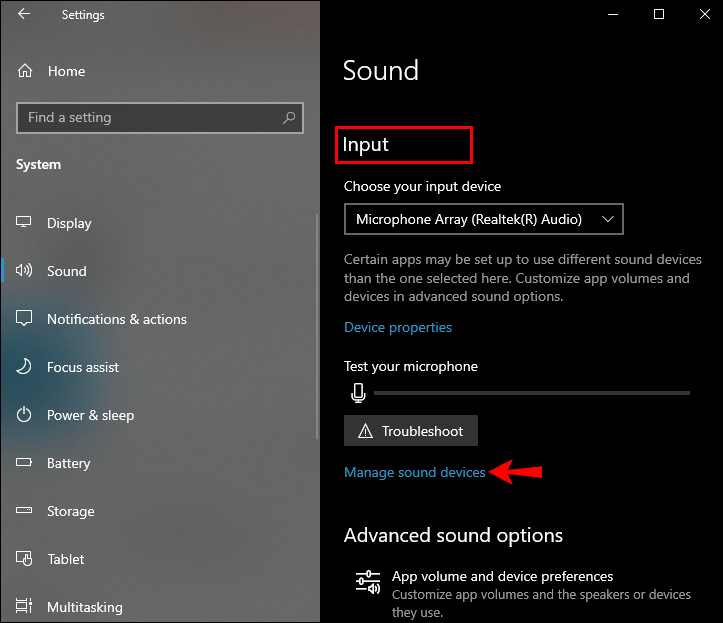
- Under the Input section, click the dropdown menu labeled “Choose your input device.”
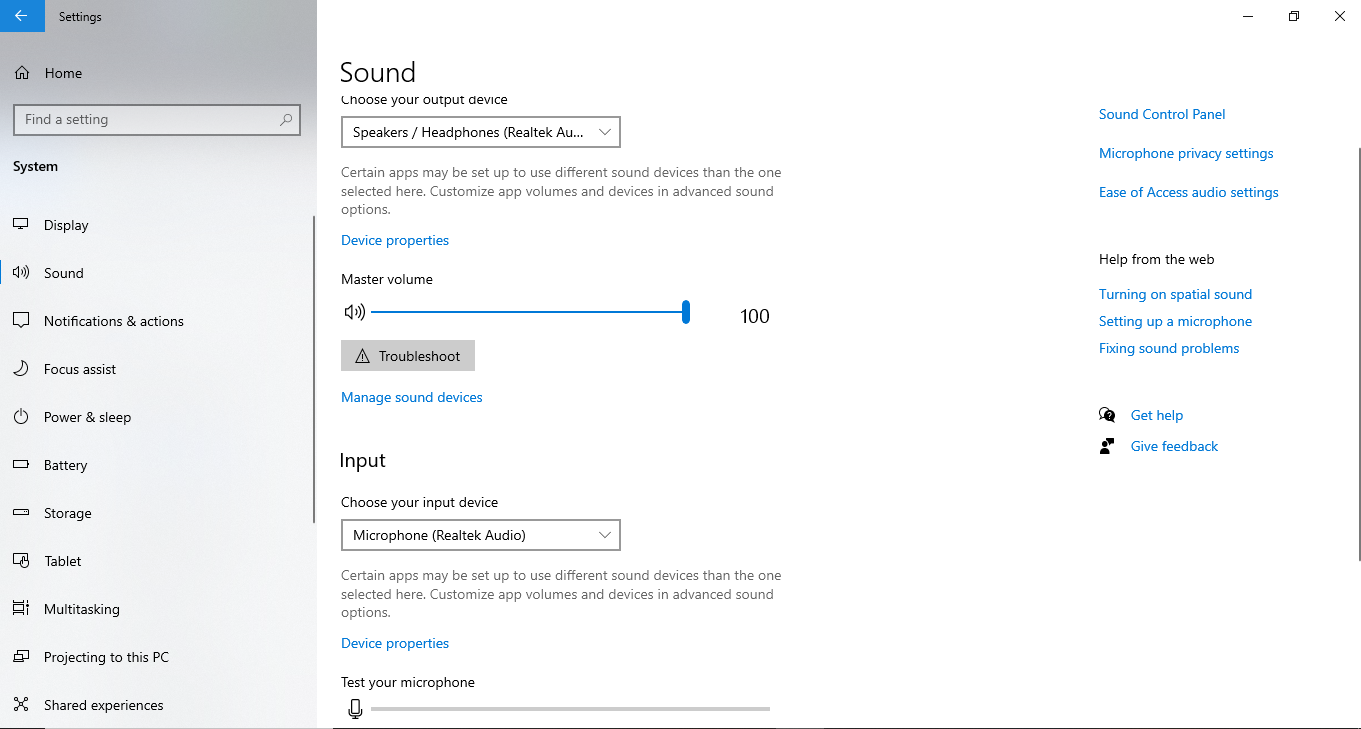
- Select the microphone you wish to use from the list of available devices.
- Use the “Test your microphone” tool just below the dropdown to check that it’s working. Speak into your mic and watch the volume bar move, confirming audio input is detected.

2. Using Control Panel
For more control and access to additional sound settings:
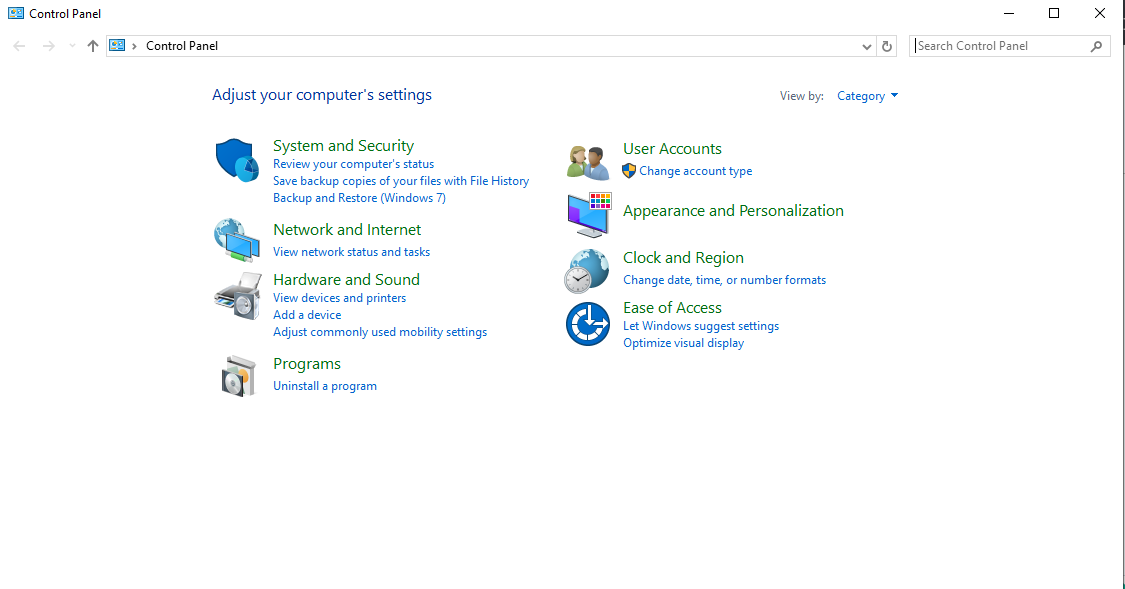
- Press Windows + R, type Control, and press Enter to open the Control Panel.
- Click on Hardware and Sound > Sound.
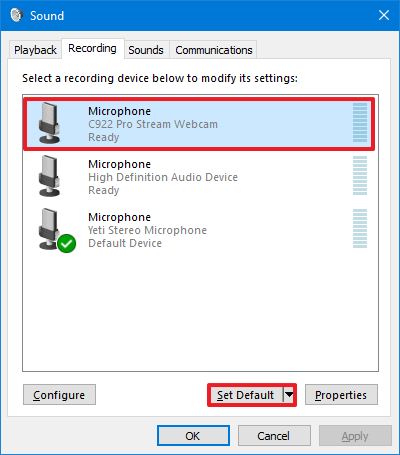
- In the Recording tab, you’ll see all connected microphones.

- Right-click on your desired mic and select “Set as Default Device.”
- If available, click the arrow next to the Set Default button to choose between:
- Default Device (used by general apps)
- Default Communication Device (used for calls and communication apps like Zoom or Skype)
- Click Apply, then OK to save your changes.

3. Using Advanced Sound Options (Per-App Configuration)
Want to use different mics for different apps? Here’s how:
- Go to Settings > System > Sound.

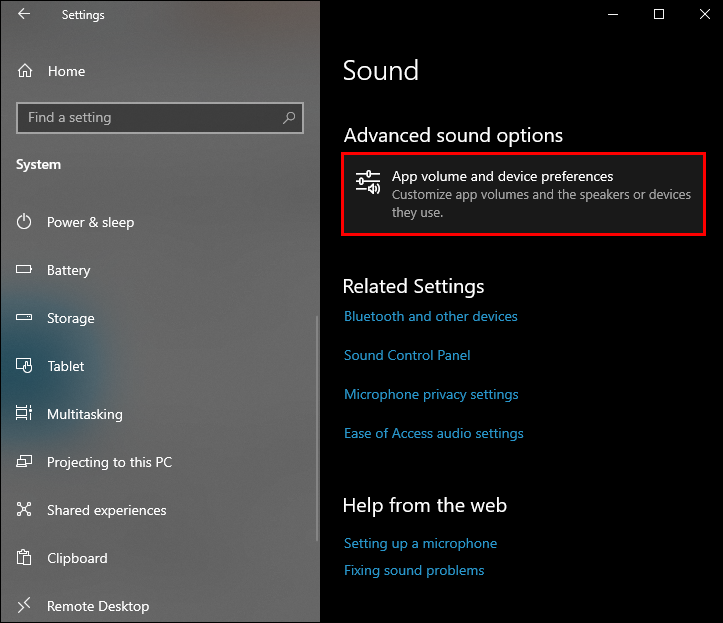
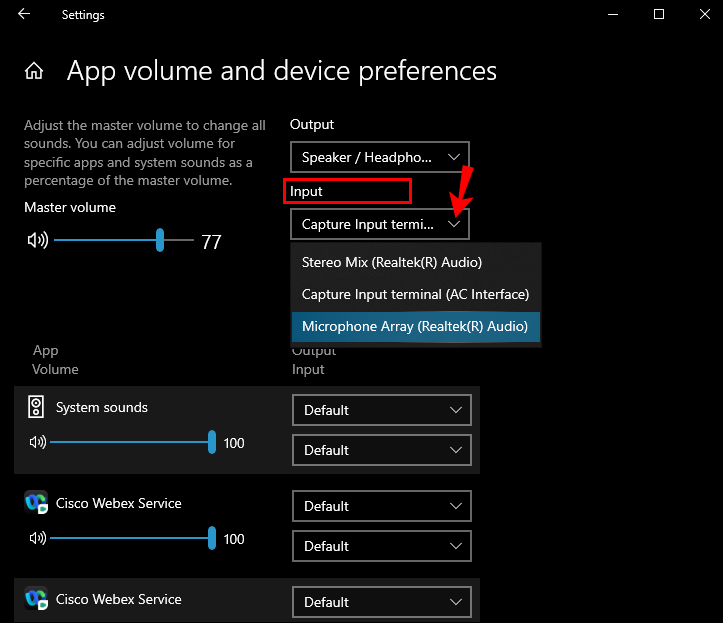
- Scroll down and click on “App Volume and Device Preferences” under the Advanced sound options section.

- Here, you can assign input (microphone) and output (speaker/headphone) devices for individual applications.
- Simply find the app in the list and select your preferred microphone from the Input dropdown menu.
Troubleshooting Common Microphone Issues
Software Fixes
If your mic still isn’t working after setting it as default, try these steps:
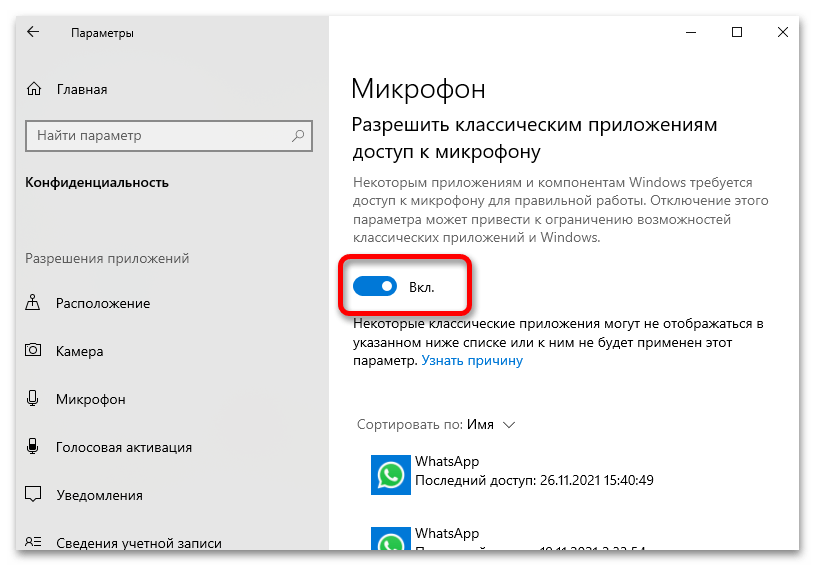
- Enable Microphone Access:
- Go to Settings > Privacy > Microphone.
- Toggle Allow apps to access your microphone to On.
- Scroll down and make sure individual apps also have access.
- Update or Reinstall Audio Drivers:
- Right-click the Start Menu and choose Device Manager.
- Expand Sound, video, and game controllers.
- Right-click your audio/mic device and select Update driver.
- You can also uninstall and restart your PC—Windows will attempt to reinstall the correct drivers automatically.
- Run the Windows Troubleshooter:
- Navigate to Settings > Update & Security > Troubleshoot > Additional troubleshooters.
- Click on Recording Audio and follow the on-screen prompts.
Hardware Checks
Sometimes, the problem lies outside of the software:
- Inspect Physical Connections:
- For external mics, ensure all jacks and USB plugs are properly inserted.
- Try different ports or cables to rule out faulty connections.
- Clean Built-In Microphone Pinholes:
- Use a can of compressed air or a soft brush to gently remove dust from mic pinholes on your laptop or webcam.
- Test on Another Device:
- Connect your microphone to a different PC or phone to determine if the issue is with the microphone itself.
Optimizing Audio Quality After Changing Default Microphones
After setting your preferred microphone as the default, it’s important to fine-tune your setup to get the best possible sound quality. A well-optimized microphone delivers clearer audio and reduces distractions, such as background noise or distortion. Here’s how to get it just right:
1. Adjust Microphone Sensitivity and Volume
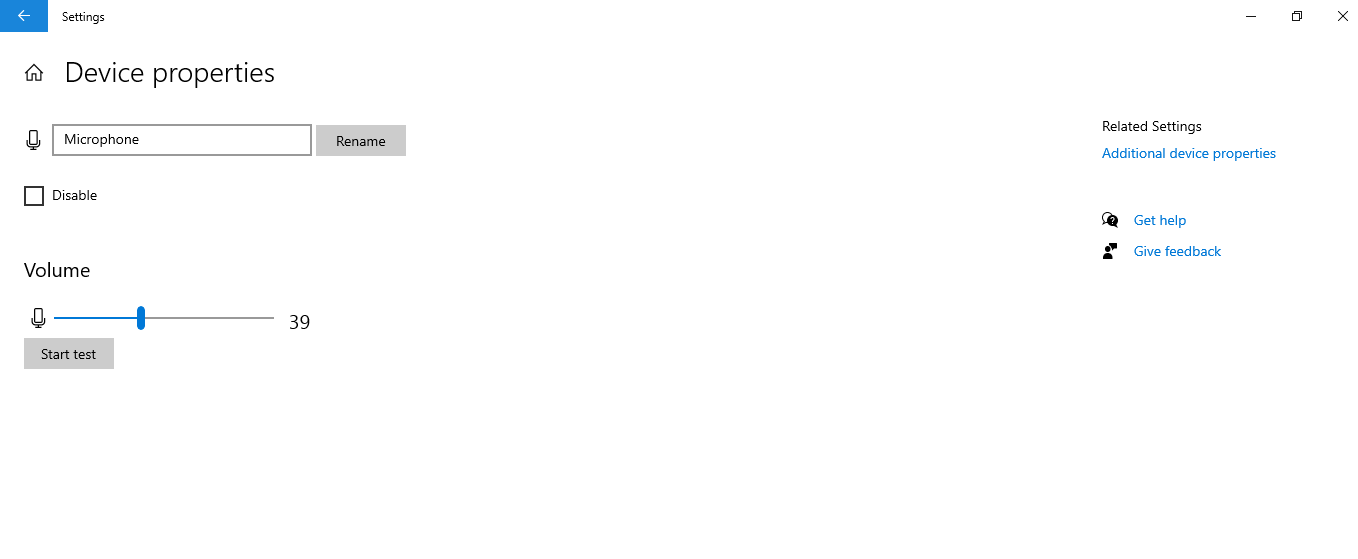
Navigate to Settings > System > Sound > Input > Device Properties and tweak the input volume. Set it high enough to pick up your voice clearly, but not so high that it captures every background sound or causes distortion.
2. Enable Noise Suppression and Echo Cancellation
Microphones and sound drivers offer built-in enhancements, such as noise suppression, echo cancellation, and automatic gain control. You can access these under Control Panel > Sound > Recording tab > [Your Mic] > Properties > Enhancements tab, or use third-party tools like Krisp or NVIDIA RTX Voice for real-time noise filtering.
3. Proper Mic Placement
For desktop or external mics, maintain a distance of about 12–18 inches from your mouth. Avoid placing the mic directly in front of your mouth to minimize popping sounds—position it slightly to the side or below.
4. Use a Pop Filter or Windscreen
A simple pop filter or foam windscreen can significantly reduce plosive sounds (like “P” or “B”) and wind noise, especially if you’re recording voiceovers or streaming.
5. Eliminate Background Noise at the Source
Try recording in a quiet room, turn off fans or air conditioners, and close windows. Consider adding soft furnishings or acoustic panels to absorb echo for serious setups.
6. Regularly Test and Recalibrate
Windows updates, driver changes, or app switching can alter sound settings. Re-test your mic occasionally using the built-in “Test your microphone” feature or online mic testers to ensure consistent performance.
Using External Microphones for Superior Audio
External microphones are ideal for professional applications requiring high-quality audio input. The Hollyland Lark M2S Wireless Microphone’s sleek logo-free design and titanium clip-on mechanism deliver exceptional sound clarity while ensuring secure attachment during use. It features advanced noise reduction capabilities and compatibility with multiple devices via USB-C connectivity.
Hollyland LARK M2S – Wireless Clip-on Microphone
- 7g Lightweight, Titanium Clip, Discreet Design
- Clear sound with 24-bit/48kHz, 70dB SNR, 116dB SPL
- Noise Cancellation & 300m Long-Range Stability
- Works with Camera/iPhone/Android/Laptop
- Perfect for Content Creators, Online-Teaching, Streaming
With up to 9 hours of battery life per transmitter and an additional 30 hours via the charging case, this microphone system supports extended recording sessions without interruption. Its impressive 300-meter (1,000 feet) range ensures stable, long-distance wireless performance, giving you freedom and confidence while recording.
Conclusion
Setting your default microphone in Windows 10 is a simple yet powerful way to improve your audio experience. Whether hopping on a video call, recording a podcast, or chatting with friends, choosing the right input device ensures your voice is clear and professional.
From built-in mics to high-performance wireless models like the Hollyland Lark M2S, taking control of your microphone settings can significantly enhance your audio experience. Follow the steps in this guide, troubleshoot as needed, and don’t forget to fine-tune your setup for the best possible sound quality.
FAQs
Q: How do I test my microphone after setting it as the default?
A: Go to Settings > System > Sound, scroll to the “Input” section, and speak into the mic. The bar under “Test your microphone” should move to show it’s picking up sound.
Q: Why isn’t my preferred microphone appearing in the list?
A: Make sure the device is connected properly and powered on. Then, right-click in the Recording tab of the Sound settings and select “Show Disabled Devices.”
Q: Can I assign different microphones for specific apps?
A: Yes. Head to Settings > System > Sound > App Volume and Device Preferences, and assign microphones individually for supported apps.
Q: What should I do if my default microphone picks up background noise?
A: Try repositioning the mic, lowering the sensitivity in Device Properties, or using built-in noise suppression options. You can also explore third-party noise reduction software.
Q: Can I set a wireless Bluetooth microphone as the default?
A: Absolutely. Once paired with your PC, it will appear in your list of input devices. You can then set it as a default like any other mic.
Q: How do I reset all sound settings in Windows 10?
A: Go to Settings > System > Sound > App Volume and Device Preferences and click “Reset” at the bottom to restore all settings to default.
Все способы:
- Вариант 1: Стандартные средства
- Способ 1: Управление звуковыми устройствами
- Способ 2: Панель управления звуком
- Вариант 2: Настройки сторонних средств
- Вопросы и ответы: 0
Вариант 1: Стандартные средства
Изменить используемый по умолчанию микрофон на компьютере под управлением Windows 10 в настоящее время можно сразу двумя способами, воспользовавшись специальным разделом в «Параметрах» системы или классической панелью управления звуками.
Способ 1: Управление звуковыми устройствами
Наиболее простой способ выполнения поставленной задачи заключается в использовании «Параметров» Windows 10, где можно как задействовать отключенные устройства, так и выбрать источник ввода по умолчанию. Тут важно учитывать, что перед выполнением описанных действий следует заранее подключить новый микрофон к компьютеру или ноутбуку в соответствующий слот и произвести проверку, так как в большинстве случаев это приведет к автоматической замене предыдущего устройства.
Подробнее: Как подключить и проверить микрофон в Windows 10
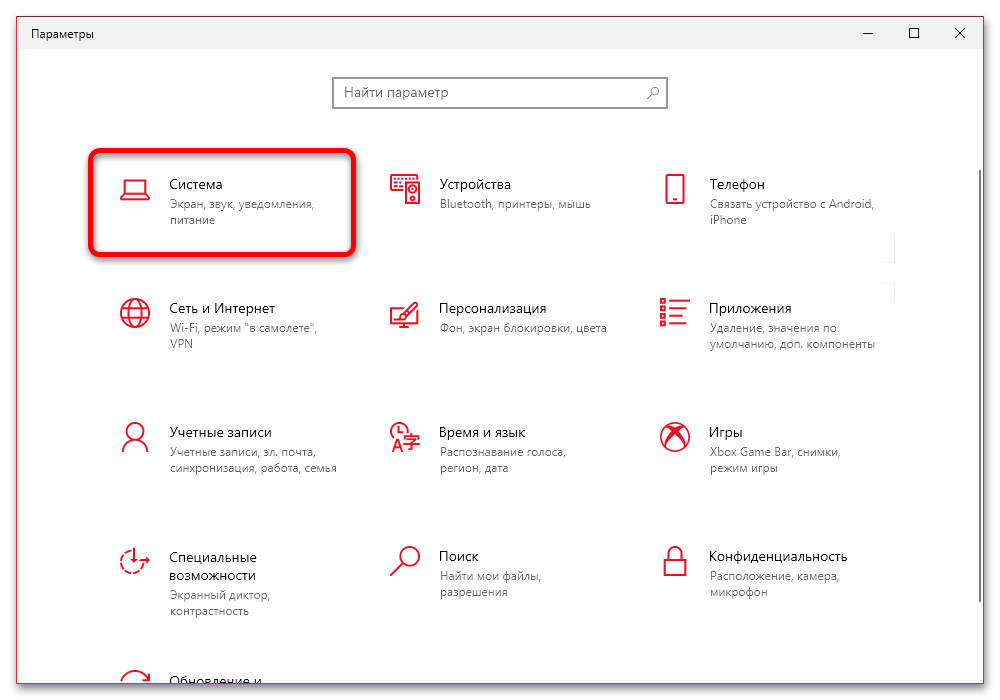
- Чтобы установить нужное устройство в качестве микрофона по умолчанию, первым делом необходимо открыть «Параметры». Для этого можете воспользоваться клавишами «Win+I», после чего необходимо перейти в категорию «Система» и выбрать «Звук».
Подробнее: Способы открытия «Параметров» на компьютере с Windows 10
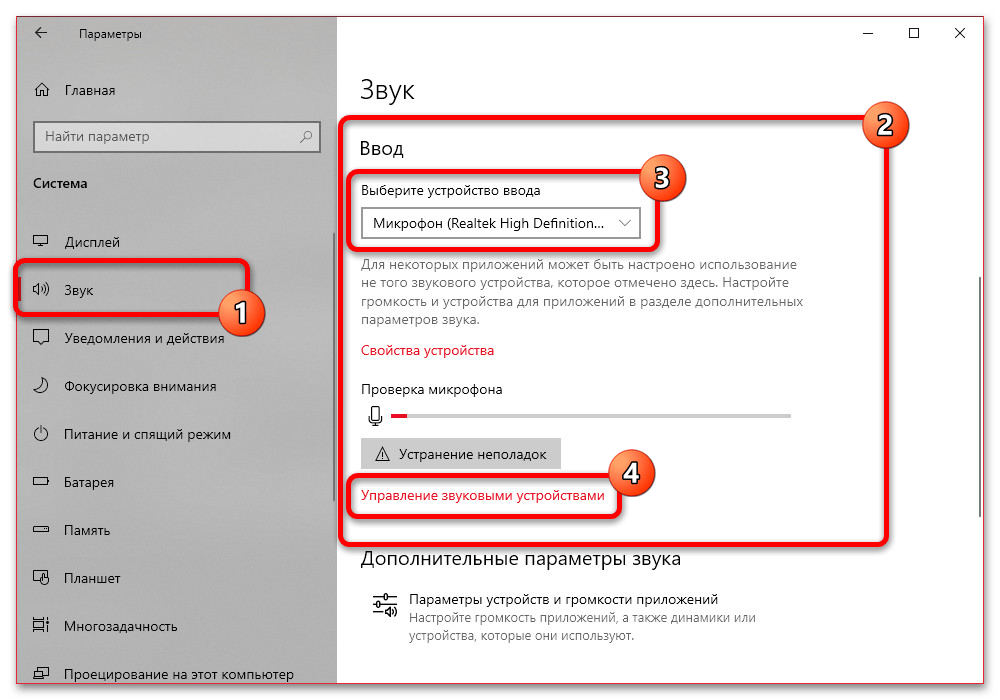
- Оказавшись на отмеченной вкладке «Звук», найдите подраздел «Ввод», разверните выпадающий список и выберите нужное устройство. Здесь же можно воспользоваться блоком «Проверка микрофона», чтобы убедиться в работоспособности микрофона.
- Если по каким-то причинам нужного пункта не оказалось в списке, воспользуйтесь ссылкой «Управление звуковыми устройствами» для открытия дополнительных настроек. После этого в категории «Устройства вывода» кликните левой кнопкой мыши по одному из микрофонов в рамках блока «Отключенные» и нажмите кнопку «Включить».

Как правило, после включения достаточно будет вернуться на предыдущую страницу и по предложенным ранее шагам изменить устройство по умолчанию. Это приведет к изменению микрофона в большинстве программ и приложений, включающих мессенджеры, софт для обработки и записи звука и компьютерные игры, однако в некоторых случаях потребуется перезапуск.
Способ 2: Панель управления звуком
Главной альтернативой «Параметрам» Windows 10 выступает классическая панель управления звуками, полностью повторяющая аналогичное окно в предыдущих версиях системы. При этом большинство представленных ранее замечаний относительно предварительного подключения и проверки микрофона в данном случае актуальны в полной мере, в особенности при использовании ноутбука и устройства, подключаемого посредством 3.5 jack.
- Открыть настройки в данном случае можно путем щелчка правой кнопкой мыши по значку звука на панели задач и последующего выбора раздела «Звуки». Существуют также альтернативные способы перехода к параметрам через «Панель управления» и «Параметры» Windows 10.
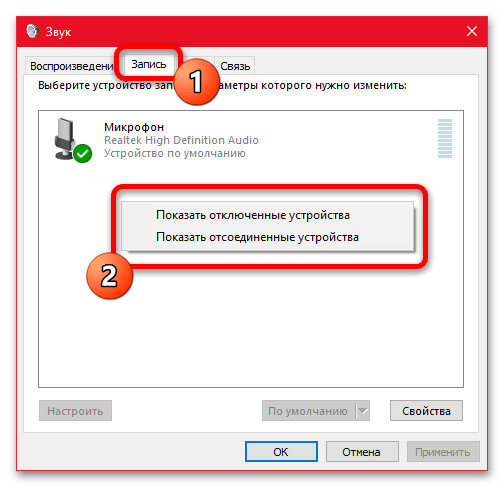
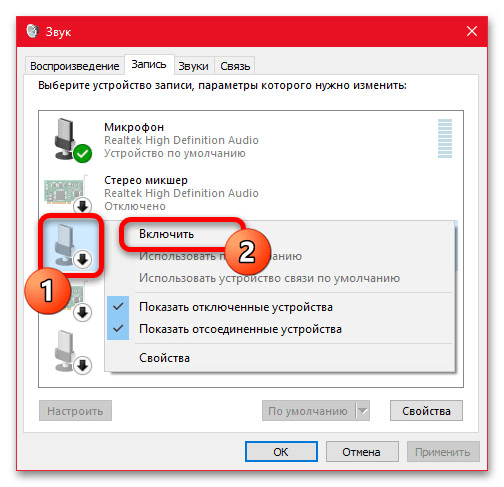
- Находясь в отдельном окне «Звук», перейдите на вкладку «Запись» с помощью верхней панели и, если помимо активного микрофона на странице ничего не отображается, кликните правой кнопкой мыши. Здесь нужно задействовать оба пункта для отображения отключенных и отсоединенных устройств.
- Разобравшись с предыдущим этапом, найдите в списке нужный вам микрофон, кликните правой кнопкой мыши и воспользуйтесь опцией «Включить». Если устройство по каким-то причинам не отображается в данном списке, рекомендуем попробовать другой способ подключения к компьютеру и ознакомиться с еще одной инструкцией.
Подробнее: Что делать, если компьютер не видит микрофон
- При появлении подписи «Готов» выберите устройство с помощью щелчка левой кнопкой мыши и в нижней части окна нажмите кнопку «По умолчанию». Это необходимо для того, чтобы микрофон автоматически использовался, как основное устройство ввода.

Сохранить обновленные параметры можете простым нажатием кнопки «ОК» в нижней части окна, но при этом не стоит забывать о перезапуске приложений, использующих микрофон по умолчанию. Кроме этого, можете деактивировать предыдущее стандартное устройство, чтобы на компьютере был доступен один единственный микрофон, который автоматически будет выбран во всех программах.
Вариант 2: Настройки сторонних средств
Иногда после внесения всех изменений некоторые программы могут продолжать использовать предыдущее устройство звукозаписи, что, как правило, связано с включением сразу двух микрофонов одновременно. Это можно исправить путем отмеченной ранее деактивации одного из вариантов или переключениями устройства по умолчанию средствами самого приложения.
Читайте также: Как включить микрофон в Skype, Zoom, Discord, WhatsApp

Рассматривать подробно данный вариант мы не будем, так как необходимые действия могут сильно меняться в зависимости от программы, но при этом отметим, что посетить необходимо внутренние настройки звука. Именно здесь должен быть выпадающий список со всеми обнаруженными устройствами звукозаписи по аналогии с «Параметрами» Windows 10.
Как бы то ни было, чтобы внести изменения, необходимо просто выбрать другое устройство и подтвердить обновление параметров. В то же время, более простым способом все равно остается полная деактивация всех микрофонов за исключением нужного.
Наша группа в TelegramПолезные советы и помощь
Windows 10 allows users to connect different types of audio devices to a system. These devices can be connected via an audio jack, a USB port, or Bluetooth. In some cases, an HDMI cable can also be used to send audio from the system to a TV.
The audio devices that a user can connect to a Windows 10 system aren’t limited to output devices. Input devices i.e., microphones can also be connected. In fact, users can connect multiple microphones to a system if they use it for recording.
Windows 10 allows users to connect multiple hardware devices of the same type i.e., multiple webcams, multiple hard drives, multiple mics, but it will still always default to one device when an app needs to use it.
This is to be expected since not every app has an option to select a device from those that are connected. Apps normally use the default device that’s set and if you want to change the device, you have to change the default device in Windows 10.
Change default microphone Windows 10
If you’ve connected more than one microphone to your Windows 10 system, you can use the following steps to change which is set as the default microphone on Windows 10.
- Connect the microphone that you want to use as the default microphone on Windows 10.
- Open Control Panel.
- Go to Hardware and Sound.
- Click Sound.
- Go to the Recording tab.
- Make sure all microphones connected to the system are listed. If they aren’t, they haven’t been configured correctly.
- Right-click the microphone you want to use as the default microphone.
- Select ‘Set as default device’. Windows 10 will now use this device for all non-call related apps e.g., recording apps.
- Right-click the device again and select ‘Set as default communication device’ and Windows 10 will use it as the default device for all calling apps (Skype, Discord, Microsoft Teams) as well.
- Click Apply.
Conclusion
Changing the default microphone on Windows 10 isn’t hard as long as you’ve set it up correctly. If a mic that you’ve connected and set as the default device is disconnected, Windows 10 will automatically switch to using the next available device as the default. When you connect the mic again, you will have to change the default.
You may have to restart an app for it to detect the new default mic. If an app allows you to select a mic from a list of connected devices, you can select the mic from the app’s settings and you won’t need to change the default microphone on Windows 10.

Fatima Wahab
Fatima has been writing for AddictiveTips for six years. She began as a junior writer and has been working as the Editor in Chief since 2014.
Fatima gets an adrenaline rush from figuring out how technology works, and how to manipulate it. A well-designed app, something that solves a common everyday problem and looks
(Image credit: Windows Central)
On Windows 10, you can connect virtually as many microphones as you want. The only issue is that the first one you install will automatically become the default recording device for the enteire system.
However, if you happen to have multiple microphones because, for example, one came built into the webcam, and then you installed one of the best microphones for streaming, it is possible to set either of them as the system default. That way when you open a recording or communication application, you don’t have to keep going through extra steps to select the microphone you want to use.
Whatever the reason it might be, Windows 10 includes at least two ways to change the default microphone with the Settings app and Control Panel.
In this Windows 10 guide, we will walk you through the steps to set a new microphone as the new default on your device.
How to change default microphone in Settings
To select a new microphone as the system default, use these steps:
- Open Settings.
- Click on System.
- Click on Sound.
- Under the «Input» section, use the Choose input device drop-down menu and select the new default microphone.
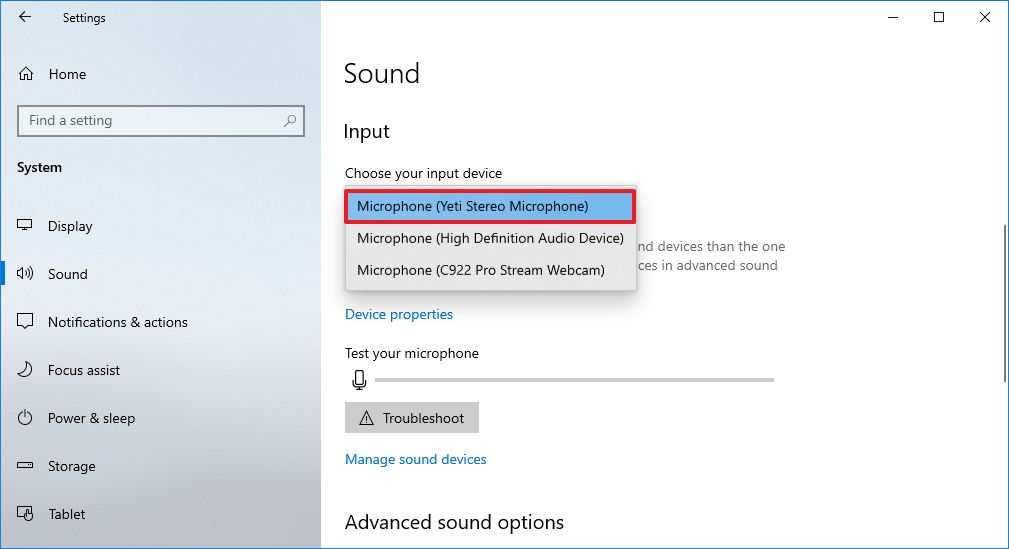
Once you complete the steps, the microphone you selected will be available as the system’s primary input device.
How to change default microphone in Control Panel
To change the default microphone settings in Control Panel, use these steps:
All the latest news, reviews, and guides for Windows and Xbox diehards.
- Open Control Panel.
- Click on Hardware and Sound.
- Click on Sound.

- Click the Recording tab.
- Select the microphone you want to set as the new default.
- Click the Set Default button.Quick tip: You can also click the down-arrow button next to «Set Default» to select whether the recording device should be the default for the entire system or only for communication applications. If you select the «Default Communication Device» option, then the previous device will continue to be the system default for other apps.
- Click the Apply button.
- Click the OK button.
After you complete the steps, Windows 10 will use the configured microphone as the new default.
More Windows 10 resources
For more helpful articles, coverage, and answers to common questions about Windows 10, visit the following resources:
- Windows 10 on Windows Central – All you need to know
- Windows 10 help, tips, and tricks
- Windows 10 forums on Windows Central
Mauro Huculak has been a Windows How-To Expert contributor for WindowsCentral.com for nearly a decade and has over 15 years of experience writing comprehensive guides. He also has an IT background and has achieved different professional certifications from Microsoft, Cisco, VMware, and CompTIA. He has been recognized as a Microsoft MVP for many years.
Are you frustrated with your default Windows 10 microphone that doesn’t work? Or maybe you just got yourself a new external microphone and want the freedom to choose which microphone to use. If this sounds like you, we’ve got good news.
This article will show you how to change the default microphone in Windows 10 to be available all the time, no matter what program you are using.
Method 1: Set Default Microphone From the Sound Control Panel
You can change the default microphone in Windows 10 through the Control Panel. To do so;
- Open the Start Menu and type “control panel” in the search bar, and then press “Enter.” Alternatively, press the ‘’Windows+X’’ keys to launch the Quick Access Menu, and then click on “Control Panel.” The control panel should then pop up on the screen.
- Click on “Hardware and Sound.”

- Select “Manage audio devices” from the “Sound” submenu.
- Click on “Recording.” You’ll see Windows’ inbuilt microphone (Realtek Audio) with a green checkmark next to it. That’s your default microphone. Any other microphones attached to your system will be listed.

- Select the mic you’d like to use, right-click on it, and then select “Set as Default Device.”
- Click on “Ok” to save your new settings. After that, the microphone you’ve selected will have a green checkmark beside it. The words “Default Device” will also appear right below it.


Any microphones previously attached to your PC will also be listed under “Recording,” but the “Set as Default Device” option will be inactive.
Method 2: Set Default Microphone From Settings
You can also bypass the Control Panel and set your default microphone from settings. Here are the steps:
- Click on the Windows icon at the bottom-left corner.

- Scroll down the alphabetized list and click on “Settings.” As with many modern devices, the settings icon is shaped like a gear.

- After the settings window opens, select “System.”

- Select “sound” from the navigation pane on the left.

- Under “Input,” click on the dropdown arrow and then select the microphone you’d like to set as your default sound input tool.


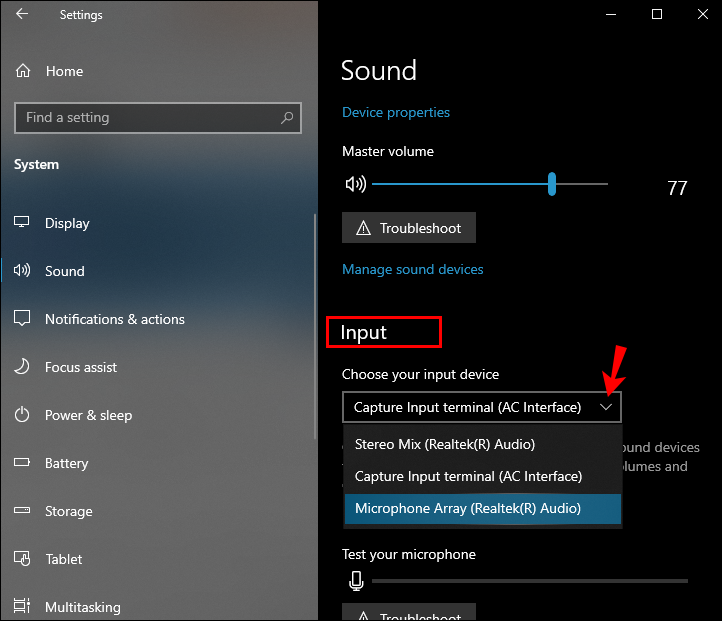
And voila! Windows 10 and its apps will now hear you loud and clear with your new default microphone. Unlike in the first method, however, any external mics will only be in the dropdown list if they are currently attached to your PC.
Method 3: Use Advanced Sound Options
To change the default microphone using this method:
- Click on the Windows icon at the bottom-left corner.
- Scroll down the alphabetized list and click on “Settings.”

- After the settings window opens, select “System.”
- Select “sound” from the navigation pane on the left.
- Scroll down to “Advanced sound options.”

- Click on “App volume and device preferences.”
- Under “Input,” click on the dropdown arrow and then select the microphone you’d like to set as default.


How to Enable a Microphone in Windows 10
Long gone are the days you had to download an additional program to record an audio or video file or even capture memories over a video chat. Windows 10 comes with an inbuilt microphone. You can even use it with Cortana, the intelligent Windows assistant that helps you find files, search for information online, and even answer questions about what’s happening in the world. However, using the inbuilt mic (or any other external mic attached to your PC) is impossible until it has been enabled.
You can enable a microphone in Windows 10 in several ways:
Use Device Properties
To enable your microphone using the “Device Properties” tab:
- Click on the Windows icon at the bottom-left corner.
- Scroll down the alphabetized list and click on “Settings.”
- After the settings window opens, select “System.”
- Select “sound” from the navigation pane on the left.
- Under “Input,” click on “Device properties.” This will open a device management section.
- Uncheck the box next to “Disabled.”


Go to Manage Sound Devices
You can also enable a microphone through the “Manage sound devices” tab. Here’s how:
- Click on the Windows icon at the bottom-left corner.

- Scroll down the alphabetized list and click on “Settings.”
- Click on “System.”
- Select “sound” from the navigation pane on the left.
- Under “Input,” click on “Manage sound devices.” This will open a new window with a list of all your input and output devices.
- Under “Input devices,” click on the microphone you’d like to set as default and then click on “Enable.”


Use Device Manager
- Open the Start Menu, type “Device Manager” in the search bar, and press “Enter.”

- Double-click on “Audio inputs and outputs.”

- Right-click on the microphone and then click on “Enable.”


How to Disable a Microphone in Windows 10?
People are often concerned about their internet privacy. This is an understandable concern, and Windows 10 has some features that can help you maintain your privacy while videoconferencing or browsing. Disabling your microphone is one of them.
There are several ways to disable your microphone. Let’s see how each works:
Use Device Properties
To disable the microphone through the “Device properties” tab:
- Click on the Windows icon at the bottom-left corner.

- Scroll down the alphabetized list and click on “Settings.”

- After the settings window opens, select “System.”
- Select “sound” from the navigation pane on the left.
- Under “Input,” click on “Device properties.”
- Check the box next to “Disabled.”
Go to Manage Sound Devices
To disable the microphone through the “Manage sound devices” tab:
- Click on the Windows icon at the bottom-left corner.

- Scroll down the alphabetized list and click on “Settings.”
- Click on “System.”
- Select “sound” from the navigation pane on the left.
- Under “Input,” click on “Manage sound devices.”
- Under “Input devices,” click on the microphone you’d like to deactivate and then click on “Disable.”

Use Device Manager
- Open the Start Menu, type “Device Manager” in the search bar, and then press “Enter.”
- Double-click on “Audio inputs and outputs.”
- Right-click on the microphone you’d like to mute and then click on “Disable.”


Record Audio Like a Pro
A quality microphone can be the difference between a successful video conference call and a barely audible session that doesn’t get the work done. The mic also comes in handy when you want to issue voice commands to Cortana, the official voice assistant for Windows 10. Sticking with the pre-installed mic is always an option, but the sound quality could be poor or garbled. Changing the default microphone can help you to discover the best recording tool for your needs. And thanks to this article, you know how to go about it.
Have you had trouble using the microphone on your Windows PC? Let us know in the comments section below.