
Do you want to run macOS Big Sur on a Windows 11/10 PC? If you can’t afford to purchase an Apple Macbook, you can use it on a virtual machine using VirtualBox.
Before installing macOS Big Sur on a Windows PC, let you know; it is not a tough job. VirtualBox has made everything easy for you. With VirtualBox, you can install multiple operating systems on a single computer and seamlessly switch between them when you desire. The guest operating systems run within an application, virtualizing the hardware, and the OS doesn’t know the difference. In this gearupwindows article, we will guide you on installing macOS Big Sur on a Windows machine.
What are the requirements to run macOS in VirtualBox?
Before you get started, you’ll need to download the following files:-
- VirtualBox for Windows
- VirtualBox Extension Pack
- macOS Big Sur ISO
How to Install macOS Big Sur Using VirtualBox on Windows 11/10?
Once you have downloaded the files as mentioned earlier on your Windows machine, do the following steps:-
Step 1. Install VirtualBox and then its Extension Pack, which you already downloaded.
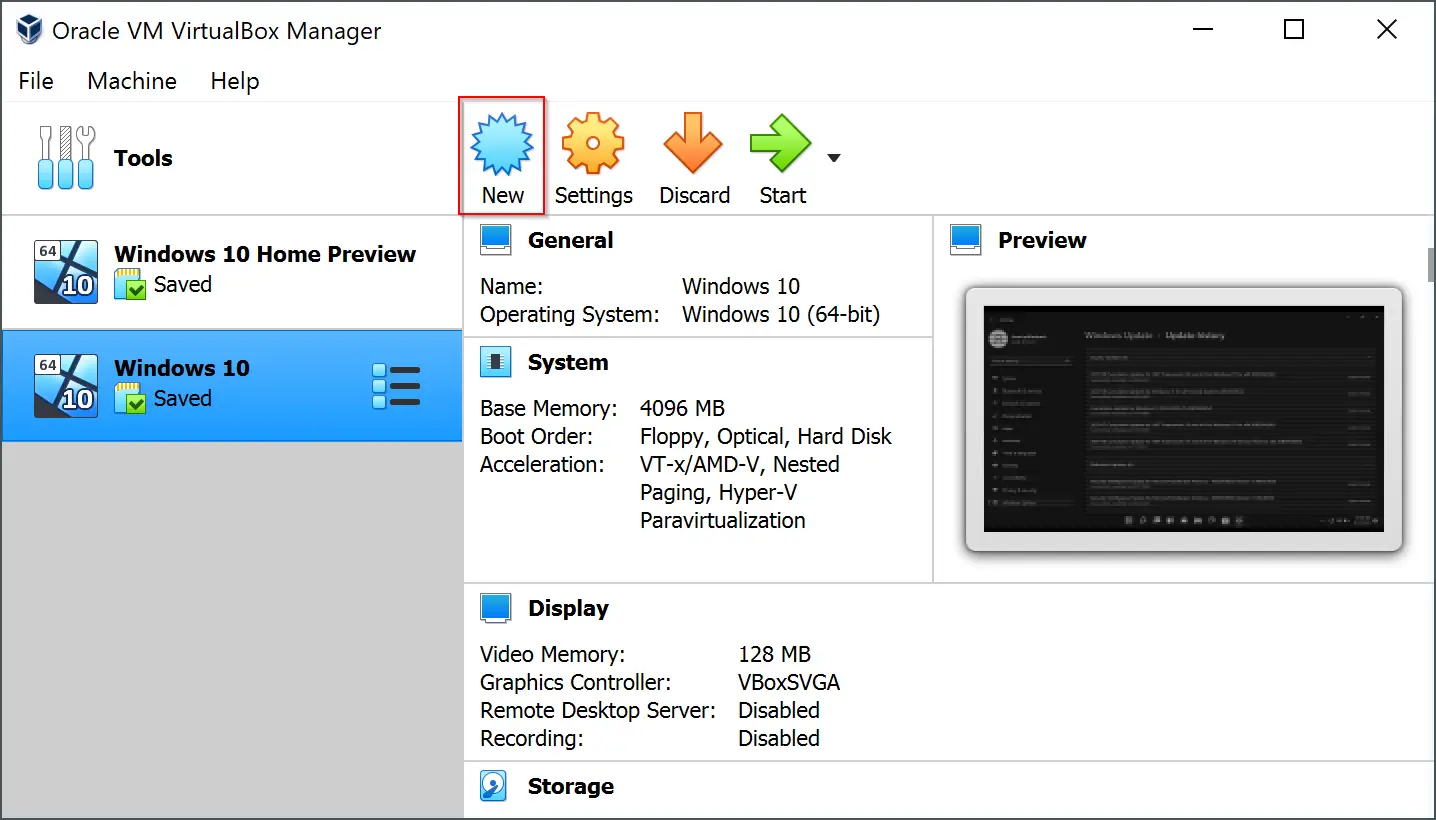
Step 2. Now, open Oracle VM VirtualBox from its desktop shortcut by double-clicking on it.
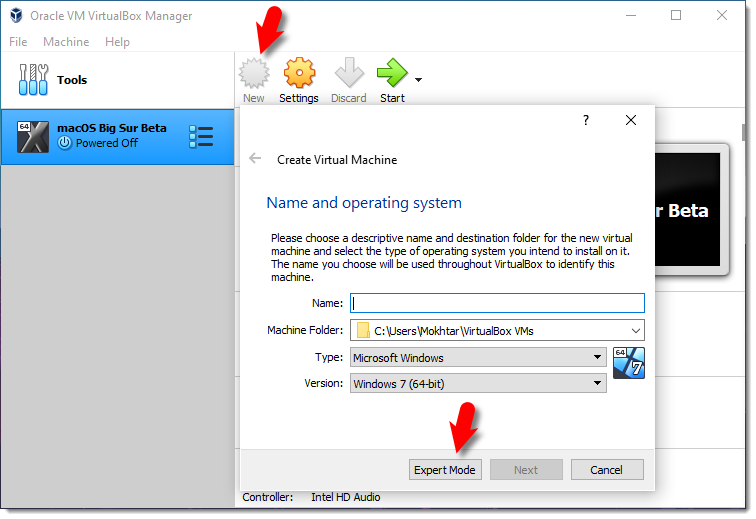
Step 3. Click New.
Step 3. Type macOS Big Sur for the virtual machine name and then click the Expert Mode button.
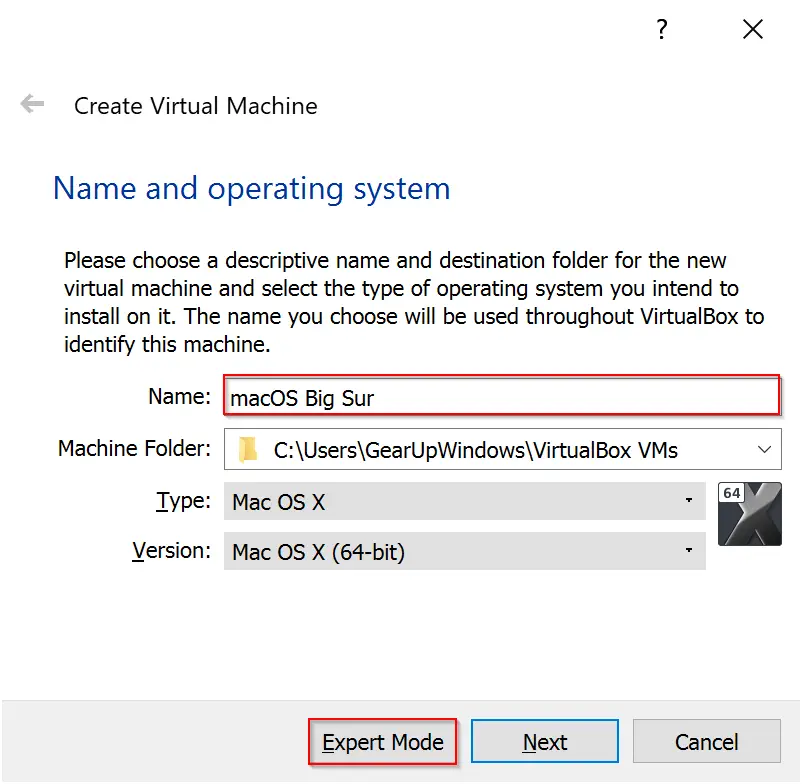
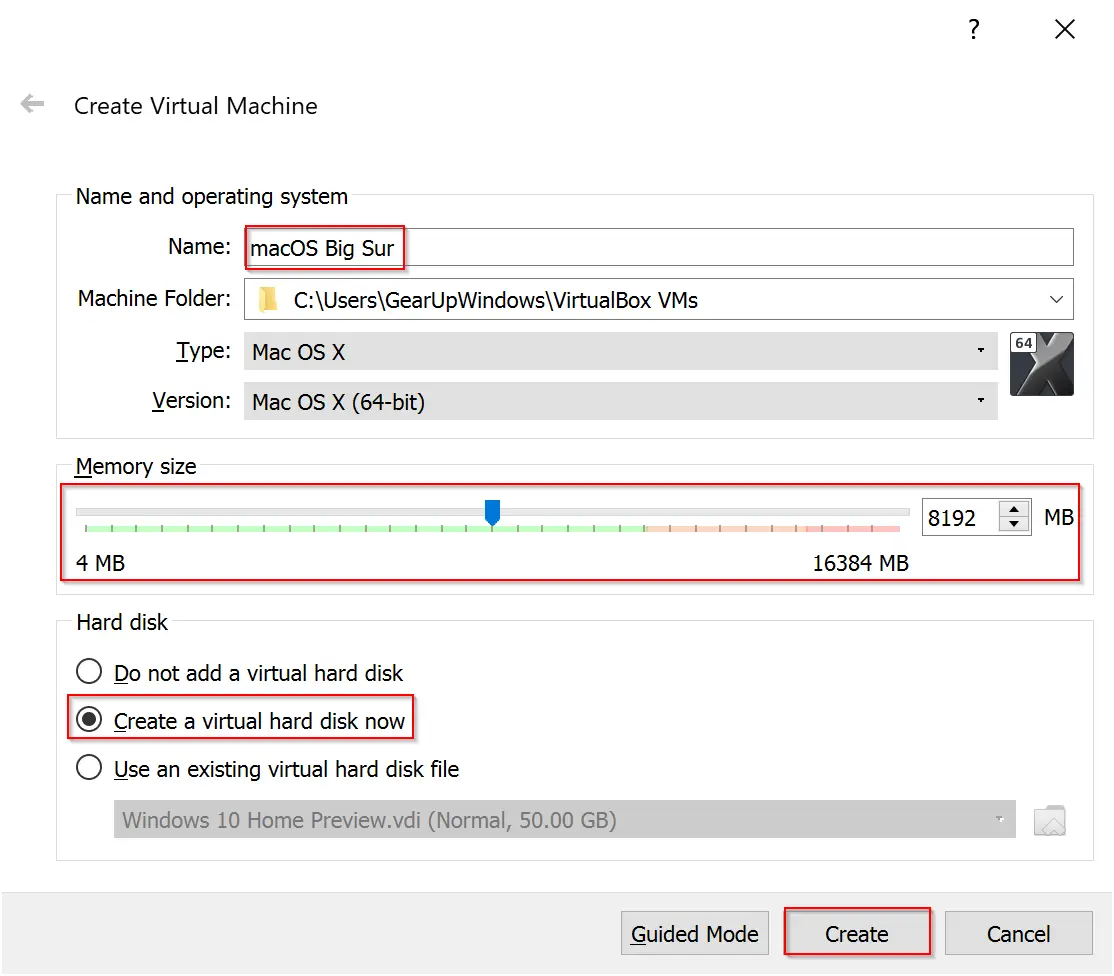
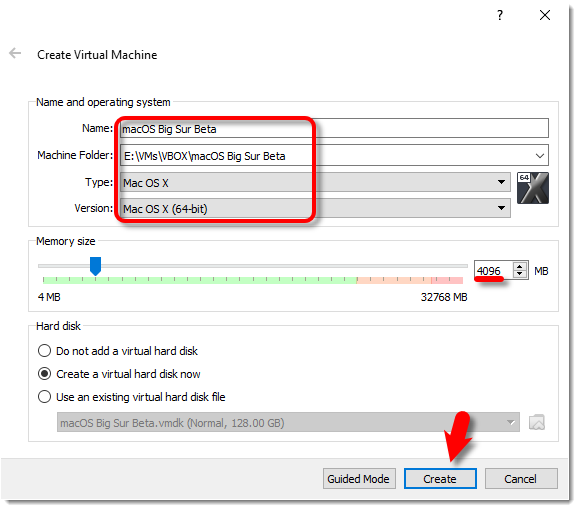
Step 4. Next, name the operating System macOS Big Sur. Use the slider to increase the memory size up to 8GB if your PC allows it. If not, then let at least 50% of physical RAM. Then make sure “Create a virtual hard disk now” is selected and click on the Create button.
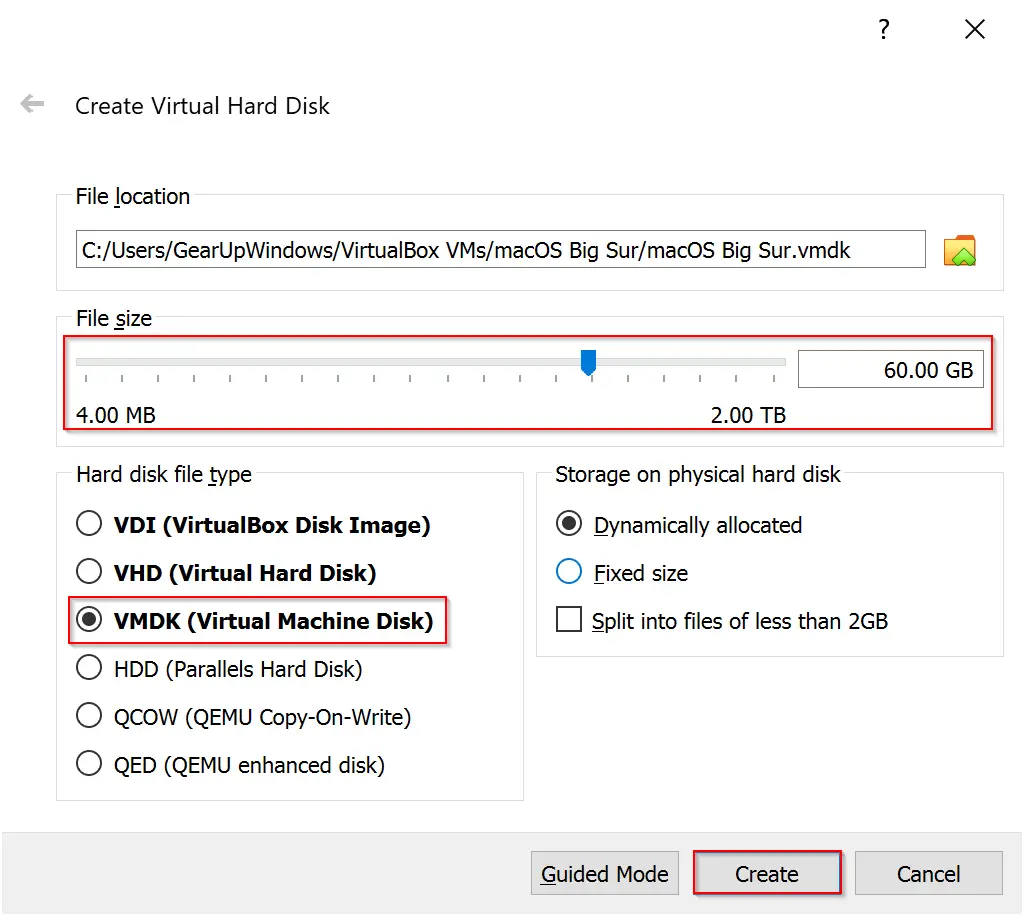
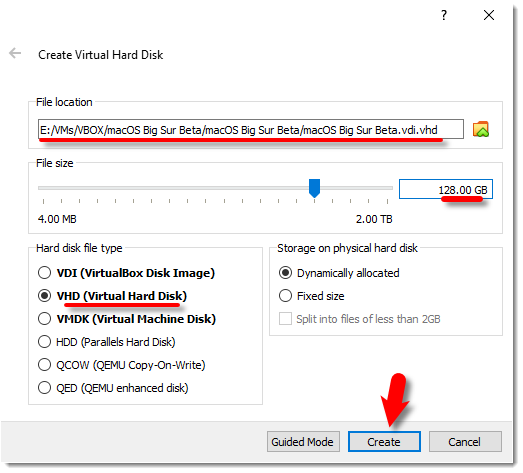
Step 5. Again use the slider to set the virtual hard disk size according to your preference. Although this depends on how much free storage space you have on your computer, we recommend allocating 60 GB for the virtual machine. Select VMDK (Virtual Machine Disk) for the hard disk file type and click the Create button.
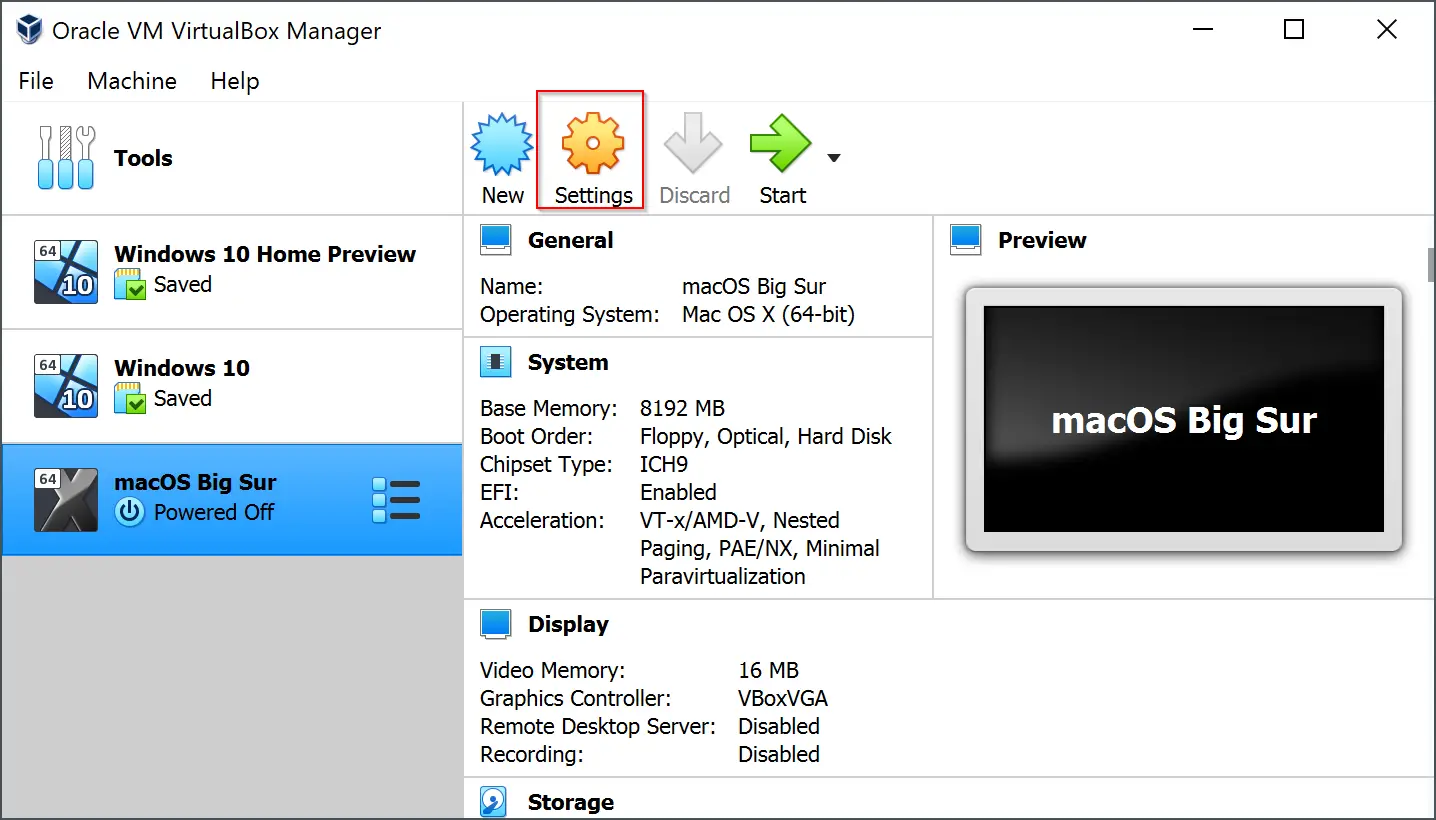
Step 6. When you’re done, click Settings.
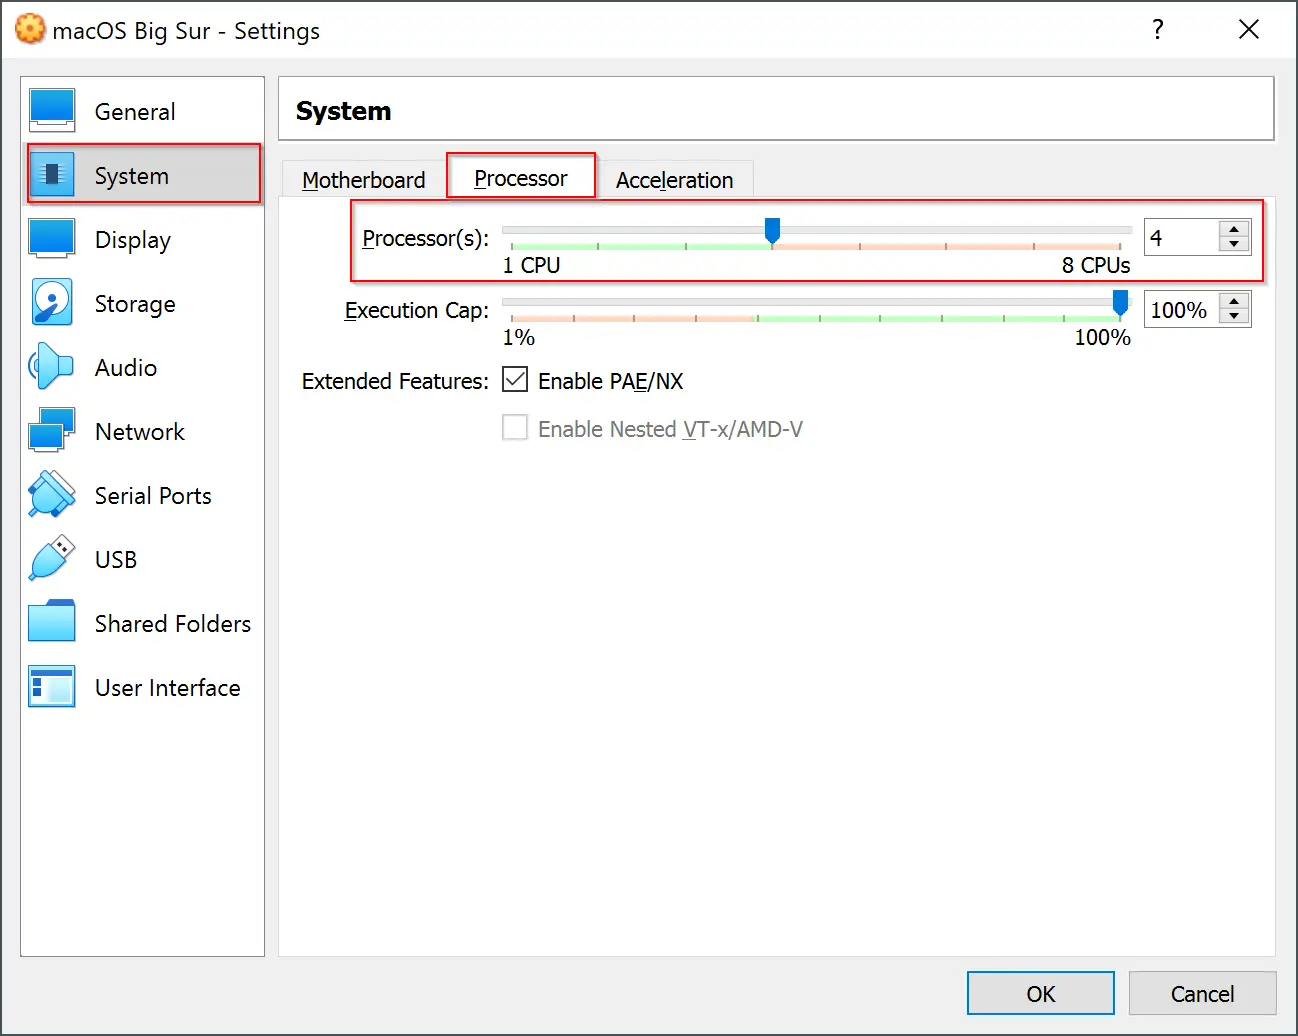
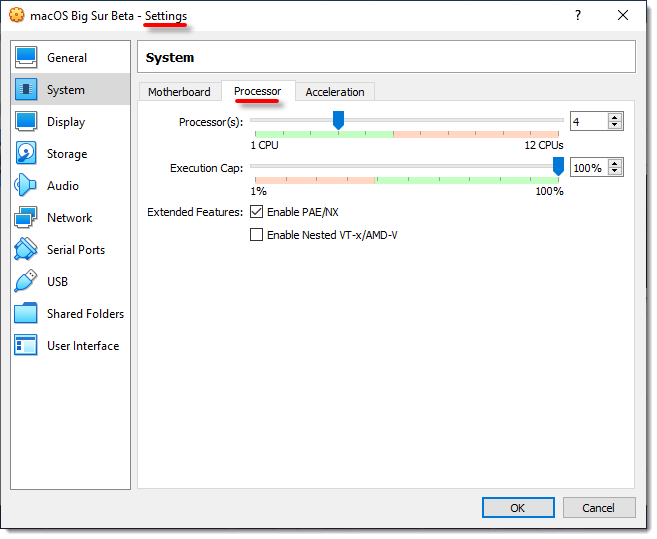
Step 7. Select the System category and then click the Processor from the top menu. Again use the slider to adjust the Processor allocation. It’s recommended to allocate half of your Processor’s core count for the virtual machine.
Note: If you have a 4-core/8-thread processor, it will appear in VirtualBox as 8 CPU cores. In that case, you can set 4-cores for processor allocation.
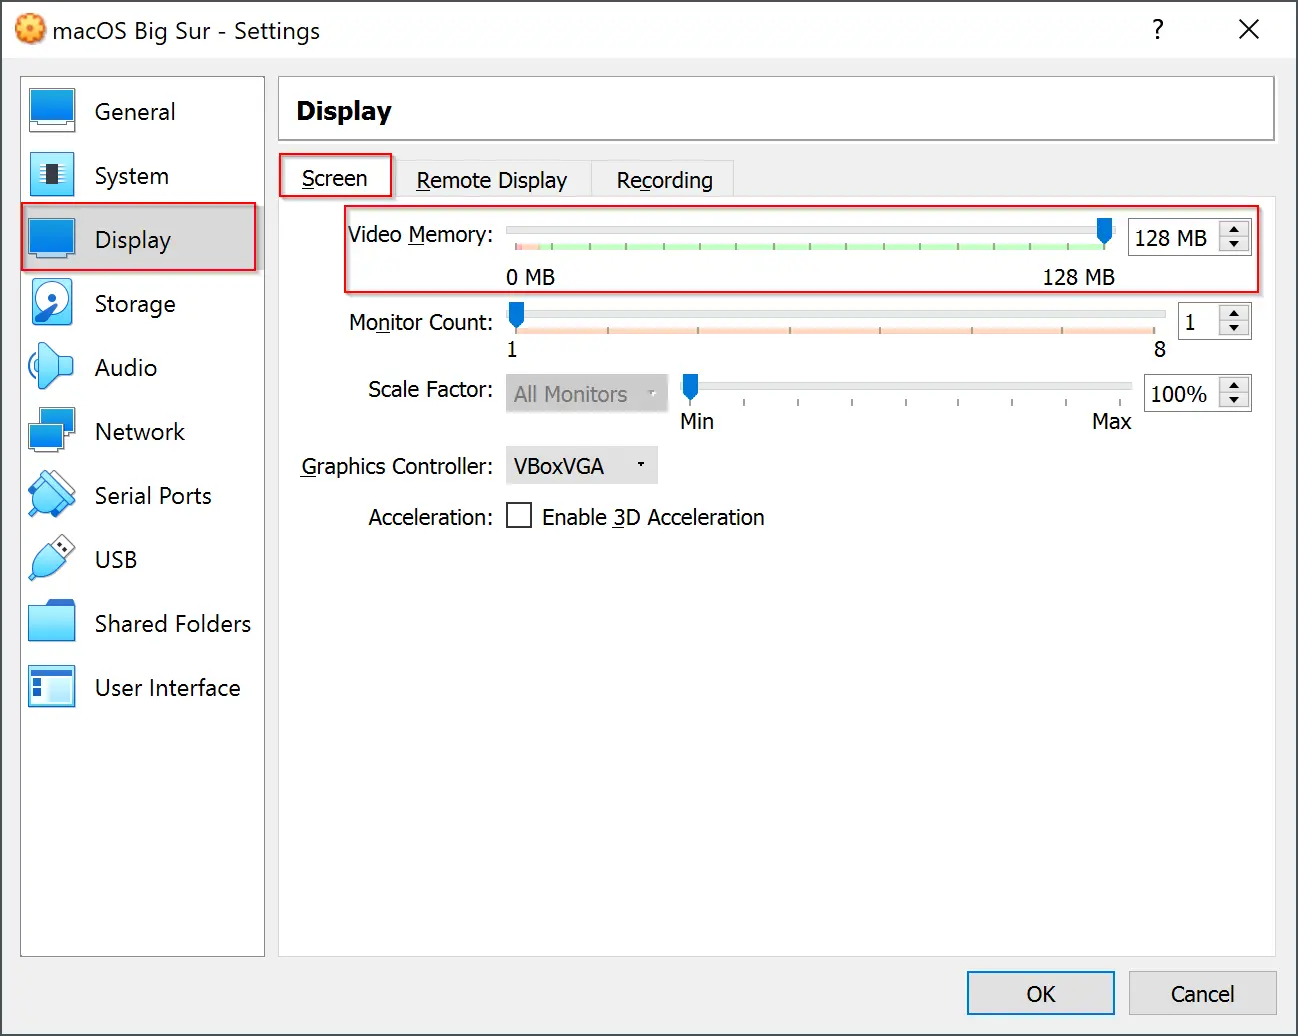
Step 8. Now, click the Display category from the left sidebar. On the right sidebar, move the slider under the “Screen” tab of “Video Memory.”
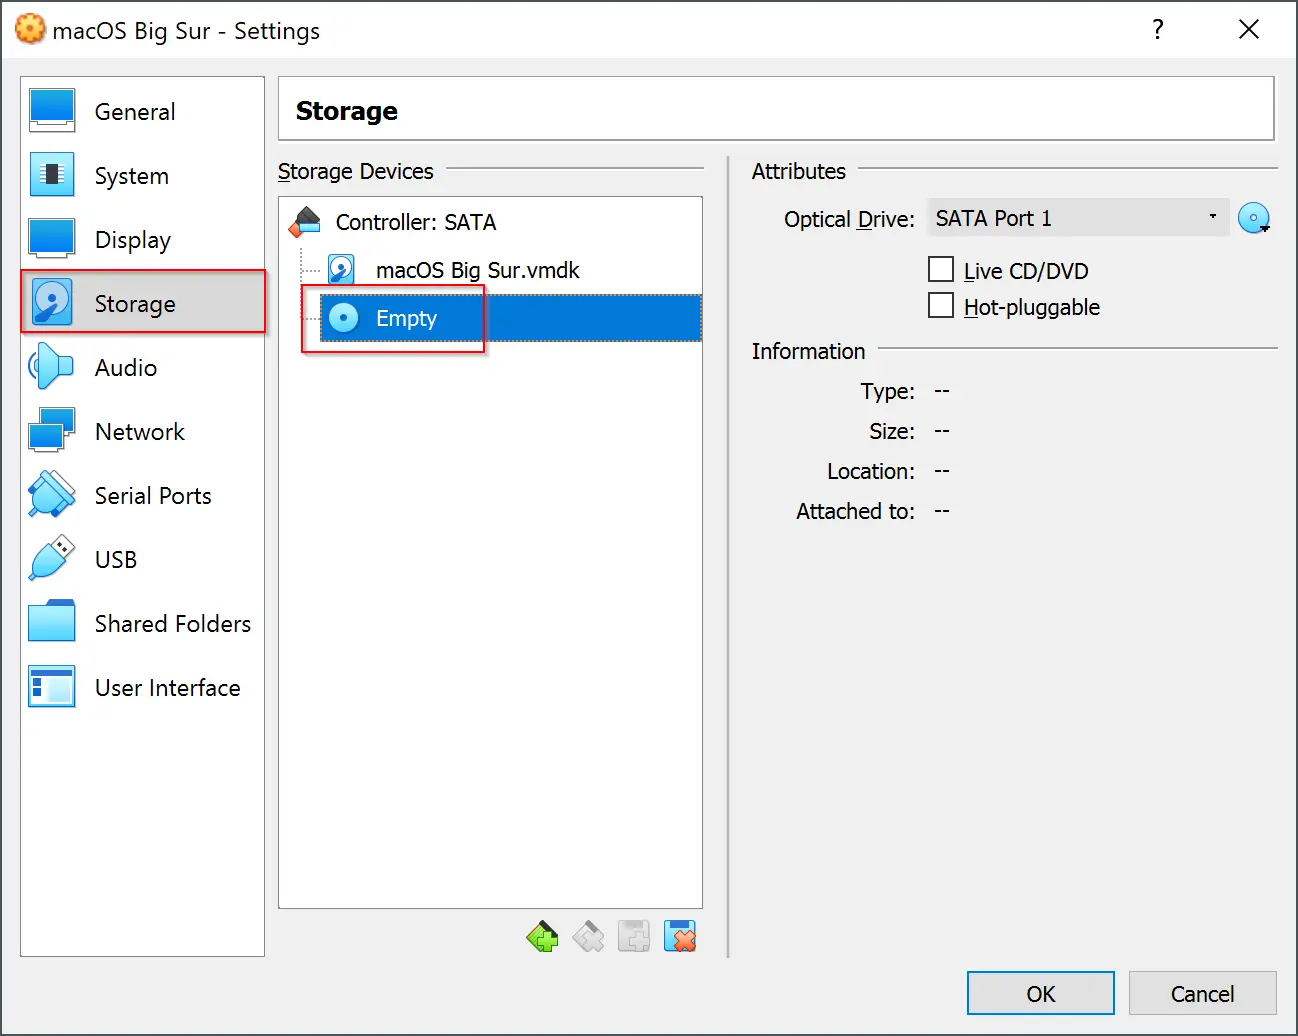
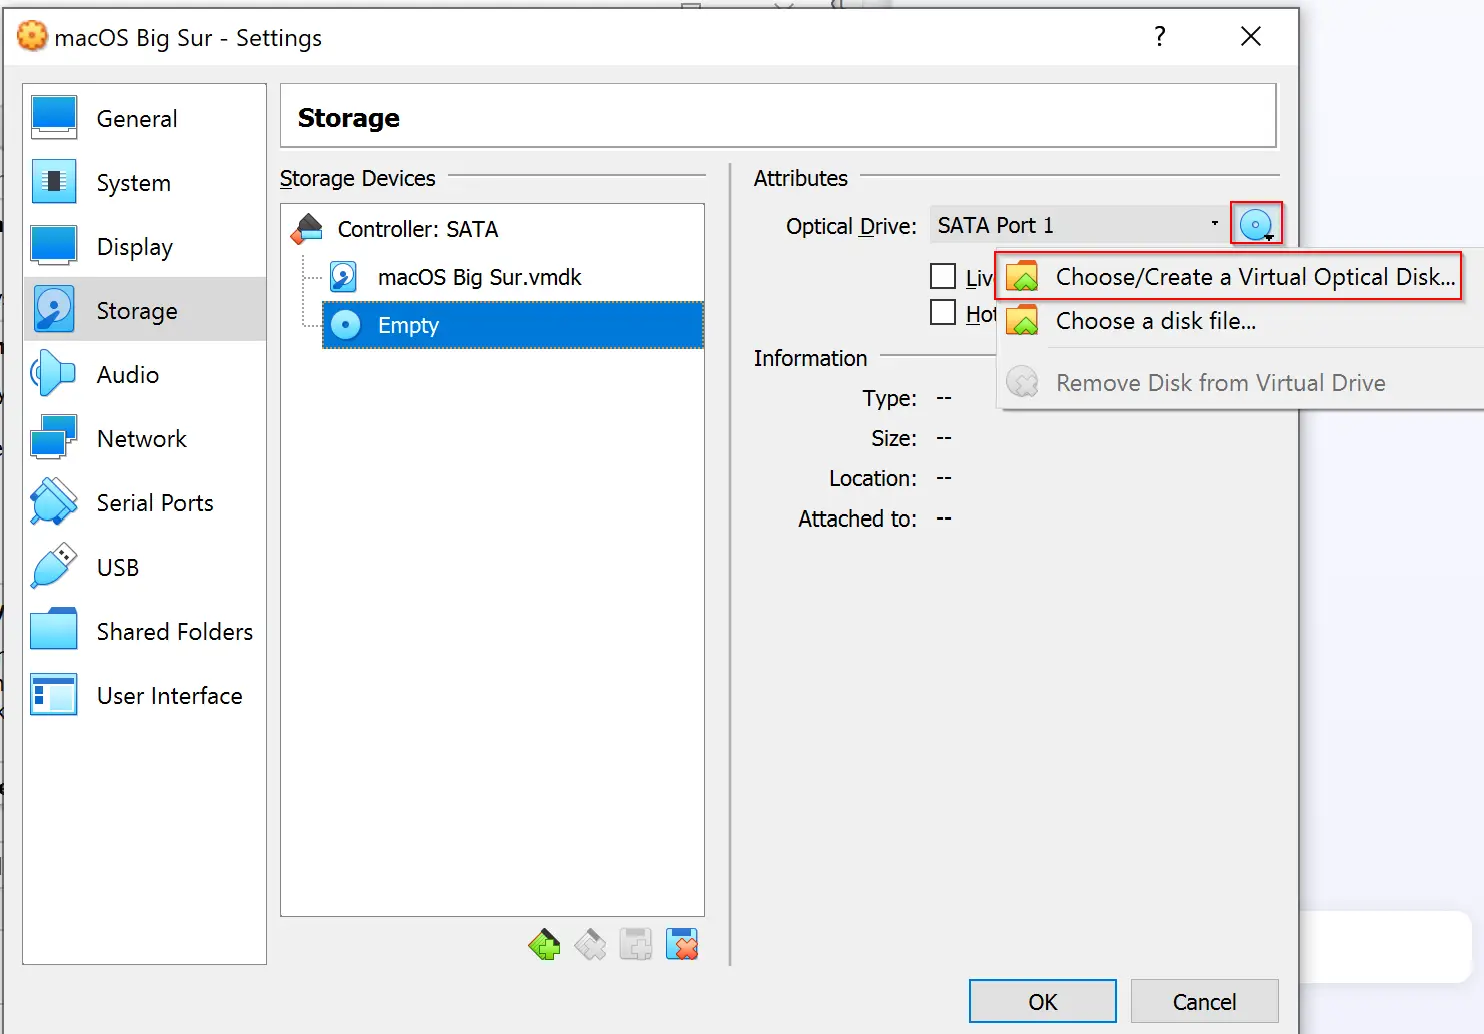
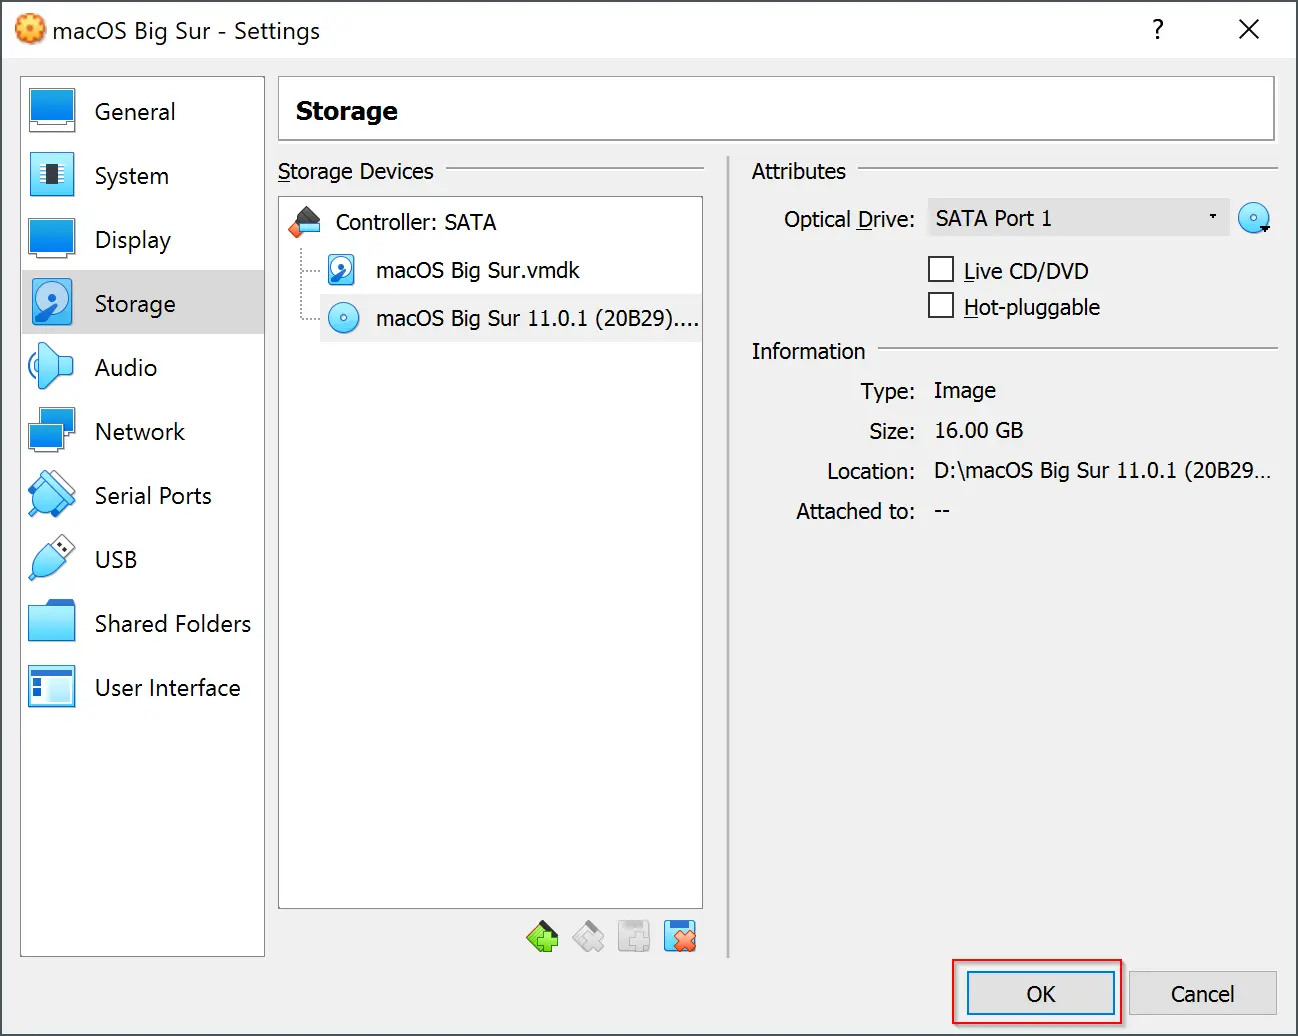
Step 9. Now, select the “Storage” category and click on Empty under the Storage Devices section.
Step 10. Click on the optical disk icon on the right sidebar and choose “Create a Virtual Optical Disk” from the dropdown menu.
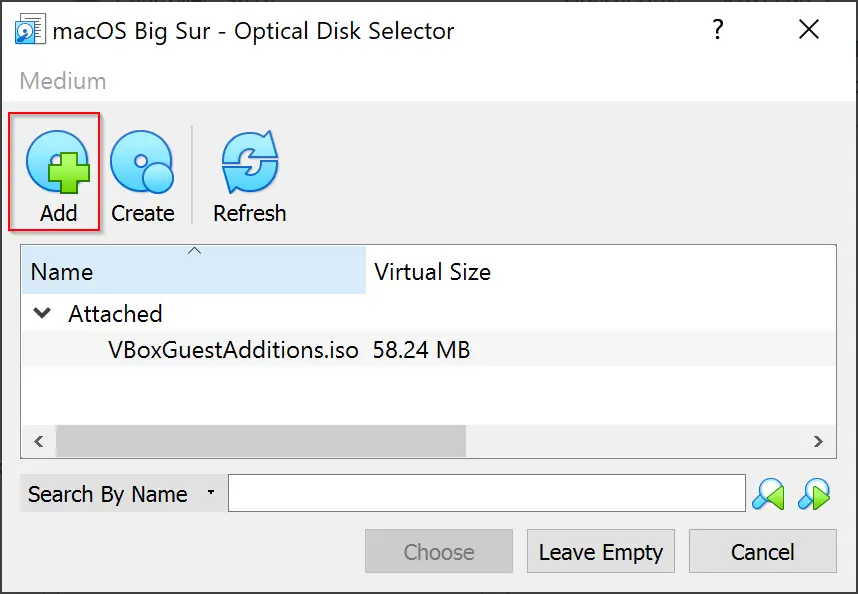
Step 11. Click the Add button to browse the macOS Big Sur ISO from the File Explorer that you already downloaded.
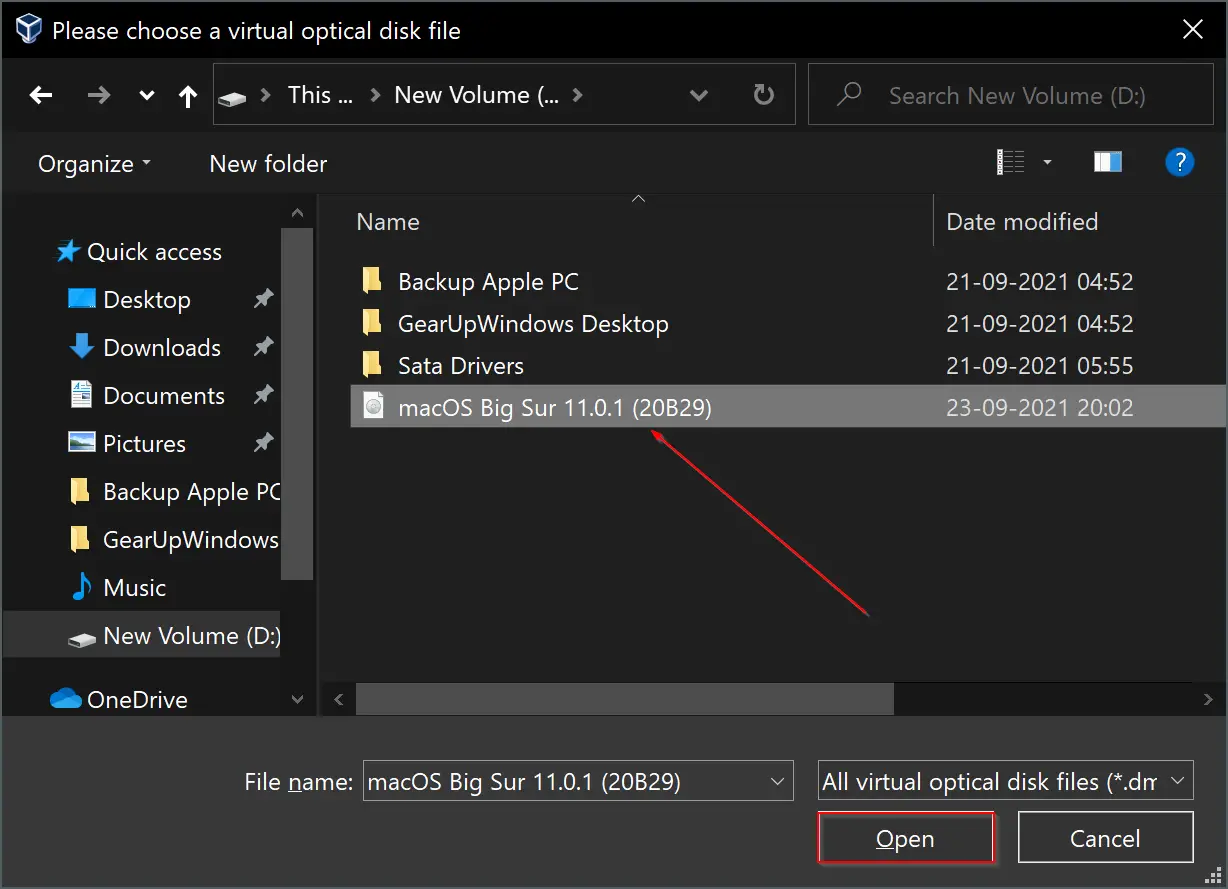
Step 12. Select the macOS Big Sur ISO file in the File Explorer and click the Open button.
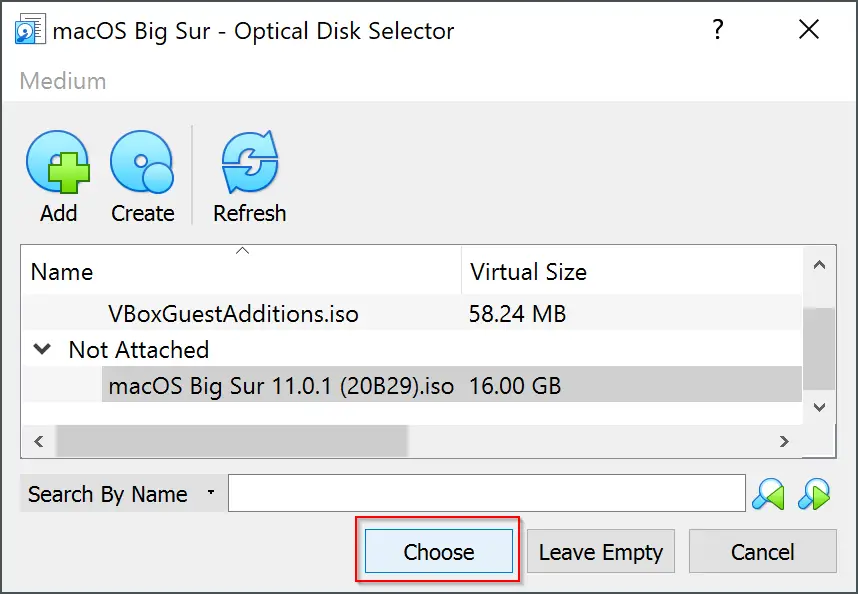
Step 13. Click the Choose button.
Step 14. Finally, click the OK button.
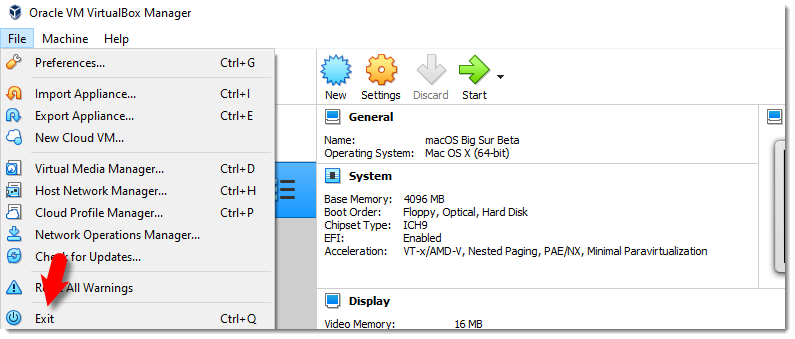
Step 15. Now, close the VirtualBox window.
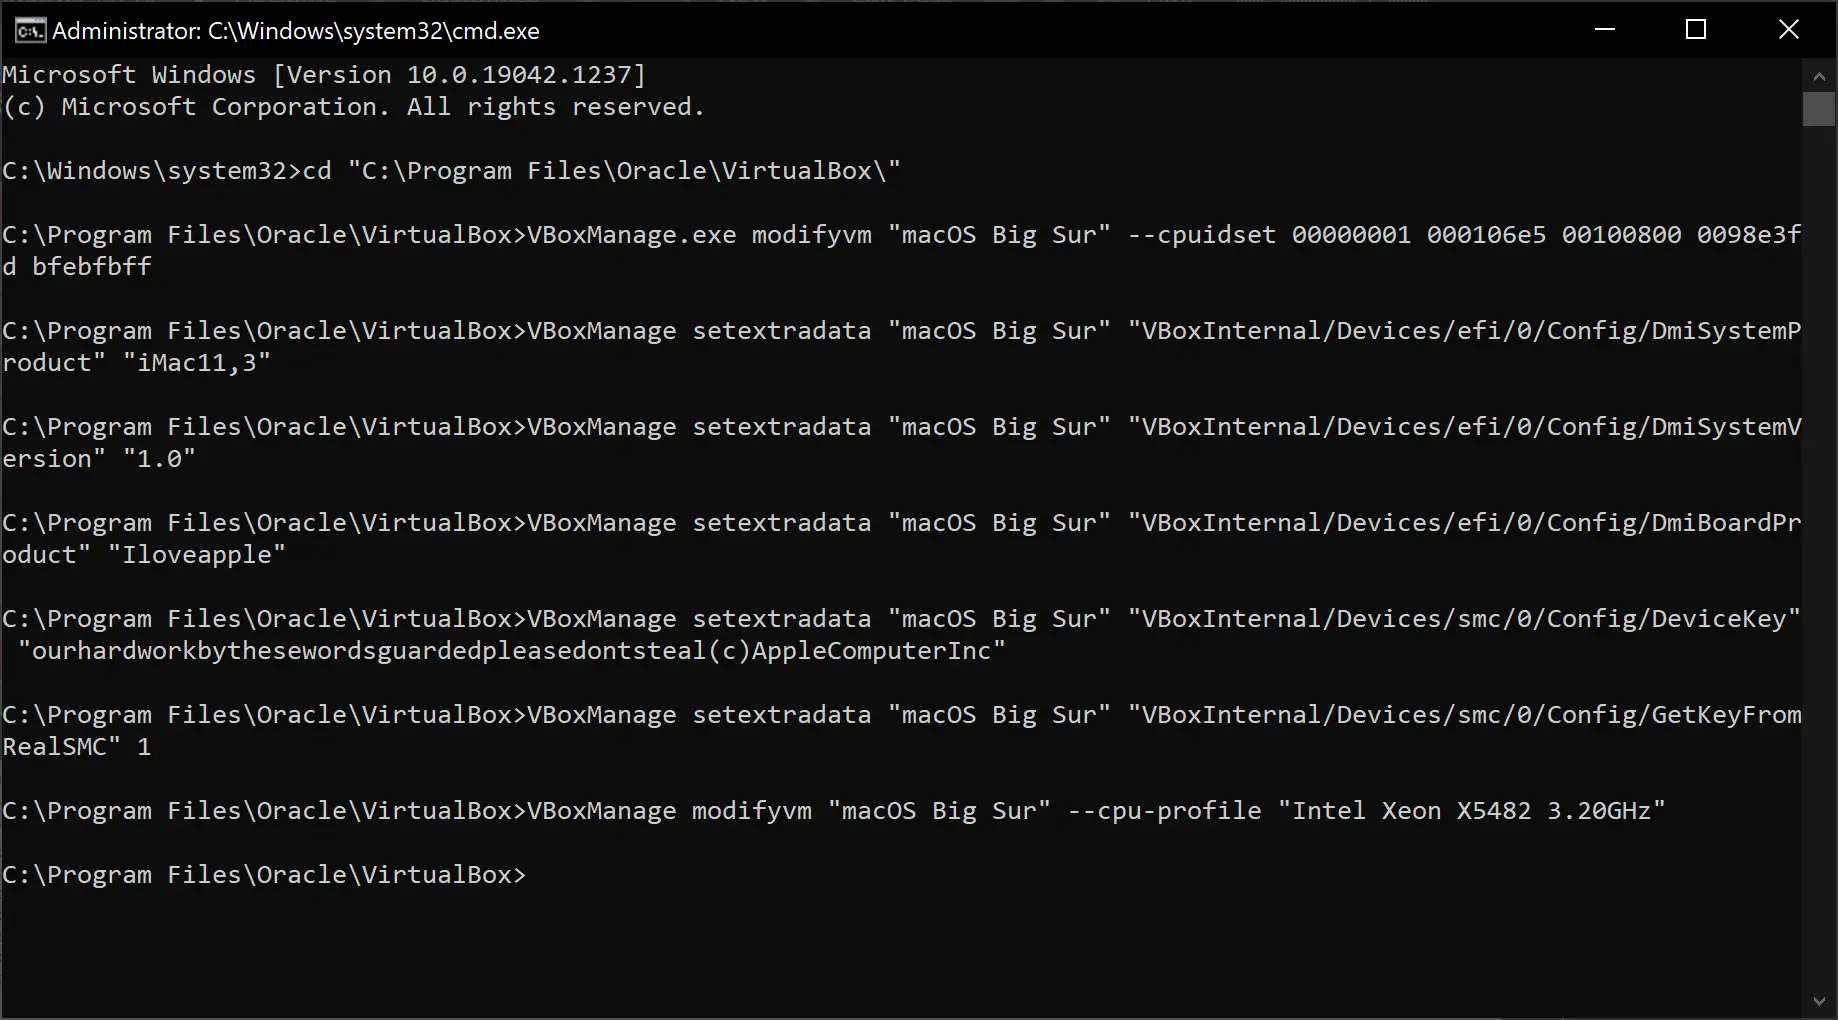
Step 16. Open Command Prompt as administrator.
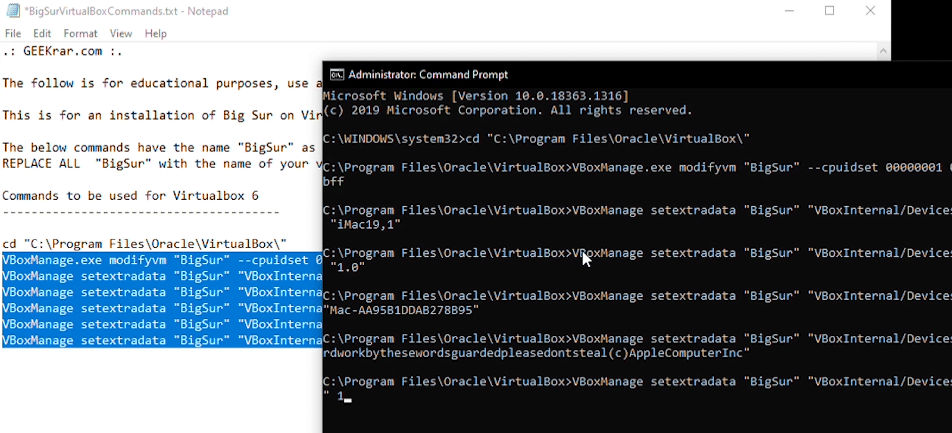
Step 17. Copy and paste the following lines into a notepad file:-
cd "C:\Program Files\Oracle\VirtualBox\"
VBoxManage.exe modifyvm "macOS Big Sur" --cpuidset 00000001 000106e5 00100800 0098e3fd bfebfbff
VBoxManage setextradata "macOS Big Sur" "VBoxInternal/Devices/efi/0/Config/DmiSystemProduct" "iMac11,3"
VBoxManage setextradata "macOS Big Sur" "VBoxInternal/Devices/efi/0/Config/DmiSystemVersion" "1.0"
VBoxManage setextradata "macOS Big Sur" "VBoxInternal/Devices/efi/0/Config/DmiBoardProduct" "Iloveapple"
VBoxManage setextradata "macOS Big Sur" "VBoxInternal/Devices/smc/0/Config/DeviceKey" "ourhardworkbythesewordsguardedpleasedontsteal(c)AppleComputerInc"
VBoxManage setextradata "macOS Big Sur" "VBoxInternal/Devices/smc/0/Config/GetKeyFromRealSMC" 1
VBoxManage modifyvm "macOS Big Sur" --cpu-profile "Intel Xeon X5482 3.20GHz"
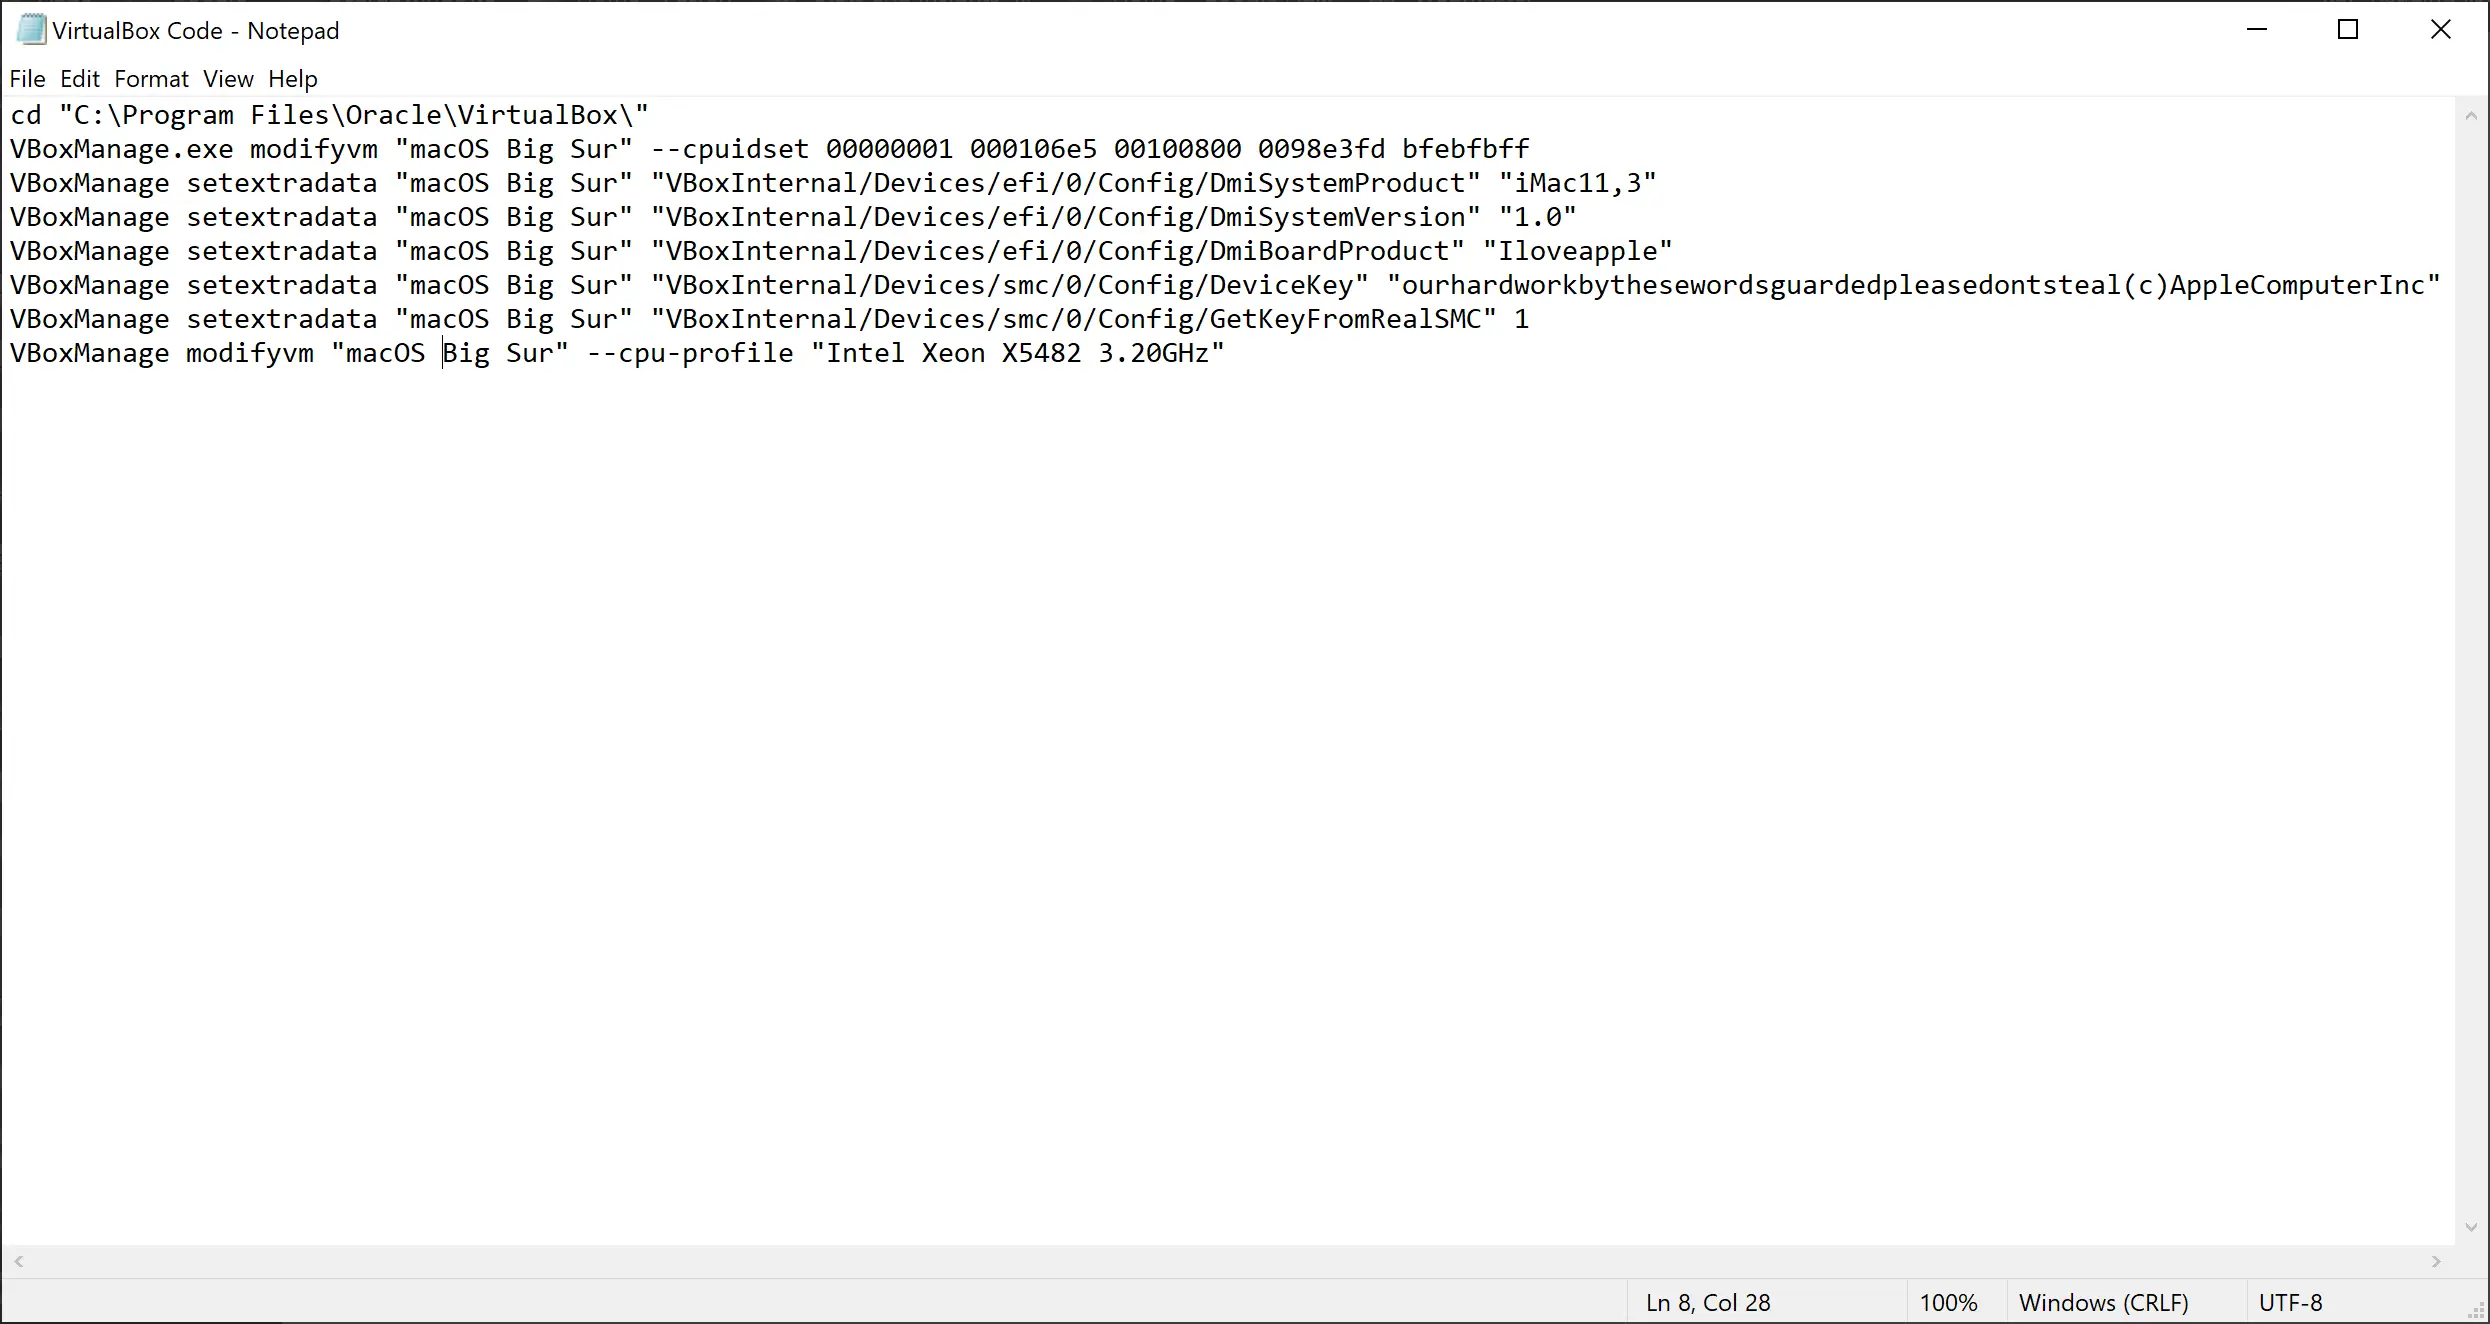
Step 18. Now, copy all the lines and paste them into the Command prompt, and then hit Enter from the keyboard to execute it. Alternatively, you can execute every line one by one.
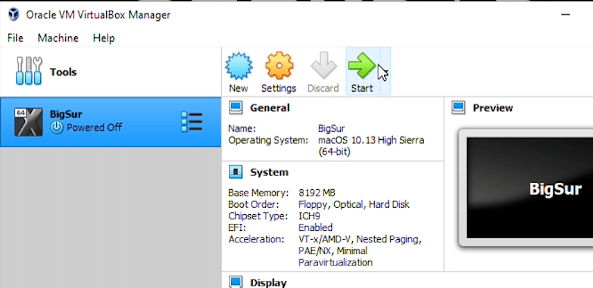
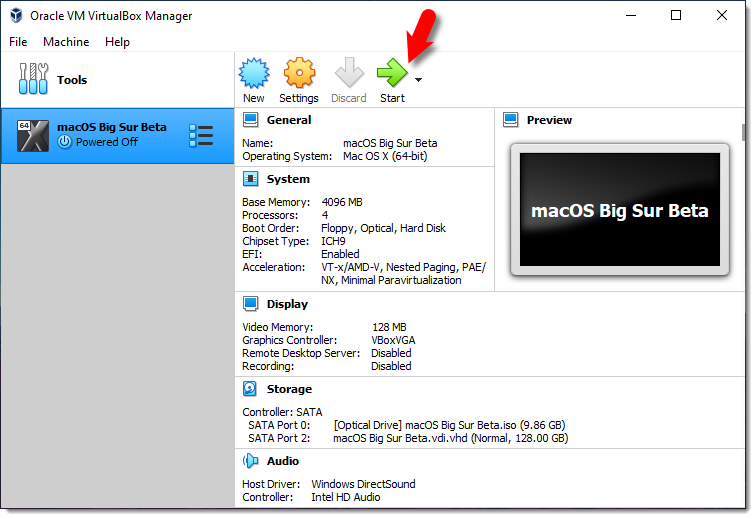
Step 19. Now, again open VirtualBox and click on Start.
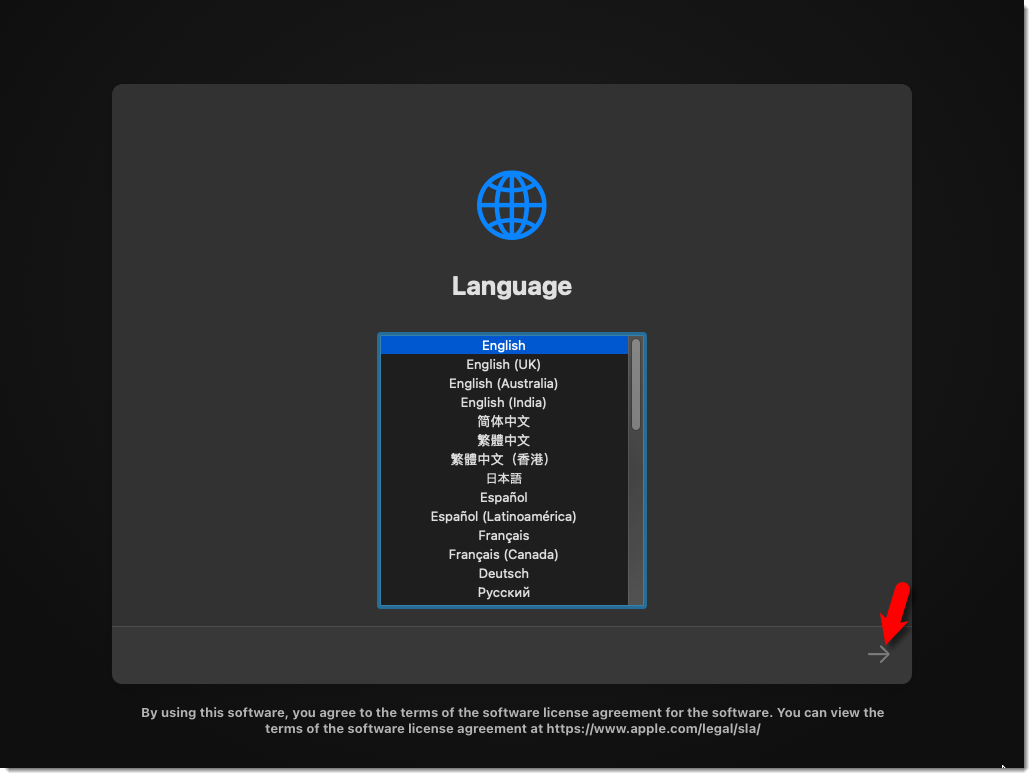
Step 20. In the next screen, select Language.
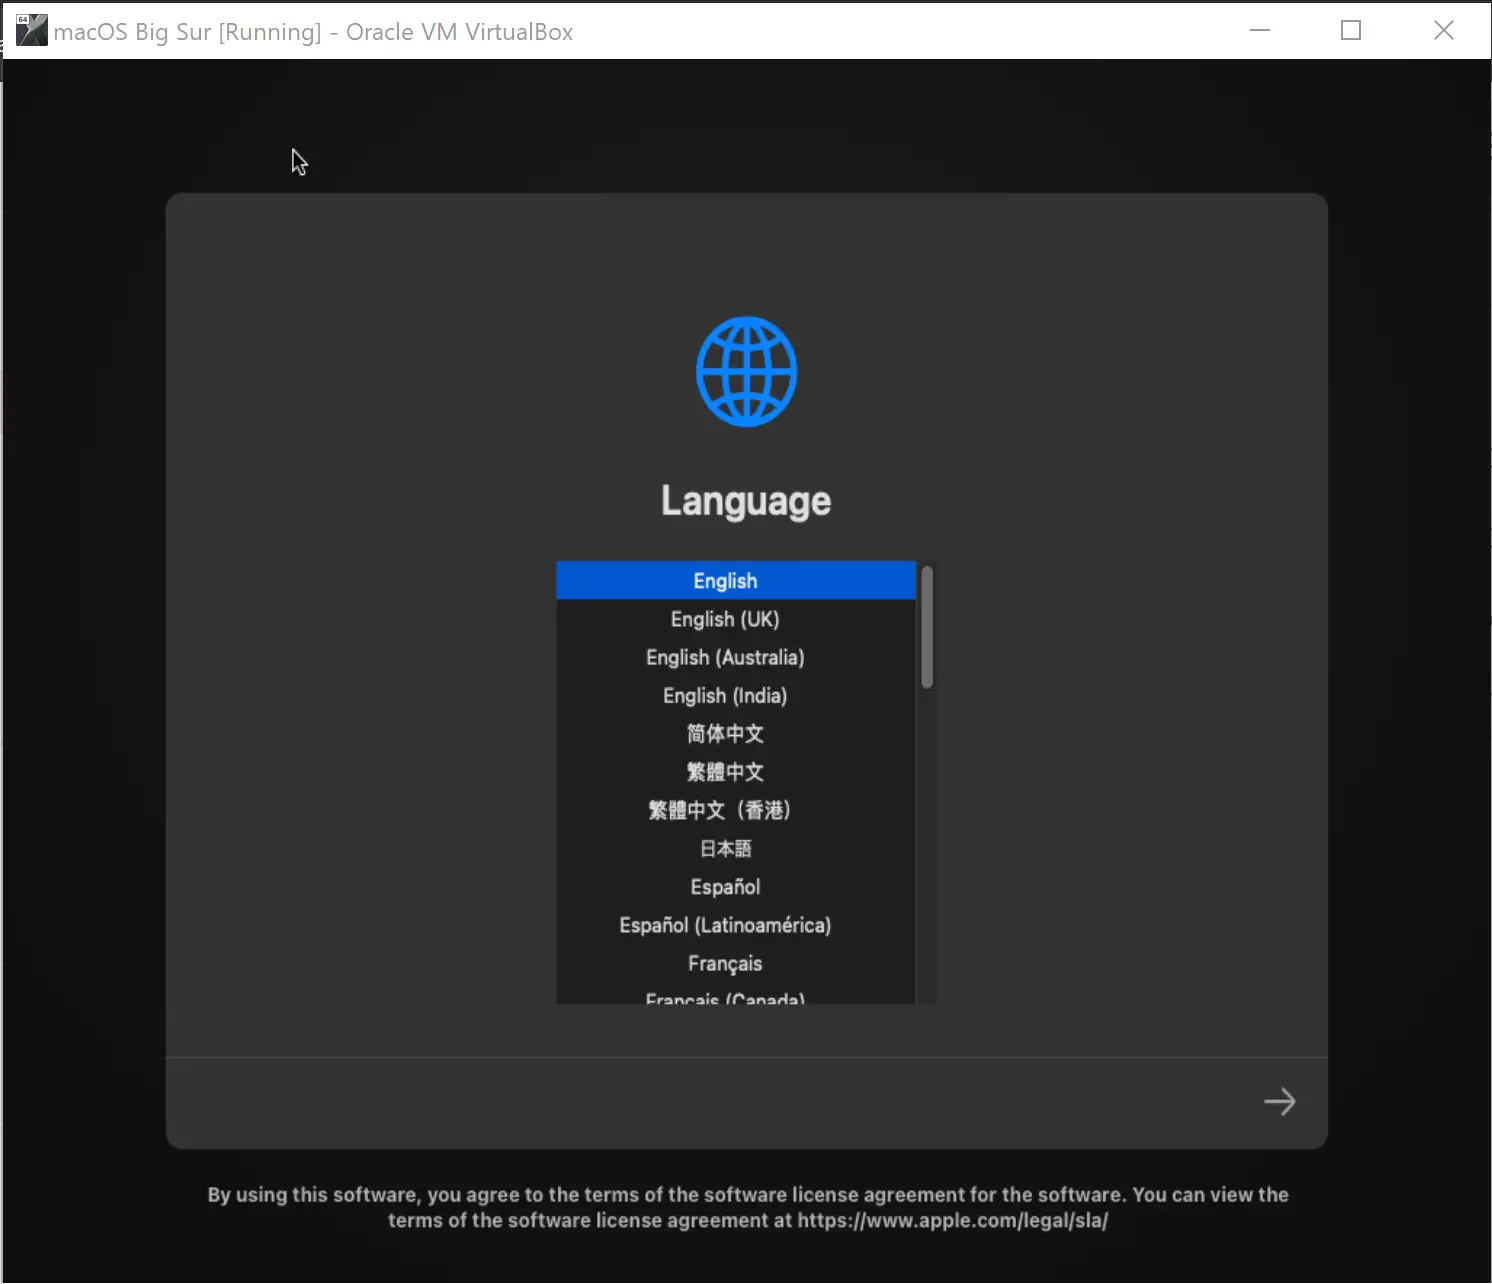
Step 21. Then click the right arrow button at the bottom right corner.
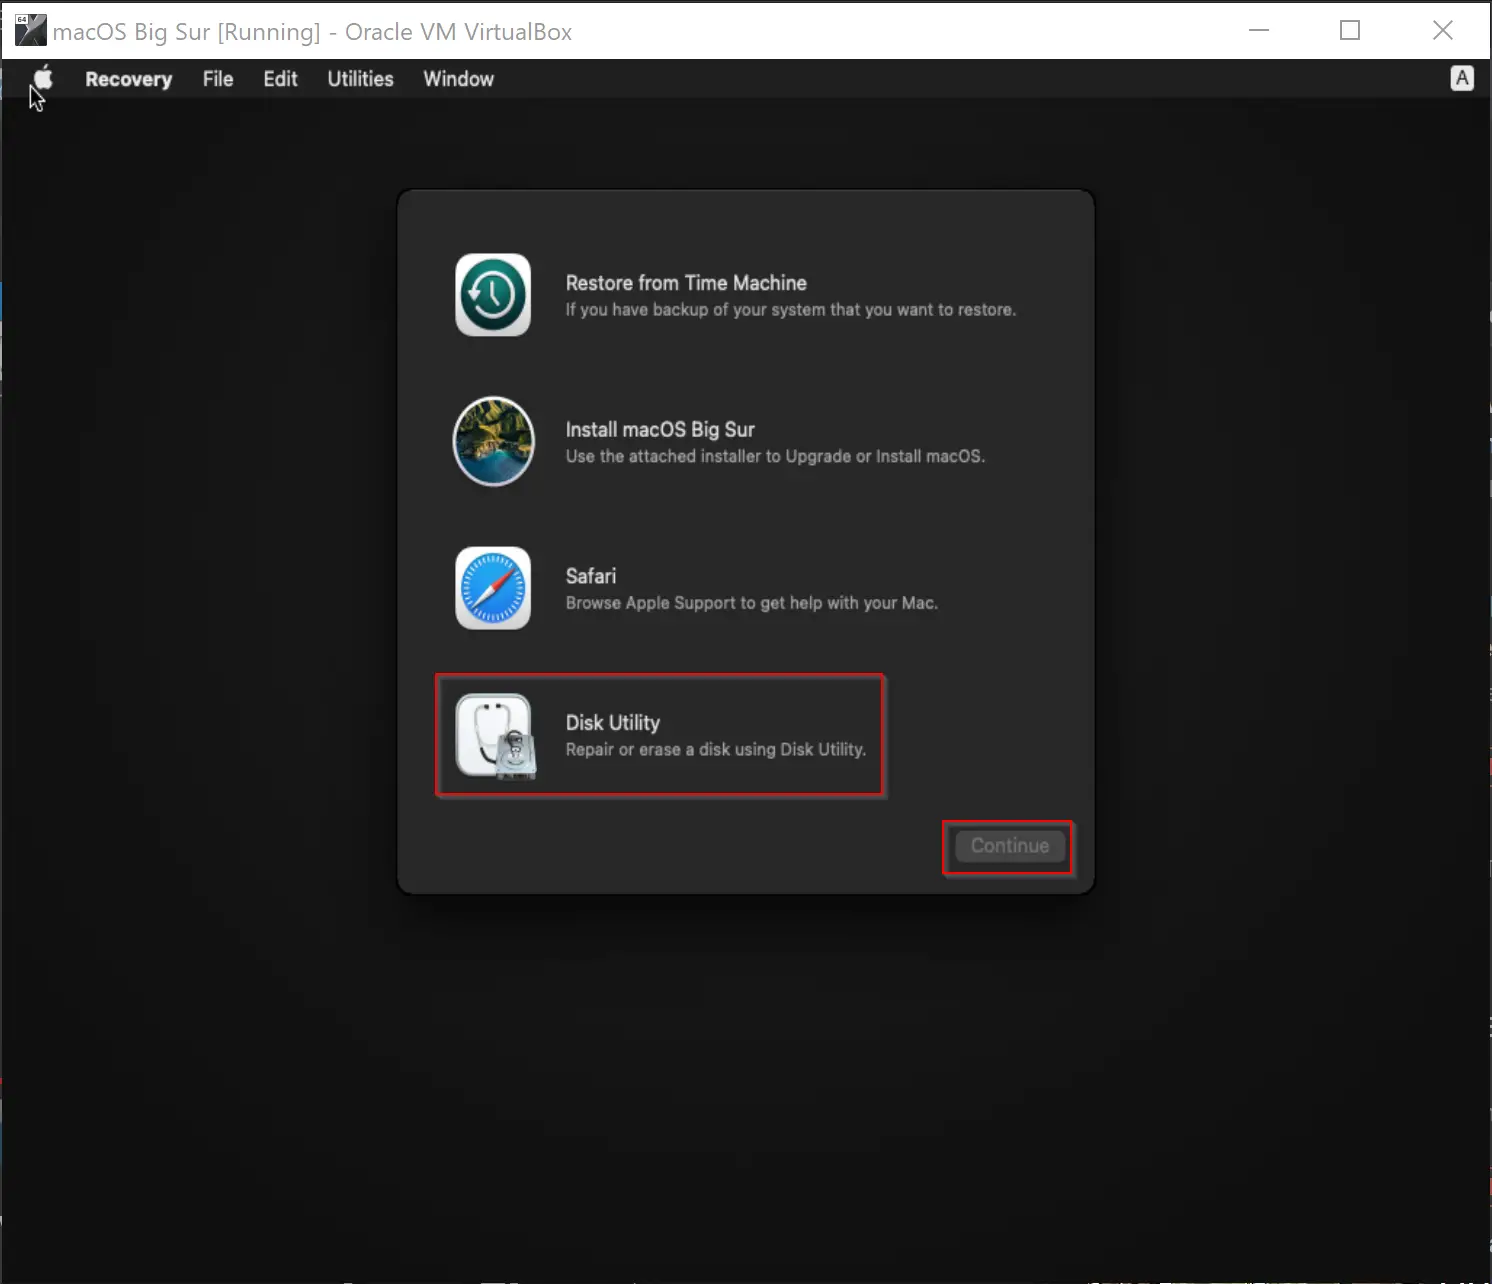
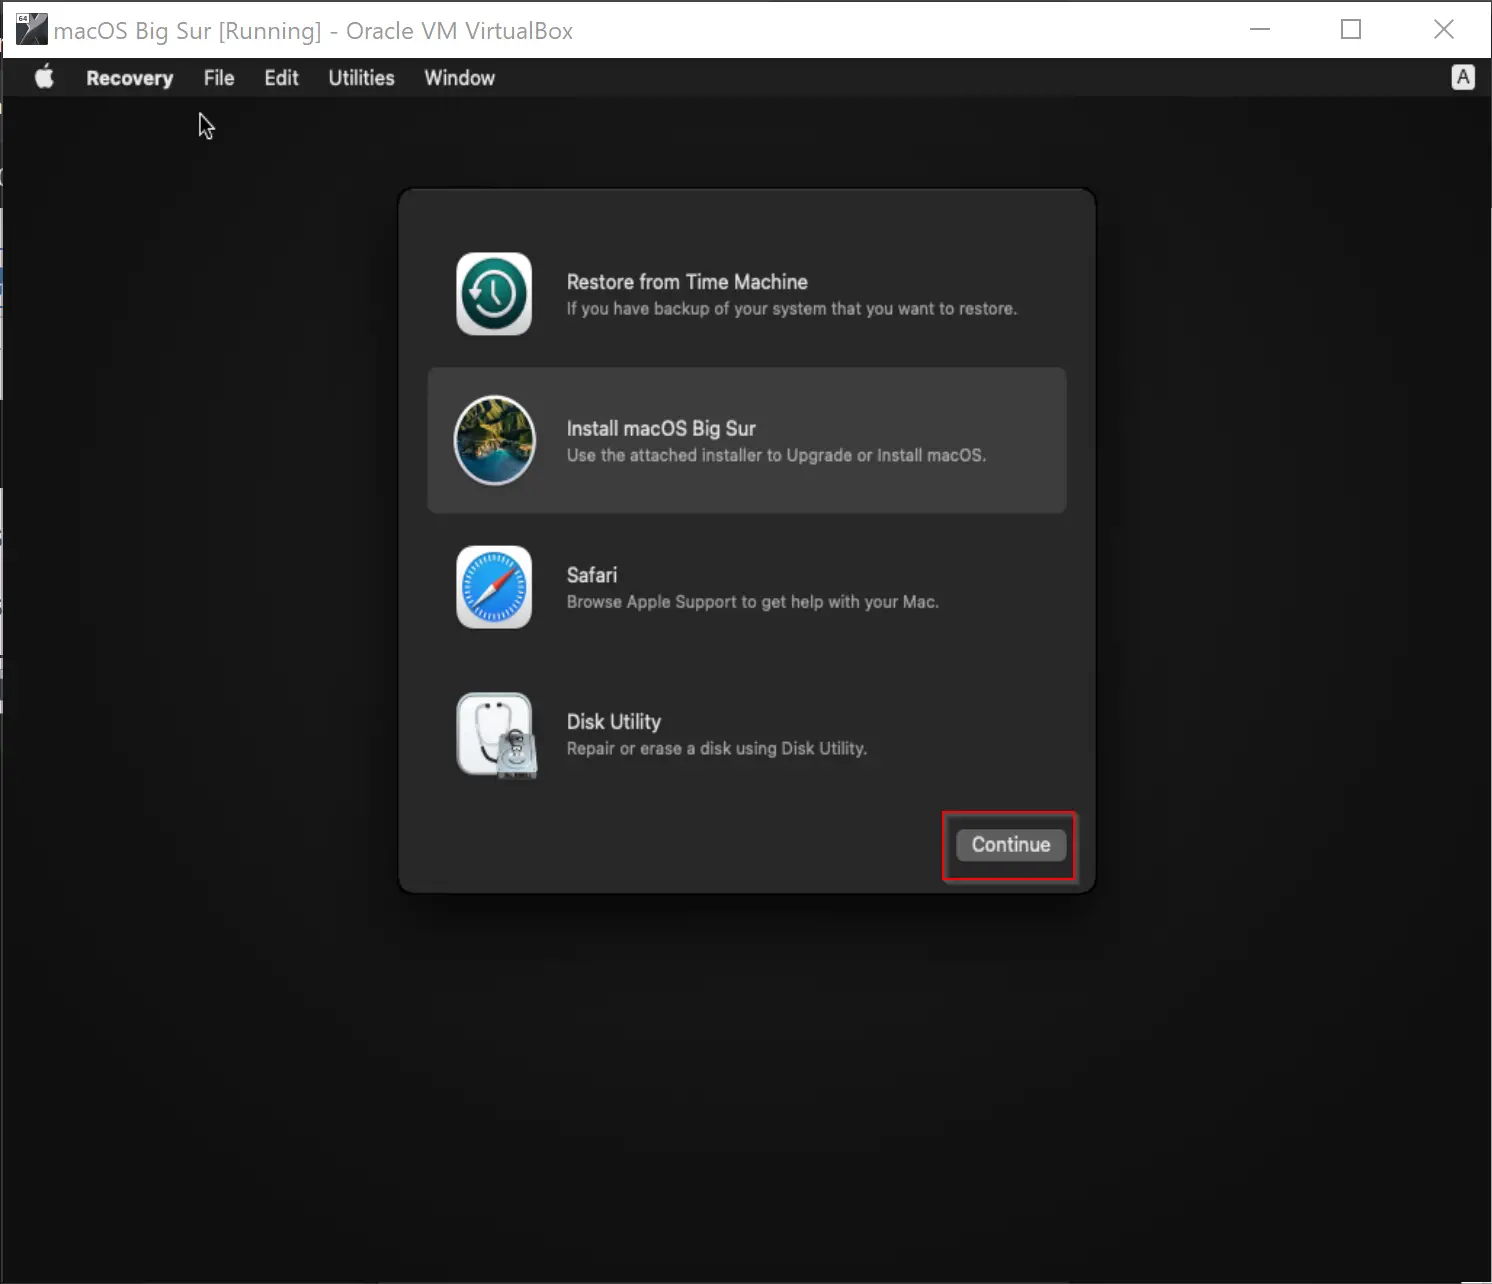
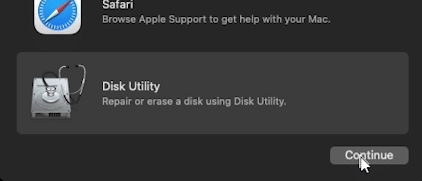
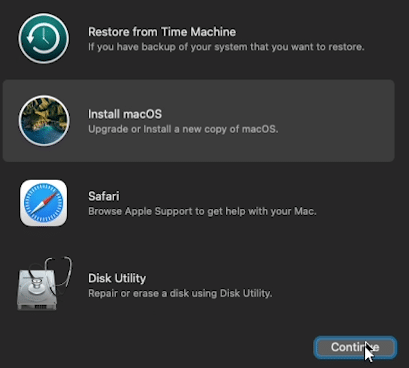
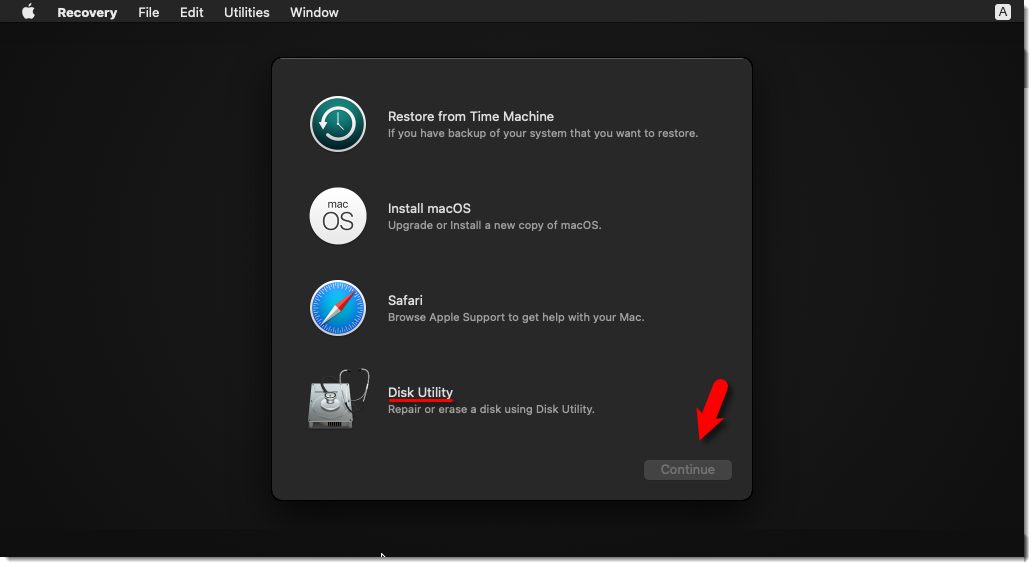
Step 22. Select the Disk Utility option.
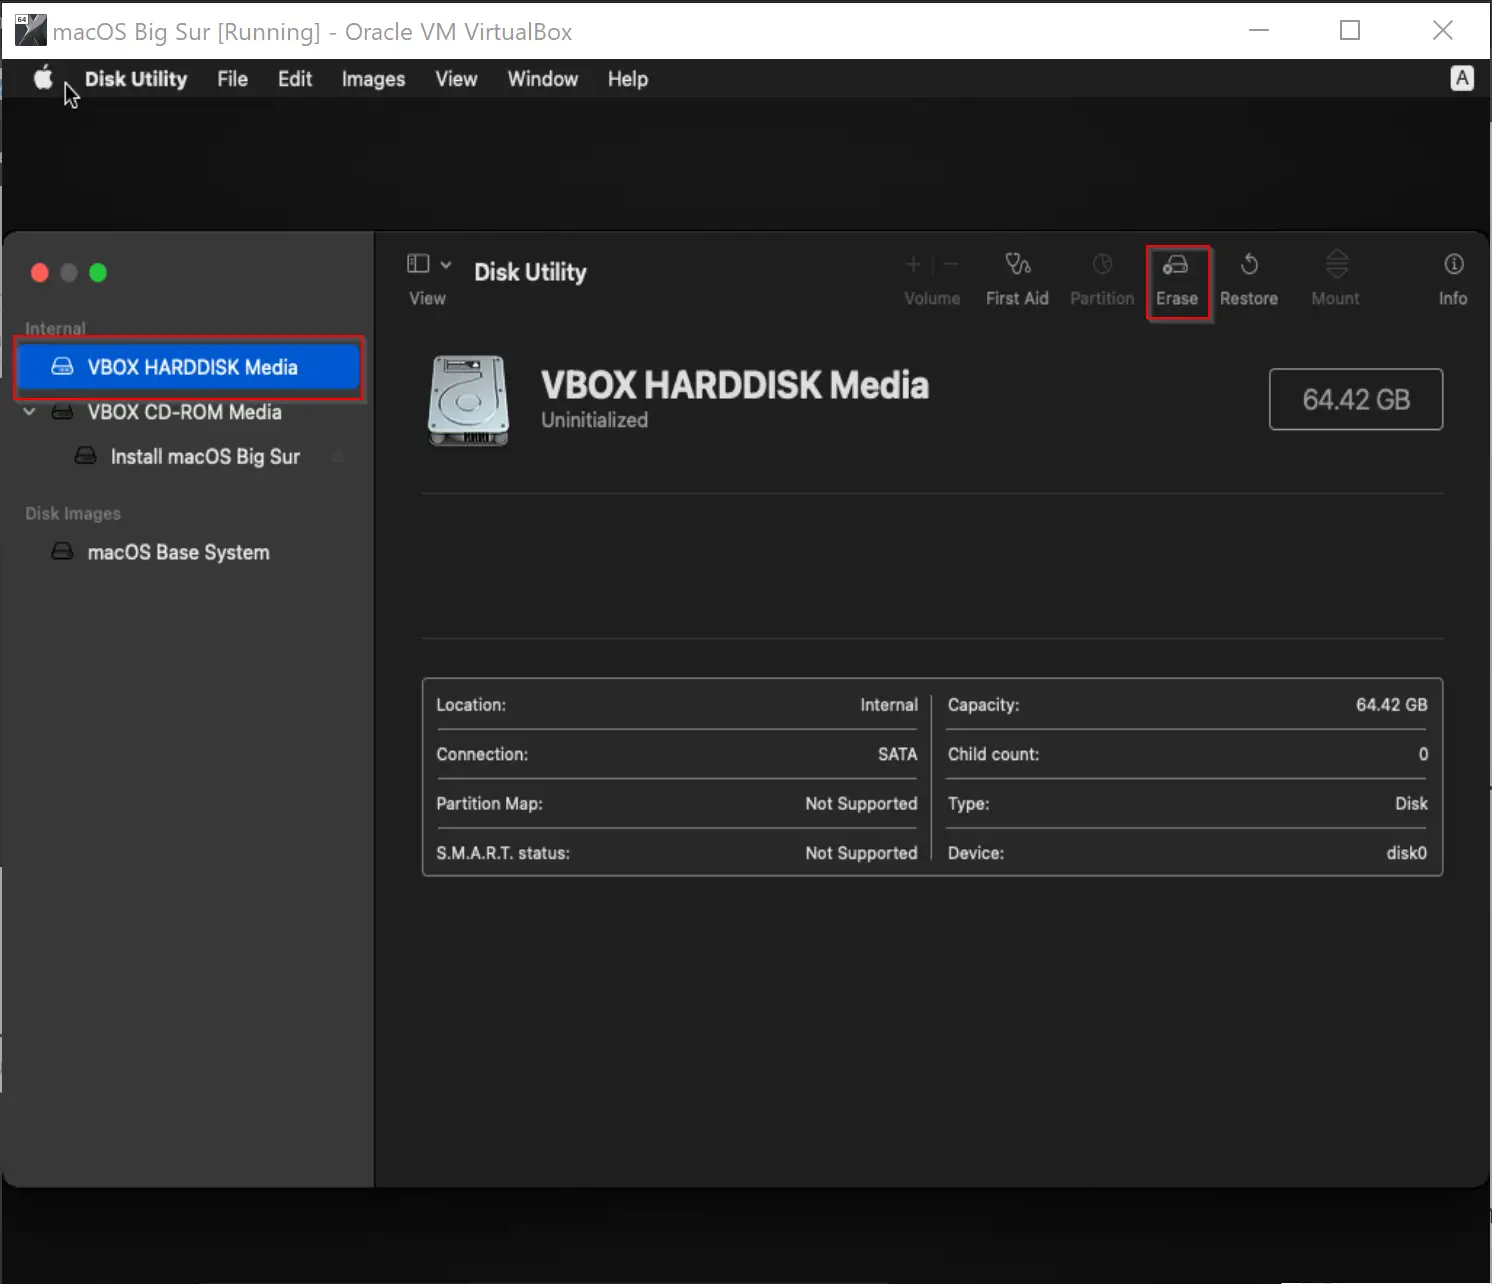
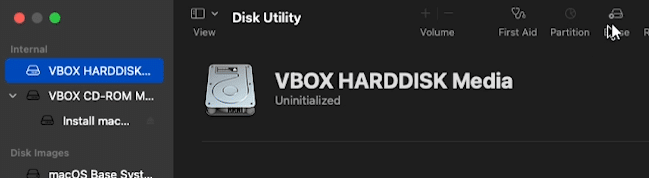
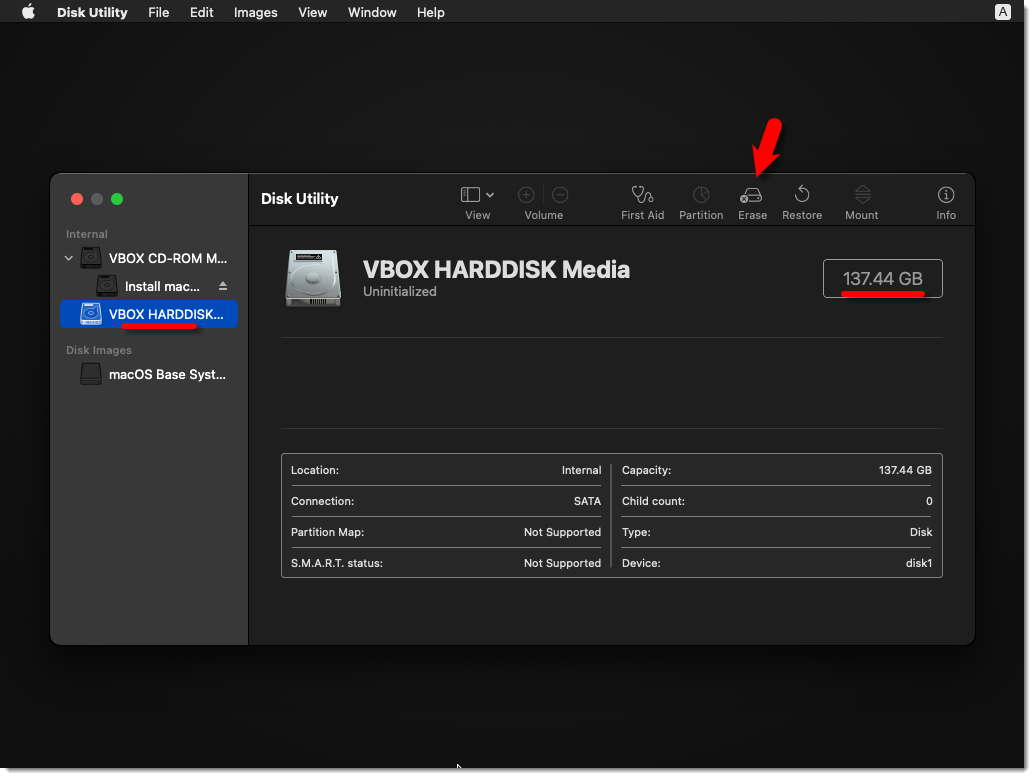
Step 23. Select VBOX HARDDISK Media from the left sidebar and click the Erase option.
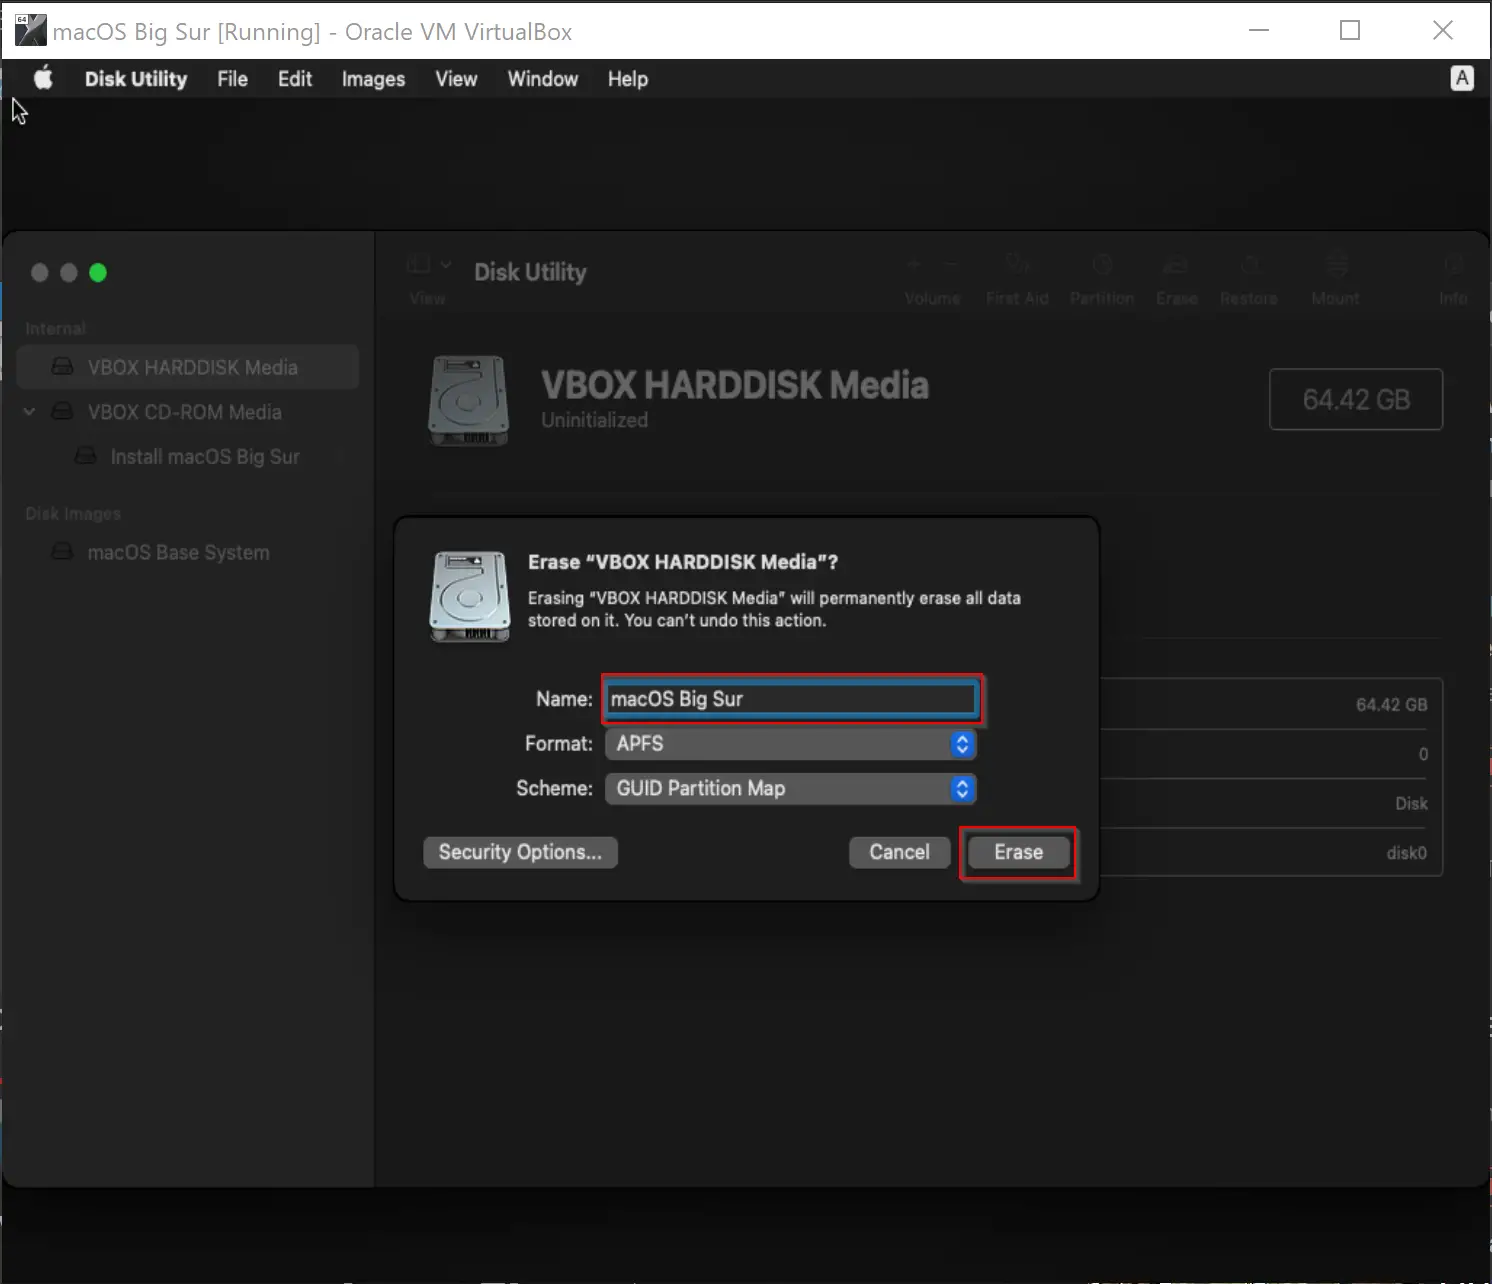
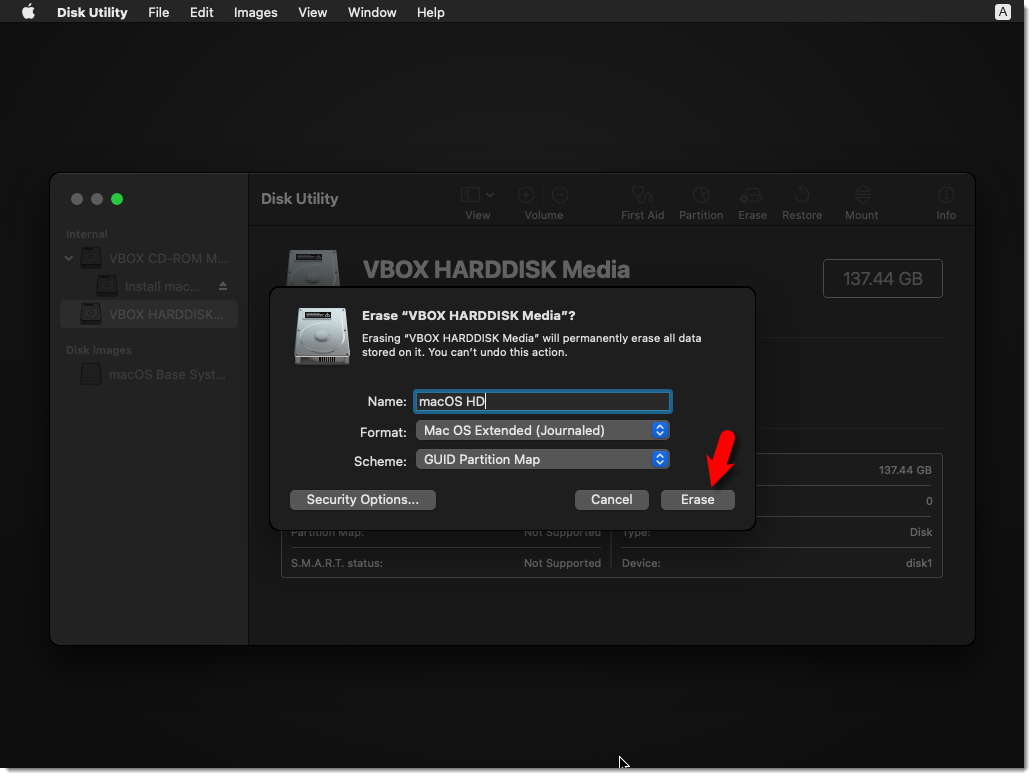
Step 24. Name the hard disk as macOS Big Sur and click the Erase button.
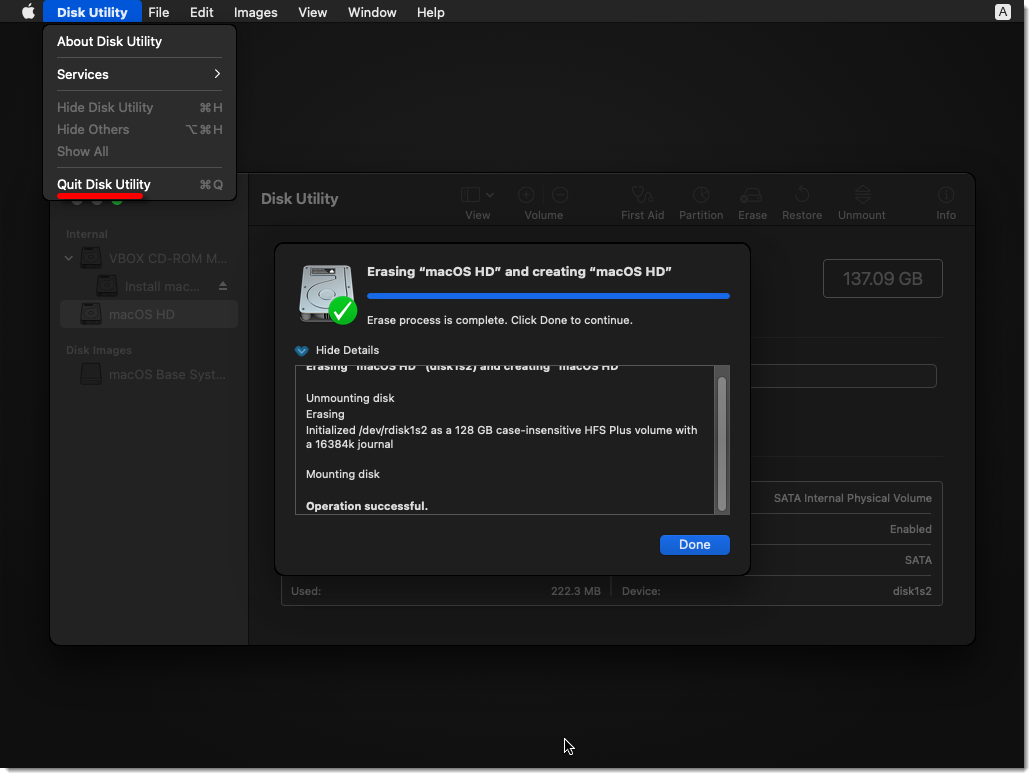
Step 25. Click the Done button when the hard disk is erased.

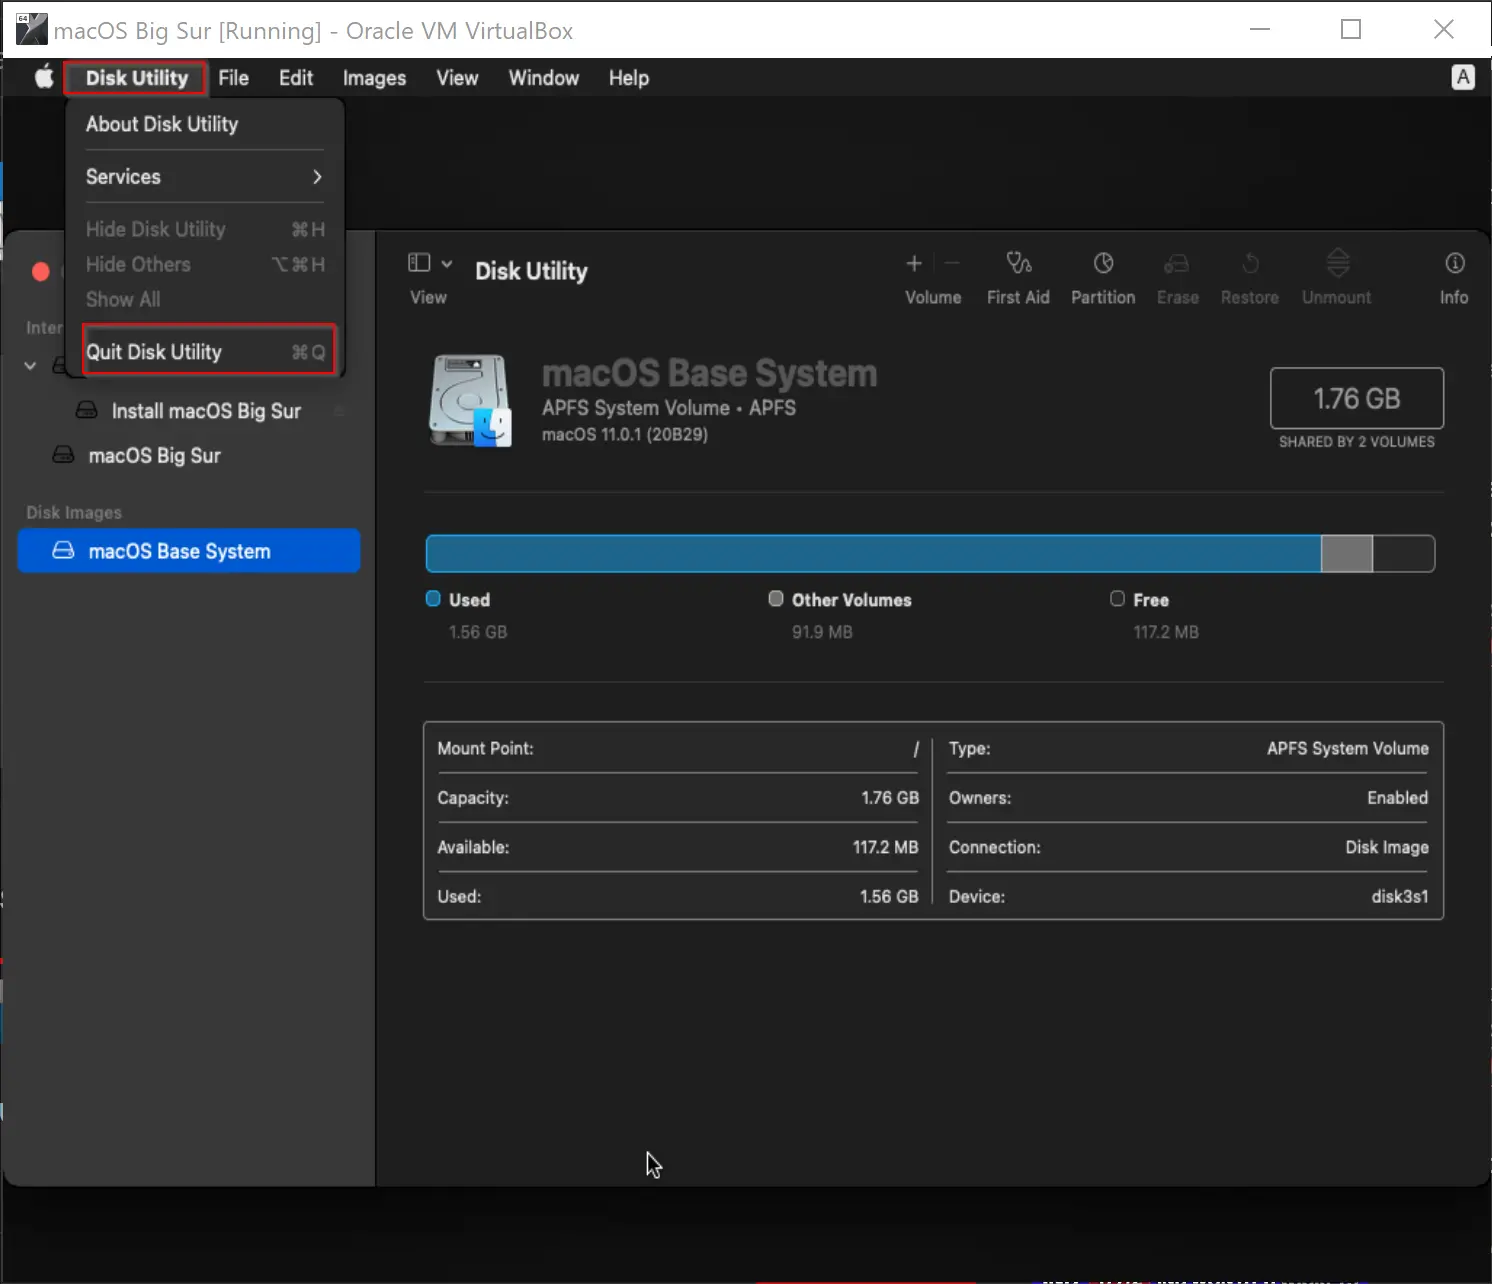
Step 26. Now, select Disk Utility from the menu and click the Quit Disk Utility option.
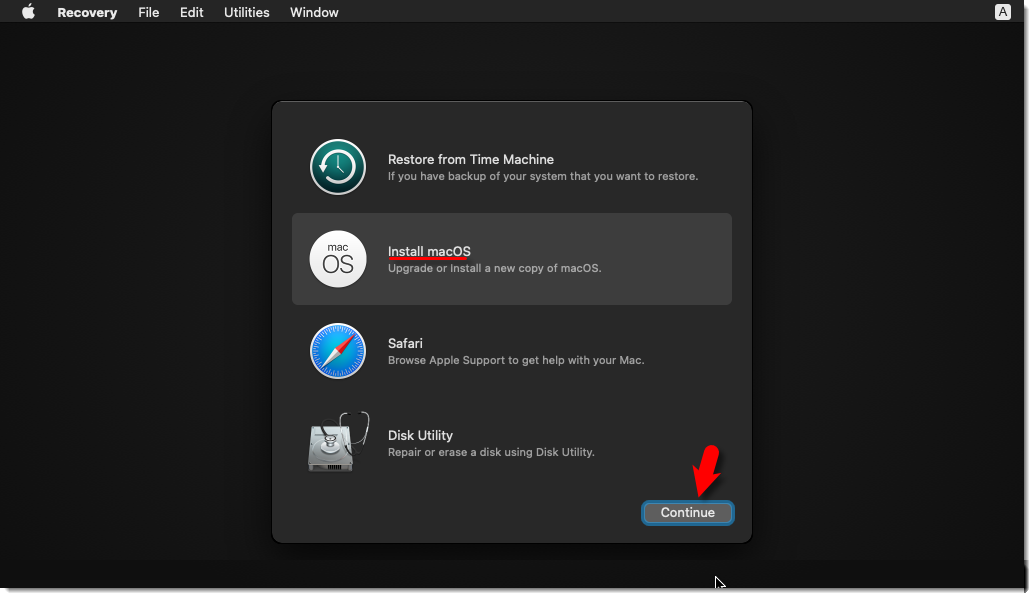
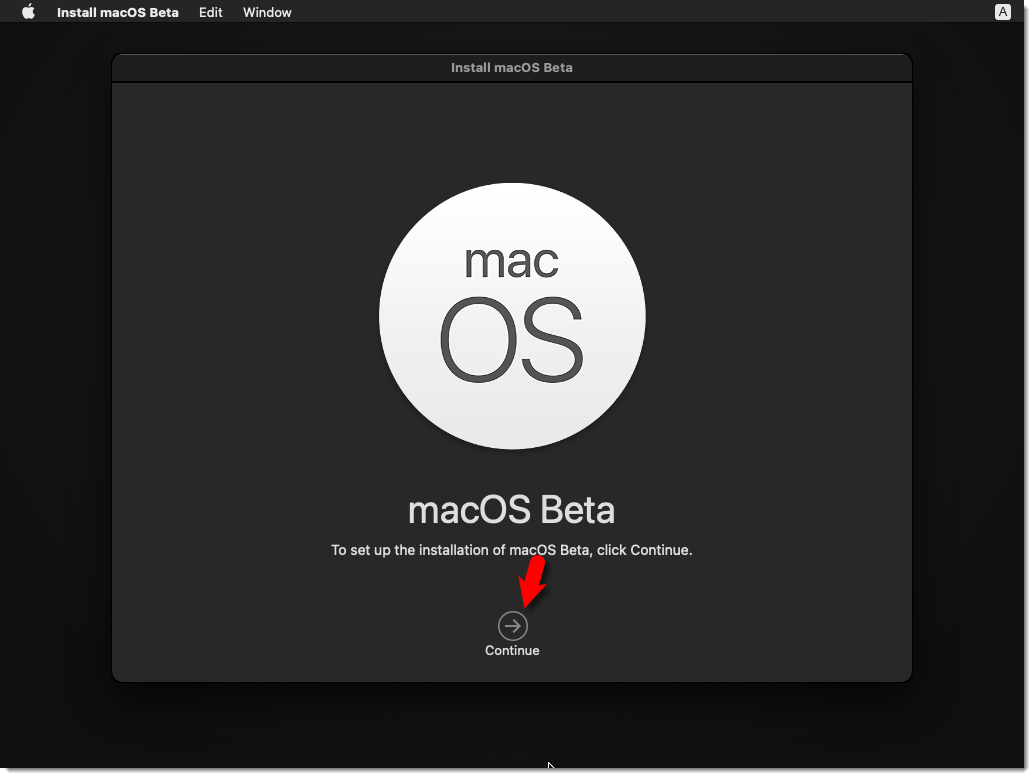
Step 27. Select Install macOS Big Sur option.

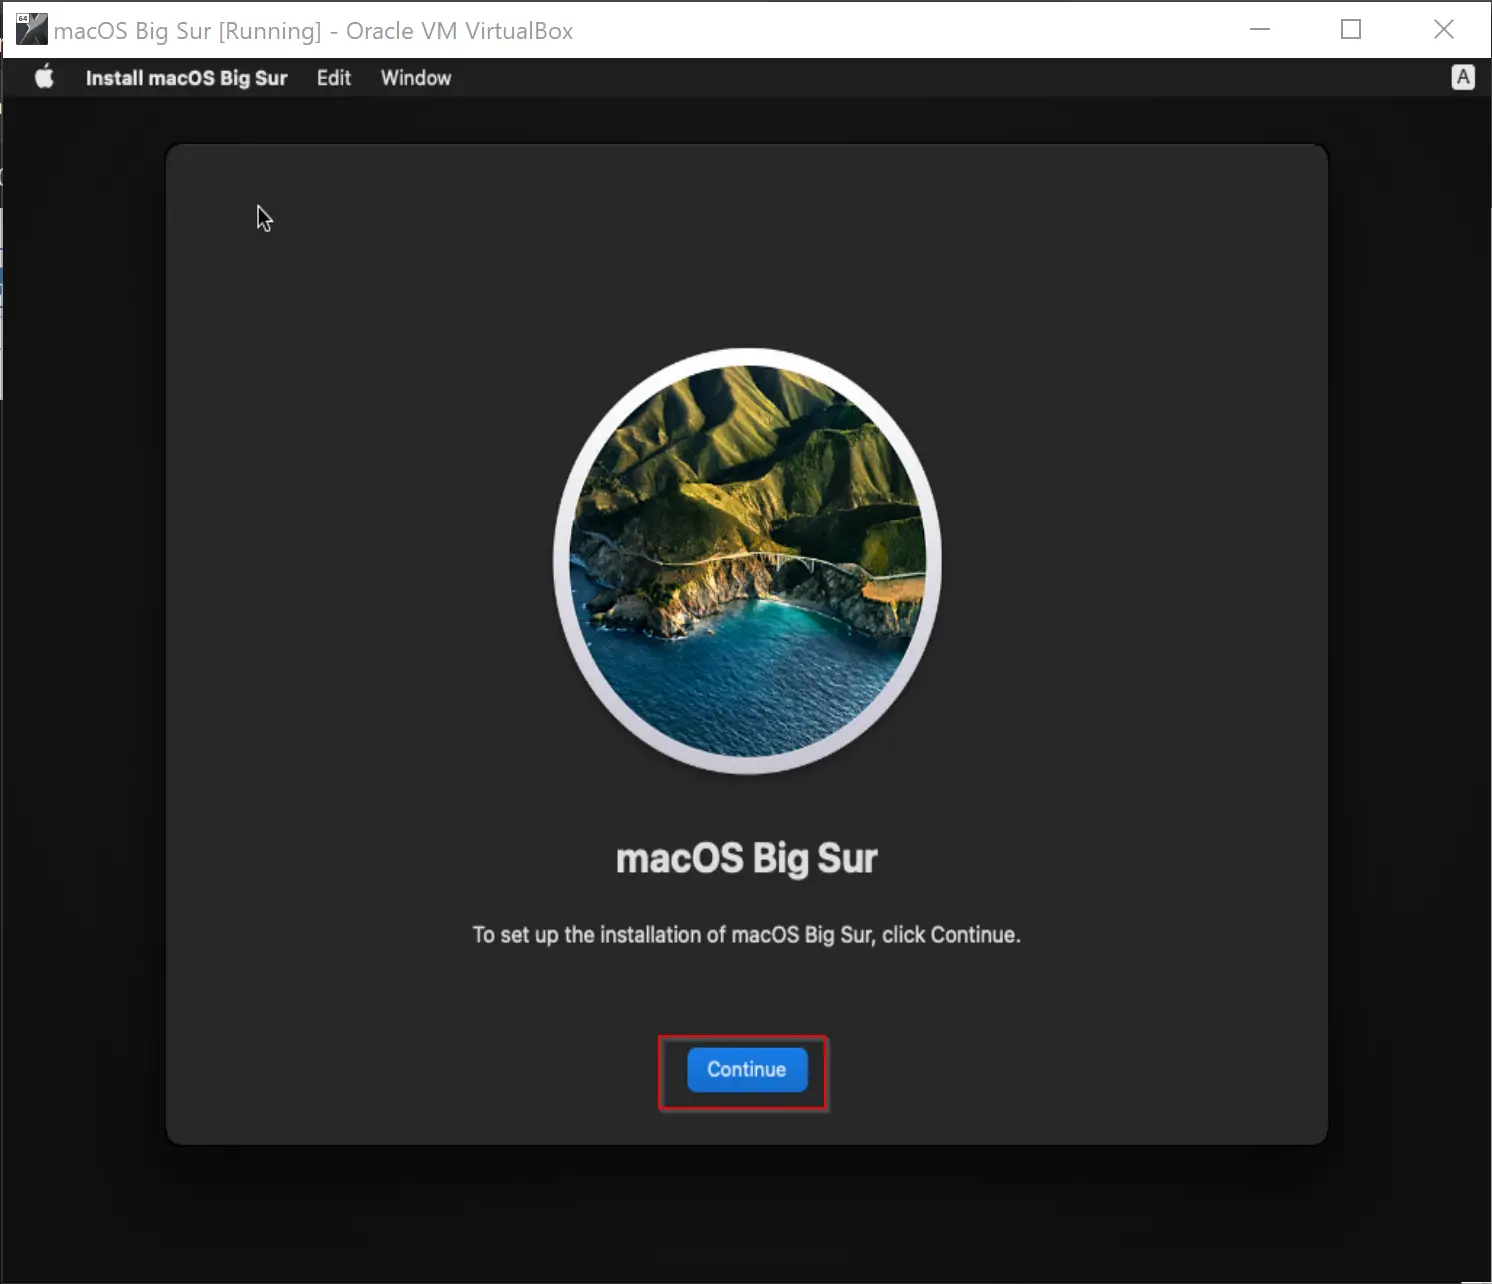
Step 28. Click the Continue button.
Step 29. Again click the Continue button.
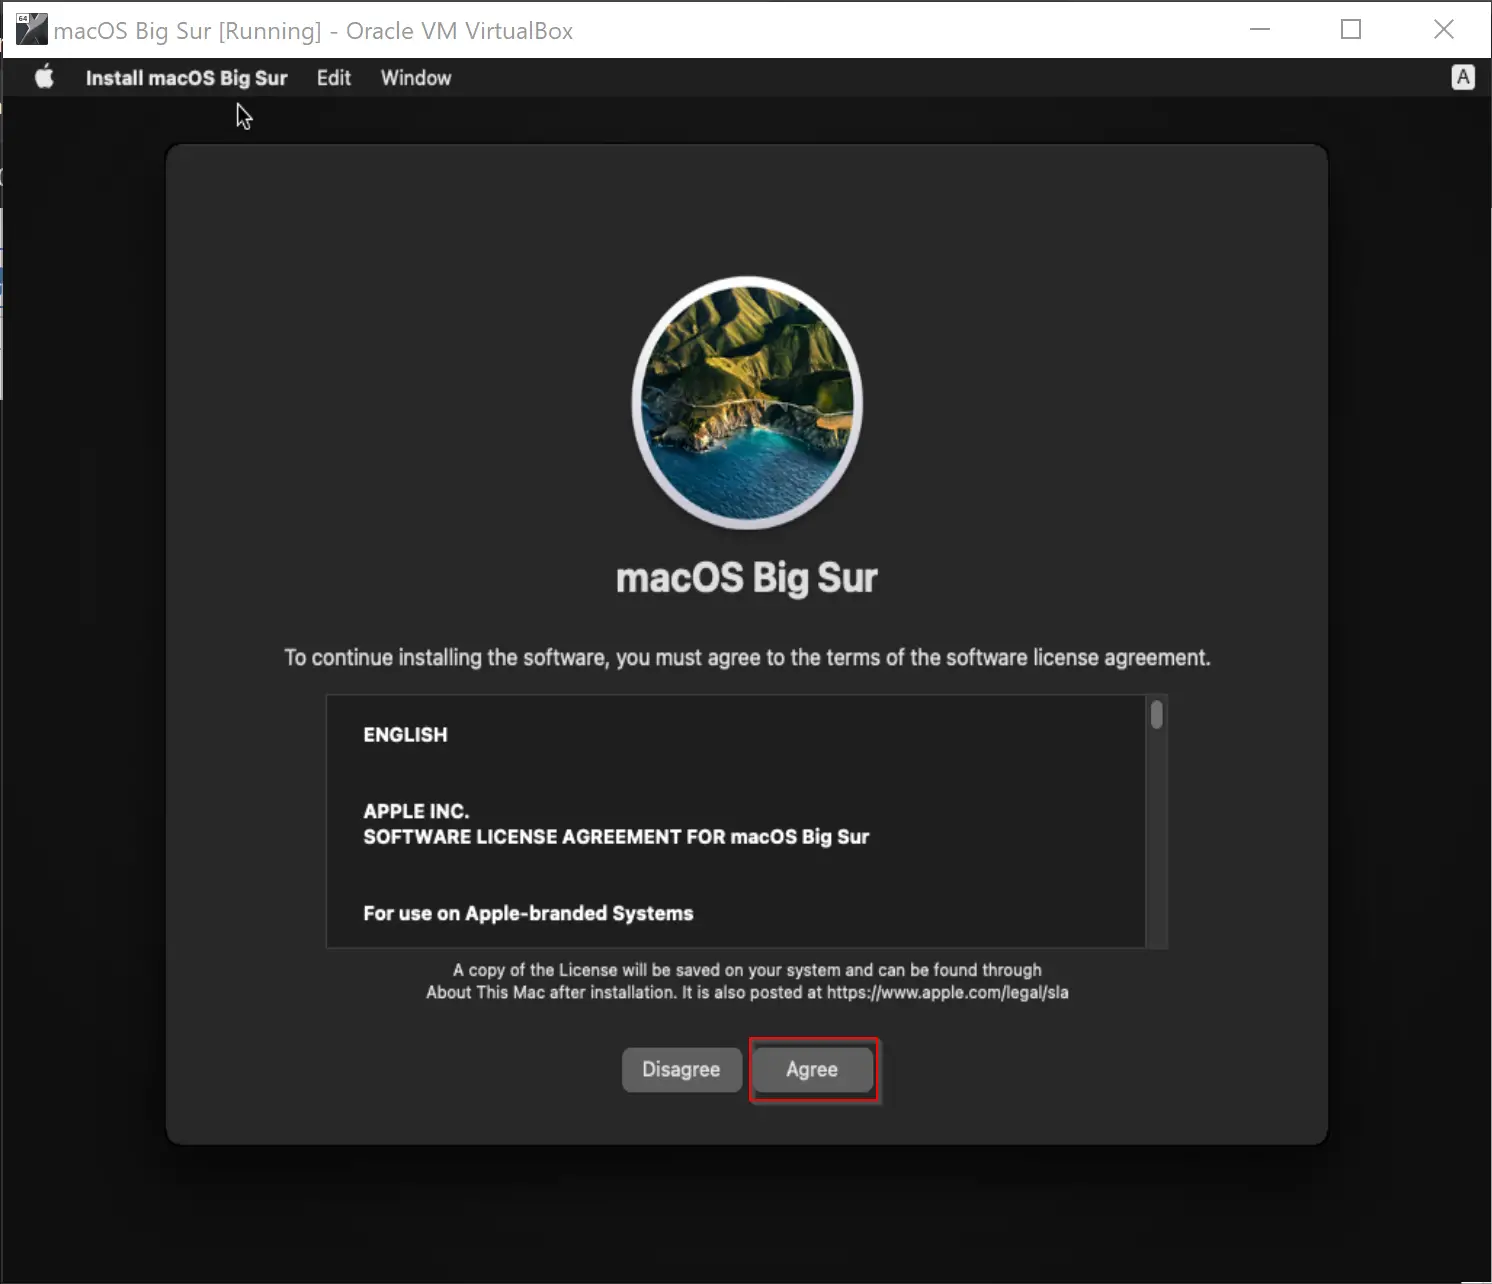
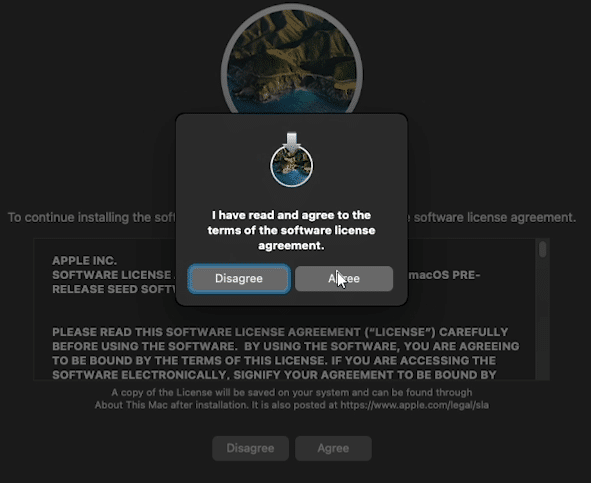
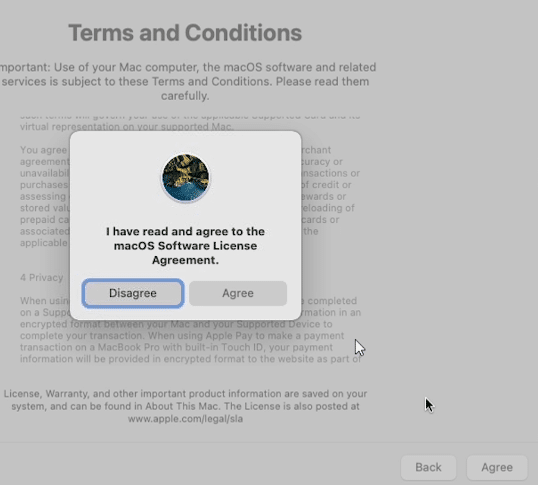
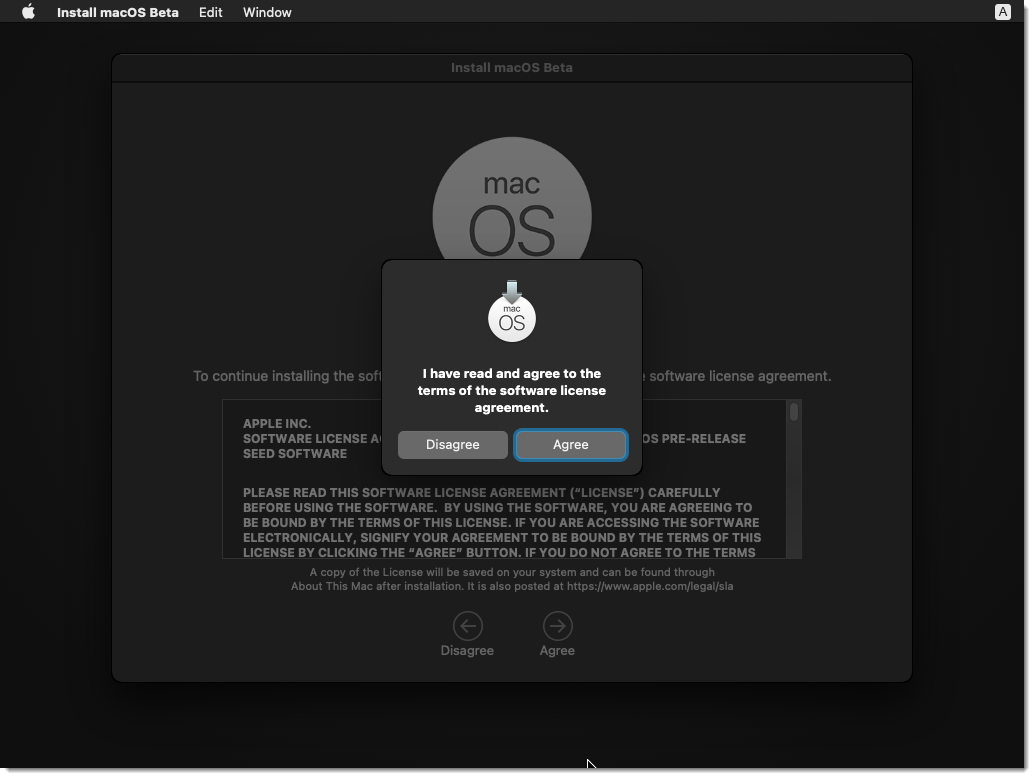
Step 30. On the license agreement page, select the Agree button.
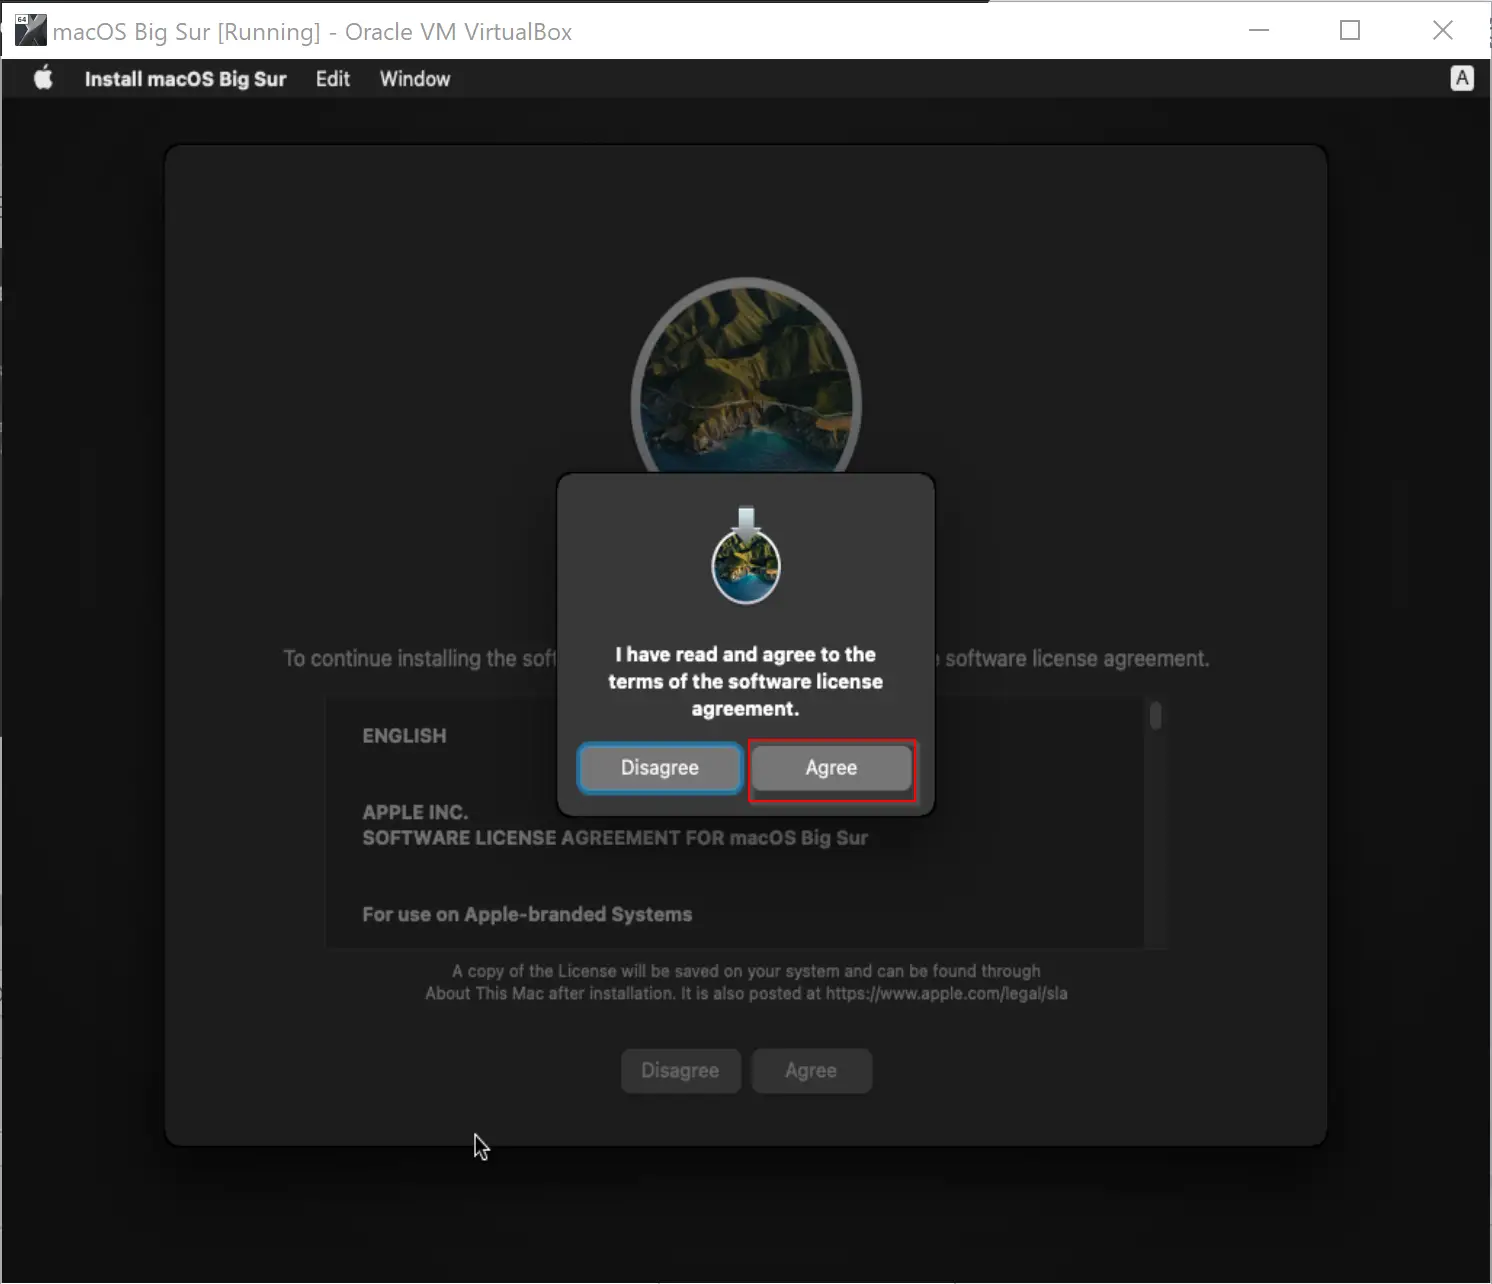
Step 31. Again click Agree on the pop-up window.
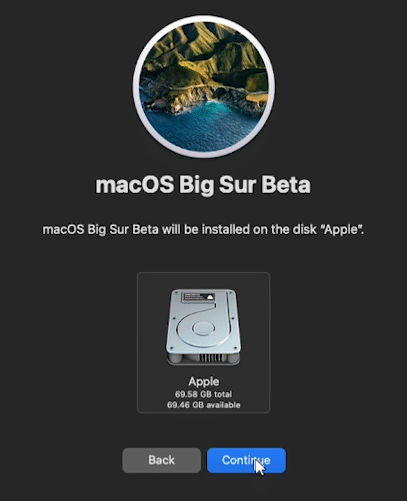
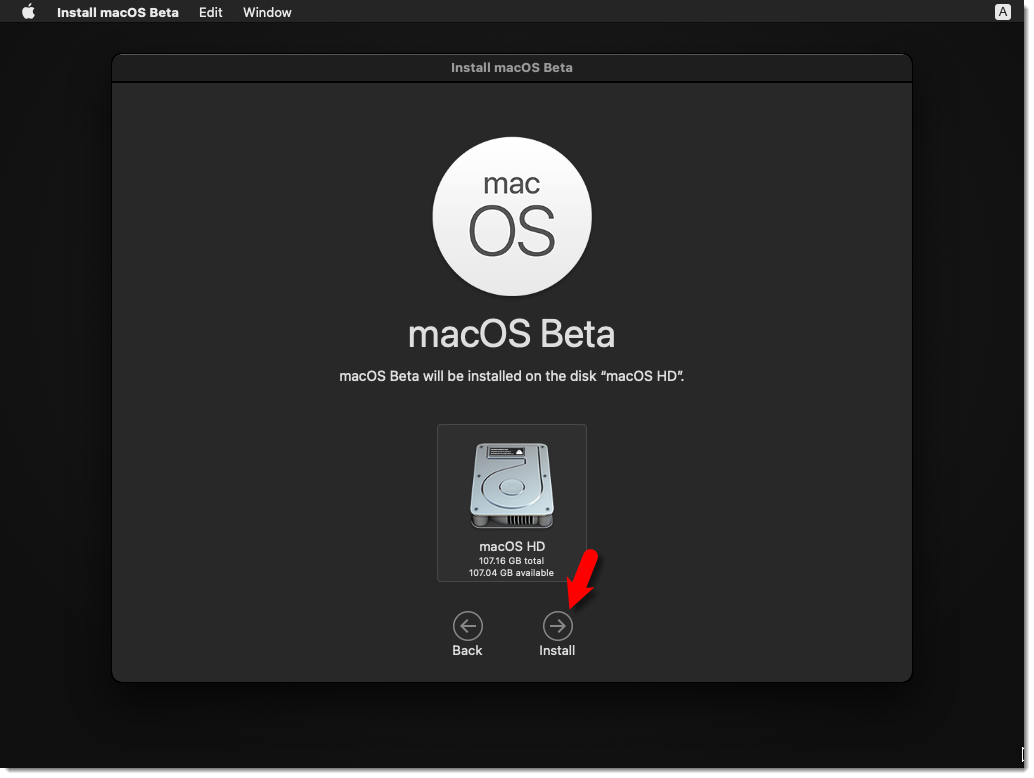
Step 32. Select the hard disk and then click the Continue button.
Step 33. Now macOS Big Sur will start installing on your Windows machine. It may take several minutes, depending on the resources you have provided in the virtual box. Furthermore, note that during the installation period, your virtual machine may restart several times.
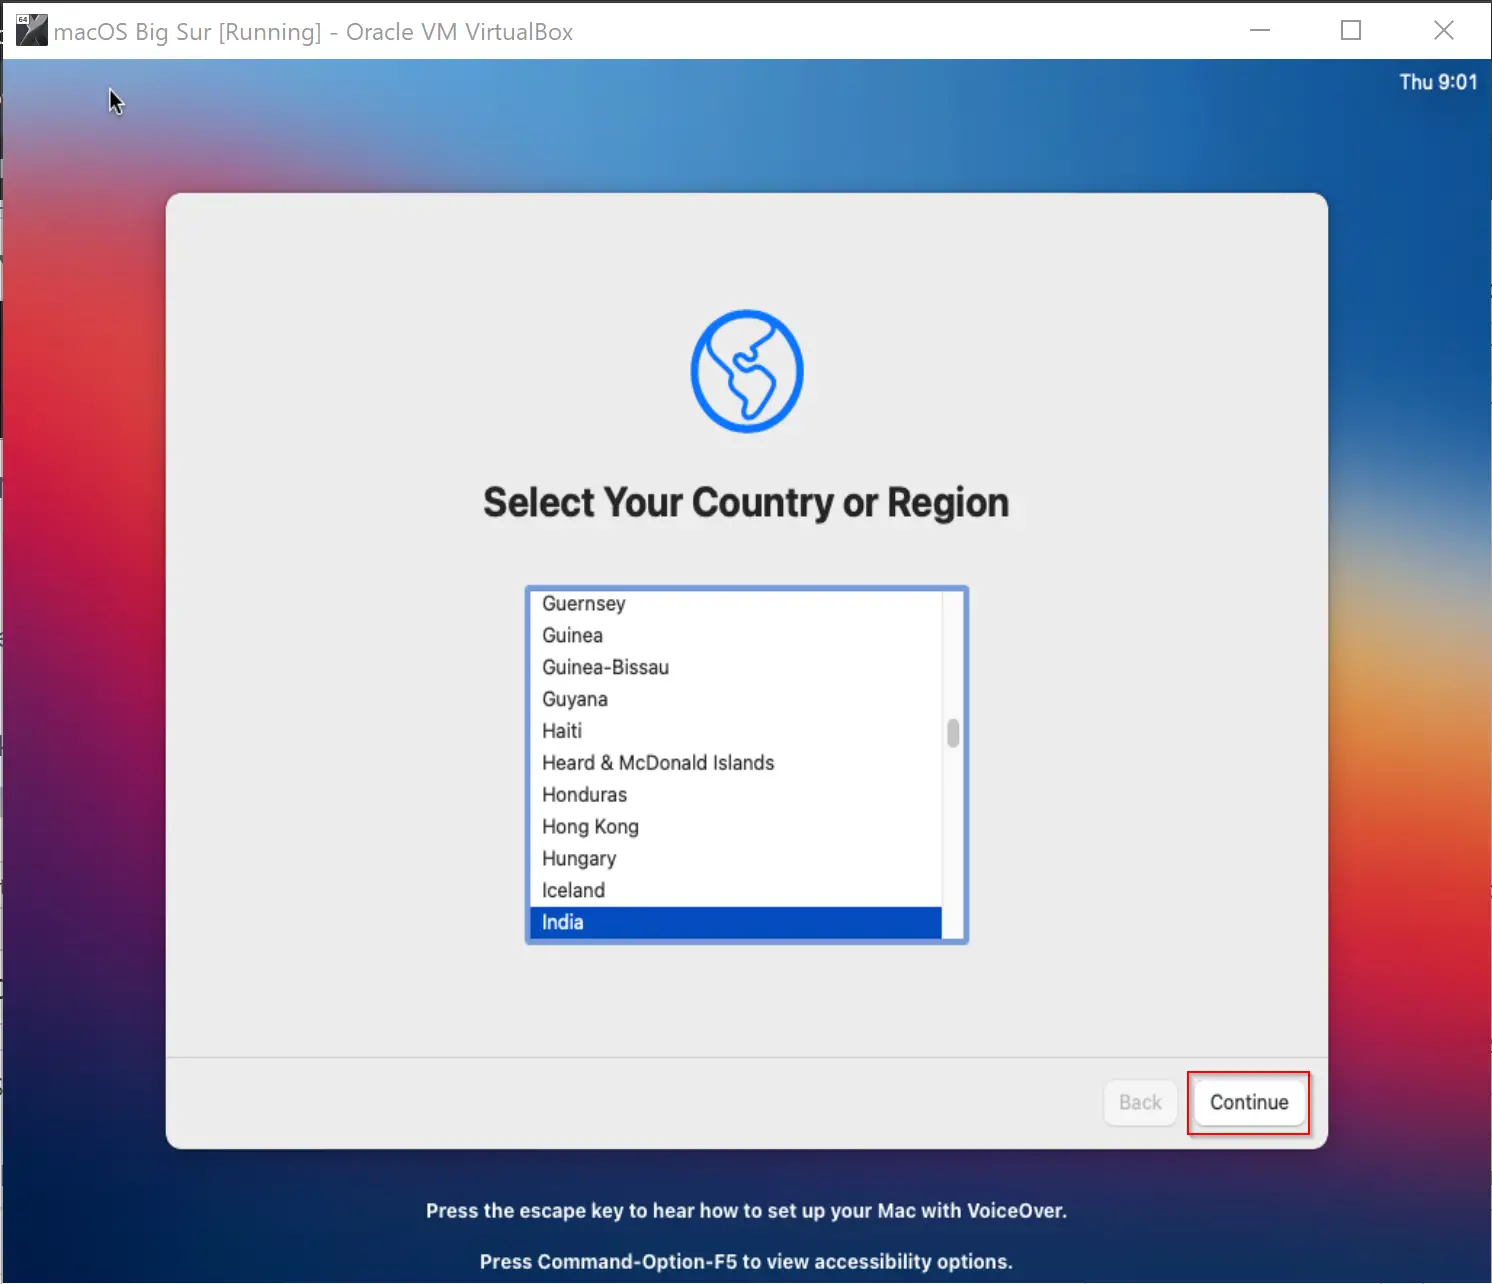
When you see “Select Your Country or Region,” click the country name from the list and click the Continue button.
Step 34. Click Continue.
Step 35. Click the Not Now button.

Step 36. On the Data & Privacy window, click the Continue button.
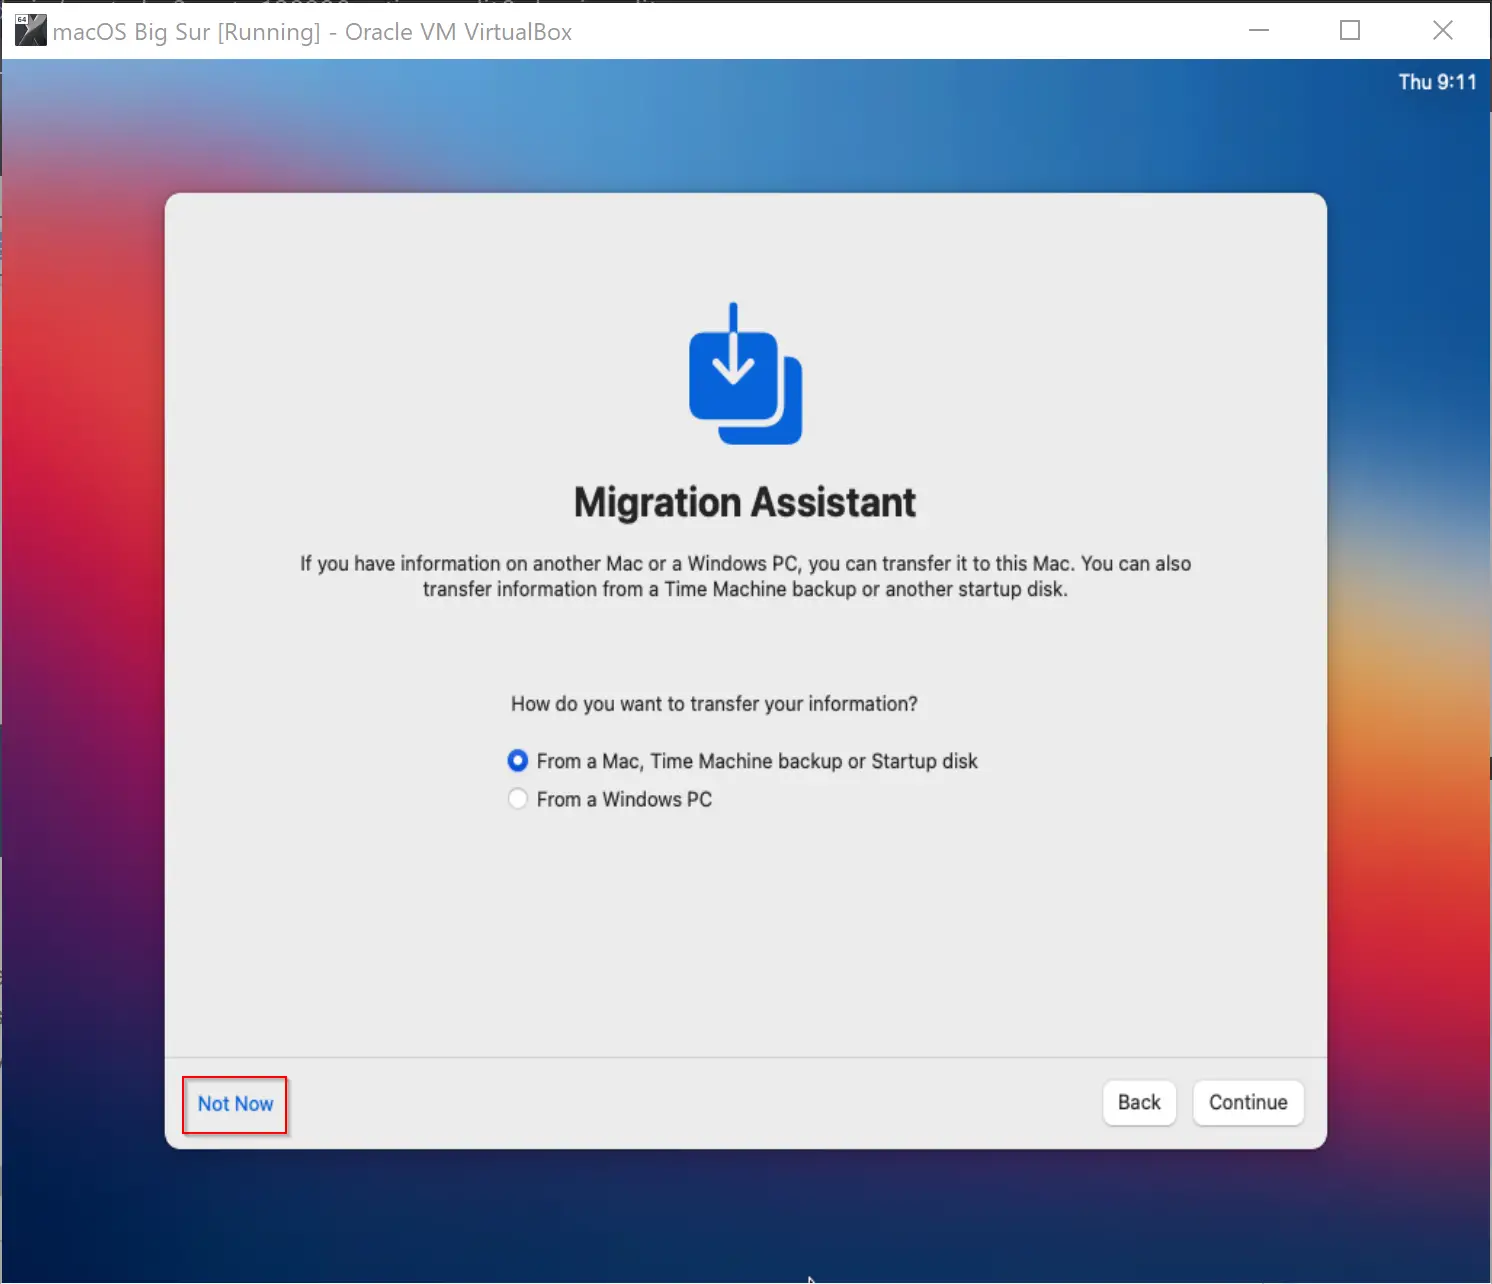
Step 37. In the Migration Assistant window, click the link Not Now.
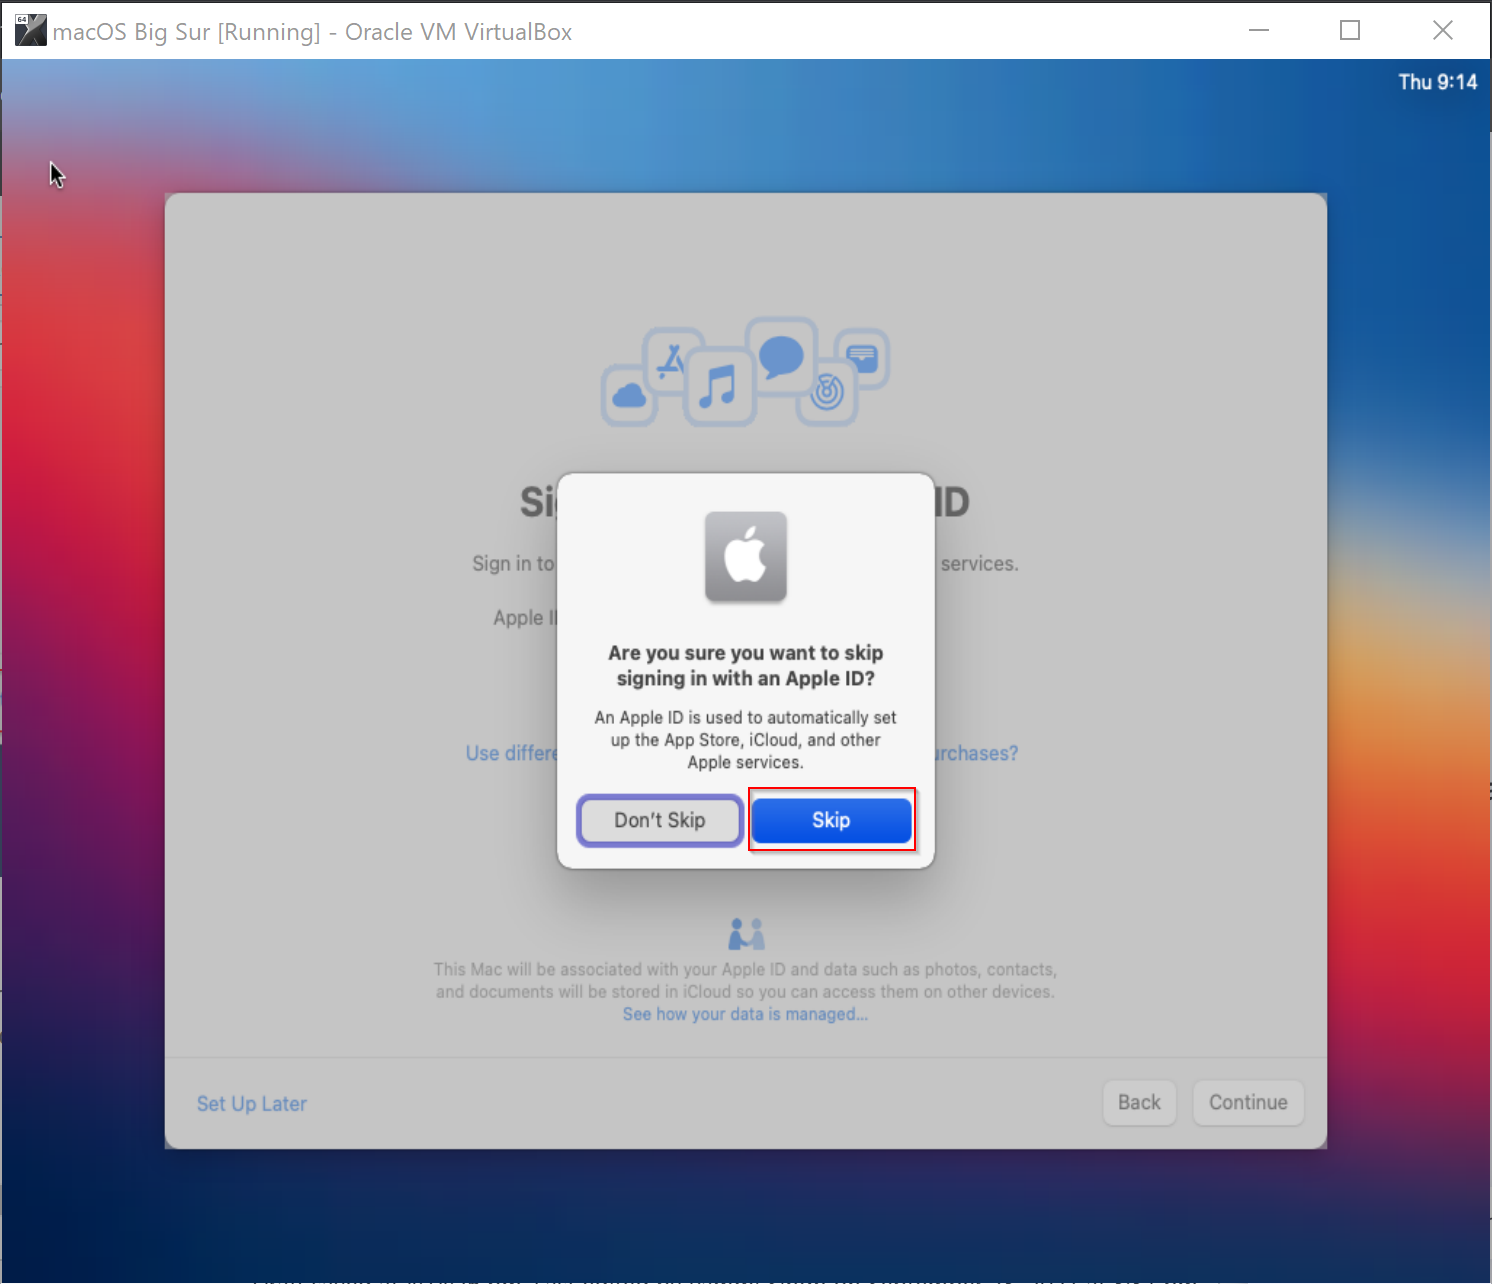
Step 38. Click the link Set Up Later.

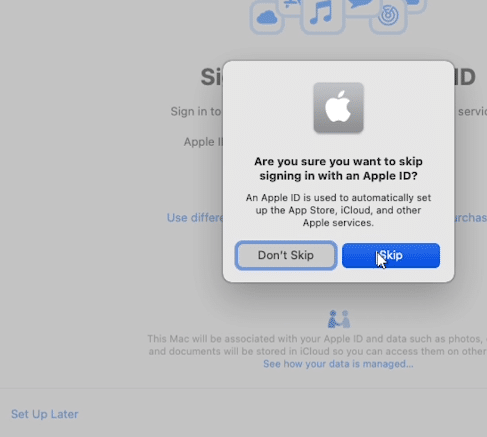
Step 39. Select Skip.
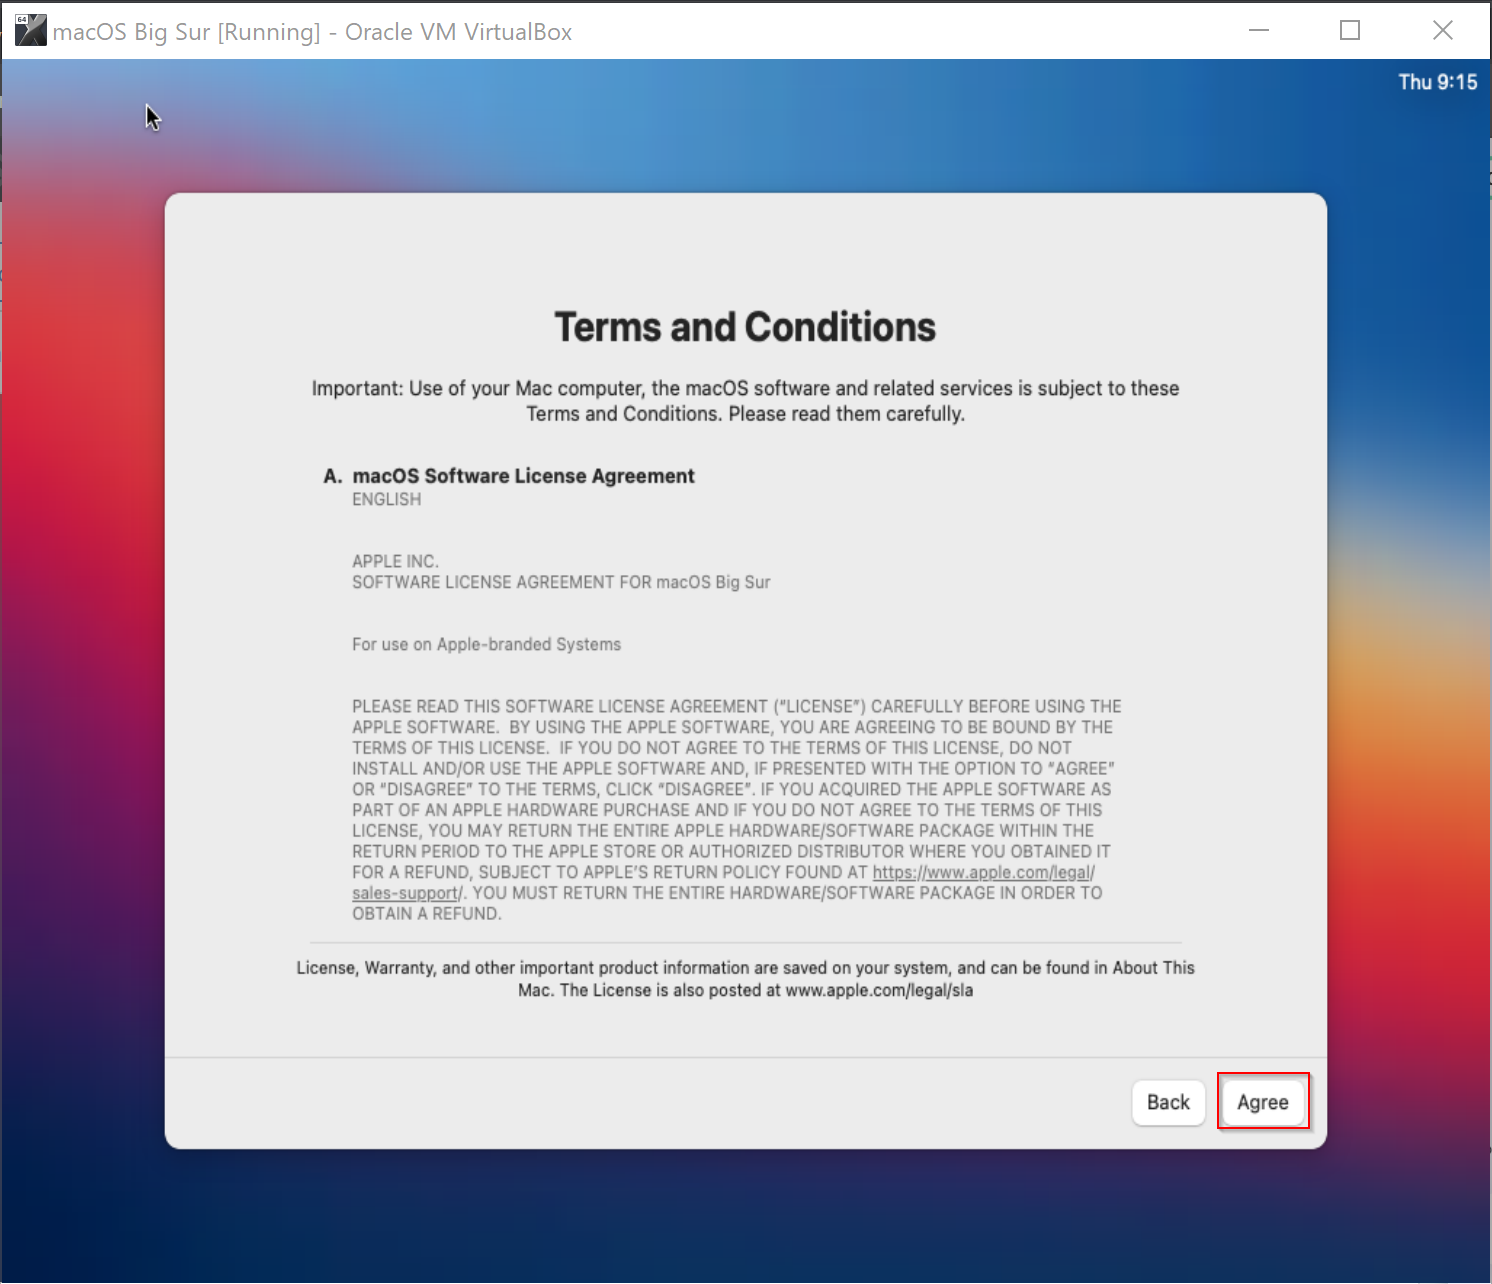
Step 40. On the Terms and Conditions window, click Agree.
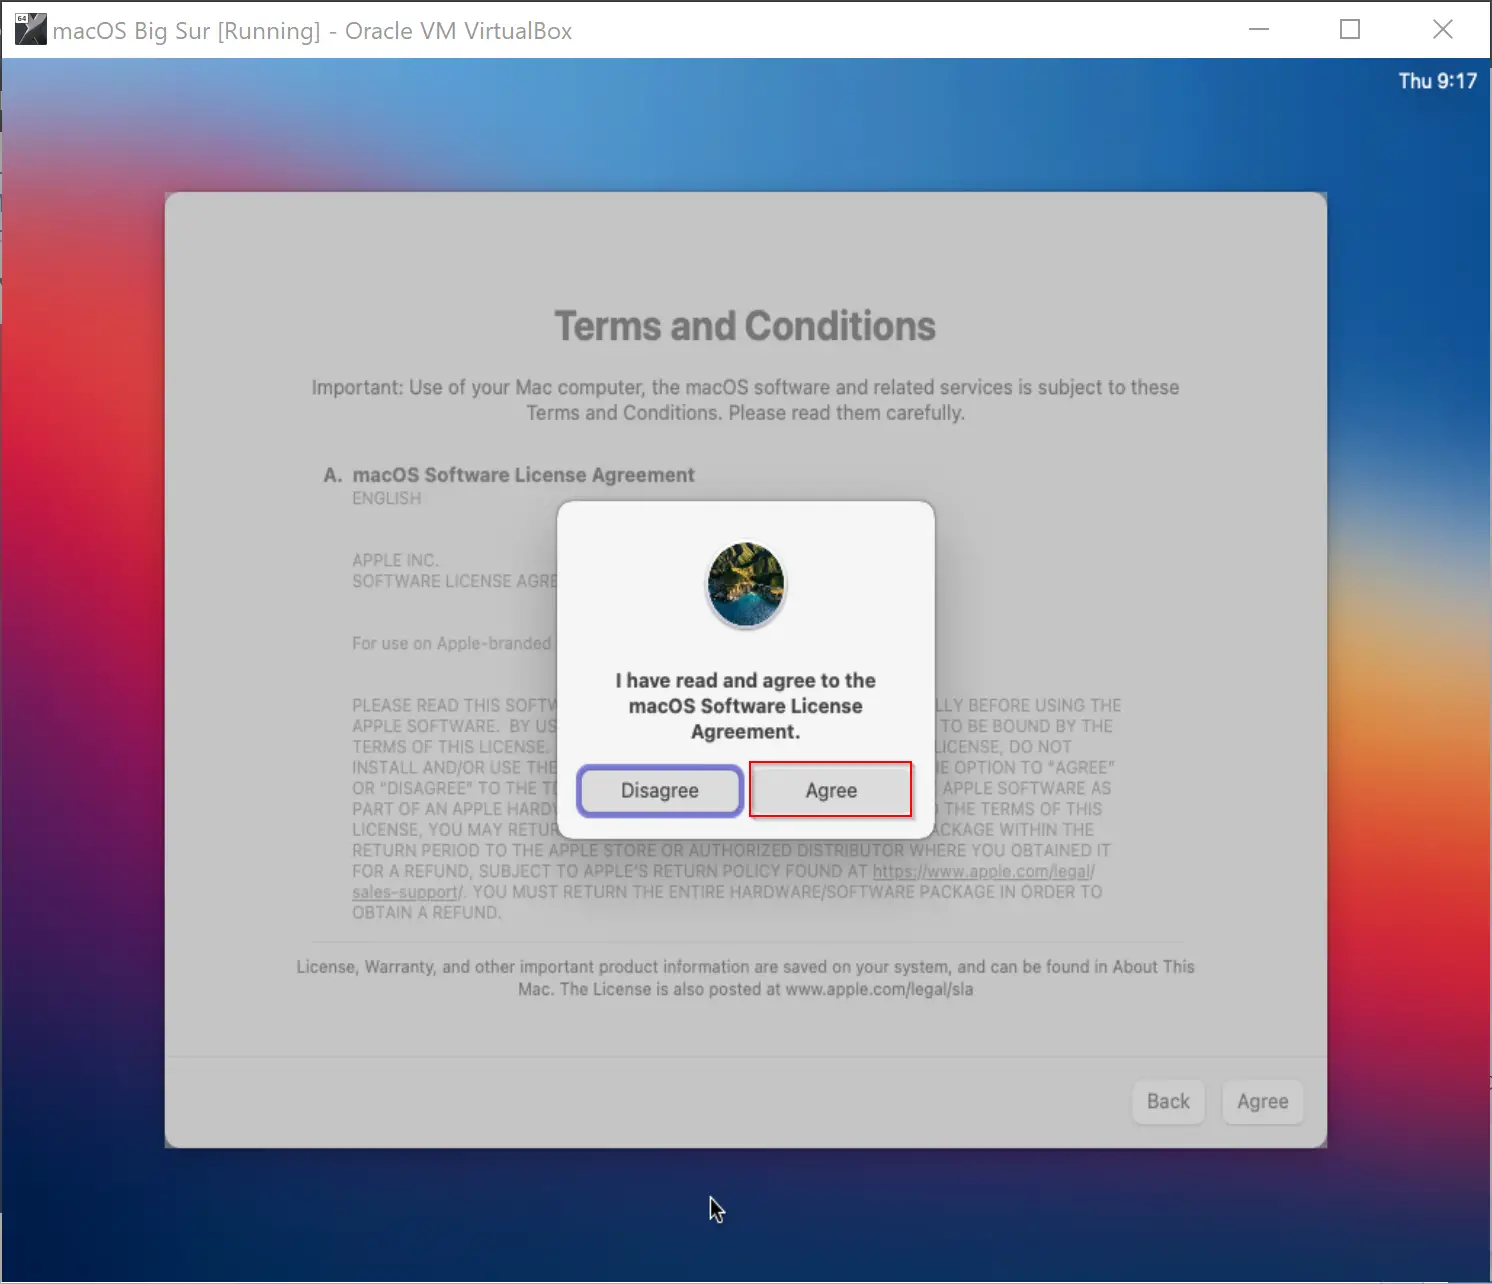
Step 41. Again click the Agree button on the pop-up window that opens.
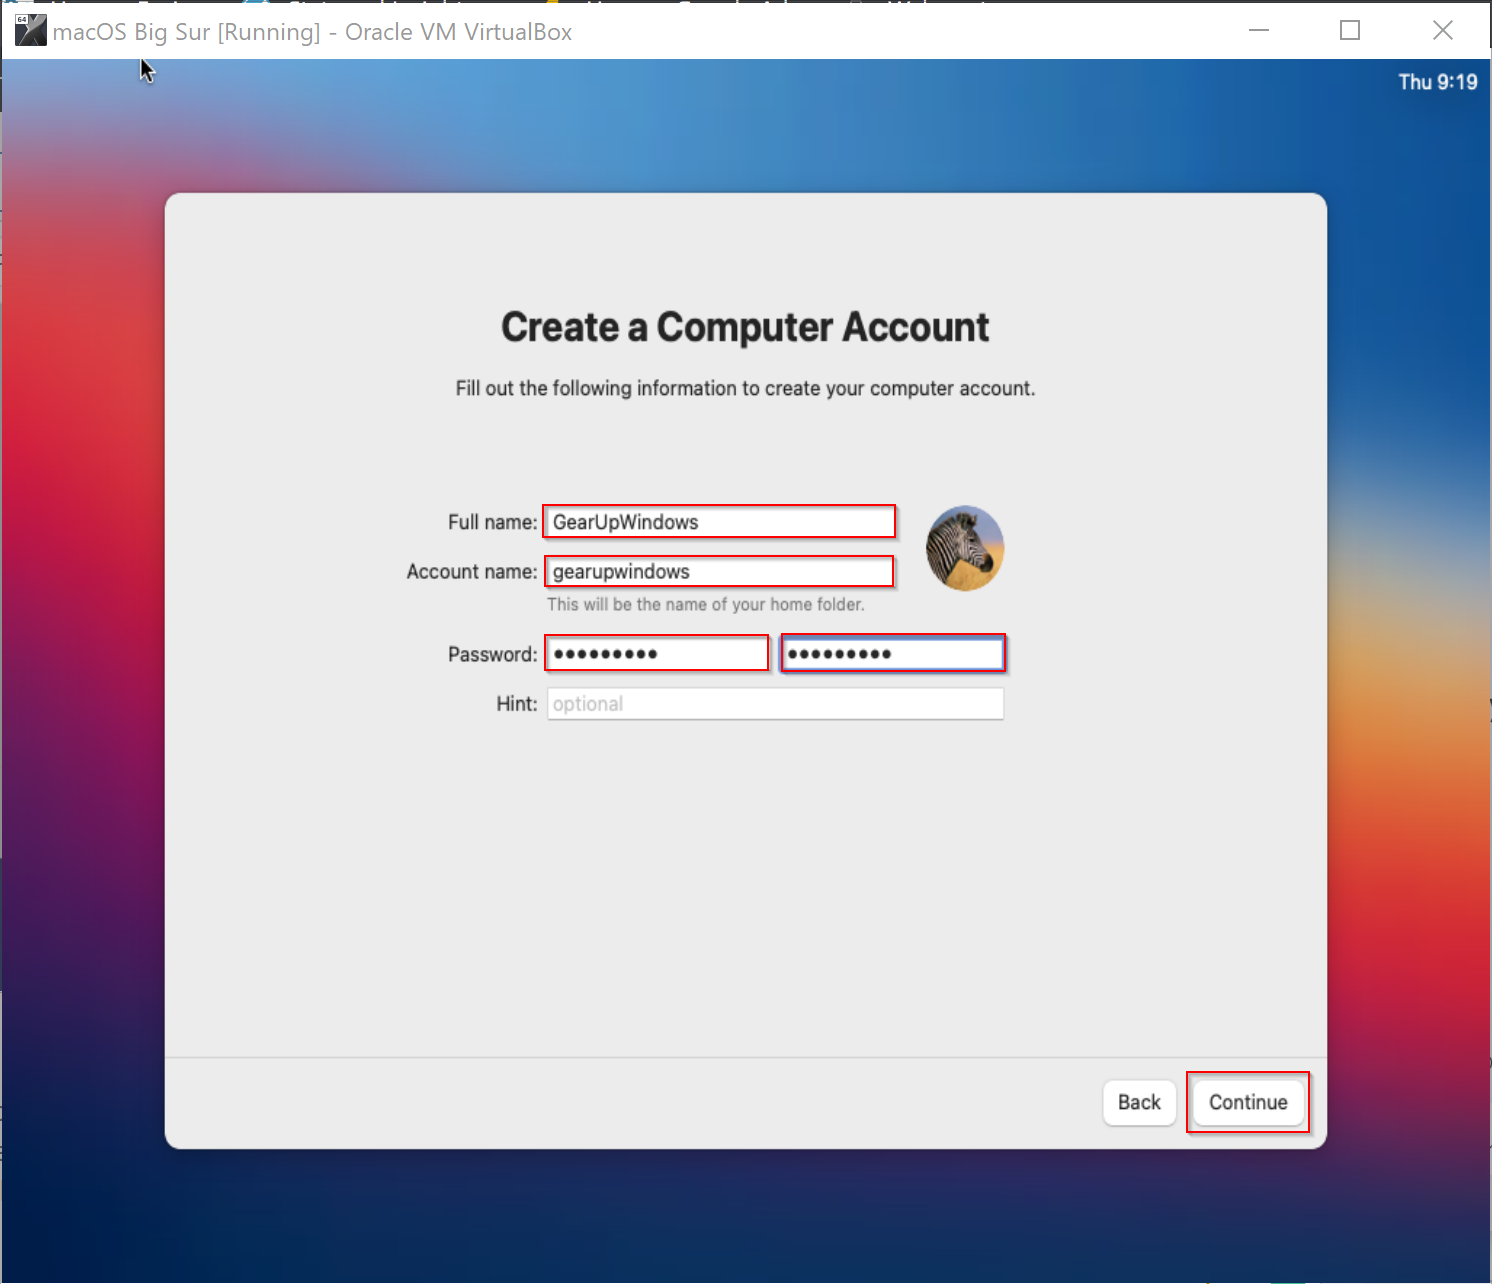
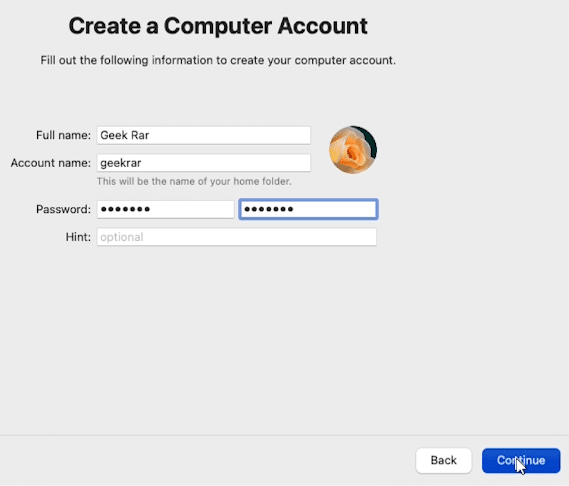
Step 42. Now fill in the full name, account name, password, and then verify the password. When done, click the Continue button.
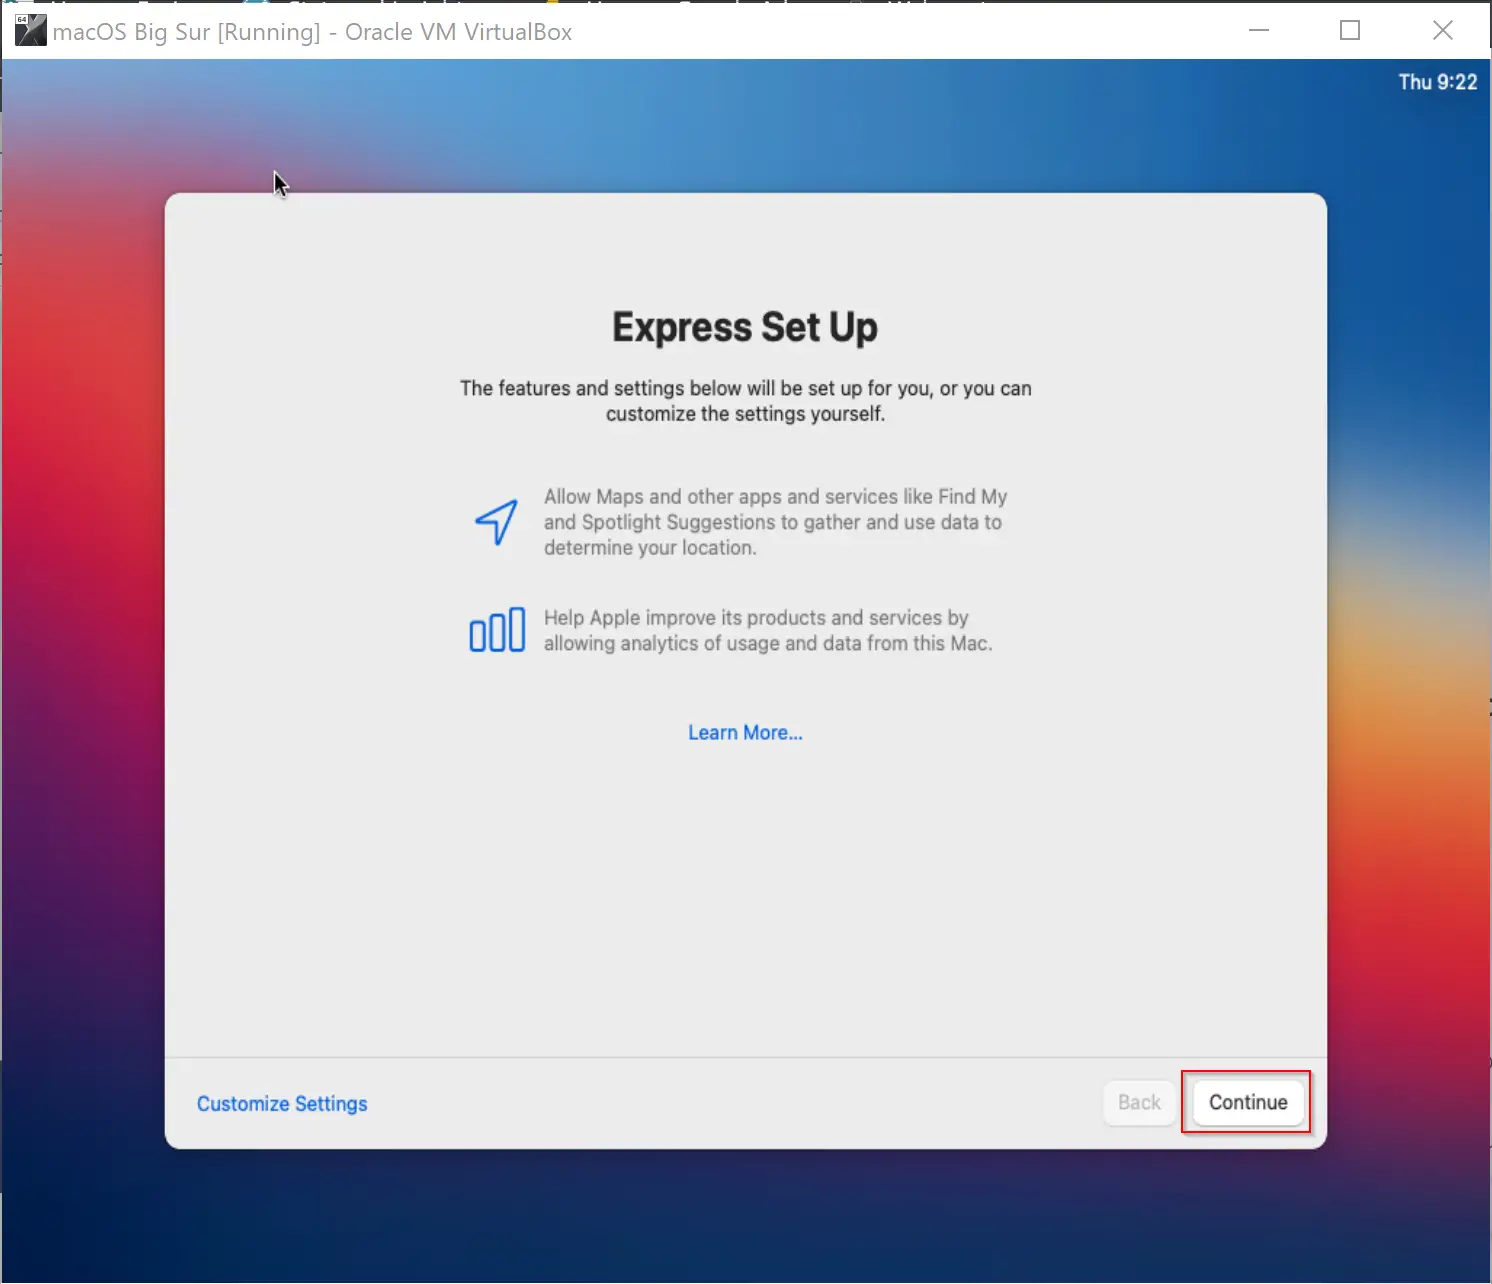
Step 43. Click the Continue button in Express Set Up.
Step 44. Click Continue on Analytics.

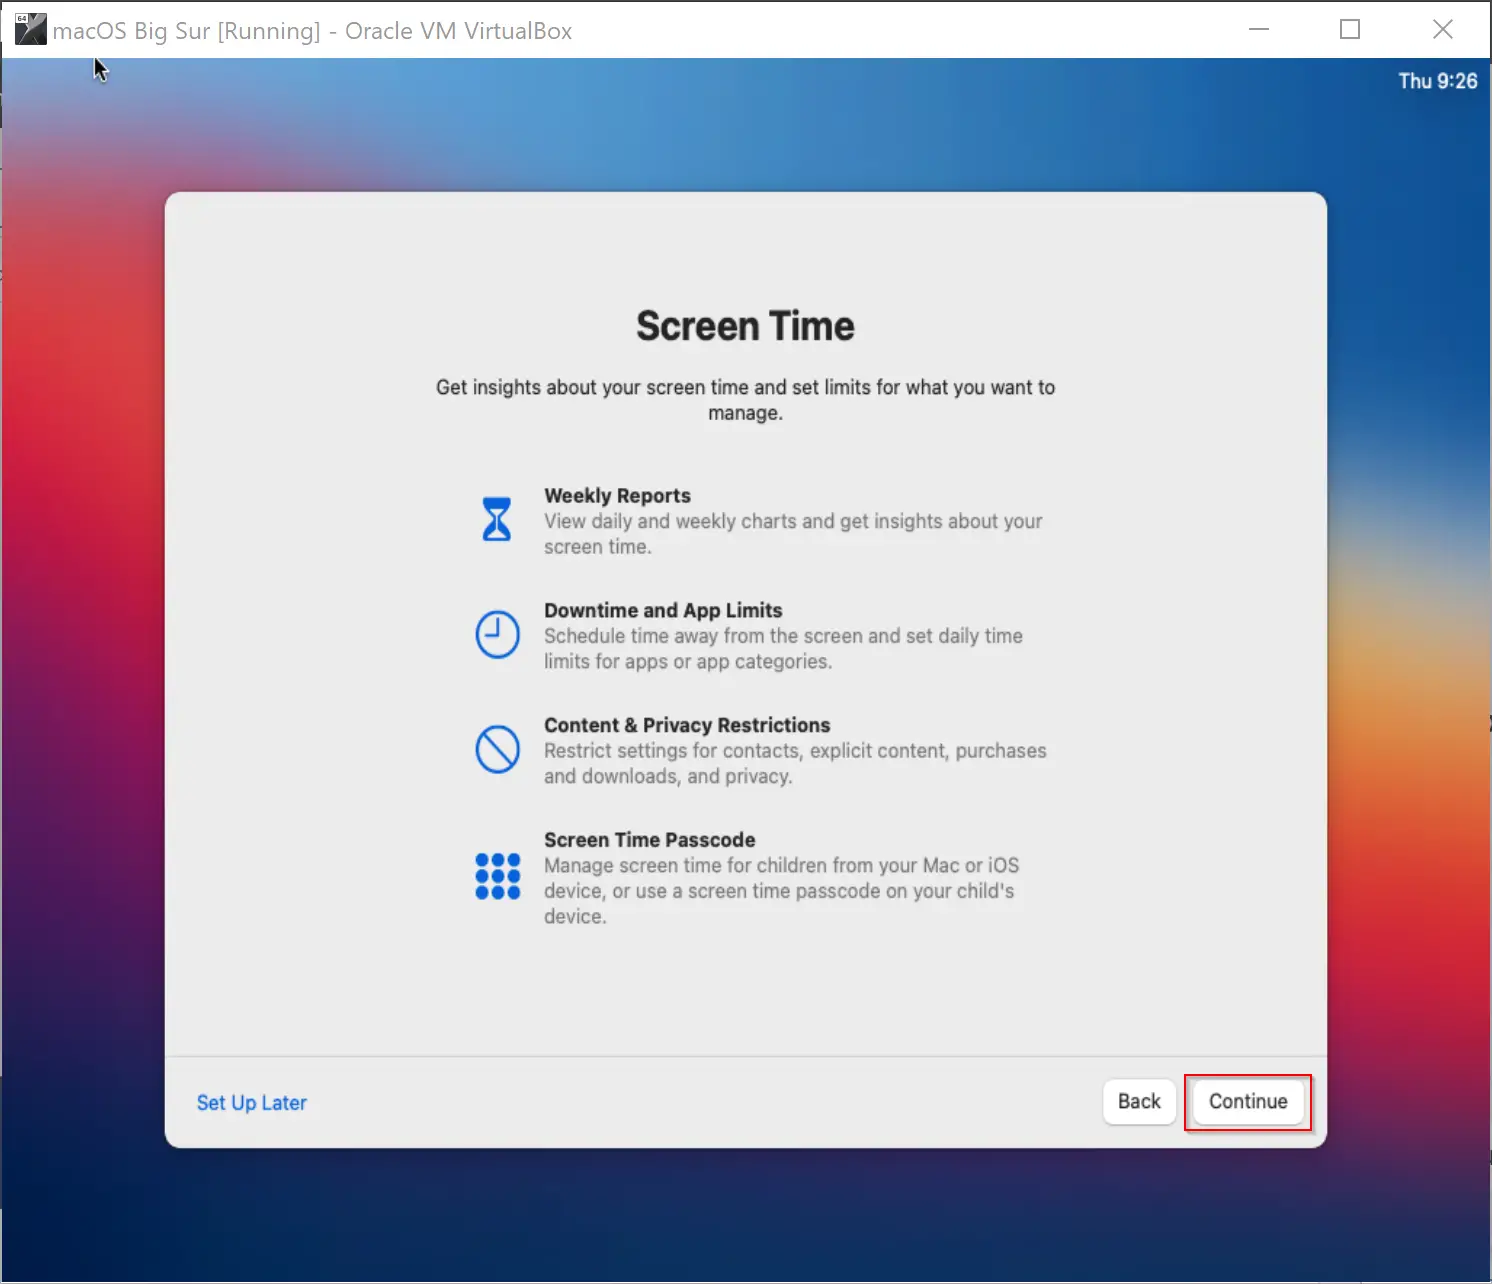
Step 45. Click Continue on the Screen Time window.
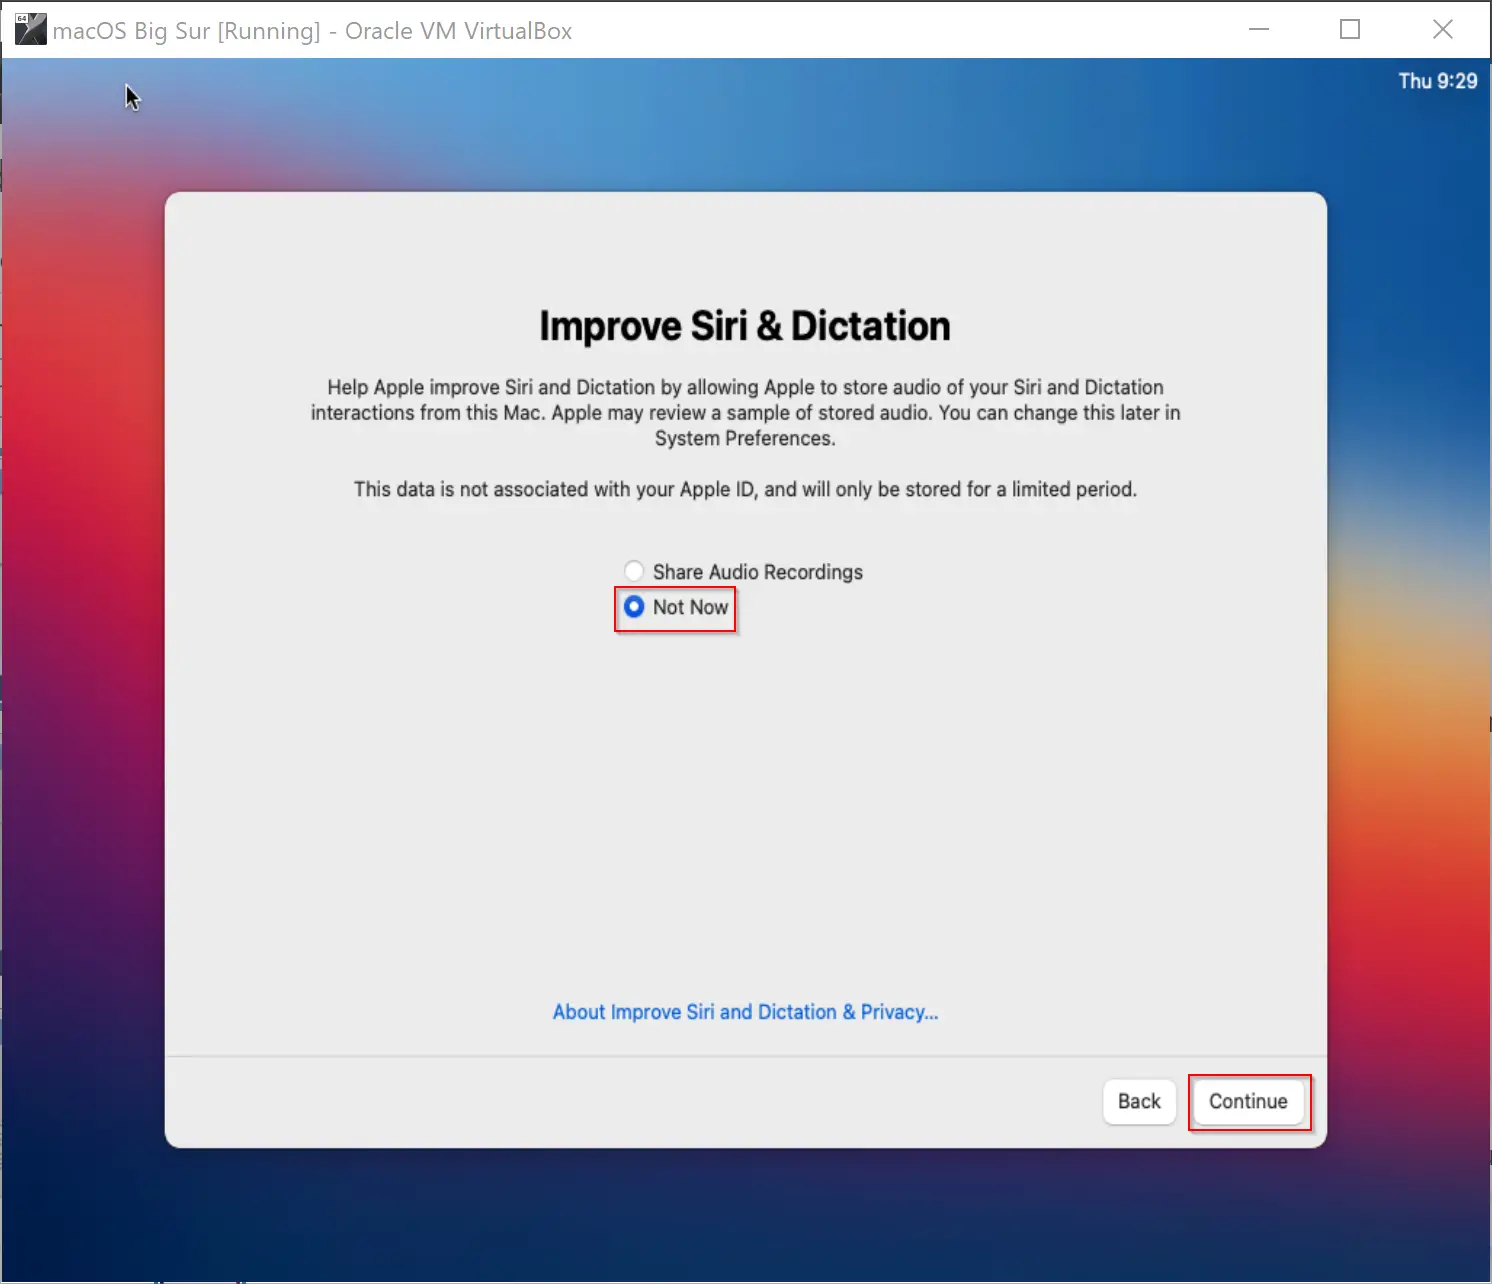
Step 46. Click Continue on Siri.

Step 47. Select the Not Now option and then click Continue.
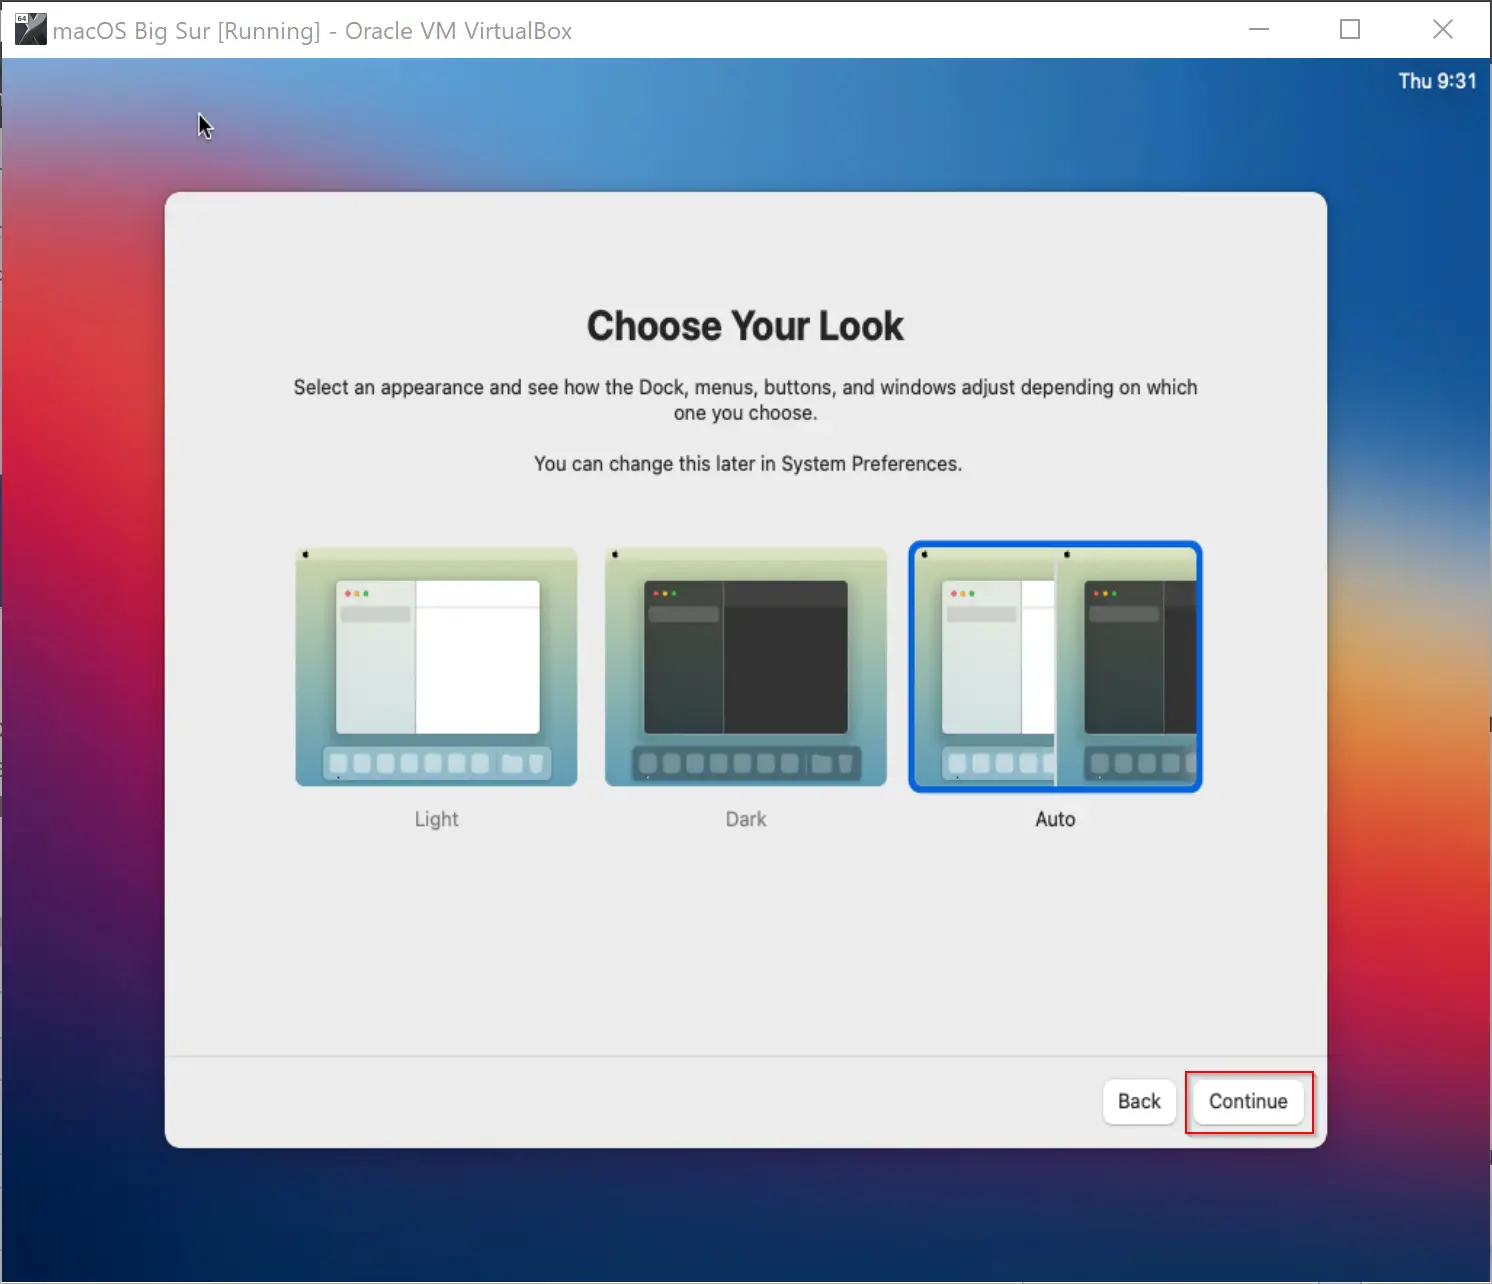
Step 48. Select appearance from Light, Dark, and Auto options, and click Continue.
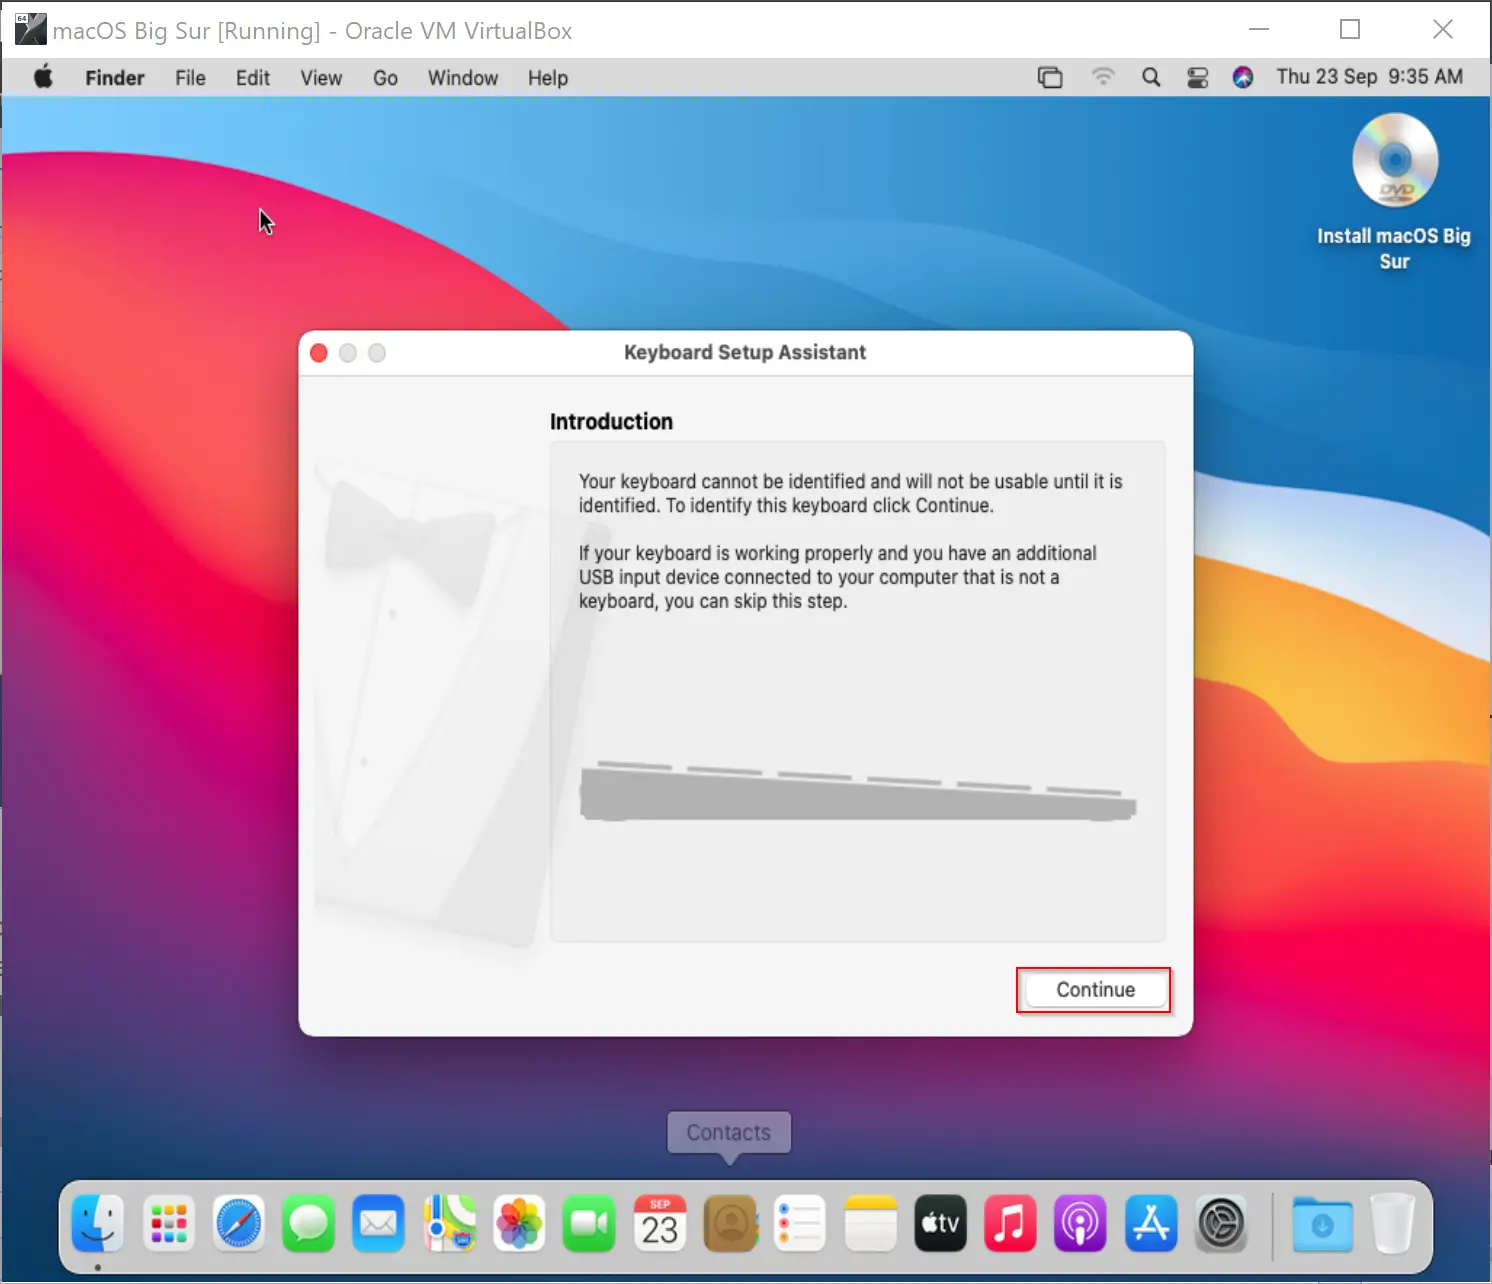
Step 49. Click Continue on the Keyboard Setup Assistant window. Then follow the on-screen instruction to calibrate the keyboard.
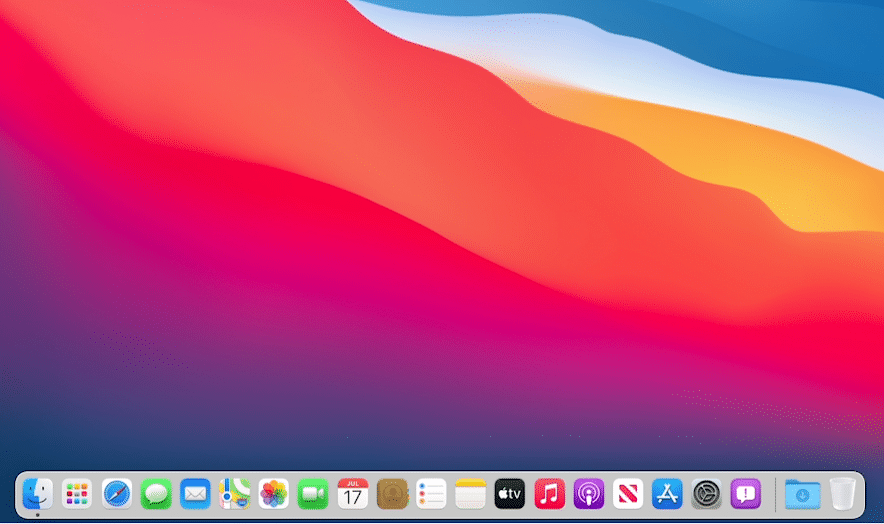
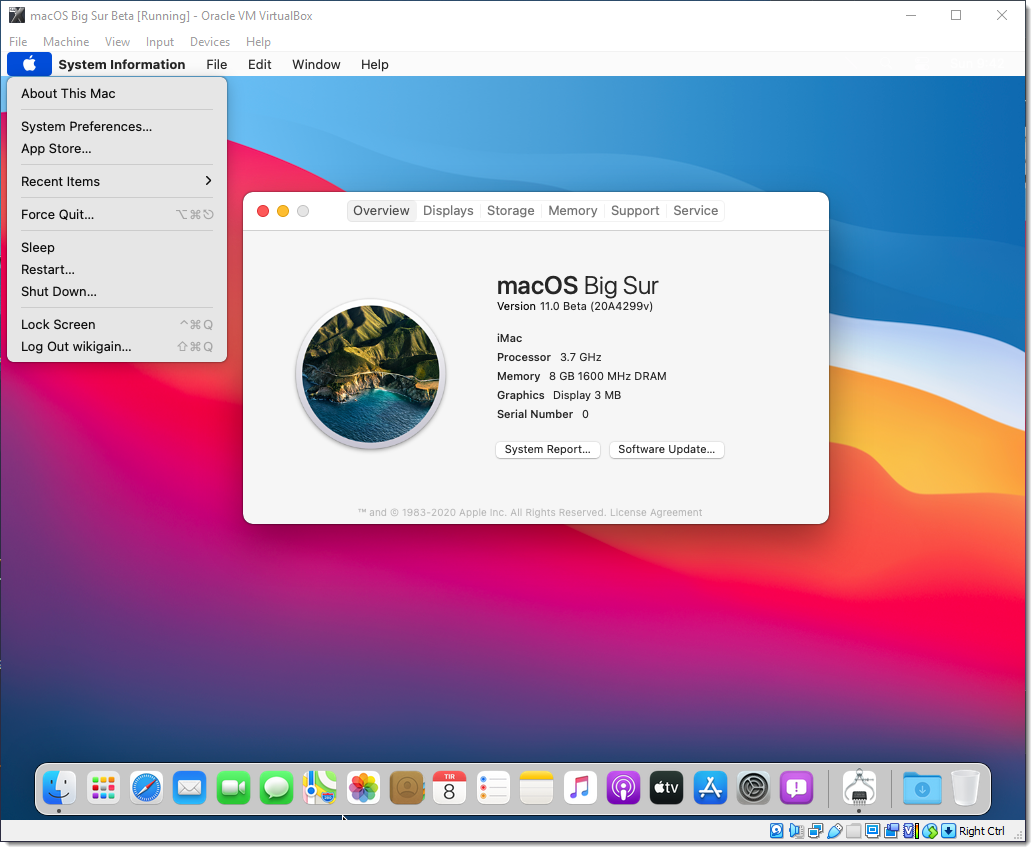
Now, you have successfully installed macOS Big Sur on your virtual machine.
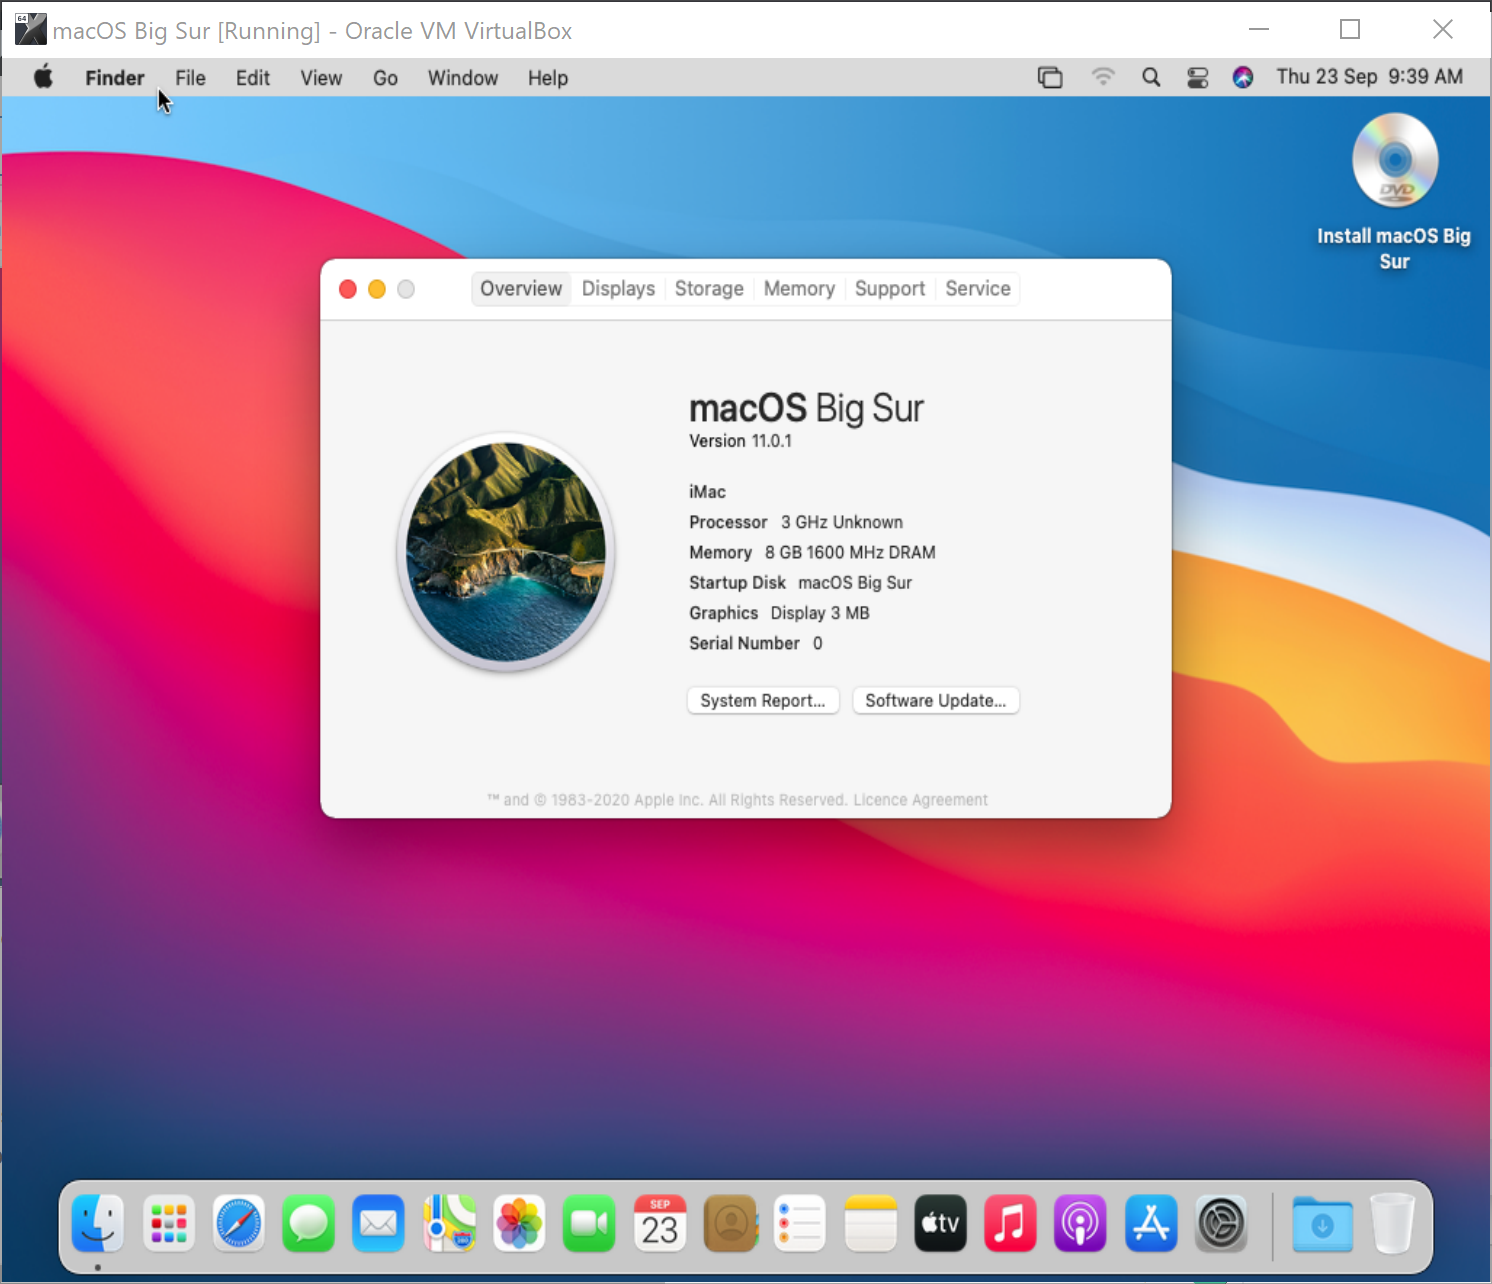
Although the procedure mentioned above primarily focuses on macOS Big Sur, you can use the same method for other recent releases of macOS. You can update your macOS installed in your virtual machine to the latest software, just like you usually would on an actual Mac.
Good luck!
Conclusion
In conclusion, running macOS Big Sur on a Windows 11/10 PC is not impossible with VirtualBox. With this application, you can install multiple operating systems on a single computer and switch between them with ease. However, before you start installing macOS, make sure to download the necessary files, including VirtualBox for Windows, VirtualBox Extension Pack, and macOS Big Sur ISO. Following the step-by-step guide provided, you can successfully install macOS Big Sur on your Windows PC using VirtualBox. By doing this, you can experience the features of macOS Big Sur without having to purchase an Apple MacBook. However, keep in mind that running macOS on a virtual machine may not provide you with the same level of performance as running it natively on an Apple device.
In this guide, we will walk you through all the steps to install macOS Big Sur in VirtualBox Windows. We will show you each step with screenshots and have a video to walk you through visually. Because there may be issues with system compatibility with installations like this, check out our forum. The new GEEKrar forum is a great place to post questions or find fixed to frequently occurring issues.
Table of Contents
What is macOS Big Sur
macOS Big Sur is the 17th release of the Mac operating system for Macintosh computers and is the successor to macOS Catalina. The OS was officially released to the public on November 12, 2020, and is available for a series of Mac computers and can also be installed virtually, like we are in this guide.
What you need for this installation:
– Windows 10
– 8 GB RAM
– 60 GB of free disk space
– VirtualBox Windows and Expansion Pack (found here)
– macOS Big Sur ISO image file (found here)
– A command file (download here)
Please Note: All image files are created only for educational purposes. Any misuse of any files is not our responsibility.
Step 1 – Creating a Virtual Machine
To begin, we need to install VirtualBox Windows. If you have done already, this article will walk you through the full process. Once VirtualBox is up and running, we want to ensure that you have your command file and Big Sur ISO file handy. We will need them to proceed.
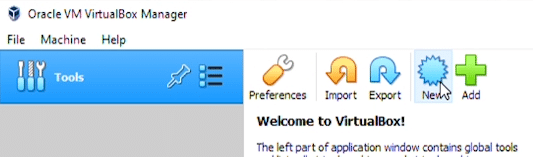
1-a. In the Oracle VM VirtualBox Manager, like the blue ‘New’ icon at the top
1-b. In the first window, we will be naming and identifying the type of virtual machine we’re creating. In the Name field, type in ‘BigSur.’ Machine Folder field can remain as the default unless you have a reason to change it. The Type will be Mac OS X. Version will be ‘macOS 10.13 High Sierra (64-bit).
1-c. Under Memory size, we want to increase the available memory to at least 8GB of RAM. Click Next
1-d. ‘Hard disk,’ we will leave the default ‘Create a virtual hard disk now’ and click ‘Create.’
1-e. The ‘hard disk file type’ will also remain with the default VHD (Virtual Hard Disk). Click Next.
1-f. ‘Storage on physical hard disk’ will be Dynamically allocated.
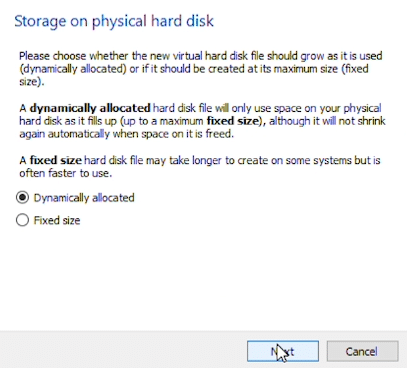
1-g. In ‘File location and size,’ we’re leaving the default folder path, but below in the disk size, we want to increase it to at least 60GB. I have tried 40GB and 50GB with many issues. So 60 or greater is strongly suggested. Once complete, click ‘Create’ and finish the first step.
Step 2 – Modifying VirtualBox with Command File
Now that the new VirtualBox is created, we need to run a few commands to modify it and proceed with running macOS Big Sur. If you haven’t downloaded the command file text, click here to get it.
2-a. Open the text file, go to the ‘Edit’ menu at the top, and then down to ‘Replace…” Here we want to type “VBoxNAME” in the ‘Find what’ field. In the ‘Replace with’ field, type in the name you called the VirtualBox (step2). Click the ‘Replace all’ button, and this should convert all items with the new file name.
2-b. Now head over the command prompt (Start, type ‘cmd’ hit enter), paste the first line, and hit enter. (run command prompt as administrator)
cd "C:\Program Files\Oracle\VirtualBox\"
2-c. This command will shift us to the VirtualBox windows directory, and we will be ready for the next commands.
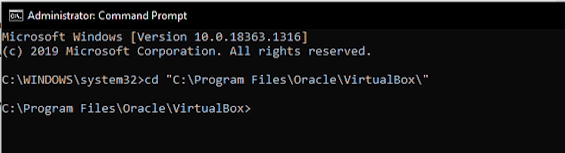
2-d. Before proceeding, verify that you are in the above directory. If you are not there, you must navigate there now before proceeding.
Highlight and copy the next six lines, paste them in the command window, and hit enter.
2-e. Once done, we can close out all the windows and start to load macOS Big Sur in VirtualBox Windows.
Step 3 – Setup for install macOS Big Sur in VirtualBox Windows
During this step, we will need to have the macOS Big Sur ISO file available. If you haven’t already downloaded it, click here to get it.
3-a. First, open VirtualBox and select the newly created install macOS Big Sur virtual machine on the left, then click the ‘Start’ button at the top.
3-b. We will be prompted to ‘Select start-up disk,’ click on the folder icon to the right
3-c. At the ‘Optical Disk Selector,’ click the ‘Add’ icon, and navigate to the folder where you have the Big Sur ISO file downloaded. Once selected, click on ‘Open’ and back at the window with the Big Sur ISO selected, click on ‘Choose.’
3-d. Back at the ‘Select start-up disk window, we should now have the BigSur ISO populated in the field, and we are ready to click ‘Start.’
3-e. The macOS Big Sur operating system will begin to load. This step may take a few minutes, but a prompt will pop up to select a language to continue when it’s done.
3-f. We now want to prep the drive for installation. We will format the drive to allow macOS Big Sur to be installed. Click on ‘Disk Utility,’ then continue.
3-g. In the Disk Utility window, select the VBOX HARDDISK option on the left and the ERASE icon at the top.
3-h. In the Name field, give the drive a label, leave the other options as default, and click Erase. This will format the drive for macOS. When the formatting is complete, click on ‘Done,’ and you can close out of the Disk Utility window.

3-i. Now we are ready to start installing macOS Big Sur. Click on the option that says ‘Install macOS’ and click on the Continue button.
3-j. You will be prompted twice for the terms of the software license agreement. To proceed, click on ‘Agree’ for both.
3-k. We will select a drive, which should be the only drive available, and click on Continue.
3-l. Now the macOS Big Sur is going to copy over and install. This process will take 15-30m to complete.
3-m. After the files have been copied over, we need to wrap up the installation with some customization details. Select Your Country or Region will prompt you to select your location, then click Continue.
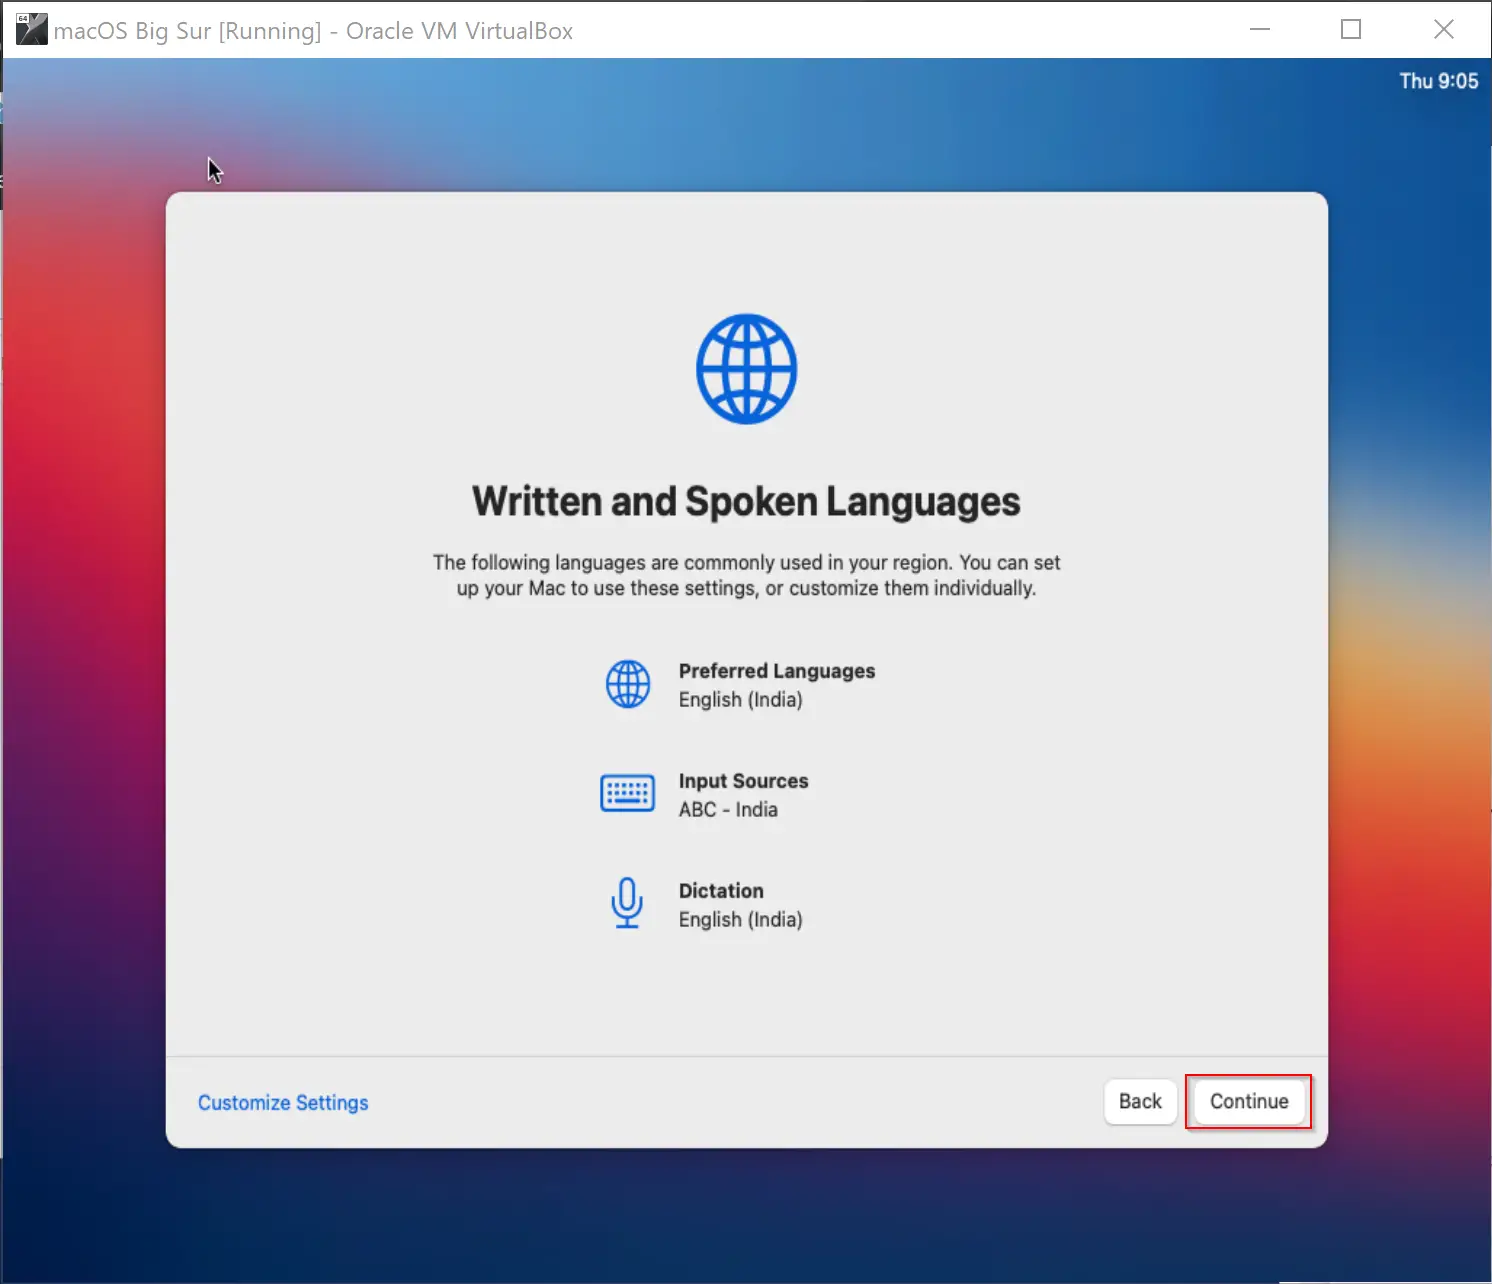
3-n. Under the Written and Spoken Languages, you can leave the default settings. If you want to change these, you can click the customize option at the bottom left, or click on Continue.
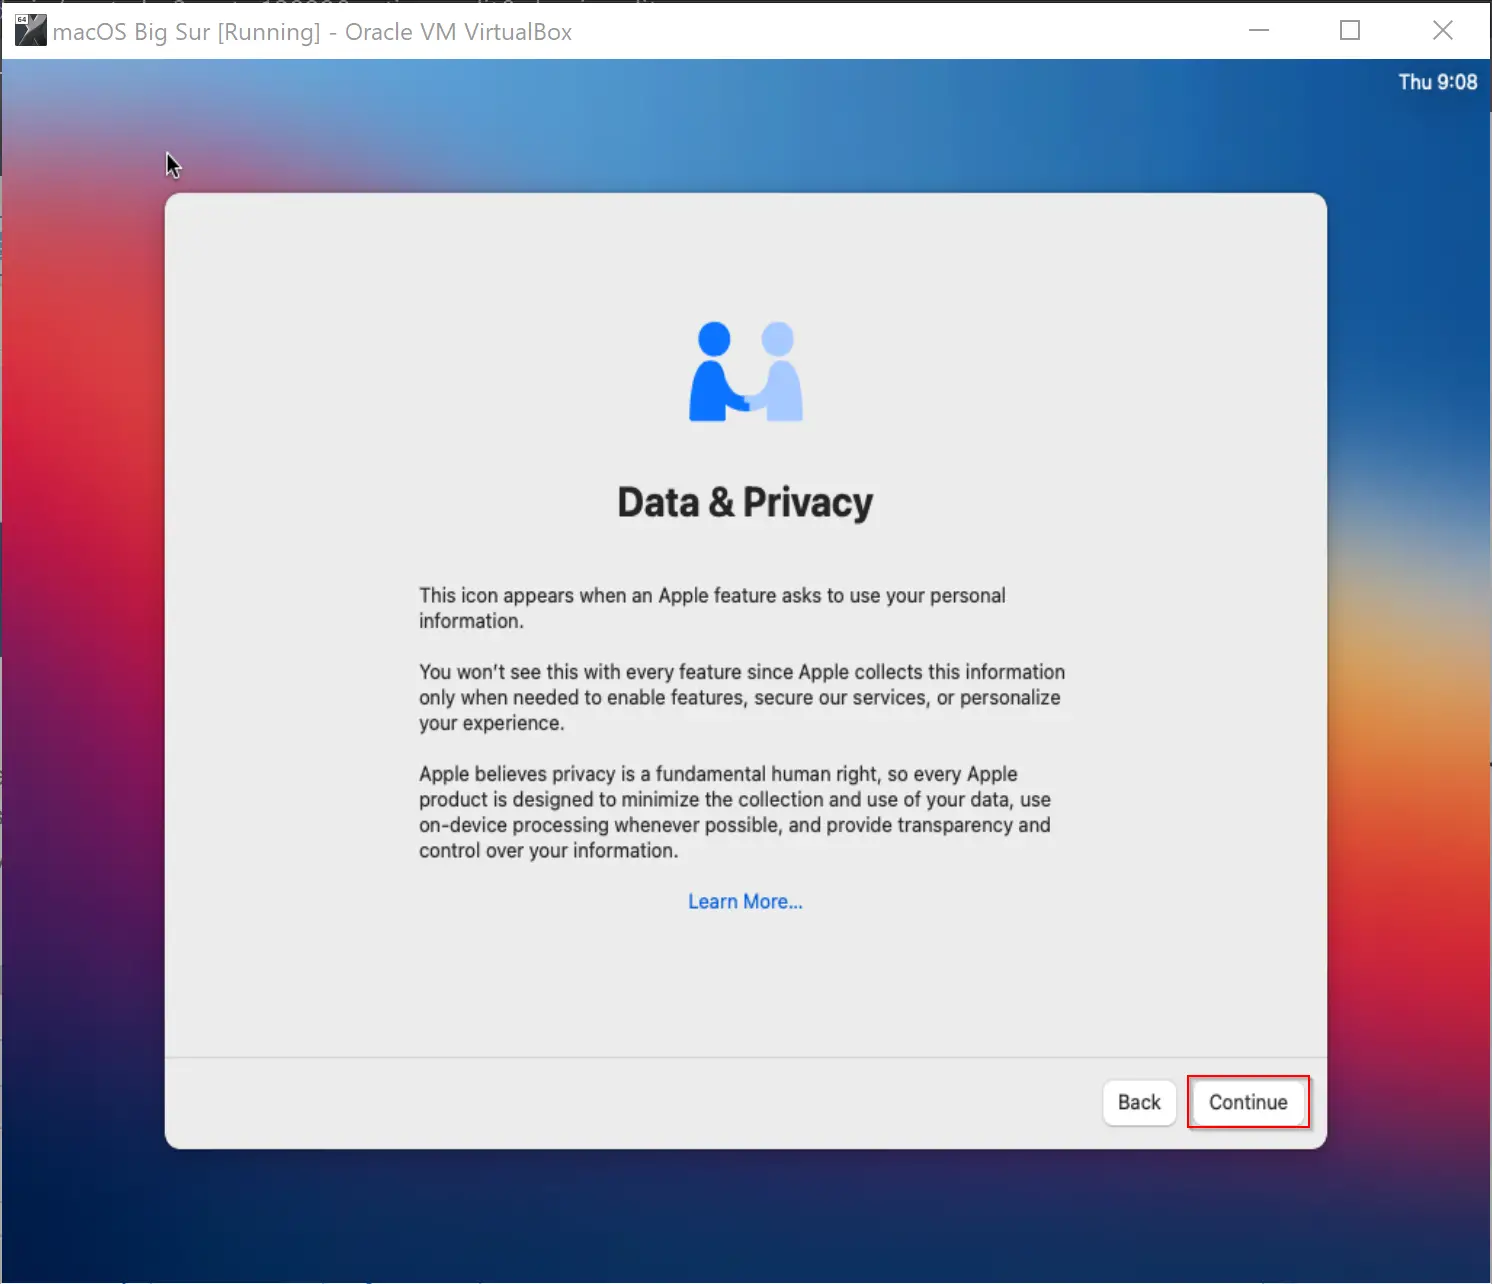
3-o. For Accessibility, Data & Privacy, and Migration Assistant options, you can click on Continue.
At the Sign In with Your Apple ID, select the option ‘Set Up Later’ at the bottom left and ‘Skip’ when prompted.
3-p. For Terms and Conditions, you will be prompted twice. Select ‘Agree’ both times to proceed.
3-q. At the Create a Computer Account window, enter a Name and password for your user profile and click on Continue.
3-r. Next, for Express Setup, Analytics, and Screen Time, we can click Continue. Your virtual machine will complete its setup and reboot. After starting, a login screen will appear—type in the password you have assigned when creating the user profile.
3-s. Lastly, a prompt for a Feedback Assistant will appear. You can either continue with it or close it out.
Now, you will see the macOS Big Sur desktop for the first time. The installation is complete! You can begin using the desktop and install any applications you’d like.
Any questions? Check out our forum some posted fixes and documentation
Visual Step by Step Guide – How to Install macOS Big Sur in VirtualBox Windows 2021
How to Install macOS on VMware in Windows PC
Note:- Please Enable VT-X or AMD-V Virtualization technology from your BIOS Settings.
Steps to Install macOS Big Sur on VMware on Windows
- Download the prerequisites
- Install the Prerequisites
- Unlock VMware to Install macOS Big Sur
- Create a New Virtual Machine
- Edit macOS Big Sur VMX File
- Start macOS Big Sur Virtual Machine
- Complete Basic macOS Account Settings
Download VMware Workstation Pro 16 or VMware Player 16.
- VMware Workstation 16 Pro
- VMware Player 16
Download the macOS Unlocker V3 for VMware
- Download – GitHub (latest Version)
- Download from this repository
Create or Download macOS Big Sur Beta ISO
-macOS Big Sur Beta ISO
tutorials
- https://buildsometech.medium.com/how-to-install-macos-on-vmware-in-windows-pc-mojave-a79329e057db
- https://www.wikigain.com/install-macos-big-sur-on-vmware-windows-pc/
Add Config Key in VMX Fil
Note:- Please make sure, before doing this advanced configuration the Vmware workstation must be closed. Or I recommend you to please restart your PC before Adding Config Key in VMX File.
Now Open the folder where you have set up your virtual machine. And in that folder, you will find a white color file of the extension .vmx . Now Open that VMware virtual machine configuration file using Notepad.
mainMem.useNamedFile = "FALSE"
prefvmx.minVmMemPct = "100"
vhv.allow = "TRUE"
smbios.reflectHost = "TRUE"
hw.model = "MacBookPro14,3"
smc.version = "0"
monitor.virtual_exec = hardware
monitor.virtual_mmu = hardware
Edit VMware config file
C:\ProgramData\VMware\VMware Workstation\config.ini
mks.gl.allowBlacklistedDrivers = "TRUE"
vhv.allow = "TRUE"
prefvmx.useRecommendedLockedMemorySize = "FALSE"
prefvmx.allVMMemoryLimit = "4096"
For steps four, five, six and seven.
- Link 1
- Link 2
Apple has announced the next major release of macOS at WWDC 2020. Available today in developer beta and coming to all users in fall 2020. macOS Big Sur will be a free software update later this year. In the meantime, the developer beta is available on https://developer.apple.com/macos/ and for public beta in July.
This OS has new features that include an all-new iOS inspired design, Control Center arriving for Mac, a revamped Safari with greater privacy controls, Apple’s new translation software that uses on-device processing, and more.
Macs compatible with macOS Big Sur (macOS 11):
- 2015 and later MacBook
- 2013 and later MacBook Air
- Late 2013 and later MacBook Pro
- 2014 and later iMac
- 2017 and later iMac Pro
- 2014 and later Mac mini
- 2013 and later Mac Pro
And Accordingly, the following models capable of running macOS Catalina will not be able to be upgraded to macOS Big Sur:
- 2012 and Early 2013 MacBook Pro
- 2012 MacBook Air
- 2012 and 2013 iMac
- 2012 Mac mini
Tip: before reading the rest of the article, it’s recommended to navigate to the Required File section of this post and download macOS Big Sur then you’ve time to read the item until the downloading gets complete.
Steps to Install macOS Big Sur on VirtualBox on Windows
- Install VirtualBox on Windows PC
- Install/Update VirtualBox Extension
- Create a New Virtual Machine & Customize it
- Run VirtualBox Code to the Command Prompt
- Start the Virtual Machine
- Perform Clean Installation of macOS Big Sur
- Summary
Important Note:
Before we get started, make sure your system can support Virtualization Technology (VT), and it is enabled from BIOS so that you should be able to run Virtualization software like Virtualbox or VMware. Also, you should have a 64-bit Windows operating system with at least 2 GB Ram and 20 GB of free storage, however, we recommend you at least 4 GB of RAM or higher so you can store more files and install more apps on macOS Big Sur.
Furthermore, if you have an SSD, it’s highly recommended to use it as storage because SSD is much faster then mechanical hard drive (HDD ) and macOS run on SSD very smooth. Anyway, it is not 100% compulsory but if you have, don’t hesitate to use it.
Required Files
- Download Virtualbox
- Download Virtualbox Code
- macOS Big Sur Beta 11.0 (20A4299v) Dev Beta 1
- macOS Big Sur Beta 11.0 (20A4300b) Dev Beta 2
- macOS Big Sur Beta 11.0 (20A5343j) Dev Beta 4/Public Beta 1
- macOS Big Sur 11.0.1 (20B29) Initial public release Latest
Note: You can create macOS Big Sur ISO Image.
Recommendation: It’s highly recommended to create a new drive on your Windows PC and install macOS Big Sur on that drive.
Step 1: Install VirtualBox on Windows PC
From the “Required File” section of this post, you should have downloaded VirtualBox as well and if you didn’t, download VirtualBox’s latest version and install it on your Windows system. If you’ve already installed VirtualBox, then you can skip this step. Other than that, double click on VirtualBox Setup and click Next for a couple of times and you’re done with the installation.
This slideshow requires JavaScript.
Step 2: Install or Update VirtualBox Extension
This step is not 100% percent necessary but it’s highly recommended to do this step because macOS Big Sur might not be compatible with VirtualBox and for this reason, it will cause a problem during the installation. Download VirtualBox Extension and follow the steps below.
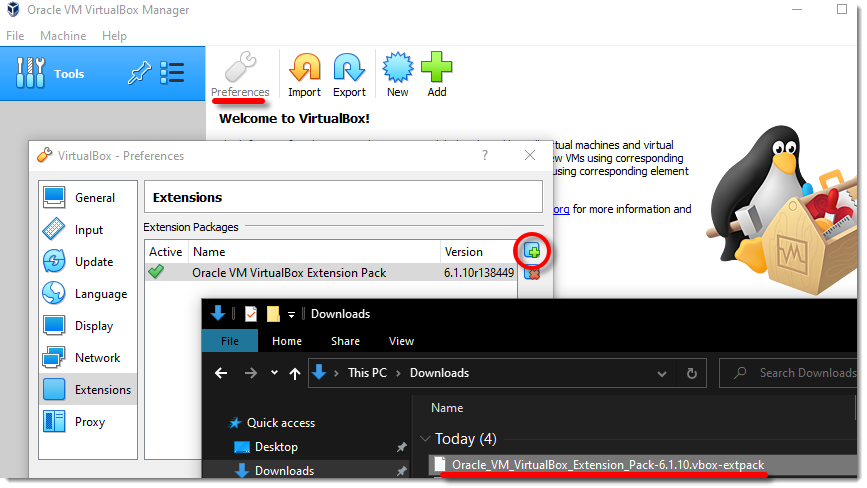
#1. Open up VirtualBox, navigate to Tools>Pereferences>Extensions.3
#2. Click on Plus icon and select VirtualBox extension which you’ve downloaded at the beginning of this section. Click Install or Upgrade and then click OK button.
#3. Finally, you should see something like the screenshot below.
Update Virtualbox Extension
Step 3: Create a New Virtual Machine & Customize it
Creating a virtual machine for macOS Big Sur is the same when you create a virtual machine for the Windows Operating system or Linux. We will use the ISO image of macOS Big Sur to do the installation process.
Note: We’ll make the VMDK as well if we receive lots of requests for that. Otherwise, there is no point because you can install macOS Big Sur with iso image as well.
#1. Open up your VirtualBox application and click New.
#2. Type a name for your Virtual Machine. Click Expert Mode and choose the following options then click Create.
Expert Mode
- Name the VM
- Virtual Machine Location (a separate drive is recommended)
- Type (Mac OS X)
- Version (Mac OS X 64-bit)
- Memory 4 GB (recommended 8 GB or higher)
- Create a virtual hard disk
Your setting should look something like the screenshot below.
Create New Virtual Machine
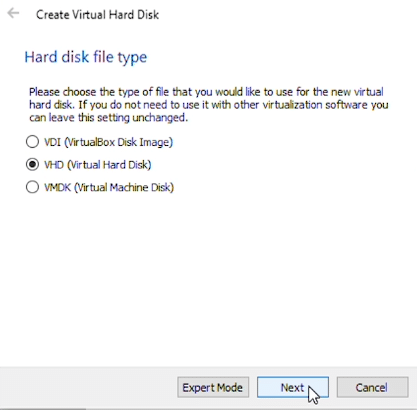
#3. Select where you want to save your virtual hard disk. Also, make sure to increase the size of the disk. From virtual hard disk, type make sure to select VHD. If you select dynamic allocated, your VM speed will not be good but it’s good that does not allocate the specified storage at once, unlike fixed-size type.
Create Virtual Hard Disk
#3. It’s time to customize some of the settings according to your choice. Click Settings and from the pane choose System. On the Motherboard, tab uncheck Floppy disk and move it down. If you’re not happy with your memory setting still, you can change it.
#4. Click the Processor tab and select a minimum of two processors or higher.
Increase the Processor
#5. Navigate to the Display menu then increase the Video memory to 128 MB.
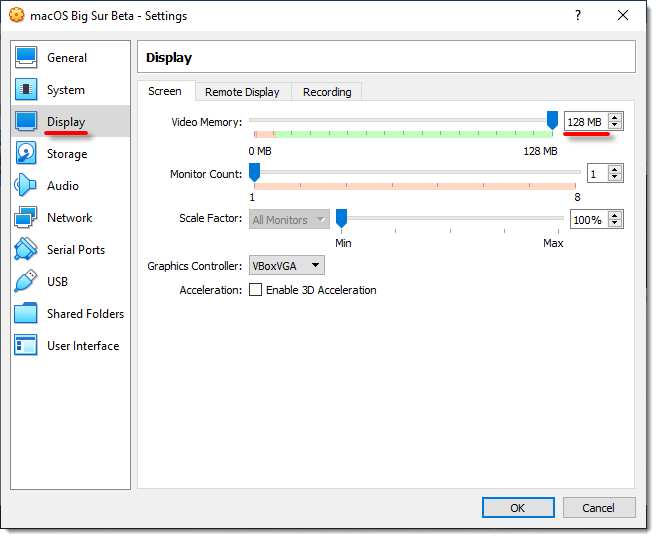
Increase Video Memory
It’s time to select your macOS Big Sur ISO file. Click Storage and then select on Empty. Click on DVD icon and choose your macOS Big Sur ISO file.
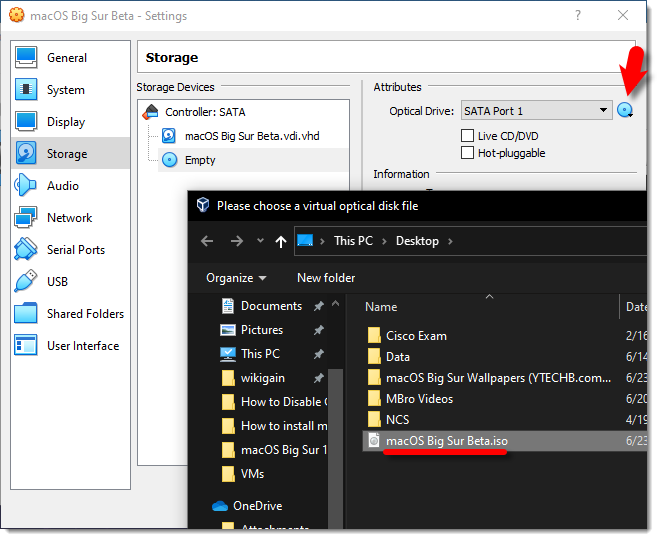
Select ISO Image
Make sure your macOS Big Sur ISO file is on the top, not your Disk because if your disk is on the top, your VM might not boot. Just change the SATA port number to 0 for your iso image. It’s not 100% compulsory.
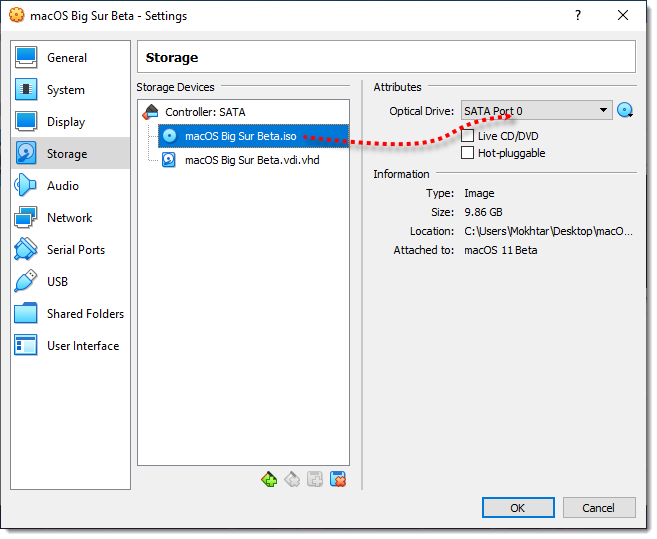
ISO Image SATA 0
Step 4: Run VirtualBox Code to the Command Prompt
Once you’ve created and customized your virtual machine, it’s time to run some codes in order to install macOS Big Sur on VirtualBox.
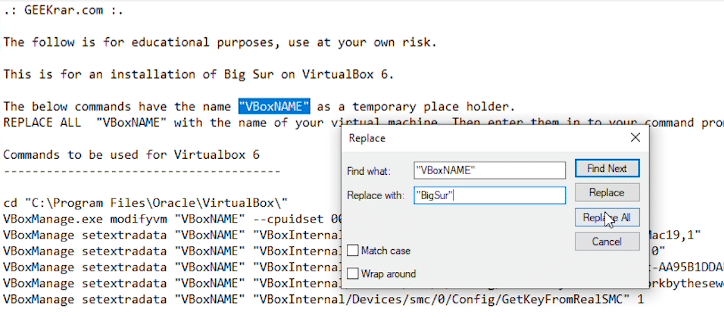
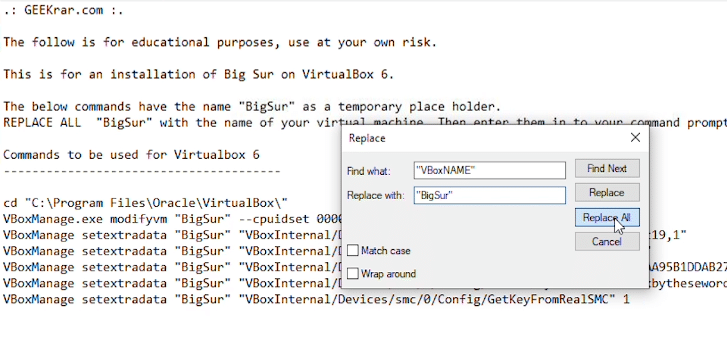
First, you should notice your virtual machine name because later on, we will use it. Open the VirtualBox code which you should have downloaded from the Required File section of this post.
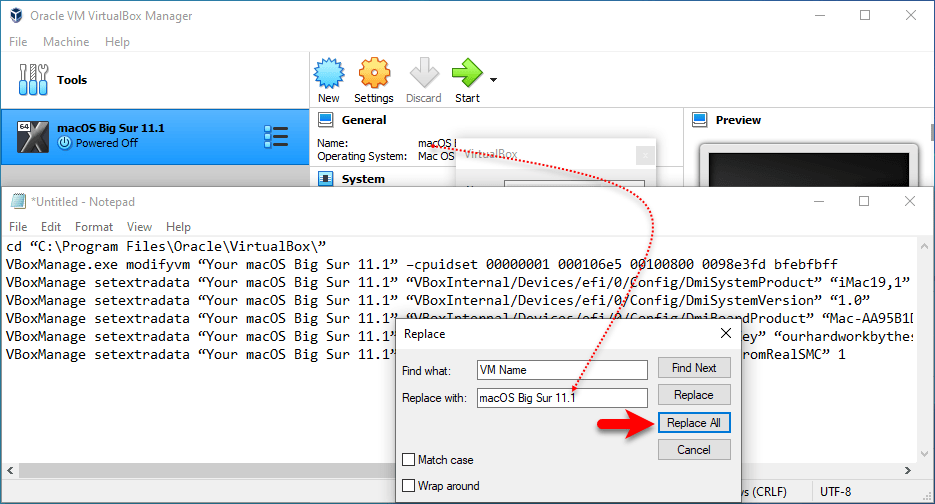
#1. When you opened VirtualBox code via notepad or any other text editor, use the replace function of the program to replace the VM Name to your virtual machine name. See the picture below to get an idea of how it’s done.
cd "C:\Program Files\Oracle\VirtualBox\"
VBoxManage.exe modifyvm "VM Name" --cpuidset 00000001 000106e5 00100800 0098e3fd bfebfbff
VBoxManage setextradata "VM Name" "VBoxInternal/Devices/efi/0/Config/DmiSystemProduct" "iMac19,1"
VBoxManage setextradata "VM Name" "VBoxInternal/Devices/efi/0/Config/DmiSystemVersion" "1.0"
VBoxManage setextradata "VM Name" "VBoxInternal/Devices/efi/0/Config/DmiBoardProduct" "Mac-AA95B1DDAB278B95"
VBoxManage setextradata "VM Name" "VBoxInternal/Devices/smc/0/Config/DeviceKey" "ourhardworkbythesewordsguardedpleasedontsteal(c)AppleComputerInc"
VBoxManage setextradata "VM Name" "VBoxInternal/Devices/smc/0/Config/GetKeyFromRealSMC" 1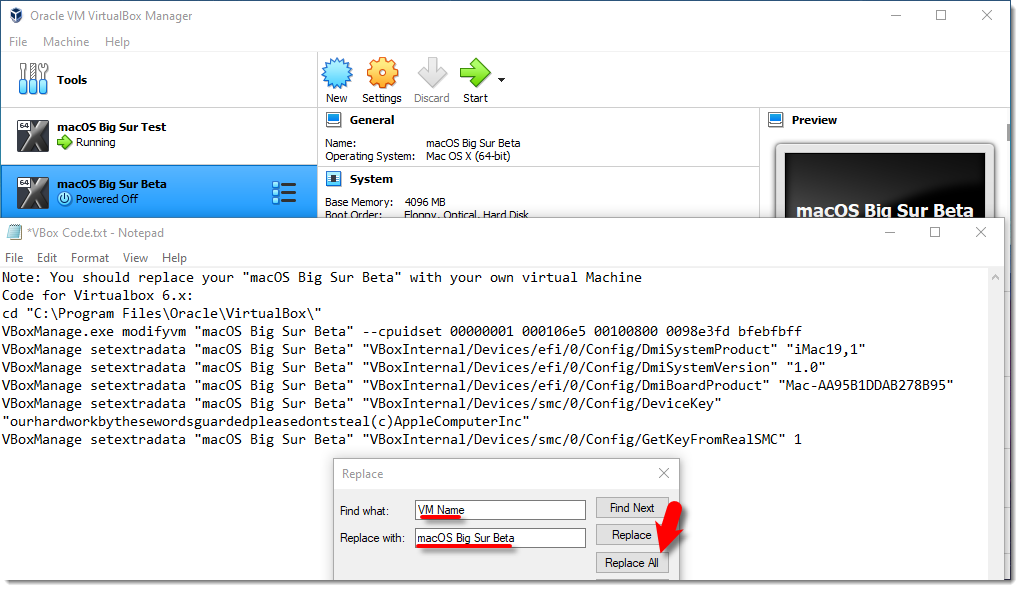
Replace VM Name
Tip: It’s highly important that you should quit the VirtualBox program before executing the code. If you don’t do it, your virtual machine might not proceed to the installation step.
Exit VirtualBox
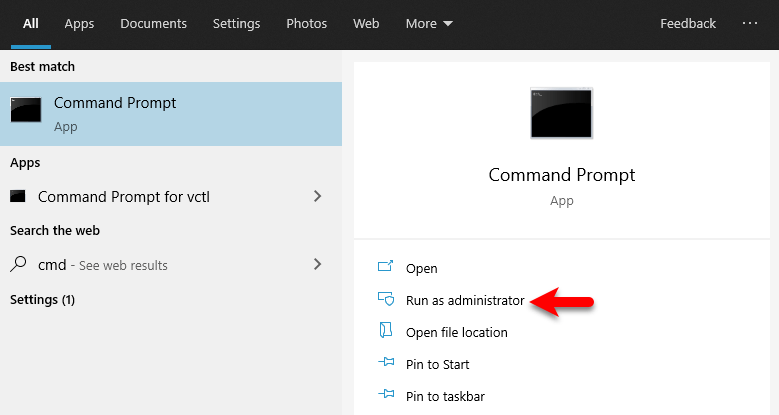
#2. Once you replaced the “VM Name” with your virtual machine name, then run the code one by one to the command prompt (CMD). You can open the command prompt by pressing Windows+X key in Windows 10 or click windows key and type CMD and run command prompt as administrator.
This slideshow requires JavaScript.
Step 5: Start the Virtual Machine
Starting macOS Big Sur with the older version of the Mac Operating system was a bit different, but with new macOS Big Sur still, it’s easy to set it up.
#1. Open the VirtualBox app then click the Start button. A black screen with a few yellow & white text will appear on the screen.
Start Virtual Machine
#2. Once you started the VM then you’ll see some code running in the background. Just wait until you see the Apple logo.
This slideshow requires JavaScript.
#3. Select a Language and click Continue arrow.
Select Language
#4. Select Disk Utility and click Continue.
Select Disk Utility
#5. Select your main Virtual Disk and click the Erase button. Make sure to check the size of the disk and you should not erase the wrong disk.
Erase Virtual Disk
#6. Name your Disk that you want to install macOS Big Sur on it. I’ll name here macOS HD. Once typed a name then click the Erase button.
Name the Virtual Disk
#7. Close Disk utility.
Close Disk Utility
#8. Select Install macOS and click Continue.
Install macOS
#9. Click Continue.
macOS Big Sur Beta
#10. Agree to terms and Conditions.
Agree to the Terms & Conditions
#11. Select the installation disk and click Continue. Once you click continue it’ll take around 29 minutes to complete the first part of the installation.
NOTE: If you get the Operation Couldn’t be Completed BiErrorDomain Error 3 then follow this step by step guide below.
Fix the Operation Couldn’t be Completed BiErrorDomain Error 3
This is a very common error with macOS Big Sur beta version 1 that most people have faced. Just use our VirtualBox code and it should work without any error.
- Fix the Operation Couldn’t be Completed BiErrorDomain Error 3
Installation Disk
Step 6: Perform Clean Installation of macOS Big Sur
- Once you hit enter, a whole bunch of code will run on the screen, but you should not worry about it. Wait for a few minutes, and you should see the macOS Big Sur installation window. Have a cup of coffee until the installation complete because it’s going to take around 29 minutes to finish.
- Once the installation part complete, your system will reboot, and after the restart, you should see macOS Big Sur Welcome page.
- Select the following options. You can change most of the settings later on, so don’t worry about that for now.
- Select your Country and click Continue.
- Choose a Keyboard Layout and click Continue. If you don’t agree with preset options then you customize it. Just click Customize Settings.
- You can turn on the Accessibility features now with macOS Big Sur. You’ve several options with accessibility like vision, motor, hearing, and cognitive. If you don’t want to set up right now just click Not Now button to skip them.
- Read Data & Privacy and click Continue.
- Now, you can transfer your data from your previous Mac or from your Windows PC. If you don’t want to transfer anything right now, just click the Not Now button to continue.
- Click on Set Up Later then Don’t Sign In. You can add your Apple ID later.
- Click Agree to the Terms and Conditions and click Continue.
- Fill out the Full name, Account name, Password, and Hint then click Continue.
- If you want to customize Express Set Up, you can click on Customize Settings otherwise click on Continue.
- On the Analytics page click Continue.
- On-Screen Time, click Set up Later.
- Select an appearance theme and click Continue. Here you choose your dark mode if you want.
- Wait for a few seconds and you’ll see the login screen now.
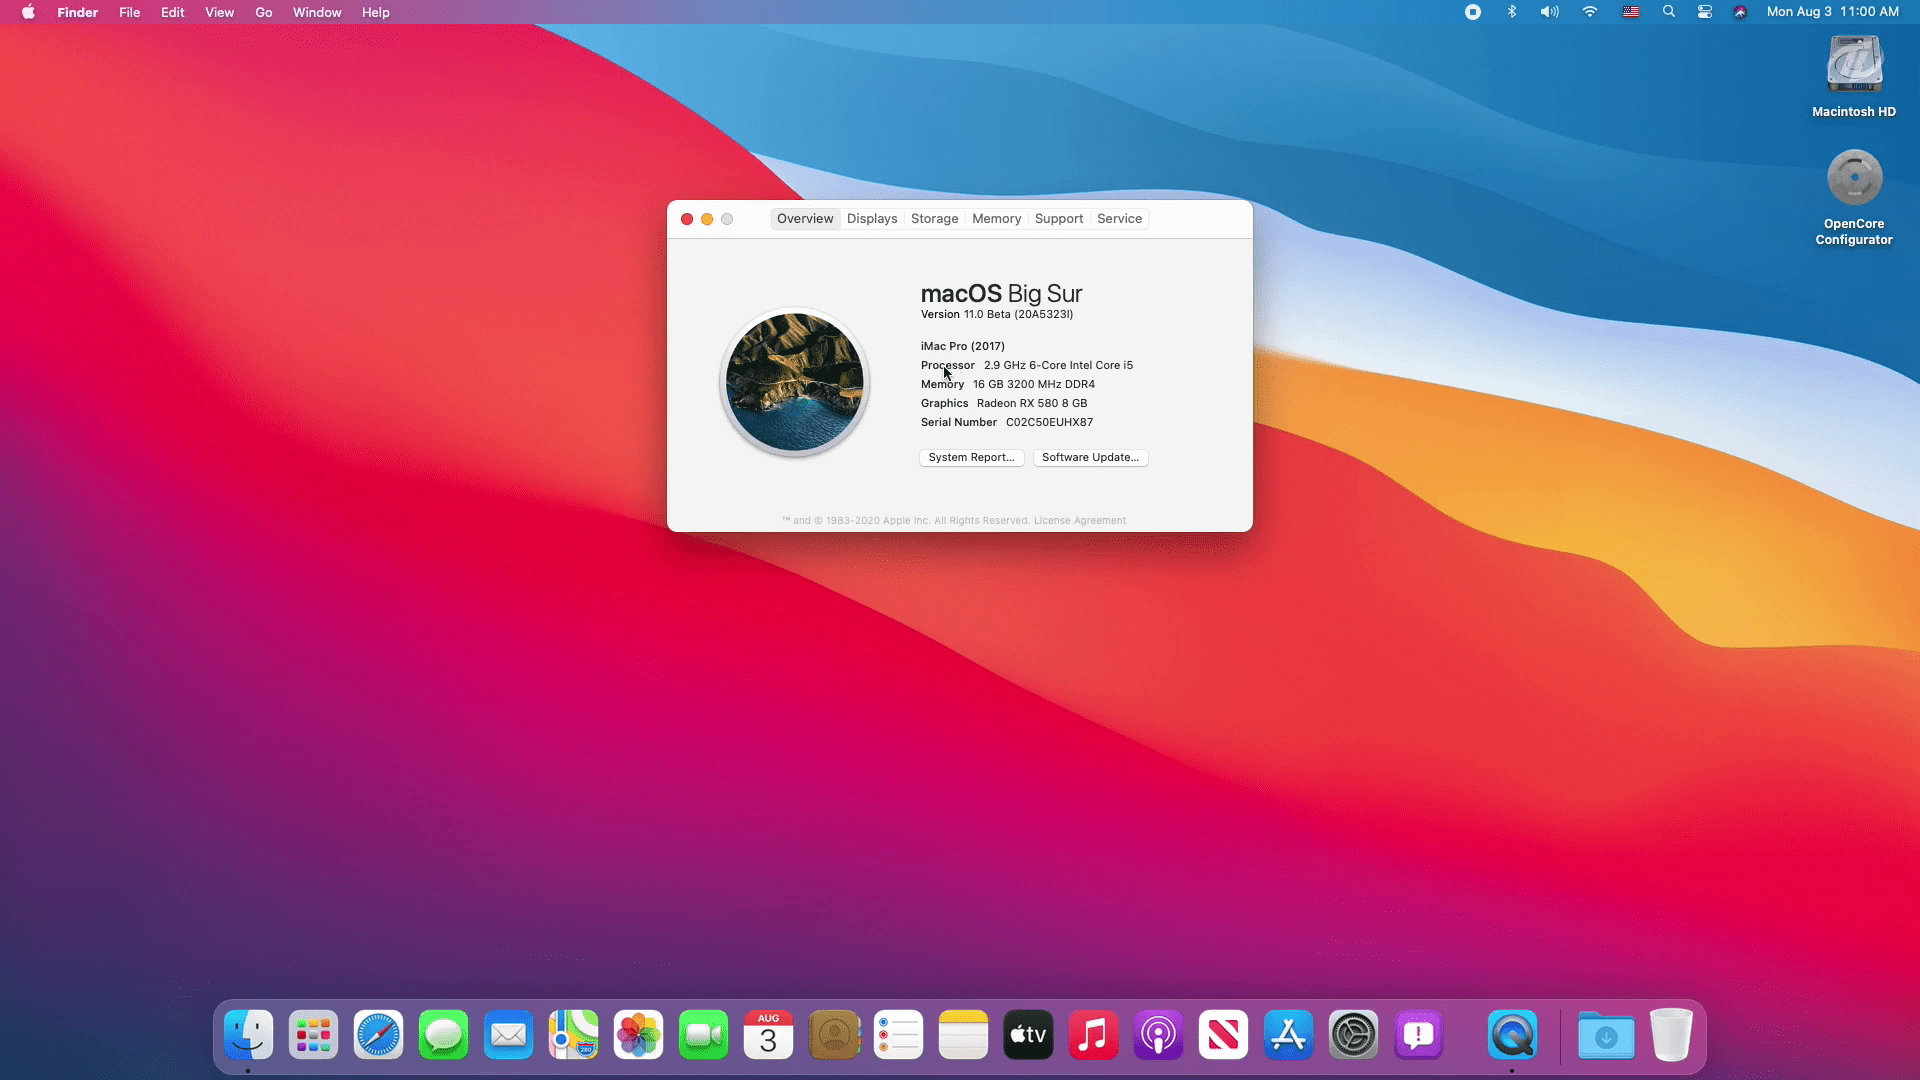
- Well done 👍👌😮 you’ve installed macOS Big Sur on VirtualBox Successfully.
Welcome to macOS Big Sur VBox
Click on the image below to see the full resolution
This slideshow requires JavaScript.
Summary
Basically, in this article, I’ve shown you the step by step pictorial guide on how to install macOS Big Sur on VirtualBox on Windows computer. After reading and following this guide, you should have done the following;
- Downloaded VirtualBox with its Extension
- Installed VirtualBox on your system
- Installed & upgraded VirtualBox extension
- Created a new virtual machine for macOS Big Sur
- Customized macOS Big Sur VM
- Executed the VirtualBox code to the CMD
- And finally performed a clean installation of macOS Big Sur.
Related: How to install macOS Big Sur on VMware on Windows.
We are ready to keep receiving your feedback about this article, and other posts on wikigain. Your suggestion and feedback are highly appreciated.
Warning: All the content of this site is copyright protected, and no-one has the right to copy-paste our materials.
In this article, I will show you how to install macOS Big Sur on VirtualBox on Windows – VMDK. macOS Big Sur is the recent release of Apple in the year 2020. Alongside, macOS Big Sur is one of the advanced operating system which make your computer more beautiful with its interface look. The latest version of the macOS operating system is being inspired by the iOS 14. Now you can enjoy using iOS 14 Applications on macOS Big Sur which can give you a better experience of using Applications of iPhone and iPad on macOS Big Sur.
Since macOS Big Sur was in Beta we have created its ISO file for installing on Windows PC. On the other hand, and finally, Apple kicked out the final version of macOS Big Sur. In November 2020 Apple released the final version of macOS Big Sur, which includes lots of bug fixes and other critical issues.
Successfully Apple update the macOS Big Sur 11.0 to the latest version and that is 11.1. In macOS Big Sur 11.1 update Apple fixes a bunch of errors and other issues. More than that, its interface look is redesigned all the portion of macOS Big Sur is now completely fixed in the final update. If you are using macOS Big Sur 11.1 version then soon you will get the latest update notification of macOS Big Sur 11.2. Everyone can download and install macOS Big Sur on their MacBook, and that latest MacBook Pro & Air. On the other hand, if you own a Windows 10 PC then you can install macOS Big Sur on your PC as a guest OS.
However, while talking about guest OS it comes to the Virtualization platforms that access you to point to install macOS, Linux, Android OS, and Windows on the actual PC. Virtualization platforms give you the ability to install multiple operating systems on the physical PC. Installing the secondary operating system on the physical PC is having the same process. It means whenever you are installing macOS on your actual Mac or installing it on the Virtualization platform the both installations will have the same process.
Coming to Virtualization tools there are many Virtualization tools such as Hyper-V, VMware Workstation, VMware Player, and VirtualBox. We have tested all of them on Windows and macOS, but the best platforms come to VirtualBox and VMware. So, through this guide, you will learn how to install macOS Big Sur on Windows – VMDK.
This method might be new because you can’t find the ways of installing macOS Big Sur on VirtualBox on Windows using VMDK. As we have tested macOS Big Sur on VirtualBox on Windows PC using ISO file. You can find the installation process from the below downlink.
- How to Install macOS 11 Big Sur on VirtualBox on Windows PC
- How to Install macOS 11 Big Sur on VMware on Windows PC
Check the below link on how to install macOS Big Sur on VMware on Windows – VMDK.
- Install macOS Big Sur on VMware on Windows – VMDK
#Required Files:
As we have mentioned this point in our few articles, if you are installing macOS Big Sur on your Windows be sure that you have to follow the below down recommended settings.
- Enable the Virtualization option from the BIOS settings.
- Pre-installed Windows 10 64-Bit OS
- 16GB of RAM for installing macOS on VirtualBox on Windows.
- For installing macOS Big Sur on Windows you need at least 40GB of free space.
#Download macOS Big Sur VMDK File
For installing macOS Big Sur on Windows 10 PC using VMDK file, you need to download the macOS Big Sur VMDK file. We have created a macOS Big Sur VMDK file and uploaded it on Mediafire storage. And the macOS Big Sur is divided into several parts, each file is compressed with WinRAR. After the downloading, you need to extract its file using the WinRAR and 7Zip.
- Download macOS Big Sur VMDK
#Install VirtualBox on Windows
Once the VMDK file downloaded alongside you need to download and install the VirtualBox on your Windows PC.
- Head over to the VirtualBox official website and open it and download the latest version of VirtualBox for Windows host.
- When the VirtualBox setup file downloaded-go to the download folder, double-click on the setup to open. Once the installation wizard launched on the first screen press next.
- Click next on the first three pages
- Click yes when prompted
- Click Install
- Click Yes when prompted
- Click again on Install when prompted, click on install to allow the VirtualBox app on Windows.
- Once the installation successfully completed click Finish to close the window.
#Create macOS Big Sur Virtual Machine
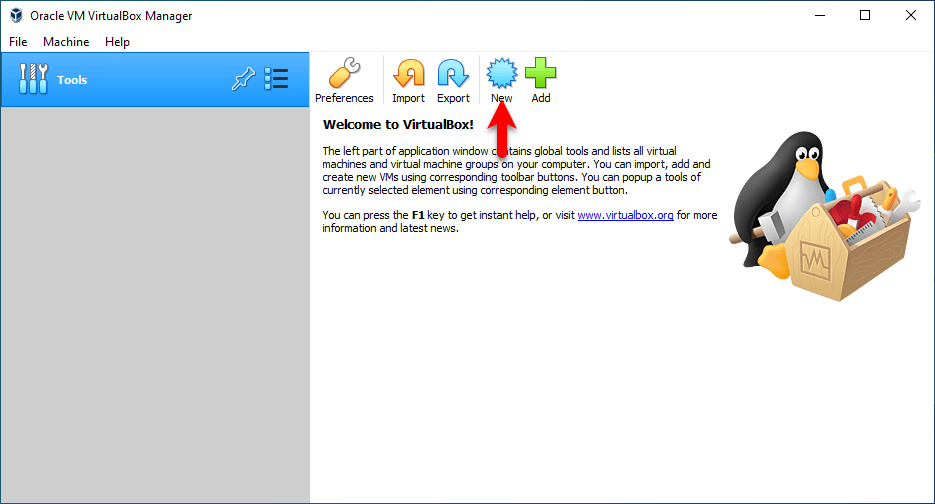
Once the VirtualBox successfully installed on Windows, for installing macOS Big Sur on VirtualBox on Windows you need to create a new virtual machine. So, open up the VirtualBox to create a new virtual machine. On the welcome wizard of VirtualBox click on the New option.
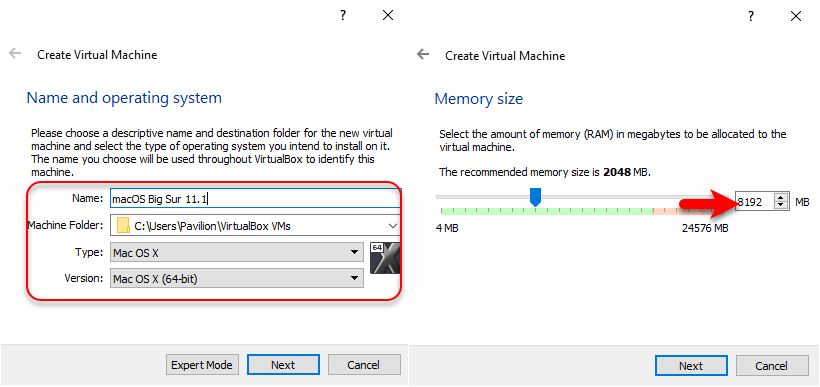
On the next window type the name macOS Big Sur, choose the machine folder, Type, Version then click Next. On the next window increase the Memory Size and click Next.
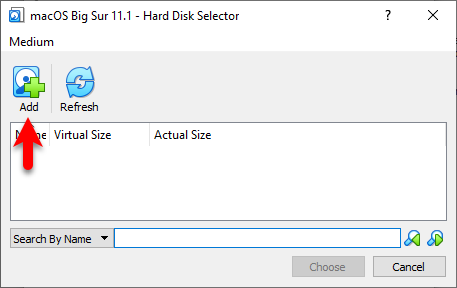
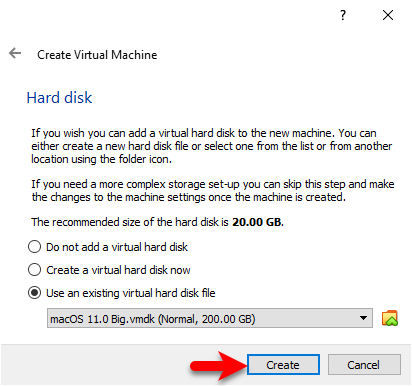
Now select the option “Use an existing virtual hard disk file” and click on the folder.

When this window opened click on the “Add” option.
Now select the macOS Big Sur VMDK file and click open, once the VMDK file added click Choose.
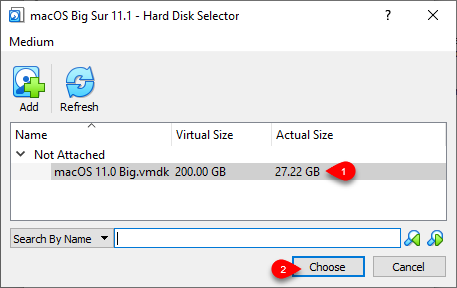
Here you can see the macOS Big Sur VMDK file added, so click on the Create option.
#Edit Virtual Machine Settings
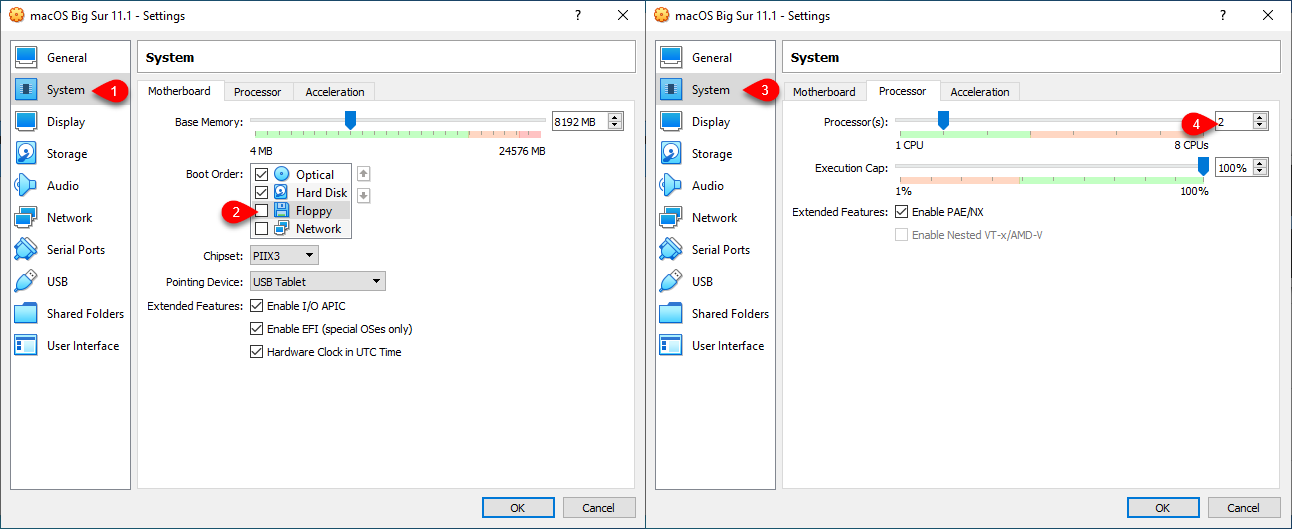
For better performance of macOS Big Sur on VirtualBox on Windows, you need to configure some settings. On the virtual machine settings window, you can increase Memory Size, Processors. So, select the created virtual machine and click Settings.

When the virtual machine settings window opened from the left-handed side select the “System” option. And on the system window select the “Motherboard” option and uncheck the Floppy disk. Select the “Processor” option and increase the processor’s number.
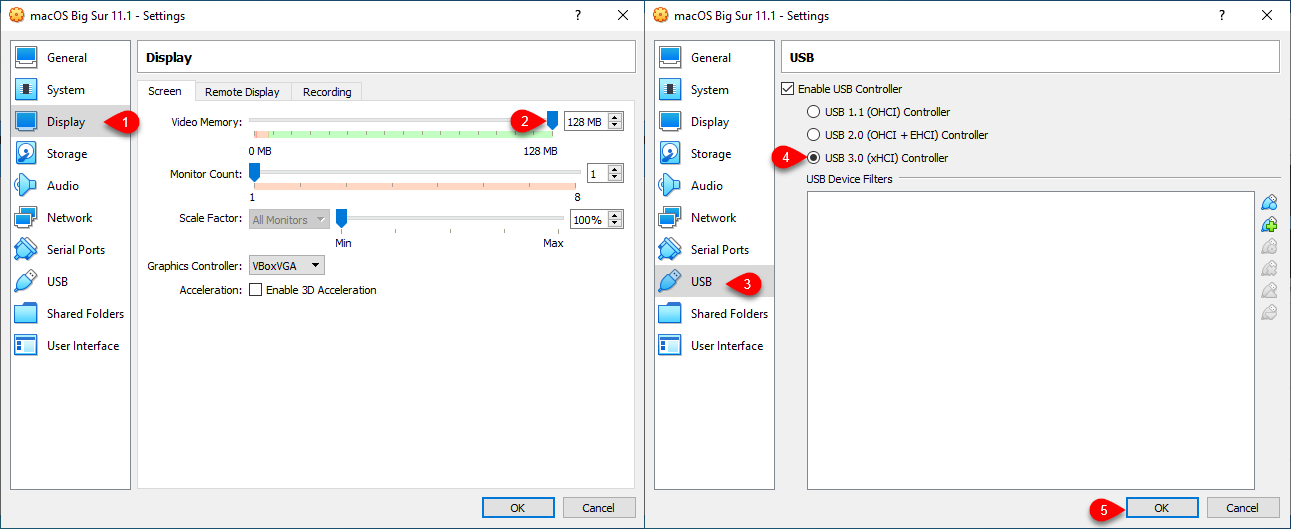
Select the “Display” option, and from the display window select the “Screen” option and increase the memory size up to 128MB. Select the USB option, then select the (USB 3.0 (xHCI) Controller) option. Once everything completed click OK to save changes.
#Run VirtualBox codes to the Command Prompt
Once you have created a Virtual machine for macOS Big Sur and edited the settings. So, for configuring the macOS Big Sur on VirtualBox on Windows you need to add some codes into the command prompt. This command will able you to install the macOS Big Sur on Windows, without these codes you won’t be able to run macOS Big Sur on Windows on VirtualBox.
Before running the codes into the command prompt be sure to completely close the VirtualBox.
cd "C:\Program Files\Oracle\VirtualBox\"
VBoxManage.exe modifyvm "VM Name" --cpuidset 00000001 000106e5 00100800 0098e3fd bfebfbff
VBoxManage setextradata "VM Name" "VBoxInternal/Devices/efi/0/Config/DmiSystemProduct" "iMac19,1"
VBoxManage setextradata "VM Name" "VBoxInternal/Devices/efi/0/Config/DmiSystemVersion" "1.0"
VBoxManage setextradata "VM Name" "VBoxInternal/Devices/efi/0/Config/DmiBoardProduct" "Mac-AA95B1DDAB278B95"
VBoxManage setextradata "VM Name" "VBoxInternal/Devices/smc/0/Config/DeviceKey" "ourhardworkbythesewordsguardedpleasedontsteal(c)AppleComputerInc"
VBoxManage setextradata "VM Name" "VBoxInternal/Devices/smc/0/Config/GetKeyFromRealSMC" 1
Copy and paste the above commands into the Notepad window, then replace the “VM Name” with the name of macOS Big Sur virtual machine. For replacing all the VM Names on the commands click on Edit, In place of “Replace with” type the name of the virtual machine and click replace All.
Now head over to the Windows start menu type CMD, once it appeared Run As Administrator.
Copy the first line of command and paste it into the command prompt window, then select the rest of the commands copy it, and paste it into the command prompt, and press enter.

#Install macOS Big Sur
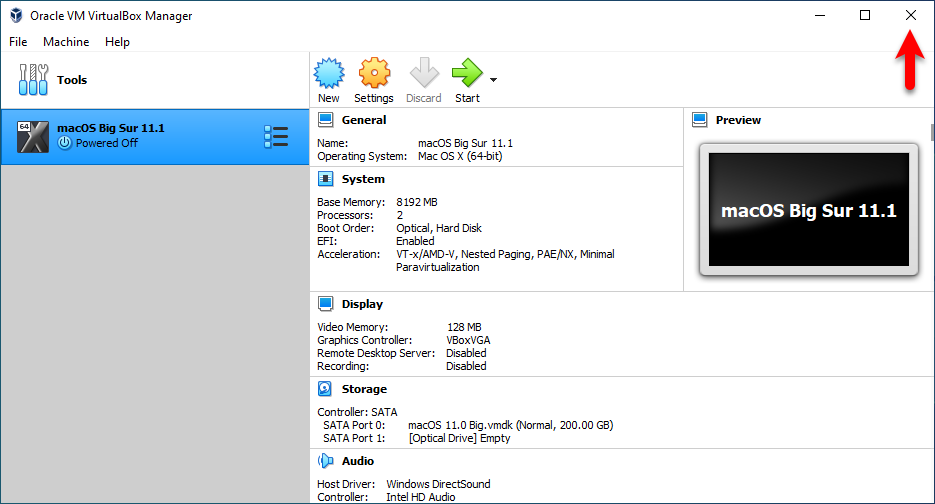
- When everything successfully completed open up the VirtualBox then select the created macOS Big Sur Virtual machine and click on the Start button.

- When everything gets ready for a clean installation of macOS Big Sur open up the VMware Workstation. From the list select macOS Big Sur virtual machine and click Power on this virtual machine.
- Once the installation launched wait for the Apple logo
- Wait until the installation should be completed, once the installation successfully completed the virtual machine will restart automatically.
- When the virtual machine restarted at the first welcome screen select your country and click continue.
- Select your written and spoken language and click continue.
- On the Data & Privacy click continue.
- Select “Don’t transfer any information right now” and click continue.
- Click Sign up later and click Skip.
- Agree with the terms and conditions of macOS Big Sur.
- Create your computer account and click continue.
- On the express setup simply click continue.
- On the Analytics click continue
- And on the Screen time again click continue.
- Select your theme for macOS Big Sur.
- Wait until it should set up the macOS Big Sur for the first use.
- And finally, macOS Big Sur successfully installed on VMware.
If you faced any kind of problem feel free to share with us via the comment section.