
In this guide, you’ll learn everything you need to know about how to run Logic Pro X on a Windows PC.
What is Logic Pro X?
Why would you want to use it on Windows?
How to get Logic Pro X to work on a Windows PC using a Hackintosh method.
Other ways you can do this.
Let’s jump right in shall we?

WHAT IS LOGIC PRO X?
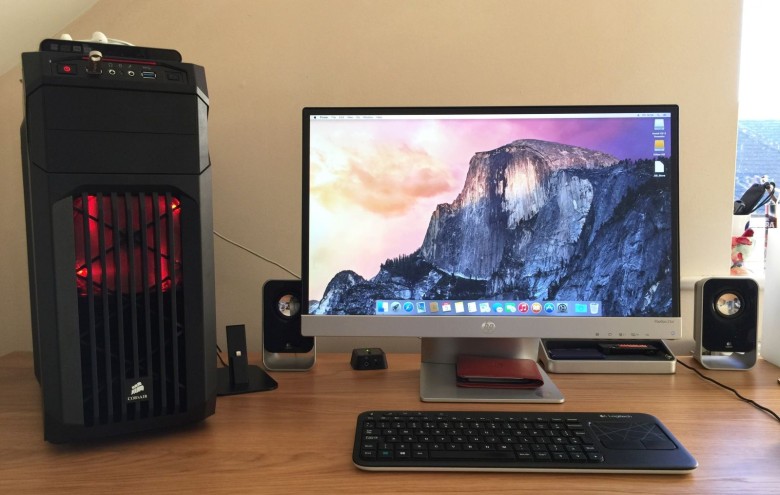
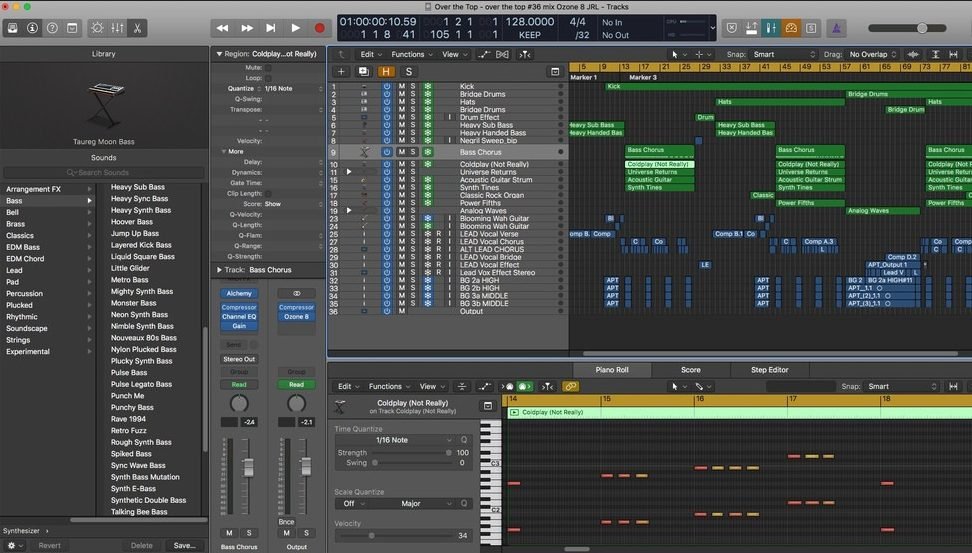
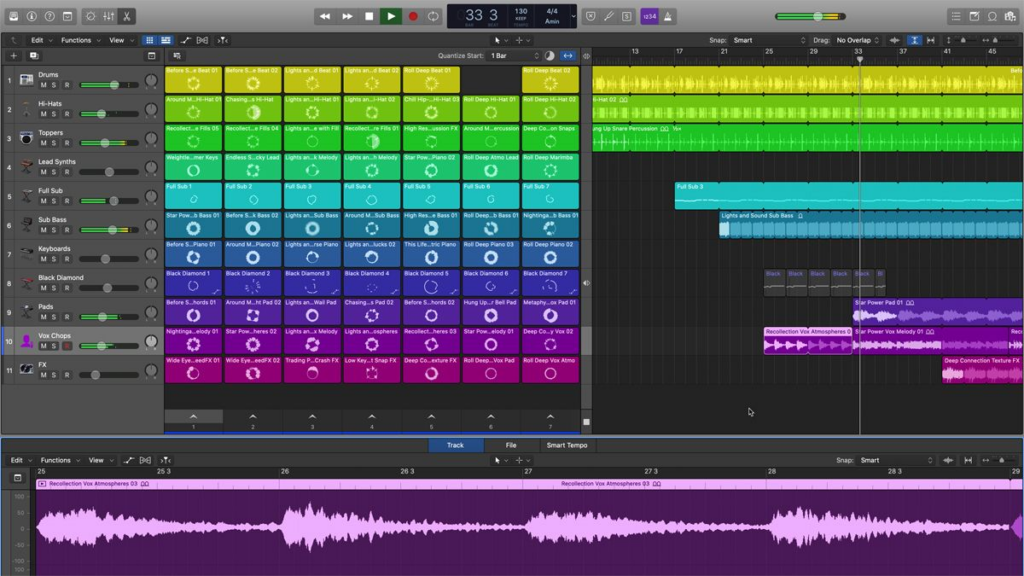
Logic Pro X is Apple’s flagship Digital Audio Workstation (DAW), used by recording engineers and producers alike, from the hobbyist to the industry leading professional. Logic Pro X allows users to record and manipulate audio, as well as program MIDI with a wide range of built in instruments, sounds, loops and effects. There are some really great built in VSTs that come with Logic, such as their Drummer program.
Here’s a rundown of some of its best features;
- Smart Tempo feature helps in matching the timing of your audio tracks automatically.
- Logic Remote feature allows your iPhone or iPad into a touch instrument with the support of a mixer with multi-touch and transport control.
- Flex Time and Flex Pitch features of Logic Pro tool allow Melodyne levels of pitch and time editing for audio such as vocals, guitar or drum sounds.
- Logic’s Track Stacks feature allows the merging of multiple related audio tracks into one.
- A vast library of loops and effects.
But it has always maintained its air of exclusivity because it is an Apple Mac product, and with their flashy hardware and hefty price tags, it can seem as though Logic is hidden behind a paywall for anyone using Windows. But is it? This leads us to the next section…
WHY WOULD YOU WANT TO USE IT ON WINDOWS?
Logic Pro X on a windows machine would allow you to access the great features of Logic Pro without having to pay huge amounts of money for some Mac hardware. Apple has always had a reputation for super expensive and flashy products, but with their most recent few releases of the Macbook Pro especially, things haven’t been so great for music producers. The amount of USB ports has reduced, as well as disk drives being a thing of the past.
However, if you have a Windows PC — which often cost a fraction of the price for a similar spec to a Macbook pro — you can get Logic to work.
Compared with Ableton Live, Logic has always had an advantage in its Audio editing and recording side. There have just been more options, a pretty good built-in pitch correction plug in, and even from a practical point of view, using Logic to record audio just runs more smoothly. It has also imported some helpful features from its little brother program Garageband; offering presets for audio channels with a rack of effects already in place for specific purposes. There are also some great plug-ins available; Logic’s EQ is great, but there are also Vintage EQ and advanced reverbs.
In short, Logic is a great program, so if you want access to it without having a Mac, read on…
HOW TO INSTALL LOGIC PRO X USING THE HACKINTOSH METHOD
When using Mac only software on Windows, you have to be prepared for a bit of a time consuming setup, but once you’re finished, you’ll be good to go. Many people go down the ‘Hackintosh’ route, which is to create a Windows PC hardware, then install macOS onto it. There are also ways to virtually run macOS on a Windows PC, which we will cover later. It’s worth nothing though that Apple doesn’t really want people installing macOS on anything other than Macs, so you have to be careful. In general, you’ll need a 64bit Intel Processor and you should be fine. As mentioned, some people build their own Custom PCs and then install macOS on it, while others do so on a machine they know is compatible, so just do whatever is in your budget, and make sure you check compatibility!
The first big tip is to create a backup of all your data, the last thing you want is to lose everything if you get one of the steps wrong!
Let’s look at the steps below:
- First, you’ll need a Mac on which you can download the OS Installer from the Mac App Store. Any Mac capable of running Mojave will work for this. You can also look at the software Unibeast from tonymacx86.com, which is a popular installer creation tool.
- Next, you’ll need a USB drive (at least 8gb) to put the installer on. You can find detailed guides on how to create an installer on the web, so make sure you check all your requirements and specs against one of these to ensure you’re doing it right.
- Then, using that installer, you can use Unibeast to install from onto your PC. It should give you an option for which drive you want to install macOS from. Navigate to ‘External’ and the macOS installer should begin. You’re one step closer to running Logic Pro X on a Windows machine!
- When it comes to selecting the drive onto which you want to install macOS, there may be no options to choose from. If this is the case, erase the drive and make sure you’ve formatted it to GUID and you should be good to go.
- Select the drive and step through the installer until macOS installation begins. Once you’re finished, restart the PC with the USB still in, and then the Unibeast boot menu will appear again, select the macOS boot disk and your PC will boot up macOS.
- Once it’s installed, launch Multibeast and configure your settings.
So, once all of this is complete, if you’ve followed each step you should have a piece of Windows hardware with macOS installed, and then you’re free to run Logic Pro X on the machine. It should be noted however that there are a few drawbacks to running macOS on a Windows PC.
Because it’s technically a hack (hence the term Hackintosh) you won’t be able to get the same software support from Apple as if you were using their hardware. There can also be compatibility issues with some hardwares, but that’s why it’s important to check your PC before you begin.
But what about creating a virtual version of macOS?
VIRTUAL VERSIONS OF MACOS
Using the Hackintosh method isn’t the only way to get macOS and Logic Pro X to run on Windows. However, it is usually the most straightforward and the most likely to work best. But read on anyway!
Creating a virtual machine on your hard drive is a great way to get programs that aren’t native to your operating system to work. It’s done a lot with creating a virtual Windows OS on a Mac, but there’s no reason you can’t do it the other way round.
Using softwares such as VMWare Fusion or the free tool VirtualBox is a great way to achieve this. But if this is the route you want to go down, you have to have a specially created virtual image of the macOS version you want to install, which can be tricky to come across. The process can sometimes be considerably trickier than the Hackintosh method listed above, too, so rather than explain myself, here is a great guide on using the Virtual Machine method to run macOS on a Windows computer.
WHAT NEXT?
So, if you’ve managed to successfully use one of the above methods, you’re ready to install Logic Pro X on your Windows computer. Remember, there may be some issues cropping up along the way, and you’re bound to run into these when running programs on operating systems that they aren’t native to.
However, if you have managed to make it work, you now have the powerful tools of Logic Pro X at your fingertips on a Windows Computer. So dive right in, explore all of the features Logic Pro offers and see what you can come up with.
Let us know in the comments below if you managed to make this work, and what your thoughts in general are on Logic Pro X and Windows. Do you think it should be made available to everyone? Or are you an Apple Mac purist?
As always, thanks for checking in with us here at Top Music Arts, and keep making music!
There is a plethora of sound editing software available in the market, but there is none to match the prowess of the Logic Pro X. Therefore, despite the fact that Logic Pro X has been developed by Apple for Mac users, there are plenty of Windows users who want to use this amazing software. The only problem is that they don’t know how to download and install Logic Pro in Windows 10 computer. In this tutorial, we will teach you how to achieve this objective in the simplest and fastest way possible.
Users who are unfamiliar with Logic Pro X may ask why to install this software when there are so many other sound editing software available. The most impressive feature of Logic Pro is that it’s simple and easy to use and even beginners can master it in a short period of time. This software supports hundreds of musical instruments and gives you access to thousands of sound effects. He is an all-in-one music producer, who can both record and edit sounds and comes with an auto-save feature.
How to Download and Install Logic Pro in Windows 10?
Downloading and installing Logic Pro X in Windows 10 is a multi-step process. First you will have to create a virtual machine in your Windows, then install Mac OS in it and finally install Logic Pro X. The whole process may seem complicated, but if you follow the steps given below, then you can easily complete it without making any mistake.
Step 1: Download Mac OS High Sierra ISO image for Virtual Box
You can download Mac OS High Sierra for Virtual Box from this download link. This file will have a .vmdk extension. You can download the file from anywhere, but make sure that it has the correct extension.
After downloading the file, extract it into a folder that is easy to locate as you will be visiting this folder soon.
Step 2: Check and Enable Virtualization in your Windows 10
Virtualization features must be active on your computer before you can create a virtual machine. To check whether this feature is active or not, you must follow the steps given below.
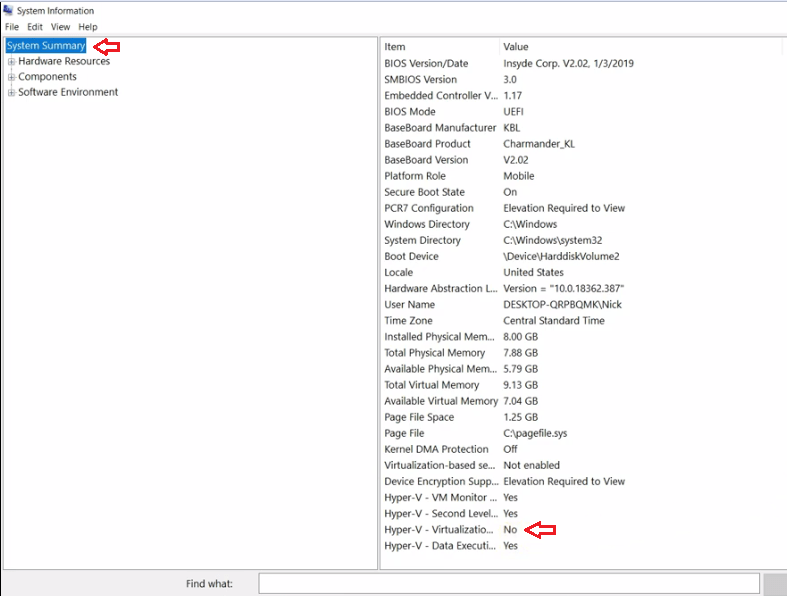
- Search ‘msinfo’ in search box and choose ‘System Information’.
- From the list of items in the System Summary, locate ‘Virtualization’ and check whether ‘Yes’ or ‘No’ is written in front of it. Yes means virtualization is active and No means it’s deactivated.

- You can activate virtualization in your PC BIOS. Follow the steps given below to activate this feature.
- Restart your computer and press the key that takes you to your PC BIO. This key can be F1, F2, F4, Esc or Delete depending on your computer.
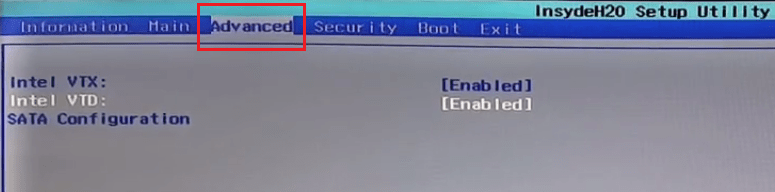
- Inside BIOS settings, look for CPU configuration items. It can be listed under Chipset, Advanced, Northbridge or Processor. In our case, it’s listed under the ‘Advanced‘ option.

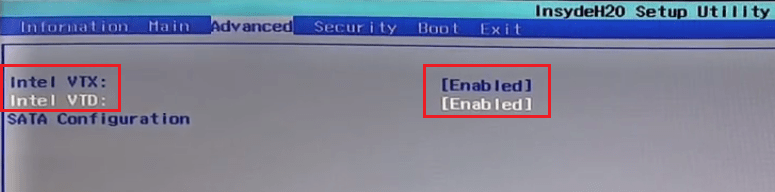
- To enable virtualization, you will have to enable options such as AMD-v, Intel VT-d, Intel VT-x, SVM, AMD IOMMU or Vanderpool. In our case, its Intel VTX and Intel VTD. We have enabled both the options.

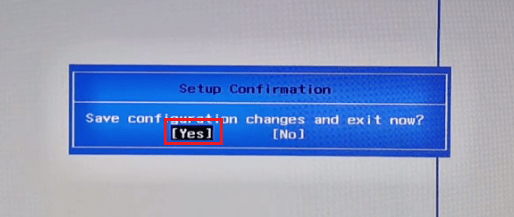
- Save the changes by pressing the F10 key in your BIOS and rebooting your computer.

- Recheck in System Information whether virtualization has been activated or not. Once activated, move to the next step.
Step 3: Download and Install Virtual Box
You will have to install Virtual Box in Windows 10 so that you can use Mac OS on a virtual machine.
- You can download Virtual Box by clicking on this download link.
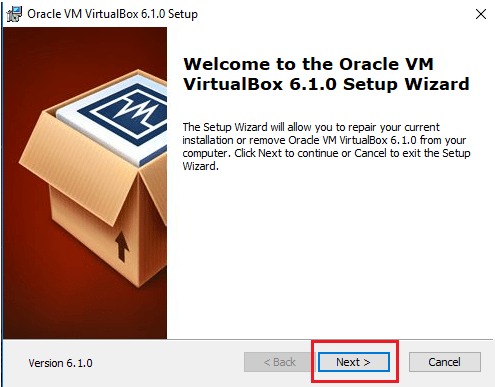
- After downloading the setup file, double click it to start the installation. Click ‘Next’ in the setup screen and proceed further to complete the installation.

Step 4: Setting-up your Virtual Machine
Follow the steps given below to setup a virtual machine using Virtual Box.
- Start Virtual Box, click ‘Machine’ and select ‘New’.

- Put a name for your virtual machine in ‘Name’ field (you will need it later). Choose version ‘macOS 10.13 High Sierra (64bit)’.
- Select the RAM size. It’s recommended to have at least 4GB RAM, but never go above 50% of your total RAM size.
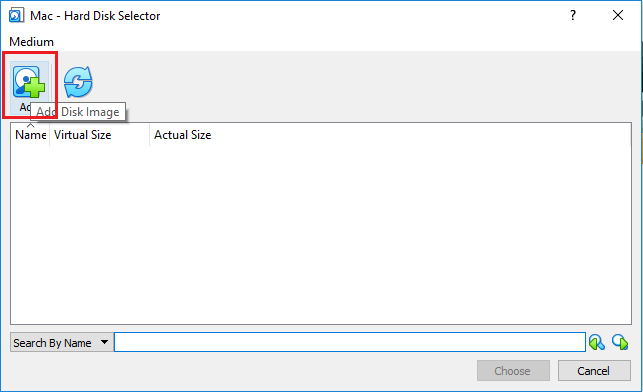
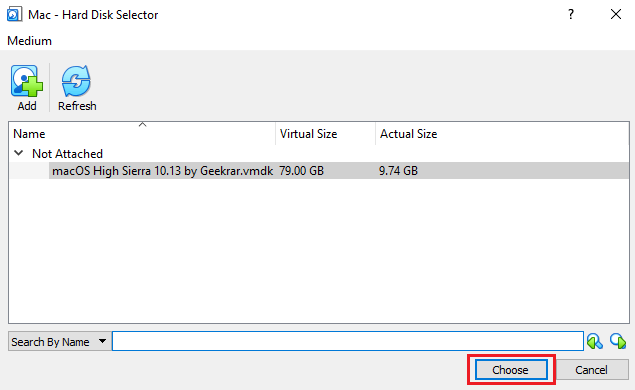
- Choose ‘‘Use an existing virtual hard disk file‘ and click ‘Folder‘ icon to browse for the file.
- Click on ‘Add’ button.

- Locate the .vdmk file you had extracted previously.
- Click ‘Choose‘ button.

- Click on ‘Create‘.

Step 5: Readying your Virtual Machine for Mac OS
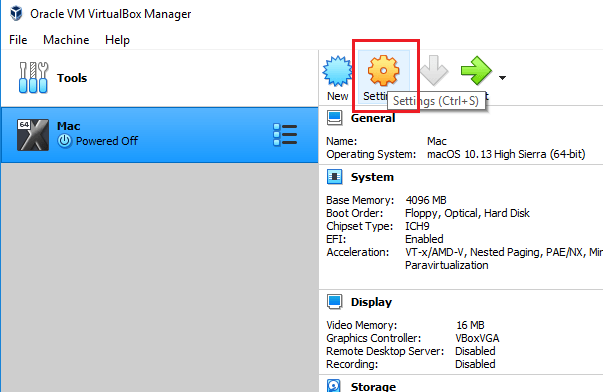
In the Virtual Box Manager, you will be able to see the virtual machine you created in the last step.
- Select your virtual machine, in this case ‘Mac’, and click ‘Settings’ button..

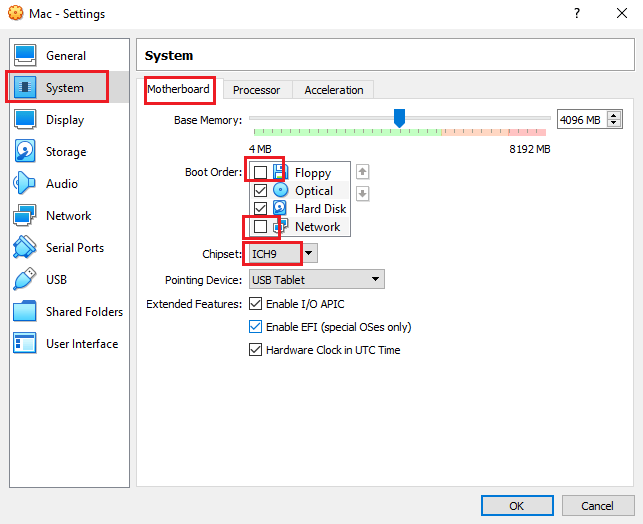
- In the System, click ‘Motherboard‘ tab, and uncheck ‘Floppy’ and ‘Network‘ options. In Chipset, choose ‘ICH9‘.

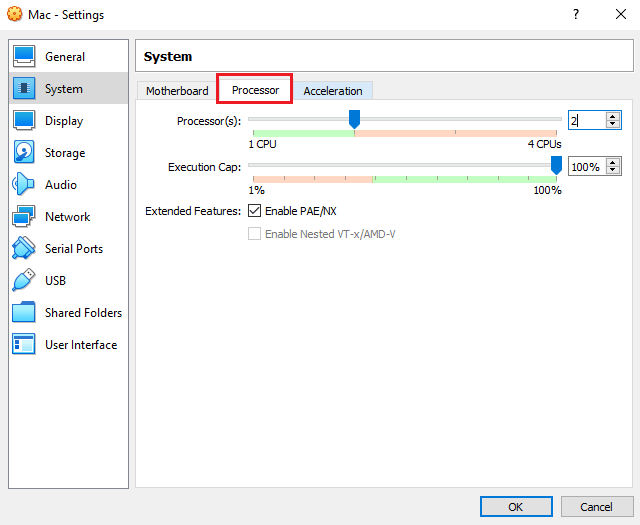
- In the Processor tab, choose at least 2, but never go more than 50% of the total processors in your real machine.

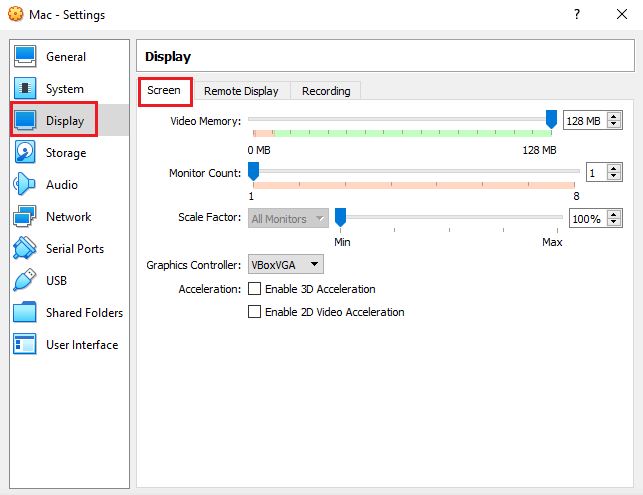
- Under the Display and under the ‘Screen‘ tab, select a video memory of 128 MB.

- Finalize all the settings by clicking ‘OK’.
Step 6: Adding Code and Installing Mac OS High Sierra
You will now have to add code to your virtual machine by using the Windows command prompt. Follow the steps given below to do this.
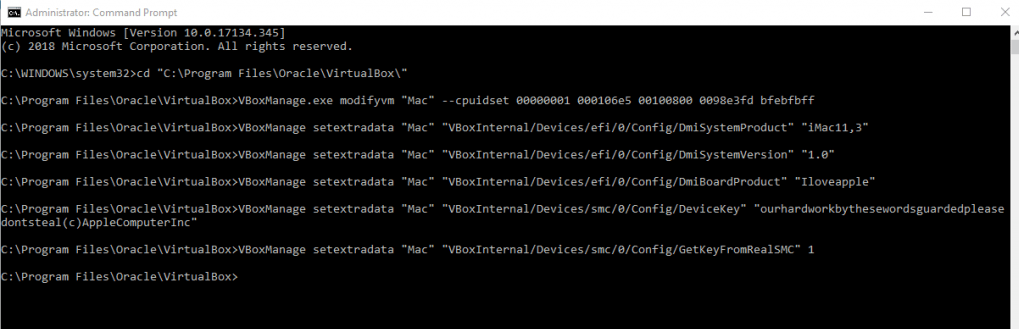
- Right click ‘Start‘ button and choose ‘Command Prompt (Admin)‘.
- Now enter the commands given below one-by-one in your command prompt. You can copy commands from here and paste them in your command prompt, but remember to change ‘Machine Name‘ with the name of your virtual machine. In our case, the virtual machine’s name is ‘Mac‘.cd “C:\Program Files\Oracle\VirtualBox\”
VBoxManage.exe modifyvm “Machine Name” –cpuidset 00000001 000106e5 00100800 0098e3fd bfebfbff
VBoxManage setextradata “Machine Name” “VBoxInternal/Devices/efi/0/Config/DmiSystemProduct” “iMac11,3”
VBoxManage setextradata “Machine Name” “VBoxInternal/Devices/efi/0/Config/DmiSystemVersion” “1.0”
VBoxManage setextradata “Machine Name” “VBoxInternal/Devices/efi/0/Config/DmiBoardProduct” “Iloveapple”
VBoxManage setextradata “Machine Name” “VBoxInternal/Devices/smc/0/Config/DeviceKey” “ourhardworkbythesewordsguardedpleasedontsteal(c)AppleComputerInc”
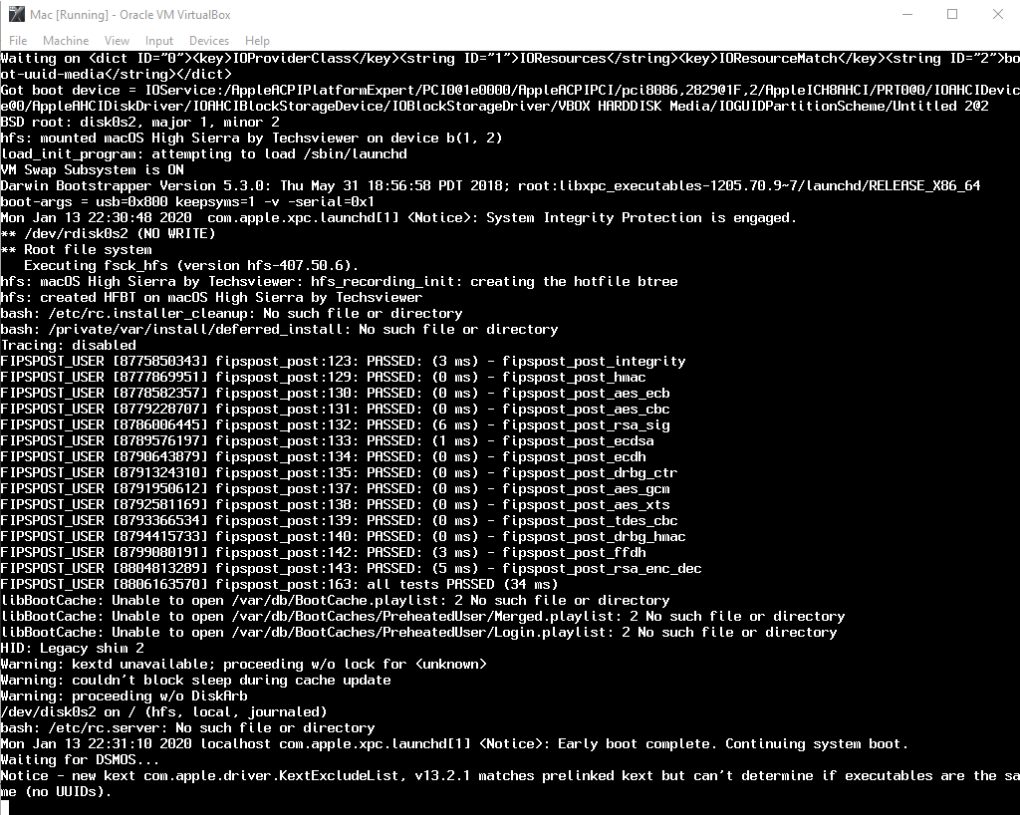
VBoxManage setextradata “Machine Name” “VBoxInternal/Devices/smc/0/Config/GetKeyFromRealSMC” 1 - Once you have entered all the code properly one-by-one, then the end result will look like the image given below.

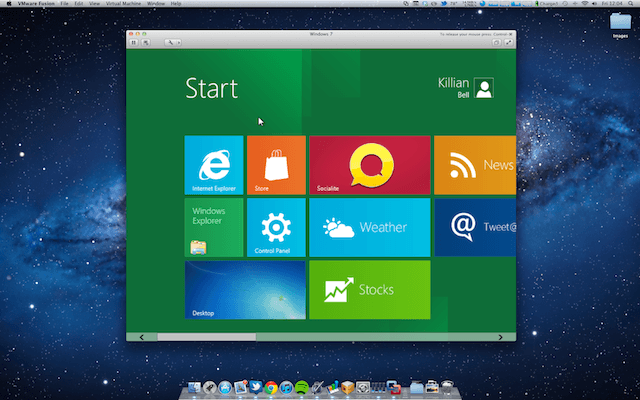
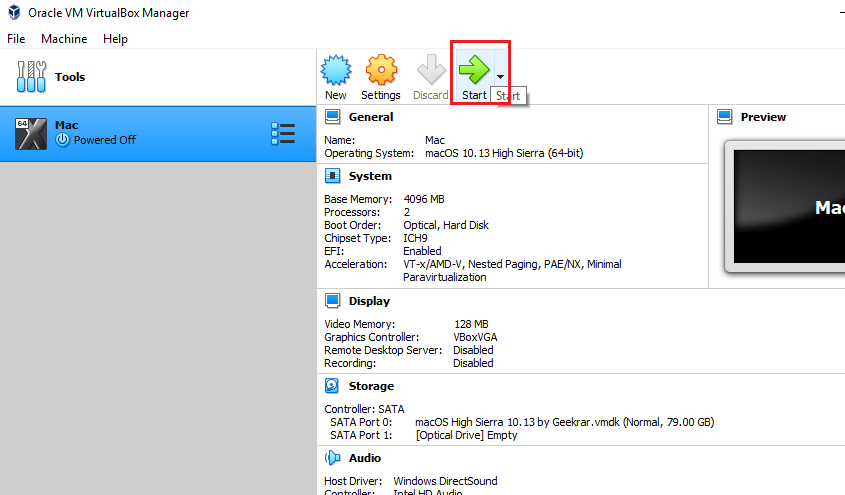
- Your virtual machine is ready for use. Click ‘Start’ button in the Virtual Box Manager.

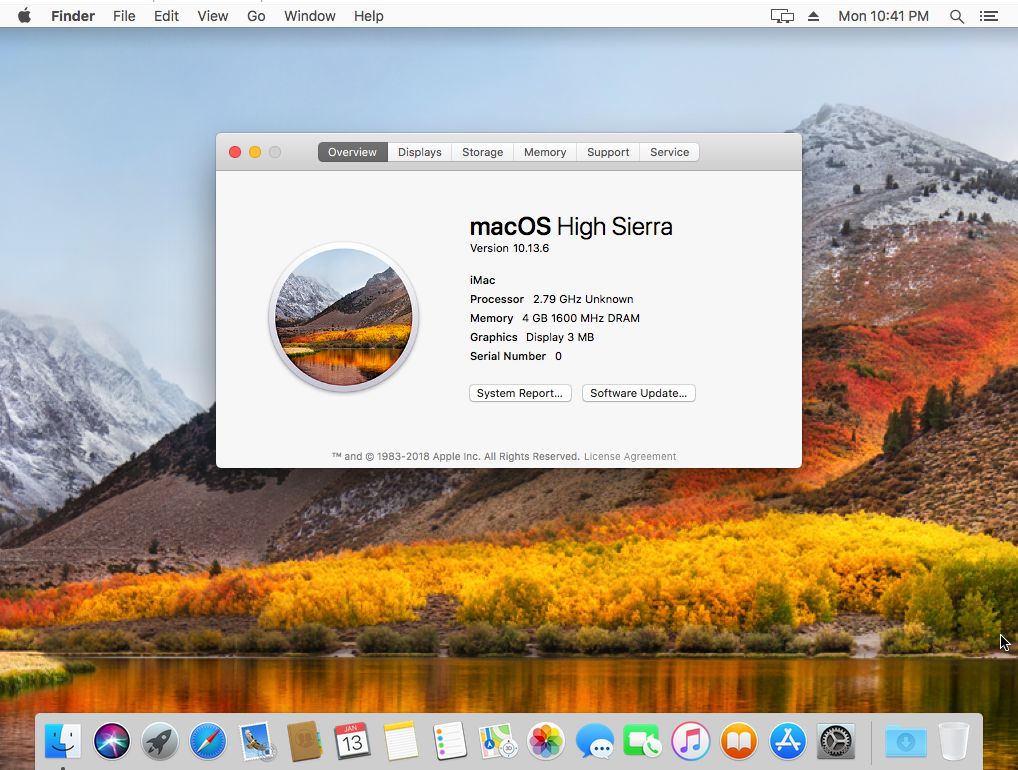
- You will see a screen similar to the image below. Please wait for some time.

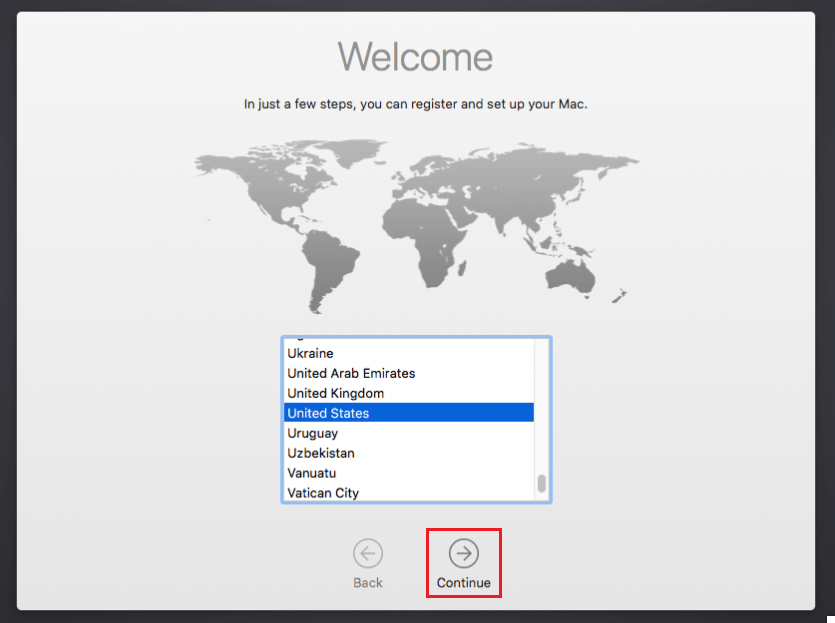
- You should now start setting up your Mac OS X. Start by selecting your country and press ‘Continue’.

- Choose Keyboard layout and click ‘Continue’.
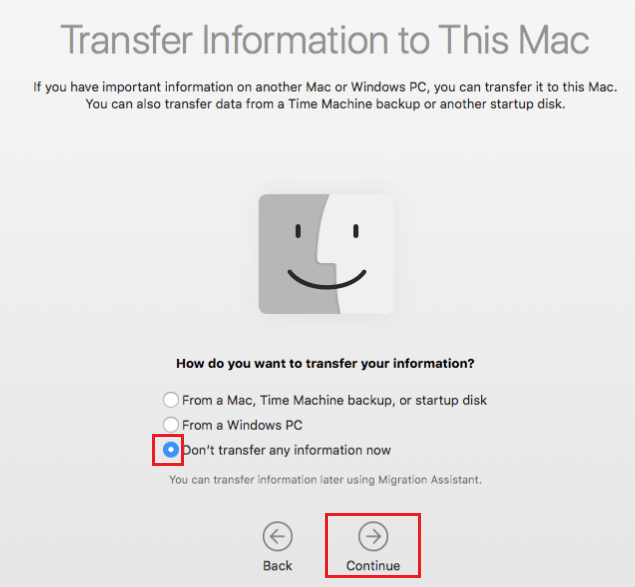
- Select ‘Don’t transfer information now‘ and click ‘Continue‘.

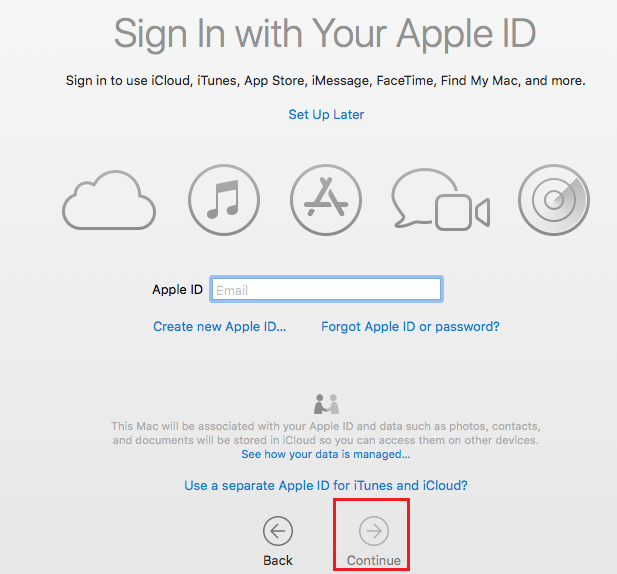
- You can choose to sign-in with your Apple ID now or you can do it later when you enter the Appstore.

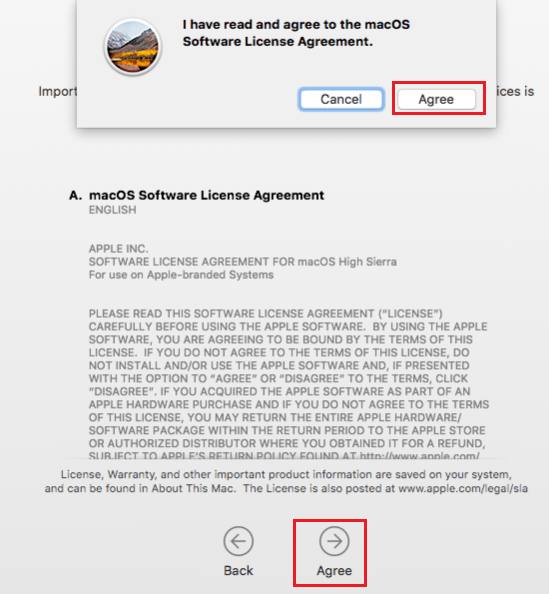
- Agree to the Apple License.

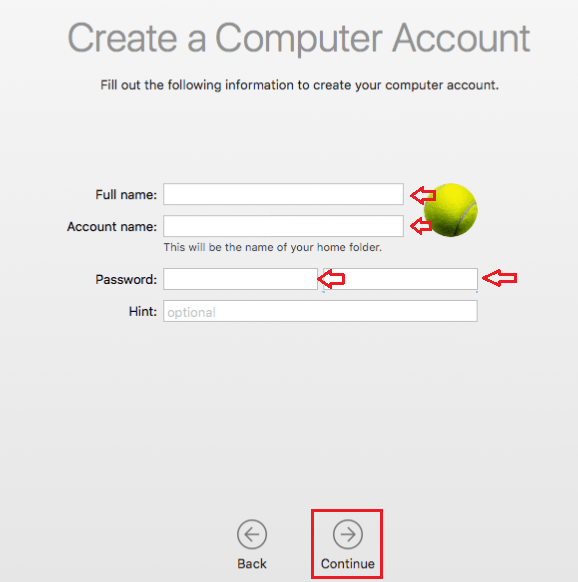
- Fill out your username and password, then click ‘Continue‘.

- That’s it, you have successfully installed Mac OS on your virtual machine.
Step 7: Installing Logic Pro X
Now it’s time to install Logic Pro X in your virtual Mac OS machine.
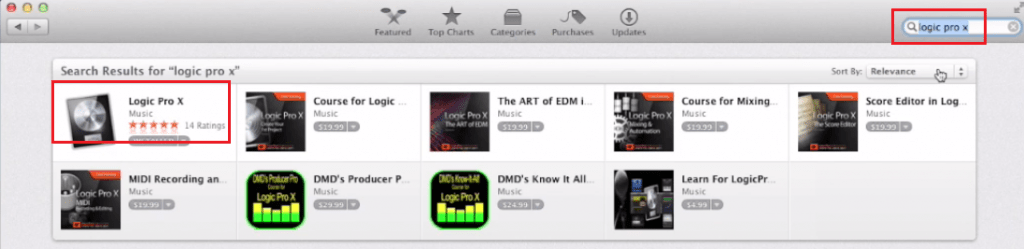
- Click Apple icon on the top-left corner and select ‘App Store‘.
- Search ‘logic pro x’ and select ‘Logic Pro X‘ from the search results.

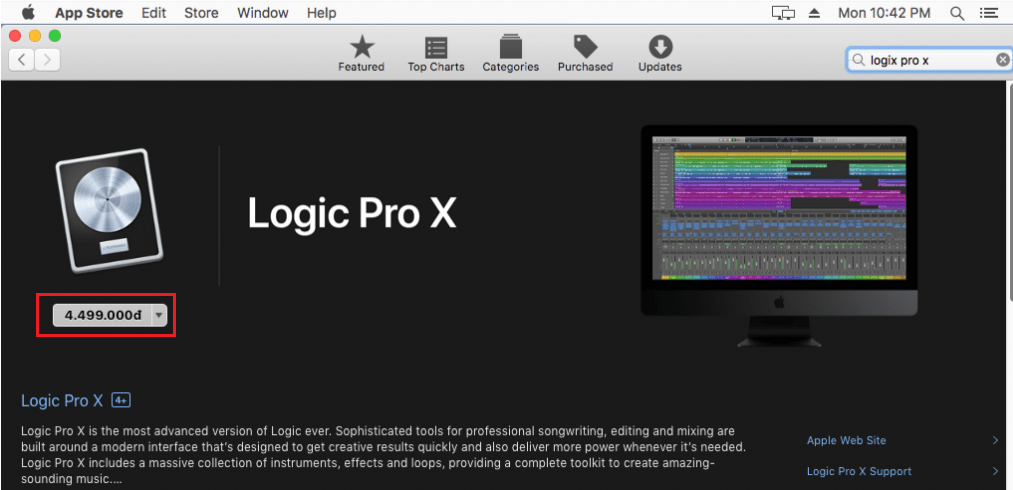
- If you have already purchased this program, then click the download button to start the download and installation of this app. If you haven’t purchased this app, then purchase it to activate the download option.

- That’s it.
My View
Several professional sound artists prefer Apple Logic Pro X for composing their music. If you are a beginner, then you will also find this application extremely useful. Don’t worry, if you have a Windows computer, because now you know how to download and install Logic Pro in Windows 10 computer.
Was this article helpful?
YesNo
Apple’s professional audio-producing program Logic Pro X comes with top-notch audio samples and loops, world-class electronic instruments, effects, and audio recording capability that all are included in the $199 suite.
In recent revisions to the suite, Apple has clearly focused on creators of well-known mainstream genres with Logic Pro X, including tools particular to electronic music and hip-hop sound production.
With professional songwriting, beat making, editing, and mixing, Logic Pro X upgraded to Flex Pitch, a fully integrated bespoke audio pitch modification tool, and drummer, an automated beat-creation device.
| Name | Logic Pro X For PC |
|---|---|
| Size: | 49 MB |
| Compatibility: | Windows 11, 10, 8.1, 8, 7, XP |
| Language: | English |
| Security: | Virus Free |
| Downloads: | 49,23,131 |
The latest version: Logic Pro X is one of the top software suites in the recording business right now.
Features of the Logic Pro X
1.Plug-ins enhanced for Spatial audio:
Enclosed pug-ins offer all the tools necessary to produce a skilled panoramic mix and are designed to operate in Dolby Atmos.
2.Live Loops:
Utilize a matrix of musical loops and themes to explore musical concepts while triggering and modifying them in real-time to produce your own tracks.
3.Remix FX:
With Reflections, Stutters, mixers, and gating techniques for DJ-style effects and transition to a single track or a whole mix.
4.Key Commands:
With Logic Pro X Key Commands one can compose at the speed of sound. Make your own customized collection of commands or else pick from curated ones for better.
5.Track Stacks:
Produce a single track out of several connected tracks. To easily build submixes use the summing stack. Alternately, make split and tiered instruments.
And many other features/ effects are now available for the users to produce/ compose a mix/track in a quirky-fun way.
Install Logic Pro X on Windows
- First step: You need to download macOS High Sierra File from any reliable web source and download the file, extract it into a folder using the extracting software WinRAR.
- Second step: Enable the virtualization option, next locate and access the PC BIOS. Visit https://www.virtualbox.org/wiki/Downloads webpage of VirtualBox and download the latest version for Windows. After the compilation, follow the on-screen instruction to set up the VirtualBox.
- Third Step: Now set up a virtual machine or virtual environment. The option to build a machine must be selected in the VirtualBox program. Make a NEW selection by clicking after selecting “CREATE A MACHINE.”
Choose macOS 10.13 High Sierra 64-bit from the version menu and provide a name.
Following completion of the previous processes, you will be prompted to select RAM (recommended that Virtual Machine use 4 GB of RAM).
A virtual hard disc file might be utilized when it comes to the hard drive and a dialogue box will appear; pick the ADD option and then pick macOS High Sierra from there.
Once the set-up of a virtual environment is done, you need to select the number of processors. You have to open the CMD and type commands.
By Changing the “Machine Name” with the name of your Virtual Machine. This all will help you to successfully install macOS.
- Fourth Step
To download Logic Pro X now go to the app store on your Windows virtual machine, search on the bar for Logic Pro X and download right away. Once you see it installed, Go ahead and use the Logic Pro X.
Alternatives for Logic Pro X
Listed below are some of the best alternatives to the Logic Pro X:
1.Cubase:
Cubase provides affordable, basic, and complex channel panels. It has a direct module channel assignment. Mixing is a breeze because you only need your keyboard. Additionally, it features a screen reader as well.
2.Nuendo:
Steinberg Nuendo has native Dolby Atmos workflow compatibility. Top production teams frequently employ Neudo for a variety of purposes including music, television, and more.
3.Puramix:
An excellent alternative that supports Dolby Atmos music, but it also has native workflow support rather than requiring you to install a plugin. Recordings with many tracks are faster. And reportedly, the only digital audio workstation that enables you to produce music that human ears perceive as analog.
Frequently ask questions:
Q1. Is there a free version of Logic Pro X?
Ans: Yes, there is a 90-day trial of the latest version of Logic Pro.
Q2. IS Logic Pro X the best DAW?
Ans: Logic Pro X has been leading among the other software.
Q3. Is Logic Pro a one-time purchase?
Ans: Yes, One can purchase with a one-time payment of $199.99 USD.
Conclusion:
Logic Pro X provides better features for recording and song mixing using a huge library of free downloadable loops and digital instruments. It is a straightforward program with many capabilities in the new version. If you are a Mac user, then totally should go for this music production software. It is also reasonably priced and produces an output of professional quality.
Logic Pro X is a powerful digital audio workstation (DAW) that has gained immense popularity among music producers and recording artists. However, one drawback of Logic Pro X is that it is only officially available for macOS. This leaves Windows users wondering if they can still use this software on their machines. In this step-by-step tutorial, we will explore the possibility of running Logic Pro X on Windows and guide you through the installation process.
Exploring Compatibility Options
While Logic Pro X is designed exclusively for macOS, there are a few workarounds that can potentially allow you to run it on a Windows system. One option is to use virtualization software like VMware or VirtualBox to create a virtual machine running macOS. By doing so, you can essentially emulate a Mac environment on your Windows PC.
Another option is to utilize a dual-boot setup, where you install macOS alongside your existing Windows operating system. This method requires creating separate partitions on your hard drive and installing macOS on one of them.
Both of these approaches have their own advantages and disadvantages, so it’s important to weigh them carefully before proceeding with the installation process.
If you decide to go with the virtualization route, the first step is to install virtualization software such as VMware or VirtualBox on your Windows machine. These programs allow you to create virtual machines and run different operating systems within them.
Once installed, you will need to obtain a copy of macOS from Apple’s App Store or other reliable sources. Follow the instructions provided by the virtualization software to create a new virtual machine using the macOS installer file.
Configuring Your Virtual Machine
After creating the virtual machine, it’s time to configure its settings. Allocate sufficient resources like CPU cores, RAM, and disk space based on your system’s capabilities and the demands of Logic Pro X. It is recommended to allocate at least 8GB of RAM to ensure smooth performance.
Next, you will need to enable virtualization features like VT-x/AMD-V in your computer’s BIOS settings. This step is crucial as it allows the virtual machine to access hardware resources more efficiently.
Installing Logic Pro X
With the virtual machine configured, you can now proceed with installing macOS and Logic Pro X. Follow the on-screen instructions provided by the macOS installer to set up your virtual Mac environment.
Once macOS is installed, open the App Store and sign in with your Apple ID. Search for Logic Pro X and purchase/download it just like you would on a real Mac. After the installation is complete, you can launch Logic Pro X and start creating music.
It’s worth mentioning that running Logic Pro X on a Windows system through virtualization may not offer the same level of performance as using it natively on a Mac. Factors such as hardware limitations and compatibility issues can affect its overall functionality. Therefore, it’s important to consider these factors before committing to this setup.
Conclusion
While Logic Pro X isn’t officially supported on Windows, there are methods available that allow users to run this powerful DAW on their Windows machines. By utilizing virtualization software or setting up a dual-boot system, Windows users can enjoy all the features and capabilities that Logic Pro X has to offer.
However, it’s important to keep in mind that these workarounds may not provide an identical experience to using a genuine Mac machine. Factors such as performance limitations and potential compatibility issues should be considered before deciding whether running Logic Pro X on Windows is right for you.
This text was generated using a large language model, and select text has been reviewed and moderated for purposes such as readability.
MORE FROM SMARTER.COM
Logic Pro is an audio editing software many OS X users have been using for a long time, and Windows users can only dream of using it. Developed by Apple, Logic Pro For Windows provides the perfect digital audio workstation on the Windows machine.
When it comes to audio mixing and editing, your initial perception is that you will need professional studio-grade equipment. This software’s core is a comprehensive range of features designed to provide easy audio editing.
What is Logic Pro?
Logic Pro X is the latest and updated version of Logic Pro with more advanced features and a new UI. If you don’t have a mac, then don’t worry. This article will guide you to Download Logic Pro For Windows 10 and 8 OS. You can do this with virtual machines like Virtual Box and VMWare.
Logic Pro is developed and designed only for Apple devices. So officially, Logic Pro is not available for Windows 10. But Mac OS x Supports Intel-based computers; you can install Mac OS on Windows. Logic Pro X for Windows can be only possible with this method.
Guide to Download Logic Pro for Windows 7/8/10
So the first thing you will need is MacOS. Without MacOS, you cannot use Logic Pro. The good news is that you can install macOS on your Windows machine.
Logic Pro X comes with excellent digital instruments, special effects, and built-in tracks.
Features of Logic Pro
- You can record and edit MIDI files with advanced track editors.
- It has Amp Designer that will help you to design the guitar.
- It comes with the support of over 750 digital instruments, a Touch Bar on MacBook Pro, and 2700 effect patches.
- You can manipulate the tempo of the record.
- Create remix music.
Install And Run Logic Pro For Windows PC
The Logic Pro X is not officially available for Windows OS, but you can use macOS to download and use Logic Pro X on Windows Machine.
Requirements for Logic Pro?
So after we made a test running this software on all operating systems for at least one month of intensive testing, we worked on :
- Windows 7, 8, and 10 (it’s running a bit slow on Windows 7)
- Mac OS File
- VMware
Step 1: Download the macOS High Sierra OS file.
Once downloaded, extract the OS file.

Step 2: Download VMware from here. You can also use Virtual Machine from here. We are using a virtual box for this guide.

For this process, you have to enable BIOS Virtualization. If you don’t know how to do it, follow the process.
Step 3: Download and install VMware or Virtual Box on your Windows and open it.
Step 4: Now click on “Open a New Virtual Machine.”
Create a new machine and then enter the name of that machine.
Then select the version of macOS, which is10.13 High Siera 64bit.
You have to set the RAM size, which should be 4GB.
Tick on “Use an existing virtual hard disk file,” then click into a folder icon and click on the add icon.
Choose a .vmdk file that is downloaded and then extracted.
Then click Choose and then click on create.
Now you are good to go. Click on power on the virtual machine.
Choose the Number of processors.
- 2 Processor
- 2 Number of cores per processor
Now open cmd and enter these commands.
cd “C:\Program Files\Oracle\VirtualBox\”
VBoxManage.exe modifyvm “Machine Name” –cpuidset 00000001 000106e5 00100800 0098e3fd bfebfbff
VBoxManage setextradata “Machine Name” “VBoxInternal/Devices/efi/0/Config/DmiSystemProduct” “iMac11,3”
VBoxManage setextradata “Machine Name” “VBoxInternal/Devices/efi/0/Config/DmiSystemVersion” “1.0”
VBoxManage setextradata “Machine Name” “VBoxInternal/Devices/efi/0/Config/DmiBoardProduct” “Iloveapple”
VBoxManage setextradata “Machine Name” “VBoxInternal/Devices/smc/0/Config/DeviceKey” “ourhardworkbythesewordsguardedpleasedontsteal(c)AppleComputerInc”
VBoxManage setextradata “Machine Name” “VBoxInternal/Devices/smc/0/Config/GetKeyFromRealSMC” 1
Replace your Machine name with “Machine Name.”

Step 9: Now, it will install macOS on your system. Follow on-screen instructions. Choose a language, and keyboard layout, Enter Apple ID, and agree to license.
Once installed, you will see a screen like this.
Step 10: Now, go to App Store and download Logic Pro X to download Logic Pro.

Start downloading and use it.
Here is how you can download and use Logic Pro on Windows OS.
Also Read: Reinstall Realtek HD Audio Manager on Windows 10
So if your system runs one of the OS above, you are ready to go to the next step ( to download the software ).
Logic Pro Alternatives for Windows
Logic Pro has released a new version called Logic Pro X. many other apps are similar to Logic Pro for Windows. Here is a list of some best Logic Pro Alternatives for Windows 10.
1. Audacity
Audacity is the most popular and free open-source software that allows users to edit audio files. Audacity comes with many advanced editing tools.
2. LMMS
LMMS is open-source audio software that allows us to edit audio files on your Windows PC. You can download LMMS for free.
3. GarageBand
GarageBand is the most famous music creation app for Mac users. GarageBand for Windows is also possible with iOS emulators. The software is free, and it comes preinstalled on a Mac computer.
Other Apps like Logic Pro:
- Ableton Live
- Pro Tools
- FL Studio
- WavePad
- Cubase
Logic Pro FAQs
Many users face issues with Logic Pro and Logic Pro X with Mac. Also, there are many questions in the user’s mind. Here are some FAQs related to Logic Pro for Windows.
Can we get Logic Pro X for Windows 7?
Yes, you can, but you must install Mac on your Windows PC. Mac OS is compatible with Intel.
How can I download Logic Pro X for free?
You can download it from the official website of Login pro X.
If we can’t find the problem, you need to open the Open Event Viewer and send the logs because it’s stored the problem you have.
How much does Logic Pro X cost?
Logic Pro X is available for $199.99.
Is Logic Pro X good?
Logic Pro X is the best music production software. There is no comparison for Logic Pro.
Is Logic Pro X available for Windows?
Sadly, it is unavailable for Windows, but you can use other Logic Pro X Alternatives.
Is Logic X Pro free?
No, it is not Free.
That’s all.