
Все способы:
- Способ 1: Приложение «Параметры»
- Способ 2: Меню «Дополнительные параметры мыши»
- Способ 3: Ручной импорт указателей
- Вариант 1: Автоматическая установка
- Вариант 2: Выбор указателей вручную
- Способ 4: RealWorld Cursor Editor
- Вопросы и ответы: 1
Способ 1: Приложение «Параметры»
Обладателям Windows 11 открывается достаточно много различных настроек персонализации, к которым относится и внешний вид курсора мыши. Проще всего изменить его стиль, цвет и размер через приложение «Параметры», поэтому и предлагаем остановиться на этом методе в первую очередь.
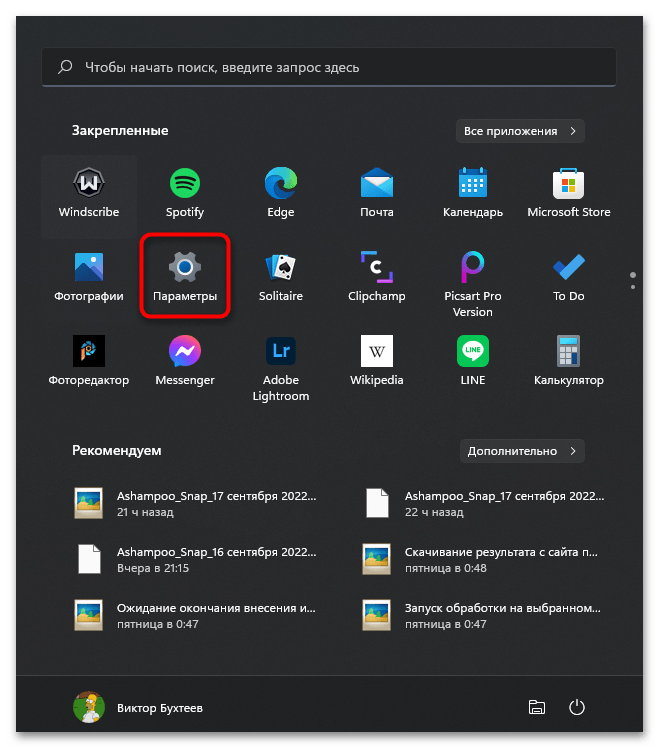
- Откройте меню «Пуск», в списке закрепленных значков найдите «Параметры» и нажмите по соответствующей иконке с изображением шестеренки.
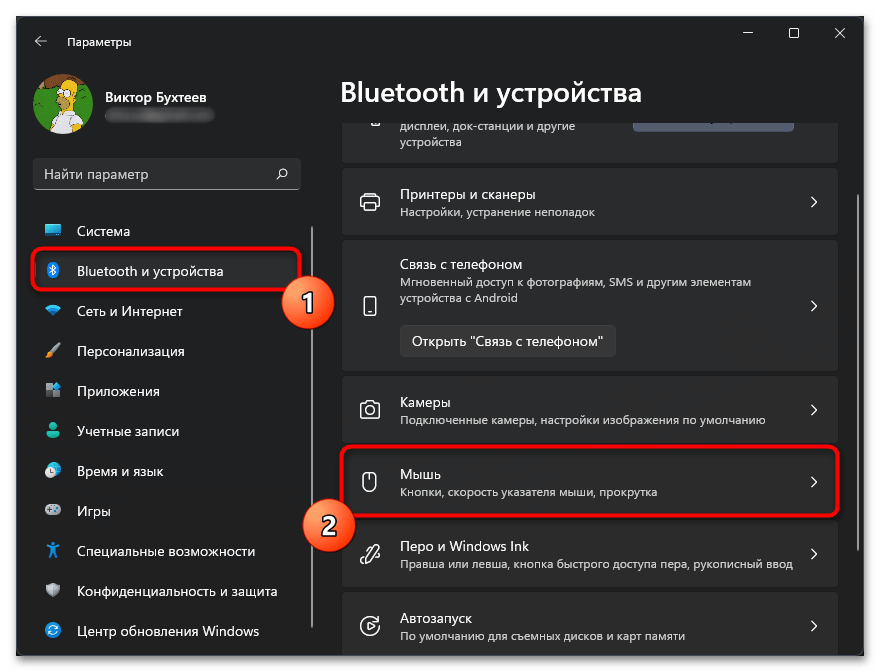
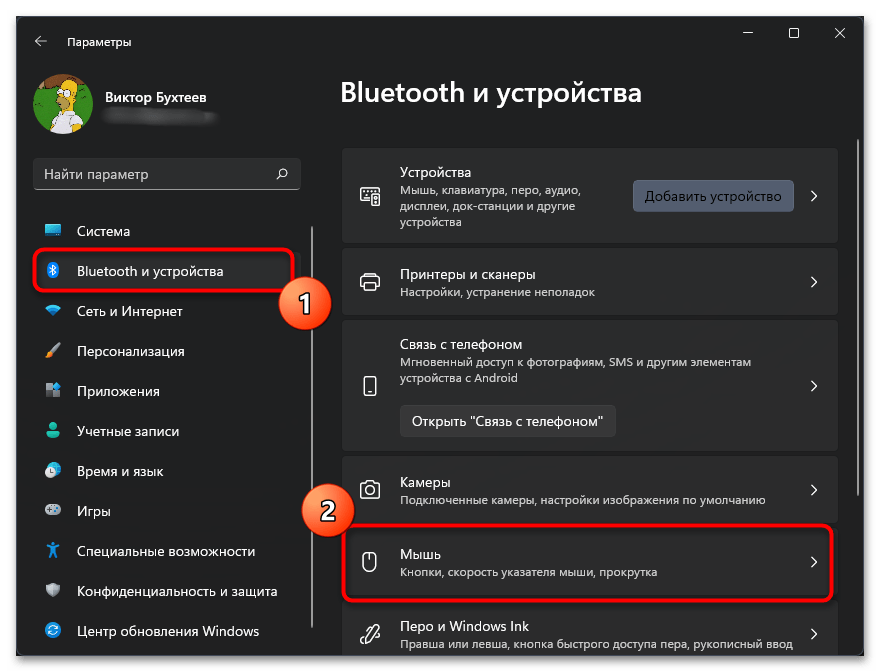
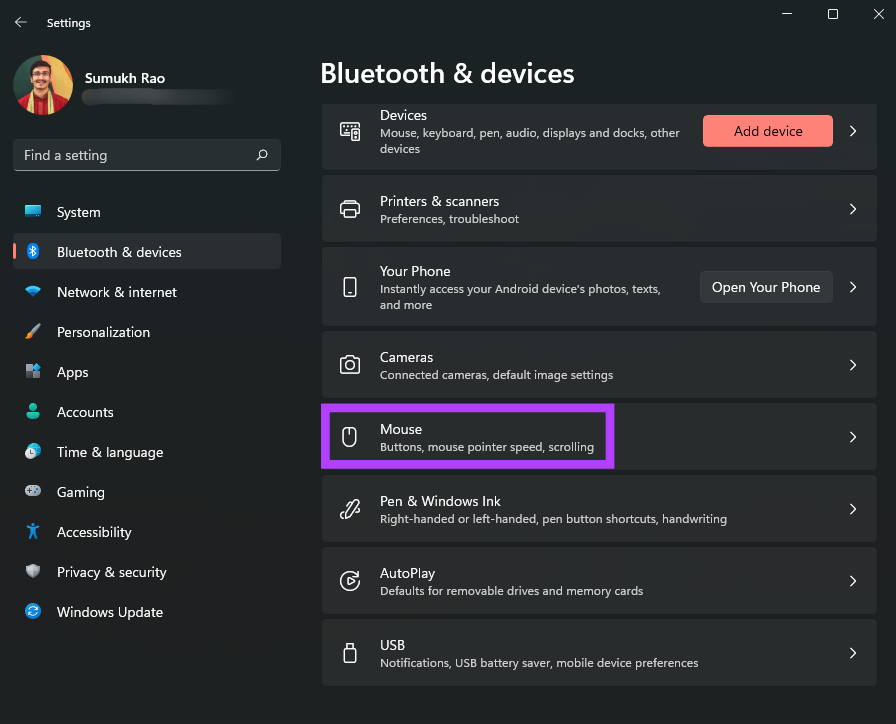
- После открытия нового окна переключитесь в раздел «Bluetooth и устройства», затем на панели справа отыщите плитку «Мышь».
- После нажатия по этой плитке вы перейдете в категорию для настройки мыши, где следует выбрать дополнительное меню — «Указатель мыши».
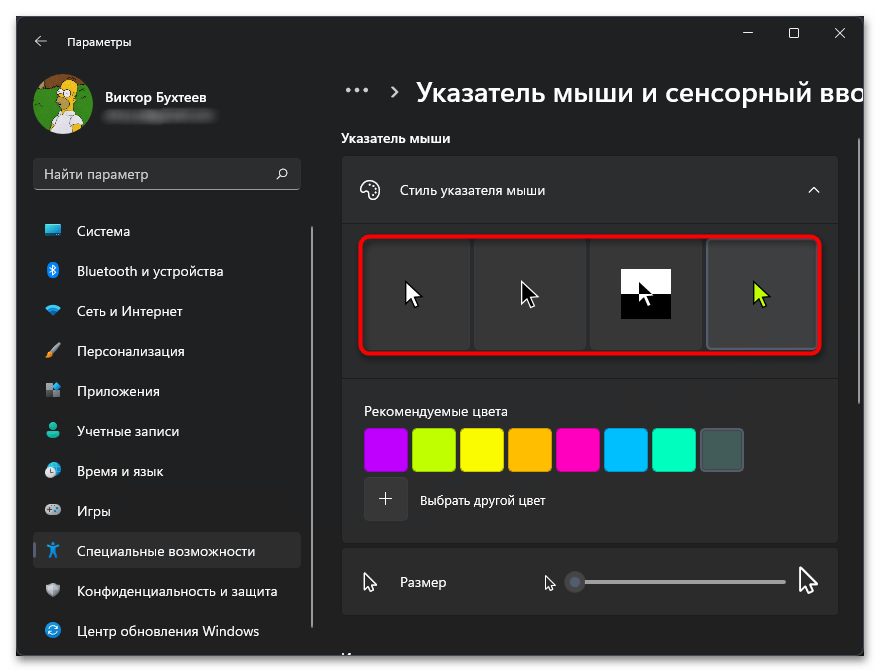
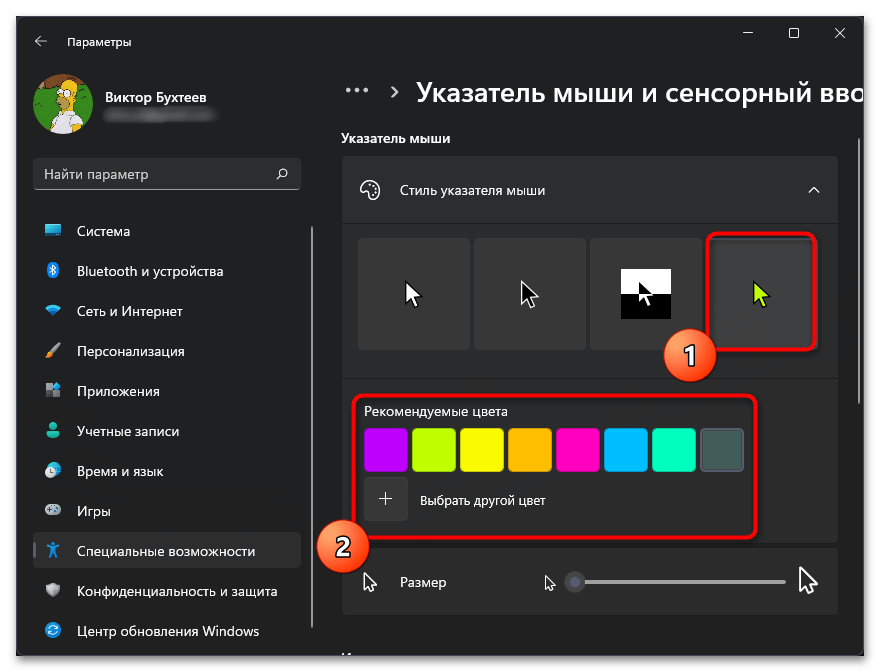
- В нем будут четыре стандартных стиля курсора, предлагаемые Windows 11. Можете выбрать среди них конкретный, если видите подходящий.
- Цвет изменяется только для одного стиля, поэтому в остальных трех случаях данный параметр будет недоступен, что следует обязательно учитывать при настройке.
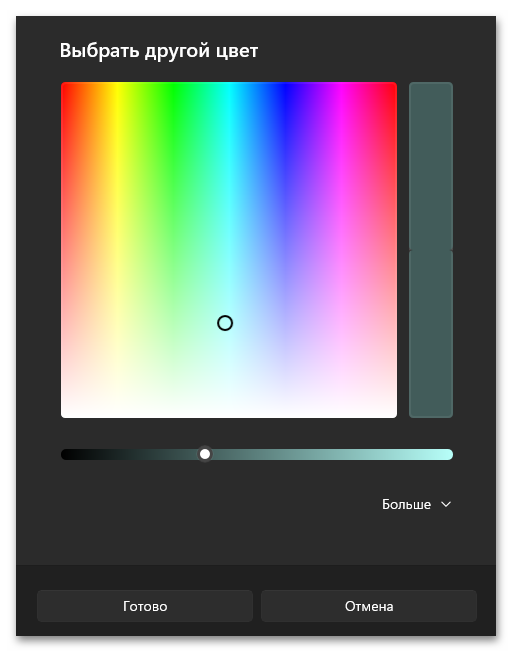
- При выборе цвета для последнего стиля вы можете нажать кнопку «Выбрать другой цвет», чтобы раскрыть расширенную палитру. Через нее очень удобно выбрать подходящий оттенок.
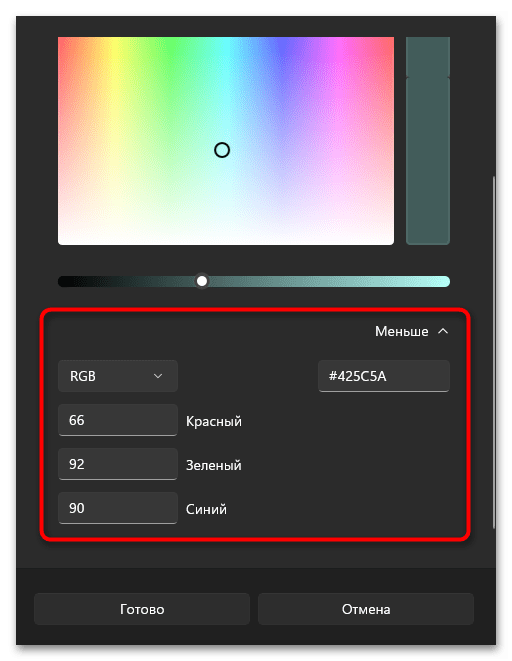
- Вместе с этим поддерживается ручной ввод значений в RGB или HEX, если вам известен номер подходящего оттенка.
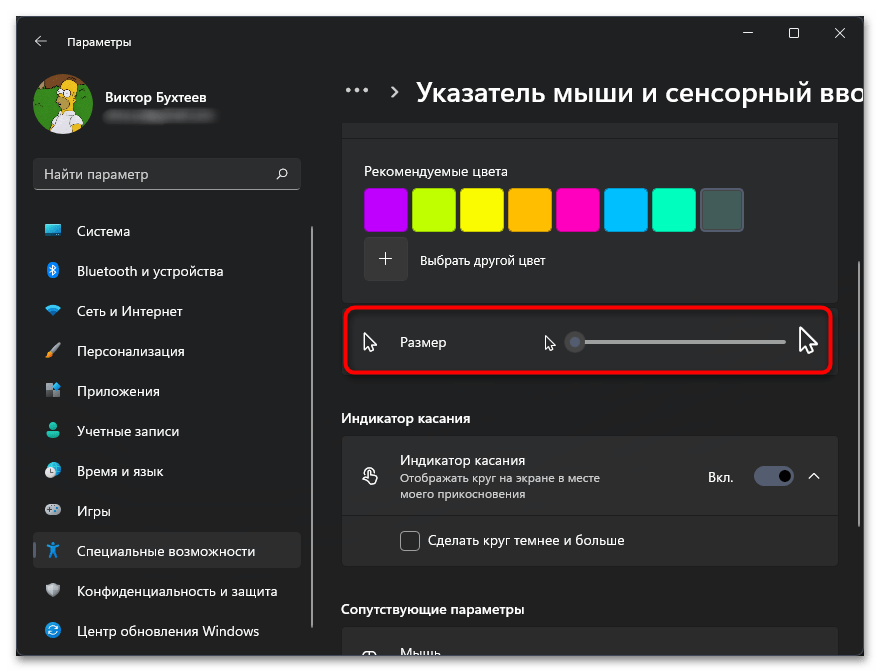
- Под блоком с настройкой текста находится ползунок, предназначенный для изменения размера курсора. Передвигайте его вправо, чтобы сделать больше. Изменения будут видны в режиме реального времени, что позволит максимально быстро подобрать значение.
Это были настройки для стандартного курсора, который вы всегда видите на экране своего монитора. Да, их не так много, в этом меню собраны только основные параметры. Вместе с ними предлагаются несколько полезных опций для текстового курсора, который отображается при вводе текста. Давайте рассмотрим и их, ведь это может быть полезно многим пользователям.
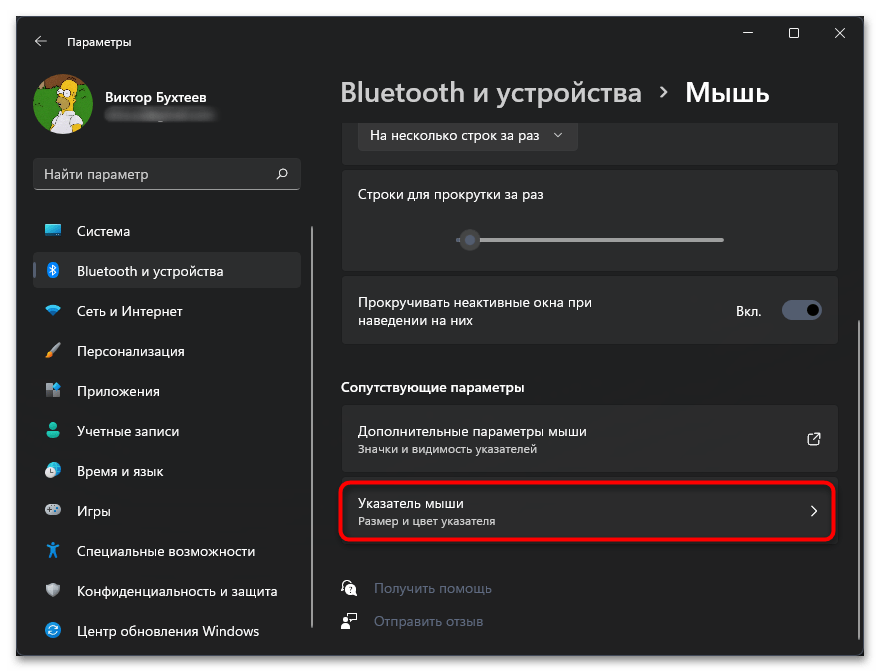
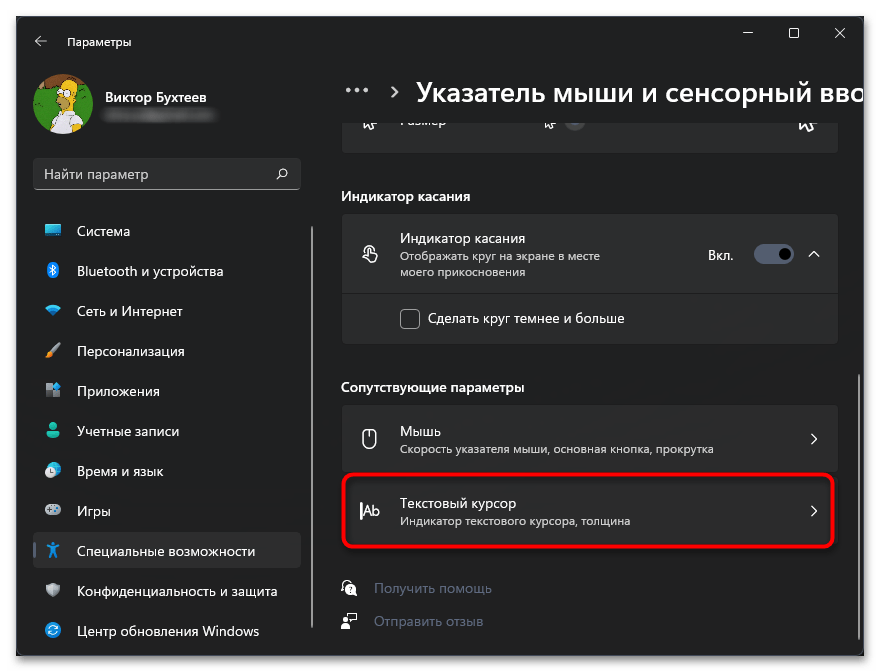
- В этом же меню с настройками указателя опуститесь к блоку «Сопутствующие параметры» и нажмите по пункту «Текстовый курсор».
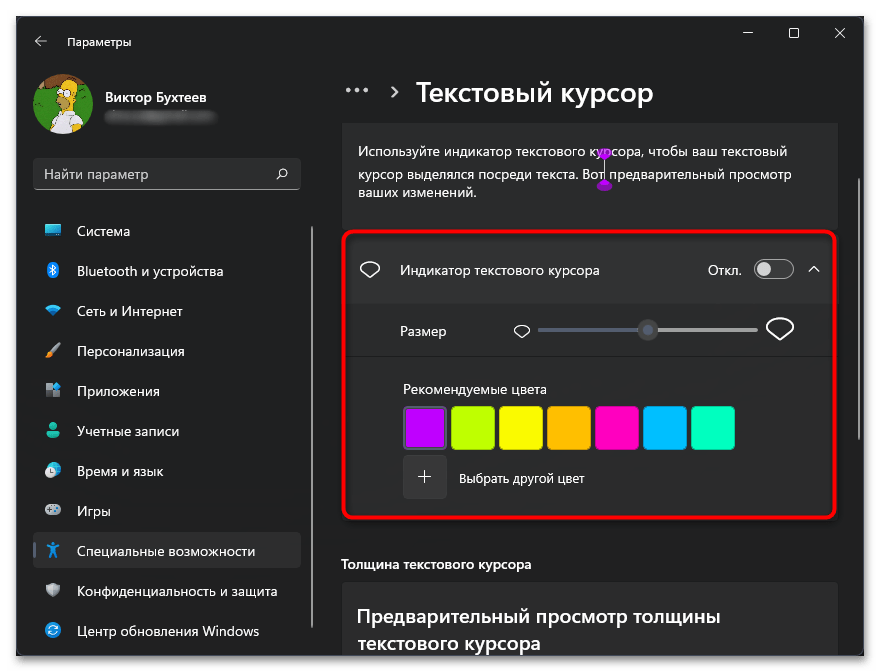
- Вы можете включить индикатор, чтобы курсор выделялся посреди текста. Пример такого отображения показан в окне. Для этого индикатора доступно регулирование размера и установка нового цвета.
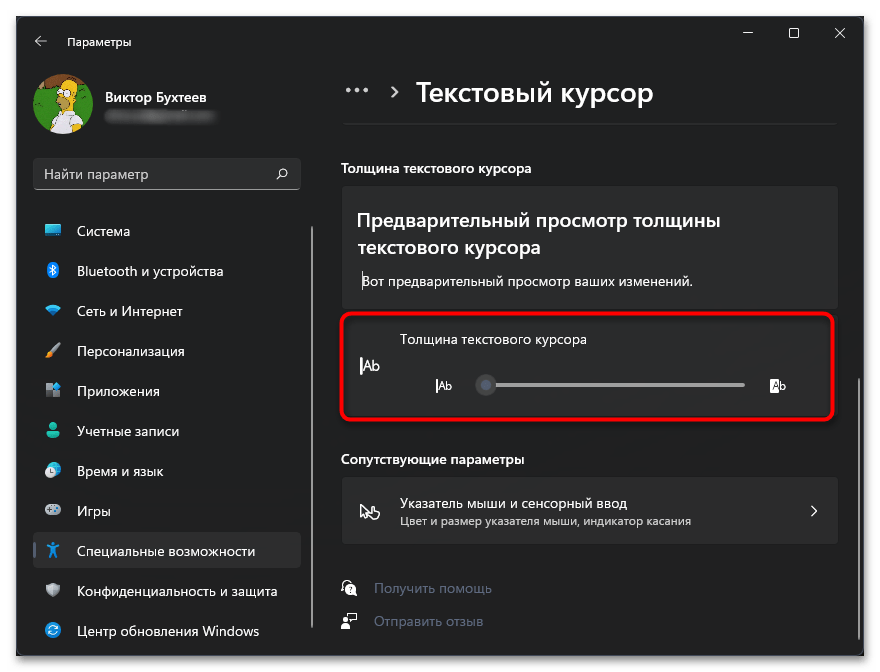
- Ниже вы увидите ползунок «Толщина текстового курсора». Передвиньте его немного вправо, если хотите сделать эту черточку, появляющуюся между символами при наборе текста, более заметной.
Способ 2: Меню «Дополнительные параметры мыши»
Пока что разработчики не перенесли все существующие настройки мыши в Windows в один раздел «Параметров», поэтому некоторые доступны только в отдельном окне. В нем вы найдете значительно большее количество разных стилей, а также сможете изменить значки каждого типа курсора на свое усмотрение.
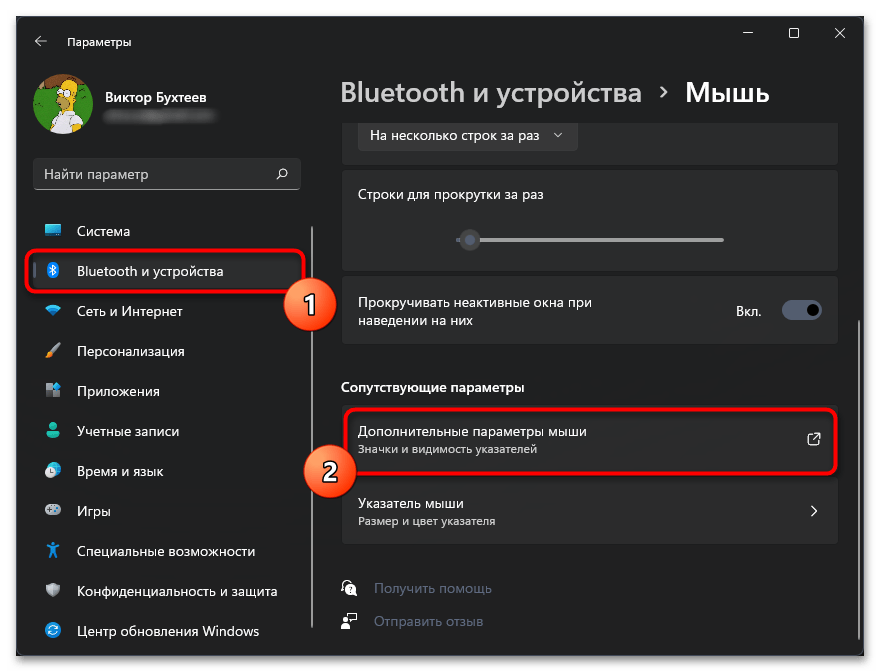
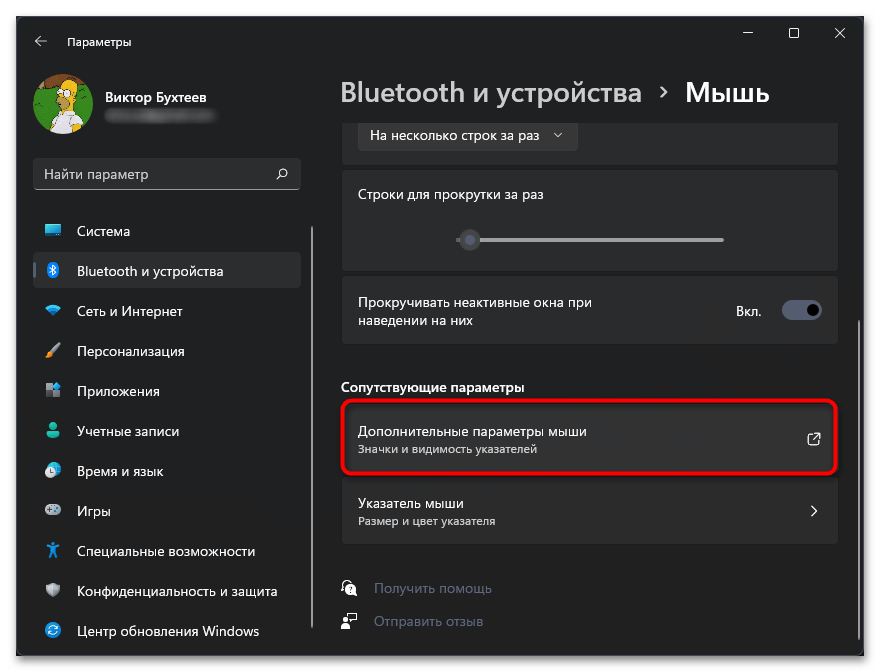
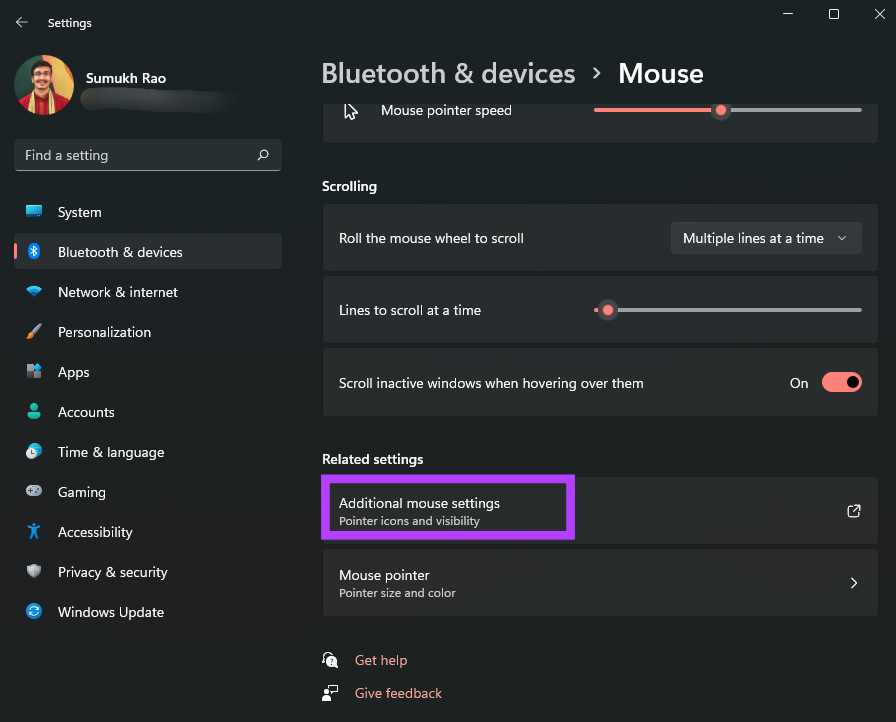
- Перейти к необходимому окну можно через «Параметры», находясь в категории «Мышь» раздела «Bluetooth и устройства». Для этого понадобится нажать по кнопке «Дополнительные параметры мыши».
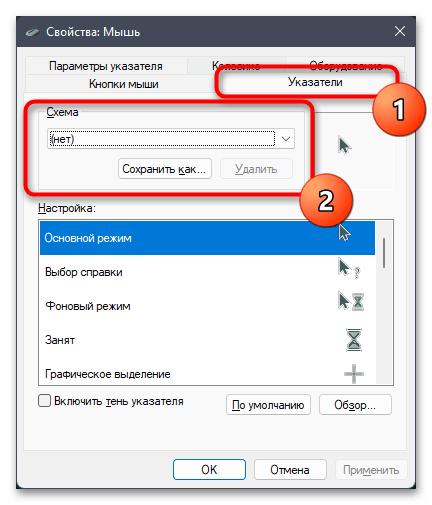
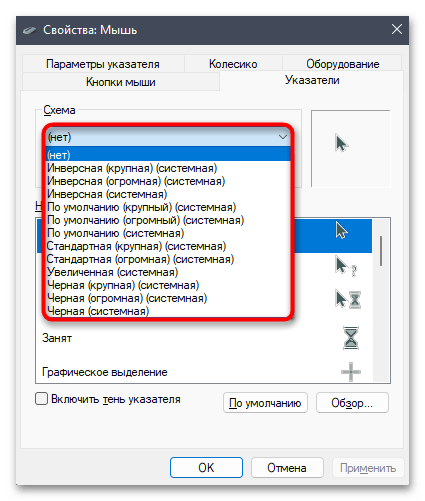
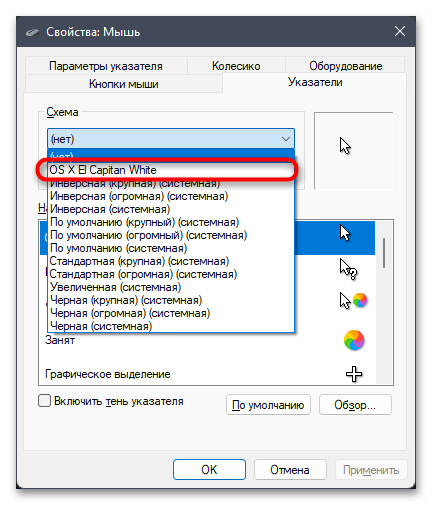
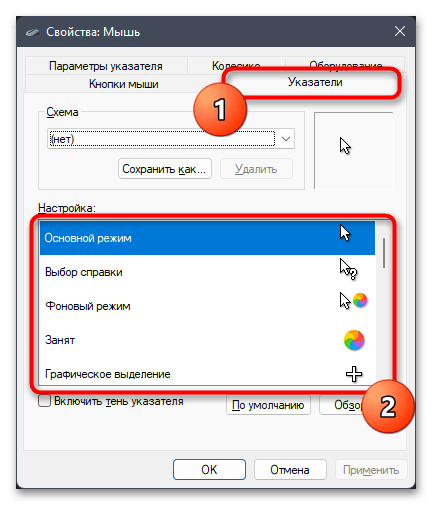
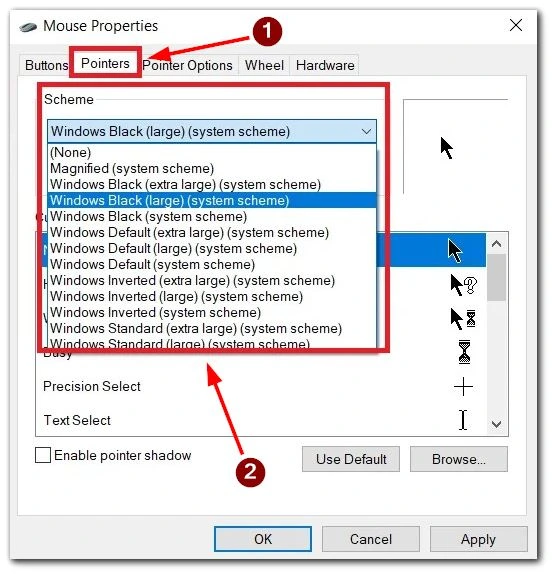
- В новом окне переключитесь на вкладку «Указатели» и разверните меню «Схема», чтобы ознакомиться с доступными стилями.
- Выбирайте каждый из них и сравнивайте, чтобы понять, если в списке какой-то подходящий для вас вариант.
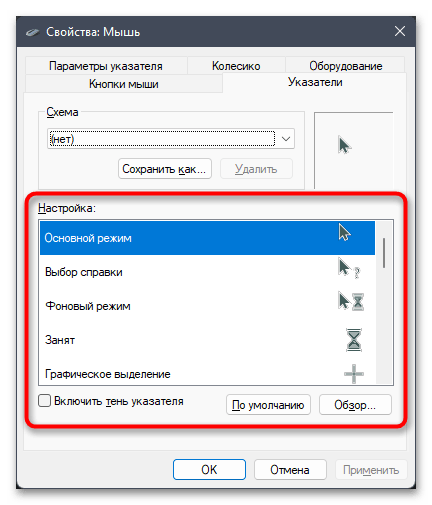
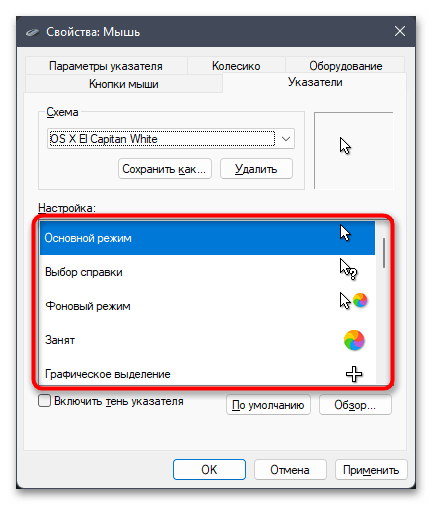
- Если заинтересованы в настройках каждого режима указателя отдельно, найдите его в списке и дважды щелкните по текущему значку левой кнопкой мыши.
- В появившемся окне отобразится много разных системных значков, каждый из которых хоть уже и задействован под то или иное состояние ОС, но может свободного использоваться для любого типа указателя. Посмотрите, есть ли в этом перечне что-то нужное.
Способ 3: Ручной импорт указателей
В предыдущем способе вы видели, что каждый режим указателя можно заменить, выбрав вариант из системной папки. Однако на этом возможности кастомизации не ограничиваются. Разные пользователи создают свои наборы курсоров, в том числе и стилизованные под конкретные темы. Их можно скачать с разных сайтов, но нужно быть уверенным в надежности файлов или предварительно проверять их любым удобным для вас образом.
Подробнее: Онлайн-проверка системы, файлов и ссылок на вирусы
Вариант 1: Автоматическая установка
Допустим, вы отыскали сайт с наборами стилей указателей, а также убедились в том, что файлы можно скачать безопасно. Далее остается только установить их, чтобы настройки применились и вы могли использовать указатели с новым внешним видом. Самый простой метод установки — автоматический, но для этого в наборе должен быть соответствующий файл.
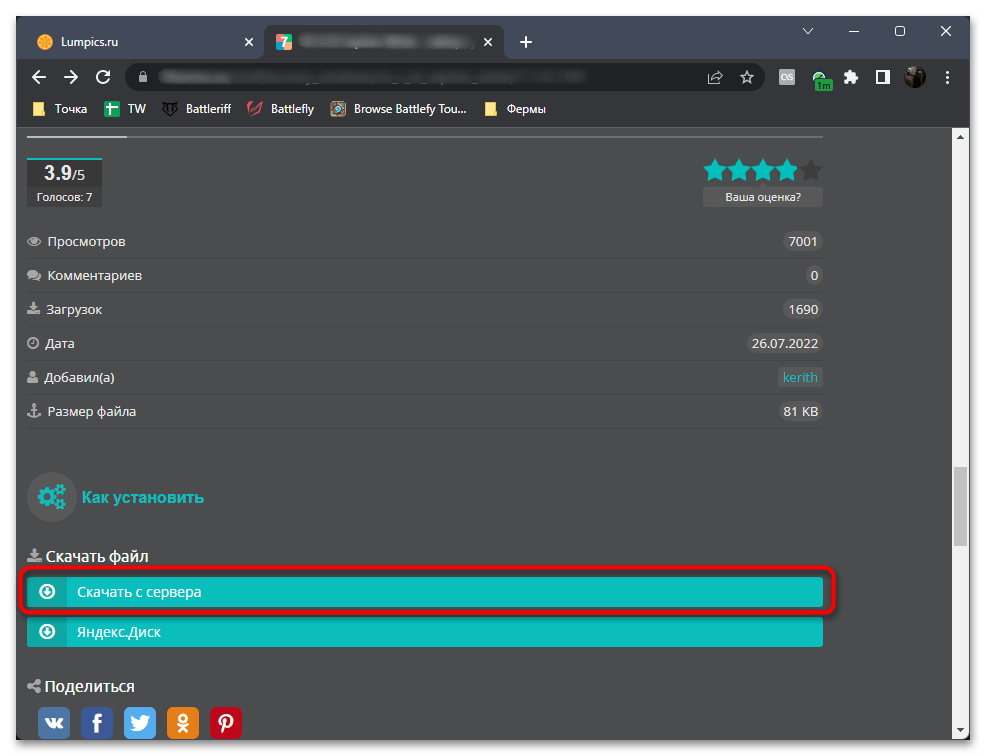
- Сначала скачайте архив или отдельные файлы с найденного источника.
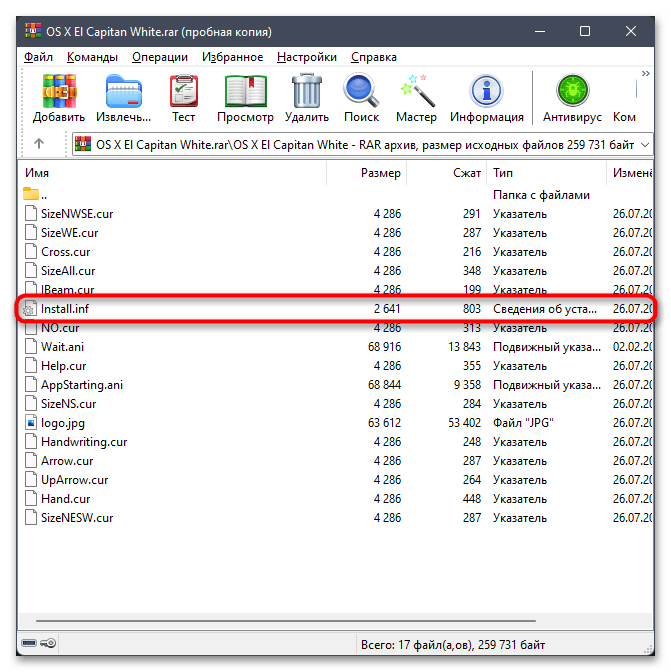
- Если они находятся в архиве, понадобится распаковать файлы в любую удобную папку. При этом обратите внимание, есть ли в ней объект с названием «Install.inf», поскольку именно он нужен для автоматической установки стиля. Если файл отсутствует, пропустите эту инструкцию и ознакомьтесь со следующей.
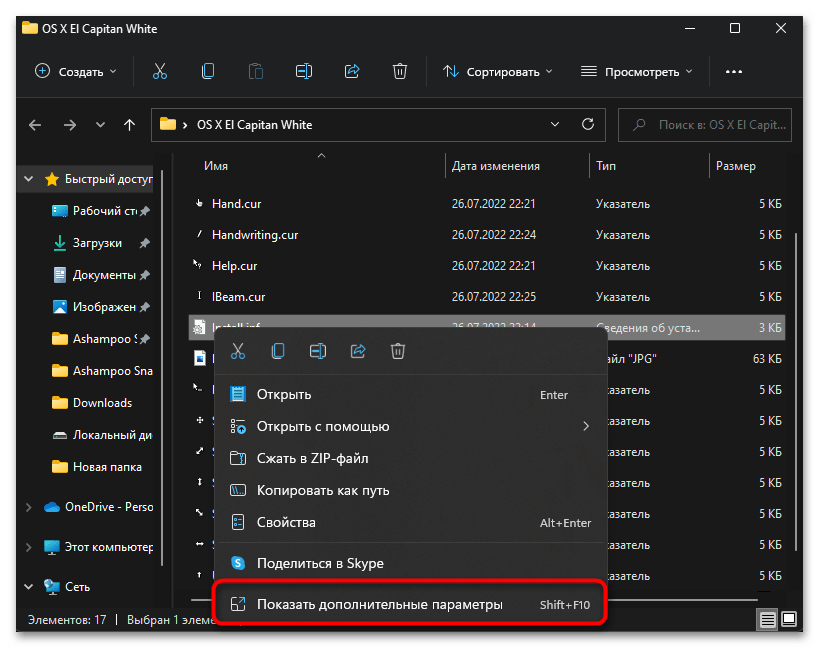
- После распаковки найдите упомянутый файл, кликните по нему правой кнопкой мыши и из контекстного меню выберите пункт «Показать дополнительные параметры».
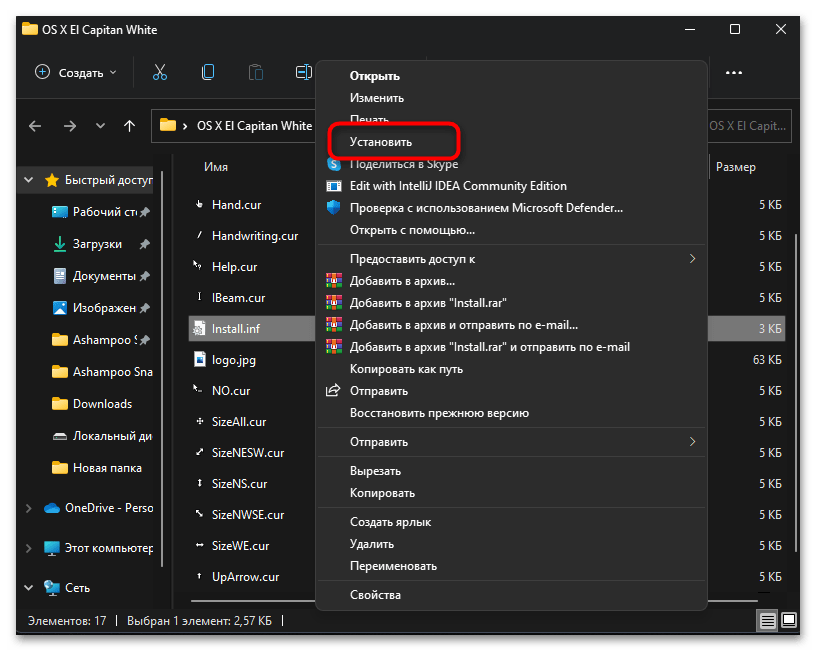
- В старой версии появившегося контекстного меню выберите пункт «Установить».
- Сразу же после этого запустится процесс инсталляции, а окно «Свойства: Мышь» отобразится автоматически. В нем из списка схем вы сможете выбрать только что установленную, определив ее по названию.
- Вместе с этим станет видно, какие именно указатели были заменены. Это позволит убедиться в том, что установка прошла успешно.
Точно таким же образом вы можете установить неограниченное количество схем для курсора в Windows 11, затем переключаться между ними в любой момент. Главное — не удаляйте исходные файлы или переместите их в системную папку C:\Windows\Cursors, чтобы случайно не избавиться от них в будущем.
Вариант 2: Выбор указателей вручную
Этот вариант подойдет тем пользователям, кто скачал новый набор указателей, но не нашел в ней файла для автоматической установки. В таком случае замену предстоит выполнить вручную, что осуществляется следующим образом:
- Как уже было показано в предыдущих инструкциях, сначала откройте «Параметры» и в разделе «Bluetooth и устройства» выберите пункт «Мышь».
- Для перехода к необходимому окну нажмите по плитке «Дополнительные параметры мыши».
- После отображения окна выберите вкладку «Указатели» и дважды щелкните по текущему значку указателя, который хотите заменить.
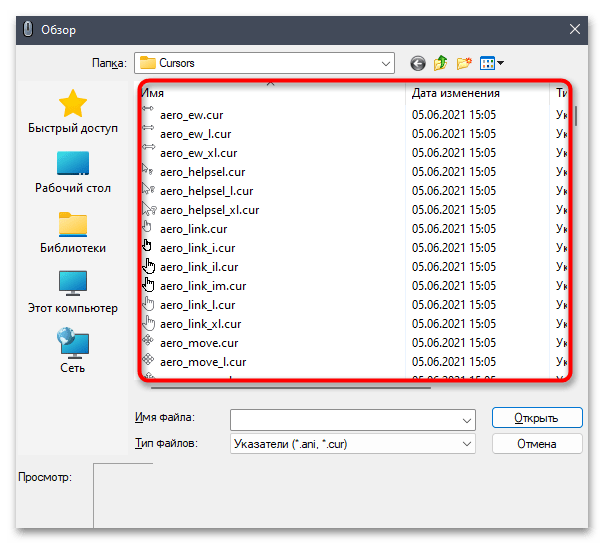
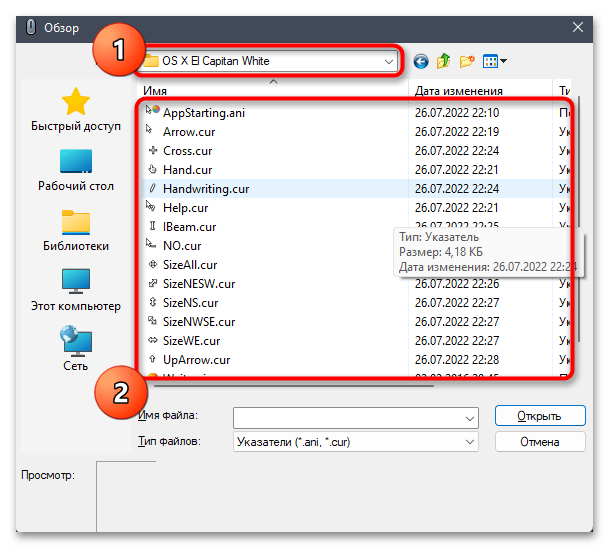
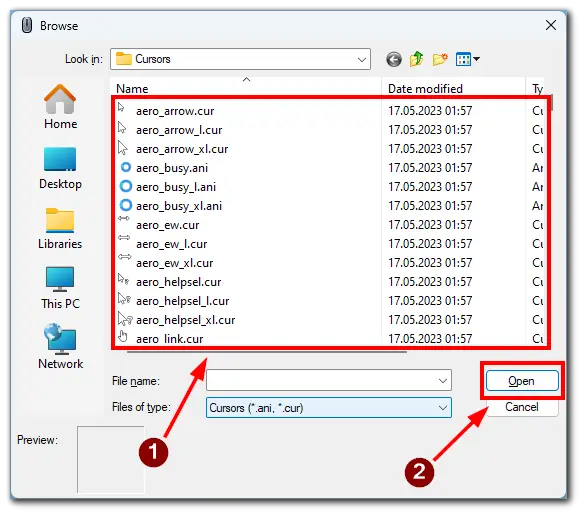
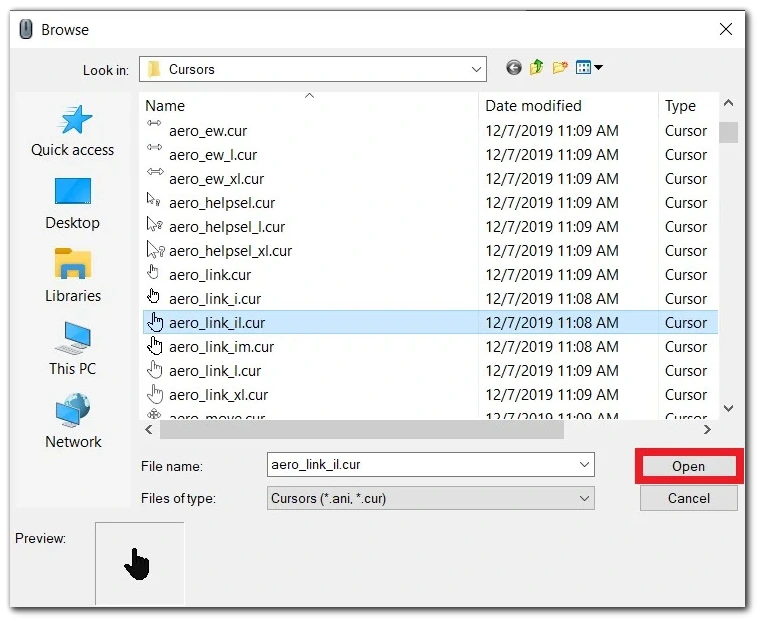
- Через появившееся окно «Обзор» перейдите к папке с вашими иконками и найдите вариант для замены, щелкнув по нему дважды левой кнопкой мыши. Сделайте так со всеми типами указателей и не забудьте применить изменения перед выходом из меню.
Способ 4: RealWorld Cursor Editor
Существует довольно много разных программ, предназначенных для редактирования курсоров в Windows. Одной из самых многофункциональных можно считать RealWorld Cursor Editor, поскольку этот софт позволяет как выбрать уже существующий указатель, так и нарисовать его с нуля при помощи встроенных инструментов. Давайте остановимся на этом софте более детально и разберем процесс взаимодействия с ним.
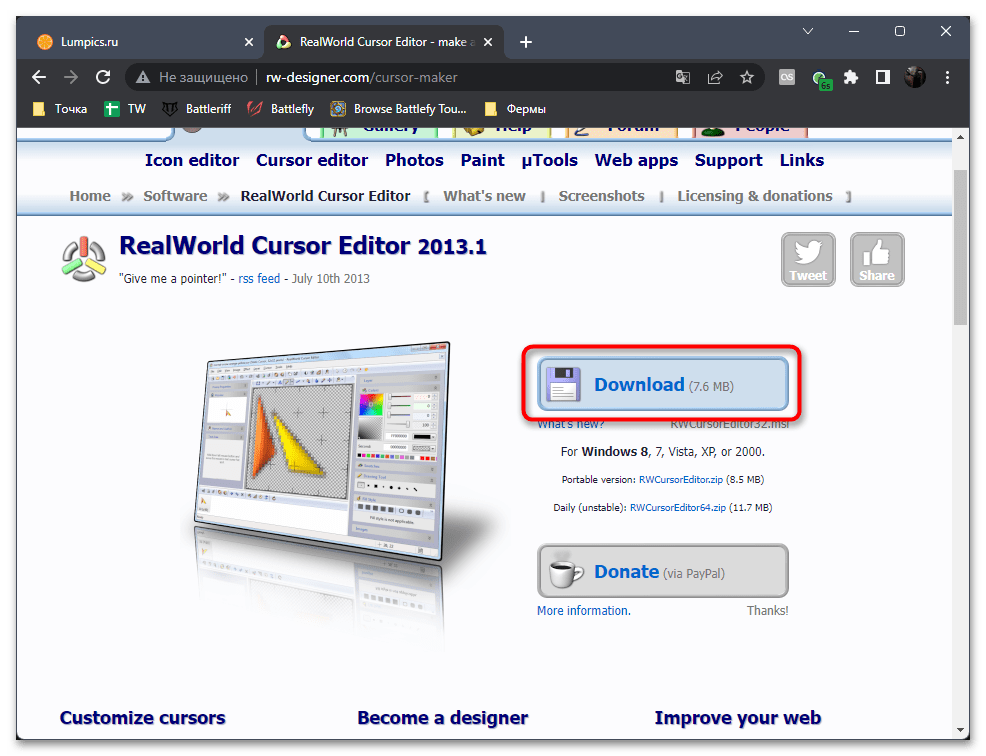
Скачать RealWorld Cursor Editor с официального сайта
- Воспользуйтесь ссылкой выше, чтобы перейти на официальный сайт и скачать полностью бесплатную программу RealWorld Cursor Editor на свой компьютер.
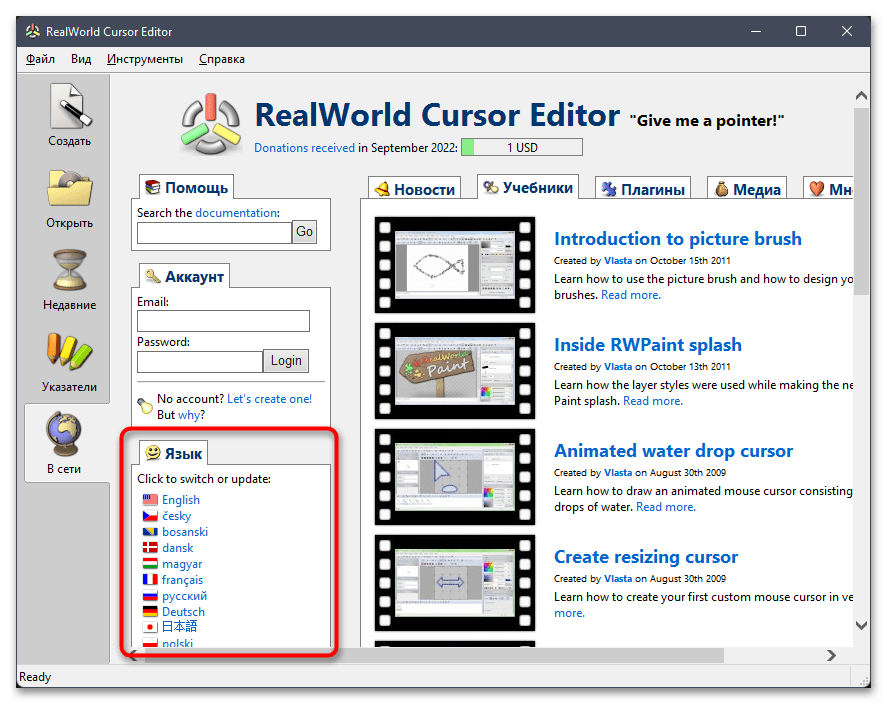
- После установки в любое удобное место и запуска рекомендуется поменять язык на русский, чтобы было проще понимать предназначение всех присутствующих кнопок.
- Теперь можно переходить непосредственно к процессу создания нового указателя, для чего на панели справа отведена соответствующая кнопка.
- RealWorld Cursor Editor поддерживает выбор курсора из картинки или полное создание с нуля. В первом случае все ясно, поскольку нужно только указать изображение. Второй — более сложный, поэтому остановимся на нем.
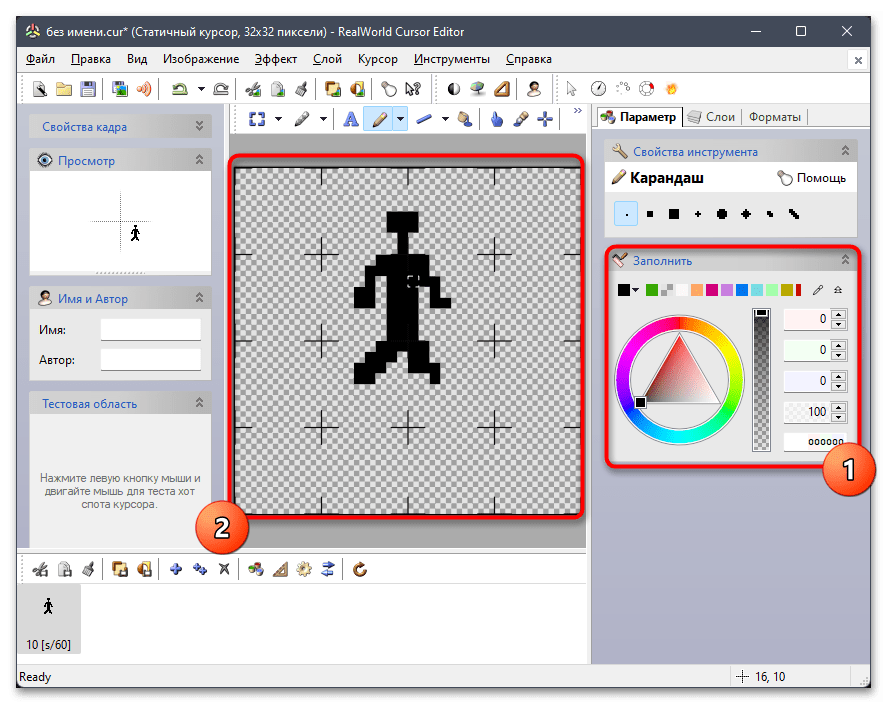
- После перехода в редактор вы можете использовать стандартный карандаш, выбрать для него цвет и нарисовать курсор по центру холста.
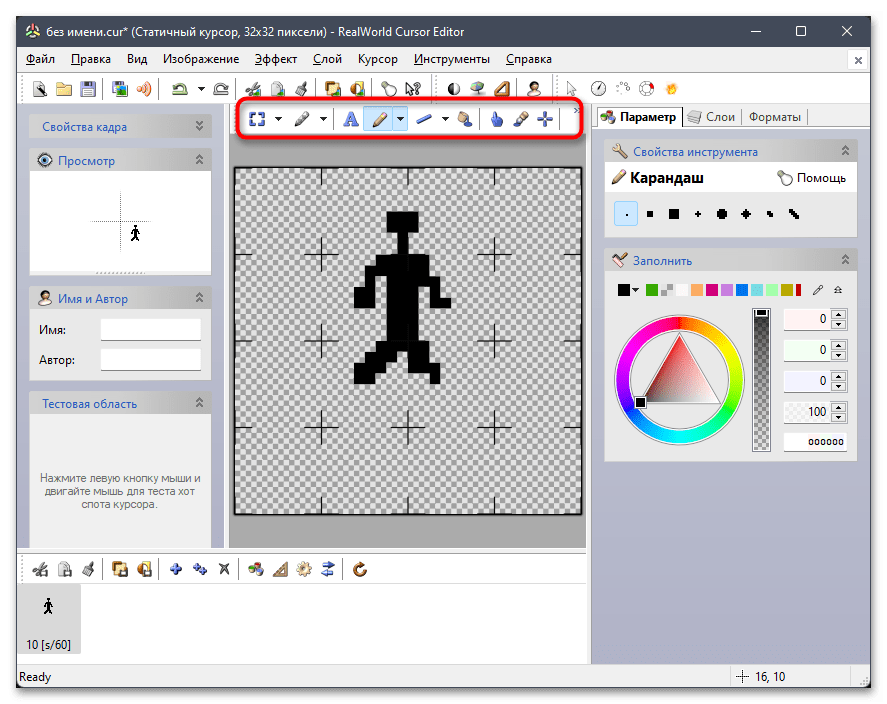
- На верхней панели вы найдете кнопки для перемещения нарисованной иконки, использования заливки, дополнительных инструментов и наложения текста.
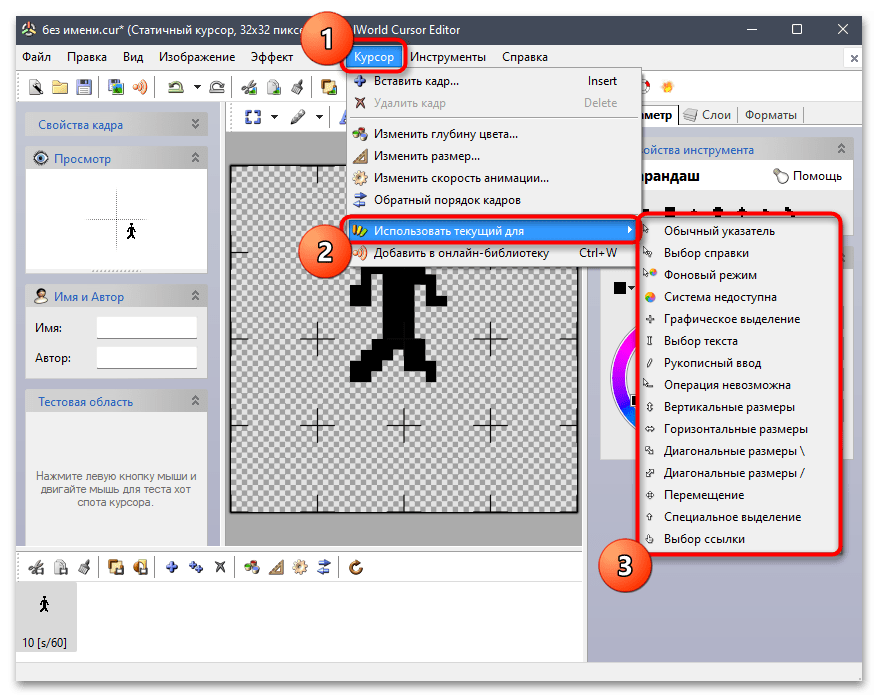
- Если рисование первого указателя на этом закончено, наведите курсор на меню «Курсор», далее на «Использовать текущий для» и выберите подходящий для вас вариант замены указателя. Продолжайте редактирование, создавая новые указатели или используя уже существующие иконки.


Наша группа в TelegramПолезные советы и помощь
Quick Tips
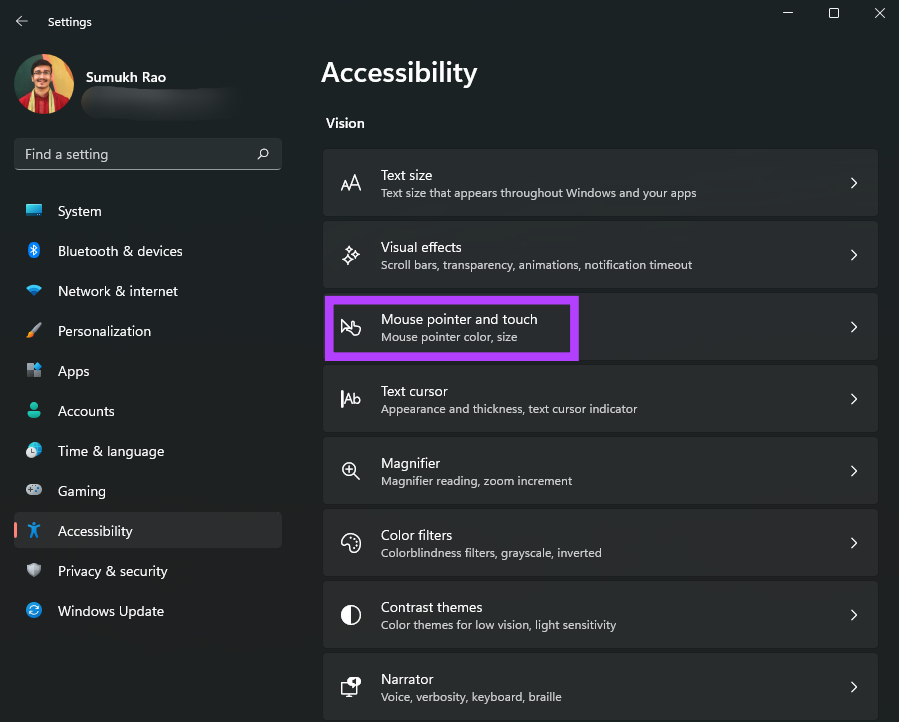
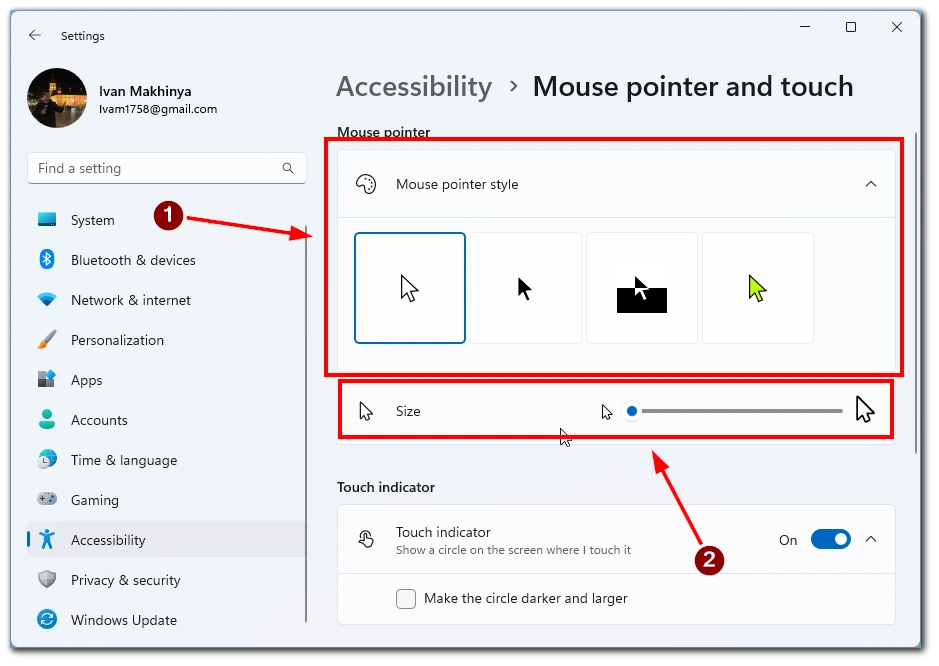
- To change the color and size of your mouse pointer in Windows 11, go to Settings > Accessibility > Mouse pointer and touch.
- You also have the option to use a custom icon as your mouse pointer in Windows 11 by accessing additional mouse settings.
How to Change the Color and Size of the Mouse Cursor
There are a few default cursor options in Windows 11 if you want to change the way the mouse pointer looks. You can choose from these default options and change the color and size of the cursor. Here’s how to do it.
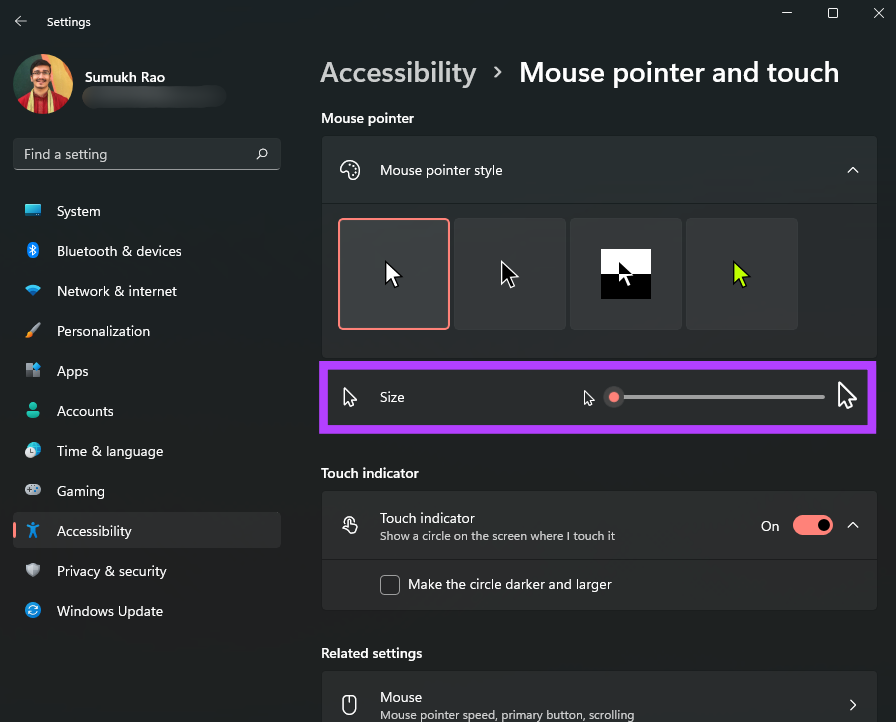
Step 1: Press the Windows key + I to launch the Settings app and navigate to Accessibility > Mouse pointer and touch.
Step 2: You can choose from different types of mouse pointers. Select the one you like.

Step 3: Use the slider under the cursor style options to adjust the size of the mouse pointer.
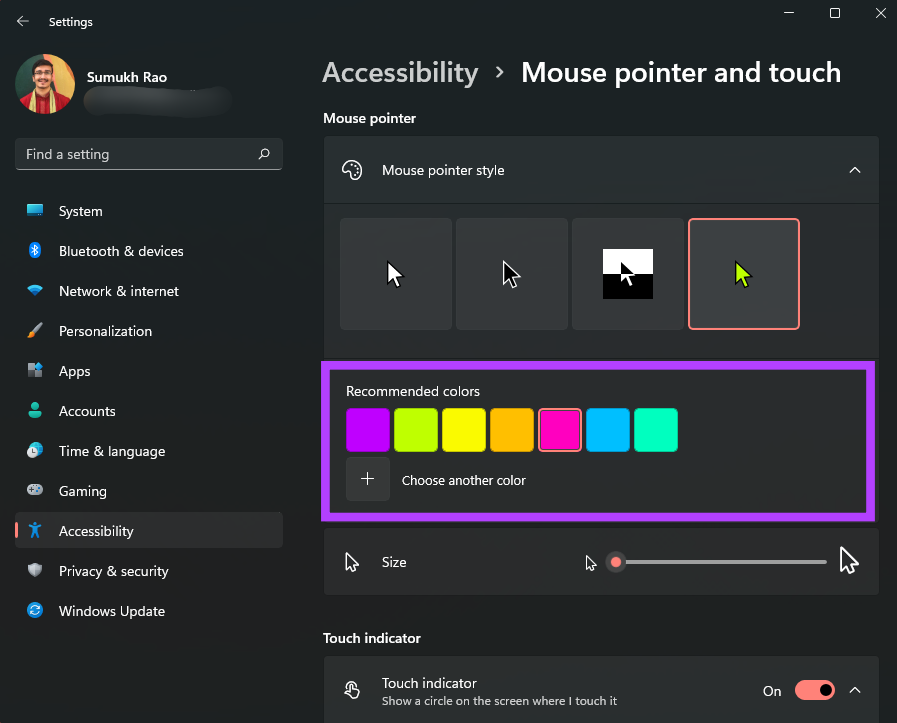
Step 4: The right-most mouse pointer style supports different colors. If the option is available, you will see a color palette to choose from.
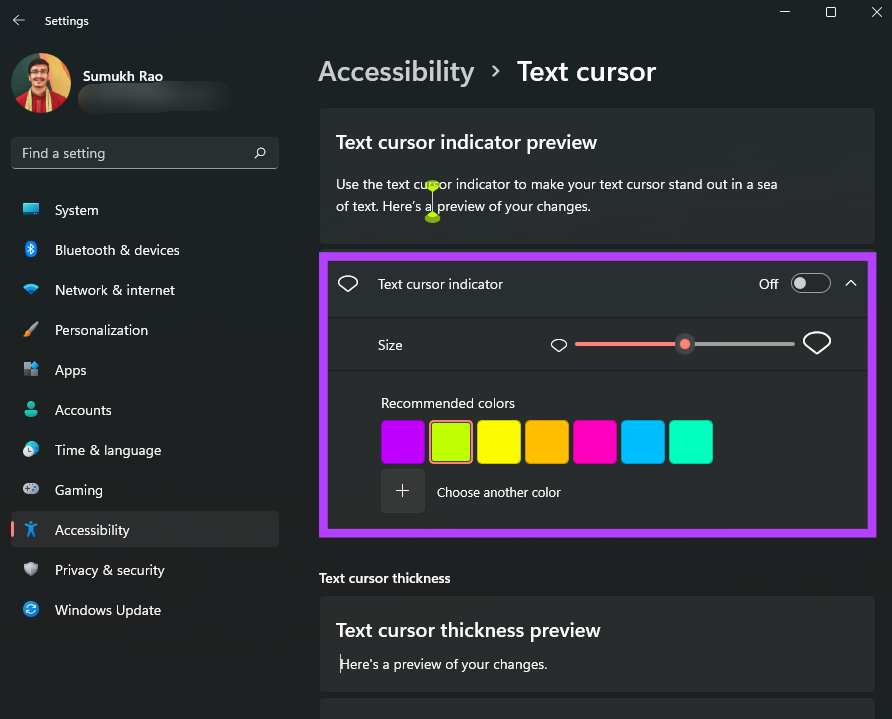
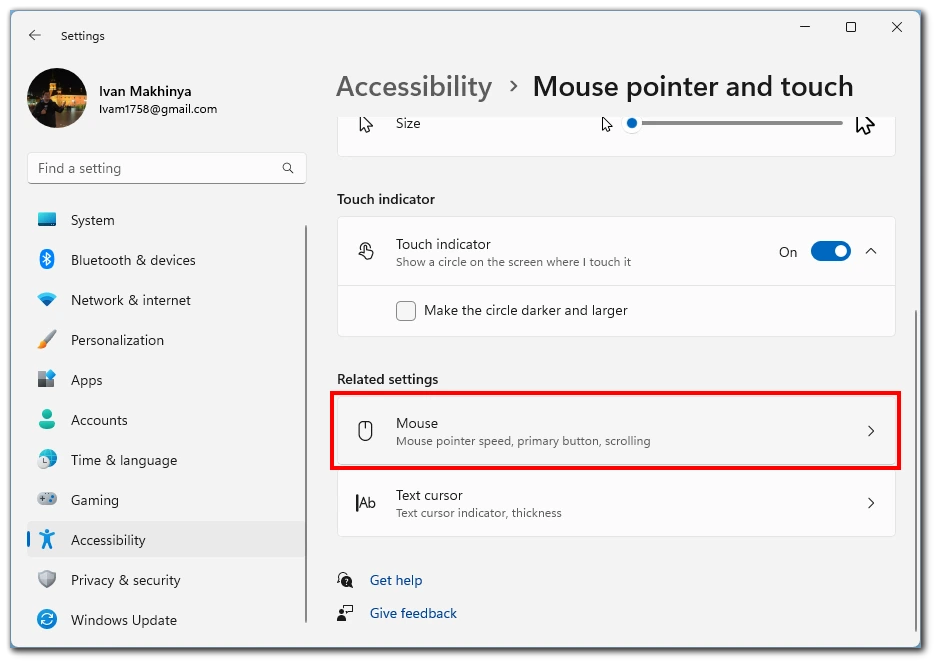
Step 5: Scroll down and click on Text cursor to modify it.

Step 6: You can enable or disable the text cursor indicator and change the color and size.
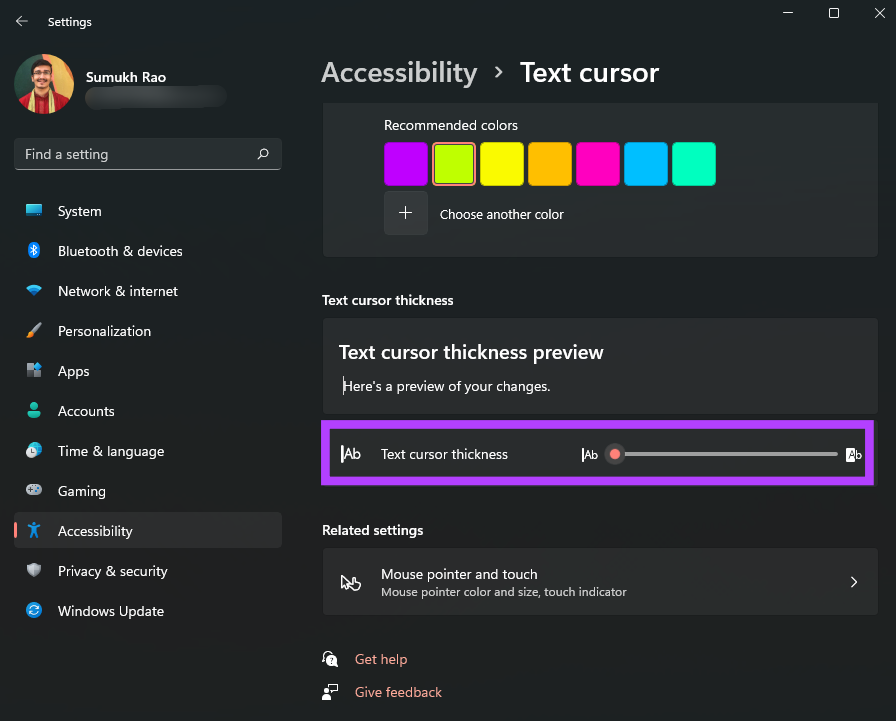
Step 7: There’s also a slider at the bottom to adjust the thickness of the text cursor.
How to Change the Mouse Cursor to a Custom Icon
If you love customizing the interface as per your choices, Windows 11 does let you completely change the mouse pointer’s look and shape as well. Here’s how to add a custom icon as your mouse pointer in Windows 11.
Step 1: Download a custom cursor pack or an icon that you wish to use as your cursor. There are plenty that you can find on the internet from various sources.
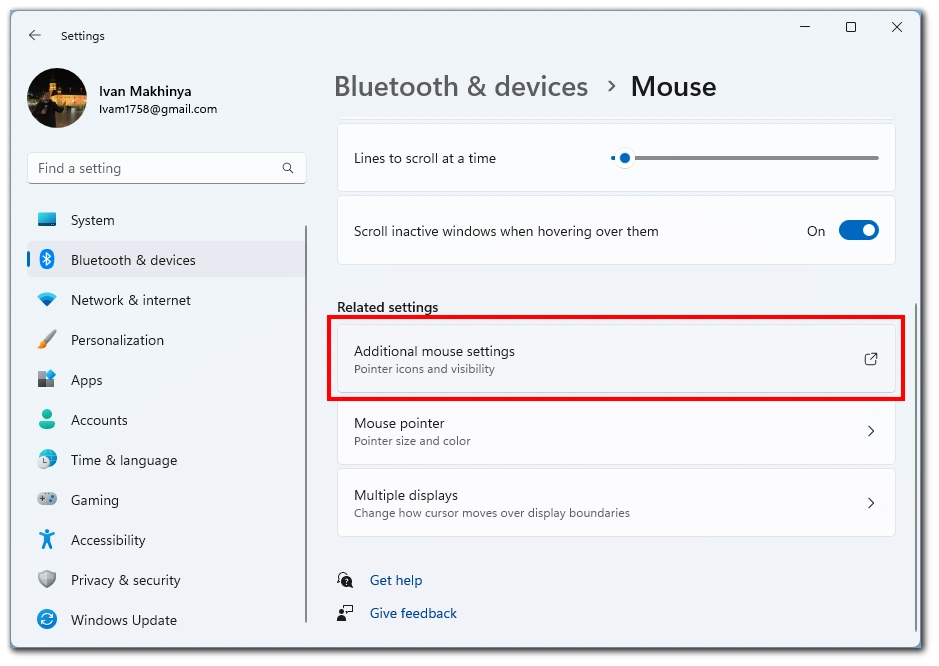
Step 2: Press the Windows key + I to launch the Settings app and navigate to Bluetooth & devices > Mouse.
Step 3: Click on Additional mouse settings.
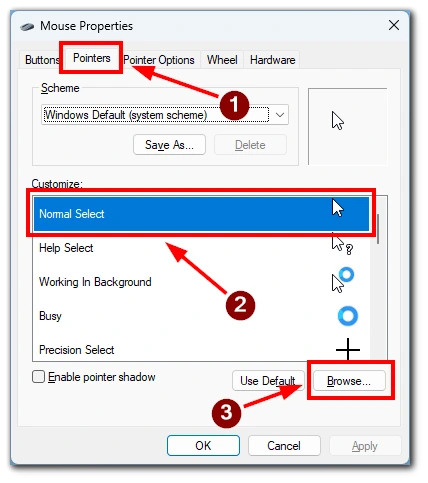
Step 4: Click on the Pointers tab at the top.
Step 5: In the Customize section, select the cursor type that you want to change. You can change all the cursor types listed here.
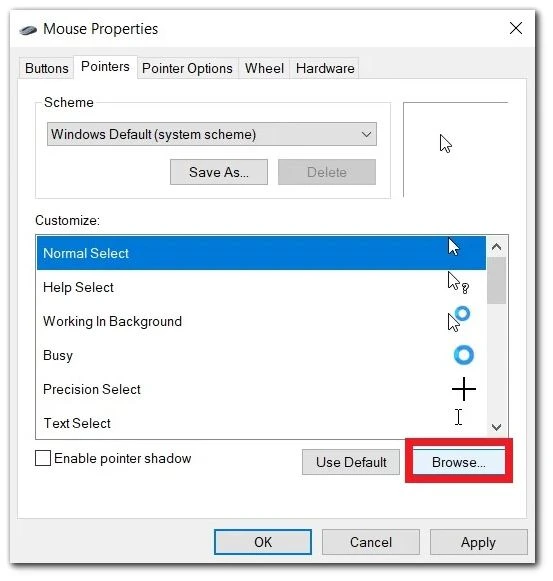
Step 6: Once you’ve selected the pointer to change, click on Browse.
Step 7: A file explorer window should pop up now. If you have downloaded a third-party cursor pack, you can navigate to the folder it is saved in.
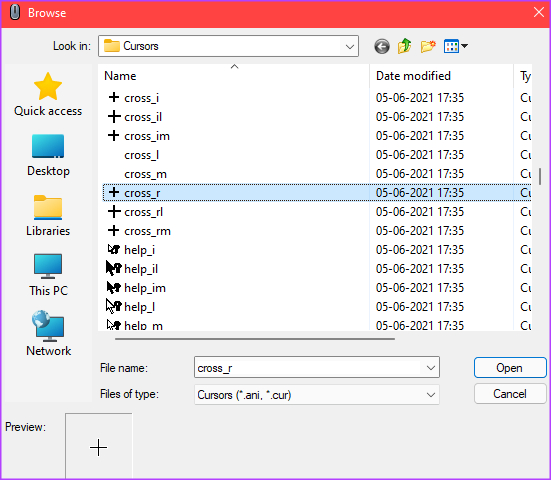
Step 8: Select the mouse pointer you want to use and then click on Open.

Step 9: Windows will change the mouse pointer to your pick. You may continue to select other options. Leave them as they are if you’re done making changes.
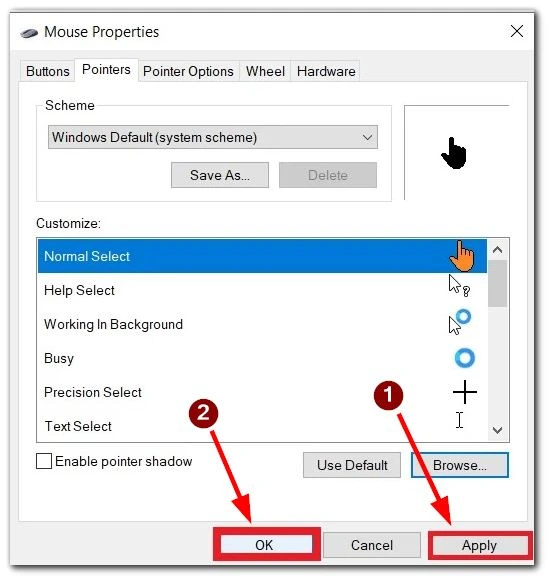
Step 10: After changing all the desired cursors, click on Apply and then on OK.
Windows will apply all the chosen changes to the mouse pointer. If you change your mind later, you can always follow the above steps and customize it to something else. To match your cursor customizations, check our guide on how to change icons on Windows 11 for an even more customized experience.
Was this helpful?
Thanks for your feedback!
The article above may contain affiliate links which help support Guiding Tech. The content remains unbiased and authentic and will never affect our editorial integrity.
Changing your cursor in Windows 11 adds a personal touch to your computer experience. In this guide, you’ll learn how to make a custom cursor by downloading, installing, and applying a new cursor theme. This process is simple and enhances your user interface to reflect your style.
Creating a custom cursor in Windows 11 involves a few straightforward steps. This guide will help you download a new cursor pack, install it, and set it as your default cursor theme.
Step 1: Download a Cursor Pack
First, download a cursor pack from a trusted website.
You can find various cursor packs on websites like DeviantArt or Open Cursor Library. Choose a pack that you like and download the .zip file.
Step 2: Extract the Files
Next, extract the downloaded .zip file to a folder on your computer.
Right-click on the .zip file and select «Extract All.» Choose a location that is easy to remember, such as your Desktop or a dedicated folder.
Step 3: Open Mouse Settings
Now, open the Mouse settings on your computer.
Go to Settings > Devices > Mouse. Click on «Additional mouse options» on the right side of the screen.
Step 4: Change Pointers
In the Mouse Properties window, navigate to the Pointers tab.
Here, you’ll see a list of cursor roles (Normal Select, Help Select, etc.). Click on the role you want to change, then click Browse.
Step 5: Select New Cursors
Select the new cursor files from the extracted folder.
Navigate to the folder where you extracted your cursor files. Select the appropriate file for each role and click Open.
Step 6: Save Your Scheme
After you’ve customized all the roles, save your new cursor scheme.
Click «Save As,» give your scheme a name, and click OK. Then, click Apply to set your new cursor theme.
Once you’ve completed these steps, your new custom cursors will be active and ready to use.
Tips for How to Make a Custom Cursor in Windows 11
- Backup your original scheme: Before changing your cursor, save your current scheme so you can revert back if needed.
- Test different packs: Don’t be afraid to try different cursor packs to see what you like best.
- Icons consistency: Ensure your new cursors are consistent in style and size for a seamless look.
- Custom schemes: Name and save different schemes for different moods or themes.
- Accessibility: Consider using high-contrast cursors if you have difficulty seeing the default ones.
Frequently Asked Questions
Can I revert to the default cursor if I don’t like the new one?
Yes, you can revert to the default cursor by selecting the Windows Default scheme in the Mouse Properties window.
Are custom cursor packs safe to download?
Always download cursor packs from trusted websites to avoid malware. Websites like DeviantArt and Open Cursor Library are generally safe.
Do I need special software to change my cursor?
No, you don’t need special software. Windows 11 has built-in features to change your cursor.
Can I create my own cursor pack?
Yes, you can create your own cursor files using image editing software that supports .cur and .ani file formats.
Will changing the cursor affect my system performance?
No, changing your cursor will not affect system performance. It’s a simple visual change.
Summary of How to Make a Custom Cursor in Windows 11
- Download a cursor pack.
- Extract the files.
- Open Mouse settings.
- Change pointers.
- Select new cursors.
- Save your scheme.
Conclusion
So there you have it! Making a custom cursor in Windows 11 is a straightforward and fun way to personalize your computer experience. By following these steps, you can easily download and apply a new cursor theme that reflects your unique style. Whether you’re going for a sleek, modern look or something more whimsical, the choice is yours.
Don’t forget to explore different cursor packs and maybe even try your hand at creating your own. Remember, your computer is an extension of you, and customizing it makes your daily tasks more enjoyable. So go ahead, give your screen that personal touch!
If you have any further questions or run into any issues, feel free to revisit this guide. Happy customizing!
Matt Jacobs has been working as an IT consultant for small businesses since receiving his Master’s degree in 2003. While he still does some consulting work, his primary focus now is on creating technology support content for SupportYourTech.com.
His work can be found on many websites and focuses on topics such as Microsoft Office, Apple devices, Android devices, Photoshop, and more.

Windows, the most widely used operating system, offers users many customization options to personalize their computer experience. Among these options is the ability to change the default cursor and replace it with a custom one. Custom cursors allow users to get creative and add a unique touch to their Windows environment. Let me show you how to do this in just a few clicks on Windows 10 and 11.
How to change the cursor in Windows 11
Changing the cursor in Windows 11 is a simple process that allows you to customize your user interface. Follow these steps to change the cursor in Windows 11:
- Press the Windows + I keys to open Settings.
- Then go to the Accessibility tab.
- Here you need to find the “Mouse pointer and touch” item. Click on it.
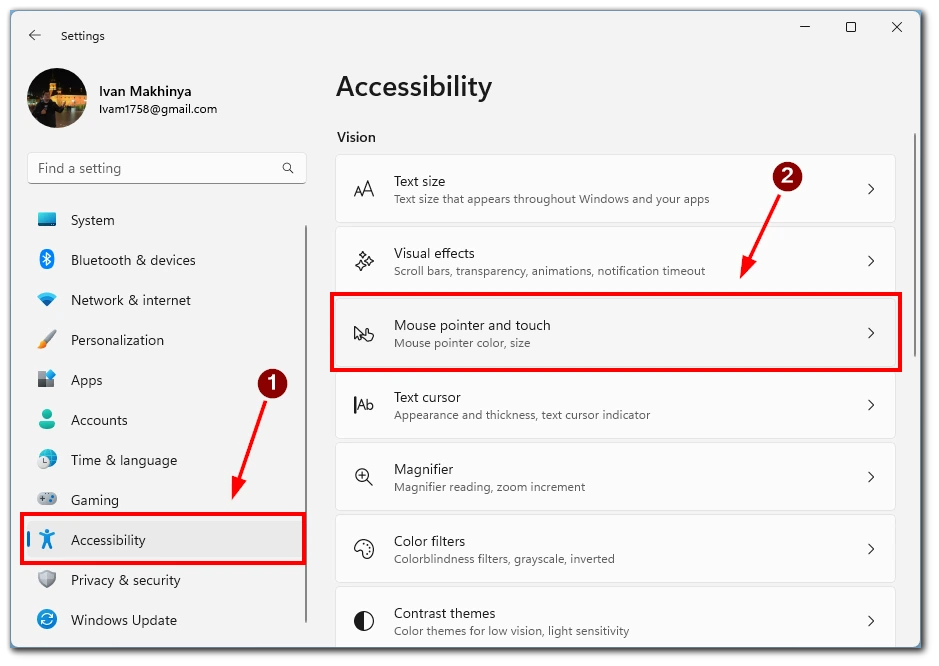
- In the next menu at the very top, you can choose from 4 options to display your cursor:
- White
- Black
- Green
- Inverted (The cursor will be white on a black background and black on a white background)
- Also, here you can find such parameters as Size, by dragging the slider, you can choose the cursor size you like if the standard one doesn’t suit you.
- If none of these cursors work for you, then in the Mouse pointer and touch menu, you need to find the item Mouse.
- In the next tab, click Additional mouse settings.
- Here you will need to click on the Pointers button at the top.
- A menu will open with all cursors configured in your system. To change any of them, double-click on it and then select the desired file in Explorer.
As you can see, changing the cursor in Windows 11 is quite easy. If you need custom cursors and aren’t unsatisfied with the regular ones, you can find ready-made cursors or make your own here by following the steps above.
If you are having trouble changing the cursor, this video should help you. Just follow all the steps described in it to change the cursor in Windows 11.
How to change the cursor in Windows 10
Windows 10 offers a range of customization options, including changing your cursor. Even though this version of Windows is older, changing the cursor is similar to Windows 11. By following the steps below, you can give your cursor a fresh and personalized look:
- Look for the Windows Search bar on your taskbar, typically located at the bottom left of the screen—type “Mouse” in the search bar to display relevant search results.
- Choose the top result From the search results that says “Mouse Settings” or “Change your mouse settings” to open the Settings screen.
- On the Mouse settings screen, locate the “Related settings” section on the right side.
- In the “Related settings” section, click “Additional mouse options” to open the Mouse Properties dialog.
- In the Mouse Properties dialog, navigate to the “Pointers” tab.
- From the dropdown menu, select a cursor scheme. The list includes both default Windows mouse themes and any installed cursor packs.
- In the “Customize” box, you can preview the icons of the selected pointer scheme.
- Once you have chosen a scheme, click the “Apply” button to use it. If you are satisfied with the changes, select the OK button to exit the dialog.
- Windows allows you to install third-party cursor packs that offer a wide range of options. These packs may contain CUR (static cursors) and ANI (animated cursors) files.
- Highlight the pointer or cursor you want to customize from the “Customize” box.
- At the bottom right corner of the Mouse Properties screen, click the “Browse” button. This will open the Windows Cursors folder (C:\Windows\Cursors).
- Select a cursor Within the Cursors folder that matches the desired function or appearance.
- After selecting the desired cursor, click “Open” and press “Apply” to apply your new cursor.
By following these steps, you can effortlessly transform the appearance of your cursor and add a touch of personalization to your Windows 10 experience. Enjoy the newfound uniqueness and style as you navigate through your Windows environment.
In this step-by-step video, you can learn how to change the cursor in Windows 10.
Why you might want to change the mouse cursor
Actually, the reasons for changing the mouse cursor can be quite simple. Many users want to customize the system to their own taste. In addition, you can find all sorts of cursor options on the internet to replace the standard ones. So your system will be unique and just the way you want it.
Another reason to change the cursor may be that users have color perception problems, and you want a more contrasting cursor to make it stand out and be seen better.
Where you can get a custom cursor on Windows
Finding custom cursors for Windows is an exciting endeavor that allows you to personalize your computer’s appearance. There are several avenues you can explore to obtain custom cursors:
- One option is to visit dedicated cursor websites, such as CursorMania, Cursor.cc, or DeviantArt. These sites offer various cursor styles and packs created by designers and artists. You can also use search engines like Google or Bing to discover custom cursor websites and specific cursor styles. Enter relevant keywords, such as “custom cursors” or “free cursor packs,” to find resources and options.
- Another approach is to explore Windows themes available through the Microsoft Store or other sources. Some themes include unique cursor designs or customization options, allowing you to change the cursor and other visual elements.
- Consider creating your own if you have artistic skills or prefer a unique cursor. You can use image editing software like Photoshop or GIMP to design static or animated cursors (.cur or .ani files).
- Modifying existing cursor designs is another possibility. Use image editing software to edit cursor files or search for pre-made cursors with customization options.
- Certain cursor software, like CursorFX, provides access to extensive libraries of custom cursors. These programs often come with additional features for further cursor customization.
- Engaging with online communities, forums, or social media groups focused on customization or Windows theming can be beneficial. Members often share their custom cursor creations, recommend reliable sources, or provide resources to access unique cursor designs.
Remember to exercise caution when downloading files from the internet. Only obtain custom cursors from trusted sources to avoid potential security risks or malicious content.
Download Article
An in-depth guide to making a custom mouse cursor in Windows 10 or 11
Download Article
- Editing Your Cursor
- Converting Your Image
- Changing Your Cursor
- Video
- Q&A
|
|
|
|
Do you want to make and use your own unique cursor on your computer? While the default cursor on Windows does the job, it’s fairly plain. By customizing your cursor, you can choose something a lot more fun and personalized. You can use any photo or image you’d like to create this new cursor; you’ll just need to edit and convert it to a .CUR file first. This wikiHow will show you how to make and apply a custom cursor for your Windows 10 or 11 computer.
Things You Should Know
- Find a .PNG image with a transparent background. Paste it onto a transparent 45 W by 50 H canvas and save.
- Convert the .PNG file to .CUR with an online converter.
- Type «Mouse settings» into the Start menu. Click «Additional mouse options» → «Pointers» → «Browse» → select your image → «Apply».
-

This image must be in .PNG format, as this provides a transparent background. If you don’t have a transparent background, you’ll need to edit the image to make it transparent.
- Search Google for images or upload your own to your computer.
-

Go to https://ipiccy.com/ in a web browser. This is a free photo editor that works in your browser.
Advertisement
-

This will be at the top of the page.
- The photo editor will open.
-

You can find this at the very top center of the screen, next to Photo Library.
-

Enter 45 in the Width box and 50 in the Height box.
- Your canvas size should be 45 W x 50 H.
- Be sure to check the box next to Transparent.
-
This looks like three rectangles layered on top of each other. You can find this on the left panel.
-
This looks like a blue star in front of a mountain and sun picture.
-
Click Upload image in the left panel, and then select your photo from your computer. Once added, it will appear in the left panel.
-

Use the scroll wheel to zoom into your canvas if needed.
- If the image doesn’t take up most of the canvas space, click and drag a corner of the image to enlarge it. Make sure the image sits in the center of your canvas and all parts of it are visible.
-
You can find this at the top of the window. This will save your changes.
-
Your cursor image is all finished; you’ll just need to save it to your computer.
- Click Save at the top.
- Click My computer.
- Enter a name for your cursor and then set the file as .png.
- Click Save to my computer.
- Select a save location.


Advertisement
-
Go to https://convertio.co/png-cur/ in a web browser. This is a free image converter. You’ll need to convert your .png image into cursor format (.cur).
-
This is the large button at the center of the screen. Make sure to avoid clicking any surrounding ads.
-
Use the pop-up window to locate the image you created in the previous section. Select it, and click Open.
-
This will convert your image to .cur format. It should only take a few moments to convert.
-

This is the blue button to the left of your image file.
- The .cur file will be downloaded to your computer.
- In most cases, this will be found in your Downloads folder. If desired, move the file to another folder by clicking and dragging.


Advertisement
-
On Windows 10 and earlier, this will be at the bottom left corner of the screen. On Windows 11, this will be at the bottom center of the screen.
-
Results will load as you type.
-
A new window will open.
-
This will be underneath the Related settings header.
- A new window will open.
-
This is the top tab, to the right of Buttons.
-
This is below the Customize box. Make sure the Normal Select mouse option is highlighted.[1]
- Alternatively, double-click Normal Select to open the Browse window.
-
Find your saved .cur image from the previous section. Click it, and then click Open.
-
This is the button at the bottom-right corner. Your cursor will change into your new image.
- Click OK to close the window.
- If you want to change the cursor back to its default, return to the Pointers menu and click Use Default.


Advertisement
Add New Question
-
Question
Can I use Microsoft Photos or Paint instead of Gimp?
Of course, you can! Right-click on a photo in your computer. Click «Properties» in the drop-down menu. In the «General» tab, click the «Change» button. Then choose any program you want the photos to open with.
-
Question
How do I know if the files I download in this process are safe?
Paul Schofield
Community Answer
On most computers these days it will warn you beforehand if the download can cause problems with your computer. If this doesn’t show up, then you will be safe to initiate the download process.
-
Question
It doesn’t say download in the digitalcoding part. How do I do that?
You need to scroll down after converting the image on digitalcoding.com.
See more answers
Ask a Question
200 characters left
Include your email address to get a message when this question is answered.
Submit
Advertisement
Video
Thanks for submitting a tip for review!
About This Article
Thanks to all authors for creating a page that has been read 230,560 times.