
Installing JMeter on Windows 10 is a straightforward process that involves downloading the software, setting environment variables, and running the JMeter application. You’ll need to have Java installed on your machine, as JMeter relies on it to operate. Once you have Java ready, fetch the JMeter ZIP file from the Apache website, extract its contents, and configure your system to recognize JMeter commands. Finally, you can launch JMeter and start testing applications right from your Windows 10 PC.
In this section, we’ll guide you through the entire process of setting up JMeter on your Windows 10 computer. By following these steps, you’ll have the tools necessary to begin your testing journey.
Step 1: Install Java
First, ensure Java is installed on your computer.
Without Java, JMeter can’t run, as it’s built on the Java platform. Visit the official Oracle website, download the latest Java Development Kit (JDK), and follow the installation instructions. Once installed, check your setup by opening a command prompt and typing java -version.
Step 2: Download JMeter
Next, head over to the Apache JMeter website to download the software.
Look for the stable version of JMeter, which is usually a ZIP file. Click on the download link and save the file to a preferred location on your computer. Remember, the ZIP file contains everything you need, so no additional installation is required.
Step 3: Extract JMeter Files
Now, unzip the downloaded JMeter file.
You can use any decompression software available on your system, like WinRAR or the built-in Windows tool. Extract the contents to a directory that you can easily access, such as C:JMeter.
Step 4: Set Environment Variables
It’s time to set up environment variables for JMeter.
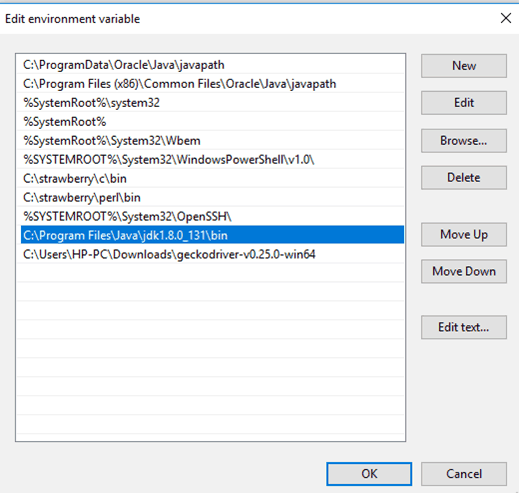
Open the Control Panel, navigate to System, then Advanced System Settings, and click on Environment Variables. Add a new system variable named JMETER_HOME with the path to your JMeter directory, and update the Path variable to include %JMETER_HOME%bin.
Step 5: Launch JMeter
Finally, run the JMeter application to start testing.
Navigate to the bin directory within your JMeter folder, and double-click on the jmeter.bat file. This will open the JMeter GUI, where you can begin creating and running your test scripts.
Once JMeter is up and running, you’ll have access to a powerful tool for performance testing. You can design test plans, simulate different user loads, and analyze the performance of web applications or services.
Tips for Installing JMeter on Windows 10
- Make sure your Java version is up-to-date, as JMeter requires a compatible Java runtime.
- Regularly check for updates on the Apache JMeter site to ensure you’re using the latest version.
- Consider setting up a dedicated folder for JMeter projects to keep your tests organized.
- Familiarize yourself with JMeter’s documentation for advanced features and troubleshooting.
- Always run JMeter from the
bindirectory to avoid configuration issues.
Frequently Asked Questions
What is JMeter used for?
JMeter is used for performance testing to simulate a heavy load on servers, networks, or objects and analyze their performance.
Do I need to install JMeter?
JMeter doesn’t require installation in the traditional sense; just download, extract, and configure it to start using.
How do I check if Java is installed on my PC?
You can check by opening a command prompt and typing java -version. If Java is installed, this will display the version number.
Can JMeter run on platforms other than Windows?
Yes, JMeter is platform-independent and can run on any machine with a compatible Java runtime, including macOS and Linux.
What should I do if JMeter doesn’t start?
Ensure your Java path is correctly set and environment variables are configured. If issues persist, consult the JMeter logs for error details.
Summary
- Install Java.
- Download JMeter.
- Extract JMeter files.
- Set environment variables.
- Launch JMeter.
Conclusion
Installing JMeter on Windows 10 might seem daunting at first, but by breaking it down into simple steps, you can set it up in no time. JMeter is an indispensable tool for anyone involved in web development or application testing, offering insights into how systems perform under stress. Once you’ve got it up and running, the possibilities for testing are endless.
Not only does JMeter help identify bottlenecks, but it also provides a window into how enhancements might improve application performance. As you get familiar with JMeter, explore its vast array of features like distributed testing and comprehensive reporting. For further exploration, consider diving into tutorials and community forums dedicated to JMeter users.
If you’ve followed along and found this guide helpful, why not try executing a simple test plan today? Discover the power of JMeter and boost your testing capabilities on your Windows 10 machine.
Matt Jacobs has been working as an IT consultant for small businesses since receiving his Master’s degree in 2003. While he still does some consulting work, his primary focus now is on creating technology support content for SupportYourTech.com.
His work can be found on many websites and focuses on topics such as Microsoft Office, Apple devices, Android devices, Photoshop, and more.
Installing Apache JMeter on Windows 10 is straightforward. By following a few simple steps, you’ll have JMeter up and running in no time. We’ll guide you through downloading JMeter, setting up Java, and configuring the environment to ensure smooth performance testing.
In this guide, we’ll walk you through the steps needed to download, install, and configure Apache JMeter on a Windows 10 machine. By the end of these steps, you’ll be ready to use JMeter for performance testing. Let’s dive in!
Step 1: Download and Install Java
The first thing you need is Java Development Kit (JDK) because JMeter runs on Java.
Head over to the Oracle website to download the latest JDK.
Install it by following the on-screen instructions. Remember to note the installation directory.
Step 2: Set Java Environment Variables
Next, you need to set up the Java environment variables to ensure JMeter can find Java.
Open the Control Panel and go to System and Security, then System. Click on «Advanced system settings» and then «Environment Variables.»
Add a new «System variable» named JAVA_HOME and set its value to the JDK installation directory. Edit the PATH variable by adding %JAVA_HOME%bin.
Step 3: Download JMeter
With Java ready, it’s time to download JMeter.
Visit the official Apache JMeter website and download the latest zip file. Unzip it to a location of your choice.
Step 4: Set JMeter Environment Variables
Just like with Java, we need to set up environment variables for JMeter.
In «Environment Variables,» create a new system variable named JMETER_HOME and set its value to the directory where you unzipped JMeter. Add %JMETER_HOME%bin to the PATH variable.
Step 5: Verify the Installation
Finally, you need to verify that JMeter is correctly installed.
Open a Command Prompt and type jmeter -v. If everything is set up correctly, you’ll see the JMeter version information.
Step 6: Launch JMeter
You can now launch JMeter and start testing.
Navigate to the JMeter bin directory and double-click on jmeter.bat. The JMeter GUI should appear, indicating that you’re ready to go.
Once you’ve completed all the steps, JMeter will be up and running. You can now use it to perform various performance tests on your applications. It’s a great tool for stress-testing your software and ensuring it can handle high traffic.
Tips for Installing JMeter in Windows 10
- Always download the latest version of Java and JMeter to ensure compatibility and access to the newest features.
- Keep your environment variables organized and double-check them if JMeter doesn’t work.
- Unzip JMeter to a simple path like
C:JMeterto avoid issues with long file paths. - Consult JMeter’s official documentation for advanced configurations and troubleshooting tips.
- Use the JMeter GUI for initial tests, but switch to the command line for large-scale testing to optimize performance.
Frequently Asked Questions
Do I need administrative privileges to install JMeter?
Yes, you generally need administrative privileges to set environment variables and install software on Windows 10.
Can I use OpenJDK instead of Oracle JDK?
Yes, JMeter is compatible with OpenJDK, and it can be a good alternative if you prefer open-source software.
Is it necessary to set environment variables for JMeter?
While not strictly necessary, setting environment variables makes it easier to run JMeter from any command prompt without navigating to its directory.
Does JMeter require continuous internet access?
No, JMeter does not require continuous internet access to run. However, you’ll need internet access to download it and any plugins you might need.
Can JMeter be installed on other operating systems?
Yes, JMeter is platform-independent and can be installed on Linux, macOS, and other operating systems, provided that Java is available.
Summary
- Download and install Java.
- Set Java environment variables.
- Download JMeter.
- Set JMeter environment variables.
- Verify the installation.
- Launch JMeter.
Conclusion
Installing JMeter on Windows 10 is a relatively simple process once you know the steps. Ensuring that Java is correctly installed and that your environment variables are properly set up is crucial for a smooth installation. With JMeter up and running, you’re well-equipped to begin performance testing your applications, ensuring they can handle the load and perform reliably under stress. If you’re new to JMeter, there are plenty of community resources and official documentation to help you get the hang of things. Happy testing!
Kermit Matthews is a freelance writer based in Philadelphia, Pennsylvania with more than a decade of experience writing technology guides. He has a Bachelor’s and Master’s degree in Computer Science and has spent much of his professional career in IT management.
He specializes in writing content about iPhones, Android devices, Microsoft Office, and many other popular applications and devices.
Read his full bio here.
In previous tutorial you read What is JMeter and How it works. Now, In this tutorial, You will learn how to download JMeter from Apache website and install it on the local system to start working on it.
But before that we need to understand that there are some prerequisites for installing JMeter. The first one is java requirement which is given as below in little detail.
Java Requirements:
We know that JMeter is pure Java application. For installing JMeter on
the system, we require to have java installed on our system. We can install the
latest version of Java Software Development Kit (JDK) from the process explained
below.
Setting up Java
First step to set up Java
is to install JDK (Java Development Kit). For installing JDK, we need to follow
following steps:
Go to google.com and write “download JDK” in the search box as given below.

We can see that there are
various links for downloading JAVA JDK. We will go to the first link which is
shown in the screenshot as given above. We need to click on URL
(www.oracle.com/technetwork/java/javase/downloads/index.html) with title –Java
SE – Downloads | Oracle Technology Network | Oracle which can be seen in the
screenshot, as given above.
After clicking on the above link, a new page will appear which is Java SE downloads page where you have option to download java JDK as per your requirement.
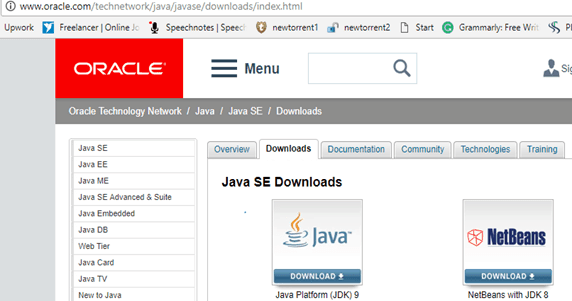
Click on download link as shown above. Following page will open. Here we get the option to download java JDK. On this page we get option to download java JDK for various operating systems such as Windows, Linux, and Mac etc.
We will click on the link given below depending on our operating system.
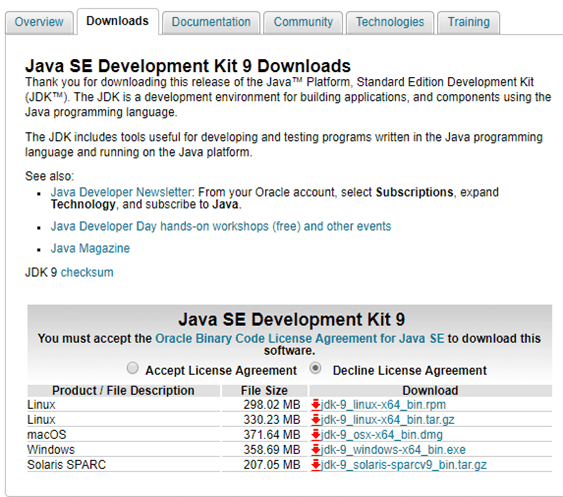
You can see that there are two radio buttons, one is for accepting licence agreement and the other is for declining license agreement. Click on Accept Licence Agreement radio button to accept the terms and condition of the website for downloading JDK, because it is mandatory to do so for downloading otherwise, it won’t allow downloading of Java JDK.
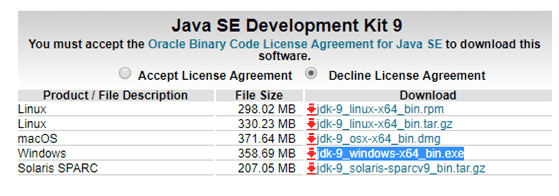
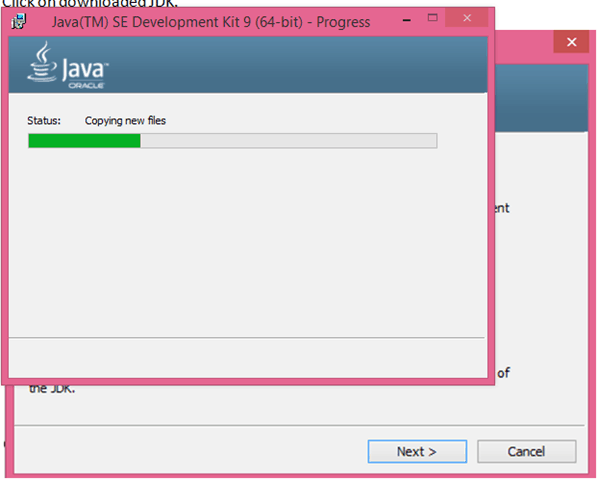
Windows is the most commonly used operating system. So here we are downloading the java JDK version for Windows operating system.. Click on latest JDK for Windows. Here it is given as “jdk-9_windows-x64_bin.exe”.
Clicking on this link will start downloading. You need to wait till download is over.
Once downloaded, you can find them in Downloaded folder on the folder which you have set for downloading as shown below.
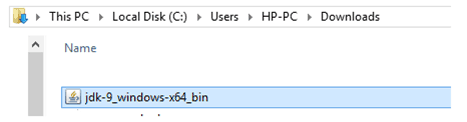
Click on the above folder link to start downloading JAVA JDK. After you click on the above link following window will appear which starts the process of downloading.
We just need to click on Next button to start downloading JAVA JDK.

We need to click on Next button again and again till the process of downloading starts which we can see in the screenshot as given below.
We need to click on Next
button again and again till the process of downloading ends after which we can
see in the final window as shown in screenshot given below.
We need to click on Next button again and again till the process of downloading ends after which we can see in the final window as shown in screenshot given below.
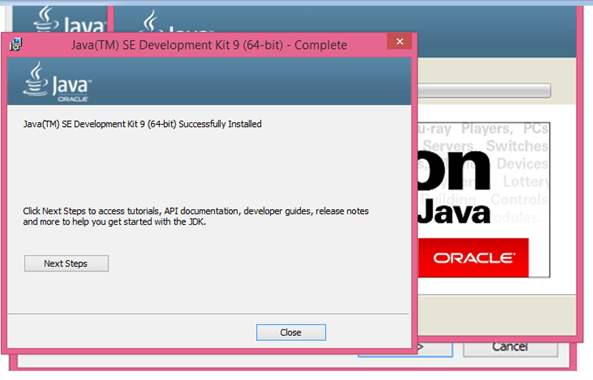
Now when we get the
message that Java development kit has been successfully installed on the
system, we need to click on the Close button. Now we have Java successfully
installed on your system.
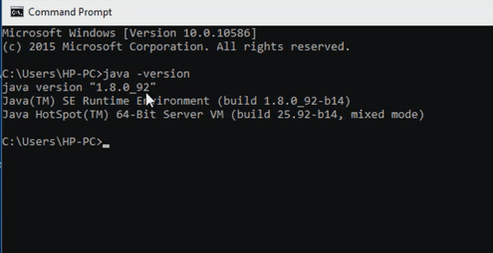
After downloading java, we need to verify whether Java has been successfully installed on our system or not. In order to verify the download of Java on the system, we need to run “java -version” command from command prompt.
If Java is successfully installed on your system, it will show the Java version installed on the system in the command prompt itself. We have Java version 1.8.0.92 installed on our system.
So when I am giving command java version on my command prompt, I get this Java version printed on the command prompt which can be seen in the screenshot which is given as below.
In case, JDK/JRE is not installed correctly on the system, we will get
the message “java is not recognized as an internal or external command”.
Also we may require setting system environment variables.
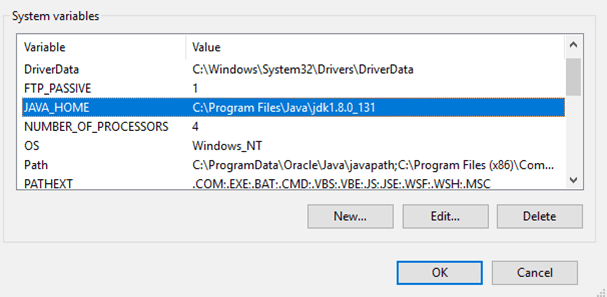
Now that we have installed the Java Development Kit (JDK) our next
step is to set the JAVA_HOME environment variable. Let us see how we will do
it. First of all we will find the location where Java is installed. Let us
suppose that it is is- C:\Program Files\Java\jdk1.8.0_65
Steps to add Java environment value on Windows system
- For
setting up environment variable in Windows we need to right-click on My
Computer/This PC and select Properties > Advanced. - We may
also go to Control Panel > System > Advanced System Settings. - Then we
need to click on on the Environment Variables button. - Now
under System Variables, click New. - In the
Variable Name field, We need to enter JAVA_HOME
if we have installed the JDK (Java Development Kit) - In the
Variable Value field, we have to enter your JDK or JRE installation path which
in our case is C:\Program Files\Java\jdk1.8.0_92 - Similarly
in the path variable we need to to add C:\Program Files\Java\jdk1.8.0_92\bin
It will be clearer from the following screenshots.
Operating System Requirements:
Since Java is platform independent language and JMeter is built using Java programming language, it should work on all the operating systems which support Java.
It supports Linux, Ubuntu, Windows 10, Mac and any other operating systems that supports Java.
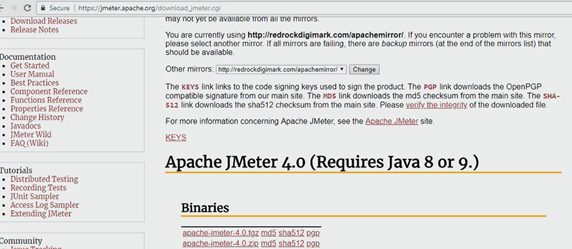
How to Download JMeter
One can download the latest version of Apache JMeter binaries (tgz or zip) from link given in the following screenshot.
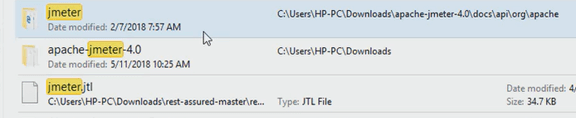
2) After JMeter is downloaded, it will appear in the Downloads folder of your system.

3) Now we need to unzip the file on to your desired path. JMeter Directory Structure looks like as given in the following screenshot:
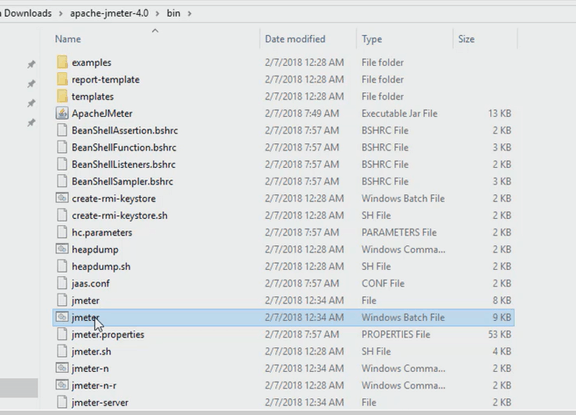
One point to be noted is that, Bin folder of JMeter folder contains
templates, .bat, .sh, .jar files which are used to start JMeter. Lib folder contains all required jar files
which are required to run JMeter.
Steps to Launch JMeter
For launching JMeter, we need to go to JMeter/ bin folder as shown in the screenshot given below.
We just need to click on the batch file which is given below. After clicking on it, the JMeter graphical user interface will pop up.
It takes some time, maybe a few seconds to start the graphical user interface of JMeter.
JMeter graphical user interface appears as given below. But before that command prompt opens which executes some command s before opening JMeter graphical user interface which can be seen in the screenshot as given below.
After launching JMeter, we can see new window appearing which is JMeter graphical user interface is. It can be seen in the screenshot as given below.
Now since we are able to see JMeter graphical user
interface, we are ready to do load testing and performance testing. We can see
that it is very light weighted and does not take much space in memory to be
installed.
1. Download the jmeter
- Open your browser to jMeter’s official website
- Click on the Download Releases link on the left
- Click on the [apache-jmeter-5.4.1.zip] link under Binaries to start the download
2. Install the jmeter
- Copy the downloaded package to the installation directory and decompress it to go to the JMeter home directory
- Go to the bin directory
- Double-click apachejmeter.jar to run JMeter
3. Use of JMeter
- Adding a thread Group
Right click on “Test Plan” -> “Add” -> “Thread (User)” -> “Thread Group”
- Set the thread group name, number of threads, ramp-up cycles, scheduler, and other parameters
Description of thread group parameters: 1) Number of threads: indicates the number of virtual users. A virtual user occupies a process or thread. Set the number of virtual users and in this case, set the number of threads. 2) Ramp-up time (s) : how long it takes for the specified virtual users to start Up. If the number of threads is 10 and the preparation time is 2, it takes 2 seconds to start 10 threads, or 5 threads per second. 3) Number of loops: the number of requests sent per thread. If the number of threads is 10 and the number of loops is 100, then each thread sends 100 requests. The total number of requests is 10 x 100=1000. If “always” is checked, all threads will continue to send requests and stop running the script as soon as possible. 4) Delay thread creation until needed: Delay thread creation when needed. 5) Scheduler: set the start time and end time of the thread group startup (when configuring the scheduler, you need to check the cycle times to be forever) Duration (s) : test duration, which will overwrite the end time start delay (s) : test delay start time, which will overwrite the start time
- Adding an HTTP Request
Right click on “Thread Groups” -> “Add” -> “Sampler” -> “HTTP Request”
- Http request parameters:
The default value is HTTP. Server name or IP: name or IP address of the target server to which the HTTP request is sent port number: port number of the target server. The default value is 80. Methods for sending HTTP requests include GET, POST, HEAD, PUT, OPTIONS, TRACE, and DELETE. Path: Destination URL path (the rest of the URL after removing the server address, port, and parameters) content coding: 3) Send parameters with the request URL parameters sent in the request. You can set all parameters in the URL in this table. Each parameter in the table is one parameter (name=value in the URL). Note If the parameter is passed in Chinese, select “Encoding”.
- Add view result tree
Right click on “Thread Groups” -> “Add” -> “Listeners” -> “View Result Tree”
- Perform the test
Click the small green arrow button to start the test
- Click yes to save the test plan. Click the small green arrow button again to start the test

JMeter isn’t particularly hard to install. But that’s easy to say when you’ve done it many times.
Basically if you want to get started with JMeter on Windows. That’s great because this guide is for you! Let’s see how to install JMeter on Windows.
Install Java
Check Java Version
JMeter is a Java program: the Java Virtual Machine must be installed prior to installing JMeter.
To check if Java is installed properly:
- Open a Command-Line console by clicking on the start menu then type
cmd, - Enter the command:
java -version.

It should display something like:
java version "1.8.0_144"
Java(TM) SE Runtime Environment <build 1.8.0_144-b01>
Java HotSpot(TM) Client VM <build 25.144-b01, mixed mode, sharing>
Java Setup
If it’s not the case (like showing java command not found, then Java must be installed.

To install Java:
- Open the Open JDK in your browser,
- Download the appropriate executable setup file,
- Run the executable setup file,
- And follow instructions.
Once Java is installed, make sure the java -version command works properly.
JMeter Setup
Now that Java is installed, we’re going to install JMeter:
Unzip Archive
- First, Download JMeter: prefer ZIP archive format,
- Using the Explorer, Open the folder,
- Right-click on JMeter’s ZIP archive and select
Extract to apache-jmeter-xx\.

JMeter Directories

Great! Now we have successfully downloaded and unzipped JMeter. You should see the following files within the apache-jmeter-XX folder:
- backups: contains the backups of JMX files (also known as JMeter projects) you edited within JMeter,
- bin: contains the executable files to launch JMeter, and configuration files to tweak JMeter settings,
- docs: JMeter’s documentation in HTML format,
- extras: some useful side tools like excel sheets to compute graphs from JTL result files,
- lib: JMeter’s libraries which are mostly Java JAR files,
- printable_docs: documentation in printable format.
It’s now time to see how to launch JMeter.
Run JMeter
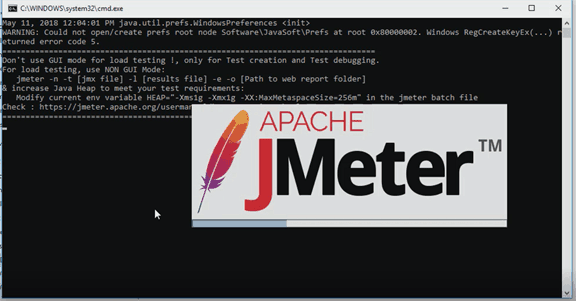
The screenshot below shows what JMeter’s bin/ folder contains. It’s a bunch of configuration and executable files.

to run JMeter:
- Browse to
bin/folder by double-clicking on it, - double-click on
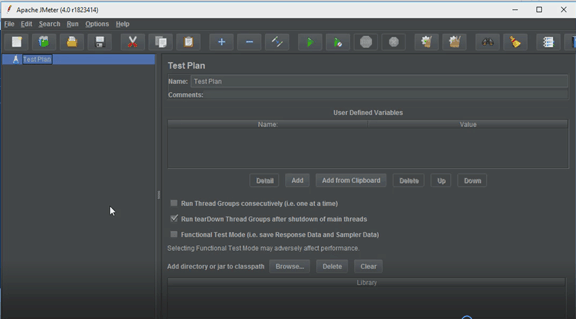
jmeter.batto run it, - It should open both a command-line terminal and JMeter’s UI.

The screenshot above shows JMeter 4.0 graphical interface with the new dark theme. As said before, it wasn’t difficult at all, but sometimes it’s always pleasant to have someone help you to install and run JMeter.
Upgrading JMeter
When a new JMeter version is available, the new JMeter version must be installed in a fresh new folder.
Please do not unzip a new JMeter version over a previous one.
Simply repeat the steps above to install a new version.
Removing JMeter
Simply delete the apache-jmeter-XX folder and you’re done. Yes, it’s that simple!