
The InfluxDB v2 time series platform is purpose-built to collect, store,
process and visualize metrics and events.
- Download and install InfluxDB v2
- Start InfluxDB
- Download, install, and configure the
influxCLI
Download and install InfluxDB v2
Recommended:: Before you open and install packages and downloaded files, use SHA
checksum verification and GPG signature verification to ensure the files are
intact and authentic.
InfluxDB installation instructions for some OS versions include steps to
verify downloaded files before you install them.
For more information about SHA and GPG verifications, see the following:
Choose the InfluxData key-pair for your OS version
Verify download integrity using SHA-256
Verify file integrity and authenticity using GPG
The following instructions include steps for downloading, verifying, and installing
InfluxDB:
To install InfluxDB, do one of the following:
- Install using Homebrew
- Manually download and install for macOS
We recommend using Homebrew to install InfluxDB v2 on macOS.
InfluxDB and the influx CLI are separate packages
The InfluxDB server (influxd) and the
influx CLI are packaged and
versioned separately.
You’ll install the influx CLI in a later step.
Install using Homebrew
brew update
brew install influxdb
Manually download and install for macOS
-
In your browser or your terminal, download the InfluxDB package.
InfluxDB v2 (macOS)
# Download using cURL curl --location -O \ "https://download.influxdata.com/influxdb/releases/influxdb2-2.7.11_darwin_amd64.tar.gz" -
Recommended:: Verify the integrity of the download–for example, enter the
following command in your terminal:
# Use 2 spaces to separate the checksum from the filename
echo "224926fd77736a364cf28128f18927dda00385f0b6872a108477246a1252ae1b  influxdb2-2.7.11_darwin_amd64.tar.gz" \
| shasum --algorithm 256 --quiet --check -
Replace the following:
224926fd77736a364cf28128f18927dda00385f0b6872a108477246a1252ae1b: the SHA checksum from the downloads page
-
Unpackage the InfluxDB binary.
Do one of the following:
- In Finder, double-click the downloaded package file.
- In your terminal (for example, Terminal or iTerm2), use
tarto unpackage the file–for example, enter the following command to extract it into the current directory:
# Unpackage contents to the current working directory tar zxvf ./influxdb2-2.7.11_darwin_amd64.tar.gz -
Optional: Place the
influxdbinary in your$PATH–for example, copy the binary to/usr/local/bin:# (Optional) Copy the influxd binary to your $PATH sudo cp influxdb2-2.7.11/influxd /usr/local/bin/With the
influxdbinary in your$PATH(/usr/local/bin), you can enterinfluxdin your terminal to start the server.If you choose not to move the
influxdbinary into your$PATH, enter the path to the binary to start the server–for example:./influxdb2-2.7.11/influxd
Recommended – Set appropriate directory permissions
Both InfluxDB 1.x and 2.x have associated influxd and influx binaries.
If InfluxDB 1.x binaries are already in your $PATH, run the v2 binaries in
place or rename them before putting them in your $PATH.
If you rename the binaries, all references to influxd and influx in this
documentation refer to your renamed binaries.
To install InfluxDB on Linux, do one of the following:
- Install InfluxDB as a service with systemd
- Manually download and install the influxd binary
InfluxDB and the influx CLI are separate packages
The InfluxDB server (influxd) and the
influx CLI are packaged and
versioned separately.
You’ll install the influx CLI in a later step.
Install InfluxDB as a service with systemd
-
Choose the InfluxData key-pair for your OS version.
-
Run the command for your OS version to install the InfluxData key,
add the InfluxData repository, and installinfluxdb.Before running the command, replace the checksum and key filename with the
key-pair from the preceding step.# Ubuntu and Debian # Add the InfluxData key to verify downloads and add the repository curl --silent --location -O \ https://repos.influxdata.com/influxdata-archive.key echo "943666881a1b8d9b849b74caebf02d3465d6beb716510d86a39f6c8e8dac7515 influxdata-archive.key" \ | sha256sum --check - && cat influxdata-archive.key \ | gpg --dearmor \ | sudo tee /etc/apt/trusted.gpg.d/influxdata-archive.gpg > /dev/null \ && echo 'deb [signed-by=/etc/apt/trusted.gpg.d/influxdata-archive.gpg] https://repos.influxdata.com/debian stable main' \ | sudo tee /etc/apt/sources.list.d/influxdata.list # Install influxdb sudo apt-get update && sudo apt-get install influxdb2# RedHat and CentOS # Add the InfluxData key to verify downloads curl --silent --location -O \ https://repos.influxdata.com/influxdata-archive.key \ && echo "943666881a1b8d9b849b74caebf02d3465d6beb716510d86a39f6c8e8dac7515 influxdata-archive.key" \ | sha256sum --check - && cat influxdata-archive.key \ | gpg --dearmor \ | tee /etc/pki/rpm-gpg/RPM-GPG-KEY-influxdata > /dev/null # Add the InfluxData repository to the repository list. cat <<EOF | tee /etc/yum.repos.d/influxdata.repo [influxdata] name = InfluxData Repository - Stable baseurl = https://repos.influxdata.com/stable/${basearch}/main enabled = 1 gpgcheck = 1 gpgkey = file:///etc/pki/rpm-gpg/RPM-GPG-KEY-influxdata EOF # Install influxdb sudo yum install influxdb2 -
Start the InfluxDB service:
sudo service influxdb startInstalling the InfluxDB package creates a service file at
/lib/systemd/system/influxdb.service
to start InfluxDB as a background service on startup. -
To verify that the service is running correctly, restart your system and then enter the following command in your terminal:
sudo service influxdb statusIf successful, the output is the following:
● influxdb.service - InfluxDB is an open-source, distributed, time series database
   Loaded: loaded (/lib/systemd/system/influxdb.service; enabled; vendor preset: enable>
   Active: active (running)
For information about where InfluxDB stores data on disk when running as a service,
see File system layout.
Pass configuration options to the service
You can use systemd to customize InfluxDB configuration options and pass them to the InfluxDB service.
-
Edit the
/etc/default/influxdb2service configuration file to assign configuration directives toinfluxdcommand line flags–for example, add one or more<ENV_VARIABLE_NAME>=<COMMAND_LINE_FLAG>lines like the following:ARG1="--http-bind-address :8087" ARG2="--storage-wal-fsync-delay=15m" -
Edit the
/lib/systemd/system/influxdb.servicefile to pass the variables to theExecStartvalue:ExecStart=/usr/bin/influxd $ARG1 $ARG2
Manually download and install the influxd binary
If necessary, adjust the example file paths and utilities for your system.
-
In your browser or your terminal, download the InfluxDB binary for your
system architecture (AMD64 or ARM).InfluxDB v2 (amd64)
InfluxDB v2 (arm)# Use curl to download the amd64 binary. curl --location -O \ https://download.influxdata.com/influxdb/releases/influxdb2-2.7.11_linux_amd64.tar.gz# Use curl to download the arm64 binary. curl --location -O \ https://download.influxdata.com/influxdb/releases/influxdb2-2.7.11_linux_arm64.tar.gz -
Choose the InfluxData key-pair for your OS version.
-
Recommended:: Verify the authenticity of the downloaded binary–for example,
enter the following command in your terminal.Before running the command for your system, replace
https://repos.influxdata.com/influxdata-archive.keywith the key URL
from the preceding step.# amd64 # Download and import the key curl --silent --location https://repos.influxdata.com/influxdata-archive.key \ | gpg --import - 2>&1 \ | grep 'InfluxData Package Signing Key <support@influxdata.com>' \ && # Download and verify the binary's signature file curl --silent --location "https://download.influxdata.com/influxdb/releases/influxdb2-2.7.11_linux_amd64.tar.gz.asc" \ | gpg --verify - influxdb2-2.7.11_linux_amd64.tar.gz \ 2>&1 | grep 'InfluxData Package Signing Key <support@influxdata.com>'# arm64 # Download and import the key curl --silent --location https://repos.influxdata.com/influxdata-archive.key \ | gpg --import - 2>&1 \ | grep 'InfluxData Package Signing Key <support@influxdata.com>' \ && # Download and verify the binary's signature file curl --silent --location "https://download.influxdata.com/influxdb/releases/influxdb2-2.7.11_linux_arm64.tar.gz.asc" \ | gpg --verify - influxdb2-2.7.11_linux_arm64.tar.gz \ 2>&1 | grep 'InfluxData Package Signing Key <support@influxdata.com>'If successful, the output is similar to the following:
gpg: Good signature from "InfluxData Package Signing Key <support@influxdata.com>" [unknown] -
Extract the downloaded binary–for example, enter the following command
for your system:# amd64 tar xvzf ./influxdb2-2.7.11_linux_amd64.tar.gz# arm64 tar xvzf ./influxdb2-2.7.11_linux_arm64.tar.gz -
Optional: Place the extracted
influxdexecutable binary in your system$PATH.# amd64 sudo cp ./influxdb2-2.7.11/usr/bin/influxd /usr/local/bin/# arm64 sudo cp ./influxdb2-2.7.11/usr/bin/influxd /usr/local/bin/If you choose to not move the
influxdbinary into your$PATH, enter the
path to the binary to start the server–for example:./influxdb2-2.7.11/usr/bin/influxd
Recommended – Set appropriate directory permissions
System requirements
- Windows 10
- 64-bit AMD architecture
- Powershell or
Windows Subsystem for Linux (WSL)
Command line examples
Use Powershell or WSL to execute influx and influxd commands.
The command line examples in this documentation use influx and influxd as if
installed on the system PATH.
If these binaries are not installed on your PATH, replace influx and influxd
in the provided examples with ./influx and ./influxd respectively.
InfluxDB and the influx CLI are separate packages
The InfluxDB server (influxd) and the
influx CLI are packaged and
versioned separately.
You’ll install the influx CLI in a later step.
InfluxDB v2 (Windows)
Expand the downloaded archive into C:\Program Files\InfluxData\ and rename the
files if desired.
Expand-Archive .\influxdb2-2.7.11-windows.zip -DestinationPath 'C:\Program Files\InfluxData\'
mv 'C:\Program Files\InfluxData\influxdb2-2.7.11' 'C:\Program Files\InfluxData\influxdb'
Recommended – Set appropriate directory permissions
Install and set up InfluxDB in a container
The following steps show how to use the
Docker CLI to set up and
run InfluxDB. but you can also
use Docker Compose.
The following guide uses Docker mounted
volumes to persist InfluxDB
configuration and data.
Persisting your data to a file system outside the container ensures that your
data isn’t deleted if you delete the container.
-
Install Docker Desktop for your system.
-
Start a Docker container from the
influxdbDocker Hub image–for example,
in your terminal, enter thedocker run influxdb:2command with command line
flags for initial setup options and file system mounts.
If you don’t specify InfluxDB initial setup options, you can
set up manually later using the UI or CLI in a running
container.
docker run \
 --name influxdb2 \
 --publish 8086:8086 \
 --mount type=volume,source=influxdb2-data,target=/var/lib/influxdb2 \
 --mount type=volume,source=influxdb2-config,target=/etc/influxdb2 \
 --env DOCKER_INFLUXDB_INIT_MODE=setup \
 --env DOCKER_INFLUXDB_INIT_USERNAME=ADMIN_USERNAME \
 --env DOCKER_INFLUXDB_INIT_PASSWORD=ADMIN_PASSWORD \
 --env DOCKER_INFLUXDB_INIT_ORG=ORG_NAME \
 --env DOCKER_INFLUXDB_INIT_BUCKET=BUCKET_NAME \
 influxdb:2
The command passes the following arguments:
-
--publish 8086:8086: Exposes the InfluxDB
UI and
HTTP API on the host’s8086port. -
--mount type=volume,source=influxdb2-data,target=/var/lib/influxdb2: Creates
a volume namedinfluxdb2-datamapped to the
InfluxDB data directory
to persist data outside the container. -
--mount type=volume,source=influxdb2-config,target=/etc/influxdb2: Creates a
volume namedinfluxdb2-configmapped to the
InfluxDB configuration directory
to make configurations available outside the container. -
--env DOCKER_INFLUXDB_INIT_MODE=setup: Environment variable that invokes the
automated setup of the initial organization, user, bucket, and token when creating the container. -
--env DOCKER_INFLUXDB_INIT_<SETUP_OPTION>: Environment variables for initial
setup options–replace the following with your own values:ADMIN_USERNAME:
The username for the initial user–an admin
user with an API Operator token.ADMIN_PASSWORD:
The password for the initial user.ORG_NAME:
The name for the initial organization.BUCKET_NAME:
The name for the initial bucket.
If successful, the command starts InfluxDB initialized with the user, organization, bucket,
and Operator token, and logs to stdout.
You can view the Operator token in the /etc/influxdb2/influx-configs file and
use it to authorize
creating an All Access token.
To run the InfluxDB container in
detached mode,
include the --detach flag in the docker run command.
For more InfluxDB configuration options,
see the influxdb Docker Hub image
documentation.
Run InfluxDB CLI commands in a container
When you start a container using the influxdb Docker Hub image, it also
installs the influx CLI in the container.
With InfluxDB setup and running in the container, you can use the Docker CLI
docker exec
command to interact with the influx and influxd CLIs inside the container.
Syntax
docker exec -it <CONTAINER_NAME> <CLI_NAME> <COMMAND>`
Examples
# List CLI configurations
docker exec -it influxdb2 influx config ls
# View the server configuration
docker exec -it influxdb2 influx server-config
# Inspect server details
docker exec -it influxdb2 influxd inspect -d
Manage files in mounted volumes
To copy files, such as the InfluxDB server config.yml file, between your local
file system and a volume, use the
docker container cp command.
Install InfluxDB in a Kubernetes cluster
The instructions below use minikube or kind, but the steps should be similar in any Kubernetes cluster.
InfluxData also makes Helm charts available.
-
Install minikube or
kind. -
Start a local cluster:
# with minikube
minikube start
# with kind kind create cluster -
Apply the sample InfluxDB configuration by running:
kubectl apply -f https://raw.githubusercontent.com/influxdata/docs-v2/master/static/downloads/influxdb-k8-minikube.yamlThis creates an
influxdbNamespace, Service, and StatefulSet.
A PersistentVolumeClaim is also created to store data written to InfluxDB.Important: always inspect YAML manifests before running
kubectl apply -f <url>! -
Ensure the Pod is running:
kubectl get pods -n influxdb -
Ensure the Service is available:
kubectl describe service -n influxdb influxdbYou should see an IP address after
Endpointsin the command’s output. -
Forward port 8086 from inside the cluster to localhost:
kubectl port-forward -n influxdb service/influxdb 8086:8086
Requirements
To run InfluxDB on Raspberry Pi, you need:
- a Raspberry Pi 4+ or 400
- a 64-bit operating system.
Recommended:: a 64-bit version of Ubuntu
of Ubuntu Desktop or Ubuntu Server compatible with 64-bit Raspberry Pi.
Install Linux binaries
Follow the Linux installation instructions
to install InfluxDB on a Raspberry Pi.
Monitor your Raspberry Pi
Use the InfluxDB Raspberry Pi template
to easily configure collecting and visualizing system metrics for the Raspberry Pi.
Monitor 32-bit Raspberry Pi systems
If you have a 32-bit Raspberry Pi, use Telegraf
to collect and send data to:
- InfluxDB OSS, running on a 64-bit system
- InfluxDB Cloud with a Free Tier account
- InfluxDB Cloud with a paid Usage-Based account with relaxed resource restrictions.
Start InfluxDB
If it isn’t already running, follow the instructions to start InfluxDB on your system:
To start InfluxDB, run the influxd daemon:
macOS requires downloaded binaries to be signed by registered Apple developers.
Currently, when you first attempt to run influxd, macOS will prevent it from running.
To manually authorize the influxd binary, follow the instructions for your macOS version to allow downloaded applications.
Run InfluxDB on macOS Ventura
- Follow the preceding instructions to attempt to start
influxd. - Open System Settings and click Privacy & Security.
- Under the Security heading, there is a message about “influxd” being blocked, click Allow Anyway.
- When prompted, enter your password to allow the setting.
- Close System Settings.
- Attempt to start
influxd. - A prompt appears with the message “macOS cannot verify the developer of “influxd”…”».
Click Open.
Run InfluxDB on macOS Catalina
- Attempt to start
influxd. - Open System Preferences and click Security & Privacy.
- Under the General tab, there is a message about
influxdbeing blocked.
Click Open Anyway.
We are in the process of updating the build process to ensure released binaries are signed by InfluxData.
“too many open files” errors
After running influxd, you might see an error in the log output like the
following:
To resolve this error, follow the
recommended steps to increase
file and process limits for your operating system version then restart influxd.
If InfluxDB was installed as a systemd service, systemd manages the influxd daemon and no further action is required.
If the binary was manually downloaded and added to the system $PATH, start the influxd daemon with the following command:
In Powershell, navigate into C:\Program Files\InfluxData\influxdb and start
InfluxDB by running the influxd daemon:
cd -Path 'C:\Program Files\InfluxData\influxdb'
./influxd
Grant network access
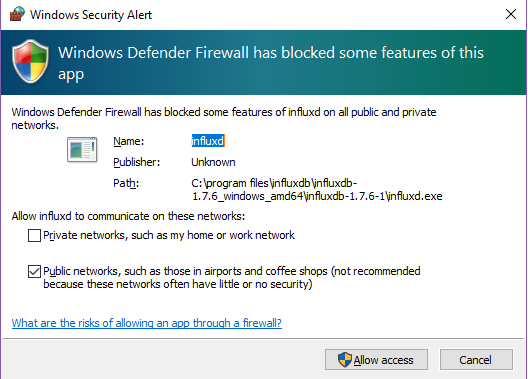
When starting InfluxDB for the first time, Windows Defender appears with
the following message:
Windows Defender Firewall has blocked some features of this app.
- Select Private networks, such as my home or work network.
- Click Allow access.
To use the Docker CLI to start an existing container, enter the following command:
Replace influxdb2 with the name of your container.
To start a new container, follow instructions to install and set up InfluxDB in a container.
To start InfluxDB using Kubernetes, follow instructions to install InfluxDB in a Kubernetes cluster.
If successful, you can view the InfluxDB UI at http://localhost:8086.
InfluxDB starts with default settings, including the following:
http-bind-address=:8086: Uses port8086(TCP) for InfluxDB UI and HTTP API client-server communication.reporting-disabled=false: Sends InfluxDB telemetry information back to InfluxData.
To override default settings, specify configuration options when starting InfluxDB–for example:
Configure the port or address
Opt-out of telemetry reporting
For information about InfluxDB v2 default settings and how to override them,
see InfluxDB configuration options.
With InfluxDB installed and initialized, get started writing and querying data.
Download, install, and configure the influx CLI
Recommended:: Install the influx CLI,
which provides a simple way to interact with InfluxDB from a command line.
For detailed installation and setup instructions,
see Use the influx CLI.
InfluxDB and the influx CLI are separate packages
The InfluxDB server (influxd) and the
influx CLI are packaged and
versioned separately.
Some install methods (for example, the InfluxDB Docker Hub image) include both.
Was this page helpful?
Thank you for your feedback!
© 2025 InfluxData, Inc.
Estimated reading: 2 minutes
507 views
InfluxDB is a popular open-source time series database that is used for storing and analyzing large amounts of data in real time. In this tutorial, we will guide you through installing InfluxDB on Windows.
Prerequisites
Before we begin, make sure that your system meets the following requirements:
- Windows
- PowerShell version 5 or later
- 64-bit processor architecture
- You can upgrade the Power Shell by following these instructions:
How to update PowerShell to the latest version on Windows


Step 1: Download InfluxDB
The first step is to download the latest version of InfluxDB from the official website [https://docs.influxdata.com/influxdb/v2/install/?t=Windows#download-and-install-influxdb-v2]. Scroll down and click the “Windows” button under the “InfluxDB OSS” section. This will initiate the download of a compressed ZIP file.

Step 2: Extract InfluxDB
Once the download is complete, go to the directory where the ZIP file is saved and extract it to a location of your choice.
Step 3: Install InfluxDB
Now, open PowerShell as an administrator and navigate to the directory where InfluxDB was extracted. In our example, we will assume that InfluxDB was extracted to the C:\InfluxDB directory.
Run the following command in PowerShell to install InfluxDB:
cd C:\InfluxDB\influxdb2-2.7.10-windows
.\influxd
This will start the InfluxDB server and its database. You should see a message.
Step 4: Verify InfluxDB Installation
To verify that InfluxDB has been successfully installed, follow these steps:
- Open a web browser and navigate to http://localhost:8086/.
- If InfluxDB is installed and running correctly, you will see a welcome page with the InfluxDB version number.

Step 5: Use InfluxDB
You can now use InfluxDB to store, analyze, and visualize data. To interact with InfluxDB, you can use the command-line interface (CLI) tool or one of the many available client libraries for your programming language.

Conclusion
This tutorial taught you how to install InfluxDB on a Windows machine. You also learned how to verify the installation and start using InfluxDB to store and analyze data. InfluxDB is a powerful tool for monitoring and analyzing system metrics and has many use cases. With InfluxDB installed on your Windows machine, you can collect and analyze data in real time.
In the present world, technologies are updating day by day with plenty of advanced facilities. Likewise, the installation of InfluxDB on windows tutorials also may differ some time to time. So, here we have come up with a useful and handy tutorial on How To Install InfluxDB on Windows which is good and up-to-date among others.
These types of technologies may change and grow all the time so educational resources should adapt properly. The main objective of offering this tutorial is to have an insightful and up-to-date article on how to install it on Windows.
The tutorial of Install InfluxDB on Windows in 2021 covers the following stuff in a detailed way:
- How do you install InfluxDB on Windows in 2021?
- How to download InfluxDB on Windows
- How to configure InfluxDB on your machine
- How to Run InfluxDB as a Windows service using NSSM Tool?
- Most Common Mistakes In The Process
Be ready to follow all the required steps for a clean InfluxDB installation.
Check out this video tutorial on how to install InfluxDB on windows and moreover, you can learn the basic commands of influxdb, and integration with Grafana from here:
How to download InfluxDB on Windows?
By following the below two methods, you can easily download the InfluxDB on windows:
a – Downloading the archive
Downloading InfluxDB is very straightforward.
Head over to the InfluxDB downloads page. There, you will see the following four boxes.

What are those four boxes for?
They are part of the TICK stack. (Telegraf, InfluxDB, Chronograf, and Kapacitor).
Each of these tools has a very specific role: gathering metrics, storing data, visualizing time series or having post-processing defined functions on your data.
In this tutorial, we are going to focus on InfluxDB (the time series database component of TICK)
- How To Install InfluxDB 1.7 and 2.0 on Linux in 2021
- How To Install InfluxDB Telegraf and Grafana on Docker
- How To Create a Database on InfluxDB 1.7 & 2.0
So should you download the v1.7.6 or v2.0.0 version?
In my previous articles, I answered the main difference between the two versions, but here’s the main difference you need to remember.
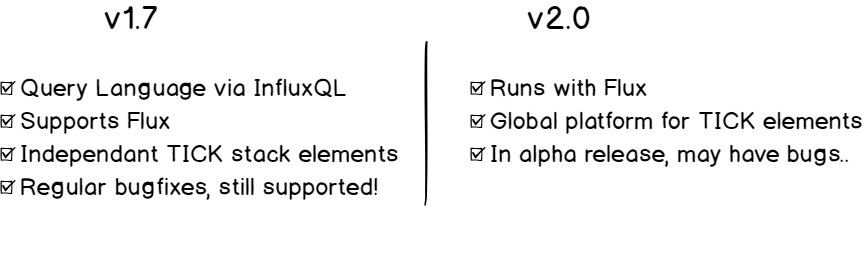
As the 2.0 version is still experimental, we are going to go for the 1.7.6 version.
Click on the v1.7.6 button.
Another window will open with all operating systems. Scroll until you see Windows Binaries (64-bit).

Simply click on the URL in the white box, and the download will automatically start in your browser.
Store it wherever you want, in my case, it will be in the Program Files folder.
Unzip the archive using your favorite archive utility tool (7-Zip in my case) or run the following command in a Powershell command line.
Expand-Archive -Force C:\path\to\archive.zip C:\where\to\extract\toGreat! Let’s take a look at what you have here.
b – Inspecting the archive
Inside your folder, you now have 5 binaries and 1 configuration file:
- influx.exe: a CLI used to execute IFQL commands and navigate into your databases.
- influx_inspect.exe: get some information about InfluxDB shards (in a multinode environment)
- influx_stress.exe: used to stress-test your InfluxDB database
- influx_tsm.exe: InfluxDB time-structured merge tree utility (not relevant here)
- influxd.exe: used to launch your InfluxDB server
- influxdb.conf: used to configure your InfluxDB instance.
Relevant binaries were marked in bold.
Also Check: How To Create a Grafana Dashboard? (UI + API methods)
How to configure InfluxDB Server on your Machine
Before continuing, you have to configure your InfluxDB instance for Windows.
We are essentially interested in four sections in the configuration file.
a – Meta section
This is where your raft database will be stored. It stores metadata about your InfluxDB instance.
Create a meta folder in your InfluxDB directory (remember in my case it was Program Files).
Modify the following section in the configuration file.
[meta]
  # Where the metadata/raft database is stored
  dir = "C:\\Program Files\\InfluxDB\\meta"
b – Data section
InfluxDB stores TSM and WAL files as part of its internal storage. This is where your data is going to be stored on your computer. Create a data and a wal folder in your folder. Again, modify the configuration file accordingly.
[data]
  # The directory where the TSM storage engine stores TSM files.
  dir = "C:\\Program Files\\InfluxDB\\data"

  # The directory where the TSM storage engine stores WAL files.
  wal-dir = "C:\\Program Files\\InfluxDB\\wal
Important: you need to put double quotes in the path!
c – HTTP section
There are many ways to insert data into an InfluxDB database.
You can use client libraries to use in your Python, Java, or Javascript applications. Or you can use the HTTP endpoint directly.
InfluxDB exposes an endpoint that one can use to interact with the database. It is on port 8086. (here’s the full reference of the HTTP API)
Back to your configuration file. Configure the HTTP section as follows:
[http]
  # Determines whether HTTP endpoint is enabled.
  enabled = true

  # The bind address used by the HTTP service.
  bind-address = ":8086"

  # Determines whether HTTP request logging is enabled.
  log-enabled = true
Feel free to change the port as long as it is not interfering with ports already used on your Windows machine or server.
d – Logging section
The logging section is used to determine which levels of the log will be stored for your InfluxDB server. The parameter by default is “info”, but feel free to change it if you want to be notified only for “error” messages for example.
[logging]
  # Determines which log encoder to use for logs. Available options
  # are auto, logfmt, and json. auto will use a more user-friendly
  # output format if the output terminal is a TTY, but the format is not as
  # easily machine-readable. When the output is a non-TTY, auto will use
  # logfmt.
  # format = "auto"

  # Determines which level of logs will be emitted. The available levels
  # are error, warn, info, and debug. Logs that are equal to or above the
  # specified level will be emitted.
  level = "error"
e – Quick test
Before configuring InfluxDB as a service, let’s run a quick-dry test to see if everything is okay.
In a command-line, execute the influxd executable. Accept the firewall permission if you are prompted to do it.
Now that your InfluxDB server has started, start a new command-line utility and run the following command.
C:\Users\Antoine>curl -sl -I http://localhost:8086/ping
HTTP/1.1 204 No Content
Content-Type: application/json
Request-Id: 7dacef6d-8c2f-11e9-8018-d8cb8aa356bb
X-Influxdb-Build: OSS
X-Influxdb-Version: 1.7.6
X-Request-Id: 7dacef6d-8c2f-11e9-8018-d8cb8aa356bb
Date: Tue, 11 Jun 2021 09:58:41 GMT
The /ping endpoint is used to check if your server is running or not.
Are you getting a 204 No Content HTTP response?
Congratulations!
You now simply have to run it as a service, and you will be all done.
How to Run InfluxDB as a Windows service using NSSM Tool?
As you guessed, you are not going to run InfluxDB via the command line every time you want to run it. That’s not very practical.
You are going to run it as a service, using the very popular NSSM tool on Windows.
You could use the SC tool that is natively available on Windows, but I just find it more complicated than NSSM.
To download NSSM, head over to https://nssm.cc/download.
Extract it in the folder that you want, for me, it will be “C:\Program Files\NSSM”.
From there, in the current NSSM folder, run the following command (you need administrative rights to do it)
> nssm install
You will be prompted with the NSSM window.
Enter the following details in it (don’t forget the config section, otherwise our previous work is useless)
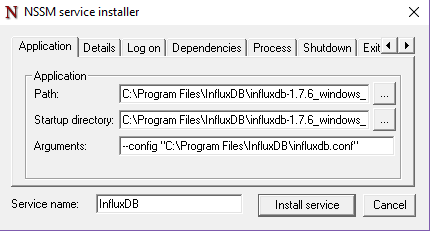
That’s it!
Now your service is installed.
Head over to the services in Windows 10. Find your service under the name and verify that its status is “Running” (if you specified an automatic startup type in NSSM of course)
Is it running? Let’s verify one more time with curl.
C:\Users\Antoine>curl -sL -I http://localhost:8086/ping
HTTP/1.1 204 No Content
Content-Type: application/json
Request-Id: ef473e13-8c38-11e9-8005-d8cb8aa356bb
X-Influxdb-Build: OSS
X-Influxdb-Version: 1.7.6
X-Request-Id: ef473e13-8c38-11e9-8005-d8cb8aa356bb
Date: Tue, 11 Jun 2021 11:06:17 GMT
Congratulations! You did it!
You installed InfluxDB on Windows as a service, and it is running on port 8086.
Most Common Mistakes In The Process
The service did not respond in a timely fashion.
I encountered this error when I tried to set up InfluxDB as a service using SC. As many solutions exist on Google and on Youtube, I solved it by using NSSM.
Tried tweaking the Windows registry but it wasn’t very useful at all.
Only one usage of each socket address (protocol/network address/port) is normally permitted.
Simple, there is already a program or service listening on 8086. You should modify the default port in the configuration file and take one that is permitted and not used.
I don’t have the same curl response
A 204 response to the curl command is the only sign that your InfluxDB is running correctly. If you don’t get the same output, you should go back and double-check the steps before.
I have a parsing error in my configuration file!
Remember that in Windows systems backslashs have to be escaped. It’s double backslashs in the paths of your InfluxDB configuration file.
If your path contains some spaces, like “Program Files”, make sure to put your path into quotes.

InfluxDB®
Follow the steps mentioned in this page to install InfluxDB® in your Laptop/PC
Last updated
Was this helpful?
You can download the InfluxDB® Windows Binaries from the following link.
-
Select the Latest version.
-
Select Windows Binaries.
-
Copy the PowerShell commands displayed on the page.
-
Run Windows PowerShell as administrator.
-
Paste and run the copied contents.
-
You have now successfully installed InfluDB on your Laptop/PC

Wondering how to install influxdb in windows? We can help you.
Here at Bobcares, we get requests from our clients to handle similar issues as a part of our Server Management Services.
Today, in this article we will steps followed by our Support Engineers for the installation.
How to install influxdb in windows?
Basically, the InfluxDB 2.0 time series platform is purpose-built to collect, store, process and visualize metrics and events.
System Requirements:
- Windows 10
- 64-bit AMD architecture
- Powershell or Windows Subsystem for Linux (WSL)
Download and install InfluxDB v2.0
Firstly, download InfluxDB v2.0 for Windows.
Then, expand the downloaded archive into C:\Program Files\InfluxData\ and rename it if desired.
Expand-Archive .\influxdb2-2.0.9-windows-amd64.zip -DestinationPath 'C:\Program Files\InfluxData\'
> mv 'C:\Program Files\InfluxData\influxdb2-2.0.9-windows-amd64' 'C:\Program Files\InfluxData\influxdb'
Networking ports
By default, InfluxDB uses TCP port 8086 for client-server communication over the InfluxDB HTTP API.
Start InfluxDB
In Powershell, navigate into C:\Program Files\InfluxData\influxdb and start InfluxDB by running the influxd daemon:
> cd -Path 'C:\Program Files\InfluxData\influxdb' > ./influxdSee the influxd documentation for information about available flags and options.
Grant network access
When starting InfluxDB for the first time, Windows Defender will appear with the following message:
Windows Defender Firewall has blocked some features of this app.
1. Firstly, select Private networks, such as my home or work network.
2. Then, click Allow access.InfluxDB “phone home”
By default, InfluxDB sends telemetry data back to InfluxData. The InfluxData telemetry page provides information about what data is collected and how it is used.
To opt-out of sending telemetry data back to InfluxData, include the –reporting-disabled flag when starting influxd.
./influxd --reporting-disabledSet up InfluxDB
The initial setup process for InfluxDB walks through creating a default organization, user, bucket, and Operator API token.
The setup process is available in both the InfluxDB user interface (UI) and in the influx command line interface (CLI).
Operator token permissions
The Operator token created in the InfluxDB setup process has full read and write access to all organizations in the database.
To prevent accidental interactions across organizations, we recommend creating an All-Access token for each organization and using those to manage InfluxDB.
Set up InfluxDB through the UI
1. Firstly with InfluxDB running, visit localhost:8086.
2. Then, click Get StartedSet up your initial user
1. Firstly, enter a Username for your initial user.
2. Then, enter a Password and Confirm Password for your user.
3. Next, enter your initial Organization Name.
4. Then, enter your initial Bucket Name.
5. Next, click Continue.InfluxDB is now initialized with a primary user, organization, and bucket. You are ready to write or collect data.
Set up and use the influx CLI
If you set up InfluxDB through the UI and want to use the influx CLI, we recommend setting up a configuration profile.
This lets you avoid having to pass your InfluxDB API token with each influx command.
Complete the following steps to set up a configuration profile that stores your credentials.
1. In a terminal, run the following command:
# Set up a configuration profile influx config create -n default \ -u http://localhost:8086 \ -o example-org \ -t mySuP3rS3cr3tT0keN \ -a2. Learn influx CLI commands. To see all available influx commands, type influx -h or check out influx – InfluxDB command line interface
[Need assistance with windows queries? We can help you]
Conclusion
Today, we saw how our Support Techs Install influxdb in windows.
PREVENT YOUR SERVER FROM CRASHING!
Never again lose customers to poor server speed! Let us help you.
Our server experts will monitor & maintain your server 24/7 so that it remains lightning fast and secure.
GET STARTED