
Install from Linux Source • Install from Windows Source
Chances are, ImageMagick is already installed on your computer if you are using some flavor of Linux, and its likely not installed if you are using some form of Windows. In either case, you can type the following to find out:
magick identify -version
If the identify program executes and identifies itself as ImageMagick, you may not need to install ImageMagick from source unless you want to add support for additional image formats or upgrade to a newer version. You also have the option of installing a pre-compiled binary release. However, if you still want to install from source, choose a platform, Linux or Windows. Before installing from source, you may want to review recent changes to the ImageMagick distribution.
The authoritative source code repository is https://github.com/ImageMagick.
Install from Linux Source
ImageMagick builds on a variety of Linux and Linux-like operating systems including Linux, Solaris, FreeBSD, Mac OS X, and others. A compiler is required and fortunately almost all modern Linux systems have one.
Clone the latest release from the source repository:
git clone --depth 1 --branch [latest_release_tag] https://github.com/ImageMagick/ImageMagick.git ImageMagick-7.1.1
Or download ImageMagick.tar.gz from imagemagick.org or a mirror and verify the distribution against its message digest.
Next configure and compile ImageMagick. Note the pkg-config script is required so that ImageMagick can find certain optional delegate libraries on your system. To configure, type:
cd ImageMagick-7.1.1
./configure
make
If build fails, try gmake instead.
For advanced users, we recommend a modules build:
./configure --with-modules
If ImageMagick configured and compiled without complaint, you are ready to install it on your system. Administrator privileges are required to install. To install, type
sudo make install
You may need to configure the dynamic linker run-time bindings:
sudo ldconfig /usr/local/lib
Finally, verify the ImageMagick install worked properly, type
/usr/local/bin/magick logo: logo.gif
For a more comprehensive test, run the ImageMagick validation suite. Ghostscript and Freetype are prerequisites, otherwise expect the EPS, PS, PDF and text annotations tests to fail.
make check
Ghostscript and Freetype are prerequisites, otherwise certain unit tests that render text and the EPS, PS, and PDF formats will likely fail. These unit tests require the open security policy to pass.
Congratulations, you have a working ImageMagick distribution and you are ready to use ImageMagick to convert, compose, or edit your images or perhaps you’ll want to use one of the Application Program Interfaces for C, C++, Perl, and others.
The above instructions will satisfy a great number of ImageMagick users, but we suspect a few will have additional questions or problems to consider. For example, what does one do if ImageMagick fails to configure or compile? Or what if you don’t have administrator privileges and what if you don’t want to install ImageMagick in the default /../usr/local folder? You will find the answer to these questions, and more, in Advanced Linux Source Installation.
Install from Windows Source
We recommend you first uninstall an existing ImageMagick, else you might be surprised that your magick commands go to the old version.
Building ImageMagick source for Windows can be done with a modern version of Microsoft Visual Studio IDE. Users have reported success with the Borland C++ compiler as well. If you don’t have a compiler you can still install a self-installing binary release.
Clone the Github repo:
git clone https://github.com/ImageMagick/ImageMagick-Windows.git ImageMagick-Windows-7
and run CloneRepositories.cmd. Or download ImageMagick-Windows.zip from imagemagick.org or a mirror and verify the distribution against its message digest.
unzip ImageMagick-windows.zip
Unzip in a folder that does not need Admin permissions, otherwise Visual Studio will not be able to build the solution.
Next, launch your Visual Studio IDE and choose Open->Project. Select the configure workspace from the ImageMagick-7.1.1/VisualMagick/configure folder and open configure.sln. Choose Build->Build Solution
to compile the program and on completion run the program.
![[configure]](https://imagemagick.org/image/configure.jpg)
Press Next and click on the multi-threaded static build. Now press, on Next twice and finally Finish. The configuration utility just created a workspace required to build ImageMagick from source. Choose Open->Project and select the VisualStaticMT workspace from the ImageMagick-7.1.1/VisualMagick/ folder. Finally, choose Build->Build Solution to compile and build the ImageMagick distribution.
The configure.exe utility can also be run on the command line instead of through the GUI wizard. You can see an example in our GitHub actions build.
To verify ImageMagick is working properly, launch a MS-DOS Command Prompt window and type
cd ImageMagick-7.1.1
magick logo: image.jpg
You may want to add the full path to VisualMagick\bin for your environment PATH variable, so you can call magick from any directory.
For a more comprehensive test, run the ImageMagick validation suite:
validate
Congratulations, you have a working ImageMagick distribution under Windows and you are ready to use ImageMagick to convert, compose, or edit your images or perhaps you’ll want to use one of the Application Program Interfaces for C, C++, Perl, and others.
The above instructions will satisfy a great number of ImageMagick users, but we suspect a few will have additional questions or problems to consider. For example, what does one do if ImageMagick fails to configure or compile? Or what if you want to install ImageMagick in a place other than the ImageMagick-7.1.1/VisualMagick/bin folder? You will find the answer to these questions, and more, in Advanced Windows Source Installation.
ImageMagick is a powerful free and open-source software for image manipulation. It is fully cross-platform and mainly used by many websites for processing images. ImageMagick has a PHP extension that makes it easy to use, powerful and is usually preferred more than PHP GD extension.
This tutorial will guide you on how to install ImageMagick on Windows operating system and make it works properly as a PHP extension.
Note: This article is solely focused on installing and getting ImageMagick to work with PHP in Windows system, and will not explain non-related PHP parts into details.
Tutorial StartsPrerequisites
This article assumes that you already got a webserver running properly with PHP installed and enabled.
Windows System Requirements
As mentioned on official ImageMagick download page, the software is fully compatible with most Windows version, from Windows Server 2008 R2 (x64) to Windows 11. Unless you wanted to install it on ancient versions as Windows 95 (!), we are good to go.
A single core Windows computer with minimum 512MB of RAM should be suffice to run ImageMagick, although having more will provide better performance. Both 32-bit, 64-bit and ARM64 system is compatible.
1. Download ImageMagick Windows package
Go to the Official ImageMagick download page and scroll to the Windows Binary Release section. You will see a table with plenty of versions to download.
To keep things simple, choose the recommended version that is listed at the first of the list to download:
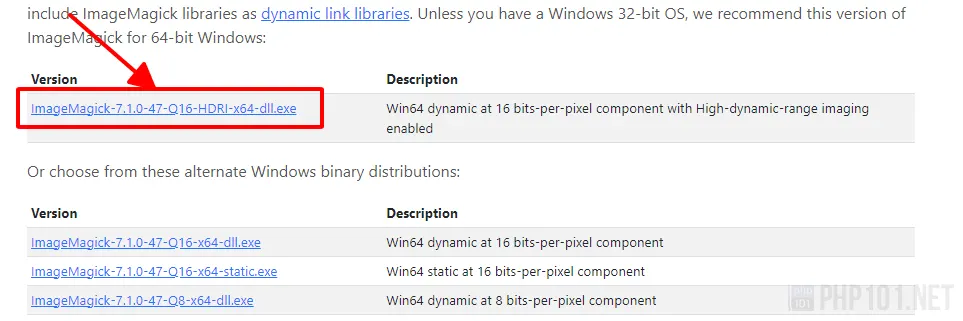
Otherwise, in case you wanted more customized version for your system, choose version that has the filename that suits your system to download:
- Choose dynamic version with dll in filename, which is more preferred for using PHP to work with.
- Version with Q8 is for 8 bits-per-pixel image processing, while Q16 provides 16 bits-per-pixel.
The latter uses more resources, but will have much better image precision. Usually, with 1GB+ memory, it’s fine to use Q16 version. - Version with HDRI will enable High Dynamic Range Imaging processing, and is recommended.
- For 64-bit system, choose the version with x64 in filename.
For 32-bit, choose x32, and for ARM64, choose arm64. - Choose installer version with exe extension, which will setup and configure the paths automatically for you (again, let’s keep things simple). If you choose portable version, you will have to set the environment paths manually.
2. Install ImageMagick on Windows
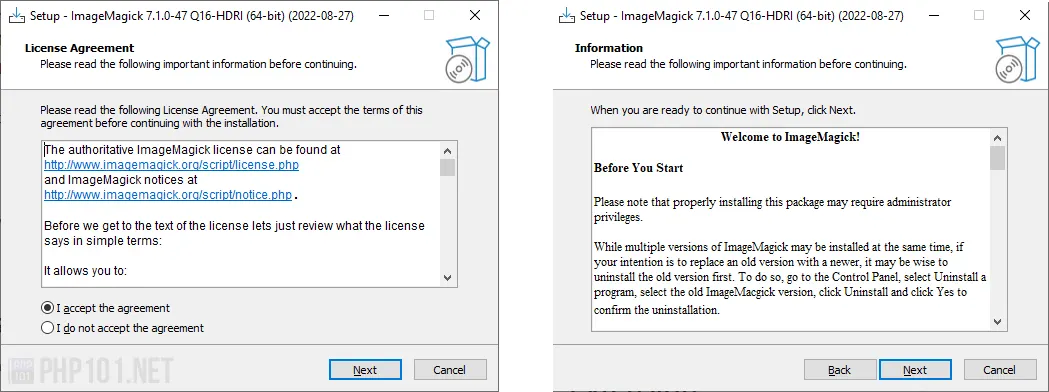
After downloaded the preferred version (which is installer version having exe extension), run the file to start the installation.
Accept the license and information:
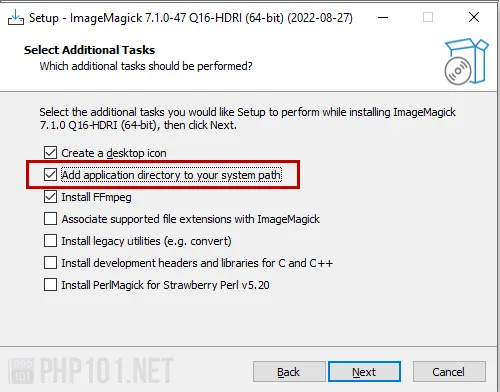
Ensure “Add application directory to your system path” is checked, so the installer can configure the environment paths for you, making things easier. If you want to process FFmpeg video, check the Install FFmpeg option, else it can be left unchecked.
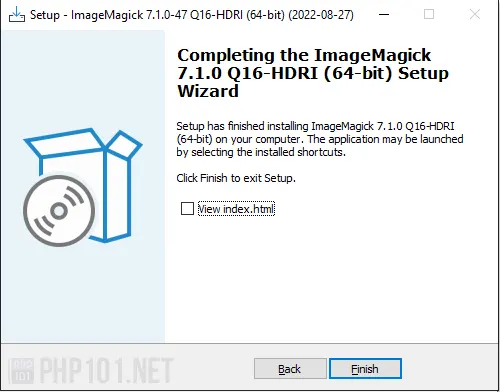
Click Install on the next screen, and ImageMagick will be installed. You can view the index.html introduction page or uncheck it and finish the installation.
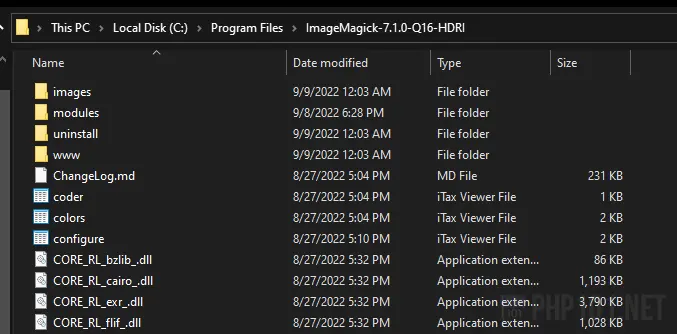
By default, it is installed on C:\Program Files\ImageMagick-{version}, which contains all of the Windows executable files that are ready to use with PHP.
Verify ImageMagick installation
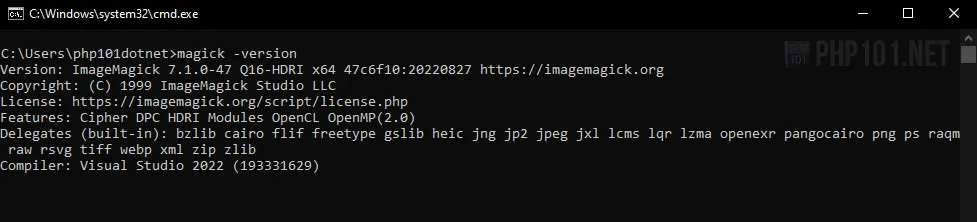
To verify if ImageMagick is installed on Windows, open a terminal console as cmd and run the command:
magick -versionOn successful installation, the command will return with ImageMagick version, and built in modules:
Now we have ImageMagick on Windows installed, in the next steps, we will also get the ImageMagick PHP extension installed for them to work together.
3. Download ImageMagick PHP extension
Depends on your installed PHP version, the recommended version for ImageMagick PHP extension will be different accordingly.
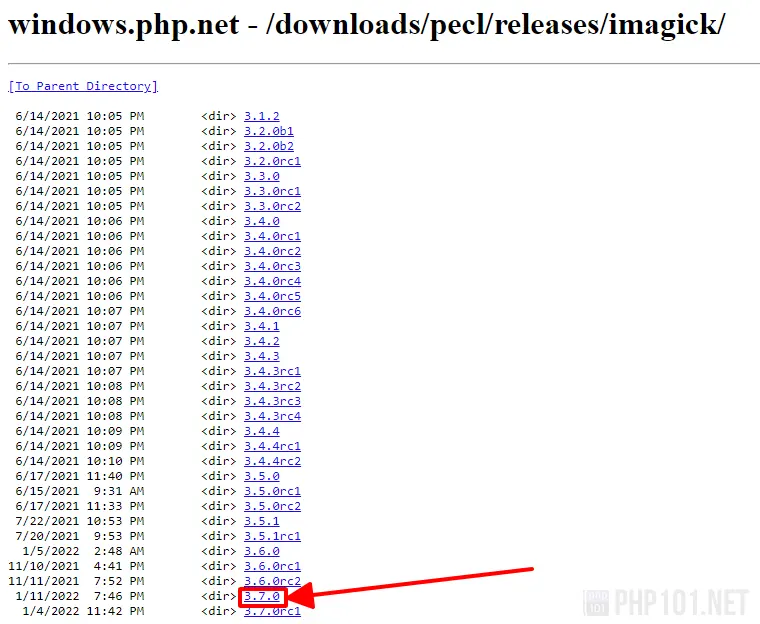
First, head to the Official Windows PHP PECL extension for ImageMagick release page. Then, choose the download according to the installed PHP version, or else the extension will not work properly.
- For PHP 7.4 to 8.1, choose the 3.7.0 version of the extension.
- For PHP 7.3, choose 3.6.0 extension version.
- For PHP 7.1 to 7.2, choose the 3.4.4 extension version.
- For PHP 7.0 and below, choose the 3.4.3 extension version.
- Any extension version below 3.4.3 is not recommended.
For example, to choose version 3.7.0 of the extension, click the 3.7.0 version URL:
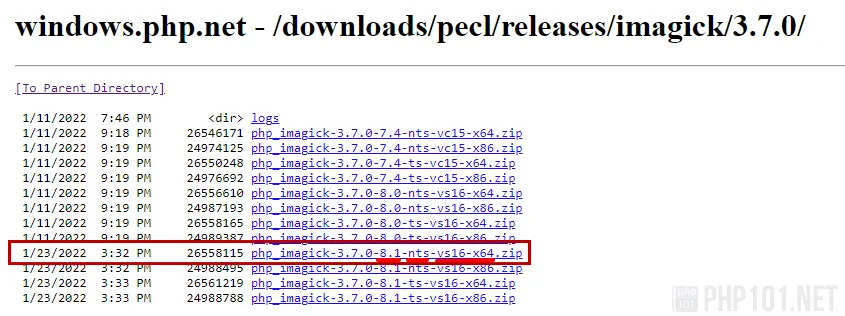
Then, pick the recommended download for your system and PHP version.
- For non-thread-safe version, choose
ntsfilename, for thread-safe version, choosetsversion.
Quick recommendation: If you use XAMPP or Laragon to host the webserver, choosentsversion.
If you use IIS for webserver, choosetsversion. - For 32-bit version, choose
x86filename, for 64-bit version, choosex64filename. - It’s recommended to pick the higher Visual Studio compiled version, which is
vs16.
For example, the recommended extension download for for PHP 8.1, 64-bit system, non-thread-safe version:
After downloading, extract the package to a folder. We are ready to install the ImageMagick extension to the existing PHP installation.
4. Install ImageMagick PHP extension
After extracting the downloaded extension zip file, we can install them to our PHP installation.
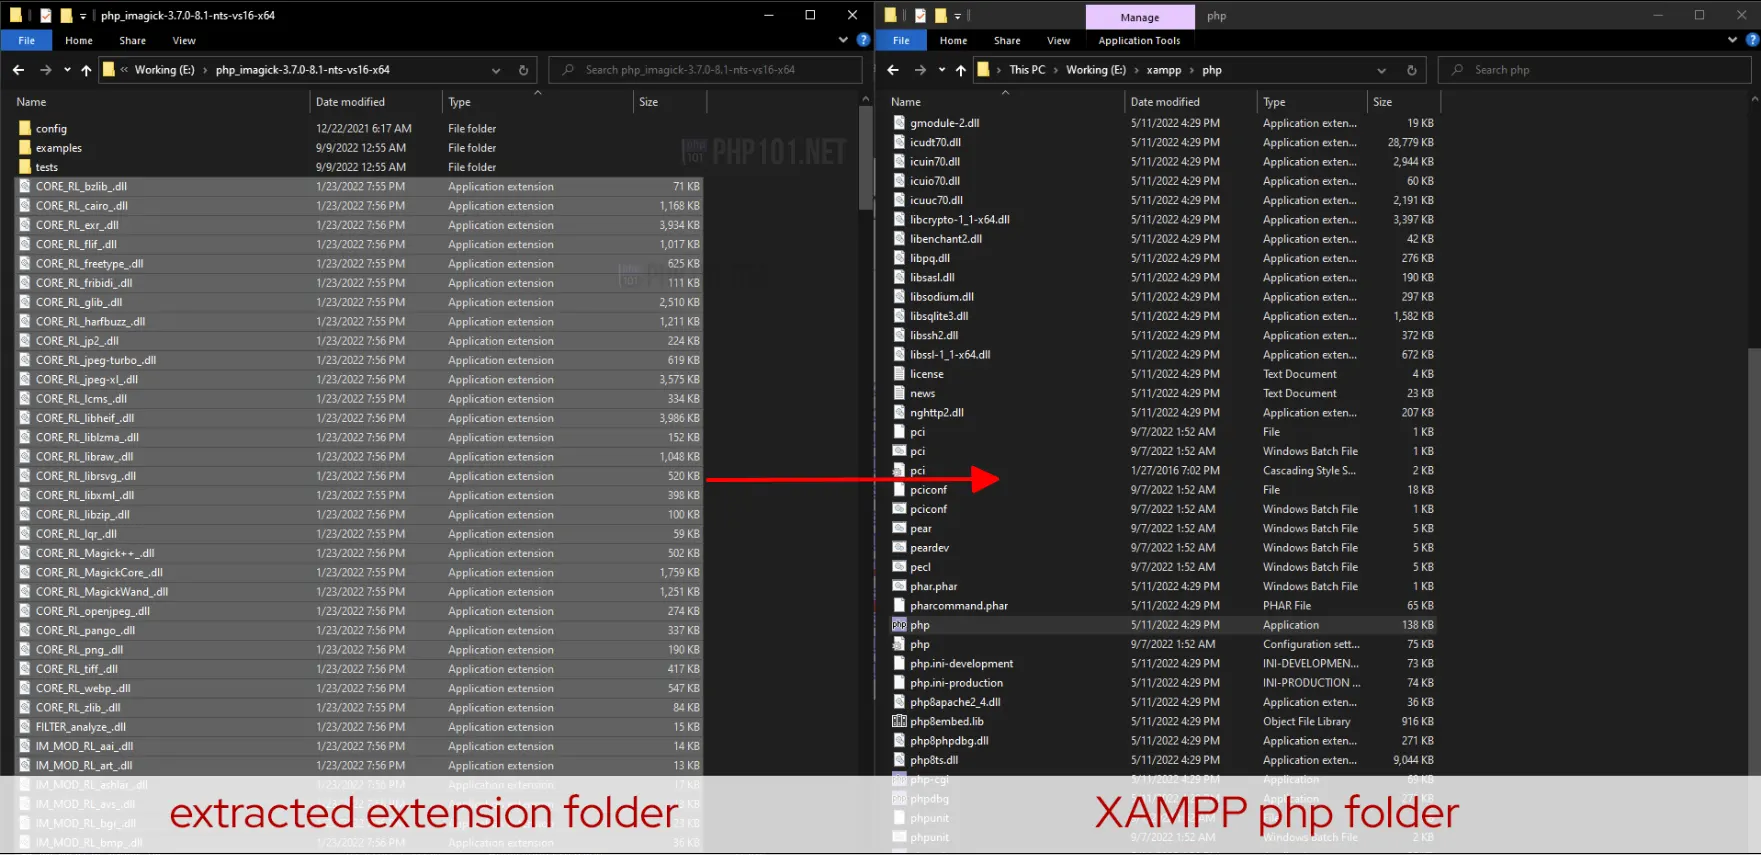
First, copy all of the .dll file in the extracted folder to the PHP installation folder where php.exe is located.
For example, with XAMPP (php folder in [XAMPP folder]/php):
For example, with Laragon (php folder in [Laragon folder]/bin/php/[php version folder]:
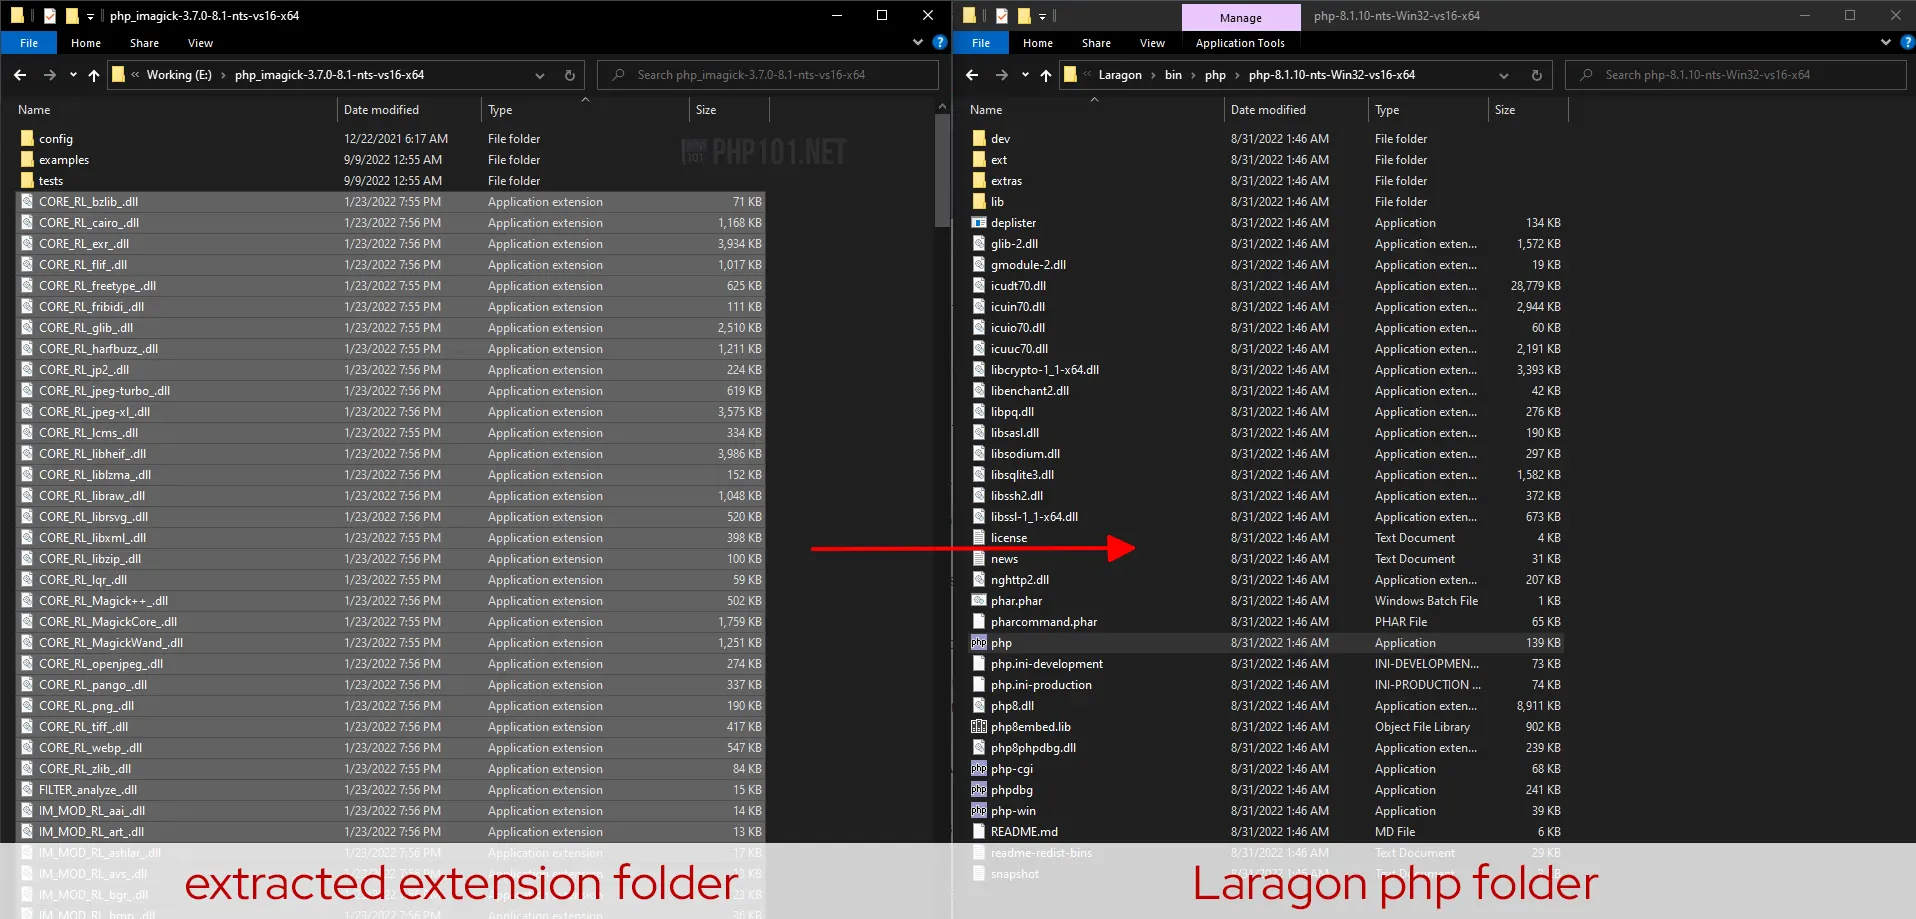
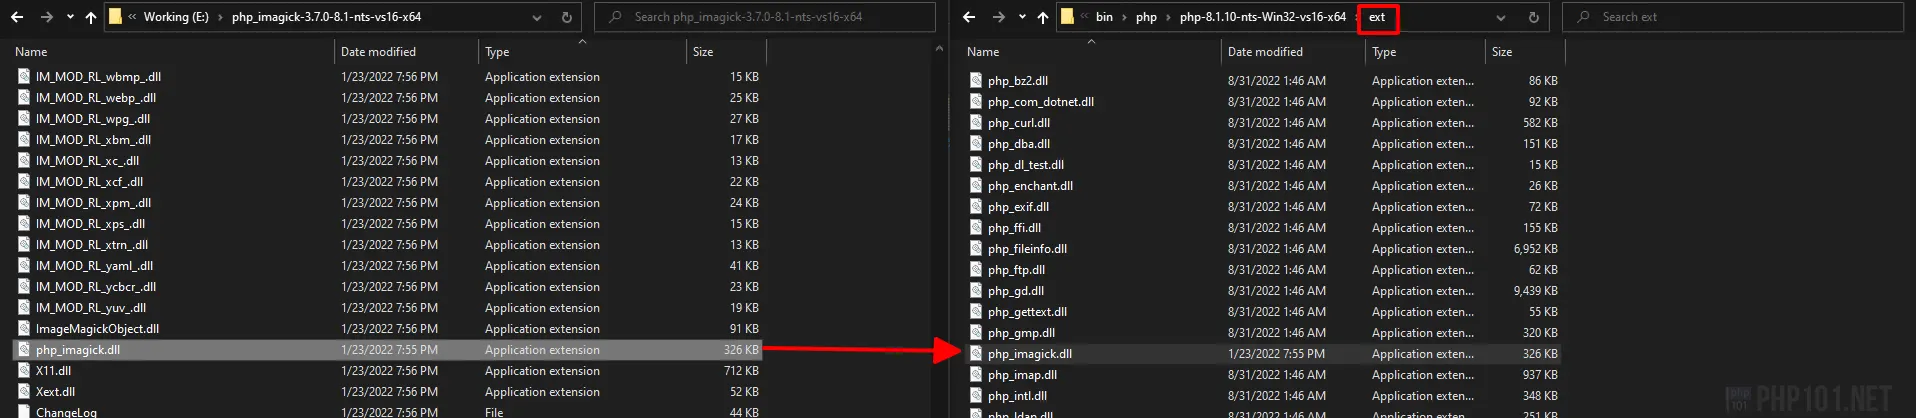
Then, copy/move the php_imagick.dll file to the ext folder of PHP installation folder:
The installation is now finished. Remember to restart the webserver for it to take effect.
5. Verify PHP ImageMagick extension working
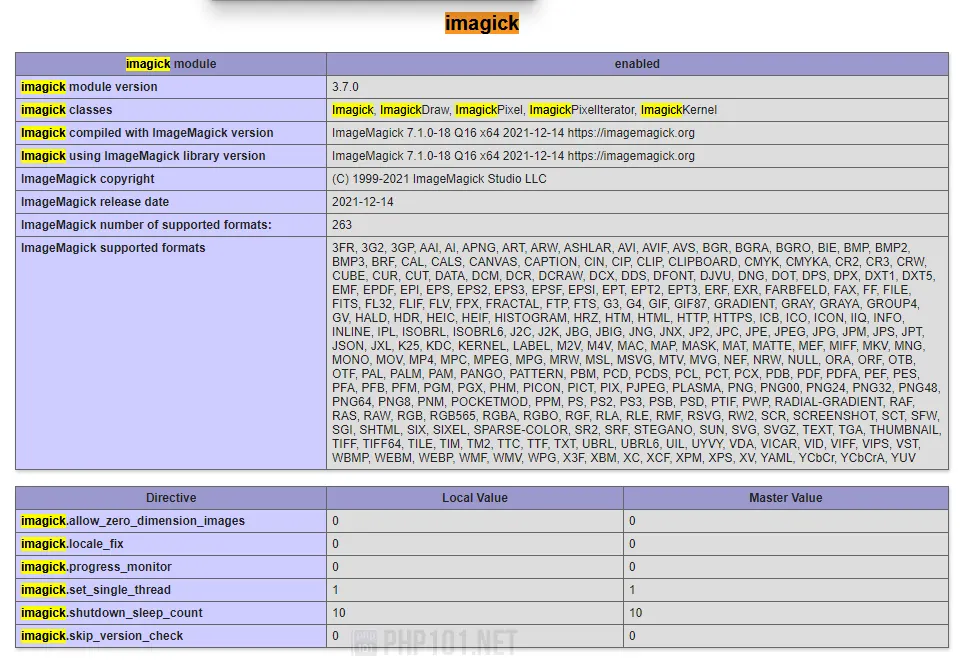
To verify that the PHP ImageMagick extension is working properly in Windows, we have multiple methods. The easiest way is to view PHPInfo and check whether the ImageMagick PHP extension is displayed.
Create a php file with the following lines:
<?php
// phpinfo.php file

phpinfo();
Open the file on your browser, and search for imagick. If this section exists, the PHP extension for ImageMagick on Windows is fully installed and should be working properly (with the condition that ImageMagick package is also installed):
The tutorial is now over.
Final thoughts
We hope this detailed tutorial can help you to get ImageMagick on Windows and its PHP extension to be installed and working properly on Windows operating system. There will be other tutorials and how-to articles on using ImageMagick properly and efficiently, as it is a very powerful yet simple to use in PHP for manipulating images.
You might also like
- How to display image from file using PHP
- How to convert image to base64 using PHP
References
- ImageMagick official website
- PHP.net Official Documentation – ImageMagick
Installing ImageMagick
In this topic you will find the basic steps you need to take in order to make sure all KTML image editing features are working fine. This includes the installation of the ImageMagick library for both Unix and Windows systems.
Note: The steps depicted in this topic are accurate and available at the time of this writing. For up-to-date instructions on how to install the latest ImageMagick version available, check out the product’s installation instructions — online, or in the downloaded package.
Installing ImageMagick on Windows-based systems
To check whether ImageMagick already exists on your system, follow the next steps:
From the Start menu select Run.
In the Run program dialog box type cmd to access the console
At the prompt type:
convert -version
If ImageMagick is already installed, a message will be displayed with the version and copyright notices:
If you do not get this message, or you get a bad command or file name message, then you have to install ImageMagick.
To install ImageMagick on a windows system it is recommended that you have administration rights. The steps to take are:
Download the ImageMagick binary install package from one of the ftp sites listed on the ImageMagick download page. Pick the location that is closest to you, then download the latest version. The file will be named similar to ImageMagick-6.2.2-Q8-windows-static.exe and should be found in the binaries subdirectory
Execute the downloaded file and follow the wizard instructions. You will be prompted to select a folder name, whether to create shortcts or not.
Note: if you do not have administrator rights on the machine, pick a folder that you have write permissions to instead of the default version.
After setting up these options, an installation progress bar will be displayed. hen the installation completes, a new dialog will appear. By default, the View ImageMagick.html is check-marked. This causes the ImageMagick web pages to be displayed in a browser when Finish is selected.
To test whether ImageMagick was installed successfully, run the steps in the section above.
Installing ImageMagick on Unix-based systems
If using a shared host or a hosting service company it is possible that ImageMagick will be already installed and configured.
To check whether ImageMagick is already installed on a Unix based system, try the following:
Open a terminal — console window.
Execute the following command:
convert -version
If the ImageMagick version and other information is displayed, then you already have ImageMagick installed, and you can skip the next section. Go to the KTML configuration directly.
To install KTML on any of the UNIX flavours (Mac OS, Linux, Solaris, etc) you should install it from the program C sources. If you do not have permissions to compile and build programs, then use one of the pre-packaged versions — download and install the Unix binary releases here.
To install ImageMagick on Unix from a binary release:
If using a rpm file, you only need to run a single command:
rpm -Uvh ImageMagick-6.2.5-5.i386.rpm
If using the zipped version, simply copy the archive contents into the folder you want it installed. Then create the path variables — as explained on the download page.
To install ImageMagick from the source:
First download the latest version of the program sources — ImageMagick.tar.gz — from the ImageMagixk ftp, here.
Unzip the package to a folder of choice. You can unzip the files using an X utility, or from the command line:
gunzip -c ImageMagick.tar.gz | tar xvf —
In the folder where you have unzipped ImageMagick run the configuration script:
./configure
Note: If you do not have administrator rights you must select a different folder for ImageMagick than the default. For this you have to use the -prefix command:
./configure -prefix /usr/personalFiles/ImageMagick
If no errors were found, you can start the install process.
make install
To check whether the installation has completed successfully, run convert-version once more.
After the installation completes, you must configure KTML to use the ImageMagick from the path you installed to.
Other resources
Install ImageMagick from binary packages on Windows and Unix
Advanced UNIX source installation instructions
Advanced Windows source installation instructions
Haven’t developed with PHP for a while but now I got a need to do some updates to an older project. The project is based on PHP, MYSQL and HTML (+ jquery) and it also uses TCPDF library for generating PDF files.
After installing XAMPP with PHP 8 and editing some settings, I managed to get stuff working.
However, I noticed that the TCPDF won’t work with default XAMPP installation as it rquires GD or ImageMagick library installed.
So I received an error when trying to create a PDF:
TCPDF requires the Imagick or GD extension to handle PNG images with alpha channel.
Installing ImageMagick
It seems that I forgot how annoying installing PHP libraries can be.
I tried many guides, including https://ourcodeworld.com/articles/read/349/how-to-install-and-enable-the-imagick-extension-in-xampp-for-windows without success.
There is good discussion here too: https://stackoverflow.com/questions/39609951/cannot-load-imagick-library
I always ended with the following error inside Apache error.log even though the file was there:
PHP Warning: PHP Startup: Unable to load dynamic library 'imagick' (tried: C:\\xampp\\php\\ext\\imagick (The specified module could not be found), C:\\xampp\\php\\ext\\php_imagick.dll (The specified module could not be found)) in Unknown on line 0
Then I noticed that I had x86 version installed, but my phpinfo() told that I have x64 php installation. However, installing x64 versions didn’t help, the same problem was still there.
Final solution (for me)
- Delete ImageMagick if installed previously
- Check using
phpinfo()what version is installed- x64 or x86?
- Thread safety enabled / disabled
- PHP version

- Download latest version from https://windows.php.net/downloads/pecl/releases/imagick/
- I had x64 PHP, thread safety enabled and PHP 8
- Latest imagick version was 3.6.0rc2
- So my file was:
php_imagick-3.6.0rc2-8.0-ts-vs16-x64.zipfrom https://windows.php.net/downloads/pecl/releases/imagick/3.6.0rc2/
- Copy
php_imagick.dlltoC:\xampp\php\ext - Copy all other files to
C:\xampp\php - Edit
php.iniand add the following line underDynamic Extensionsextension=imagick- NOTE: In PHP8 the
php_and.dllare not longer used in extension filename
- Restart Apache
ImageMagick is a powerful, open-source software suite designed for displaying, converting, and editing raster image files. It supports a wide range of image formats, making it a versatile tool for tasks such as resizing, cropping, flipping, and applying effects to images. With ImageMagick, users can automate image manipulation tasks via command-line tools or integrate its functionalities into applications through its programming interfaces.
Common Use Cases:
- Image Conversion: Transforming images from one format to another (e.g., from PNG to JPEG).
- Editing: Applying filters, adjusting colors, adding text, and other modifications.
- Batch Processing: Automating repetitive tasks for large numbers of images.
- Creating Image Galleries: Generating thumbnails or creating montage layouts.
Purpose of the Guide:
This guide aims to provide step-by-step instructions for installing ImageMagick on various operating systems. Whether you’re a developer needing image processing capabilities for your application or just looking to automate image tasks, this guide will help you get ImageMagick up and running on your system. We’ll cover installation procedures for Windows, macOS, and Linux, ensuring you have all the information needed to get started with this powerful tool.
Prerequisites
Before installing ImageMagick, ensure you meet the following prerequisites:
1 Basic System Requirements
- Operating System: ImageMagick supports various operating systems. Make sure your system is compatible:
- Windows: Windows 7 or later
- macOS: macOS 10.9 (Mavericks) or later
- Linux: Most modern distributions (e.g., Ubuntu, Fedora, CentOS)
- Hardware: The installation process itself doesn’t have high hardware requirements, but ensure you have sufficient disk space and memory for running ImageMagick and processing images.
2 Necessary Software
- Package Managers: Depending on your operating system, you may need package managers to simplify the installation:
- Windows: Chocolatey or another package manager (optional)
- macOS: Homebrew (recommended for easy installation)
- Linux: Your system’s package manager (e.g.,
aptfor Debian-based systems,yumordnffor Red Hat-based systems)
- Compiler Tools (for building from source): If you choose to build ImageMagick from source, you’ll need development tools:
- Windows: Visual Studio or MinGW
- macOS: Xcode Command Line Tools (installable via
xcode-select --install) - Linux:
build-essentialpackage and other development libraries
3 Dependencies
- Required Libraries: ImageMagick depends on several libraries for various functionalities (e.g., JPEG, PNG, TIFF support). Most package managers handle these dependencies automatically, but if you’re building from source, you may need to manually install these libraries.
- Windows: Dependencies are usually bundled with the installer.
- macOS: Dependencies managed through Homebrew or similar tools.
- Linux: Dependencies managed through the system’s package manager (e.g.,
libjpeg-dev,libpng-dev).
4 Network Connectivity
- Ensure you have an active internet connection to download the installer or packages, and to access online documentation if needed.
5 Administrative Privileges
- Permissions: You might need administrative privileges to install software, especially if you’re installing system-wide or modifying system paths.
Installation on Different Operating Systems
1 Windows
- Using the Installer:
- Download the installer from the ImageMagick website.
- Run the installer and follow the prompts.
- Choose any additional components and configuration options.
- Using Windows Package Manager (e.g., Chocolatey):
- Install Chocolatey if not already installed.
- Open Command Prompt and run:
choco install imagemagick.
2 macOS
- Using Homebrew:
- Install Homebrew if not already installed.
- Open Terminal and run:
brew install imagemagick.
- Direct Download:
- Download the binary from the ImageMagick website.
- Open the downloaded file and follow the installation instructions.
3 Linux
- Using Package Manager:
- Debian/Ubuntu-based Systems:
- Run:
sudo apt-get install imagemagick.
- Run:
- Red Hat/Fedora-based Systems:
- Run:
sudo yum install imagemagickorsudo dnf install imagemagick.
- Run:
- Other Distributions:
- Use the corresponding package manager command.
- Debian/Ubuntu-based Systems:
- Building from Source:
- Download the source code from the ImageMagick website.
- Extract the archive and navigate to the directory.
- Run
./configure,make, andsudo make install.
Common Issues and Troubleshooting
1. Installation Errors
- Error: Missing Dependencies
- Issue: During installation, you might see errors indicating missing libraries or dependencies.
- Solution: Ensure all required dependencies are installed. For package managers like
apt-getoryum, install them using commands such assudo apt-get install libjpeg-dev libpng-devfor Debian-based systems. Consult the ImageMagick documentation for a full list of dependencies.
- Error: Permission Denied
- Issue: Installation fails due to insufficient permissions.
- Solution: Run the installation command with elevated privileges. For instance, use
sudoon Linux and macOS (sudo apt-get install imagemagick) or ensure you are running the installer as an administrator on Windows.
2. Post-Installation Issues
- Issue: ImageMagick Command Not Found
- Problem: The command-line tool (
convert,magick, etc.) is not recognized. - Solution: Verify that ImageMagick is installed correctly and that its binary directory is included in your system’s PATH. On Linux and macOS, you can add the directory to PATH by modifying your
.bashrcor.zshrcfile. On Windows, update the PATH variable in the System Properties.
- Problem: The command-line tool (
- Issue: Incorrect Version or Build
- Problem: You get an older version or a build with missing features.
- Solution: Check the installed version using
magick -version. If it’s not the desired version, you might need to update or reinstall ImageMagick. For package managers, use commands to update the package (sudo apt-get update && sudo apt-get upgrade imagemagickfor Debian-based systems).
3. ImageMagick Commands Not Working
- Issue: Commands Return Errors or Do Not Execute
- Problem: Running commands like
convertormagickproduces errors. - Solution: Ensure that the command syntax is correct and that the necessary input files exist. Refer to the ImageMagick command-line documentation for proper syntax.
- Problem: Running commands like
- Issue: Missing Delegate Libraries
- Problem: Errors related to missing image formats or delegates.
- Solution: Install the necessary delegate libraries that support various image formats. For example, to support TIFF files, you may need to install
libtiff-dev. Check the ImageMagick configure options to ensure all required libraries are enabled.
4. Building from Source Issues
- Issue: Compilation Errors
- Problem: Errors occur during the
./configureormakeprocess. - Solution: Check the error messages for clues about missing dependencies or configuration issues. Ensure that you have all the required development tools and libraries installed. You can usually resolve this by installing additional packages or correcting the paths to libraries.
- Problem: Errors occur during the
- Issue: Configuration Issues
- Problem: Incorrect configuration flags or options.
- Solution: Review the options used during configuration (
./configure --helpprovides a list of available options). Ensure that you are using the correct flags for your system and needs.
5. Getting Help
- Community and Support:
- If you continue to experience issues, consider reaching out to the ImageMagick community or forums for support. Provide detailed information about your system, installation method, and any error messages you encounter.
- Documentation and Resources:
- Refer to the ImageMagick official documentation for detailed information and troubleshooting tips.
Conclusion
In conclusion, installing ImageMagick is a straightforward process that varies slightly depending on your operating system. By following the appropriate steps for Windows, macOS, or Linux, you can easily get ImageMagick up and running on your machine. Whether you use an installer, package manager, or build from source, the key is to ensure all prerequisites are met and to verify the installation to confirm that everything is functioning correctly. With ImageMagick installed, you’ll have a powerful tool at your disposal for a wide range of image manipulation tasks. For further learning and troubleshooting, the official documentation and community resources provide valuable support and guidance.