
Большинство пользователей не сталкиваются с необходимостью ручной установки цветовых профилей монитора в Windows 11/10 и используют стандартные: обычно это не несёт каких-то проблем, а изображение выглядит именно так, как предполагалось производителем мониторов.
Однако, для некоторых мониторов, особенно предполагающих работу с графикой, производители обычно поставляют подходящий цветовой профиль, который разумным будет установить и использовать в Windows после приобретения монитора или переустановки системы. О том, как это сделать и пойдет речь далее в инструкции.
Процесс установки или изменения цветового профиля
Цветовой профиль представляет собой файл .icm или .icc и обычно доступен в комплекте ПО монитора или на официальной странице поддержки конкретной модели монитора отдельно или в составе драйвера. При этом:
- Он может устанавливаться автоматически при установке драйвера монитора — здесь вопросов обычно не возникает, всё происходит автоматически. Несмотря на то, что почти все мониторы исправно работают без установки драйвера вручную, для некоторых моделей, функции и характеристики которых отличаются от стандартных, имеет смысл установить драйвер производителя.

- Может требовать ручной установки.

Далее будет рассмотрен пример именно ручной установки профиля монитора ICM (Image Color Management) или ICC (International Color Consortium).
Необходимые шаги будут следующими:
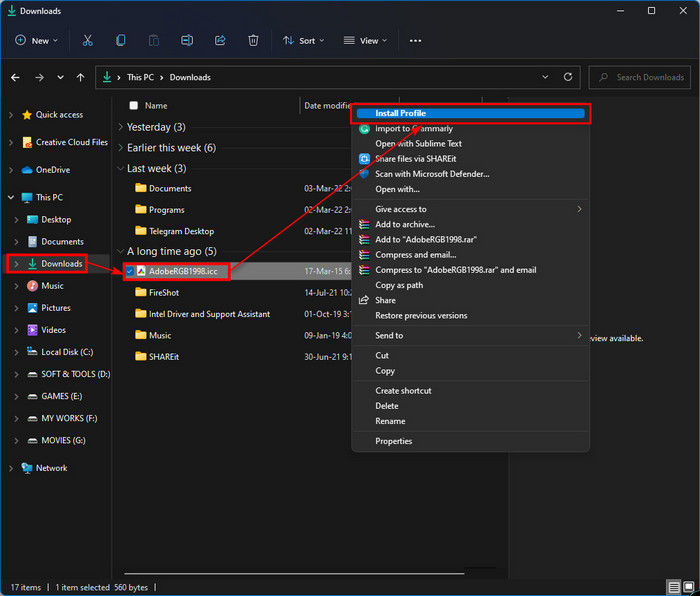
- Нажмите правой кнопкой мыши по файлу цветового профиля и выберите пункт «Установить профиль в контекстном меню». Каких-либо сообщений вы не увидите, но профиль будет добавлен в системе.

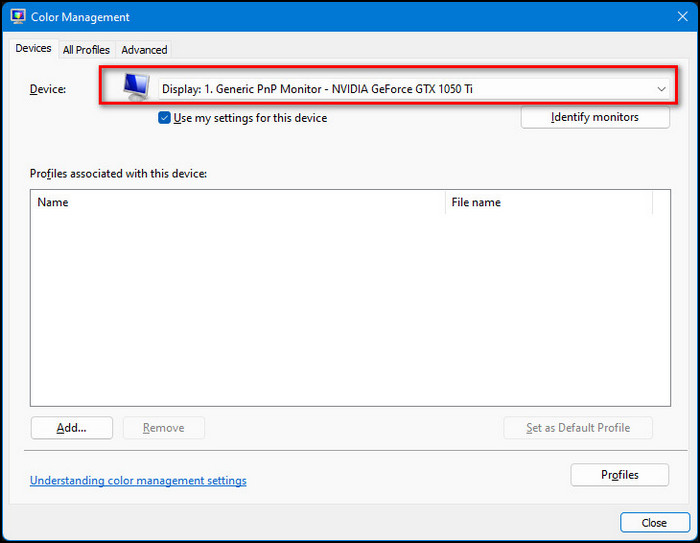
- Нажмите клавиши Win+R на клавиатуре, либо нажмите правой кнопкой мыши по кнопке «Пуск» и выберите пункт «Выполнить», введите colorcpl в окне «Выполнить» и нажмите Ok или Enter.
- В поле «Устройство» выберите нужный монитор, установите отметку «Использовать мои параметры для этого устройства, нажмите кнопку «Добавить» и выберите недавно установленный профиль в списке, нажмите «Ок». Для добавления профиля в список также можно нажать кнопку «Обзор» и выбрать файл профиля, если вы пропустили 1-й шаг.

- Убедитесь, что нужный профиль выбран и нажмите кнопку «Сделать профилем по умолчанию».


После выполнения указанных шагов (иногда только после перезагрузки) монитор должен слегка изменить цвета и начать их отображать так, как было спроектировано и настроено производителем.
Дополнительная информация
Некоторые дополнительные сведения, которые могут быть полезными в части установки цветовых профилей:
- Если вам требуется регулярно менять цветовой профиль монитора, вы можете сделать это в параметрах дисплея Windows: в списке будут отображаться профили, добавленные на 3-м шаге, между которыми вы легко сможете переключаться.

- При включенном режиме HDR, при использовании переходников для подключения монитора, выбор цветового профиля может быть недоступен, либо они могут работать не так, как ожидается.
- В некоторых случаях системные настройки Windows работают не лучшим образом в части цветовых профилей: например, некоторые сталкиваются с невозможностью смены цветового профиля в сценарии, когда к компьютеру подключены два монитора, а в параметрах дисплея установлен показ только на 2-м мониторе.
- Иногда эффективнее обратиться к ПО производителя монитора или к простым утилитам, таким как Colorprofile Keeper.
- Цветовой профиль может автоматически переключаться при запуске 3D приложений, полноэкранных игр и в других сценариях.
- Для Windows 11 Майкрософт предлагает отдельное приложение (доступно в Microsoft Store) — Windows HDR Calibration, позволяющее откалибровать работу дисплея при включенном режиме HDR.
- Некоторые программы для работы с графикой могут иметь собственные настройки отображения цветов. Например, в Adobe Photoshop и Illustrator их можно обнаружить в разделе меню «View» (Вид), пункты Proof Setup и Proof Colors.

Надеюсь, представленная информация поможет разобраться, если вы столкнулись с необходимостью установить или изменить цветовой профиль для вашего монитора. Если же остаются вопросы, вы можете задать их в комментариях.
Do you want to install an ICC profile on your Windows 11 system to adjust your display color with a particular device?
But before starting installing the ICC profiles, you want to know the step-by-step installation process. You also want to learn the ICC profile load or activation process to avoid color issues on your Windows 11 computer.
Right now, you are looking for a complete step-by-step guide to installing the ICC profiles and color adjustments process.
If this is your scenario, you are landed in the right place.

In this in-depth guide, I will walk you through the steps to help you install the ICC profiles. You will also learn the process of active or loading the ICC profile and adjustments of color profile to avoid color issues on your Windows 11 computer.
Keep reading and precisely follow the step-by-step guide.
So, let’s begin to learn the ICC profiles installation process.
Installing the ICC profiles is an easy and quick process. Within a few clicks and minutes, you can install your ICC profile.
ICC profiles are used to match the external devices such as a printer, camera, scanner, etc., color values on your display, and it automatically synchronizes your external devices’ color accuracy.
The ICC profiles allow you to easily get the external devices’ color accuracy on your computer display, which helps you do your work efficiently.
This section will describe an ultimate step-by-step guide to installing the ICC profiles on your Windows 11 computer.
There are a few ways to install the ICC profiles on your Windows 11 computer. Here I will describe all of those methods.
So, let’s get started to know the ICC profiles installation process.
Check out the easiest way to Fix Installation Failed Error 800f0830 on Windows 11.
Here are the steps to install ICC profiles on Windows 11 computer:
1. Install via Right Mouse Click
The first method to install the ICC profiles is by right-clicking on your mouse. It is the easiest and quick way to install the ICC profiles on your Windows 11 computer.
Here are the steps to install the ICC profiles:
- Go to your specific external device website to download the ICC profile you want to install.
- Click on the download button to download the ICC profile file.
- Open the folder where the ICC profile file is downloaded.
- Select your downloaded .icc extension profile file and right-click on it to open the file context menu.
- Select the Install Profile to start the installation process.
- Wait a few moments to finish the installation.
After some time, your ICC profile installation is completed, and you are ready to use the ICC profile on your Windows 11 computer.
2. Install via Copy & Paste
Another effective and easy method to install the ICC profiles on your Windows 11 computer is copying and pasting your ICC profiles file into your Windows driver’s color folder.
Here are the steps to install the ICC profiles:
- Go to your specific external device website to download the ICC profile you want to install.
- Click on the download button to download the ICC profile file.
- Open your download folder where the ICC profile file is downloaded.
- Select and copy your downloaded .icc extension profile file.
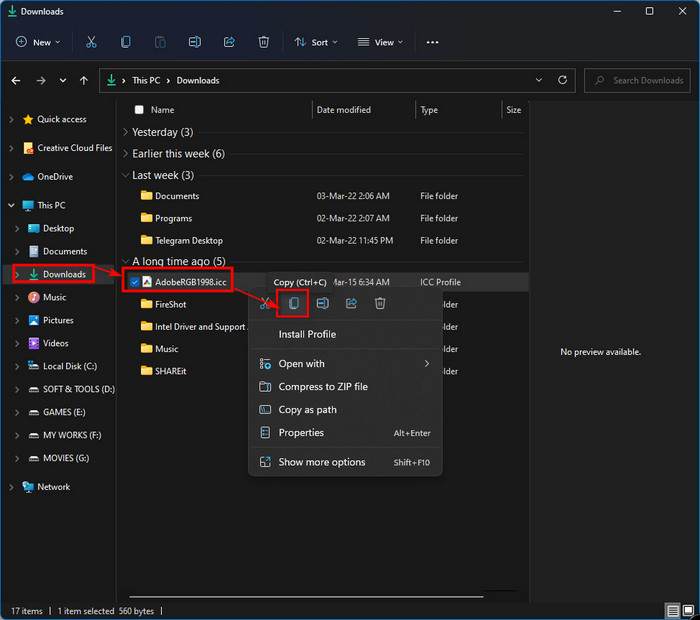
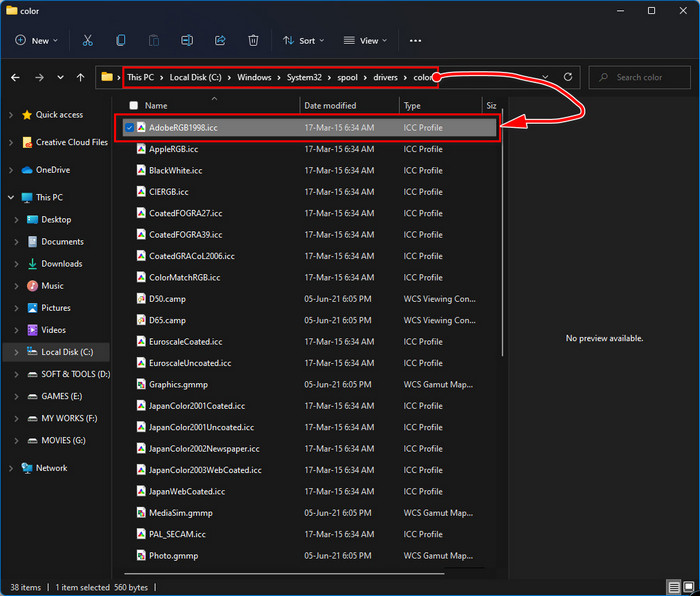
- Go to the C:/Windows/system32/spool/drivers/color folder.
- Paste your copied file into the color folder for installing your ICC profile.
Also, check our latest post on how to Fix Sound Cracking Issue on Windows 11.
How to Activate or Load ICC Profiles on Windows 11
After installing the ICC profiles successfully on your Windows 11 computer, you need to activate or load to use the ICC profile on your display.
Here are the steps to activate or load the ICC profile on Windows 11:
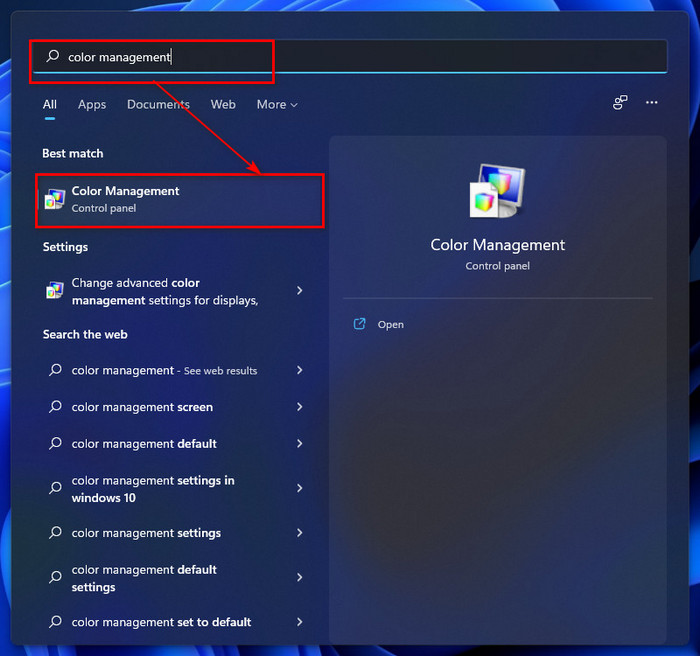
- Press Win + S on your keyboard to open the Windows Search panel.
- Type color management on the search bar.
- Click on the search result or hit the Enter key to open Color Management.
- Click on the drop-down menu next to the Device.
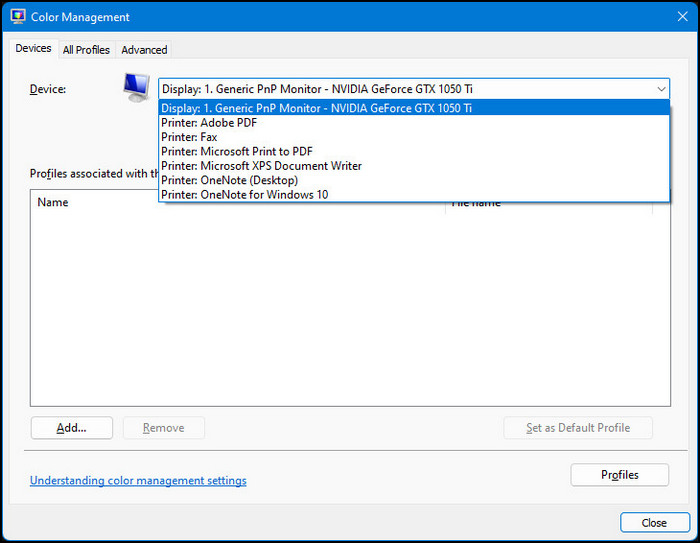
- Select your specific display to show the ICC color profile if you use more than one monitor. If you use a single display, ignore this option because your display is automatically selected.
- Check to Use my settings for this device checkbox.
- Click on the Add button to add your installed ICC profile.
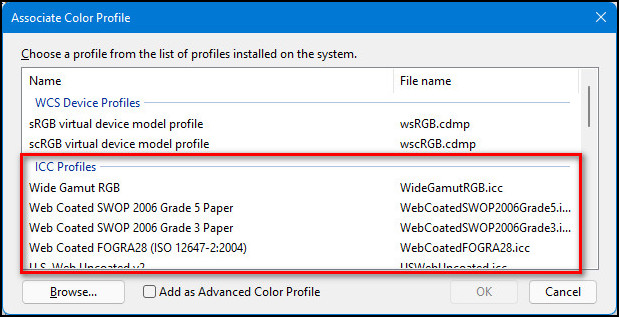
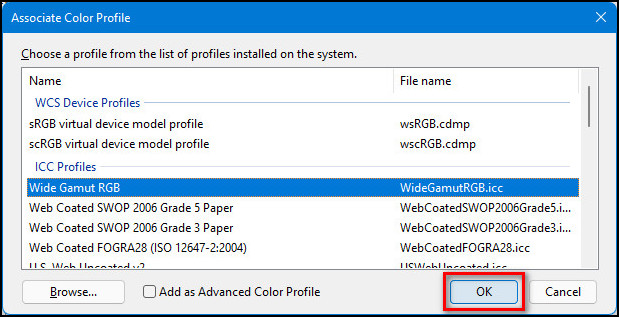
- Choose your ICC profile from the list of profiles installed on the system under the ICC Profiles.
- Click on the OK button to activate or load your profile.
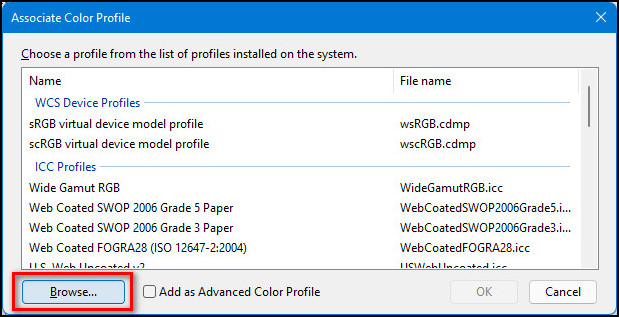
- Click on the Browse button and select your ICC profile .icc file to install and activate your ICC profile directly if you want.
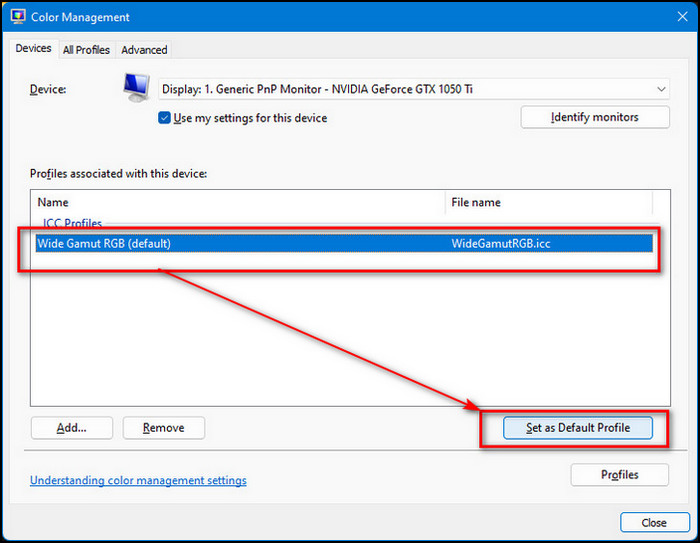
- Select your profile and click on the Set as Default Profile button to set the profile as a default profile on your display.
- Go to the Advanced tab.
- Click on the Change system defaults button at the bottom of the window and go to the Advanced tab again.
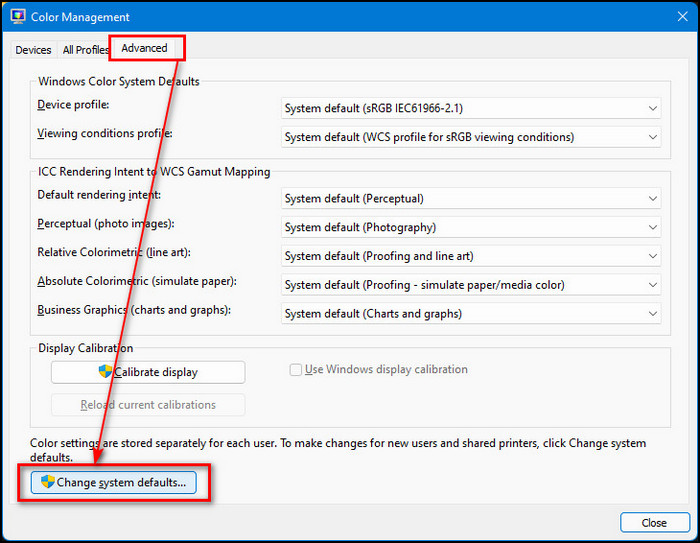
- Check to Use Windows display calibration checkbox.
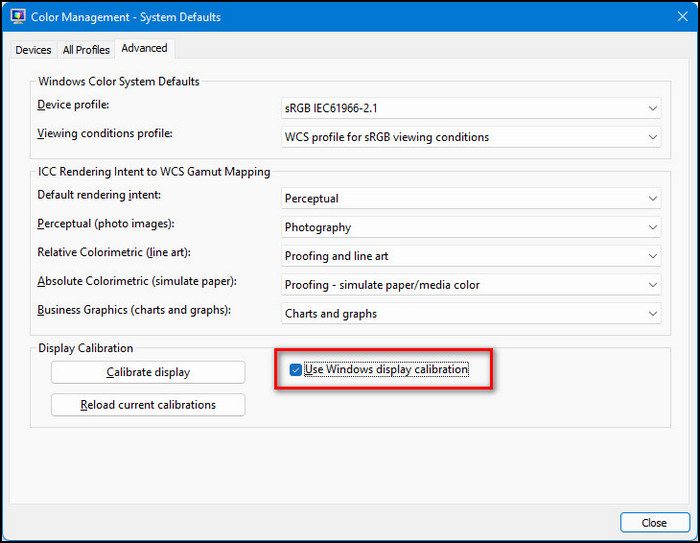
- Click on the Close button to leave the window.
Related guide: How to Backup and Restore in Windows 11.
Final Thoughts
The ICC profiles are simple to install and take only a few minutes. You may install your ICC profile within a few clicks.
After reading and following the whole instructions, you learn the ultimate step-by-step guide to installing the ICC profiles on your Windows 11 computer.
You also understand how to load or activate the ICC profiles on your Windows 11 computer.
If any solutions can solve your problem, let me know which method works for you. I hope this post is helpful and easy to understand for you, and you can easily install the ICC profiles on your Windows 11 system.
Farhan Max
Farhan Max is a tech geek with a particular interest in computer hardware. He’s been fascinated by gaming since childhood and is now completing his undergraduate studies while researching and testing the latest tech innovations. Alongside his love for all things geeky, Farhan is also a skilled photographer.
Installing an ICC profile on Windows 11 ensures that your display shows colors accurately. You can accomplish this by downloading the profile, opening the color management settings, and adding the profile manually. The process is straightforward and can be done in just a few minutes.
In this guide, you’ll learn how to install an ICC profile on Windows 11. This will help your monitor display colors as they are meant to be seen. Follow these steps carefully to complete the process.
Step 1: Download the ICC Profile
First, download the ICC profile from a trusted source.
Make sure the file you download is compatible with your monitor model and save it somewhere easy to find, like your desktop.
Step 2: Open Color Management Settings
Next, open the Color Management settings on your Windows 11 computer.
To do this, you can use the search bar in the Start menu by typing «Color Management» and selecting it from the results.
Step 3: Select Your Monitor
Now, select the monitor for which you want to install the ICC profile.
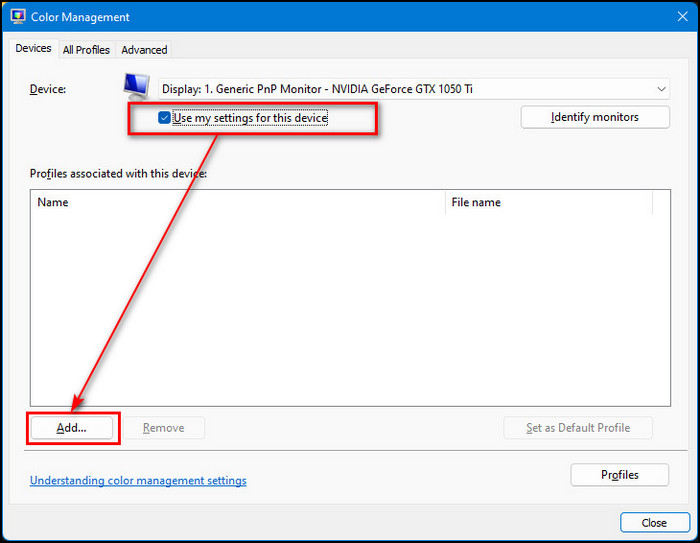
In the Color Management window, go to the «Devices» tab. Use the drop-down menu to choose your monitor. Make sure the checkbox «Use my settings for this device» is checked.
Step 4: Add the ICC Profile
Click on the «Add…» button to add the new ICC profile.
A file dialog will open. Navigate to the location where you saved the ICC profile and select it. Click «Add» to include it in the list of profiles.
Step 5: Set as Default Profile
Finally, set the newly added ICC profile as the default profile for your monitor.
Select the profile you’ve just added from the list and click on the «Set as Default Profile» button. This will ensure that Windows uses this ICC profile for color management.
After completing these steps, your monitor will use the new ICC profile to display colors accurately. You should notice an improvement in color fidelity right away.
Tips for How to Install ICC Profile Windows 11
- Ensure Correct Profile: Double-check that the ICC profile is specifically designed for your monitor model.
- Backup Original Settings: Before making changes, back up your current color settings.
- Keep Profiles Updated: Manufacturers sometimes release updated ICC profiles; keep an eye out for these.
- Restart Your Computer: Sometimes, a quick restart can help apply the profile changes properly.
- Use a Calibration Tool: For the best results, use a calibration tool in conjunction with the ICC profile.
Frequently Asked Questions
What is an ICC profile?
An ICC profile is a file that describes how colors should be displayed on your monitor, ensuring color accuracy.
Do I need an ICC profile?
Yes, if color accuracy is important for your work, like photo or video editing, you need an ICC profile.
Where can I find ICC profiles?
You can usually download ICC profiles from your monitor manufacturer’s website.
Can I use any ICC profile for my monitor?
No, it’s best to use an ICC profile specifically designed for your monitor model.
How often should I update my ICC profile?
Update it whenever a new profile is released by the manufacturer or after significant system updates.
Summary
- Download the ICC profile.
- Open Color Management settings.
- Select your monitor.
- Add the ICC profile.
- Set as default profile.
Conclusion
Installing an ICC profile on Windows 11 is a quick and easy way to ensure your monitor displays colors accurately. Whether you are an artist, photographer, or just someone who enjoys vibrant, true-to-life colors, this step can make a huge difference.
Remember to always download profiles from trusted sources and ensure they are compatible with your specific monitor model. Don’t forget to back up your original settings before making any changes, and consider using a calibration tool for the best results. With the new ICC profile set up, you’ll notice an immediate improvement in color accuracy, making your work or gaming experience much more enjoyable.
If you found this guide helpful and want to learn more about color management, check out additional resources available online or contact your monitor’s manufacturer for further support. Happy color-tuning!
Matt Jacobs has been working as an IT consultant for small businesses since receiving his Master’s degree in 2003. While he still does some consulting work, his primary focus now is on creating technology support content for SupportYourTech.com.
His work can be found on many websites and focuses on topics such as Microsoft Office, Apple devices, Android devices, Photoshop, and more.
In today’s digital age, color accuracy is paramount, especially for professionals working in graphic design, photography, video editing, and printing. One way to ensure that your monitors and printers reproduce colors more accurately is by using ICC (International Color Consortium) profiles. These profiles are essential for maintaining color consistency across different devices and media. In this comprehensive guide, we will discuss how to install ICC profiles on Windows 11, ensuring that you can achieve precision in your color-related tasks.
What is ICC Profile?
An ICC profile is a set of data that characterizes a color input or output device, or a color space, according to standards promulgated by the ICC. It contains information about how colors are represented in a device and is used to ensure that the color seen on a monitor matches the color printed on paper, for instance. ICC profiles are vital in various industries, including digital graphics, photography, video production, and printing.
Types of ICC Profiles
Before diving into the installation process, it’s essential to understand the different types of ICC profiles:
- Input Profiles: These profiles are used for devices like scanners and cameras, mapping the colors captured by the device to the standard color space.
- Output Profiles: These profiles apply to printers and monitors, converting the device’s color space to standard formats suitable for display or print.
- Device Link Profiles: These profiles are used to connect two different color spaces directly, ensuring accurate color transfer without converting to a standard space first.
Why Use ICC Profiles?
Using ICC profiles offers numerous advantages:
- Color Accuracy: They help ensure that colors are consistent across different devices.
- Great for Multiple Devices: If you work with more than one monitor or printer, ICC profiles help maintain uniformity.
- Professional Standards: ICC profiles are essential for industries that require high-quality color reproduction.
- Customization: You can create or acquire specific profiles tailored to your devices, improving overall performance.
Preparing for ICC Profile Installation
Before installing an ICC profile on Windows 11, follow these steps:
-
Acquire the ICC Profile: Download the ICC profile you need from a reliable source. This could be a manufacturer’s website or a specialized color management website.
-
Check Compatibility: Ensure that the ICC profile is compatible with your device (monitor, printer), color space, and software applications.
-
Backup Existing Profiles: If you have existing profiles, it is a good idea to back them up in case you need to revert to them.
Installing ICC Profiles in Windows 11
Here is a step-by-step guide to installing ICC profiles on Windows 11.
Step 1: Download the ICC Profile
First, download the ICC profile file from a trusted source. Ensure that the downloaded file has the .icc or .icm file extension, as these are the standard extensions for ICC profiles.
Step 2: Locate the ICC Profile
After downloading the ICC profile, locate it in your Downloads folder or the specific folder where you saved it. It’s crucial to keep track of where the profile is saved, as you will need to navigate to this location during the installation process.
Step 3: Open Color Management Settings
-
Access Settings: Click on the Start button and select Settings (gear icon), or you can press
Windows + Ito open the settings window. -
System Settings: In the Settings menu, select System from the left-hand panel.
-
Color Management: Scroll down and click on the Display option. Scroll to the bottom and click on Advanced display, then select the display you want to manage. Here you will find a Color management link that you should click.
Step 4: Add a New ICC Profile
-
Color Management Dialog: In the Color Management window, check the box that says «Use my settings for this device».
-
Add Profile: Click the Add button to start the process of adding your new ICC profile. A new window will open, showing a list of available profiles.
-
Select the Profile: Click the Browse button and navigate to the location where you saved the downloaded ICC profile. Select the profile and click Open.
-
Profile Confirmation: Once you select the profile, it should appear in the list of profiles in the Color Management window. Ensure the new profile is highlighted, indicating that it’s the default for this device.
Step 5: Set as Default (Optional)
If you have multiple profiles installed, you can set the new profile as your default:
-
Select the Profile: Click on the newly added ICC profile in the list to highlight it.
-
Set as Default: Click on Set as Default Profile. This action ensures that Windows uses this profile whenever color data is processed for the selected device.
Step 6: Verify the Installation
After you’ve installed the ICC profile, you should verify that it has been applied correctly:
-
Monitor Calibration: Use tools such as Windows’ built-in calibration tool or third-party software for optimal calibration based on your newly installed profile.
-
Visual Check: Open an image or use a color sample tool to check if colors are being rendered accurately.
Troubleshooting Common Issues
While installing an ICC profile should be a straightforward process, you may encounter some common issues. Here are some troubleshooting tips:
- Profile Not Showing Up: Ensure that you’ve installed the profile correctly and that it’s compatible with your devices.
- Colors Still Look Wrong: Calibrate your monitor after installing the profile. Sometimes, adjusting brightness, contrast, and gamma settings can help in achieving better color accuracy.
- Running into Permissions Issues: If you do not have permission to install or change color profiles, you may need to run the Color Management settings as an administrator or ensure your user account has the necessary permissions.
Tips for Managing ICC Profiles
After successfully installing ICC profiles on Windows 11, here are some tips for managing them effectively.
Regular Updates
Keep your profiles updated by checking with manufacturers for any new or updated profiles that better suit your devices. Regularly refresh your profiles, especially after major updates or changes to your setup.
Profile Organization
Maintain a well-organized folder structure for different profiles—whether based on devices or usage scenarios. This approach will help streamline the process of locating and installing profiles in the future.
Backup Profiles
It is always a best practice to back up your profiles regularly. Save a copy on an external drive or cloud storage, ensuring that you can restore them if needed.
Use Color Management Software
Consider using professional color management software, which can automate much of the color calibration and profile management. These tools can help provide more accurate results and simplify your workflow.
Conclusion
In conclusion, understanding how to install and manage ICC profiles in Windows 11 can significantly enhance your color accuracy and control, particularly if you work in color-critical fields. By following the steps outlined above, you can easily install, manage, and troubleshoot ICC profiles tailored to your devices. This knowledge can greatly improve your productivity while ensuring that your digital assets convey their intended colors. Remember to keep your profiles updated, monitor calibration, and, when possible, utilize professional software solutions to streamline your color management process. Happy color managing!
Installing ICC profiles on Windows 11 is a process we often overlook, yet it’s crucial for achieving accurate color representation on our displays. ICC profiles are a staple in color management; they contain data that adjusts the color output of your screen, ensuring it matches the original source content. This is particularly vital for professionals in graphic design, photography, and any field where color fidelity is key.

To install ICC profiles, we need to ensure that we have the desired profile ready, typically obtained from the device manufacturer or from a color calibration process. We do so by adding the profile to the correct directory and then associating it with our display device through Windows 11’s color management settings. It’s a straightforward task that can have a significant impact on the visual accuracy of our work.
During installation on Windows 11, we generally involve our GPU as well since ICC profiles modify gamma tables and Look Up Tables (LUT) for our display. It’s an essential step for us in preserving the integrity of our digital workspace, making sure that the colors we see on our monitor precisely match our expectations and requirements.
Contents
- 1 Preparing to Install ICC Profiles
- 1.1 Understanding ICC Profiles
- 1.2 Checking System Compatibility
- 1.3 Locating ICC Profile Downloads
- 2 Installation Process
- 2.1 Adding ICC Profiles to Windows
- 2.2 Setting the Default Profile
- 2.3 Managing Color Profiles in Windows
- 3 Calibration and Configuration
- 3.1 Calibrating Your Display
- 3.2 Advanced Display Settings
- 4 Troubleshooting Common Issues
- 4.1 Resolving Installation Errors
- 4.2 Restoring Default Settings
Preparing to Install ICC Profiles
Before we dive into the installation process, it’s crucial that we understand what ICC profiles are, ensure our system can handle them, and know exactly where to find these profiles.

Understanding ICC Profiles
ICC profiles are a set of data that characterize a color input or output device. By using an ICC profile for your device, such as a monitor, printer, camera, or scanner, we can ensure that colors are consistently represented across various devices. Each device processes color differently, and ICC profiles help bridge the gap between them.
Checking System Compatibility
Before installing an ICC profile, we must verify that our operating system is up to date. Windows 11 should be equipped with color management settings that allow the application of ICC profiles. These profiles are crucial for tasks demanding color accuracy, so we must ensure our system settings are correctly configured to support them.
Locating ICC Profile Downloads
| Source | Type of Device | Notes |
| Manufacturer’s Website | Monitor, Printer, Camera, Scanner | Best for device-specific profiles |
| Third-Party Providers | Generic Profiles | May offer a wide range of profiles |
| Custom Profile Services | Custom-Tailored Profiles | Ideal for precision requirements |
Finding the right ICC profile can take a bit of research. We need to download the correct profile for our particular device. This is often available on the manufacturer’s website or from specialized third-party sources. Ensuring we use the exact profile for our device guarantees the colors will display as intended.
Installation Process
Accurate color reproduction on displays is crucial, particularly for professionals in image-related industries. We’ll guide you through three key steps: adding ICC profiles, setting a profile as the default, and managing your color profiles.
Adding ICC Profiles to Windows
First, we need to add ICC or ICM profile files to our system. Once we’ve downloaded the appropriate profile from a trusted source, we can install it with a simple right-click on the file and select ‘Install Profile’. This minimal-effort method ensures the profile is added to the correct directory for color profiles.
Setting the Default Profile
Color profiles won’t make a difference unless set as the default profile for a device. To set an ICC profile as the default on Windows 11, we search for ‘Color Management’ using Win + S. In the Color Management window, we check ‘Use my settings for this device’, add the desired profile, and set it as the default.
Managing Color Profiles in Windows
For managing color profiles in Windows, we navigate to the Control Panel, then to ‘Color Management’. Here we monitor installed profiles, remove outdated ones, and associate specific profiles with different devices. This centralized management of color profiles helps us ensure consistent and accurate color representation across our devices.
Calibration and Configuration
To ensure accurate color representation on your Windows 11 device, proper calibration and the configuration of display settings are essential. This involves adjusting your display to an industry-standard color space, like sRGB, and aligning it with other devices through the use of ICC profiles.
Calibrating Your Display
We begin the calibration process with the Windows Display Calibration tool. It helps us adjust our monitor’s gamma settings, brightness, contrast, and color balance to achieve more accurate color representation.
- Search for “Calibrate Display Color” in the Start menu and select the tool.
- Follow the on-screen instructions to adjust gamma, brightness, contrast, and color balance.
- Upon completion, save the calibration results as a new ICC profile, commonly known as an ICM file, which will be applied to your display.
While performing this task, make sure your display is warmed up (at least 30 minutes of being on), and the environment lighting conditions are consistent with your normal usage.
Advanced Display Settings
In the “Advanced display settings,” we tweak more specific aspects related to our display device and the graphics card.
To access these settings:
- Right-click on the desktop and select “Display settings.”
- Scroll down and click on “Advanced display” to view and modify the display adapter properties.
| LUT and Gamma Correction | ICC Profile Management |
| Here, we aim to optimize the Look Up Table (LUT) adjustments for our GPU, ensuring that the right shades of colors are displayed. | Inside the advanced settings, we can also manage our color profiles. If the new ICC profile needs to be installed, we can add it through the “Color Management” section. |
Remember to regularly review and update the display adapter’s driver through the Device Manager, as this can influence how colors and calibration profiles are managed by Windows 11.
Troubleshooting Common Issues
When installing ICC profiles on Windows 11, we may encounter several issues. Here we’re going to walk you through resolving installation errors and restoring default settings effectively.
Resolving Installation Errors
Installation Error Solutions:
If you’re facing installation errors, first, ensure your ICC profile is compatible with Windows 11. An incompatible profile can lead to errors. If you encounter a specific error code when trying to install an ICC profile, it often indicates the nature of the issue—document these codes. For example, Error 800f0830 might suggest a corrupted file or system component.
To address installation errors:
- Verify the ICC profile’s source and integrity.
- Run Windows Update to ensure the OS is up to date, as this can resolve compatibility issues.
- If errors persist, we can try resetting the system defaults for color profiles to see if that resolves the issue.
Restoring Default Settings
Restoring the default settings can often fix the ICC profile issues we may face.
To reset color profiles to the system defaults:
Head to the Color Management settings and remove the current profile. There, we have the option to set the system defaults, which includes the default ICC profile that came with Windows 11. This action restores standard configurations, which can be a clean slate to start with if we faced installation errors. Also, ensure that brightness and HDR settings are configured to the default settings if we’re experiencing display issues after installing a new profile. The default state provides a baseline for accurate color representation, which is crucial for color-sensitive work.