Как установить hashcat на windows

Hashcat is my favorite password cracker. You can use it on any operating system or distribution, but it’s often easier to use Windows to avoid drivers issues (especially with a recent GPU). Anyway, I will explain how to install it on Windows in this tutorial.

Hashcat is officially supported on Windows, binaries files can be downloaded on the official website directly. Once the files extracted, Hashcat can be used directly in the command prompt, there is no installation required.

If you are new to this, it might not be obvious to you, but don’t worry, I’ll explain everything in this step-by-step tutorial.

Master Linux Commands
Your essential Linux handbook
Want to level up your Linux skills? Here is the perfect solution to become efficient on Linux. 20% off today!

Download now

Hide your IP address and location with a free VPN:
Try it for free now, with advanced security features.
2900+ servers in 65 countries. It’s free. Forever.

Here are the required steps to install Hashcat on Windows:

  • Download the latest Hashcat version from the official website.
  • Extract the files on your computer.
  • Open a command prompt and run hashcat in command line.

I will now explain each step in details.

Download Hashcat

The first step is to download the latest Hashcat version. It’s available on their official website:

  • Go to the Hashcat website homepage.
  • Find the binaries and click on “Download” to get the archive on your computer.

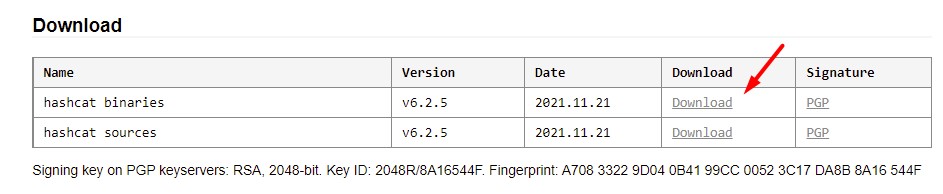
The file is an archive, so the next step will be to extract the files before using them.

Extract the files

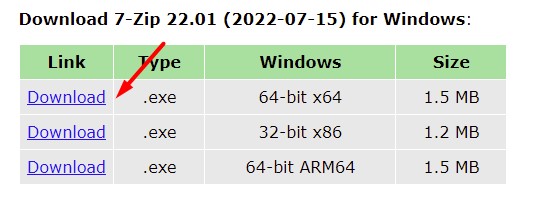
The files are compressed with 7zip. If you can’t open the archive, you might need to install it first:

  • Go to the 7zip website.
  • Download the file corresponding to your operating system (the first link should be fine if your computer is recent, or use the 32-bit version if you have any doubt).

  • Once downloaded, double-click on the file to install 7zip on your computer.
    Follow the installation wizard, keep the default options.

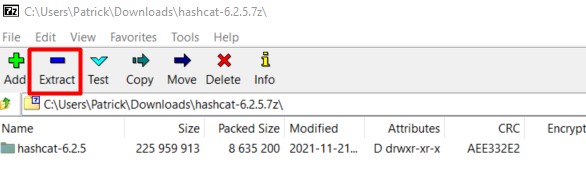
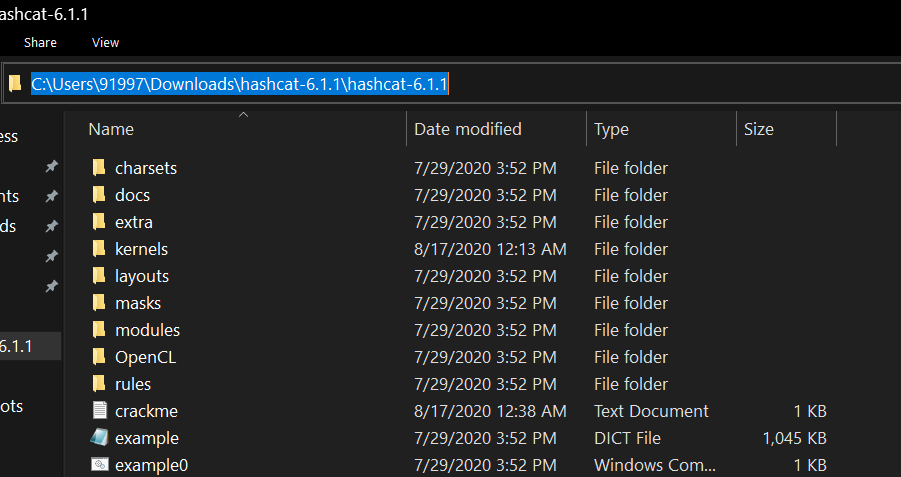
Once done, you should be able to open the Hashcat archive and extract the files.
Click on the “Extract” button in the top bar:

I recommend choosing a different path for the extract location. I don’t know you, but in my case, I tend to delete everything in the “Downloads” folder from time to time, and if I keep hashcat there, I will need to reinstall it eventually.
So, for the example, I’m extracting the files to C:\hashcat, but you can put them wherever you want:

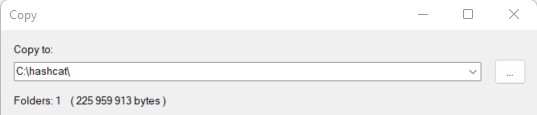
Remember the files location, as you’ll have to go to this path on the next step.

Run Hashcat for the first time

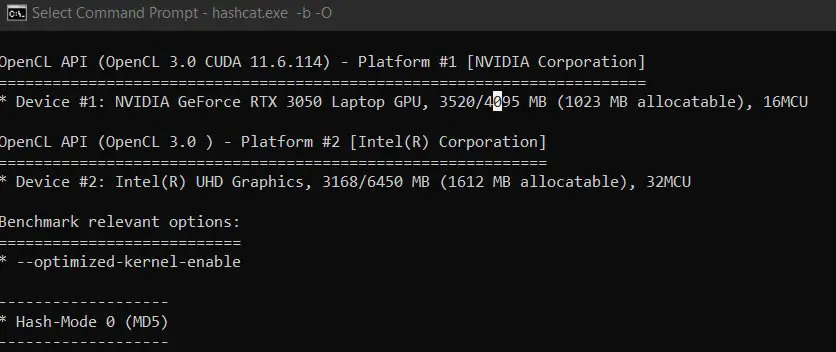
We are almost done, we’ll just make sure everything is working as expected:

This command will run a benchmark of your system, telling you the decryption rate you can expect on this computer, but also showing errors if there is something misconfigured on your system (like missing GPU drivers).

How to use Hashcat on Windows

If the benchmark command is working correctly, you can now use Hashcat on your Windows computer with the same commands as on Linux. It’s the same thing.

I already have several tutorials on this topic on the website, so I won’t repeat myself here, but if you need further assistance, feel free to read these tutorials:

  • Is MD5 Easy to Crack? (and how long does it really takes)
  • How to Brute Force a Password? (MD5 Hash)
  • How to Install and Use Hashcat to Decrypt MD5? (Tutorial)

Hashcat FAQ

Is there a GUI for Hashcat?

Hashcat doesn’t include a graphic interface by default, but a few projects exist with the goal to add an interface to it, like the hashcat GUI toolkit (Windows interface) or Crackerjack (web interface).

Hide your IP address and location with a free VPN:
Try it for free now, with advanced security features.
2900+ servers in 65 countries. It’s free. Forever.

Is Hashcat cross-platform?

Hashcat can run on most operating systems (Linux, Windows and macOS). The installation is slightly different on each system, but the command usage is the same on all platforms.

You can find my guide on how to install Hashcat on Ubuntu there.

How to install OpenCL on Windows?

Running hashcat on Windows require the latest drivers for your OpenCL device (your GPU). AMD and Nvidia official drivers include OpenCL by default, and for Intel GPU you have to install an additional package (link here).

If you experience any issue, make sure you installed the latest version of your graphic card driver, downloading it from the official website.
Installing this on Linux could be a nightmare with some distributions and hardware, but on Windows it’s pretty straightforward (in theory).

Hi, my name is Patrick, I’m a web developer and network administrator. I have always been interested in security, and I created this website to share my findings with you.

In today’s digital age, the protection of sensitive information is of utmost importance. Whether it’s guarding our personal data or securing our online accounts, passwords play a vital role in safeguarding our digital lives. But have you ever wondered how secure your passwords really are? Welcome to “Unlocking the Power of Password Cracking:

A Step-by-Step Guide to Installing Hashcat on Windows.” In this comprehensive guide, we will take you through the fascinating world of password cracking and introduce you to Hashcat, a powerful tool used by ethical hackers and security professionals to test the strength of passwords.

Whether you’re a curious tech enthusiast wanting to enhance your knowledge or an aspiring cybersecurity professional looking to sharpen your skills. This guide will provide you with the essential knowledge and step-by-step instructions to get started with Hashcat on Windows. Get ready to delve into the world of password cracking and unlock the secrets to stronger digital security!

Complete Guide to Using Mask Attack With Hashcat

Understanding Hash Functions and Encryption

To comprehend the fundamentals of password cracking, it’s crucial to understand the concept of hash functions and encryption. A hash function is a mathematical algorithm that takes an input (in this case, a password) and generates a fixed-size string of characters, known as the hash value or hash code.

This process is irreversible, meaning you cannot derive the original password from the hash value alone. Encryption, on the other hand, involves transforming data into an unreadable format using an encryption key. Hash functions and encryption are essential components of password security, as they ensure that passwords are not stored in plain text.

However, with the advancement in computing power, traditional hashing algorithms have become vulnerable to various hacking techniques. One of the most prevalent methods used by ethical hackers and security professionals to assess password strength is password cracking. Password cracking involves attempting to guess or discover passwords by systematically testing all possible combinations or using precomputed tables of password hashes.

Hashcat, the subject of this guide, is a powerful password cracking tool that utilizes the computing power of modern GPUs to accelerate the cracking process. By understanding the inner workings of hash functions and encryption, you’ll be better equipped to grasp the significance of tools like Hashcat in evaluating the security of passwords.

What is Hashcat?

Hashcat is an open-source, advanced password recovery tool used for password cracking. Developed by Jens “Atom” Steube, Hashcat is renowned for its speed and versatility in cracking a wide range of hash types, including MD5, SHA-1, NTLM, and many others.

It leverages the power of modern GPUs to achieve unparalleled processing speeds, making it a go-to tool for security professionals and researchers. Hashcat supports various attack modes, including dictionary attacks, mask attacks, hybrid attacks, and rule-based attacks, providing flexibility and customization options to suit different cracking scenarios. Whether you’re testing the strength of passwords for an organization or conducting research on password security, Hashcat is a valuable tool in your arsenal.

Benefits of Using Hashcat for Password Cracking

Using Hashcat for password cracking offers several advantages over other password recovery tools. Firstly, Hashcat is highly optimized for GPU acceleration, allowing it to perform password cracking at lightning-fast speeds. Modern GPUs have thousands of cores, which Hashcat harnesses to perform parallel processing, significantly reducing the time required for cracking passwords compared to CPU-based approaches. Additionally, Hashcat supports distributed cracking, enabling multiple systems to work together in a coordinated manner, further enhancing cracking speed and efficiency.

Another notable benefit of Hashcat is its extensive hash type support. It can crack a wide range of hash algorithms commonly used in various operating systems, databases, and applications. This versatility makes Hashcat a valuable tool for assessing password security in diverse environments. Moreover, Hashcat allows for highly customizable attack modes, enabling users to tailor their cracking strategies based on specific requirements. From dictionary attacks to rule-based attacks that apply transformation rules to wordlists, Hashcat provides flexibility to adapt to different cracking scenarios.

System Requirements for Installing Hashcat on Windows

Before diving into the installation process, it’s essential to ensure that your system meets the necessary requirements for running Hashcat. Since Hashcat leverages GPU acceleration, having a compatible GPU is crucial. Ideally, you should have a modern NVIDIA or AMD GPU with CUDA or OpenCL support. Hashcat’s performance varies depending on the GPU model, so it’s recommended to use a high-end GPU for optimal cracking speed. Additionally, you’ll need a Windows operating system (Windows 7 or later) and the latest GPU drivers installed.

Apart from the hardware requirements, you’ll also need to have the appropriate software dependencies installed. Hashcat relies on a few libraries, namely, OpenCL runtime, OpenSSL, and zlib. These libraries are typically bundled with the GPU drivers, but you may need to install them separately if required. Ensuring that your system meets these requirements will pave the way for a smooth installation and usage of Hashcat on Windows.

Now that we have a solid understanding of the concepts and benefits of using Hashcat, let’s walk through the step-by-step process of installing Hashcat on a Windows system. Follow these instructions carefully to set up Hashcat and get ready for password cracking.

1. Download Hashcat: Visit the official Hashcat website (https://hashcat.net/hashcat/) and download the latest version of Hashcat for Windows. Choose the appropriate binary package based on your system architecture (32-bit or 64-bit).

2. Extract the Hashcat Archive: Once the download is complete, extract the contents of the Hashcat archive to a location of your choice. You can use a file archiving utility like 7-Zip to extract the files.

3. Install GPU Drivers: Ensure that you have the latest GPU drivers installed on your system. Visit the respective GPU manufacturer’s website (NVIDIA or AMD) to download and install the latest drivers compatible with your GPU model.

4. Open a Command Prompt: Press `Win + R` to open the Run dialog box, type `cmd`, and press Enter. This will launch the Command Prompt.

5. Navigate to the Hashcat Directory: In the Command Prompt, navigate to the directory where you extracted the Hashcat files using the `cd` command. For example, if you extracted the files to the `C:\Hashcat` directory, you would use the command `cd C:\Hashcat`.

6. Test Hashcat Installation: To verify that Hashcat is installed correctly, run the command `hashcat --version`. If Hashcat is installed properly, you should see the version information displayed in the Command Prompt.

Congratulations! You have successfully installed Hashcat on your Windows system. Now that Hashcat is up and running, let’s explore some additional configurations and techniques to maximize its performance and effectiveness.

Configuring Hashcat for Optimal Performance

While Hashcat works out of the box, tweaking certain configurations can enhance its performance and improve the chances of cracking passwords. Here are a few key configurations to consider:

1. **Choosing the Right Attack Mode**: Hashcat supports various attack modes, each with its own strengths and weaknesses. Depending on the nature of the passwords you’re cracking and the available information, you can select the most suitable attack mode. For example, dictionary attacks are effective when you have a list of potential passwords, while mask attacks are useful when you have knowledge about the password pattern.

2. **Optimizing Workload Distribution**: Hashcat allows you to distribute the workload across multiple GPUs or systems, improving cracking speed and efficiency. By utilizing distributed computing, you can harness the power of multiple GPUs or systems working in parallel.

3. **Fine-Tuning Rule-Based Attacks**: Rule-based attacks in Hashcat involve applying transformation rules to wordlists to generate variations of potential passwords. These rules can significantly increase the chances of cracking passwords by generating permutations based on common patterns. Experimenting with different rule sets and combinations can yield better results in cracking passwords.

By understanding and configuring these aspects of Hashcat, you can maximize its potential and achieve faster and more accurate password cracking results.

Generating and Using Wordlists for Password Cracking

Wordlists are a crucial component of password cracking, as they form the basis for dictionary attacks and rule-based attacks. A wordlist is essentially a text file containing a list of potential passwords that Hashcat will attempt to crack. While Hashcat comes with a default wordlist, creating custom wordlists tailored to the target environment can significantly improve cracking success rates. Here are a few methods for generating and using wordlists in Hashcat:

1. Using Prebuilt Wordlists:

Numerous prebuilt wordlists are available online, covering various categories such as common passwords, leaked passwords, and specific terms related to industries or interests. These wordlists can be used directly with Hashcat or serve as a starting point for further customization.

2. Customizing Wordlists:

Customizing wordlists involves tailoring them to the target environment or specific scenarios. This can be done by adding domain-specific terms, personal information, or relevant keywords that might be used in passwords. Combining prebuilt wordlists and customizing them can enhance the chances of cracking passwords in specific contexts.

3. Applying Transformation Rules:

Hashcat allows you to apply transformation rules to wordlists, generating variations of potential passwords. These rules can manipulate the words in the wordlist by capitalizing letters, adding common suffixes or prefixes, or substituting characters with similar-looking symbols. By applying rules, you can significantly expand the password search space and increase the chances of cracking complex passwords.

Generating and utilizing wordlists effectively is a skill that comes with experience. As you gain more knowledge and exposure to different password cracking scenarios, you’ll be able to create targeted wordlists and fine-tune your cracking strategies for optimal results.

Advanced Techniques for Password Cracking with Hashcat

While the previous sections covered the fundamentals of password cracking and the basic usage of Hashcat, there are several advanced techniques that can further enhance your password cracking endeavors. These techniques involve utilizing additional resources, employing specialized hardware, or leveraging specific attack methodologies. Here are a few advanced techniques to consider:

1. Using Rainbow Tables:

Rainbow tables are precomputed tables containing a vast number of password hashes and their corresponding plaintext passwords. These tables can significantly speed up the cracking process by eliminating the need to compute hashes for each password guess. Hashcat can utilize rainbow tables to crack passwords quickly, especially for common hash types. However, rainbow tables can be resource-intensive and require substantial storage space.

2. Utilizing Distributed Computing:

As mentioned earlier, Hashcat supports distributed computing, allowing multiple systems or GPUs to work together on a cracking task. By pooling the computational power of multiple resources, you can achieve faster cracking speeds and distribute the workload more efficiently.

3. Using Hardware Accelerators:

In addition to GPUs, Hashcat can utilize specialized hardware accelerators, such as FPGA (Field-Programmable Gate Array) or ASIC (Application-Specific Integrated Circuit) devices. These hardware solutions are designed to perform password cracking tasks efficiently and can offer significant speed improvements compared to traditional CPUs or GPUs.

4. Combining Attack Modes:

Hashcat allows you to combine different attack modes, such as dictionary attacks, mask attacks, and rule-based attacks, to create hybrid attacks. Hybrid attacks leverage the strengths of multiple attack modes, increasing the chances of cracking complex passwords. Experimenting with different combinations can yield better results in certain cracking scenarios.

By exploring these advanced techniques and staying up-to-date with the latest advancements in password cracking, you can further refine your skills and become a proficient password cracker.

Best Practices for Password Security

While password cracking can be a fascinating and educational endeavor, it’s essential to remember the importance of password security. As individuals and organizations, we should strive to implement robust password practices to protect our digital assets. Here are some best practices to keep in mind:

1. Use Strong and Unique Passwords:

Create passwords that are long, complex, and unique for each account. Avoid using common words, personal information, or easily guessable patterns. Consider using a password manager to generate and store strong passwords securely.

2. Enable Multi-Factor Authentication:

Whenever possible, enable multi-factor authentication (MFA) for your online accounts. MFA adds an extra layer of security by requiring additional verification, such as a fingerprint or a one-time password, in addition to your password.

3. Regularly Update Passwords:

Periodically update your passwords, especially for critical accounts or after a potential security breach. Changing passwords regularly minimizes the risk of unauthorized access to your accounts.

4. Stay Informed About Password Security:

Stay updated on the latest trends, techniques, and vulnerabilities related to password security. By staying informed, you’ll be better equipped to protect yourself and make informed decisions regarding password practices.

By following these best practices and adopting a security-conscious mindset, you can significantly enhance your personal and organizational password security.

Conclusion

In this comprehensive guide, we have explored the fascinating world of password cracking and introduced you to Hashcat, a powerful tool used by ethical hackers and security professionals. From understanding hash functions and encryption to installing and configuring Hashcat on Windows, we have covered the essential aspects of password cracking.

We have delved into advanced techniques, such as utilizing wordlists, optimizing performance, and exploring hybrid attacks. Additionally, we have emphasized the importance of password security and outlined best practices to protect your digital assets.

As you embark on your journey into the world of password cracking, remember to always approach this field ethically and responsibly. Password cracking is a valuable tool for evaluating the strength of passwords and enhancing digital security.

By arming yourself with knowledge, staying up-to-date with advancements, and practicing good password hygiene, you can contribute to a safer digital world. So, go forth and unlock the secrets to stronger digital security with Hashcat!

Read Also:

20 Best Ethical Hacking Tools You Need to Know

The 9 Best Penetration Testing Tools for Linux

John the Ripper Password Cracking Tool: A Comprehensive Guide

Reading Time: 5 minutes

Hashcat is a powerful and fast password cracking tool widely used by security professionals, ethical hackers, and penetration testers. It supports a variety of hash algorithms such as MD5, SHA-1, SHA-256, bcrypt, and others, allowing users to crack encrypted passwords and test the security of systems. Hashcat’s ability to utilise both CPU and GPU for cracking makes it one of the fastest tools in the industry. In this comprehensive guide, we will walk you through the process of installing Hashcat on a Windows operating system.

Windows is one of the most popular operating systems, and Hashcat‘s compatibility with it makes it accessible to a wide range of users. Installing Hashcat on a Windows machine allows you to leverage the power of both the CPU and GPU to perform password cracking tasks more efficiently. Windows also offers compatibility with many popular graphics cards (from both AMD and NVIDIA), which can significantly accelerate Hashcat’s performance.

Whether you’re conducting a penetration test, performing security research, or recovering a lost password, Hashcat on Windows is a valuable tool. The installation process is straightforward, and once set up, Hashcat provides all the features you need to crack various types of password hashes effectively.

Prerequisites for Installing Hashcat on Windows

Before you begin the installation of Hashcat, there are a few things to ensure:

  1. System Requirements: Make sure your system meets the necessary hardware requirements. While Hashcat can run on both CPU and GPU, a powerful GPU (either from AMD or NVIDIA) will greatly accelerate cracking times.
  2. Graphics Drivers: Hashcat uses your system’s GPU to speed up the cracking process. Therefore, it’s crucial that you have the appropriate graphics card drivers installed for either AMD or NVIDIA GPUs.
  3. Operating System: This guide focuses on installing Hashcat on Windows 10 or Windows 11. The installation process may vary slightly for older versions of Windows.
  4. Administrator Privileges: You’ll need administrator privileges to install software and drivers on your Windows system.
  5. A Hash File: For testing Hashcat after installation, you’ll need a hash file. This file typically contains encrypted passwords that Hashcat will attempt to crack.

Methods for Installing Hashcat on Windows

There are two main methods for installing Hashcat on Windows: using precompiled binaries or building it from source. Most users will prefer the precompiled binary method due to its simplicity, but for those who want the latest features or need to make modifications, building from source is a viable option.

Method 1: Installing Hashcat Using Precompiled Binaries

The easiest and most straightforward way to install Hashcat on Windows is by downloading the precompiled binaries from the official Hashcat website. This method ensures that you are using a stable, up-to-date version of Hashcat, and it avoids the complexities of compiling from source.

Step-by-Step Guide:

  1. Download Hashcat Binaries: Visit the official Hashcat website to download the latest stable version of Hashcat for Windows. The download will be available as a .7z archive. You can also download it directly using a browser or use the following wget command if you have a command line tool:
    wget https://hashcat.net/files/hashcat-<version>.7z
    Replace <version> with the version number (e.g., 6.2.6).
  2. Extract the Archive: Once the .7z archive is downloaded, you will need to extract it using a tool like 7-Zip or WinRAR. If you don’t have 7-Zip installed, you can download it from here.After installing 7-Zip, right-click the downloaded file, select “7-Zip”, and choose “Extract Here” or “Extract to [folder]”.
  3. Navigate to the Extracted Folder: After extraction, you’ll have a folder containing the Hashcat executable and associated files. Open the folder to locate the hashcat.exe file. This is the main executable you’ll use to run Hashcat.
  4. Install GPU Drivers (Optional): To use GPU acceleration, it’s crucial to install the appropriate drivers for your graphics card:
    • For NVIDIA GPUs: Install the latest NVIDIA drivers from NVIDIA’s website, ensuring that you also install CUDA Toolkit and OpenCL support for enhanced performance.
    • For AMD GPUs: Install the latest AMD drivers from AMD’s website, and ensure that OpenCL is supported.
  5. Verify the Installation: After extracting the files and installing the drivers, open a Command Prompt window in the folder containing hashcat.exe by holding the Shift key and right-clicking the folder. Select “Open Command Window Here” or “Open PowerShell Window Here”.To check if Hashcat is installed correctly, type the following command and press Enter:
    hashcat --version
    If installed correctly, the command will output the current version of Hashcat installed on your system.
  6. Run Hashcat: Now, you are ready to start using Hashcat. For example, if you want to crack an MD5 hash using a dictionary attack, you can run the following command:
    hashcat -m 0 -a 0 hashfile.txt wordlist.txt
    Here:
    • -m 0 specifies the hash type (0 is for MD5).
    • -a 0 specifies the attack mode (0 is for a dictionary attack).
    • hashfile.txt is your file containing hashes.
    • wordlist.txt is your dictionary file.

Method 2: Building Hashcat from Source on Windows

For those who wish to compile Hashcat from source (perhaps to get the latest features or to customise the code), this method is an option. However, this process is more involved and may require additional software like Cygwin or Windows Subsystem for Linux (WSL).

Step-by-Step Guide:

  1. Install Dependencies:
    • First, you will need Visual Studio (with C++ build tools), which can be downloaded from Visual Studio’s website. During installation, ensure that you select “Desktop development with C++”.
    • Install Cygwin or enable Windows Subsystem for Linux (WSL) to provide the necessary Linux-like environment for compiling.
  2. Clone the Repository: Once you have the dependencies set up, clone the official Hashcat repository from GitHub:
    git clone https://github.com/hashcat/hashcat.git
  3. Build Hashcat: After cloning the repository, navigate to the hashcat directory and use the following commands to compile it:
    cd hashcat make
    This process will compile the source code into a usable executable file. Depending on your system’s resources, this could take some time.
  4. Install the Necessary Drivers: If you intend to use GPU acceleration, make sure to install the relevant GPU drivers (NVIDIA or AMD) and ensure that OpenCL is properly set up.
  5. Run Hashcat: Once compiled and the necessary drivers are installed, you can run Hashcat as you would with the precompiled binary. Open a Command Prompt in the hashcat folder and use the following command to verify the installation:
    hashcat --version
    This will output the current version of Hashcat, confirming that it’s ready to use.

Running Hashcat on Windows

Once Hashcat is installed, you can begin using it to crack password hashes. Below is an example of how to use Hashcat to crack a hash file:

  1. Prepare the Hash File: Make sure you have a hash file to crack. Hashcat supports various hash algorithms, and the hash file typically contains encrypted passwords.
  2. Choose an Attack Mode: Hashcat offers several attack modes, including:
    • Dictionary Attack (-a 0)
    • Brute-Force Attack (-a 3)
    • Mask Attack (-a 6)
    • Combinator Attack (-a 1)
  3. Run Hashcat: For example, to perform a dictionary attack on an MD5 hash file, use the following command:
    hashcat -m 0 -a 0 hashfile.txt wordlist.txt
    Replace hashfile.txt with the path to your hash file and wordlist.txt with the path to your dictionary.

Conclusion

Installing Hashcat on Windows is a relatively straightforward process, whether you choose to use precompiled binaries or compile from source. The ability to harness both CPU and GPU acceleration makes it a powerful tool for cracking password hashes, useful for penetration testers, ethical hackers, and security researchers alike.

By following the steps outlined in this guide, you should be able to install and begin using Hashcat on your Windows machine. Always remember to use Hashcat responsibly and ensure that you have the necessary permissions for the password cracking activities you engage in.

Disclaimer: This post may contain affiliate links. If you make a purchase through one of these links, Cyberly may earn a small commission at no extra cost to you. Your support helps us continue providing free tutorials and content. Thank you!

Содержание статьи

  1. Как пользоваться Hashcat на Windows
  2. Установка и настройка Hashcat в Windows
  3. Использование Hashcat в Windows

Ранее мы уже рассказывали про Hashcat в статье «Использовании Hashcat на Kali Linux». Сегодня покажу, как установить и использовать Hashcat на Windows. Будем взламывать хеш пароля в MD5, MD4, SHA1, SHA3 и коснемся других способов взлома хешей.

Еще по теме: Создание флешки Kali Linux (быстрый способ)

Hashcat — самый быстрый инструментом для взлома паролей. Он кроссплатформенный и доступен для Windows, macOS и Linux. Взломщик паролей поддерживает большое количество алгоритмов хеширования, включая LM Hash, NT hash, MD4, MD5, SHA-1 и 2 и многие другие. На сегодняшний день поддерживает 237 различных типов хешей.

Как пользоваться Hashcat на Windows

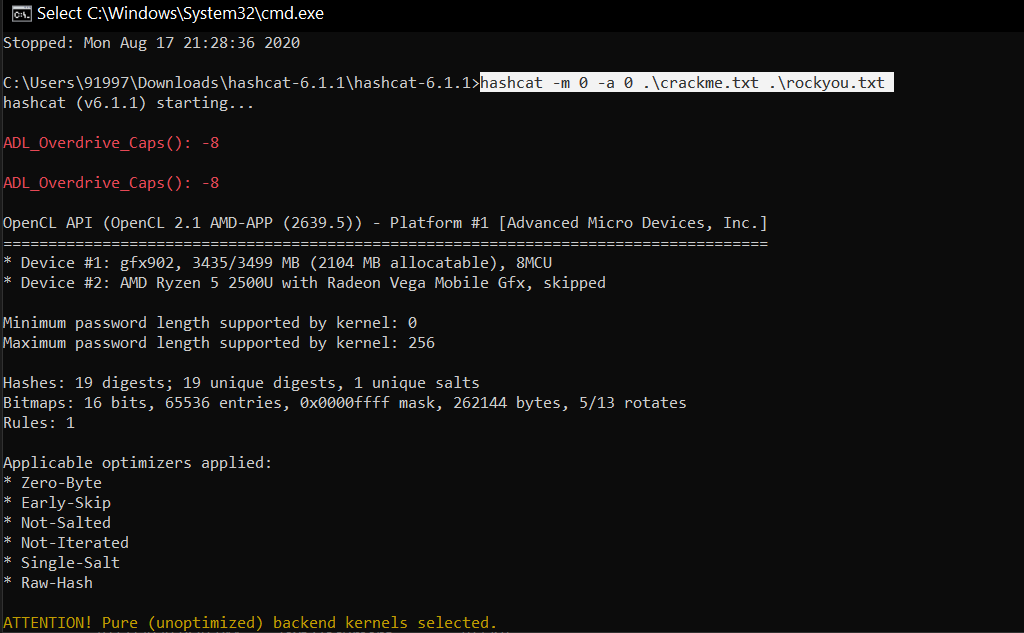
Рассмотрим команду использования Hashcat в Windows:

.\hashcat m 0 a 0 .\crackme.txt .\rockyou.txt

.\hashcat -m 0 -a 0 .\файл_хешей.txt .\словарь.txt

  • -m (тип хеша) — Например, MD5, SHA1 и т. д. В этом примере мы будем использовать
    m 0 для MD5.
  • -a (тип атаки) — Указывает Hashcat, каким методом взламывать пароль. Например, с использованием словаря слов, или перебора, или знаменитой комбинированной атаки. В этом примере мы будем использовать
    a 0 для атаки по словарю.
  • [файл_хешей.txt] — Задает расположение файла, содержащего хеш-коды, которые вы собираетесь взломать. В примере я использовал
    crackme.txt.
  • [словарь.txt | маска | каталог] — Задает используемый словарь (список слов), маску или каталог. В этом примере мы будем использовать словарь для брута
    rockyou.txt.

Установка и настройка Hashcat в Windows

Зайдите на сайт Хешкэт и скачайте бинарник (версию для Windows).

Запустите командную строку и с помощью команды
cd перейдите в папку с извлеченным из архива Hashcat.

Установка Hashcat Windows

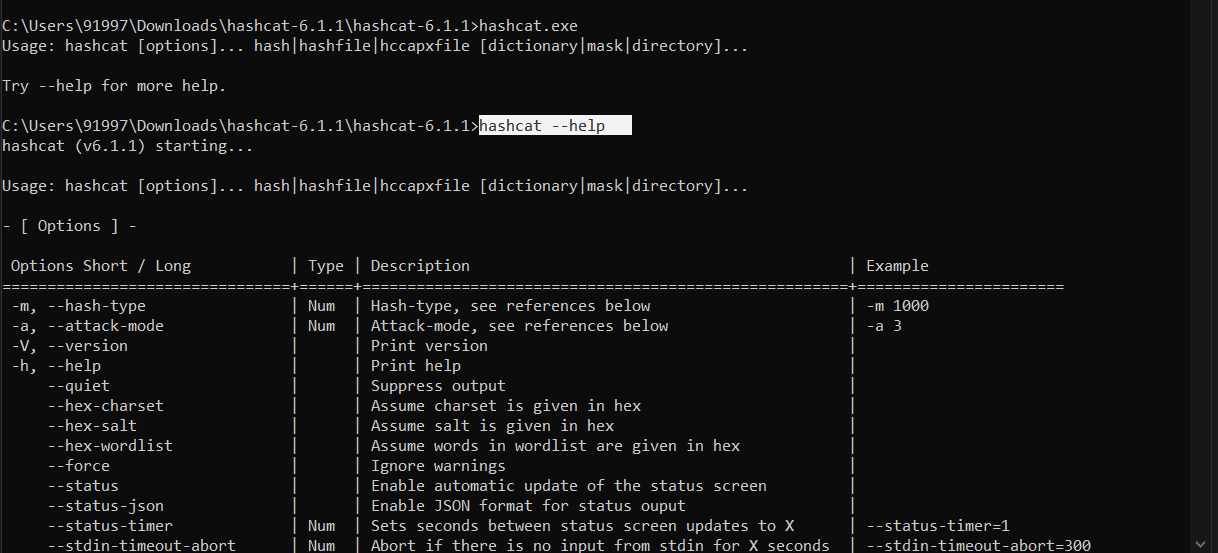
Убедитесь, что находитесь в папке Hashcat введя hashcat.exe.

Запуск Hashcat Windows

Создайте новый текстовый документ внутри папки hashcat, где будут хранятся хеши ваших паролей, в моем случае — это файл crackme.txt. Ниже приведен список тестовых хэшей, которые вы можете использовать.

6c569aabbf7775ef8fc570e228c16b98

e10adc3949ba59abbe56e057f20f883e

25f9e794323b453885f5181f1b624d0

5f4dcc3b5aa765d61d8327deb882cf9

d8578edf8458ce06fbc5bb76a58c5ca4

fcea920f7412b5da7be0cf42b8c93759

96e79218965eb72c92a549dd5a330112

25d55ad283aa400af464c76d713c07ad

e99a18c428cb38d5f260853678922e03

7c6a180b36896a0a8c02787eeafb0e4c

3f230640b78d7e71ac5514e57935eb69

f6a0cb102c62879d397b12b62c092c06

Добавьте не менее 5 хешей.

Можете сгенерировать свои собственные хэши каким-нибудь онлайн-сервисом.

Теперь создайте словарь для брута. Hashcat имеет свой словарь example (файл DICT), но лучше использовать словарь Kali Linux rockyou.txt или свой словарь.

Использование Hashcat в Windows

Откройте командную строку и убедитесь, что находитесь в папке Hashcat.

Для справки введите команду:

Справк hashcat --help windows

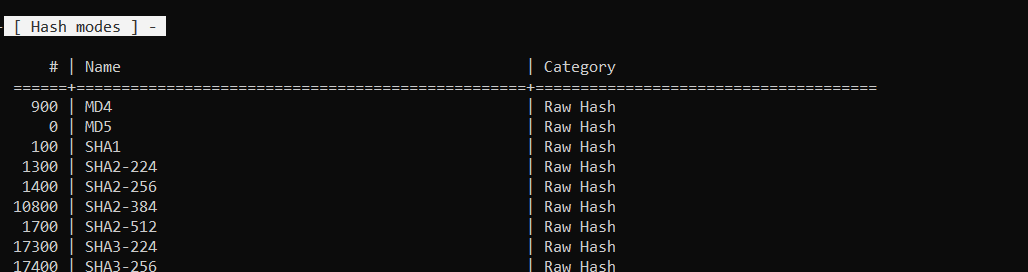
Большой выбор алгоритмов хеширования:

Алгоритмы хеширования Hashcat

Для взлома наших хешей используем атаку по словарю
a 0 на хеш MD5
m 0.

Команда Hashcat для взлома хеша пароля

Как можно видеть на скрине ниже, Хешкэт взломал несколько хешей.

Взлом хеша пароля Hashcat Windows

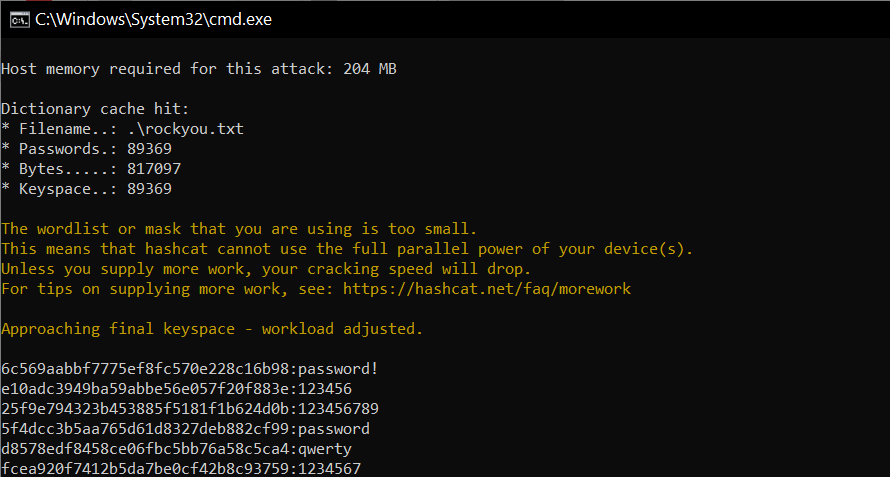
Hashcat добавляет все взломанные пароли в файл potfile и сохраняет в своей папке.

На этом все. Теперь вы знаете как пользоваться мощным инструментом Хешкэт, для взлома паролей.

ПОЛЕЗНЫЕ ССЫЛКИ:

  • Лучшие словари для Hashcat
  • Актуальные методы взлома паролей
  • Брут секретного ключа JWT с помощью Hashcat

This is a guide to installing hashcat on a windows 10 build. Hashcat allows for the use of GPUs to crack hashes which is significantly faster then within a VM and/or using a CPU alone.

Legal Usage:
The information provided by executeatwill and this website is to be used for educational purposes only. The website creator and/or editor is in no way responsible for any misuse of the information provided. All the information on this website is meant to help the reader develop penetration testing and vulnerability aptitude to prevent attacks discussed. In no way should you use the information to cause any kind of damage directly or indirectly. Information provided by this website is to be regarded from an “ethical hacker” standpoint. Only preform testing on systems you OWN and/or have expressed written permission. Use information at your own risk.

By continued reading, you acknowledge the aforementioned user risk/responsibilities.

Keep in mind by using your GPU the faster the clock speed the faster it will crack hashes. Understand with increased speed comes increased heat. Our goal should be to ensure we control the heat being generated from large password lists to which I recommend MSI Afterburner.

(recommended) — MSI Afterburner can be used to monitor/overclock GPUs and is found at:

within the hash.txt — add hashes you would like to crack.
within the cracked.txt — you should have cracked hashes append here.

Testing a MD5 hash
create a quick MD5 hash at: http://www.miraclesalad.com/webtools/md5.php

1
2
string: hashcat
md5 hash: 8743b52063cd84097a65d1633f5c74f5

change directory and navigate to hashcat directory.

1
2
3
4
5
6
7
8
9
10
11
12
13
14
15
16
17
18
19
20
21
22
23
24
25
26
27
28
29
30
31
32
33
34
35
36
37
38
39
40
41
42
43
44
45
46
47
48
49
50
51
52
53
54
55
56
57
58
59
60
61
62
63
64
65
66
67
68
69
70
71
72
73
74
75
76
77
78
79
80
81
82
83
84
85
86
87
88
89
90
91
92
93
94
95
96
97
98
99
100
101
102
103
104
105
106
107
108
109
110
111
112
113
114
115
116
117
118
119
120
121
122
123
124
125
126
127
128
129
130
131
132
133
134
135
136
137
138
139
140
141
142
143
144
145
146
147
148
149
150
151
152
153
154
155
156
157
158
159
160
161
162
163
164
165
166
167
168
169
170
171
172
173
174
175
176
177
178
179
180
181
182
183
184
185
186
187
188
189
190
191
192
193
194
195
196
197
198
199
200
201
202
203
204
205
206
207
208
209
210
211
212
213
214
215
216
217
218
219
220
221
222
223
224
225
226
227
228
229
230
231
232
233
234
235
236
237
238
239
240
241
242
243
244
245
246
247
248
249
250
251
252
253
254
255
256
257
258
259
260
261
262
263
264
265
266
267
268
269
270
271
272
273
274
275
276
277
278
279
280
281
282
283
284
285
286
287
288
289
290
291
292
293
294
295
296
297
298
299
300
301
302
303
304
305
306
307
308
309
310
311
312
313
314
315
316
317
318
319
320
321
322
323
324
325
326
327
328
329
330
331
332
333
334
335
336
337
338
339
340
341
342
343
344
345
346
347
348
349
350
351
352
353
354
355
356
357
358
359
360
361
362
363
364
365
366
367
368
369
370
371
372
373
374
375
376
377
378
379
380
381
382
383
384
385
386
387
388
389
390
391
392
393
394
395
396
397
398
399
400
401
402
403
404
405
406
407
408
409
410
411
412
413
414
415
416
417
418
419
420
421
422
423
424
425
426
427
428
429
430
431
432
433
434
435
436
437
438
439
440
441
442
443
444
445
446
447
448
449
450
451
452
453
454
455
456
457
458
459
460
461
462
463
464
465
466
467
468
469
470
471
472
473
474
475
476
477
478
479
480
481
482
hashcat - advanced password recovery

Usage: hashcat [options]... hash|hashfile|hccapxfile [dictionary|mask|directory]...

- [ Options ] -

 Options Short / Long           | Type | Description                                          | Example
================================+======+======================================================+=======================
 -m, --hash-type                | Num  | Hash-type, see references below                      | -m 1000
 -a, --attack-mode              | Num  | Attack-mode, see references below                    | -a 3
 -V, --version                  |      | Print version                                        |
 -h, --help                     |      | Print help                                           |
     --quiet                    |      | Suppress output                                      |
     --hex-charset              |      | Assume charset is given in hex                       |
     --hex-salt                 |      | Assume salt is given in hex                          |
     --hex-wordlist             |      | Assume words in wordlist are given in hex            |
     --force                    |      | Ignore warnings                                      |
     --status                   |      | Enable automatic update of the status screen         |
     --status-timer             | Num  | Sets seconds between status screen updates to X      | --status-timer=1
     --stdin-timeout-abort      | Num  | Abort if there is no input from stdin for X seconds  | --stdin-timeout-abort=300
     --machine-readable         |      | Display the status view in a machine-readable format |
     --keep-guessing            |      | Keep guessing the hash after it has been cracked     |
     --self-test-disable        |      | Disable self-test functionality on startup           |
     --loopback                 |      | Add new plains to induct directory                   |
     --markov-hcstat2           | File | Specify hcstat2 file to use                          | --markov-hcstat2=my.hcstat2
     --markov-disable           |      | Disables markov-chains, emulates classic brute-force |
     --markov-classic           |      | Enables classic markov-chains, no per-position       |
 -t, --markov-threshold         | Num  | Threshold X when to stop accepting new markov-chains | -t 50
     --runtime                  | Num  | Abort session after X seconds of runtime             | --runtime=10
     --session                  | Str  | Define specific session name                         | --session=mysession
     --restore                  |      | Restore session from --session                       |
     --restore-disable          |      | Do not write restore file                            |
     --restore-file-path        | File | Specific path to restore file                        | --restore-file-path=x.restore
 -o, --outfile                  | File | Define outfile for recovered hash                    | -o outfile.txt
     --outfile-format           | Num  | Define outfile-format X for recovered hash           | --outfile-format=7
     --outfile-autohex-disable  |      | Disable the use of $HEX[] in output plains           |
     --outfile-check-timer      | Num  | Sets seconds between outfile checks to X             | --outfile-check=30
     --wordlist-autohex-disable |      | Disable the conversion of $HEX[] from the wordlist   |
 -p, --separator                | Char | Separator char for hashlists and outfile             | -p :
     --stdout                   |      | Do not crack a hash, instead print candidates only   |
     --show                     |      | Compare hashlist with potfile; show cracked hashes   |
     --left                     |      | Compare hashlist with potfile; show uncracked hashes |
     --username                 |      | Enable ignoring of usernames in hashfile             |
     --remove                   |      | Enable removal of hashes once they are cracked       |
     --remove-timer             | Num  | Update input hash file each X seconds                | --remove-timer=30
     --potfile-disable          |      | Do not write potfile                                 |
     --potfile-path             | File | Specific path to potfile                             | --potfile-path=my.pot
     --encoding-from            | Code | Force internal wordlist encoding from X              | --encoding-from=iso-8859-15
     --encoding-to              | Code | Force internal wordlist encoding to X                | --encoding-to=utf-32le
     --debug-mode               | Num  | Defines the debug mode (hybrid only by using rules)  | --debug-mode=4
     --debug-file               | File | Output file for debugging rules                      | --debug-file=good.log
     --induction-dir            | Dir  | Specify the induction directory to use for loopback  | --induction=inducts
     --outfile-check-dir        | Dir  | Specify the outfile directory to monitor for plains  | --outfile-check-dir=x
     --logfile-disable          |      | Disable the logfile                                  |
     --hccapx-message-pair      | Num  | Load only message pairs from hccapx matching X       | --hccapx-message-pair=2
     --nonce-error-corrections  | Num  | The BF size range to replace AP's nonce last bytes   | --nonce-error-corrections=16
     --keyboard-layout-mapping  | File | Keyboard layout mapping table for special hash-modes | --keyb=german.hckmap
     --truecrypt-keyfiles       | File | Keyfiles to use, separated with commas               | --truecrypt-keyf=x.png
     --veracrypt-keyfiles       | File | Keyfiles to use, separated with commas               | --veracrypt-keyf=x.txt
     --veracrypt-pim            | Num  | VeraCrypt personal iterations multiplier             | --veracrypt-pim=1000
 -b, --benchmark                |      | Run benchmark of selected hash-modes                 |
     --benchmark-all            |      | Run benchmark of all hash-modes (requires -b)        |
     --speed-only               |      | Return expected speed of the attack, then quit       |
     --progress-only            |      | Return ideal progress step size and time to process  |
 -c, --segment-size             | Num  | Sets size in MB to cache from the wordfile to X      | -c 32
     --bitmap-min               | Num  | Sets minimum bits allowed for bitmaps to X           | --bitmap-min=24
     --bitmap-max               | Num  | Sets maximum bits allowed for bitmaps to X           | --bitmap-max=24
     --cpu-affinity             | Str  | Locks to CPU devices, separated with commas          | --cpu-affinity=1,2,3
     --example-hashes           |      | Show an example hash for each hash-mode              |
 -I, --opencl-info              |      | Show info about detected OpenCL platforms/devices    | -I
     --opencl-platforms         | Str  | OpenCL platforms to use, separated with commas       | --opencl-platforms=2
 -d, --opencl-devices           | Str  | OpenCL devices to use, separated with commas         | -d 1
 -D, --opencl-device-types      | Str  | OpenCL device-types to use, separated with commas    | -D 1
     --opencl-vector-width      | Num  | Manually override OpenCL vector-width to X           | --opencl-vector=4
 -O, --optimized-kernel-enable  |      | Enable optimized kernels (limits password length)    |
 -w, --workload-profile         | Num  | Enable a specific workload profile, see pool below   | -w 3
 -n, --kernel-accel             | Num  | Manual workload tuning, set outerloop step size to X | -n 64
 -u, --kernel-loops             | Num  | Manual workload tuning, set innerloop step size to X | -u 256
 -T, --kernel-threads           | Num  | Manual workload tuning, set thread count to X        | -T 64
     --spin-damp                | Num  | Use CPU for device synchronization, in percent       | --spin-damp=50
     --hwmon-disable            |      | Disable temperature and fanspeed reads and triggers  |
     --hwmon-temp-abort         | Num  | Abort if temperature reaches X degrees Celsius       | --hwmon-temp-abort=100
     --scrypt-tmto              | Num  | Manually override TMTO value for scrypt to X         | --scrypt-tmto=3
 -s, --skip                     | Num  | Skip X words from the start                          | -s 1000000
 -l, --limit                    | Num  | Limit X words from the start + skipped words         | -l 1000000
     --keyspace                 |      | Show keyspace base:mod values and quit               |
 -j, --rule-left                | Rule | Single rule applied to each word from left wordlist  | -j 'c'
 -k, --rule-right               | Rule | Single rule applied to each word from right wordlist | -k '^-'
 -r, --rules-file               | File | Multiple rules applied to each word from wordlists   | -r rules/best64.rule
 -g, --generate-rules           | Num  | Generate X random rules                              | -g 10000
     --generate-rules-func-min  | Num  | Force min X functions per rule                       |
     --generate-rules-func-max  | Num  | Force max X functions per rule                       |
     --generate-rules-seed      | Num  | Force RNG seed set to X                              |
 -1, --custom-charset1          | CS   | User-defined charset ?1                              | -1 ?l?d?u
 -2, --custom-charset2          | CS   | User-defined charset ?2                              | -2 ?l?d?s
 -3, --custom-charset3          | CS   | User-defined charset ?3                              |
 -4, --custom-charset4          | CS   | User-defined charset ?4                              |
 -i, --increment                |      | Enable mask increment mode                           |
     --increment-min            | Num  | Start mask incrementing at X                         | --increment-min=4
     --increment-max            | Num  | Stop mask incrementing at X                          | --increment-max=8
 -S, --slow-candidates          |      | Enable slower (but advanced) candidate generators    |
     --brain-server             |      | Enable brain server                                  |
 -z, --brain-client             |      | Enable brain client, activates -S                    |
     --brain-client-features    | Num  | Define brain client features, see below              | --brain-client-features=3
     --brain-host               | Str  | Brain server host (IP or domain)                     | --brain-host=127.0.0.1
     --brain-port               | Port | Brain server port                                    | --brain-port=13743
     --brain-password           | Str  | Brain server authentication password                 | --brain-password=bZfhCvGUSjRq
     --brain-session            | Hex  | Overrides automatically calculated brain session     | --brain-session=0x2ae611db
     --brain-session-whitelist  | Hex  | Allow given sessions only, separated with commas     | --brain-session-whitelist=0x2ae611db

- [ Hash modes ] -

      # | Name                                             | Category
  ======+==================================================+======================================
    900 | MD4                                              | Raw Hash
      0 | MD5                                              | Raw Hash
   5100 | Half MD5                                         | Raw Hash
    100 | SHA1                                             | Raw Hash
   1300 | SHA2-224                                         | Raw Hash
   1400 | SHA2-256                                         | Raw Hash
  10800 | SHA2-384                                         | Raw Hash
   1700 | SHA2-512                                         | Raw Hash
  17300 | SHA3-224                                         | Raw Hash
  17400 | SHA3-256                                         | Raw Hash
  17500 | SHA3-384                                         | Raw Hash
  17600 | SHA3-512                                         | Raw Hash
  17700 | Keccak-224                                       | Raw Hash
  17800 | Keccak-256                                       | Raw Hash
  17900 | Keccak-384                                       | Raw Hash
  18000 | Keccak-512                                       | Raw Hash
    600 | BLAKE2b-512                                      | Raw Hash
  10100 | SipHash                                          | Raw Hash
   6000 | RIPEMD-160                                       | Raw Hash
   6100 | Whirlpool                                        | Raw Hash
   6900 | GOST R 34.11-94                                  | Raw Hash
  11700 | GOST R 34.11-2012 (Streebog) 256-bit, big-endian | Raw Hash
  11800 | GOST R 34.11-2012 (Streebog) 512-bit, big-endian | Raw Hash
     10 | md5($pass.$salt)                                 | Raw Hash, Salted and/or Iterated
     20 | md5($salt.$pass)                                 | Raw Hash, Salted and/or Iterated
     30 | md5(utf16le($pass).$salt)                        | Raw Hash, Salted and/or Iterated
     40 | md5($salt.utf16le($pass))                        | Raw Hash, Salted and/or Iterated
   3800 | md5($salt.$pass.$salt)                           | Raw Hash, Salted and/or Iterated
   3710 | md5($salt.md5($pass))                            | Raw Hash, Salted and/or Iterated
   4010 | md5($salt.md5($salt.$pass))                      | Raw Hash, Salted and/or Iterated
   4110 | md5($salt.md5($pass.$salt))                      | Raw Hash, Salted and/or Iterated
   2600 | md5(md5($pass))                                  | Raw Hash, Salted and/or Iterated
   3910 | md5(md5($pass).md5($salt))                       | Raw Hash, Salted and/or Iterated
   4300 | md5(strtoupper(md5($pass)))                      | Raw Hash, Salted and/or Iterated
   4400 | md5(sha1($pass))                                 | Raw Hash, Salted and/or Iterated
    110 | sha1($pass.$salt)                                | Raw Hash, Salted and/or Iterated
    120 | sha1($salt.$pass)                                | Raw Hash, Salted and/or Iterated
    130 | sha1(utf16le($pass).$salt)                       | Raw Hash, Salted and/or Iterated
    140 | sha1($salt.utf16le($pass))                       | Raw Hash, Salted and/or Iterated
   4500 | sha1(sha1($pass))                                | Raw Hash, Salted and/or Iterated
   4520 | sha1($salt.sha1($pass))                          | Raw Hash, Salted and/or Iterated
   4700 | sha1(md5($pass))                                 | Raw Hash, Salted and/or Iterated
   4900 | sha1($salt.$pass.$salt)                          | Raw Hash, Salted and/or Iterated
  14400 | sha1(CX)                                         | Raw Hash, Salted and/or Iterated
   1410 | sha256($pass.$salt)                              | Raw Hash, Salted and/or Iterated
   1420 | sha256($salt.$pass)                              | Raw Hash, Salted and/or Iterated
   1430 | sha256(utf16le($pass).$salt)                     | Raw Hash, Salted and/or Iterated
   1440 | sha256($salt.utf16le($pass))                     | Raw Hash, Salted and/or Iterated
   1710 | sha512($pass.$salt)                              | Raw Hash, Salted and/or Iterated
   1720 | sha512($salt.$pass)                              | Raw Hash, Salted and/or Iterated
   1730 | sha512(utf16le($pass).$salt)                     | Raw Hash, Salted and/or Iterated
   1740 | sha512($salt.utf16le($pass))                     | Raw Hash, Salted and/or Iterated
     50 | HMAC-MD5 (key = $pass)                           | Raw Hash, Authenticated
     60 | HMAC-MD5 (key = $salt)                           | Raw Hash, Authenticated
    150 | HMAC-SHA1 (key = $pass)                          | Raw Hash, Authenticated
    160 | HMAC-SHA1 (key = $salt)                          | Raw Hash, Authenticated
   1450 | HMAC-SHA256 (key = $pass)                        | Raw Hash, Authenticated
   1460 | HMAC-SHA256 (key = $salt)                        | Raw Hash, Authenticated
   1750 | HMAC-SHA512 (key = $pass)                        | Raw Hash, Authenticated
   1760 | HMAC-SHA512 (key = $salt)                        | Raw Hash, Authenticated
  11750 | HMAC-Streebog-256 (key = $pass), big-endian      | Raw Hash, Authenticated
  11760 | HMAC-Streebog-256 (key = $salt), big-endian      | Raw Hash, Authenticated
  11850 | HMAC-Streebog-512 (key = $pass), big-endian      | Raw Hash, Authenticated
  11860 | HMAC-Streebog-512 (key = $salt), big-endian      | Raw Hash, Authenticated
  14000 | DES (PT = $salt, key = $pass)                    | Raw Cipher, Known-Plaintext attack
  14100 | 3DES (PT = $salt, key = $pass)                   | Raw Cipher, Known-Plaintext attack
  14900 | Skip32 (PT = $salt, key = $pass)                 | Raw Cipher, Known-Plaintext attack
  15400 | ChaCha20                                         | Raw Cipher, Known-Plaintext attack
    400 | phpass                                           | Generic KDF
   8900 | scrypt                                           | Generic KDF
  11900 | PBKDF2-HMAC-MD5                                  | Generic KDF
  12000 | PBKDF2-HMAC-SHA1                                 | Generic KDF
  10900 | PBKDF2-HMAC-SHA256                               | Generic KDF
  12100 | PBKDF2-HMAC-SHA512                               | Generic KDF
     23 | Skype                                            | Network Protocols
   2500 | WPA-EAPOL-PBKDF2                                 | Network Protocols
   2501 | WPA-EAPOL-PMK                                    | Network Protocols
  16800 | WPA-PMKID-PBKDF2                                 | Network Protocols
  16801 | WPA-PMKID-PMK                                    | Network Protocols
   4800 | iSCSI CHAP authentication, MD5(CHAP)             | Network Protocols
   5300 | IKE-PSK MD5                                      | Network Protocols
   5400 | IKE-PSK SHA1                                     | Network Protocols
   5500 | NetNTLMv1                                        | Network Protocols
   5500 | NetNTLMv1+ESS                                    | Network Protocols
   5600 | NetNTLMv2                                        | Network Protocols
   7300 | IPMI2 RAKP HMAC-SHA1                             | Network Protocols
   7500 | Kerberos 5 AS-REQ Pre-Auth etype 23              | Network Protocols
   8300 | DNSSEC (NSEC3)                                   | Network Protocols
  10200 | CRAM-MD5                                         | Network Protocols
  11100 | PostgreSQL CRAM (MD5)                            | Network Protocols
  11200 | MySQL CRAM (SHA1)                                | Network Protocols
  11400 | SIP digest authentication (MD5)                  | Network Protocols
  13100 | Kerberos 5 TGS-REP etype 23                      | Network Protocols
  16100 | TACACS+                                          | Network Protocols
  16500 | JWT (JSON Web Token)                             | Network Protocols
  18200 | Kerberos 5 AS-REP etype 23                       | Network Protocols
    121 | SMF (Simple Machines Forum) > v1.1               | Forums, CMS, E-Commerce, Frameworks
    400 | phpBB3 (MD5)                                     | Forums, CMS, E-Commerce, Frameworks
   2611 | vBulletin < v3.8.5                               | Forums, CMS, E-Commerce, Frameworks
   2711 | vBulletin >= v3.8.5                              | Forums, CMS, E-Commerce, Frameworks
   2811 | MyBB 1.2+                                        | Forums, CMS, E-Commerce, Frameworks
   2811 | IPB2+ (Invision Power Board)                     | Forums, CMS, E-Commerce, Frameworks
   8400 | WBB3 (Woltlab Burning Board)                     | Forums, CMS, E-Commerce, Frameworks
     11 | Joomla < 2.5.18                                  | Forums, CMS, E-Commerce, Frameworks
    400 | Joomla >= 2.5.18 (MD5)                           | Forums, CMS, E-Commerce, Frameworks
    400 | WordPress (MD5)                                  | Forums, CMS, E-Commerce, Frameworks
   2612 | PHPS                                             | Forums, CMS, E-Commerce, Frameworks
   7900 | Drupal7                                          | Forums, CMS, E-Commerce, Frameworks
     21 | osCommerce                                       | Forums, CMS, E-Commerce, Frameworks
     21 | xt:Commerce                                      | Forums, CMS, E-Commerce, Frameworks
  11000 | PrestaShop                                       | Forums, CMS, E-Commerce, Frameworks
    124 | Django (SHA-1)                                   | Forums, CMS, E-Commerce, Frameworks
  10000 | Django (PBKDF2-SHA256)                           | Forums, CMS, E-Commerce, Frameworks
  16000 | Tripcode                                         | Forums, CMS, E-Commerce, Frameworks
   3711 | MediaWiki B type                                 | Forums, CMS, E-Commerce, Frameworks
  13900 | OpenCart                                         | Forums, CMS, E-Commerce, Frameworks
   4521 | Redmine                                          | Forums, CMS, E-Commerce, Frameworks
   4522 | PunBB                                            | Forums, CMS, E-Commerce, Frameworks
  12001 | Atlassian (PBKDF2-HMAC-SHA1)                     | Forums, CMS, E-Commerce, Frameworks
     12 | PostgreSQL                                       | Database Server
    131 | MSSQL (2000)                                     | Database Server
    132 | MSSQL (2005)                                     | Database Server
   1731 | MSSQL (2012, 2014)                               | Database Server
    200 | MySQL323                                         | Database Server
    300 | MySQL4.1/MySQL5                                  | Database Server
   3100 | Oracle H: Type (Oracle 7+)                       | Database Server
    112 | Oracle S: Type (Oracle 11+)                      | Database Server
  12300 | Oracle T: Type (Oracle 12+)                      | Database Server
   8000 | Sybase ASE                                       | Database Server
    141 | Episerver 6.x < .NET 4                           | HTTP, SMTP, LDAP Server
   1441 | Episerver 6.x >= .NET 4                          | HTTP, SMTP, LDAP Server
   1600 | Apache $apr1$ MD5, md5apr1, MD5 (APR)            | HTTP, SMTP, LDAP Server
  12600 | ColdFusion 10+                                   | HTTP, SMTP, LDAP Server
   1421 | hMailServer                                      | HTTP, SMTP, LDAP Server
    101 | nsldap, SHA-1(Base64), Netscape LDAP SHA         | HTTP, SMTP, LDAP Server
    111 | nsldaps, SSHA-1(Base64), Netscape LDAP SSHA      | HTTP, SMTP, LDAP Server
   1411 | SSHA-256(Base64), LDAP {SSHA256}                 | HTTP, SMTP, LDAP Server
   1711 | SSHA-512(Base64), LDAP {SSHA512}                 | HTTP, SMTP, LDAP Server
  16400 | CRAM-MD5 Dovecot                                 | HTTP, SMTP, LDAP Server
  15000 | FileZilla Server >= 0.9.55                       | FTP Server
  11500 | CRC32                                            | Checksums
   3000 | LM                                               | Operating Systems
   1000 | NTLM                                             | Operating Systems
   1100 | Domain Cached Credentials (DCC), MS Cache        | Operating Systems
   2100 | Domain Cached Credentials 2 (DCC2), MS Cache 2   | Operating Systems
  15300 | DPAPI masterkey file v1                          | Operating Systems
  15900 | DPAPI masterkey file v2                          | Operating Systems
  12800 | MS-AzureSync  PBKDF2-HMAC-SHA256                 | Operating Systems
   1500 | descrypt, DES (Unix), Traditional DES            | Operating Systems
  12400 | BSDi Crypt, Extended DES                         | Operating Systems
    500 | md5crypt, MD5 (Unix), Cisco-IOS $1$ (MD5)        | Operating Systems
   3200 | bcrypt $2*$, Blowfish (Unix)                     | Operating Systems
   7400 | sha256crypt $5$, SHA256 (Unix)                   | Operating Systems
   1800 | sha512crypt $6$, SHA512 (Unix)                   | Operating Systems
    122 | macOS v10.4, MacOS v10.5, MacOS v10.6            | Operating Systems
   1722 | macOS v10.7                                      | Operating Systems
   7100 | macOS v10.8+ (PBKDF2-SHA512)                     | Operating Systems
   6300 | AIX {smd5}                                       | Operating Systems
   6700 | AIX {ssha1}                                      | Operating Systems
   6400 | AIX {ssha256}                                    | Operating Systems
   6500 | AIX {ssha512}                                    | Operating Systems
   2400 | Cisco-PIX MD5                                    | Operating Systems
   2410 | Cisco-ASA MD5                                    | Operating Systems
    500 | Cisco-IOS $1$ (MD5)                              | Operating Systems
   5700 | Cisco-IOS type 4 (SHA256)                        | Operating Systems
   9200 | Cisco-IOS $8$ (PBKDF2-SHA256)                    | Operating Systems
   9300 | Cisco-IOS $9$ (scrypt)                           | Operating Systems
     22 | Juniper NetScreen/SSG (ScreenOS)                 | Operating Systems
    501 | Juniper IVE                                      | Operating Systems
  15100 | Juniper/NetBSD sha1crypt                         | Operating Systems
   7000 | FortiGate (FortiOS)                              | Operating Systems
   5800 | Samsung Android Password/PIN                     | Operating Systems
  13800 | Windows Phone 8+ PIN/password                    | Operating Systems
   8100 | Citrix NetScaler                                 | Operating Systems
   8500 | RACF                                             | Operating Systems
   7200 | GRUB 2                                           | Operating Systems
   9900 | Radmin2                                          | Operating Systems
    125 | ArubaOS                                          | Operating Systems
   7700 | SAP CODVN B (BCODE)                              | Enterprise Application Software (EAS)
   7701 | SAP CODVN B (BCODE) via RFC_READ_TABLE           | Enterprise Application Software (EAS)
   7800 | SAP CODVN F/G (PASSCODE)                         | Enterprise Application Software (EAS)
   7801 | SAP CODVN F/G (PASSCODE) via RFC_READ_TABLE      | Enterprise Application Software (EAS)
  10300 | SAP CODVN H (PWDSALTEDHASH) iSSHA-1              | Enterprise Application Software (EAS)
   8600 | Lotus Notes/Domino 5                             | Enterprise Application Software (EAS)
   8700 | Lotus Notes/Domino 6                             | Enterprise Application Software (EAS)
   9100 | Lotus Notes/Domino 8                             | Enterprise Application Software (EAS)
    133 | PeopleSoft                                       | Enterprise Application Software (EAS)
  13500 | PeopleSoft PS_TOKEN                              | Enterprise Application Software (EAS)
  11600 | 7-Zip                                            | Archives
  12500 | RAR3-hp                                          | Archives
  13000 | RAR5                                             | Archives
  13200 | AxCrypt                                          | Archives
  13300 | AxCrypt in-memory SHA1                           | Archives
  13600 | WinZip                                           | Archives
  14700 | iTunes backup < 10.0                             | Backup
  14800 | iTunes backup >= 10.0                            | Backup
   62XY | TrueCrypt                                        | Full-Disk Encryption (FDE)
     X  | 1 = PBKDF2-HMAC-RIPEMD160                        | Full-Disk Encryption (FDE)
     X  | 2 = PBKDF2-HMAC-SHA512                           | Full-Disk Encryption (FDE)
     X  | 3 = PBKDF2-HMAC-Whirlpool                        | Full-Disk Encryption (FDE)
     X  | 4 = PBKDF2-HMAC-RIPEMD160 + boot-mode            | Full-Disk Encryption (FDE)
      Y | 1 = XTS  512 bit pure AES                        | Full-Disk Encryption (FDE)
      Y | 1 = XTS  512 bit pure Serpent                    | Full-Disk Encryption (FDE)
      Y | 1 = XTS  512 bit pure Twofish                    | Full-Disk Encryption (FDE)
      Y | 2 = XTS 1024 bit pure AES                        | Full-Disk Encryption (FDE)
      Y | 2 = XTS 1024 bit pure Serpent                    | Full-Disk Encryption (FDE)
      Y | 2 = XTS 1024 bit pure Twofish                    | Full-Disk Encryption (FDE)
      Y | 2 = XTS 1024 bit cascaded AES-Twofish            | Full-Disk Encryption (FDE)
      Y | 2 = XTS 1024 bit cascaded Serpent-AES            | Full-Disk Encryption (FDE)
      Y | 2 = XTS 1024 bit cascaded Twofish-Serpent        | Full-Disk Encryption (FDE)
      Y | 3 = XTS 1536 bit all                             | Full-Disk Encryption (FDE)
   8800 | Android FDE <= 4.3                               | Full-Disk Encryption (FDE)
  12900 | Android FDE (Samsung DEK)                        | Full-Disk Encryption (FDE)
  12200 | eCryptfs                                         | Full-Disk Encryption (FDE)
  137XY | VeraCrypt                                        | Full-Disk Encryption (FDE)
     X  | 1 = PBKDF2-HMAC-RIPEMD160                        | Full-Disk Encryption (FDE)
     X  | 2 = PBKDF2-HMAC-SHA512                           | Full-Disk Encryption (FDE)
     X  | 3 = PBKDF2-HMAC-Whirlpool                        | Full-Disk Encryption (FDE)
     X  | 4 = PBKDF2-HMAC-RIPEMD160 + boot-mode            | Full-Disk Encryption (FDE)
     X  | 5 = PBKDF2-HMAC-SHA256                           | Full-Disk Encryption (FDE)
     X  | 6 = PBKDF2-HMAC-SHA256 + boot-mode               | Full-Disk Encryption (FDE)
     X  | 7 = PBKDF2-HMAC-Streebog-512                     | Full-Disk Encryption (FDE)
      Y | 1 = XTS  512 bit pure AES                        | Full-Disk Encryption (FDE)
      Y | 1 = XTS  512 bit pure Serpent                    | Full-Disk Encryption (FDE)
      Y | 1 = XTS  512 bit pure Twofish                    | Full-Disk Encryption (FDE)
      Y | 1 = XTS  512 bit pure Camellia                   | Full-Disk Encryption (FDE)
      Y | 1 = XTS  512 bit pure Kuznyechik                 | Full-Disk Encryption (FDE)
      Y | 2 = XTS 1024 bit pure AES                        | Full-Disk Encryption (FDE)
      Y | 2 = XTS 1024 bit pure Serpent                    | Full-Disk Encryption (FDE)
      Y | 2 = XTS 1024 bit pure Twofish                    | Full-Disk Encryption (FDE)
      Y | 2 = XTS 1024 bit pure Camellia                   | Full-Disk Encryption (FDE)
      Y | 2 = XTS 1024 bit pure Kuznyechik                 | Full-Disk Encryption (FDE)
      Y | 2 = XTS 1024 bit cascaded AES-Twofish            | Full-Disk Encryption (FDE)
      Y | 2 = XTS 1024 bit cascaded Camellia-Kuznyechik    | Full-Disk Encryption (FDE)
      Y | 2 = XTS 1024 bit cascaded Camellia-Serpent       | Full-Disk Encryption (FDE)
      Y | 2 = XTS 1024 bit cascaded Kuznyechik-AES         | Full-Disk Encryption (FDE)
      Y | 2 = XTS 1024 bit cascaded Kuznyechik-Twofish     | Full-Disk Encryption (FDE)
      Y | 2 = XTS 1024 bit cascaded Serpent-AES            | Full-Disk Encryption (FDE)
      Y | 2 = XTS 1024 bit cascaded Twofish-Serpent        | Full-Disk Encryption (FDE)
      Y | 3 = XTS 1536 bit all                             | Full-Disk Encryption (FDE)
  14600 | LUKS                                             | Full-Disk Encryption (FDE)
  16700 | FileVault 2                                      | Full-Disk Encryption (FDE)
  18300 | Apple File System (APFS)                         | Full-Disk Encryption (FDE)
   9700 | MS Office <= 2003 $0/$1, MD5 + RC4               | Documents
   9710 | MS Office <= 2003 $0/$1, MD5 + RC4, collider #1  | Documents
   9720 | MS Office <= 2003 $0/$1, MD5 + RC4, collider #2  | Documents
   9800 | MS Office <= 2003 $3/$4, SHA1 + RC4              | Documents
   9810 | MS Office <= 2003 $3, SHA1 + RC4, collider #1    | Documents
   9820 | MS Office <= 2003 $3, SHA1 + RC4, collider #2    | Documents
   9400 | MS Office 2007                                   | Documents
   9500 | MS Office 2010                                   | Documents
   9600 | MS Office 2013                                   | Documents
  10400 | PDF 1.1 - 1.3 (Acrobat 2 - 4)                    | Documents
  10410 | PDF 1.1 - 1.3 (Acrobat 2 - 4), collider #1       | Documents
  10420 | PDF 1.1 - 1.3 (Acrobat 2 - 4), collider #2       | Documents
  10500 | PDF 1.4 - 1.6 (Acrobat 5 - 8)                    | Documents
  10600 | PDF 1.7 Level 3 (Acrobat 9)                      | Documents
  10700 | PDF 1.7 Level 8 (Acrobat 10 - 11)                | Documents
  16200 | Apple Secure Notes                               | Documents
   9000 | Password Safe v2                                 | Password Managers
   5200 | Password Safe v3                                 | Password Managers
   6800 | LastPass + LastPass sniffed                      | Password Managers
   6600 | 1Password, agilekeychain                         | Password Managers
   8200 | 1Password, cloudkeychain                         | Password Managers
  11300 | Bitcoin/Litecoin wallet.dat                      | Password Managers
  12700 | Blockchain, My Wallet                            | Password Managers
  15200 | Blockchain, My Wallet, V2                        | Password Managers
  16600 | Electrum Wallet (Salt-Type 1-3)                  | Password Managers
  13400 | KeePass 1 (AES/Twofish) and KeePass 2 (AES)      | Password Managers
  15500 | JKS Java Key Store Private Keys (SHA1)           | Password Managers
  15600 | Ethereum Wallet, PBKDF2-HMAC-SHA256              | Password Managers
  15700 | Ethereum Wallet, SCRYPT                          | Password Managers
  16300 | Ethereum Pre-Sale Wallet, PBKDF2-HMAC-SHA256     | Password Managers
  16900 | Ansible Vault                                    | Password Managers
  18100 | TOTP (HMAC-SHA1)                                 | One-Time Passwords
  99999 | Plaintext                                        | Plaintext

- [ Brain Client Features ] -

  # | Features
 ===+========
  1 | Send hashed passwords
  2 | Send attack positions
  3 | Send hashed passwords and attack positions

- [ Outfile Formats ] -

  # | Format
 ===+========
  1 | hash[:salt]
  2 | plain
  3 | hash[:salt]:plain
  4 | hex_plain
  5 | hash[:salt]:hex_plain
  6 | plain:hex_plain
  7 | hash[:salt]:plain:hex_plain
  8 | crackpos
  9 | hash[:salt]:crack_pos
 10 | plain:crack_pos
 11 | hash[:salt]:plain:crack_pos
 12 | hex_plain:crack_pos
 13 | hash[:salt]:hex_plain:crack_pos
 14 | plain:hex_plain:crack_pos
 15 | hash[:salt]:plain:hex_plain:crack_pos

- [ Rule Debugging Modes ] -

  # | Format
 ===+========
  1 | Finding-Rule
  2 | Original-Word
  3 | Original-Word:Finding-Rule
  4 | Original-Word:Finding-Rule:Processed-Word

- [ Attack Modes ] -

  # | Mode
 ===+======
  0 | Straight
  1 | Combination
  3 | Brute-force
  6 | Hybrid Wordlist + Mask
  7 | Hybrid Mask + Wordlist

- [ Built-in Charsets ] -

  ? | Charset
 ===+=========
  l | abcdefghijklmnopqrstuvwxyz
  u | ABCDEFGHIJKLMNOPQRSTUVWXYZ
  d | 0123456789
  h | 0123456789abcdef
  H | 0123456789ABCDEF
  s |  !"#$%&'()*+,-./:;<=>?@[\]^_`{|}~
  a | ?l?u?d?s
  b | 0x00 - 0xff

- [ OpenCL Device Types ] -

  # | Device Type
 ===+=============
  1 | CPU
  2 | GPU
  3 | FPGA, DSP, Co-Processor

- [ Workload Profiles ] -

  # | Performance | Runtime | Power Consumption | Desktop Impact
 ===+=============+=========+===================+=================
  1 | Low         |   2 ms  | Low               | Minimal
  2 | Default     |  12 ms  | Economic          | Noticeable
  3 | High        |  96 ms  | High              | Unresponsive
  4 | Nightmare   | 480 ms  | Insane            | Headless

- [ Basic Examples ] -

  Attack-          | Hash- |
  Mode             | Type  | Example command
 ==================+=======+==================================================================
  Wordlist         | $P$   | hashcat -a 0 -m 400 example400.hash example.dict
  Wordlist + Rules | MD5   | hashcat -a 0 -m 0 example0.hash example.dict -r rules/best64.rule
  Brute-Force      | MD5   | hashcat -a 3 -m 0 example0.hash ?a?a?a?a?a?a
  Combinator       | MD5   | hashcat -a 1 -m 0 example0.hash example.dict example.dict

If you still have no idea what just happened, try the following pages:

* https://hashcat.net/wiki/#howtos_videos_papers_articles_etc_in_the_wild
* https://hashcat.net/faq/
1
hashcat64.exe -m0 -a3 -o cracked.txt hash.txt

in my case I have x1 GTX 1070 for cracking.

In this example it took 10s to crack this MD5 hash using brute force with x1 GTX 1070.

Hashcat GUI
For a bit easier user experience I recommend checking out Hashcat GUI.

Setup:
Start by downloading the HashcatGUI_1.1beta0.zip from above website.

We are going to need to extract the zip and copy all the contents from the orginal hashcat into GUI directory.

files from hashcat folder were pasted into GUI folder.

where are you going to find wordlists you ask? Lets checkout SecLists on github: https://github.com/danielmiessler/SecLists

hashkiller download section also has an frequently updated password list:
https://hashkiller.co.uk/downloads.aspx

configure the input file to the hash.txt and the output file to the cracked.txt.
untick “Disabled Pot File”
untick “CPU only”
change Format: Plain
change Hashcat Path

configured in my case to crack MD5 hashes.

Понравилась статья? Поделить с друзьями:
0 0 голоса
Рейтинг статьи
Подписаться
Уведомить о
guest

0 комментариев
Старые
Новые Популярные
Межтекстовые Отзывы
Посмотреть все комментарии
  • Mount linux directory to windows
  • Назначить учетной записи статус пред windows 2000 компьютера
  • Название службы защитник windows
  • Смена назначения разъемов realtek windows 10 не работает
  • Программная оболочка windows norton commander linux wdm драйвер