
GPG или OpenPGP (GnuPG — GNU Privacy Guard) — это свободная программа с открытым исходным кодом для криптографической защиты Ваших личных файлов или сообщений. GnuPG был разработан как бесплатная альтернатива проприетарному PGP (Pretty Good Privacy) и выпущен под «GNU General Public License» свободной лицензией.
- Как использовать OpenPGP (GnuPG) в Windows
- Установка Gpg4win
- Создание пары PGP ключей
- Обмен публичными PGP ключами
- Шифровка и обмен файлами с использованием публичных ключей
- Шифровка и обмен почтовыми сообщениями с использованием публичных GPG ключей
- Экспорт/импорт PGP (GnuPG) ключей
- Как проверить PGP подпись файла
- Создание портативной (portable) версии Gpg4win
- Gpg4win и проблемы с кириллицей
- Ссылки по теме GnuPG
Ввиду последних скандалов с тотальной прослушкой Интернет трафика провайдерами, крупными веб-сервисами (Google, Yahoo etc.), всяческими службами безопасности (АНБ, ФСБ, СБУ, ЦРУ и т.д.), использование GnuPG в Windows будет полезно всем, кто беспокоится о сохранности своих приватных данных.
Как использовать OpenPGP (GnuPG) в Windows
Для начала нам нужно установить GnuPG, но для Windows специально создан порт под именем Gpg4win.
Для загрузки доступны три реализации Gpg4win:
- Gpg4win — один большой глючный комбайн;
- Gpg4win-Light — лайт версия глючного комбайна;
- Gpg4win-Vanilla — исключительно только основные GnuPG компоненты.
К установке рекомендуется только Gpg4win-Vanilla, другие варианты тоже можно устанавливать, но они могут часто глючить и вводить в заблуждение, например при попытке создать пару ключей в Windows XP, как через графический интерфейс так и через консоль, я получил неизвестную ошибку в приложении pinentry.exe с сообщением «gpg: problem with the agent: Input/output error» и предложением отправить отчет дядюшке Биллу
Я предупредил, а кто поставил не Gpg4win-Vanilla, то я не виноват!:) Теперь нам нужно создать пару ключей (публичный и приватный), один из которых (публичный) опубликовать на сервере ключей (по умолчанию keys.gnupg.net) для того, чтобы нам каждый раз не высылать свой публичный ключ тому, с кем мы собираемся обмениваться шифровками, а чтобы он самостоятельно мог его получить в любое время и из любой точки сети Интернет.
В целом использование OpenPGP (GnuPG) в Windows, да и не только, сводится к таким этапам:
- Установка Gpg4win-Vanilla;
- Создание пары PGP ключей;
- Обмен публичными PGP ключами, обычно через сервер ключей;
- Шифровка и обмен сообщениями/файлами с использованием публичных ключей;
- Расшифровка сообщений/файлов с помощью своего приватного ключа.
В приведённых здесь примерах используется портативный вариант Gpg4win-Vanilla версии 2.2.1.16059. О том, как создать портативную версию Gpg4win будет рассказано далее.
Главное, что нужно помнить — это то, что GnuPG (OpenPGP) в Windows корректно работает только из командной строки, а большая часть графических инструментов для Windows одарят Вас различными глюками и багами. Хотя, собственно и в командной строке Windows не всё так гладко с OpenPGP, когда речь идёт о кириллице, но об этом позже…
Установка Gpg4win
Установка Gpg4win сводится к банальному нажатию кнопки «Далее». Как ранее упоминалось желательно устанавливать Gpg4win-Vanilla, который содержит только основные GnuPG компоненты, а иначе вполне вероятно получим множественные глюки.
Создание пары PGP ключей
В ходе создания пары OpenPGP (GnuPG) ключей нужно будет ввести пароль не менее 8-ми символов для приватного ключа, в котором обязательно должны быть буквы (желательно разного регистра) и хотя бы одна-две цифры — чем длиннее пароль на приватный ключ, тем более стойким он будет к взлому! Для того, чтобы создать пару GnuPG (OpenPGP) ключей, выполним:
С:\PORTABLE\GnuPG\pub>gpg --gen-key
gpg (GnuPG) 2.0.22; Copyright (C) 2013 Free Software Foundation, Inc.
This is free software: you are free to change and redistribute it.
There is NO WARRANTY, to the extent permitted by law.

gpg: keyring `С:/PORTABLE/GnuPG/home/secring.gpg' created
gpg: keyring `С:/PORTABLE/GnuPG/home/pubring.gpg' created
Please select what kind of key you want:
   (1) RSA and RSA (default)
   (2) DSA and Elgamal
   (3) DSA (sign only)
   (4) RSA (sign only)
Your selection?
RSA keys may be between 1024 and 4096 bits long.
What keysize do you want? (2048) 4096
Requested keysize is 4096 bits
Please specify how long the key should be valid.
         0 = key does not expire
      <n>  = key expires in n days
      <n>w = key expires in n weeks
      <n>m = key expires in n months
      <n>y = key expires in n years
Key is valid for? (0)
Key does not expire at all
Is this correct? (y/N) y

GnuPG needs to construct a user ID to identify your key.

Real name: Windows Remote Shaman (www.remoteshaman.com)
Email address: remoteshaman.com@gmаil.соm
Comment: GPG key for remoteshaman.com@gmаil.соm
You selected this USER-ID:
    "Windows Remote Shaman (www.remoteshaman.com) (GPG key for remoteshaman.com@
gmаil.соm) <remoteshaman.com@gmаil.соm>"

Change (N)ame, (C)omment, (E)mail or (O)kay/(Q)uit? o
You need a Passphrase to protect your secret key.

We need to generate a lot of random bytes. It is a good idea to perform
some other action (type on the keyboard, move the mouse, utilize the
disks) during the prime generation; this gives the random number
generator a better chance to gain enough entropy.
We need to generate a lot of random bytes. It is a good idea to perform
some other action (type on the keyboard, move the mouse, utilize the
disks) during the prime generation; this gives the random number
generator a better chance to gain enough entropy.
gpg: С:/PORTABLE/GnuPG/home/trustdb.gpg: trustdb created
gpg: key 346B72D7 marked as ultimately trusted
public and secret key created and signed.

gpg: checking the trustdb
gpg: 3 marginal(s) needed, 1 complete(s) needed, PGP trust model
gpg: depth: 0  valid:   1  signed:   0  trust: 0-, 0q, 0n, 0m, 0f, 1u
pub   4096R/346B72D7 2014-01-19
      Key fingerprint = 8CC0 592D 17F5 0B9D A625  3324 1590 B040 346B 72D7
uid                  Windows Remote Shaman (www.remoteshaman.com) (GPG key for r
emoteshaman.com@gmаil.соm email) <remoteshaman.com@gmаil.соm>
sub   4096R/6D2314B5 2014-01-19
После ввода «(O)kay» и сообщения «You need a Passphrase to protect your secret key.» мы должны сразу же увидеть окно для ввода пароля на наш приватный OpenPGP (GnuPG) ключ:

Но в моём случае процесс \GnuPG\gpgp2.exe не смог вовремя получить доступ к Loopback интерфейсу, закрыто брандмауэром, в результате окна для ввода пароля я так и не дождался, оно не появилось даже после повторной попытки создать пару ключей. Если в Вашем случае возникла также ситуация, то разрешите в брандмауэре для процесса \GnuPG\gpgp2.exe доступ к Loopback интерфейсу, после удалите всё из каталога \GnuPG\home, кроме файлов gpa.conf, gpg.conf, pubring.gpg, secring.gpg и trustdb.gpg, после чего повторите попытку.
Сначала просмотрим список установленных ключей и найдём там ИД своего «pub» ключа, он понадобится нам для отправки на сервер ключей и публикации на сайтах или в любых других местах:
С:\PORTABLE\GnuPG\pub>gpg --list-keys
С:/PORTABLE/GnuPG/home/pubring.gpg
----------------------------------------
pub   4096R/346B72D7 2014-01-19
uid                  Windows Remote Shaman (www.remoteshaman.com) (GPG key for r
emoteshaman.com@gmаil.соm email) <remoteshaman.com@gmаil.соm>
sub   4096R/6D2314B5 2014-01-19
Наш pub ИД «346B72D7», его также можно было узнать/записать вовремя создания пары ключей, отправляем его на сервер ключей:
С:\PORTABLE\GnuPG\pub>gpg --keyserver keys.gnupg.net --send-key 346B72D7
gpg: sending key 346B72D7 to hkp server keys.gnupg.net
Для отправки ключей на сервер процессу «gpg2keys_hkp.exe» нужно будет разрешить исходящее TCP соединение с удалённым ИП «130.133.110.62» на удалённый порт «11371«. Для того, чтобы убедится, что наш публичный ключ уже на сервере, открываем в браузере адрес keys.gnupg.net (иногда может переадресовать на другой, рабочий в текущий момент), в поисковой форме отмечаем «Index choice — Verbose Index«, в поле «Search text» вводим часть нашего «uid» (в нашем случае «Windows Remote Shaman»), дальше жмем Search и получаем результат:
Search results for 'windows shaman remote'
Type bits/keyID     cr. time   exp time   key expir
pub  4096R/346B72D7 2014-01-19

uid Windows Remote Shaman (www.remoteshaman.com) (GPG key for \
        remoteshaman.com@gmаil.соm email) <remoteshaman.com@gmаil.соm>
sig  sig3  346B72D7 2014-01-19 __________ __________ [selfsig]

sub  4096R/6D2314B5 2014-01-19
sig sbind  346B72D7 2014-01-19 __________ __________ []
Для успешной шифровки, обмена и дешифровки сообщений/файлов у отправителя и получателя должны быть публичные ключи — как минимум у отправителя шифрованного сообщения должен быть публичный ключ получателя! Для того чтобы получить (импортировать) публичный ключ получателя нужно узнать «pub» ИД ключа и выполнить:
C:\PORTABLE\GnuPG\pub\>gpg --recv-keys 346B72D7
gpg: requesting key 346B72D7 from hkp server keys.gnupg.net
gpg: key 346B72D7: public key "Windows Remote Shaman (www.remoteshaman.com) (GPG
 key for remoteshaman.com@gmаil.соm email) <remoteshaman.com@gmаil.соm>" importe
d
gpg: Total number processed: 1
gpg:               imported: 1  (RSA: 1)
Шифровка и обмен файлами с использованием публичных ключей
Мы установили GnuPG и у нас есть импортированный публичный ключ «gpg --recv-keys 346B72D7» получателя, настал момент совершить обмен зашифрованным файлом.
Шифрование файла в GnuPG выполняется командой:
C:\PORTABLE\GnuPG\pub\>gpg -e -r 346B72D7 test.txt
gpg: 6D2314B5: There is no assurance this key belongs to the named user

pub  4096R/6D2314B5 2014-01-19 Windows Remote Shaman (www.remoteshaman.com) (GPG
 key for remoteshaman.com@gmаil.соm email) <remoteshaman.com@gmаil.соm>
 Primary key fingerprint: 8CC0 592D 17F5 0B9D A625  3324 1590 B040 346B 72D7
      Subkey fingerprint: F711 E6D7 034B 4D58 B324  DFB2 6B94 B164 6D23 14B5

It is NOT certain that the key belongs to the person named
in the user ID.  If you *really* know what you are doing,
you may answer the next question with yes.

Use this key anyway? (y/N) y
В примере выше был зашифрован файл «test.txt», в котором содержалось сообщение «test message«. На выходе мы получили файл «test.txt.gpg».
Для зашифрованного файла был определён «-r» получатель (—recipient) с ИД публичного ключа «346B72D7«. Этот файл сможет расшифровать только получатель с ИД «346B72D7», а если отправитель тоже хочет иметь возможность его расшифровать в будущем, то при шифровании нужно также использовать и публичный ключ отправителя «gpg -e -r ID_FROM -r ID_TO test.txt«, где «ID_FROM» ИД публичного ключа отправителя, а «ID_TO» ИД публичного ключа получателя.
Теперь зашифрованный файл test.txt.gpg можно смело отправить по сети получателю или даже выложить на каком-то файлообменнике.
Для того чтобы расшифровать «test.txt.gpg» выполним:
С:\PORTABLE\GnuPG\pub>gpg -d test.txt.gpg > test.txt

You need a passphrase to unlock the secret key for
user: "Windows Remote Shaman (www.remoteshaman.com) (GPG key for remoteshaman.co
m@gmаil.соm email) <remoteshaman.com@gmаil.соm>"
4096-bit RSA key, ID 6D2314B5, created 2014-01-19 (main key ID 346B72D7)

gpg: encrypted with 4096-bit RSA key, ID 6D2314B5, created 2014-01-19
      "Windows Remote Shaman (www.remoteshaman.com) (GPG key for remoteshaman.co
m@gmаil.соm email) <remoteshaman.com@gmаil.соm>"
Вводим пароль от своего приватного ключа и получаем расшифрованный файл:

Вместо «gpg -d test.txt.gpg > test.txt» можно использовать «gpg --output test.txt -d test.txt.gpg» или просто «gpg test.txt.gpg«, а иначе содержимое файла будет выведено в консоль.
При расшифровке файла/сообщения в обычной файловой системе (не на виртуальном шифрованном диске) нужно помнить, что расшифрованный файл после обычного удаления будет доступен доступен для восстановления, а чтобы этого избежать, то для его безвозвратного удаления нужно использовать специальные программы, например sdelete (входит в пакет «сисьинтерналс суита»).
Шифровка и обмен почтовыми сообщениями с использованием публичных GPG ключей
Описанный ниже метод обмена шифрованными GPG сообщениями будет полезен в случаях, когда почтовый клиент оппонента не поддерживает автоматическую обработку шифрованных GPG сообщений, как например Outlook Express.
Шифрование электронных почтовых сообщений с использованием GPG ключей выполняется почти аналогично шифрованию файлов, но с некоторыми отличиями. В чём заключаются эти отличия?
В примере выше шифрование файла выполнялось в двоичном формате (binary), что не хорошо при передаче в теле почтового сообщения, но допустимо при передаче самого зашифрованного файла во вложении к электронному письму.
Если мы хотим передать само зашифрованное сообщение в теле письма, то у нас ест несколько вариантов:
- Создать обычный текстовый файл (расширение .txt) в котором набрать нужное сообщение, после чего зашифровать его с флагом «-a» (—armor);
- Скопировать в буфер обмена и там его зашифровать при помощи графических утилит kleopatra.exe или gpa.exe
Первый вариант реализуется из консоли, с помощью команды «gpg -e -a -r TO_ID -r FROM_ID filename.txt«, в результате чего получим файл «filename.txt.asc» с примерно таким содержимым:
-----BEGIN PGP MESSAGE-----
Version: GnuPG v2.0.22 (MingW32)

hQIMA2uUsWRtIxS1ARAApAEj1FfvasNx68tQbjU6G80LVl5WGeqiZmnYR+Dy/ryD
................
TQHuyM587gfUf/3kwiKPvbzgCtH3yaiwAuVXbl8JufdxKaMaKrPrXhGQHdueWlQD
gE0NKMmwO/MbtKDAZtq61ojiM2E49O98XnYDVlS1
=oGdy
-----END PGP MESSAGE-----
Это сообщение в ASCII формате можно свободно отправлять в теле электронного сообщения, желательно в виде обычного текста, а не в виде ХТМЛ.
Вторым вариантом шифрования текста сообщения является использование программ из пакетов Gpg4win или Gpg4win-Light — это либо GPA (GNU Privacy Assistant (альтернатива WinPT)) или Kleopatra (Менеджер ключей Kleopatra).
Например, при использовании Менеджера ключей Kleopatra последовательность шифрования следующая:
- Нужно запустить менеджер ключей Kleopatra, после чего в «трее» появится соответствующий значок;
- В текстовом редакторе набрать нужное сообщение, которое мы хотим зашифровать, после чего выделить его и скопировать через контекстное меню или использовать для этого комбинацию клавиш Ctrl+C;
- В трее, на значке менеджера ключей Kleopatra, кликнуть правой кнопкой крыски, чем вызвать контекстное меню, где выбрать пункт «Clipboard — Encrypt«, в открывшемся окне добавить ИД ключей получателей (ака Add Recipient), далее нажать «Next — Ok«, после чего буфер обмена будет содержать уже зашифрованное сообщение, которое можно вставить куда угодно используя контекстное меню «Вставить» или комбинацию клавиш «Ctrl+V«.
В обоих случаях зашифрованный текст сообщения будет в ASCII формате, который можно смело отправлять в теле электронного почтового сообщения.
Экспорт/импорт PGP (GnuPG) ключей
Если мы не желаем обмениваться публичным ключом через публичные сервера ключей, то мы можем выполнить его экспорт в файл и переслать по почте. Экспорт публичного ключа выполняется с помощью флага «—export«
gpg --export --output 346B72D7.public.gpg 346B72D7
Приведённая выше команда выполнит экспорт публичного PGP ключа (с ИД 346B72D7) в файл 346B72D7.public.gpg в двоичном (binary) формате, но это может быть неудобно при его пересылке например в теле сообщения по электронной почте. Мы можем выполнить экспорт ключа в ASCII формате добавив флаг «—armor» (или просто «-a»):
gpg --export --armor --output 346B72D7.public.gpg 346B72D7
Для того чтобы выполнить экспорт приватного PGP ключа, вместо флага «—export» мы должны использовать флаг «—export-secret-keys«, но, странно, что этого флага нет в справке «gpg --help«:
gpg --export-secret-keys -a --output 346B72D7.private.gpg 346B72D7
Импорт ключей выполняется командой «gpg --import public.gpg» или «gpg --allow-secret-key-import --import private.gpg» соответственно. Смотрим список ключей «gpg --list-keys«.
Экспорт приватных ключей желательно выполнять прямо на съёмные носители или же виртуальные шифрованные диски, имхо в обычной файловой системе после обычного удаления они будут доступны для восстановления.
Для создания точек соединения между файловой системой и виртуальным шифрованным диском, а если проще создания символьной ссылки (ака symlink в Unix), можно использовать linkd.
Как проверить PGP подпись файла
В примере ниже мы проверяем PGP подпись файла multibit-0.5.16-windows-setup.exe, которая расположена в файле с тем же именем, но только с приставкой «.asc» — оба файла должны располагаться в одной и той же директории («C:\» в нашем случае):
С:\PORTABLE\GnuPG\pub>gpg --verify multibit-0.5.16-windows-setup.exe.asc
gpg: no signed data
gpg: can't hash datafile: No data

С:\PORTABLE\GnuPG\pub>
С:\PORTABLE\GnuPG\pub>gpg --verify multibit-0.5.16-windows-setup.exe.asc
gpg: Signature made 12/18/13 13:33:21 +ЁхЎш , TєЁЎш  (чшьр) using RSA key ID 23F
7FB7B
gpg: Good signature from "Jim Burton (multibit.org developer) <jim618@fastmail.c
o.uk>"
gpg: WARNING: This key is not certified with a trusted signature!
gpg:          There is no indication that the signature belongs to the owner.
Primary key fingerprint: 299C 423C 672F 47F4 756A  6BA4 C197 2AED 79F7 C572
     Subkey fingerprint: 4A71 A836 F572 01B4 D088  7D60 0820 A658 23F7 FB7B
При первой проверке файл «multibit-0.5.16-windows-setup.exe» был расположен в другом каталоге, при второй проверке оба файла были в корне диска «С:\PORTABLE\GnuPG\pub» откуда мы и выполняли проверку подписи. Результат проверки положительный: «Good signature from …«.
Предупреждение говорит нам о том, что мы не доверяем любым ключам, которыми был подписан ключ Джима (Jim Burton):
GPG: ВНИМАНИЕ: Этот ключ не заверен доверенной подписью!
GPG: Здесь нет никаких признаков, что подпись принадлежит владельцу.
Если Вы хотите включить этот ключ в свою цепочку доверия, тогда Вам нужно подписать ключ Джима своим собственным ключом. Дополнительную информацию о подписи ключей и других особенностях GPG можно найти здесь.
Создание портативной (portable) версии Gpg4win
Для того чтобы создать портативную версию GnuPG сначала нужно установить полную, «лайт» или «vanilla» версию, после чего из консоли перейти в директорию установки и выполнить:
Microsoft Windows XP [Версия 5.1.2600]
(С) Корпорация Майкрософт, 1985-2001.

C:\Documents and Settings\root>cd C:\Program Files\GNU\GnuPG

C:\Program Files\GNU\GnuPG>mkportable C:\PORTABLE\GnuPG

C:\Program Files\GNU\GnuPG>
В каталоге C:\PORTABLE\GnuPG будет создана портативная версия GnuPG. Ваши GnuPG ключи и настройки будут считываться из директории ‘home’ корневого каталога портативной версии.
Если хотим использовать gpg команду из любого каталога, тогда добавим путь к каталогу С:\PORTABLE\GnuPG\pub в переменную PATH. Можно создать пользовательскую переменную PATH, т.е. не обязательно править системную!
Gpg4win и проблемы с кириллицей
Если в консоли возникают проблемы с кириллицей, а они обычно возникают всегда, то обходим (не решаем) их переименованием каталога «%Program Files%\GPG4win\share\locale\ru«, например в «%Program Files%\GPG4win\share\locale\sru«:) После этого будем иметь английский интерфейс, но уж пусть лучше английский, чем куча каракуль в консоли.
GnuPG под Windows также не любит кириллические символы в именах шифруемых файлов, поэтому лучше избегать кириллицы в именах файлов!
…
Всё, кажись основные моменты для успешного использования GnuPG в Windows раскрыты. Теперь, после GnuPG шифрования, наши с Вами приватные данные будут в относительно большей безопасности, чем если бы они передавались в открытом виде.
Дополнительно предлагается изучить информацию по представленным ниже ссылкам, а про всё, что не найдено и не понято, пишите в комментарии.
Ссылки по теме GnuPG
- GnuPG — Википедия
- openPGP в России / Часто задаваемые вопросы / Общие вопросы
- openPGP в России / Часто задаваемые вопросы / Шифрование, подпись, уничтожение данных
- Gpg4win — Documentation
- GnuPG — Documentation
- Gpg4win Compendium — A Information on the GpgOL Outlook extension
Let’s get started!
1. Installing Gpg4win
To kick things off, download and install Gpg4win from the official website.
By default, Gpg4win comes with a set of GPG command line tools and will install Kleopatra. Both will come in handy, as we will need them to create (or import) an OpenPGP key pair.

2. Generating a New GPG Key
If you’re reading this, chances are you don’t have a GPG key yet. Let’s generate a new one for signing commits and tags.
We can do this «the easy way» (with Kleopatra, which presents a Graphical User Interface) or «the not-so-easy way» (by accessing the Command Line).
If you go with the latter, Windows Powershell (that comes with Windows) is all you’ll need.
Option A: Kleopatra
After installing Gpg4win, Kleopatra should already be running. If not, you can launch it by visiting the Start menu.
Let’s click on «File > New Key Pair» and generate a new Open GPG key pair.
The first screen will ask you to enter your name and email address (it should match the one in your Git configuration and in your GitHub account).
We also advise you to tick the «Protect the generated key with a passphrase.» box.
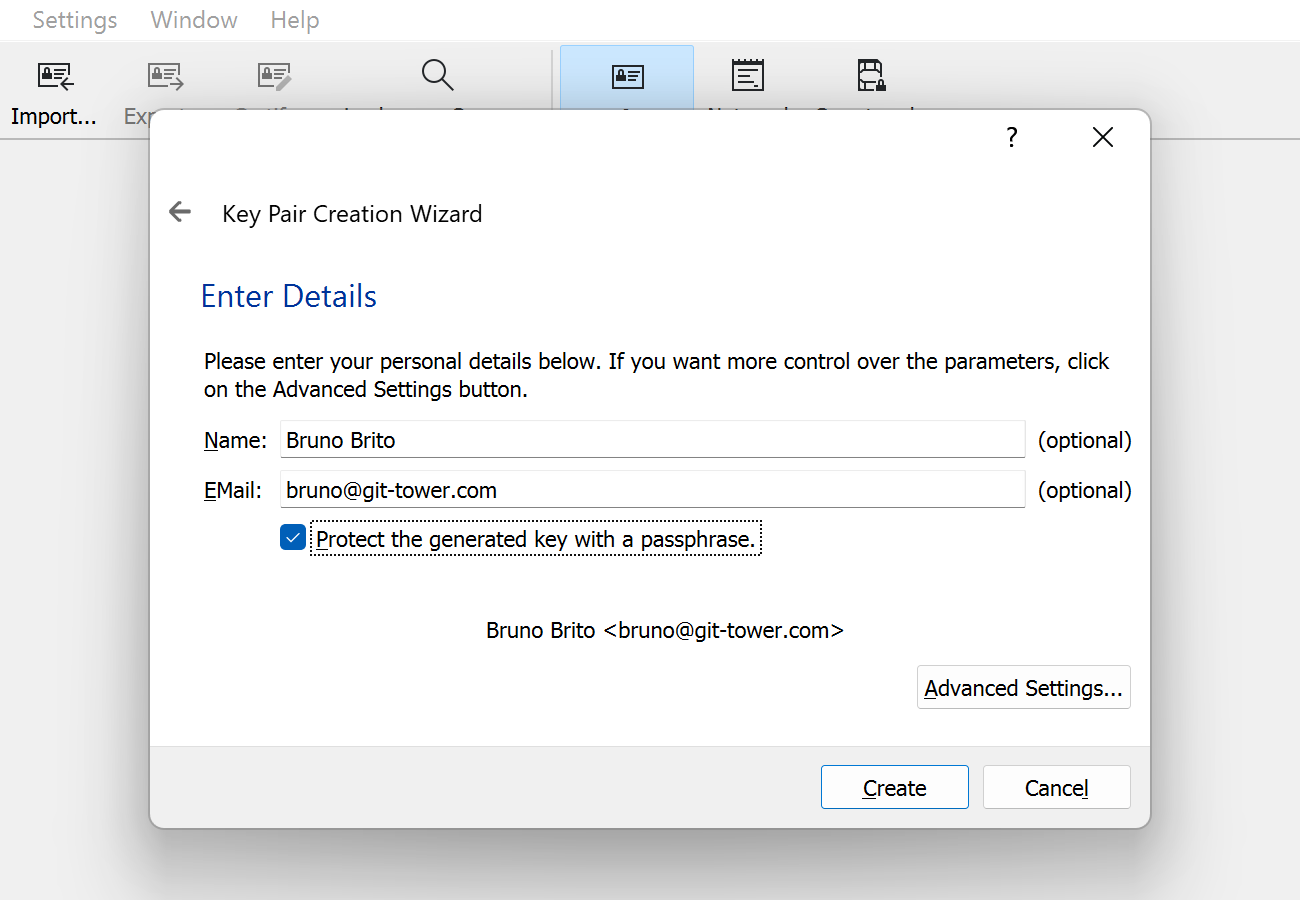
Before clicking «Create», click on «Advanced Settings» and choose a RSA key that is 4,096 bits long. In this example, we will also remove the expiration date.

We’re done! That wasn’t so hard, was it? 😎
Now would be a good time to create a backup of this key and store it somewhere safe. On to the next step!
Option B: Command Line
Fire up Windows Powershell and run the following command:
$ gpg --full-generate-keyWe will need to answer 3 questions. We suggest you create a RSA key that is 4,096 bits long (with no expiry date).
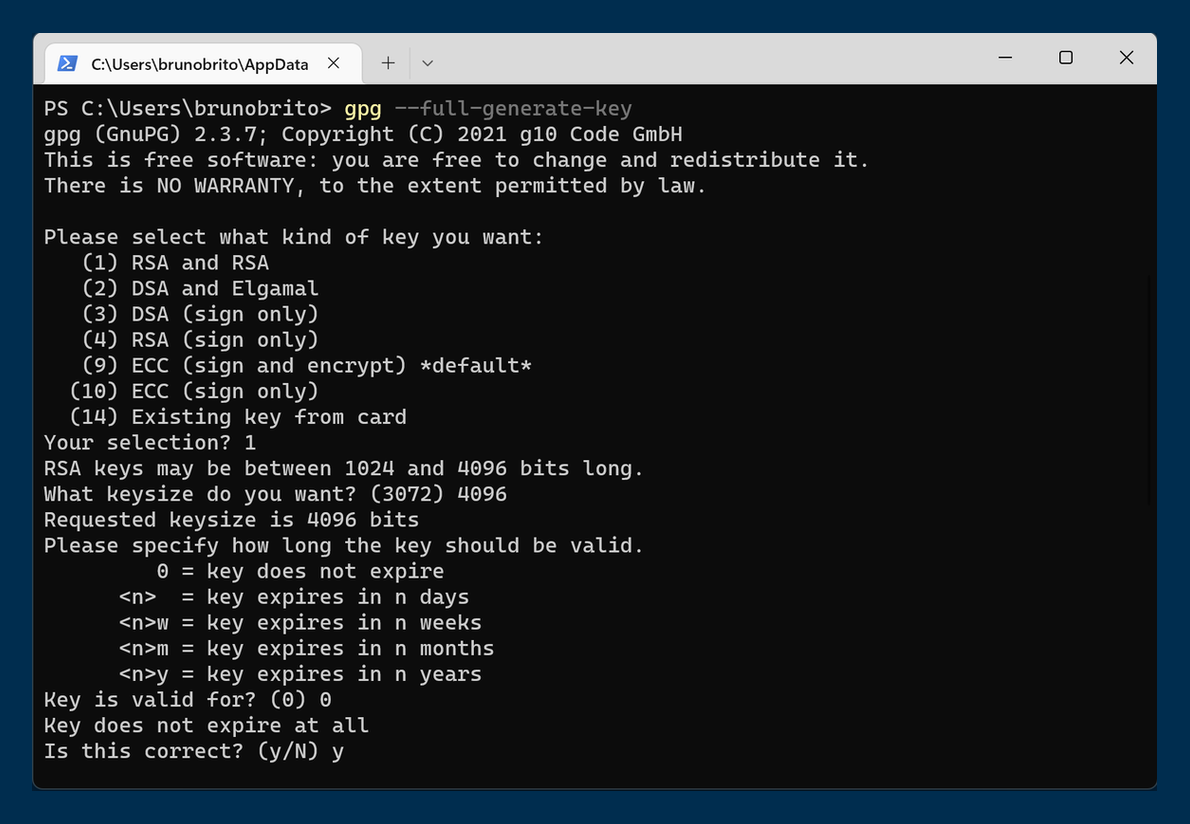
You will then be prompted to type your name and email address. As mentioned in option A, it should match the one in your Git configuration and in your GitHub account.
To finish things off, you will need to enter (and re-enter) a secure passphrase to protect the key you’ve just generated.
3. Getting GPG’s Location
Congrats — you now have a GPG key! 🎉
Now we just need to tell Git where gpg.exe is located for things to work seamlessly. Following our method, it should be here:
C:\Program Files (x86)\GnuPG\bin\gpg.exe.
Just to be sure, type the following in Windows Powershell:
$ where.exe gpgCopy the output and move on to the next and final step!

4. Signing Commits in Git
To wrap things up, we will need to:
- Indicate where the GPG binary is located
- Select a Global GPG Key
Again, we can do this «the easy way» — with Tower, our easy to use Git client — or «the not-so-easy way», also known as the Command Line.
Not a Tower user yet?
Download our 30-day free trial and experience a better way to work with Git!
Option A: Tower
In Tower, setting this up is very straightforward. You’ll just need to head over to the «Git Config» tab in the «Preferences» window and locate gpg.exe (as mentioned in the previous step).
You can then choose a GPG key by accessing the dropdown menu. Tick the «Sign Commits» box if you would like to sign every commit by default.

This will set it up globally (i.e., for every project) but you can also set it on a per-project basis by accessing the «Settings» view in the sidebar.
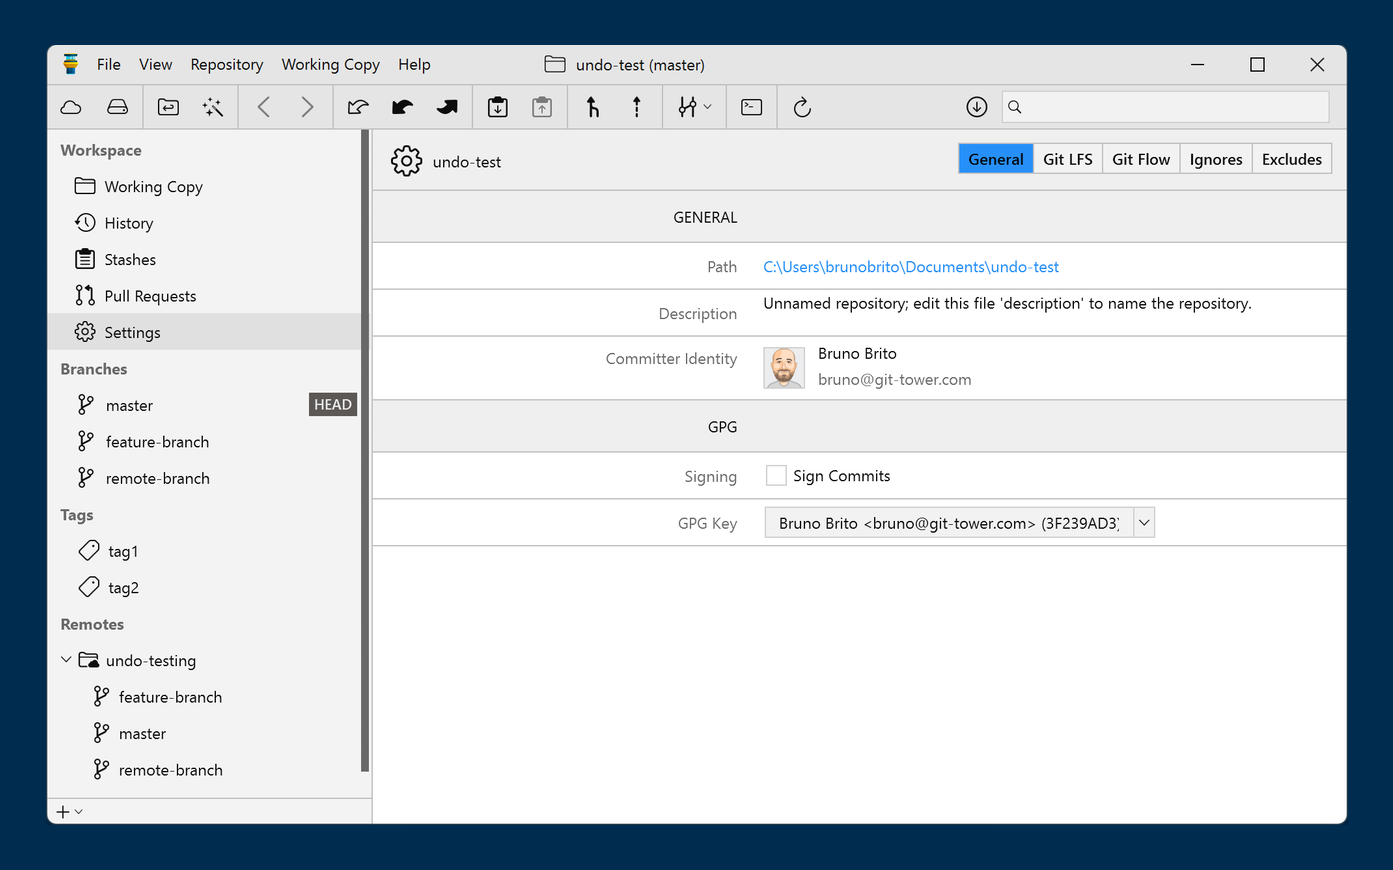
Signed commits are easy to tell apart, thanks to the green dot. Learn more about GPG Support in Tower for Windows here.
You’re done! Happy committing! 🥳
Option B: Command Line
Back to Windows Powershell. Type the following command, where [PATH] is the output from the command you ran in step 3:
$ git config --global gpg.program [PATH]You can then set Git to sign all commits in a project by typing the following:
$ git config --local commit.gpgsign true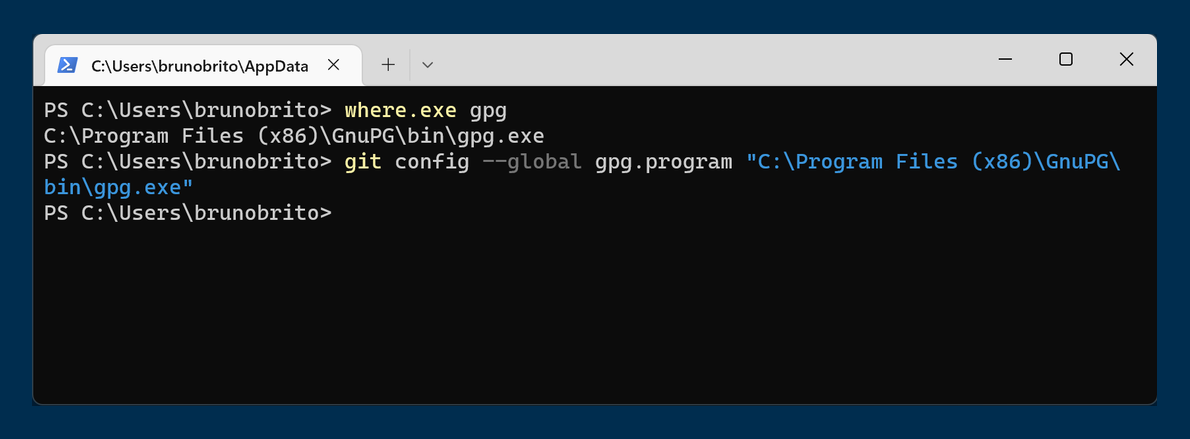
Two more commands to go! First, let’s get the ID of the GPG key by typing:
$ gpg --list-secret-keys --keyid-format LONGThe ID should be located after 4096R/, as shown in the image below:
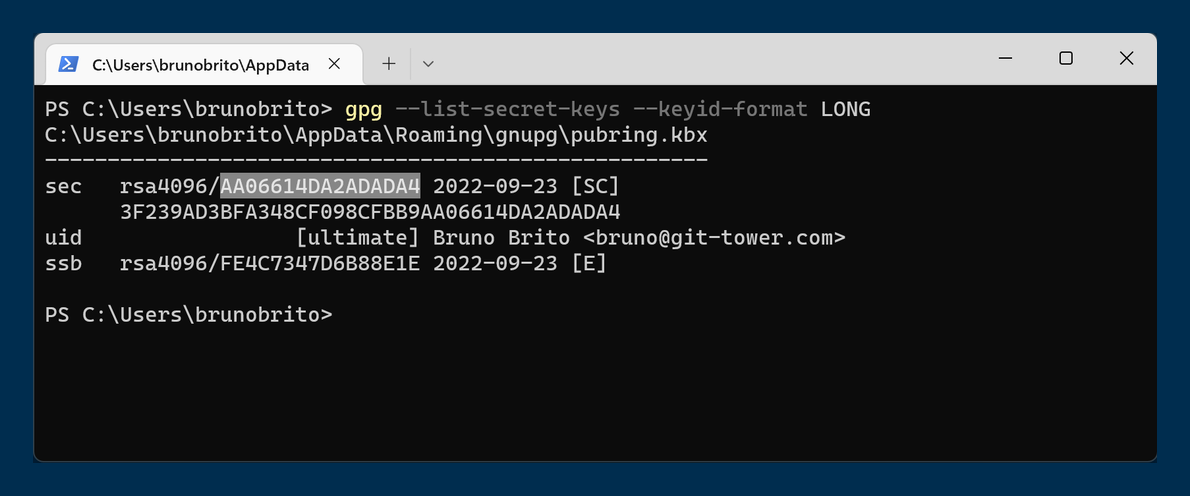
Finally, paste the ID at the end of this command:
$ git config --local user.signingkey "[GPG_KEY]"That’s it! Now you can add commits as before — they will automatically be signed.
Final Words
We hope you found this guide useful. For more tips, sign up for our newsletter below and follow Tower on Twitter and LinkedIn! ✌️
Join Over 100,000 Developers & Designers
Be the first to know about new content from the Tower blog as well as giveaways and freebies via email.
Время на прочтение3 мин
Количество просмотров30K
GnuPG (GNU Privacy Guard ) — открытая реализация PGP, совместимая со стандартами OpenPGP ( RFC 2440 ). GnuPG позволяет шифровать, расшифровывать, подписывать и верифицировать электронные сообщения при помощи пар ключей ( RSA по-умолчанию ). Наиболее частое применение GnuPG — в шифровании электронной почты и проверки подписи файлов, выложенных для скачивания. Но есть возможность использовать и в других протоколах: например, PSI (Jabber-клиент) поддерживает GnuPG и позволяет поточно шифровать переговоры.
Рассмотрим установку и первичную настройку GnuPG для трёх ОС: Windows, Mac OS X и Linux.
Подразумевается, что читатель имеет достаточные знания для того, чтобы выполнить несколько команд в консоли ОС (CMD/Terminal/xterm соответственно).
Скачивание
Windows: GPG4Win — готовая сборка GnuPG + GUI + Claws-Mail.
Mac OS X: Установить GPG Suite
Linux: В зависимости от вашего дистрибутива. Ключевое слово — gnupg2.
В связи с многообразием клиентов под *nix, расписывать установку для каждого — бесполезно.
Список клиентов, поддерживающих GNUPG — тут.
Установка
Windows: Стандартная установка. Не забываем поставить галочку около «Claws Mail».
Mac OS X: Устанавливаем GPG Suite.
Linux: В зависимости от дистрибутива и почтового клиента :)l.
Создание ключей
Запускаем терминал (cmd.exe/Terminal/xterm).
Для ОС Windows делаем cd «Папка_Куда_установлена_GPG4Win» (C:\Program Files\GNU\GnuPG\ по умолчанию )
Для всех: выполняем команду gpg2 —gen-key
Вам зададут несколько вопросов.
Please select what kind of key you want:
   (1) RSA and RSA (default)
   (2) DSA and Elgamal
   (3) DSA (sign only)
   (4) RSA (sign only)
Выбираем 1.
RSA keys may be between 1024 and 4096 bits long.
What keysize do you want? (2048)
2048 должно хватить. Просто жмём Enter.
Please specify how long the key should be valid.
         0 = key does not expire
      <n>  = key expires in n days
      <n>w = key expires in n weeks
      <n>m = key expires in n months
      <n>y = key expires in n years
Через какое время ключ будет считаться недействительным? Жмите «Enter»  Пусть будет вечным.
Далее жмём «Y». И отвечаем на 3 вопроса.
Real Name: — вводим своё имя латинскими буквами (напр. Vasily Pupkin ).
Email: — вводим e-mail (напр. v.pupkin@gmail.com)
Comment: — что угодно, от названия фирмы до ника )
Если всё правильно — жмём «O».
Теперь нас спросят пароль для ключа. Вводим 2 раза один и тот-же (или 2 раза жмём Enter для ключа без пароля).
Несколько секунд… И ключ готов! Ура! )
Проверяем: gpg2 —list-keys
pub 2048R/5C35B909 2010-01-31
uid Vasily Pupkin <v.pupkin@gmail.com>
sub 2048R/40ADD978 2010-01-31
Использование
Windows: Запускаем Claws-Mail. Подключаем аккаунт почты (тот, для которого создавали ключ! ).
Идём в настройки-модули, проверяем, что там есть модуль GPG.
Теперь, создаём сами себе сообщение и выбираем Параметры->Зашифровать.
Кстати, можем сразу создать новые ключи для другой учетной записи — Настройки-Настройки учетной записи-Модуль-GPG-Генерировать новую пару ключей
Mac OS X: Запускаем Mail, создаём новое сообщение, видим галочки «Signed» и «Encryped». Можем выбрать ключ для подписи/шифрования. Для 10.6 и Claws-mail аналогично Windows.
Linux:В зависимости от клиента. Для Claws-Mail аналогично Windows.
Переписка
Для переписки с абонентом необходимо иметь его публичный ключ. Свой ключ можно получить командой gpg2 -a —export ваш e-mail.
Импортировать чужой — gpg2 —import файл ключа
Финал
Вот собственно, и всё. Удачного Вам шифрования )
Если хотите проверить — пишите мне (не забывайте прикладывать свой публичный ключ аттачем ).
Мой ключ — тут.
Удачи!
UPD@23.01.2014: Обновил ссылки
Если эта публикация вас вдохновила и вы хотите поддержать автора — не стесняйтесь нажать на кнопку
Installing GPG on Windows: A Step-by-Step Guide
Introduction
GPG (GNU Privacy Guard) is a free and open-source encryption software that provides secure communication and data protection. It is widely used by individuals and organizations to protect their online activities and sensitive information. In this article, we will guide you through the process of installing GPG on Windows.
Why Install GPG on Windows?
Before we dive into the installation process, let’s discuss why you might want to install GPG on Windows. GPG offers several benefits, including:
- Secure communication: GPG encrypts your emails, messages, and files, making them unreadable to anyone who doesn’t have the decryption key.
- Data protection: GPG protects your sensitive information, such as passwords, credit card numbers, and personal data.
- Open-source: GPG is free and open-source, which means you can use it without any licensing fees.
Installing GPG on Windows
To install GPG on Windows, you’ll need to download and install the GnuPG software. Here’s a step-by-step guide:
Step 1: Download GPG
- Go to the official GPG website (www.gpgmail.org) and download the latest version of GPG for Windows.
- Choose the correct version for your Windows version (32-bit or 64-bit).
Step 2: Install GPG
- Once you’ve downloaded the GPG installer, run the installer and follow the prompts to install GPG.
- Make sure to select the «Add to PATH» option during the installation process.
Step 3: Configure GPG
- After installation, you’ll need to configure GPG to use your email account.
- Go to the GPG settings page (https://www.gpgmail.org/settings) and follow the instructions to set up your email account.
Step 4: Verify GPG Installation
- To verify that GPG is installed correctly, open a command prompt and type the following command:
gpg --version - This should display the version of GPG that you installed.
Using GPG on Windows
Once GPG is installed and configured, you can use it to encrypt and decrypt your emails, messages, and files.
Encrypting Emails
To encrypt an email using GPG, follow these steps:
- Open a new email client, such as Microsoft Outlook or Mozilla Thunderbird.
- Attach the email you want to encrypt to the email client.
- Click on the «File» menu and select «Open» to open the email client.
- Click on the «GPG» tab and select «Encrypt» to encrypt the email.
Decrypting Emails
To decrypt an encrypted email using GPG, follow these steps:
- Open a new email client, such as Microsoft Outlook or Mozilla Thunderbird.
- Click on the «File» menu and select «Open» to open the email client.
- Click on the «GPG» tab and select «Decrypt» to decrypt the email.
Using GPG with Other Applications
GPG can also be used with other applications, such as:
- Email clients: GPG can be used with email clients like Microsoft Outlook and Mozilla Thunderbird to encrypt and decrypt emails.
- File transfer protocols: GPG can be used with file transfer protocols like SFTP and FTP to encrypt and decrypt files.
- Cloud storage: GPG can be used with cloud storage services like Dropbox and Google Drive to encrypt and decrypt files.
Security Considerations
When using GPG on Windows, there are several security considerations to keep in mind:
- Use strong passwords: Use strong passwords for your email account and other online accounts that use GPG.
- Keep GPG up to date: Keep GPG up to date by installing the latest version of GPG.
- Use a secure email client: Use a secure email client that supports GPG encryption.
Conclusion
Installing GPG on Windows is a straightforward process that requires only a few steps. By following these steps, you can use GPG to encrypt and decrypt your emails, messages, and files, and protect your sensitive information. Remember to keep GPG up to date and use strong passwords to ensure the security of your online activities.
Additional Resources
- GPG Website: www.gpgmail.org
- GPG Documentation: https://www.gpgmail.org/docs
- GPG Community: https://www.gpgmail.org/community
Unlock the Future: Watch Our Essential Tech Videos!
You can skip right to the installation for Windows or macOS. GnuPG is included in all major Linux distributions.
Introduction
GnuPG or “GNU Privacy Guard” is a free and open source implementation of the OpenPGP standard. GnuPG was first released in 1997, and has been actively developed and updated ever since. It is primarily used to secure communications between two or more people, however, you can encrypt any file for personal storage as well. Encryption can be done with the latest secure methods either by public key cryptography via RSA or ECC, or symmetric cryptography via AES or other ciphers.
Public Key Cryptography
Public key cryptography, also known as asymmetric cryptography, works by using someone else’s public key to encrypt information that they can decrypt with their private key. The idea is that only that person has possession and control of their private key, therefore you can be sure that they are the only person that can access the data. However, you should be sure that the public key you are using actually belongs to the intended recipient.
As a side note, you can use your private key to sign data so that the recipient knows that you sent it and that it hasn’t changed since you signed it.
Symmetric Key Cryptography
Symmetric key cryptography works by setting a password, and using that password in some cipher to encrypt data. The recipient would then use that password to decrypt the data. The issue here is that the recipient must first know the password. The other concern is that the recipient may not be the only one who knows the password, also the password could be brute-forced. As of this writing, GnuPG uses the AES256 cipher, so you know your data is secured, as long as the password isn’t compromised.
Installation on Windows
GnuPG can be installed on Windows through the official installer or via Gpg4Win. We’ll covering the official installer, as that is all that is needed for basic functionality. If you would like a graphical interface, you can use Gpg4Win if you choose.
- Visit https://gnupg.org/ftp/gcrypt/binary/ in your browser and select the most recent version.
- As of this writing the lastest installer is
gnupg-w32-2.3.3_20211012.exe
- As of this writing the lastest installer is
- Run the installer. You may need to provide administrator access.
- Open a terminal or powershell window.
- Type in
gpg --version- You should get something similar to:
1 2 3 4 5 6 7 8 9 10 11 12 13 14 15 16 |
PS C:\Users\User> gpg --version gpg (GnuPG) 2.3.3 libgcrypt 1.9.4 Copyright (C) 2021 g10 Code GmbH License GNU GPL-3.0-or-later <https://gnu.org/licenses/gpl.html> This is free software: you are free to change and redistribute it. There is NO WARRANTY, to the extent permitted by law. Home: C:\Users\User\AppData\Roaming\gnupg Supported algorithms: Pubkey: RSA, ELG, DSA, ECDH, ECDSA, EDDSA Cipher: IDEA, 3DES, CAST5, BLOWFISH, AES, AES192, AES256, TWOFISH, CAMELLIA128, CAMELLIA192, CAMELLIA256 AEAD: EAX, OCB Hash: SHA1, RIPEMD160, SHA256, SHA384, SHA512, SHA224 Compression: Uncompressed, ZIP, ZLIB, BZIP2 |
Installation on macOS
GnuPG can be installed on macOS through Homebrew, via GPGSuite or gpgOSX. I’ll be covering the Homebrew method, as that is all that is needed for basic functionality. If you would like a graphical interface, you can use GPGSuite if you choose.
- If Homebrew is not installed, follow the instructions at https://brew.sh
- Once Homebrew is installed run
brew install gnupgin a Terminal window. - Now that GnuPG is installed, run
gpg --versionin the terminal.- You should get something similar to:
1 2 3 4 5 6 7 8 9 10 11 12 13 14 15 16 |
~/ > gpg --version gpg (GnuPG) 2.3.3 libgcrypt 1.9.4 Copyright (C) 2021 Free Software Foundation, Inc. License GNU GPL-3.0-or-later <https://gnu.org/licenses/gpl.html> This is free software: you are free to change and redistribute it. There is NO WARRANTY, to the extent permitted by law. Home: /Users/User/.gnupg Supported algorithms: Pubkey: RSA, ELG, DSA, ECDH, ECDSA, EDDSA Cipher: IDEA, 3DES, CAST5, BLOWFISH, AES, AES192, AES256, TWOFISH, CAMELLIA128, CAMELLIA192, CAMELLIA256 AEAD: EAX, OCB Hash: SHA1, RIPEMD160, SHA256, SHA384, SHA512, SHA224 Compression: Uncompressed, ZIP, ZLIB, BZIP2 |