
The bootable GParted Live image can also be
installed on a USB flash drive.
Following are instructions on how to setup GParted Live on your USB
flash drive using either MS Windows
or GNU/Linux.
NOTE: These installation methods only work when the USB flash drive
is formatted with a FAT file system. Some users have reported that
only the FAT16 file system worked for them. For other file systems
you might try to use grub or some other boot loader.
USB setup with Windows
Choose one of the following methods to setup GParted Live on your
USB flash drive using MS Windows:
- Windows Method A: Unetbootin
- Windows Method B: Manual
- Windows Method C: LinuxLive USB Creator
- Windows Method D: Tuxboot
Windows Method A: Unetbootin
-
If you already have Unetbootin installed on your computer then
skip to the next step (2).
Otherwise download and
install Unetbootin on your MS Windows computer. -
Download the GParted
Live iso file. -
From Windows, run the Unetbootin program and follow the
instructions in the GUI to install GParted Live on your USB flash
drive.
Windows Method B: Manual
WARNING!
DO NOT RUN makeboot.bat from your local hard drive!
Doing so could cause your MS windows not to boot!!!
-
Download the GParted
Live zip file. -
If you already have a partition of at least 300 MB in size on your
USB flash drive formatted with a FAT file system then skip to the
next step (3).Otherwise create at least a 300 MB partition on your USB flash
drive and format it with a FAT16 or FAT32 file system.
The partition must be large enough to hold the extracted
contents of the GParted Live zip file. -
Extract all the contents of the zip file to FAT16/FAT32
partition on your USB flash drive. Keep the directory
architecture, for example, file «GPL» should be in the USB
flash drive’s top directory (e.g. G:\GPL). -
Browse to your USB flash drive and as an administrator
(On the USB flash key, create a shortcut to the makeboot.bat file.
Then right-clic on the shortcut, Properties, Advanced and check
«Run as administrator».), click the makeboot.bat in the dir
utils\win32\. WARNING!
Makeboot.bat must be run from your USB flash drive. -
Follow the on-screen instructions.
(PS: The above description is modified from:
http://www.pendrivelinux.com/2007/01/02/all-in-one-usb-dsl.
Thanks to PDLA from http://pendrivelinux.com)
Windows Method C: LinuxLive USB Creator
-
If you already have LinuxLive USB Creator installed on your computer then
skip to the next step (2).
Otherwise download and
install LinuxLive USB Creator on your MS Windows computer. -
Download the GParted
Live iso file. -
From Windows, install then run the LinuxLive USB Creator program and follow the
instructions in the GUI to install GParted Live on your USB flash
drive.
Windows Method D: Tuxboot
- Download Tuxboot on your MS Windows computer.
-
Follow
the USB setup with MS Windows instructions to
install GParted Live on your USB flash drive.
USB setup with GNU/Linux
Choose one of the following methods to setup GParted Live on your
USB flash drive using GNU/Linux:
- GNU/Linux Method A: Unetbootin
- GNU/Linux Method B: Manual
- GNU/Linux Method C: Manual — Overwrite
- GNU/Linux Method D: Tuxboot
GNU/Linux Method A: Unetbootin
-
If you already have Unetbootin installed on your computer then
skip to step 2.
Otherwise install Unetbootin on your GNU/Linux computer. -
Download the GParted
Live iso file. -
From GNU/Linux, run the Unetbootin program and follow the
instructions in the GUI to install GParted Live on your USB flash
drive.
GNU/Linux Method B: Manual
WARNING!
Confirm you have the correct path name before executing commands!
Failure to do so could cause loss of data or your GNU/Linux not to boot!!!
/dev/sde is a device path name
/dev/sde1 is a partition path name
-
Download the GParted
Live zip file. -
If you already have a FAT16 or FAT32 partition on your USB flash
drive then skip to the next step (3).Otherwise prepare at least a 300 MB partition formatted with
either a FAT16 or FAT32 file system.
The partition must be large enough to hold the extracted
contents of the GParted Live zip file.If the USB flash drive or USB hard drive does not have
any partition, you can use a partitioning tool (e.g. gparted, parted, fdisk,
cfdisk or sfdisk) to create a partition with a size of 300 MB or
more.
Here we assume your USB flash drive or USB hard drive is /dev/sdd
(You have to confirm your device name, since
it’s _NOT_ always /dev/sdd) on your GNU/Linux, so the
partition table is like:# fdisk -l /dev/sdd Disk /dev/sdd: 12.8 GB, 12884901888 bytes 15 heads, 63 sectors/track, 26630 cylinders Units = cylinders of 945 * 512 = 483840 bytes Disk identifier: 0x000c2aa7 Device Boot Start End Blocks Id System /dev/sdd1 * 1 26630 12582643+ b W95 FAT32Then format the partition as FAT with a command such as «mkfs.vfat
-F 32 /dev/sdd1»
WARNING! Executing the mkfs.vfat command
on the wrong partition or device could cause your GNU/Linux not to
boot. Be sure to confirm the command before you run it.# mkfs.vfat -F 32 /dev/sdd1 mkfs.vfat 2.11 (12 Mar 2005) -
Insert your USB flash drive or USB hard drive into the USB port on
your Linux machine and wait a few seconds. Next, run the command
«dmesg» to query the device name of the USB flash drive or USB
hard drive. Let’s say, for example, that you find it is
/dev/sdd1. In this example, we assume /dev/sdd1 has FAT
filesystem, and it is automatically mounted in dir /media/usb/. If
it’s not automatically mounted, manually mount it with commands
such as «mkdir -p /media/usb; mount /dev/sdd1 /media/usb/». -
Unzip all the files and copy them into your USB flash drive or USB
hard drive. You can do this with a command such as: «unzip
gparted-live-0.4.5-2.zip -d /media/usb/»). Keep the directory
architecture, for example, file «GPL» should be in the USB
flash drive or USB hard drive’s top directory
(e.g. /media/usb/GPL). -
To make your USB flash drive bootable, first change the working
dir, e.g. «cd /media/usb/utils/linux», then run «bash makeboot.sh
/dev/sdd1» (replace /dev/sdd1 with your USB
flash drive device name), and follow the prompts.
WARNING! Executing makeboot.sh with the
wrong device name could cause your GNU/Linux not to boot. Be sure
to confirm the command before you run it.NOTE: There is a known problem if you run makeboot.sh on Debian
Etch, since the program utils/linux/syslinux does not work
properly. Make sure you run it on newer GNU/Linux, such as Debian
Lenny, Ubuntu 8.04, or Fedora 9.
TIP:
If your USB flash drive or USB hard drive is not able to boot, check
the following:
- Ensure that your USB flash drive contains at least one FAT partition.
- Ensure that the partition is marked as «bootable» in the partition table.
-
Ensure that the partition starts on a cylinder boundary.
For the first partition this is usually sector 63.
GNU/Linux Method C: Manual — Overwrite
WARNING: Confirm you have the correct device path name before executing commands!
This method will overwrite the destination device. Hence it is
critical to select the proper USB flash device.
Since GParted Live is based on Debian Live and this image is a
isohybrid, the
GParted Live CD
image can be written directly to a USB flash drive.
NOTE: This method is only bootable with BIOS/MBR (Legacy), not uEFI/GPT.
-
Download the GParted
Live iso file. -
Insert the USB flash drive your Linux computer and wait a few
seconds. Next, from a terminal window run the command:
dmesg
This command queries the device name of the USB flash drive. For
example, you might find the device name is /dev/sde. -
From a terminal window, enter the following command using the
gparted .iso file name and USB device path you discoved in the
previous steps.
For example:
sudo dd if=/path-to-gparted-live.x.y.z-w.iso of=/dev/sde bs=4M; sync
GNU/Linux Method D: Tuxboot
NOTE: Tuxboot requires older libqt4 libraries.
Use for Ubuntu 18.04 and older, or Debian 10 and older.
- Download Tuxboot on your GNU/Linux computer.
-
Follow
the USB setup with GNU/Linux instructions to
install GParted Live on your USB flash drive.
Иногда перед владельцами компьютеров встают вопросы, каким образом поменять размер логического диска, как из двух логических дисков сделать один или, наоборот, из одного диска — сделать два, как поменять файловую систему. Так получилось, что уже много лет я пользуюсь для этих целей программой GParted, а точнее Live CD версией этой программой. В статье я уделю внимание именно этой версии программы.
Как самостоятельное приложение GParted работает на Linux-дистрибутивах Debian, Fedora, OpenSUSE и Ubuntu (команды для установки можно узнать здесь). Во всех остальных случаях, например, если у вас на компьютере установлен Windows, Android или другая операционная система, вы можете использовать Live CD дистрибутив программы GParted Live. Прелесть использования именно Live CD версии состоит в том, что нет совершенно никакой разницы, какие операционные системы установлены на компьютере. Главное, чтобы файловые системы поддерживались программой GParted.
Возможности GParted
Вот список операций, которые может выполнять программа GParted:
— Создание таблицы разделов;
— Управление разделами: создание, перемещение, копирование, изменение размера, проверка, установка метки, смена идентификатора и удаление;
— Установка и снятие флагов разделов (boot или hidden);
— Выравнивание размеров разделов по мебибайтам или цилиндрам;
— Возможность восстановления данных из потерянных разделов.
Программа GParted работает с жёсткими дисками (SATA, IDE, SCSI), флеш-устройствами, такими как USB-флешки и твердотельные диски (SSD), RAID устройствами (аппаратные RAID, BIOS RAID на материнских платах и программные RAID-массивы Linux). Поддерживаются все размеры секторов (512, 1024, 2048, 4096 и другие).
В настоящий момент поддерживается 21 файловая система. Для большинства из них есть ограничения, но основные файловые системы поддерживаются полностью, это NTFS, FAT32, FAT16, ext2, ext3, ext4, NILFS и ReiserFS. Список поддерживаемых операций для файловых систем можно посмотреть здесь.
Кроме всего перечисленного в плюсы версии GParted Live можно добавить ещё и то, что вы получаете полноценную Linux-систему, с помощью которой вы можете, например, конфигурировать файлы загрузчика GRUB, просматривать содержимое на дисках и пр.
Создание загрузочного диска GParted Live
Создать загрузочный CD диск с программой GParted проще всего. Нужно скачать образ диска со страницы загрузки программы (на ваш выбор есть стабильная или тестовая версии) и записать его на CD болванку. Лучше использовать перезаписываемый диск, чтобы можно было обновляться до свежих версий программы, используя тот же CD диск.
Кроме CD диска можно создать загрузочную USB-флешку с GParted Live (как это сделать см. здесь), использовать PXE сервер (как это сделать см. здесь) или установить GParted Live на жесткий диск (как это сделать см. здесь). Как создать установочную флешку имея на руках файл образа с помощью программы UNetbootin было описано в нашей статье «Установка Android на нетбук или компьютер» в части «Создание установочной флешки Android».
Загрузка компьютера с GParted Live
После того как загрузочный диск создан, вставлен в компьютер и в BIOS включена загрузка с него, можно загружать компьютер. Все подробности как загрузить компьютер используя загрузочный диск GParted Live описаны на официальном сайте здесь. В статье я опишу лишь основные моменты.
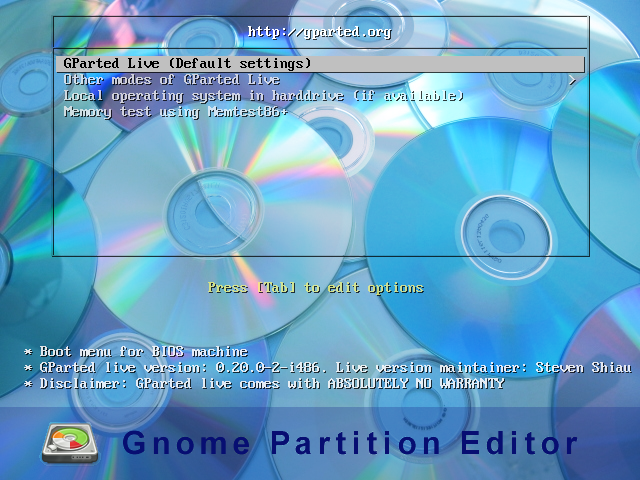
После загрузки первый экран, который вы увидите, будет выбор способа загрузки. Первый пункт «GParted Live (Default settings)» — это загрузка по умолчанию, со стандартными вопросами и запуском программы GParted в конце загрузки. Внутри второго пункта меню «Other modes of GParted Live» вы сможете выбрать разные варианты загрузки. Третий пункт «Local operating system in harddrive (if available)» запускает операционную систему, установленную на вашем компьютере (или запускает загрузчик, если систем несколько). Последний пункт «Memory test using Memtest86+» запускает программу Memtest86+ для проверки ОЗУ вашего компьютера. На этом шаге выберите первый пункт меню.
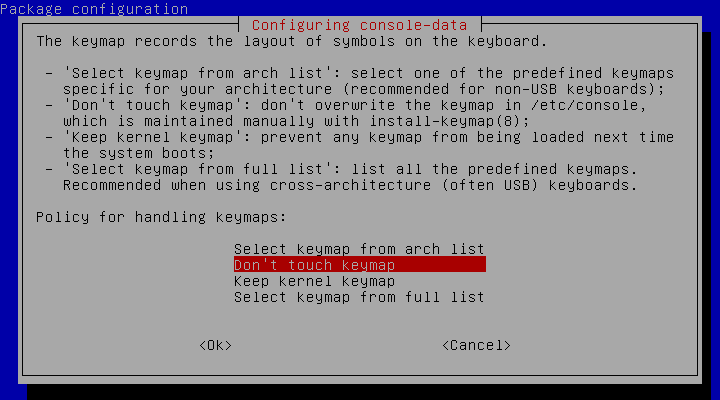
Первый вопрос, который вы увидите при загрузке, будет вопрос о том, какую раскладку клавиатуры использовать. Оставьте пункт «Don’t touch keymap», если раскладку менять не нужно и нажмите Enter.
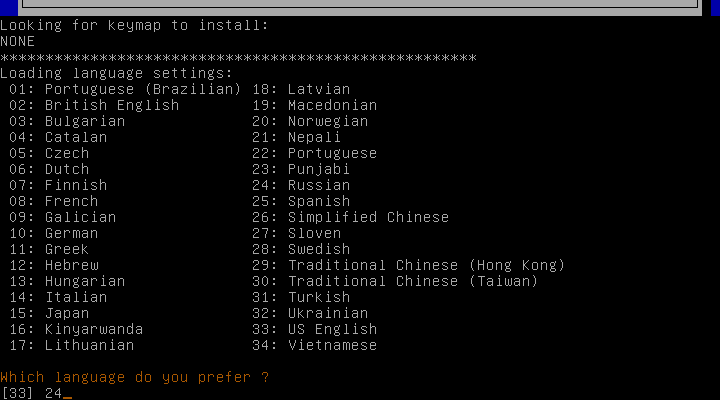
На следующем шаге вам нужно будет выбрать язык. Чтобы выбрать русский, введите число 24 и нажмите Enter.
Следующим этапом нужно выбрать видео режим. Для запуска стандартного графического режима и использования приложения GParted оставьте 0 и нажмите Enter.

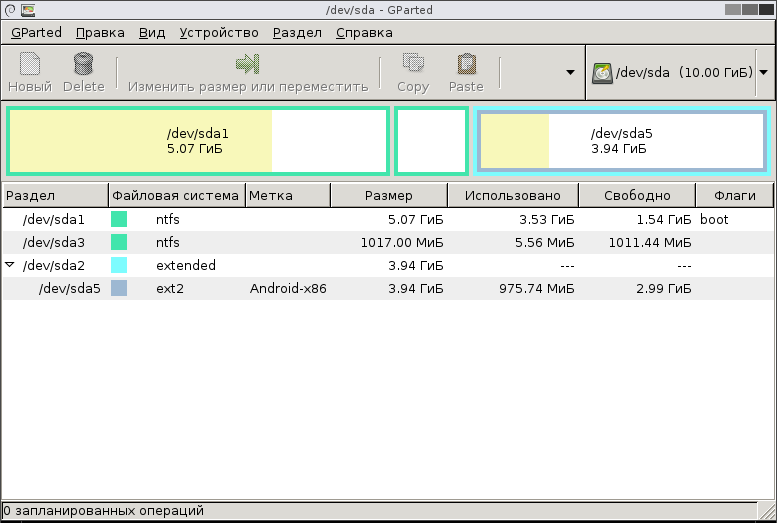
После загрузки вы увидите рабочий стол и запущенное приложение GParted, которое сразу после запуска показывает информацию по подключенным к компьютеру физическим дискам.
Работа с дисками в приложении GParted
Работа в приложении GParted проста и интуитивно понятна, поэтому не буду подробно на этом останавливаться. Документацию по приложению на русском языке можно почитать здесь.
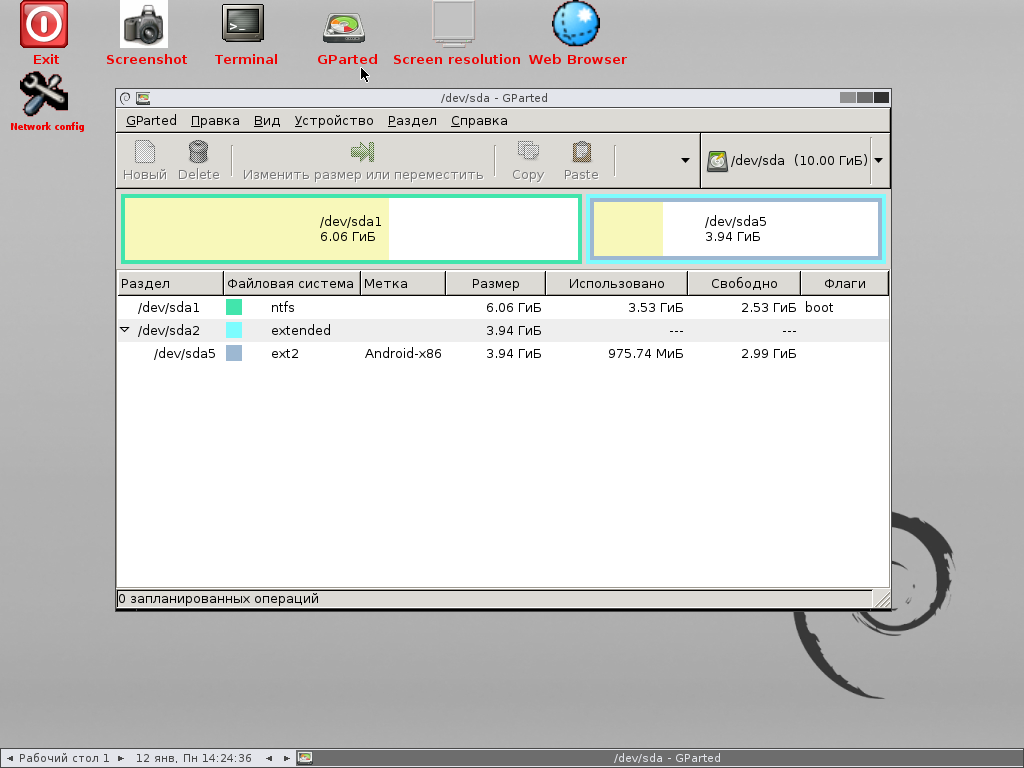
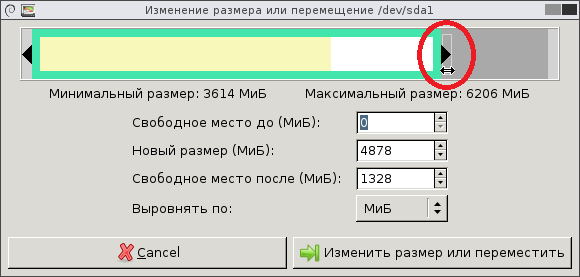
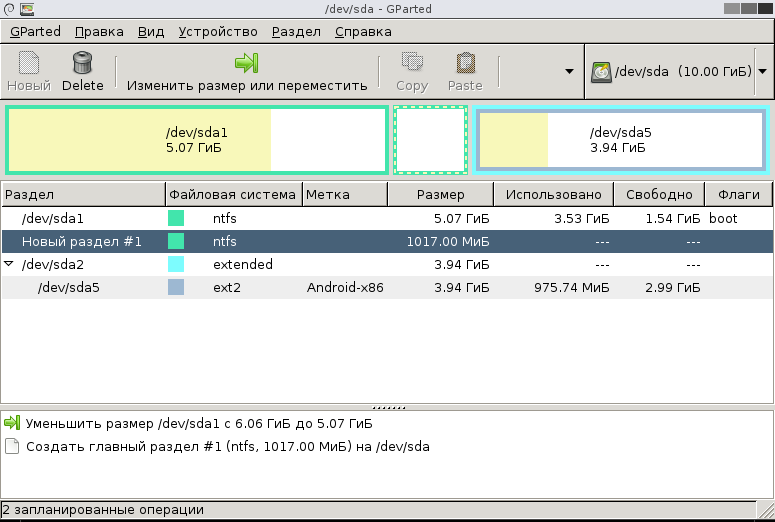
Рассмотрим лишь один пример: разбиение раздела NTFS, на котором установлена система Windows, на два NTFS раздела. Для этого щёлкните по нужному разделу правой клавишей мышки и выберите пункт «Изменить размер или переместить».

В появившемся диалоге «Изменение размера или перемещение» схватите правый краешек диска мышкой и перетащите так, чтобы уменьшить размер раздела до нужного размера. При этом размер диска уменьшится и справа от него появится свободное место для нового диска. Всё это наглядно видно, что очень удобно. Точно так же можно изменять размер, хватаясь мышкой за левый край, тогда пустое пространство появится слева.
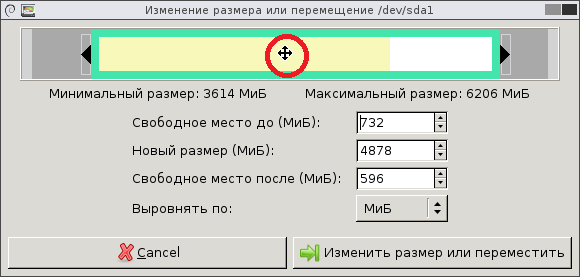
А можно, схватившись за раздел мышкой, передвигать его левее и правее, регулируя свободное место слева и справа, см. картинку.
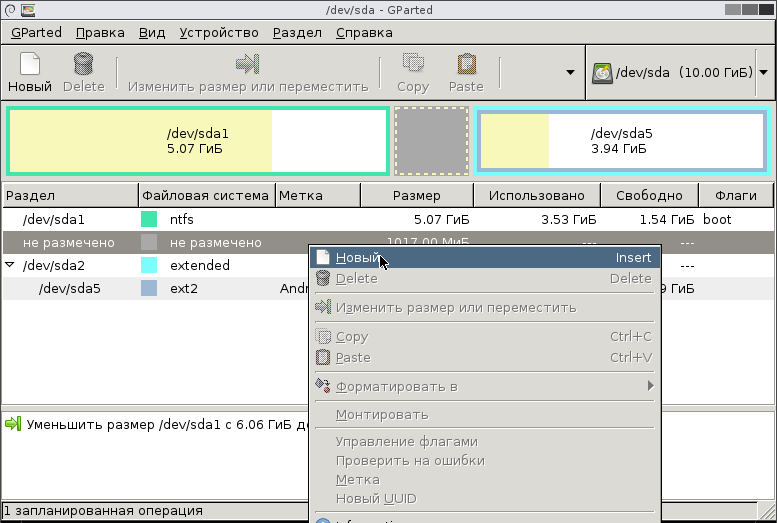
После того как вы закончили, нажмите на кнопку «Изменить размер или переместить». Затем нужно решить, как будет размечено появившееся пустое пространство. Щёлкните по неразмеченной области правой кнопкой мышки и выберите пункт контекстного меню «Новый».
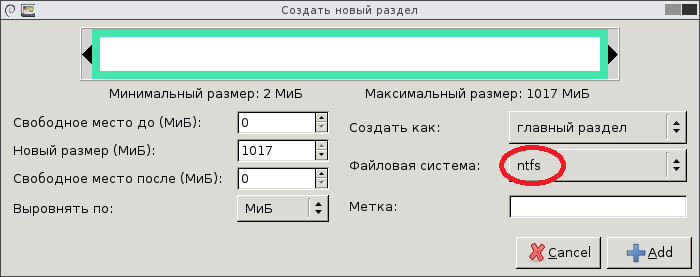
В диалоге «Создать новый раздел» укажите какую файловую систему нужно создать и нажмите кнопку «Add».
Обратите внимание, что все действия с разделами не выполняются, а только планируются. Все запланированные действия перечислены в списке внизу окна приложения. Запланированные операции можно отменить (пункты меню «Правка -> Отменить последнюю операцию» и «Правка -> Очистить список операций»).
Чтобы выполнить все запланированные действия, щёлкните по пункту меню «Правка -> Применить все операции».
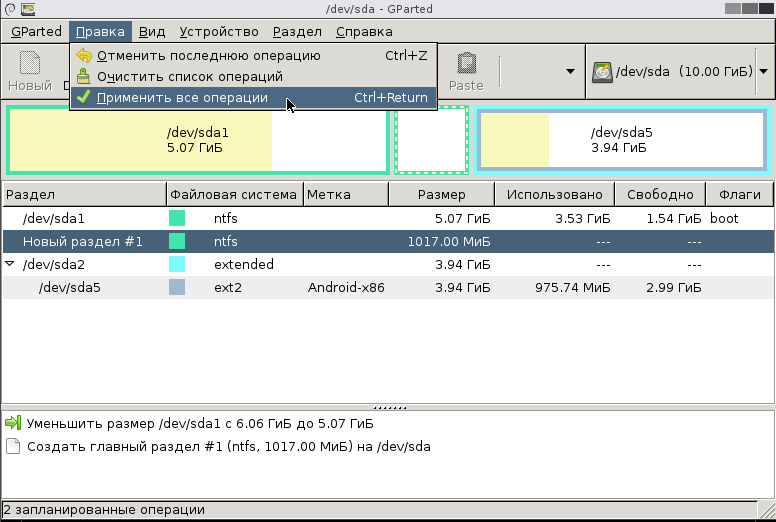
Подтвердите ваше желание применить все операции с разделами, нажав на клавишу «Apply» в диалоге.

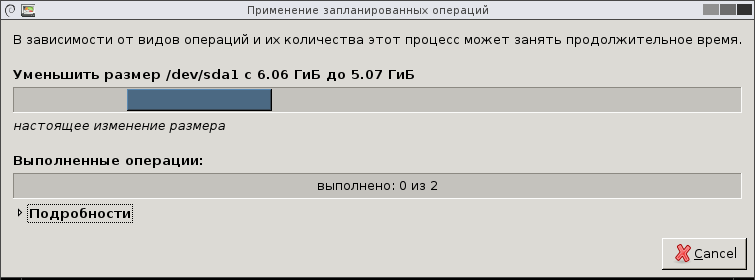
Выполнение операций может занять продолжительное время.
После выполнения операций вы увидите результат, см. картинку. Здесь же можно посмотреть и сохранить подробности.
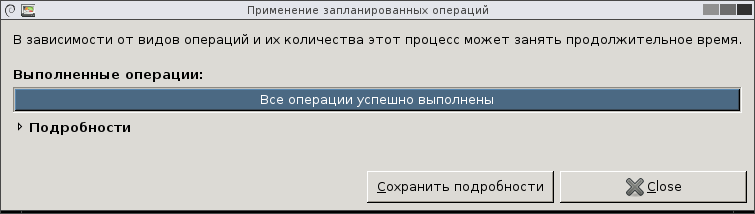
После выполнения операций можно увидеть, как теперь выглядят разделы на диске.
Завершение работы с GParted Live
После того как работа с программой завершена. Щёлкните по ярлыку «Exit» на рабочем столе и выберите в диалоге «Shutdown», чтобы выключить компьютер или «Reboot», чтобы перегрузить.
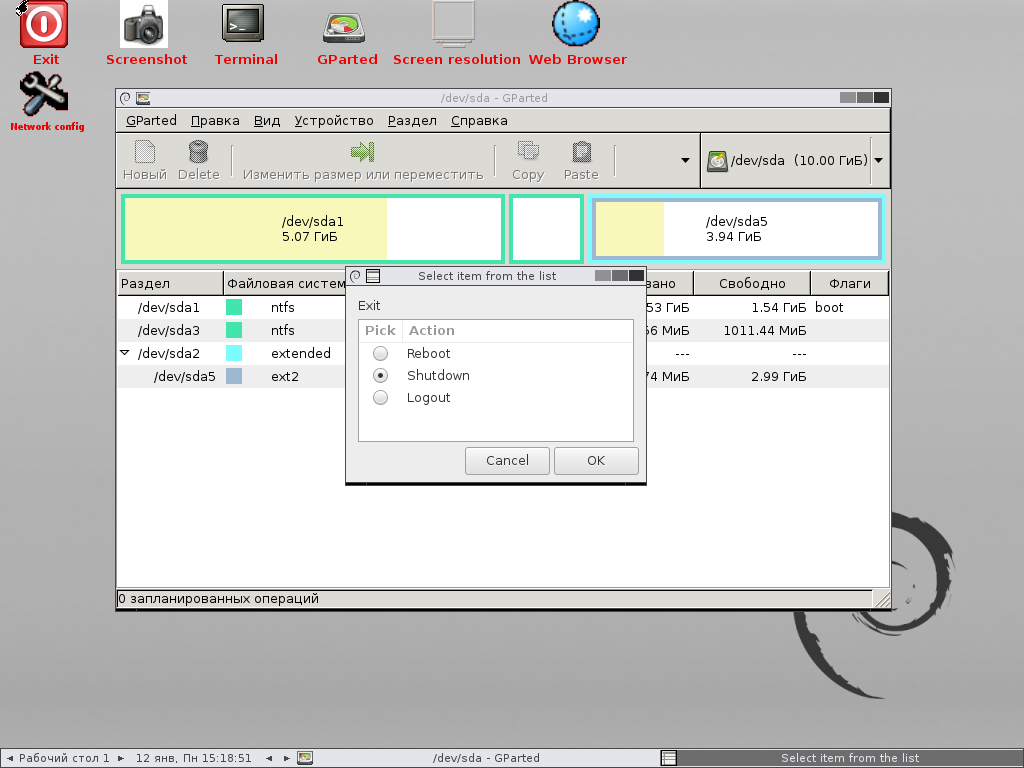
Перед следующим включением компьютера обязательно выньте загрузочный диск с GParted Live.
Итог общения с GParted Live
В заключении хочется сказать, что программа GParted является мощным и простым инструментом для работы с дисками, который вы можете использовать абсолютно бесплатно. При этом, в случае использования загрузочного диска, программе не требуется установка на компьютер, что очень удобно. Но при работе с GParted всегда нужно помнить, что разработчики не несут ответственности за сохранность данных на ваших дисках, поэтому перед всеми манипуляциями с дисками делайте копии нужных данных или диска целиком. Для создания резервной копии всего диска (вместе со всеми разделами) вы можете использовать следующее бесплатное ПО: Clonezilla, doClone, FSArchiver, G4L, g4u, Partimage или Partclone.
Summary
This page is about how to delete partitions when Gparted cannot delete partition on Windows/Linux.
Part1: How to use Gparted on Windows 11/10/8/7
GParted is primarily designed for Linux systems and is not natively available for Windows. However, there are a few ways you can use GParted on a Windows system:
-
Bootable GParted Live USB: One common approach is to create a bootable GParted Live USB. GParted provides a live distribution based on Linux that you can run from a USB drive. This allows you to use GParted’s partitioning tools without installing it on your Windows system.
Video: how to run Gparted Live from bootable usb
To do this:
- Download the GParted Live ISO from the official GParted website.
- Use a tool like Rufus or Etcher to create a bootable USB drive from the ISO.
- Boot your computer from the USB drive to access GParted’s interface and perform partitioning tasks.
-
Virtual Machine with Linux: Another approach is to set up a virtual machine on your Windows system using virtualization software like VirtualBox or VMware. Install a Linux distribution that supports GParted (such as GParted Live) in the virtual machine. This way, you can run GParted within the virtual machine environment.
-
Third-party Windows Alternatives: While GParted is not natively available for Windows, there are alternative partitioning tools designed specifically for Windows such as IM-Magic Partition Resizer (100% free tool), Disk Management (Windows built in tool), or diskpart (Windows built-in commands).
Useful guide
How to move recovery partition using gparted
Cannot delete partition using Gparted fixes
How to resize partition gparted
Gparted convert mbr to gpt
Gparted clone to smaller disk
The following part will introduce the differences among Gparted and other Windows tools.
Part2: Gparted VS Partition Resizer VS Disk Management VS Diskpart
| Gparted (Windows/Linux) |
Partition Resizer (Windows) |
Disk Management (Windows) |
Diskpart (Windows) |
|
| Resize/Delete/Move/Copy partition when running Windows | NO(Burn Gparted Live ISO to CD/USB and run from bootable media needed) | |||
| Move partition without losing data | NO | NO | ||
| Extend ntfs partition with right side unallocated space | ||||
| Shrink fat32 partition | NO | NO | ||
| Extend fat32 C partition | NO | NO | ||
| Clone disk | NO | NO | ||
| Convert mbr to gpt without losing data | NO | NO | NO | |
| Convert fat32 to ntfs without losing data | NO | NO | NO | |
| Migrate OS to new ssd/hdd | NO | NO | ||
| User friendly UI | NO | NO | NO | |
| Roll-back protection | NO | NO | NO | |
| Price | FREE | FREE | FREE | FREE |
| Download Win 11-7 (Free) Download Win Server (Free Demo) |
let’s compare GParted, Partition Resizer, Disk Management, and DiskPart in terms of their features and capabilities for disk partitioning and management:
-
GParted:
- Platform: Primarily designed for Linux systems but can be used on Windows through methods like bootable GParted Live USB.
- Features: GParted offers a wide range of advanced partitioning and disk management features, including resizing, moving, creating, deleting, and formatting partitions. It also supports filesystem manipulation and label setting. It’s highly versatile and can work with various filesystems.
- User Interface: GParted features a graphical user interface that makes it user-friendly, even for those less familiar with command-line interfaces.
-
IM-Magic Partition Resizer:
- Platform: Windows.
- Features: Similar to GParted, these third-party tools offer advanced partition management features, including resizing, moving, merging, splitting, and copying partitions. They often come with additional utilities for disk optimization and data migration.
- User Interface: Typically provides a user-friendly graphical interface for ease of use.
Useful guide
How to move partition without losing data
How to expand c drive without losing data
How to clone disk to migrate OS
More video guide…
-
Disk Management (Windows built-in tool):
- Platform: Windows.
- Features: Disk Management is a basic built-in Windows tool for managing partitions and volumes. It allows you to create, delete, format, and change drive letters of partitions. It also supports simple resizing of basic partitions, but more advanced operations might not be available.
- User Interface: Comes with a simple GUI integrated into the Windows operating system.
- Can’t: There are a few operations that Disk Management cannot perform including: convert mbr to gpt without losing data, convert fat32 to ntfs without losing data, convert basic to dynamic without losing data, shrink fat32 partition, extend fat32 c drive, move partition, migrate OS, clone disk
Also read:
Extend volume greyed out disk management
Shrink volume greyed out disk management
Delete volume greyed out disk management
-
DiskPart (Windows command-line tool):
- Platform: Windows.
- Features: DiskPart is a command-line tool that provides more advanced partitioning and disk management capabilities compared to Disk Management. It’s suitable for scripting and automating partition-related tasks. It can be more powerful but requires knowledge of command-line commands.
- User Interface: Command-line interface, which might not be as user-friendly for those not familiar with command-line usage.
- Can’t: There are a few operations that Diskpart cannot perform either including: convert mbr to gpt without losing data, convert fat32 to ntfs without losing data, convert basic to dynamic without losing data, shrink fat32 partition, extend fat32 c drive, move partition, migrate OS, clone disk
Also read:
Extend c drive diskpart
Resize partition diskpart
Shrink fat32 volume diskpart
Delete volume diskpart
Merge partitions diskpart
In summary, the choice between these tools depends on your specific needs and comfort level with different interfaces. If you’re on Windows, you might find third-party tools like IM-Magic Partition Resizer suitable for advanced partitioning tasks. Disk Management and DiskPart are built into Windows and can handle basic partitioning tasks, with DiskPart offering more advanced options via command-line scripting. If you’re using Linux or are open to booting from a live USB, GParted provides a highly capable solution with a user-friendly GUI for a wide range of partitioning tasks.
Why IM-Magic Partition Resizer other than other third party tools?
It offers free license for users to migrate OS while other tools need a paid license to do this job together with other advanced features.
Easily Create a GParted Live USB flash drive from Windows using YUMI to perform the task. A popular graphical partition editor headed by Curtis Gedak, this free and powerful open source USB partition tool can be used to create, reorganize, and or delete disk partitions. Other notable features include the ability to create multiple partitions, enable or disable the boot flag, resize a partition, format a drive, and more.
GParted Live Running on a USB Flash Drive
- Distribution Website: Project Home Page
- Author: Curtis Gedak
- Persistent Feature: No (not necessary)
GParted Free Open Source GNOME Partition Editor
GParted is a free open source partition editor software used for graphically managing and manipulating hard drive partitions. It stands for «GNOME Partition Editor» and is part of the GNOME desktop environment. This powerful tool is often used by IT professionals, system administrators, and home users for managing partitions.
Available for Linux, Windows, and macOS, it can be used to quickly create, resize, delete, move, and copy partitions without data loss. It supports a variety of file systems, including NTFS, FAT16/FAT32, ext2, ext3, ext4, hfs/hfs+, linux-swap, reiserfs/4, ufs, xfs, and many more file systems. It can also detect RAID devices.
The software UI is intuitive and very user-friendly. Novice and experienced users should have no problem navigating and using it. It can also be run as a live USB, which allows you to use the software without installing it on a computer. It is often included in Linux distributions but can also be downloaded as a stand-alone ISO file from the official website.
Key Features of GParted
This popular Free USB partition tool is most commonly used for the following tasks:
- Create Partitions: Easily create new partitions on your disk.
- Resize Partitions: Resize existing partitions without losing data.
- Delete Partitions: Safely remove partitions that are no longer needed.
- Move Partitions: Reorganize partitions for better disk usage.
- Format Drives: Format partitions with a variety of file systems, including NTFS, FAT, ext4, and more.
- Manage Boot Flags: Enable or disable the boot flag for partitions.
- Clone Partitions: Duplicate partitions for backup or migration purposes.
Prerequisites to make a GParted Live USB
- Windows, Linux or macOS
- Fast SSD USB drive
- GParted ISO file
- YUMI Multiboot Windows USB Booter (or by using DD in Linux/macOS)
How to Create a GParted Live USB from Windows
To create a GParted Live USB from within Windows:
- Download and run YUMI Windows USB Booter
- (1) Choose your USB flash drive.
(2) Select * GParted (Partition Tools) from the list.
(3) Browse to your ISO file and then click Create. - Reboot your PC and set your system BIOS or Boot Menu to boot from the USB device, save your changes and reboot booting from the memory stick.
Note: You can now use WINE to run YUMI from Linux. * If «GParted» does not exist in the distribution dropdown list, use the «Try unlisted ISO» option, instead.
How to Make a GParted Bootable USB from Linux
WARNING: The following dd method will wipe your chosen drive clean. It essentially overwrites the contents with that of the ISO file. Before proceeding, make sure you don’t have anything left on the flash drive that you want to keep. And make sure to use the right device letter.
To create a GParted bootable USB from within Linux (Ubuntu was used for this test),
- Insert a USB flash drive into your PC.
- Download GParted Live ISO and move it to your Desktop.
- Open a terminal (Ctrl + Alt + T)
- To find your USB device, type the following and press enter.
sudo fdisk -l
Make note of which device belongs to your USB drive. For example /dev/sdX.
- Type the following command to change your current directory to Desktop.
cd Desktop
- Type the following command replacing X with your actual USB device letter from step 4.
sudo dd if=gparted-live*.iso of=/dev/sdX status=progress - Reboot your PC and set your BIOS or Boot Menu to boot from your USB drive.
Upon reboot, you should successfully be up and running GParted from your USB flash memory stick.
How to Put GParted on USB from macOS
To put GParted on USB from macOS, follow these steps:
- Insert your USB flash drive into your Mac.
- Download the GParted Live ISO from the website.
- Open the Terminal on macOS.
- Use the following command to identify your USB drive:
diskutil list
- Unmount the USB device (replace «X» with your USB drive identifier, e.g., /dev/disk2):
diskutil unmountDisk /dev/diskX
- Write the GParted ISO to the USB drive using the `dd` command (replace «X» with your USB identifier):
sudo dd if=/path/to/gparted-live.iso of=/dev/rdiskX bs=1m
- Once the process is complete, eject the USB drive with:
diskutil eject /dev/diskX
- Reboot your Mac and hold the Option key to select the USB drive as the boot device.
FAQ (Frequently Asked Questions)
- What is GParted, and why would I use it?
- GParted (GNOME Partition Editor) is a powerful, open-source tool used to manage disk partitions. It allows you to resize, delete, move, or create partitions without data loss. You might use it if you need to reorganize or format partitions on your hard drive or external storage devices.
- What file systems are supported by GParted?
- GParted supports a wide range of file systems, including NTFS, FAT16/FAT32, ext2, ext3, ext4, HFS/HFS+, Linux-swap, ReiserFS/4, UFS, XFS, and others.
- How to check my selected drive before making the GParted Live USB?
- It’s important to double check the device name (e.g.,
/dev/sdX) using fdisk (on Linux) or through the YUMI interface (on Windows) to ensure that you’re selecting the correct USB drive. Choosing the wrong drive can result in unrecoverable data loss. - Can I use a USB drive with a persistent partition?
- You could technically create a persistent partition on your USB if you need to save settings or data across sessions. However, persistence is typically not necessary for USB partitioning tools.
Troubleshooting Tips
- My system doesn’t boot from the USB drive after following the steps.
-
- Ensure the boot order in your BIOS or UEFI settings is configured to boot from the USB device first.
- If using a legacy BIOS, check if the system supports booting from a USB device.
- Try using a different USB port or a different USB drive to rule out hardware issues.
- GParted doesn’t appear in YUMI’s distribution list.
-
- If GParted is not listed in the YUMI dropdown, choose the Try unlisted ISO option and manually browse to your downloaded GParted Live ISO.
- Ensure you have the correct ISO file downloaded, and that it’s not corrupted.
- The dd command in Linux is failing or taking too long.
-
- Double check that you’ve selected the correct device letter (‘/dev/sdX’) in the dd command.
- Make sure the ISO file is not corrupted, and try using the
status=progressoption to monitor the progress. - If the process is extremely slow, try a faster USB drive or port (USB 3.0 or higher recommended).
- The USB drive becomes unreadable or unusable after creating the GParted Live USB.
-
- This is expected if you’ve used the
ddmethod, as it completely overwrites the contents of the USB drive. - You can format the USB drive again using any partition tool or operating system to make it usable for other purposes.
- This is expected if you’ve used the
- I can’t find the GParted ISO file after downloading it.
-
- Check your browser’s download folder or settings to locate the ISO file.
- You can also use your system’s search functionality to find it on your computer.
- Make sure you’ve downloaded the correct file for creating the bootable USB (i.e., a ‘.iso’ file).
- GParted Live USB is not detecting my hard drive or partition.
-
- Ensure that the hard drive is properly connected and recognized by the system’s BIOS/UEFI.
- If you’re using RAID or special configurations, check if GParted supports your device by reviewing the list of supported systems on the official website.
- Sometimes, you may need to update the version of your GParted Live USB in order to support newer hardware.
Содержание
- Введение в GParted
- Шаг 1: Загрузка GParted
- Шаг 2: Создание загрузочного диска или USB-накопителя
- Шаг 3: Загрузка компьютера с загрузочного устройства
- Общий итог
- Gparted для windows как его установить
- Что такое Gparted?
- Как установить Gparted для Windows?
- Итоги
- Gparted для Windows: как его установить
- Шаг 1: Загрузка Gparted
- Шаг 2: Установка Gparted
- Шаг 3: Запуск Gparted
- Шаг 4: Использование Gparted
- Итог
Добро пожаловать в наше экспертное руководство по установке GParted для Windows! Если вы ищете надежный инструмент для разбиения дискового пространства и управления разделами на вашем компьютере с операционной системой Windows, то GParted может быть вашим лучшим решением.
Введение в GParted
GParted — это бесплатное программное обеспечение с открытым исходным кодом, предоставляющее пользователю мощные функции для работы с разделами на жестком диске. Он основан на Unix-подобной операционной системе и может быть запущен в операционной системе Windows с помощью специального запускаемого диска или USB-накопителя.
Шаг 1: Загрузка GParted
Первым шагом в установке GParted для Windows является загрузка его соответствующей версии с официального веб-сайта проекта. Перейдите на страницу загрузки и найдите последнюю версию GParted для Windows. Загрузите установочный файл на свой компьютер.
Шаг 2: Создание загрузочного диска или USB-накопителя
После загрузки GParted вам потребуется создать загрузочное устройство (диск или USB-накопитель), чтобы запустить программу на вашем компьютере. Для этого вам потребуется программное обеспечение для записи образов дисков, например, Rufus или Etcher.
Откройте выбранное вами программное обеспечение для записи образов дисков и выберите загруженный файл GParted в режиме образа. Затем выберите ваше загрузочное устройство (диск или USB-накопитель) и начните процесс создания загрузочного диска или USB-накопителя.
Шаг 3: Загрузка компьютера с загрузочного устройства
Теперь, когда у вас есть загрузочное устройство с GParted, вы должны перезагрузить компьютер и запустить его с загрузочного устройства. Для этого вам, скорее всего, потребуется изменить порядок загрузки в BIOS или выбрать определенный ключ, чтобы выбрать загрузочное устройство при запуске компьютера.
После успешной загрузки с загрузочного устройства вы увидите интерфейс GParted, готовый к использованию и готовый для управления разделами на вашем диске.
Общий итог
В этой статье мы рассмотрели процесс установки GParted для Windows. Он включает загрузку программы с официального сайта, создание загрузочного диска или USB-накопителя и загрузку компьютера с этого устройства. GParted — мощный инструмент, позволяющий управлять разделами на вашем диске в операционной системе Windows.

Теперь у вас есть все необходимые знания для установки GParted и начала использования его на вашем компьютере. Не забывайте резервировать свои данные перед внесением каких-либо изменений в разделы, чтобы избежать потери информации.

Установите GParted для Windows и наслаждайтесь свободой управления своими разделами с помощью этой замечательной программы! Надеемся, что наше руководство было полезным и понятным для вас.
Gparted для windows как его установить
Добро пожаловать в нашу статью, посвященную установке Gparted для Windows. Если вы хотите настроить, изменить или управлять разделами на вашем жестком диске, Gparted — это мощный инструмент, который поможет вам сделать это без проблем. В этой статье мы расскажем вам, как установить Gparted на Windows и начать использовать его.
Что такое Gparted?

Gparted — это бесплатный и открытый источник программного обеспечения, предназначенный для управления разделами на жестких дисках. Он позволяет создавать, изменять, удалять и перемещать разделы, а также изменять их размеры. Gparted поддерживает различные операционные системы, включая Linux, Windows и Mac.
Как установить Gparted для Windows?
Для установки Gparted на Windows вы должны выполнить следующие шаги:
- Перейдите на официальный сайт Gparted и нажмите на ссылку «Download Gparted Live ISO». Это должно загрузить файл ISO на ваш компьютер.
- После загрузки файла ISO вам понадобится специальная программа для создания загрузочного USB-накопителя. Вам может потребоваться загрузочная утилита, такая как Rufus или UNetbootin.
- Подключите USB-накопитель к компьютеру и откройте программу для создания загрузочного USB-накопителя. Выберите загруженный файл ISO Gparted и укажите свое устройство USB-накопителя в качестве целевого.
- Нажмите кнопку «Создать» или «Записать», чтобы начать процесс создания загрузочного USB-накопителя с Gparted. Подождите, пока процесс завершится.
- После создания загрузочного USB-накопителя вставьте его в компьютер, который нужно настроить с помощью Gparted. Перезагрузите компьютер и выберите загрузку с USB-накопителя (обычно нажатием клавиши F12 или DELETE во время загрузки).

Это все! Теперь вы установили Gparted для Windows и готовы начать использовать его для управления разделами на вашем жестком диске.
Итоги
Gparted — это незаменимый инструмент для управления разделами на вашем жестком диске. Установка Gparted на Windows может быть немного сложной задачей, но с помощью этой статьи вы сможете успешно установить и начать использовать Gparted в кратчайшие сроки. Не бойтесь экспериментировать с разделами на вашем жестком диске, и Gparted обязательно поможет вам в этом!
Gparted для Windows: как его установить

Добро пожаловать на страницу, посвященную установке Gparted для операционной системы Windows! Если вы ищете удобное и мощное решение для управления разделами на вашем компьютере, то Gparted – это то, что вам нужно. В этой статье я подробно расскажу, как установить Gparted на ваш Windows-компьютер. Давайте начнем!
Шаг 1: Загрузка Gparted
Первым шагом в установке Gparted на Windows является загрузка программы. Для этого перейдите на официальный сайт Gparted (ссылка на официальном сайте) и найдите раздел загрузки. Будьте внимательны при выборе версии, убедитесь, что вы загружаете подходящую для вашей системы. Gparted доступен как для 32-разрядной, так и для 64-разрядной версий Windows.
Шаг 2: Установка Gparted

Как только загрузка Gparted будет завершена, откройте загруженный файл для начала установки. Следуйте инструкциям мастера установки, чтобы выполнить процесс установки Gparted на ваш компьютер. Будьте внимательны и ознакомьтесь со всеми всплывающими подсказками во время установки. По завершению установки Gparted будет готов к использованию.
Шаг 3: Запуск Gparted
После установки Gparted, вы можете спокойно запустить программу со своего рабочего стола или из меню «Пуск». Когда Gparted загружается, вам будет представлено основное окно программы со списком всех доступных разделов на вашем компьютере. Вы также увидите панель инструментов с различными опциями для управления разделами.
Шаг 4: Использование Gparted
Теперь, когда Gparted установлен и запущен, вы готовы начать использовать его для управления разделами на вашем компьютере. Gparted предлагает множество возможностей, таких как создание новых разделов, изменение размера разделов, перемещение разделов, форматирование разделов и многое другое.
Одним из ключевых преимуществ Gparted является его простота использования и доступность даже для начинающих пользователей. Программа предоставляет интуитивно понятный пользовательский интерфейс с подробными инструкциями и справкой, чтобы помочь вам в выполнении необходимых задач.
Итог
В этой статье я рассказал о том, как установить Gparted на Windows-компьютер. Шаги включают загрузку Gparted, установку программы, запуск и использование для управления разделами. Gparted – это надежное и мощное решение, которое поможет вам в управлении разделами на вашем компьютере.
Установка Gparted на Windows – простой и понятный процесс, который может быть выполнен даже новичком в области компьютеров. Следуя инструкциям и справке Gparted, вы сможете успешно управлять разделами на своем компьютере.
Так что не стесняйтесь и установите Gparted на ваш компьютер уже сегодня! Наслаждайтесь преимуществами этого удобного инструмента и управляйте разделами на своем Windows-компьютере без проблем!