
В Windows 11 с помощью подсистемы Windows для Android (WSA) вы можете установить магазин Google Play Store, загружать и устанавливать любые приложения Android на свой компьютер с помощью определенных действий, которые включает в себя множество шагов.
Это был просто вопрос времени, теперь вы можете устанавливать Android приложения из Play Store в Windows 11, но не официально. Пользователь твиттера — ADeltaX, разработал процедуру, позволяющую обойти подсистему Windows для Android и установить приложение Google Play Store, что дает вам доступ в Windows 11 ко всему каталогу приложений для Android.
Пока, неясно, как это повлияет на будущие обновления. Другими словами, данный способ вполне может быть только временным решением, поскольку до сих пор не понятно, что произойдет после того, как WSA получит обновление через Магазин Microsoft. Вероятно, любому, кто использует этот метод, придется повторить весь процесс настройки. Конечно, если вы не отключите автоматическое обновление приложений в параметрах приложения Магазин Microsoft.
Этот способ установки магазина Google Play Store в Windows 11 является сокращением инструкций ADeltaX, но, если есть желание, вы можете следовать полной инструкции из репозитория Github.
Следуйте шагам ниже, чтобы установить магазин приложений Google и иметь возможность устанавливать приложения для Android в Windows 11.
Подготовка компьютера с Windows 11 для установки WSA
Прежде чем перейти к загрузке и установке, необходимо убедиться, что на вашем компьютере включены дополнительные функции Hyper-V и Virtual Machine Platform.
Шаг 1: Для этого, нажмите сочетание клавиш Win R, чтобы открыть диалоговое окно «Выполнить».
Шаг 2: Введите или скопируйте и вставьте:
OptionalFeatures
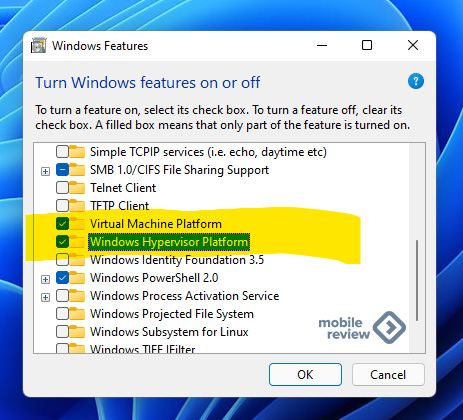
Шаг 3: Здесь в окне «Компоненты Windows» для «Hyper-V» и «Платформа виртуальной машины» установите флажок, чтобы включить его.
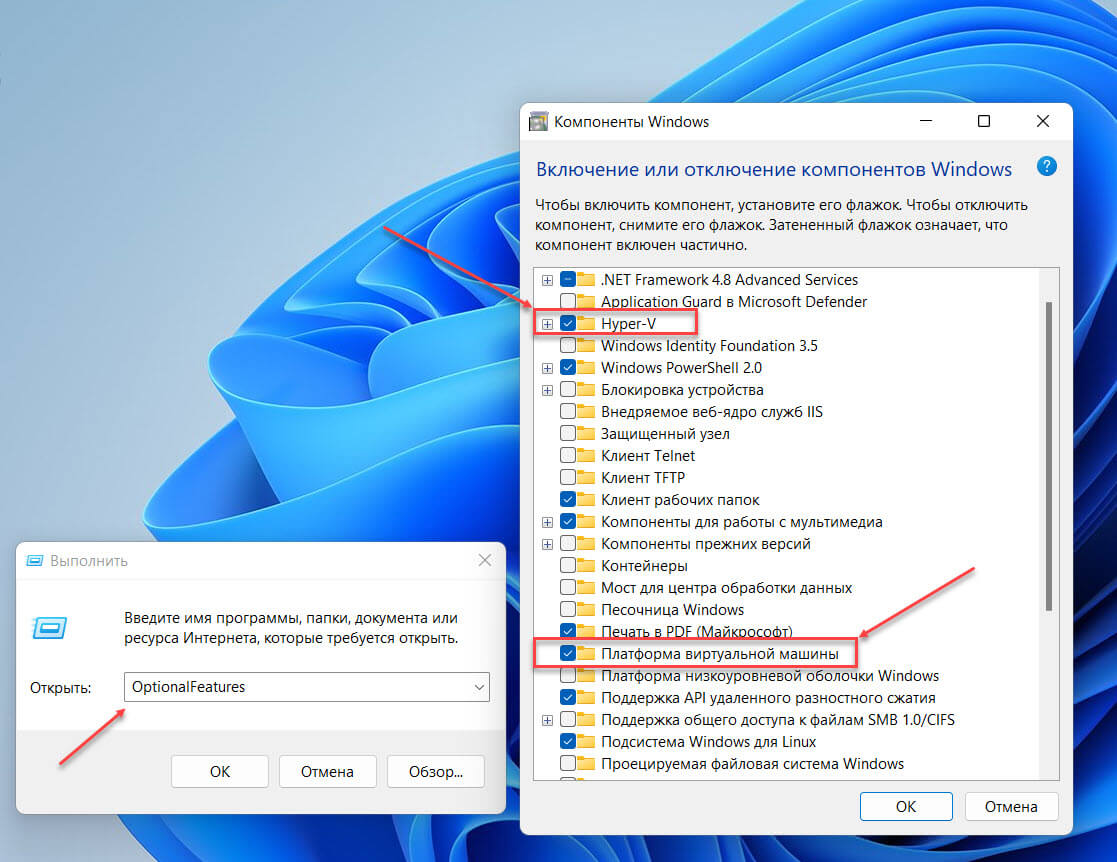
Шаг 4: Нажмите кнопку «ОК», чтобы установить эти дополнительные функции на свой компьютер с Windows.
Удалите любой ранее установленный пакет WSA
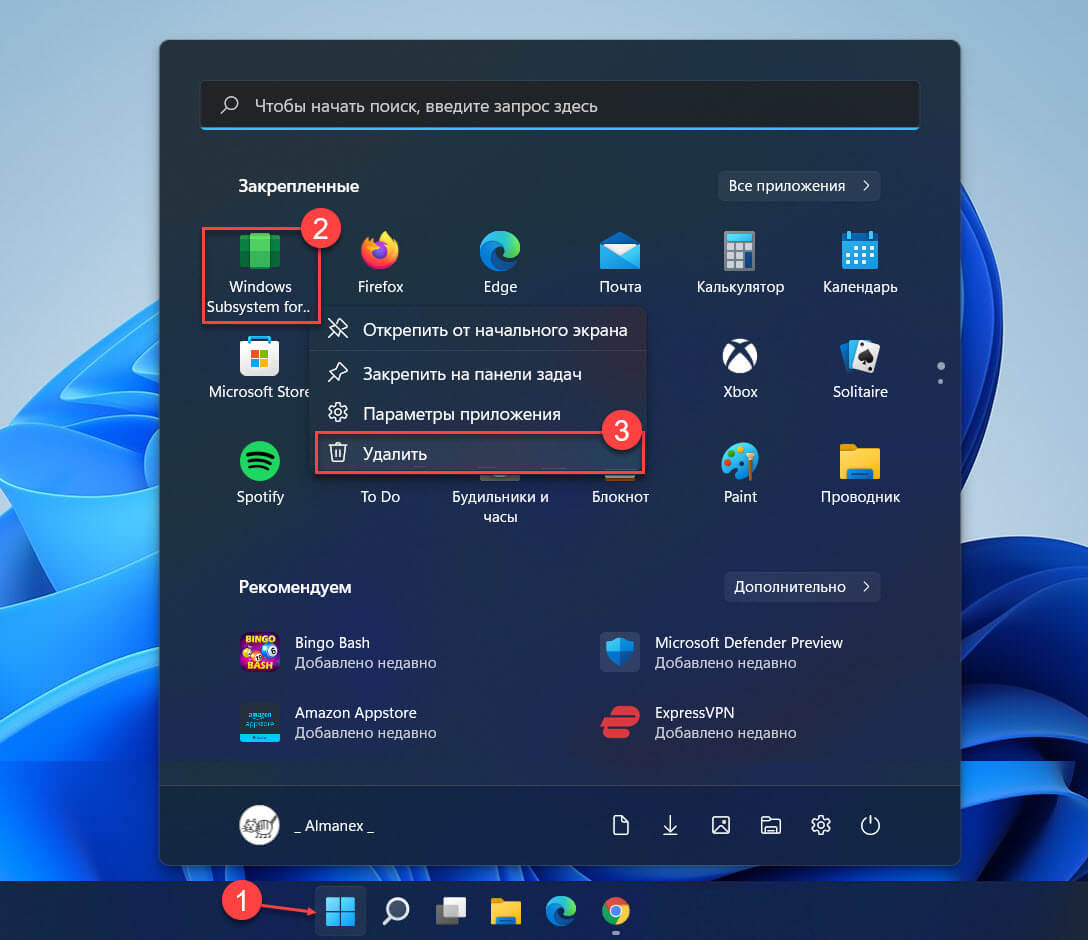
Удалите подсистему Windows для Android, если она уже установлена. Это связано с тем, что мы будем устанавливать новую подсистему Windows для Android, в которой существует интеграция Google Apps.
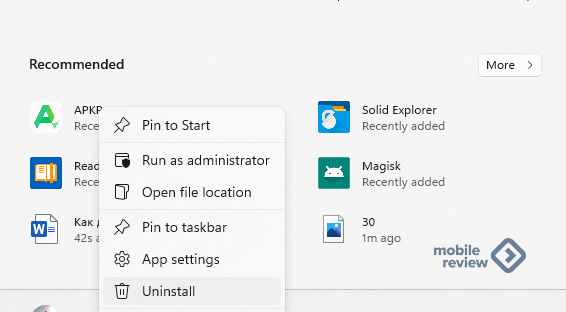
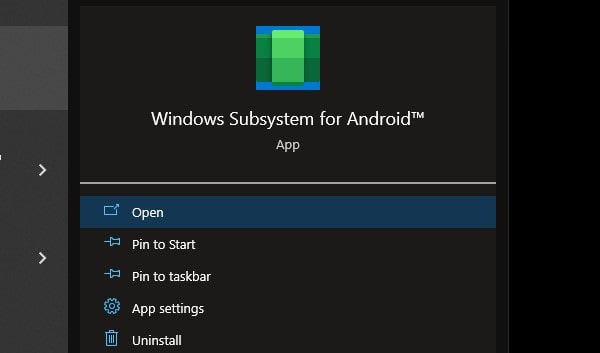
Шаг 5: Для этого, откройте меню «Пуск», найдите и кликните на подсистему «Windows Subsystem for Android» правой кнопкой мыши и выберите в контекстном меню пункт «Удалить». Затем следуйте инструкциям на экране, чтобы завершить процесс удаления.
Включите параметры разработчика в Windows 11.
Вам нужно будет включить параметры разработчика в Windows (в Windows 11, а не в WSA!).
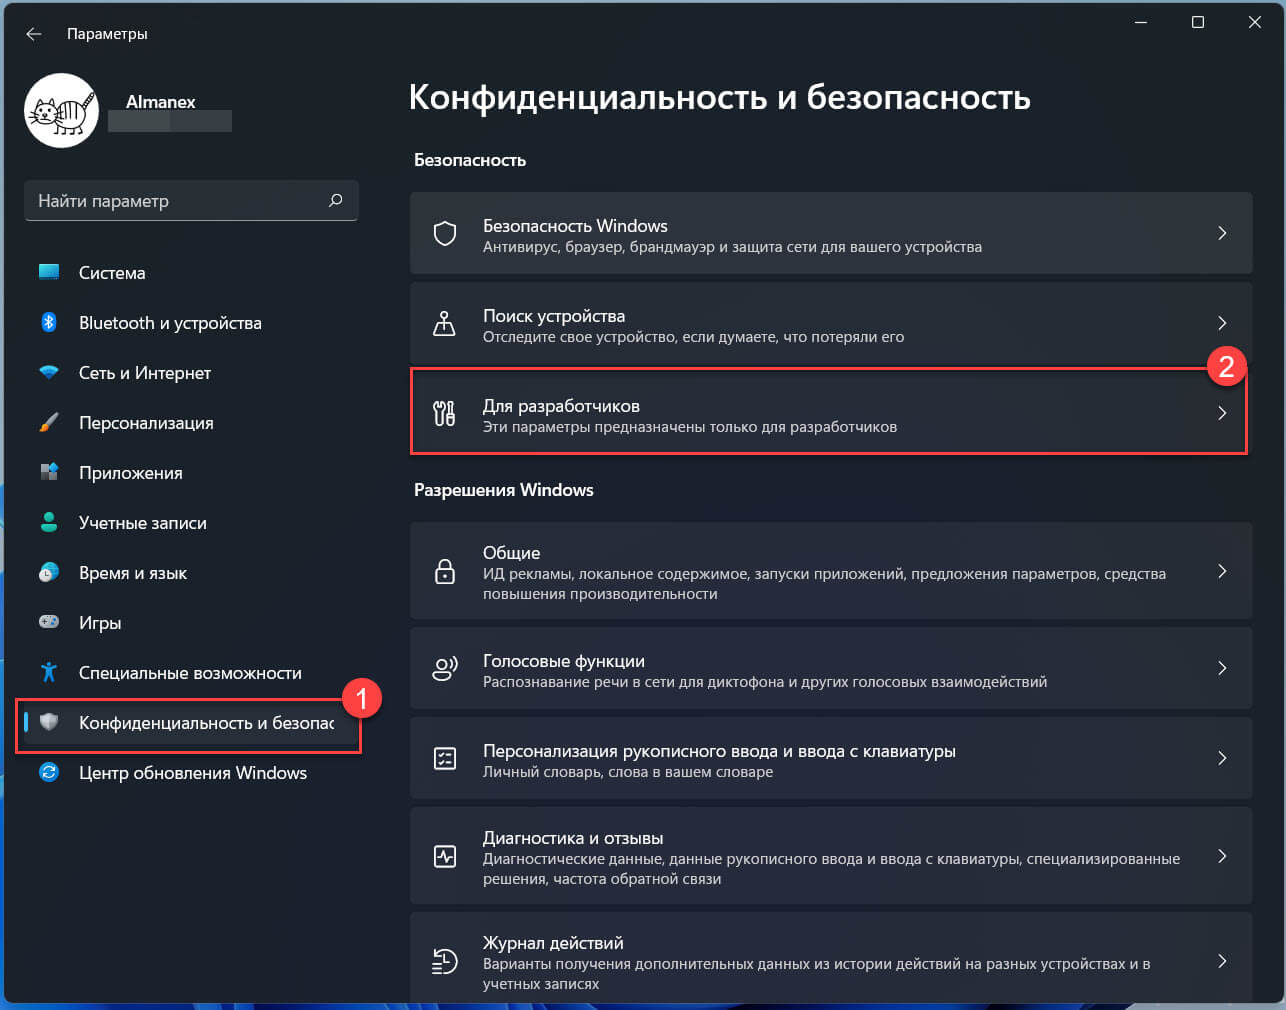
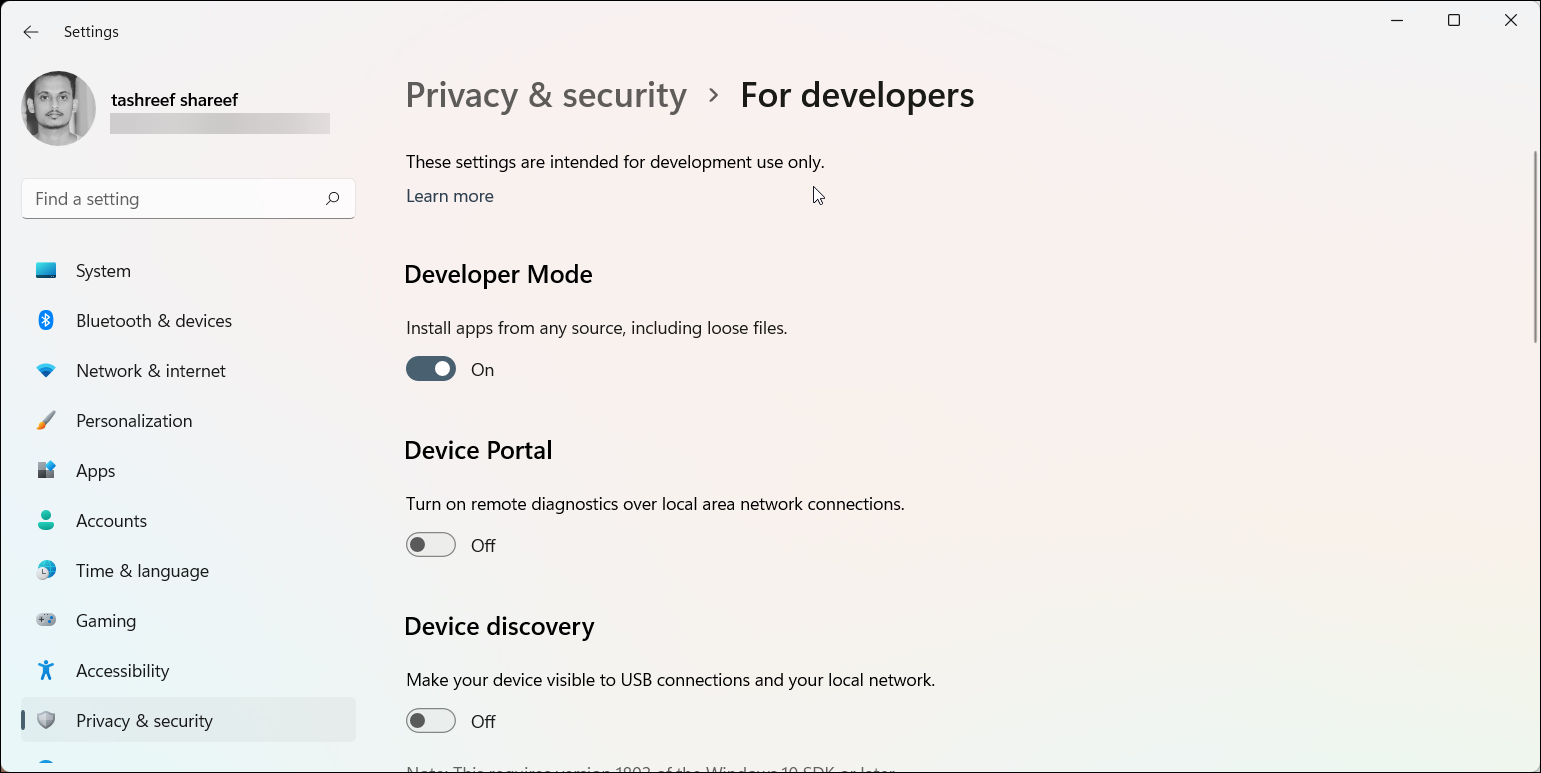
Шаг 6: Откройте параметры Windows 11, перейдите в раздел «Конфиденциальность и безопасность» → «Для разработчиков».
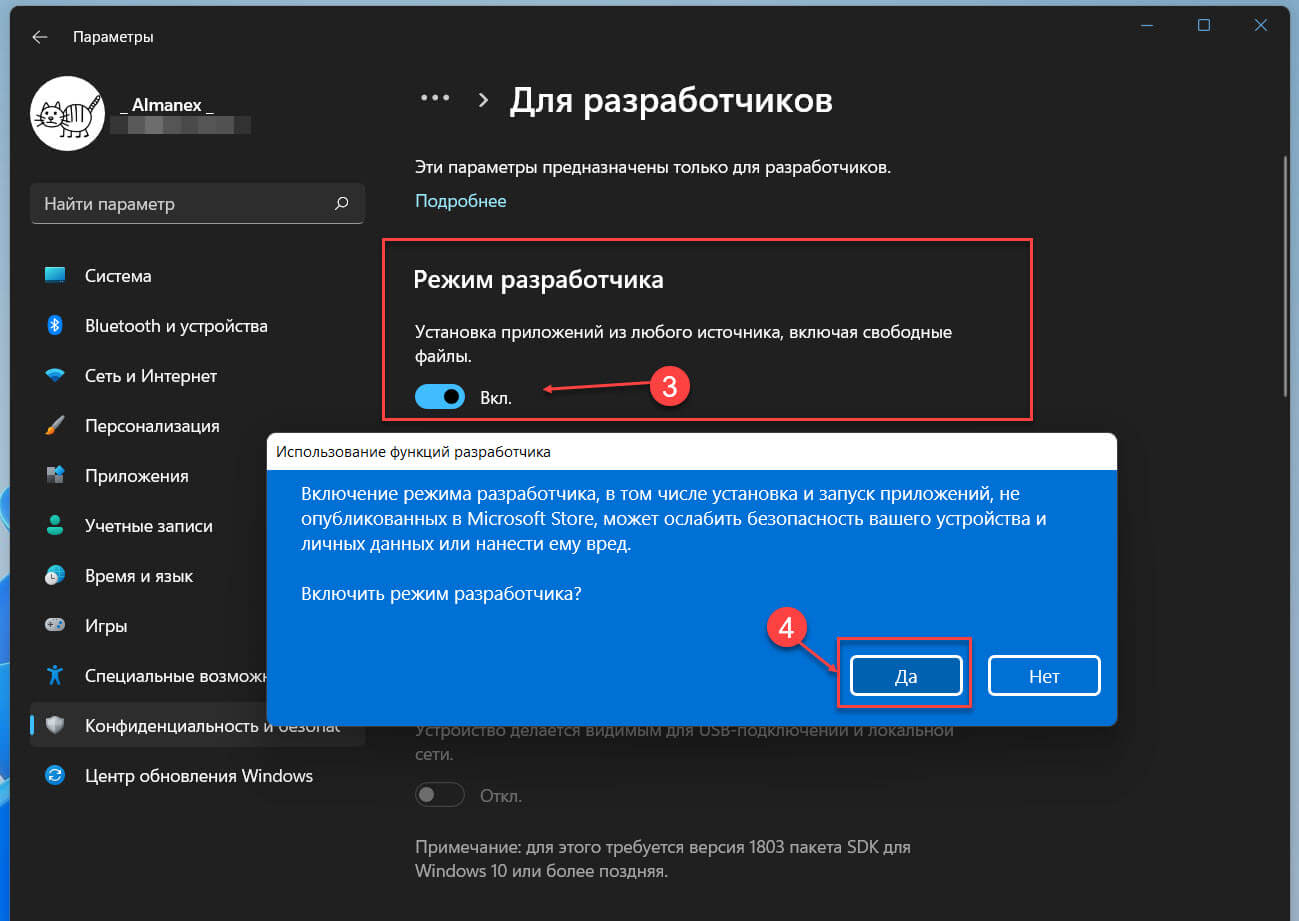
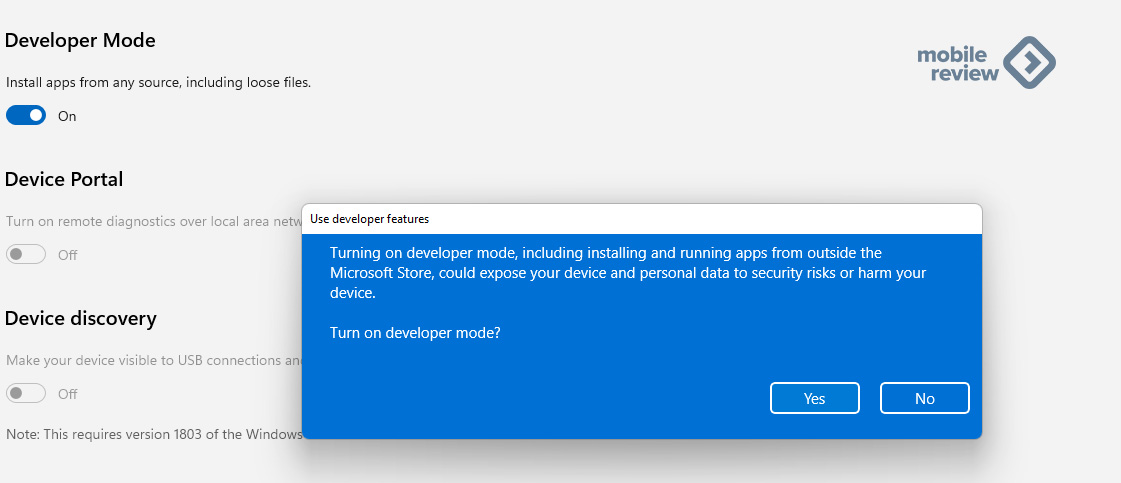
Шаг 7: В разделе режим разработчика передвиньте ползунок переключателя в положение «Вкл.»
Шаг 8: В следующем всплывающем окне подтвердите свои действия нажав кнопку «Да».
Загрузите WSA + GApps пакет MSIX:
Выберите для загрузки файл в зависимости от вашего устройства.
Шаг 9: Это модифицированная версия – «Windows Subsystem for Android (WSA-x86 64-бит + GApps)». (Mirror | Mirror 2)
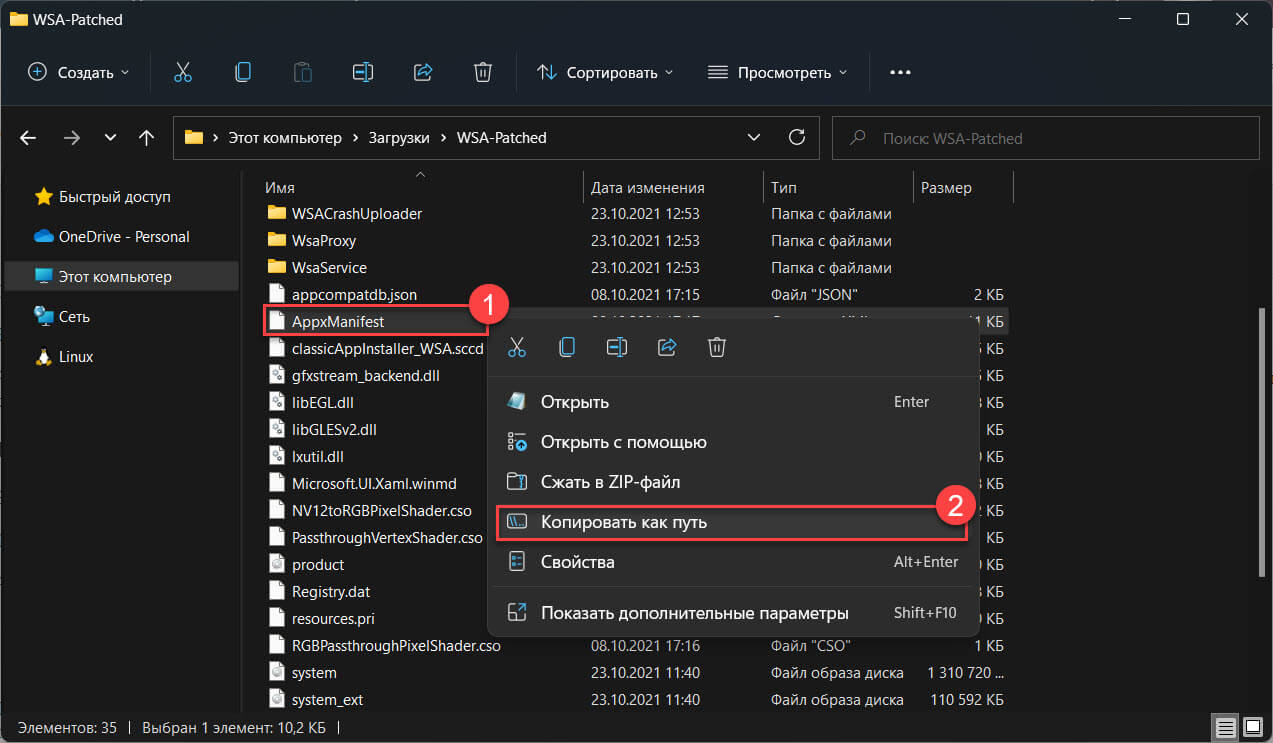
Шаг 10: Распакуйте загруженный Zip-архив в любое расположение, в дальнейшем нам потребуется указать путь к файлу AppxManifest.xml из этой папки.
Чтобы быстро получить путь к расположению файла, кликните на AppxManifest.xml правой кнопкой мыши и выберите «Копировать как путь», чтобы скопировать путь к файлу в буфер обмена ПК с Windows 11.
Зарегистрируйте пакет WSA + GApps:
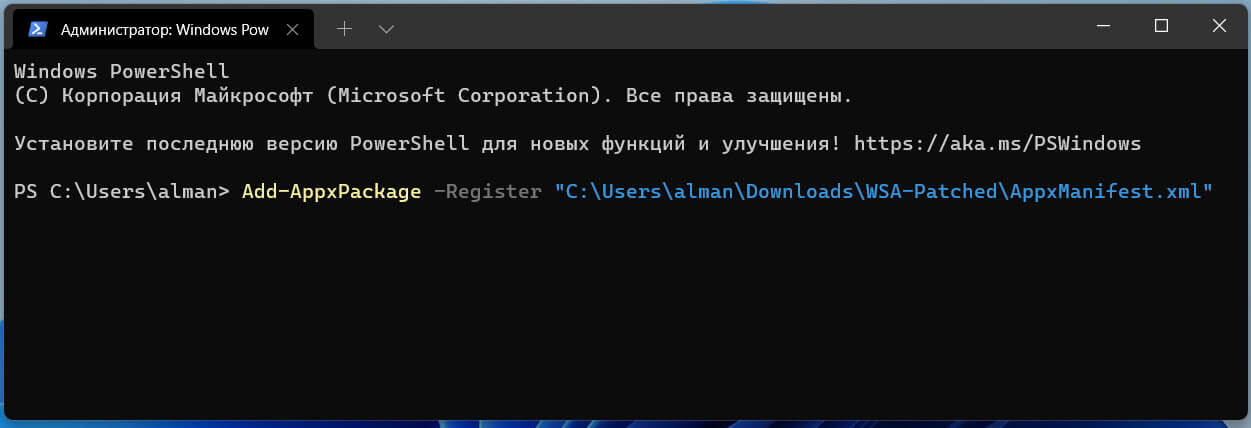
Шаг 11: Запустите Powershell от имени администратора с помощью Терминала или любым другим удобным вам способом.
Шаг 12: Измените команду Powershell, указав расположение извлеченного Zip-файла
Add-AppxPackage -Register "Путь_к_папке_с_WSA\AppxManifest.xml"
В моем случае команда выглядит так:
Add-AppxPackage -Register "C:\Users\almanex\Downloads\WSA-Patched\AppxManifest.xml"
Приложение WSA будет установлено на ваше устройство в фоновом режиме. Если вы получите сообщение об ошибке, убедитесь, что все шаги были выполнены правильно.
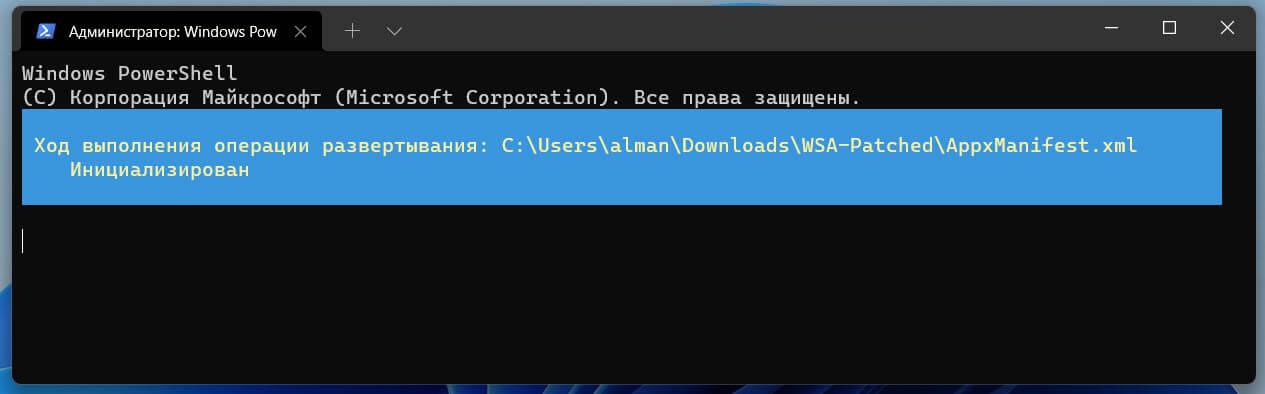
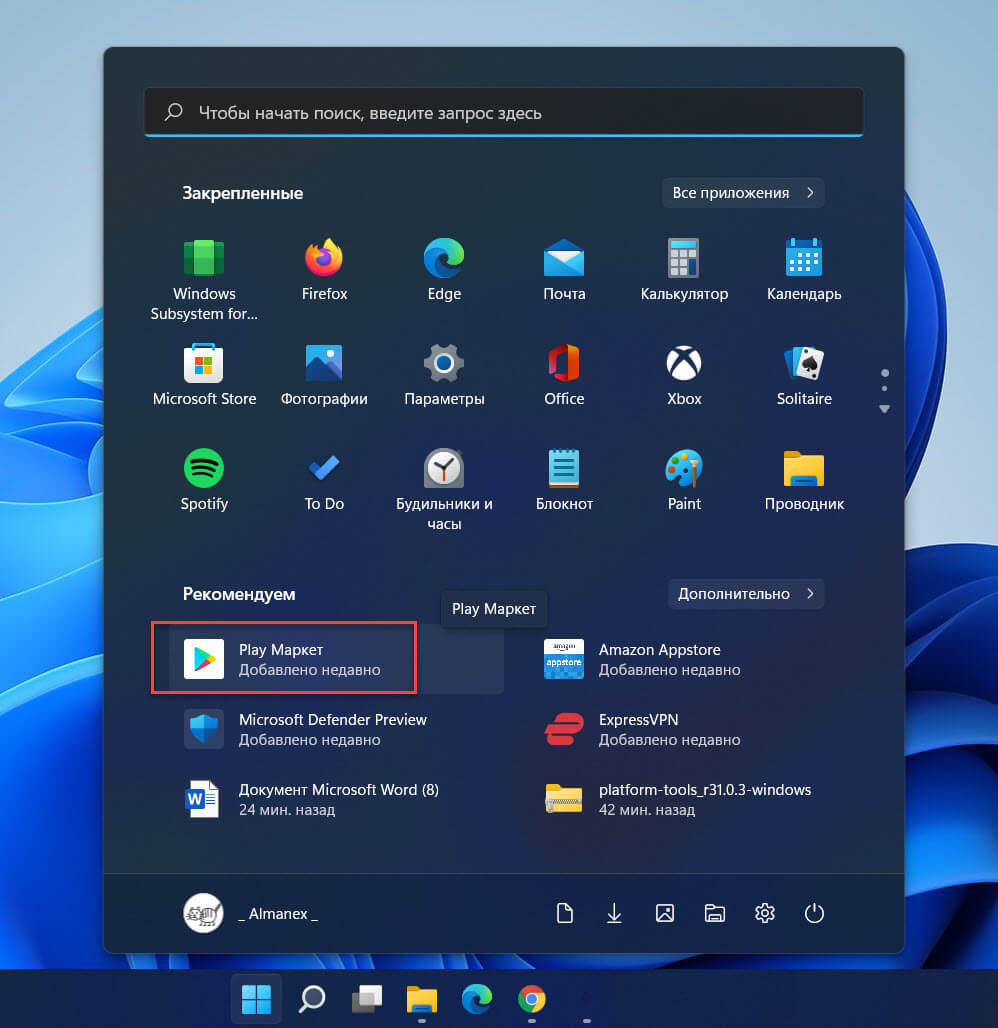
После регистрации WSA, магазин Google Play должен быть доступен в меню «Пуск».
И последнее, что нужно сделать, прежде чем вы сможете войти в свою учетную запись Google.
Загрузите ADBKit:
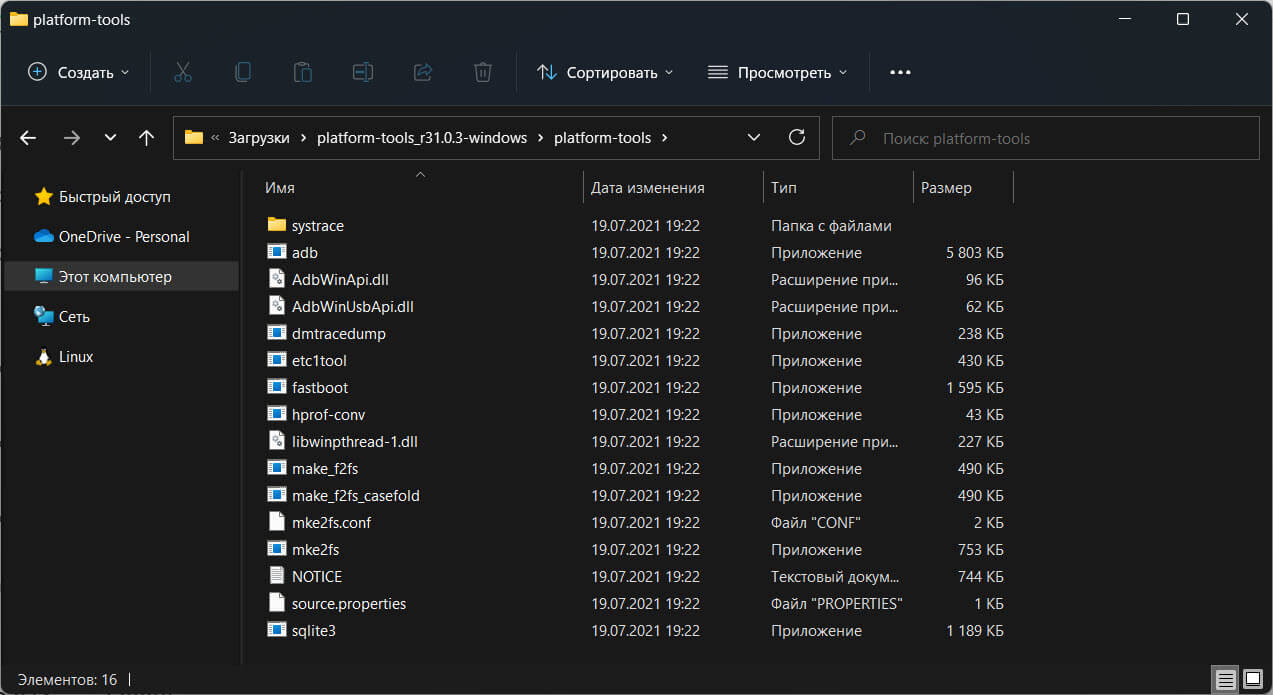
Шаг 13: На странице developer.android.com загрузите «SDK Platform-Tools for Windows».
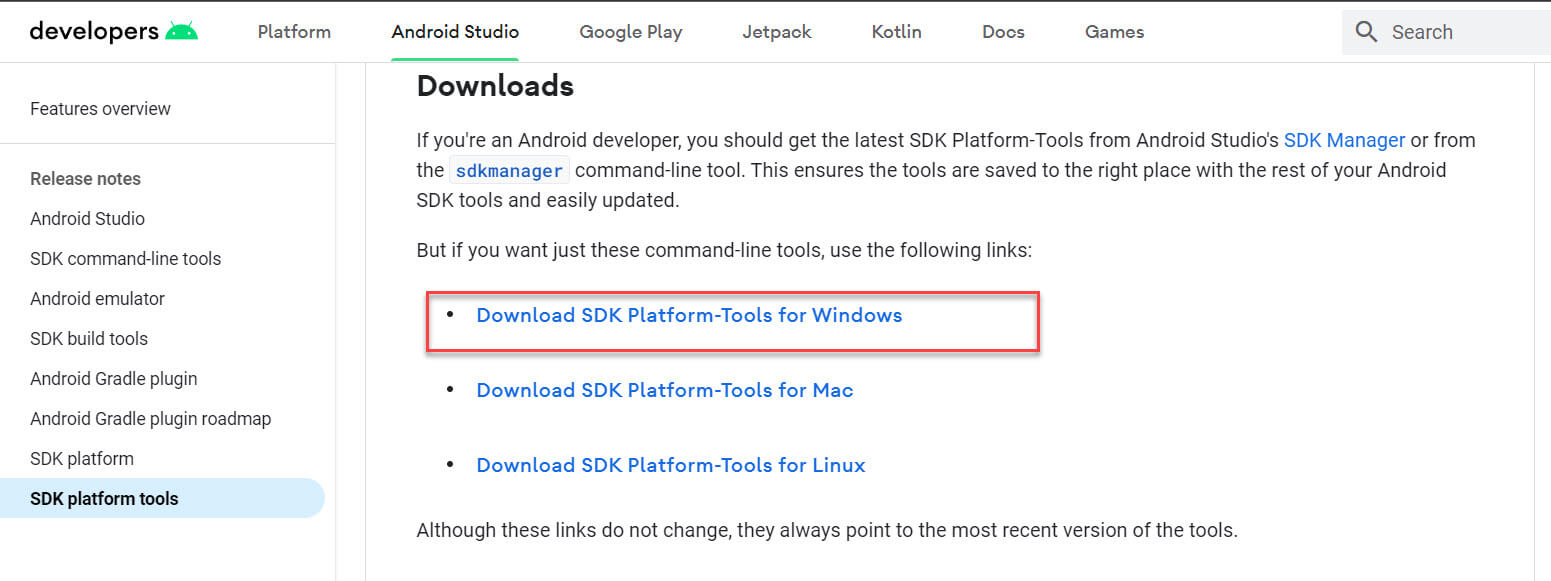
Шаг 14: Pаспакуйте zip-архив в любую папку.
Настройка WSA
Шаг 15: С помощью меню «Пуск» откройте приложение «Windows Subsystem for Android».
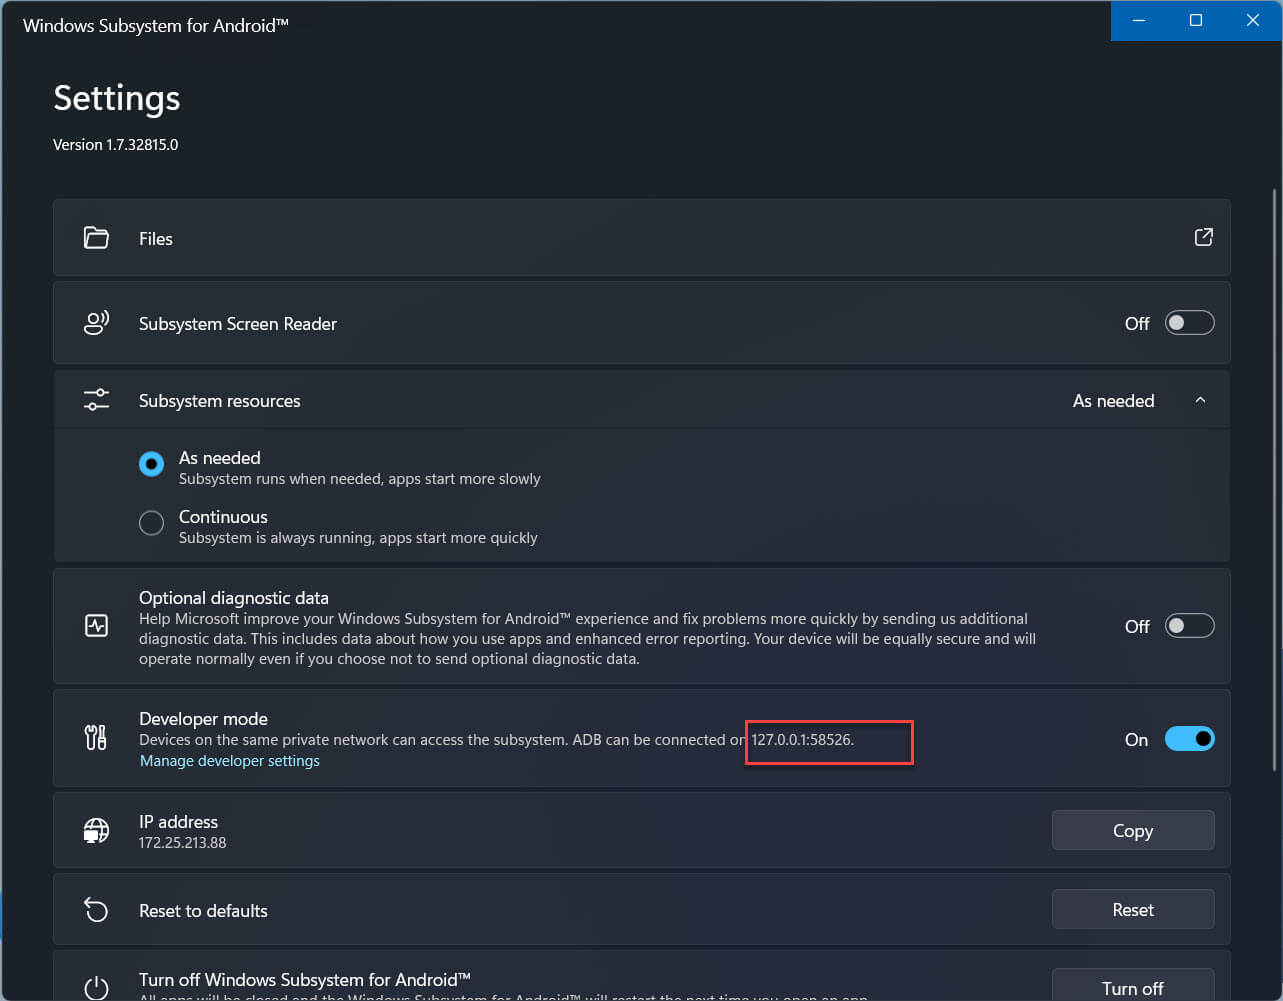
Шаг 16: В разделе «Режим разработчика» передвиньте ползунок переключателя в положение «Вкл.», как показано на экране ниже.
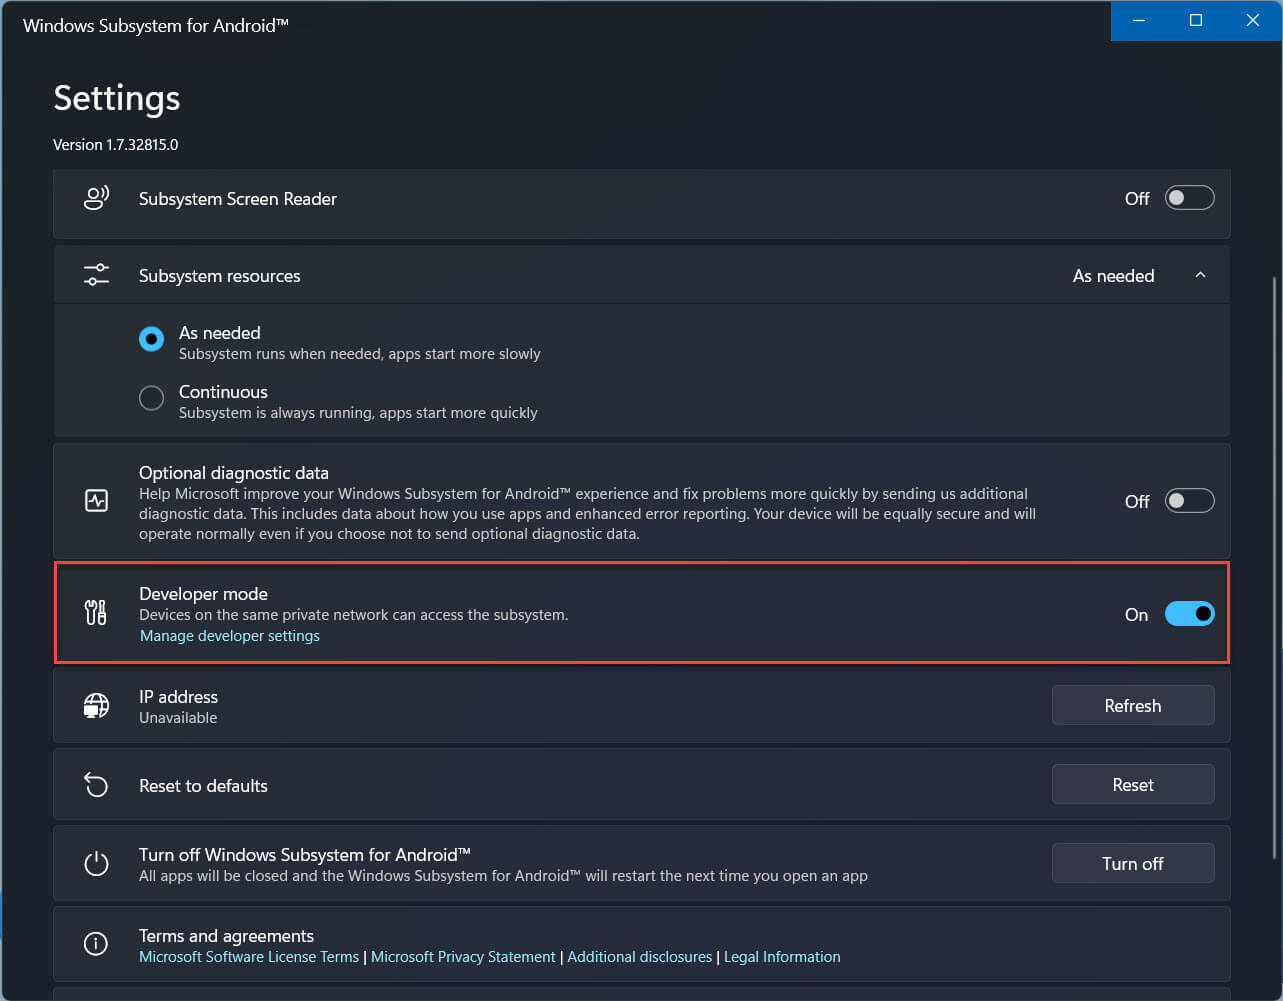
При появлении запроса брандмауэра разрешите доступ ADB.
Скопируйте IP-адрес
Шаг 17: Теперь в верхней части страницы параметров WSA откройте опцию «Файлы», в появившемся диалоговом окне нажмите «Продолжить».
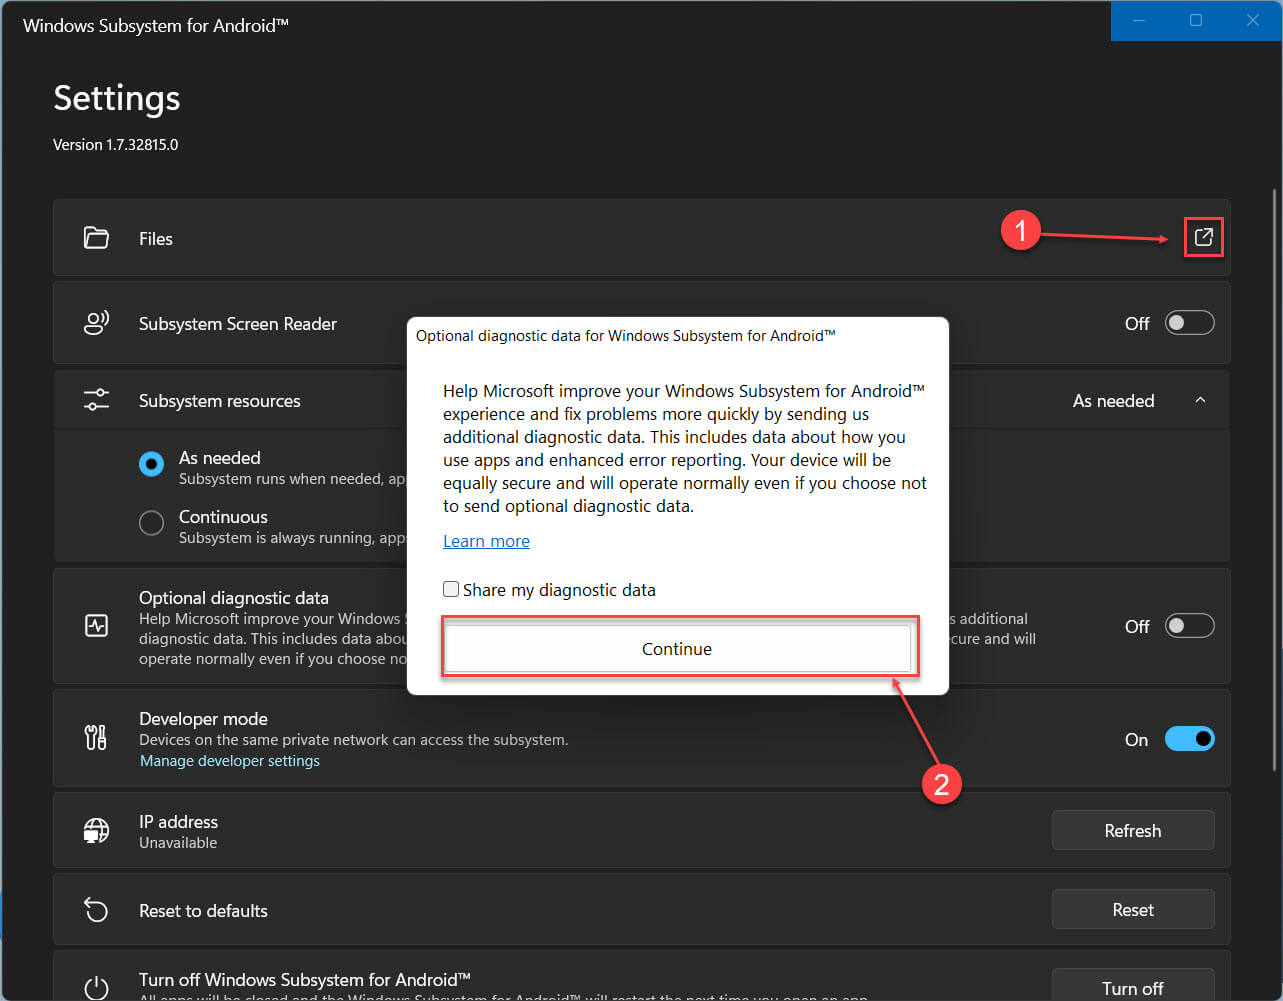
Шаг 18: Затем нажмите кнопку «Обновить» напротив опции IP-адрес.
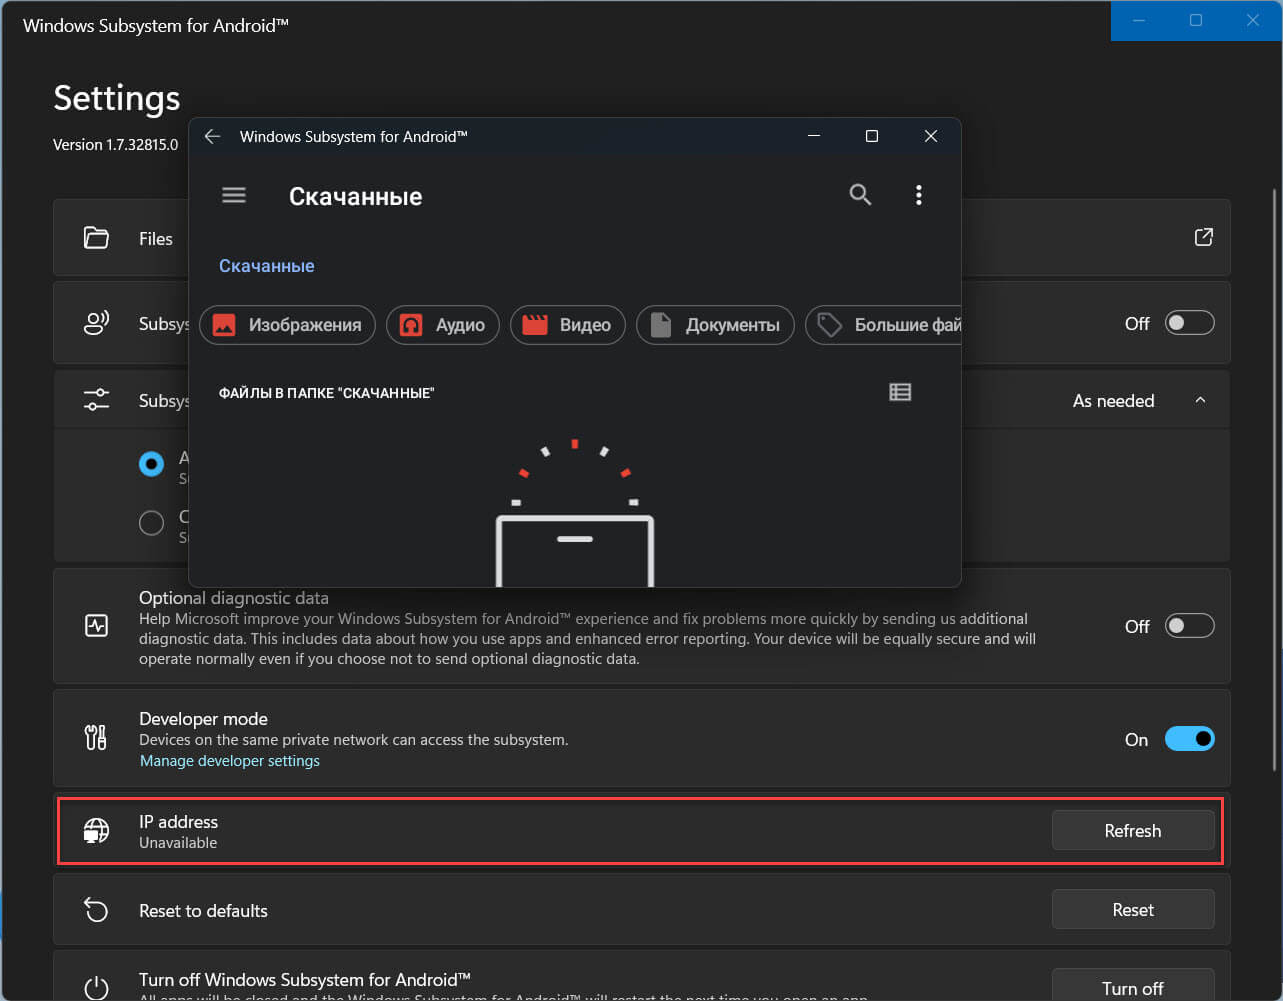
Шаг 19: Обратите внимание на адрес ADB, в разделе «Developer mode» отображается как 127.0.0.1:58526 (он должен быть таким же для вас)
Установите соединение
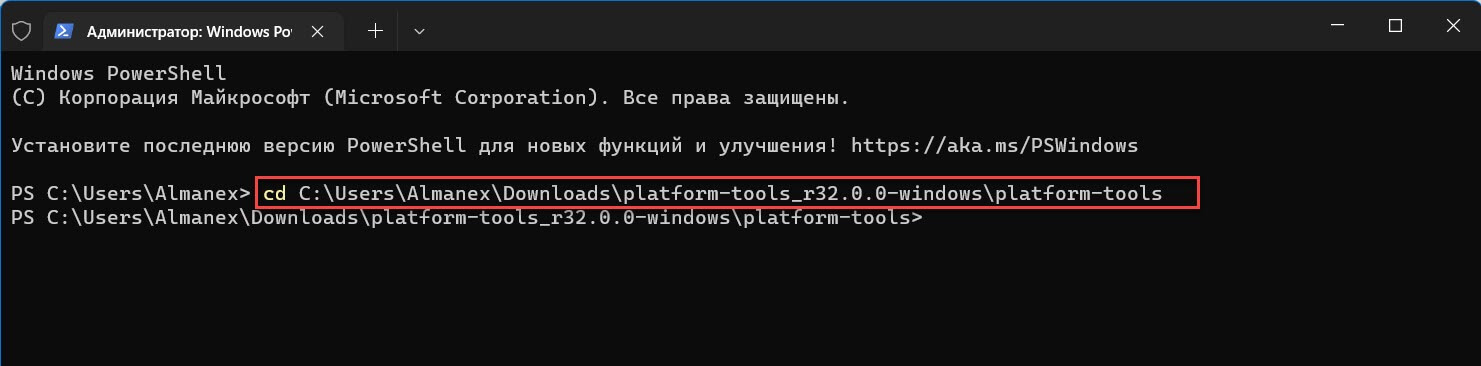
Шаг 20: Откройте Powershell от имени администратора и перейдите в папку «C:\Users\Almanex\Downloads\platform-tools_r32.0.0-windows\platform-tools» для этого можно использовать команду, предварительно заменив Имя_пользователя:
cd C:\Users\Имя_пользователя\Downloads\platform-tools_r32.0.0-windows\platform-tools
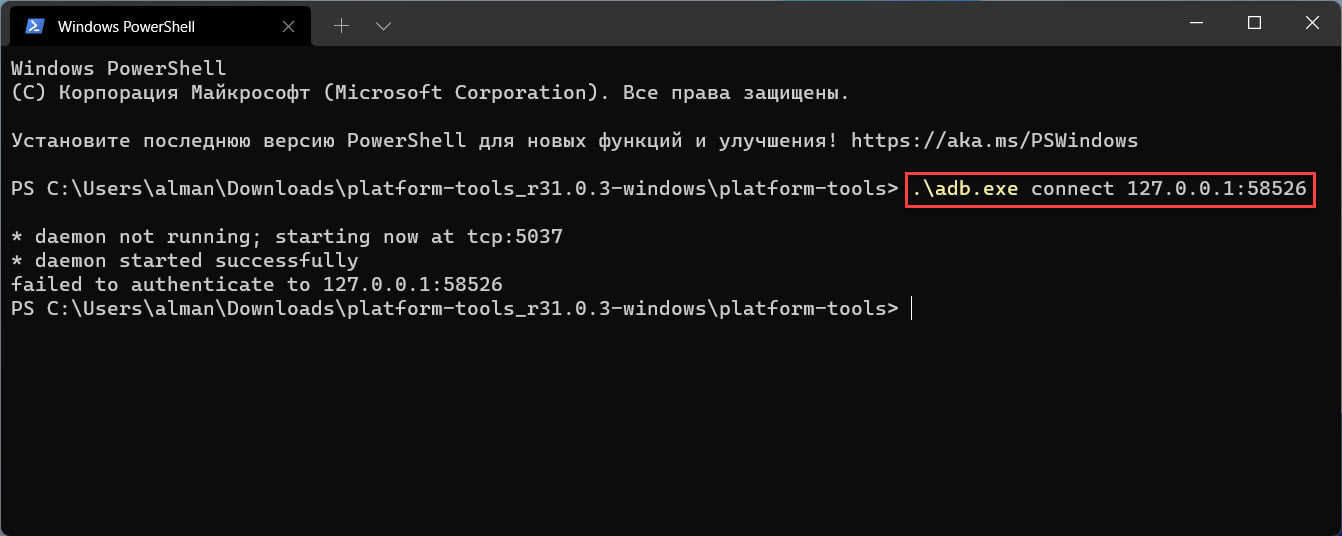
Теперь, выполните команду:
.\adb.exe connect 127.0.0.1:58526
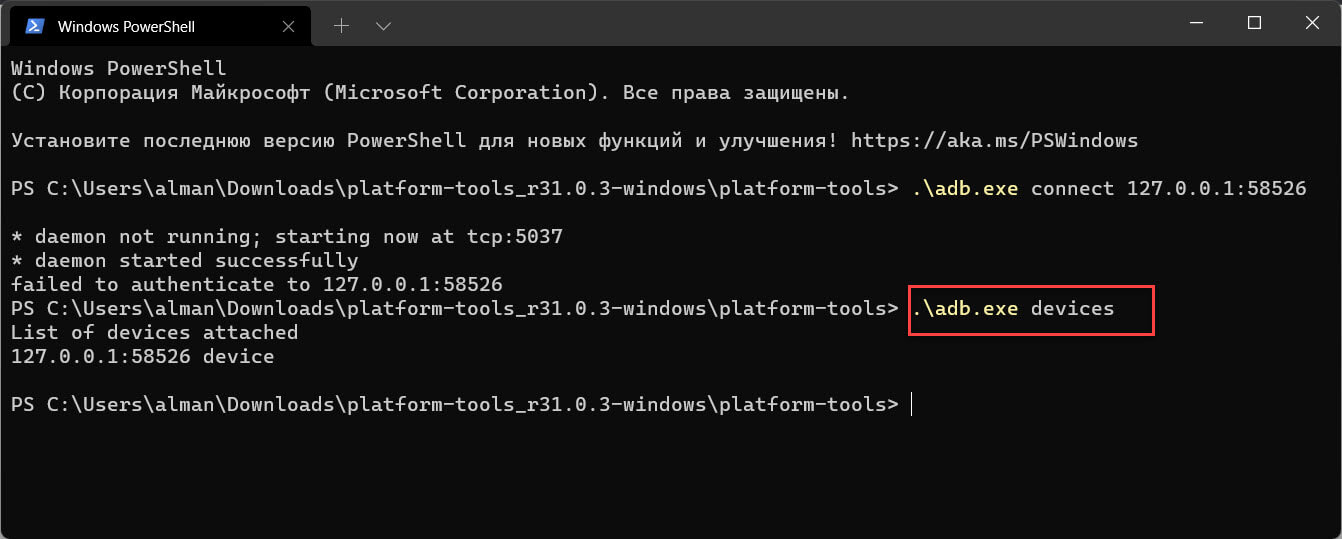
Шаг 21: Убедитесь, что adb подключен, выполнив:
.\adb.exe devices
Установите Google Play Store в Windows 11
Шаг 22: Чтобы иметь возможность авторизироваться в магазине Google Play, выполните по очереди три команды:
.\adb.exe shell
su
setenforce 0
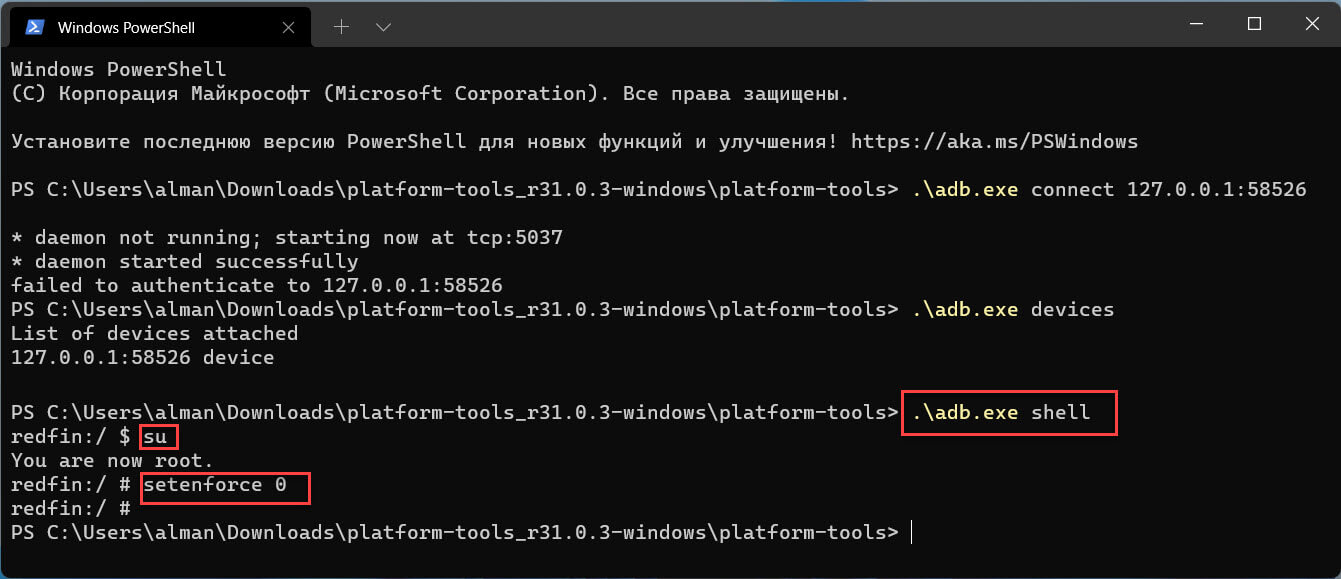
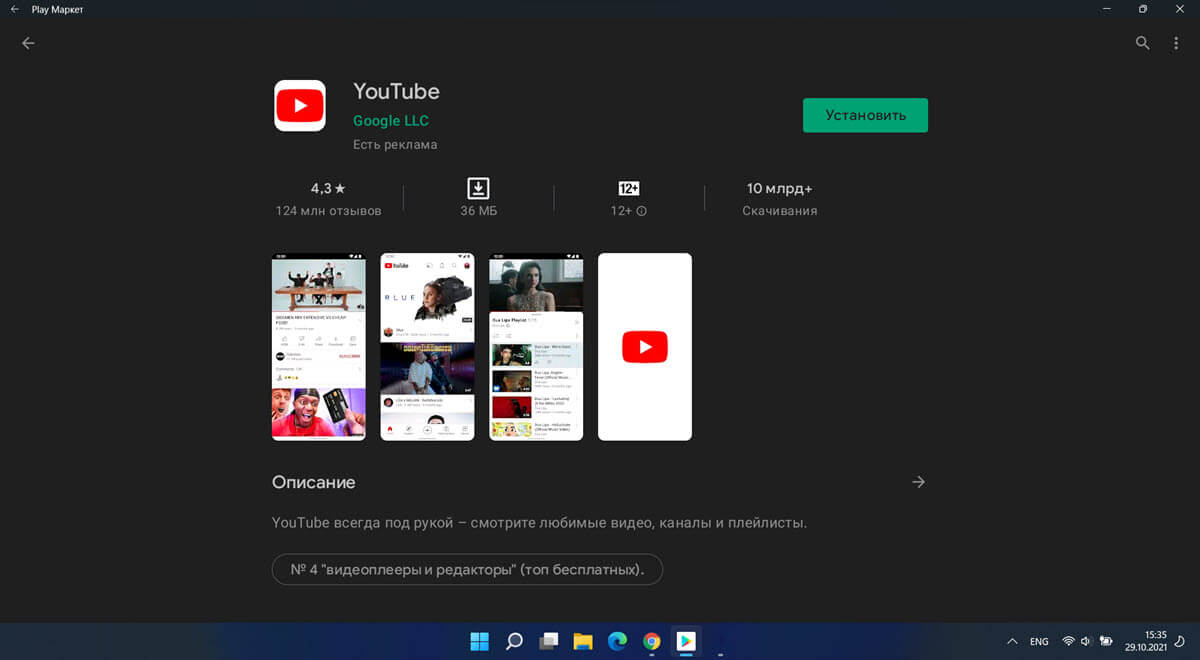
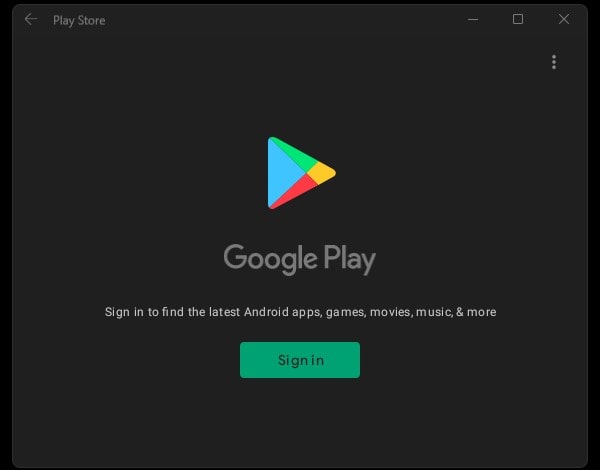
Если вы все сделали правильно, вы сможете войти в Google Play Store со своей учетной записью Google.
Теперь вы можете пользоваться полным набором приложений Google Play на наших компьютерах с Windows 11.
Большое спасибо ADeltaX, благодаря которому это стало возможным!
На этом мы завершаем руководство о том, как установить Google Play Store на ПК с Windows 11 с помощью подсистемы Windows для Android. Play Маркет, вероятно, лучший вариант, потому что он может похвастаться большим каталогом приложений и обеспечивает безопасную и надежную экосистему.
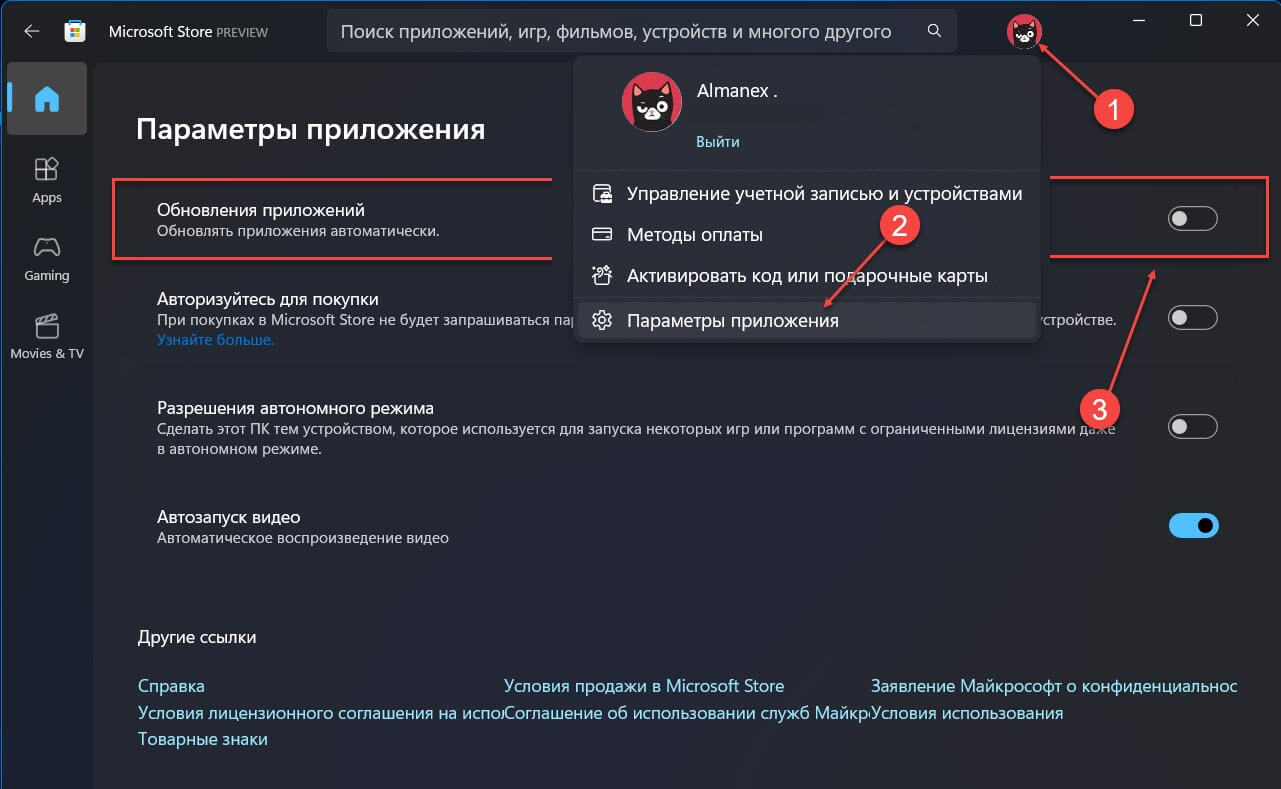
Если вы хотите, чтобы будущие обновления для подсистемы Windows для Android не сбросили выполненный вами процесс, вы можете отключить автоматические обновления для приложений в Магазине Microsoft: перейдите в меню «Профиль» → «Параметры приложения» и отключите автоматическое «Обновление приложений». Если вы хотите обновить другие приложения, вам необходимо обновить их вручную.
Вопросы.
- Могу ли я использовать Google Play Store для установки приложений в Windows 11?
Да, Google Play Store полностью работает в Windows 11. Спасибо пользователю Twitter ADeltaX.
- Нужен ли мне канал Windows Beta для запуска приложений Android в Windows 11?
Официально да. Но вы можете установить модифицированный пакет Msixbundle, чтобы он работал в любой сборке Windows 11.
- Как удалить приложение Android из Windows 11?
Чтобы удалить приложение Android из Windows 11, откройте меню «Пуск» найдите приложение, которое хотите удалить. кликните приложение правой кнопкой мыши и выберите «Удалить».
Зачем нужны Android-приложения на Windows? Несколько причин:
- Android на Windows запускается в отдельной подсистеме, которая никак не связана с основной системой. Соответственно, это оптимальный вариант для запуска приложений, которые скачаны непонятно где и уверенности в которых нет. Зачем запускать скачанные непонятно где приложения? Возможно, у вас есть проблемы с покупкой приложений в Google Play.
- Запуск игр. На Android есть интересные игрушки, некоторые даже довольно красивые и вызывают желание поиграть в них с комфортом на большом экране.
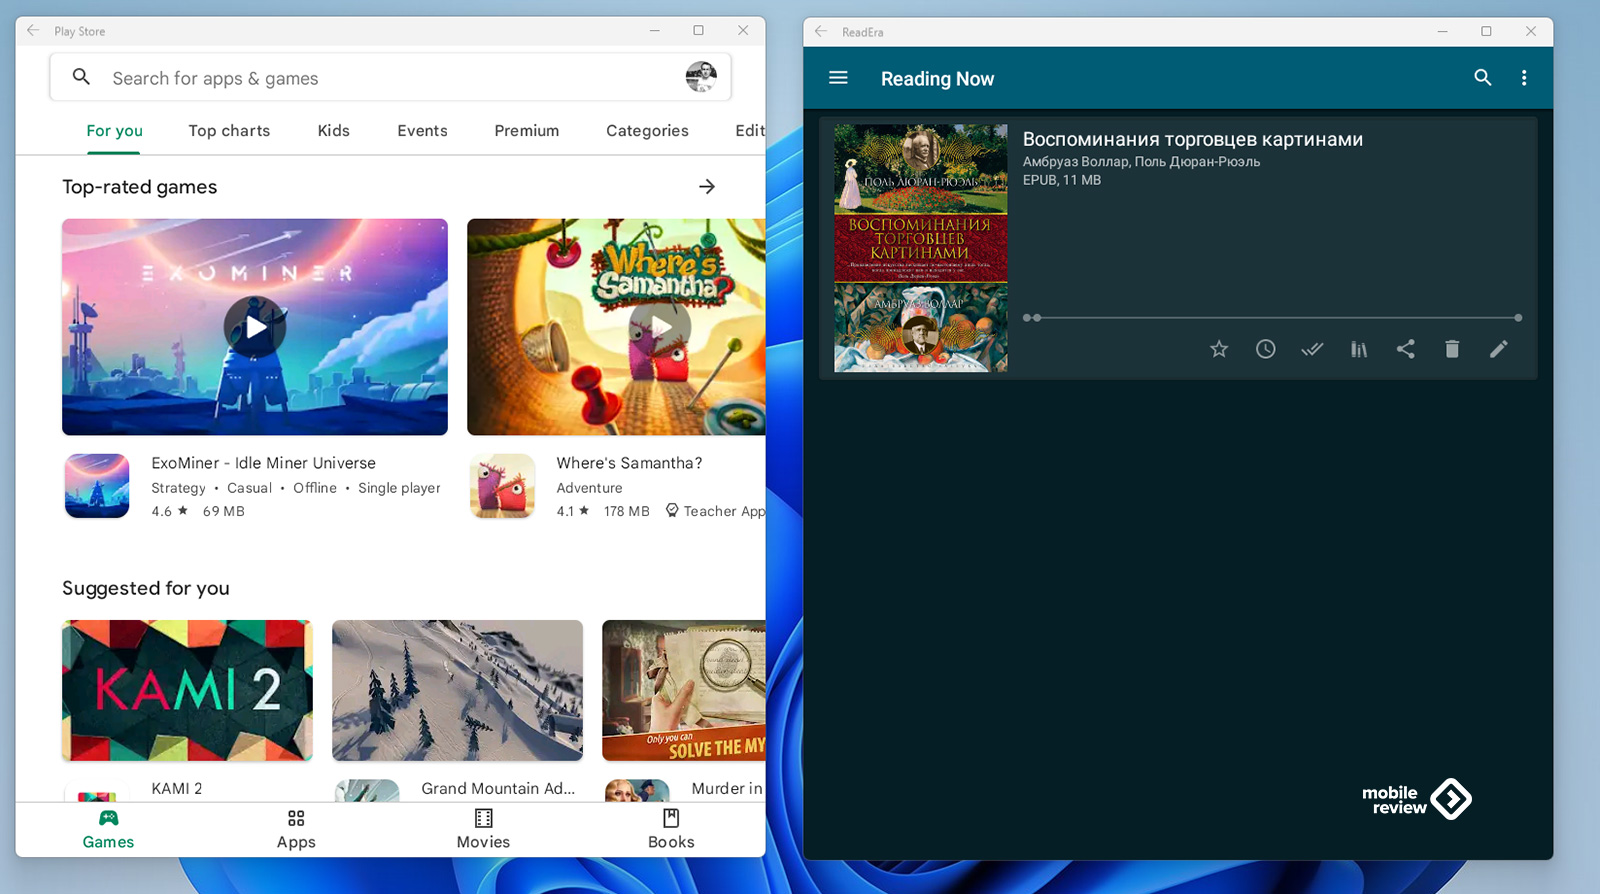
- Приложения для чтения книг. Беда Windows в том, что тут ужасно мало бесплатных, но хороших приложений для чтения книг. Та же Sumatra PDF – хороша, но настраивать размер шрифта, открывая в блокноте файл настроек?
- Защита от вирусов. Или вот понадобилась мне недавно читалка DJVU-файлов, пошел скачивать с привычного депозитария, проверил по привычке антивирусом и нашел 15 зловредов. Видимо, кто-то нехороший подсунул взломанную версию. Специально взял установочный файл этой же программы с ноутбука, проверил – всё чисто. А Google Play предлагает большой набор «чистых» программ. Например, у меня есть любимое приложение ReadEra, открывающее большинство файлов, всё без рекламы, есть все необходимые настройки.
- Приложение для подкастов. Это хороший вариант, так как позволяет не только установить привычное приложение, но и, войдя в Google-аккаунт, всё быстро синхронизировать.
- При этом, оценивая идею запуска Android-приложений на Windows, не забывайте, что Microsoft давно и упорно работает над идеей компьютеров 2-в-1, то есть устройств с сенсорным экраном и поддержкой стилуса. Соответственно, если у вас такой ноутбук, то Android-приложения – это множество хороших журналов для рисования и заметок.
Короче говоря, Android на Windows позволяет запустить любое приложение, аналог которого вам лень искать на Windows.
Основная беда заключается в том, что по умолчанию Windows использует магазин приложений Amazon. Это пустой и грустный магазин, в котором ничего нет. Соответственно, сразу же хочется что-то нормальное – Google или ApkPure.
Попутно рекомендую к прочтению материал, посвященный другому способу установки Google Play. Тот способ гораздо проще, но, к сожалению, оказалось, что это проделки хакеров и компьютер полон вирусов.
Table of Contents
-
Как установить магазин приложений Google Play
- Шаг 1: подготовка
- Шаг 2: модифицированная «Подсистема Windows для Android»
- Шаг 3: установка Google Play
- Шаг 4: установка ApkPure
- Заключение
Как установить магазин приложений Google Play
К сожалению, скриншоты в данной статье будут на английском языке, так как такая у меня лицензия Windows. Поскольку зачастую вся интересная документация к Windows, Office (и любым другим программам) публикуется на английском, то проще держать систему на английском языке, чем заморачиваться с переводом и поиском в меню нужных опций.
Шаг 1: подготовка
Если у вас уже была установлена Windows Subsystem for Android (WSA), то её придётся удалить. Это можно сделать привычным способом. Открыть в меню «Пуск», найти там «Подсистема Windows для Android», правая кнопка мышки и выбрать «Удалить».
Дальше надо включить режим разработчика. Эта опция находится по пути «Настройки» — «Конфиденциальность и безопасность» — «Для разработчиков» и выбрать соответствующий пункт. Но гораздо проще нажать на значок лупы рядом с кнопкой «Старт» и начать писать «разрабо…», и Windows сама предложит нужное меню.
Далее нужно включить в настройках виртуальную машину и Hyper-V платформу. Снова нажимаем на значок лупы и печатаем «включение или отключение компонентов windows» (Turn Windows features On or Off). Нажимаем Ok, и нужно немного подождать установки новых компонентов. После чего система предложит перезагрузиться.
Шаг 2: модифицированная «Подсистема Windows для Android»
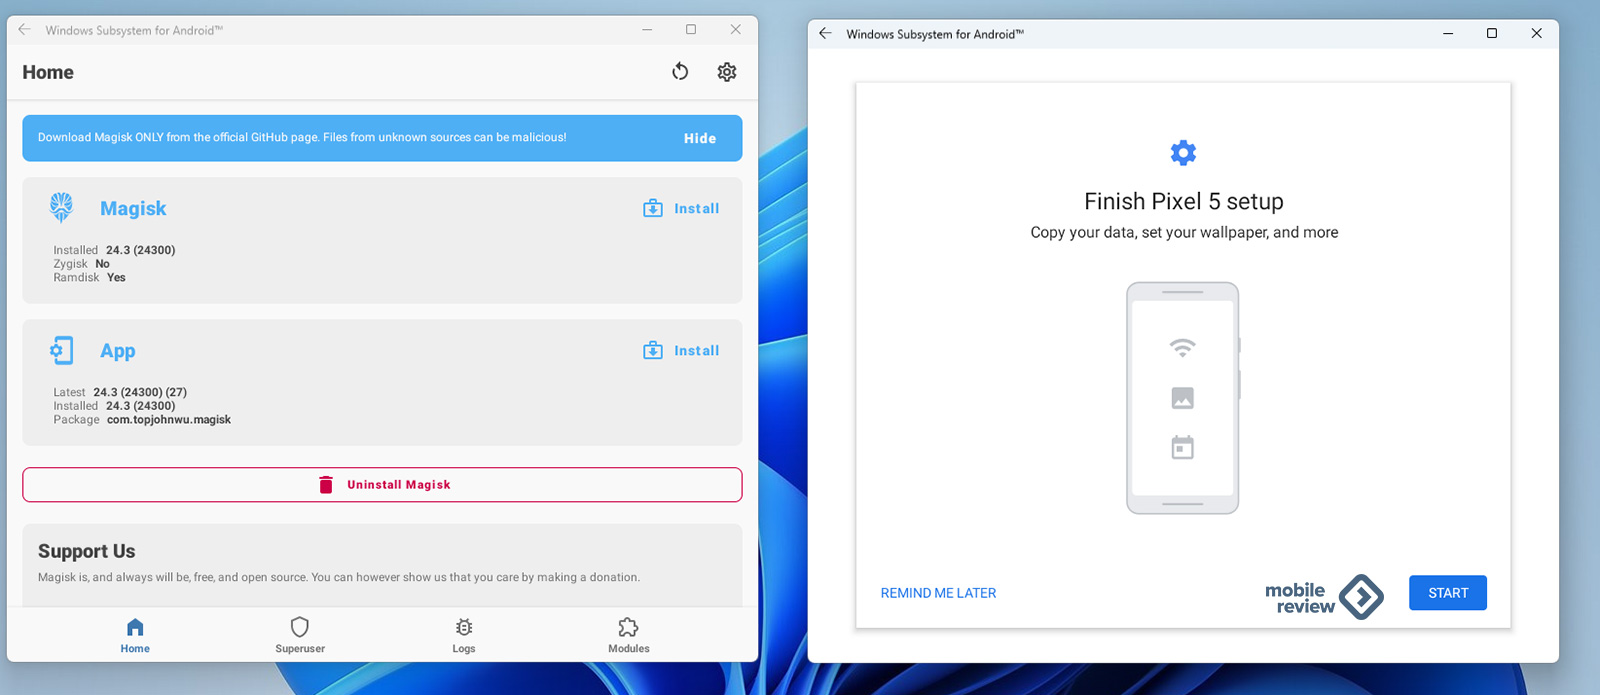
Теперь понадобится модифицированная подсистема. Модификация заключается в интеграции Magisk. Полагаю, Magisk знаком всем, кто когда-либо «рутовал» свой Android-смартфон.
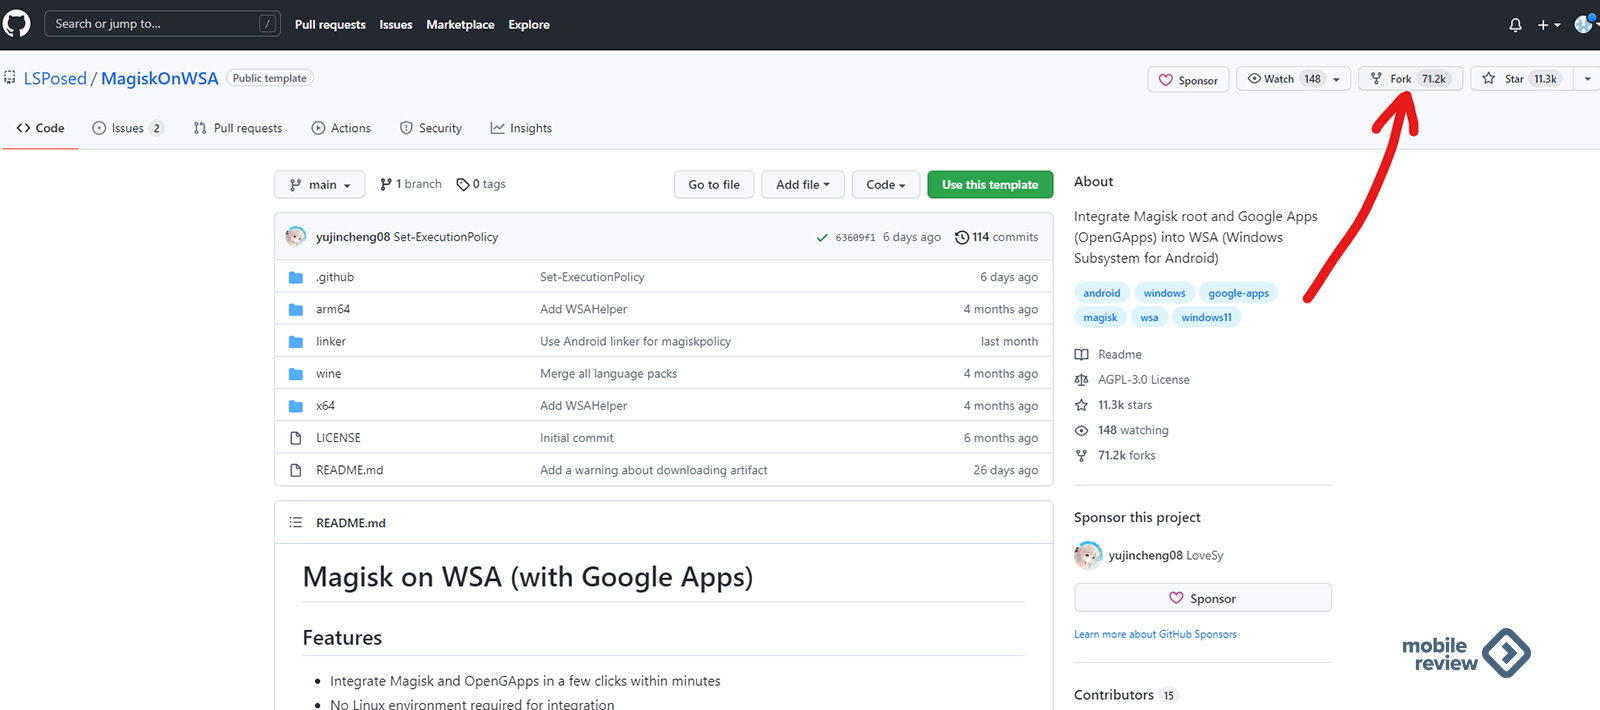
Magisk – это самая скучная часть нашего процесса, так как придётся отправиться на GitHub и создать копию репозитория. Нужная нам страница находится по адресу: https://github.com/LSPosed/MagiskOnWSA
Если вы на GitHub впервые, то придется потратить время на создание аккаунта. Зарегистрировавшись, идем по ссылке, указанной выше, и создаем собственную копию Magisk on WSA (with Google Apps). Для этого в правом верхнем углу нажимаем на кнопку «Fork» и ждем пару секунд.
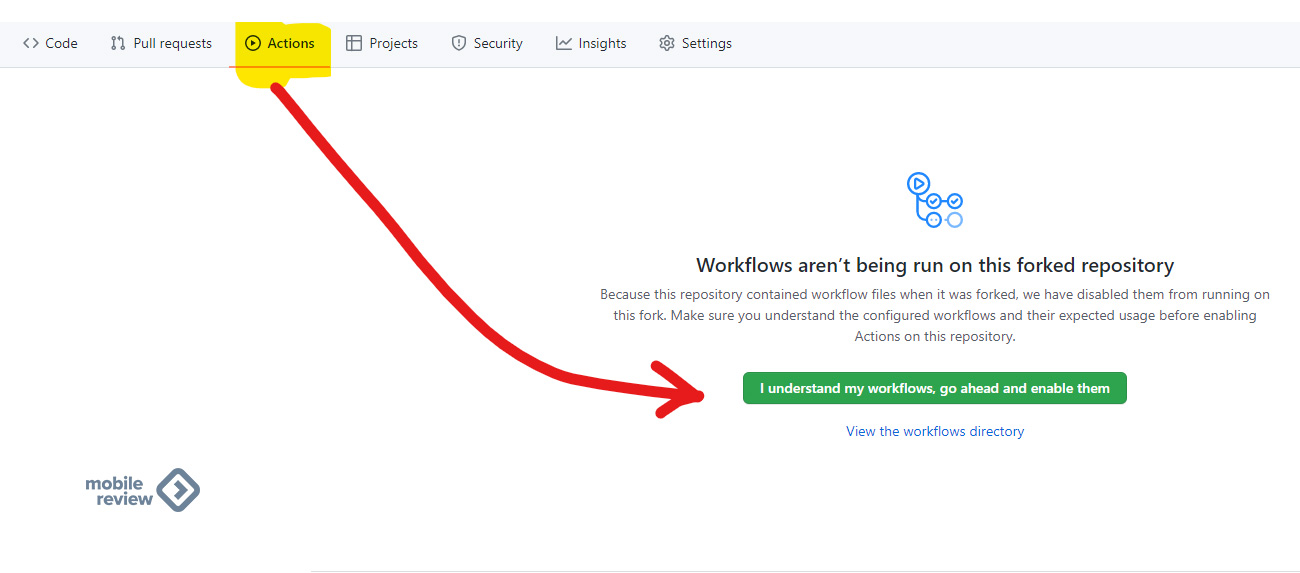
Теперь у нас появился собственный репозиторий, с которым можем делать что угодно. Идем на вкладку «Actions» и нажимаем зеленую кнопку «I understand my workflows, go ahead and enable them».
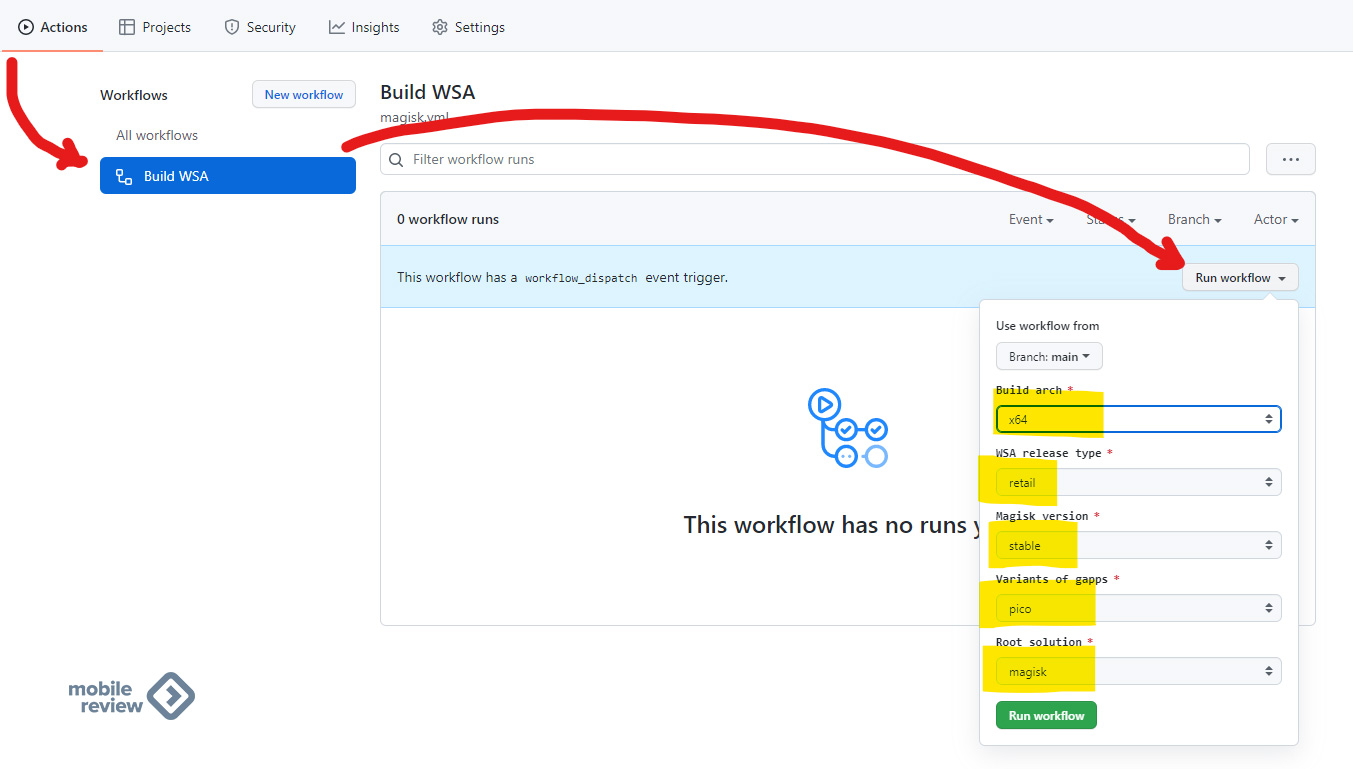
Теперь нажимаем на «Build WSA», а дальше на кнопку «Запустить рабочий процесс» (Run Workflow). В появившемся меню выбираем всё как на скриншоте ниже. Версия x64 (если у вас компьютер на ARM-процессоре, то поменяйте вариант), выбирайте сборку для ритейла, стабильную версию Magisk, версию Gapps – PICO, а в конце Magisk в качестве решения для рутинга.
Поясню для любопытствующих. Google требует, чтобы все производители, создающие смартфоны на Android ОС, использовали Google-приложения (GApps) и проходили тест совместимости. Мы же сейчас занимаемся тем, что, по сути, создаём виртуальный Google-смартфон, так что нам нужно установить Google-приложения.
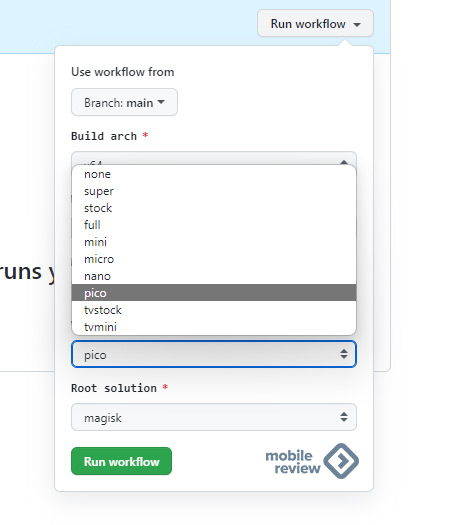
Существует множество версий наборов Google-приложений. PICO – это минимальный набор. Nano – чуть больше, TVStock – это набор для Android TV. Думаю, смысл вы уловили. Возможно, глаз зацепился за Super. Super – это набор вообще всех Google-приложений, которые когда-либо были в наборе. Соответственно, лучше всего выбрать комплект PICO, дабы не захламлять систему. Но отказываться от Google-приложений нельзя, оставляя в графе «none», так как Google Play и Play Services входят в набор.
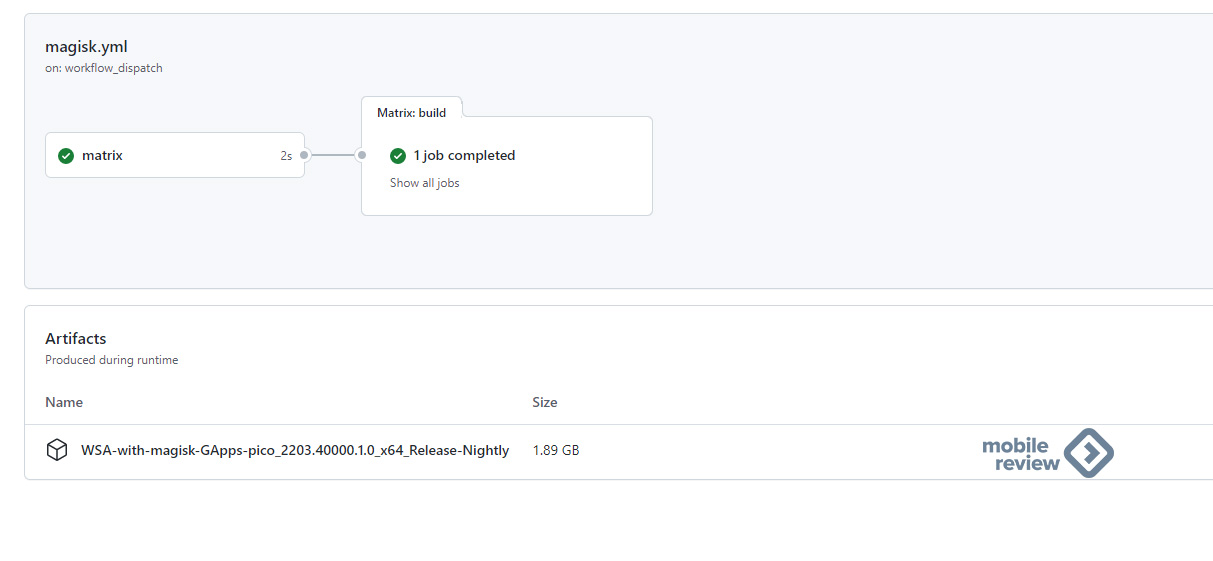
Итак, выбрав все пункты и запустив выполнение, придется подождать компиляции. В принципе, можно сходить попить чаю или даже пообедать (минут 5-15 у вас есть). Когда сборка готова (появится зеленая галочка напротив), то остаётся её скачать. Сборка весит около 2 ГБ.
Шаг 3: установка Google Play
Распаковываем скачанный архив, находим файл Instal.ps1 и запускаем правой кнопкой через PowerShell. Соглашаемся с тем, что данный скрипт может вносить изменения. Ну а дальше процесс происходит автоматически, а мы уже подключаемся на том этапе, когда нужно завершить настройку своего новенького виртуального Pixel 5!
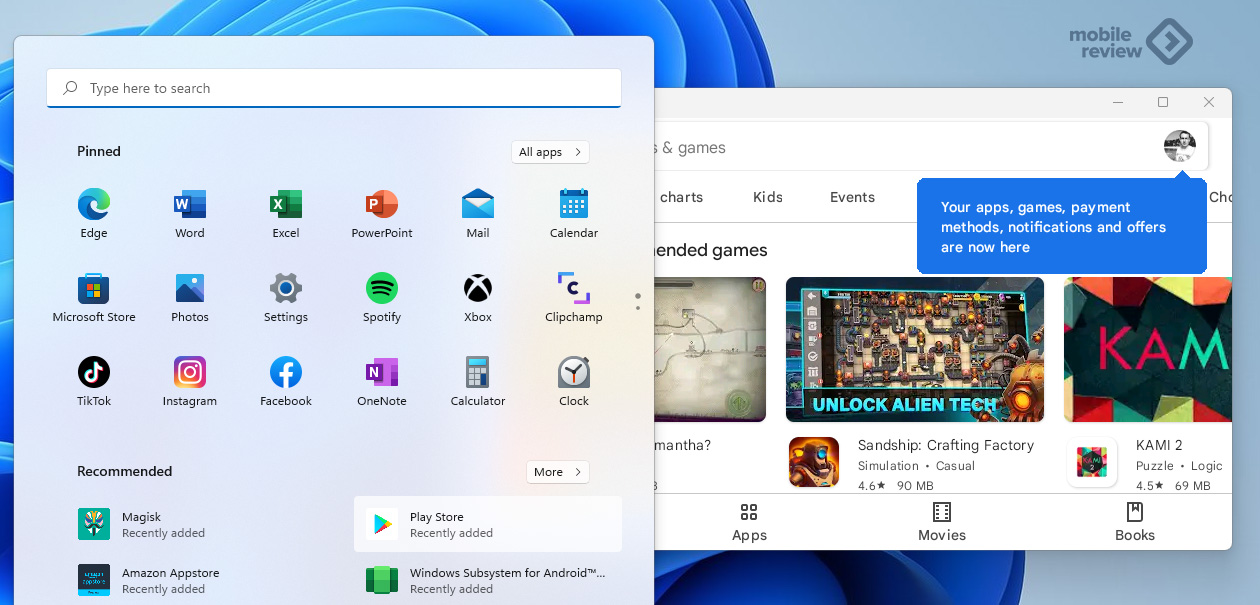
Создаём или новый Google-аккаунт, или вводим текущий. Вот и всё. Теперь у вас в меню «Пуск» появились две иконки: Amazon AppStore (он нам не нужен, но без него нельзя) и Google Play. Ну и, пока Android-система запущена, какое-то время вы будете получать уведомления про обновленный софт, как это бывает, когда запущен новый смартфон.

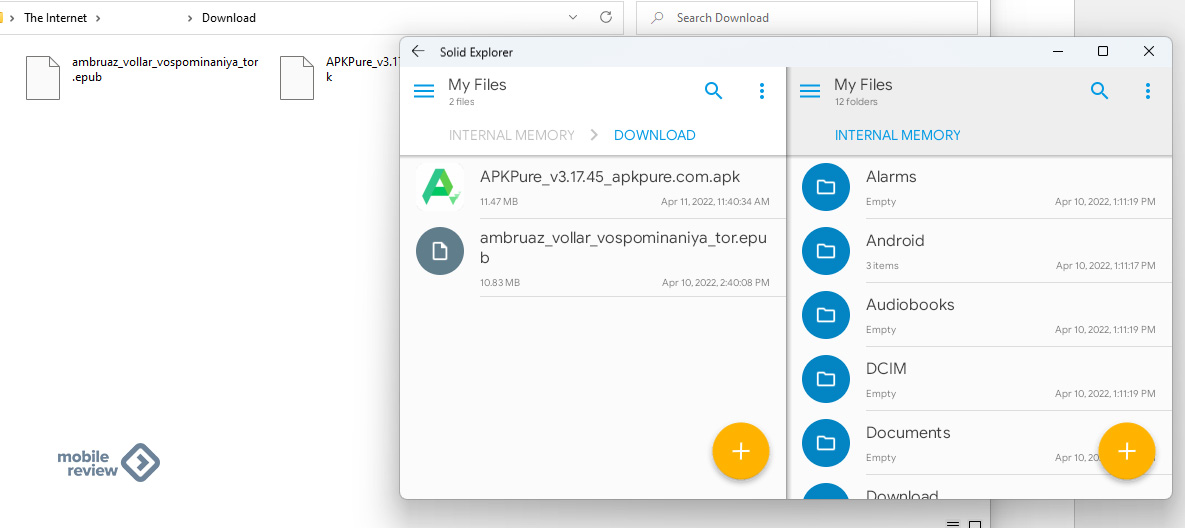
Шаг 4: установка ApkPure
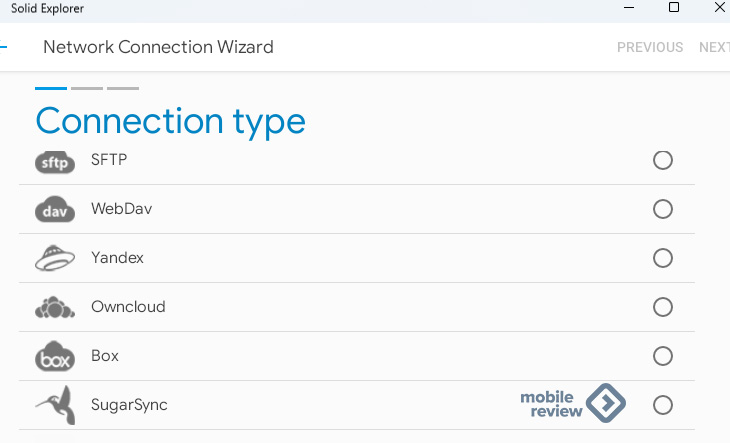
Solid Explorer, как и любой другой файл-менеджер, поможет нам с установкой любых других приложений. Всего лишь надо скопировать в наш виртуальный смартфон нужный apk-файл, а потом в файл-менеджере запустить его, попутно система попросит разрешения установить стороннее приложение. Я знаю, что можно ставить приложения через командную строку, прописывая адрес и путь. Но тут про простые пути для простых пользователей, которые хотят мышкой тык-тык, и всё.
Альтернативный магазин приложений может быть полезен, если Google вдруг решит запретить доступ к своему магазину приложений.

Я выбрал Solid Explorer, так как купил это приложение ещё для своей Android TV приставки. В принципе, подойдет любой другой файловый менеджер, позволяющий создавать ftp-сервер.
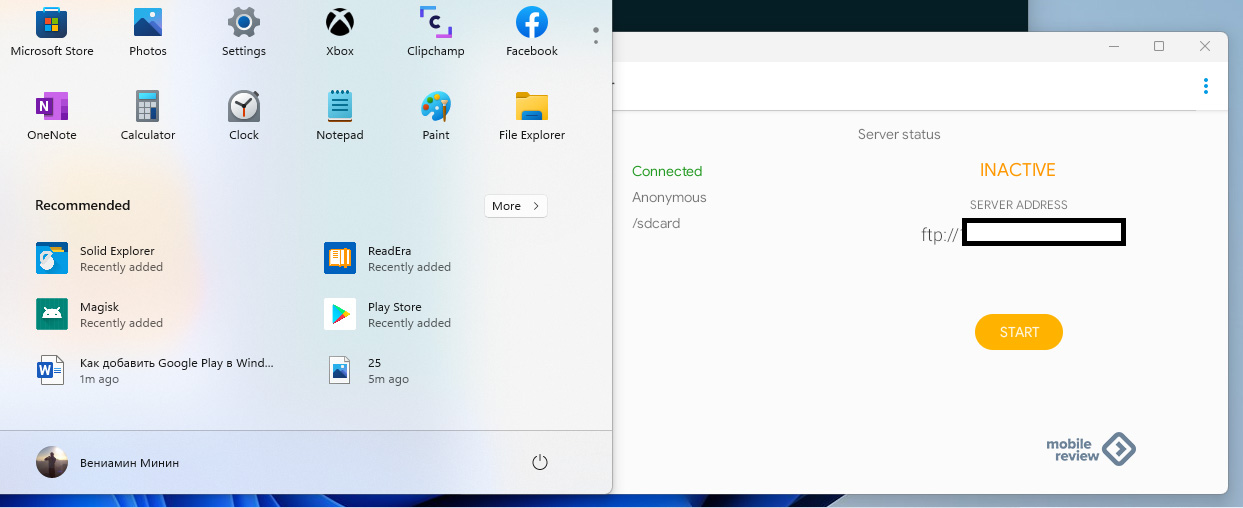
Заходишь на ftp через «Проводник» и скидываешь все нужные тебе файлы.
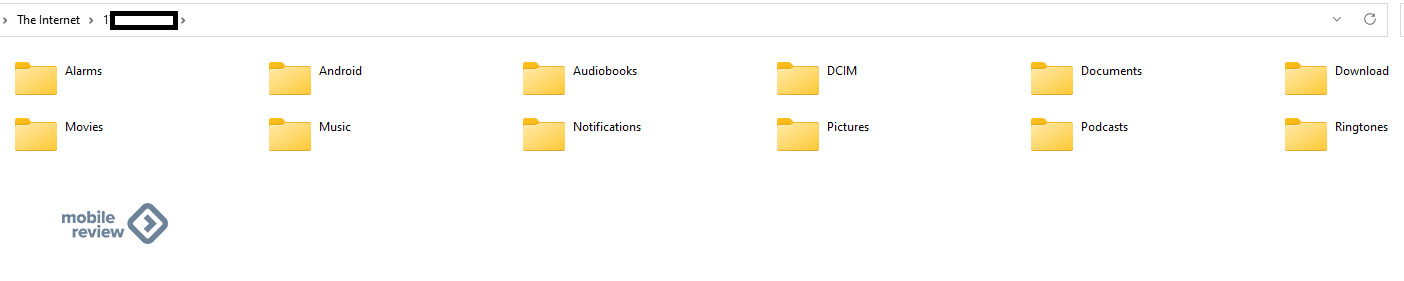
Другой бонус Solid Explorer в возможности подключать облака, включая «Яндекс». В данном случае тогда и ftp открывать не надо, а просто сохраняешь файл в папку облака на компьютере, и вот он уже доступен на виртуальном смартфоне.
Заключение
Удалять установленные приложения очень просто. Достаточно в «Пуске» щелкнуть правой кнопкой и выбрать «Удалить».
Точно так же можно удалить и всю систему, найдя в меню «Пуск» пункт WSA и удалив его. Также не забывайте, что даже после закрытия Android-приложения WSA остаётся в памяти компьютера. Чтобы выключить WSA, надо запустить одноименное приложение и выбрать пункт «Выключить».
Напоследок можно сказать, что, с одной стороны, Windows Subsystem For Android (WSA) довольно бесполезная штука для простых пользователей. С другой — она, безусловно, сделает пользовательский опыт чуть более комфортным, особенно для тех, у кого компьютеры с сенсорным экраном. Всё-таки Android-приложения ориентированы на сенсорное управление, в отличие от Windows.
You can natively run Android apps on Windows 11 via Windows Subsystem for Android (WSA); however, it has its limitations. The new OS only natively supports Amazon’s Appstore and not Google Play Store. And while sideloading Android apps is an option, anything that requires Google Play Services will not work.
However, you can install Google Play Store on Windows 11 to overcome this limitation. Here we show you how.
How to Install Google Play Store on Windows 11
As discussed earlier, you can sideload and run Android apps on Windows 11. However, finding APKs and installing them via the Command Prompt is cumbersome. You also need to configure Android Debug Bridge (ADB) to install Android apps.
You can install a fully functional Google Play Store to remedy this problem. Also, this allows you to run Google Play Services-dependent apps.
However, it is a complicated process and involves downloading several small packages and then moving them around. Fortunately, a developer (Yujinchang08) on GitHub has simplified this process with a custom WSA installer.
The WSA installer consists of a modified WSA package with Magisk and Open GApps integration. Magisk is a root access utility wherein Open GApps offers up-to-date Google Apps packages.
For this guide, we will focus on the second method to install Google Play Store on Windows 11. So, let’s begin.
Note that this process requires installing third-party modified files and packages and involves potential risks. Before proceeding, create a restore point in Windows 11 or recovery drive. These recovery options can help you undo the changes or repair the system if something goes wrong.
Step 1: Uninstall Android Subsystem for Android
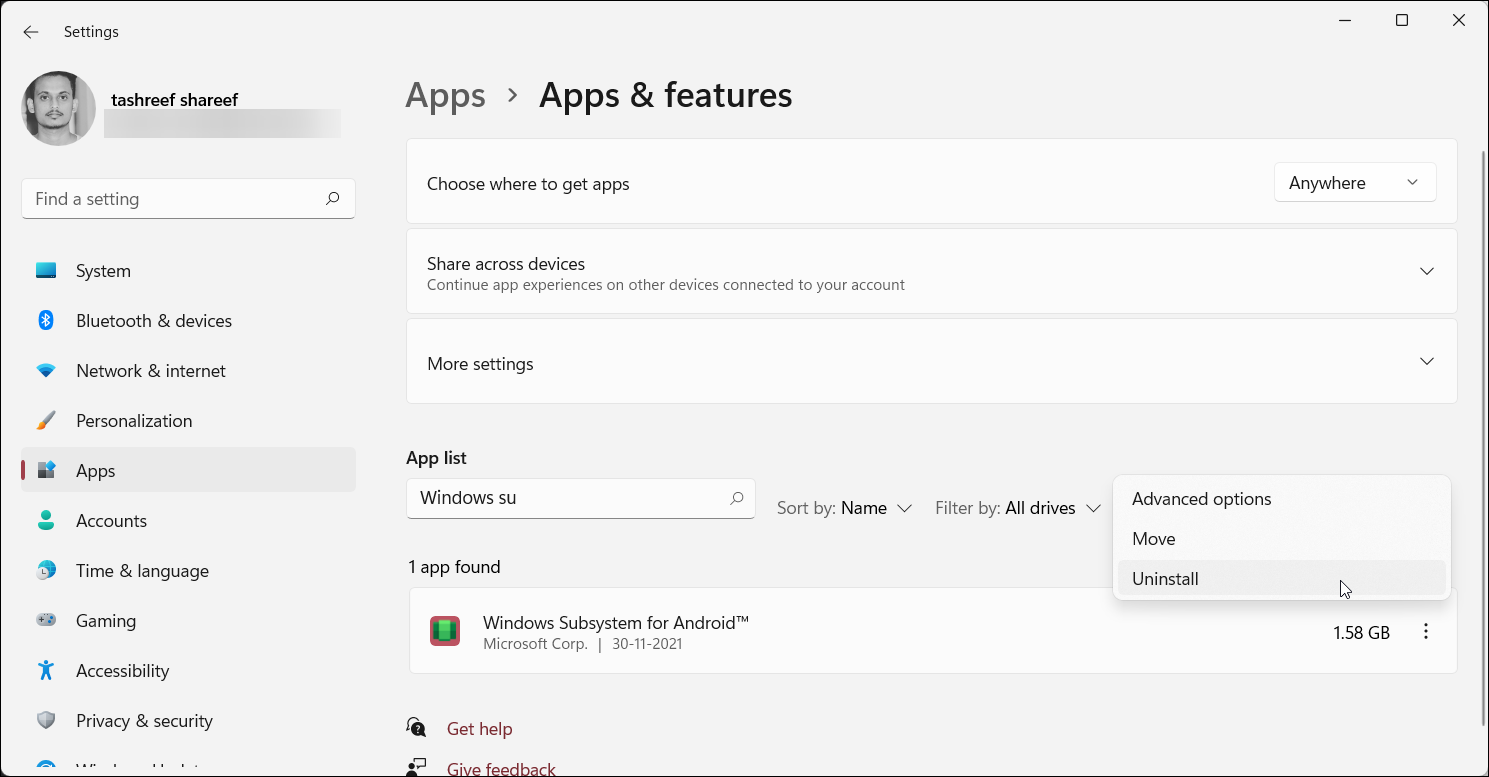
If you have Windows Subsystem for Android installed, you can uninstall it from the Apps & features section.
To uninstall WSA:
- Press Win + I to open the Settings panel.
- Open the Apps tab in the left pane.
- Next, click on Apps & Features.
- Locate and click on Windows Subsystem for Android under App list.
- Click the three dots and select Uninstall. Click Uninstall again to confirm the action.
Step 2: Enable Developer Mode in Windows 11
Developer Mode allows you to sideload apps and access other developer features, including remote installation apps via SSH services.
To enable Developer Mode:
- Press Win + I to open the Settings app.
- Open the Privacy and Security tab in the left pane.
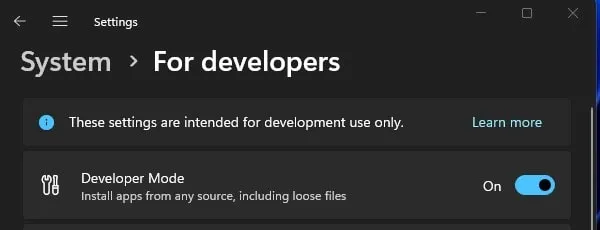
- In the right pane, click on For Developers.
- Toggle the switch for Developer Mode and set it to On. Click Yes to confirm the action.
Step 3: Enable Virtual Machine to Run Android Apps
You need to enable and configure Virtual Machine Platform and Windows Hypervisor Platform to run Windows Subsystem for Android on Windows 11. Skip this step if you have installed WSA previously.
To configure the Virtual Machine:
- Press Win + S to open the search bar.
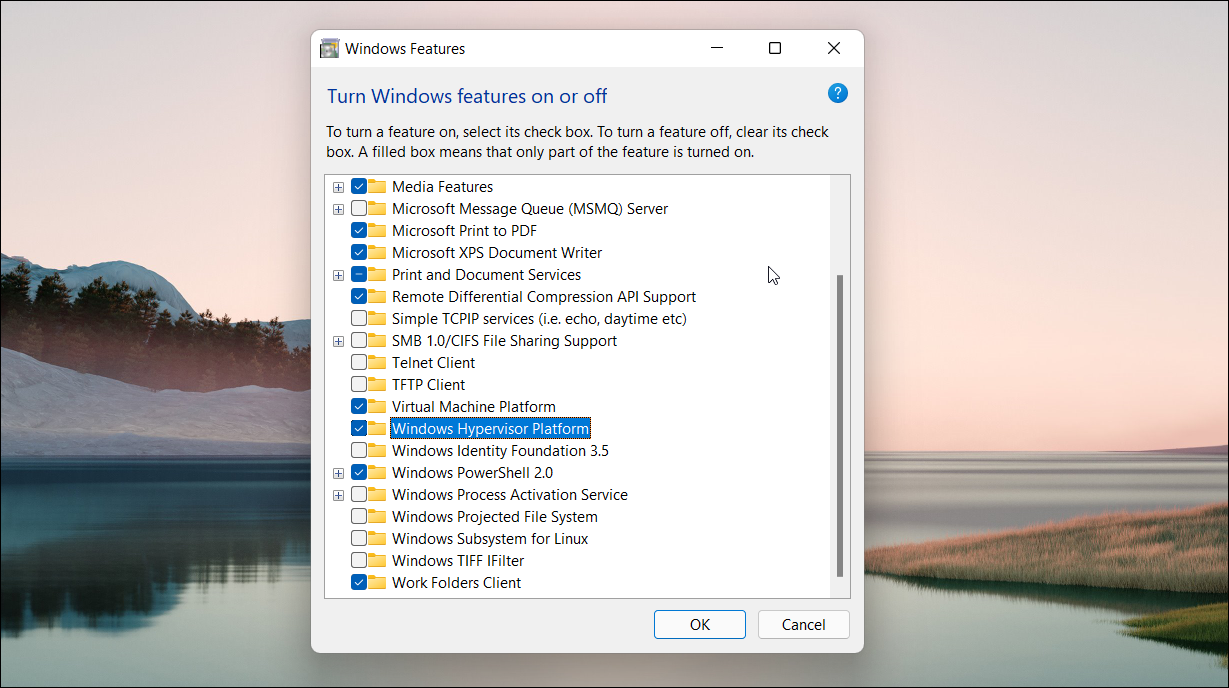
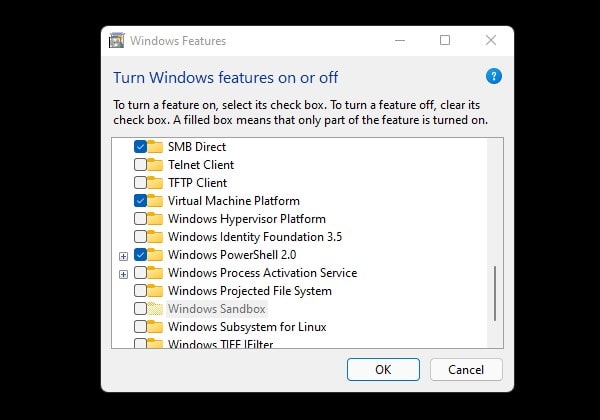
- Type Windows Features and then click on Turn Windows features on or off from the search results.
- In the Windows Features window, select Virtual Machine Platform and Windows Hypervisor Platform.
- Click OK to save the changes and Windows will install the selected features. Restart your PC to apply the changes.
If successful, you will see an update status message during restart.
Step 4: Setup and Install Windows Subsystem for Linux and Linux Distro on Windows 11
To install Google Play Store on Windows 11, you’ll need to build a locally modified Windows Subsystem for Android. For this, you’ll need to install Windows Subsystem for Linux (WSL) and a Linux distro. This is necessary as you’ll need to run some commands to build Windows Subsystem for Android.
To install WSL and a Linux distro on Windows 11:
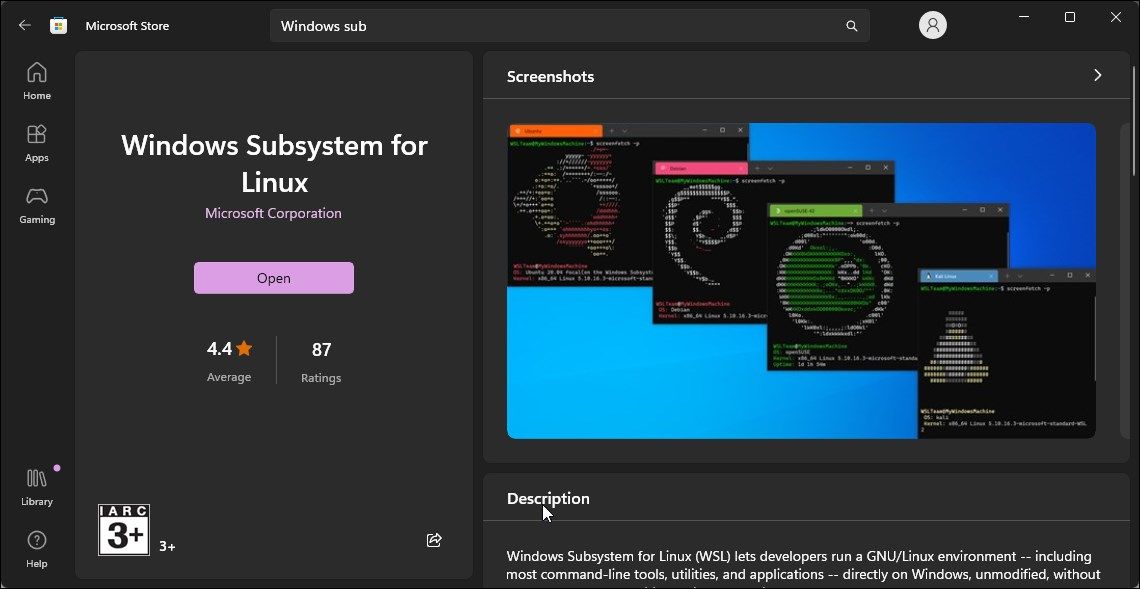
- Launch Microsoft Store.
-
In Microsoft Store, search for Windows Subsystem for Linux (WSL) and install the app. Wait for the app to install.

-
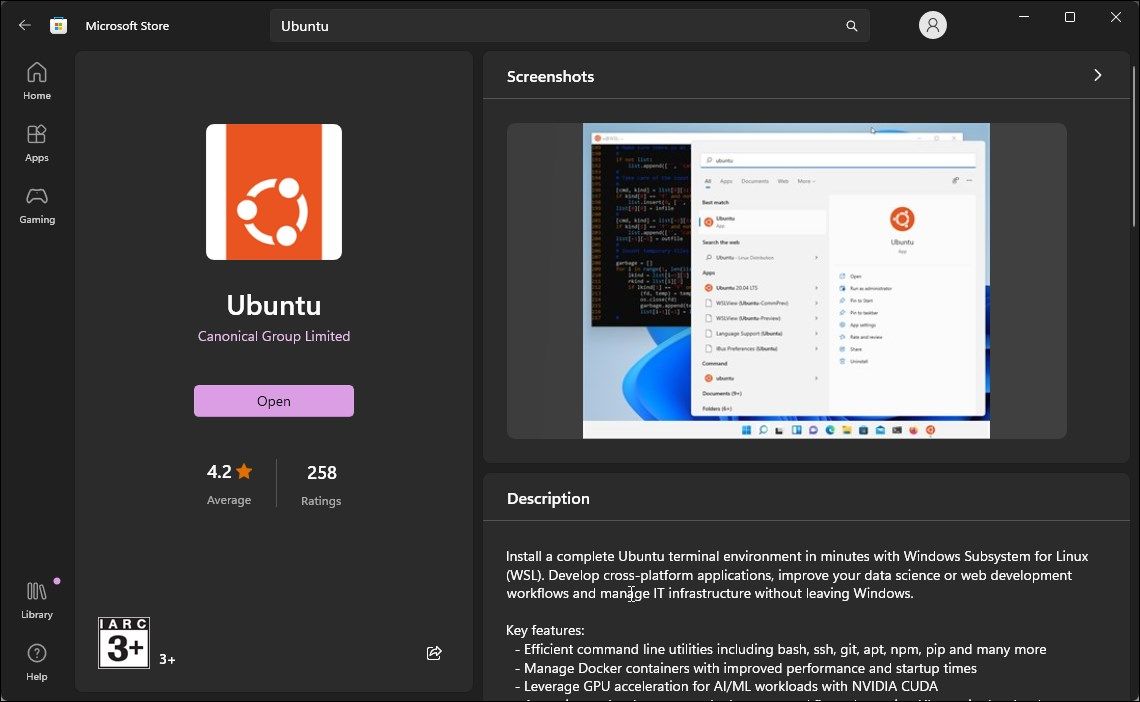
Next, search for a Linux distro. We’ll use Ubuntu. So, search for Ubuntu and install the distro. If you have a Linux distro installed, you can skip to the next step

- Once installed, press the Win key and type Ubuntu. Right-click on Ubuntu and select Run as administrator.
- In the Ubuntu terminal, you’ll need to create a user with a password for the Linux system. So, create a username and password. Leave the Ubuntu terminal open.
Now you’ll see a Linux\Ubuntu folder in File Explorer’s left pane.
Step 5: Setup Magisk and Windows Subsystem for Android
The next set of steps involve downloading a Gitbub repository, MagiskOnWSALocal, to integrate Magisk root and Google Apps into WSA.
- Go to the MagiskOnWSALocal page on GitHub.
-
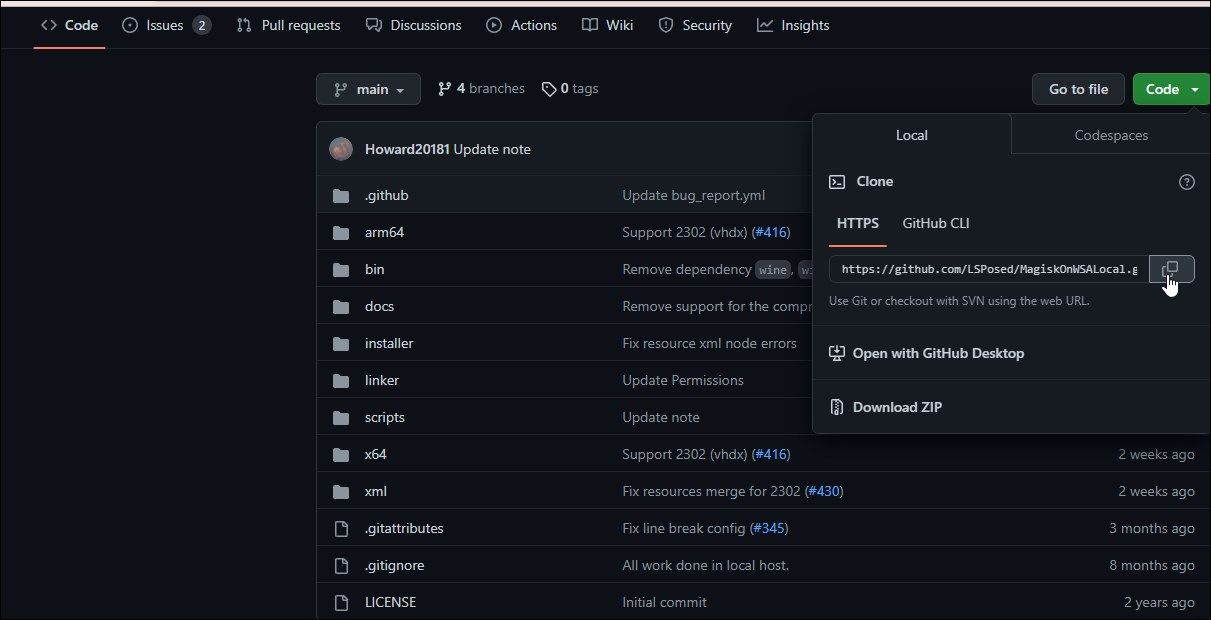
Click the Code drop-down in the top right corner.

-
Copy the GitHub URL under the HTTPS tab.

-
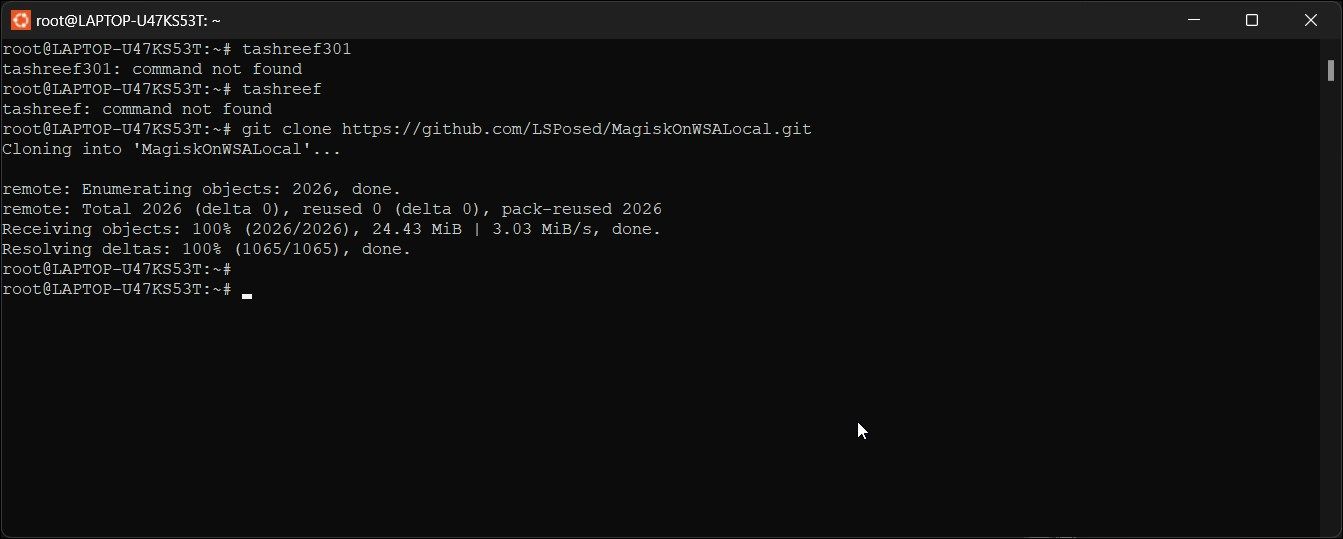
Open the Ubuntu terminal and type the following command followed by the GitHub URL:
git clone https://github.com/LSPosed/MagiskOnWSALocal.git -
Press Enter to close the GitHub repository to the Linux user account on your computer.

-
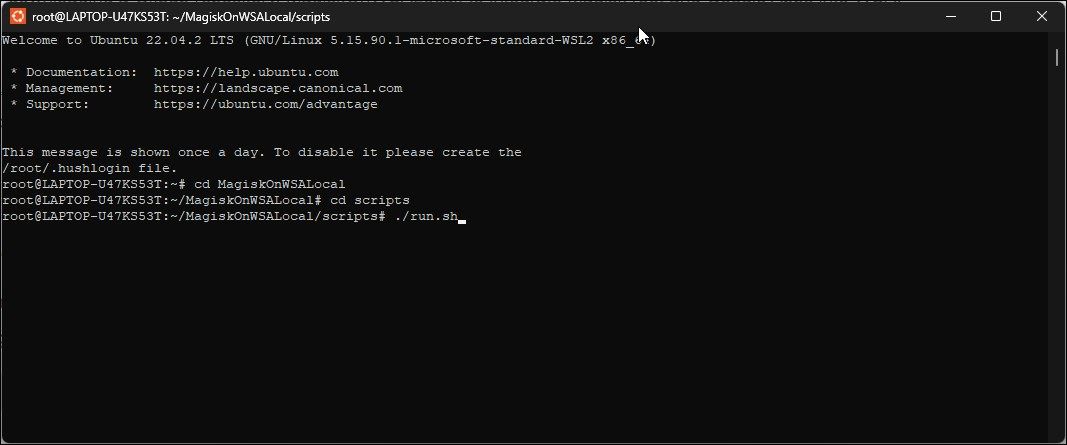
Next, type the following command to move to the scripts folder. This will change the directory to the specified folder.
        cd MagiskOnWSALocal
cd scripts -
Next, type the following command to run the script and download the necessary files to install all the necessary files for Magisk, Play Store, and Windows Subsystem for Android:
./run.sh - Depending on your Internet speed, downloading may take some time. So, wait till the process is complete.
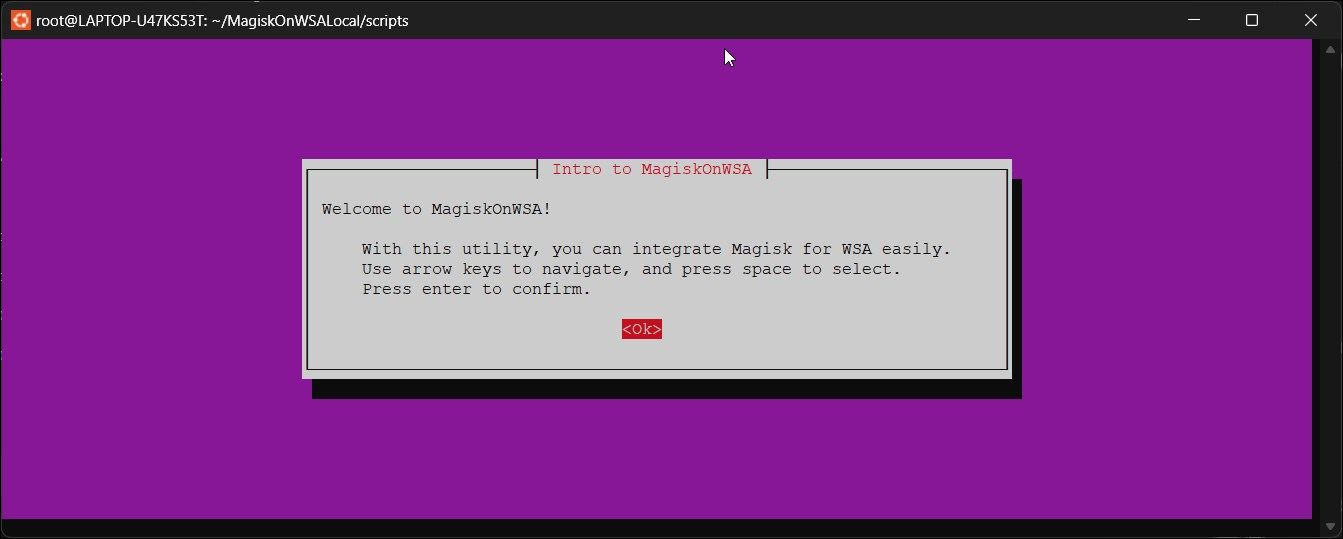
- As the process completes, you’ll see a command line installer open up.
Step 6: Install Google Play Store on Windows 11
-
Next, in the Into to MagiskOnWSA dialog, select OK.
-
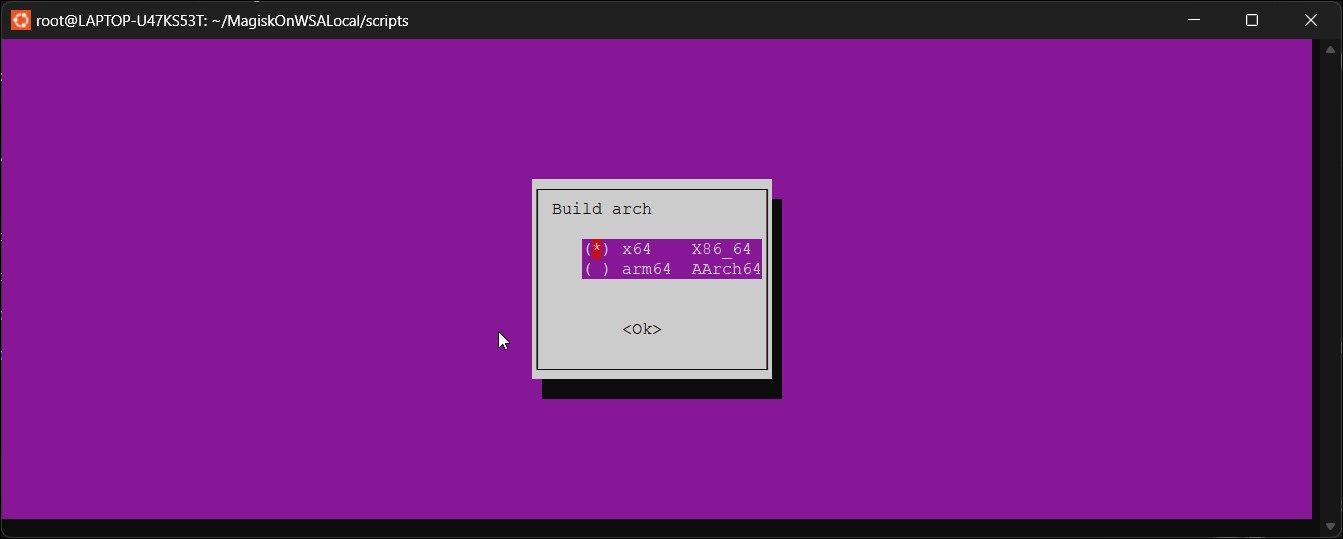
Next, select X64 X86_64 for Build Arch.
-
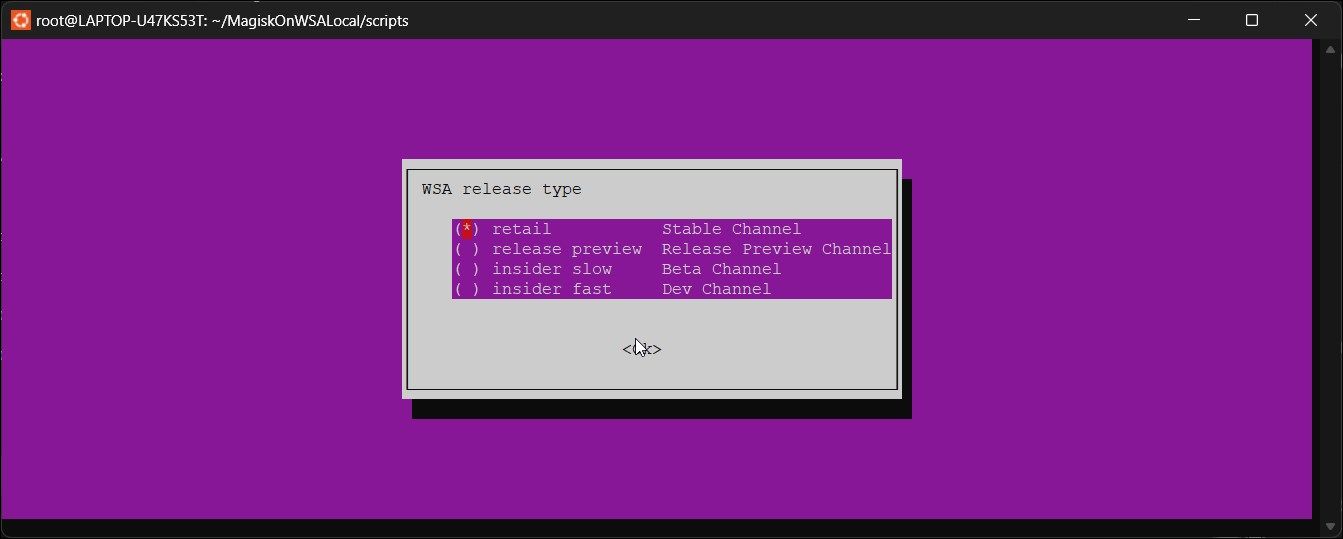
Next, for WSA release type, select Retail Stable Channel.
- Select No in the Do you want to Root WSA dialog.
-
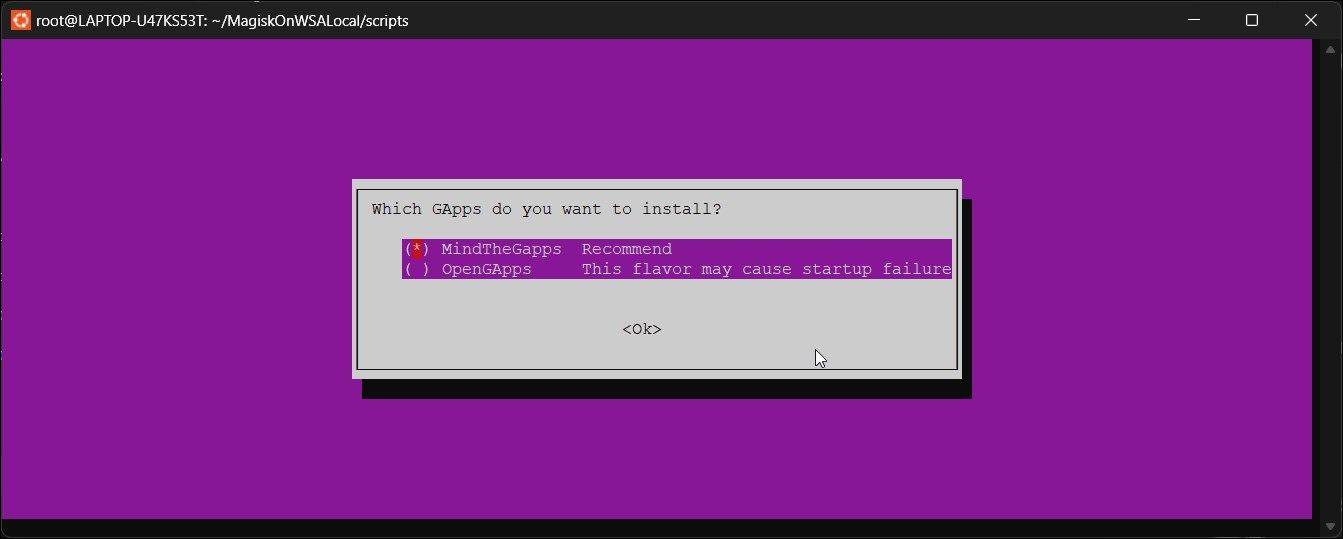
Select Yes in the Do you want to install GApps dialog.
- Select OpenGApps in the Which GApps do you want to install dialog.
- Next, in the Do you want to keep Amazon Appstore dialog, select Yes or No, depending on your requirement.
- Select No in the Do you want to compress the output dialog.
- MagiskOnWSALocal will start generating custom Windows subsystem for the Android image.
This process may take some time to complete. So, wait for the process to complete.
Step 7: Install Windows Subsystem for Android
Once done, you’ll need to install WSA on Windows 11. To install WSA, you’ll need to copy the contents of the MagiskonWSALocal folder, which contains the image file, to your installation drive and then execute a command.
To install WSA, you need to enable Developer Mode on Windows 11. Once enabled, follow the below steps to install WSA.
To install WSA on Windows 11:
- Open File Explorer and go to the Linux\Ubuntu tab.
-
Next, depending on where you had installed MagiskOnWSA, go to:
        \home\username\MagiskOnWSALocal\Output
or
\root\MagiskOnWSALocal\output -
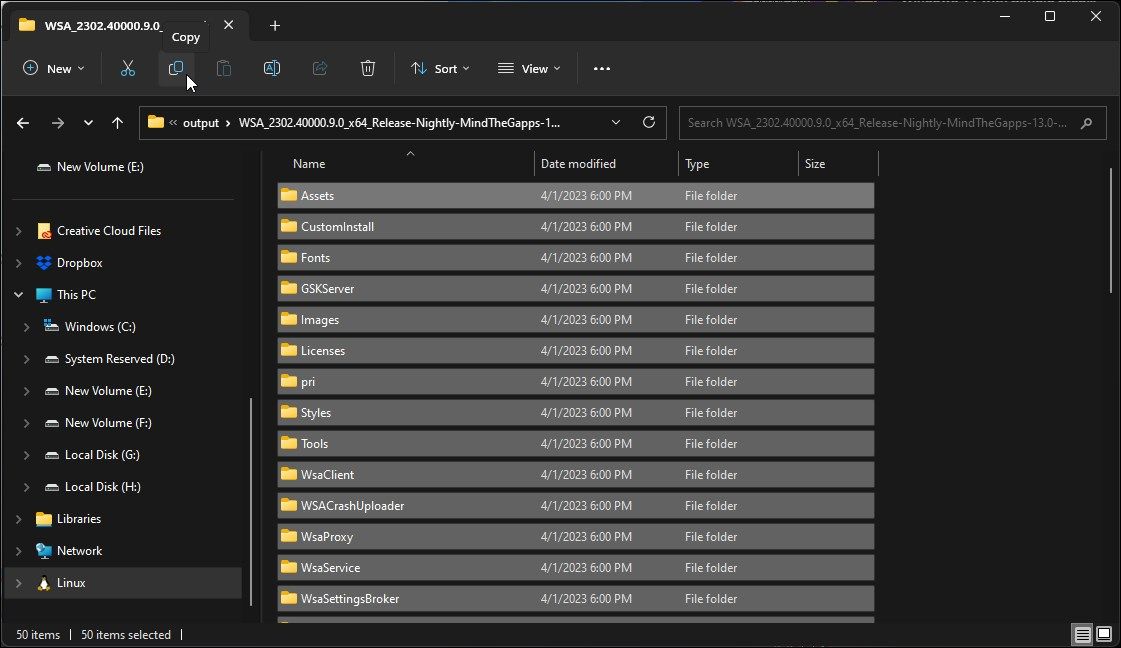
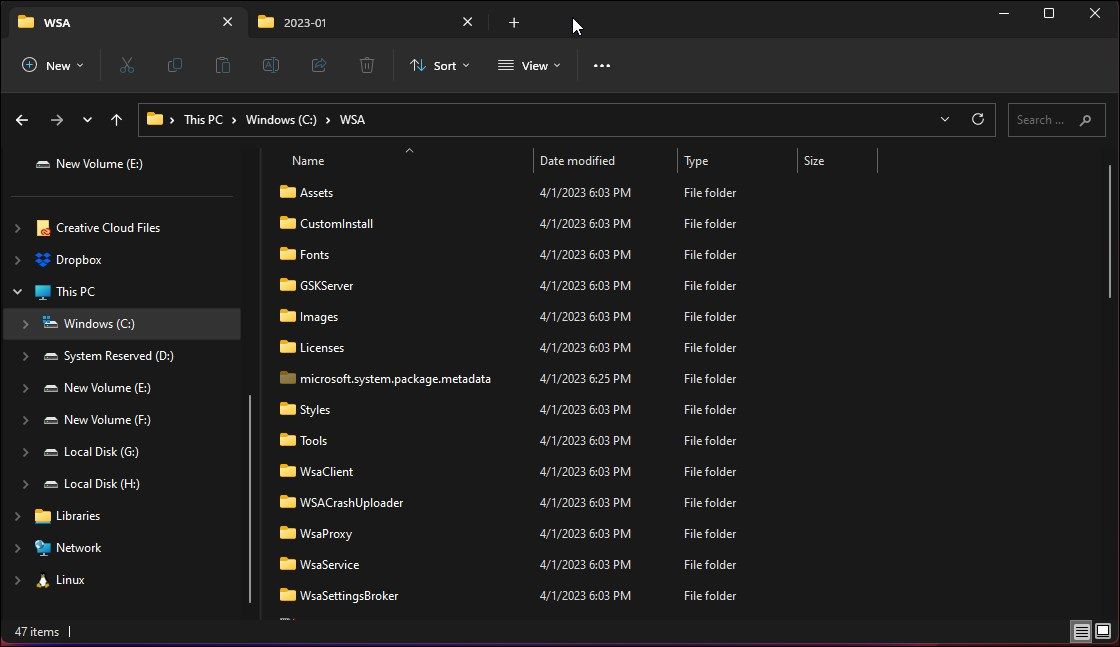
Next, open the WSA_2302.40000.9.0_x64_Release-Nightly-MindTheGapps-13.0-RemovedAmazon folder.

- Copy all the files and folders inside the WSA folder.
-
Next, go to your installation drive C:\ and create a new folder named WSA.

- Paste the copied files into the WSA folder.
- Close File Explorer.
-
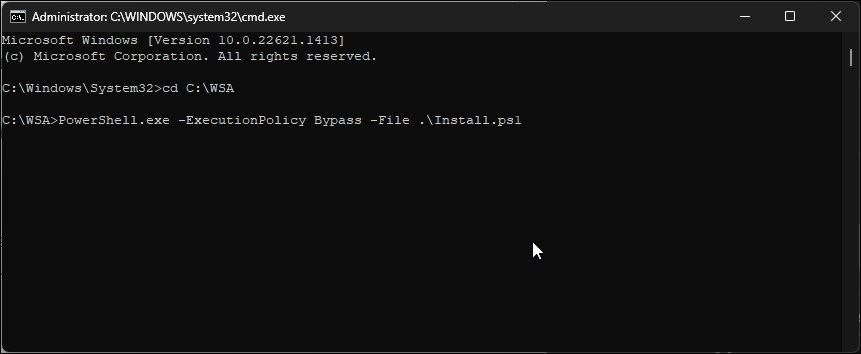
Press the Win key and type cmd. Right-click on Command Prompt and select Run as administrator.

-
In the Command Prompt window, type the following command to change the directory to the WSA folder:
cd C:\WSA -
Next, run the following command to execute the following command to install the WSA package:
PowerShell.exe -ExecutionPolicy Bypass -File .\Install.ps1 - The script will install the modified Windows subsystem for Android with Play Store support. Wait for the installation to complete and ignore any errors in the PowerShell console.
- Once done, you’ll see the Magisk and Play Store windows. However, you’ll need to enable Developer mode on Windows Subsystem for Android to use Play Store.
To enable Developer mode on Windows Subsystem for Android:
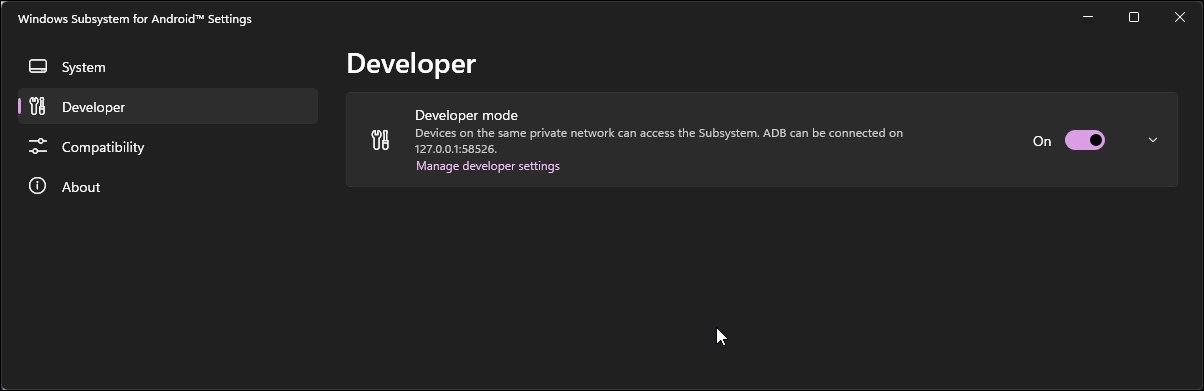
- Press the Win key, type Windows Subsystem for Android, and open the app from the search results.
- Next, open the Developer tab in the left pane.
- Toggle the Developer mode switch to turn it On.
- Next, open the Play Store App and sign in with your Google account. You may need to authenticate and sign in on your Android device.
After signing in, you can download and install all the Play Store apps just like on an Android phone. Also, you can open the installed apps from the Start menu, Windows search, and apps list.
Now you can install Android apps on Windows 11 from Google Play Store. That said, some apps may still not work properly due to the region and licensing restrictions.
Installing the Google Play Store on Windows 11
Being able to run Android apps natively on Windows 11 removes the hassle of Android emulators. Now with the Play Store support, you can install most if not all the Android apps without sideloading.
That said, for the apps that are not available in Play Store, you can sideload them on your Windows 11 PC using Command Prompt or the WSA Tool.
Quick Tips
- You can use an Android emulator to download the Google Play Store on Windows 11, but you may not get the full experience.
- This guide focuses on using the developer mode with modifications to the system and the BIOS. Make sure to back up your system before applying these changes.
- With this option, you can run apps natively rather than through an emulator, which can improve performance.
With the previous Windows versions, the easiest way to use native Android apps on the PC was to download an emulator like BlueStacks. However, while the emulator works well, it still means you have to open separate programs every time you want to run the Windows 11 Google Play Store to download new apps.
Here’s an in-depth explanation on how to Install the Google Play Store on windows 11 quickly and easily.
Part 1: Setting Up the Virtual Device
First off, you’ll need to enable or disable several features which are critical for this process to work, the chief among them being virtualization and native virtual machines. Without them, you might be able to download the third-party program, but running it will display only errors.
Step 1. Go to Settings.
Step 2. In the “System” tab, choose “For Developers,” then turn on “Developer Mode.”
Step 3. You will receive a pop-up confirmation that you’ll need to press “Yes” on to confirm the choice. Close the Settings window after.

Step 4. Open the “Run” command with “Win + R.”
Step 5. In the textbox, type or paste “optionalfeatures” and hit Enter.

Step 6. Enable the “Virtual Machine Platform” and “Windows Hypervisor Platform.”

Step 7. Hit “OK” and wait for the process to finish. You’ll be prompted to restart your PC to complete the setup. However, before doing that, read through the guide to complete the following steps as well.
Step 8. While restarting, hit “Esc” or “F2” to show your Windows boot options, then enter BIOS setup. The exact command will differ depending on the motherboard or laptop manufacturer.
Step 9. In the BIOS settings, the virtualization options should be under the “Advanced” tab.
Step 10. Find an option named “Virtualization” or “Virtualization Technology” and enable it.
Step 11. Usually, you’ll need to hit F10 to accept the changes, which will restart your PC again. This time, let it boot the system as usual.
Part 2: Downloading the Custom Windows Subsystem for Android
With the setup done, you can turn on Google Play Store for Windows by using the Windows Subsystem for Android, or WSA. However, only one such system can be used simultaneously, as they would clash with one another.
Step 1. Check your installed programs for WSA applications. One of the most common ones is “Amazon Appstore,” which is a significantly stunted version of the Google Play Store.
Step 2. Remove these programs from your PC.

Step 3. Go to the Custom WSA Builds repository by MustardChef.
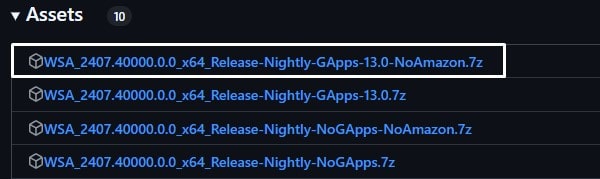
Step 4. Scroll down and download the first option in the “Assets” section.

Step 5. Open the downloaded file. You may need 7Zip or WinRAR to unzip the file and extract it in a folder. However, the stock Windows 11 unzipper could also work. You can right-click on the downloaded file, select “Extract All,” and choose where to put the resulting folder.

Step 6. Open the extracted folder, right-click on an empty space inside of it, and select “Open in Terminal.”

Step 7. In the Terminal, paste the following command and hit “Enter:”
PowerShell.exe -ExecutionPolicy Bypass -File .\Install.ps1

Step 8. You may be prompted for administration permissions, which you’ll need to confirm. When the command runs, you’ll have to press “a” or “y” to complete it.
This installs the WSA on your device and allows you to use the Google Play Store natively. If it doesn’t work, refer to the WSA repository linked in Step 3 for additional requirements or setup.
Part 3: Using the Google Play Store
When you complete the installation from Part 2, the virtual machine should open immediately. If not, you can find it through your start menu by searching for “Windows Subsystem for Android.”
The program opens a separate window, similar to an emulator, that shows the basic Android functionality. From there, you can use the Google Play Store as if you were on an Android device by logging in with a Google account.
Applications you install through the WSA will also show up on your Windows search bar, and running them will automatically open the WSA.
Was this helpful?
Thanks for your feedback!
The article above may contain affiliate links which help support Guiding Tech. The content remains unbiased and authentic and will never affect our editorial integrity.
Finally, Microsoft has released the Windows subsystem for Android with Amazon App Store support. Yes, you can install Amazon Appstore on Windows 11 and Sideload Android Apps. But, now you don’t have to do that so. Because now you can install Google Play Store on Windows 11 using Android Subsystem. Even, you will be able to sign in to Play Store without any errors. So no more need to sideload apps by running commands. You can directly install any App from Google Play Store.
Yes, for now, you might not able to play Android Games like PUBG/BGMI, because of keymapping required. But hopefully soon, we will find out the solution for that as well. Before you start following this guide, first do uninstall any older version of the Windows subsystem for Android. You can uninstall by using Windows search. Also, if you haven’t installed the Android subsystem yet, then first complete the following requirements.
Install Google Play Store on Windows 11
Prerequisites.
- Latest Version of Windows 11
- Set the region to the United States
- Enable Virtualization in BIOS.
- Enable Virtual Machine Platform.
Step 1: Install the Latest Version of Windows 11.
The Amazon Appstore is available for the latest version of Windows 11 22H2. So make sure you’re using the latest version of Windows 11.
- Press
Windows + IKeyboard Shortcut to open Settings App.
- From the left pane, click on Windows Update.
- Click on “Check for updates”.
- That’s it, Windows 11 will now check for any required updates. And, it will install it for you.
Step 2: Set the region to the United States. (Optional)
As I mentioned earlier, the preview is only available for devices based in the United States. So, you have to first change your region. Though, if you’re already from the United States, then you can skip this part.
- Press
Windows + Ikey to open the Settings App. Now, from the left pane, click on “Time & language”.
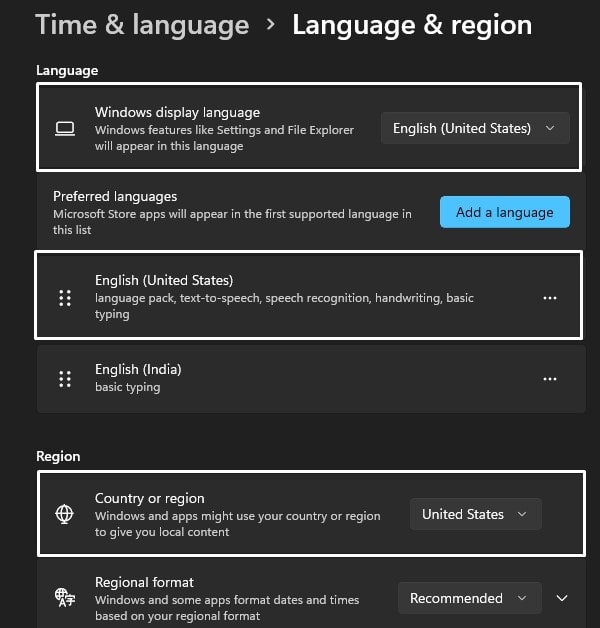
- After that, click on “Language & Region”.
- Now select the United States in “country or region”.
- Also, do change the Window display language.
- That’s it, now restart Windows.
Step 3: Enable Virtualization in BIOS.
To run the Windows Subsystem for Android, you need to enable virtualization from BIOS settings. Every motherboard’s BIOS settings are different. It is not possible to mention every manufacturer’s motherboard. So do check your computer/motherboard manufacturer to find specific steps to enable Virtualization. I am using Intel Processor, so I have enabled “Intel (VMX) Virtualization Technology”.

Step 4: Enable Virtual Machine Platform.
Once you enable virtualization from BIOS settings, after that, you have to enable Virtual Machine Platform.
- Search for “Turn Windows features on or off” in Windows 11. And, click on open from the top search result.
- Windows features window will now get Open, scroll, and do select “Virtual Machine Platform”.
- And, click on ok.
- Once the Virtual Machine Platform gets installed, you have to restart Windows to Apply changes.
Step 5: Enable Windows 11 Developer Mode.
As of now Windows Subsystem for Android with Google Play Store support is in development mode. So to sideload it we have to enable developer mode.
- Press Windows + I keyboard Shortcut to open Settings App.
- Click on System from left-pane.
- Click on “For developers”.
- Now, from here, do enable developer mode.
Download WSA Gapps Package
Now, do download latest WSA build from the following GitHub link. You will find “Windows Subsystem for Android” for the arm64 and x64. If you’re unaware with your system type. Then, follow these steps to check.
- Open Settings App.
- Click on system.
- Scroll down and click on About.
- You will now find your System type.
If your system type is x64, then scroll down and you will find WSA for Windows 11 x64. Open the asset section and download the WSA package with Gapps and NoAmazon.
Extract WSA Package
- First, make sure 7-Zip is installed in your system. If not do install it, it’s free.
- Right-click on downloaded WSA zip file. Click on Show More options.
- Now, click on 7-Zip > Extract to WSA.
(Alternatively you can click on Extract All > Extract)
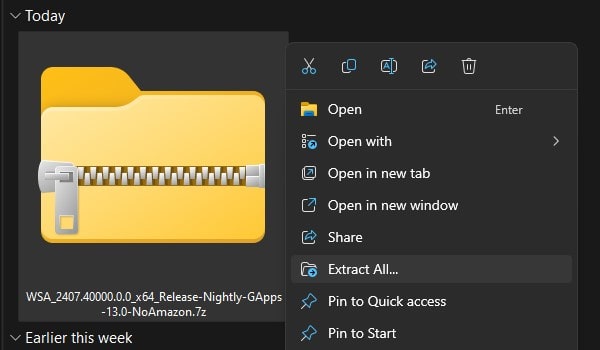
- That’s it, 7-Zip will extract the Android Subsystem package.
- Do open extracted folder, you will find another WSA folder inside it.
- Do rename folder name to “WindowsSubsystemAndroid” or “WSA”.
Install Windows Subsystem for Android with Play Store.
- Open WindowsSubsystemAndroid folder, and do Right-Click on Install file and then click on “Run with PowerShell”.
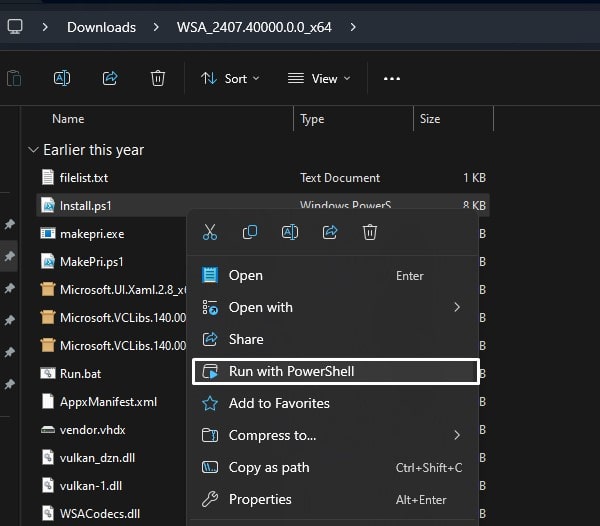
- Security Warning might appear, click on Open. UAC window will now appear, click on Yes.
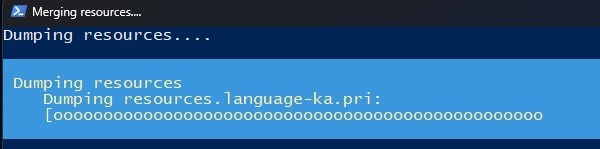
- That’s it, within a few seconds through Windows PowerShell Windows subsystem for Android with Play Store gets installed.
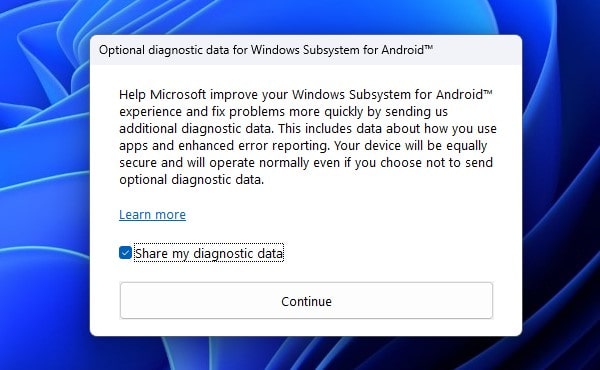
- Optional Diagnostic data for Windows Subsystem for Android window will appear. Click on Continue.
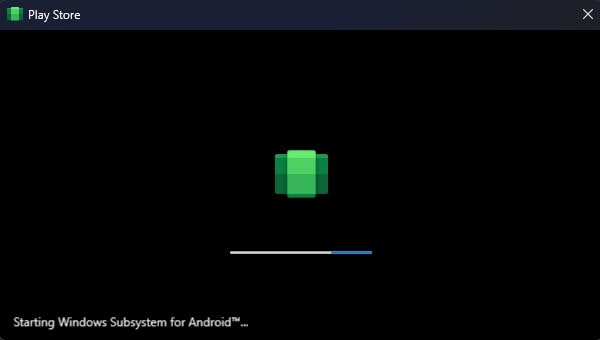
- That’s it, Play Store window with starting windows subsystem for Android will appear. And, Play will get open within few seconds.
- However, if Play Store doesn’t get open. Then, use Windows Search, and do search and open “Windows Subsystem for Android”.
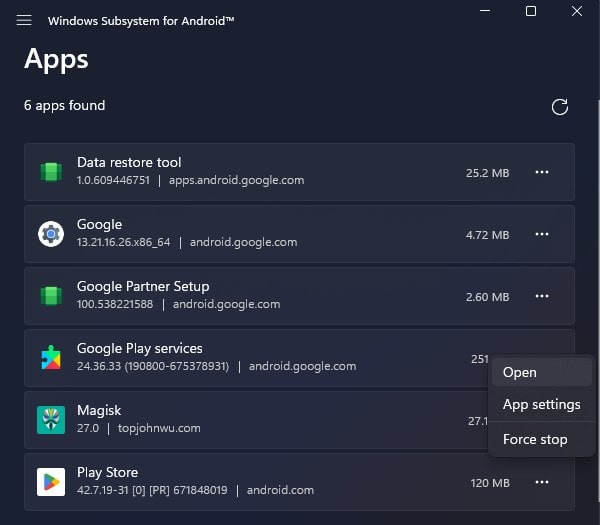
- Click on Apps from left-pane. And, you will find Play Store App in Apps list. Click on “…” icon and then click on Open. (Yes, you can use Windows Search and directly open Play Store.)
- Once, Play Store gets open, Click on Sign In and login using your Google Account.
- Now, you can install any Android app on Windows 11 PC.
- So, that’s how you can Install Google Play Store on Windows 11 using WSA.