
GarageBand is a popular digital audio workstation (DAW) developed by Apple, primarily designed for macOS and iOS. It is widely appreciated for its user-friendly interface, extensive loops and samples, and powerful tools for composing, recording, and producing music. Unfortunately, GarageBand is not natively available for Windows operating systems, including the latest Windows 11. However, there are several methods you can employ to run GarageBand on a Windows PC. This detailed guide explores these methods step-by-step, providing you all the information you need to successfully install and run GarageBand on your Windows 11 PC.
Understanding the Compatibility Issues
Before diving into the installation processes, it’s essential to understand why GarageBand isn’t directly available for Windows. Apple has developed GarageBand as part of its ecosystem, targeting macOS devices primarily to give users a seamless experience within its operating system environment. Unlike other DAWs that have cross-platform support, such as FL Studio or Ableton Live, GarageBand remains exclusive to Apple products.
Method 1: Using a Virtual Machine
One of the most popular methods to run GarageBand on Windows is by using a virtual machine (VM). A virtual machine allows you to run macOS on a Windows PC, thus making it possible to install GarageBand. Here’s how to set it up:
Step 1: Ensure Your PC Meets the Requirements
Before starting the installation, make sure your PC meets the following requirements:
- RAM: At least 8 GB (preferably 16 GB or more).
- Processor: A multi-core processor (Intel i5 or better).
- Storage: At least 256 GB of free space to run macOS comfortably.
Step 2: Install Virtualization Software
You’ll need virtualization software to create a virtual machine. Two popular choices are VMware Workstation and Oracle VirtualBox. In this guide, we will use VirtualBox, which is free and open-source.
- Download and install VirtualBox from the official website.
- Download the VirtualBox Extension Pack for additional functionality like USB support.
Step 3: Obtain macOS
You will need a macOS image (ISO) to install macOS on your virtual machine. You can create a macOS installer on a Mac or search for a reliable macOS ISO online. Be cautious, as downloading from unofficial sources may not be legal or secure.
Step 4: Create the Virtual Machine
- Open VirtualBox and click on «New» to create a new virtual machine.
- Name your virtual machine (for example, «macOS»).
- Set the type to «Mac OS X» and the version to «macOS 64-bit.»
- Allocate RAM (at least 4 GB, but more is recommended).
- Create or select a virtual hard disk (at least 50 GB).
- Adjust graphics settings in the VM settings to ensure better performance.
Step 5: Configure the Virtual Machine Settings
- Right-click your newly created VM and select «Settings.»
- Under the «System» tab, ensure that the «Chipset» is set to «PIIX3» and enable «EFI.»
- Under the «Processor» tab, allocate at least 2 CPUs.
- Go to the «Display» tab and set Video Memory to the maximum (128 MB).
Step 6: Install macOS
- Start your virtual machine.
- Your macOS installer should load from the ISO file.
- Follow the on-screen instructions to install macOS.
- After installation, configure your macOS as you would on a regular Mac.
Step 7: Install GarageBand
- Once you’re in macOS, open the App Store.
- Sign in with your Apple ID (create one if you don’t have it).
- Search for GarageBand and click Download.
- The installation will begin. Once it completes, you can find GarageBand in your Applications folder.
Method 2: Using Hackintosh
Another method to run GarageBand on a Windows PC is to create a Hackintosh. This process involves installing macOS directly on non-Apple hardware. However, this method is complex and requires specific hardware configurations to bypass Apple’s restrictions. Here’s a brief overview:
Step 1: Check Hardware Compatibility
Ensure your hardware supports macOS installation:
- Intel CPU (compatible chipsets).
- GPU that is compatible with macOS (refer to Hackintosh forums).
- A suitable motherboard.
Step 2: Gather Required Materials
You will need:
- A macOS installer (can be downloaded from a Mac).
- A USB drive (at least 16 GB).
- Tools such as Clover or OpenCore for creating a bootable USB.
Step 3: Create a Bootable USB Drive
- Format the USB drive as Mac OS Extended (Journaled) using Disk Utility.
- Use a tool such as UniBeast to create a bootable USB installer with macOS.
Step 4: Install macOS
- Boot your PC from the USB installer.
- Follow the on-screen prompts to install macOS on your primary drive.
- After installation, you’ll need to configure your bootloader (Clover/OpenCore) to allow booting into macOS.
Step 5: Install GarageBand
Once macOS is installed successfully, you can open the App Store and download GarageBand as described in the Virtual Machine method.
Method 3: Using an Alternative Emulator
Another option is to use CrossOver or Wine, which are compatibility layers that allow running some macOS applications on Windows. However, running GarageBand through these methods can be hit or miss and might not provide the same functionalities.
Step 1: Download CrossOver or Wine
- Download CrossOver: Visit the CrossOver website and download the installer.
- Alternatively, you can download Wine from its official website.
Step 2: Install the Application
- Follow the installation instructions for CrossOver or Wine.
- Make sure you have all necessary dependencies installed.
Step 3: Configure and Install GarageBand
- With CrossOver, you can use the «Install a Windows Application» option to try and install GarageBand.
- You might need to experiment with different settings and configurations, as compatibility may vary significantly.
Method 4: Explore Alternatives
If you’re primarily looking for music production software and do not necessarily need GarageBand, consider exploring alternative DAWs that run natively on Windows.
Recommended Alternatives:
- FL Studio: Known for its user-friendly interface and extensive features suitable for music production.
- Ableton Live: Excellent for live performances and music composition, widely used by professionals.
- Cakewalk by BandLab: A free and professional-grade DAW with comprehensive features.
These alternatives can often replicate much of the functionality GarageBand offers and may be more suited for a Windows environment.
Conclusion
While GarageBand is an excellent tool for music creation, its limitation to Apple’s ecosystem presents challenges for Windows users. Fortunately, through methods such as using a virtual machine, creating a Hackintosh, or employing compatibility layers like CrossOver, Windows users can enjoy GarageBand’s features.
Whichever method you choose, make sure to follow the steps carefully to ensure a successful installation. However, if the process seems cumbersome, it may be worth considering transitioning to a Windows-native DAW that can suit your music production needs without the complexities of running macOS.
By familiarizing yourself with the available alternatives and features, you can discover new ways to enhance your music production journey in a Windows environment. Happy music making!
If you love making music and you have an iOS device, then you must be familiar with the GarageBand app. It is considered to be one of the best music creation apps available on iOS devices. It is also available on macOS, but if you’re using a PC with Windows OS, there might be a slight issue because there’s no official GarageBand Windows version available.
GarageBand can record and layer up to eight tracks of loops, instruments, and vocals to create original songs and soundscapes.
How to Get GarageBand for Windows 11/10?
Since the official version is not supported for Windows, other than macOS, here are some of the workarounds you can follow to have Garageband on Windows 11/10.
- Set up a macOS virtual machine on a Windows PC.
- Use Garageband alternatives on Windows OS.
- Use Android emulators.
Features of Garagaband:
- A pool of virtual Smart Instruments with pre-programmed chord progressions, scales, and rhythmic riffs.
- Pre-recorded drum grooves.
- Music production tools.
- Sharing features that let the user share songs.
- Organize virtual jamming sessions.
- Users can also record vocals or live instruments using a microphone.
Users can connect an external microphone and plug an instrument into their devices using any particular adapter for professional-quality live recording in GarageBand.
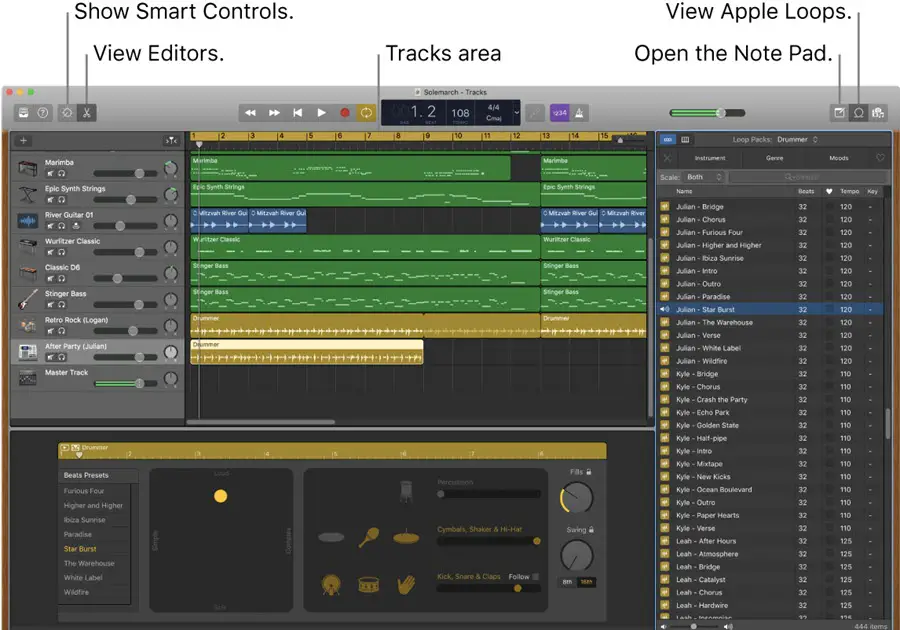
If you’re serious about making music, then GarageBand is the best choice; imagine being able to write, record, and share your own music of a professional standard, that too just with a few taps of a screen. It is a powerful digital audio terminal for multitrack recording with impressive on-board loops and production and top-of-the-line editing tools.
The app’s user-friendly controls and graphic interface help users see their music and easily explain how songs are put together and recorded.
GarageBand for Windows as Virtual Machine
We will use macOS as a virtual machine on a Windows physical computer and then install GarageBand from the Apple App Store.
You can follow any of the guides mentioned here to install and use macOS with VMware or VirtualBox.
1) Follow this guide to download the pre-installed Mac OS X 10.9 VMware image and use it on Windows 10. Even you can try the latest macOS 11 Big Sur as described in this guide.
Now, you will have a working macOS as a virtual machine on the PC.
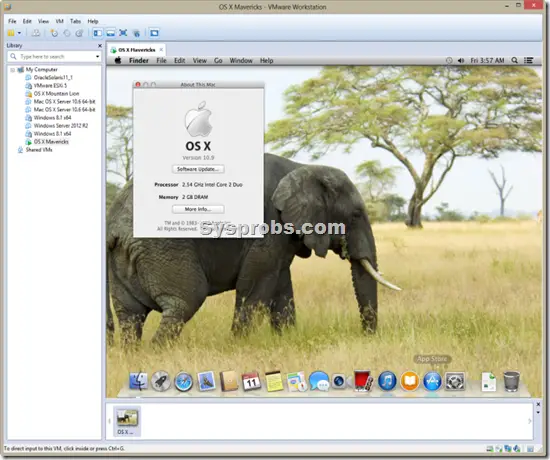
2) Open the Apple App Store and search for GarageBand. Make sure your Apple ID can download this app. I prefer to use macOS VM on a VMware workstation than Oracle VirtualBox because of the working sound and display quality.
It is recommended to check the sound of the virtual machine (the sound should be playing through the speaker/headphone, which is connected to your physical computer).

Read Also: How to use Xcode on Windows PC
Garageband is an excellent software for a beginner, but it is not the best music production software out there. There are plenty of other tools used by professional artists that offer an official Windows version and other useful functionalities. We have picked the four most recommended software to make music, and they are official, too.
- LMSS:
LMMS is an abbreviation for Linux Multimedia Studio; it has a version that has been supported by Windows OS for quite a while. LMMS is a free and open-source sound generation software, MIDI control system, beat/baseline editor, and synthesizer.
If you compare LMSS with GarageBand, you’ll realize that it lacks an appealing UI, which can be understood as LMSS is open-source software. But UI isn’t everything; if your work is done efficiently, you can compromise on UI.

When we talk about functionality and completing the task, LMSS is a no-brainer; it is very helpful in editing and making music. LMMS comes with a good range of pre-loaded software functionality, which includes samples and effects that will get you started. All these samples are open source, too. So you can use the samples in whichever way you like.
- FL Studio:
FL Studio is a very famous and one of the earliest music-making software. It is like the big brother of LMMS, which is not freeware. It looks like the developers of LMMS considered from FL Studio while making their software, even the User interface is quite similar.
FL Studio offers a wide range of functionality to get you started. While LMSS is free and open-source software, it lacks documentation, comes with trivial bugs and problems, and whenever the user faces a problem, there is no customer support. Apart from that, FL Studio offers much better support for plugins, which can make a key difference for a particular project.
RELATED: Best laptops for FL Studio
FL Studio has an official app for Windows 10/8.1, and the elementary edition named fruity comes at a price of around € 89, which does not support audio recording, so be mindful of that.
- Reaper:
Reaper is a fantastic music production software, but it is a bit complex compared to the other professional software on the market. With Reaper, you can do layering of the already recorded tracks, edit the tracks, and add effects to your recordings.
With Reaper, you also get 300 free plugins, which give you enough functionality to produce fantastic professional-level music. Reaper is priced at just $60, so it is a much cheaper alternative to other professional apps like FL Studio, and it also has a highly customizable user interface. It requires less system power and comes with many great inbuilt features.
- MixCraft 9:
The last alternative to GarageBand on our list is Mixcraft, which is another fantastic music production tool for Windows users that is easy to upgrade whenever you feel like it.
The GarageBand is mostly known for its massive library of loops, Mixcraft 9 is no less, it has a broad selection of loops which is as large as GarageBand’s. This library makes it easy to quickly produce soundtracks. Apart from this, Mixcraft also has a live recording feature, which makes it a serious competitor to GarageBand.
It is not only limited to a huge library, but in the Pro version, the automation functionality has been enhanced, and the sound engine has been made more advanced. The suite of plugins will give you access to any instrument you wish for, and the bundled high-quality sounds help in giving you enough of a base to make music of professional standards.
Installing GarageBand on Windows Using an Android Emulator
For music enthusiasts looking to use GarageBand on a Windows PC, using an Android emulator offers a practical and increasingly popular solution. This method stands out for its efficiency and simplicity, making it a top choice for those eager to explore GarageBand’s capabilities without the need for an Apple device.
Here’s a step-by-step guide to get you started:
- Downloading the Emulator: Begin by downloading LDPlayer, a key component in this process. LDPlayer is known for its compatibility and smooth performance, making it an ideal choice for running GarageBand.
- Extracting the Files: Once the download is complete, you’ll find a compressed file. Use a reliable extraction tool like 7 Zip or WinRAR to unpack the contents. This step is crucial to access the installer that lies within.
- Running the Installer: Navigate to the folder where you extracted the files. Here, you’ll find the LDPlayer installer. Click on this installer and follow the on-screen instructions to install LDPlayer on your PC.
- Launching LDPlayer: After installation, locate the LDPlayer icon on your desktop or in your program list. Click to launch the emulator.
- Accessing the App Store: With LDPlayer open, the next step is to launch the app store available within the emulator. This is where you’ll find GarageBand.
- Searching for GarageBand: In the app store’s search bar, type “GarageBand” and press enter. Select the first search result – this is the GarageBand app you’re looking for.
- Installing GarageBand: Finally, download and install GarageBand. The emulator will handle the installation process, adapting the iOS app for use on your Windows PC.
And there you have it! You’re now ready to dive into the world of music creation with GarageBand on your Windows computer.
Final Verdict:
Music production in Windows OS is easily possible even if you don’t use GarageBand on your Windows PC. Setting it up might be a little complicated task; you can try any other alternative from the list above as per your choice.
If you’re an aspiring music artist with dreams of creating melodious tunes, GarageBand is the perfect platform for you. It offers a variety of instruments, sound effects, voice modulation, and pitch adjustments. However, this app is exclusively available for iOS and macOS devices. So, how can you get it on your Windows PC? If you’re also in search of answers like many others, continue reading to find out how to download GarageBand on Windows 10 and 11 PCs.

As you may already know, GarageBand is not available for Windows computers. In fact, getting several macOS or iOS apps on a Windows PC is not possible directly.
So, if you want to use GarageBand on Windows PCs, you have to imitate the macOS environment on your computer. Various emulators can help you download and use this software on Windows 10 or 11 PCs.
The following steps will illustrate this process in detail, so please continue reading!
1. Visit the VirtualBox Downloads page on your browser.
2. Click on the Windows hosts link to download it on your PC.

3. Then, click on Install.

4. Now, download the VirtualBox Extension Pack file and Install it.
5. After installation, click on the New option.

6. Enter the desired name for your VM and select Next.
7. Now, search for the Command Prompt from the Start menu search bar and click on Run as administrator.
8. Copy and paste the following commands in the CMD window and press the Enter key.
Note: Replace the macOS_VM_Name with your VM (Virtual Machine) name.
cd "C:\Program Files\Oracle\VirtualBox\"

VBoxManage.exe modifyvm "macOS_VM_Name" --cpuidset 00000001 000106e5 00100800 0098e3fd bfebfbff

VBoxManage setextradata "macOS_VM_Name" "VBoxInternal/Devices/efi/0/Config/DmiSystemProduct" "iMac11,3"

VBoxManage setextradata "macOS_VM_Name" "VBoxInternal/Devices/efi/0/Config/DmiSystemVersion" "1.0"

VBoxManage setextradata "macOS_VM_Name" "VBoxInternal/Devices/efi/0/Config/DmiBoardProduct" "Iloveapple"

VBoxManage setextradata "macOS_VM_Name" "VBoxInternal/Devices/smc/0/Config/DeviceKey" "ourhardworkbythesewordsguardedpleasedontsteal(c)AppleComputerInc"

VBoxManage setextradata "macOS_VM_Name" "VBoxInternal/Devices/smc/0/Config/GetKeyFromRealSMC" 1
9. Now, access and download the Big Sur ISO VMDK file to get GarageBand on your Windows PC later.
10. After downloading, Extract the file.
11. In your Virtual Machine, access Settings and click on the System tab.
12. Switch to the Processor tab and select 4 CPU cores from the Processors slider.

13. Click on the Display option from the left pane and select the Screen tab.
14. For the Video Memory field, set the slider at 128 MB, allocating that much memory.

15. Select Storage > Empty.
16. Click on the Disk icon present next to the Optical Drive field.

17. Select Choose a disk file and click on the Big SUR ISO file that you just extracted.
18. After this, click on Start to install the macOS environment on your Windows 10 PC.

19. Once macOS has been emulated in your Windows 10, go to the Mac App Store and install GarageBand.
Also Read: How To Download GarageBand On Android
How to Download GarageBand for Windows 11?
If you’ve upgraded to Windows 11, the process of downloading GarageBand remains the same as with the Windows 10 method. Follow the steps outlined above to enjoy the GarageBand app’s features on your Windows 11 PC.
Is GarageBand Available for Windows 7?
No, GarageBand is unfortunately not available for Windows 7. You can, however, emulate macOS on your PC through VirtualBox or BlueStacks.
After learning how to download GarageBand on a Windows PC, you can compose, record, and produce your melodies right from your Windows computer. If you have any questions or suggestions, don’t hesitate to drop a comment below. Stay tuned for our upcoming tech tutorials. Until next time!
To download and run GarageBand on your PC, confirm your system meets the necessary requirements, including virtualization support. Next, download and install VirtualBox, carefully following prompts for setup. Obtain a macOS disk image from a reliable source, ensuring compatibility with VirtualBox. Set up the macOS virtual machine, allocating sufficient RAM and storage. Log into the Virtual Machine, access the App Store using a valid Apple ID, and download GarageBand. Troubleshoot any installation issues by ensuring internet stability or updating to the latest software versions. These steps provide a structured pathway to successfully utilizing GarageBand on a PC.
Key Takeaways
- Enable virtualization in BIOS settings to support running macOS on a virtual machine.
- Download and install VirtualBox along with the Extension Pack for USB 3.0 support.
- Acquire a compatible macOS disk image from trusted sources for virtual installation.
- Set up a macOS virtual machine in VirtualBox, allocating sufficient RAM and storage.
- Use the macOS App Store to download and install GarageBand in the virtual machine.
Verify System Requirements
To successfully run GarageBand on your Windows PC, it is essential to verify that your system meets specific technical requirements.
Begin by confirming that your computer has a minimum system specification of an Intel i5 processor or an AMD Ryzen 7. This will provide the necessary power for seamless music production.
Additionally, your hard disk should have at least 128 GB of free space to accommodate the macOS installation required within a virtual machine.
The recommended RAM is 8 GB to guarantee smooth operation of the virtual environment.
Verify that your Windows OS version supports virtualization technology, such as AMD-V or Intel VT-x, and confirm it is enabled in your BIOS settings.
These preparations will facilitate superior functionality of GarageBand.
Download VirtualBox Software
To begin setting up GarageBand on your PC, the first step is to download and install VirtualBox from its official website, selecting the version compatible with Windows hosts.
Follow the installation prompts carefully, and afterward, enhance functionality by downloading the VirtualBox Extension Pack, which is essential for enabling USB 3.0 support.
Once installed, configure a new virtual machine with the macOS type, ensuring you allocate at least 8 GB of RAM and 128 GB of storage to run the software efficiently.
VirtualBox Installation Steps
Getting started with VirtualBox involves a few straightforward steps to guarantee a seamless installation process on your Windows PC.
First, verify that your system meets the minimum system requirements for VirtualBox to assure smooth operation.
Follow these steps to download and install VirtualBox:
- Download and Install: Visit the official VirtualBox website and download the latest version compatible with your Windows OS. Follow the installation prompts, selecting the appropriate installation location for the software.
- Configure Virtual Machine: After installation, create a new virtual machine, selecting ‘macOS’ as the machine type.
- Allocate Resources: Assign at least 8 GB of RAM and 128 GB of hard drive space for peak performance.
- Verify Performance: Confirm everything is set up correctly and test the virtual machine for stability.
Extension Pack Essentials
Having successfully installed VirtualBox, attention must now be given to enhancing its capabilities with the VirtualBox Extension Pack. This essential add-on is critical for enabling advanced functionalities such as USB 3.0 support, which greatly improves the virtual machine experience.
To begin, visit the official VirtualBox website and download the Extension Pack compatible with your system. The installation process is straightforward: simply open VirtualBox, navigate to the «Preferences» menu, and select «Extensions.»
From there, you can install the Extension Pack by locating the downloaded file. This step guarantees that VirtualBox operates at its best on your Windows system, enabling you to run macOS applications like GarageBand seamlessly.
Both VirtualBox and the Extension Pack are freely available, providing a robust platform for your computing needs.
Setting up Macos
Before starting the journey to run GarageBand on your PC, setting up macOS within a virtual environment is an essential step. This setup involves several precise actions to guarantee a seamless experience.
Follow these steps to install GarageBand on Windows using VirtualBox:
- Download VirtualBox: Visit the official VirtualBox website. Select the appropriate version for Windows hosts and initiate the installation.
- Install VirtualBox: Follow setup prompts and choose your desired installation location. Confirm you complete the VirtualBox setup.
- Download Extension Pack: Obtain the VirtualBox Extension Pack to enable USB 3.0 support, vital for running macOS.
- Create Virtual Machine: In VirtualBox, select the macOS machine type. Allocate a minimum of 8 GB RAM and 128 GB disk space for peak performance.
Patch for macOS compatibility to run GarageBand software.
Install VirtualBox on Windows
Starting the installation of VirtualBox on a Windows system begins with accessing the official VirtualBox website to download the version compatible with your operating system.
To install VirtualBox on Windows, follow the setup prompts attentively, choosing the desired location for the software.
Once installed, enhance functionality by downloading the VirtualBox Extension Pack, which provides USB 3.0 compatibility and other advanced features.
With VirtualBox ready, you can create a new virtual machine by selecting «New».
Configure it to run macOS by setting the machine type accordingly, ensuring a minimum of 8 GB RAM and 128 GB disk space for ideal performance.
Proper configuration of your virtual machine settings is vital to effectively run macOS and GarageBand on your Windows system.
Obtain Macos Disk Image
With VirtualBox successfully installed and configured to run macOS, the next step is to obtain a suitable macOS disk image.
To guarantee a smooth installation process, follow these guidelines:
- Choose a Compatible Version: Select a legitimate macOS disk image, such as macOS Ventura (13.0.0) or higher, as it supports GarageBand’s requirements.
- Legally Obtained Sources: Download the macOS disk image from trusted and legal sources, ensuring compliance with Apple’s licensing agreements.
- Verify Format: Verify the image is in a compatible format like .dmg or .iso for VirtualBox use.
- Checksum Verification: Validate the integrity of the macOS disk image by checking checksums to avoid corrupted files that may hinder the installation process.
Set up Macos Virtual Machine
Begin by downloading and installing VirtualBox from its official website, guaranteeing that you also obtain the VirtualBox Extension Pack to enable USB support, which is vital for a fully functional macOS experience.
Next, create a new virtual machine, selecting macOS as the operating system type. Allocate at least 8 GB of RAM and 128 GB of hard drive space for peak performance.
Before proceeding, patch the virtual machine to confirm macOS compatibility on non-Apple hardware. This step is important to install and run macOS on the virtual setup.
Start the macOS virtual machine and utilize Disk Utility to format the virtual hard disk.
Follow the macOS setup prompts carefully, setting the stage for downloading GarageBand for Windows PC later via this step-by-step guide.
Install Garageband From App Store
To install GarageBand from the App Store on your macOS virtual machine, begin by launching the App Store and logging in with your Apple ID credentials.
Next, search for «GarageBand» and select the «GET» button to initiate the download process, ensuring your internet connection is stable for a seamless installation. Ensure that your macOS virtual machine is running on macOS 10.12 or later to meet the minimum system requirements for GarageBand.
Once the download is complete, GarageBand will be available in the Applications folder of your virtual machine, ready for you to explore its features.
Accessing App Store
Setting up a macOS virtual machine on your PC is the initial step you need to complete to access the App Store and install GarageBand.
By utilizing VirtualBox or VMWare, you can emulate a macOS environment on your Windows system. Once the virtual machine is operational, follow these steps to proceed:
- Accessing App Store: Launch the macOS virtual machine and open the App Store from the Dock or Applications folder.
- Apple ID: Verify you have an Apple ID ready; you will need it to access the App Store.
- Search for GarageBand: Enter «GarageBand» in the App Store’s search bar and locate the application.
- Download Process: Click the «GET» button to initiate the download and installation.
GarageBand will appear in your Applications folder upon completion.
Apple ID Login
Seamlessly logging into the App Store with your Apple ID marks an important step in installing GarageBand on your PC via a macOS virtual machine.
After setting up macOS, verify you have a stable internet connection to facilitate a smooth login process. Verify your Apple ID credentials to avoid any login issues; a valid account is vital for accessing the App Store.
Once logged in, initiate the process to download GarageBand by searching for it within the App Store. Click «GET» to begin the download, confirming your Apple ID grants permission for this action.
It is advisable to monitor the installation progress closely within the App Store interface to guarantee that GarageBand installs successfully before proceeding to use the software.
Downloading GarageBand Successfully
Initiate the process of downloading GarageBand by guaranteeing your macOS virtual machine is fully operational and compliant with the software’s system requirements.
To effectively download GarageBand for Windows, follow these detailed steps:
- Set up a macOS virtual machine: Utilize VirtualBox or VMWare to install macOS Ventura (13.0.0) or higher on your Windows PC, enabling you to run GarageBand.
- Access the App Store: Within the virtual machine, open the App Store and log in using your Apple ID credentials.
- Search and download: Locate GarageBand using the search function, then click «GET» to initiate the download.
- Monitor installation: Keep track of the download progress, guaranteeing that once complete, GarageBand is ready for your music production endeavors.
This method guarantees the best way to install and run GarageBand efficiently.
Troubleshoot Common Issues
Steering through the intricacies of running GarageBand on your PC through a virtual machine can occasionally present challenges that require a methodical troubleshooting approach. Begin by ensuring your macOS virtual machine is equipped with a minimum of 8 GB RAM and 128 GB storage, essential for seamless GarageBand operation. If you face issues during installation, verify that your Apple ID is accurately entered—incorrect credentials can impede your ability to install GarageBand. Restart the macOS virtual machine and confirm a stable internet connection if downloads fail. Consult online forums for troubleshooting tips on common installation problems unique to virtual machines. GarageBand allows you to import audio files by dragging and dropping them from Finder into the project workspace, which is a beneficial feature to utilize once the software is running smoothly. Keep macOS and GarageBand updated to their latest versions, mitigating potential bugs and compatibility issues that could affect performance.
Frequently Asked Questions
How to Run Garageband on PC?
To run GarageBand on a PC, employ virtual audio software to achieve cross-platform compatibility. As a digital audio workstation, it offers extensive music production tools. Alternatively, explore alternative music apps designed for Windows systems.
Can I Use Garageband on My Computer?
While GarageBand features aren’t natively available on Windows due to software compatibility issues, several GarageBand alternatives exist for music production and audio editing. These alternatives offer user-friendly interfaces and robust tools for seamless digital audio creation.
Is Garageband Free for PC?
GarageBand is not free for PC due to the absence of a native Windows version. Windows users may explore GarageBand alternatives like BandLab, which offers similar features, tutorials, and plugins without cost, alongside useful GarageBand tips.
How Do I Download Garageband?
To download GarageBand, consider its system requirements, user interface, and audio editing capabilities. Due to its unavailability on PCs, explore GarageBand alternatives like BandLab, which offer similar features and functionalities for music production.
Conclusion
The process of downloading and running GarageBand on a PC involves several technical steps that require attention to detail. By verifying system requirements, downloading and installing VirtualBox, obtaining a macOS disk image, and setting up a macOS virtual machine, users can create an environment suitable for installing GarageBand from the App Store. Addressing common troubleshooting issues guarantees a smooth experience. This method provides a practical solution for utilizing GarageBand’s features on a non-native platform, enhancing creative possibilities.
Step 1: Start by downloading Andy’s emulator on the Windows device. Visit the official website, download the ‘.exe’ and run the whole setup. Step 2: Once you’re done downloading the andy emulator and the setup is complete, open and on the search bar, enter “GarageBand”.
Moreover, can you download GarageBand on Windows? So, Can You Get GarageBand On Windows? As GarageBand is developed by Apple, you are not going to find a version for PC/Windows.
As many you asked, how do I install garage band on Windows?
- Download and install VirtualBox onto your computer.
- Download a copy of MacOS Sierra onto your computer and extract the contents.
- Open VirtualBox and select New to create the VM.
- Give it a meaningful name.
- Set the Guest OS as Apple Mac OS X and the version as Mac OS X 10.11 or 10.12.
Similarly, is GarageBand free for Windows 10? Garageband is not available on Windows 10; therefore, we suggest taking a look at the following free Garageband alternatives: Soundation Studio. LMMS (Let’s Make Music)
Also, is GarageBand for Windows safe? Is GarageBand for Windows Safe? As we already established, there is no version of GarageBand for Windows. If anybody tries to sell you GarageBand for Windows, it’s not a safe version, and you shouldn’t rely on it or that person.4) Audacity Has More Nuanced Editing Tools Than GarageBand But, where Audacity is great at editing audio, GarageBand is great at creating audio. One of the main advantages of using Audacity is that effects can be added to any section you want. With GarageBand, you have to change the entire track to the same effect.
Can you download GarageBand on HP?
Does GarageBand App Available on Windows? There is no official version of Garageband available for Windows 10. However,many Mac apps can be downloaded to Windows using iOS emulators In order to download iOS apps on to your Windows PC, you need to download and Install an iOS emulator on your PC ie iPadian emulator.
Is Garage Band free?
What’s been in it for Apple, which has not only declined to make money on the app for 15 years but spent millions meticulously refining it? (Garageband’s premium version, Logic, costs around $200, but Garageband itself has always been free.)
What can I use instead of GarageBand?
- Audacity.
- Adobe Audition.
- Ableton Live.
- FL Studio.
- Cubase.
- Studio One.
- Reaper.
- Music Maker.
How good is GarageBand?
Garageband is a great DAW for recording and editing audio because it has many features that other more sophisticated DAWs have, albeit in a more simplistic and stream-lined format. The user interface is incredibly friendly and it also has things like Apple Loops and drummer automation.
What is GarageBand Windows version?
LMMS: Best Open-source GarageBand Alternative Available on Windows, Mac, and Linux, it offers a powerful music production solution with numerous mixing and mastering tools. With LMMS, you can sequence, compose, mix and automate songs in one simple interface. It also lets you note playback via MIDI or typing keyboard.
How do I make free music on my computer?
- GarageBand.
- DarkWave Studio. An alternative for PC users, DarkWave Studio is a free music production software that supports Windows 7 or later.
- Audacity.
- LMMS.
- Tracktion T7.
- Cakewalk by BandLab.
What is the best music maker?
- Ableton Live. An inspiring DAW with a next-level workflow.
- Image-Line FL Studio. A unique DAW that’s kickstarted many electronic music producers’ careers.
- Apple Logic Pro. Amazing value and great performance on the Mac.
- Steinberg Cubase.
- PreSonus Studio One.
- Cockos Reaper 6.
- Reason Studios Reason.
- Bitwig Studio.
Do professionals use GarageBand?
Yes, GarageBand is used by many professional music producers and singers – Steve Lacy, T-Pain, Rihanna, and Oasis have all been using GarageBand at some point. You can install GarageBand on all your Apple devices, making it a very versatile DAW for music production.
What happened to GarageBand?
GarageBand.com closed its doors in June 2010, offering users migration to iLike. After the demise of the original MP3.com in 2003, subsidiary Trusonic, with an inventory of 250,000 artists representing 1.7 million songs, partnered with GarageBand.com in 2004 to revive these artist accounts.
How do I play GarageBand on my PC?
The only way to use Garageband on your PC is to virtualize a complete Max OS X environment which then allows you to run Garageband like any other Mac OS X App. While you can find working VMware images with MAC OS X quite easily, we advise you not to use them.
Is GarageBand better than Pro Tools?
All though Garageband does have everything you need to produce music, it’s main uses are for mobile considerations. As a result, considering a more professional digital audio workstation may be your best bet. On the other hand Pro Tools is industry standard and has the professional producer in mind.