

Are you curious to work with the Linux Operating System inside your PC/Laptop? Then you’re at the right place. This guide helps you in the hassle-free installation of Fedora Linux on your System.
Now, we are going to install Fedora Workstation v35 on our system.
What is Fedora?
Fedora Linux is a Linux distribution developed by the community-supported Fedora Project which is sponsored primarily by Red Hat, a subsidiary of IBM, with additional support from other companies.
If you want to know more about Linux and its distributions, check it out here.
Prerequisites
- 35GB+ free space in HDD/SSD
- 8/16GB Pen drive
- Windows 11/10
Note: This guide is only for the system which has UEFI BIOS and the type of SSD/HDD is GPT and System Type is x64-based.
How to check the BIOS Mode of your system?
- Click Start Button
- Search msinfo32 (or) System Information in the search bar
- Check BIOS Mode Property

If it’s UEFI, you’re good to go.
How to check the SSD/HDD Mode of your system?
- Click Start Button
- Search for
cmd - Run
cmdas administartor - Type
diskpartand press enter. - Next, type
list diskand press enter.
If you see * under GPT of Disk 0, you’re ready for installation of Fedora Linux in your System.
Softwares Required
- Fedora Workstation ISO

- Rufus for making USB bootable. Click here to know more.
Now, it’s time to create a bootable USB. So, format your USB beforehand.
Create a Bootable USB using Rufus
- Open Rufus and plug your clean USB stick into your computer.
- Rufus will automatically detect your USB. Click on Device and choose the USB you want to use from the drop-down menu.
- Make sure the Boot Selection option is set to Disk or ISO image then click Select. Rufus will open a file explorer browser window, locate the ISO image which you downloaded named
Fedora-Workstation-Live-x86_64-XX-X.X.isoto burn onto the USB, and select it.
- Leave other options as default and click Start.
- You’ll get a warning saying that any data on the USB will be destroyed (this is normal). Click OK and Rufus will start creating the ISO image on the USB.
- Let it run in the background, jump to the next section.
- Once Rufus has finished creating the ISO image on the USB, you can close it and your bootable USB is ready to go!
Make a new Unallocated Partition.
-
Press the
Windows key + Ron your keyboard to open the Run utility, or search for it in the Start menu. -
Type
diskmgmt.mscand press OK. -
A menu will appear with a list of all your hard drives. Right-click on the drive you want to partition and select Shrink Volume.
-
You’ll be asked how much you want the drive to shrink. The amount you enter will be the amount of space left for your new partition. The
total size after shrinkwill be the space left in the original partition. -
Enter a value and Click Shrink. (Note: If you want 50GB partition, the value is 50 x 1024 = 51200).
-
Now, you’ll find a new Unallocated Partition under Disk 0.


Reboot your system into BIOS Mode.
- To boot into BIOS, Press the below keys before OEM Logo (Brand Logo) appears. the key may be
ESC,Del,F1,F2,F10,F12. If still, it’s not booting into BIOS, Check the below step. - Google your system model with BIOS mode at the end. You’ll find the solution.
- After booting into BIOS, disable
Secure Bootand Change the Boot Drive priority toUSB. - Save the Changes and Reboot.
Boot into Fedora
- If all steps have been performed correctly, you will see the below image.
- Select
Test this media & start Fedora Workstation-Live XX - Wait for some time, you’ll see a window with two options.
- Click Install to Hard Drive. Again, wait for < 1 min.
- You will land on the below Window.

-
Click on the
Keyboardoption, Select your Keyboard Language and Click Continue. -
Similarly, Click on the
Date & Timeoption, Select your Time Zone and Click Done.
Installation
- Now, Click
Installation Destination.

- Select your disk, Choose Custom under Storage Configuration and Click on Done.

- Now, you’ll be in the below window and also verify that the Available Space is your Unallocated Partition Space.
- Click on the + icon, a popup appears, Choose
/boot/efiUnder Mounting Point which is System’s EFI partition. Enter1024MiBin Desired capacity. Click on Add mount Point.

- Similarly, Click on the + icon again, In popup, Choose
/Under Mounting Point which is called Root Partition. Subtract 5GiB from Available Space and Enter remaining space in Desired capacity (Ex: 50 GiB). Click on Add mount Point. And Verify it’sDevice Typewhich is Btrfs.
- Similarly, Click on the + icon again, In Pop up, Choose
swapUnder Mounting Point, which is swap memory. Enter the remaining space in Desired capacity (Ex: 5 GiB). Click on Add mount Point.
- Finally, you’ll see all the partitions created.

- Now, click on Done. Verify the Summary of Changes. And click on Accept Changes.

- You’ll see the below window. Now, click on Begin Installation.

Relax for 10-15 mins.
- Click on Finish Installation.
The system will restart automatically and you’ll see the GRUB Bootloader, Select Fedora, and Press Enter.
Enter your details and you’ll be finally booted into Fedora Linux.

Thanks for following the guide. Hope this helps you in some way 
This is a step by step beginner’s guide shows how to install Fedora Workstation using an USB stick.
Fedora is a Linux distribution developed by the community-supported Fedora Project which is sponsored primarily by Red Hat. It features Workstation, Server, and loT editions. And here’s I’m going to show how to install the Workstation (Desktop) edition.
Preparation:
Fedora Linux has an official USB writer called Fedora Media Writer. You can use it to create bootable installer from Windows or Mac OS.
As an alternative, download the ISO image and create live-USB via:
- Download Fedora Workstation ISO.
- Create bootable USB installer from Linux, Windows, or Mac OS. It does work for Fedora though written for Linux Mint.
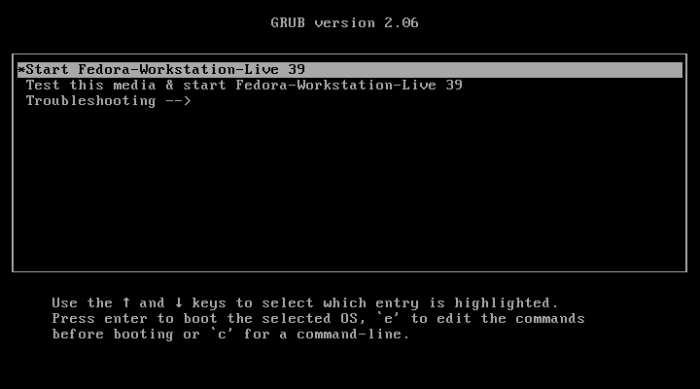
1. Boot Fedora Workstation Live-USB:
Once you created the USB installer, plug in and boot it in your machine. Depends on your device, you may press ESC, F2, Del, etc on startup to get into BIOS and set up boot order.
When it starts into menu, hit Enter to boot with first entry “Start Fedora-Workstation-Live 39”.
2. Launch the Installer Wizard:
Once you boots into the live system, click “Install Fedora …” in the welcome dialog.
You can of course click “Not Now” to close the dialog, then re-open it at any time from the bottom dock in ‘Activities’ overview screen.

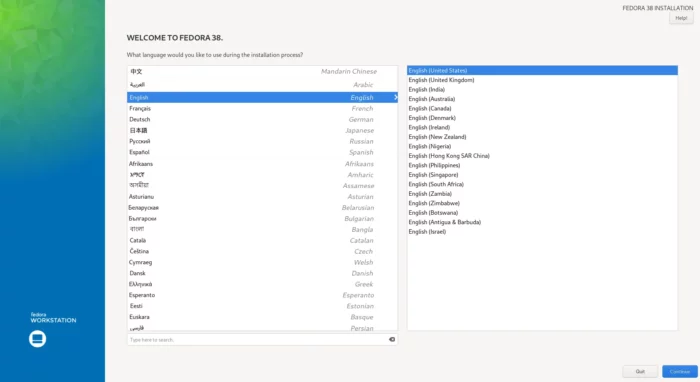
When the wizard opens, select your language that will be in use for current installer wizard:
3. Configure Keyboard, Time & Data:
Little different to other Linux, e.g., Ubuntu, Linux Mint, and Manjaro, after choosing the wizard language, it goes directly to “Installation Summary”:

It automatically detects your keyboard and timezone. You can just skip them. If you want, click them one by one and set as you mind.
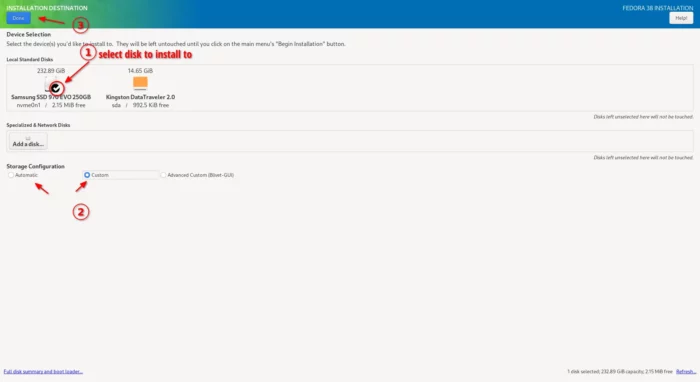
4. Choose disk for Fedora system:
For the SYSTEM section (see the last screenshot), you need to click on it to configure the installation destination.
There do:
- select the disk you want to install Fedora onto. There will be a check-mark on it once selected.
- Under “Storage Configuration”, select ‘Automatic’ if you’re sure there are enough free space, or select “Custom” to manually assign partitions for Fedora.
- Finally, click “Done” button in the top-left.
5. Assign disk partitions for Fedora
If you chose “Custom” in the previous screen, it will then go to the following screen once you click Done.
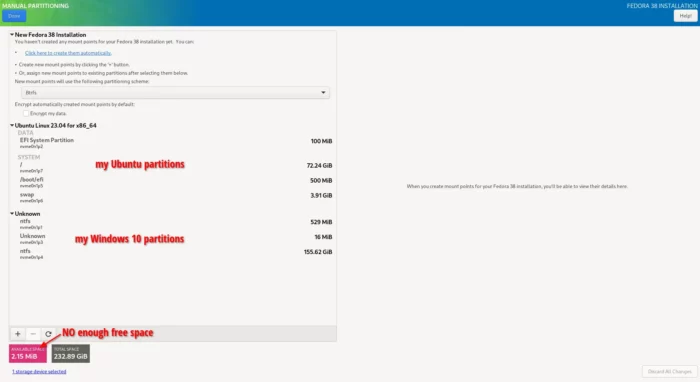
In my case, I have Ubuntu and Windows 10 file systems on the disk, and there’s NO enough free space. So I have to delete something via the “-” icon in bottom left. And, I deleted all the Ubuntu partitions. So it then looks like:
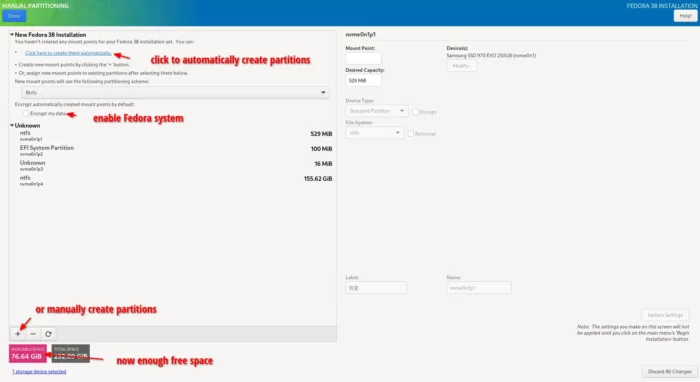
Once you have enough free space, do:
- Option 1 (Super Easy):
- Enable “Encrypt my data” if you want, so it will add password protection on every boot of Fedora.
- Then click the link “Click here to create them automatically” to automatically create all partitions required for Fedora.
- Finally click “Done” in the top-left.
- Option 2. The previous method does NOT create Swap partition in my case. If you DO require swap (e.g., for hibernation use), do following steps to manually create system partitions:
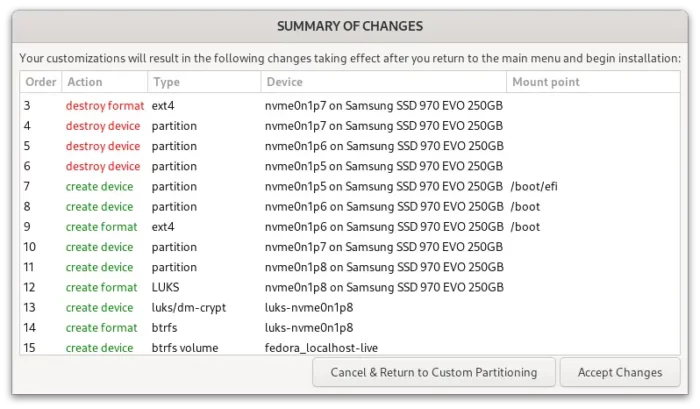
After creating partitions for your Fedora system, click top-left “Done” button. It WILL pop-up the dialog ask for setting password, if you enabled “Encrypt” option.

Then, it will pop-up all the changes summary you did on the disk. Click “Accept Changes” to apply.
6. Start Installing
When done assigning disk spaces, the summary page should be looking like the screenshot below:

You can now click “Begin Installation” and wait the installing process done. If everything goes well, it will prompt ‘Complete’ with button to “Finish Installation“.

Then, you can either choose to continue testing the live system, or restart computer.
If Windows 10 or 11 does not have a separate EFI partition, it may disappear from the boot menu.
In the case, boot Fedora 39 and setup your user account in the welcome wizard. When done, do:
- Click top-left ‘Activities‘ and then search for and open ‘Terminal’.
- When terminal opens, run command to edit the boot menu config file:
sudo gnome-text-editor /etc/default/grub
- When the file opens, add (or set if that line exist): GRUB_DISABLE_OS_PROBER=false
- Save the file, and apply change by running command:
grub2-mkconfig -o /boot/grub2/grub.cfg
Conclusion:
Compare to Linux Mint and Manjaro, the installer wizard of Fedora Linux is not so friendly for beginners. The partition table even don’t tell you what it is in sda1, sda2, etc. It’s troublesome if any other operating system exists in the hard disk.
Dual booting is a popular approach that allows users to run two operating systems on a single machine. Among the many combinations available, dual booting Fedora and Windows 11 is a common choice for those looking to leverage the strengths of both Linux and Windows environments. This guide will walk you through the complete process, from preparing your system to installing and configuring both operating systems for smooth operation.
I. Understanding Dual Booting
What is Dual Booting?
Dual booting refers to the practice of installing two different operating systems on the same computer, enabling you to choose which one to load at boot time. This approach is especially common for users who want the compatibility and software availability of Windows alongside the stability, security, and flexibility of Linux distributions like Fedora.
Why Dual Boot Fedora and Windows 11?
- Flexibility: You can choose the OS that fits your task best at any given moment.
- Software Availability: Some applications are available only on Windows, while others perform better in a Linux environment.
- Development: Many developers prefer Linux for programming tasks, making dual booting an excellent option for those who also require Windows for testing.
- Learning: If you’re new to Linux, dual booting allows you to explore without entirely abandoning your familiar Windows setup.
II. Prerequisites
System Requirements
Before you begin the dual booting process, ensure that your system meets the following requirements:
- Hardware: At least 20 GB of free disk space for Fedora, a compatible processor, and sufficient RAM (4 GB or more recommended).
- Backup: Back up your important files and settings in case something goes wrong during the partitioning or installation process.
- Windows Installation: Make sure you have Windows 11 installed and running properly on your system.
- Fedora ISO and USB: Download the latest version of Fedora from the official website and create a bootable USB drive. You can use tools like Rufus for Windows or the ‘dd’ command for Linux users.
Preparing Your System
- Update Windows: Ensure that your Windows installation is fully updated.
- Disk Management:
- Open Windows Disk Management by searching for «Disk Management» in the Start menu.
- Right-click on the primary drive (usually C:).
- Select “Shrink Volume” to create unallocated space for Fedora. You should allocate at least 20 GB, but more is preferable, depending on your usage.
III. Creating Space for Fedora
- Shrink Volume: In the Shrink Volume window, specify the amount of space to shrink in MB. For example, to allocate 20 GB, enter 20480. Click “Shrink”.
- Unallocated Space: After shrinking the volume, you will see unallocated space as a result. Leave this space unformatted; Fedora will handle it during installation.
IV. Booting from the Fedora USB
- Reboot Your Computer: With your Ubuntu USB drive plugged in, restart your computer.
- Access the Boot Menu: As the system starts, access the boot menu (usually by pressing F12, F10, or ESC, depending on your system’s manufacturer).
- Select USB Drive: From the boot menu, select the USB drive containing the Fedora installation medium.
V. Installing Fedora
Starting the Installation
- Select «Try Fedora» or «Install to Hard Drive»: Upon booting from the USB drive, you will see options to either try Fedora Live or install it. Choose “Install to Hard Drive”.
- Select Language: Choose your preferred language and click “Continue”.
Installation Options
-
Installation Destination:
- When you reach the Installation Destination screen, select the drive where you want to install Fedora. The unallocated space should be visible.
- Choose “I will configure partitioning” to proceed.
-
Disk Partitioning:
- Click on the unallocated space and select “Create”.
- You will need to create at least two partitions:
- Root Partition: Mount point
/, ext4 file system, size at least 15 GB. - Swap Partition: Size should typically be equal to your RAM size or double if you plan to use hibernation.
- Optionally, you may create a Home partition to store user files separately, which makes backups easier.
Completing the Installation
- Begin Installation: After configuring the partitions, go back to the Installation Summary screen and click “Begin Installation”.
- Create User Account: While Fedora installs, you will be prompted to set up a root password and create a user account. Follow the prompts to do this.
- Finish Installation: Once installation is complete, remove the USB drive and reboot your system.
VI. Configuring the Bootloader
GRUB Bootloader
After a successful installation of Fedora, the system will configure the GRUB bootloader. This bootloader is responsible for allowing you to choose between Fedora and Windows 11 at startup.
- Reboot Your System: After installation, upon reboot, you will see the GRUB menu.
- Selecting Operating System: The menu will list Fedora and Windows 11; you can select which OS to boot into.
Troubleshooting GRUB
If Windows 11 does not appear in the GRUB menu, you might need to update the GRUB configuration.
- Boot into Fedora.
- Open the terminal.
- Type
sudo grub2-mkconfig -o /boot/grub2/grub.cfgand hit Enter. This command scans for installed operating systems and updates the GRUB menu. - Reboot your system again to check if Windows appears in the GRUB menu.
VII. Post-Installation Considerations
Secure Boot
Some systems with Secure Boot enabled may misinterpret Linux operating systems as untrustworthy. If you encounter an issue logging into Fedora or getting it to boot at all, you may need to disable Secure Boot in your BIOS settings.
Drivers and Updates
- Check for Updates: After you have booted into Fedora, it is essential to check for system updates:
- Open the terminal in Fedora and run:
sudo dnf update
- Open the terminal in Fedora and run:
- Install Additional Drivers: If you need proprietary drivers (like NVIDIA), you can do so via RPM Fusion repositories:
- Enable the repositories by running the following commands in the terminal:
sudo dnf install https://download1.rpmfusion.org/free/fedora/rpmfusion-free-release-$(rpm -E dora).noarch.rpm sudo dnf install https://download1.rpmfusion.org/nonfree/fedora/rpmfusion-nonfree-release-$(rpm -E dora).noarch.rpm - Install desired software or drivers using:
sudo dnf install
- Enable the repositories by running the following commands in the terminal:
Windows Fast Startup
Windows 11’s fast startup feature may lead to issues accessing shared files across both OS. To disable fast startup:
- Boot into Windows 11 and navigate to Control Panel > Hardware and Sound > Power Options.
- Click “Choose what the power buttons do” and then “Change settings that are currently unavailable.”
- Uncheck “Turn on fast startup” and save changes.
VIII. Sharing Data Between Fedora and Windows
Creating a Shared Partition
To access files across both operating systems:
- Create a Shared NTFS Partition: Use Windows Disk Management to create an NTFS partition that will be used by both operating systems.
- Accessing from Windows: You can easily access this partition like any other.
- Accessing from Fedora: In Fedora, you can mount this partition by adding an entry in
/etc/fstab, using the UUID of the drive.
Security Considerations
- Be cautious with file permissions when sharing data between systems.
- Ensure that the partition used for sharing does not have sensitive information that should be confined to either operating system.
IX. Conclusion
Dual booting Fedora and Windows 11 can significantly enhance your computing experience by offering the advantages of both operating systems. While the installation process may seem daunting, following the steps outlined in this guide will help you set up a successful dual-boot system.
Explore Fedora’s vast array of applications and development tools while still having access to the Windows operating system when you need it. Enjoy the flexibility and control of having both systems at your fingertips. Remember to regularly back up your important data, and happy computing!
How to Install Fedora on Windows 11: A Step-by-Step Guide
Fedora is a popular Linux distribution known for its cutting-edge features and stability. Many Windows users are curious about how to install and run Fedora alongside Windows 11, particularly for software development, system administration, or simply exploring Linux. This article serves as a comprehensive guide to installing Fedora on Windows 11 using different methods, including dual-booting and using virtualization software like Windows Subsystem for Linux (WSL) and VirtualBox.
Understanding Fedora and Its Benefits
Fedora provides a blend of modern technology and user-friendly experience. It features:
- Cutting-Edge Software: Fedora is known for integrating the latest software innovations.
- Strong Community Support: Users can access a wealth of community-driven resources, documentation, and forums.
- Excellent Package Management: It employs the DNF package manager, allowing smooth software installation and management.
- Security Features: With SELinux, Fedora emphasizes security by enforcing various access controls.
These features make Fedora popular among developers, IT professionals, and tech enthusiasts.
Preparation Steps Before Installation
Regardless of the installation method you choose, some preliminary steps are crucial:
-
Backup Your Data: Always back up essential files before making significant changes to your system. This ensures that you won’t lose any critical data in case something goes wrong.
-
Check System Requirements: Ensure your system meets the minimum requirements for running Fedora:
- 2 GB of RAM (recommended: 4 GB or more)
- 25 GB of free disk space (recommended: more depending on your usage)
- 64-bit processor
-
Download Fedora: Head over to the official Fedora website and download the desired version. The “Fedora Workstation” edition is recommended for personal computing and development.
-
Create a Bootable USB Drive: You need to create a bootable USB drive to install Fedora. Tools like Rufus or Etcher work well for this purpose.
Method 1: Dual Boot Fedora with Windows 11
Dual-booting allows you to install Fedora alongside your existing Windows installation, enabling you to choose which operating system to boot when starting your computer.
Step 1: Prepare Your Hard Disk
- Disk Management: Right-click on the Start menu and select “Disk Management”.
- Shrink Volume: Identify your Windows installation volume, right-click it, and choose “Shrink Volume”. Allocate sufficient space for Fedora (at least 20 GB).
Step 2: Create a Bootable USB Drive
- Format the USB: Insert your USB drive, and format it to FAT32.
- Use Rufus:
- Open Rufus.
- Choose your USB drive.
- Select the Fedora ISO file you downloaded.
- Click «Start» to create the bootable USB.
Step 3: Disable Fast Startup in Windows 11
Fast Startup can sometimes cause issues when dual-booting with Linux.
- Open Control Panel: Search for and open Control Panel.
- Power Options: Go to “Power Options” and then click on “Choose what the power buttons do”.
- Change Settings: Click “Change settings that are currently unavailable” and uncheck “Turn on fast startup”.
Step 4: Boot from USB Drive
- Access Boot Menu: Restart your computer and press the appropriate key (usually F12, Esc, or Del) to access the boot menu.
- Select the USB Drive: Choose your bootable USB drive from the menu.
Step 5: Install Fedora
- Start the Installation: At the Fedora welcome screen, select “Start Fedora”.
- Begin Installation: Click on “Install to Hard Drive”.
- Select Language and Keyboard: Choose your preferred language and keyboard layout.
- Installation Destination: Select the partition you created earlier for Fedora. Ensure that «Automatically configure partitioning» is unchecked if you want to customize. Configure the partitions according to your needs (generally, a root partition with ext4 is sufficient, and you might want to create a swap partition).
- Configure Network and Hostname: Optional, but recommended; set up your network connection and hostname here.
- Begin Installation: Once you’ve set everything, click “Begin Installation”.
The installation process may take several minutes. During this time, you can set up the root password and create a user account.
Step 6: Post-Installation
- Reboot: Once the installation is complete, reboot your computer.
- Select Fedora or Windows: After the reboot, you will see a GRUB menu where you can select Fedora or Windows to boot.
Now, you have a dual-boot system with Windows 11 and Fedora!
Method 2: Installing Fedora Using Windows Subsystem for Linux (WSL)
WSL allows you to run a Linux environment directly on Windows 11 without a virtual machine or dual-booting.
Step 1: Enable WSL
- Open PowerShell as Administrator: Right-click the Start menu and select «Windows Terminal (Admin)» or «PowerShell (Admin)».
- Run the Command:
wsl --install
This will install WSL, download the default Linux distribution (usually Ubuntu), and configure the Windows subsystem.
Step 2: Install Fedora via WSL
- Open Microsoft Store: Search for the «Microsoft Store» in Windows.
- Search for Fedora: Enter «Fedora Remix for WSL» in the search bar. This is the optimized version for WSL.
- Install Fedora Remix for WSL: Click «Get» or «Install» to download it.
Step 3: Set Up Fedora
- Launch Fedora Remix: Open the start menu and search for «Fedora Remix» to launch it.
- Create User Account: The terminal will prompt you to set up a username and password for the Fedora environment.
You now have Fedora running on your Windows system via WSL! You can use it just like you would use a full installation, albeit with some limitations typical of the WSL installation regarding graphical applications.
Method 3: Using VirtualBox
If you prefer to run Fedora in a separate environment without altering your system partitions, consider using VirtualBox.
Step 1: Install VirtualBox
- Download VirtualBox: Go to VirtualBox’s official website and download the Windows installer.
- Install VirtualBox: Run the installer and follow the prompts to complete the installation.
Step 2: Create a New Virtual Machine
-
Launch VirtualBox: Open VirtualBox after installation.
-
Create New VM: Click on “New”.
- Name: Enter a name for your VM (e.g., Fedora).
- Type: Select «Linux».
- Version: Choose «Red Hat (64-bit)».
-
Allocate Memory: Choose the amount of RAM to dedicate to the VM (at least 2048 MB recommended).
-
Create Virtual Hard Disk: Select «Create a virtual hard disk now».
- Hard Disk File Type: Choose “VDI (VirtualBox Disk Image)” and click “Next”.
- Storage on Physical Hard Disk: Select “Dynamically allocated” and click “Next”.
- File Location and Size: Set a size for your virtual hard disk (20 GB is typically enough).
Step 3: Install Fedora in the Virtual Machine
-
Select ISO: In the VirtualBox interface, select your newly created VM and click “Settings”. Under “Storage”, click on the empty CD/disk icon and load your Fedora ISO file.
-
Start the VM: Click “Start” to boot the virtual machine.
-
Begin Installation: The Fedora installer will launch. Follow the on-screen prompts to install Fedora, just as you would on a dedicated machine.
-
Configuration: Set up language, keyboard, partitions, and user accounts as described in the dual-boot section.
Step 4: Use Fedora on VirtualBox
Once installation is complete, you can run Fedora in the VirtualBox window. This setup allows you to use Fedora while keeping it isolated from your Windows environment.
Conclusion
Installing Fedora on Windows 11 can enhance your computing experience, combining the strengths of both operating systems. Whether you choose to dual-boot, use WSL, or employ virtualization through VirtualBox, each method has its advantages:
- Dual-Boot: Full performance and access to system resources but requires some partitioning.
- WSL: Integrates Linux into Windows for lightweight tasks; ideal for development or command-line usage.
- VirtualBox: Excellent for isolating the Linux environment, especially for testing or educational purposes.
Choose the method that best fits your needs, and don’t hesitate to explore the vibrant ecosystem that Fedora offers. Remember to keep updating and learning, as the open-source community thrives on curiosity and exploration.
November 12, 2021 | By the+gnu+linux+evangelist.
GNU/Linux Fedora 35 Alongside Windows 11 Installation – QuickStart Guide
Hi! The Tutorial shows you Step-by-Step and Visually How to Install GNU/Linux Fedora 35 on Top of Microsoft Windows 11 OS.
And this Fedora 35 Windows 11 Installation Guide for Beginners will let you to Getting-Started Easily with GNU/Linux on a PC!
Moreover, the purpose of Linux Fedora is to produce a Modern, Elegant and Comfortable operating system which is both Powerful and Easy to use.
Especially relevant: to get a usable System you Require at least 30 Gb of Free Space on your PC.
Finally, here is shown the Fedora GNOME Desktop Setup, but for the others Spins the process is quite the same.

-
1. Burning ISO
How to Burn GNU/Linux ISO to CD/DVD/USB
Burning GNU/Linux Fedora ISO