
NOTE: How to pages contain long CLI commands with slider which are not visible using Edge or Chrome browsers. Please use Firefox browser!
Are you new to EVE-NG? Don’t worry! This tutorial is designed for beginners and aims to guide you through installing and configuring EVE-NG on your computer. Whether you have prior experience, this tutorial will provide the essential steps to ensure a successful installation and setup.
We’ll be with you every step of the way, providing clear instructions to help you successfully install EVE-NG. From installing VMware Player to creating your first lab, we’ll ensure you have everything you need. We’ll even guide you through configuring your first EVE-NG lab.
So don’t worry; by the end of this tutorial, you’ll feel confident and accomplished in setting up your EVE-Ng environment. Ready? Let’s go!
(NOTE: The Ultimate Free EVE-NG Course – Master network simulation with our step-by-step guide and elevate your skills from beginner to pro. Start your free course now!)
Table of contents
- What is EVE-NG?
- Getting Started with EVE-NG
- Exploring the Three Versions of EVE-NG Licenses
- Before You Begin, Here’s What You Need
- Minimum System Requirements
- VMware Workstation Player
- EVE-NG Community Edition
- WinSCP
- EVE-NG Windows Client Side
- vIOS Router Image (I will provide you the download link )
- Step 1. VMware Workstation Player Installation
- Step 2. How to Download and Install EVE-NG
- Step 3. Creating Your First Lab in EVE-NG
- Step 4. How to Start Building Your First EVE-NG Lab
- Step 5. How to Configure Static Routing on a Cisco Router
- Wrapping Up Your EVE-NG Journey
- Where to Go From Here
What is EVE-NG?
EVE-NG is a popular network emulation software that allows individuals and organizations to design, configure, and test various network scenarios. It’s designed for both educational purposes and real-world network testing and development. EVE-NG provides a flexible and scalable environment for emulating complex network topologies, including routers, switches, firewalls, and more, all within a virtualized environment. There are three versions of EVE-NG licenses. The community version is free, the pro version is paid, and the learning center is ideal for IT learning centers or universities.
Getting Started with EVE-NG
You might be wondering, Which version of EVE-NG should I install? Great question! If you’re unsure which version of EVE-NG to install, don’t worry—I’ll help! We’ll go through each version step by step to ensure you choose the right one for your needs. Let’s examine each version of EVE-NG and see what sets them apart.
Exploring the Three Versions of EVE-NG Licenses
EVE-NG offers three main licensing options: the Free Community Edition, the Paid Pro Version, and the Ideal Learning Center Option.
- EVE-NG Community: The Free Community Edition of EVE-NG allows users to explore and experiment with the software without financial commitment. This version provides basic functionalities and features that allow users to set up and manage virtual networks. While it may have limitations, such as restricted access to some advanced features or restricted usage of commercial images, the Free Community Version is still a valuable resource for network enthusiasts, students, or professionals on a budget.
- EVE-NG Professional or Pro: On the other hand, the Paid Pro Version of EVE-NG offers an enhanced experience with additional features and advanced functionalities. By subscribing to the Pro Version, users can access a wider range of network appliances and images, allowing for more comprehensive network simulations. This license also provides priority support from the EVE-NG team, ensuring prompt assistance whenever needed. The Paid Pro Version caters to individuals and organizations requiring a more extensive network environment for testing, research, or training purposes and is willing to invest in a premium experience.
- EVE-NG Learning Center: Lastly, the Ideal Learning Center Option is explicitly designed for educational institutions or training centers that aim to incorporate EVE-NG into their networking curriculum. This option provides extensive benefits for instructors and students alike. It offers seamless integration with learning management systems (LMS), simplifying virtual labs’ setup and management for large-scale deployments. Furthermore, the Ideal Learning Center Option includes dedicated technical support and ongoing updates to ensure a smooth and uninterrupted learning experience. Educational institutions can optimize their network training programs and empower their students with practical, hands-on experience by choosing this option.
In conclusion, EVE-NG offers a range of licensing options tailored to different needs and requirements. A suitable EVE-NG license is available whether you are an individual looking to learn and experiment with network configurations, a professional needing advanced functionalities, or an educational institution or training center seeking an ideal networking education platform. So, explore the licensing options to find the perfect fit for your networking endeavors.
Before You Begin, Here’s What You Need
Before installing your EVE-NG, you’ll need a few essential things. Let’s break down each of these so you know exactly what to look for and how to get started.
Minimum System Requirements
Knowing the minimum system requirements is essential to ensure a smooth installation process. According to the EVE-NG team, you will need at least a 64-bit operating system, 8GB of RAM,10 GB of free space, and a quad-core CPU. An SSD is also recommended for better performance. Meeting these requirements allows you to enjoy a seamless experience while exploring various networking scenarios on EVE-NG.
VMware Workstation Player
VMware Workstation Player is a handy program that offers a great solution for running a virtual computer on your own physical computer. It’s completely free and serves as a necessary tool for installing EVE-NG. To get it, click the link below and download the free version of VMware Workstation Player.
→ Get your free copy of VMware Workstation Player
In this tutorial, we will use the free EVE-NG Community Edition. This makes it a perfect choice for beginners seeking hands-on experience or individuals who want to practice specifically for the Cisco exam. Later in the tutorial, we will cover the installation process of EVE-NG.
WinSCP
For Windows Secure Copy, WinSCP is a file management software designed for the Windows operating system. It provides a secure and reliable way to transfer files through SSH (Secure Shell) and SFTP (Secure File Transfer Protocol). If we want to use image files in eve-ng, we must upload and install them. We need images to upload the file.
→ Get your free copy of WinSCP
EVE-NG Windows Client Side
The EVE-NG Windows Client Side is a handy tool that enables us to connect conveniently to network nodes within EVE-NG labs. Using the EVE-NG Client pack, we can seamlessly interact with network nodes and carry out various tasks. This tool supports telnet/ssh and vnc protocols, which provide secure and efficient connectivity options.
vIOS Router Image (I will provide you the download link )
IOSv is a virtual version of Cisco IOS that operates as a complete virtual machine on a hypervisor. This allows users to simulate the functionality and features of Cisco IOS without having to install it on hardware physically, and running it as a virtual machine offers network administrators and professionals greater flexibility, scalability, and convenience. It is a valuable tool for testing, learning, and experimentation in a virtual environment.
Step 1. VMware Workstation Player Installation
For EVE-NG installation, the easiest way is to install it over VMware Player or Workstation. As VMware Player is the free version and there is no need to pay for a license, we will install EVE-NG over VMware Player, making it easy for you to elaborate on the installation.
1. Once you download the Setup file, you should see the downloaded file like the below screenshot.
2. Then it would be best if you double-click on the VMware Player Setup file to install it on you’re PC.
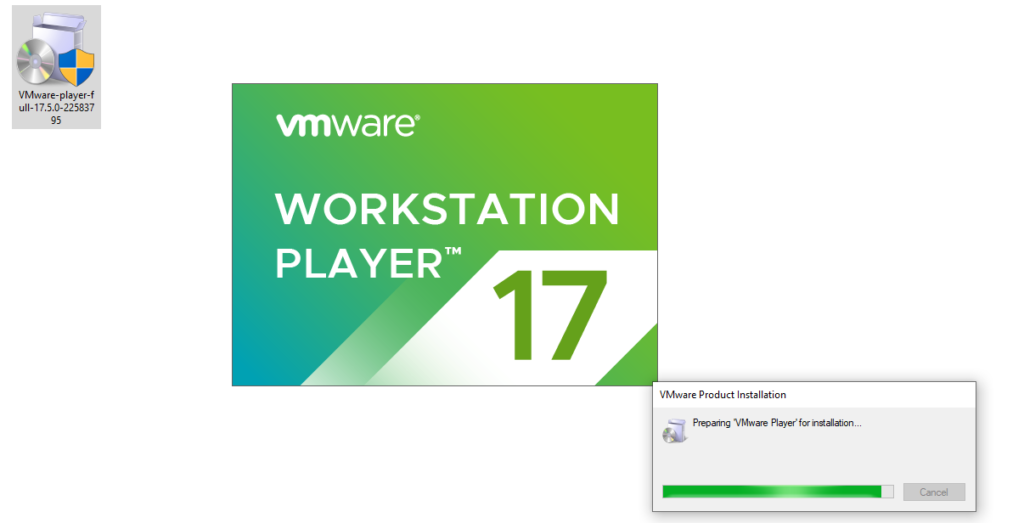
3. Once the wizard is ready for installation, click on → Next to initiate the installation.
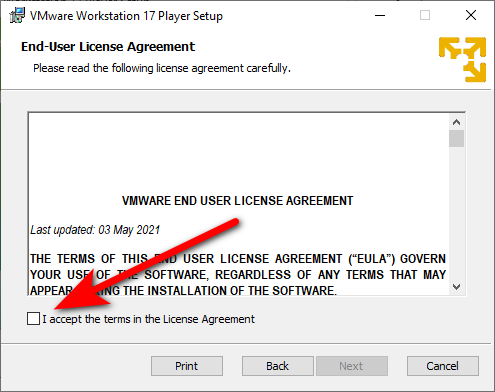
4. We need to accept the license agreements.
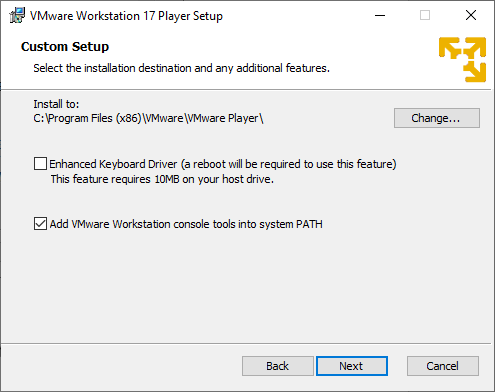
5. In this stage, we can select the Enhance Keyword Driver option or leave it unchecked.
Click on → Next.
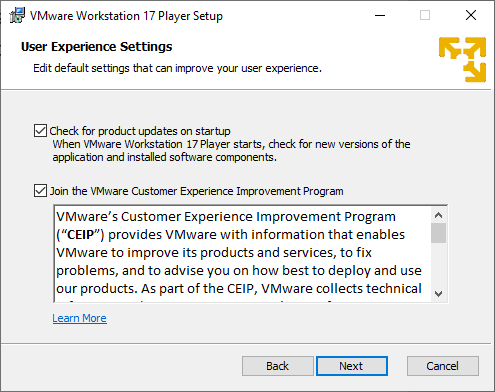
6. Next, you must decide whether to get a new product update or join the VMware Customers Experience Improvement Program, which we are leaving to the default and will click → Next.
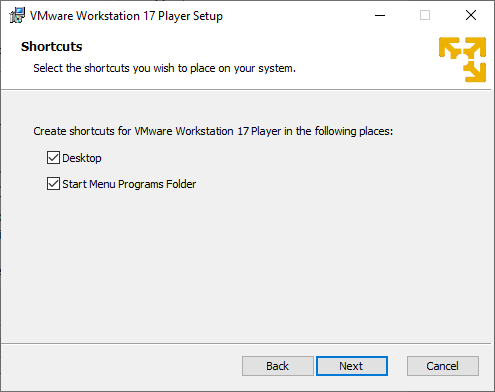
7. We can create an icon on the Desktop or Start Menu and click → Next.
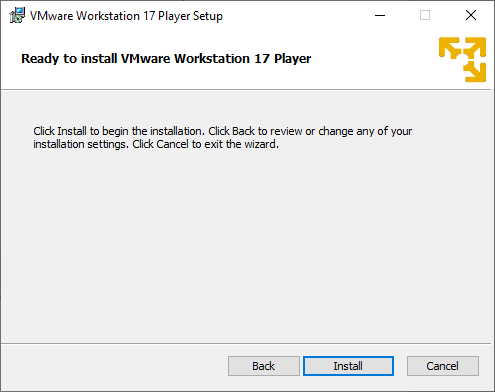
8. Now is the time to install a VMware workstation on your Windows PC. Click → Install.
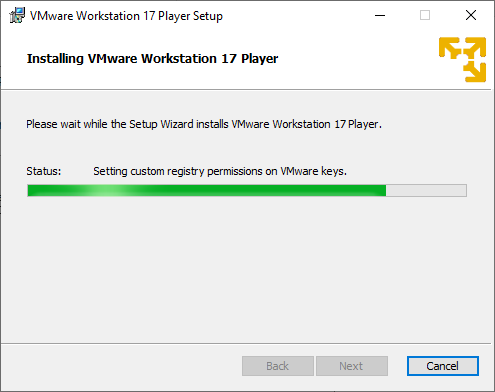
9. Please Wait!…
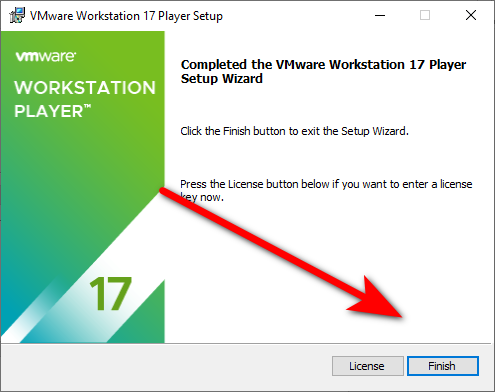
10. Great, the VMware Workstation Player is ready. To install EVE-NG in our system, Click on and click → Finish.
11. The VMware Player icon is on the desktop. It would be best to double-click on it.
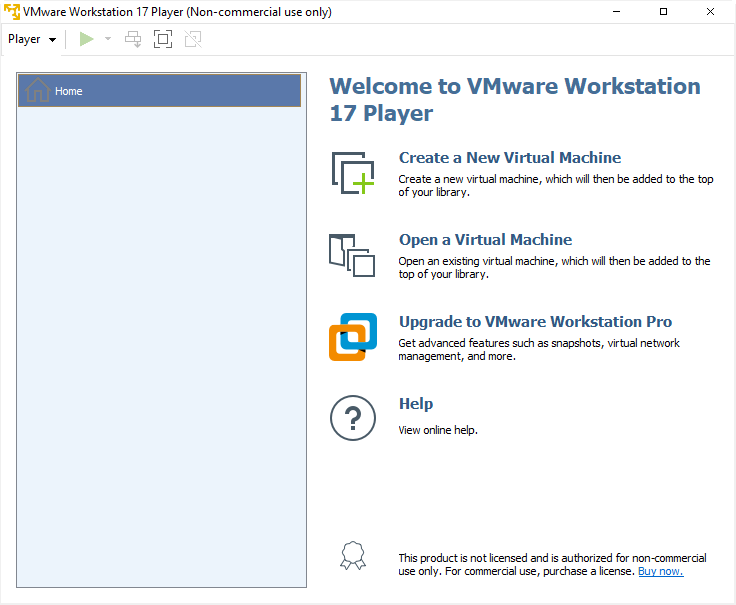
12. We have two choices. We can select the free, non-commercial version by clicking the option below and then Clicking on it and clicking → Continue.
13. Lastly, click on →Finish.
14. Now, the VMware Workstation Player is ready for you.
Step 2. How to Download and Install EVE-NG
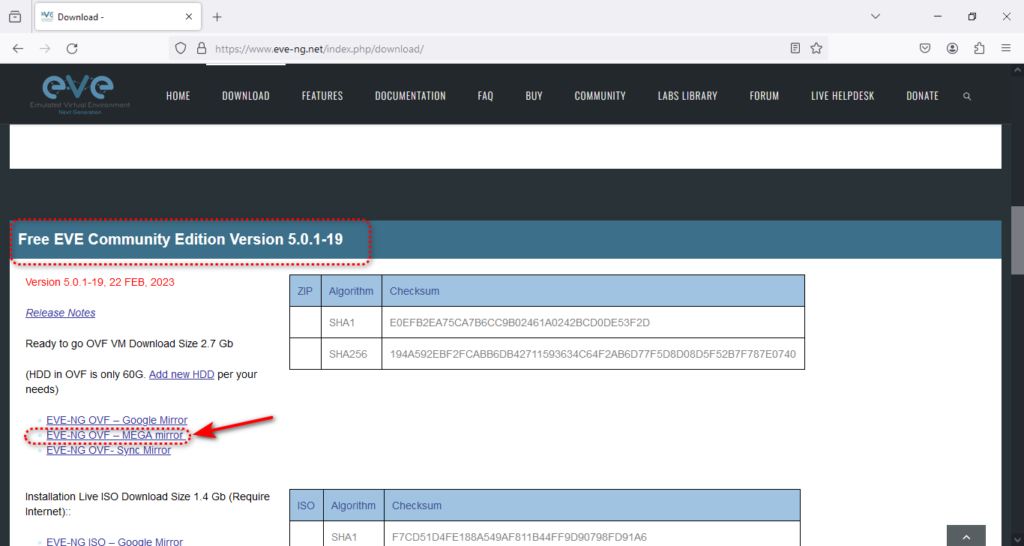
Now is the time to download the latest EVE-NG OVA file. Don’t worry if you’re looking for the EVE-NG OVA file; we’ve covered you. You can directly download it by visiting this link. Additionally, if you prefer to download the iso file, you can visit the EVE-NG website and obtain it through the provided link.
Note — The OVA version of EVE-NG has been removed from their website, and only the ISO version is currently available. We recognize that using the OVA is the simplest method for installation on a virtualizer. Therefore, we have produced an OVA version from the ISO for your convenience. To access the download link, please Download EVE-NG community OVA.
(NOTE: The Ultimate Free EVE-NG Course – Master network simulation with our step-by-step guide and elevate your skills from beginner to pro. Start your free course now!)
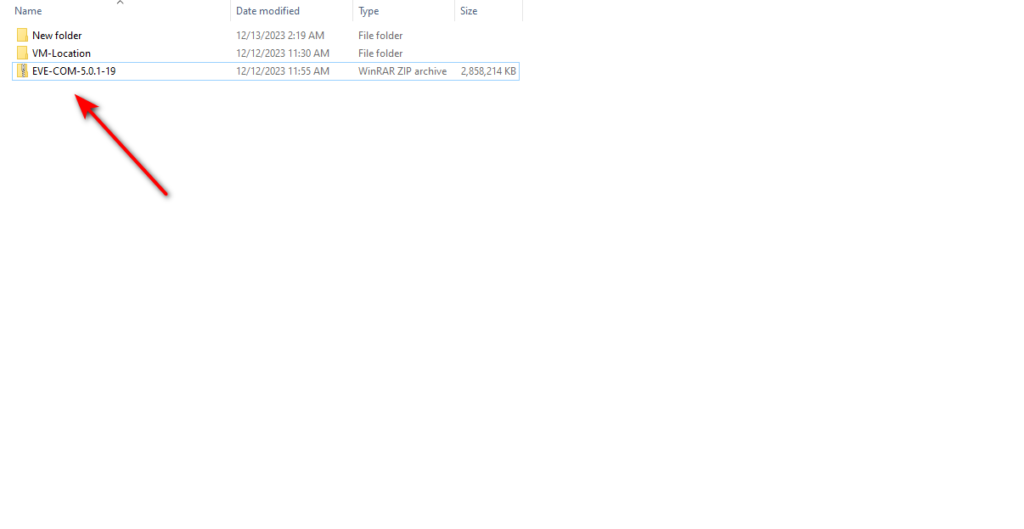
Now is the time to download the eve-ng ovf the file, like the screenshot below.
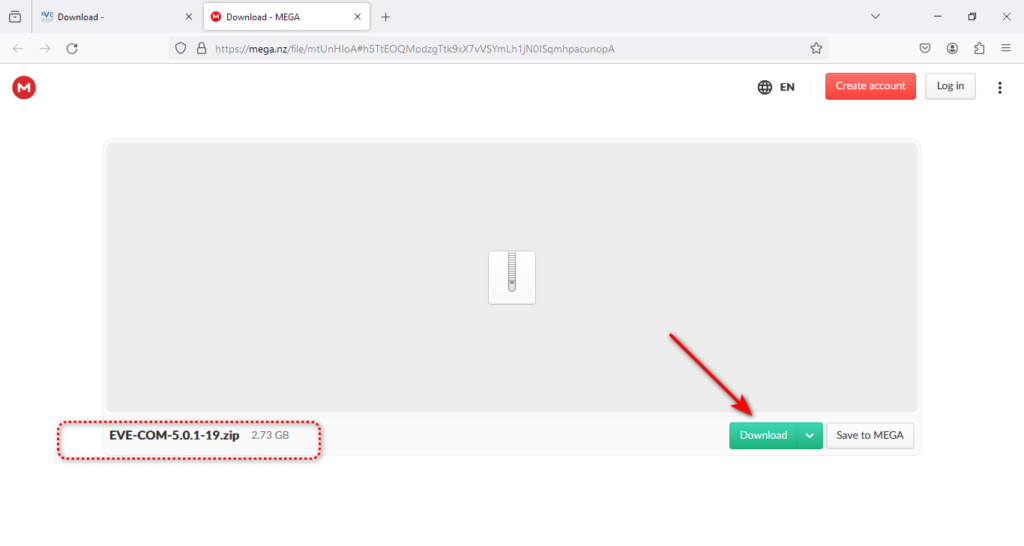
Then, you should see the downloaded file like this.
The downloaded file is a zip file. You must extract it to get the off format and install it on your VMware Player. To do that, right-click on the downloaded file and select the “Extract All” option.
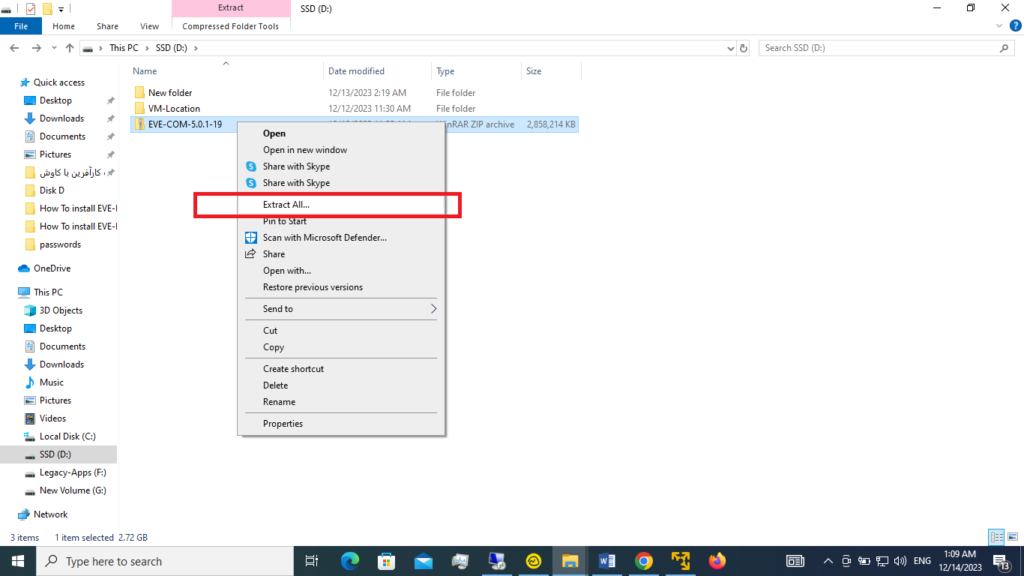
Then, you need to click on the extract option.
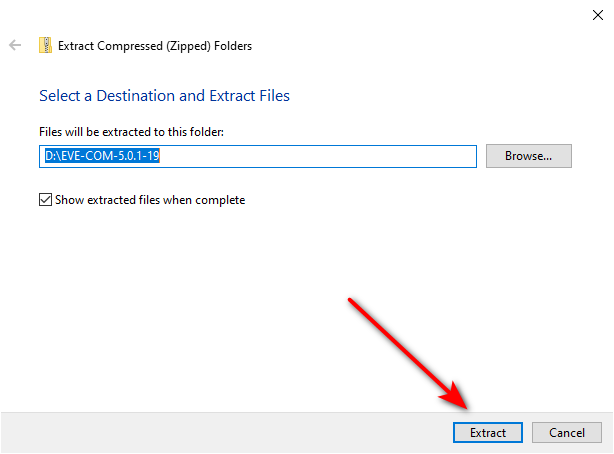
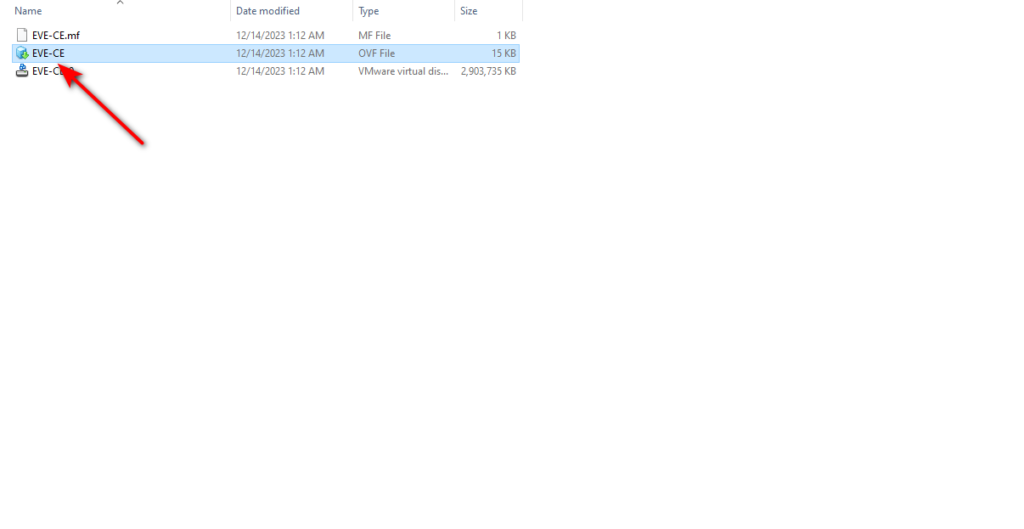
Now you need to go to the extracted folder to see the Ovf format of eve-ng.

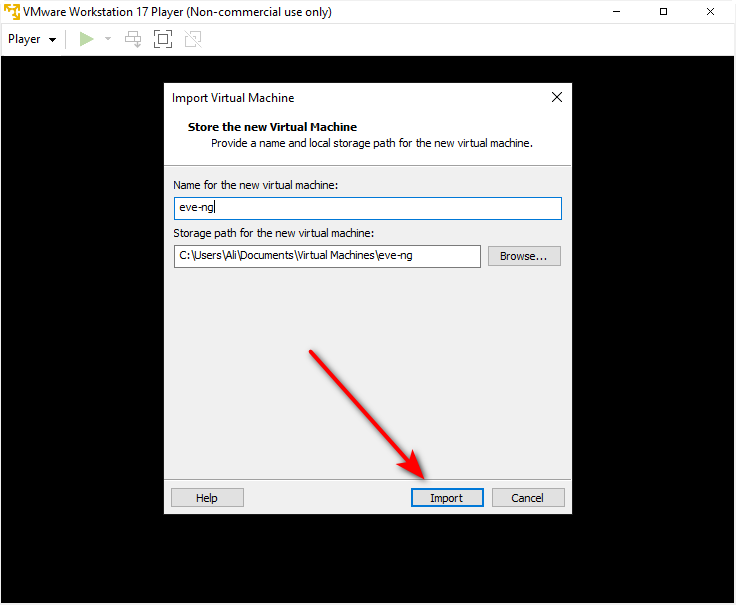
In the extracted folder, you can see the off file. At this stage, you need to double-click on the file and install the eve-ng of the file in Vmware Player.
Then, you need to give the VM a name, specify its storage path, and click on import.
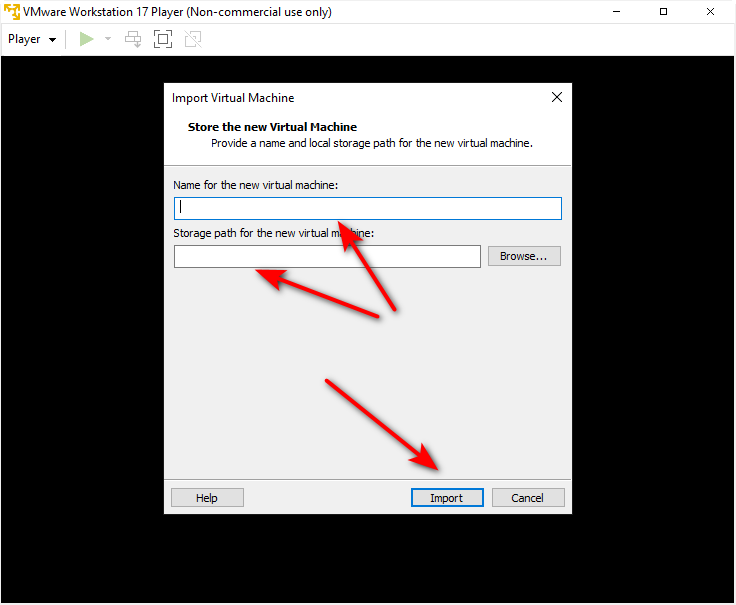
Like the screenshot below.
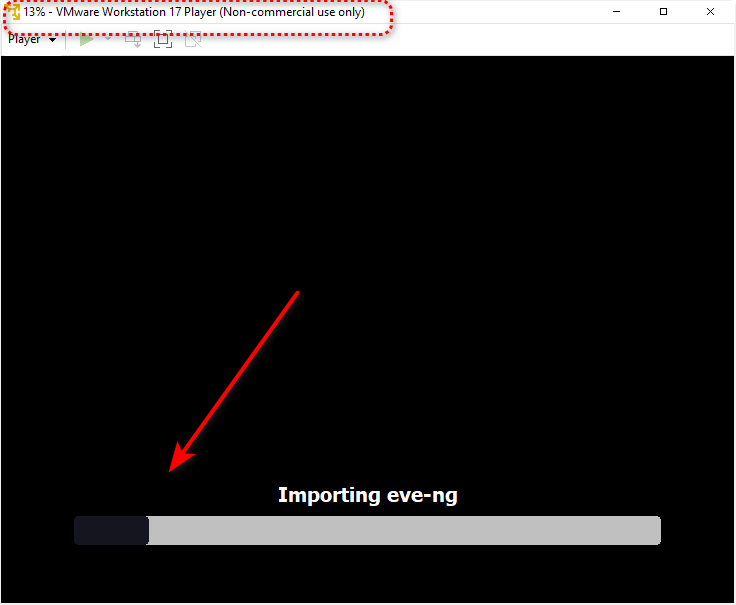
You can see the installation process at this stage, which might take 5 to 10 minutes.
When the installation is finished, the eve-ng VM will start booting automatically. It would be best to wait to see if the installation is completed, and you should see the eve-ng VM IP.
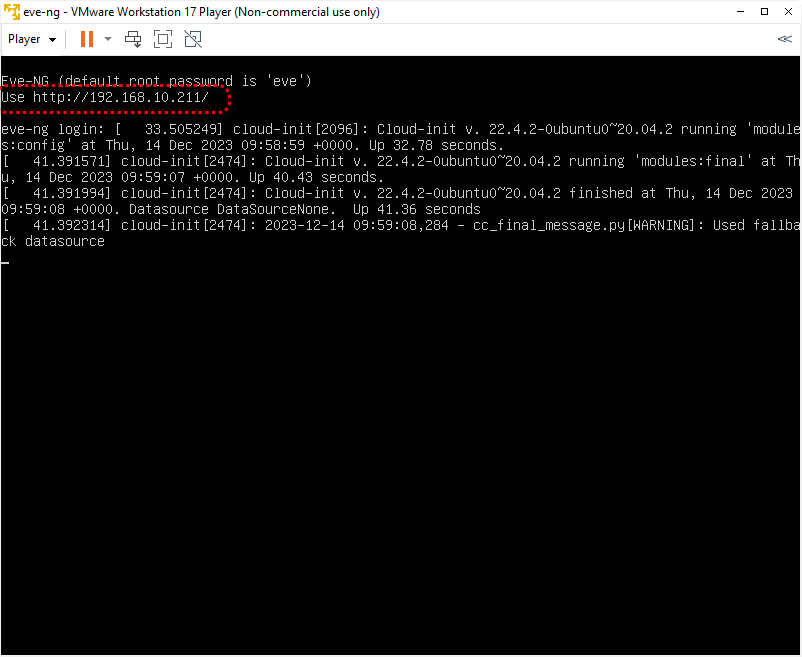
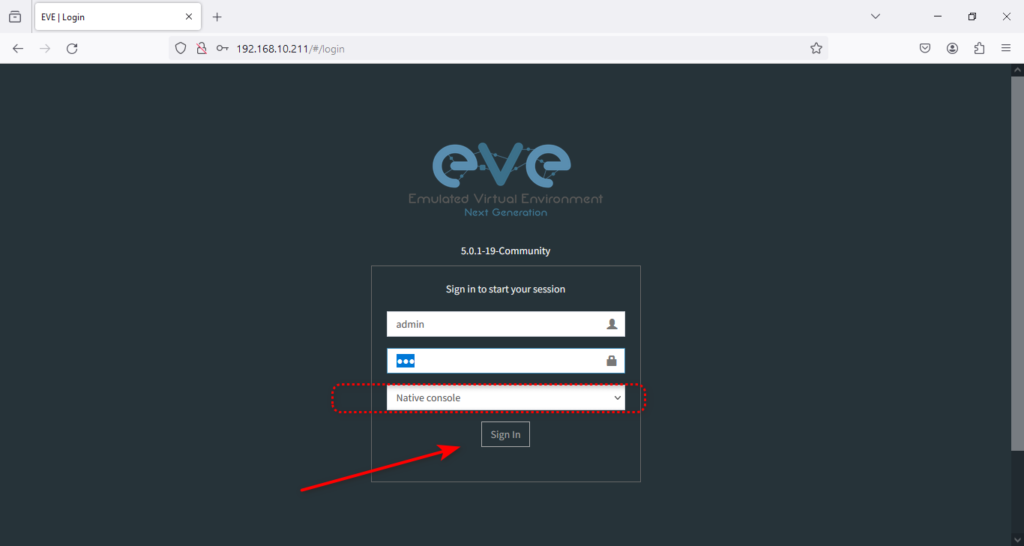
Now is the time to connect to the EVE-NG web console. The default credentials for the web are admin/eve, and for cli, they are root/eve. And make sure you have selected the native console option.
Congratulations, you have successfully installed EVE-NG on VMware Player.
Step 3. Creating Your First Lab in EVE-NG
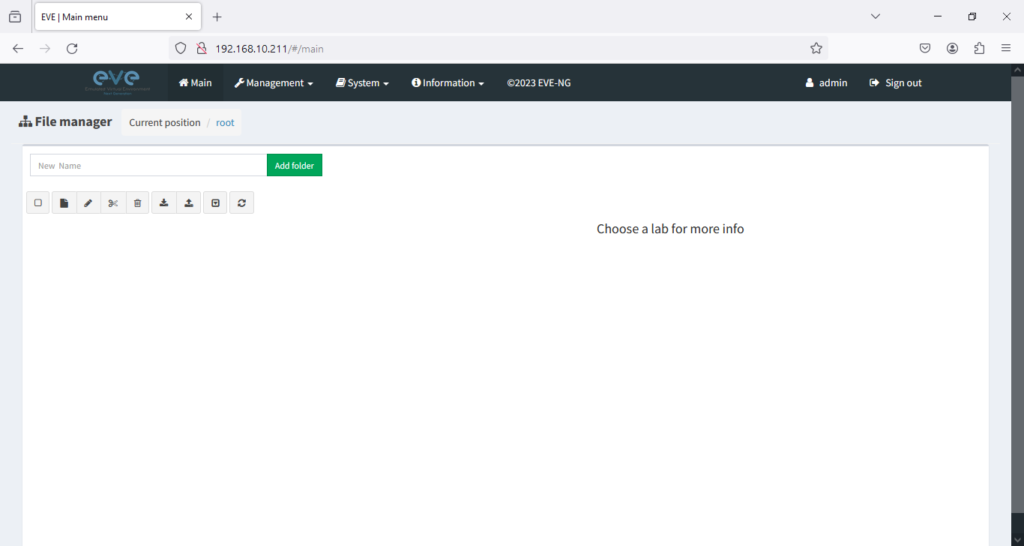
Creating your first lab in EVE-NG is quite simple. To begin, open the EVE-NG web interface and login to your account.
After logging in, you will be greeted by a screen that resembles the image below.
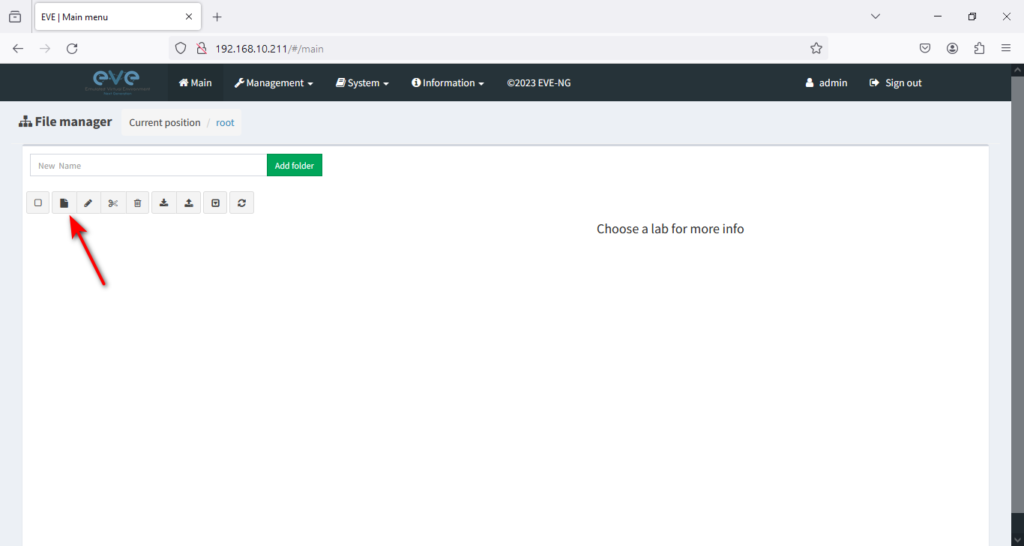
Next, click on the New Lab icon to create a new lab.
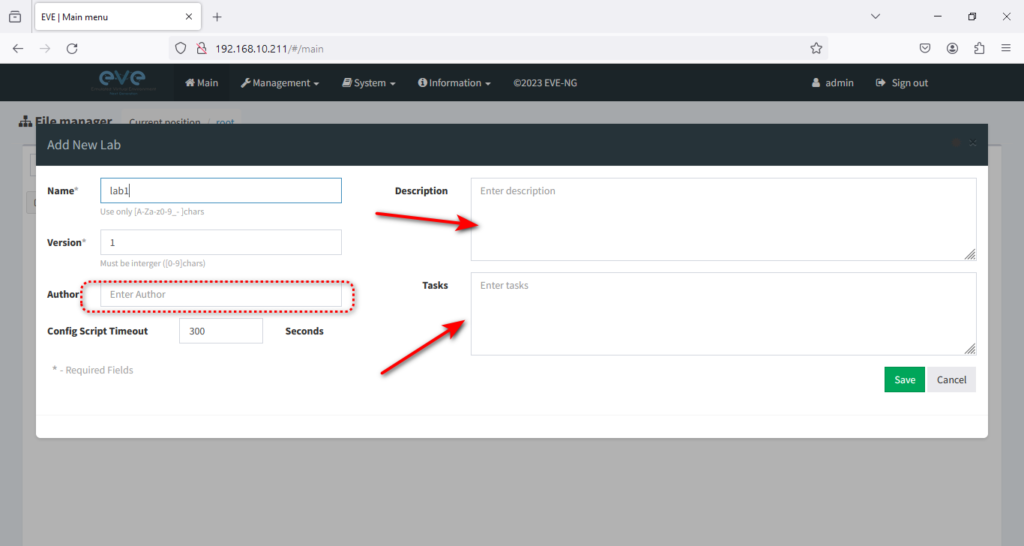
This will open a window. You need to give the lab a name, author, description, and task and click on → Save.
Once you have saved the new lab information, a redirect will take you to a new page. This page will allow you to begin crafting your desired scenario.
To begin, you only have to click on the + icon. This will allow you to add a node and start with whatever task you have. It’s a straightforward process that doesn’t require much explanation. So, click on that + icon to begin your journey!
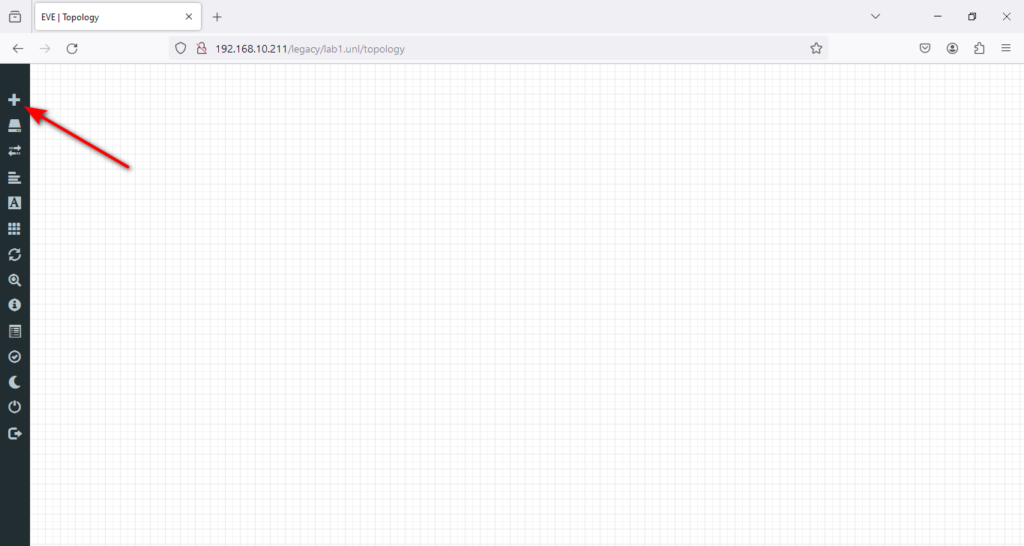
Or right-click on the lab and select Node.
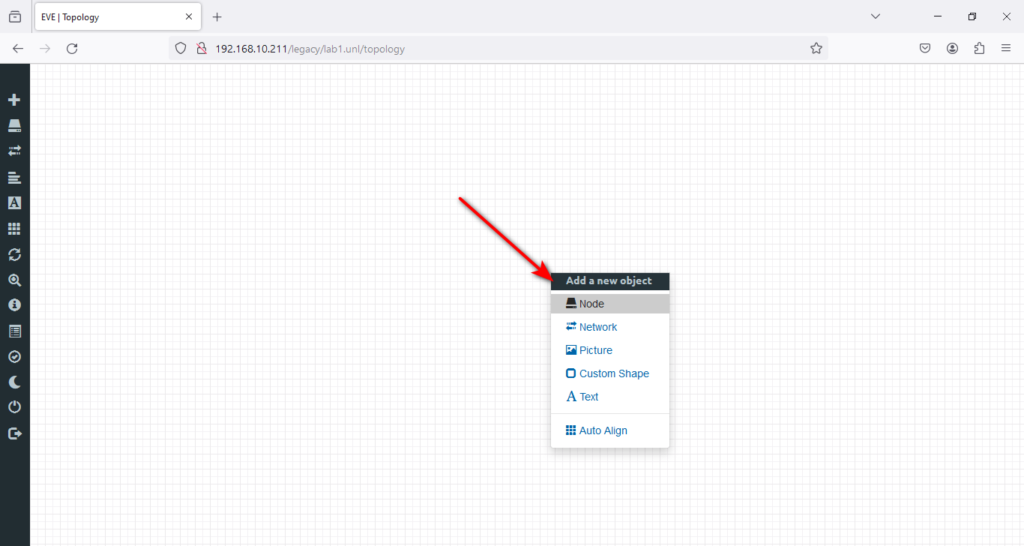
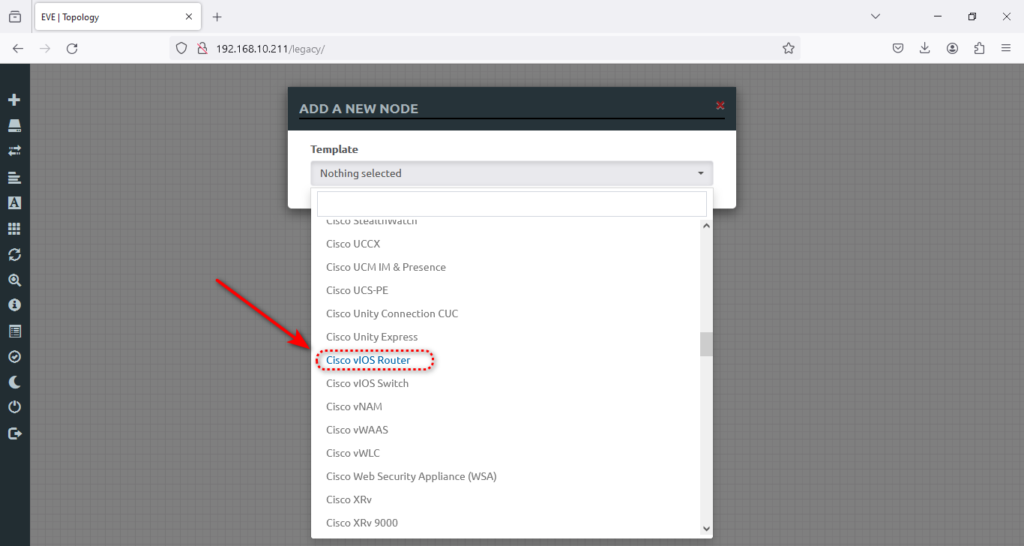
As you can see, no image is installed, and you need to install a new image to start your first lab. The only image available is the VPCs node, which is great for a client node. I will install the Cisco IOSv Router as it’s a standard router that we can use to start creating a lab and practice static routing in the lab.
Free Download — Cisco IOSv Router for EVE-NG
To receive the link, all you need to do is enter your best email address in the form provided below, and I’ll send it right away.
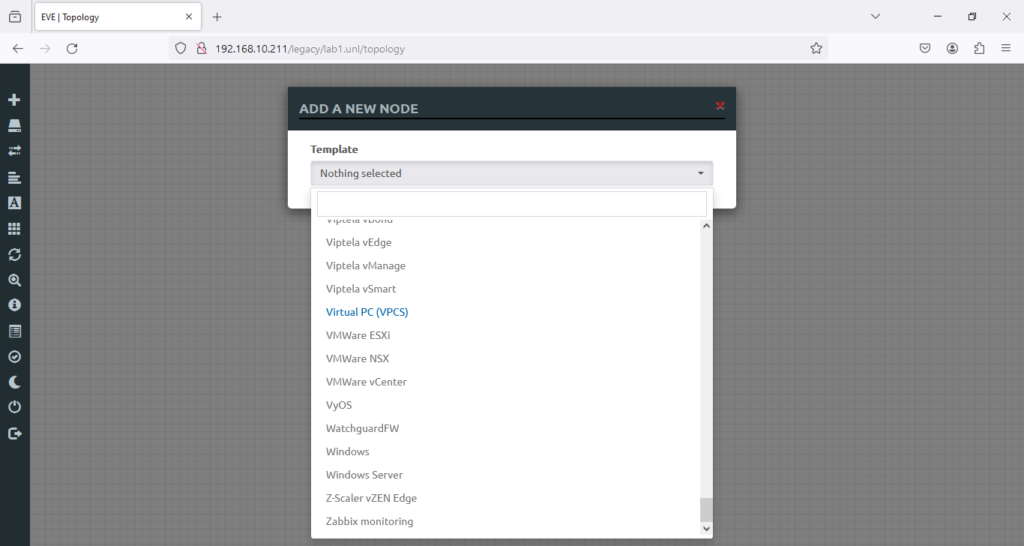
I’m going to install this version of vIOS router vios-adventerprisek9-m.spa.158-3.m2 (which you might have downloaded it from the above link)
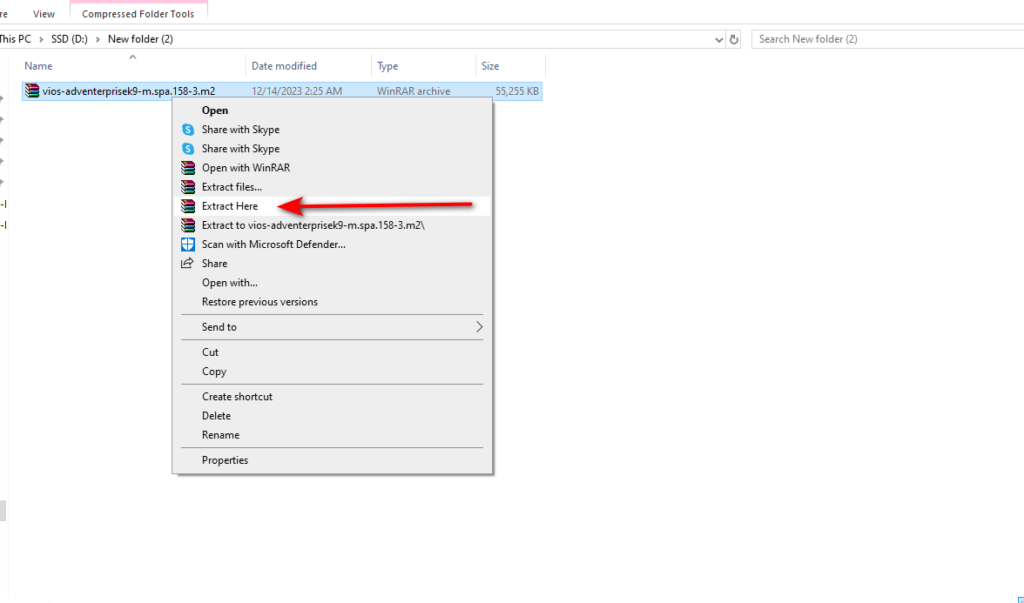
Note that the image format is in qcow2 format and compressed in zip format; you must unzip it first. Like the screenshot below, choose → Extract here or → Extract all.
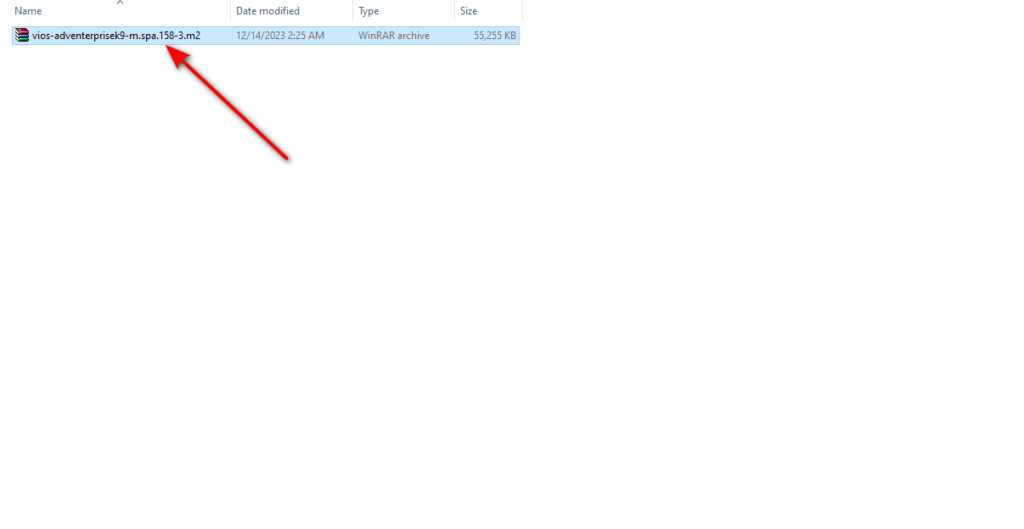
Right-click the image and select the Extract Here option in WinRAR or 7zip.
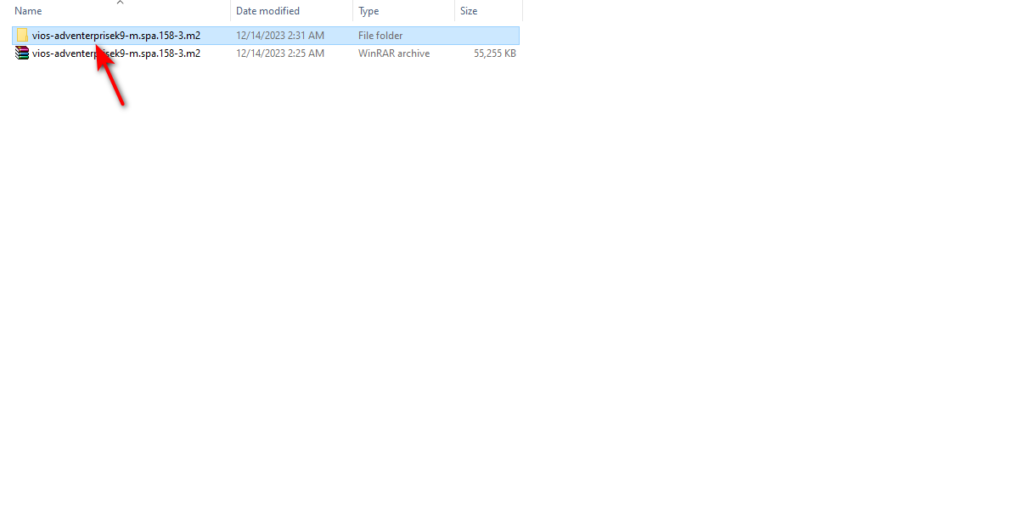
After extraction, you will see the image folder name and qemu image name, which we have prepared for you. You only need to upload it to your eve-ng.
Tip — Please do not change the folder and image file name.
We need to download WinSCP or FileZilla to upload this image to the desired directory on our EVE-NG.
Here is the directory path: →/opt/unetlab/addons/qemu
To upload the necessary image in EVE-NG, you must install WinSCP. If you are unsure how to install WinSCP, refer to the video tutorial below. It will guide you through the process with easy-to-follow instructions.
If you’d like to try WinScp, you can easily download it by visiting its official website at WinScp. Alternatively, you can also download it from the right → Get WinScp.
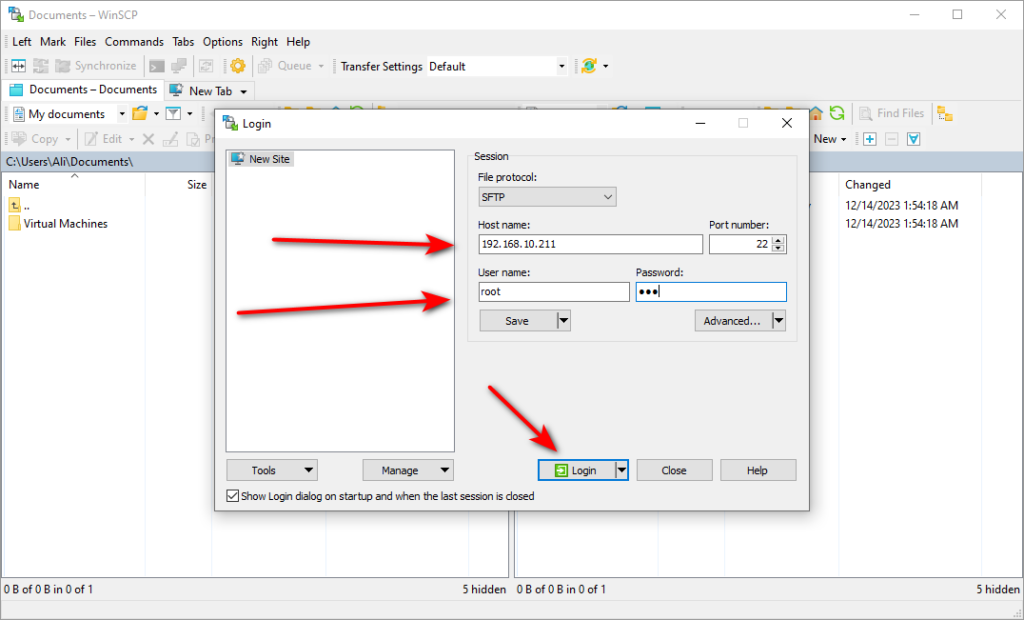
Now, we need to connect to EVE-NG with Winscp.
We need the EVE-NG IP and CLI username, which is the root. The password is eve, and the port is 22. Then, we will hit log in.
Tip—If you recall from the screenshot below, you can find your EVE-NG IP address and connect to it with Winscp.
Now is the time to connect to EVE-NG VM with IP and credential, which is default {root/eve}
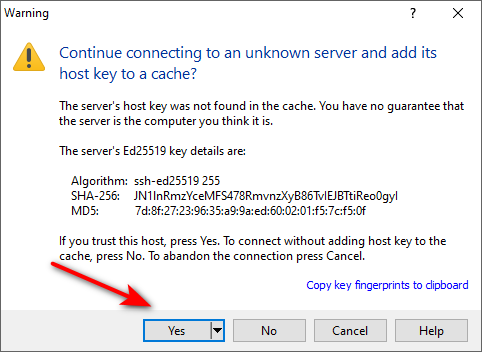
At first login, we need to accept the warning below.
As shown in the screenshot below, the red area is your EVE-NG server, and the blue area is your PC. We need to upload the image from your computer to this EVE-NG directory.
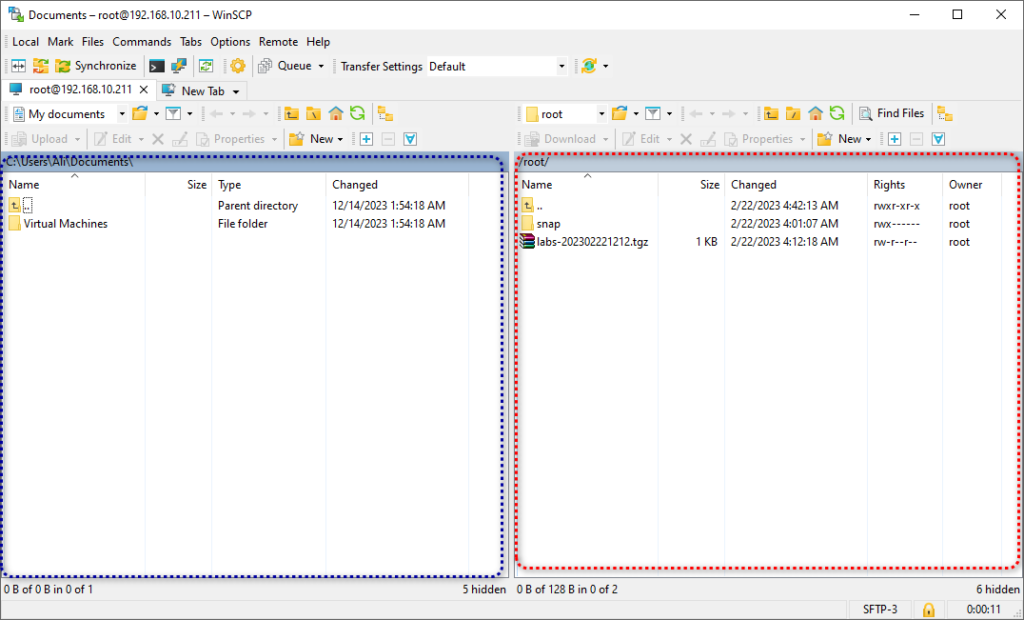
To upload the image from your computer to the EVE-NG directory, refer to the video below. It will guide you through the process step by step.
After successfully uploading the vIOS router, we can return to the eve-ng dashboard and continue with our work.
Will click on the router and accept the default settings.
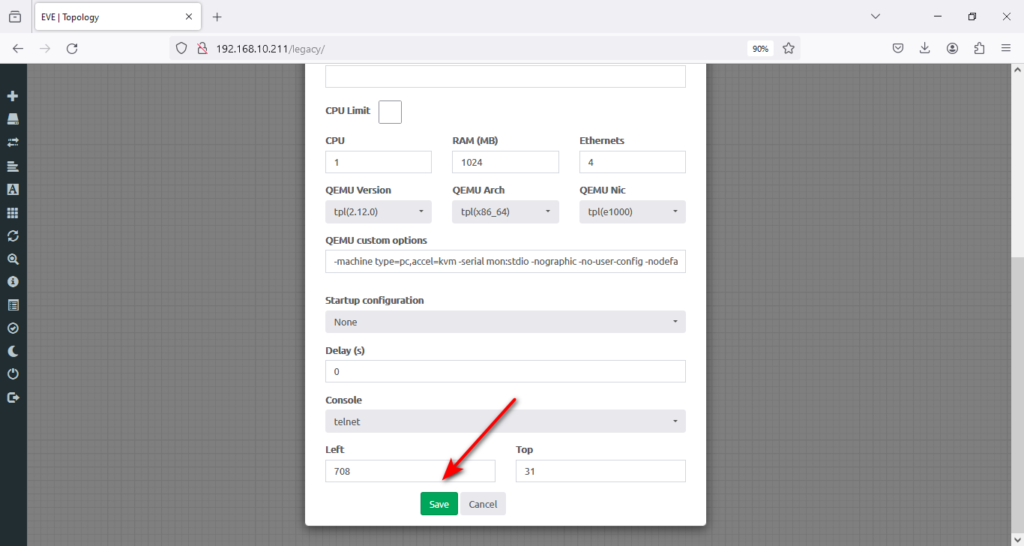
Finish.
Step 4. How to Start Building Your First EVE-NG Lab
Now is the time to build an EVE-NG lab for static routing, one of the crucial majors in Cisco technology. We need to add two more Vios routers to connect them and start practicing static routing. The scenario should be like this (I will upload the lab .unl file, too, where you can easily import it and you don’t need to create this lab from scratch)
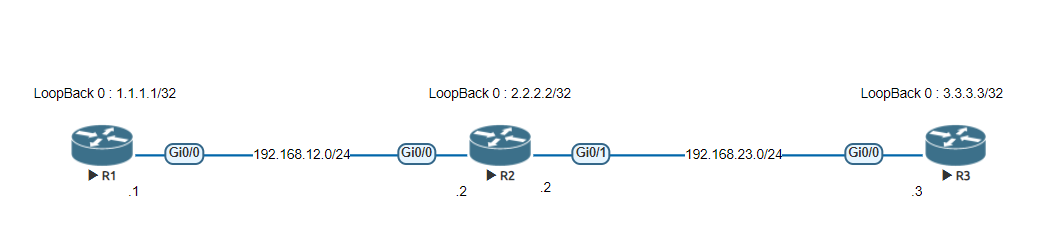
To create this scenario, we need to give each router a name. Which are R1, R2, and R3.
1. To do that, right-click the first router and select the Edit option.
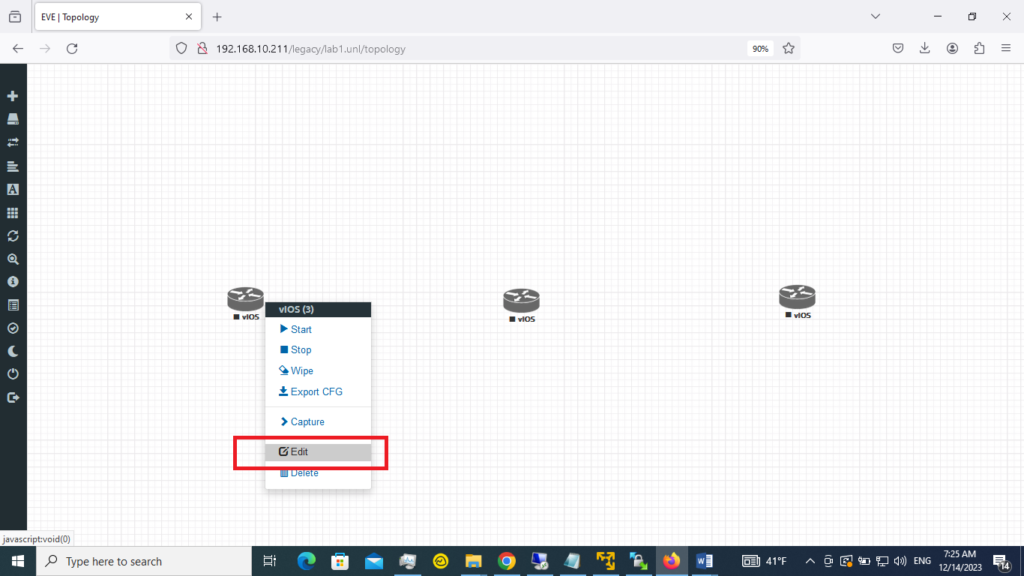
2. Then, I will type a name in Name/prefix, R1.
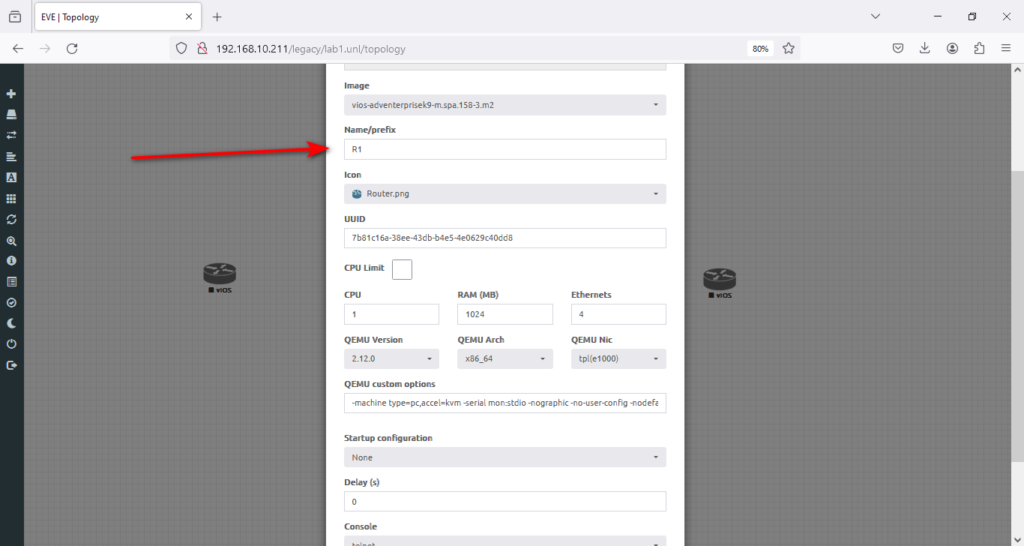
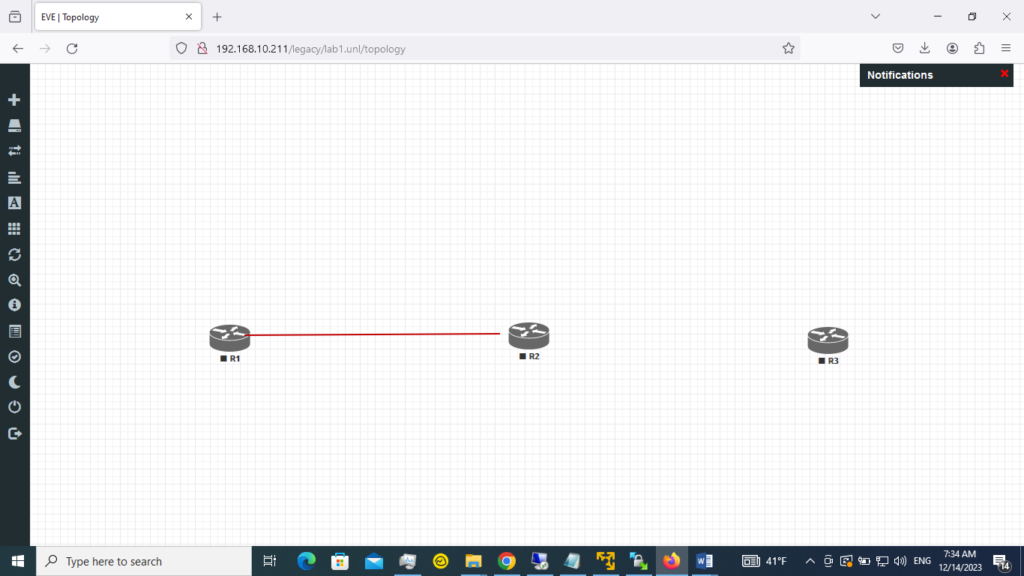
3. Then, I will hit save. Now, assign all images a desired name, R2 and R3. Once finished, you must see R1, R2, and R3 in the lab. You should see the plug button by hovering the cursor over the router. What we need here is to connect the routers.

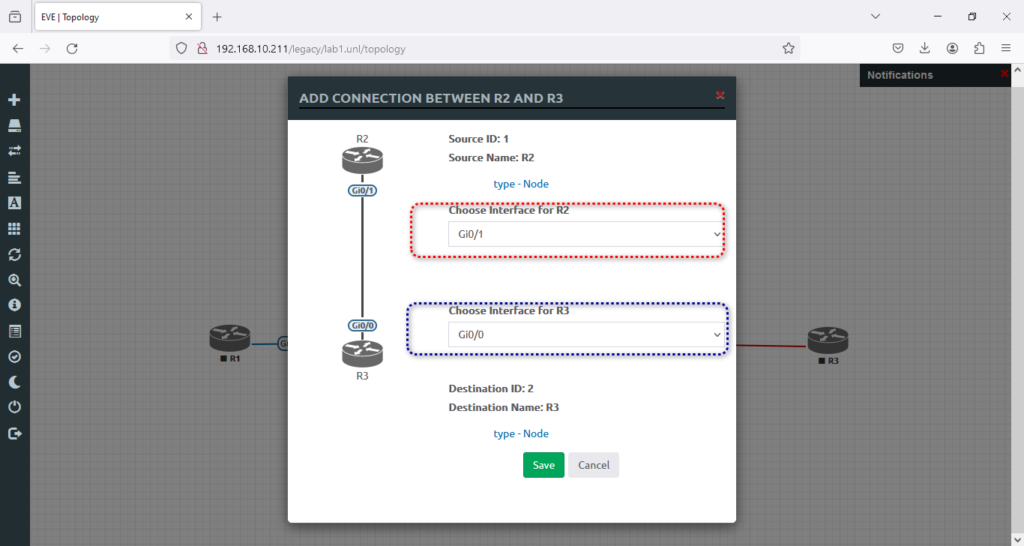
4. Select R1 and connect it to R2; drag the mouse from R1 to R2 by choosing the plug button.
5. Here, we will accept the default connections for both routers in the G0/0 interface.
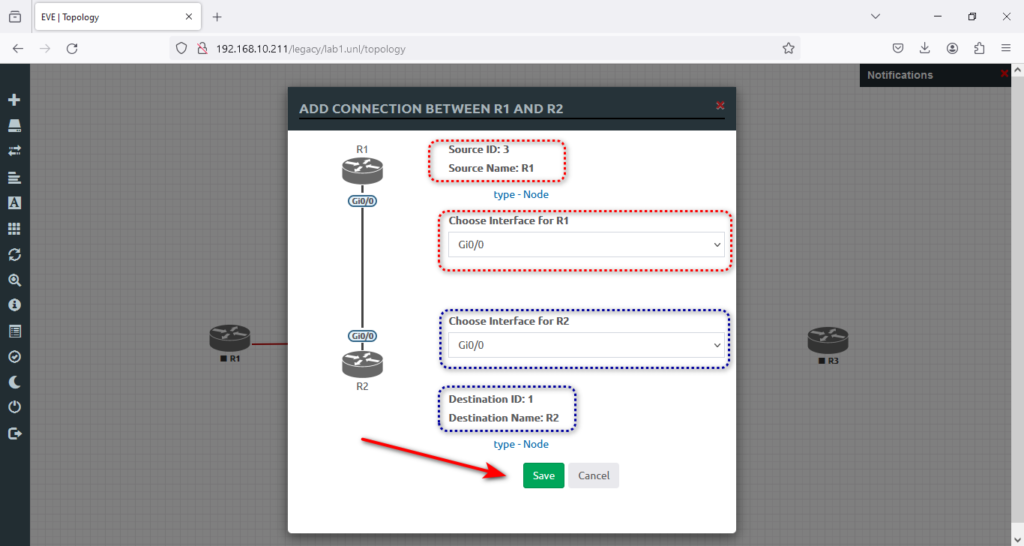
6. And now is the time to connect R2 to R3, like the screenshot below, and will hit → Save.
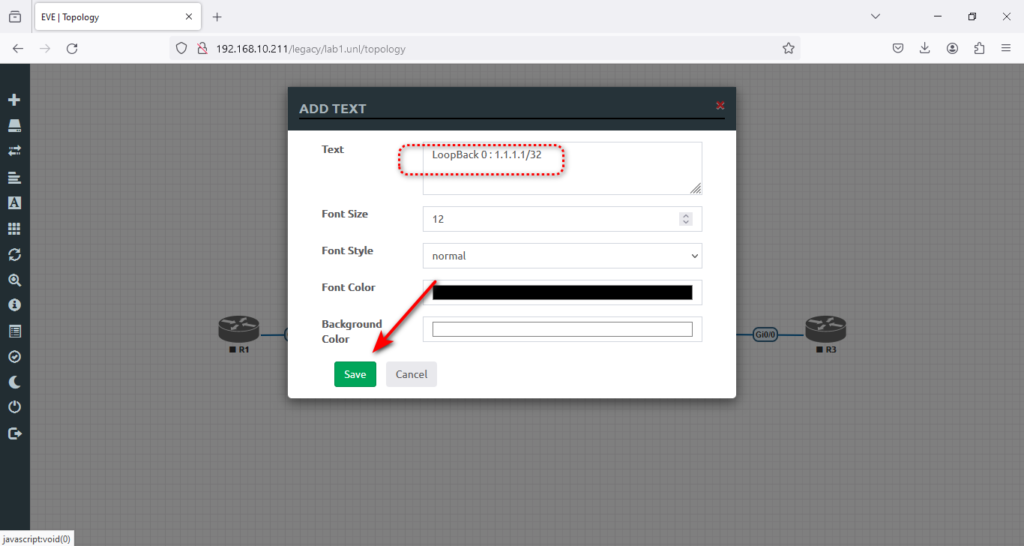
7. Now, we need text notes to understand the topology much better. This will help you focus while practicing in the lab. To do that, click and select text at the top of the R1. Then type LoopBack 0: 1.1.1.1/32 and hit → Save.
8. We need to add the IP range between routers R1 and R2 and then between R2 and R3. Again, we must right-click the area between R1 and R2 to add a text note.
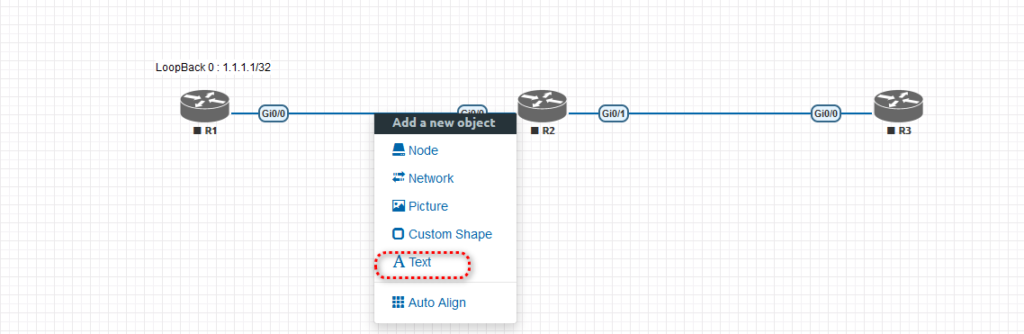
9. You may need to set the text position in the middle of two routers, R1 and R2.

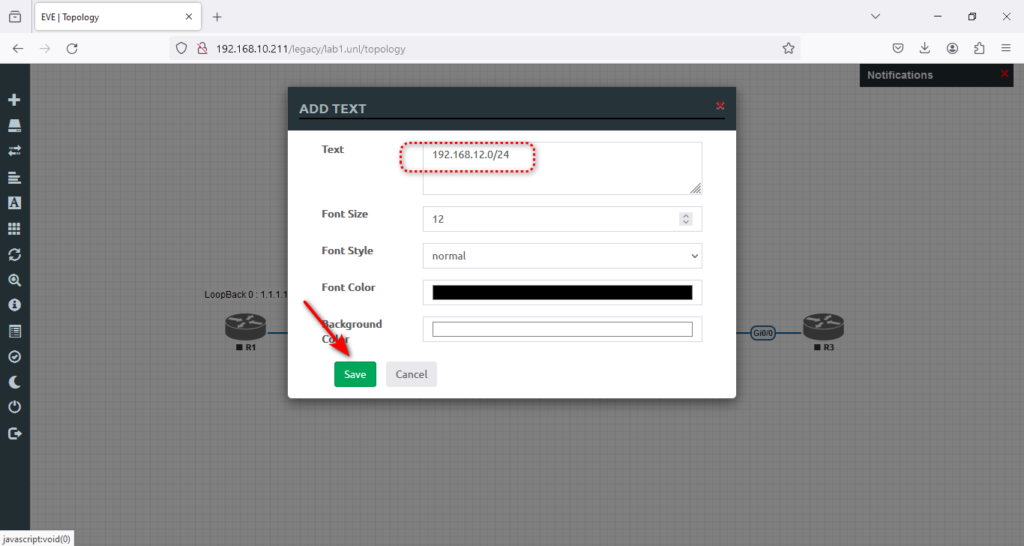
10. So now I need you to add the rest of the text, like the screenshot below, to finish the lab creation.
Great job. Now, here are the lab details.
NOTE — The Ultimate Free EVE-NG Course – Master network simulation with our step-by-step guide and elevate your skills from beginner to pro. Start your free course now!
Step 5. How to Configure Static Routing on a Cisco Router
Static route configuration is a fundamental skill. There are several methods to configure static routes on a Cisco router, each with pros and cons. As a Cisco engineer and in the Cisco CCNA exam, you will be expected to know how to configure static routes via any of the methods available in Cisco IOS.
Lab Objective
This lab exercise aims to configure static routes via Ethernet interfaces between 3 routers. This lab also validates the configured static routes.
LAB: Static Route v1.0
Level: CCNA / Basic
Approximate time: 20 minutes
Preferred image: vios-adventerprisek9-m.SPA.159-3.M6
This LAB will cover topics of
Chapter 16: Configuring IPv4 Addresses and Static Routes
For more information, we suggest “CCNA 200-301, Volume 1 Official Cert Guide.”


Commands Guide:
All commands in this document have this style:
 # Interface gig 0/0
If any option specified with italic letters means that you must replace the keyword with a desired value, for example:
 # ip address ip_address  subnet_mask
 # ip address 192.168.10.1 255.255.255.0
And finally, if we mention something in {}, it means that you must use one of the options
# Show ip route| Router | LoopBack 0 | Gi 0/0 | Gi 0/1 |
|---|---|---|---|
| R1 | 1.1.1.1/32 | 192.168.12.1/24 | – |
| R2 | 2.2.2.2/32 | 192.168.12.2/24 | 192.168.23.2/24 |
| R3 | 3.3.3.3/32 | 192.168.23.3/24 | – |
In order to access the router in our lab, we need to install the Windows integration Client pack on our Windows system. Otherwise, we won’t be able to console any nodes in the lab. Below is how to download and initiate the installation.
You should see the downloaded file like this, and you need to double-click and install it.
Tip — You need to accept all the prerequisite files during installation. The wizard will install Putty, VNC client, and Wireshark, and you must take all of that as they are prerequisites and mandatory and must be installed on your system. Below, you can see step-by-step instructions. What I need is to install it like the screenshots below.
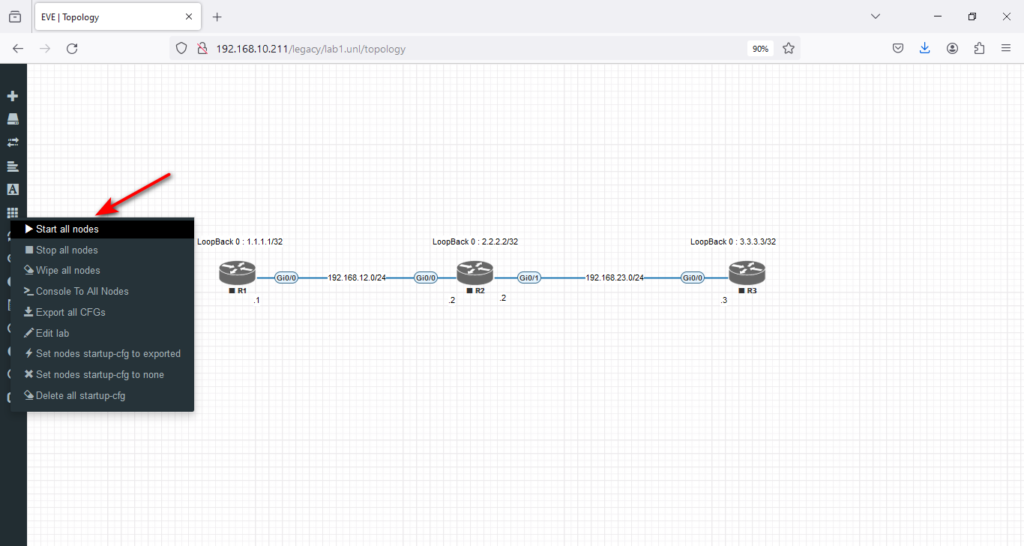
Great Job. Now is the time to click on the left menu, select → More actions,

and → Start all nodes.
Now is the time to start the lab configuration. I have added tasks, an IP table, and step-by-step instructions (workbook) to help you understand how to start from scratch and finish your lab successfully.
Task 1
Configure the hostnames on routers R1, R2, and R3, as the topology illustrates. Assign addresses as mentioned in Table 1.
| Router | LoopBack 0 | Gi 0/0 | Gi 0/1 |
|---|---|---|---|
| R1 | 1.1.1.1/32 | 192.168.12.1/24 | – |
| R2 | 2.2.2.2/32 | 192.168.12.2/24 | 192.168.23.2/24 |
| R3 | 3.3.3.3/32 | 192.168.23.3/24 | – |
Go to R1, double on the router, and set the basic configuration as instructed.
Router>en
Router#conf ter
Enter configuration commands, one per line.  End with CNTL/Z.
Router(config)#hostname R1
R1(config)#interface gig 0/0
R1(config-if)#ip add 192.168.12.1 255.255.255.0
R1(config-if)#no shut
R1(config-if)#exit
R1(config)#interface loopback 0
R1(config-if)#ip address 1.1.1.1 255.255.255.255
R1(config-if)#end
R1#show ip interface brief
Interface                  IP-Address      OK? Method Status                Protocol
GigabitEthernet0/0         192.168.12.1    YES manual up               up
GigabitEthernet0/1         unassigned      YES unset  administratively down down
GigabitEthernet0/2         unassigned      YES unset  administratively down down
GigabitEthernet0/3         unassigned      YES unset  administratively down down
Loopback0                  1.1.1.1         YES manual up               up
R1#
Go to R2 and set the basic configuration as this instruction
Router>en
Router#conf ter
Enter configuration commands, one per line.  End with CNTL/Z.
Router(config)#hostname R2
R2(config)#interface gi 0/0
R2(config-if)#ip address 192.168.12.2 255.255.255.0
R2(config-if)#no shut
R2(config-if)#exit
R2(config)#interface loopback 0
R2(config-if)#ip address 2.2.2.2 255.255.255.255
R2(config-if)#no shut
R2(config-if)#exit
R2(config)#interface gi 0/1
R2(config-if)#ip address 192.168.23.2 255.255.255.0
R2(config-if)#no shut
R2(config)#end
R2#show ip interface brief
Interface                  IP-Address      OK? Method Status                Protocol
GigabitEthernet0/0         192.168.12.2    YES manual up                    up
GigabitEthernet0/1         192.168.23.2    YES manual up                    up
GigabitEthernet0/2         unassigned      YES unset  administratively down down
GigabitEthernet0/3         unassigned      YES unset  administratively down down
Loopback0                  2.2.2.2         YES manual up                    up
Go to R3 and set the basic configuration as this instruction
Router>en
Router#conf ter
Enter configuration commands, one per line.  End with CNTL/Z.
Router(config)#hostname R3
R3(config)#interface gi 0/0
R3(config-if)#ip address 192.168.23.3 255.255.255.0
R3(config-if)#no shut
R3(config-if)#
*Sep 26 13:57:39.161: %LINK-3-UPDOWN: Interface GigabitEthernet0/0, changed state to up
*Sep 26 13:57:40.162: %LINEPROTO-5-UPDOWN: Line protocol on Interface GigabitEthernet0/0, changed state to up
R3(config-if)#exit
R3(config)#interface loopback 0
R3(config-if)#ip address 3.3.3.3 255.255.255.255
R3(config-if)#no shut
R3(config-if)#exit
R3(config)#exit
R3#
*Sep 26 13:58:15.458: %SYS-5-CONFIG_I: Configured from console by console

R3#show ip interface brief
Interface                  IP-Address      OK? Method Status                Protocol
GigabitEthernet0/0         192.168.23.3    YES manual up                    up
GigabitEthernet0/1         unassigned      YES unset  administratively down down
GigabitEthernet0/2         unassigned      YES unset  administratively down down
GigabitEthernet0/3         unassigned      YES unset  administratively down down
Loopback0                  3.3.3.3         YES manual up                    up
R3#
Task 2
Configure static routes on routers.
R1 Configuration: Due to the diagram, R1 needs to reach 2.2.2.2/32 and 3.3.3.3/32 and 192.168.23.0/24 networks; all these networks are reachable via R2. So, we have to configure 3 static routes for R1 to make this possible. Maybe you guessed we can do that by adding one default route to R2 in this example. For now, we prefer to define 3 separate routes. Look at the example:
R1>en
R1#conf ter
Enter configuration commands, one per line.  End with CNTL/Z.
R1(config)#ip route 192.168.23.0 255.255.255.0 192.168.12.2
R1(config)#ip route 2.2.2.2 255.255.255.255 192.168.12.2
R1(config)#ip route 3.3.3.3 255.255.255.255 192.168.12.2
R1(config)#
With these commands, R1 can reach, for example, R3, but R3 has no idea where it is, for instance, 1.1.1.1/32 and how it can reach it. So, we need to configure R2 and R3, too.
Go to the R2 router, and for the first step, check the routing table. As you can see, R2 has two connected routes for 192.168.12.0/24 and 192.168.23.0/24. So, we need to configure two routes for 1.1.1.1/32 and 3.3.3.3/32
R2>en
R2 #show ip route
Codes: L - local, C - connected, S - static, R - RIP, M - mobile, B - BGP
       D - EIGRP, EX - EIGRP external, O - OSPF, IA - OSPF inter area
       N1 - OSPF NSSA external type 1, N2 - OSPF NSSA external type 2
       E1 - OSPF external type 1, E2 - OSPF external type 2
       i - IS-IS, su - IS-IS summary, L1 - IS-IS level-1, L2 - IS-IS level-2
       ia - IS-IS inter area, * - candidate default, U - per-user static route
       o - ODR, P - periodic downloaded static route, H - NHRP, l - LISP
       a - application route
       + - replicated route, % - next hop override, p - overrides from PfR


Gateway of last resort is not set


      2.0.0.0/32 is subnetted, 1 subnets
C        2.2.2.2 is directly connected, Loopback0
      192.168.12.0/24 is variably subnetted, 2 subnets, 2 masks
C        192.168.12.0/24 is directly connected, GigabitEthernet0/0
L        192.168.12.2/32 is directly connected, GigabitEthernet0/0
      192.168.23.0/24 is variably subnetted, 2 subnets, 2 masks
C        192.168.23.0/24 is directly connected, GigabitEthernet0/1
L        192.168.23.2/32 is directly connected, GigabitEthernet0/1
R2#conf ter
Enter configuration commands, one per line.  End with CNTL/Z.
R2(config)#ip route 1.1.1.1 255.255.255.255 192.168.12.1
R2(config)#ip route 3.3.3.3 255.255.255.255 192.168.23.3
R2(config)#
The R3 configuration is almost the same as the R1. We need 3 routes for 1.1.1.1/32, 2.2.2.2/32, and 192.168.12.0/24. But this time, let’s use a default gateway instead!
R3>en
R3#conf ter
Enter configuration commands, one per line.  End with CNTL/Z.
R3(config)#ip route 0.0.0.0 0.0.0.0 192.168.23.2
R3(config)#exit
Task 3
After completing our configuration, let’s check it with → ping and → traceroute commands.
We did the test from R3, but you can do the same thing from the others.
R3#ping 1.1.1.1 source 3.3.3.3
Type escape sequence to abort.
Sending 5, 100-byte ICMP Echos to 1.1.1.1, timeout is 2 seconds:
Packet sent with a source address of 3.3.3.3
!!!!!
Success rate is 100 percent (5/5), round-trip min/avg/max = 4/5/7 ms
R3#traceroute 1.1.1.1 source 3.3.3.3
Type escape sequence to abort.
Tracing the route to 1.1.1.1
VRF info: (vrf in name/id, vrf out name/id)
  1 192.168.23.2 3 msec 3 msec 3 msec
  2 192.168.12.1 8 msec 12 msec *
R3#
Wrapping Up Your EVE-NG Journey
We’ve come a long way in installing EVE-NG from scratch, designed to suit your needs as a beginner. During this journey, you learned what EVE-NG is, what each of its versions does, and what the minimum system requirements are. It has been an enlightening experience, and I am excited to share my newfound knowledge with you. With EVE-NG, you can create virtual labs and practice networking concepts in a virtual environment. So, EVE-NG can be a great choice if you’re a beginner looking for a platform to experiment and learn.
Where to Go From Here
Now that you’ve successfully installed EVE-NG, it’s crucial to understand that the process doesn’t end here. To truly succeed in network technologies and excel in Cisco exams, it’s essential to dedicate yourself to practice and perseverance. Merely installing the software is just the first step towards accomplishing your goals. Through continuous learning, practical application, and determination, you can effectively answer these exams and successfully execute the required tasks. So, keep pushing forward and never lose sight of your ambitions.
We recommend opting for the EVE-NG LABs Full Pack images to take your journey forward. With this package, you can access a comprehensive collection of 300 scenarios & labs accompanied by clear step-by-step instructions (workbook). You will also have access to 61 useful images that can be effortlessly installed. This Full Pack package will give you invaluable resources to enhance your experience and further excel in your endeavors.
Good luck!
Содержание
- 1 Введение
- 1.1 Краткое описание
- 2 Системные требования
- 2.1 Основные потребности и ограничения
- 2.2 Примеры конфигураций
Введение
Краткое описание
Дистрибутив EVE-NG доступен в OVA и ISO формате. Открытый стандарт виртуальных машин (OVA) представляет собой tar-архив, в который упакованы диски и конфигурационные файлы виртуальной машины. Данный файл может использоваться для развертывания машины в VMware workstation, Player, ESXI. Обратите внимание, что использования EVE-NG как гостевой виртуальной машины снижает производительность. Это может быть незаметно, если у вас достаточно ресурсов на хосте виртуализации.
Также EVE-NG может быть установлен на физические машины, без использования гипервизора, используя установку с iso образа. Данный метод называется установкой на “голое железо” (bare metal) и является рекомендуемым методом установки EVE.
- Установка с ISO образа (предпочтительный вариант)
- Установка с OVA образа
- Установка дополнительной ноды кластера eve-ng pro с ISO образа
Системные требования
Основные потребности и ограничения
Для EVE-NG требуется:
- Поддержка технологии Intel CPU VT-x/EPT
- Одно из следующего списка:
- Ubuntu 18.04 64bit / 16.04 64bit. (Ubuntu 18 не поддерживается, т.к. не содержит необходимых библиотек для EVE). Начиная с 3 версии EVE-NG Pro поддерживается только 18.04 версия. EVE-NG Community работает на 16.04.
- VMware ESXi 6.0 или новее
- VMware Workstation 12.5 или новее
- VMware Fusion 8 или новее
- VMware Player 12.5 или новее
Ограничения EVE-NG:
- Не поддерживается Oracle VM VirtualBox.
- Не поддерживается Citrix XenServer.
- AMD-V/RVI процессоры совместимы (практически без ограничений), но официально не поддерживаются командой разработчиков EVE-NG Team, т.к. возможны проблемы с виртуализацией qemu образов.
- Hyper-V and Proxmox не официально поддерживаются, но не рекомендуются.
Примеры конфигураций
Системные требования к количеству ядер и объему RAM напрямую зависят от типа и количества образов, которые будут задействованы в вашей топологии и конфигураций используемых на них. На нашем сайте есть калькулятор. При помощи данного калькулятора можно рассчитать рекомендуемые системные требования к железу.
Минимальная конфигурация
| CPU (ядра) | RAM (Gb) | HDD (Gb) |
|---|---|---|
| 4 | 6 | 40 |
Минимальные требования позволят запускать маленькие лаборатории. Общая производительность будет сильно зависеть от числа узлов, задействованных в схеме.
На данной конфигурации можно будет запустить один из следующих вариантов:
- IOL: 40-50 устройств
- Dynamips: 20-25 устройств
- vIOS: 8-10 устройств
- CSRv1000: 2-3 устройства
Рекомендуемая конфигурация для частной VM с EVE
| CPU (ядра) | RAM (Gb) | HDD (Gb) |
|---|---|---|
| 8 | 20 | 200 |
Данная конфигурация подходит для средних лабораторных стендов.
На данной конфигурации можно будет запустить один из следующих вариантов:
- IOL: 120 устройств
- vIOS: 20-40 устройств
- CSRv1000: 10 устройств
Рекомендуемый выделенный сервер виртуализации
| CPU (ядра) | RAM (Gb) | HDD (Gb) |
|---|---|---|
| 40 | 128 | 2048 |
EVE-NG (Emulated Virtual Environment Next Generation) is an advanced network emulator that enables the simulation of complex networking situations. It’s a vital tool for network engineers, developers, and cybersecurity professionals who need a platform for creating, testing, and learning about different network configurations. This article will guide you through the step-by-step installation of EVE-NG on Windows 11, including the necessary prerequisites, installation process, and additional configurations.
Prerequisites
Before starting the installation, ensure that your Windows 11 system meets the following requirements:
-
Hardware Specifications:
- A minimum of 8 GB of RAM (16 GB recommended).
- At least 20 GB of free disk space for a smooth experience.
- A multi-core processor (Intel or AMD).
-
Software Requirements:
- Windows 11 Professional, Enterprise, or Education edition (Home edition is not supported for Hyper-V).
- Virtualization support (Intel VT-x or AMD-V) must be enabled in BIOS.
- Hyper-V feature must be activated on Windows to run EVE-NG.
-
Download Links:
- Download EVE-NG Community Edition from the official EVE-NG website.
- Download and install Oracle VM VirtualBox or VMware Workstation Player if you plan to use these platforms instead of Hyper-V.
Step 1: Enable Virtualization and Hyper-V
To run EVE-NG on Windows 11, you must ensure that virtualization is enabled in your system’s BIOS settings:
- Restart your computer and enter the BIOS setup. This usually involves pressing a key like F2, Delete, or Esc during the boot process (the specific key depends on your motherboard).
- Locate the Virtualization Settings in the BIOS menu. This setting might be under the «Advanced», «CPU Configuration», or «Security» tab, depending on your motherboard.
- Enable Intel VT-x or AMD-V option (based on your CPU).
- Save the changes and exit the BIOS.
Next, enable Hyper-V in Windows:
- Right-click the Start button and select Apps and Features.
- Click on Optional features and then on the More Windows features link.
- In the Windows Features window, check the box next to Hyper-V, then click OK.
- Wait for the installation to complete and restart your computer if prompted.
Step 2: Download EVE-NG
- Navigate to the official EVE-NG website (https://www.eve-ng.net/).
- Go to the Download section and select the Community Edition.
- Fill in the necessary information to register, and then download the EVE-NG OVA file (which is essentially a virtual machine file).
- This OVA file will be used to import EVE-NG into the virtualization application you choose to use (Hyper-V, VirtualBox, or VMware).
Step 3: Install Virtualization Software
If you’ve decided to use Oracle VirtualBox or VMware Workstation Player instead of Hyper-V, you’ll need to install one of these applications first.
Installing Oracle VirtualBox:
- Go to the official VirtualBox website (https://www.virtualbox.org/).
- Download the latest version available for Windows hosts.
- Open the downloaded installer and follow the on-screen instructions. Ensure you have checked the options to create shortcuts and to register the VirtualBox network interfaces.
- After installation, initiate VirtualBox to verify it’s working correctly.
Installing VMware Workstation Player:
- Go to the VMware official site (https://www.vmware.com/products/workstation-player.html).
- Download the latest version of VMware Workstation Player for Windows.
- Run the installer and follow the installation process.
- When installation is complete, run VMware Workstation Player to confirm it is working properly.
Step 4: Import EVE-NG OVA File
Here’s how to import the EVE-NG OVA file using either VirtualBox or VMware:
Importing with Oracle VirtualBox:
- Open VirtualBox.
- Click on File, then select Import Appliance.
- Browse to the location of the downloaded EVE-NG OVA file and select it.
- Click on Next and review the appliance settings. Make sure to allocate adequate resources (e.g., RAM and CPU) based on your system specifications. The suggested settings are generally acceptable.
- Click on Import and wait for the process to finish.
Importing with VMware Workstation Player:
- Open VMware Workstation Player.
- Click on File, then choose Open.
- Navigate to the EVE-NG OVA file and select it.
- Ensure that the Virtual Machine is edited to allocate sufficient resources for your needs.
- Click on Import and wait for the import to complete.
Step 5: Configure Networking Settings
For EVE-NG to work effectively, appropriate networking configurations must be set up. This step involves adjusting network settings according to your virtualization software.
For Oracle VirtualBox:
- In VirtualBox, select your imported EVE-NG VM and click on Settings.
- Navigate to Network. You should see adapters labeled Adapter 1 through Adapter 4.
- Set Adapter 1 to Bridged Adapter. This will allow your EVE-NG instance to communicate with your local network.
- Ensure the other adapters follow the recommended configuration: Adapter 2, Adapter 3, and Adapter 4 should usually be set to Host-only Adapter.
- Click OK to save.
For VMware:
- In VMware Workstation Player, select your imported EVE-NG VMs and click on Edit virtual machine settings.
- In the Network Adapter properties, set the first adapter to Bridged. Similar to VirtualBox, this allows for communication with the local network.
- Ensure other adapters are set to Host-only as necessary, based on usage.
- Apply the changes and exit the settings.
Step 6: Start EVE-NG for the First Time
Now that everything is set up, it’s time to start EVE-NG for the first time:
- Select the EVE-NG VM in your virtualization software (VirtualBox or VMware).
- Click on Start to power up EVE-NG.
- On the first boot, EVE-NG will take some time to initialize. Monitor the console for the IP address it will use.
- Once booted, note the IP address provided in the terminal.
Step 7: Access EVE-NG via Web Browser
- Open a web browser on your Windows 11 machine.
- Type the IP address you noted from the VM console into the address bar. It should be something like
http://192.168.x.x. - You will be prompted for a username and password:
- Use
adminas the username. - Use
eveas the password.
- Use
- This should bring you to the EVE-NG dashboard.
Step 8: Configure EVE-NG
After logging in, it is advisable to configure some settings and upload images for use in EVE-NG.
Uploading Images:
- Prepare your networking images (e.g., Cisco IOU images, GNS3 compatible images, etc.).
- Use WinSCP or FileZilla to connect to your EVE-NG instance.
- Connect using the IP address and your admin credentials.
- Upload your images to the respective directories under
/opt/unetlab/addons/qemu/. - Make sure to set the appropriate permissions on each of the uploaded images by logging into the console with SSH and running the following command within that directory:
chmod +x - Finally, run the command to consolidate the images in EVE-NG:
/opt/unetlab/wrappers/unl_wrapper -a fixpermissions
Configure Preferences:
- Go to settings on the EVE-NG dashboard to adjust preferences as needed.
- This may include changing the default language, configuring network settings, or adjusting the node types.
Conclusion
Congratulations! You have successfully installed EVE-NG on your Windows 11 machine. This robust platform will now allow you to create various network topologies, perform simulations, and enhance your networking skills. EVE-NG opens up a world of possibilities for network design and testing, significantly aiding those in network engineering, development, and cybersecurity. For future endeavours, always keep your EVE-NG images and the software itself up to date to ensure optimal performance and access to the latest features.
Remember, practice is key to mastering EVE-NG, so utilize your new setup to experiment, learn, and grow in the field of networking. If you encounter issues during your use, the EVE-NG community forums and official documentation are valuable resources. Happy simulating!
Introduction to EVE-NG
EVE-NG (Emulated Virtual Environment Next Generation) is a popular network emulation tool that allows users to design, implement, and test complex network topologies in a virtual environment. It is widely used by network professionals, engineers, and students for practicing configuration, troubleshooting, and developing networking skills. EVE-NG supports various network operating systems, including Cisco IOS, Juniper, and virtual machines, and it enables users to create a lab environment that closely mirrors real-world scenarios.
If you’re running Windows 11 and want to install EVE-NG, this guide will walk you through the entire process step by step. Ensuring that you can set up your virtual lab environment smoothly.
System Requirements
Before diving into the installation process, it’s essential to ensure that your system meets the necessary prerequisites to run EVE-NG effectively. Here are the minimum system requirements:
- Processor: Intel or AMD 64-bit processor
- RAM: At least 8 GB (16 GB or more recommended)
- Storage: At least 50 GB of free disk space
- OS: Windows 11 (64-bit version)
- Virtualization: Hardware Virtualization support in your BIOS (Intel VT-x or AMD-V)
- Network Adapter: Ethernet adapter for external connections
- Hypervisor: VMware Workstation or Oracle VirtualBox
Step 1: Enable Hardware Virtualization
To run EVE-NG smoothly, hardware virtualization should be enabled on your machine. Here’s how to check and enable it:
-
Access BIOS/UEFI: Restart your Windows 11 computer and enter the BIOS setup. This usually involves pressing a key like F2, Delete, or Esc immediately after powering on, depending on your motherboard manufacturer.
-
Locate Virtualization Settings: Once in the BIOS, look for settings related to CPU configuration. This might be under «Advanced,» «CPU Configuration,» or «Security.» Look for options such as «Intel VT-x» or «AMD-V.»
-
Enable Virtualization: Change the setting to “Enabled.”
-
Save and Exit: Save your changes and exit the BIOS setup.
Step 2: Download EVE-NG
With virtualization enabled, the next step is to download the EVE-NG ISO from the official website:
-
Visit the EVE-NG Website: Go to the official EVE-NG website (http://www.eve-ng.net/).
-
Select the Right Version: Choose the community edition if you are looking for a free option. You may also find additional features in the professional edition but for most users, the community edition suffices.
-
Download the ISO: Locate the ISO image for the version you want to install and download it to your computer. Ensure the file is fully downloaded before proceeding.
Step 3: Install VMware Workstation or Oracle VirtualBox
EVE-NG can be run either on VMware Workstation or Oracle VirtualBox. For this guide, we will focus on using VMware Workstation since it’s widely used and provides robust features. However, if you prefer VirtualBox, the steps are similar.
Installing VMware Workstation
-
Download VMware Workstation: Go to the VMware website (https://www.vmware.com/) and download the latest version of VMware Workstation Player (or Pro, if you have a license).
-
Run the Installer: Once downloaded, run the installer and follow the prompts to complete the installation. Accept the license agreement and choose the necessary installation options.
-
Finish Installation: Once the installation is complete, open VMware Workstation to begin setting up your EVE-NG virtual lab.
Step 4: Create the EVE-NG Virtual Machine
Now that VMware is installed, it’s time to create a new virtual machine for EVE-NG.
-
Open VMware Workstation: Launch VMware Workstation and select «Create a New Virtual Machine.»
-
Select the Configuration Type: Choose «Typical» installation and click «Next.»
-
Use the EVE-NG ISO: When prompted to select the operating system installer, select “I will install the operating system later.” Click “Next.”
-
Choose Guest Operating System: Select “Linux” as the operating system and “Other Linux 5.x or later kernel 64-bit” as the version. Click “Next.”
-
Name Your Virtual Machine: Enter a name for your EVE-NG virtual machine (e.g., “EVE-NG”) and choose a location to store it.
-
Specify Disk Capacity: Allocate at least 50 GB for the virtual machine disk capacity. Choose to store the virtual disk as a single file for better performance.
-
Customize Hardware: Before finishing, click on “Customize Hardware.” Here are the recommended settings:
- Memory: At least 4 GB (8-16 GB recommended for larger labs).
- Processors: 2 or more, and ensure the option “Virtualize Intel VT-x/EPT or AMD-V/RVI” is enabled.
- Network Adapter: Set it to Bridged mode for easier access to the virtual machine over your home network.
- CD/DVD Drive: Use the EVE-NG ISO file you downloaded earlier.
-
Finish the Setup: Click “Close” to exit the hardware settings and then “Finish” to create the virtual machine.
Step 5: Install EVE-NG on the Virtual Machine
-
Power On the Virtual Machine: Right-click on your EVE-NG VM in VMware Workstation and select «Power On.»
-
Start the Installation: Once the virtual machine boots, it will load the EVE-NG installation process.
-
Follow the Prompts: Navigate through the installation prompts. Generally, the default settings will suffice. Select Yes when prompted to proceed with the installation, and allow the installation process to complete which will take several minutes.
-
Reboot the Virtual Machine: After installation completes, you’ll be prompted to restart the VM. Do so.
Step 6: Accessing EVE-NG
-
Find the IP Address: After the reboot, you’ll see a terminal interface showing the IP address assigned to your EVE-NG instance. Note this IP address for the next steps.
-
Open a Web Browser: On your Windows 11 host machine, open a web browser.
-
Enter EVE-NG IP Address: Type the IP address of your EVE-NG instance in the address bar preceded by
http://(e.g.,http://192.168.1.100). -
Login: Use the default credentials:
- Username:
admin - Password:
eve
- Username:
-
Change Password: Once logged in, it is recommended to change your password for security purposes.
Step 7: Setting Up EVE-NG
Now that you’ve successfully logged into EVE-NG, it’s time to set up the environment to start creating network topologies.
-
Upload Network Images: To use different network operating systems, you need to upload the appropriate images to EVE-NG. This usually entails downloading the images (like Cisco IOS, etc.) from a reputable source and transferring them to the appropriate directories in EVE-NG.
-
Use WinSCP or FileZilla: You can use a file transfer tool like WinSCP or FileZilla to transfer the images into EVE-NG. Connect using the IP address, username, and password, then navigate to the
/opt/unetlab/addons/qemu/directory. -
Follow Image Installation Instructions: Each type of network image might come with specific installation instructions. Follow them carefully to ensure your images are correctly configured.
Step 8: Creating Your First Lab
-
Create a New Lab: In the EVE-NG web interface, click ‘Lab’ and ‘Add a new lab’. Provide a name and description for your lab.
-
Add Devices: Once your lab is created, click on it and then start adding devices by dragging them from the left panel. Choose the network images you’ve just uploaded.
-
Connect Devices: Use the connection tool to link devices as required in your topology.
-
Start Devices: After the devices are configured, click the ‘Start’ button to power them on.
-
Access Console: Click on the console icon next to each device to access its terminal.
Conclusion
Installing EVE-NG on Windows 11 is straightforward if you follow the detailed steps outlined in this guide. Once set up, you can leverage EVE-NG’s powerful features to simulate complex network environments and hone your networking skills. As you become more comfortable with EVE-NG, you may explore its extensive capabilities, including integrating additional virtual machines, utilizing various network protocols, and more.
Whether you’re studying for certifications, preparing for a job in networking, or just playing with new technologies, EVE-NG provides a comprehensive platform for learning and experimentation. Enjoy building your virtual networks and dive deep into the world of network emulation!