
Skip to content
How to install Elasticsearch on Windows 10
In this tutorials, we will show how to install Elasticsearch on Windows 10 operating system.
Versions:
- Windows 10 Pro, 64 bit
- Elasticsearch 6.7.1
Prerequisites:
Elasticsearch requires Java 8 (or later) installation to run. If you haven’t installed Java yet, follow our previous article to install Java on Windows operating system.
Install Elasticsearch on Windows 10:
Follow the below steps to download and install Elasticsearch.
Get Elasticsearch:
Download the latest Elasticsearchthe from the official website. Usually, it will be available as a .zip file.

Install Elasticsearch:
The elasticsearch-x.x.x.zip file will be download, upon clicking the above-highlighted URL.
Extract the downloaded file; then you would see the below folder structure.

/bin folder contains all binaries required to run Elasticsearch.
/config folder contains all configuration properties related to Elasticsearch, Java and user settings.
Start Elasticsearch:
Once the downloading process completed; now we can start the Elasticsearch from the command line.
D:\softwares\elasticsearch-6.7.1\bin>elasticsearch.exeIf everything went well, the command line terminal would display output similar to the following:

Elasticsearch loads the configuration details from an elasticsearch.yml file while running it. If you wanted to change the configurations; you always free to change it from the elasticsearch.yml file or you can even provide as parameters while executing the elasticsearch.exe file.
Checking Elasticsearch is running:
You can test that your Elasticsearch node is running by sending an HTTP request to port 9200 on localhost:

References:
- Elasticsearch Installation guide
- Install Java on Windows 10
Happy Learning 🙂
Share a word.
Related Posts
Page load link
We explained what Elasticsearch is in our previous article. You can check it by clicking here. Now we will install Elasticsearch on Windows 10.
Elasticsearch Installation on Windows 10
We download the file with the .zip extension from the Elastichsearch site. You can download Elastichsearch from the link below.
https://www.elastic.co/downloads/elasticsearch

We extract the downloaded “elasticsearch-7.12.1-windows-x86_64.zip” file from the zip.
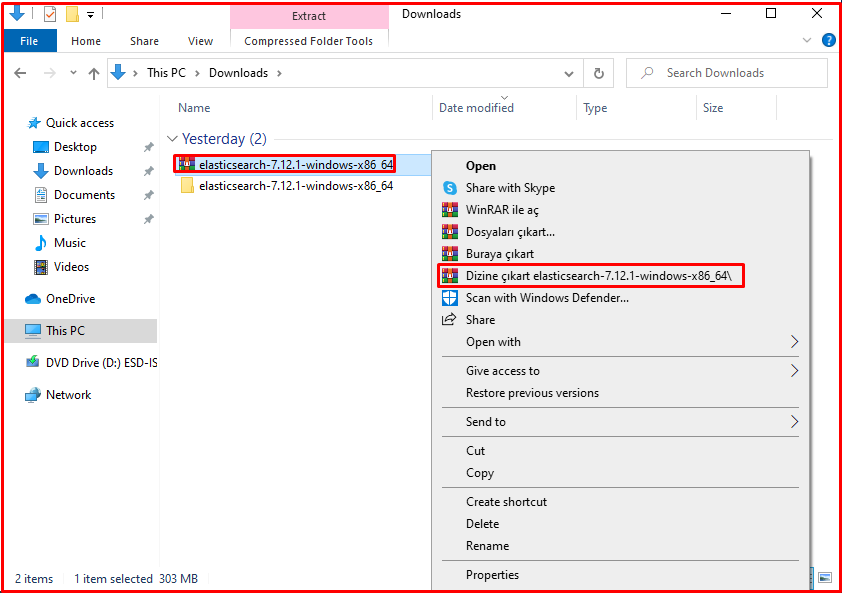
Then we open the Windows PowerShell program.

We go to the location “elasticsearch-7.12.1-windows-x86_64 \elasticsearch-7.12.1\bin“. Run the “elasticsearch” file here.
PS C:\Users\omer\Downloads\elasticsearch-7.12.1-windows-x86_64\elasticsearch-7.12.1\bin> .\elasticsearch                Could not rename log file 'logs/gc.log' to 'logs/gc.log.03' (Permission denied).
[2021-05-19T23:57:54,305][INFO ][o.e.n.Node               ] [DESKTOP-4OEUMOR] version[7.12.1], pid[5384], build[default/zip/3186837139b9c6b6d23c3200870651f10d3343b7/2021-04-20T20:56:39.040728659Z], OS[Windows 10/10.0/amd64], JVM[AdoptOpenJDK/OpenJDK 64-Bit Server VM/16/16+36]
[2021-05-19T23:57:54,338][INFO ][o.e.n.Node               ] [DESKTOP-4OEUMOR] JVM home [C:\Users\omer\Downloads\elasticsearch-7.12.1-windows-x86_64\elasticsearch-7.12.1\jdk], using bundled JDK [true]
[2021-05-19T23:57:54,409][INFO ][o.e.n.Node               ] [DESKTOP-4OEUMOR] JVM arguments [-Des.networkaddress.cache.ttl=60, -Des.networkaddress.cache.negative.ttl=10, -XX:+AlwaysPreTouch, -Xss1m, -Djava.awt.headless=true, -Dfile.encoding=UTF-8, -Djna.nosys=true, -XX:-OmitStackTraceInFastThrow, -XX:+ShowCodeDetailsInExceptionMessages, -Dio.netty.noUnsafe=true, -Dio.netty.noKeySetOptimization=true, -Dio.netty.recycler.maxCapacityPerThread=0, -Dio.netty.allocator.numDirectArenas=0, -Dlog4j.shutdownHookEnabled=false, -Dlog4j2.disable.jmx=true, -Djava.locale.providers=SPI,COMPAT, --add-opens=java.base/java.io=ALL-UNNAMED, -XX:+UseG1GC, -Djava.io.tmpdir=C:\Users\omer\AppData\Local\Temp\elasticsearch, -XX:+HeapDumpOnOutOfMemoryError, -XX:HeapDumpPath=data, -XX:ErrorFile=logs/hs_err_pid%p.log, -Xlog:gc*,gc+age=trace,safepoint:file=logs/gc.log:utctime,pid,tags:filecount=32,filesize=64m, -Xms2047m, -Xmx2047m, -XX:MaxDirectMemorySize=1073741824, -XX:G1HeapRegionSize=4m, -XX:InitiatingHeapOccupancyPercent=30, -XX:G1ReservePercent=15, -Delasticsearch, -Des.path.home=C:\Users\omer\Downloads\elasticsearch-7.12.1-windows-x86_64\elasticsearch-7.12.1, -Des.path.conf=C:\Users\omer\Downloads\elasticsearch-7.12.1-windows-x86_64\elasticsearch-7.12.1\config, -Des.distribution.flavor=default, -Des.distribution.type=zip, -Des.bundled_jdk=true]
[2021-05-19T23:58:05,002][INFO ][o.e.p.PluginsService     ] [DESKTOP-4OEUMOR] loaded module [aggs-matrix-stats]
[2021-05-19T23:58:05,006][INFO ][o.e.p.PluginsService     ] [DESKTOP-4OEUMOR] loaded module [analysis-common]
[2021-05-19T23:58:05,008][INFO ][o.e.p.PluginsService     ] [DESKTOP-4OEUMOR] loaded module [constant-keyword]
[2021-05-19T23:58:05,011][INFO ][o.e.p.PluginsService     ] [DESKTOP-4OEUMOR] loaded module [flattened]
[2021-05-19T23:58:05,013][INFO ][o.e.p.PluginsService     ] [DESKTOP-4OEUMOR] loaded module [frozen-indices]
[2021-05-19T23:58:05,018][INFO ][o.e.p.PluginsService     ] [DESKTOP-4OEUMOR] loaded module [ingest-common]
[2021-05-19T23:58:05,019][INFO ][o.e.p.PluginsService     ] [DESKTOP-4OEUMOR] loaded module [ingest-geoip]
[2021-05-19T23:58:05,023][INFO ][o.e.p.PluginsService     ] [DESKTOP-4OEUMOR] loaded module [ingest-user-agent]
[2021-05-19T23:58:05,024][INFO ][o.e.p.PluginsService     ] [DESKTOP-4OEUMOR] loaded module [kibana]
[2021-05-19T23:58:05,026][INFO ][o.e.p.PluginsService     ] [DESKTOP-4OEUMOR] loaded module [lang-expression]
[2021-05-19T23:58:05,027][INFO ][o.e.p.PluginsService     ] [DESKTOP-4OEUMOR] loaded module [lang-mustache]
[2021-05-19T23:58:05,029][INFO ][o.e.p.PluginsService     ] [DESKTOP-4OEUMOR] loaded module [lang-painless]
[2021-05-19T23:58:05,029][INFO ][o.e.p.PluginsService     ] [DESKTOP-4OEUMOR] loaded module [mapper-extras]
[2021-05-19T23:58:05,030][INFO ][o.e.p.PluginsService     ] [DESKTOP-4OEUMOR] loaded module [mapper-version]
[2021-05-19T23:58:05,031][INFO ][o.e.p.PluginsService     ] [DESKTOP-4OEUMOR] loaded module [parent-join]
[2021-05-19T23:58:05,031][INFO ][o.e.p.PluginsService     ] [DESKTOP-4OEUMOR] loaded module [percolator]
[2021-05-19T23:58:05,032][INFO ][o.e.p.PluginsService     ] [DESKTOP-4OEUMOR] loaded module [rank-eval]
[2021-05-19T23:58:05,033][INFO ][o.e.p.PluginsService     ] [DESKTOP-4OEUMOR] loaded module [reindex]
[2021-05-19T23:58:05,037][INFO ][o.e.p.PluginsService     ] [DESKTOP-4OEUMOR] loaded module [repositories-metering-api]
[2021-05-19T23:58:05,038][INFO ][o.e.p.PluginsService     ] [DESKTOP-4OEUMOR] loaded module [repository-encrypted]
[2021-05-19T23:58:05,039][INFO ][o.e.p.PluginsService     ] [DESKTOP-4OEUMOR] loaded module [repository-url]
[2021-05-19T23:58:05,039][INFO ][o.e.p.PluginsService     ] [DESKTOP-4OEUMOR] loaded module [search-business-rules]
[2021-05-19T23:58:05,041][INFO ][o.e.p.PluginsService     ] [DESKTOP-4OEUMOR] loaded module [searchable-snapshots]
[2021-05-19T23:58:05,042][INFO ][o.e.p.PluginsService     ] [DESKTOP-4OEUMOR] loaded module [snapshot-repo-test-kit]
[2021-05-19T23:58:05,042][INFO ][o.e.p.PluginsService     ] [DESKTOP-4OEUMOR] loaded module [spatial]
[2021-05-19T23:58:05,043][INFO ][o.e.p.PluginsService     ] [DESKTOP-4OEUMOR] loaded module [transform]
[2021-05-19T23:58:05,047][INFO ][o.e.p.PluginsService     ] [DESKTOP-4OEUMOR] loaded module [transport-netty4]
[2021-05-19T23:58:05,048][INFO ][o.e.p.PluginsService     ] [DESKTOP-4OEUMOR] loaded module [unsigned-long]
[2021-05-19T23:58:05,049][INFO ][o.e.p.PluginsService     ] [DESKTOP-4OEUMOR] loaded module [vectors]
[2021-05-19T23:58:05,055][INFO ][o.e.p.PluginsService     ] [DESKTOP-4OEUMOR] loaded module [wildcard]
[2021-05-19T23:58:05,055][INFO ][o.e.p.PluginsService     ] [DESKTOP-4OEUMOR] loaded module [x-pack-aggregate-metric]
[2021-05-19T23:58:05,058][INFO ][o.e.p.PluginsService     ] [DESKTOP-4OEUMOR] loaded module [x-pack-analytics]
[2021-05-19T23:58:05,059][INFO ][o.e.p.PluginsService     ] [DESKTOP-4OEUMOR] loaded module [x-pack-async]
[2021-05-19T23:58:05,061][INFO ][o.e.p.PluginsService     ] [DESKTOP-4OEUMOR] loaded module [x-pack-async-search]
[2021-05-19T23:58:05,062][INFO ][o.e.p.PluginsService     ] [DESKTOP-4OEUMOR] loaded module [x-pack-autoscaling]
[2021-05-19T23:58:05,063][INFO ][o.e.p.PluginsService     ] [DESKTOP-4OEUMOR] loaded module [x-pack-ccr]
[2021-05-19T23:58:05,064][INFO ][o.e.p.PluginsService     ] [DESKTOP-4OEUMOR] loaded module [x-pack-core]
[2021-05-19T23:58:05,065][INFO ][o.e.p.PluginsService     ] [DESKTOP-4OEUMOR] loaded module [x-pack-data-streams]
[2021-05-19T23:58:05,065][INFO ][o.e.p.PluginsService     ] [DESKTOP-4OEUMOR] loaded module [x-pack-deprecation]
[2021-05-19T23:58:05,066][INFO ][o.e.p.PluginsService     ] [DESKTOP-4OEUMOR] loaded module [x-pack-enrich]
[2021-05-19T23:58:05,071][INFO ][o.e.p.PluginsService     ] [DESKTOP-4OEUMOR] loaded module [x-pack-eql]
[2021-05-19T23:58:05,072][INFO ][o.e.p.PluginsService     ] [DESKTOP-4OEUMOR] loaded module [x-pack-fleet]
[2021-05-19T23:58:05,073][INFO ][o.e.p.PluginsService     ] [DESKTOP-4OEUMOR] loaded module [x-pack-graph]
[2021-05-19T23:58:05,074][INFO ][o.e.p.PluginsService     ] [DESKTOP-4OEUMOR] loaded module [x-pack-identity-provider]
[2021-05-19T23:58:05,075][INFO ][o.e.p.PluginsService     ] [DESKTOP-4OEUMOR] loaded module [x-pack-ilm]
[2021-05-19T23:58:05,076][INFO ][o.e.p.PluginsService     ] [DESKTOP-4OEUMOR] loaded module [x-pack-ingest]
[2021-05-19T23:58:05,076][INFO ][o.e.p.PluginsService     ] [DESKTOP-4OEUMOR] loaded module [x-pack-logstash]
[2021-05-19T23:58:05,077][INFO ][o.e.p.PluginsService     ] [DESKTOP-4OEUMOR] loaded module [x-pack-ml]
[2021-05-19T23:58:05,080][INFO ][o.e.p.PluginsService     ] [DESKTOP-4OEUMOR] loaded module [x-pack-monitoring]
[2021-05-19T23:58:05,081][INFO ][o.e.p.PluginsService     ] [DESKTOP-4OEUMOR] loaded module [x-pack-ql]
[2021-05-19T23:58:05,081][INFO ][o.e.p.PluginsService     ] [DESKTOP-4OEUMOR] loaded module [x-pack-rollup]
[2021-05-19T23:58:05,082][INFO ][o.e.p.PluginsService     ] [DESKTOP-4OEUMOR] loaded module [x-pack-runtime-fields]
[2021-05-19T23:58:05,082][INFO ][o.e.p.PluginsService     ] [DESKTOP-4OEUMOR] loaded module [x-pack-security]
[2021-05-19T23:58:05,083][INFO ][o.e.p.PluginsService     ] [DESKTOP-4OEUMOR] loaded module [x-pack-sql]
[2021-05-19T23:58:05,090][INFO ][o.e.p.PluginsService     ] [DESKTOP-4OEUMOR] loaded module [x-pack-stack]
[2021-05-19T23:58:05,091][INFO ][o.e.p.PluginsService     ] [DESKTOP-4OEUMOR] loaded module [x-pack-text-structure]
[2021-05-19T23:58:05,094][INFO ][o.e.p.PluginsService     ] [DESKTOP-4OEUMOR] loaded module [x-pack-voting-only-node]
[2021-05-19T23:58:05,095][INFO ][o.e.p.PluginsService     ] [DESKTOP-4OEUMOR] loaded module [x-pack-watcher]
[2021-05-19T23:58:05,098][INFO ][o.e.p.PluginsService     ] [DESKTOP-4OEUMOR] no plugins loaded
[2021-05-19T23:58:05,693][ERROR][o.e.b.ElasticsearchUncaughtExceptionHandler] [DESKTOP-4OEUMOR] uncaught exception in thread [main]
org.elasticsearch.bootstrap.StartupException: java.lang.IllegalStateException: failed to obtain node locks, tried [[C:\Users\omer\Downloads\elasticsearch-7.12.1-windows-x86_64\elasticsearch-7.12.1\data]] with lock id [0]; maybe these locations are not writable or multiple nodes were started without increasing [node.max_local_storage_nodes] (was [1])?
        at org.elasticsearch.bootstrap.Elasticsearch.init(Elasticsearch.java:163) ~[elasticsearch-7.12.1.jar:7.12.1]
        at org.elasticsearch.bootstrap.Elasticsearch.execute(Elasticsearch.java:150) ~[elasticsearch-7.12.1.jar:7.12.1]
        at org.elasticsearch.cli.EnvironmentAwareCommand.execute(EnvironmentAwareCommand.java:75) ~[elasticsearch-7.12.1.jar:7.12.1]
        at org.elasticsearch.cli.Command.mainWithoutErrorHandling(Command.java:116) ~[elasticsearch-cli-7.12.1.jar:7.12.1]
        at org.elasticsearch.cli.Command.main(Command.java:79) ~[elasticsearch-cli-7.12.1.jar:7.12.1]
        at org.elasticsearch.bootstrap.Elasticsearch.main(Elasticsearch.java:115) ~[elasticsearch-7.12.1.jar:7.12.1]
        at org.elasticsearch.bootstrap.Elasticsearch.main(Elasticsearch.java:81) ~[elasticsearch-7.12.1.jar:7.12.1]
Caused by: java.lang.IllegalStateException: failed to obtain node locks, tried [[C:\Users\omer\Downloads\elasticsearch-7.12.1-windows-x86_64\elasticsearch-7.12.1\data]] with lock id [0]; maybe these locations are not writable or multiple nodes were started without increasing [node.max_local_storage_nodes] (was [1])?
        at org.elasticsearch.env.NodeEnvironment.<init>(NodeEnvironment.java:292) ~[elasticsearch-7.12.1.jar:7.12.1]
        at org.elasticsearch.node.Node.<init>(Node.java:352) ~[elasticsearch-7.12.1.jar:7.12.1]
        at org.elasticsearch.node.Node.<init>(Node.java:278) ~[elasticsearch-7.12.1.jar:7.12.1]
        at org.elasticsearch.bootstrap.Bootstrap$5.<init>(Bootstrap.java:217) ~[elasticsearch-7.12.1.jar:7.12.1]
        at org.elasticsearch.bootstrap.Bootstrap.setup(Bootstrap.java:217) ~[elasticsearch-7.12.1.jar:7.12.1]
        at org.elasticsearch.bootstrap.Bootstrap.init(Bootstrap.java:397) ~[elasticsearch-7.12.1.jar:7.12.1]
        at org.elasticsearch.bootstrap.Elasticsearch.init(Elasticsearch.java:159) ~[elasticsearch-7.12.1.jar:7.12.1]
        ... 6 more
uncaught exception in thread [main]
java.lang.IllegalStateException: failed to obtain node locks, tried [[C:\Users\omer\Downloads\elasticsearch-7.12.1-windows-x86_64\elasticsearch-7.12.1\data]] with lock id [0]; maybe these locations are not writable or multiple nodes were started without increasing [node.max_local_storage_nodes] (was [1])?
        at org.elasticsearch.env.NodeEnvironment.<init>(NodeEnvironment.java:292)
        at org.elasticsearch.node.Node.<init>(Node.java:352)
        at org.elasticsearch.node.Node.<init>(Node.java:278)
        at org.elasticsearch.bootstrap.Bootstrap$5.<init>(Bootstrap.java:217)
        at org.elasticsearch.bootstrap.Bootstrap.setup(Bootstrap.java:217)
        at org.elasticsearch.bootstrap.Bootstrap.init(Bootstrap.java:397)
        at org.elasticsearch.bootstrap.Elasticsearch.init(Elasticsearch.java:159)
        at org.elasticsearch.bootstrap.Elasticsearch.execute(Elasticsearch.java:150)
        at org.elasticsearch.cli.EnvironmentAwareCommand.execute(EnvironmentAwareCommand.java:75)
        at org.elasticsearch.cli.Command.mainWithoutErrorHandling(Command.java:116)
        at org.elasticsearch.cli.Command.main(Command.java:79)
        at org.elasticsearch.bootstrap.Elasticsearch.main(Elasticsearch.java:115)
        at org.elasticsearch.bootstrap.Elasticsearch.main(Elasticsearch.java:81)
For complete error details, refer to the log at C:\Users\omer\Downloads\elasticsearch-7.12.1-windows-x86_64\elasticsearch-7.12.1\logs\elasticsearch.log
PS C:\Users\omer\Downloads\elasticsearch-7.12.1-windows-x86_64\elasticsearch-7.12.1\bin>

And finally, we check whether the elasticsearch application is working properly in our internet browser. We enter the “http://localhost:9200” link in our Internet Browser and run it.
Note: If you do not have Java installed on your computer, you will get an error like this. Download and install the Java program. Java Download

Elasticsearch can be installed on Windows using the Windows .zip archive. This
comes with a elasticsearch-service.bat command which will setup Elasticsearch to run as a
service.
This package contains both free and subscription features.
Start a 30-day trial to try out all of the features.
On Windows the Elasticsearch machine learning feature requires the Microsoft Universal
C Runtime library. This is built into Windows 10, Windows Server 2016 and more
recent versions of Windows. For older versions of Windows it can be installed
via Windows Update, or from a
separate download.
If you cannot install the Microsoft Universal C Runtime library you can still
use the rest of Elasticsearch if you disable the machine learning feature.
The latest stable version of Elasticsearch can be found on the
Download Elasticsearch page.
Other versions can be found on the
Past Releases page.
Enable automatic creation of system indicesedit
Some commercial features automatically create indices within Elasticsearch.
By default, Elasticsearch is configured to allow automatic index creation, and no
additional steps are required. However, if you have disabled automatic index
creation in Elasticsearch, you must configure
action.auto_create_index in elasticsearch.yml to allow
the commercial features to create the following indices:
action.auto_create_index: .monitoring*,.watches,.triggered_watches,.watcher-history*,.ml*
If you are using Logstash
or Beats then you will most likely
require additional index names in your action.auto_create_index setting, and
the exact value will depend on your local configuration. If you are unsure of
the correct value for your environment, you may consider setting the value to
* which will allow automatic creation of all indices.
Run Elasticsearch from the command lineedit
Run the following command to start Elasticsearch from the command line:
When starting Elasticsearch for the first time, security features are enabled and
configured by default. The following security configuration occurs
automatically:
-
Authentication and authorization are enabled, and a password is generated for
theelasticbuilt-in superuser. -
Certificates and keys for TLS are generated for the transport and HTTP layer,
and TLS is enabled and configured with these keys and certificates. - An enrollment token is generated for Kibana, which is valid for 30 minutes.
The password for the elastic user and the enrollment token for Kibana are
output to your terminal.
We recommend storing the elastic password as an environment variable in your shell. Example:
$ELASTIC_PASSWORD = "your_password"
If you have password-protected the Elasticsearch keystore, you will be prompted to
enter the keystore’s password. See Secure settings for more details.
By default Elasticsearch prints its logs to the console (STDOUT) and to the <cluster file within the logs directory. Elasticsearch logs some
name>.log
information while it is starting, but after it has finished initializing it
will continue to run in the foreground and won’t log anything further until
something happens that is worth recording. While Elasticsearch is running you can
interact with it through its HTTP interface which is on port 9200 by default.
To stop Elasticsearch, press Ctrl-C.
Enroll nodes in an existing clusteredit
When Elasticsearch starts for the first time, the security auto-configuration process
binds the HTTP layer to 0.0.0.0, but only binds the transport layer to
localhost. This intended behavior ensures that you can start
a single-node cluster with security enabled by default without any additional
configuration.
Before enrolling a new node, additional actions such as binding to an address
other than localhost or satisfying bootstrap checks are typically necessary
in production clusters. During that time, an auto-generated enrollment token
could expire, which is why enrollment tokens aren’t generated automatically.
Additionally, only nodes on the same host can join the cluster without
additional configuration. If you want nodes from another host to join your
cluster, you need to set transport.host to a
supported value
(such as uncommenting the suggested value of 0.0.0.0), or an IP address
that’s bound to an interface where other hosts can reach it. Refer to
transport settings for more
information.
To enroll new nodes in your cluster, create an enrollment token with the
elasticsearch-create-enrollment-token tool on any existing node in your
cluster. You can then start a new node with the --enrollment-token parameter
so that it joins an existing cluster.
-
In a separate terminal from where Elasticsearch is running, navigate to the directory
where you installed Elasticsearch and run the
elasticsearch-create-enrollment-tokentool
to generate an enrollment token for your new nodes.bin\elasticsearch-create-enrollment-token -s node
Copy the enrollment token, which you’ll use to enroll new nodes with
your Elasticsearch cluster. -
From the installation directory of your new node, start Elasticsearch and pass the
enrollment token with the--enrollment-tokenparameter.bin\elasticsearch --enrollment-token <enrollment-token>
Elasticsearch automatically generates certificates and keys in the following directory:
- Repeat the previous step for any new nodes that you want to enroll.
Configure Elasticsearch on the command lineedit
Elasticsearch loads its configuration from the %ES_HOME%\config\elasticsearch.yml
file by default. The format of this config file is explained in
Configuring Elasticsearch.
Any settings that can be specified in the config file can also be specified on
the command line, using the -E syntax as follows:
.\bin\elasticsearch.bat -Ecluster.name=my_cluster -Enode.name=node_1
Values that contain spaces must be surrounded with quotes. For instance -Epath.logs="C:\My Logs\logs".
Typically, any cluster-wide settings (like cluster.name) should be
added to the elasticsearch.yml config file, while any node-specific settings
such as node.name could be specified on the command line.
Check that Elasticsearch is runningedit
You can test that your Elasticsearch node is running by sending an HTTPS request to port
9200 on localhost:
curl --cacert %ES_HOME%\config\certs\http_ca.crt -u elastic:$ELASTIC_PASSWORD https://localhost:9200
|
Ensure that you use
|
The call returns a response like this:
{
  "name" : "Cp8oag6",
  "cluster_name" : "elasticsearch",
  "cluster_uuid" : "AT69_T_DTp-1qgIJlatQqA",
  "version" : {
    "number" : "8.10.0-SNAPSHOT",
    "build_type" : "tar",
    "build_hash" : "f27399d",
    "build_flavor" : "default",
    "build_date" : "2016-03-30T09:51:41.449Z",
    "build_snapshot" : false,
    "lucene_version" : "9.7.0",
    "minimum_wire_compatibility_version" : "1.2.3",
    "minimum_index_compatibility_version" : "1.2.3"
  },
  "tagline" : "You Know, for Search"
}
Install and run Elasticsearch as a service on Windowsedit
You can install Elasticsearch as a service that runs in the background or starts
automatically at boot time without user interaction.
-
Install Elasticsearch as a service. The name of the service and the value of
ES_JAVA_HOMEwill be made available during install:C:\elasticsearch-8.10.0\bin>elasticsearch-service.bat install Installing service : "elasticsearch-service-x64" Using ES_JAVA_HOME (64-bit): "C:\jvm\jdk1.8" The service 'elasticsearch-service-x64' has been installed.
-
Start Elasticsearch as a service. When Elasticsearch starts, authentication is enabled by
default:C:\elasticsearch-8.10.0\bin>bin\elasticsearch-service.bat start
TLS is not enabled or configured when you start Elasticsearch as a service.
-
Generate a password for the
elasticuser with the
elasticsearch-reset-passwordtool. The password is output
to the command line.C:\elasticsearch-8.10.0\bin>\bin\elasticsearch-reset-password -u elastic
While a JRE can be used for the Elasticsearch service, due to its use of a client
VM (as opposed to a server JVM which offers better performance for long-running
applications) its usage is discouraged and a warning will be issued.
The system environment variable ES_JAVA_HOME should be set to the path
of the JDK installation that you want the service to use. If you upgrade the
JDK, you are not required to the reinstall the service but you must set the
value of the system environment variable ES_JAVA_HOME to the path to the new
JDK installation. However, upgrading across JVM types (e.g. JRE versus SE) is
not supported, and does require the service to be reinstalled.
Manage Elasticsearch as a service on Windowsedit
Run the elasticsearch-service.bat script in the bin\ folder to install,
remove, manage, or configure the service and potentially start and stop the
service from the command line.
C:\elasticsearch-8.10.0\bin>elasticsearch-service.bat

Usage: elasticsearch-service.bat install|remove|start|stop|manager [SERVICE_ID]
The script requires one parameter (the command to execute), followed by an
optional one indicating the service id (useful when installing multiple
Elasticsearch services).
The commands available are:
|
|
Install Elasticsearch as a service |
|
|
Remove the installed Elasticsearch service (and stop the service if started) |
|
|
Start the Elasticsearch service (if installed) |
|
|
Stop the Elasticsearch service (if started) |
|
|
Start a GUI for managing the installed service |
Customize service settingsedit
The Elasticsearch service can be configured prior to installation by setting the following environment variables (either using the set command from the command line, or through the System Properties→Environment Variables GUI).
|
|
A unique identifier for the service. Useful if installing multiple instances |
|
|
The user to run as, defaults to the local system account. |
|
|
The password for the user specified in |
|
|
The name of the service. Defaults to |
|
|
The description of the service. Defaults to |
|
|
The installation directory of the desired JVM to run the service under. |
|
|
Service log directory, defaults to |
|
|
Configuration file directory (which needs to include |
|
|
Any additional JVM system properties you may want to apply. |
|
|
Startup mode for the service. Can be either |
|
|
The timeout in seconds that procrun waits for service to exit gracefully. Defaults to |
At its core, elasticsearch-service.bat relies on Apache Commons Daemon project
to install the service. Environment variables set prior to the service installation are copied and will be used during the service lifecycle. This means any changes made to them after the installation will not be picked up unless the service is reinstalled.
By default, Elasticsearch automatically sizes JVM heap based on a node’s
roles and total memory. We recommend this default sizing for most
production environments. If needed, you can override default sizing by manually
setting the heap size.
When installing Elasticsearch on Windows as a service for the first time or running Elasticsearch
from the command line, you can manually Set the JVM heap size.
To resize the heap for an already installed service,
use the service manager: bin\elasticsearch-service.bat manager.
The service automatically configures a private temporary directory for use
by Elasticsearch when it is running. This private temporary directory is
configured as a sub-directory of the private temporary directory for the user
running the installation. If the service will run under a different user, you
can configure the location of the temporary directory that the service should
use by setting the environment variable ES_TMPDIR to the preferred location
before you execute the service installation.
-
Using the Manager GUI
-
It is also possible to configure the service after it’s been installed using the manager GUI (
elasticsearch-service-mgr.exe), which offers insight into the installed service, including its status, startup type, JVM, start and stop settings amongst other things. Invokeelasticsearch-service.bat managerfrom the command-line to open the manager window.
Most changes (like JVM settings) made through the manager GUI will require a restart of the service to take affect.
Connect clients to Elasticsearchedit
When you start Elasticsearch for the first time, TLS is configured automatically for the
HTTP layer. A CA certificate is generated and stored on disk at:
%ES_HOME%\config\certs\http_ca.crt
The hex-encoded SHA-256 fingerprint of this
certificate is also output to the terminal. Any clients that connect to Elasticsearch,
such as the
Elasticsearch Clients,
Beats, standalone Elastic Agents, and Logstash must validate that they trust the
certificate that Elasticsearch uses for HTTPS. Fleet Server and Fleet-managed
Elastic Agents are automatically configured to trust the CA certificate.
Other clients can establish trust by using either the fingerprint of the CA
certificate or the CA certificate itself.
If the auto-configuration process already completed, you can still obtain the
fingerprint of the security certificate. You can also copy the CA certificate
to your machine and configure your client to use it.
Use the CA fingerprintedit
Copy the fingerprint value that’s output to your terminal when Elasticsearch starts, and
configure your client to use this fingerprint to establish trust when it
connects to Elasticsearch.
If the auto-configuration process already completed, you can still obtain the
fingerprint of the security certificate by running the following command. The
path is to the auto-generated CA certificate for the HTTP layer.
openssl x509 -fingerprint -sha256 -in config/certs/http_ca.crt
The command returns the security certificate, including the fingerprint.
The issuer should be Elasticsearch security auto-configuration HTTP CA.
issuer= /CN=Elasticsearch security auto-configuration HTTP CA
SHA256 Fingerprint=<fingerprint>
Use the CA certificateedit
If your library doesn’t support a method of validating the fingerprint, the
auto-generated CA certificate is created in the following directory on each Elasticsearch
node:
%ES_HOME%\config\certs\http_ca.crt
Copy the http_ca.crt file to your machine and configure your client to use this
certificate to establish trust when it connects to Elasticsearch.
Directory layout of .zip archiveedit
The .zip package is entirely self-contained. All files and directories are,
by default, contained within %ES_HOME% — the directory created when
unpacking the archive.
This is very convenient because you don’t have to create any directories to
start using Elasticsearch, and uninstalling Elasticsearch is as easy as
removing the %ES_HOME% directory. However, it is advisable to change the
default locations of the config directory, the data directory, and the logs
directory so that you do not delete important data later on.
| Type | Description | Default Location | Setting |
|---|---|---|---|
|
home |
Elasticsearch home directory or |
Directory created by unpacking the archive |
|
|
bin |
Binary scripts including |
|
|
|
conf |
Configuration files including |
|
|
|
conf |
Generated TLS keys and certificates for the transport and HTTP layer. |
|
|
|
data |
The location of the data files of each index / shard allocated |
|
|
|
logs |
Log files location. |
|
|
|
plugins |
Plugin files location. Each plugin will be contained in a subdirectory. |
|
|
|
repo |
Shared file system repository locations. Can hold multiple locations. A file system repository can be placed in to any subdirectory of any directory specified here. |
Not configured |
|
Содержание
- Введение
- 1. Требования к компьютеру
- 2. Установка Elasticsearch
- 3. Подключение к Elasticsearch при развертывании экземпляра продукта
- 4. Пример типового файла конфигурации Elasticsearch
Введение
Для работы Comindware Business Application Platform требуется сервер Elasticsearch. См. системные требования.
В случае установки Comindware Business Application Platform версии 4.7 в Windows Утилита администрирования устанавливает службу Elasticsearch в папку C:\Program Files\Elasticsearch\elasticsearch-8.1.0\. Эта служба имеет базовую конфигурацию и доступна по адресу localhost:9200.
Вы можете использовать имеющуюся службу Elasticsearch или развернуть её на отдельном сервере.
В этой статье представлены требования к конфигурации компьютера для сервера Elasticsearch, инструкции по установке и настройке конфигурации сервера и службы Elasticsearch в ОС Windows, а также приведен пример типового файла конфигурации. Инструкции представлены для версии 8.10.2, для других версий содержимое файлов конфигурации и порядок установки могут быть иными.
Только после того, как служба Elasticsearch запущена, можно приступать к развертыванию Comindware Business Application Platform, указав путь к серверу Elasticsearch.
1. Требования к компьютеру
Сервер Elasticsearch создает значительную нагрузку на вычислительные ресурсы компьютера, поэтому рекомендуется:
- использовать отдельный SSD-диск для хранения журналов и данных сервера Elasticsearch;
- осуществлять мониторинг свободного места на диске, так как сервер перестает записывать данные, если на диске мало свободного места;
- использовать высокопроизводительный компьютер с достаточным объемом ОЗУ и количеством ядер ЦП, так как для обработки каждого индекса создается отдельный поток, а индексов может быть много.
2. Установка Elasticsearch
Для установки Elasticsearch необходимо распаковать исполняемые файлы из ZIP-архива, а затем настроить переменные среды, службу Elasticsearch и конфигурацию сервера.
В процессе установки и настройки Elasticsearch все команды следует выполнять от имени администратора.
2.1. Скачайте файл elasticsearch-<8.XX.X>-windows-x86_64.zip c дистрибутивом Elasticsearch. Здесь <8.XX.X> — номер версии Elasticsearch.
2.2. Распакуйте архив в целевую папку, например: C:\Program Files\Elastic\Elasticsearch\elasticsearch-<8.XX.X>
Последующие инструкции подразумевают, что сервер Elasticsearch установлен в эту папку.
2.3. Настройте переменные среды, как указано ниже.
- Путь к исполняемым файлам Elasticsearch:
ES_HOME: C:\Program Files\Elasticsearch\elasticsearch\elasticsearch-<8.XX.X> - Путь к JDK (требуется версия, совместимая с текущей версией Elasticsearch):
ES_JAVA_HOME: C:\Program Files\Elasticsearch\elasticsearch-<8.XX.X>\jdk - Папка с файлами конфигурации:
ES_PATH_CONF: C:\Program Files\Elasticsearch\elasticsearch-<8.XX.X>\config - Папка с файлами журналов:
SERVICE_LOG_DIR: C:\ProgramData\Elasticsearch\elasticsearch-<8.XX.X>\logs - Директива для автоматического запуска службы:
ES_START_TYPE: auto
2.4. Настройте службу Elasticsearch с помощью файла конфигурации elasticsearch.yml
Можно скопировать его содержимое из раздела «Пример типового файла конфигурации Elasticsearch».
2.5. Зарегистрируйте службу Elasticsearch, выполнив следующую команду: "C:\Program Files\Elasticsearch\elasticsearch-<8.XX.X>\bin\elasticsearch-service.bat" install
2.6. Запустите службу Elasticsearch, выполнив следующую команду: "C:\Program Files\Elasticsearch\elasticsearch-<8.XX.X>\bin\elasticsearch-service.bat" start
2.7. Сформируйте пароль для пользователя Elasticsearch с помощью следующей команды: "C:\Program Files\Elasticsearch\elasticsearch-<8.XX.X>\bin\elasticsearch-reset-password.bat" –u elastic
2.8. Сохраните пароль, который отобразится на экране.
Примечание. Если пароль не отобразился, но отобразилось сообщение с предложением нажать клавишу «Y» для просмотра пароля, нажмите клавишу «Y».
2.9. Убедитесь, что служба Elasticsearch успешно зарегистрирована и работает с помощью приложения «Службы» (services.msc):

Сведения о службе Elasticsearch в приложении «Службы»
2.10. Если служба Elasticsearch не запустилась:
- проверьте ошибки конфигурации в журнале Elasticsearch по пути
C:\ProgramData\Elasticsearch\elasticsearch-<8.XX.X>\logs(указанном в переменной окружения средыSERVICE_LOG_DIR). - устраните ошибки, запустите службу и проверьте работоспособность службы, как указано в параграфе 8.
3. Подключение к Elasticsearch при развертывании экземпляра продукта
3.1. Перед созданием экземпляра продукта укажите адрес сервера Elasticsearch, который будет использоваться по умолчанию для новых экземпляров продукта, в конфигурации Утилиты администрирования Comindware. См. документ «Утилита администрирования Comindware. Установка и использование».

Настройка стандартного адреса сервера Elasticsearch
3.2. Если не указать адрес сервера Elasticsearch в конфигурации Утилиты администрирования, то его потребуется указать при развертывании экземпляра продукта.
3.3. Укажите адрес сервера и префикс индекса Elasticsearch для данного экземпляра Comindware Business Application Platform.

Настройка адреса сервера Elasticsearch для экземпляра продукта
3.4. После развертывания экземпляра продукта в разделе «Администрирование системы» — «Подключения» будет отображаться настроенное подключение к Elasticsearch.

Подключение к Elasticsearch в новом экземпляре продукта
3.5. Чтобы изменить свойства подключения к Elasticsearch, дважды нажмите его строку в списке подключений.
3.6. Отобразится окно «Свойства подключения: Elasticsearch».
3.7. При необходимости измените свойства подключения, проверьте соединение и нажмите кнопку «Сохранить».

Настройка свойств подключения к Elasticsearch
3.8. После изменения свойств сервера Elasticsearch перезапустите экземпляр продукта с помощью Утилиты администрирования Comindware. См. документ «Утилита администрирования Comindware. Установка и использование».
4. Пример типового файла конфигурации Elasticsearch
Ниже приведен пример файла elasticsearch.yml для следующей конфигурации сервера:
- сервер Elasticsearch состоит из единственного узла;
- служба работает в локальной сети;
- включена аутентификация;
- служба доступна через порт
9201; - адрес сервера
http://testhost:9201; - путь к файлу конфигурации:
C:\Program Files\Elastic\Elasticsearch\<8.XX.X>\config\elasticsearch.yml
#Начало файла конфигурации#Разрешить свопинг памятиbootstrap.memory_lock: false
#Название кластераcluster.name: cmw
#Максимальное возможное количество шардов в кластере#Система создает отдельный индекс для каждого объекта мониторинга, поэтому рекомендуется увеличить количество шардов до 3000cluster.max_shards_per_node: 3000
#Стандартный номер порта 9200 изменен по соображениям безопасностиhttp.port: 9201
#Сетевые параметры#Если доступ по сети не требуется, то закомментируйте строки #network.host и discovery.seed_hosts#Замените имя компьютера — testhost — на реальное имяnetwork.host: testhostdiscovery.seed_hosts:- testhost
#Простейшая конфигурация с одним узломdiscovery.type: single-node
#Название узлаnode.name: cmw
#Путь к папке с даннымиpath.data: d:\ProgramData\Elasticsearch\elasticsearch-<8.XX.X>\data
#Путь к папке с журналамиpath.logs: d:\ProgramData\Elasticsearch\elasticsearch-<8.XX.X>\logs
#Путь к папке с резервными копиями#Путь должен указывать на существующий диск#Резервные копии должны храниться на отдельном диске отдельно от #основных данных#Раскомментируйте директиву path.repo, если требуется создавать резервные копии#path.repo: d:elastic_backup
#Обычная лицензияxpack.license.self_generated.type: basic
#Аутентификация включенаxpack.security.enabled: true
#Этот флаг требуется для записи данных в индексыindices.id_field_data.enabled: true
#отключить геолокациюingest.geoip.downloader.enabled: false
К началу
Last Updated :
07 May, 2024
Elasticsearch is a powerful distributed search and analytics engine that is widely used for various applications, including log analytics, full-text search, and real-time analytics.
In this article, we will learn about the installation process of Elasticsearch on different platforms, including Windows, macOS, and Linux. We’ll cover all the necessary steps to set up Elasticsearch and verify its installation with some basic commands.
What is Elasticsearch?
- Elasticsearch is a distributed, RESTful search and analytics engine designed for horizontal scalability, reliability, and real-time search capabilities. It is built on top of the Apache Lucene library and provides a simple, JSON-based query language that allows us to store, search, and analyze large volumes of data quickly and in near real-time.
- Elasticsearch is designed to be distributed, allowing us to scale horizontally by adding more nodes to our cluster to handle large amounts of data and traffic.
- Elasticsearch provides a RESTful API that allows us to interact with the cluster using simple HTTP requests.
- Elasticsearch provides a rich query language based on JSON that allows us to perform complex queries, aggregations, and filters on our data.
Prerequisites
Before installing Elasticsearch, make sure you have the following prerequisites:
- Java Runtime Environment (JRE) version 8 or higher installed on your system.
- Sufficient memory and disk space available for Elasticsearch to run efficiently.
Elasticsearch Installation on Windows
Step 1: Download Elasticsearch
- Visit the official Elasticsearch website (https://www.elastic.co/downloads/elasticsearch) and download the Elasticsearch ZIP package for Windows.
Step 2: Extract the ZIP package
- Extract the downloaded ZIP package to a directory of your choice. For example C:\elasticsearch.
Step 3: Configure Elasticsearch (Optional)
- Open the config/elasticsearch.yml file and configure Elasticsearch settings if needed. We can adjust parameters like cluster name, node name, network host etc.
Step 4: Start Elasticsearch
Open a command prompt with administrative privileges.
Navigate to the Elasticsearch directory (C:\elasticsearch).
Run the following command to start Elasticsearch:
bin\elasticsearch.bat
Elasticsearch Installation on macOS
Step 1: Download Elasticsearch
Visit the official Elasticsearch website (https://www.elastic.co/downloads/elasticsearch) and download the Elasticsearch TAR package for macOS.
Step 2: Extract the TAR package
Open Terminal and navigate to the directory where the TAR package was downloaded.
Extract the TAR package using the following command:
tar -xzvf elasticsearch-{version}-darwin-x86_64.tar.gz
Step 3: Configure Elasticsearch (Optional)
Navigate to the config directory inside the extracted Elasticsearch directory.
Edit the elasticsearch.yml file to configure Elasticsearch settings if needed.
Step 4: Start Elasticsearch
Open Terminal and navigate to the Elasticsearch directory.
Run the following command to start Elasticsearch:
./bin/elasticsearch
Elasticsearch Installation on Linux (Ubuntu/Debian)
Step 1: Download and Install Java
Install Java Runtime Environment (JRE) if not already installed:
sudo apt update
sudo apt install default-jre
Step 2: Download Elasticsearch
Visit the official Elasticsearch website (https://www.elastic.co/downloads/elasticsearch) and download the Elasticsearch DEB package for Ubuntu/Debian.
Step 3: Install Elasticsearch
Install the downloaded DEB package using the following command:
sudo dpkg -i elasticsearch-{version}-amd64.deb
Step 4: Configure Elasticsearch (Optional)
Edit the /etc/elasticsearch/elasticsearch.yml file to configure Elasticsearch settings if needed.
Step 5: Start Elasticsearch
Start the Elasticsearch service using the following command:
sudo systemctl start elasticsearch
Verify Installation
After starting Elasticsearch, you can check its status to ensure that it’s running properly.
Check Elasticsearch Status For Windows:
- For Windows: Open a web browser and navigate to http://localhost:9200.
- For macOS/Linux: Run the following command in Terminal:
curl -XGET http://localhost:9200
Check Elasticsearch Logs
- For Windows: Navigate to the logs directory inside the Elasticsearch installation directory (e.g., C:\elasticsearch\logs) and open the log files using a text editor.
- For macOS/Linux: View the logs using the tail command:
tail -f /var/log/elasticsearch/{cluster_name}.log
Conclusion
Overall, we covered the installation process of Elasticsearch on Windows, macOS, and Linux platforms. We walked through the steps to download, extract, configure, and start Elasticsearch, along with verifying the installation using basic commands. By following these instructions, you should now have Elasticsearch up and running on your system, ready to be used for various search and analytics tasks.