
Общие сведения:
Эта статья — пошаговая инструкция по установке драйвера USB-UART преобразователя на чипе CH340 для операционной системы Window 10.
Внимание! Для установки драйверов необходимы права администатора. Зайдите от имени пользователя с правами администратора или попросите администатора компьютера дать повышенные права аккаунту, от имени которого будет производиться установка драйвера.
Драйвер — исполняемая программа-модуль, предоставляющая интерфейсы высокого уровня для управления устройствами на низком уровне.
Шаг 1. Подключение устройства.
Подключите устройство с USB-UART перобразователем к персональному компьютеру. Если компьютер не подключён к сети интернет или на нём не работает Windows Update, то драйвера для USB-UART преобразователя придётся установить вручную.
Шаг 2. Диспетчер устройств.
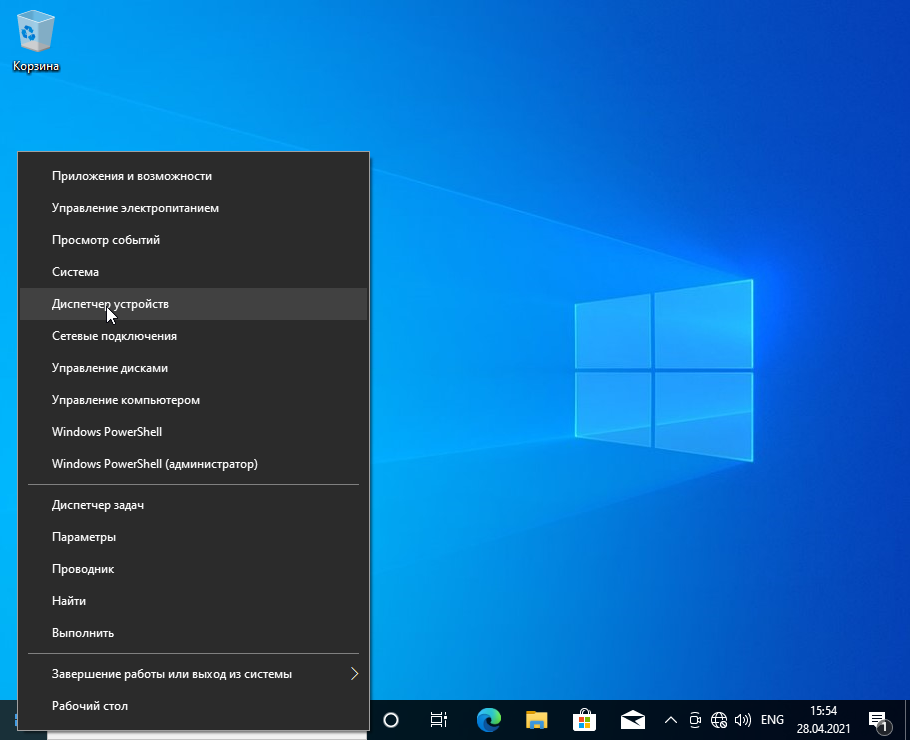
Нажмите правой клавишей мыши на кнопку с логотипом Windows в левом нижнем углу и нажмите на пункт «Диспетчер устройств» в открывшемся меню.
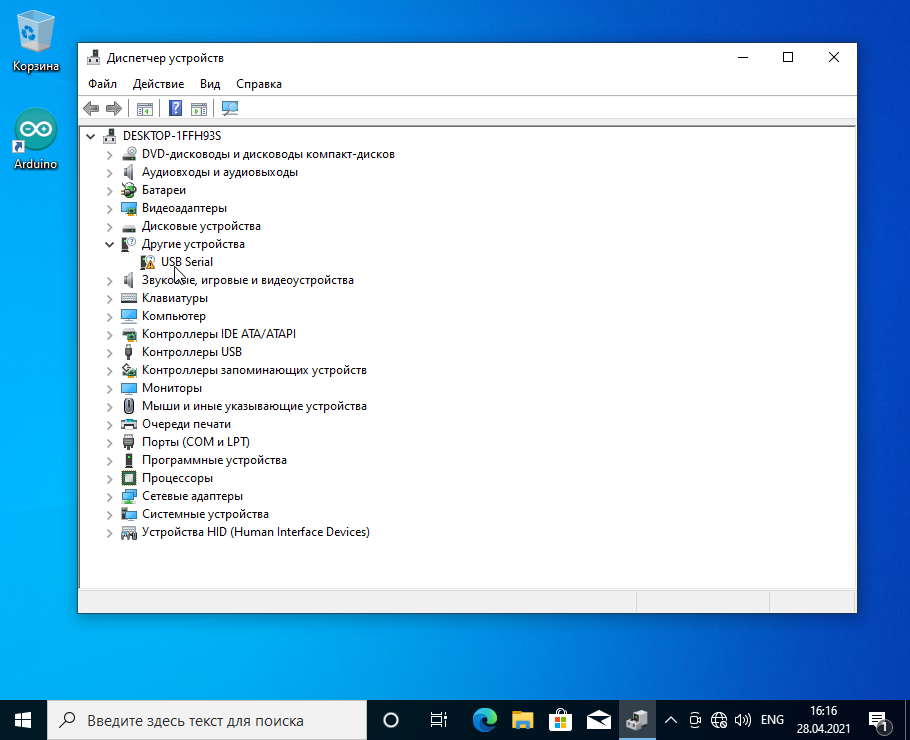
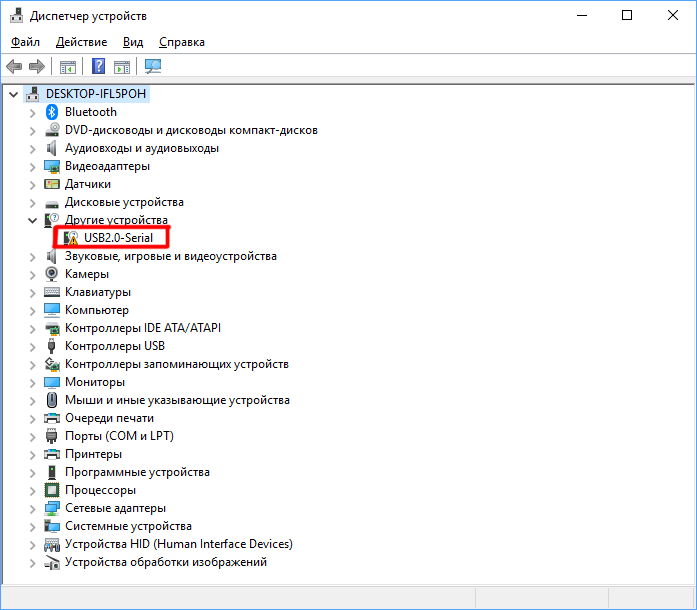
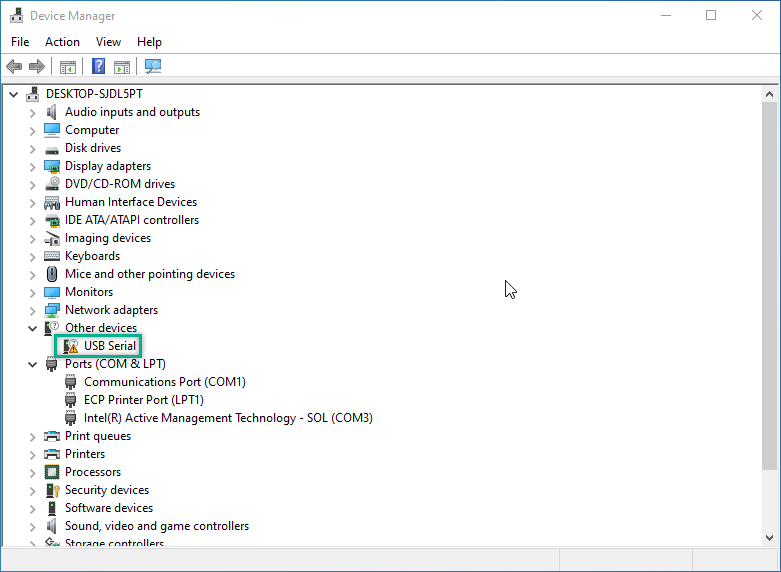
Откроется окно Диспетчера устройств, в нём должен быт пункт «Другие устройства -> USB Serial» с пиктограммой в виде жёлтого треугольника с восклицательным знаком.
Шаг 3. Скачивание драйвера.
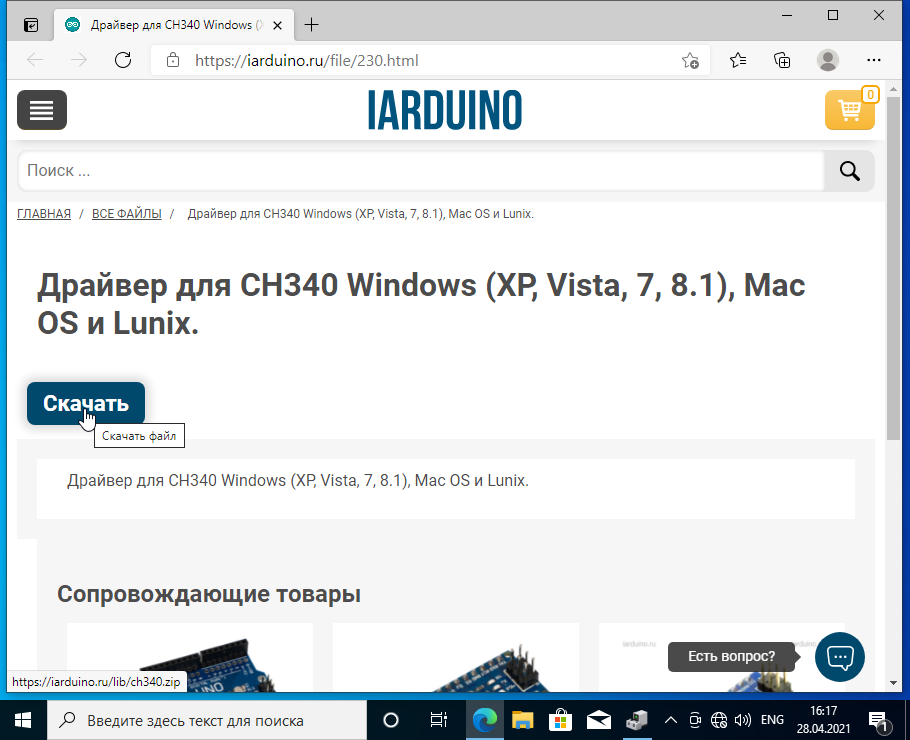
Нажмите на эту ссылку и скачайте драйвер, нажав на кнопку скачать.
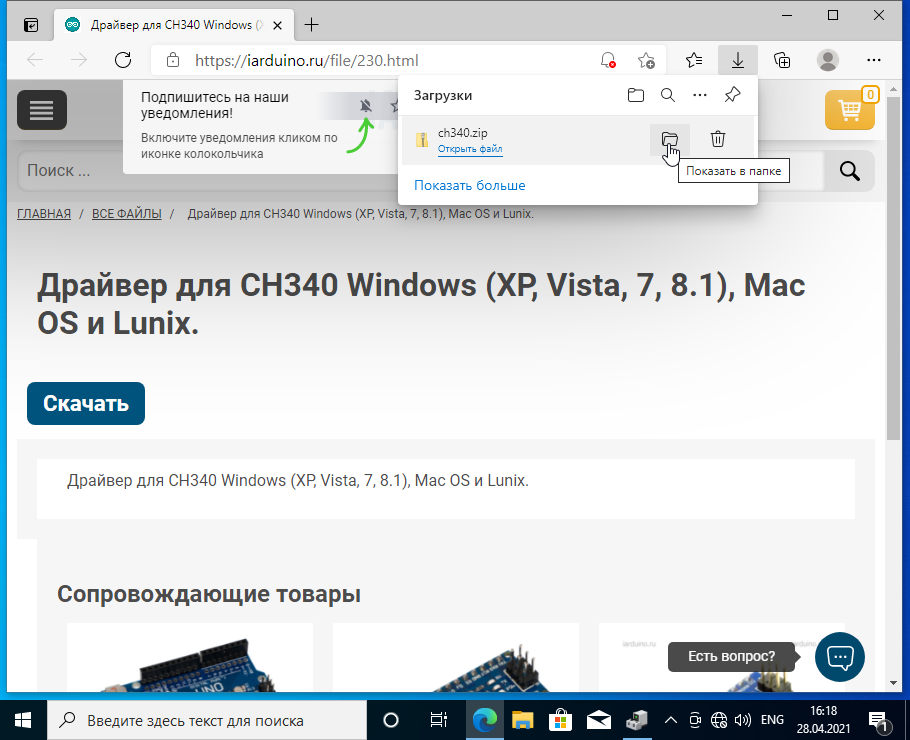
После того как файл скачался, нажмите на иконку «Показать в папке» в окне загрузок.
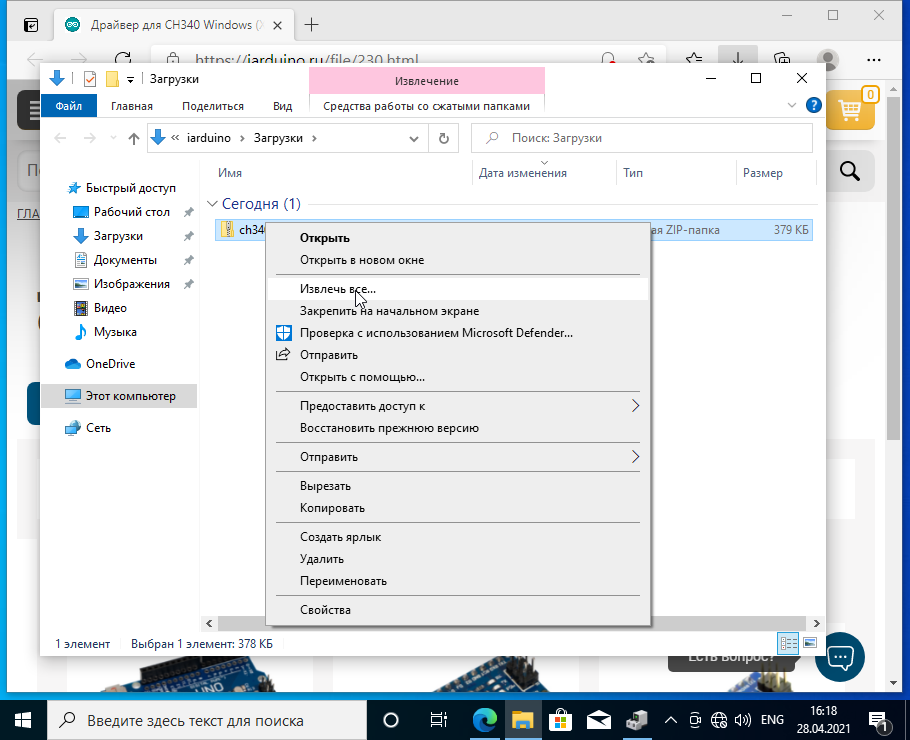
Откроется окно Windows Explorer. Нажмите на только что скачанный файл правой клавишей мыши и выбирите пункт «Извлечь все…» из меню.
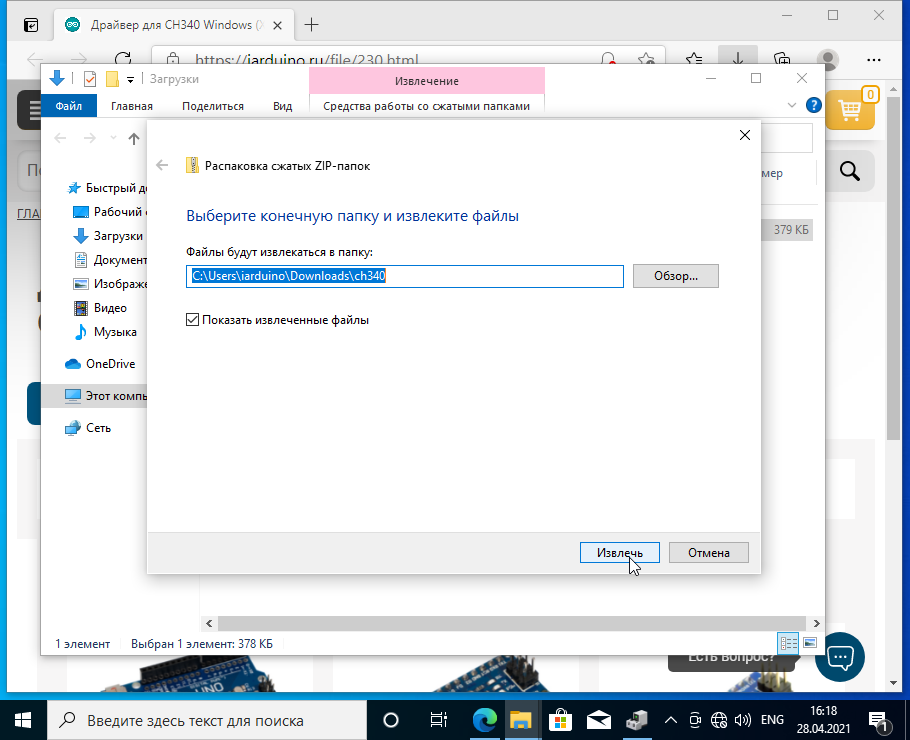
Во вновь открывшемся окне нажмите «Извлечь«. Убедитесь, что стоит галочка слева от фразы «Показать извлечённые файлы».
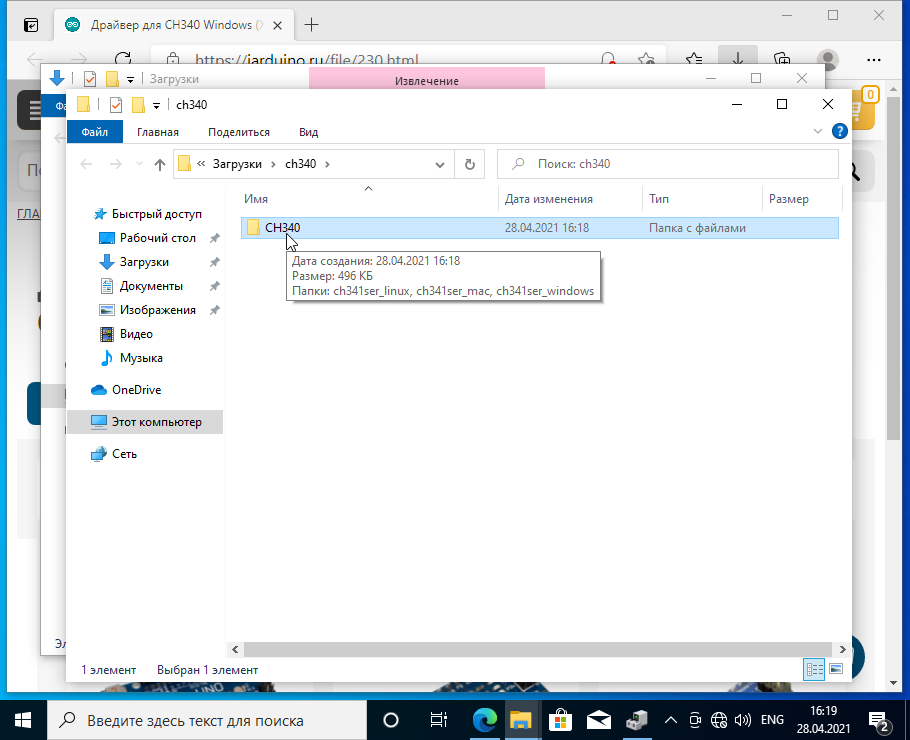
Откроется окно Windows Explorer с распакованными файлами драйверов. Откройте папку CH340.
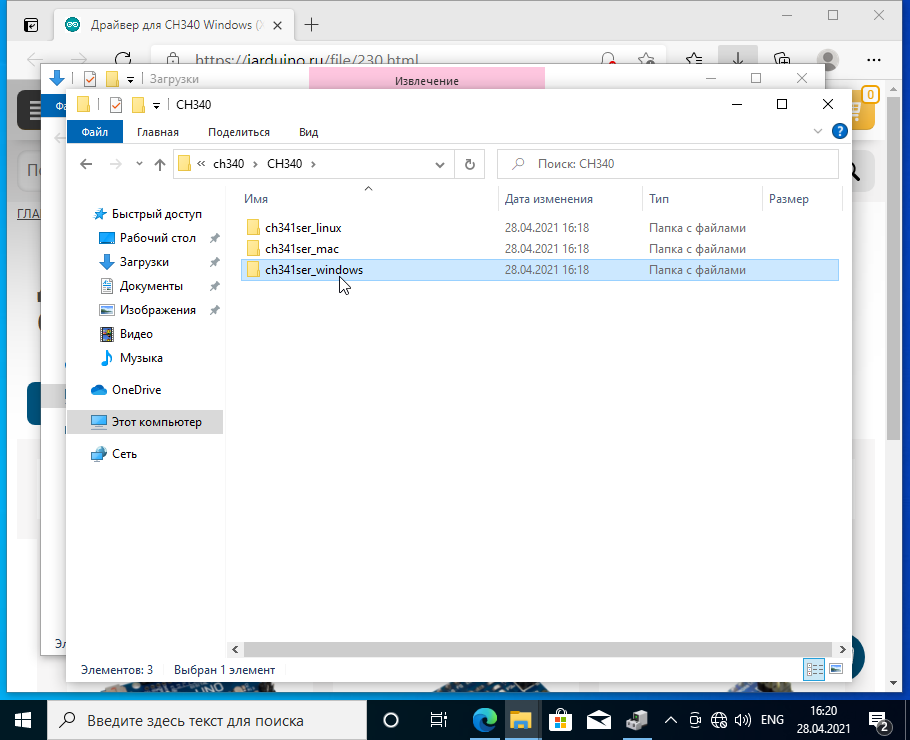
Откройте папку ch341ser_windows
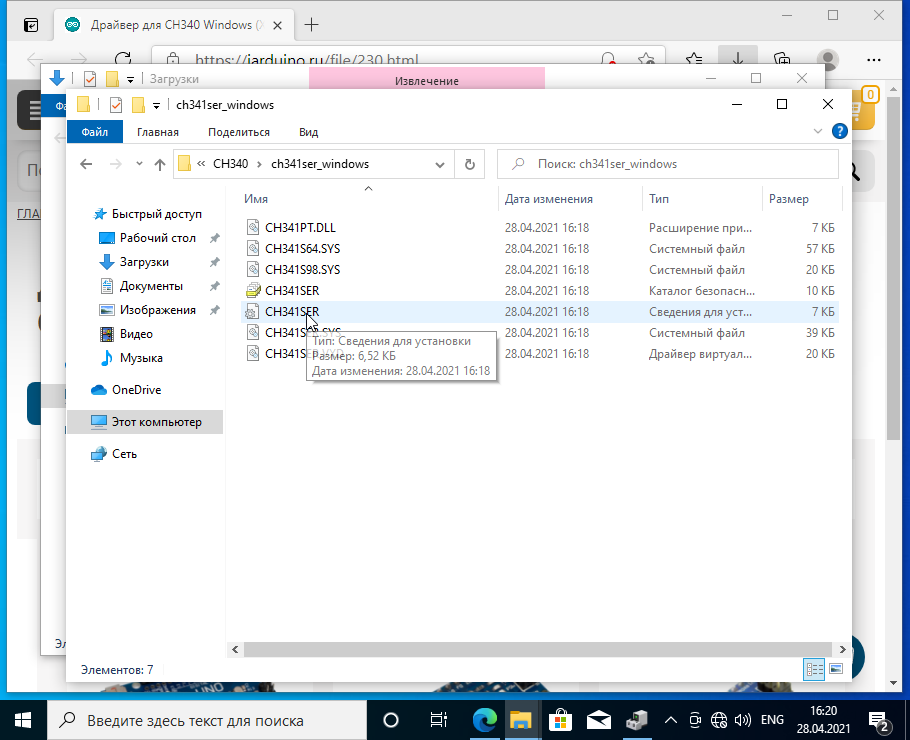
В папке находится файл сведений для установки CH341SER.INF. Если Ваша система настроена не отображать расширения известных типов файлов, то распознать этот файл можно по иконке с одной шестерёнкой и всплывающей подсказке при наведении на него. Подсказка должна выглядеть как на рисунке.
Шаг 4. Установка драйвера.
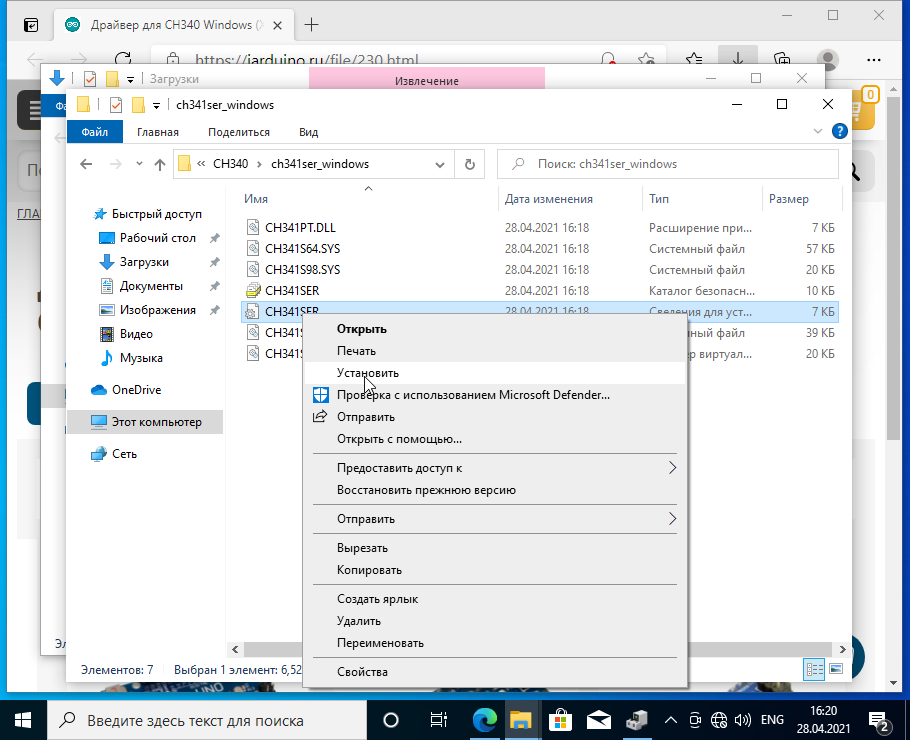
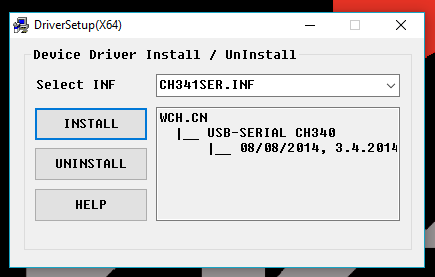
Нажмите правой клавишей мыши на файл CH341SER.INF и выберете из меню пункт «Установить«.
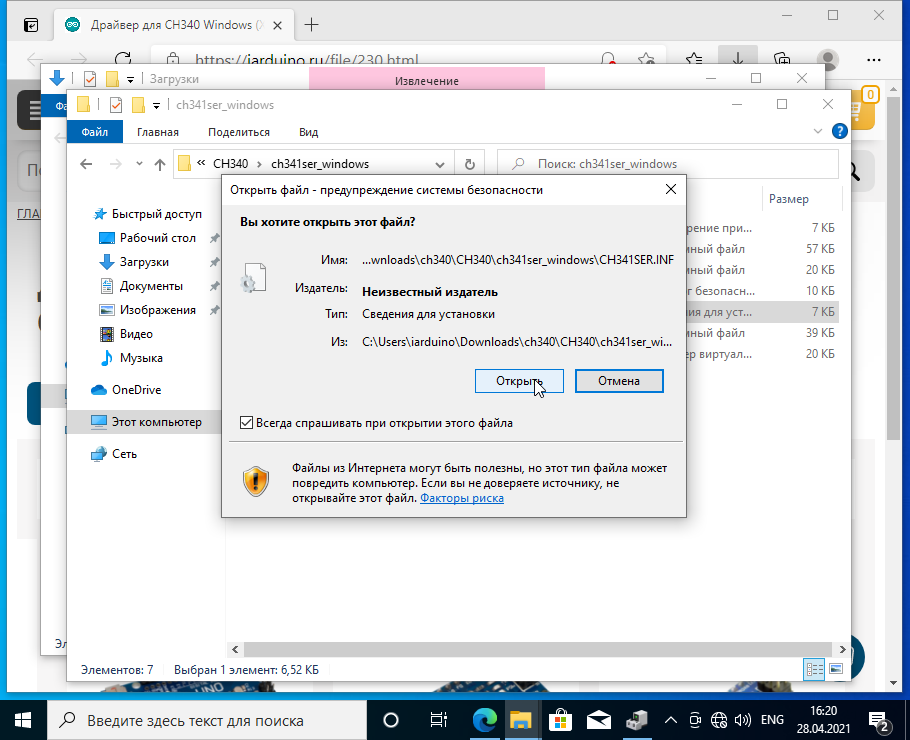
Во вновь открывшемся окне нажмите «Открыть«.
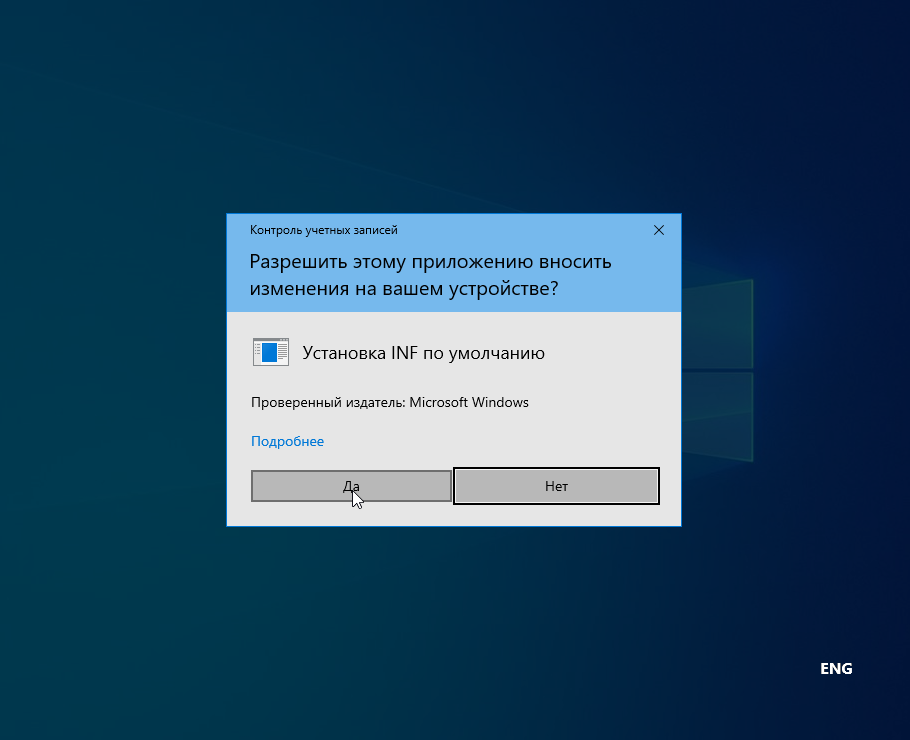
Нажмите «Да».
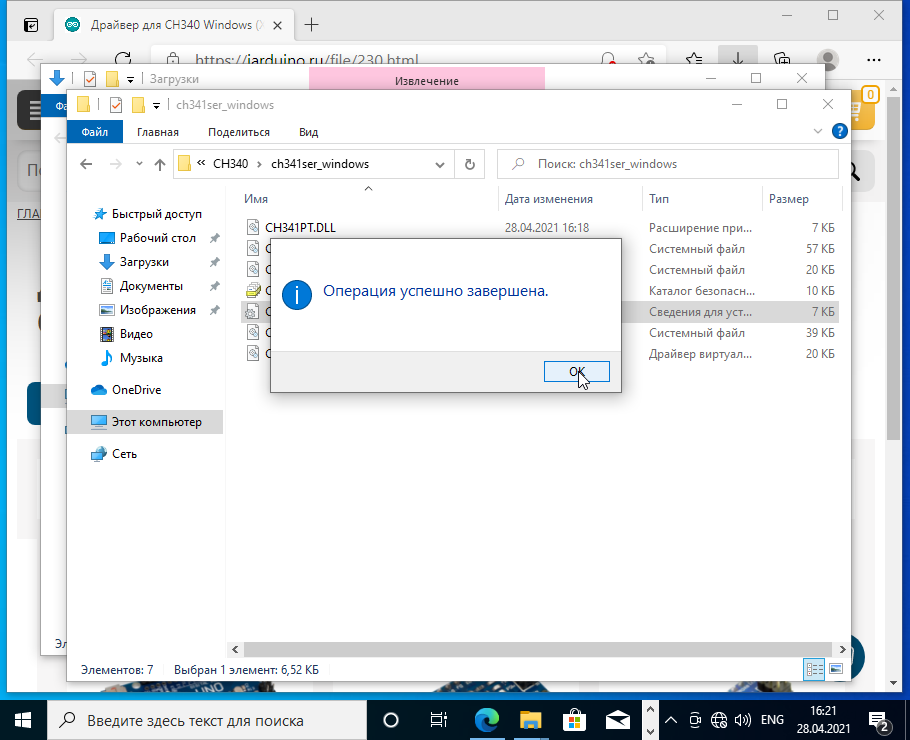
После завершения установки нажмите «OK».
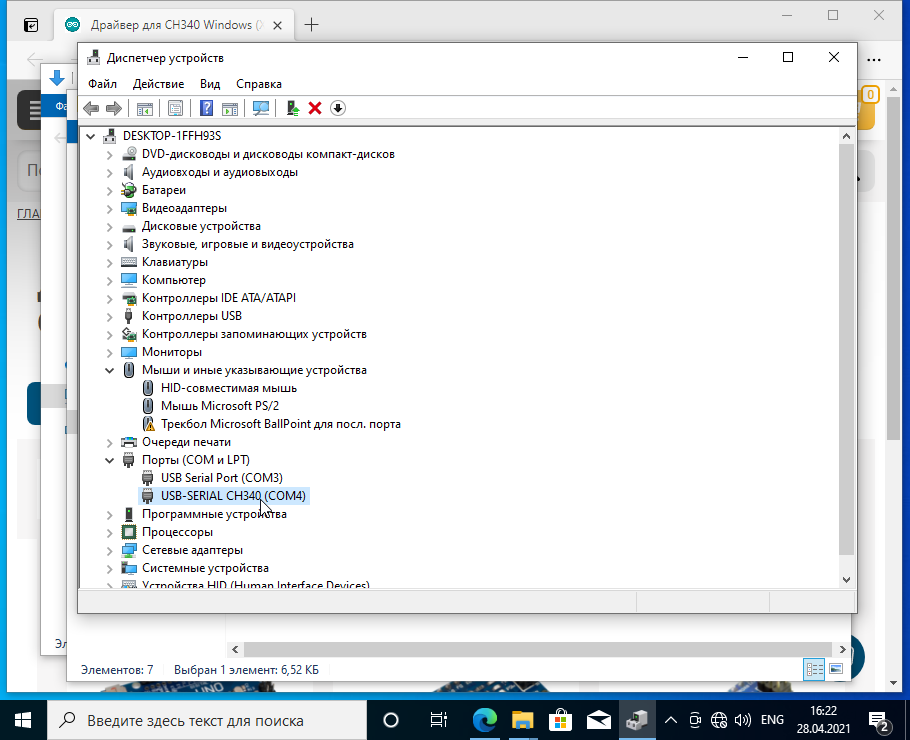
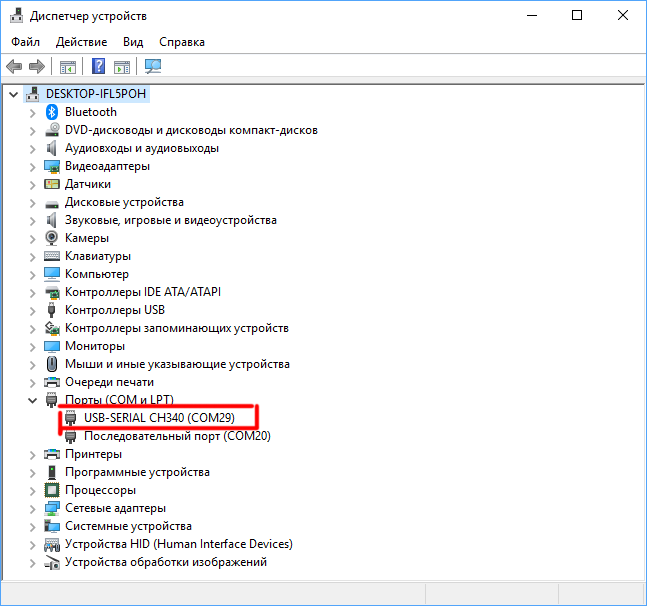
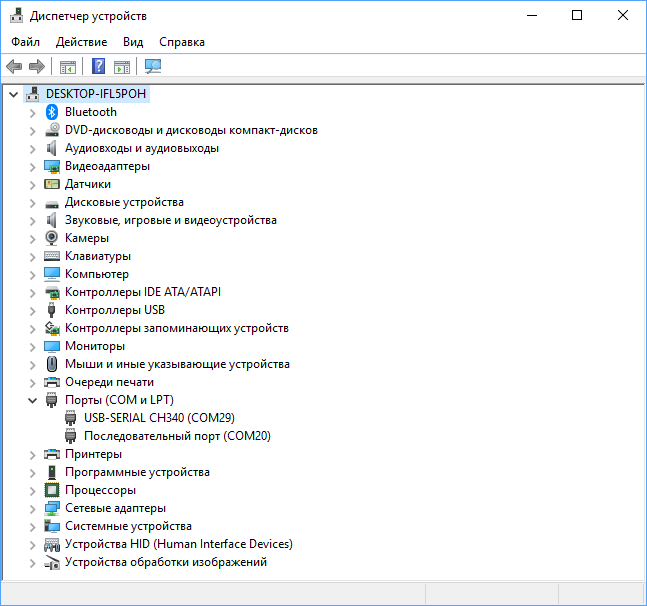
В Диспетчере устройств, в разделе «Порты (COM и LPT)» должен появиться новый виртуальный COM-порт «USB-SERIAL CH340«.
Шаг 5. Проверка.
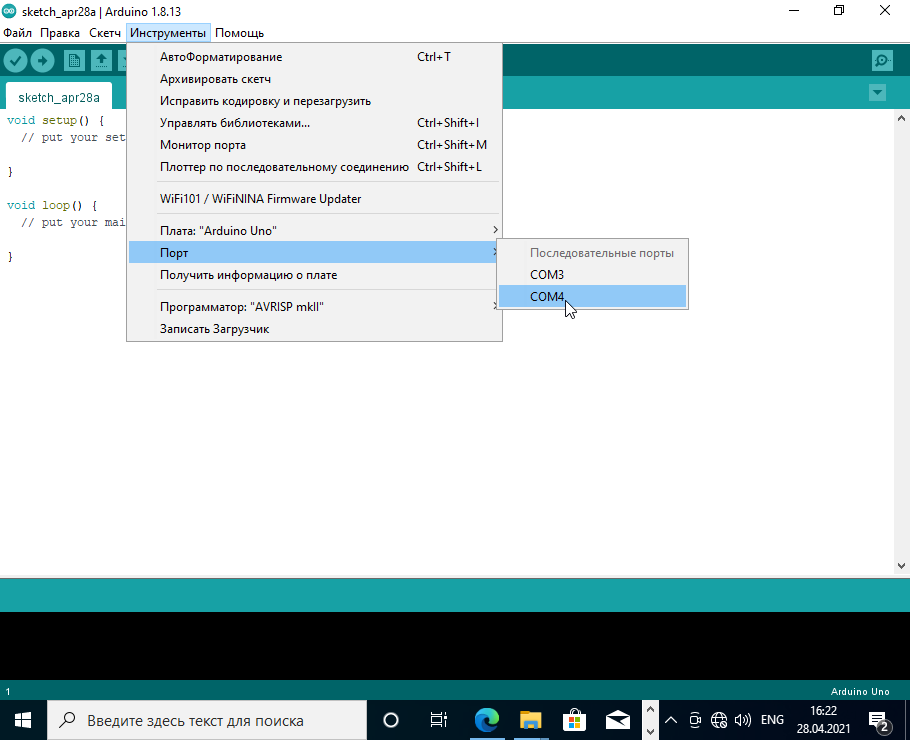
После установки драйвера откройте Arduino IDE и убедитесь, что появился новый виртуальный COM-порт.
При подключении платформ разработки на базе Arduino к компьютеру, вы связываете между собой два мира: микроконтроллерный и микропроцессорный.
Стандартным интерфейсом плат Arduino на микроконтроллерах ATmega328P является UART, а у современных компьютеров используется USB. Чип USB-UART CH340G служит мостом между микроконтроллером и USB-портом компьютера, который позволяет загружать прошивку в плату, а также передавать между собой данные.
Список поддерживаемых плат
Зачем нужен драйвер?
При подключении любого устройства к USB-порту компьютера необходимо подсказать операционной системе, как с ним общаться. На стороне компьютера таким переводчиком является специальная программа, называемая драйвером. Например, драйвер преобразователя USB-UART работает в режиме эмуляции последовательного COM-порта. Т. е. при подключении вашей платы к компьютеру чип моста с помощью драйвера попросит операционную систему открыть виртуальный COM-порт, через который начнётся общение между платой и ПК.
Каждый производитель делает свои чипы с соответствующими драйверами. К сожалению, не все драйверы предустановлены в операционных системах по умолчанию. Когда нужного драйвера нет, ОС пытается найти его для нового подключённого устройства, не находит, и вместо виртуального COM-порта вы видите надпись «USB 2.0 SERIAL» или «Неизвестное устройство». Для решения проблемы скачайте и установите драйвер CH340 для вашей операционной системы.
Установка драйвера
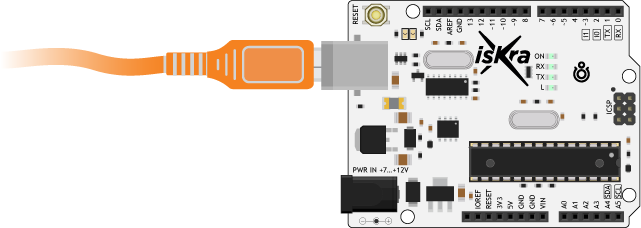
Рассмотрим установку драйвера на примере платы Iskra Uno в операционной системе Windows. С остальными платами ситуация будет аналогичная.
-
Подключите плату к компьютеру по USB. Для коммуникации используйте кабель USB (A — B).

-
Установите и настройте интегрированную среду разработки Arduino IDE.
-
Откройте диспетчер устройств Windows и раскройте вкладку «Порты (COM и LPT)».
-
Если во вкладке отображается пункт
USB-SERIAL CH340 (COMx)— значит, всё получилось, и можно переходить к прошивке платформы.
-
Если пункта не обнаружено или вкладка «Порты (COM и LPT)» вовсе отсутствует, следуйте дальнейшей инструкции.
-
-
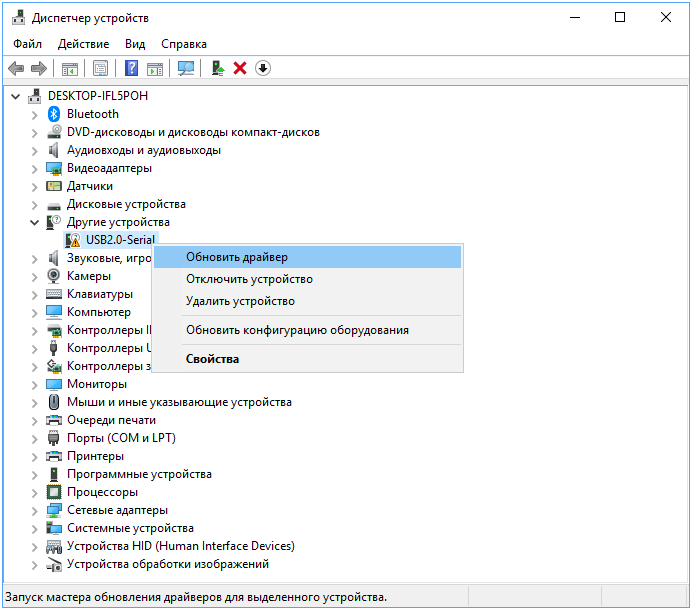
В диспетчере устройств Windows раскройте вкладку «Другие устройства» и найдите пункт
USB2.0-Serial.
-
Далее кликните правой кнопкой мыши по пункту
USB 2.0 Serialи выберите раздел «обновить драйвер».
-
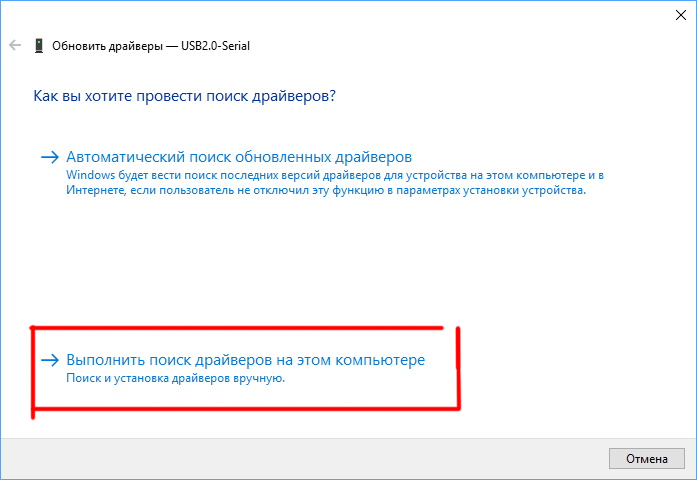
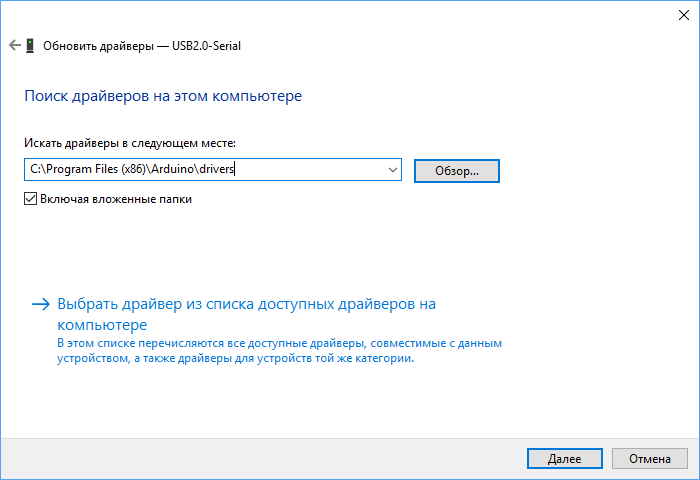
Выберите пункт «Выполнить поиск драйверов на этом компьютере».
-
Укажите путь к директории драйвера и нажмите кнопку «установить». В нашем случае:
-
Если всплывёт окно с текстом «Не удалось проверить издателя драйверов», кликните по вкладке «Всё равно установить этот драйвер». По завершении процесса вы должны увидеть сообщение об удачной установке драйвера.
-
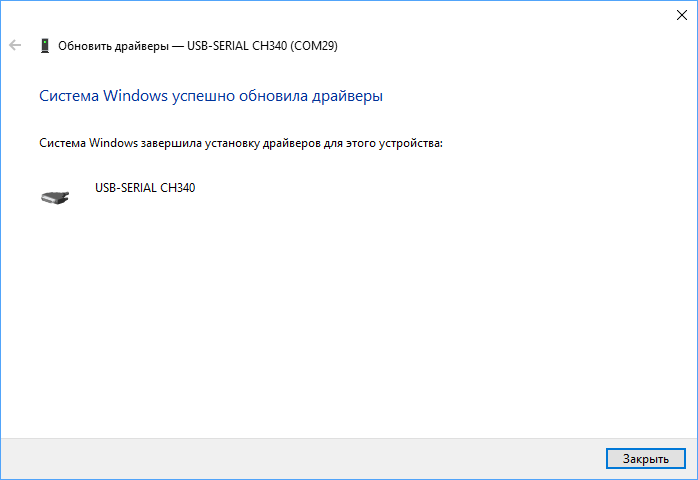
Откройте повторно вкладку «Порты (COM и LPT)» в диспетчере устройств. Если там отображается пункт
USB-SERIAL CH340 (COMx)— значит, всё получилось, и теперь можно переходить к прошивке платформы.
Ресурсы
-
Скачать драйвер CH340
Contributors:
bboyho, santaimpersonator
Introduction
In this tutorial, we’ll show you how to install CH340 drivers on multiple operating systems if you need. The driver should automatically install on most operating systems. However, there is a wide range of operating systems out there. You may need to install drivers the first time you connect the chip to your computer’s USB port or when there are operating system updates.
Watch a video walkthrough of this process
Required Materials
Depending on your application, the CH340 may be populated on a breakout or development board. Here are a few boards that use this particular USB-to-serial converter.
Accessories
You’ll also need the correct USB cable to connect the board to your computer. You may need a jumper wires and a breadboard for prototyping.
Suggested Reading
Before you begin this tutorial, you should have the Arduino IDE installed on your computer. Check out our Installing Arduino tutorial for a step by step guide.
Serial Communication
Asynchronous serial communication concepts: packets, signal levels, baud rates, UARTs and more!
Connector Basics
Connectors are a major source of confusion for people just beginning electronics. The number of different options, terms, and names of connectors can make selecting one, or finding the one you need, daunting. This article will help you get a jump on the world of connectors.
What is an Arduino?
What is this ‘Arduino’ thing anyway? This tutorials dives into what an Arduino is and along with Arduino projects and widgets.
Logic Levels
Learn the difference between 3.3V and 5V devices and logic levels.
Serial Terminal Basics
This tutorial will show you how to communicate with your serial devices using a variety of terminal emulator applications.
Alright, let’s get to work! You can visit the next section to learn more about the CH340 and why you need the drivers, or you can skip straight to the operating system of your choice!
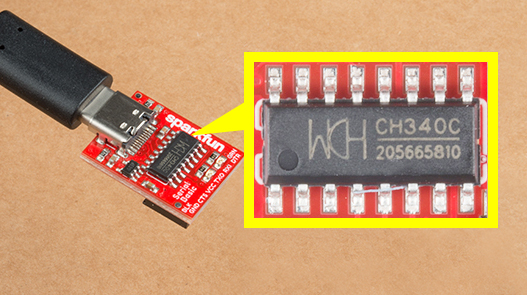
Meet the CH340
There are a few variants of the CH340. The CH340G requires an external crystal oscillator to function while the CH340C includes a built-in crystal oscillator. However, both function in the same fashion — they convert USB data for a serial UART and vice versa!
The CH340 is also populated on development boards such as the RedBoard Qwiic to upload code using the Arduino IDE.

Drivers (If You Need Them)
The CH340 has been tested on:
- Windows 7/10
- Mac OSX
- v10.10.5 (Yosemite)
- v10.11.6 (El Capitan)
- v10.13.0 (High Sierra)
- v10.14.5 (Mojave)
- Linux
- Raspbian Stretch (11-13-2018 release) for the Raspberry Pi
- Raspbian Buster (2019-07-10 release) for the Raspberry Pi
- Ubuntu v18.04.2, 64-bit
These operating systems have the CDC drivers pre-installed, which means you shouldn’t need to install any extra software. However, there are a wide range of operating systems out there, so if you run into driver problems, you can get the archived drivers linked below:
- Windows (EXE) — Driver executable
- Windows (ZIP) : Driver v3.4 (2016-09-27)
- Mac (ZIP) : Driver v1.5 (2018-07-04)
- Linux (ZIP) : Driver v1.5 (2018-03-18)
The CH340 is made by WCH. You can find the latest version of their drivers in their English translated website.
Note: At the time of writing, you were only able to find the latest version of their drivers from their website in Mandarin. If you use a Chrome web browser, you had the option to have the web page translated. However, you now have the option of browsing the WCH website in either language. For those interested in heading to the Mandirin side, you can click on the button below.
Updating Drivers
If you have the older CH340 drivers installed, you may need to update them. In the following sections, are the instructions for doing so on each of the tested operating systems.
Windows 7/10
Note for Educators: You will need to obtain administrative privileges from your network or IT administrator in order to install these drivers. Make sure to test the drivers before class and set aside some time with students in the classroom when installing the drivers.
Download and run the executable.
Click the «Uninstall» button first. Then click on the «Install» button.
Windows CH340 Driver Installation
Driver Verification for Windows
To verify that your driver is working, you should see a difference in the following pictures after plugging the CH340 to a USB port.
Device Manager
To check that the CH340 enumerates to a COM port, you can open the device manager. You can click the Start or ⊞ (Windows) button and type «device manager to quickly search for the application.
Using the search on Windows 10 to look for the device manager.
After opening the device manager, you will need to open the Ports (COM & LPT) tree. The CH340 should show up as USB-SERIAL CH340 (COM##). Depending on your computer, the COM port may show up as a different number.
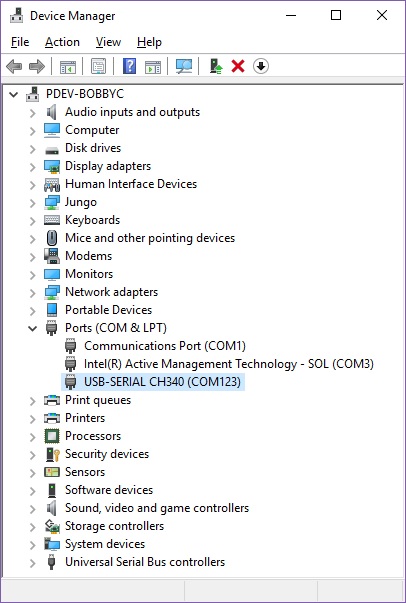
Screenshot of Window 10 Device Manager with a CH340 displayed on COM123. Click to enlarge.
Arduino IDE
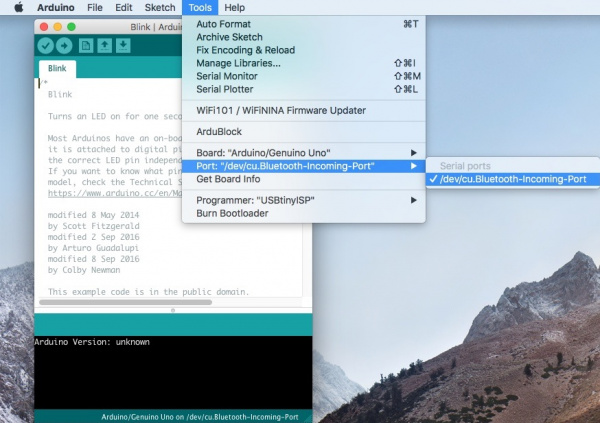
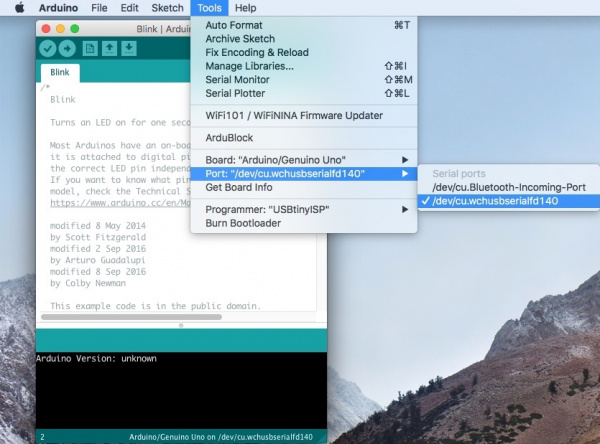
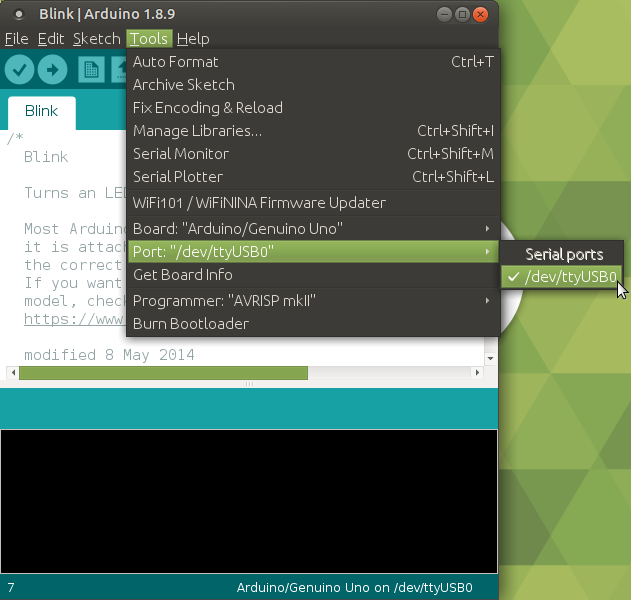
Alternatively, if you have the Arduino IDE installed, you should also see a change in the number of available COM Ports (you may need to restart the Arduino IDE for the board to populate). Without the CH340 connected to your computer, click on Tools > Port. Take note of the Serial Ports available.
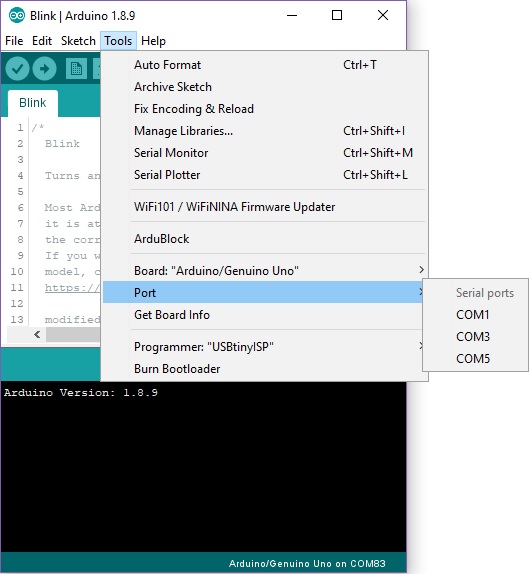
Connect the CH340 to your computer’s USB port. Click on somewhere else on the screen for the menu to refresh itself. Then head back to the menu by clicking on Tools > Port. A new COM port should pop up. By process of elimination, the CH340 should have enumerated to the new COM port! Feel free to click on the COM port to select if you are uploading code to a microcontroller. Depending on your computer, the COM port may show a different number.

Serial Loop Back Test
You can also verify if the USB-to-serial converter is working by doing a serial loop back test or echo test. If you are using the breakout board, you can add a jumper between the Tx and Rx to try and echo a character in a terminal program. For more information, try checking out the Hardware Test for the serial basic hookup guide.
Mac OSX
Note for Educators: You will need to obtain administrative privileges from your network or IT administrator in order to install these drivers. Make sure to test the drivers before class and set aside some time with students in the classroom when installing the drivers.
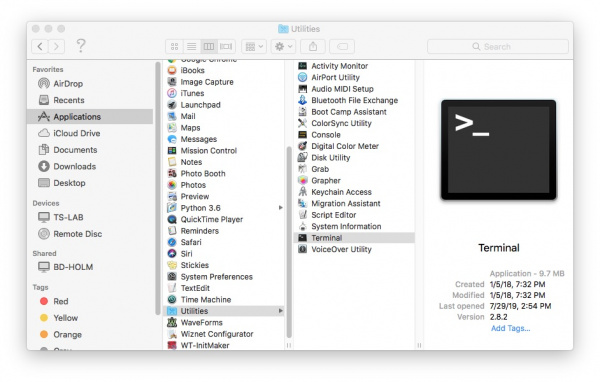
Open the Terminal program by selecting Go > Applications.
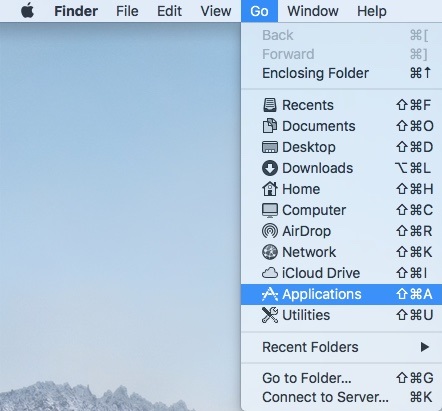
Select and open the Terminal program under Applications > Utilities > Terminal.
Note: You can also search with Spotlight by pressing ⌘ (Command) + space bar (Space Bar). Then type «Terminal» and double-click the search result.
If you are still unsure of how to access the Terminal, watch this video or read this Apple support article.
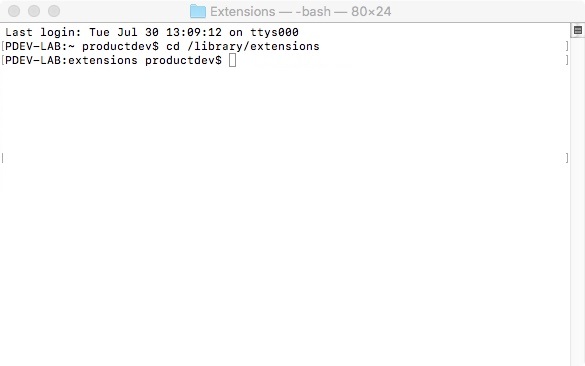
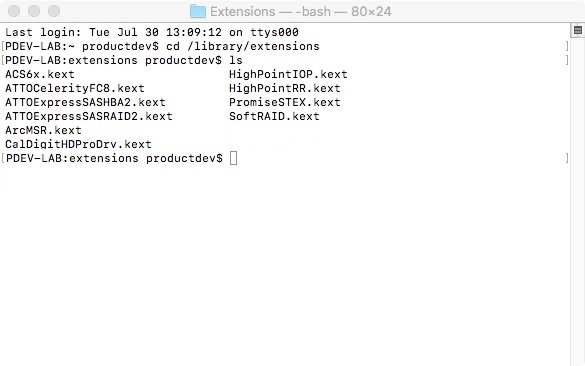
You’ll need to move to the directory where the *.kext files are stored.
-
For Mac OSX v10.9+, you will need to use this command:
language:bash cd /Library/Extensions -
For Mac OSX v10.8 and below, you will need to use this command:
language:bash
cd /System/Library/Extensions
In this case, we will be using Mac OSX v10.13, so we will need to use the first command.
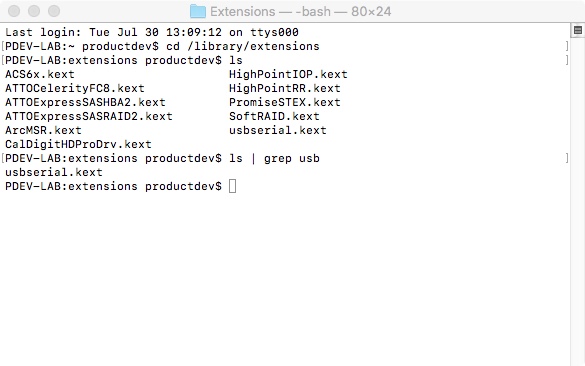
To check to see if the CH340 driver is in the correct path, use the following command to list the contents of the folder.
language:bash
ls
To look for CH340 driver files (i.e. usb.kext or usbserial.kext) in the path, you could use the following command.
language:bash
ls | grep usb
You should see something similar to the output below after using the commands.
If you have found the file in the path, you will need to run each of the following commands in the CLI/Terminal to remove old CH340 drivers. In this case, there was only the usbserial.kext file but it does not hurt to run both commands. Make sure to have administrative privileges to ensure that the drivers are removed.
language:bash
sudo rm -rf /Library/Extensions/usb.kext
sudo rm -rf /Library/Extensions/usbserial.kext
Check if the old drivers were removed in the paths by using the ls command with your respective OS version. You will notice that the *.kext file is removed from the respective paths. In this case, the usbserial.kext was removed from Mac OSX High Sierra.
language:bash
ls
Download and extract the folder.
Then, open the «*.pkg» file from the unzipped folder and follow the instructions. You’ll need to restart your computer for the changes to take effect.
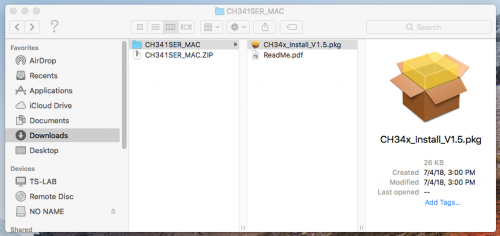
Mac OSX CH340 Driver Installation File
Driver Verification for Macs
To verify that your driver is working, you should see a difference in the following pictures after plugging the CH340 to a USB port.
Command Line
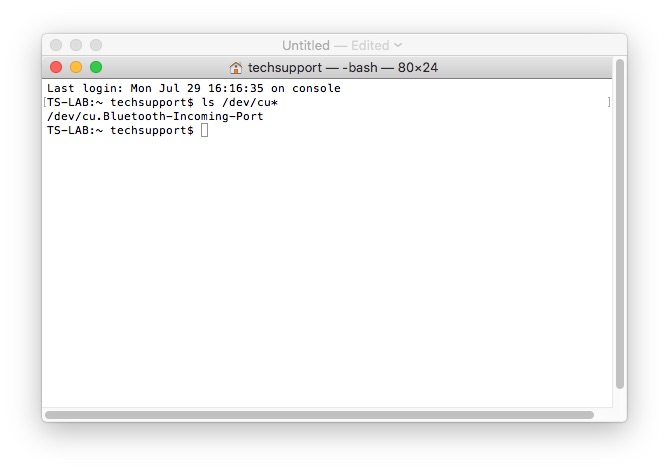
Open the Terminal by heading to Applications > Utilities > Terminal if the program is not open yet.
Then run the following command:
language:bash
ls /dev/cu*
A list of devices connected to your Mac’s COM ports will be displayed as a result. Assuming that the CH340 is not connected to your computer, you should see something similar to the image below.
Connect the CH340 to one of your Mac’s COM ports. Check for the following changes (your board may show up under a different device name). The CH340 should show up as /dev/cu.wchusbserial*****. Depending on your computer, the COM port may show up as a different number.
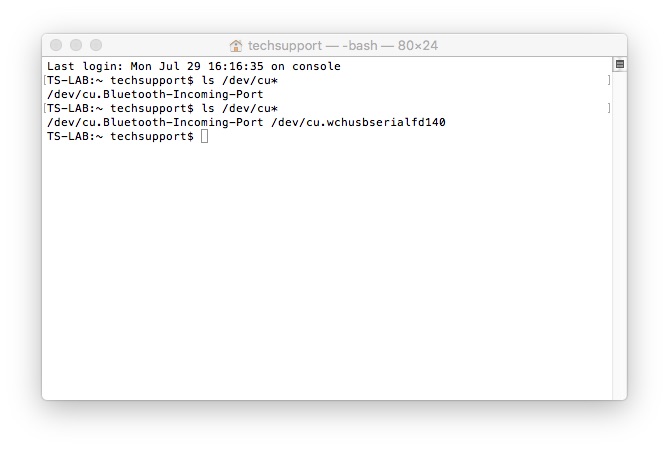
Screenshot of Mac OSX terminal with CH340 on cu.wchusbserialfd1410. Click to enlarge.
Arduino IDE
Alternatively, if you have the Arduino IDE installed, you should also see a change in the number of available COM Ports (you may need to restart the Arduino IDE for the board to populate). Without the CH340 connected to your computer, click on Tools > Port. Take note of the Serial Ports available.
Connect the CH340 to your computer’s USB port. Click on somewhere else on the screen for the menu to refresh itself. Then head back to the menu by clicking on Tools > Port. A new COM port should pop up. By process of elimination, the CH340 should have enumerated to the new COM port! Feel free to click on the COM port to select if you are uploading code to a microcontroller. Depending on your computer, the COM port may show a different number.
Serial Loop Back Test
You can also verify if the USB-to-serial converter is working by doing a serial loop back test or echo test. If you are using the breakout board, you can add a jumper between the Tx and Rx to try and echo a character in a terminal program. For more information, try checking out the Hardware Test for the serial basic hookup guide.
Linux
Note for Educators: You will need to obtain administrative privileges from your network or IT administrator in order to install these drivers. Make sure to test the drivers before class and set aside some time with students in the classroom when installing the drivers.
Raspbian for Raspberry Pi
Run the following commands in the CLI/Terminal when using Raspbian on a Raspberry Pi. After updating, the latest CH340 should be installed!
language:bash
sudo apt-get update
sudo apt-get upgrade
Other Linux Distributions
Here is a downloadable *.ZIP of standard CH340 drivers for Linux.
There are some reported cases of serial communication failure when using the factory drivers in Linux. If you encounter this problem, you can try installing patched drivers as explained in this forum post. Here are the steps (to run in the command line):
- Plug and unplug your CH340 device from the USB port
- Type
dmesgto see what has happened- The expected output (shows «ch341») should have the following in the recent log:
[  xxx] ch341-uart ttyUSB0: ch341-uart converter now disconnected from ttyUSB0
[ xxx] ch341 3-2:1.0: device disconnected- Download the patched drivers repository and unzip the files
cdinto the directory where the files are savedmake cleanmakesudo make loadsudo rmmod ch341to uninstall the broken driverlsmod | grep ch34to list what modules are currently installed- Plug and unplug your CH340 device again on the USB port
dmesg- Expected output (should show «ch34x» now):
[  xxx] ch34x ttyUSB0: ch34x converter now disconnected from ttyUSB0
[  xxx] ch34x 3-2:1.0: device disconnected
Depending on your root permissions, you may need to configure the serial port with the following two commands. Make sure to adjust the $username with respect to the user ID that is currently logged in.
language:bash
sudo usermod -a -G dialout $username
sudo chmod a+rw /dev/ttyUSB0
Driver Verification for Linux
Command Line
Plug the CH340 back to your computer’s USB port. Then run the following command in the CLI/Terminal on any Linux distribution. Check for the following changes (your board may show up under a different device name).
language:bash
ls /dev/ttyUSB*
The serial port that CH340 is connected to should pop up as a result.
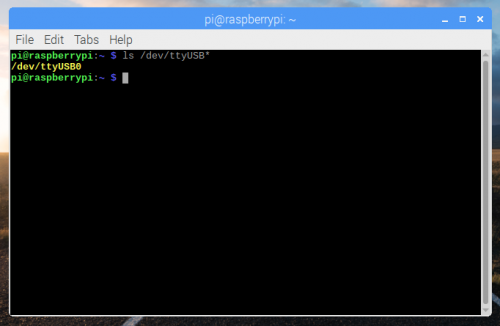
Screenshot of Raspberry Pi CLI with the CH340 on ttyUSB0. Click to enlarge
Arduino IDE
Alternatively, if you have the Arduino IDE installed, you should also see a change in the number of available COM Ports (you may need to restart the Arduino IDE for the board to populate). Without the CH340 connected to your computer, click on Tools > Port. Depending on the Linux flavor that you have, the Ports may not open to display any serial ports. Take note of the Serial Ports available if it opens up.

Connect the CH340 to your computer’s USB port. Click on somewhere else on the screen for the menu to refresh itself. Then head back to the menu by clicking on Tools > Port. A new COM port should pop up. By process of elimination, the CH340 should have enumerated to the new COM port! Feel free to click on the COM port to select if you are uploading code to a microcontroller. Depending on your computer, the COM port may show a different number.
Serial Loop Back Test
You can also verify if the USB-to-serial converter is working by doing a serial loop back test or echo test. If you are using the breakout board, you can add a jumper between the Tx and Rx to try and echo a character in a terminal program. For more information, try checking out the Hardware Test for the serial basic hookup guide.
Troubleshooting
COM Port is Not Showing Up as CH340 Windows
We have had a few reports on Windows 10 where the driver will automatically install and the board will show up under a new COM port as USB-Serial CH340, but with a different device name. However, the board cannot be accessed on the Arduino IDE. Others have had issues where the installation process hangs.
Based on the customer experiences, this might be specific to the manufacturer and are usually isolated cases. Users seem to be able to eventually get the board recognized by a combination of giving the computer time to finish the install (close to 20 min), plugging the board back in multiple times, reinstalling the drivers, and/or resetting the computer multiple times (repeat both steps).
COM Port Not Available Windows, Mac, and Linux
If you installed the drivers for the CH340 on your computer but have issues connecting via serial terminal or uploading code using the Arduino IDE, there may be an issue with your user settings preventing you from using the CH340. You may receive an avrdude: ser_open(): can't open device error similar to the output shown below.
language:bash
avrdude: ser_open(): can't open device "/dev/ttyUSB0": No such file or directory
In this case, the error appeared on a Linux when trying to upload code due to the drivers not being installed and the root permissions.

Make sure to check your configuration settings and ensure that the serial port for the CH340 is enabled for your OS. You may also need to reinstall the drivers for your operating system.
USB Cable Windows, Mac, and Linux
Certain USB cables are for power only and may not have the data lines available. Try checking your USB cable and ensure that the data lines are intact.
Issues Uploading at Fast Baud Rates
If you are uploading to certain boards like the Apollo3 on the Artemis development boards with fast baud rates, there are some platforms (Linux flavors) where the standard CH340 USB to serial drivers don’t operate well at speeds higher than 115200. So if you run into upload problems, consider reducing the upload speed. For more information about upload issues, see this forum post and consider upgrading with these drivers for Mac OSX or these for Linux.
Resources and Going Further
Now that you’ve successfully got your CH340 up and running, it’s time to incorporate it into your own project!
- WCH: CH340 Drivers — Latest drivers can be downloaded from the manufacturer.
- Windows (EXE) — Driver executable
- Windows (ZIP) — Driver v3.4 (2016-09-27)
- Mac (ZIP) — Driver v1.5 (2018-07-04)
- Linux (ZIP) — Driver v1.5 (2018-03-18)
USB-to-serial converters like the CH340 are great for uploading code to a microcontroller or viewing data from a GPS on a serial terminal. Check out these tutorials to dive even deeper into the world of microcontrollers or send serial data to your computer with a GPS!
Serial Terminal Basics
This tutorial will show you how to communicate with your serial devices using a variety of terminal emulator applications.
GPS-RTK Hookup Guide
Find out where you are! Use this easy hook-up guide to get up and running with the SparkFun high precision GPS-RTK NEO-M8P-2 breakout board.
RedBoard Qwiic Hookup Guide
This tutorial covers the basic functionality of the RedBoard Qwiic. This tutorial also covers how to get started blinking an LED and using the Qwiic system.
SparkFun Inventor’s Kit Experiment Guide — v4.1
The SparkFun Inventor’s Kit (SIK) Experiment Guide contains all of the information needed to build all five projects, encompassing 16 circuits, in the latest version of the kit, v4.1.2 and v4.1.
Or check out these blog posts.
Contents
-
Programming
-
Written by
Mohammadreza Akbari
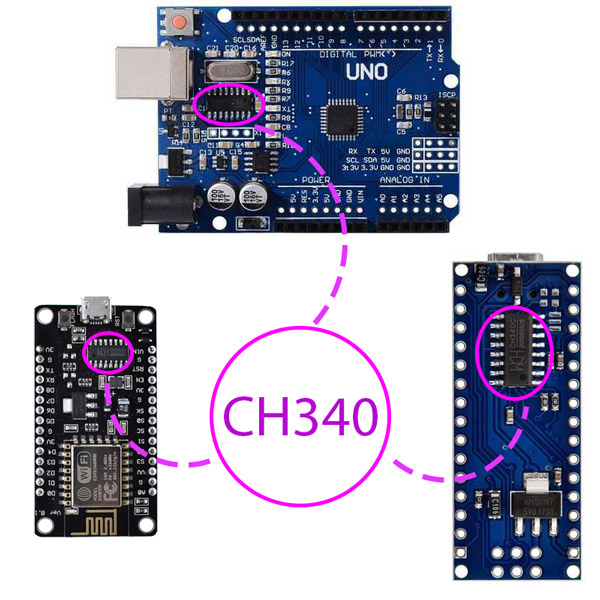
What is CH340?
CH340 is a TTL (serial) to USB converter and vice versa. This chip has been used in some boards such as Arduino Uno CH340G, ESP8266, etc. The boards using the CH340 chip, don’t need a programmer in order to access the processor or to program them.
But there is a downside. An extra driver must be installed before starting to work with boards having this IC. In this tutorial, you will learn how to install CH340 driver.
You can apply this guide to all Windows versions, including Windows 11, 10, 8, and Vista. The process of installing the CH340 driver on Windows 11 closely resembles that of Windows 10 (or other earlier versions).
Installing CH340 Driver on Windows
If you connect your board to the computer before installing the driver, your computer will not recognize the board correctly and you will see following image in Device Manager.
To open Device Manager, search for it in the Windows Start menu.
Follow the steps below to install the CH340 driver:
Step 1: Download CH340 driver
First, download the CH340 driver from the this link.
You can also download the latest version of the driver directly from the manufacturer’s site.
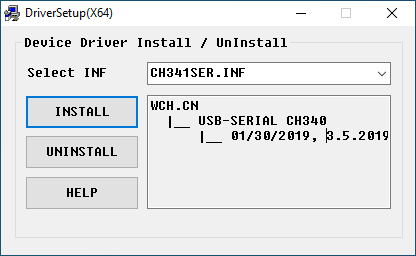
Step 2: Install CH340 Driver
After downloading the CH340 driver, open it and click Install.
After successful installation you should see this message.
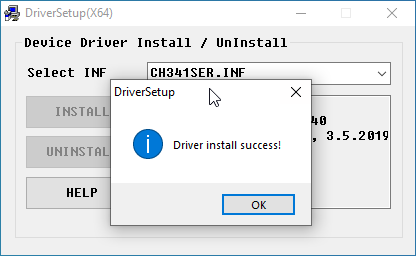
Note
In some cases, you may need to restart Windows after the driver installation is complete.
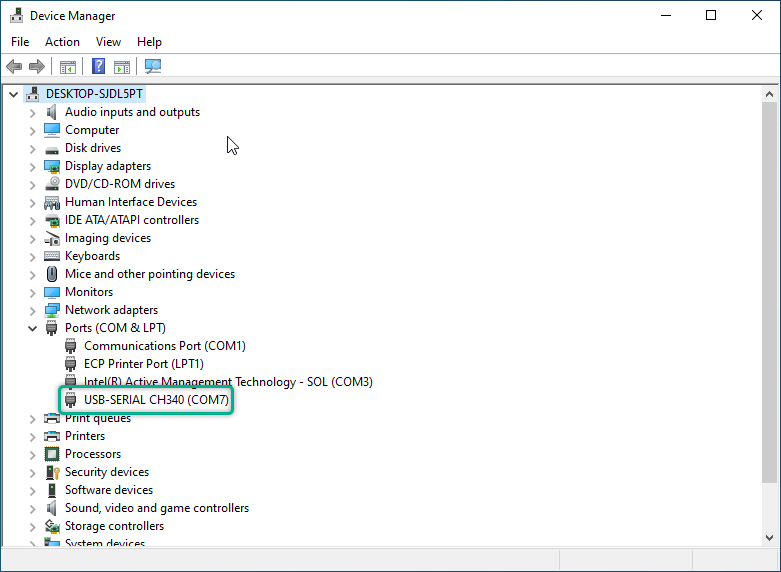
Step 3: Checking Correct Driver Installation in Device Manager
If your CH340 driver has been installed correctly, and if you connect your board to a computer, then you can see its name and port number in the Port section. For example, my Arduino board is connected to COM7.
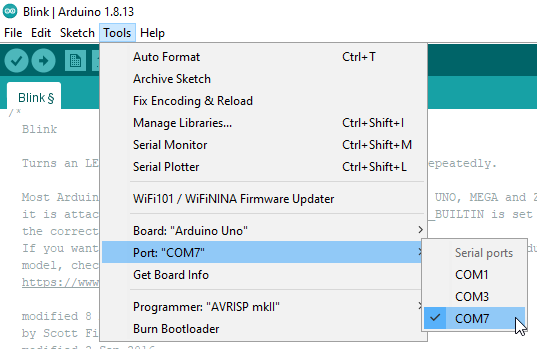
Step 4: Checking Correct Driver Installation in Arduino IDE
Open the Arduino IDE software. Go to the Tools menu and from the Port section, select the port number appropriate port that your board is connected to. Note that this port number must be the same as the number you saw in the previous step.
To make sure, you can upload a code that you have already written to your board. For example, I use the Blink example, which is a Built-in example of the Arduino IDE.
If your code is uploaded correctly to the Arduino, you should see a Done uploading message.
Success
At this point, you have successfully installed the CH340 driver correctly and from now on you can easily upload the code you have written to your board.
Get Updates And Learn From The Best
Comments (33)
-
swetha chiliveri
Reply
Thank you so much, it worked! Just that I was getting “drive installation failed”, in that case I uninstalled and then installed again.
January 28, 2021 at 2:57 pm
-
Mehran Maleki
Reply
You’re so welcome! And thanks for sharing your experience.
January 30, 2021 at 1:43 pm
-
-
Eric
Reply
After I installes the driver (Step 2) I got the following message: “The driver is succesfully Pre-installed in advance.”
And thats it!
No connections to the board. (No Windows plug in sound, nothing)
And yes, i tried it with several cables.
And yes, I tried it on all my hubs.
And yes, I uses a another computer.
And yes, I cleaned ab my USB-Devices, my registry.
And yes, I used different boards (3pcs), all of them are not working.
And yes, they are from differnt stores.April 3, 2021 at 1:46 am
-
Mehran Maleki
Reply
What board are you using? Make sure that it comes with CH340 driver. Also open the Device Manager on your computer to see if any new device is added to the “Other devices” or “Ports (COM & LPT)” section when you plug in your board.
April 3, 2021 at 3:58 am
-
Rens
Reply
Hi encountered exactly the same issue as Eric. Any solutions found?
April 17, 2021 at 10:38 am
-
Mehran Maleki
Reply
First see if this comment helps you. If not, we can think of something else.
“What board are you using? Make sure that it comes with CH340 driver. Also open the Device Manager on your computer to see if any new device is added to the “Other devices” or “Ports (COM & LPT)” section when you plug in your board.”April 18, 2021 at 5:02 am
-
Rens
Reply
Thanks for the comment. I am using a Mega2560 . Windows10 device manager shows an unknown device (error 43) , but not within COM&LPT section but within the USB controller section.
In the com lpt section Com1 ,Lpt and the intel active management technology SOL at com3 is listed.
Any suggestions will be welcome. ThanksApril 18, 2021 at 10:47 am
-
-
-
Rens
Reply
Good news. Issue has been solved! The usb cable was too long , changed from 1.5 meter to 1 meter. Now ok
April 18, 2021 at 2:10 pm
-
Mehran Maleki
Reply
Well, that’s great.
April 19, 2021 at 4:55 am
-
-
umut
Reply
Hello ı have non original arduino uno. I cant see port and ı installed driver. But still cant see on my laptop. Driver says “the driver is succesfully pre- installed in advance. I couldnt see port. I did few things but still cant see. Can anyone help me ?
April 19, 2021 at 6:46 pm
-
Mehran Maleki
Reply
Hi. Open the Device Manager on your computer to see if any new device is added to the “Other devices” or “Ports (COM & LPT)” section when you plug in your board. If nothing appears, there might be something wrong with the Arduino board you have.
April 20, 2021 at 4:25 am
-
-
Ardhian
Reply
Thank you. In my case, I need to connect the board first before install. Otherwise, the installation was always fail.
May 14, 2021 at 1:23 am
-
Mehran Maleki
Reply
That’s because when you connect the board, the PC can recognize the driver of it. So, it’s better that you connect it first.
May 17, 2021 at 4:47 am
-
-
P
Reply
I hope that I can get a reply, I think I installed the driver correctly because the bafang programming tool can now see it. When I press conect it starts connecting and my cable starts flikkering a blue light.
The problem now is that no information is showing up and I cant press “read”. The button stays grey. What is the cause of this and how do I solve it?
July 31, 2021 at 11:00 am
-
Mehran Maleki
Reply
Hi,
What’s the board you’re using? Do you see the port of that board in the “Device Manager” when you connect it to the PC?
And also, as Rick said, try a different cable to see if it solves the problem.August 1, 2021 at 4:46 am
-
-
Rick
Reply
Try a different cable. Some just don’t work proerly.
July 31, 2021 at 5:06 pm
-
DIego
Reply
Hi, I have an issue with the ch340 as well, I have download it and isntall, also got the pre-nstalled message. Went to my device manager and no “other devices” displeady as No porst also. the thing is I can´t see my 3D printer by the micro USB cable. Have tryed different things notihing works
January 13, 2022 at 6:00 pm
-
Mehran Maleki
Reply
Hi.
The device manager must display the PORT related to your 3D printer whether you have installed the right driver or not. If you can’t see the 3D printer in device manger when you connect it to your PC via a micro USB cable, there might be something wrong either the cable you’re using or with the 3D printer itself. So, to troubleshoot the issue, first check the device manager thoroughly to make sure no new PORT is added when you plug in your 3D printer. Notice that the new PORT might appear in “Other devices”, “PORTS” or “Universal Serial Bus controllers”. So, check all these 3 parts carefully. In the next step, in case you didn’t see any new port appear in the device manager, try different cables. This usually solves the problem. But, if the problem still existed, the problem might be related to the 3D printer itself.January 15, 2022 at 6:32 am
-
-
DONALD l FUCHIK
Reply
I have the same problem with the ch340>rs232 board. My most recent trial was with a download directly from the chinese mfg. What happens is that when I click the Install I get “install fails” Interestingly, I have an ES32camera board and it appears to have the same chip a ch340 on it. That board dd installed fine. I thought I could simply copy the dd for that board over to the ch340 but of course its just not that simple. Something in a new windows update or something else causes that install to fail maybe windows is trying to protect us from a chinese chip provider.
March 29, 2022 at 3:16 am
-
Mehran Maleki
Reply
I couldn’t fully understand your problem! If you have already installed the CH340 driver for another board, you don’t need to install it again for another CH340 board you have. You can just connect it to your PC and it will work just fine.
April 4, 2022 at 5:27 am
-
-
don
Reply
Ch340 install problems. Since my last posting I have discovered some things that may help eliminate this problem. First thing to do is run/click the uninstall button. After doing that I was able to solve the install failed problem.
Next, it is apparent that the Ch340 design does not meet USB standards in the area of critical timings. I say this because I have noticed that if I plug my Ch340 board directly into my USB port it works. However, if I use an extension USB cable most of the time it fails to work. From my work experience I know that the USB timings are very critical in order to maximize performance. Consequently if a chip designer is not careful about meeting USB timing specs then there will be situations when that chip will not work. This would also explain why sometimes it will work after installing into a different USB connector on the PC since those timings can vary as well. When I say I get it to work, all I have been able to do is install the wrap connector and get the adapter to talk to itself as verified with putty.
Recently I got a ESS32-CAM card and it contains the same Ch340 chip and it has worked fine even with the USB cable so I suspect that the ch340 designer released an updated design of the chip that meets the USB timing specs or maybe some aspects of the board design are adjusted to help make the timings.
Bottom line, unless you enjoy chasing down problems you will be better off buying the more expensive ftdi or other non-Chinese designed chips.
March 29, 2022 at 2:57 pm
-
Mehran Maleki
Reply
Hi,
Thank you so much for sharing your valuable experiences. That means a lot to us.April 4, 2022 at 5:31 am
-
-
Andrew A Hayes
Reply
The download is dead!
June 17, 2022 at 2:58 am
-
Mehran Maleki
Reply
Hi.
You’re right! The link is now fixed.June 19, 2022 at 6:32 pm
-
-
Jonathan
Reply
Hello, this is for my 3d printer, sometimes it works some times it doesn’t. I have tried installing CH341 and it says it’s preinstalled yet when I try to uninstall it says no device detected. I tried to manually select the LL file for CH341 however it said please select one that works with windows. It appears on the device manager but is recognized this can change from either plugging it into a USB extender and trying to put it in a random port for it to work but it has never worked directly connected to my pc. Any ideas would help thx
March 12, 2023 at 1:29 pm
-
Mohammad Damirchi
Reply
Hi there
you can connect a CH340 or CH341 device to your pc and then go to the device manager and right-click on your port and then select the “uninstall device” option. Next, install the driver again. This might help.April 8, 2023 at 1:42 pm
-
-
M. Hamza Khan
Reply
Hey,
I installed the driver but it isn’t showing up anywhere when i open the device manager.
p.s. i’m trying to connect my FS-i6X controller to my laptop.April 21, 2023 at 11:24 am
-
Mohammad Damirchi
Reply
Hey
What module are you using for communication?May 6, 2023 at 7:03 am
-
-
dennis
Reply
Hello I am trying to use this but keep getting a message saying it’s been preinstalled. But I don’t see the device in device manager or hear windows connect to it.
January 29, 2024 at 5:42 am
-
Mohammad Damirchi
Reply
January 29, 2024 at 9:46 am
-
-
Mili Shine
Reply
My device is not recognized on device manager. I tried plugging esp first, then i tried with arduino uno. Both need the same driver (ch340xx). I installed it and it shows the message that it is preinstalled. Then i connected my device to the laptop and checked in the device manager but it doesn’t show neither arduino nor esp.I connected them seperately one at a time.
My usb ports are working, the devices are not faulty even the driver is installed. This is the second esp i tried because the first one had the same issue and i ordered again.I even tried different usb cables.
I even tried rebooting my laptop and also checked the devices on other laptop but still they both won’t show on device manager . What should I do?
June 5, 2024 at 8:08 am
-
Mohammad Damirchi
Reply
Hi Mili,
First, check if your cable is working properly. You can test it with an old Android phone or another device that sends and receives data via the cable.
Next, open Device Manager on your computer and observe what changes when you connect your device. It might take several attempts to identify the connected device.
If the device shows up as “CH340 (COM xx)” like in the image in the article, everything is fine. However, if a different name appears, there might be a problem. Please share that name with me so I can help you find a solution.June 8, 2024 at 12:25 pm
-
Mili Shine
Reply
Nothing comes up.No matter how many times I try no new device comes up be it arduino or esp8266 I plug
June 9, 2024 at 5:54 pm
-
-
Leave a Reply
Download: https://fs.keyestudio.com/CH340-WINDOWS
Windows 10 (and later systems) boasts their own drivers, so there is no need to install additional drivers.
Connect the control board to your computer.
Click Computer– Properties – Device Manager, as shown below. This indicates a successful connection, so the installation of driver is not required.

If the following situation occurs, you need to manually install the driver.
.png)
Click to select “Update driver”. And then the driver will start to install.
.png)
Tap “Browse my computer for drivers”.
.png)
Find the file usb_ch341_3.1.2009.06 or cp210x you have downloaded, and click “Next”.
.png)
After finishing installing, click “Close” and the serial port number will show up.
.png)
The driver is successfully installed!
Click Computer– Properties – Device Manager to check: