
This document will guide you through installing Python 3.13 and Django on
Windows. It also provides instructions for setting up a virtual environment,
which makes it easier to work on Python projects. This is meant as a beginner’s
guide for users working on Django projects and does not reflect how Django
should be installed when developing changes for Django itself.
The steps in this guide have been tested with Windows 10. In other
versions, the steps would be similar. You will need to be familiar with using
the Windows command prompt.
Install Python
Django is a Python web framework, thus requiring Python to be installed on your
machine. At the time of writing, Python 3.13 is the latest version.
To install Python on your machine go to https://www.python.org/downloads/. The
website should offer you a download button for the latest Python version.
Download the executable installer and run it. Check the boxes next to “Install
launcher for all users (recommended)” then click “Install Now”.
After installation, open the command prompt and check that the Python version
matches the version you installed by executing:
py is not recognized or found
Depending on how you’ve installed Python (such as via the Microsoft Store),
py may not be available in the command prompt.
You will then need to use python instead of py when entering
commands.
About pip
pip is a package manager for Python and is included by default with the
Python installer. It helps to install and uninstall Python packages
(such as Django!). For the rest of the installation, we’ll use pip to
install Python packages from the command line.
Setting up a virtual environment
It is best practice to provide a dedicated environment for each Django project
you create. There are many options to manage environments and packages within
the Python ecosystem, some of which are recommended in the Python
documentation.
Python itself comes with venv for managing
environments which we will use for this guide.
To create a virtual environment for your project, open a new command prompt,
navigate to the folder where you want to create your project and then enter the
following:
...\> py -m venv project-name
This will create a folder called ‘project-name’ if it does not already exist
and set up the virtual environment. To activate the environment, run:
...\> project-name\Scripts\activate.bat
The virtual environment will be activated and you’ll see “(project-name)” next
to the command prompt to designate that. Each time you start a new command
prompt, you’ll need to activate the environment again.
Install Django
Django can be installed easily using pip within your virtual environment.
In the command prompt, ensure your virtual environment is active, and execute
the following command:
...\> py -m pip install Django
This will download and install the latest Django release.
After the installation has completed, you can verify your Django installation
by executing django-admin --version in the command prompt.
See Get your database running for information on database installation
with Django.
Colored terminal output
A quality-of-life feature adds colored (rather than monochrome) output to the
terminal. In modern terminals this should work for both CMD and PowerShell. If
for some reason this needs to be disabled, set the environmental variable
DJANGO_COLORS to nocolor.
On older Windows versions, or legacy terminals, colorama 0.4.6+ must be
installed to enable syntax coloring:
...\> py -m pip install "colorama >= 0.4.6"
See Syntax coloring for more information on color settings.
Common pitfalls
-
If
django-adminonly displays the help text no matter what arguments
it is given, there is probably a problem with the file association in
Windows. Check if there is more than one environment variable set for
running Python scripts inPATH. This usually occurs when there is more
than one Python version installed. -
If you are connecting to the internet behind a proxy, there might be problems
in running the commandpy -m pip install Django. Set the environment
variables for proxy configuration in the command prompt as follows:...\> set http_proxy=http://username:password@proxyserver:proxyport ...\> set https_proxy=https://username:password@proxyserver:proxyport
-
In general, Django assumes that
UTF-8encoding is used for I/O. This may
cause problems if your system is set to use a different encoding. Recent
versions of Python allow setting thePYTHONUTF8environment
variable in order to force aUTF-8encoding. Windows 10 also provides a
system-wide setting by checkingUse Unicode UTF-8 for worldwide languagein Language ‣ Administrative Language Settings
support
‣ Change system locale in system settings.
Примечание: если ты используешь Chromebook, пропусти эту главу, но выполни инструкции по настройке для Chromebook
Примечание: если ты уже выполнила установку — можешь пропустить эту часть и сразу перейти к следующей главе!
Отдельные части этой главы основаны на учебных пособиях Geek Girls Carrots (https://github.com/ggcarrots/django-carrots).
Отдельные части этой главы основаны на учебном пособии django-marcador, лицензированном под Creative Commons Attribution-ShareAlike 4.0 International License. Руководство django-marcador защищено авторским правом Markus Zapke-Gründemann et al.
Виртуальное окружение
Перед установкой Django мы попросим тебя установить крайне полезный инструмент, который поможет тебе содержать среду разработки в чистоте. Можно пропустить этот шаг, но мы очень советуем этого не делать. Использование лучших рекомендаций с самого начала убережёт от многих проблем в будущем!
Итак, давай создадим виртуальное окружение (оно также называется virtualenv). Virtualenv будет изолировать настройки Python/Django для каждого отдельного проекта. Это значит, что изменения одного сайта не затронут другие сайты, которые ты разрабатываешь. Удобно, правда?
Всё, что тебе нужно сделать — найти директорию, в которой мы создадим virtualenv; домашний каталог вполне подойдёт. Для Windows адрес будет выглядеть так: C:\Users\Name (где Name — твоё имя пользователя).
Примечание: Если ты работаешь в Windows, удостоверься, что в названии директории нет специальных символов или символов с диакритическими знаками; если в твоём имени пользователя есть такие символы, выбери другую директорию, например,
C:\djangogirls.
Мы будем использовать отдельную директорию djangogirls в домашнем каталоге:
command-line
$ mkdir djangogirls
$ cd djangogirls
Мы создадим виртуальное окружение под именем myvenv. В общем случае команда будет выглядеть так:
command-line
$ python3 -m venv myvenv
Виртуальное окружение: Windows
Чтобы создать новое virtualenv, тебе нужно открыть командную строку и набрать python -m venv myvenv. Это будет выглядеть так:
command-line
C:\Users\Name\djangogirls> python -m venv myvenv
Здесь myvenv — имя твоего virtualenv. Ты можешь выбрать другое имя, но используй только строчные буквы, без пробелов и специальных символов. Имя виртуального окружения выбирай покороче — тебе придётся часто его набирать!
Виртуальное окружение: Linux и macOS
В Linux и macOS достаточно набрать python3 -m venv myvenv, чтобы создать virtualenv:
command-line
$ python3 -m venv myvenv
myvenv — имя виртуального окружения virtualenv. Можешь выбрать другое имя, но используй только строчные буквы и никаких пробелов. Имя виртуального окружения лучше выбирать покороче — набирать его предстоит не раз!
Примечание: В некоторых версиях Debian/Ubuntu может произойти следующая ошибка:
command-line
The virtual environment was not created successfully because ensurepip is not available.  On Debian/Ubuntu systems, you need to install the python3-venv package using the following command.
   apt install python3-venv
You may need to use sudo with that command.  After installing the python3-venv package, recreate your virtual environment.
В таком случае следуй приведённым инструкциям и установи пакет
python3-venv:command-line
$ sudo apt install python3-venvПримечание: В некоторых версиях Debian/Ubuntu при таком способе создания виртуального окружения ты можешь получить такую ошибку:
command-line
Error: Command '['/home/eddie/Slask/tmp/venv/bin/python3', '-Im', 'ensurepip', '--upgrade', '--default-pip']' returned non-zero exit status 1Чтобы обойти её, используй команду
virtualenv.command-line
$ sudo apt install python-virtualenv
$ virtualenv --python=python3.12 myvenv
Примечание: Если ты получаешь следующую ошибку
command-line
E: Unable to locate package python3-venvто запусти команду:
command-line
sudo apt install python3.12-venv
Работаем с virtualenv
Указанная выше команда создаст директорию myvenv (или другую, в зависимости от выбранного тобой имени), которая будет содержать виртуальное окружение (по сути — набор файлов и папок).
Работаем с virtualenv: Windows
Запусти виртуальное окружение, выполнив:
command-line
C:\Users\Name\djangogirls> myvenv\Scripts\activate
ПРИМЕЧАНИЕ: в Windows 10 при работе в Windows PowerShell ты можешь получить ошибку вида
execution of scripts is disabled on this system. В этом случае открой ещё одно окно Windows PowerShell, выбрав опцию «Запустить от имени Администратора». Затем перед использованием виртуального окружения попробуй запустить следующую команду:command-line
C:\WINDOWS\system32> Set-ExecutionPolicy -ExecutionPolicy RemoteSigned
    Execution Policy Change
    The execution policy helps protect you from scripts that you do not trust. Changing the execution policy might expose you to the security risks described in the about_Execution_Policies help topic at http://go.microsoft.com/fwlink/?LinkID=135170. Do you want to change the execution policy? [Y] Yes  [A] Yes to All  [N] No  [L] No to All  [S] Suspend  [?] Help (default is "N"): A
Работаем с virtualenv: Linux и macOS
Запусти виртуальное окружение, выполнив:
command-line
$ source myvenv/bin/activate
Не забудь поменять myvenv на выбранное тобой имя для virtualenv!
ПРИМЕЧАНИЕ: иногда команда
sourceможет быть недоступна. В таком случае используй следующий метод:command-line
$ . myvenv/bin/activate
Ты поймёшь, что virtualenv запущено, когда увидишь префикс (myvenv) в начале приглашения командной строки.
При работе с виртуальным окружением команда python будет автоматически обращаться к правильной версии языка, так что ты можешь использовать просто python вместо python3.
Отлично, теперь мы будем хранить все важные зависимости в одном месте. Наконец можно установить Django!
Установка Django
После запуска virtualenv ты можешь установить Django.
Перед этим мы должны удостовериться, что у тебя установлена последняя версия pip — программы, которую мы используем для установки Django.
command-line
(myvenv) ~$ python3 -m pip install --upgrade pip
Установка библиотек через указание требований
Файл с требованиями (requirements) хранит список зависимостей, которые нужно установить с помощью
pip install:
Для начала создай файл requirements.txt внутри директории djangogirls/, используя текстовый редактор, который ты установила ранее. Просто создай в редакторе новый файл, а затем сохрани его под именем requirements.txt в директории djangogirls/. После этого твоя директория будет выглядеть так:
djangogirls
└───requirements.txt
В файл djangogirls/requirements.txt нужно добавить такой текст:
djangogirls/requirements.txt
Django~=5.1.2
Теперь выполни команду pip install -r requirements.txt, чтобы установить Django.
command-line
(myvenv) ~$ pip install -r requirements.txt
Collecting Django~=5.1.2 (from -r requirements.txt (line 1))
  Downloading Django-5.1.2-py3-none-any.whl (7.1MB)
Installing collected packages: Django
Successfully installed Django-5.1.2
Установка Django: Windows
Если при запуске pip в Windows ты получаешь сообщение об ошибке, проверь, что путь к директории с проектом не содержит пробелов или специальных символов (
C:\Users\User Name\djangogirls). Если проблема в этом, то, пожалуйста, перенеси свой проект в другое место, адрес которого не будет содержать пробелов и специальных символов (предлагаемC:\djangogirls). Создай новое виртуальное окружение в новой директории, после этого удали старое и попробуй запустить команды выше заново (перемещение виртуального окружения не сработает, поскольку в нём используются абсолютные пути).
Установка Django: Windows 8 и Windows 10
При попытке установки Django твоя командная строка может зависнуть. Если это произошло, вместо приведённой выше команды используй:
command-line
C:\Users\Name\djangogirls> python -m pip install -r requirements.txt
Установка Django: Linux
При возникновении ошибки при вызове pip под Ubuntu 12.04, пожалуйста, запусти `python -m pip install -U —force-reinstall pip`, чтобы исправить установку pip в virtualenv.
Вот и всё! Теперь ты (наконец-то) готова создать своё Django-приложение!
Последнее обновление: 05.12.2023
Перед началом работы с Django нам естественно надо установить интерпретатор Python. Подоробнее об этом можно почитать
здесь.
Существуют разные способы установки Django. Рассмотрим рекомендуемый способ.
Пакетный менеджер pip
Пакеты Django размещаются в центральном репозитории для большинства пакетов Python — Package Index (PyPI). И для установки из этого репозитория
нам потребуется пакетный менеджер pip. Менеджер pip позволяет загружать пакеты и управлять ими.
Обычно при установке python также устанавливается и менеджер pip. В этом случае мы можем проверить версию менеджера, выполнив в командной строке/терминале команду
pip -V (V — с заглавной буквы):
C:\Users\eugen>pip -V
pip 23.3.1 from C:\Users\eugen\AppData\Local\Programs\Python\Python312\Lib\site-packages\pip (python 3.12)

C:\Users\eugen>
Если pip не установлен, то мы увидим ошибку типа
"pip" не является внутренней или внешней командой, исполняемой программой или пакетным файлом
В этом случае нам надо установить pip. Для этого можно выполнить в командной строке/консоли следующую команду:
python -m ensurepip --upgrade
Если pip ранее уже был установлен, то можно его обновить с помощью команды
python -m pip install --upgrade pip
Установка виртуальной среды
Виртуальная среда или venv не является неотъемлимой частью разработки на Django. Однако ее рекомендуется использовать, так как она
позволяет создать множество виртуальных сред Python на одной операционной системе. Благодаря виртуальной среде приложение может запускаться независимо от
других приложений на Python.
В принципе можно запускать приложения на Django и без виртуальной среды. В этом случае все пакеты Django устанавливаются глобально.
Однако что если после создания первого приложения выйдет новая версия Django? Если мы захотим использовать для второго проекта новую версию Django,
то из-за глобальной установки пакетов придется обновлять первый проект, который использует старую версию. Это потребует некоторой дополнительной работы по обновлению, так как
не всегда соблюдается обратная совместимость между пакетами.
Если мы решим использовать для второго проекта старую версию, то мы лишиемся потенциальных преимуществ новой версии. И использование
виртуальной среды как раз позволяет разграничить пакеты для каждого проекта.
Для работы с виртуальной средой в python применяется встроенный модуль venv
Итак, создадим вируальную среду. Вначале определим каталог для проектов django. Например, пусть это будет каталог C:\django.
Прежде всего перейдем в терминале/командной строке в этот каталог с помощью команды cd.
cd C:\django
Затем для создания виртуальной среды выполним следующую команду:
python -m venv .venv
Модулю venv передается название среды, которая в данном случае будет называться «.venv». Для наименования виртуальных сред нет каких-то определенных условностей. Пример консольного вывода:
C:\Users\eugen>cd C:\djangoПереход к папке будущей виртуальной среды

C:\django>python -m venv .venvСоздание виртуальной среды

C:\django>
После этого в текущей папке (C:\django) будет создан подкаталог «.venv».
Активация виртуальной среды
Для использования виртуальную среду надо активировать. И каждый раз, когда мы будем работать с проектом Django, связанную с ним виртуальную среду
надо активировать. Например, активируем выше созданную среду, которая располагается в текущем каталоге в папке .venv. Процесс активации немного отличается в зависимости от операционной системы и от того, какие инструменты применяются. Так, в Windows можно использовать командную строку и PowerShell,
но между ними есть отличия.
Активация в Windows в коммандной строке
Если наша ОС — Windows, то в папке .venv/Scripts/ мы можем найти файл activate.bat), который активирует
виртуальную среду. Так, в Windows активация виртуальной среды в коммандной строке будет выглядеть таким образом:
.venv\Scripts\activate.bat
Активация в Windows в PowerShell
Также при работе на Windows в папке .venv/Scripts/ мы можем найти файлactivate.ps1, который также активирует виртуальную среду,
но применяется только в PowerShell. Но при работе с PowerShell следует учитывать, что по умолчанию в этой оболочке запрещено применять скрипты. Поэтому
перед активацией среды необходимо установить разрешения для текущего пользователя. Поэтому для активации виртуальной среды в PowerShell необходимо выполнить две следующих команды:
Set-ExecutionPolicy -ExecutionPolicy RemoteSigned -Scope CurrentUser
.venv\Scripts\Activate.ps1
Активация в Linux и MacOS
Для Linux и MacOS активация будет производиться с помощью следующей команды:
source .venv/bin/activate
Далее я буду приводить примеры на основе командной строки Windows, однако все остальные примеры не будут зависеть от того, что используется — PowerShell или командная строка, Windows, Linux или MacOS.
В любом случае после успешной активации слева от текущего каталога мы увидим в скобках название виртуальной среды:
C:\Users\eugen>cd C:\django

C:\django>python -m venv .venv

C:\django>.venv\Scripts\activate.batАктивация виртуальной среды

(.venv) C:\django> Виртуальная среда активирована
Установка Django
После активации виртуальной среды для установки Django выполним в консоли следующую команду
python -m pip install Django
Она устанавливает последнюю версию Django.
(.venv) C:\django>python -m pip install Django
Collecting Django
  Using cached Django-4.1-py3-none-any.whl (8.1 MB)
Collecting sqlparse>=0.2.2
  Using cached sqlparse-0.4.2-py3-none-any.whl (42 kB)
Collecting tzdata
  Using cached tzdata-2022.1-py2.py3-none-any.whl (339 kB)
Collecting asgiref<4,>=3.5.2
  Using cached asgiref-3.5.2-py3-none-any.whl (22 kB)
Installing collected packages: tzdata, sqlparse, asgiref, Django
Successfully installed Django-4.1 asgiref-3.5.2 sqlparse-0.4.2 tzdata-2022.1

(.venv) C:\django>
Если нам интересует конкретная версия Django, то мы можем указать ее при установке:
python -m pip install django~=4.0.0
Проверка установки
Чтобы убедиться, что все установлено правильно, мы можем перейти к интерпретатору python. Для этого введем в терминале команду
python
И затем выполним последовательно следующие две инструкции:
>>> import django
>>> print(django.get_version())
Консольный вывод в моем случае:
(.venv) C:\django>python
Python 3.10.1 (tags/v3.10.1:2cd268a, Dec  6 2021, 19:10:37) [MSC v.1929 64 bit (AMD64)] on win32
Type "help", "copyright", "credits" or "license" for more information.
>>> import django
>>> print(django.get_version())
4.1
>>>
Деактивация виртуальной среды
После окончания работы с виртуальной средой мы можем ее деактивировать с помощью команды:
deactivate
Django, a high-level Python web framework, has gained immense popularity among web developers for its simplicity, scalability, and robustness. If you’re a Windows user and want to start building web applications using Django, you’re in the right place. In this step-by-step guide, we’ll walk you through the process of installing Django on your Windows machine.
Prerequisites
Before we dive into the installation process, make sure you have the following prerequisites in place:
- Python: Django is a Python framework, so you’ll need Python installed. Visit the official Python website and download the latest version (Python 3.7 or higher is recommended).
- Pip (Python Package Installer): Pip is included with Python 3.4 and later versions.
Install Python and Pip
Download the Python Web Installer from Stable Release – here
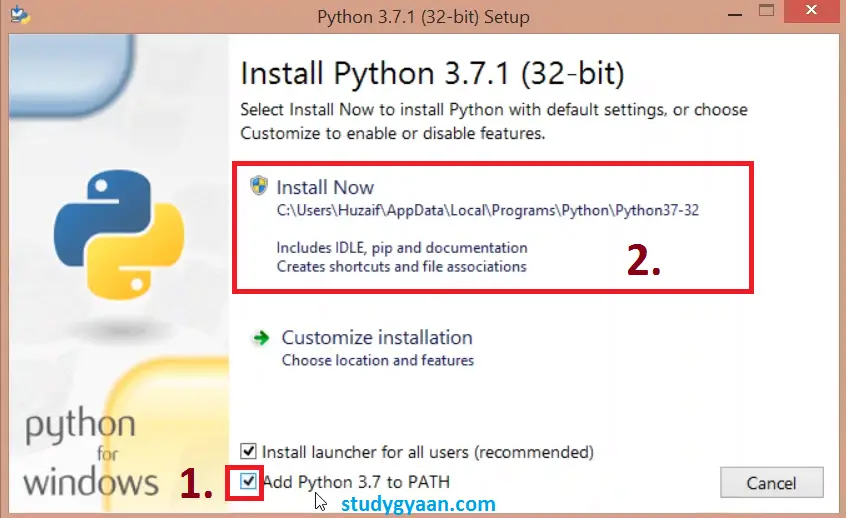
Open the setup file of Python which we have downloaded. Double click on that file and follow the steps in Images.:
- Check the box for Add Python 3.7 to PATH for accessing python from the command line.
- Customize installation: Remove features that can be used by Python Frameworks (I recommend let it be the default).
- Click on Install Now for installing and give permissions
Verify if Python and Pip is installed, by typing the below commands –
python --version
pip --version
If Pip is not installed, you can follow the official installation guide to install it.
Step 1: Open a Command Prompt
To install Django, you’ll need to use the command prompt. Press Win + R, type cmd, and hit Enter to open a command prompt window.
Step 2: Create a Virtual Environment (Optional but Recommended)
Creating a virtual environment is a good practice to isolate your project’s dependencies. To create a virtual environment, run the following command:
python -m venv myenvReplace myenv with your preferred virtual environment name.
Step 3: Activate the Virtual Environment
Navigate to the directory where you created the virtual environment (e.g., cd myenv) and activate it:
For Command Prompt:
myenv\Scripts\activateFor PowerShell:
myenv\Scripts\Activate.ps1Step 4: Install Django
With the virtual environment activated, you can now install Django using Pip:
pip install DjangoThis command will download and install the latest version of Django and its dependencies.
Step 5: Verify Django Installation
To verify that Django has been installed successfully, you can check the installed version by running:
python -m django --versionThis should display the installed Django version, such as “3.x.x.”
Step 6: Create a Django Project
Now that Django is installed, you can create a new Django project. Navigate to the directory where you want to create your project and run:
django-admin startproject projectnameReplace projectname with the desired name for your project.
Step 7: Run the Development Server
To start the development server and see your Django project in action, navigate to your project’s directory and run the following command:
cd projectname
python manage.py runserver
This command will start the development server, and you should see output indicating that the server is running. Open a web browser and visit http://127.0.0.1:8000/ to see your Django project’s default page.
Congratulationionss! You’ve successfully installed Django on your Windows machine and created a new Django project. You’re now ready to start building web applications using this powerful Python framework.
Blogs You Might Like to Read!
- Django Basic Template Boilerplate Skeleton Project
- Connect and Configure MySQL in Django Project
- Connect and Configure PostgreSQL in Django Project
- Folder and File Structure for Django Templates: Best Practices
- Django Bootstrap – Integrate Template Example
- Django Rest Framework Tutorials
Introduction to Installing Django on Windows 10
Overview of Python
Python is a powerful and versatile programming language that has become increasingly popular in recent years. It can be used for web development, data analysis, game development, and much more. Python is easy to learn and use, making it a great choice for beginners and experienced developers alike.
Benefits of Using Python
Using Python has many advantages. It is open source, meaning that anyone can use and modify the language without paying a fee. It is also highly extensible, allowing developers to add new features and libraries to the language. Additionally, Python has a large and active community of developers who are always willing to help out with any questions or problems you may have.
Step-by-Step Guide to Installing Django on Windows 10
Installing Django on Windows 10 is a relatively simple process. However, there are a few prerequisites that must be met before you can begin.
Prerequisites
Before you can install Django on Windows 10, you must first install Python. You can do this by downloading the latest version of Python from the official website. Once you have Python installed, you can then proceed to the next step.
Download and Install Python
Once you have downloaded Python, you can then install it on your Windows 10 machine. To do this, simply double-click the downloaded file and follow the on-screen instructions. Once Python has been installed, you can then proceed to the next step.
Install Django
Now that you have Python installed, you can then install Django. To do this, open the Command Prompt (or PowerShell) and enter the following command:
pip install django
This will install the latest version of Django on your Windows 10 machine. Once the installation is complete, you can then start using Django!
Conclusion
Installing Django on Windows 10 is a relatively simple process. By following the steps outlined above, you can have Django up and running in no time. With Django, you can create powerful web applications with ease.
Summary of Steps
- Install Python on your Windows 10 machine.
- Open the Command Prompt (or PowerShell) and enter the following command:
pip install django.
Benefits of Using Django
Using Django has many advantages. It is open source, meaning that anyone can use and modify the language without paying a fee. It is also highly extensible, allowing developers to add new features and libraries to the language. Additionally, Django has a large and active community of developers who are always willing to help out with any questions or problems you may have.
Resources for Further Learning
If you are interested in learning more about Django, there are many resources available online. The official Django website has detailed documentation and tutorials that can help you get started. Additionally, there are many online courses and books that can help you further your understanding of Django.
Python is a powerful and versatile programming language that can be used for a wide variety of tasks. It is easy to learn and has a large number of libraries and frameworks that make it even more powerful. One of the most popular frameworks for Python is Django, which is an open-source web framework that allows you to quickly and easily create powerful web applications. If you want to unlock the power of Python and use Django, then you need to learn how to install Django on Windows 10. Fortunately, it is a relatively simple process that can be completed in just five easy steps.
The first step is to install Python on your Windows 10 computer. Once Python is installed, you can then download the Django installer and use it to install Django on your system. After Django is installed, you can then create a virtual environment to work in. This will help to keep your projects and files organized and help to ensure that everything runs smoothly. Once the virtual environment is set up, you can then install the necessary packages and libraries to get Django up and running. Finally, you can use the Django development server to test out your code and make sure everything is working properly.
Following these five easy steps will allow you to unlock the power of Python and use the Django framework to create powerful web applications. With the right knowledge and the right tools, you can quickly and easily get started with Django on Windows 10 and start creating amazing applications.
Frequently Asked Questions (FAQ) :
Q1: What is Django?
A1:
Django is a high-level Python web framework that encourages rapid development and clean, pragmatic design. It takes care of much of the hassle of web development, so you can focus on writing your app without needing to reinvent the wheel.
Q2: What are the benefits of using Django?
A2:
Using Django provides many benefits including: fast development, scalability, secure authentication, and a large and active community. Django also offers a wide range of features such as an object-relational mapper, template engine, URL routing, and more.
A3:
To install Django on Windows 10, you will need to first install Python. After Python is installed, you can use the pip package manager to install Django. To do this, open the command prompt and type “pip install django”.
Q4: What is the difference between Python and Django?
A4:
Python is a general-purpose programming language while Django is a web framework built with Python. Python is used to write the logic of an application while Django provides the tools and libraries to build a website.
Q5: What are some common uses for Django?
A5:
Django is commonly used for web applications, content management systems, and web services. It is also used for creating data-driven websites, e-commerce platforms, and scientific computing platforms.