
Компания Embarcadero в 2018 году представила Delphi Community Edition — бесплатную версию легендарной среды разработки Delphi. Использовать её могут студенты, стартаперы, небольшие команды, некоммерческие организации. Условия использования: лицензия на использование продолжает действовать до тех пор, пока прибыль физического лица или компании от приложений Delphi не достигнет 5 000 долларов США, или штат команды разработчиков не превысит 5 человек.
Мы ставим Delphi в учебных целях, поэтому ее можно использовать бесплатно. А после заработка первых 5 тысяч долларов её можно приобрести: цены начинаются от 98 999 руб. (почти $1600).
С помощью Delphi Community Edition можно разрабатывать мультиплатформенные приложения на Windows, Android, iOS и macOS. В этой статье мы пошагово пройдём процесс установки среды и напишем тестовое приложение под Windows. Delphi всегда был инструментом для быстрого старта в разработке под Windows на языке Pascal, это мы сегодня и проверим.
Примерное время установки: около 40-60 минут.
1. Скачивание бесплатной версии Delphi
Для того, чтобы получить доступ к Delphi Community Edition, пройдите по этой ссылке https://www.embarcadero.com/ru/products/delphi/starter/free-download
Заполните форму, введенный пароль сохраните. В качестве компании я указал один из своих сайтов, телефон реальный, но мне никто пока что не звонил :). Главное: правильно укажите электронную почту.
На почту вам придёт письмо с ключом — его лучше сохранить. После отправки формы начнётся процесс загрузки. Если загрузка не начнётся, ссылка будет также в письме. Письмо вам необходимо — если оно не пришло, проверяйте спам. Если вообще не пришло, регистрируйтесь заново на другой ящик. Я регистрировался дважды на разные email — один на доменную почту, второй на Gmail. Оба раза всё было ок. Вот как выглядит письмо:
2. Установка Delphi Community Edition
Запускаем установщик, у меня файл назывался: radstudio_10_3_3_esd7899_nt.exe
Соглашаемся с условиями использования:
На этом экране я нажал кнопку Оptions — открылось окно, где можно изменить каталог установки и настройки: ярлык на рабочем столе и установка для всех пользователей. Эти опции я оставил включёнными, вы можете убрать. Каталог установки можно оставить этот.
После нажатия Ок на форме Options возвращаемся на окно с соглашением, жмём Next.
Здесь выбираем вариант I already have a serial number («У меня есть серийный номер». Он есть у вас в почте) и нажимаем Install.
Начнётся установка, через несколько минут появилось окно для ввода данных регистрации (серийного номера):
Введите Serial number из письма в почте и нажмите Register.
Программа начнёт связываться с серверами Embarcadero и попытается зарегистрировать вашу копию. На одном компьютере у меня всё произошло мгновенно, на другом с третьей попытки. Судя по сообщениям, проблема была с серверами Embarcadero. Если всё получилось, переходите к следующему разделу статьи. Если нет, попробуйте сделать следующее. На скриншоте ниже кликните по ссылке «Trouble connection…»
Cистема предложит пройти на web-регистрацию. Соглашаемся — жмём Yes (или копируем предложенный URL в браузер). Откроется окно регистрации через сайт. Жмёте Download, чтобы скачать файл с лицензией в формате txt.
Его нужно будет использовать: в диалоге Product Registration нажать Advanced. Затем Import в следующем окне и импортировать файл лицензии. Надеюсь, у вас всё получится.
3. Выбор платформ для установки
Далее установщик предложить выбрать платформы для разработки.
Я выбрал Windows 32, Windows 64 и Android:
В рамках наших ближайших статей мы будем рассматривать разработку под Windows и Android, поэтому я выбрал только их. Для работы с экосистемой Apple вам понадобится платный ключ разработчика, поэтому ставить iOS и macOS имеет смысл, если вы действительно планируете этим заниматься. В любом случае можно будет доустановить недостающие компоненты позже.
Жмём Install и наблюдаем за загрузкой
У меня процесс занял минут 30. Ждём до победного. После окончания установки жмём Start Working.
4. Первичная настройка среды разработки Delphi
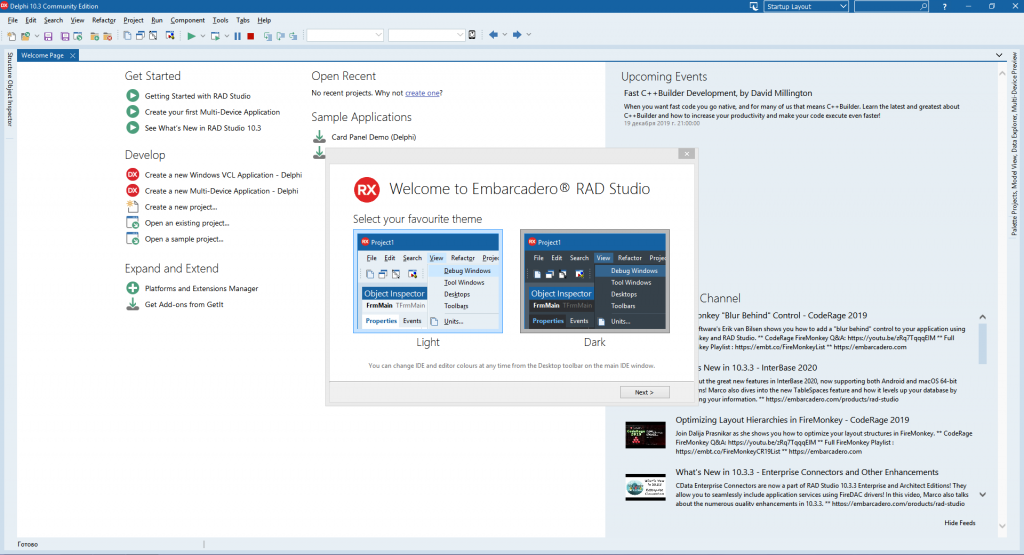
Появится окно с Delphi. Можно выбрать тему, я люблю светлую, поэтому нажал на Light
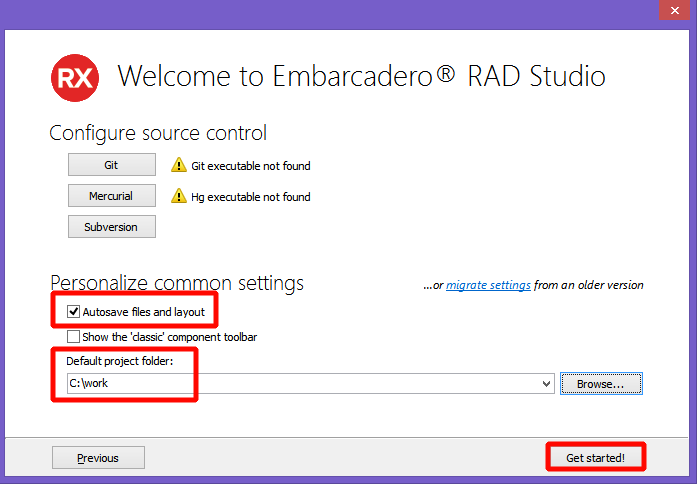
Жмём Next, на следующем экране можно подключить систему контроля версий (пока можно пропустить), включить автосохранение файлов и оформления темы (рекомендую поставить эту галку), а также выбрать папку для сохранения проектов по умолчанию. Я рекомендую создать какую-либо папку в корне, например C:\work
После окончания настройки жмите Get Started.
5. Создание проекта программы на Delphi под Windows
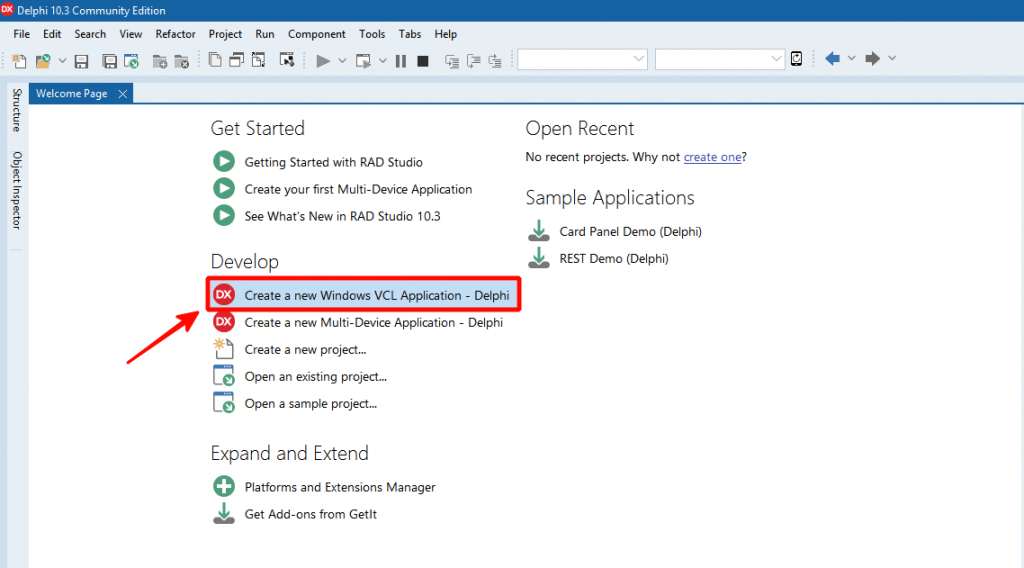
Откроется Welcome Page, на ней нажмите Create Windows VCL Application, чтобы создать простое приложение под Windows. (Также можно это сделать с помощью верхнего меню File → New → Windows VCL Application — Delphi)
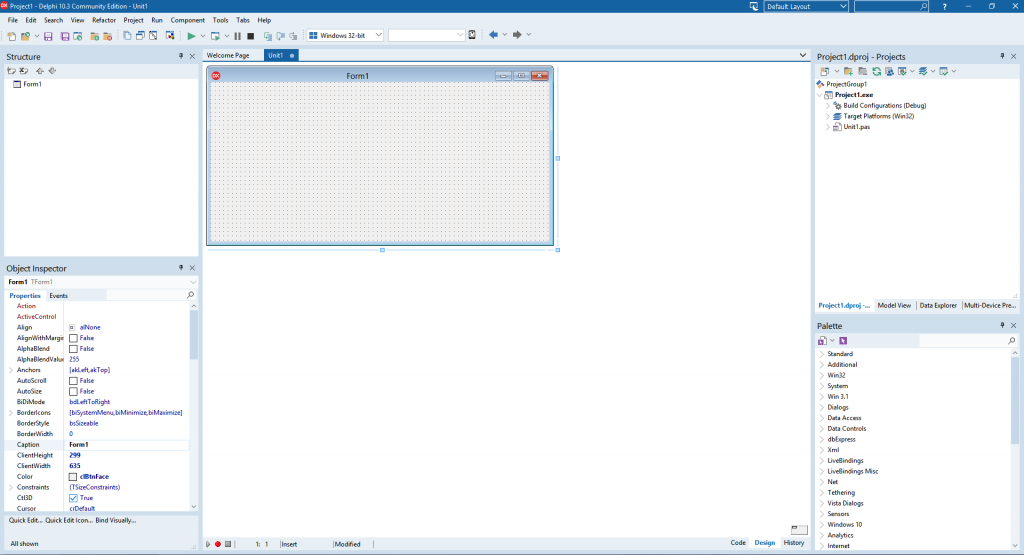
Откроется окно нового проекта, где уже будет размещена Form1 — главное окно вашего приложения.
Нажмите Save All (иконка с дискетами в левом верхнем меню), чтобы сохранить проект.

В рабочем каталоге создайте папку HelloWorld, зайдите в неё. Сохраните файл Unit1.pas (это единственный модуль вашего приложения. Рекомендуется давать им более осмысленные названия, но сейчас мы этот шаг пропустим).
Затем сохраните файл проекта, назвав его HelloWorld.dproj (так будет называться ваше приложение, в том числе запускаемый exe-файл).
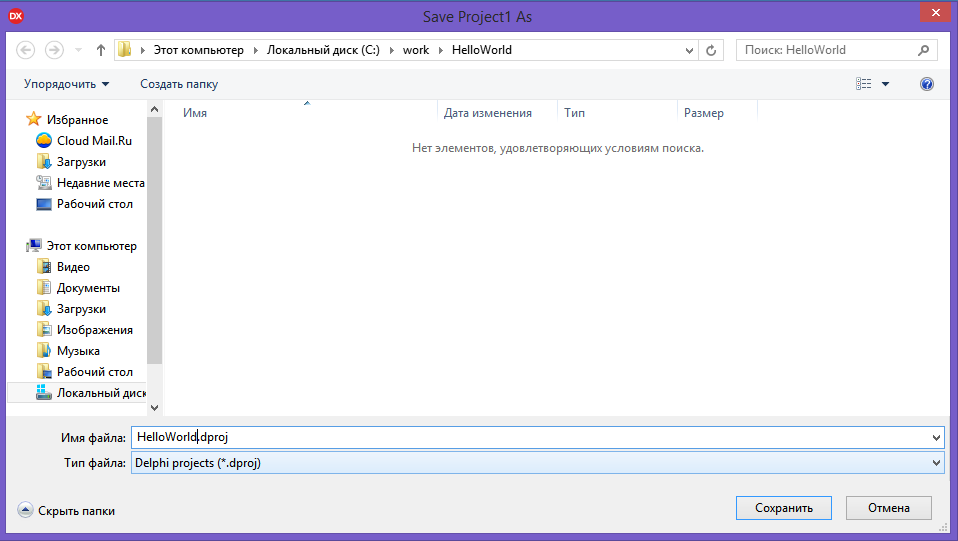
После сохранения имя запускаемого файла отобразится справа в окне проектов:
6. Создание интерфейса приложения
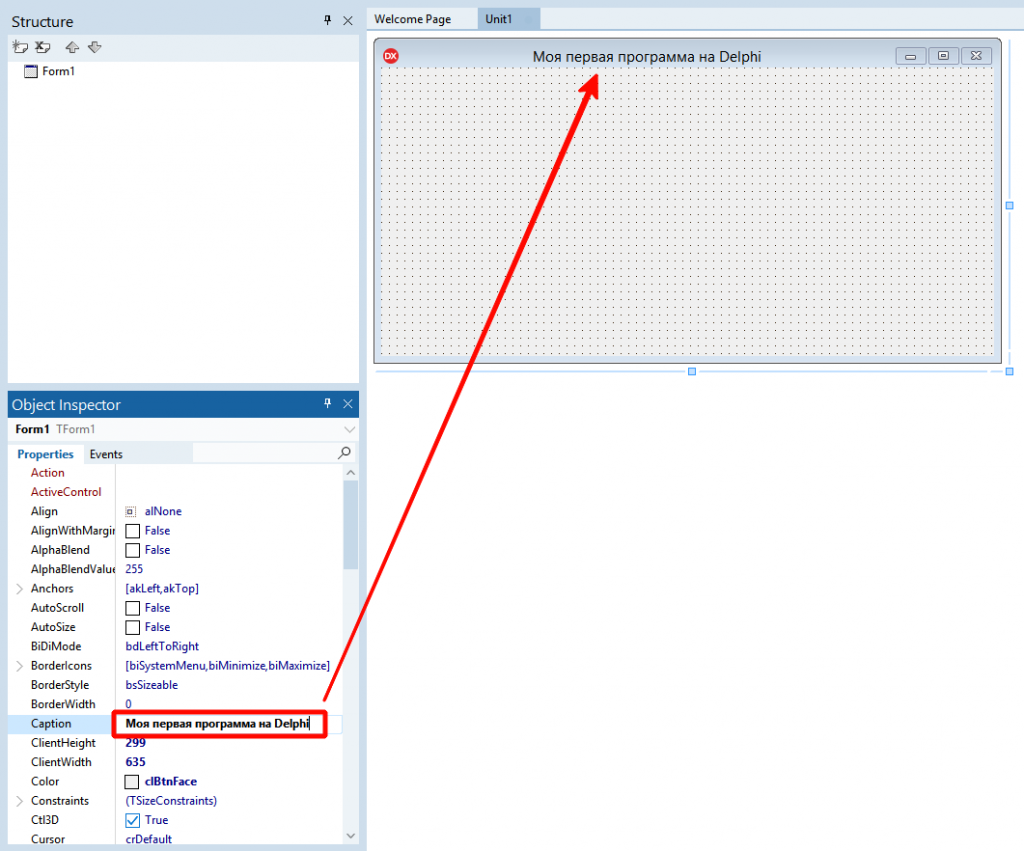
Теперь займёмся главным окном приложения. Поменяйте заголовок окна
Слева в окне Object Inspector найдите свойство Caption у вашей Form1 и напишите там: «Моя первая программа на Delphi». Обратите внимание, что одновременно будет меняться заголовок окна
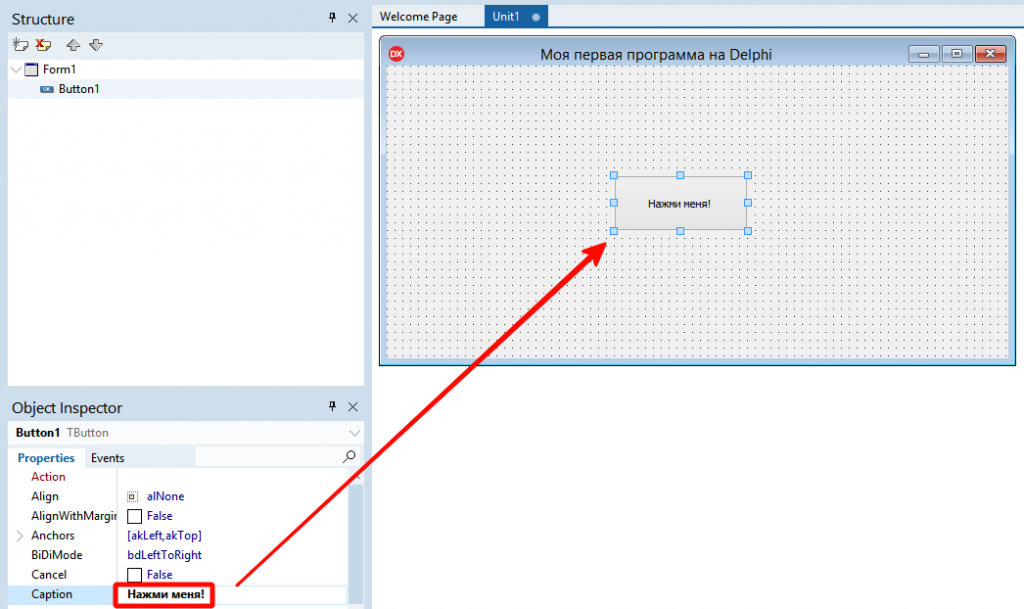
Добавим кнопку на форму. Найдите в правом нижнем углу экрана палитру компонентов и нажмите на Standart — вам откроется набор популярных компонентов. Два раза щёлкните на компоненте TButton — кнопка появится в самом центре формы.
Вы можете изменить её размеры, ухватив за уголок и протянув в нужном направлении. Зажав левую кнопку мыши на элементе Button1 вы можете перетащить его на любой место формы. Поэкспериментируйте с этим, сделав кнопку покрупнее.
В инспекторе объектов (по аналогии с изменением заголовка Form1) поменяйте Caption кнопки на «Нажми меня!«. Окно проекта в Delphi будет выглядеть примерно так:
Обращаю ваше внимание, что визуальная часть нашей программы уже готова. Оцените мощь Delphi, создать форму рабочего приложения можно за несколько минут!
7. Написание кода и запуск приложения в среде Delphi
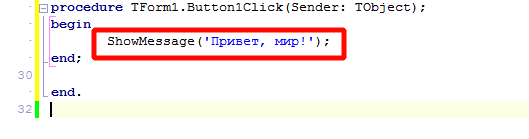
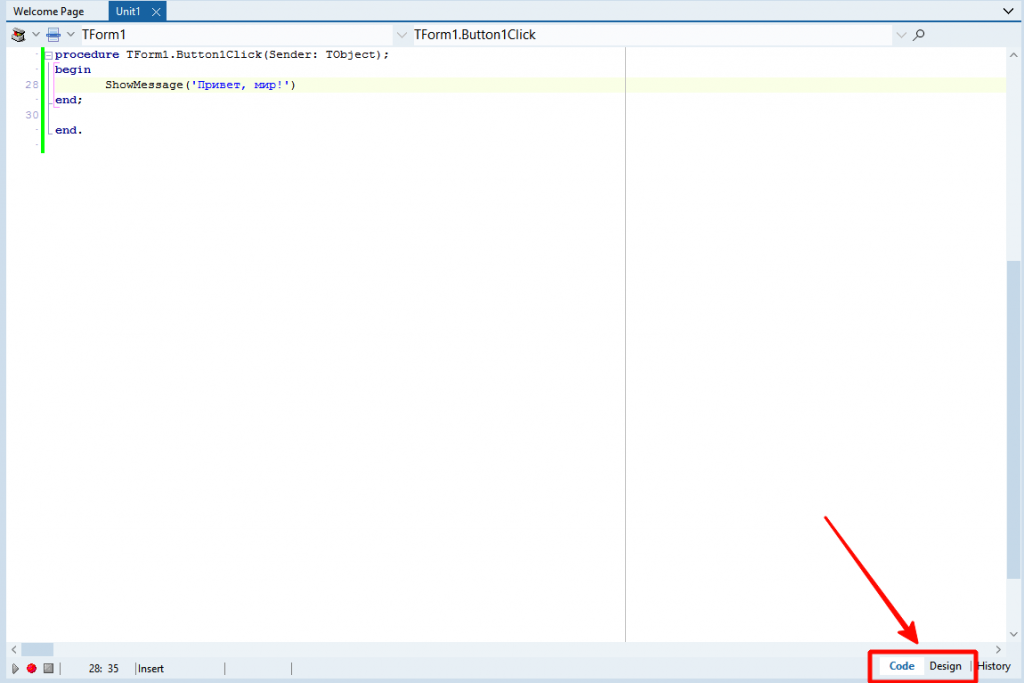
Самое время написать свою первую строку кода. Щёлкните два раза на кнопку Button1 (Button1 — имя объекта, на самой кнопке уже написано «Нажми меня!«). Откроется редактор кода. Delphi автоматически создало событие, которое произойдёт после щелчка по кнопке TForm1.Button1Click.
Всё, что вам нужно: вписать свой код между begin и end; в теле процедуры
Пишем:
|
ShowMessage(‘Привет, мир!’); |
Редактор автоматически сделает отступ, чтобы код процедуры был заметнее. Рекомендую следовать стандарту и оставить оформление таким же.
Нажмите F9. Или зеленую кнопку:

Если вы ввели код правильно (или скопировали его с этой страницы), программа скомпилируется и запуститься. Проверьте работу кнопки: вы увидите ваше всплывающее сообщение.
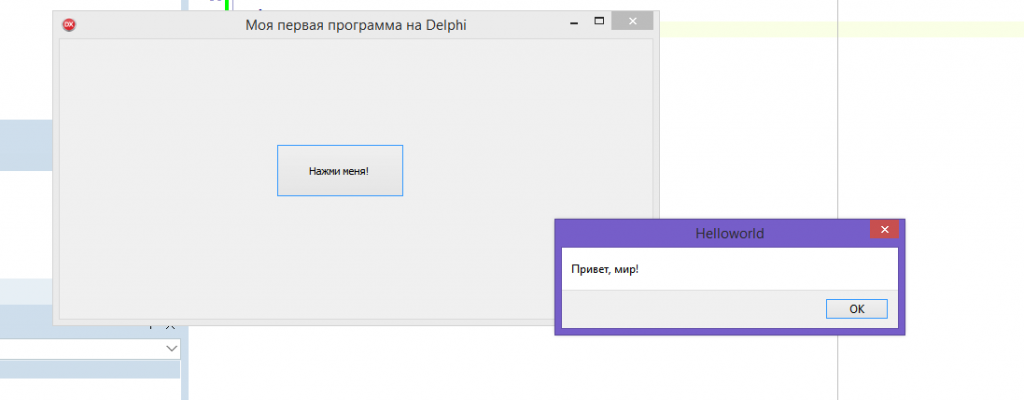
Поздравляю! Вы написали свою первую программу под Windows на Delphi.
Попробуйте изменить текст сообщения и надпись на кнопке и запустите программу заново. Переключаться между кодом программы и формой можно с помощью переключателя в правом нижнем углу окна модуля
8. Релиз приложения и размер exe-файла
Полученный исполняемый файл для Windows называется HelloWorld.exe, он находится в папке c:\work\HelloWorld\Win32\Debug\ (у вас путь к файлу может отличаться) и весит около 12 Mb.
Многовато для простого приложения.
Размер связан с двумя факторами:
1) Библиотеки Delphi вшиваются в файл с программой, что позволяет передавать просто сам exe-файл, дополнительных библиотек не нужно. Я просто отправил файл товарищу, у которого Delphi не установлено — приложение заработало сразу.
2) Сейчас мы компилируем программу в режиме отладки (Debug), который добавляет в исполняемый файл отладочную информацию и библиотеки. Попробуем уменьшить размер файла за счет смены режима.
В окне проекта (справа вверху) нажмите Build Configurations и дважды щёлкните на режим Release.
Запустить приложение, нажав F9. Программа запустится как обычно, но при этом в папке проекта создастся подкаталог Release, где будет находиться новый HelloWorld.exe. Его размер составит около 2,5 Mb, что существенно меньше. Этот файл я также проверил на другом компьютере — всё отлично заработало. Именно его вам и стоит передавать заказчику или выкладывать (предварительно сделав установщик setup, но это тема отдельной статьи).
Надеюсь, создавать программу на Delphi вам понравилось! В следующей статье мы разберём создание мультиплатформенного приложения, которое будет работать на Windows и Android.
Delphi is an integrated development environment (IDE) and programming language that was originally developed by Borland Software Corporation in the mid-1990s. It is primarily used for developing Windows applications, especially desktop applications.
Delphi uses the Object Pascal programming language, which is an extension of the Pascal programming language with added object-oriented features. It offers a visual development environment, with a user-friendly drag-and-drop interface for designing user interfaces and forms.
Delphi supports native Windows development, meaning that it can create applications specifically for the Windows operating system. It is well-suited for creating desktop applications with rich graphical user interfaces, database connectivity, and multi-tier architectures.
One of the major advantages of Delphi for Windows development is its ability to leverage the powerful Windows API (Application Programming Interface). This allows developers to directly access and utilize various Windows features and resources, such as system services, file handling, multimedia, networking, and more.
Furthermore, Delphi provides a range of pre-built components and libraries, including a comprehensive set of user interface controls, database components, networking components, and more. These components make it easier and faster to develop Windows applications by providing ready-to-use functionality.
Delphi has a large and active community of developers, with numerous online resources and forums available for support and collaboration. Over the years, Delphi has evolved and adapted to new technologies, such as supporting mobile application development for iOS and Android platforms.
In summary, Delphi is a powerful development tool for Windows application development. It offers a visual development environment, native Windows support, access to the Windows API, and a wide range of pre-built components. These features make Delphi a popular choice for developing robust, feature-rich, and user-friendly applications for the Windows platform.
How to Install Delphi on Windows 10?
To install Delphi on Windows 10, follow these steps:
- Download the Delphi installer: Go to the Embarcadero Delphi website (https://www.embarcadero.com/products/delphi) and click on the «Download Free Trial» button. Provide your details and follow the instructions to download the installer.
- Run the installer: Locate the downloaded installer file (usually named «setup.exe» or similar) and double-click on it to run it. If prompted, give administrative permissions to the installer.
- Select installation options: In the installer, you will see various installation options. You can choose to install additional components or not. Click on the «Next» button to proceed.
- Review the license agreement: Read through the license agreement carefully and accept it if you agree. You will not be able to proceed with the installation unless you accept the terms and conditions.
- Choose installation location: The installer will prompt you to select the location where you want to install Delphi. You can either choose the default location or specify a different one. Click on the «Next» button to continue.
- Select additional software: If you want to install additional components, such as database drivers or third-party tools, select them on the following screen. Otherwise, click on the «Next» button to proceed.
- Review installation summary: The installer will show you a summary of your chosen installation options. Review it to make sure everything looks correct. Click on the «Install» button to start the installation process.
- Wait for the installation to complete: The installer will now begin installing Delphi and any additional components you selected. It may take a while, depending on your system’s speed.
- Finish the installation: Once the installation is complete, you will see a confirmation screen. Click on the «Finish» button to exit the installer.
- Launch Delphi: To launch Delphi, go to your Start menu and search for «Delphi.» Click on the Delphi icon that appears to start the application.
That’s it! You have successfully installed Delphi on Windows 10. You can now start developing applications using the Delphi IDE.
Best Borland Delphi Books to Read in May 2025
1
Rating is 5 out of 5
Mastering Delphi Programming: A Complete Reference Guide: Learn all about building fast, scalable, and high performing applications with Delphi
2
Rating is 4.9 out of 5
The Little Book Of Delphi Programming: Learn To Program with Object Pascal (Little Programming Books)
3
Rating is 4.8 out of 5
Mastering Pascal and Delphi Programming (Palgrave Master Series (Computing), 1)
4
Rating is 4.7 out of 5
Delphi Cookbook: Recipes to master Delphi for IoT integrations, cross-platform, mobile and server-side development, 3rd Edition
5
Rating is 4.6 out of 5
Delphi Programming Projects: Build a range of exciting projects by exploring cross-platform development and microservices
6
Rating is 4.5 out of 5
Delphi Cookbook — Second Edition
7
Rating is 4.4 out of 5
Delphi GUI Programming with FireMonkey: Unleash the full potential of the FMX framework to build exciting cross-platform apps with Embarcadero Delphi
8
Rating is 4.3 out of 5
Delphi Cookbook
How to Install Delphi on Windows 8?
To install Delphi on Windows 8, follow these steps:
- Visit the official Embarcadero website (https://www.embarcadero.com/) and navigate to the Delphi product page.
- On the Delphi product page, click on the «Buy Now» or «Download Trial» button to proceed.
- Fill in the required information, such as your name, email address, and country, and select the appropriate options for your needs (e.g., Delphi version, license type).
- After completing the form, click on the «Submit» or «Continue» button.
- Choose the download option according to your preference (trial or full version).
- Once the download is complete, locate the downloaded installer file (usually a .exe file) on your computer.
- Double-click on the installer file to launch the Delphi installation wizard.
- Follow the instructions provided by the installation wizard to proceed with the installation.
- When prompted, review the license agreement and accept it to continue.
- Choose the installation directory where you want to install Delphi. If no specific directory is preferred, you can leave the default installation path.
- Select the components and features you wish to install. If you are unsure, it is recommended to keep the default selections.
- Configure any additional settings, such as shortcuts and file associations, as desired.
- Click on the «Install» or «Next» button to initiate the installation process.
- Wait for the installation to complete. This might take some time, depending on your system and the selected components.
- Once the installation is finished, click on the «Finish» or «Close» button to exit the installation wizard.
- You can now launch Delphi from your Start menu or desktop shortcut.
Note: It is important to have a valid license or trial version to install and use Delphi. Make sure to follow any additional instructions provided by Embarcadero during the installation process.
How to Install Delphi on Windows 7?
To install Delphi on Windows 7, follow the steps below:
- Download the Delphi installer from the official Embarcadero website or a trusted source.
- Locate the downloaded installer file and double-click on it to start the installation process.
- If prompted, choose the preferred language for the installer.
- The installer will then extract the necessary files. This may take a few minutes.
- Once the extraction is complete, the installation wizard will launch. Click on the «Next» button to proceed.
- Read and accept the license agreement, then click on the «Next» button.
- Choose the desired installation path for Delphi. You can either accept the default path or specify a custom one. Click on the «Next» button when ready.
- Select the features you want to install. By default, all features are selected. If you want to change the installation options, click on the «Modify» button. Otherwise, click on the «Next» button.
- Review the summary of the installation settings and click on the «Install» button to start the installation process.
- The installation process may take a while, depending on your system’s performance. During the installation, a progress bar will show the installation progress.
- Once the installation is complete, you will be prompted to enter your Embarcadero account credentials. If you have an account, enter your email and password. Otherwise, click on the «Skip Registration» button.
- After entering your account credentials or skipping the registration, the installation wizard will finish the installation process. Click on the «Finish» button.
- Delphi is now installed on your Windows 7 computer. You can launch the software from the desktop icon or the Start menu.
It is important to note that these steps may vary slightly depending on the specific version of Delphi you are installing.

Borland Delphi 7 or commonly referred to as Delphi 7 is a programming language that is and works within the scope of the Windows operating system.
Delphi 7 programming language is also an object-oriented programming language or commonly called OOP. By using this programming language, you can design an application program that looks the same as other windows applications.
Another capability of Delphi 7 is that it can provide components that you can later use to create an application that is similar to the appearance and workings of the Windows Operating System.
Not only that, Delphi 7 has also been strengthened with a structured and reliable type of programming language. To be able to use and write script code using the Delphi 7 programming language, you must first download and install the Delphi 7 application.
How to Install Delphi 7 on Windows 10
Delphi 7 has provided visual application creation as in Visual Basic. This programming language has also made it easy for us to be able to use program codes, compile programs quickly, have very attractive designs, develop software, and is supported by the object Pascal programming language.
Delphi 7 also has a special interface that can support the performance of the Delphi programming language in order to build an application with the help of VCL or the Visual Component Library.
And as for most of the Delphi developers who compile and write program code using the Integrated Development Environment or IDE. Here’s how to install Delphi 7 on Windows 10.
- Download the Delphi 7 package first. If so, then enter the Install folder. Find where the Delphi 7 installer is located. Then double click on the Delphi 7 installer.
- Then the initial screen of the Delphi installation wizard appears. Click Next to continue.
- Next you will be asked to fill in the serial number. Type in the serial number column as shown in the image below. If so, then click Next.
- Then in the License Agreement section, select the I accept the terms in the license agreement option. After that click Next.
- Click Next to continue.
- Next, select the setup type for this Delphi 7 application. And choose the Typical type. Then click the Next button.
- In the Choose VisiBroker section, click the check box on the Use VisiBroker/COBRA Support section. After that click Next.
- The next step you will be asked to choose the version of Office that you will use later for Delphi applications 7. Choose the Office XP option. Then click the Next button.
- On this Delphi 7, you can install Additional Components. But for this step, you have to uncheck all the options. Then click the Next button.
- The next step is the folder locations for the Delphi 7 application settings. Just click the Next button to continue the installation.
- Then at the Save installation database stage, you can check the Save installation database to hard drive (recommended) section. After that click Next.
- After completing all the initial configuration to install the Delphi 7 application, you can directly install this application. Click the Install button.
- Wait a while until the Delphi 7 application is finished installing. Then click the Finish button to finish installing the Delphi 7 application.
Thus the article that explains how to install Delphi 7 on Windows 10. You can learn the Delphi programming language using this Delphi 7 application.
And you can also create an application or software that can run on the Windows operating system easily using this application. Hopefully this article can be useful for you.
Установка программы Делфи на компьютер
Скачайте программу с ЯД или скопируйте с СД-диска на компьютер – системный диск С в корень.
Прежде чем устанавливать программу, подготовьте ваш компьютер:
— отключите антивирус (Касперский, НОД, Аваст или McAfee удалить!)
— отключите системный защитник Windows
— на Windows 7 Prof, Windows 8 / 10 отключить обязательную проверку электронной подписи драйвера:
ОТКЛЮЧЕНИЕ ЭЛЕКТРОННОЙ ПОДПИСИ ДРАЙВЕРА НА WINDOWS10 ДЛЯ УСТАНОВКИ ДИАГНОСТИЧЕСКОГО ОБОРУДОВАНИЯ И ЕГО НОРМАЛЬНОЙ РАБОТЫ:
1.Пуск — Параметры — Обновление и Восстановление — Восстановление — Перезапустить компьютер
2. Диагностика — Доп. параметры — параметры загрузки — Перезагрузить
3. Отключить обязательную проверку подписи драйвера — отключить антивирус (либо приостановить)
Windows 8.1: откройте панель справа => выберите «Параметры» => Изменение параметров компьютера => Обновление и восстановление => Восстановление => в пункте «Особые варианты загрузки» выберите «Перезагрузить сейчас».
После перезагрузки перед вами откроется меню в котором нужно выбрать «Поиск и устранение неисправностей».
откройте «Дополнительные параметры».
Параметры загрузки.
Нажмите кнопку «Перезагрузить».
После перезагрузки перед вами откроется меню настройки, в котором вы сможете как отключить некоторые настройки, так и включить различные варианты загрузки Windows. Действия здесь нужно проводить кнопками F1-F9 или 1-9, в нашем случаи нужно отключить обязательную проверку подписи драйверов, нажимаем клавишу F7 или 7.
На 7-ке:
1. Перезагрузите ПК — при начале загрузки ОС несколько раз нажмите на клавиатуре кнопку F8, пока не появится список на черном фоне. Выберите «Отключение обязательной проверки электронной подписи драйвера.
Заходим в Системный защитник (если это ОС 8 и 10), отключаем защиту в реальном времени, далее листам вниз, находим «Добавить в исключение», добавляем папку в программой, которая должна у Вас храниться в корне системного диска С вашего ПК.
Теперь можно приступать к установке Программы.
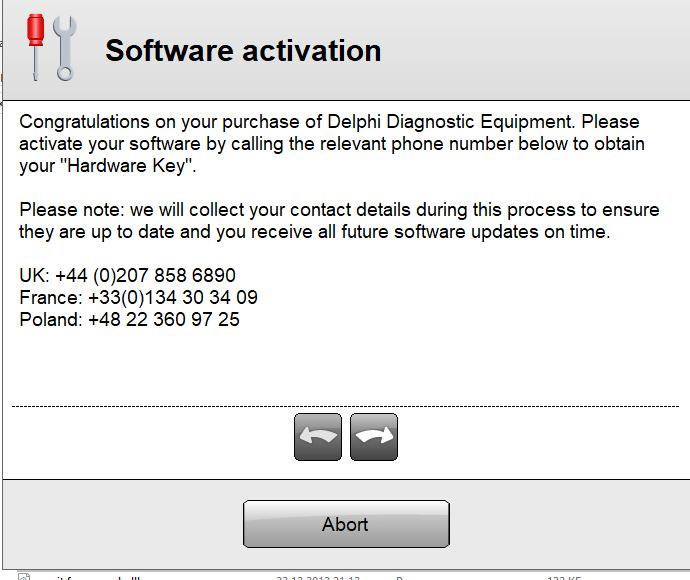
Запускаем MAIN.EXE от имени администратора
Жмем на стрелочку далее
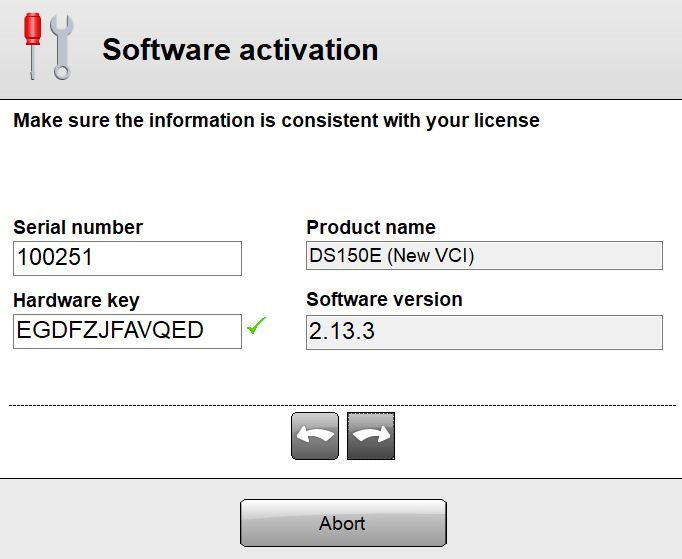
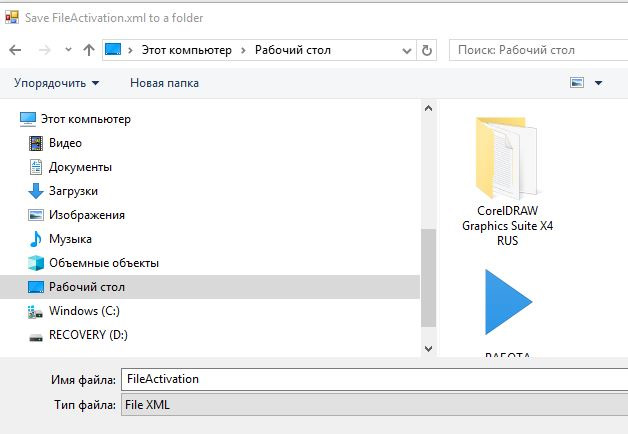
Нажимаем «Старт», жмем «ДА», сохраняем файл на рабочий стол ПК.
Отправляем файл для активации на почту продавца, у кого купили или мне (платно активирую, так как кейген был мною куплен.
Программу на время активации НЕ ЗАКРЫВАЕМ!
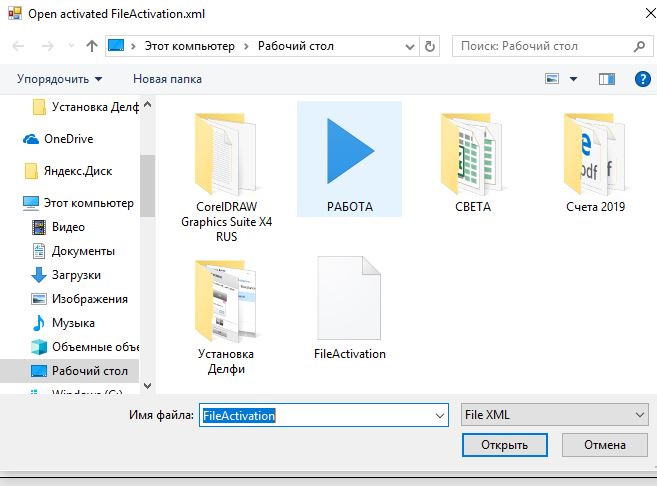
Мы вышлем активированный файл. Сохраните его на рабочий стол своего ПК с заменой
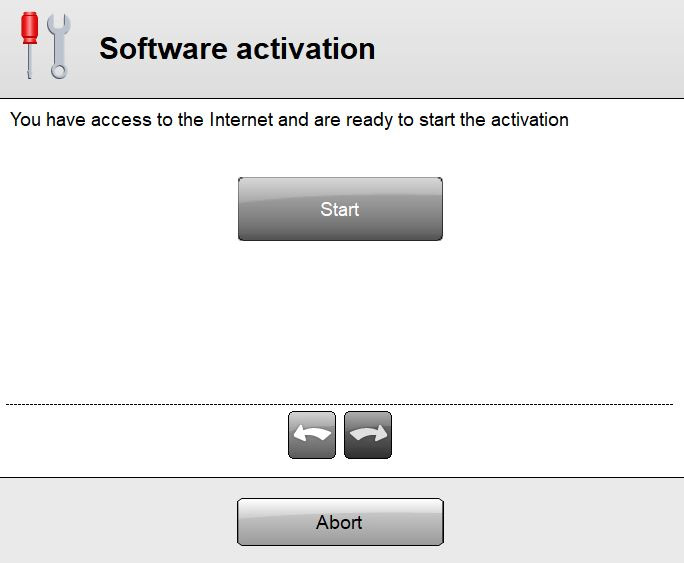
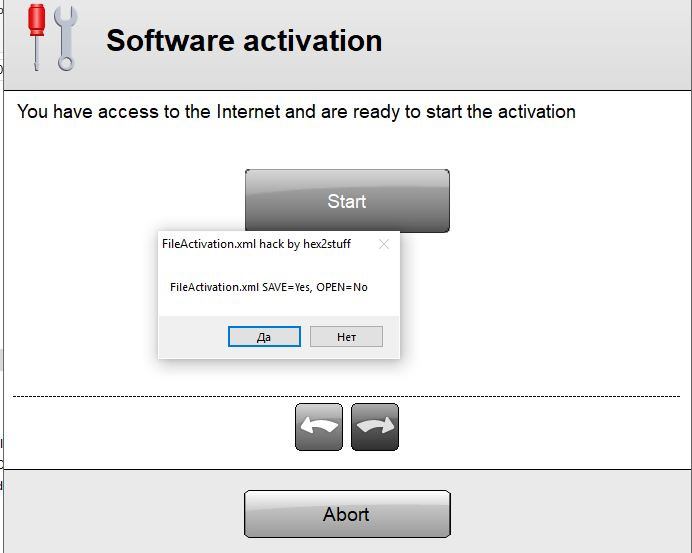
Возвращаемся к окну программы. Жмем «Старт», выбираем «НЕТ», выбираем файл активации с рабочего стола
Ждем
Все. Программа запустится. В настройках можно поменять язык


To install Delphi on your computer, follow these steps:
- First, you need to download the Delphi installer from Embarcadero’s official website.
- Run the installer executable file that you downloaded.
- Accept the license agreement to proceed.
- Choose the installation directory where you want Delphi to be installed. You can either go with the default location or select a different one.
- Select the components you want to install. The installer typically includes all necessary components by default, but you can customize the installation if needed.
- Choose the Start Menu folder where you want Delphi’s shortcuts to be located.
- Decide if you want to create desktop shortcuts for easy access to Delphi.
- Review the summary page to confirm your selections.
- Click on the Install button and wait for the installation process to complete.
- Once the installation is finished, you can launch Delphi by using the shortcuts created during the installation or by searching for Delphi in the Start Menu.
That’s it! Delphi should now be installed on your computer and ready for use.
Best Delphi Books to Read in 2024
1
Rating is 5 out of 5
Delphi Cookbook: Recipes to master Delphi for IoT integrations, cross-platform, mobile and server-side development, 3rd Edition
2
Rating is 4.9 out of 5
Delphi Programming for Dummies
3
Rating is 4.8 out of 5
The Little Book Of Delphi Programming: Learn To Program with Object Pascal (Little Programming Books)
4
Rating is 4.7 out of 5
Delphi GUI Programming with FireMonkey: Unleash the full potential of the FMX framework to build exciting cross-platform apps with Embarcadero Delphi
5
Rating is 4.6 out of 5
Borland Delphi Second Edition
6
Rating is 4.5 out of 5
Mastering Delphi Programming: A Complete Reference Guide: Learn all about building fast, scalable, and high performing applications with Delphi
7
Rating is 4.4 out of 5
Borland Delphi 7
8
Rating is 4.3 out of 5
Delphi High Performance: Master the art of concurrency, parallel programming, and memory management to build fast Delphi apps, 2nd Edition
How can I install Delphi for free?
To install Delphi for free, you can follow these steps:
- Visit the official Embarcadero website.
- Go to the Delphi Community Edition download page.
- Click on the «Download Free Community Edition» button.
- Fill in the required information, such as your name and email address, and click on «Register.»
Please note that the Delphi Community Edition is available for non-commercial use only. If you plan to use Delphi for commercial projects, you will need to purchase the appropriate license.
How to configure version control systems in Delphi?
To configure version control systems in Delphi, such as Git, SVN, or Mercurial, you can follow these steps:
- Install the version control system software on your development machine. You can download these tools from their respective websites or use a package manager like Chocolatey.
- Open your Delphi project or create a new project that you want to track with version control.
- Initialize the version control repository in the root directory of your project. For example, if you are using Git, open the command prompt or terminal in the project’s root directory and run the following command:
This command will create a new empty Git repository in the project folder.
- Add the files of your project to the version control system. Use the following command to add all the files to the Git repository:
- Commit your changes. With Git, you need to provide a commit message while committing changes. Use the following command to commit your changes:
1
|
git commit -m "Initial commit"
|
This will save all the current changes in the repository.
- Configure the version control system-specific settings. Depending on the version control system you are using, you may need to provide additional configuration settings. For example, you may need to set up remote repositories or configure branch management.
- Use the version control system commands to manage your project. Common commands include:
- git status: To check the status of your repository and see which files have been modified.
- git add : To stage specific files for commit.
- git commit -m «commit message»: To commit the staged changes.
- git push: To push the committed changes to a remote repository.
- git pull: To fetch and merge the changes from a remote repository into your local repository.
Remember to consult the documentation of the specific version control system you are using for more detailed instructions and advanced features.
What is the Delphi Package Manager and how to use it?
The Delphi Package Manager (DPM) is a tool introduced in Delphi XE8 and later versions, used to manage components and packages in Delphi’s Integrated Development Environment (IDE).
The package manager allows you to easily install, uninstall, update, and configure third-party packages and components in Delphi. Third-party packages are typically used to extend the functionality of the IDE, provide additional components or libraries, or integrate with external APIs and frameworks.
To use the Delphi Package Manager, follow these steps:
- Open Delphi IDE and go to the «Tools» menu.
- Select «GetIt Package Manager» from the options.
- The Package Manager window will open, listing available packages.
- Browse the available packages or use the search functionality to find specific packages.
- Click on a package to view its details, including description, version, and dependencies.
- Click the «Install» button next to a package to download and install it.
- After installation, the package will be added to your Delphi environment.
- To uninstall a package, go to the «Installed Packages» tab in the Package Manager window.
- Find the package you want to uninstall and click the «Uninstall» button.
- You can also update packages by checking for updates in the Package Manager window and clicking the «Update» button for relevant packages.
- The Package Manager also provides options to block or unblock specific packages, manage repositories, and configure settings.
Overall, the Delphi Package Manager simplifies the process of managing and integrating third-party components and packages within the Delphi IDE, enhancing productivity and extending the functionality of your Delphi applications.
What is the difference between Delphi and Turbo Delphi?
Delphi and Turbo Delphi are both integrated development environments (IDEs) used for building software applications in the Delphi programming language. However, there are some differences between the two:
- Legacy and name change: Delphi is the original IDE developed by Borland in the mid-1990s, while Turbo Delphi was a later version released by Embarcadero Technologies when they acquired Delphi from Borland. Turbo Delphi was essentially a stripped-down version of Delphi.
- Target audience: Delphi was mainly targeted towards professional software developers, providing a full-featured IDE with a wide range of tools, components, and frameworks. On the other hand, Turbo Delphi was intended for beginners and hobbyists, offering a simplified and free version of Delphi.
- Feature set: Delphi included a comprehensive set of tools, libraries, and components for building complex applications, including database connectivity, graphical user interface (GUI) design, web development, and more. Turbo Delphi had a more limited feature set, focusing on basic application development capabilities.
- Price: Delphi was a commercial product, requiring a license to use, while Turbo Delphi was a free version available for download and use. This made Turbo Delphi more accessible to individuals and small-scale developers.
Overall, Delphi provided a more powerful and feature-rich environment suitable for professional software development, whereas Turbo Delphi offered a simpler and free alternative for beginners and enthusiasts.
What is the role of the Delphi Object Inspector?
The Delphi Object Inspector is a visual component that is used in the Delphi Integrated Development Environment (IDE) for managing and modifying the properties of visual and non-visual components.
Its role is to provide a convenient and user-friendly interface for developers to view and edit the properties of various components used in their Delphi applications. The Object Inspector allows developers to easily modify properties such as the size, position, color, font, and many others. It also enables them to customize the behavior and appearance of the components without writing any code.
The Object Inspector provides a hierarchical view of the components and their properties, allowing developers to navigate through the component structure and modify properties at various levels. It supports different types of properties, including basic data types, strings, enumerations, sets, and more.
Additionally, the Object Inspector can also handle events associated with components, allowing developers to assign event handlers or modify existing event handlers easily.
Overall, the Object Inspector greatly simplifies the process of modifying component properties and makes it more intuitive for developers to work with the visual and non-visual components in their Delphi applications.
How to install Delphi on my Windows computer?
To install Delphi on your Windows computer, follow these steps:
- Download the Delphi installer: Visit the Embarcadero website (https://www.embarcadero.com/products/delphi) and click on the «Free Trial» or «Download Now» button to download the installer.
- Run the installer: Once the installer is downloaded, locate the downloaded file and double-click on it to run it. You may need administrative privileges to install the software.
- Choose the installation options: The installer will guide you through the installation process. Select the desired installation options such as language, edition, and destination folder. You can choose to install additional tools and components if needed.
- Activate or Skip the license activation: During the installation process, you may be prompted to activate your license. If you have a license, enter the activation details. If you don’t have a license yet, you can choose to activate the trial version or skip the activation process for now.
- Wait for the installation to complete: The installer will now begin installing Delphi on your computer. This process may take a few minutes, depending on your system’s performance.
- Launch Delphi: Once the installation is complete, you can launch Delphi from the Start menu or desktop shortcut.
- Configure the software: When you launch Delphi for the first time, you may need to configure some settings according to your preferences. This includes selecting the user interface theme, setting up your workspace, and providing any necessary additional information.
- Begin using Delphi: Delphi is now installed and ready to use. You can start creating and running Delphi projects on your Windows computer.
Note: Make sure your system meets the minimum system requirements for Delphi, which may vary depending on the version you are installing.