
Table of contents
- Overview
- Windows and MacOS installer
- ZIP archive
- Debian Package
- RPM Package
- Automatic updates
Overview
The installation process depends on the distribution type and your operating system.
DBeaver supports the following operating systems:
- Microsoft Windows: Windows 8.1, Windows Server 2012 or later versions.
- Windows Server: Windows Server 2016 or later versions.
- macOS: macOS 11 or later versions.
For downloading the product, please visit the appropriate links below:
- DBeaver PRO Products.
- DBeaver Community Edition.
Windows and MacOS installer
The installer distribution is the recommended method for installing DBeaver on Windows and MacOS. It includes all
necessary dependencies. Additionally, the installer automatically upgrades DBeaver to the new version if a previous
version is already installed. To install DBeaver, run the installer executable and follow the on-screen instructions.
Note:
- The installer does not modify any system settings or the Java installation.
- The included JDK is accessible only to DBeaver.
- DBeaver includes OpenJDK, which is an open-source version of Java. This means you do not need to purchase a separate
Java license to use DBeaver.
ZIP archive
To install DBeaver manually without using an installer:
-
Extract the contents of the archive.
Note:
- Do not unzip the archive over a previous version of DBeaver. If you already have any version of DBeaver extracted
in the same location, remove it before unzipping the new version. - All configurations, scripts, and other necessary data are stored in a separate location (usually in the user’s
home directory), so uninstalling the program does not affect them.
- Do not unzip the archive over a previous version of DBeaver. If you already have any version of DBeaver extracted
-
Run the dbeaver executable.
Debian Package
To install DBeaver using a Debian package:
- Run
sudo dpkg -i dbeaver-<version>.deb. - Execute
dbeaver &.
RPM Package
To install DBeaver using an RPM package:
- Run
sudo rpm -ivh dbeaver-<version>.rpm. - Execute
dbeaver &.
Note: To upgrade DBeaver to a newer version, use the
-Uvhparameter. For
instance:sudo rpm -Uvh dbeaver-<version>.rpm.
Automatic updates
This feature is available only on Windows and macOS.
Periodically, DBeaver automatically checks for new versions. If the check is not disabled and a new version is
available, it will prompt you to decide whether to upgrade. If you choose to upgrade, the installer will be downloaded
and launched automatically upon completion.
Note: DBeaver itself will be gracefully closed to avoid data loss.
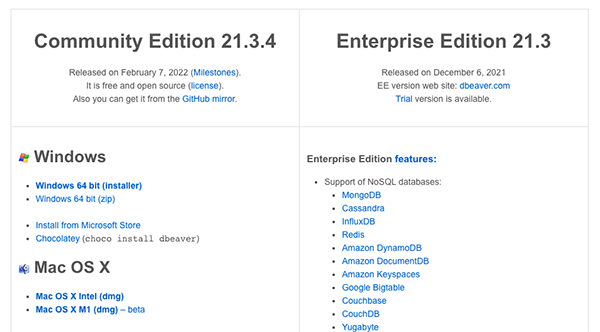
DBeaver Community 25.0.4Released on May 4th 2025 (Milestones). |
DBeaver PRO 25.0Released on March 10th, 2025 |
Windows
Mac OS X
Linux
Eclipse Plugin
Checksums
Previous versions
|
DBeaver PRO features:
|
| Usually we release a new Minor Community Edition version once per two weeks. Major version is released quarterly (every 3 months). Information about previous releases you can find here. |
System Requirements:
DBeaver is tested and verified for Windows, Linux and Mac OS X.
Supported versions:
- Microsoft Windows 8 or later versions
- Windows Server 2012 or later versions
- macOS 11 or later versions
Install:
Windows installer – run installer executable. It will automatically upgrade version (if needed). Windows 8 / Windows Server 2012 and earlier are not supported.
MacOS DMG – just run it and drag-n-drop DBeaver into Applications. MacOS 10 and earlier are not supported.
Debian package – run sudo dpkg -i dbeaver-<version>.deb. Then execute “dbeaver &”.
RPM package – run sudo rpm -ivh dbeaver-<version>.rpm. Then execute “dbeaver &”. Note: to upgrade use “-Uvh” parameter.
ZIP archive – extract archive and run “dbeaver” executable. Do not extract archive over previous version (remove previous version before install).
Upgrade – don’t be afraid to remove previous DBeaver version – your settings won’t be lost. All settings are kept in the separate folder (DBeaverData in user home)
Java notes:
DBeaver requires Java 21 or higher. Since version 23.0 all distributions include OpenJDK 21 bundle.
If you want to use you own locally installed Java you may delete folder “jre” in the DBeaver installation folder.
Debian repository:
sudo  wget -O /usr/share/keyrings/dbeaver.gpg.key https://dbeaver.io/debs/dbeaver.gpg.key
echo "deb [signed-by=/usr/share/keyrings/dbeaver.gpg.key] https://dbeaver.io/debs/dbeaver-ce /" | sudo tee /etc/apt/sources.list.d/dbeaver.list
sudo apt-get update && sudo apt-get install dbeaver-ce
Ubuntu PPA:
You can use PPA repository to easily install/upgrade DBeaver on Debian Linuxes. Mostly it is the same as regular Debian repo but it is hosted on Launchpad.
sudo add-apt-repository ppa:serge-rider/dbeaver-ce
sudo apt-get update
sudo apt-get install dbeaver-ce
Early Access:
You may get latest build (EA version) of DBeaver. Usually it contains all major bug fixes found in current stable version. Just choose the archive corresponding to your OS and hardware from the following folder: EA version downloads.
Archive:
All recent DBeaver versions are available in the archive.
Source code:
Please, star the repository!
CloudBeaver
DBeaver is desktop application.
If you are looking for a web-based database management system – please check another of our products: CloudBeaver.
It is also open-source and free.
DBeaver is a multiplatform application. It has versions for Windows, macOS, and Linux users. To start working with DBeaver you need to download and install it, and today we will go through these steps with you.

How can I get the app?
You can easily download the commercial versions of DBeaver from our official website DBeaver.com. To do this, go to Products -> Download and select an edition. We have three commercial products: Lite, Enterprise, and Ultimate. For your convenience, we have prepared a comparison table, where you can choose the most suitable product in terms of the number of features.
All previous DBeaver versions are available in the archive. You can also download the early access version with the most recent fixes, enhancements, and features. It is less tested, so use it at your own risk.
We suggest taking advantage of the free 14 days trial period if you have not purchased a license yet.
You can get it in the “Try for free” section.
When you open the download page, your operating system will be recognized automatically and you will see a button to get a compatible version. If you want to get a different installer, select one of the options from the list.
The installation process depends on your operating system.
Move on to the installation
WINDOWSRun installer executable. When the installation wizard opens, follow the instructions and choose the options you need. In the dialog box, you can select whether to install DBeaver for all users or for the current user. You also have the option to change the destination folder from default to custom.
| macOS | Drag and drop DBeaver into your Application folder. On reinstall do the same. |
|---|---|
| Linux Debian package | Run sudo dpkg -i dbeaver-.deb. Then execute the package. |
| Linux RPM package | Run sudo rpm -ivh dbeaver-.rpm, and then execute the package. Note: to upgrade use “-Uvh” parameter. |
You can easily change a DBeaver file’s location in any operating system using the app.
Just go to File -> Switch Workspace and set a new path.
When you launch the application, the system will suggest that you generate a trial version of the product or import your license key into DBeaver. You can copy it from your profile on our website. More information about importing a license can be found on our Wiki page.
If you need to update DBeaver, you do not have to uninstall the previous version. Just close the running application and follow the same steps as during the first installation.
You can install all DBeaver Editions on one computer and it will not cause any problems.
But we advise you not to open more than one of our apps at the same time.
What about DBeaver CE?
To download our open-source product DBeaver Community go to dbeaver.io and click the “Download” button on the main page. You will be redirected to a page where you can select the version compatible with your operating system. You will receive the latest edition of the product with the updates listed below. On the download page, you can also find the archives of previous DBeaver Community releases to download an earlier version.
The installation process for the DBeaver Community is the same as for the commercial products.
That’s all. Now you can start using DBeaver for your projects. We hope you will enjoy it!
DBeaver — это бесплатное программное обеспечение для работы с базами данных. При помощи DBeaver можно создавать новые базы данных, объекты и управлять данными в базе данных, а также выполнять SQL-запросы.
Открываем страницу на официальном сайте DBeaver и выбираем необходимый дистрибутив для загрузки.
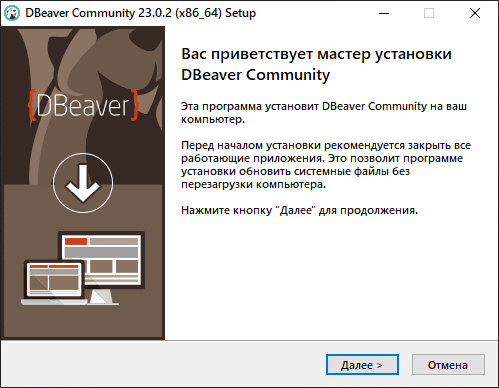
Запускаем загруженный файл. Выбираем язык для дальнейшей установки, нажимаем — ОК.
Пропускаем экран приветствия, нажимаем — Далее.
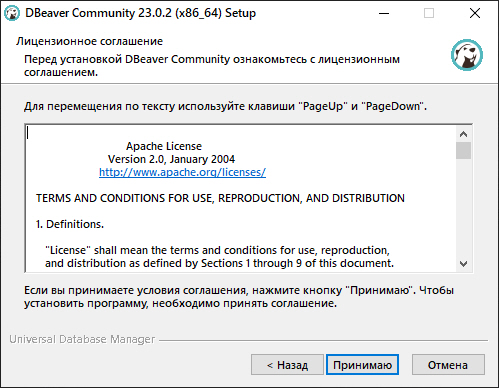
Принимаем условия лицензионного соглашения, нажимаем — Принимаю.
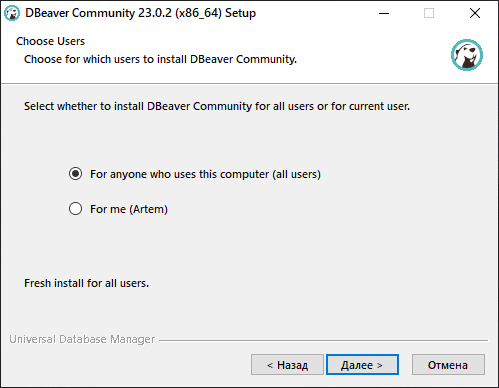
Выбираем для кого будет установлено программное обеспечение, то есть, для всех пользователей компьютера или только для одного пользователя. Выбираем пункт — For anyone who uses this computer (all users) и нажимаем — Далее.
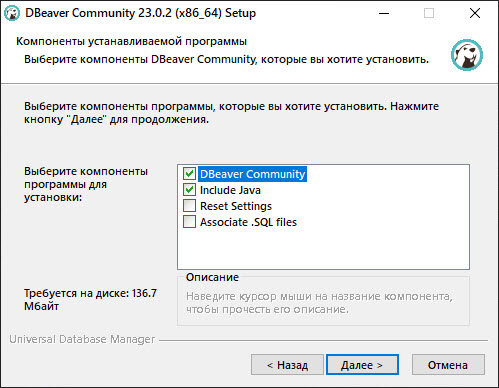
Отмечаем компоненты, которые необходимо установить: DBeaver Community и Include Java, нажимаем — Далее.
Указываем директорию для установки DBeaver, и нажимаем — Далее.

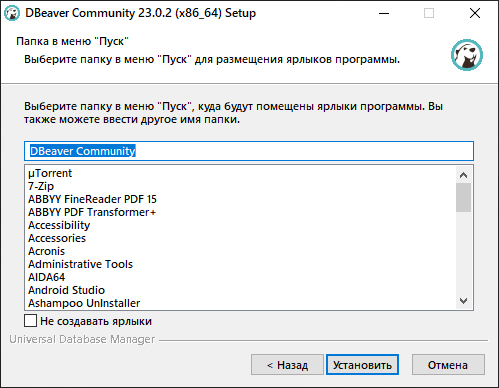
Выбираем директорию в меню пуск, в которую будут помещены ярлыки DBeaver. Нажимаем — Установить.
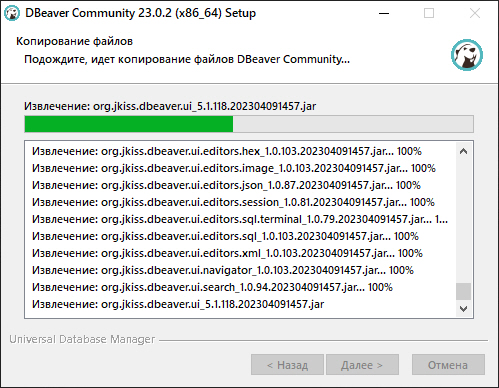
Пошёл процесс установки.
Установка программного обеспечения DBeaver закончена, ставим галочку на пункте — Create desktop Shortcut, и нажимаем — Готово.
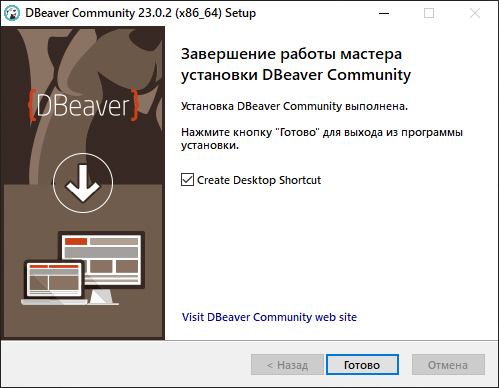
На рабочем столе появился ярлык для запуска DBeaver, и теперь можно запустить программное обеспечение.

Метки: DBeaver.
Diving into DBeaver: Why It’s Worth Your Time
DBeaver, if you haven’t heard of it, is a seriously powerful database management tool. It’s like the Swiss Army knife of database tools—versatile, reliable, and packed with features. Whether you’re dealing with MySQL, PostgreSQL, SQLite, or even more exotic databases, DBeaver’s got your back. Today, we’re going to walk through installing DBeaver on Windows. It’s not just about getting the software up and running; it’s about understanding why DBeaver is such a game-changer.
I remember the first time I used DBeaver. I was working on a project that involved multiple databases, and juggling different tools was a nightmare. DBeaver streamlined everything, and I never looked back. So, let’s get started and see how you can bring this powerhouse onto your Windows machine.
Preparing for Installation: What You Need to Know
Before we dive into the installation process, let’s make sure you’ve got everything you need. Here’s a quick checklist:
- A Windows machine (obviously)
- Administrative privileges (you’ll need these to install software)
- An internet connection (to download the installer)
- A bit of patience (always handy)
Got all that? Great! Let’s move on.
Downloading DBeaver: The First Step
The first thing you need to do is download the DBeaver installer. Head over to the DBeaver download page. You’ll see a few options, but for most users, the Community Edition is the way to go. It’s free and open-source, which is always a plus.
Click on the Windows installer link. This will download an .exe file to your computer. Easy enough, right?
Running the Installer: The Nitty-Gritty
Once the download is complete, navigate to the folder where the installer was saved. Double-click the .exe file to launch the installer. You’ll see a familiar installation wizard pop up.
Follow the on-screen instructions. You’ll be prompted to accept the license agreement (read it if you’re into that sort of thing), choose an installation location, and select any additional tasks you want the installer to perform. I usually go with the default settings, but feel free to customize as you see fit.
Customizing Your Installation: Optional but Useful
During the installation process, you might be asked if you want to install additional components or create a desktop shortcut. These are optional, but they can make your life easier. For example, having a desktop shortcut means you can launch DBeaver with just a click.
You might also be asked if you want to associate .sql files with DBeaver. This can be handy if you work with a lot of SQL scripts. It’s a small detail, but it can save you a bit of time in the long run.
Finishing Up: The Final Steps
Once you’ve made all your selections, click ‘Install.’ The installer will do its thing, and you’ll see a progress bar as it works. This usually doesn’t take too long, but it’s a good time to grab a coffee or check your emails.
After the installation is complete, you’ll be prompted to launch DBeaver. Go ahead and click ‘Finish’ to start the application.
Exploring DBeaver: What to Do After Installation
Congratulations! You’ve successfully installed DBeaver on your Windows machine. But what now? Let’s take a quick tour of the interface and some of the key features.
When you first launch DBeaver, you’ll be greeted with a welcome screen. This is where you can create new database connections, open existing ones, or explore the various tools and settings.
Creating Your First Database Connection
To get started, you’ll want to create a new database connection. Click on the ‘New Database Connection’ button. You’ll be presented with a list of database types. Select the one you want to connect to (e.g., MySQL, PostgreSQL, etc.).
Enter the connection details, such as the host, port, database name, username, and password. DBeaver will test the connection to make sure everything is set up correctly. If all goes well, you’ll see your database listed in the Database Navigator panel.
Navigating the Interface: A Quick Tour
The DBeaver interface is pretty intuitive, but it’s worth taking a moment to familiarize yourself with the layout. The Database Navigator panel on the left is where you’ll see all your connected databases. You can expand each database to view its tables, views, and other objects.
The main editor panel is where you’ll write and execute your SQL queries. There are also tabs for viewing query results, managing database objects, and more.
Exploring Advanced Features: Diving Deeper
DBeaver is packed with advanced features that can make your database management tasks a breeze. For example, you can use the ER Diagram tool to visualize your database schema. This can be incredibly useful for understanding complex relationships between tables.
Another handy feature is the SQL Editor’s autocomplete and syntax highlighting. These features can save you a lot of time and help you catch errors before you execute your queries.
Customizing DBeaver: Making It Your Own
One of the great things about DBeaver is how customizable it is. You can tweak the settings to suit your workflow. For example, you can change the theme, adjust the font size, and even customize the toolbar.
To access these settings, go to the ‘Window’ menu and select ‘Preferences.’ From here, you can explore the various options and make DBeaver feel like your own personal database tool.
Troubleshooting Common Issues: What to Do If Things Go Wrong
Even with the best tools, things can go wrong. If you run into issues during the installation or while using DBeaver, don’t panic. Here are some common problems and how to fix them.
Installation Fails: What to Check
If the installer fails, it could be due to a few reasons. First, make sure you have administrative privileges on your Windows machine. Sometimes, the installer needs these permissions to make changes to the system.
Another common issue is a corrupted download. If the installer fails, try downloading the .exe file again and running it. This often solves the problem.
Connection Issues: Troubleshooting Tips
If you’re having trouble connecting to your database, double-check the connection details. Make sure the host, port, database name, username, and password are all correct.
Also, ensure that your database server is running and accessible. Sometimes, firewall settings or network configurations can block the connection.
Performance Problems: Speeding Things Up
If DBeaver is running slow, there are a few things you can try. First, make sure you’re running the latest version of the software. Updates often include performance improvements.
You can also adjust the memory settings in DBeaver. Go to ‘Window’ > ‘Preferences’ > ‘DBeaver’ > ‘Memory Settings.’ Increasing the allocated memory can help improve performance, especially if you’re working with large databases.
Conclusion: Embracing the Power of DBeaver
Installing DBeaver on Windows is just the beginning. This powerful tool can revolutionize the way you manage your databases. Whether you’re a seasoned pro or just getting started, DBeaver has something to offer.
So, go ahead and explore. Connect to your databases, run your queries, and see what DBeaver can do for you. I think you’ll be impressed.
FAQ
Q: Is DBeaver free to use?
A: Yes, the Community Edition of DBeaver is free and open-source. There are also paid versions with additional features.
Q: Can I use DBeaver with multiple databases?
A: Absolutely. DBeaver supports a wide range of databases, including MySQL, PostgreSQL, SQLite, Oracle, and more.
Q: What if I encounter an issue during installation?
A: If you run into problems, try downloading the installer again or check your administrative privileges. You can also refer to the DBeaver documentation for troubleshooting tips.
Q: How do I update DBeaver?
A: DBeaver will notify you when a new version is available. You can download the latest installer from the DBeaver website and run it to update the software.