
В очередной раз после переустановки Windows осознал, что надо накатить драйвера, CUDA, cuDNN, Tensorflow/Keras для обучения нейронных сетей.
Каждый раз для меня это оказывается несложной, но времязатратной операцией: найти подходящую комбинацию Tensorflow/Keras, CUDA, cuDNN и Python несложно, но вспоминаю про эти зависимости только в тот момент, когда при импорте Tensorflow вижу, что видеокарта не обнаружена и начинаю поиск нужной страницы в документации Tensorflow.
В этот раз ситуация немного усложнилась. Помимо установки Tensorflow мне потребовалось установить PyTorch. Со своими зависимостями и поддерживаемыми версиями Python, CUDA и cuDNN.
По итогам нескольких часов экспериментов решил, что надо зафиксировать все полезные ссылки в одном посте для будущего меня.
Краткий алгоритм установки Tensorflow и PyTorch
Примечание: Установить Tensorflow и PyTorch можно в одном виртуальном окружении, но в статье этого алгоритма нет.
Подготовка к установке
- Определить какая версия Python поддерживается Tensorflow и PyTorch (на момент написания статьи мне не удалось установить PyTorch в виртуальном окружении с Python 3.9.5)
- Для выбранной версии Python найти подходящие версии Tensorflow и PyTorch
- Определить, какие версии CUDA поддерживают выбранные ранее версии Tensorflow и PyTorch
- Определить поддерживаемую версию cuDNN для Tensorflow – не все поддерживаемые CUDA версии cuDNN поддерживаются Tensorflow. Для PyTorch этой особенности не заметил
Установка CUDA и cuDNN
- Скачиваем подходящую версию CUDA и устанавливаем. Можно установить со всеми значениями по умолчанию
- Скачиваем cuDNN, подходящую для выбранной версии Tensorflow (п.1.2). Для скачивания cuDNN потребуется регистрация на сайте NVidia. “Установка” cuDNN заключается в распакове архива и заменой существующих файлов CUDA на файлы из архива
Устанавливаем Tensorflow
- Создаём виртуальное окружение для Tensorflow c выбранной версией Python. Назовём его, например,
py38tf - Переключаемся в окружение
py38tfи устанавливаем поддерживаемую версию Tensorflowpip install tensorflow==x.x.x - Проверяем поддержку GPU командой
python -c "import tensorflow as tf; print('CUDA available' if tf.config.list_physical_devices('GPU') else 'CUDA not available')"
Устанавливаем PyTorch
- Создаём виртуальное окружение для PyTorch c выбранной версией Python. Назовём его, например,
py38torch - Переключаемся в окружение
py38torchи устанавливаем поддерживаемую версию PyTorch - Проверяем поддержку GPU командой
python -c "import torch; print('CUDA available' if torch.cuda.is_available() else 'CUDA not available')"
В моём случае заработала комбинация:
- Python 3.8.8
- Драйвер NVidia 441.22
- CUDA 10.1
- cuDNN 7.6
- Tensorflow 2.3.0
- PyTorch 1.7.1+cu101
Tensorflow и PyTorch установлены в разных виртуальных окружениях.
Итого
Польза этой статьи будет понятна не скоро: систему переустанавливаю я не часто.
Если воспользуетесь этим алгоритмом и найдёте какие-то ошибки – пишите в комментарии
#96
пятница, 19 июля 2024 г.
четверг, 25 июля 2024 г.
6 минут(ы)
501 слово
Для установки поддержки CUDA под Windows 10 для Python и C++, выполните следующие шаги:
Шаг 1: Установите драйверы NVIDIA
- Перейдите на официальный сайт NVIDIA Drivers.
- Введите данные вашей видеокарты и скачайте последнюю версию драйверов.
- Установите драйверы, следуя инструкциям установщика.
Шаг 2: Установите CUDA Toolkit
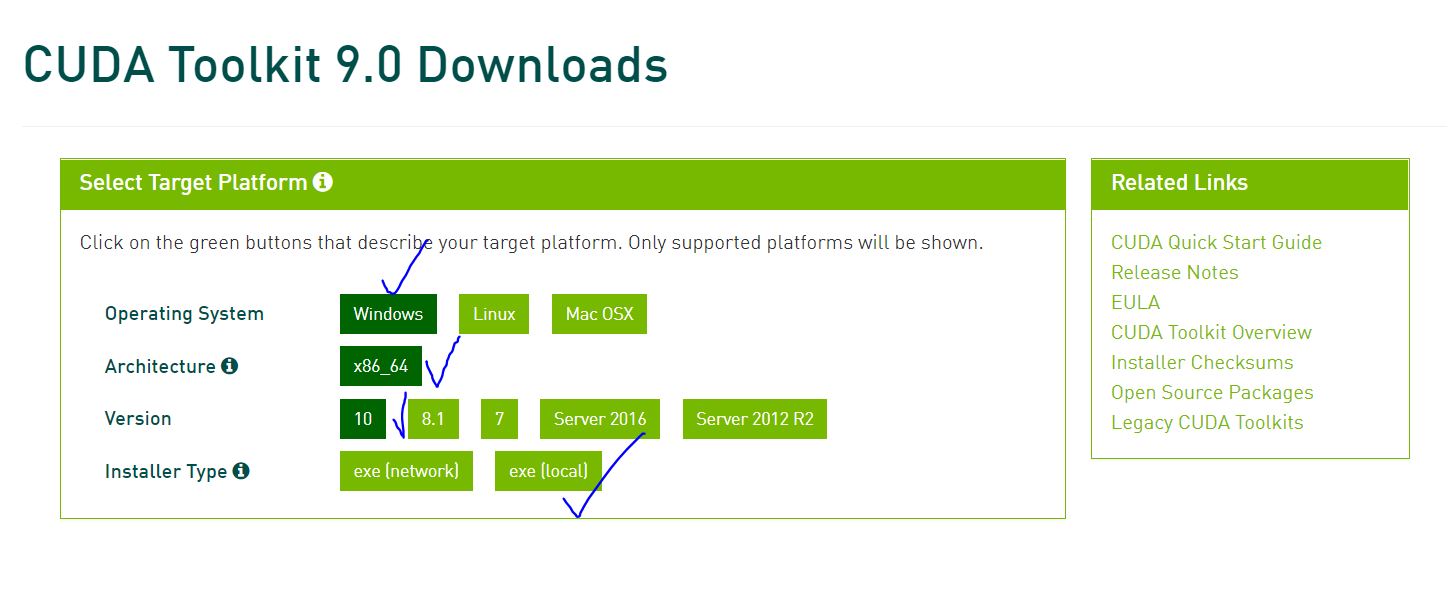
- Перейдите на страницу CUDA Toolkit Downloads.
- Выберите вашу операционную систему (Windows), архитектуру x86_64, версию Windows (10), и тип установщика (exe (local)).
- Скачайте и запустите установочный файл.
- Следуйте инструкциям установщика. Рекомендуется оставить все параметры по умолчанию.
- Содержимое будет распакованно в директорию установки CUDA (например,
C:\Program Files\NVIDIA GPU Computing Toolkit\CUDA\vX.X), заменяя существующие файлы.
Шаг 3: Установите cuDNN (для глубокого обучения)
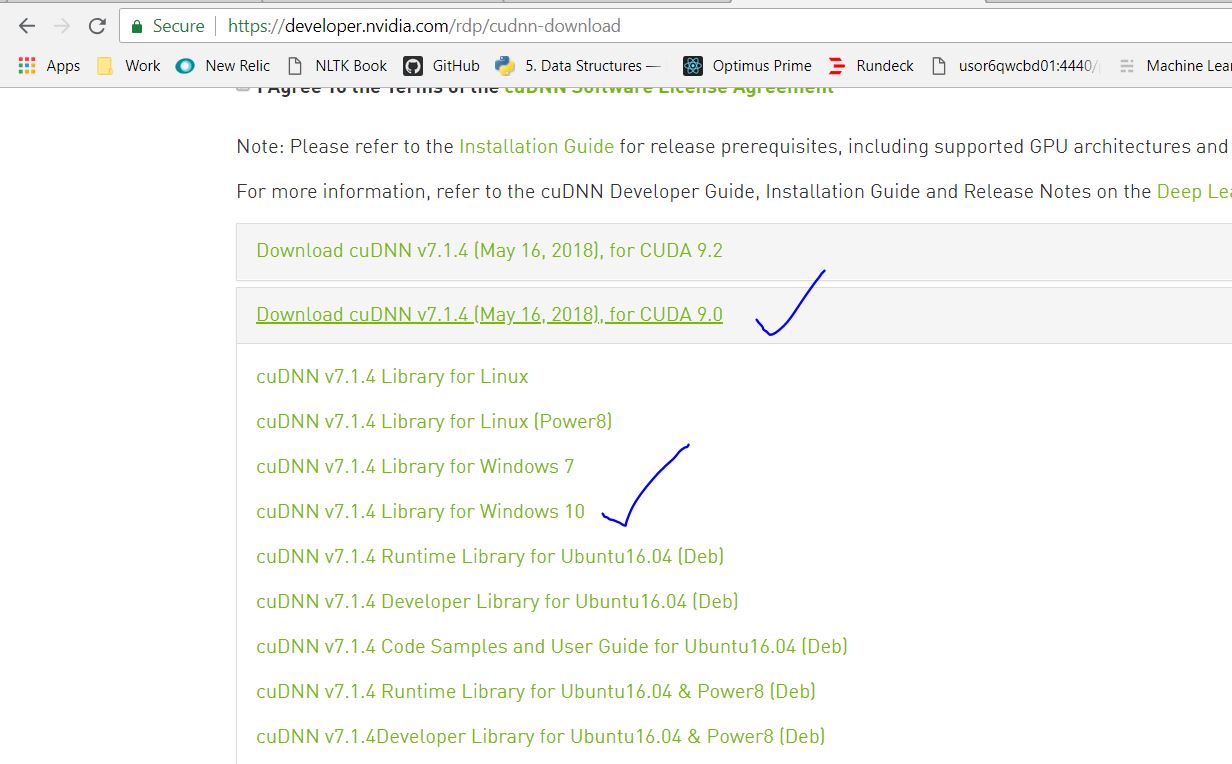
- Перейдите на страницу cuDNN Download.
- Выберите вашу операционную систему (Windows), архитектуру x86_64, версию Windows (10), и тип установщика (exe (local)).
- Скачайте файл и запустите его.
- Следуйте инструкциям установщика. Рекомендуется оставить все параметры по умолчанию.
- Содержимое будет распакованно в директорию установки CUDNN (например,
C:\Program Files\NVIDIA\CUDNN\vX.X), заменяя существующие файлы.
ВАЖНОЕ ЗАМЕЧАНИЕ!
Выполнив шаги 1, 2, 3, вы установите все необходимые драйверы и программы для поддержки CUDA под Windows 10 для Python и C++.
Следующие шаги предназначены только для программистов и не являются необходимыми для обычных пользователей ПК.
Шаг 4: Настройте переменные окружения при необходимости
- Откройте «Свойства системы» (System Properties) через меню «Пуск» или панели управления.
- Перейдите на вкладку «Дополнительно» (Advanced) и нажмите «Переменные среды» (Environment Variables).
- В разделе «Системные переменные» (System Variables) найдите переменную
CUDA_PATHи нажмите «Изменить» (Edit). - Добавьте следующие пути (замените
vX.Xна вашу версию CUDA): —C:\Program Files\NVIDIA GPU Computing Toolkit\CUDA\vX.XC:\Program Files\NVIDIA GPU Computing Toolkit\CUDA\v12.5
- Нажмите «OK» для сохранения изменений.
Шаг 5: Установка поддержки CUDA для Python
-
Установка PyTorch: В зависимости от твоей операционной системы и наличия видеокарты (NVIDIA или AMD), тебе может потребоваться установить PyTorch с CUDA поддержкой. RVC-Project использует PyTorch для глубокого обучения, и наличие CUDA значительно ускорит процесс тренировки моделей. Подробные инструкции по установке PyTorch можно найти на сайте https://pytorch.org/get-started/locally/.
-
Откройте командную строку или терминал. Активируйте ваш Python проект:
- Установите пакет
PyTorch, который предоставляет поддержку CUDA для Python:
pip install torch torchvision torchaudio --index-url https://download.pytorch.org/whl/cu121
- При необходимости установите пакет
cupy, который предоставляет поддержку CUDA для Python:
pip install cupy-cuda11x # Замените 11x на вашу версию CUDA (например, cupy-cuda112 для CUDA 11.2)
Шаг 6: Проверка установки для C++ и Python
C++
Создайте тестовый файл test_cuda.cu с содержимым:
#include <iostream>
#include <cuda_runtime.h>

__global__ void helloCUDA() {
    printf("Hello from CUDA!\n");
}

int main() {
    helloCUDA<<<1, 1>>>();
    cudaDeviceSynchronize();
    return 0;
}
Скомпилируйте и выполните его:
nvcc -o test_cuda test_cuda.cu
test_cuda.exe
Python
Создайте тестовый скрипт test_cuda.py:
import cupy as cp

a = cp.array([1, 2, 3, 4, 5])
print(a)
Запустите скрипт:
Если вы увидите массив, выводимый на экран, установка выполнена успешно.
Теперь вы настроили поддержку CUDA под Windows 10 для Python и C++.
Web: https://d00m4ace.com/
GitHub: https://github.com/d00m4ace/
YouTube: https://www.youtube.com/c/@d00m4ace
Telegram: https://t.me/d00m4ace_blog
CUDA Install Guide
This is a must-read guide if you want to setup a new Deep Learning PC. This guide includes the installation of the following:
- NVIDIA Driver
- CUDA Toolkit
- cuDNN
- TensorRT
Recommendation
Debian installation method is recommended for all CUDA toolkit, cuDNN and TensorRT installation.
For PyTorch, CUDA 11.0 and CUDA 10.2 are recommended.
For TensorFlow, up to CUDA 10.2 are supported.
TensorRT is still not supported for Ubuntu 20.04. So, Ubuntu 18.04 is recommended
Install NVIDIA Driver
Windows
Windows Update automatically install and update NVIDIA Driver.
Linux
Update first:
sudo apt update
sudo apt upgrade
Check latest and recommended drivers:
sudo ubuntu-drivers devices
Install recommended driver automatically:
sudo ubuntu-drivers install
Or, Install specific driver version using:
sudo apt install nvidia-driver-xxx
Then reboot:
Verify the Installation
After reboot, verify using:
Install CUDA Toolkit
Installation Steps
- Go to https://developer.nvidia.com/cuda-toolkit-archive and choose your desire CUDA toolkit version that is compatible with the framework you want to use.
- Select your OS.
- Select your system architecture.
- Select your OS version.
- Select Installer Type and Follow the steps provided. (.exe on Windows and .run or .deb on Linux)
Post-Installation Actions
Windows exe CUDA Toolkit installation method automatically adds CUDA Toolkit specific Environment variables. You can skip the following section.
Before CUDA Toolkit can be used on a Linux system, you need to add CUDA Toolkit path to PATH variable.
Open a terminal and run the following command.
export PATH=/usr/local/cuda-11.1/bin${PATH:+:${PATH}}
or add this line to .bashrc file.
In addition, when using the runfile installation method, you also need to add LD_LIBRARY_PATH variable.
For 64-bit system,
export LD_LIBRARY_PATH=/usr/local/cuda-11.1/lib64${LD_LIBRARY_PATH:+:${LD_LIBRARY_PATH}}
For 32-bit system,
export LD_LIBRARY_PATH=/usr/local/cuda-11.1/lib${LD_LIBRARY_PATH:+:${LD_LIBRARY_PATH}}
Note: The above paths change when using a custom install path with the runfile installation method.
Verify the Installation
Check the CUDA Toolkit version with:
Install cuDNN
The NVIDIA CUDA Deep Neural Network library (cuDNN) is a GPU-accelerated lirbary of primitives for deep neural networks. cuDNN provides highly tuned implementations for standard routines such as forward and backward convolution, pooling, normalization and activation layers.
- Go to https://developer.nvidia.com/cudnn and click «Download cuDNN».
- You need to sing in to proceed.
- Then, check «I Agree to the Terms…».
- Click on your desire cuDNN version compatible with your installed CUDA version. (If you don’t find desire cuDNN version, click on «Archived cuDNN Releases» and find your version. If you don’t know which version to install, latest cuDNN version is recommended).
Windows
-
Choose «cuDNN Library for Windows (x86)» and download. (That is the only one available for Windows).
-
Extract the downloaded zip file to a directory of your choice.
-
Copy the following files into the CUDA Toolkit directory.
a. Copy
<extractpath>\cuda\bin\cudnn*.dlltoC:\Program Files\NVIDIA GPU Computing Toolkit\CUDA\vx.x\bin.b. Copy
<extractpath>\cuda\include\cudnn*.htoC:\Program Files\NVIDIA GPU Computing Toolkit\CUDA\vx.x\include.c. Copy
<extractpath>\cuda\lib\x64\cudnn*.libtoC:\Program Files\NVIDIA GPU Computing Toolkit\CUDA\vx.x\lib\x64.
Linux
Download the 2 files named as:
- cuDNN Runtime Library for …
- cuDNN Developer Library for …
for your installed OS version.
Then, install the downloaded files with the following command:
sudo dpkg -i libcudnn8_x.x.x...deb
sudo dpkg -i libcudnn8-dev_x.x.x...deb
Install TensorRT
TensorRT is meant for high-performance inference on NVIDIA GPUs. TensorRT takes a trained network, which consists of a network definition and a set of trained parameters, and produces a highly optimized runtime engine that performs inference for that network.
- Go to https://developer.nvidia.com/tensorrt and click «Download Now».
- You need to sing in to proceed.
- Click on your desire TensorRT version. (If you don’t know which version to install, latest TensorRT version is recommended).
- Then, check «I Agree to the Terms…».
- Click on your desire TensorRT sub-version. (If you don’t know which version to install, latest version is recommended).
Windows
- Download «TensorRT 7.x.x for Windows10 and CUDA xx.x ZIP package» that matches CUDA version.
- Unzip the downloaded archive.
- Copy the DLL files from
<extractpath>/libto your CUDA installation directoryC:\Program Files\NVIDIA GPU Computing Toolkit\CUDA\vx.x\bin
Then install the uff, graphsurgeon and onnx_graphsurgeon wheel packages.
pip install <extractpath>\graphsurgeon\graphsurgeon-x.x.x-py2.py3-none-any.whl
pip install <extractpath>\uff\uff-x.x.x-py2.py3-none-any.whl
pip install <extractpath>\onnx_graphsurgeon\onnx_graphsurgeon-x.x.x-py2.py3-none-any.whl
Linux
Download «TensorRT 7.x.x for Ubuntu xx.04 and CUDA xx.x DEB local repo package» that matches your OS version, CUDA version and CPU architecture.
Then install with:
os="ubuntuxx04"
tag="cudax.x-trt7.x.x.x-ga-yyyymmdd"

sudo dpkg -i nv-tensorrt-repo-${os}-${tag}_1-1_amd64.deb
sudo apt-key add /var/nv-tensorrt-repo-${tag}/7fa2af80.pub

sudo apt update
sudo apt install -y tensorrt
If you plan to use TensorRT with TensorFlow, install this also:
sudo apt install uff-converter-tf
Verify the Installation
For Linux,
You should see packages related with TensorRT.
Upgrading TensorRT
Download and install the new version as if you didn’t install before. You don’t need to uninstall your previous version.
Uninstalling TensorRT
sudo apt purge "libvinfer*"
sudo apt purge graphsurgeon-tf onnx-graphsurgeon
sudo apt autoremove
sudo pip3 uninstall tensorrt
sudo pip3 uninstall uff
sudo pip3 uninstall graphsurgeon
sudo pip3 uninstall onnx-graphsurgeon
PyCUDA
PyCUDA is used within Python wrappers to access NVIDIA’s CUDA APIs.
Install PyCUDA with:
If you want to upgrade PyCUDA for newest CUDA version or if you change the CUDA version, you need to uninstall and reinstall PyCUDA.
For that purpose, do the following:
- Uninstall the existing PyCUDA.
- Upgrade CUDA.
- Install PyCUDA again.
References
- Official CUDA Toolkit Installation
- Official cuDNN Installation
- Official TensorRT Installation
This is an how-to guide for someone who is trying to figure our, how to install CUDA and cuDNN on windows to be used with tensorflow.
It should be noted that at the time of writing this, tensor flow is supporting only upto CUDA version 9.0 and corresponding cuDNN libraries so please don’t download CUDA 9.2.
Installing CUDA 9.0 on windows.
Pre requisites :
- NVIDIA GPU with compute capability of > 2.0 . Check your GPU here
- Download CUDA version 9.0
Please note if your connection permits, please download the local version. That saves you from sitting around waiting for download to finish at the installation time.
The download should be ~ 1.4 G. Once the download finishes, launch the installer and follow the defaults. It takes around 10-15 mins for installation to finish.
Pleasy verify the files at the default install location after the installation finishes: C:\Program Files\NVIDIA GPU Computing Toolkit\CUDA\v9.0
Installing cuDNN from NVIDIA
First of all, register yourself at NVIDIA Developer site. Its an free registration and takes only a couple of mins. From there, the installation is a breeze
Once registered, goto the download page and accept the terms and conditions. POst this download cuDNN v7.1.4 for CUDA 9.0
Once the files are downloaded locally, unzip them. Installing cuDNN is pretty straight forward. You just have to copy three files from the unzipped directory to CUDA 9.0 install location.
For reference, NVIDIA team has put them in their own directory. So all you have to do is to copy file from :
{unzipped dir}/bin/—>C:\Program Files\NVIDIA GPU Computing Toolkit\CUDA\v9.0\bin{unzipped dir}/include/—>C:\Program Files\NVIDIA GPU Computing Toolkit\CUDA\v9.0\include{unzipped dir}/lib/—>C:\Program Files\NVIDIA GPU Computing Toolkit\CUDA\v9.0\lib
That’s it.
Testing it with tensor flow
Install tensorflow-gpu using pip3 install tensorflow-gpu. Once that is done, fire up a python console do a from tensorflow import *. If you don’t see any errors, we are good.
Another way you know that your GPU is being used by executing a keras model and having it use tensorflow as its backend. So at the runtime, you should see a message like this :
2018-08-05 23:43:32.091733: I T:\src\github\tensorflow\tensorflow\core\platform\cpu_feature_guard.cc:141] Your CPU supports instructions that this TensorFlow binary was not compiled to use: AVX2
2018-08-05 23:43:33.288310: I T:\src\github\tensorflow\tensorflow\core\common_runtime\gpu\gpu_device.cc:1392] Found device 0 with properties:
name: GeForce GTX 1050 Ti major: 6 minor: 1 memoryClockRate(GHz): 1.62
pciBusID: 0000:01:00.0
totalMemory: 4.00GiB freeMemory: 3.29GiB
2018-08-05 23:43:33.289799: I T:\src\github\tensorflow\tensorflow\core\common_runtime\gpu\gpu_device.cc:1471] Adding visible gpu devices: 0
2018-08-05 23:43:35.537890: I T:\src\github\tensorflow\tensorflow\core\common_runtime\gpu\gpu_device.cc:952] Device interconnect StreamExecutor with strength 1 edge matrix:
2018-08-05 23:43:35.538772: I T:\src\github\tensorflow\tensorflow\core\common_runtime\gpu\gpu_device.cc:958]      0
2018-08-05 23:43:35.539309: I T:\src\github\tensorflow\tensorflow\core\common_runtime\gpu\gpu_device.cc:971] 0:   N
2018-08-05 23:43:35.540537: I T:\src\github\tensorflow\tensorflow\core\common_runtime\gpu\gpu_device.cc:1084] Created TensorFlow device (/job:localhost/replica:0/task:0/device:GPU:0 with 3020 MB memory) -> physical GPU (device: 0, name: GeForce GTX 1050 Ti, pci bus id: 0000:01:00.0, compute capability: 6.1)
Happy coding
In this tutorial, we are going to be covering the installation of CUDA, cuDNN and GPU-compatible Tensorflow on Windows 10. This article assumes that you have a CUDA-compatible GPU already installed on your PC such as an Nvidia GPU; but if you haven’t got this already, the tutorial, Change your computer GPU hardware in 7 steps to achieve faster Deep Learning on your Windows PC will help you get that hardware set up, ready for the steps below.
- Step 1: Check the software versions you will need to install
- Step 2: Download and Install Visual Studio Express
- 2.1 Visual Studio is a Prerequisite for CUDA Toolkit
- 2.2 Selecting and downloading Visual Studio Express
- 2.3 Installing Visual Studio Express
- 2.4 A PC reboot after installation of Visual Studio May be Required
- Step 3: Download CUDA Toolkit for Windows 10
- Step 3.1: Downloading CUDA 9.0 from the CUDA Toolkit Archive
- Step 3.2: Installing CUDA 9.0
- Step 4: Download Windows 10 CUDA patches
- Step 5: Download and Install cuDNN
- Step 5.1: Downloading cuDNN
- Step 5.2: Unzipping cuDNN files and copying to CUDA folders
- Step 5.3: Checking CUDA environment variables are set in Windows
- Step 6: Install Python (if you don’t already have it)
- Step 7: Install Tensorflow with GPU support
- Step 7.1: Calling up the command prompt with administration rights
- Step 7.2: System wide install of Tensorflow via python pip
- Step 8: Test Installation of TensorFlow and its access to GPU
- Conclusions
- Other postings of this article:
Step 1: Check the software versions you will need to install
Assuming that Windows is already installed on your PC, the additional bits of software you will install as part of these steps are:-
- Microsoft Visual Studio
- the NVIDIA CUDA Toolkit
- NVIDIA cuDNN
- Python
- Tensorflow (with GPU support)
Step 2: Download and Install Visual Studio Express
2.1 Visual Studio is a Prerequisite for CUDA Toolkit
Visual studio is required for the installation of Nvidia CUDA Toolkit (this prerequisite is referred to here). If you attempt to download and install CUDA Toolkit for Windows without having first installed Visual Studio, you get the message shown in Fig. 1, “No supported version of Visual Studio was found”.

2.2 Selecting and downloading Visual Studio Express
At the original time of writing, the most recent version of Visual Studio (which is free) is the Visual Studio Express Community Version 2017, shown in Fig 2. You can get previous versions of Visual Studio for free by joining “Visual Studio Dev Essentials” and then searching for the version of Visual Studio you want.

2.3 Installing Visual Studio Express
Once you have downloaded Visual Studio Express, its initial installation is straightforward. Fig 3 shows the executable file (.exe) you receive as a download.

When you press the ‘save file’ option on Fig 3, the window in Fig 4 will appear where you can set installation options (or just leave them as they are by default, as I did).

During installation, Visual Studio prompts you to as whether you ‘want to continue without workloads’. I pressed ‘continue’ here, as I had no intention of using workloads at all.

2.4 A PC reboot after installation of Visual Studio May be Required
After installing Visual Studio, I initially moved straight on to downloading and attempting to install CUDA Toolkit for Windows — that step is Step 3 which I will be describing next. I got a message that Visual Studio was still operating and was preventing the installation of CUDA Toolkit. Rebooting my PC before attempting to install CUDA Toolkit again solved this problem.
Step 3: Download CUDA Toolkit for Windows 10
These CUDA installation steps are loosely based on the Nvidia CUDA installation guide for windows. The CUDA Toolkit (free) can be downloaded from the Nvidia website here.
At the original time of writing this tutorial, the default version of CUDA Toolkit offered is version 10.0, as shown in Fig 6. However, you should check which version of CUDA Toolkit you choose for download and installation to ensure compatibility with Tensorflow (looking ahead to Step 7 of this process). When you go onto the Tensorflow website, the latest version of Tensorflow available (1.12.0) requires CUDA 9.0, not CUDA 10.0. To find CUDA 9.0 or any earlier releases, you need to navigate to the “Legacy Releases” on the bottom right hand side of Fig 6.

Step 3.1: Downloading CUDA 9.0 from the CUDA Toolkit Archive
Choosing “Legacy Releases” takes you to the CUDA Toolkit Archive. Based on Tensorflow installation guidance, the CUDA version required is 9.0, as listed in Fig 7.

Step 3.2: Installing CUDA 9.0
CUDA 9.0 comes as a base installation and four patches; the base installation of CUDA 9.0 must be installed first, followed by the patches. The options for the base install which I selected are shown in Fig. 8.

Running the base installer which has just been downloaded will produce the CUDA Setup Package window, as shown in Fig 9.

The CUDA installer extracts to your PC and, when complete, the NVIDIA CUDA Toolkit installation will start; you will get a message to that effect. The resulting NVIDIA Installer windows throughout the installation process are shown at Fig 10 — Fig 13. I chose the express installation option (Fig. 10).

Fig. 11 provides the opportunity to select installation location; I chose the default locations provided, which for CUDA is :
C:\Program Files\NVIDA GPU Computing Toolkit\CUDA\v9.0
Fig. 12 below shows the CUDA installations which rely on Visual studio, previously installed in Step 1.

Pressing ‘next’ at the window shown in Fig. 12 above, gives the final installation window, shown as Fig.13 below, where the NVIDIA installer is marked as finished.

Step 4: Download Windows 10 CUDA patches
At the time of writing, there are four CUDA patches to get (as well as the base installer), so let’s go and download these. They are shown in Fig.14.

When the four patches are downloaded, they can be installed in the same way as the base installer — with installation windows providing guidance through the process.
Step 5: Download and Install cuDNN
Having installed CUDA 9.0 base installer and its four patches, the next step is to find a compatible version of CuDNN. Based on the information on the Tensorflow website, Tensorflow with GPU support requires a cuDNN version of at least 7.2.
Step 5.1: Downloading cuDNN
In order to download CuDNN, you have to register to become a member of the NVIDIA Developer Program (which is free).

When you create an account, login and fill out some other required details about why you are using the account, you get the download page shown in Fig. 16.

As I have downloaded CUDA 9.0, the corresponding version of cuDNN is version 7.4.2. Choosing cuDNN version 7.4.2 enables the download as a zip file named as follows:
cudnn-9.0-windows10-x64-v7.zip
Step 5.2: Unzipping cuDNN files and copying to CUDA folders
Instructions at Nvidia provide support for windows cuDNN installation, as do instructions on the Tensorflow website ; I have reproduced these instructions in distilled form, based on my implementation of them. In my case, I downloaded the cuDNN .zip file named above into a folder which has the following path on my PC (your path will no doubt be different).
C:\Users\jo\Documents\cuDNN_downloads\
In the instructions below, I refer to the folder path “ C:\Users\jo\Documents\cuDNN_downloads\” (referred to just above) as “<downloadpath>”, such that the zip file is now in the path:
<downloadpath>\cudnn-9.0-windows10-x64-v7.5.0.56.zip
I unzipped the cuDNN “.zip” file where I downloaded it, hence the unzipped folder structure which will contain the required cuDNN files is now:-
<downloadpath>\cudnn-9.0-windows10-x64-v7.5.0.56\
There are three files in the unzipped cuDNN folder subdirectories which are to be copied into the CUDA Toolkit directories. These are cudnn64_7.dll, cudnn.h and cudnn.lib:
1. cudnn64_7.dll
cudnn64_7.dll can be found in the following path within the downloaded cuDNN files:
<downloadpath>\cudnn-9.0-windows10-x64-v7.5.0.56\cuda\bin\cudnn64_7.dll
Assuming that you installed CUDA 9.0 to its default path (as I did at Step 2.3), namely the following default path:
C:\Program Files\NVIDA GPU Computing Toolkit\CUDA\v9.0
you can copy the cudnn64_7.dll file directly into the CUDA folder’s bin folder path (note: you don’t need to create any new subfolders):
C:\Program Files\NVIDIA GPU Computing Toolkit\CUDA\v9.0\bin\2. cudnn.h
As with the cudnn64_7.dll file above, after downloading and unzipping the cuDNN folder, the header file cudnn64.h can be found in the path:
<downloadpath>\cudnn-9.0-windows10-x64-v7.5.0.56\cuda\ include\cudnn.h
Again, assuming that you installed CUDA 9.0 into the default path as I did at Step 2.3, copy cudnn.h directly into the CUDA folder with the following path (no new subfolders are necessary):
C:\Program Files\NVIDIA GPU Computing Toolkit\CUDA\v9.0\include\
3. cudnn.lib
The .lib file cudnn.lib can be found in the downloaded cuDNN path:
<downloadpath>\cudnn-9.0-windows10-x64-v7.5.0.56\cuda\lib\x64\cudnn.lib
Copy cudnn.lib directly into the CUDA folder with the following path:
C:\Program Files\NVIDIA GPU Computing Toolkit\CUDA\v9.0\lib\x64\
Step 5.3: Checking CUDA environment variables are set in Windows
Finally, the instructions at Nvidia direct that you ensure that the CUDA environment variable has previously been set up, as follows:
Variable Name: CUDA_PATH
Variable Value: C:\Program Files\NVIDIA GPU Computing Toolkit\CUDA\v9.0
In Windows 10, the Environment Variables can be found by choosing:
Control Panel ->System and Security->System->Advanced System settings.
This opens up a window called “System Properties” (Fig 17), at which point the “Environment Variables” button should be chosen.

When the Environment Variables window then appears, within “system variables” (in the bottom half of the window), click on “Path” and choose the button “edit”. A new window will appear, called “Edit environment variable” as shown in Fig 18 below.
On checking the Environment Variables, I found the installation process which determines the CUDA installation path — Step 3.2, see Fig. 11 — had already added two paths to CUDA . These paths are shown in Fig 18 below, so I found I did not need to add a further CUDA path.

Step 6: Install Python (if you don’t already have it)
Now that CUDA and cuDNN are installed, it is time to install Python to enable Tensorflow to be installed later on. At the time of writing, the most up to date version of Python 3 available is Python 3.7, but the Python 3 versions required for Tensorflow are 3.4, 3.5 or 3.6. Python 3.6 can be downloaded for Windows 10 from here. When you run the Python installer for windows, the setup window in Fig 19 will appear.

Of the options in Fig. 19 above during Python installation, I chose to select all of them. These options are useful: Python’s ‘pip’ installer is used at Step 7.2 of this guide to install Tensorflow. Additionally, I use the IDE (integrated development environment for writing and running python code) called “IDLE” at Step 8.
In the “Advanced Options” (shown at Fig 20 below), I chose the installation of Python for all users (which was not ticked by default); this gives the system wide installation.

Tensorflow provides instructions for checking that CUDA, cuDNN and (optional: CUPTI) installation directories are correctly added to the PATH environmental variables. As the three cuDNN files were copied into the subfolders of CUDA, I did not update the existing CUDA environmental variables path.
Step 7.1: Calling up the command prompt with administration rights
In this step a system-wide install of Tensorflow is carried out, not a per user install, but an alternative means of carrying out this tensorflow installation (not covered here) is to create a Python virtual environment, activate the environment and install Tensorflow within that environment.
If you wish to make a system wide installation of Tensorflow, this requires administrative rights, therefore, accordingly the command prompt should be run with administrative rights. To do this, open up the command prompt by running ‘cmd’ in the search bar, and then right clicking on command prompt to choose ‘run as administrator’. This opens up Administrator: Command Prompt as shown in Fig 21.
Step 7.2: System wide install of Tensorflow via python pip
Having opened the Command Prompt, the system-wide installation command for Tensorflow with GPU support is as follows:
pip3 install --upgrade tensorflow-gpu
The “pip3” command (as opposed to “pip”) is required as the installation is to Python 3. Execution of this command in the command prompt is shown in Fig 22.

The resulting output from the command is shown in Fig 23, and if all goes to plan there should eventually be a message to confirm that Tensorflow has been installed successfully.

Step 8: Test Installation of TensorFlow and its access to GPU
Go to the start menu in windows and search for the IDE called ‘idle’, which will be installed as part of your python installation if you selected as I did at Step 6. A Python window should appear labelled Python 3.6.x Shell. At the prompt (denoted by ‘>>>’), import the Tensorflow package. This will check that Tensorflow has been installed (as you can import it). The command for the IDLE shell to import the tensorflow package is as follows:
# importing the tensorflow package
import tensorflow as tf
To test CUDA support for your Tensorflow installation, you can run the following command in the shell:
tf.test.is_built_with_cuda()
Finally, to confirm that the GPU is available to Tensorflow, you can test using a built-in utility function in TensorFlow as shown here:
tf.test.is_gpu_available(cuda_only=False, min_cuda_compute_capability=None)
It takes a few minutes to return a result from this; when it is finished it returns True, and then the prompt `>>>`appears again. Importing tensorflow and these tests are all shown in Fig 24 in the Python IDLE Shell.

Conclusions
These were the steps I took to install Visual Studio, CUDA Toolkit, CuDNN and Python 3.6, all with the ultimate aim of installing Tensorflow with GPU support on Windows 10. To date, my GPU based machine learning and deep learning work has been on Linux Ubuntu machines; by the same token, much of the machine learning community support online focuses on Ubuntu.
For Machine Learning, the major drawback to using Windows is that it is necessary to build more things from source (for example using Cmake) than on Linux, and also to install additional software for the build processes, such as Visual Studio. For example, if you were to install Caffe2 on Windows, there are no pre-built binaries and Windows build is in testing and beta mode. I installed CUDA and cuDNN on Windows 10 more out of curiosity than anything else, just to see how straightforward (or otherwise) it was.
As I suggested in [reference], now that CUDA, cuDNN and Tensorflow are successfully installed on Windows 10 and I have checked Tensorflow’s access to GPU, I am going to sweep the whole Windows 10 operating system away in order to make a fresh installation of Ubuntu 18.04 LTS. This new installation of Ubuntu will be covered in Part 3 of this series.
Other postings of this article:
This tutorial was originally posted by Dr Joanne Kitson as Installing Tensorflow with CUDA, cuDNN and GPU support on Windows 10 in Towards Data Science on Medium.com