
Уровень сложностиПростой
Время на прочтение1 мин
Количество просмотров1.2K
Привет, сегодня поговорим, как установить ChromeDriver без костылей и ошибок.
Если автоматическая загрузка актуальной версии chromedriver (или драйвера для другого браузера) не предусмотрена. Или не работает, и мы при запуске UI-тестов получаем ошибку о том:
-
Что у нас отсутствует chromedriver
-
Не совпадает версия chromedriver и chrome (также может относиться к любому другому браузеру и его драйверу)
Скачиваем соответствующую версию chromedriver
На Linux
-
Распаковываем скаченный архив
-
Переходим в каталог /usr/bin
-
Удаляем старую версию chromedriver


-
Перемещаем в /usr/bin скаченный и распакованный новый chromedriver
sudo mv Downloads/chromedriver-linux64/chromedriver /usr/bin/
На Windows
-
Распаковываем скаченный архив
-
Перемещаем chromedriver в желаемую папку
-
Прописываем системный путь к ней:
Шаг #4: Добавление ChromeDriver в System Path (Windows)
-
Нажимаем «My Computer» — «Properties»
-
Выбираем «Advanced system settings»
-
Далее нажмите «Environment Variables»
-
В разделе «System Variables» найдите и выделите «Path».
-
Нажмите «Edit»
-
Добавьте новую строчку и введите путь к папке ChromeDriver (например, C:\путь\к\chromedriver)
-
Затем нажмите «OK» для сохранения изменений
Шаг #5: Проверка установки ChromeDriver
• Откройте командную строку (CMD) или PowerShell.
• Введите следующую команду и нажмите Enter:

Удачных тестов!
Теги:
- тестирование
- установка chromedriver
- chromedriver
Хабы:
- Блог компании Reksoft
- Тестирование IT-систем
- Тестирование веб-сервисов
- Карьера в IT-индустрии

Installing on Windows 7 & 10:
The following are the best ways to install ChromeDriver on Windows so you can run Selenium:
- The easiest way to install ChromeDriver is to use a package manager such as Chocolatey. You should really have a package manager if you don’t now:
- Install Chocolatey. I used the cmd.exe method and it worked really quickly.
- Install ChromeDriver
choco install chromedriver - Confirm it was installed by typing
chromedriver —versioninto your command line and seeing that it returns a version number. If it errors, ChromeDriver wasn’t installed.
- Or run Chrome & ChromeDriver in a container such as Docker. Simply download the combined container, start it and point your code at the right address. Here’s an example.
Which methods have you found the easiest or most success with? Which methods didn’t work for you? Please leave a comment below.
If this article worked for you please consider following me on twitter, sharing it or buying me coffee!
Для запуска тестов Selenium в Google Chrome, помимо самого браузера Chrome, должен быть установлен ChromeDriver. Установить ChromeDriver очень просто, так как он находится в свободном доступе в Интернете. Загрузите архив в зависимости от операционной системы, разархивируйте его и поместите исполняемый файл chromedriver в нужную директорию.
Мы должны установить именно ту версия которая была бы совместима с установленным Google Chrome на нашем ПК или VDS. В случае, если версии не совпадают, то мы получим данную ошибку:
selenium.common.exceptions.SessionNotCreatedException: Message: session not created: This version of ChromeDriver only supports Chrome version 81
Введите в адресную строку Google Chrome данный путь:
У вас появится вот такое окно:
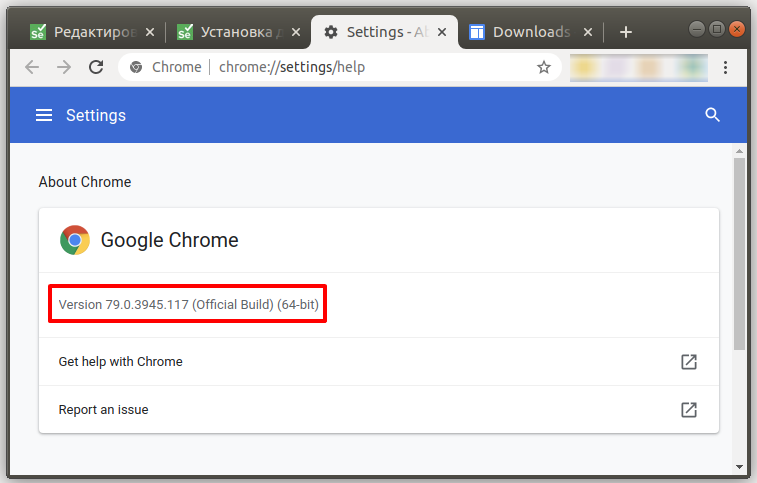
Рисунок 1 — Узнаем версию браузера Google Chrome
Скачать ChromeDriver для Linux, Windows и Mac
Заходим на сайт: https://sites.google.com/a/chromium.org/chromedriver/downloads
На данный момент актуальная версия драйвера 81.0.40 хотя у меня установлен более старый Google Chrome и последняя версия мне не подойдет. Как видно на рисунке выше, мне нужна версия 79.0.39 у вас может быть другая версия, нужно её скачать.
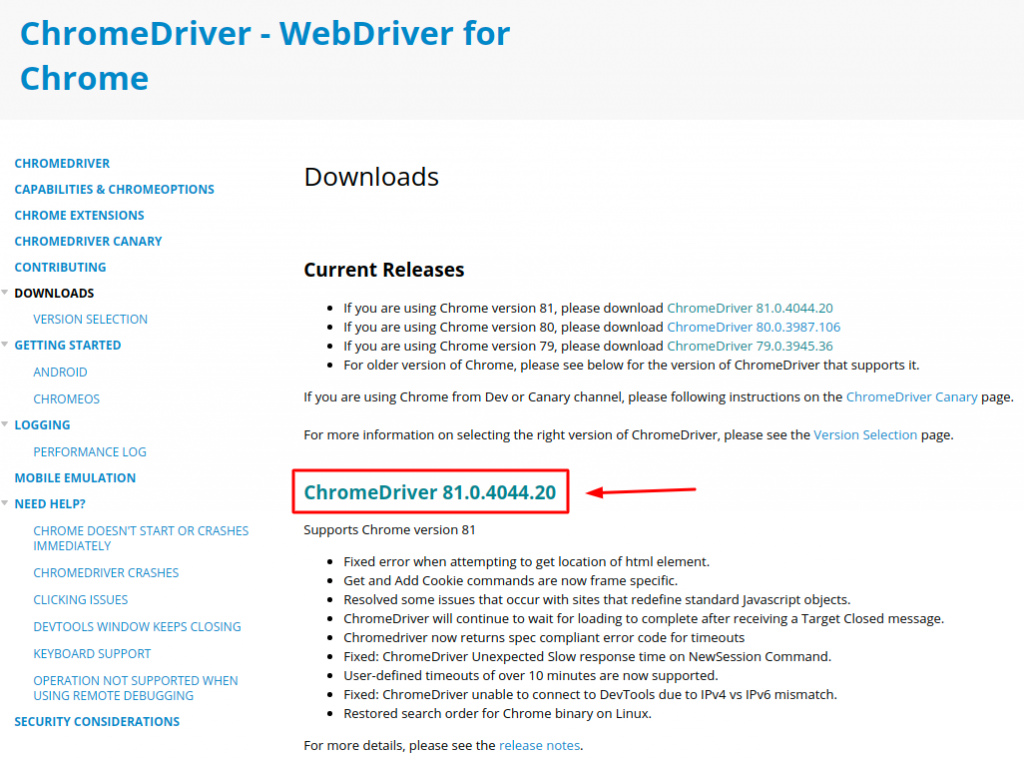
Рисунок 2 — Официальный сайт Google для загрузки драйвера chromedriver
На момент прочтения этой статьи версия может быть другой. Всегда выбирайте более новую версию, чтобы не поймать старые баги которые уже давно исправили в новой версии. НО! Помните, что вам нужно обновить и свой браузер Google Chrome если вы хотите работать с новой версией ChromeDriver.
Установка ChromeDriver под Linux, Windows и Mac
- Заходим на сайт https://chromedriver.storage.googleapis.com/index.html?path=79.0.3945.36/ (Проверьте сайт с Рис. 2 на обновления, тут версия: 79.0.3945);
- Скачиваем архив под вашу операционную систему;
- Распаковываем файл и запоминаем где находится файл chromedriver или chromedriver.exe (Windows).
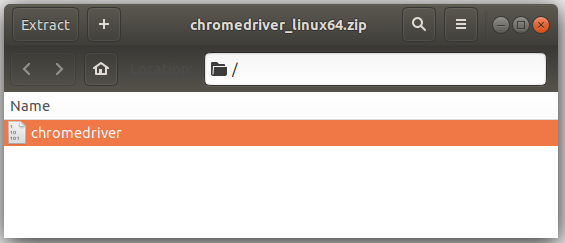
Рисунок 3 — Скаченный архив с ChromeDriver
Если у вас Linux дистрибутив или Mac, вам нужно дать файлу chromedriver нужные права на выполнения. Открываем терминал и вводим команды одна за другой.
|
cd /путь/до/драйвера/ sudo chmod +x chromedriver |
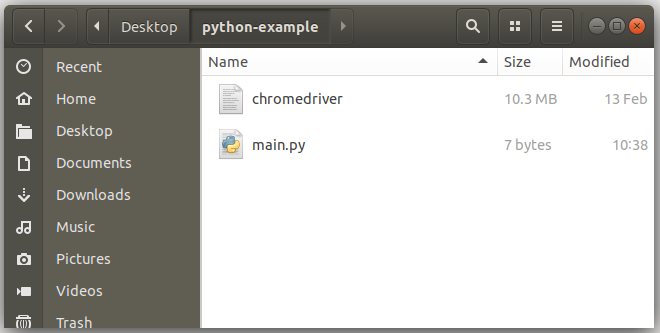
Рисунок 4 — Установленный ChromeDriver
Теперь, когда вы будете запускать код в Python, вы должны указать Selenium на файл chromedriver.
|
from selenium import webdriver driver = webdriver.Chrome(‘/путь/до/драйвера/chromedriver’) driver.get(«http://www.google.com») |
Для Windows
|
from selenium import webdriver # Указываем полный путь к geckodriver.exe на вашем ПК. driver = webdriver.Chrome(‘C:\\Files\\chromedriver.exe’) driver.get(«http://www.google.com») |
Stay organized with collections
Save and categorize content based on your preferences.
This page documents how to start using ChromeDriver for testing your website on
desktop (Windows/Mac/Linux). You can also read
Getting Started with Android or
Getting Started with ChromeOS.
Setup
ChromeDriver is a separate executable that Selenium WebDriver uses to control Chrome. It is maintained by the Chromium team with help from WebDriver contributors. If you are unfamiliar with Selenium WebDriver, you should check out the Selenium site.
Follow these steps to setup your tests for running with ChromeDriver:
- Ensure Chromium and Google Chrome are installed in a recognized location.
- ChromeDriver expects you to have Chrome installed in the default location
for your platform. You can
force ChromeDriver to use a custom location
by setting a special capability.
- ChromeDriver expects you to have Chrome installed in the default location
- Download the ChromeDriver binary for your platform.
- Help WebDriver find the downloaded ChromeDriver executable.
Any of these steps should work:
- Include the ChromeDriver location in your PATH environment variable
- (Java only) Specify its location using the
webdriver.chrome.driversystem property (see sample below) - (Python only) Include the path to ChromeDriver when instantiating
webdriver.Chrome. See the following samples.
Sample Java test
import org.openqa.selenium.*;
import org.openqa.selenium.chrome.*;
import org.junit.Test;
public class GettingStarted {
@Test
public void testGoogleSearch() throws InterruptedException {
  // Optional. If not specified, WebDriver searches the PATH for chromedriver.
  // System.setProperty("webdriver.chrome.driver", "/path/to/chromedriver");
  // WebDriver driver = new ChromeDriver();
  driver.get("http://www.google.com/");
  Thread.sleep(5000);  // Let the user actually see something!
  WebElement searchBox = driver.findElement(By.name("q"));
  searchBox.sendKeys("ChromeDriver");
  searchBox.submit();
  Thread.sleep(5000);  // Let the user actually see something!
  driver.quit();
 }
}
Sample Python test
import time
from selenium import webdriver

driver = webdriver.Chrome('/path/to/chromedriver')  # Optional argument, if not specified will search path.
driver.get('http://www.google.com/')
time.sleep(5) # Let the user actually see something!
search_box = driver.find_element_by_name('q')
search_box.send_keys('ChromeDriver')
search_box.submit()
time.sleep(5) # Let the user actually see something!
driver.quit()
Control ChromeDriver’s lifetime
The ChromeDriver class starts the ChromeDriver server process at creation and
terminates it when quit is called. This can waste a significant amount of time
for large test suites where a ChromeDriver instance is created per test. There
are two options to remedy this, ChromeDriverService and starting ChromeDriver
separately.
ChromeDriverService
Use the ChromeDriverService. This is available for most languages and lets you start or stop the ChromeDriver server yourself. Here’s a Java example, with JUnit 4:
import java.io.*;
import org.junit.*;
import org.openqa.selenium.*;
import org.openqa.selenium.chrome.*;
import org.openqa.selenium.remote.*;
public class GettingStartedWithService {
  private static ChromeDriverService service;
  private WebDriver driver;
  @BeforeClass
  public static void createAndStartService() throws IOException {
      service = new ChromeDriverService.Builder()
              .usingDriverExecutable(new File("/path/to/chromedriver"))
              .usingAnyFreePort()
              .build();
      service.start();
  }

  @AfterClass
  public static void stopService() {
    service.stop();
  }

  @Before
  public void createDriver() {
    driver = new RemoteWebDriver(service.getUrl(), new ChromeOptions());
  }

  @After   public void quitDriver() {
    driver.quit();
  }

  @Test
  public void testGoogleSearch() {
    driver.get("http://www.google.com");
    // rest of the test...
  }
}
Python:
import time
from selenium import webdriver
from selenium.webdriver.chrome.service import Service
service = Service('/path/to/chromedriver')
service.start()
driver = webdriver.Remote(service.service_url)
driver.get('http://www.google.com/');
time.sleep(5) # Let the user actually see something!
driver.quit()
Start ChromeDriver separately
Start the ChromeDriver server separately before running your tests, and connect
to it using the Remote WebDriver.
Terminal:
$ ./chromedriver
Starting ChromeDriver
76.0.3809.68 (...) on port 9515
...
Java:
import java.net.*;
import org.openqa.selenium.*;
import org.openqa.selenium.chrome.*;
import org.openqa.selenium.remote.*;

public class GettingStartedRemote {

  public static void main(String[] args) throws MalformedURLException {
    WebDriver driver = new RemoteWebDriver(
        new URL("http://127.0.0.1:9515"),
        new ChromeOptions());
    driver.get("http://www.google.com");
    driver.quit();
  }
}

ChromeDriver is a standalone executable server that acts as an intermediary between your WebDriver-based test scripts and the Google Chrome web browser. It facilitates the communication between your code and the browser, allowing you to automate interactions with web pages using programming languages like Python, Java, Ruby, or C#.
Here’s what ChromeDriver does:
- Browser Control: ChromeDriver allows you to open, control, and manage instances of the Google Chrome web browser programmatically. You can open and close browser windows, navigate to specific URLs, interact with web elements, and perform various actions just as a human user would.
- Automation: It provides a way to automate tasks on web pages, such as filling out forms, clicking buttons, submitting data, and extracting information from websites. This is particularly useful for web scraping, web testing, and web application automation.
- Cross-Platform: ChromeDriver is available for multiple operating systems, including Windows, macOS, and Linux. This cross-platform compatibility makes it a versatile tool for web automation across different environments.
- Selenium Integration: ChromeDriver is commonly used in conjunction with the Selenium WebDriver framework. Selenium WebDriver is a popular tool for automating web browsers, and ChromeDriver serves as the WebDriver implementation for Google Chrome.
When you write code using a WebDriver library (e.g., Selenium WebDriver), you can specify that you want to use ChromeDriver as the driver for Google Chrome. Your code then sends commands to ChromeDriver, which translates those commands into actions performed by the Chrome browser. This allows you to automate tasks, conduct web testing, and gather data from websites in an automated and reproducible manner.
ChromeDriver Installation on PC
Check Your Chrome Browser Version
First, you need to determine the version of Google Chrome installed on your computer. You can find this information by opening Chrome, clicking on the three-dot menu (top-right corner) > Help > About Google Chrome. Note down the version number.
Download ChromeDriver
Go to the ChromeDriver download page: https://sites.google.com/chromium.org/driver/. On this page, you will find ChromeDriver downloads for different versions of Chrome.
- Find the Chrome version that matches the one installed on your computer.
- Click on the link to download ChromeDriver for that version. Make sure to choose the appropriate version for your operating system (e.g., Windows, macOS, or Linux).
We also published: Blockchain basics: What is Blockchain technology
- For Windows: After downloading, extract the ChromeDriver executable (chromedriver.exe) from the ZIP file to a directory of your choice.
- For macOS or Linux: After downloading, extract the ChromeDriver executable (chrome driver) from the ZIP file to a directory of your choice. You may need to make it executable using the
chmod +x chromedrivercommand in the terminal.
Add ChromeDriver to System PATH
- On Windows: You need to add the directory containing chromedriver.exe to your system’s PATH environment variable. You can do this by editing your system’s Environment Variables and adding the directory to the PATH variable.
- On macOS and Linux: You can place the chrome driver executable in a directory that is already in your PATH, or you can add its directory to your PATH in your shell’s profile file (e.g.,
.bashrc,.zshrc, or.profile).
For example:
export PATH=$PATH:/path/to/chromedriver_directory
I am using a Windows machine, so for me it was D:\lab\server\chromedriver-win64. You can launch System Properties by typing SystemPropertiesAdvanced on the RUN prompt.
Verify Installation
Open a terminal or command prompt and type chromedriver --version. You should see the version of ChromeDriver displayed, which confirms the installation.
You can now use ChromeDriver with automation tools or scripts like Selenium to interact with Google Chrome programmatically. Make sure to include the appropriate driver path in your automation code.
To launch a website use the following python code.
from selenium import webdriver
from selenium.webdriver.common.by import By
import time

driver = webdriver.Chrome()
driver.get('https://tech-champion.com/tech-fundamentals/blockchain-basics-what-is-blockchain-technology/')
time.sleep(5)
driver.quit()